
You don’t need a bootable USB flash drive or Media Creation Tool to install Windows 11 on a computer already running Windows 10. You can simply mount the ISO file to File Explorer and run the upgrade setup.
Although you would typically use the Media Creation Tool to perform an in-place upgrade or a bootable USB flash drive to do a clean installation, it’s also possible to use the Windows image mounting capability to load the ISO file to launch the Windows 11 setup and continue with the installation.
In this guide, you will learn the steps to perform an upgrade or clean installation of Windows 11 without a bootable USB or Media Creation Tool.
Important: This process will delete everything on your device. It’s recommended to make a full backup of your computer before proceeding. You’ve been warned.
To install Windows 11 without a USB flash drive, use these steps:
-
Download Windows 11 ISO file.
-
Right-click the ISO file, select the Open with submenu, and choose the Windows Explorer option.
-
Click on the mounted drive from the left navigation pane.
-
Double-click the Setup file to begin the Windows 11 upgrade process.
-
(Optional) Click the Change how Windows Setup downloads updates option.

-
Select the Not right now option.
-
Click the Next button.
-
Click the Accept button to agree to the terms.
-
Click the Install button to upgrade while keeping your files and apps.


If you want to perform a clean installation of Windows 11, click the Change what to keep option, select the Nothing option, click the Next button, and then click the Install button.
After you complete the steps, the upgrade process will begin and the computer will restart several times. After the installation, you may need to go through the out-of-box experience (OOBE) to finish configuring Windows 11.
Why You Can Trust Pureinfotech
The author combines expert insights with user-centric guidance, rigorously researching and testing to ensure you receive trustworthy, easy-to-follow tech guides. Review the publishing process.
Windows 11 is the second most frequently used operating system, next to Windows 10. According to statistics, the number of users of Windows 11 is increasingly growing because of the end of Windows 10 life in 2025. When you buy a new PC and want to install Windows 11 on it or want to install Windows 11 onto your old computer but do not know how? Don’t worry. EaseUS will detail how to install Windows 11 on new PC with the best and most common 2 ways. Hurry up and learn!
What to Do Before Installing Windows 11 on Your PC
Windows 11 does not run on all computers; therefore, if you want to install it on your computer, you need to prepare something. Here is a list:
- Check for compatibility/PC health check. Windows 11 does not run on all computers; therefore, if you want to install it on your computer, you need to ensure your computer meets the Windows 11 minimum system requirements.
- Back up your data. If your PC is a used one, you need to back up data on it in case something goes wrong. Free backup software — EaseUS Todo Backup — is recommended here.
- Prepare a USB drive (Optional). You’ll need an empty USB drive that’s at least 8GB to create the Windows 11 bootable USB.
- Check the Internet connection. A good Internet connection can ensure you enjoy a smooth Windows installation process.
Is this article useful? If you find it helpful, share it on your social platforms to help more Googlers get out of this problem.
The easiest and quickest way to install Windows 11 on a new computer is to migrate Windows 11 to a new hard drive rather than installing Windows 11 from a USB flash drive. This is called cloning, which can help copy your Windows installation to an SDD or HDD. You must apply third-party cloning tools for this since Windows has no such cloning settings.
Fortunately, EaseUS Disk Copy, a dedicated and renowned tool in the cloning field, can meet all your needs. This ultimate cloning software offers full-around solutions to cloning a hard drive.
EaseUS hard drive cloning software can let you clone your system, disk, partition, etc., and transfer data from one SSD to another without losing anything. It enables you to upgrade to a larger hard drive and quickly migrate data from one PC to another. In addition, it lets you replace old SSD with new SSD with simple clicks. Some highlights of EaseUS cloning software:
- Clone a hard disk for backup & recovery
- Create a WinPE bootable disk to boot a PC
- Change primary hard drive on Windows PCs
- Resize the disk partition when cloning a disk
- Make a new SSD C drive on your computer
- Clone a hard disk with bad sectors easily
EaseUS disk cloning software lets you clone, upgrade, replace, or back up your hard drive without trouble. It can easily help you move the OS to another drive without reinstalling the system or app. Ensure you download it today to your computer and help you transfer your Windows 11 to another computer. Here is how to go for it.
- Important
- What you need to do before cloning:
- 1️⃣A computer running Windows 11
- 2️⃣Remove the system disk from your new PC
- 3️⃣Connect it to the Windows 11 PC via a USB-to-SATA connector
Prior Notice:
- The «Sector by sector copy» asks the size of your destination disk to be at least equal to or larger than that of the source disk. Leave this feature unchecked if you wish to clone a larger hard disk to a smaller hard disk.
- All data on the destination disk will be completely erased, so take care.
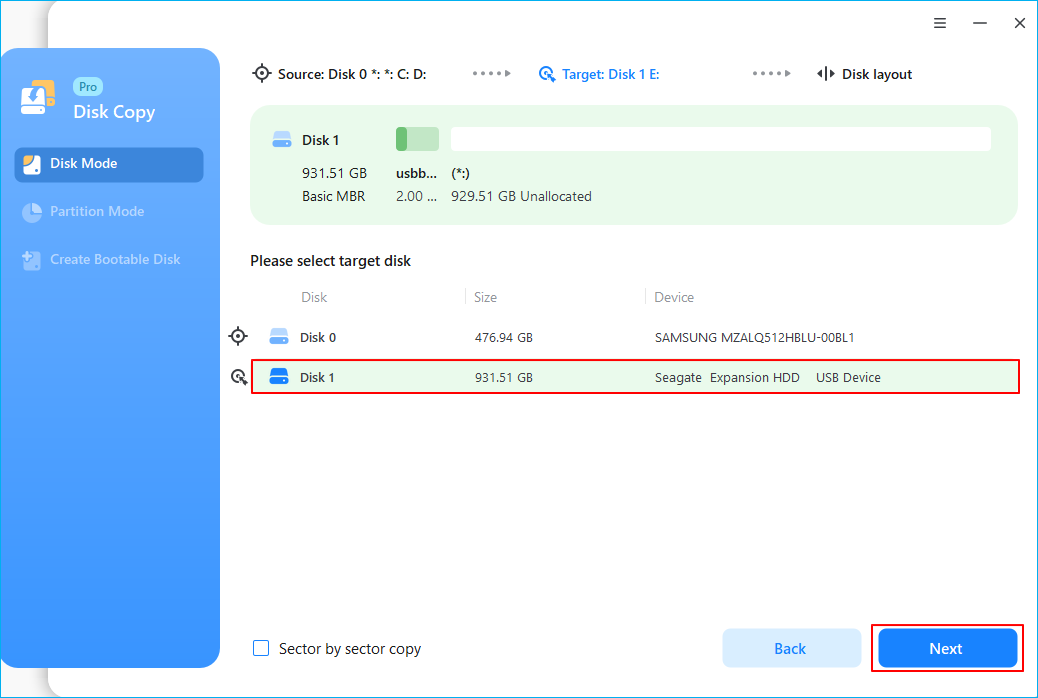
Step 1. To start copying/cloning an entire disk to another, choose this disk as the source disk under «Disk Mode» and click «Next».

Step 2. Choose the other disk as the destination disk.
Step 3. Check the disk layout of the two disks. You can manage the disk layout of the destination disk by selecting «Autofit the disk», «Copy as the source» or «Edit disk layout».
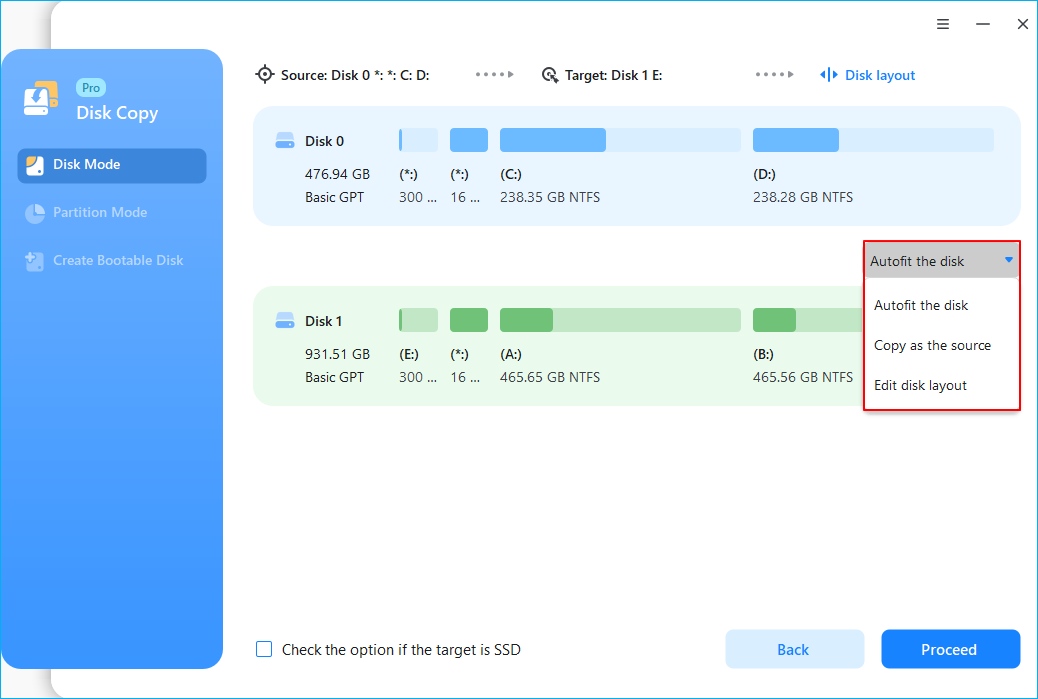
- «Autofit the disk» makes some changes by default on the destination disk layout so that it can work at its best status.
- «Copy as the source»does not change anything on destination disk and the layout is the same as source disk.
- «Edit disk layout» allows you to manually resize/move partition layout on this destination disk.
Tick the «Check the option if the target is SSD» option to put your SSD in its best performance.
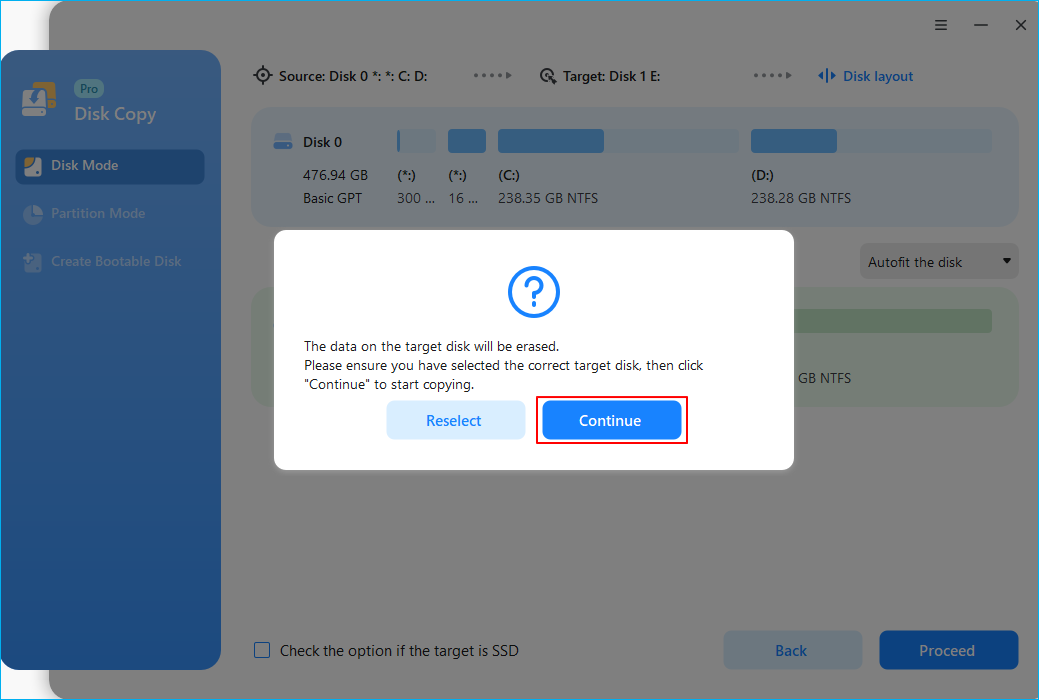
A message now appears, warning you that data will be lost. Please confirm this message by clicking «OK» and then click «Next».
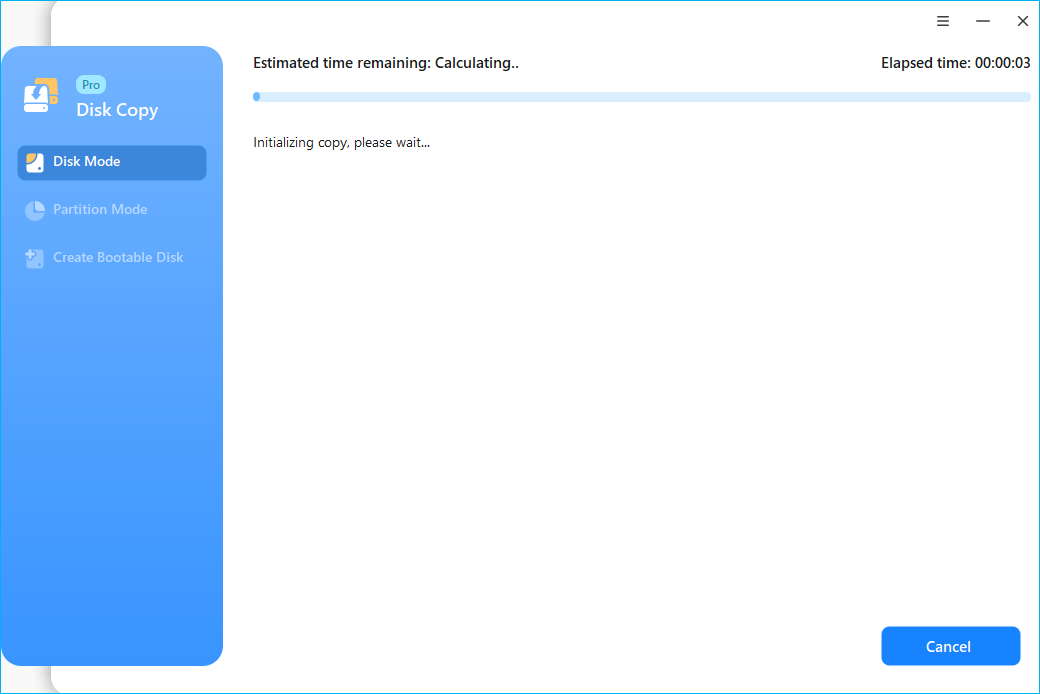
Step 4. Click «Proceed» to officially execute the task.
How to Install Windows 11 from USB on New PC
If you want to learn how to install Windows 11 on new PC build from a USB drive without cloning, you can also get your answer here. In this part, you will learn how to install Windows 11 on new PC with USB via the Media Creation Tool. The following is the step-by-step guide to installing Windows 11 on a new computer from USB.
Part 1. Create a Windows 11 Bootable USB Drive
You must first create Windows 11 installation media, such as a bootable USB drive, to install Windows 11 from a USB drive. To this end, you can use 3 free bootable USB creator tools: EaseUS OS2Go, Rufus, and Windows Media Creation Tool.
It is worth noting that you must download a Windows 11 ISO file from Microsoft’s site to create a bootable USB via Rufus or Media Creation Tool. Therefore, EaseUS OS2Go stands out, which can help you create a bootable USB with/without the ISO. You can refer to the following article to create a Windows bootable USB drive.
How to Create a Windows Bootable USB
This article describes 2 simple ways to create Windows bootable USB installation media. If you don’t know how to create a Windows bootable USB, you have come to the right place. Read more >>
Part 2. Boot Your New PC from That Bootable USB
To boot your PC from the Windows 11 bootable USB, follow the steps below:
Step 1. Insert the bootable USB into your computer you want to install Windows 11.
Step 2. Restart that computer, and press the BIOS key (usually, F1, F2, F10, ESC, or DEL keys) to access the BIOS settings.
Step 3. Under the Boot tab, select USB as the first boot drive.
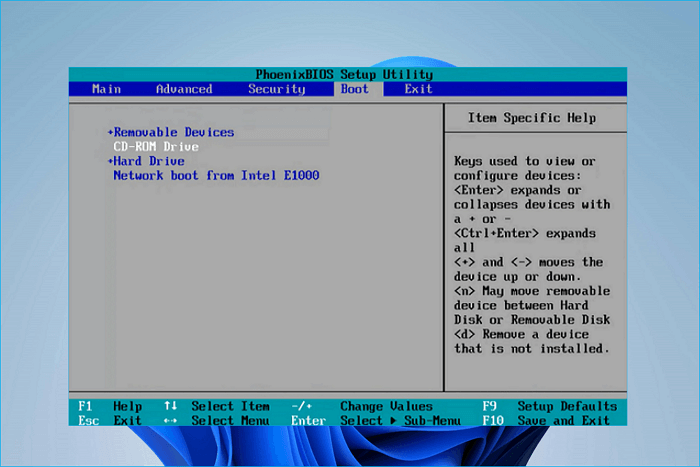
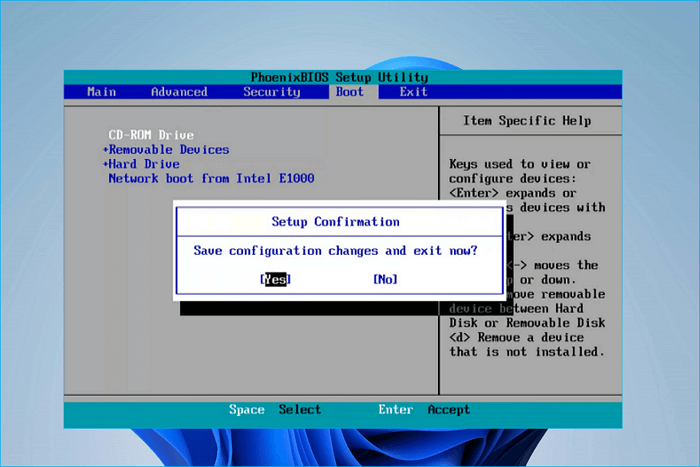
Step 4. Save the changes, exit the BIOS settings, and restart your computer.
Your PC will boot from the bootable USB successfully.
Part 3. Clean Install Windows 11 on New PC
After your computer boots from the USB, you can start installing Windows 11 on a new PC from scratch. This is called clean install or fresh install. The steps to Windows 11 on a new hard drive are as follows:
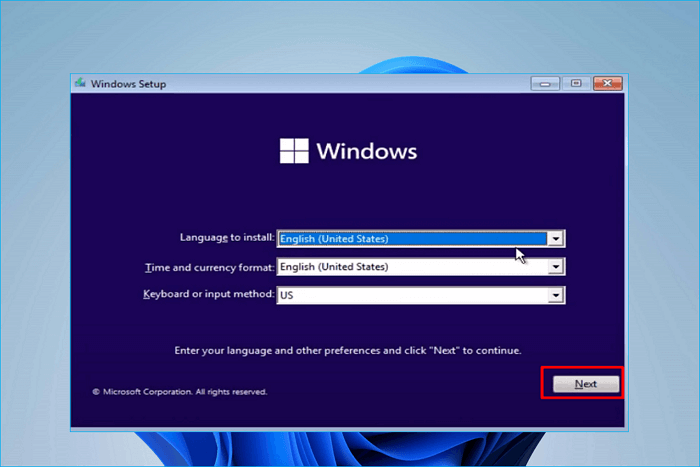
Step 1. Set the Windows 11 preferences when you see the Windows 11 Setup window when the PC restarts and press Next.
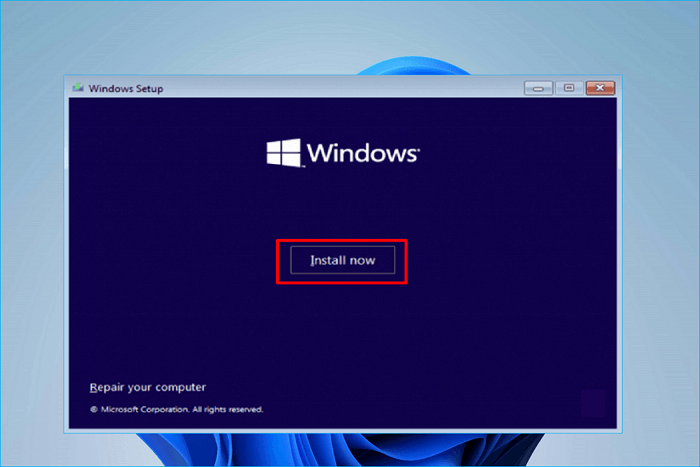
Step 2. Tap Install now.
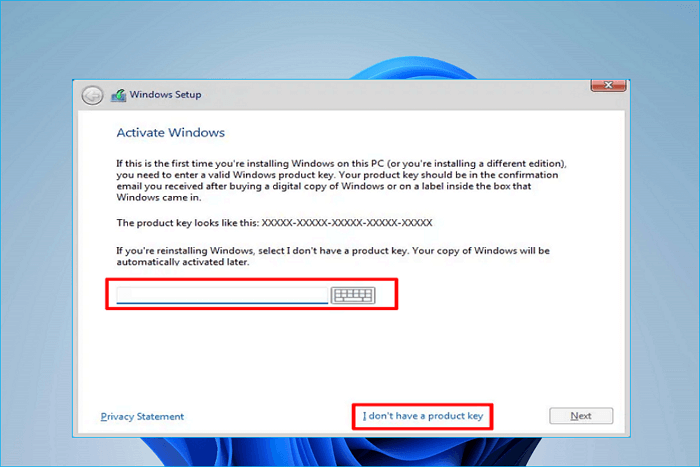
Step 3. Select I don’t have a product key. (You can also input the product key if you have one.)
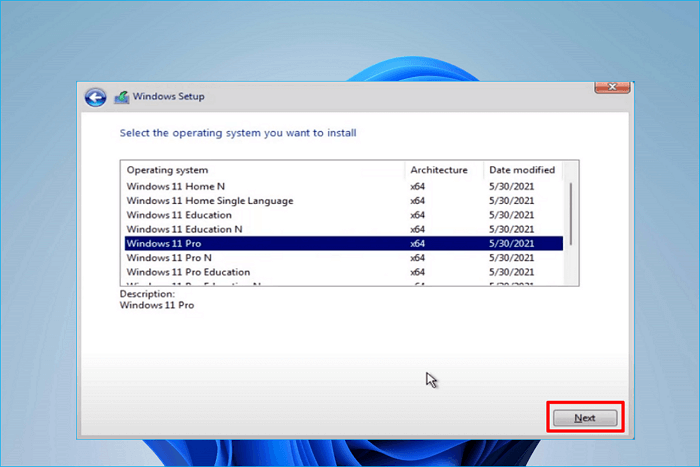
Step 4. Select the Windows 11 version you want to install and click Next.
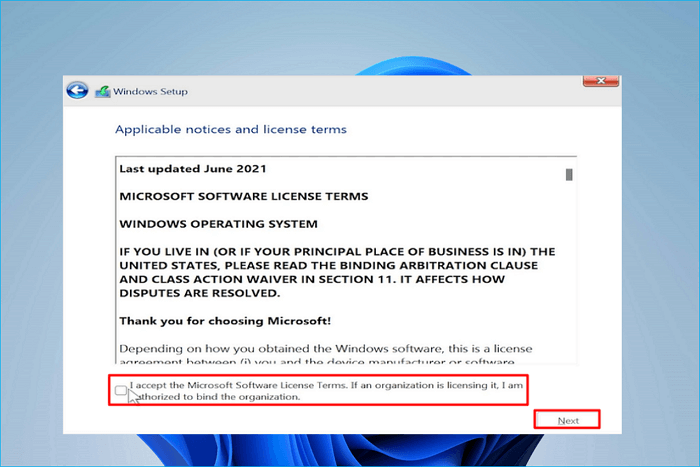
Step 5. Click I accept the Microsoft License Terms and then tap Next.
Step 6. Press Custom: Install Windows only (advanced).

Step 7. Choose a hard drive on which you want to install Windows 11, press Next, and then follow the on-screen guide to complete the Windows 11 installation process.

Here is also a video on how to do a clean installation of Windows 11 from Microsoft’s official website.
Is this article useful? If you find it helpful, share it on your social platforms to help more Googlers get out of this problem.
To Wrap Things Up
How to install Windows 11 on new PC? Have you got your ideas now? This article describes the 2 most common ways to help install Windows 11 on a new computer: cloning OS to another drive and performing a clean installation of Windows 11. You can choose one according to your own needs.
It is worth noting that if you want to save time and effort, migrating your Windows 11 to a new computer will be easier and quicker. Cloning can help you transfer everything from one hard drive/computer to another without reinstalling Windows and apps. You will only need a reliable disk cloning tool like EaseUS Disk Copy to help you. Ensure you download it on your PC to help you install Windows and clone your hard drive with ease!
FAQs on How to Install Windows 11 on a New PC
1. How to install Windows 11 without current operating system?
How to install Windows 11 on new PC without operating system? To do that, you can try cloning your Windows 11 to another computer or perform a universal restore to install Windows 11 on a PC.
2. How can I Install Windows 11 on a new hard drive?
The best and easiest way to install Windows 11 on a new drive is to clone your Windows 11 on your PC to that new drive. This is because you do not have to reinstall Windows and programs after that, which can save your time and effort.
3. How do I install Windows 11 onto my second drive?
To install Windows on a secondary hard drive, you can utilize the Windows Media Creation Tool to perform a clean installation or clone your Windows 11 to the second drive.
Как установить Windows 7, 10, 11 не используя флешку и установочный DVD диск?
Если вы периодически занимаетесь установкой Windows 7, 10 и 11, то данное видео будет очень полезно посмотреть. Так как мы рассмотрим вариант установки ОС Windows без флешки и диска, как бы странно это не звучало.
Причем, если в процессе установки вы сталкиваетесь с различными ошибками, то этот метод так же позволит их обойти.
Собственно, суть метода в том, что мы подключаем жесткий диск пользователя к нашему рабочему или домашнему компьютеру, пробрасываем его к виртуальной машине и выполняем все необходимые настройки.
После чего, подключаем диск обратно и пользователь уже может работать.
А как это сделать, сейчас мы рассмотрим на практике.
Достоинства и недостатках данного метода:
.jpg)
- + нужен только жесткий диск, который вы можете забрать у клиента или попросить занести его вам. Если речь идет о новой установке, допустим у меня частенько бывает, когда пользователь хочет перейти на жесткий диск SSD, то он мне просто переводит деньги, я покупаю диск, все настраиваю, а потом подключаю к его компьютеру и все J
- + минимум времени, проведенного у клиента
- + комфортная обстановка, вы можете настраивать в любом удобном для вас месте в привычной рабочей среде
- + удобство настройки, так как нет необходимости постоянно отвлекаться на другое устройство, все выполняется в отдельном окне той же операционной системы за которой вы работаете
- + все необходимое у вас уже находится на рабочем компьютере (образы, софт, инструкции, инструменты и т.д.), поэтому нет потребности таскать все это на флешке с ограниченным объемом и следить за их актуальностью
- + удобно выполнять резервное копирование данных пользователя (если работа ведется у него за компом, то порой нужно использовать флешку, чтобы перекинуть часть данных и т.д.) А тут мы все можем перенести на свой компьютер и после вернуть обратно.
- — придется активировать софт заново, или как минимум проверить не слетела ли активация. К примеру, у меня активация Windows и Office не слетает, но с Windows 7 такая проблема была актуальна. Тем более, что бывают программы, активационные данные которых хранятся в профиле пользователя и их придется активировать заново. Можно вообще сам процесс активации выполнять уже на рабочем железе клиента.
- — а также придется все равно выполнять минимальную настройку операционной системы под пользователя (настройка папки Temp, объема виртуальной памяти, автозапуск программ и т.д. все что вы настраиваете обычно), т.е. настроить все под ключ не получится. Однако, если пользователь не сильно деревянный, можно его попросить, чтобы он подключил жесткий диск, создал пользователя и просто прислал вам данные для TeamViewer.
Работа с данными пользователя
Если у вас не новый диск, то перед нами стоит задача, перенести данные с системного раздела, установить на него операционную систему и настроить её, установив последние обновления и софт.
Если пользователю необходимо скопировать какие-то данные с прошлой Windows, то мы можем просто перенести либо все данные на раздел с данными, либо папку рабочий стол, мои документы и загрузки (как правило все данные хранятся там). Так же можно попросить пользователя указать где конкретно находятся важные для него файлы.
.jpg)
Создание виртуальной машины для настройки системы
Когда все нужные данные перенесены, можем приступать к переустановке операционной системы. Как я и говорил, для этого нам понадобится виртуальная машина, в моем случае это будет VMWare (Файл \ Новая виртуальная машина \ Выборочно \ Далее \ Я установлю операционную систему позже \ Windows 10 x64 \ Путь любой, так как много места эта машина занимать не будет, так как мы будем использовать не файл жесткого диска, а непосредственно физический жесткий диск для работы \ BIOS \ Процессоры \ Оперативка \ Мост, репликация состояния физического сетевого подключения \ Далее \ SATA \ Использовать физический диск \ Выбор физического диска).
.jpg)
Проброс физического диска в виртуальную машину
И тут очень внимательно, так как нам нужно выбрать именно наш диск (Этот компьютер \ ПКМ \ Управление \ Управление дисками \ Смотрим номер диска \ PhysicalDriver0 \ Использовать отдельные разделы, чтобы проверить, действительно тот диск выбран или нет \ Назад \ Использовать весь диск, чтобы все выглядело аналогично установке на реальной машине \ Далее \ Готово)
.jpg)
.jpg)
Подключаем установочный образ Windows
Подключим образ с операционной системой к виртуальному приводу (Параметры VM \ DVD \ Файл образа \ ОК)
.jpg)
Устанавливаем ОС (Запустить \ F2 \ BIOS \ Приоритет загрузки \ Далее \ Установить \ У меня нет ключа \ Windows 10 Pro \ Выборочная настройка, только для опытных \ Раздел 1 форматировать \ Выбираем его для установки \ Далее \ Установка)
.jpg)
Запускаемся в режиме аудита
Когда появляется диалоговое окно, «Давайте начнем с региона», нажимаем Ctrl+Shift+F3 чтобы попасть в режим аудита, виртуальная машина перезагрузится.
Режим аудита позволяет не сохранять всякий мусор в системе, и по завершению работы в данном режиме, система очищается от всех данных текущего пользователя, чтобы система была чистой, как будто еще ни один пользователь не создавался в текущей системе. А также удаляется привязка к оборудованию, т.е. у вас не возникнут проблемы при запуске на компьютере с другим процессором или материнской платой.
Закрывать появившееся окно не нужно!
Установка программ и настройка системы
Теперь нам необходимо установить весь требуемый софт и обновления Windows, если вам это нужно.
Обновления (Пуск \ Параметры \ Обновления и безопасность \ Центр обновления Windows \ Проверка наличия обновлений)
Что касаемо установки софта, то тут нам потребуется получить доступ к файлам хост системы (Виртуальная машина \ Установить паке VMWare Tools \ Установить \ Typical \ Перезагрузка)
.jpg)
Теперь можем подключить папку с софтом к виртуальной машине (Виртуалка \ Параметры \ Параметры \ Общие папки \ Всегда включено \ Подключить как сетевой диск в гостевых Windows \ D:/Софт \ Включить этот общий ресурс \ ОК)
.jpg)
Теперь мы можем устанавливать нужный нам софт (Этот компьютер \ Shared Folders \ Софт \ Устанавливаем все необходимые программы)
Удаляем софт VMWare Tools, конечно можно и обойтись без него, но тогда придется настраивать должным образом сеть и сетевые доступы, а это не всегда удобно.
Подготовка системы к первому запуску
Далее в программе подготовки системы 3.14 указываем Переход в окно приветствия системы \ Подготовка к использованию \ Завершение работы. Именно завершение работы, так как далее мы вытащим диск, и подключим его к клиентскому компьютеру.
Если мы сейчас включим виртуальную машину, то увидим все то, что будет происходить на физической машине. Т.е. настройка Windows при первом входе в систему, но, тут я думаю вы прекрасно знаете, что делать.
Так мы можем настраивать сразу несколько компьютеров одновременно.
Спасибо за внимание и жду ваше мнение по поводу всего рассмотренного.
-
Star
(1)
You must be signed in to star a gist -
Fork
(0)
You must be signed in to fork a gist
-
Clone this repository at <script src="https://gist.github.com/awesome-windows11/52b35de87f369196e1516882fa27a62e.js"></script>
- Save awesome-windows11/52b35de87f369196e1516882fa27a62e to your computer and use it in GitHub Desktop.
Clone this repository at <script src="https://gist.github.com/awesome-windows11/52b35de87f369196e1516882fa27a62e.js"></script>
Введение: Необычная Задача
Привет, друзья! Сегодня я хочу рассказать вам о том, как я устанавливал Windows 11 без использования флешки. Эта задача показалась мне интересной, так как обычно для установки системы используют USB-носители. Однако у меня были свои причины искать альтернативные пути.
Подготовка к Установке
Проверка Системных Требований
Прежде всего, я удостоверился, что мой компьютер соответствует системным требованиям Windows 11. Я проверил наличие достаточного объема оперативной памяти, места на жестком диске и поддержку TPM 2.0.
Сохранение Важных Данных
Также я позаботился о сохранности моих данных. Я сделал резервную копию важных файлов, чтобы не потерять их в процессе установки.
Шаг 1: Создание Виртуального Диска
Использование Утилиты DiskPart
Я решил использовать утилиту DiskPart для создания виртуального диска. Для этого открыл командную строку от имени администратора и ввёл команду `diskpart`.
Создание и Монтирование VHD
В DiskPart я создал виртуальный жесткий диск (VHD), используя команды `create vdisk file=C:\myVHD.vhdx size=25000 type=expandable` и `attach vdisk`. Это создало виртуальный диск размером 25 ГБ на моем жестком диске.
Шаг 2: Скачивание Образа Windows 11
Переход на Официальный Сайт
Я перешёл на официальный сайт Microsoft и скачал образ Windows 11. Это был ISO-файл, который я планировал использовать для установки.
Шаг 3: Монтирование Образа Windows 11
Использование Встроенного Функционала
Далее я монтировал скачанный ISO-образ в Windows. Для этого достаточно было кликнуть правой кнопкой мыши по файлу и выбрать «Монтировать«.
Шаг 4: Установка Windows 11 на Виртуальный Диск
Запуск Установки
После монтирования образа я запустил установочный файл Windows 11, находящийся на виртуальном диске.
Выбор Места Установки
В процессе установки я выбрал виртуальный диск как место установки. Это позволило установить Windows 11 непосредственно на созданный мной VHD.
Шаг 5: Завершение Установки и Настройка Системы
Ожидание Завершения Установки
Процесс установки занял некоторое время. Я следил за ходом установки и ждал, пока система полностью установится на виртуальный диск.
Первоначальная Настройка Системы
После завершения установки я перезагрузил компьютер и в BIOS выбрал загрузку с виртуального диска. Затем прошёл процесс первоначальной настройки Windows 11, включая настройку языка, учетной записи и пароля.
Заключение: Мои Впечатления
Установка Windows 11 без флешки оказалась довольно увлекательным и полезным опытом. Хотя этот процесс и может показаться сложным на первый взгляд, он открывает новые возможности для работы с операционными системами.
Вот так я установил Windows 11 без использования флешки. Надеюсь, мой опыт поможет вам, если вы захотите попробовать что-то подобное. Удачи в установке и наслаждайтесь новой системой!