
Некоторые обновления Windows, драйверов, а в некоторых случаях и программных компонентов могут распространяться в виде сжатых файлов с расширением .cab — Windows Cabinet File и не всегда ясно, как именно устанавливать такие файлы.
В этой инструкции подробно о способах установить CAB файлы в Windows 11, Windows 10 и других версиях системы.
Установка CAB в командной строке или PowerShell
Первый способ подойдёт не для всех файлов: обычно он срабатывает лишь для CAB-файлов обновлений Windows. Шаги для установки будут следующими:
- Запустите командную строку или Windows PowerShell от имени администратора.
- В командной строке используйте команду
dism /online /Add-Package /PackagePath:"путь_к_файлу.cab"
- В Windows PowerShell команда будет иметь следующий вид:
Add-WindowsPackage -Online -PackagePath "путь_к_файлу.cab"
- Устаревший вариант команды для установки CAB файлов:
pkgmgr /ip /m:путь_к_файлу.cab
Если файл предназначен для установки таким способом, соответствующий пакет будет установлен в Windows, но это происходит не всегда.
Для многих файлов CAB выполнение указанных команд приведёт к появлению сообщения об ошибке 0x80070002 (Ошибка 2) «Не удается найти указанный файл».
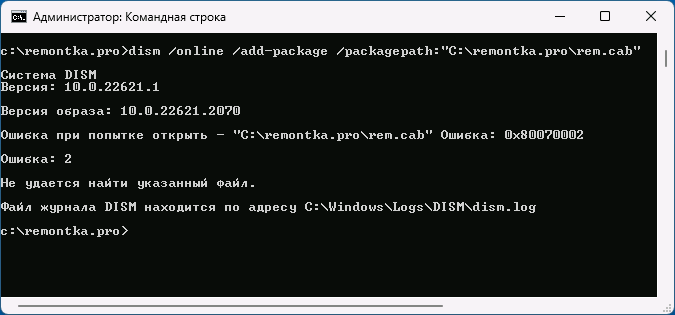
Речь в сообщении об ошибке идёт не о самом файле .cab, а о необходимом для установки описанным способов «вложенном» файле, обычно — update.mum, который содержит сведения для установки пакетов или обновлений Windows описанным способом.
Распаковка файлов CAB и установка вручную
Если установить файл .cab описанным выше способом не получается, вы можете распаковать его содержимое в удобное расположение:
Внимание: не следует использовать проводник для распаковки — несмотря на то, что он «открывает» файл .cab и позволяет скопировать его содержимое, набор файлов, полученный таким образом, будет непригоден к использованию.
После распаковки файла .cab в удобном расположении, в зависимости от его содержимого, вы можете:
- Запустить установку соответствующих файлов, используя находящийся в папке файл установщика .exe или другого типа (при его наличии в папке).
- В случае, если в CAB файле находились файлы драйвера, использовать ручную установку драйвера в диспетчере устройств с указанием папки, подробнее об этом в инструкции Как установить драйвер INF в Windows.
Если у вас остаются вопросы, касающиеся установки файла .cab в Windows, вы можете задать их в комментариях, желательно с описанием того, о каком именно файле идёт речь — возможно, мне удастся вам помочь.
Обновления для операционной системы Windows выпускаются в виде файлов с расширением MSU или CAB. Если на компьютере не работает (отключена) служба Windows Update (Центр обновления Windows), вы можете скачать и установить накопительные обновления или обновления безопасности Windows вручную. В этой статье мы покажем, как скачать и установить в Windows обновления в формате MSU и CAB файлов.
Содержание:
- Как вручную скачать MSU файлы обновлений для Windows?
- Установка обновлений из MSU файлов в Windows
- Как извлечь CAB файл из MSU обновления?
- Установка CAB файла обновлений в Windows 10/11
- Установка CAB и MSU обновления с помощью скриптов
Как вручную скачать MSU файлы обновлений для Windows?
Microsoft выпускает обновления и патчи в формате CAB файла. Именно в таком виде ваш компьютер получает обновления с серверов обновлений Microsoft или локального сервера WSUS. Для более удобного ручного распространения отдельных обновлений клиентами через каталог обновлений Microsoft, такие CAB файлы упаковываются в специальный формат MSU (Microsoft Update Standalone Package).
Вы можете скачать MSU файлы обновлений Windows (а в некоторых случаях и CAB) и других продуктов MSFT можно в каталоге обновлений Microsoft (https://www.catalog.update.microsoft.com/). Перейдите в Microsoft Update Catalog, найдите и скачайте нужное обновление. К примеру, я хочу установить обновление стека 2022-05 Servicing Stack Update for Windows 10 Version 21H2 for x64-based Systems (KB5014032). Нажмите на кнопку Download.

Переместите скачанный файл ssu-19041.1704-x64_70e350118b85fdae082ab7fde8165a947341ba1a.msu в каталог C:\temp. Переименуйте файл на более короткое имя — windows10-21h2-kb5014032.msu.
Установка обновлений из MSU файлов в Windows
Для запуска установки пакета обновления в Windows достаточно дважды щёлкнуть по скачанному MSU файлу. Если обновление применимо к данному компьютеру, откроется диалоговое окно Автономного установщика обновлений Windows (Windows Update Standalone Installer), в котором нужно подтвердить установку апдейта.
При установке MSU обновления может появится ошибка “Обновление неприменимо к этому компьютеру”. Причины этой ошибки подробно разобраны в статье по ссылке.
Также вы можете установить msu пакет обновления из командной строки с помощью утилиты wusa.exe.
Для установки обновления в «тихом» режиме (пользователю не будут показываться никакие всплывающие окна) с отложенной перезагрузкой, откройте командную строку с правами администратора и выполните команду:
wusa.exe c:\Temp\windows10-21h2-kb5014032.msu /quiet /norestart
Через некоторое время проверьте, что обновление успешно установлено:
wmic qfe list | findstr 5014032
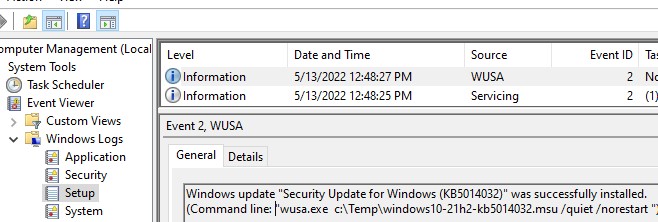
Или найдя в журнале событий Установка (Event Viewer -> Windows Logs -> Setup) запись с Event ID 2 от источника WUSA с текстом:
Windows update "Security Update for Windows (KB5014032)" was successfully installed. (Command line: "wusa.exe c:\Temp\windows10-21h2-kb5014032.msu /quiet /norestart ")
Обновление Windows "Security Update for Windows (KB5014032)" было успешно установлено. (Командная строка: C:\Windows\system32\wusa.exe c:\Temp\windows10-21h2-kb5014032.msu /quiet /norestart)
Обратите внимание, что установка обновлений в msu формате в Windows через wusa.exe выполняется медленнее, чем при установке того же обновления в виде cab файла. Причина в выполнении дополнительного сканирования на серверах Windows Update/WSUS. См статью о медленной установке msu обновлений.
Как извлечь CAB файл из MSU обновления?
Если служба Windows Update (wuausrv) работает некорректно, вы не сможете установить обновление из MSU файла. В этом случае можно вручную распаковать пакет MSU, извлечь из него CAB файл обновления и вручную установить его в Windows.
Чтобы распаковать MSU пакет в каталог C:\Temp\kb4056887 (каталог нужно предварительно создать), выполните следующую команду:
expand -f:* “C:\Temp\windows10.0-kb4056887-x64.msu” C:\Temp\kb4056887
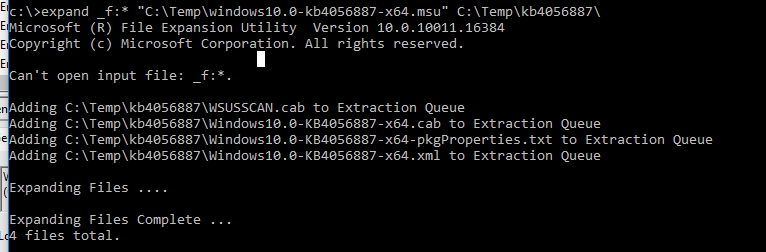
Microsoft (R) File Expansion Utility Version 10.0.10011.16384
Copyright (c) Microsoft Corporation. All rights reserved.
Adding C:\Temp\kb4056887\WSUSSCAN.cab to Extraction Queue
Adding C:\Temp\kb4056887\Windows10.0-KB4056887-x64.cab to Extraction Queue
Adding C:\Temp\kb4056887\Windows10.0-KB4056887-x64-pkgProperties.txt to Extraction Queue
 Adding C:\Temp\kb4056887\Windows10.0-KB4056887-x64.xml to Extraction Queue
Expanding Files ....
Expanding Files Complete ...
4 files total.
Как вы видите в каталоге появилось 4 типа файлов:
- .xml файл (Windows10.0-KB4056887-x64.xml) — содержит метаданные пакета msu и используется программой Wusa.exe
- .cab файл (Windows10.0-KB4056887-x64.cab — один или несколько) – непосредственно архив с обновлением Windows
- *pkgProperties.txt файл (Windows10.0-KB4056887-x64-pkgProperties.txt)– содержит свойства пакета (дата выпуска, архитектура, тип пакета, ссылка на KB и т.д.)
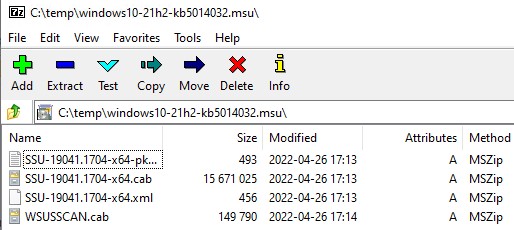
Также вы можете открыть любой MSU файла с помощью утилиты 7-ZIP и извлечь из него CAB файл.
Установка CAB файла обновлений в Windows 10/11
Вы можете установить CAB файл обновления в Windows двумя способами.
Наиболее универсальный способ установки обновления из CAB файл – утилита DISM.exe. Команда установки может быть такой:
DISM.exe /Online /Add-Package /PackagePath:c:\Temp\kb4056887\Windows10.0-KB4056887-x64.cab
Deployment Image Servicing and Management tool
Version: 10.0.10240.16384
Image Version: 10.0.10240.16384
Processing 1 of 1 - Adding package Package_for_KB4056887~31bf3856ad364e35~amd64~~10.0.1.0
[==========================100.0%==========================]
The operation completed successfully.
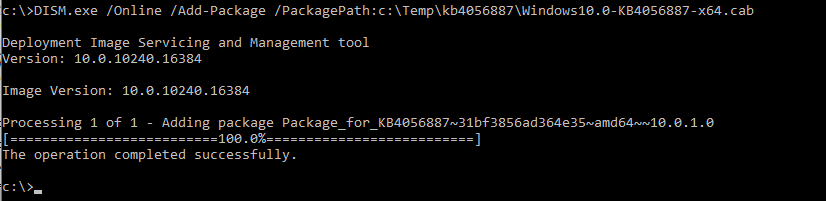
Примечание. Обратите внимание, как быстро происходит установка пакета через DISM по сравнению со скоростью установки обновления из MSU файла.
Если нужно установить CAB пакет в тихом режиме и подавить запрос на перезагрузку компьютера после установки обновления, команда DISM будет такой:
start /wait DISM.exe /Online /Add-Package /PackagePath: c:\Temp\kb4056887\Windows10.0-KB4056887-x64.cab /Quiet /NoRestart
Команда DISM.exe /Add-Package позволяет установить и MSU обновление (поддерживается только установка в офлайн образ Windows). Также вы можете в параметре
/PackagePath
указать путь к каталогу, в котором хранятся MSU и CAB файлы обновлений. DISM рекурсивно просканирует указанные каталог и вложенные папки и установит в образ Windows все найденные CAB и MSU пакеты.
Здесь нужно отметить, что команда DISM.exe /Add-Package не проверяет зависимости и требования к окружению при добавлении CAB файла в образ Windows (в отличии от wusa.exe которая предварительно проверяет, применимо ли MSU обновление к компьютеру.
Для установки CAB файлов в образ Windows вместо команды DISM /Add-Package можно использовать PowerShell командлет
Add-WindowsPackage -Online -PackagePath "C:\win10_kb123456.cab"
В Windows 8 и Windows 7 можно установить обновление с помощью менеджера пакетов Pkgmgr. Команда:
start /w Pkgmgr /ip /m:c:"c:\Temp\kb4056887\Windows-KB123456.cab"
Примечание. В Windows 10 / Windows Server 2016 менеджер пакетов PkgMgr.exe более не поддерживается. При его запуске появляется предупреждении о необходимости использовать для управления пакетами DISM.exe.
Note: The PkgMgr.exe has been deprecated. Please update your scripts to use dism.exe to extract, install, uninstall, configure and update features and packages for Windows.

Примечание. Обратите внимание, что языковые пакеты Windows (MUI) также распространяются в формате CAB. Однако не получиться использовать для их установки команду DISM. Вместо этого, для установки новых языков в систему нужно использовать отдельную утилиту lpksetup.exe.
Вы можете добавить в контекстное меню File Explorer контекстное меню для установки CAB файлов. Для этого добавьте следующие *.reg файл в реестр:
Windows Registry Editor Version 5.00
[-HKEY_CLASSES_ROOT\CABFolder\Shell\RunAs]
[HKEY_CLASSES_ROOT\CABFolder\Shell\RunAs]
@="Install"
"HasLUAShield"=""
[HKEY_CLASSES_ROOT\CABFolder\Shell\RunAs\Command]
@="cmd /k dism /online /add-package /packagepath:\"%1\""
Теперь для установки CAB файла нужно выбрать пункт Install в контекстном меню.
Установка CAB и MSU обновления с помощью скриптов
Если вам нужно установить сразу несколько CAB или MSU обновлений на компьютере, вы можете использовать BAT и PowerShell скрипты. Благодаря таким скриптам вам не придется по ставить обновления вручную по одному.
Создайте на диске каталог с обновлениями и скопируйте в него все MSU файлы, которые нужно обновить. Теперь для установки всех обновлений из указанного каталога, достаточно запустить скрипт install_msu.bat:
Set Folder="C:\updates"
for %%f in (%Folder%\*.msu) do (
 wusa.exe %%f /quiet /norestart
)
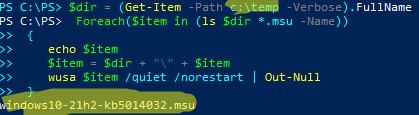
По аналогии можно использовать PowerShell скрипт для установки MSU обновлений из указанной папки:
$dir = (Get-Item -Path c:\temp -Verbose).FullName
Foreach($item in (ls $dir *.msu -Name))
{
 echo $item
 $item = $dir + "\" + $item
 wusa $item /quiet /norestart | Out-Null
}
Данная инструкция по ручной установке накопительных (если вы не помните что это такое, прочитайте статью про новую модель обновлений Windows систем) и любых других обновлений Windows применима ко всем поддерживаемым версиям ОС: Windows 11/10/8.1 и Windows Server 2022/2019/2016/2012R2.
Key Points
How to Use and Install CAB Files in Windows
- Install CAB files with DISM:
dism /online /add-package /packagepath:MY_FILE.cab
- Install drivers from a CAB file:
pnputil /add-driver MY_FILE.cab /install
- Install CAB using PowerShell:
Add-WindowsPackage -Online -PackagePath "MY_FILE.cab"
- Uninstall CAB-based features or updates:
- With DISM:
- Find name:
dism /online /get-packages - Remove:
dism /online /remove-package /packagename:PACKAGENAME
- Find name:
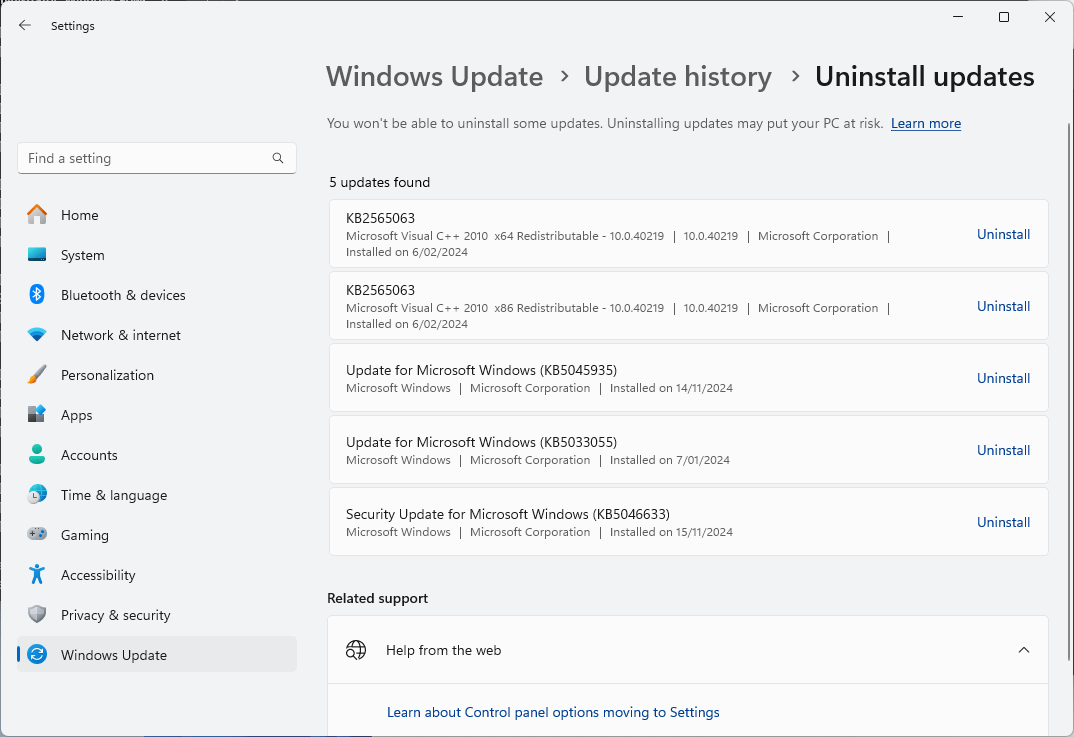
- Or via Settings:
- Windows Update > Update history > Uninstall updates
- With DISM:
- Manual driver install from extracted CAB:
- Open Device Manager
- Right-click device > Update driver > Browse to extracted files
- Create a CAB file:
- Single file:
makecab MY_FILE.txt MY_ARCHIVE.cab - Multiple files: Create a
.ddfdirective file and runmakecab /F MY_FILES.ddf
- Single file:
This guide explains what Windows CAB files are, and includes step-by-step instructions on how to install a CAB file using the Command Prompt, PowerShell, and the DISM tool. This allows you to manually install CAB files to update drivers and install updates or other Windows features.
What to do before you install Windows features, updates, drivers, or software from CAB files
Before you install any software downloaded from the internet, you should take a full backup of your system in case the installation is not fully successful, has unintended side effects, or contains malware.
You should also make sure you fully understand the impact running any command line commands or scripts will have. This involves reading the documentation for each command or program and making sure you understand what the software you are installing will do.
Verifying a CAB file’s origin and integrity
Before you install or run any software on your PC, you should ensure it is from an official source. You should inspect the legitimacy and reputation of websites you download files from, and, optionally, verify the digital signatures of installers, archives, and executables.
You can verify the integrity of CAB files in Windows by running the following signtool (included as part of Visual Studio) command from the Command Prompt or PowerShell:
signtool verify /pa /v FILENAME.cab
Where FILENAME.cab is the path to the CAB file you wish to verify.
How to extract a CAB file in Windows
In Windows 11 and Windows 10, you can double-click on a CAB file to open it in Windows Explorer and drag files out of it to decompress them.
You also can use the extract command that comes with Windows to extract an entire CAB file. You can use it from the Command Prompt or PowerShell by running:
expand MY_ARCHIVE.cab -F:* DESTINATION_PATH
Replace MY_ARCHIVE.cab with the path to your CAB file and DESTINATION_PATH to the location you want to extract the files. The -F* parameter tells the extract command to extract all files included in the CAB file.
It’s important to note that the extract command does not preserve directories when extracting: all files are extracted to the destination with no subfolders. If you want to retain the structure of the extracted files, you will need to use a third-party tool like 7-Zip:
7z x MY_ARCHIVE.cab -o”DESTINATION_PATH”
This 7-Zip command will extract a CAB file while preserving the original directory structure of the compressed files if it was included. 7-Zip also provides a graphical interface for interacting with compressed files.
Installing CAB files using the DISM (Deployment Image Servicing and Management) tool
The DISM (Deployment Image Servicing and Management) is a built-in Windows command-line tool that can be used to install Windows Updates and features (like language packs or optional Windows features) provided as CAB files.
To install a compatible CAB file using the DISM command, open the Command Prompt as an Administrator and run the following command:
dism /online /add-package /packagepath:MY_FILE.cab
Replace MY_FILE.cab with the path to the required CAB file.
Installing drivers from CAB files using the pnputil tool
You can install drivers directly from CAB files using the following pnputil command (again, from a Command Prompt with Administrative privileges):
pnputil /add-driver MY_FILE.cab /install
This command will add the drivers stored in MY_FILE.cab to the driver store on your Windows system. The /install option tells pnputil to install the driver for compatible hardware once it’s added to the driver store.
You can also extract the contents of the CAB file manually and then use pnputil to install the included driver files individually if you do not wish to install all of them.
Installing Windows features from CAB files using PowerShell
The PowerShell Add-WindowsPackage (part of the DISM tool) cmdlet can be used to install Windows updates and features provided as CAB files:
Add-WindowsPackage -Online -PackagePath “MY_FILE.cab”
Manually installing updates and drivers from CAB files
It’s not possible to install Windows updates or features by manually extracting CAB files and moving the files into place. You can, however, manually extract drivers from CAB files (using the method described above) and then install them using the Device Manager:
- Right-click on the Start button and click Device Manager
- Find the device that requires the driver from the previously extracted CAB file
- Right-click on the device and select Update driver
Uninstalling CAB files
As CAB files are just archives, they cannot be ‘uninstalled’. The files extracted from a CAB archive can simply be deleted. To uninstall a driver that came from a CAB file, locate the device in the Device Manager (as described above), right-click on it, and select Uninstall driver.
If you installed a Windows update or feature using the DISM tool, you can remove it using the Windows Settings App by navigating to Windows Update > Update history > Uninstall updates.
You can also use the DISM tool to do this by running:
dism /online /remove-package /packagename:PACKAGENAME
If you do not know the name of the package, run the following command to list them:
dism /online /get-packages
How to create a CAB file
To archive a single file into a CAB file, use the makecab command:
makecab MY_FILE.txt MY_ARCHIVE.cab
Replace MY_FILE.txt with the path to the file you want to compress and MY_ARCHIVE.cab with the name of the CAB file you want to create.
To compress multiple files into a CAB file, you need to create a directive file with the extension .ddf that lists the files that will be included. You can create this file in Notepad:
.OPTION EXPLICIT

.SET CabinetNameTemplate=MY_ARCHIVE.cab

.SET DiskDirectoryTemplate=.

.SET CompressionType=LZX

.SET MaxDiskSize=0

.SET Cabinet=on

.SET Compress=on

"file1.txt"

"file2.txt"

"folder1\file3.txt"
The lines beginning with .OPTION and .SET are mandatory, and should be followed by the list of files to compress.
Then, run the following command, replacing MY_FILES.ddf with the path to your directive file:
makecab /F MY_FILES.ddf
Note that you don’t need to specify the name of the output CAB file here, as the settings for the output file are specified within the .ddf file.
In addition to the CAB file, a setup.inf file will be created with information about the created CAB file.
What is a CAB file?
A CAB (cabinet) file has the file extension .cab and is an archive format used by Windows for distributing software such as updates, drivers, and system components. CAB files take multiple files and store them as a single file to simplify distributing and downloading software.
CAB files are compressed (so they download faster) and can be digitally signed to ensure they haven’t been tampered with and come from a legitimate source. Windows includes native support for extracting CAB files, so no additional software is required.
While Windows updates and driver installations are usually automated, they are also distributed as CAB files that you can also download and install yourself.
You may need to manually install Windows updates or features using CAB files when an automatic update fails or for offline installation in situations where you don’t have an internet connection (typically in secure business environments, not when you’re just going on holiday and can’t tether for a few days or weeks). Device drivers are also often distributed in CAB archives.
Unlike executable MSI files that include installation scripts and additional data for configuring software, CAB files just compress files. This means you can also use CAB files for daily compression tasks, like compressing a folder full of files for archiving or transfer.
Deploying and managing apps, drivers, and updates for multiple Windows PCs
One of the primary use cases for CAB files is deploying Windows updates in enterprise environments. Rather than having hundreds (or thousands) of Windows PCs downloading updates individually from Microsoft’s servers (wasting time and internet bandwidth), and installing at different times, updates can be downloaded once, and deployed to workstations and mobile devices once they have been tested with your hardware and software.
Patch Management software by NinjaOne automates Windows updates and updates for third-party software, streamlining their testing and deploying and ensuring a reliable update experience for end-users. You can even roll back failed or problematic patches remotely.
With NinjaOne’s unified remote monitoring and management (RMM) platform, your Windows, Apple, and Android devices can be centrally managed, kept up-to-date, and secured against the latest threats, all without the labor of manually testing and deploying updates to each device.
As the name implies, a cabinet (CAB or .cab) file is like a container for storing other files (usually .inf, .dll , etc). Developers prefer this format of file packaging because of its excellent compression ratio.
On the user’s end, a CAB File is typically used to manually update a driver or install a system update when the usual methods such as Windows Update don’t work. As for how to do this, it’s very simple.
You can extract the CAB package and install it via Device Manager. Or, if you prefer the command line, you can use the DISM tool in CMD/Powershell. We’ve listed the necessary steps for all these and more in the guide below.
How to Install CAB File Using DISM
The DISM tool can be used to install a specified .cab or .msu package to a Windows image. You can do this via Powershell or Command Prompt as you prefer.
Note: The code listed below is for servicing online images. Attempting to add CAB packages to an offline image will return an error message along the lines of DISM does not support servicing windows with the /online option. For this purpose, check the offline section instead.
Command Prompt
Here’s how to install CAB files via cmd:
- Press Win + R, type
cmd, and press CTRL + Shift + Enter. - Type the following command, replace the file path with the appropriate value, and press Enter:
DISM /Online /Add-Package /PackagePath:"C:\Filepath.cab”
- Press Y to restart if prompted to properly complete the update.

Powershell
Here’s how to install CAB files via powershell:
- Press Win + R, type powershell, and press CTRL + Shift + Enter.
- Type the following command, replace the file path with the appropriate value, and press Enter:
Add-WindowsPackage -Online -PackagePath "C:\Filepath.cab"
- Restart the computer once the installation completes.

How to Extract CAB Package and Install Manually
If the command-line method doesn’t work, you can extract the CAB package’s contents and try to install the file manually. Right-click the extracted .inf file and select Install. If no such option is available, follow the steps listed below to update via Device Manager:
- Double-click the CAB file and select all the contents inside it.
- Right-click and select the Extract option.

- Pick the destination to extract the files to and press the Extract button.
- Press Win + R, type
devmgmt.msc, and press Enter. - Right-click the driver you’re trying to update and select Update driver.

- When prompted, select Browse my computer for drivers.

- Click on Browse, then locate and select the extracted CAB folder from Step 3.
- Press OK > Next > Close.


Note: While updating certain driver updates, you may encounter an error message with the code 0x80070002 or similar. This is fairly common with the Realtek HD Audio Driver, for instance. Even if the error code is different, searching about it online will help you find solutions for that specific error.
How to Install CAB File to an Offline Image?
Sometimes you’ll need to install a CAB file to an offline image, and an MSU package is only supported on offline images, to begin with. For such cases, here’s how to install CAB files to an offline image:
- Press Win + R, type
cmd, and press CTRL + Shift + Enter. - Type or copy the following command:
Dism /Image:C:\test\offline /Add-Package /PackagePath:C:\test\packages\package.cab
- Here, replace the image path and package path with the appropriate values as indicated in the picture above, then press Enter to execute the command.
- If you wish to install multiple packages at once, simply add the additional packages as shown below:
Dism /Image:C:\test\offline /Add-Package /PackagePath:C:\packages\package1.cab /PackagePath:C:\packages\package2.caband so on. - They will be installed in the order listed on the command line.

How to Remove CAB Package from a Windows Image?
You can use either the PackageName or PackagePath switches in conjunction with the Remove-Package command to remove the specified .cab package from an image. Make note that this command doesn’t work for .msu packages. With that said, here are the necessary steps:
- Open an elevated command prompt window and use the following commands as appropriate.
- To list the packages in an online image:
Dism /Online /Get-Packages - To list the packages in an offline image:
Dism /Image:C:\test\offline /Get-Packages
- To remove a CAB package using the PackageName option:
Dism /Image:C:\test\offline /LogPath:C:\test\RemovePackage.log /Remove-Package /PackageName:Microsoft.Windows.Calc.Demo~6595b6144ccf1df~x86~en~1.0.0.0
- To remove a CAB package using the PackagePath option:
Dism /Image:C:\test\offline /LogPath:C:\test\RemovePackage.log /Remove-Package /PackagePath:C:\packages\package1.cab /PackagePath:C:\packages\package2.cab


Note: In the commands listed above, don’t forget to replace the package name, original source, and offline image path as appropriate for the particular package you’re trying to remove.
Question: How to install .cab file? It is just a compressed archive file containing files inside it. It cannot be executed directly. We can extract the contents from the .cab file but how to install it?
Answer: We can use the build in pkgmgr.exe (Windows Package Manager) to install the .cab file.
Steps: Open an elevated command prompt and run the following command to install the Cabinet file.
Pkgmgr /ip /m:(path to.cab file) /quiet
Example:
start /w Pkgmgr /ip /m:c:\temp\Windows6.0-KB92xxx-x86.cab /quiet
or
Pkgmgr /ip /m:c:\test.cab /quiet
Pkgmgr /? will show the complete list of commands that can be used. Screenshot below.
You can also take log file for the Installation and Uninstallation using the /l parameter at the end of the command.