
Tip
This page assumes you are comfortable using a terminal and are familiar with package managers.
The only prerequisite for installing NumPy is Python itself. If you don’t have
Python yet and want the simplest way to get started, we recommend you use the
Anaconda Distribution — it includes
Python, NumPy, and many other commonly used packages for scientific computing
and data science.
The recommended method of installing NumPy depends on your preferred workflow. Below, we break down the installation methods into the following categories:
- Project-based (e.g., uv, pixi) (recommended for new users)
- Environment-based (e.g., pip, conda) (the traditional workflow)
- System package managers (not recommended for most users)
- Building from source (for advanced users and development purposes)
Choose the method that best suits your needs. If you’re unsure, start with the Environment-based method using conda or pip.
Below are the different methods for installing NumPy. Click on the tabs to explore each method:
Recommended for new users who want a streamlined workflow.
-
uv: A modern Python package manager designed for speed and simplicity.
-
pixi: A cross-platform package manager for Python and other languages.
The two main tools that install Python packages are pip and conda. Their functionality partially overlaps (e.g. both can install numpy), however, they can also work together. We’ll discuss the major differences between pip and conda here — this is important to understand if you want to manage packages effectively.
The first difference is that conda is cross-language and it can install Python, while pip is installed for a particular Python on your system and installs other packages to that same Python install only. This also means conda can install non-Python libraries and tools you may need (e.g. compilers, CUDA, HDF5), while pip can’t.
The second difference is that pip installs from the Python Packaging Index (PyPI), while conda installs from its own channels (typically “defaults” or “conda-forge”). PyPI is the largest collection of packages by far, however, all popular packages are available for conda as well.
The third difference is that conda is an integrated solution for managing packages, dependencies and environments, while with pip you may need another tool (there are many!) for dealing with environments or complex dependencies.
- Conda: If you use conda, you can install NumPy from the defaults or conda-forge channels:
conda create -n my-env conda activate my-env conda install numpy - Pip:
Tip
Tip: Use a virtual environment for better dependency management
python -m venv my-env
source my-env/bin/activate  # macOS/Linux
my-env\Scripts\activate     # Windows
pip install numpy
Not recommended for most users, but available for convenience.
macOS (Homebrew):
Linux (APT):
sudo apt install python3-numpyWindows (Chocolatey):
For advanced users and developers who want to customize or debug NumPy.
A word of warning: building Numpy from source can be a nontrivial exercise.
We recommend using binaries instead if those are available for your platform via one of the above methods.
For details on how to build from source, see the building from source guide in the Numpy docs.
Verifying the Installation#
After installing NumPy, verify the installation by running the following in a Python shell or script:
import numpy as np
print(np.__version__)
This should print the installed version of NumPy without errors.
Troubleshooting#
If your installation fails with the message below, see Troubleshooting
ImportError.
IMPORTANT: PLEASE READ THIS FOR ADVICE ON HOW TO SOLVE THIS ISSUE!

Importing the numpy c-extensions failed. This error can happen for
different reasons, often due to issues with your setup.
Overview
Numpy is an open-source python library that can be installed using Python packages like pip and conda on different operating systems like macOS, Linux, and Windows.
Introduction
To run the NumPy program, first, Numpy needs to be installed. Numpy is installed from Python’s official website using pip and conda by running different commands on different operating systems. Many important packages are automatically installed within the Numpy library.
Pre-Requisites
- It is mandatory to install Python from Python’s official website before installing NumPy.
- Compilers are needed for building any extension modules. NumPy is developed mainly using GNU compilers.
Steps for Installing NumPy
- Download and Install Python.
- Python should be installed before installing NumPy.
- Download Python from Python’s official website according to the operating system.
After installing Python, Numpy is installed using different commands in different operating systems.
Let’s see how NumPy is installed on different operating systems.
Installing Numpy
1. Installing NumPy on Mac Operating System
- Check if pip3 and python3 are installed correctly by running the following command:
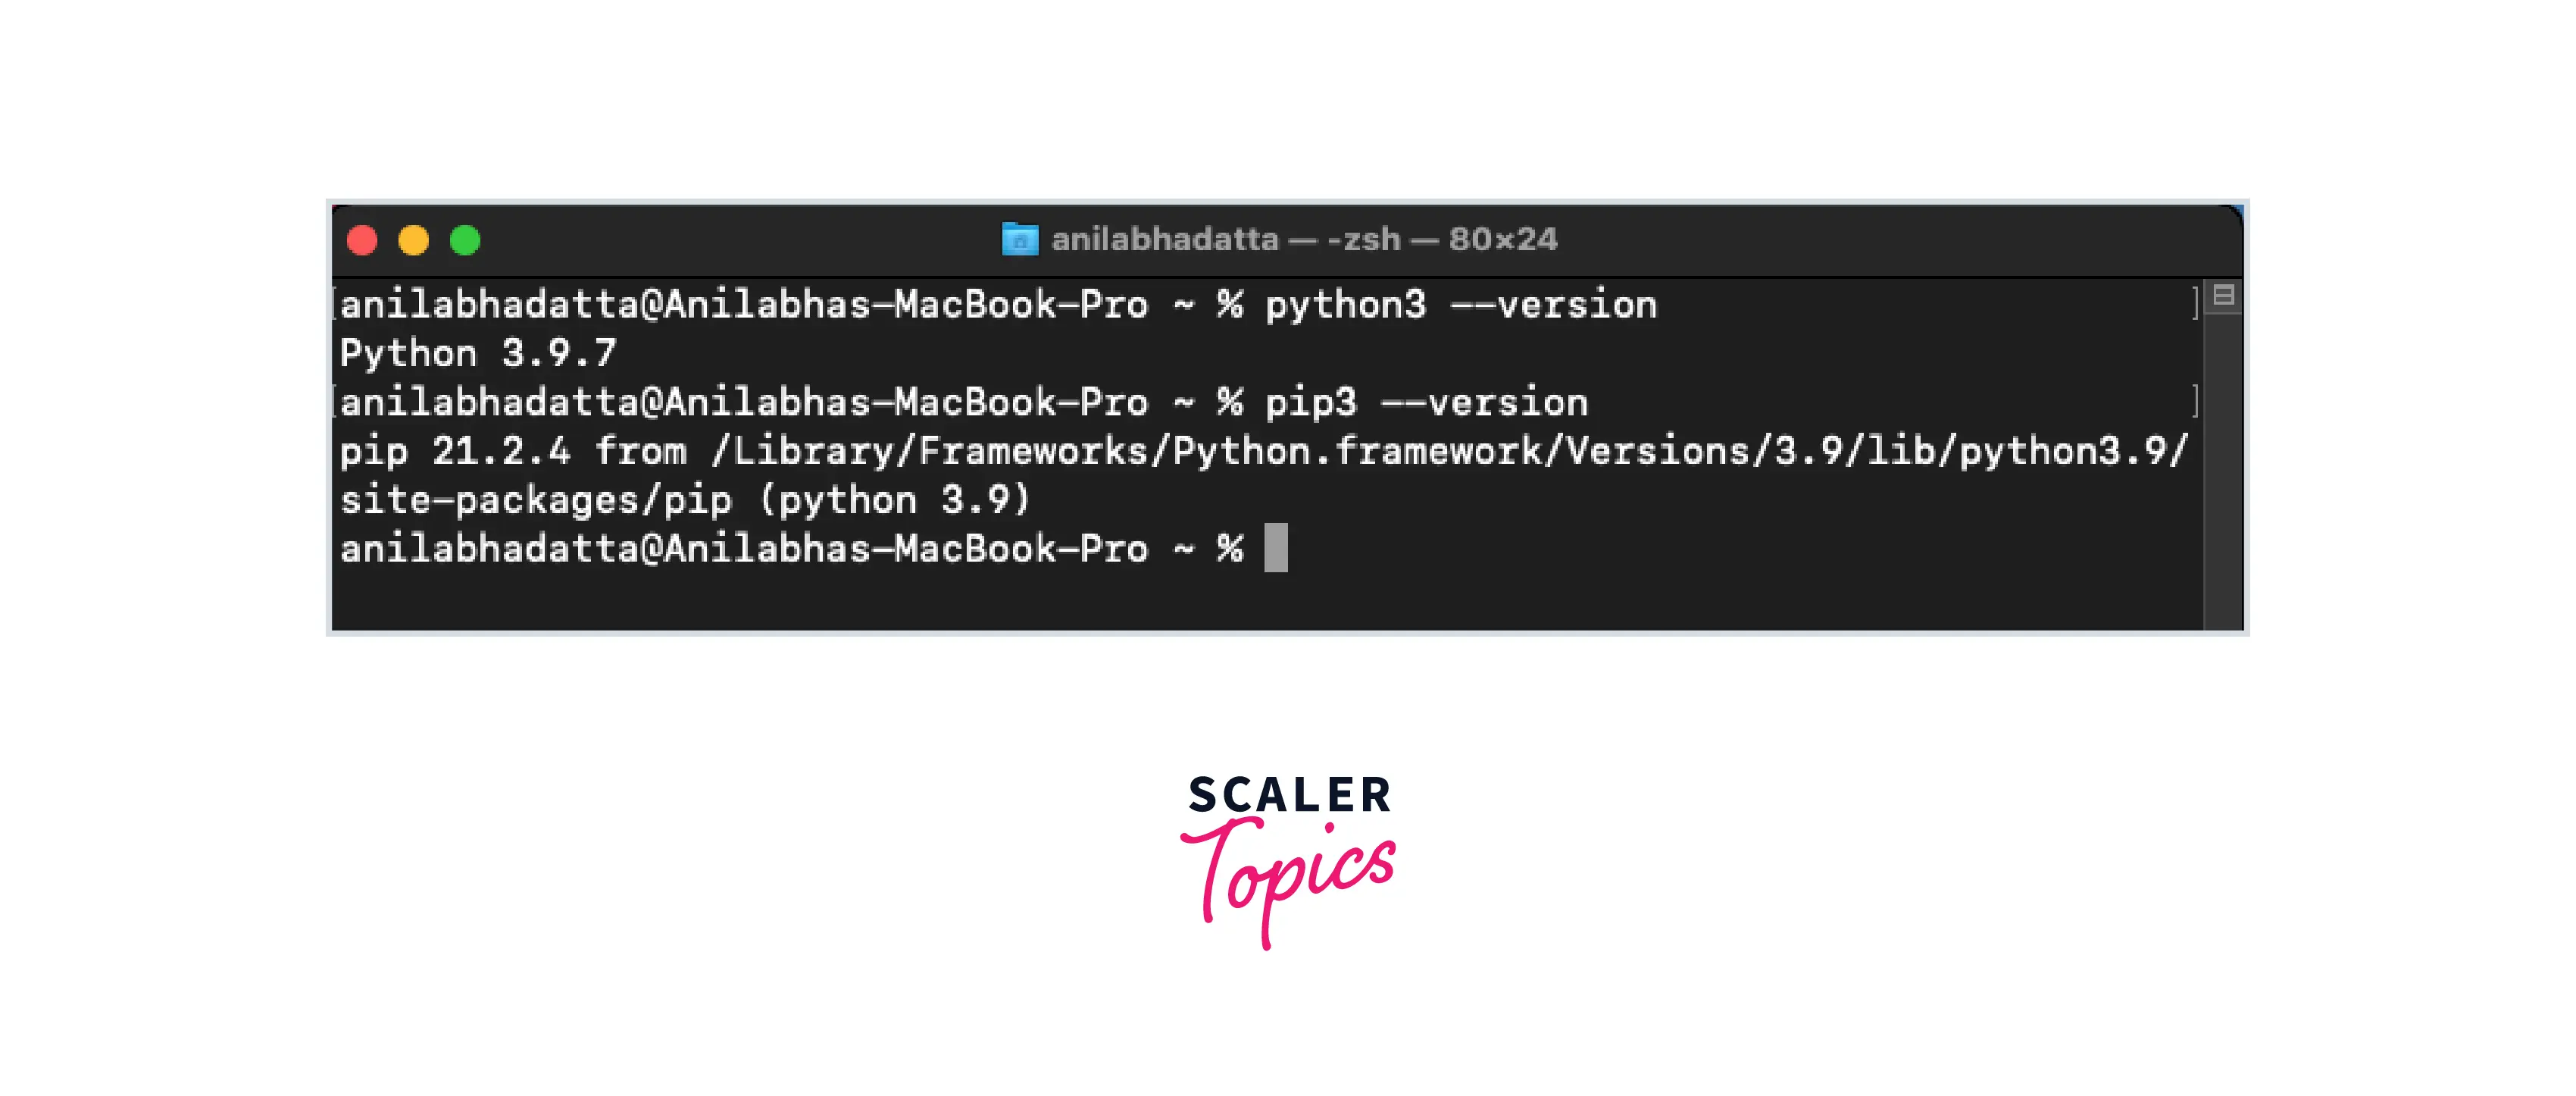
- Install numpy by using the pip command:

- Verify installation by typing the following command:
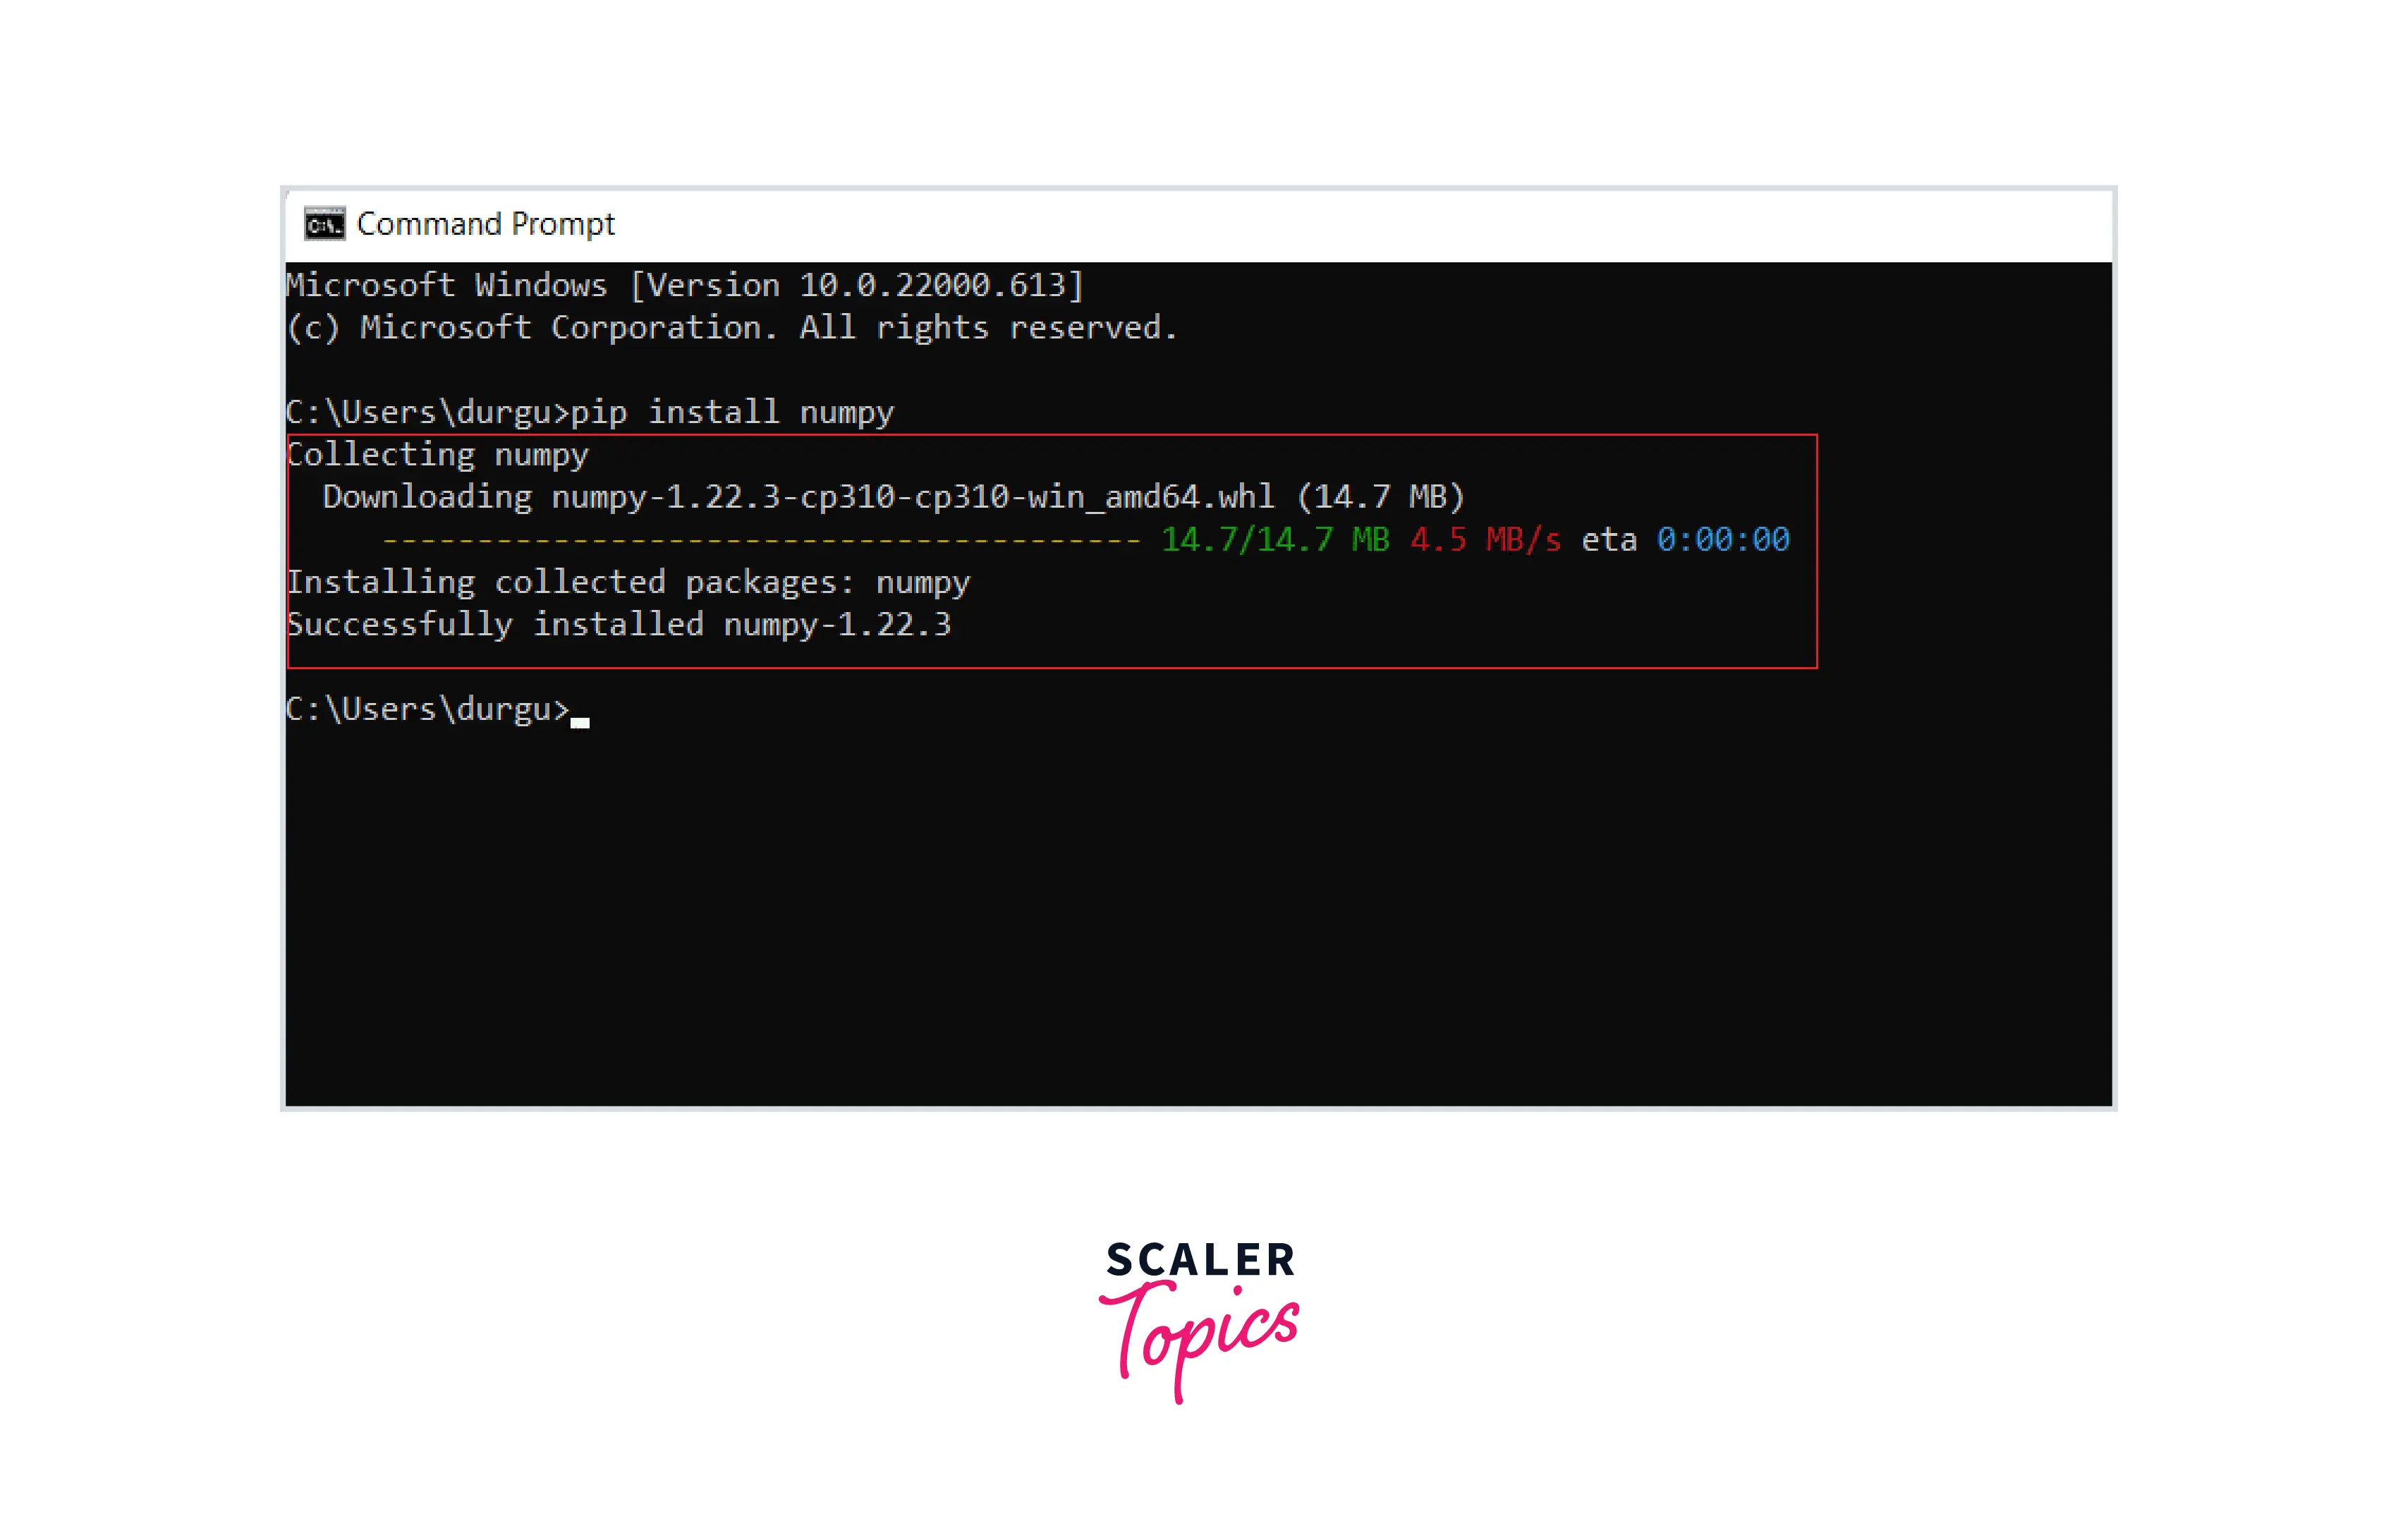
2. Installing NumPy on Windows Operating System
Steps for installing NumPy on Windows:
1. Install NumPy using the following PIP command in the command prompt terminal:
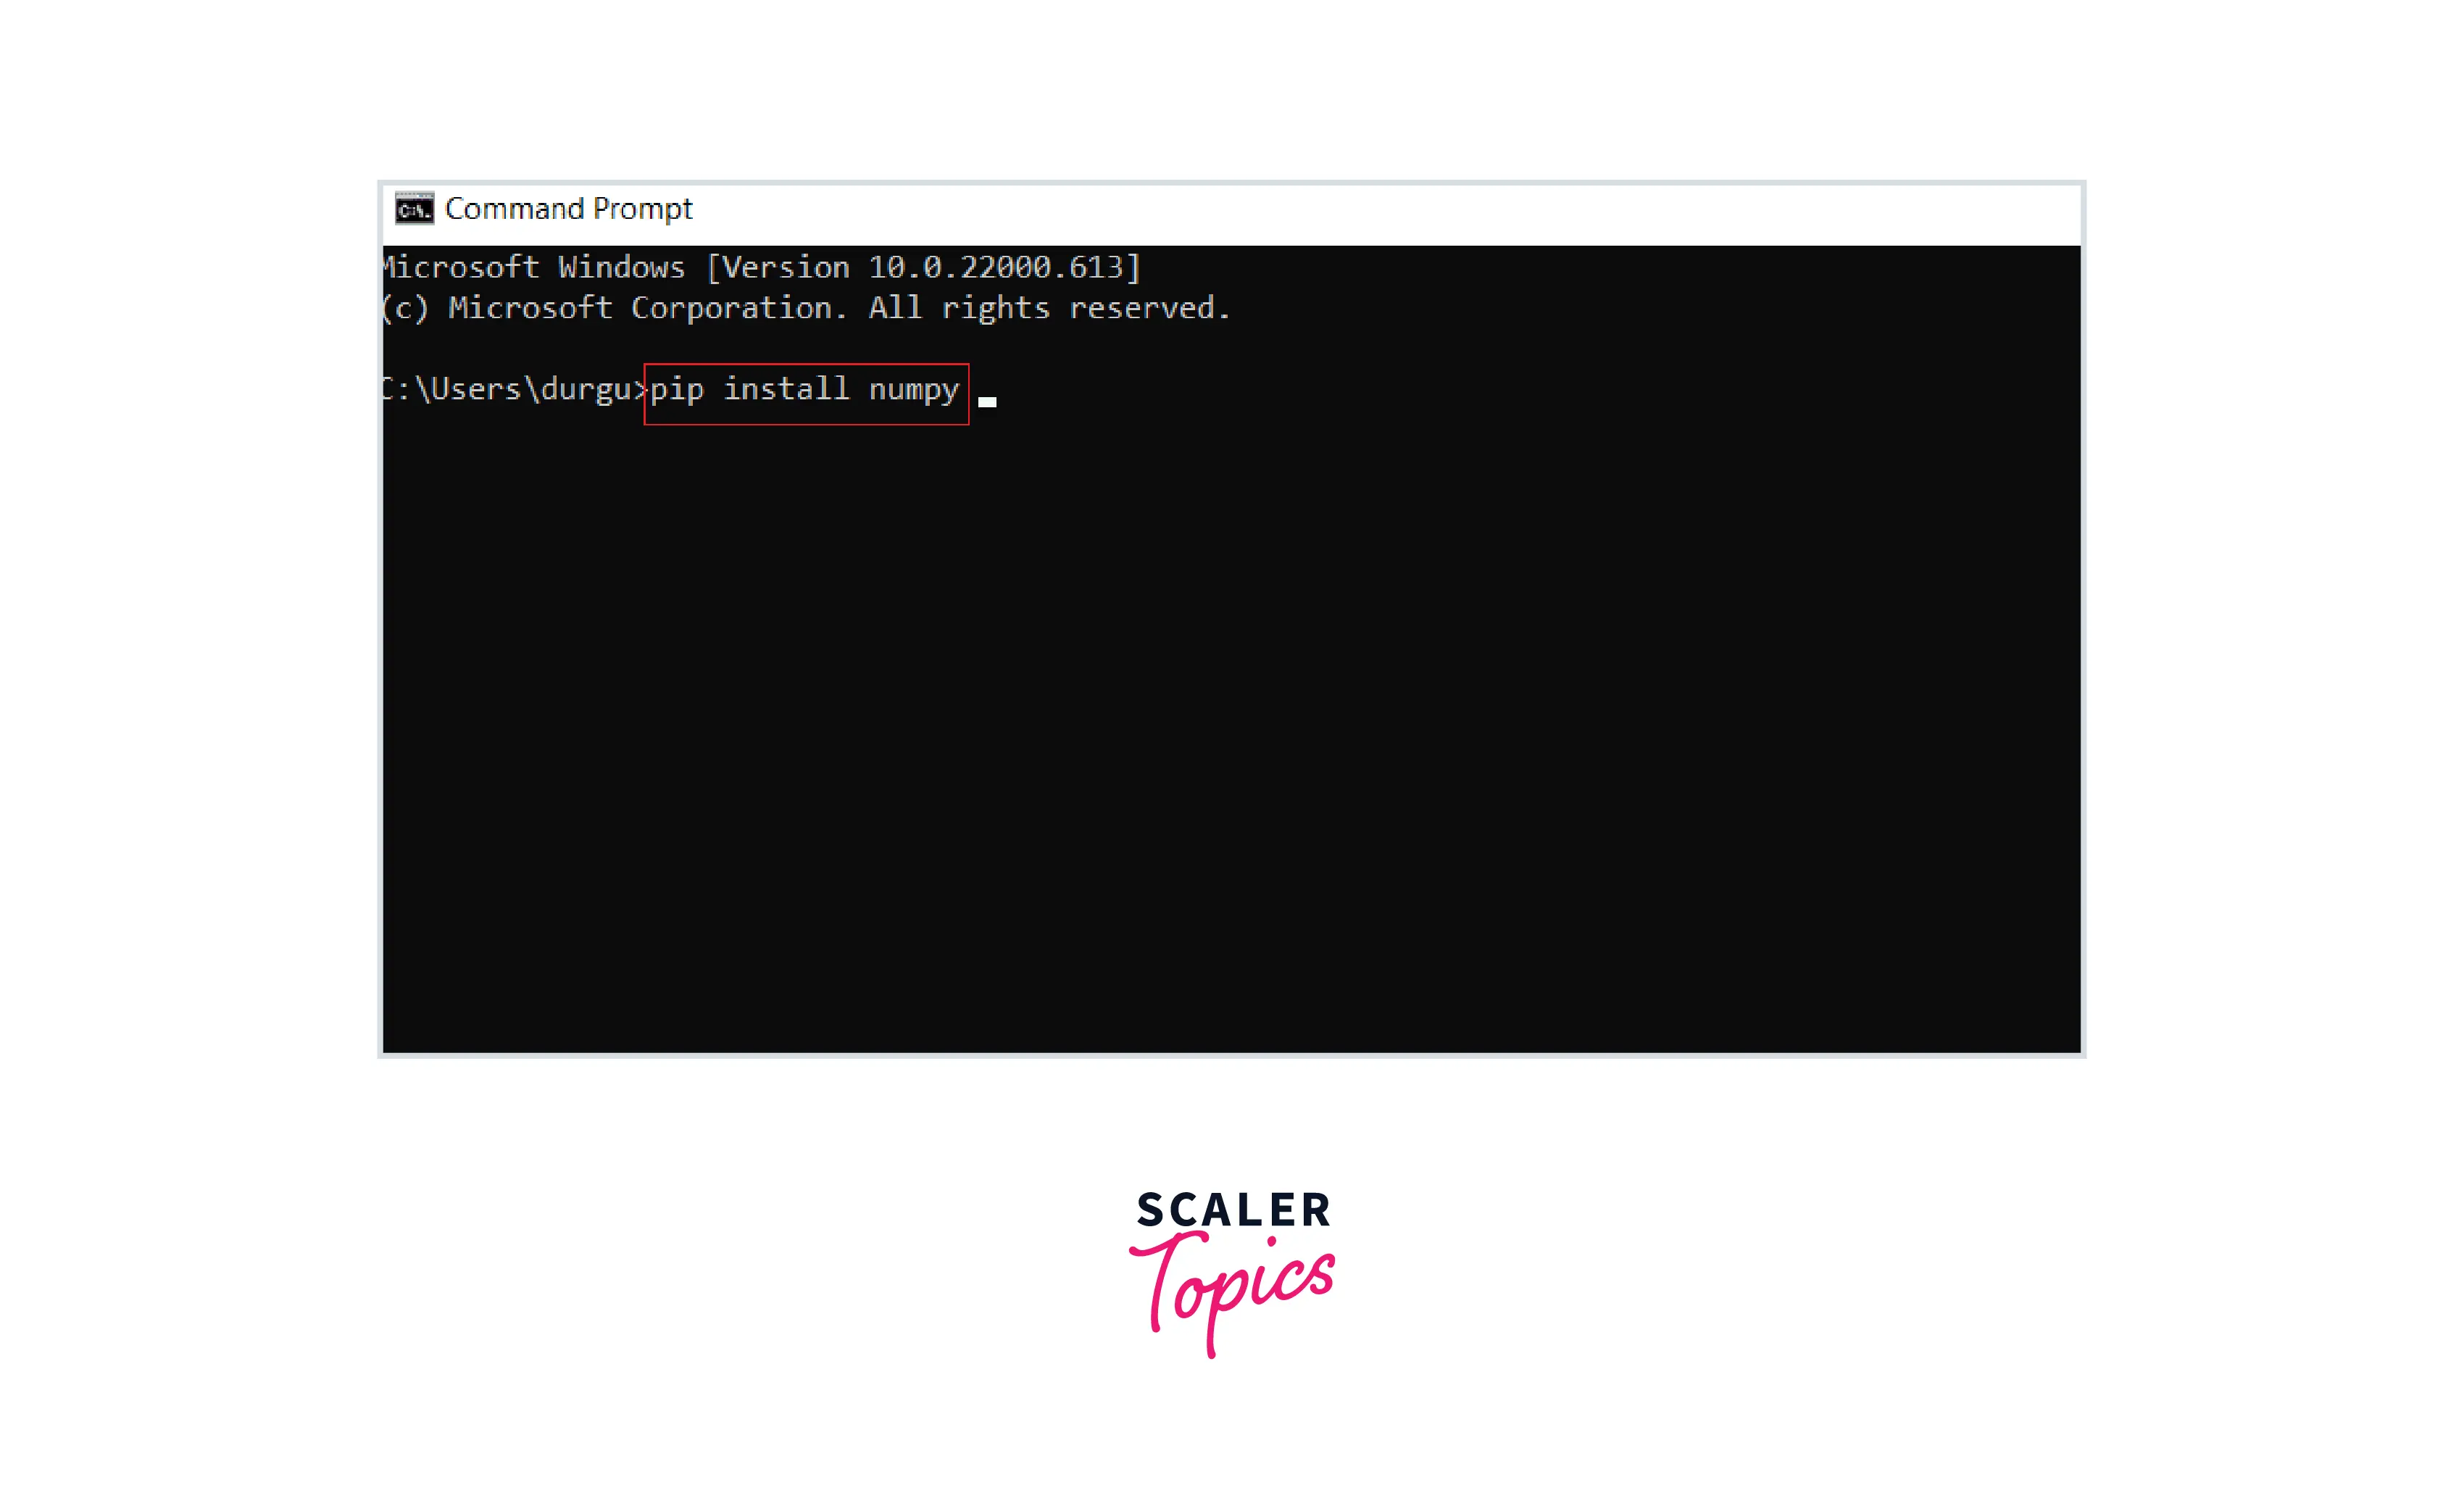
The installation will start automatically, and Numpy will be successfully installed with its latest version.
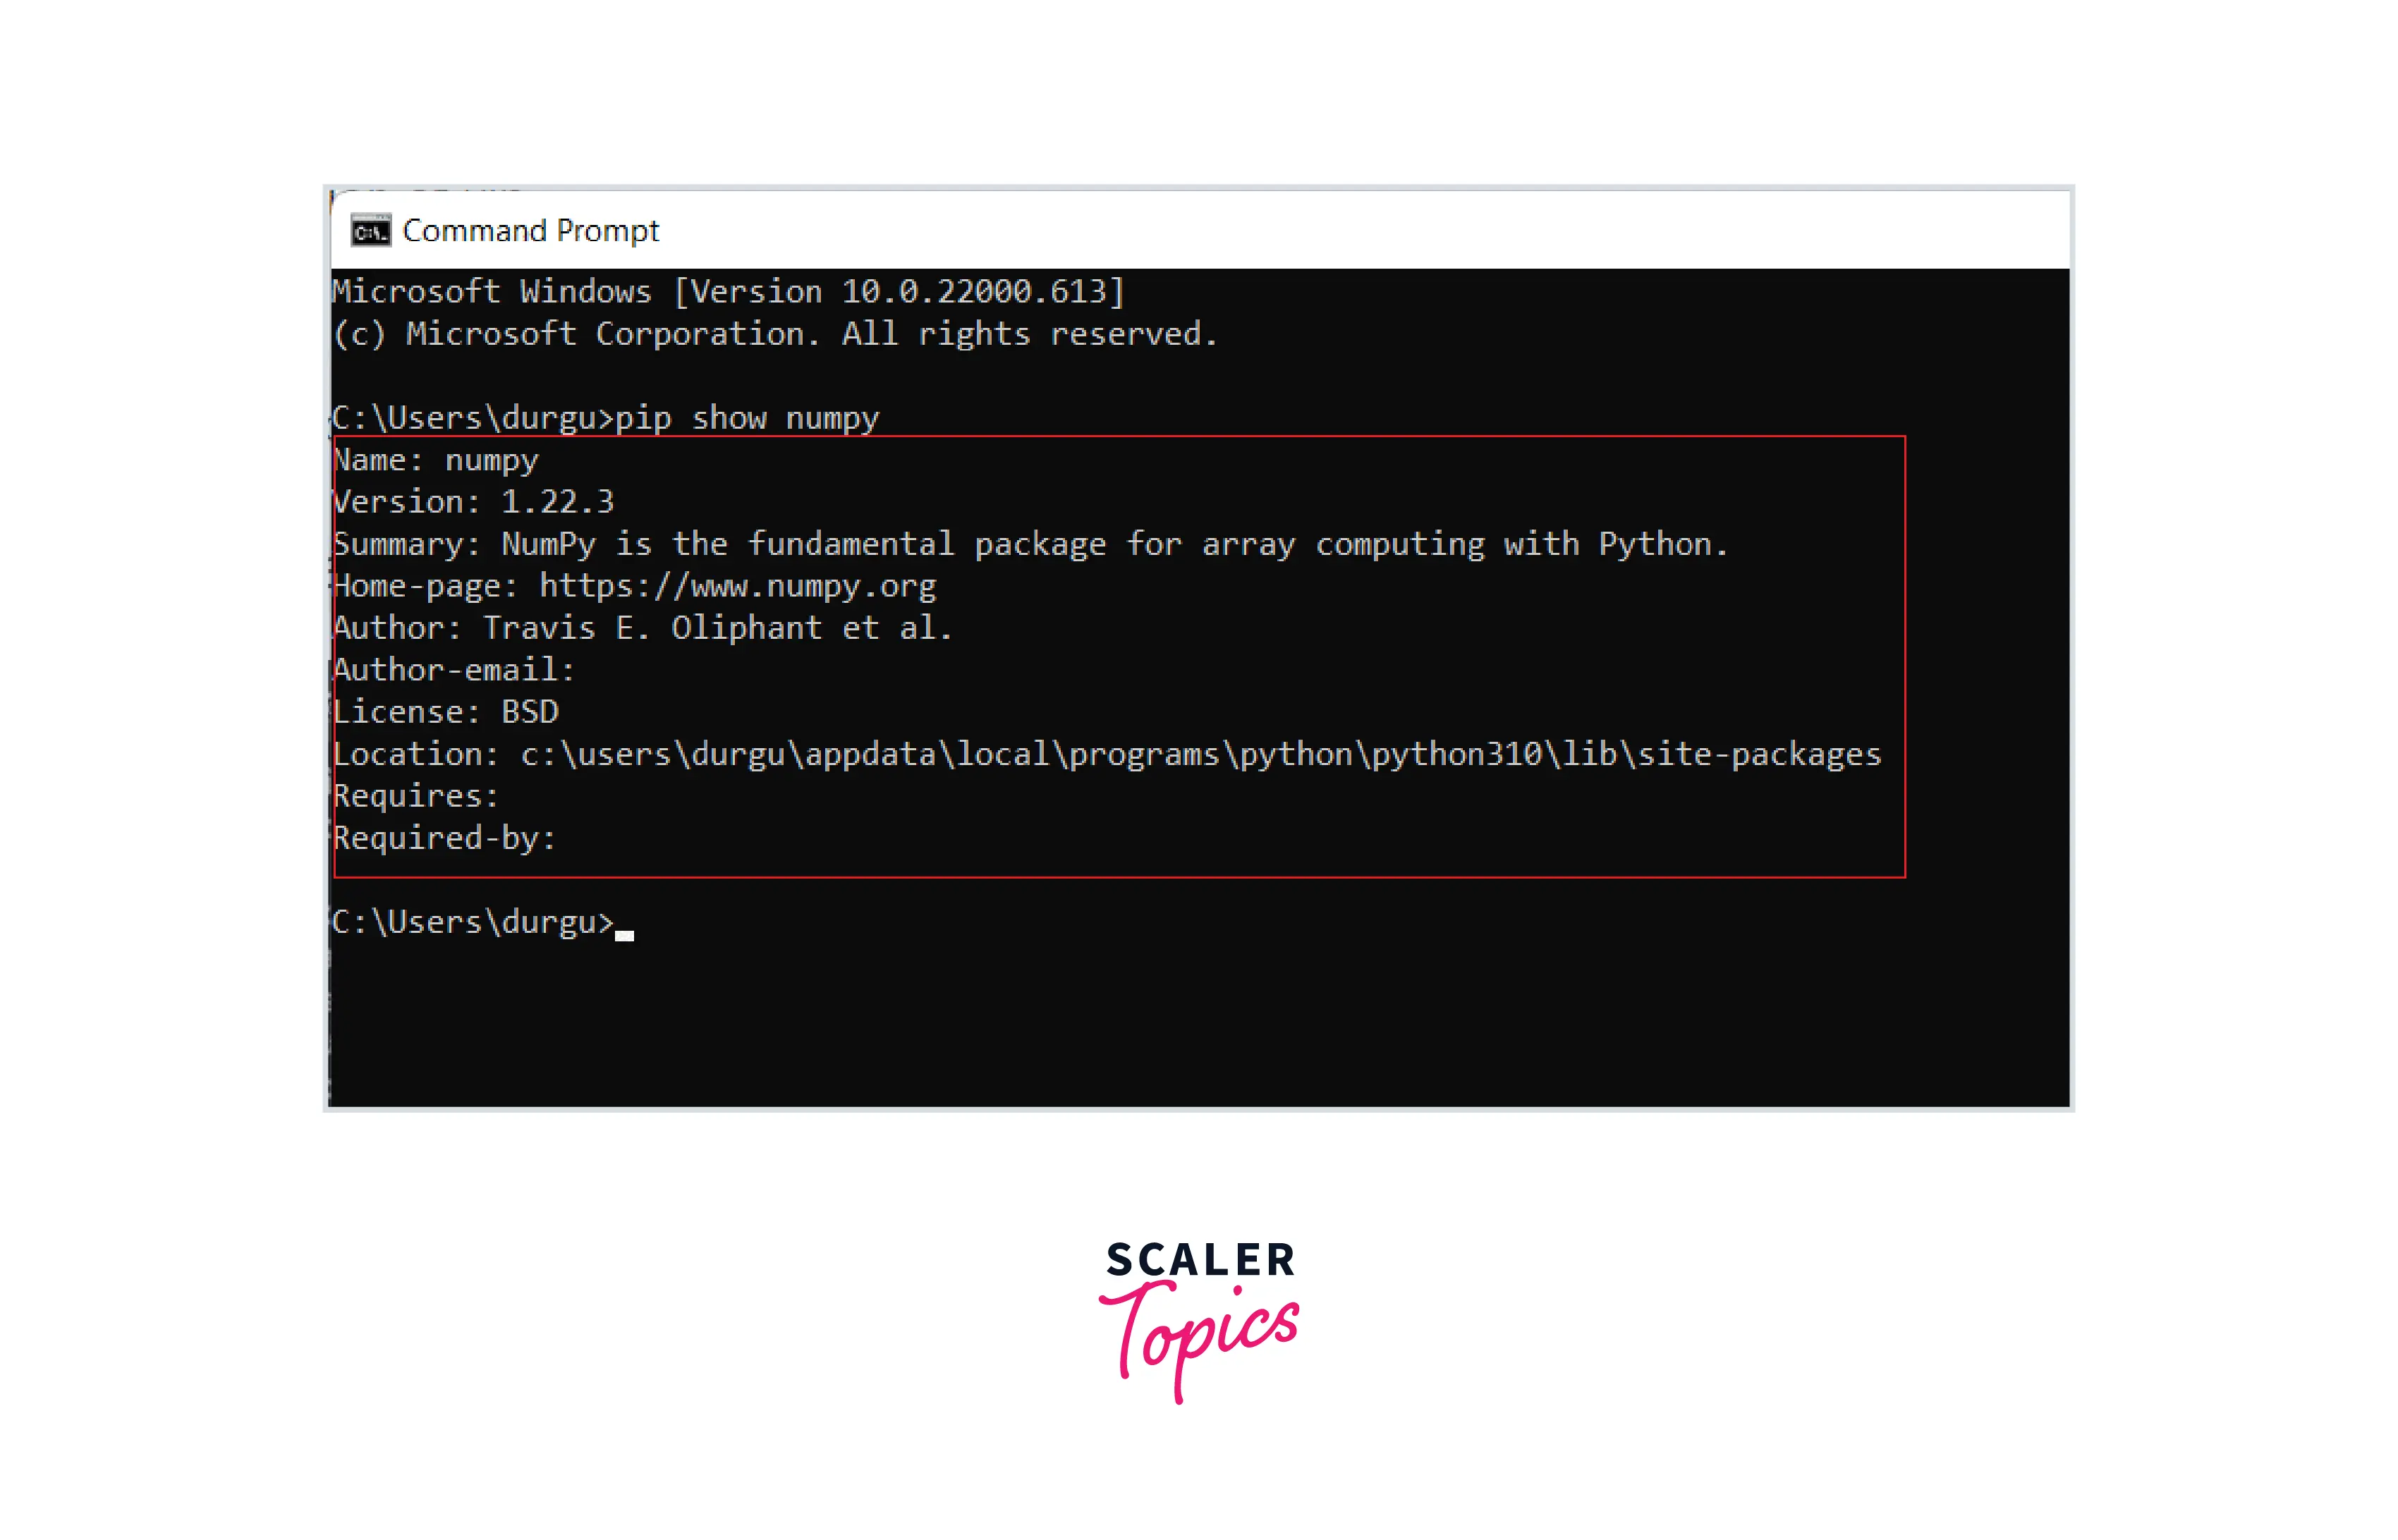
2. Verify NumPy Installation by typing the command given below in cmd:
It will show the location and numpy version installed.
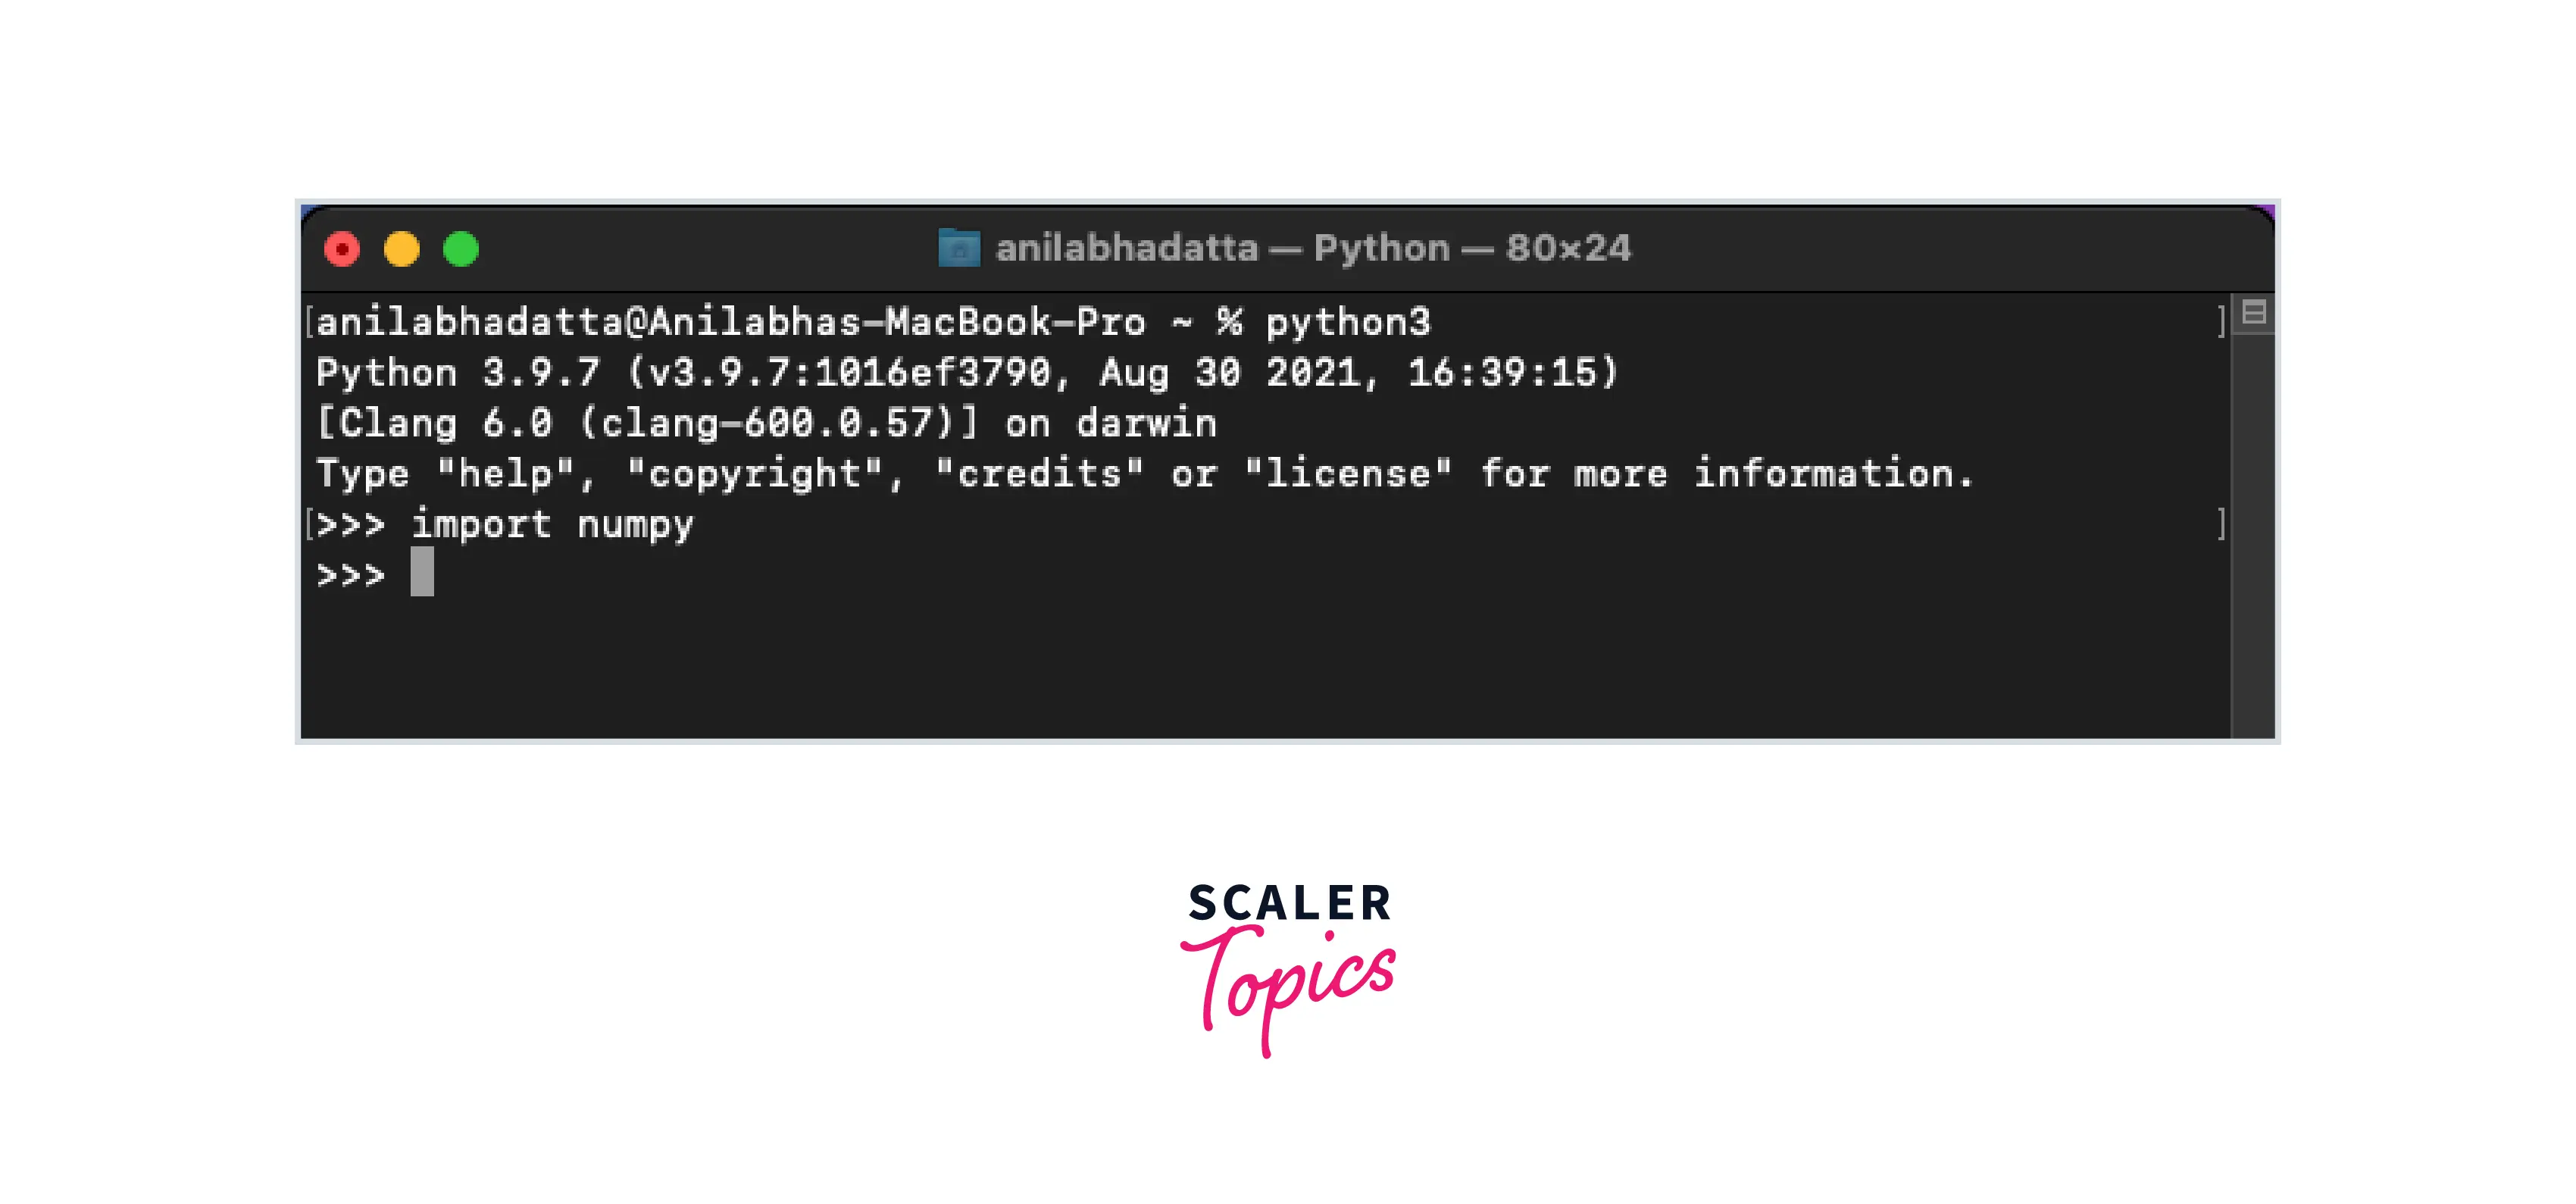
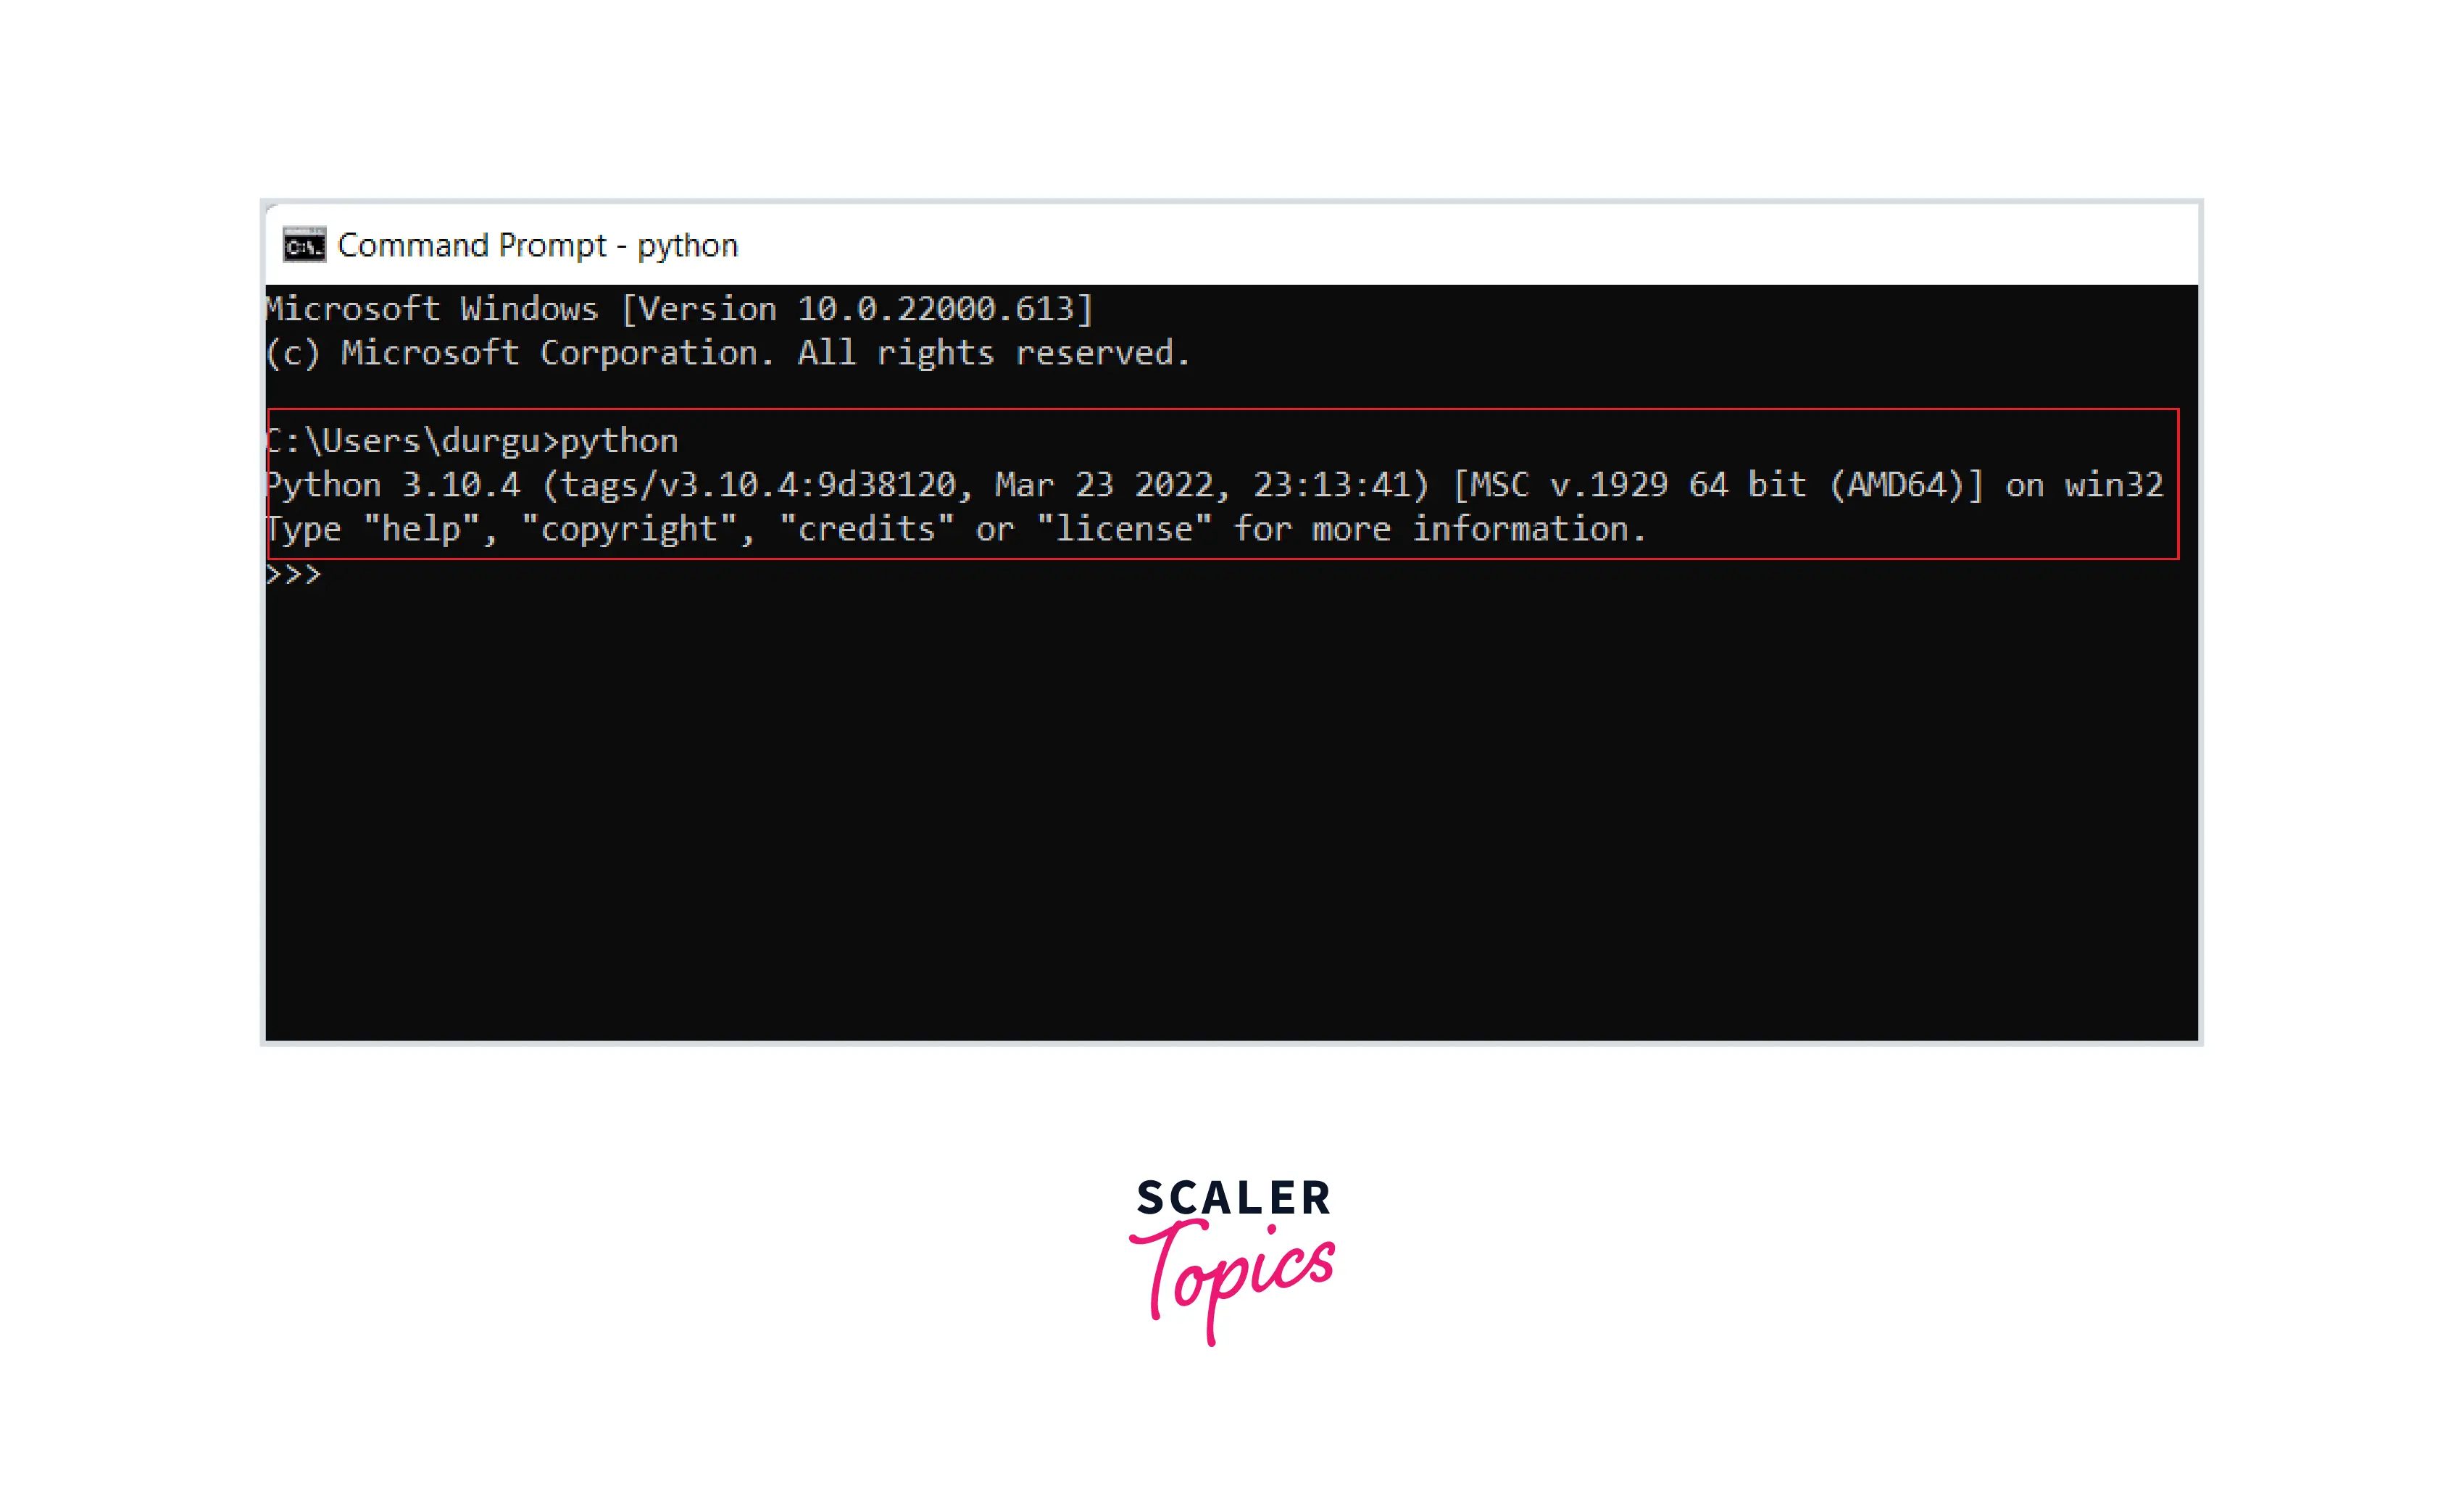
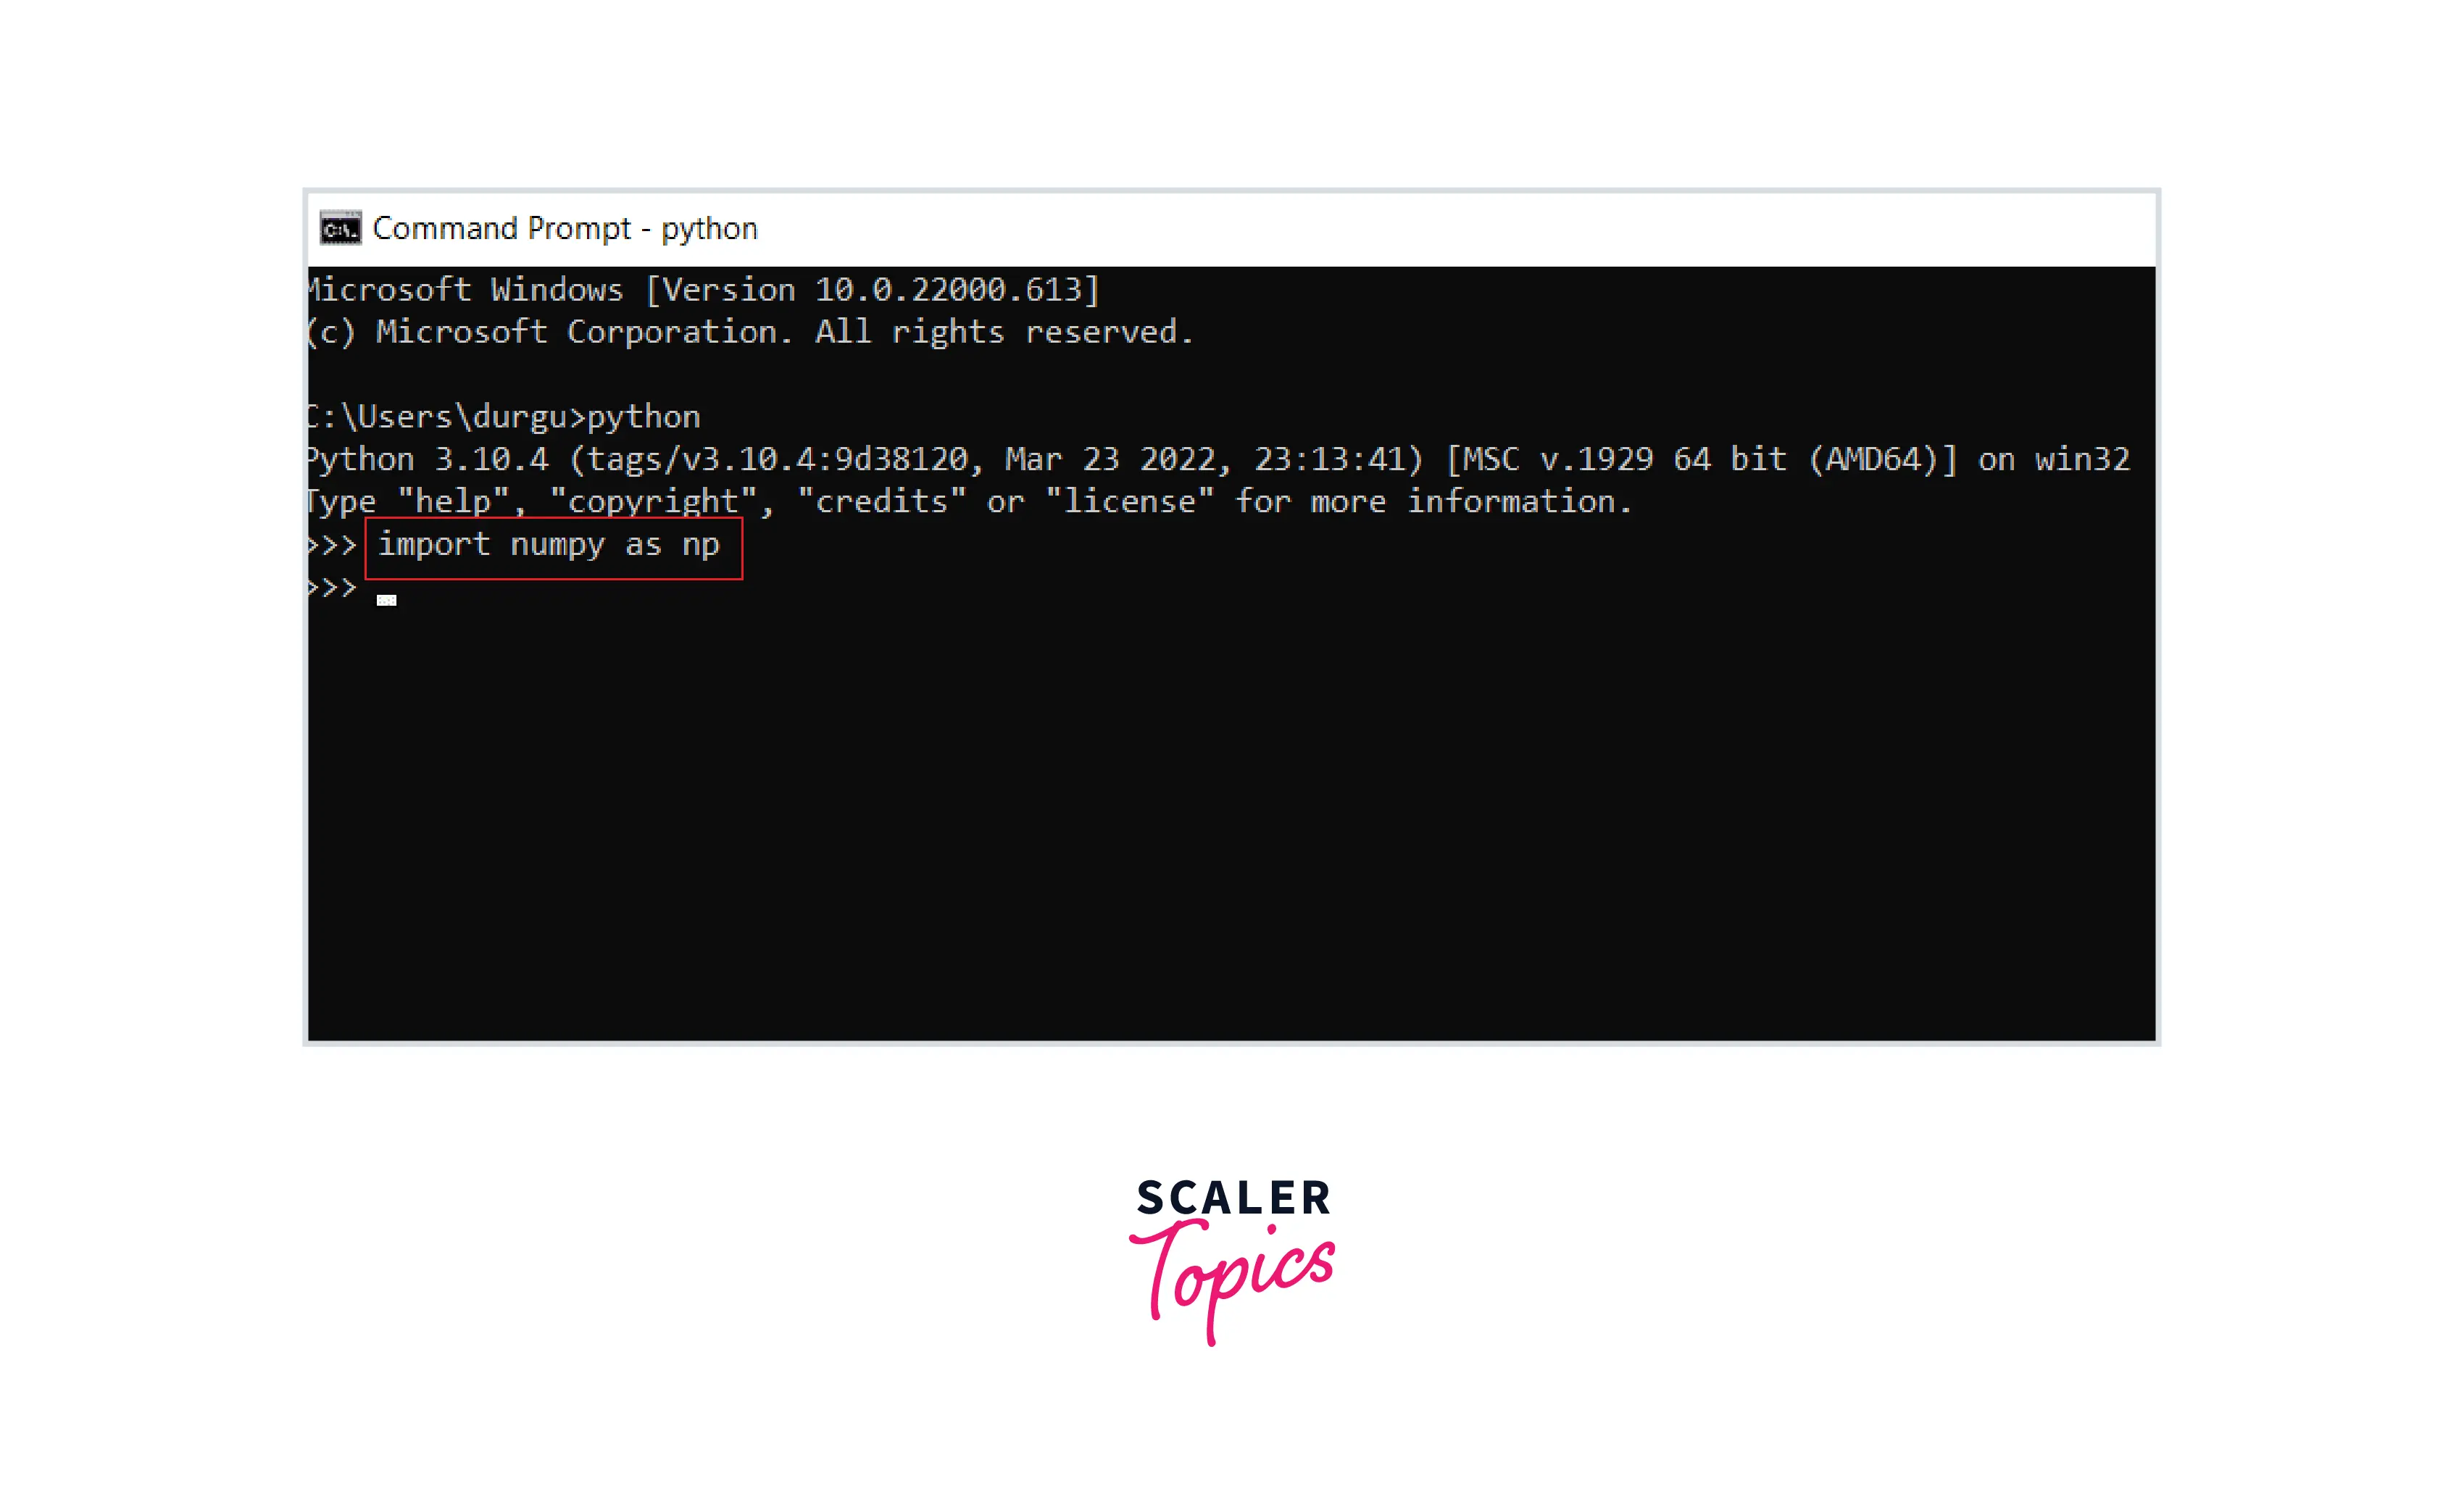
3. Import NumPy Package
- Create python Environment in cmd by typing:Python
- Type command import numpy as np
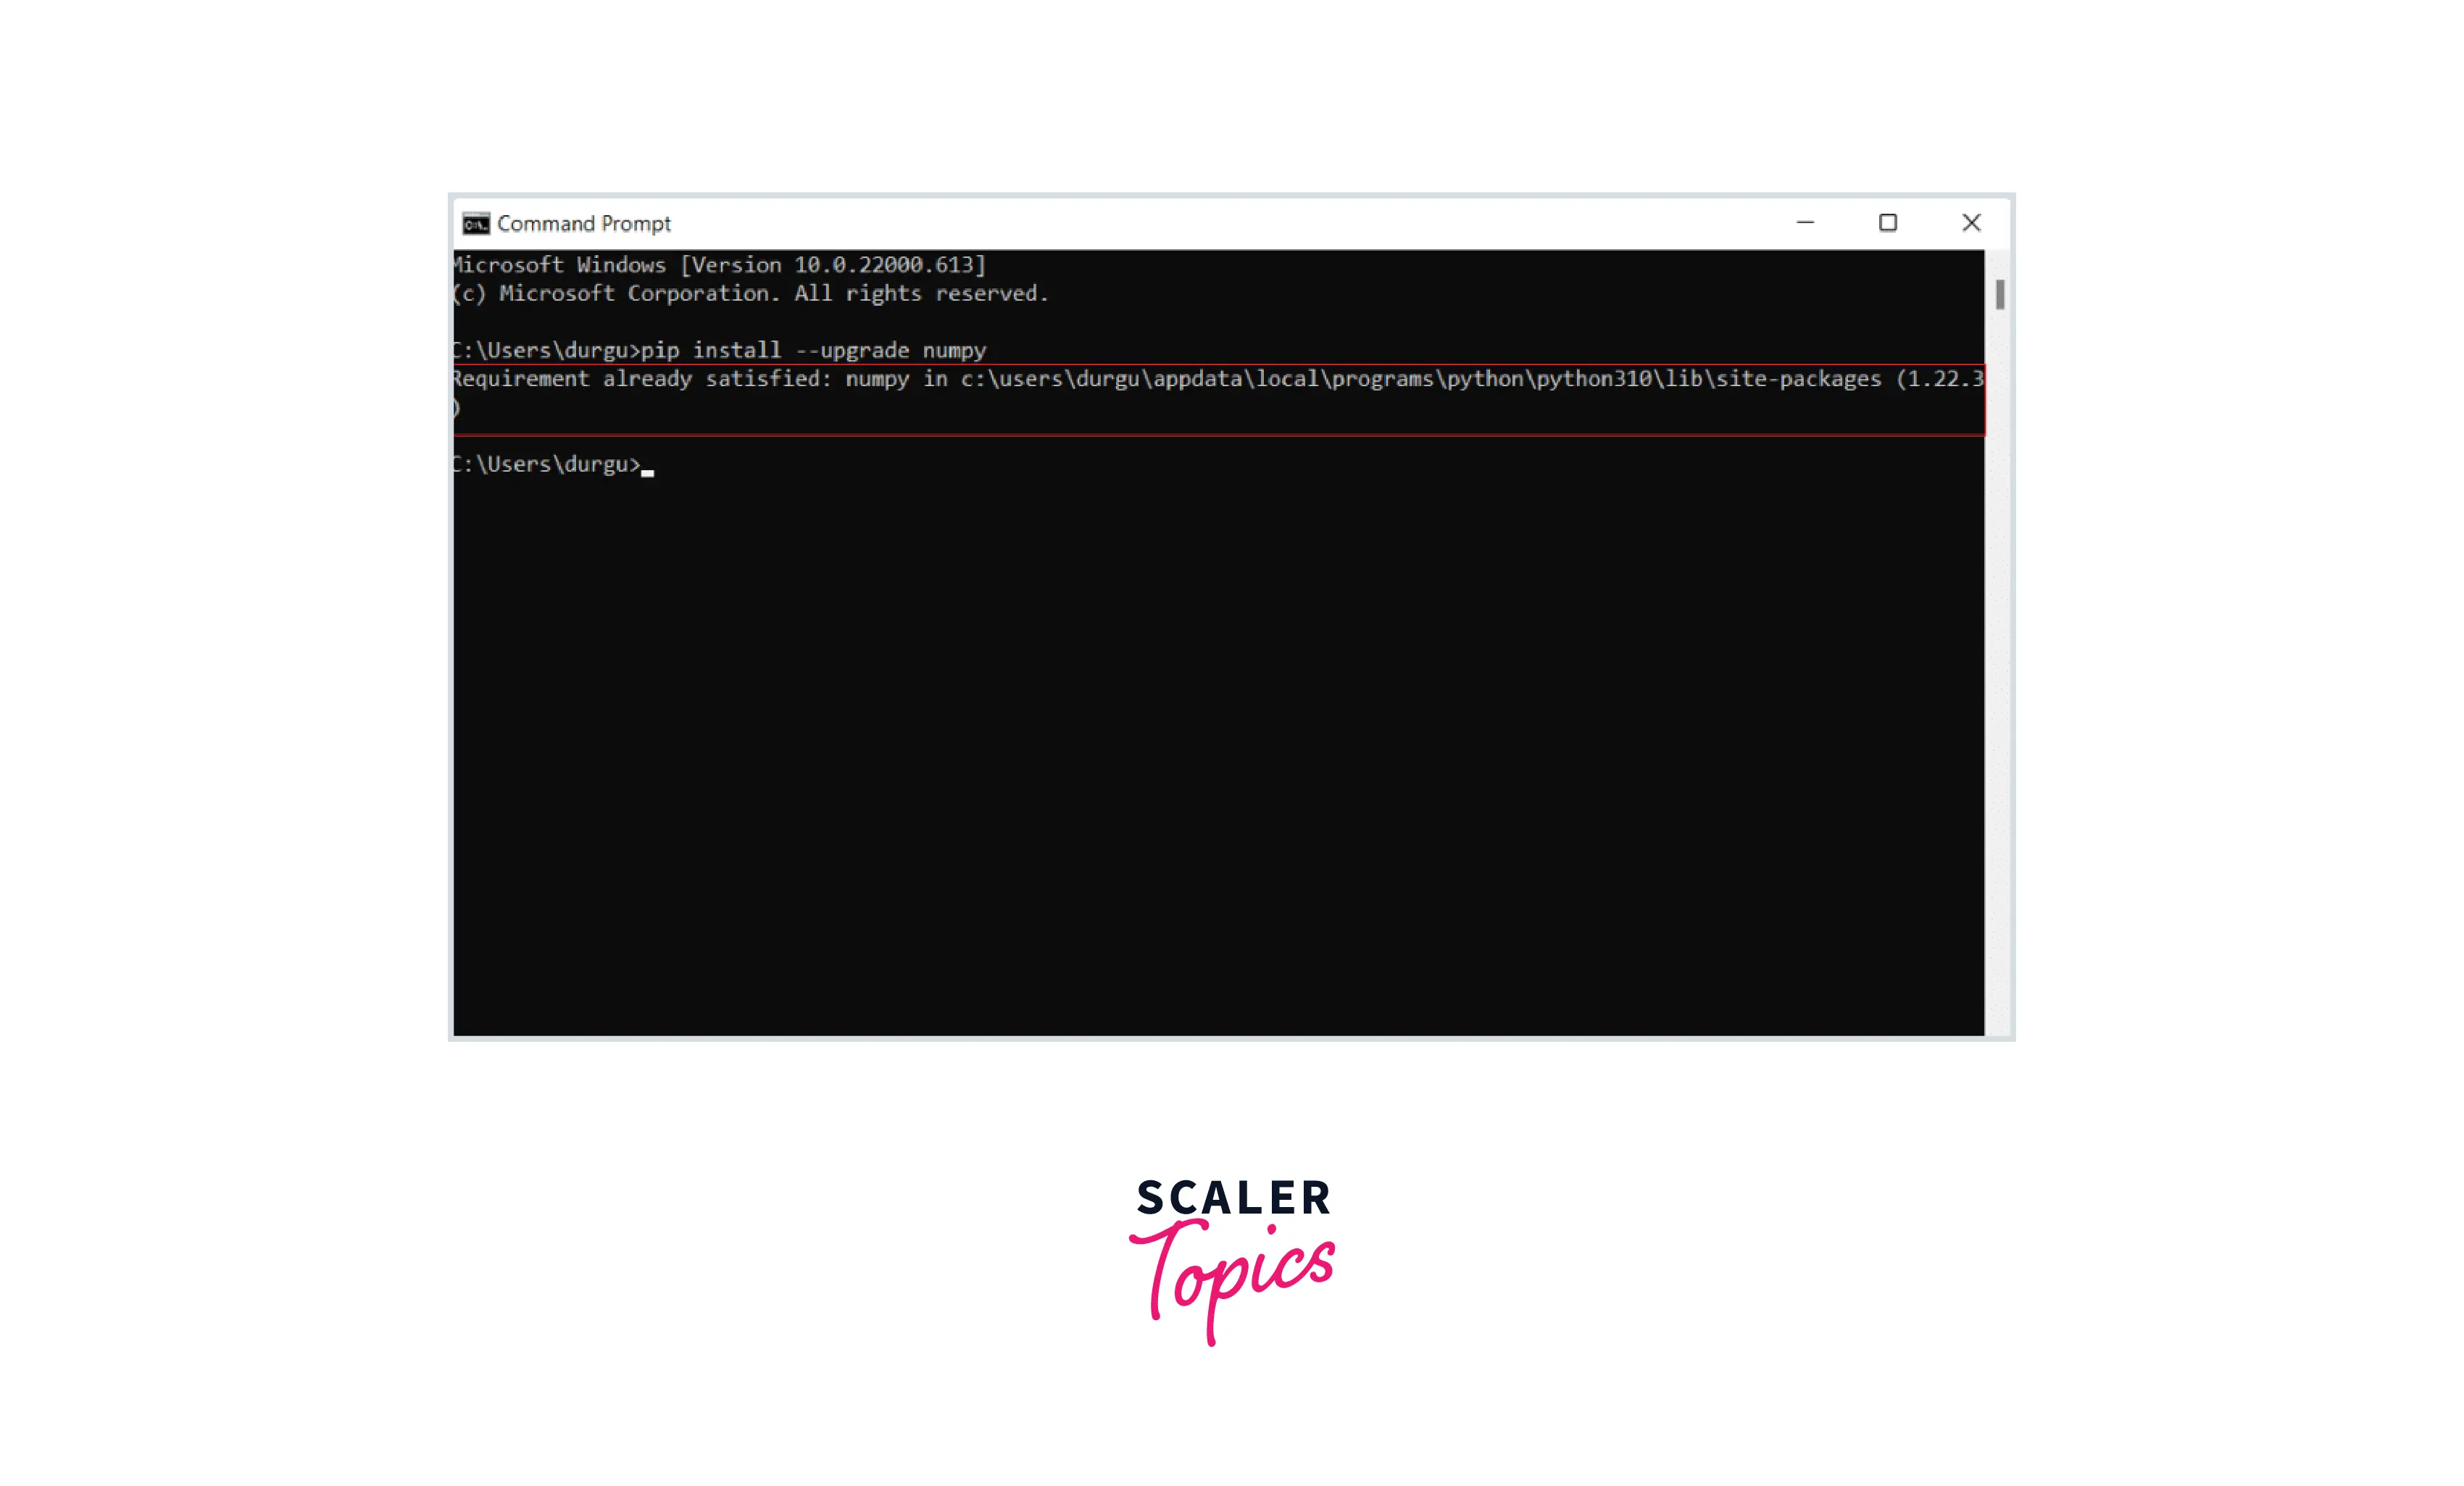
4. Upgrade NumPy by using the following command:
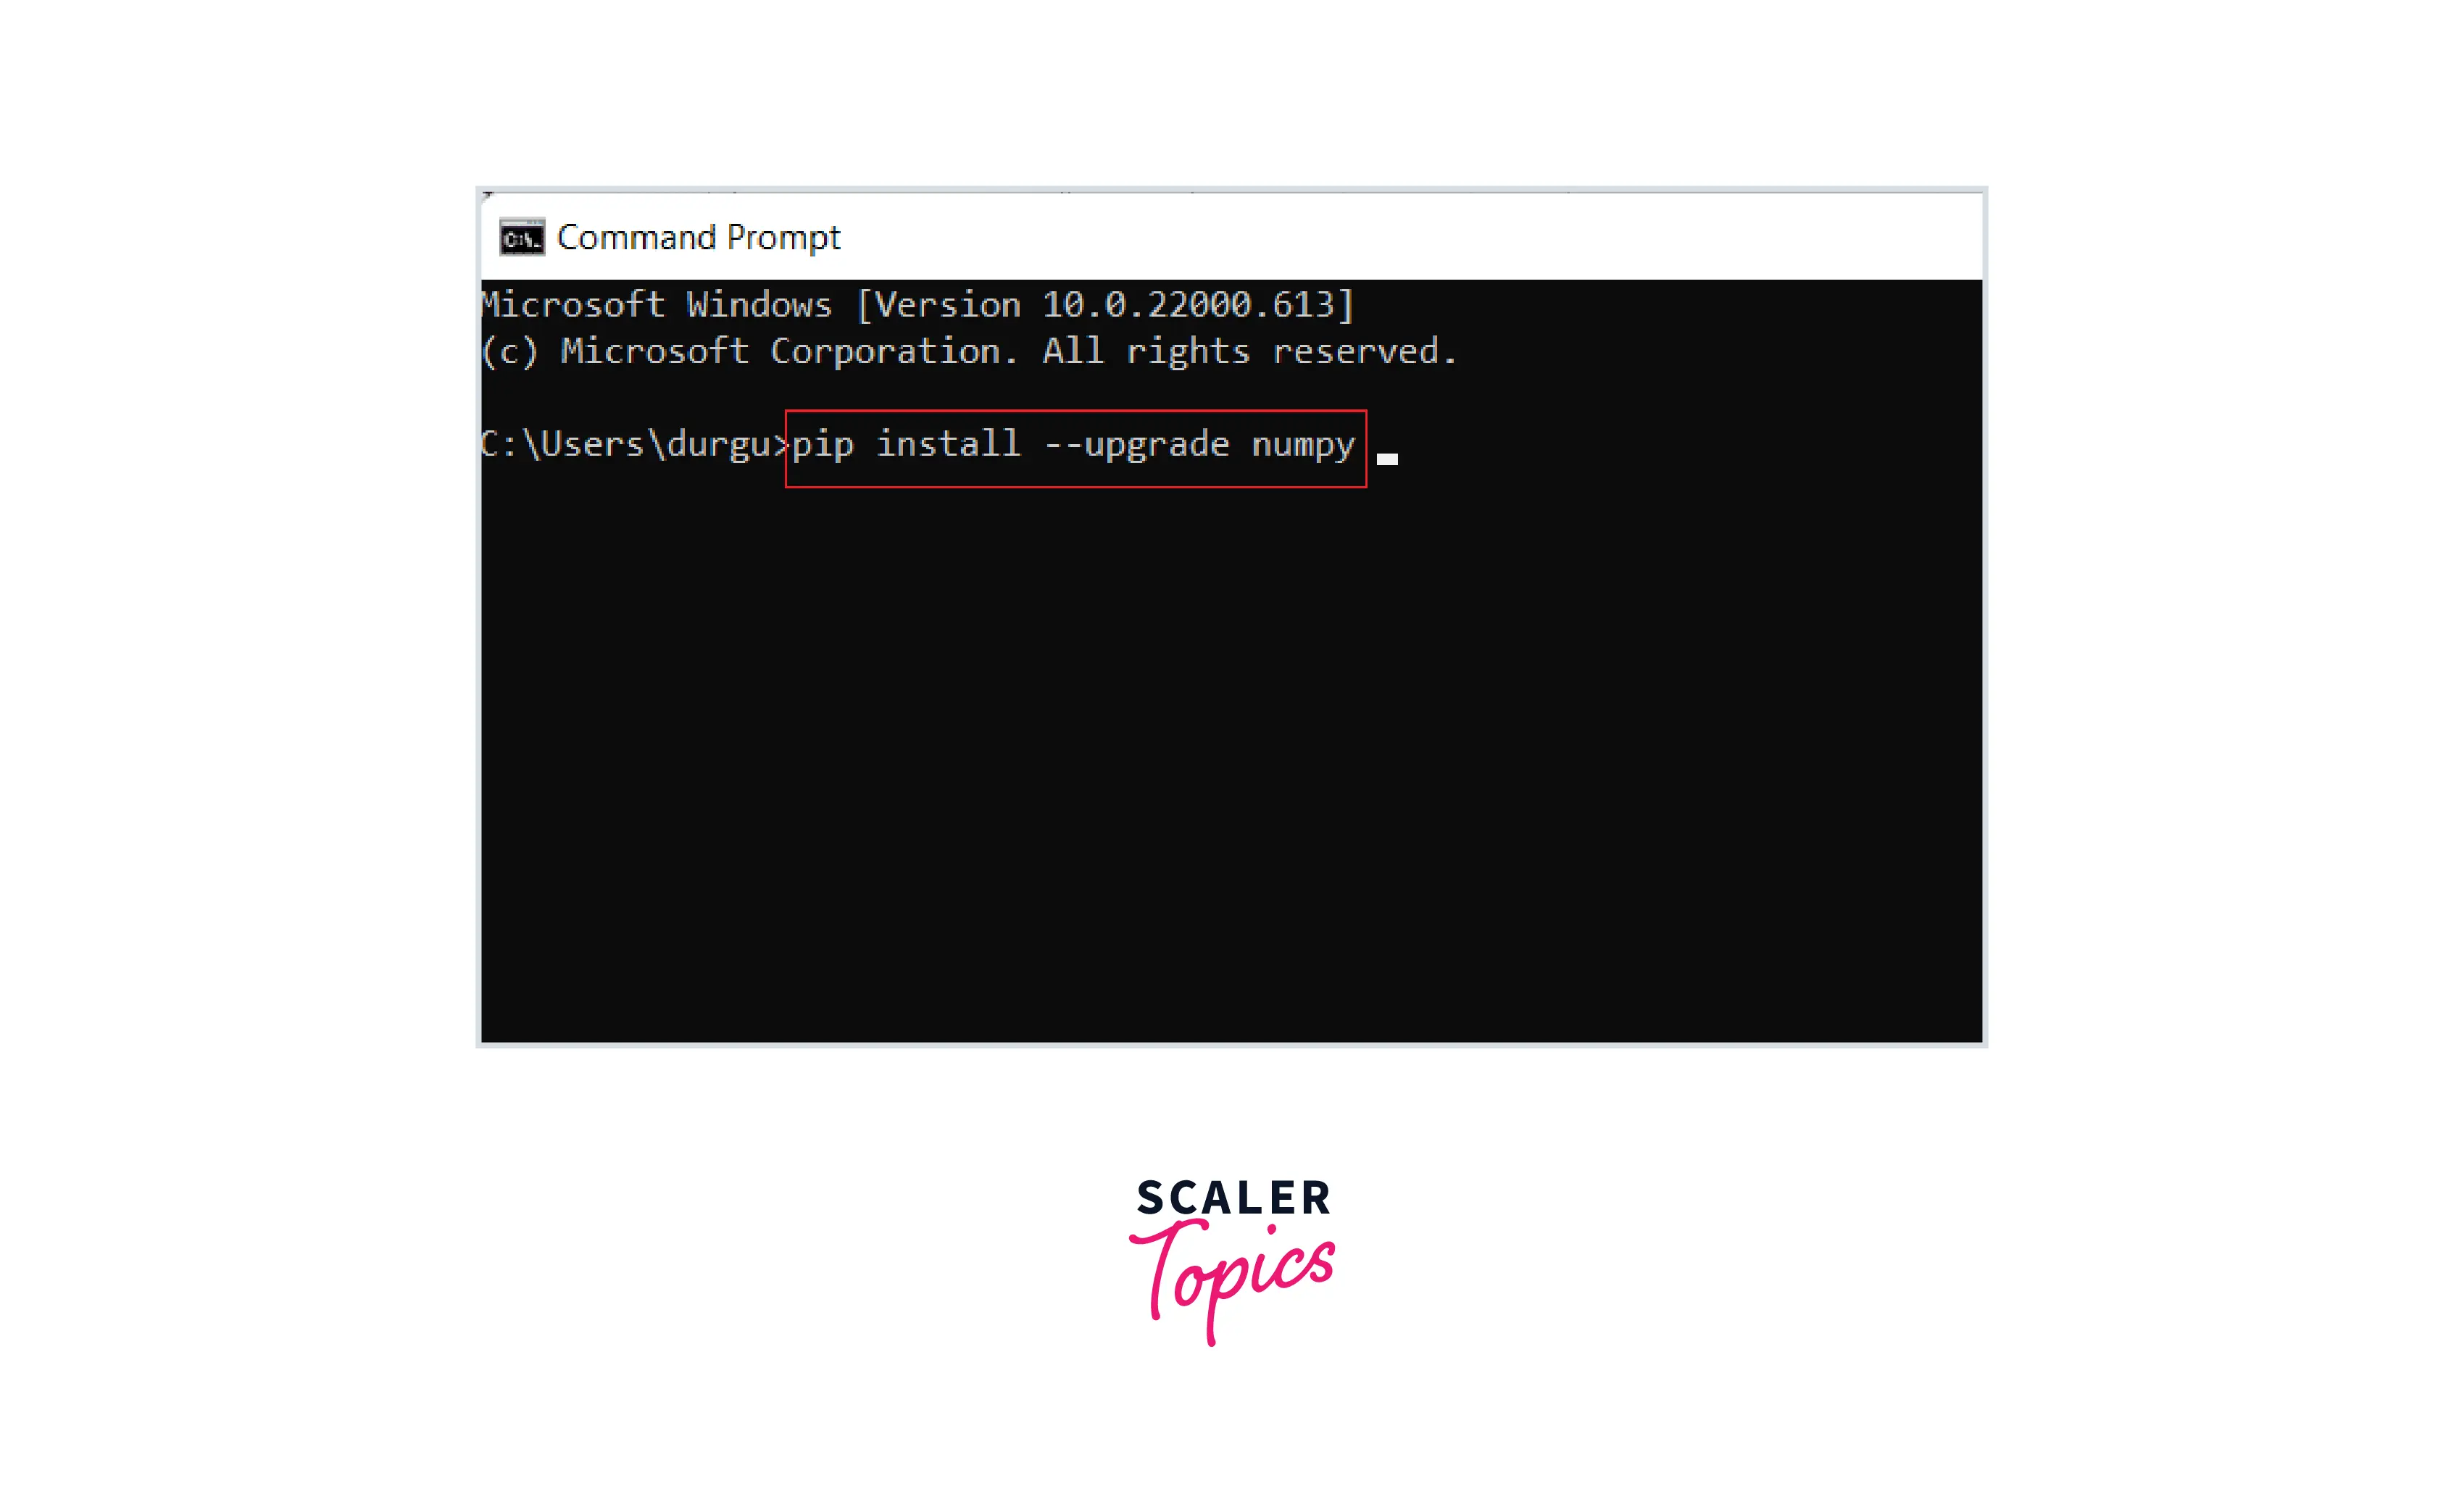
Shows message: Requirement already satisfied: numpy in [location (version)]
By performing all the above steps, Numpy will be successfully installed.
3. NumPy Installation on Ubuntu Operating System
Python is pre-installed on Ubuntu computers. Pip, on the other hand, is not installed.
There are two ways to install pip:
- Install the complete package by downloading python from python.org, then use the apt install command for installing on the Ubuntu system.
- Another way is to directly install pip first on Ubuntu and then install NumPy by performing the following steps:
Type command apt install python-pip python-pip3
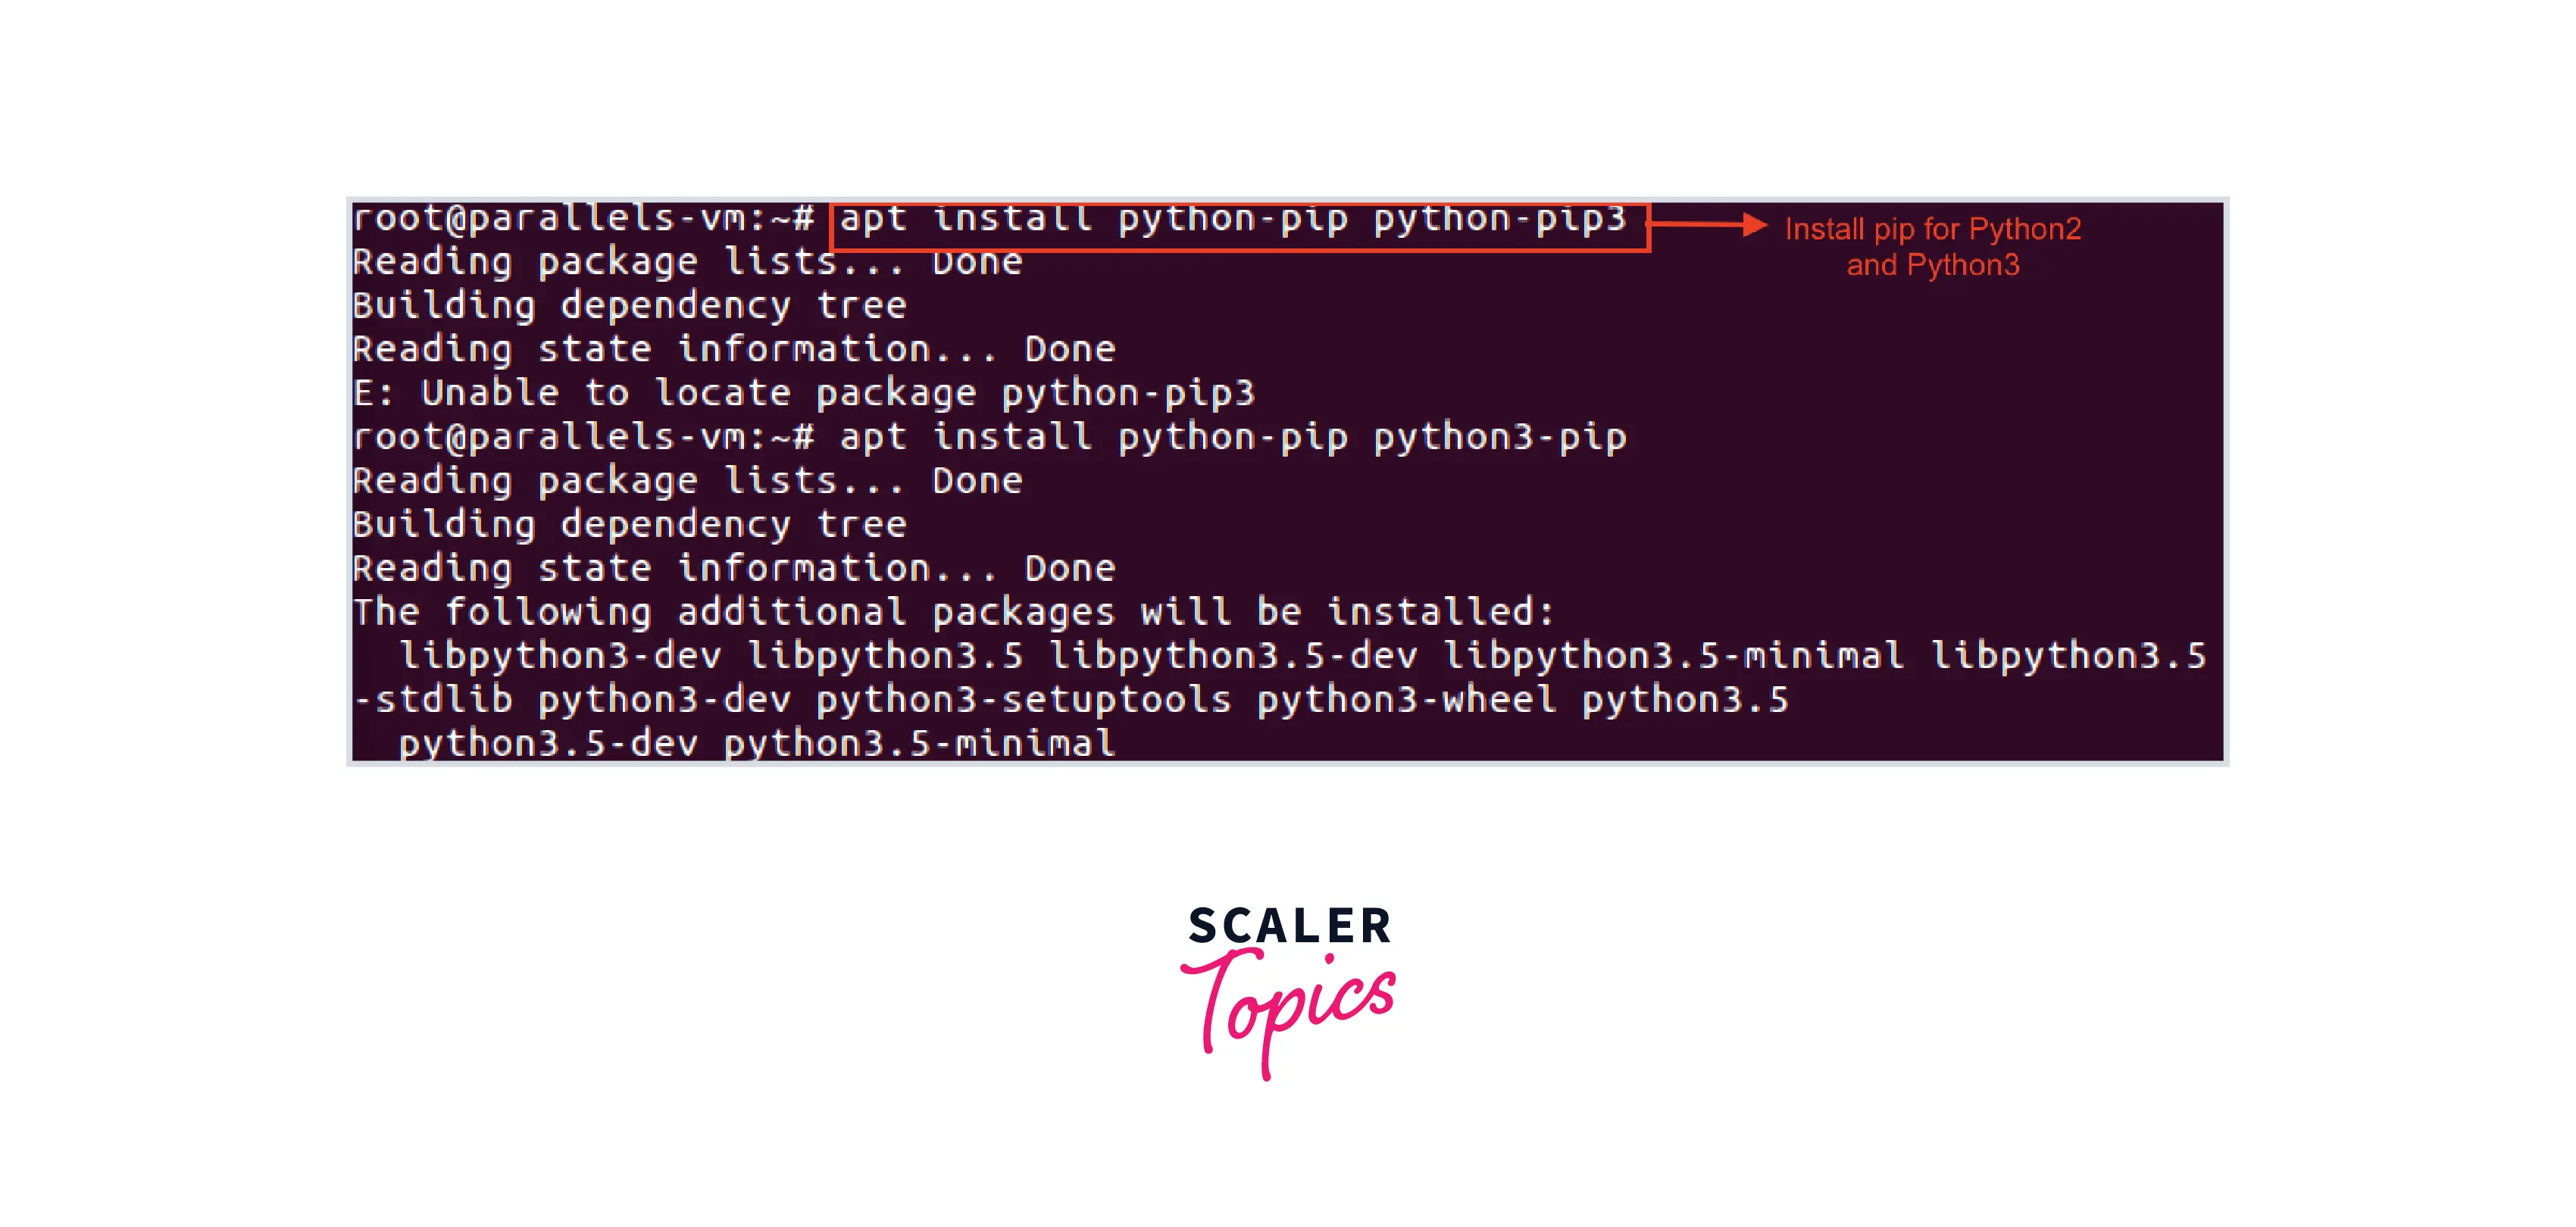
- Type command pip3 install numpy for installing python3, use pip install numpy for installing python2.
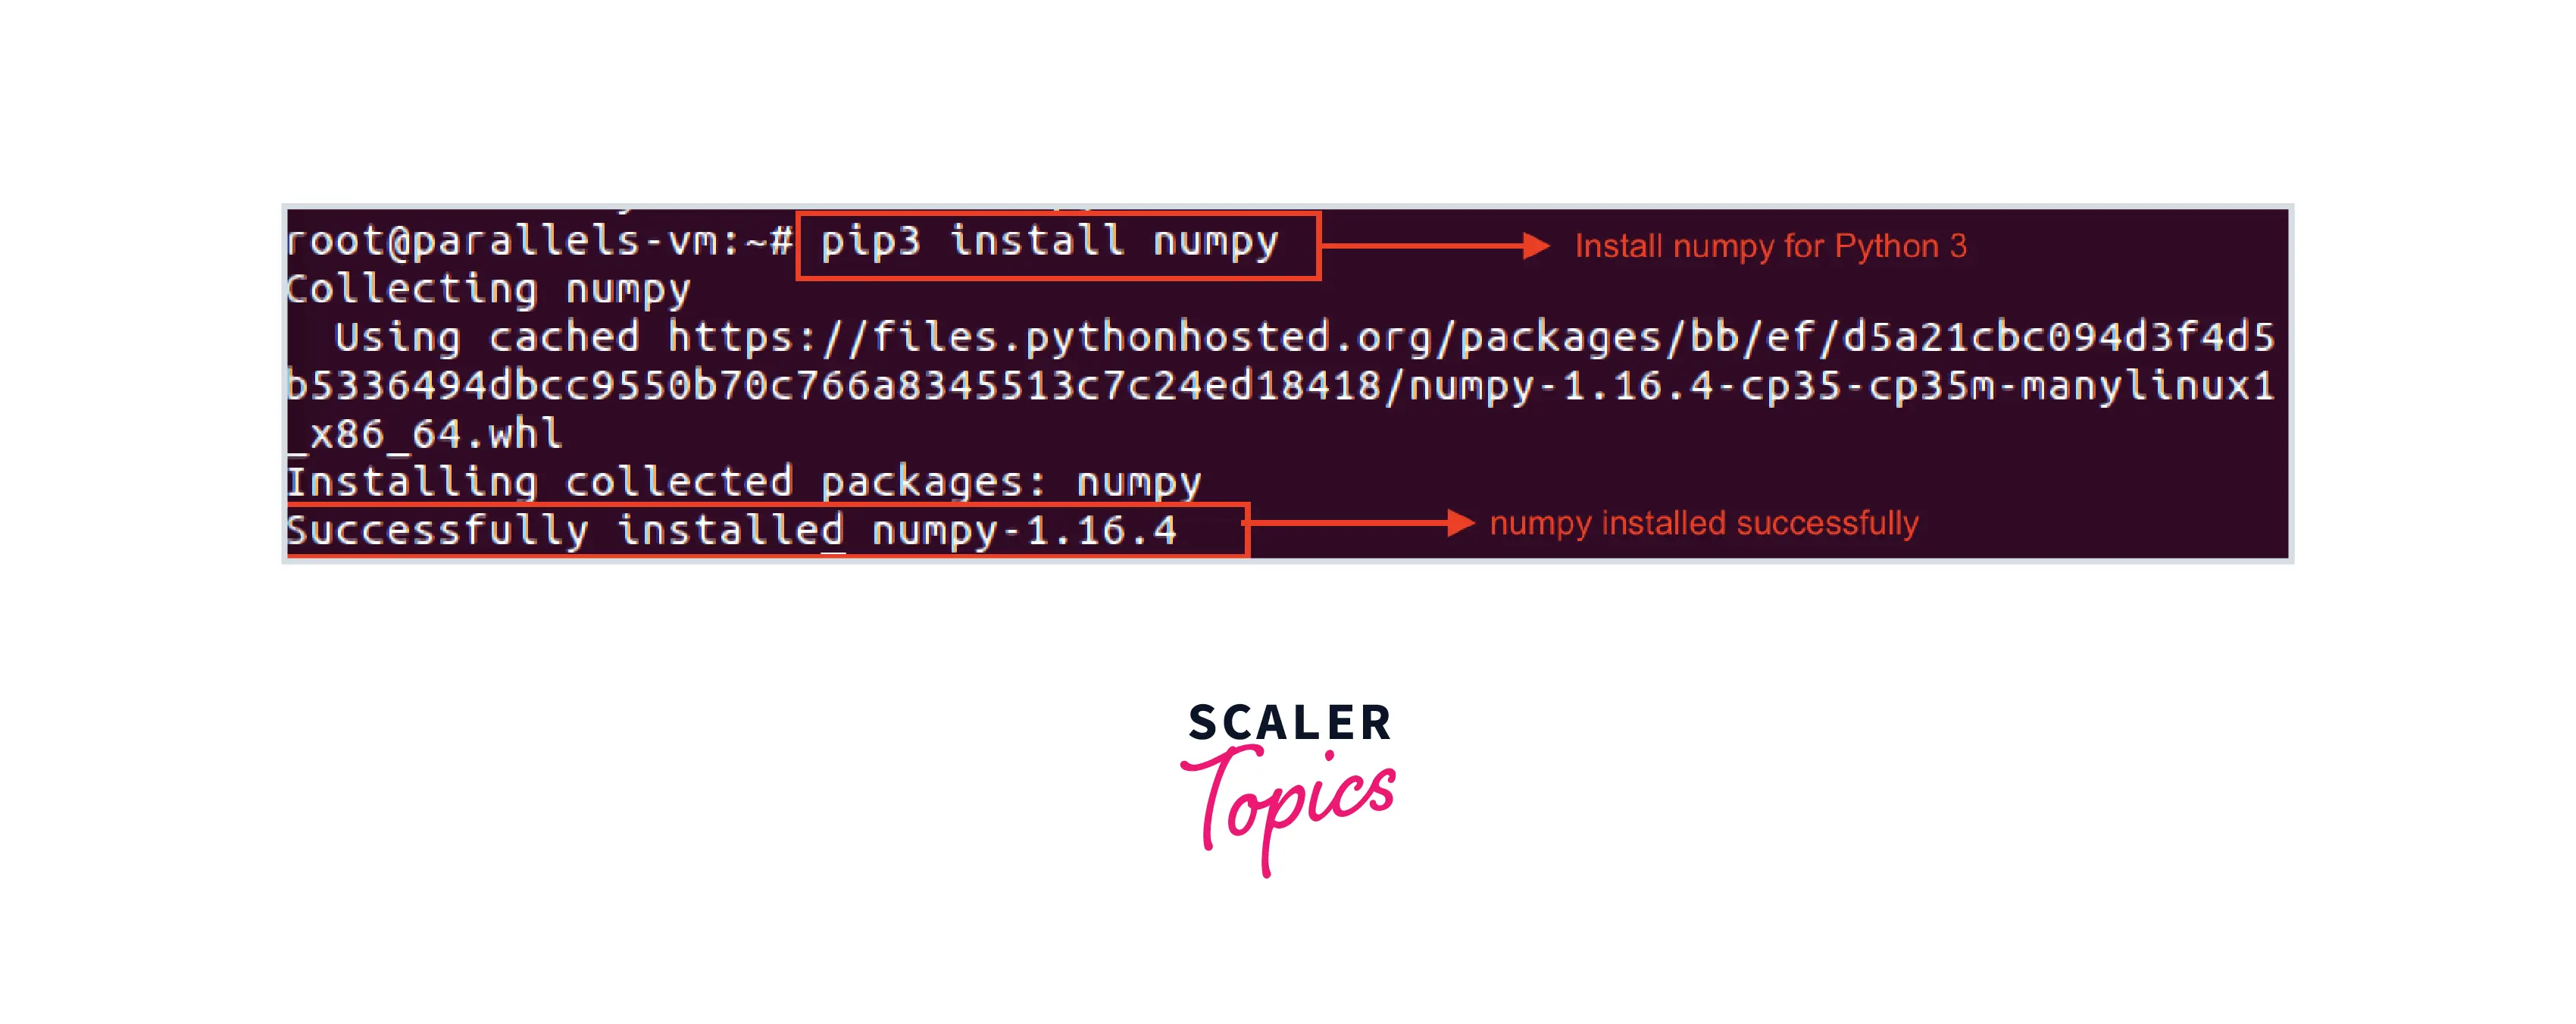
Numpy is successfully installed on Ubuntu using the above commands.
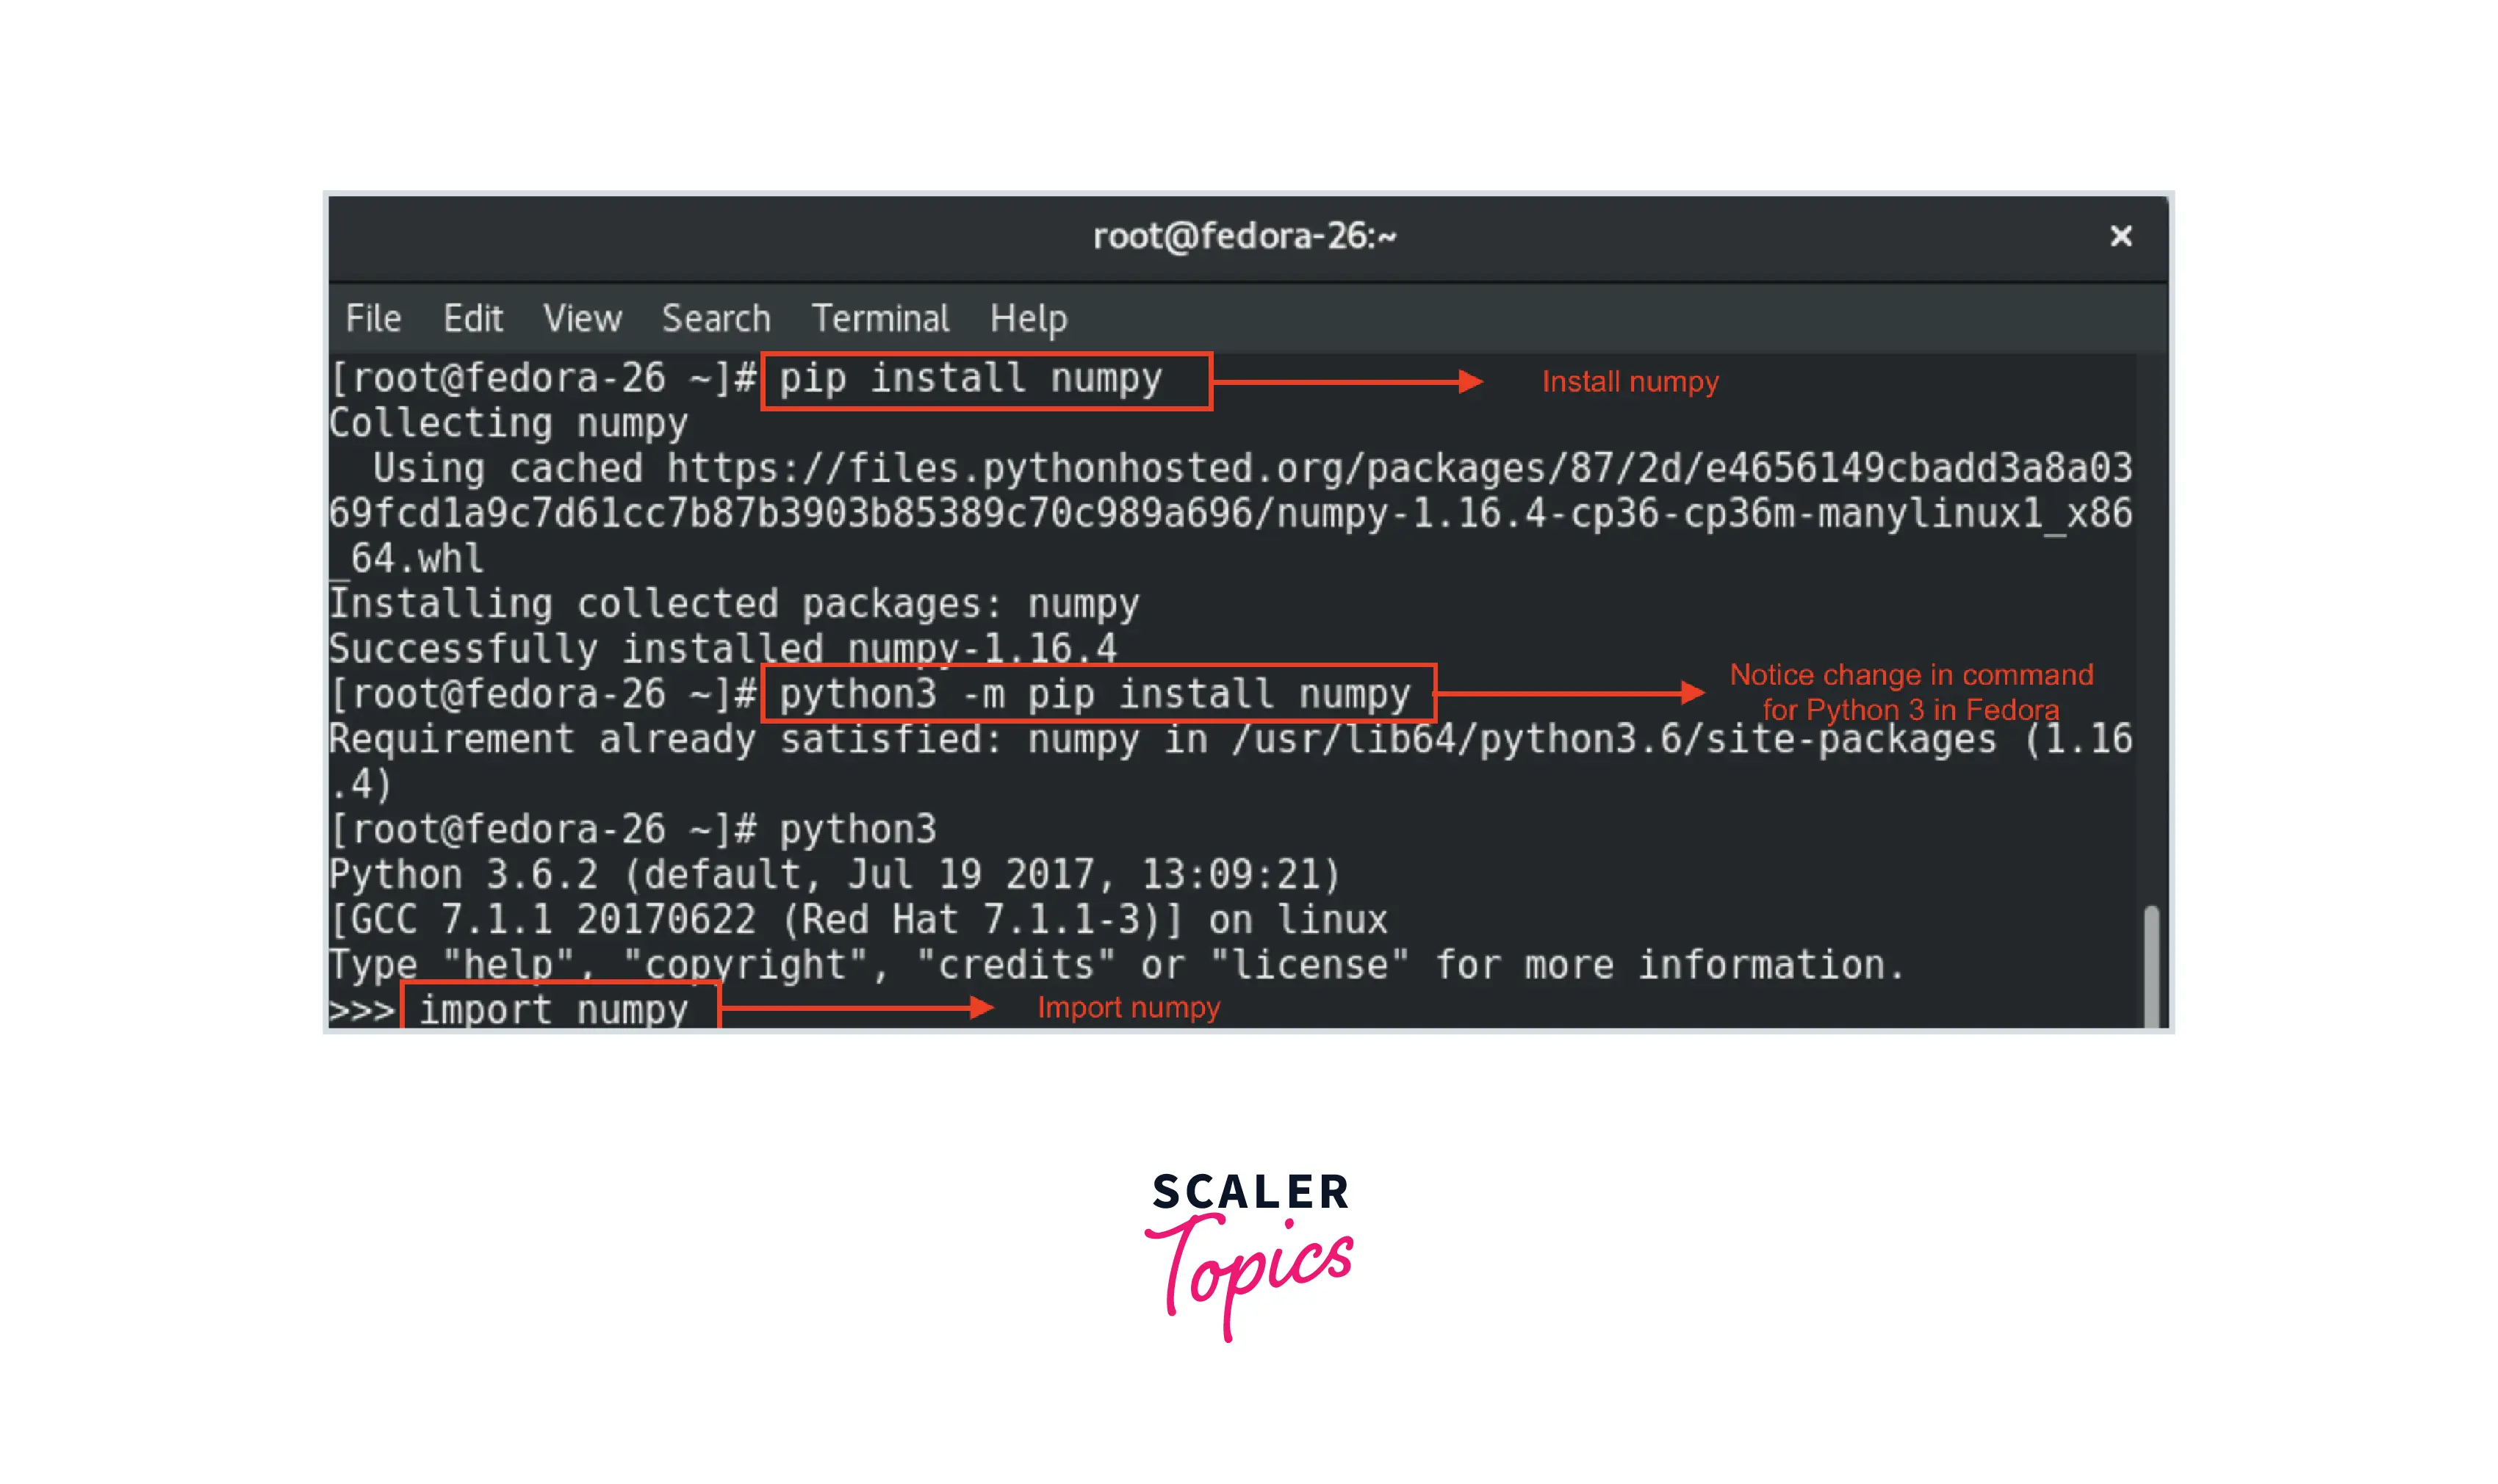
4. How to Install NumPy on Fedora Operating System
Like Ubuntu, Python is already installed in Fedora operating system.
Type command pip install numpy
5. Advanced Usage
1.CONDA
Conda is an open-source environment and package system. Windows, macOS, GNU/Linux, and many hardware platforms, including x86 and Power 8 and 9, are all supported by conda.
- It offers prebuilt packages and can install and update.
- There is no need to install the system and Python packages separately. Everything is already there in the .yml environment. .yml is a text file that contains a list of dependencies, etc., in a single file.
Using Default or conda-forage NumPy can be easily installed by performing the following steps.
- Install NumPy by using Environment
- Installation using conda-forge
- The actual install command
2. Using Pip/Pypi
- pip installs packages for python from the Python Package Index(Pypi) and other indexes.
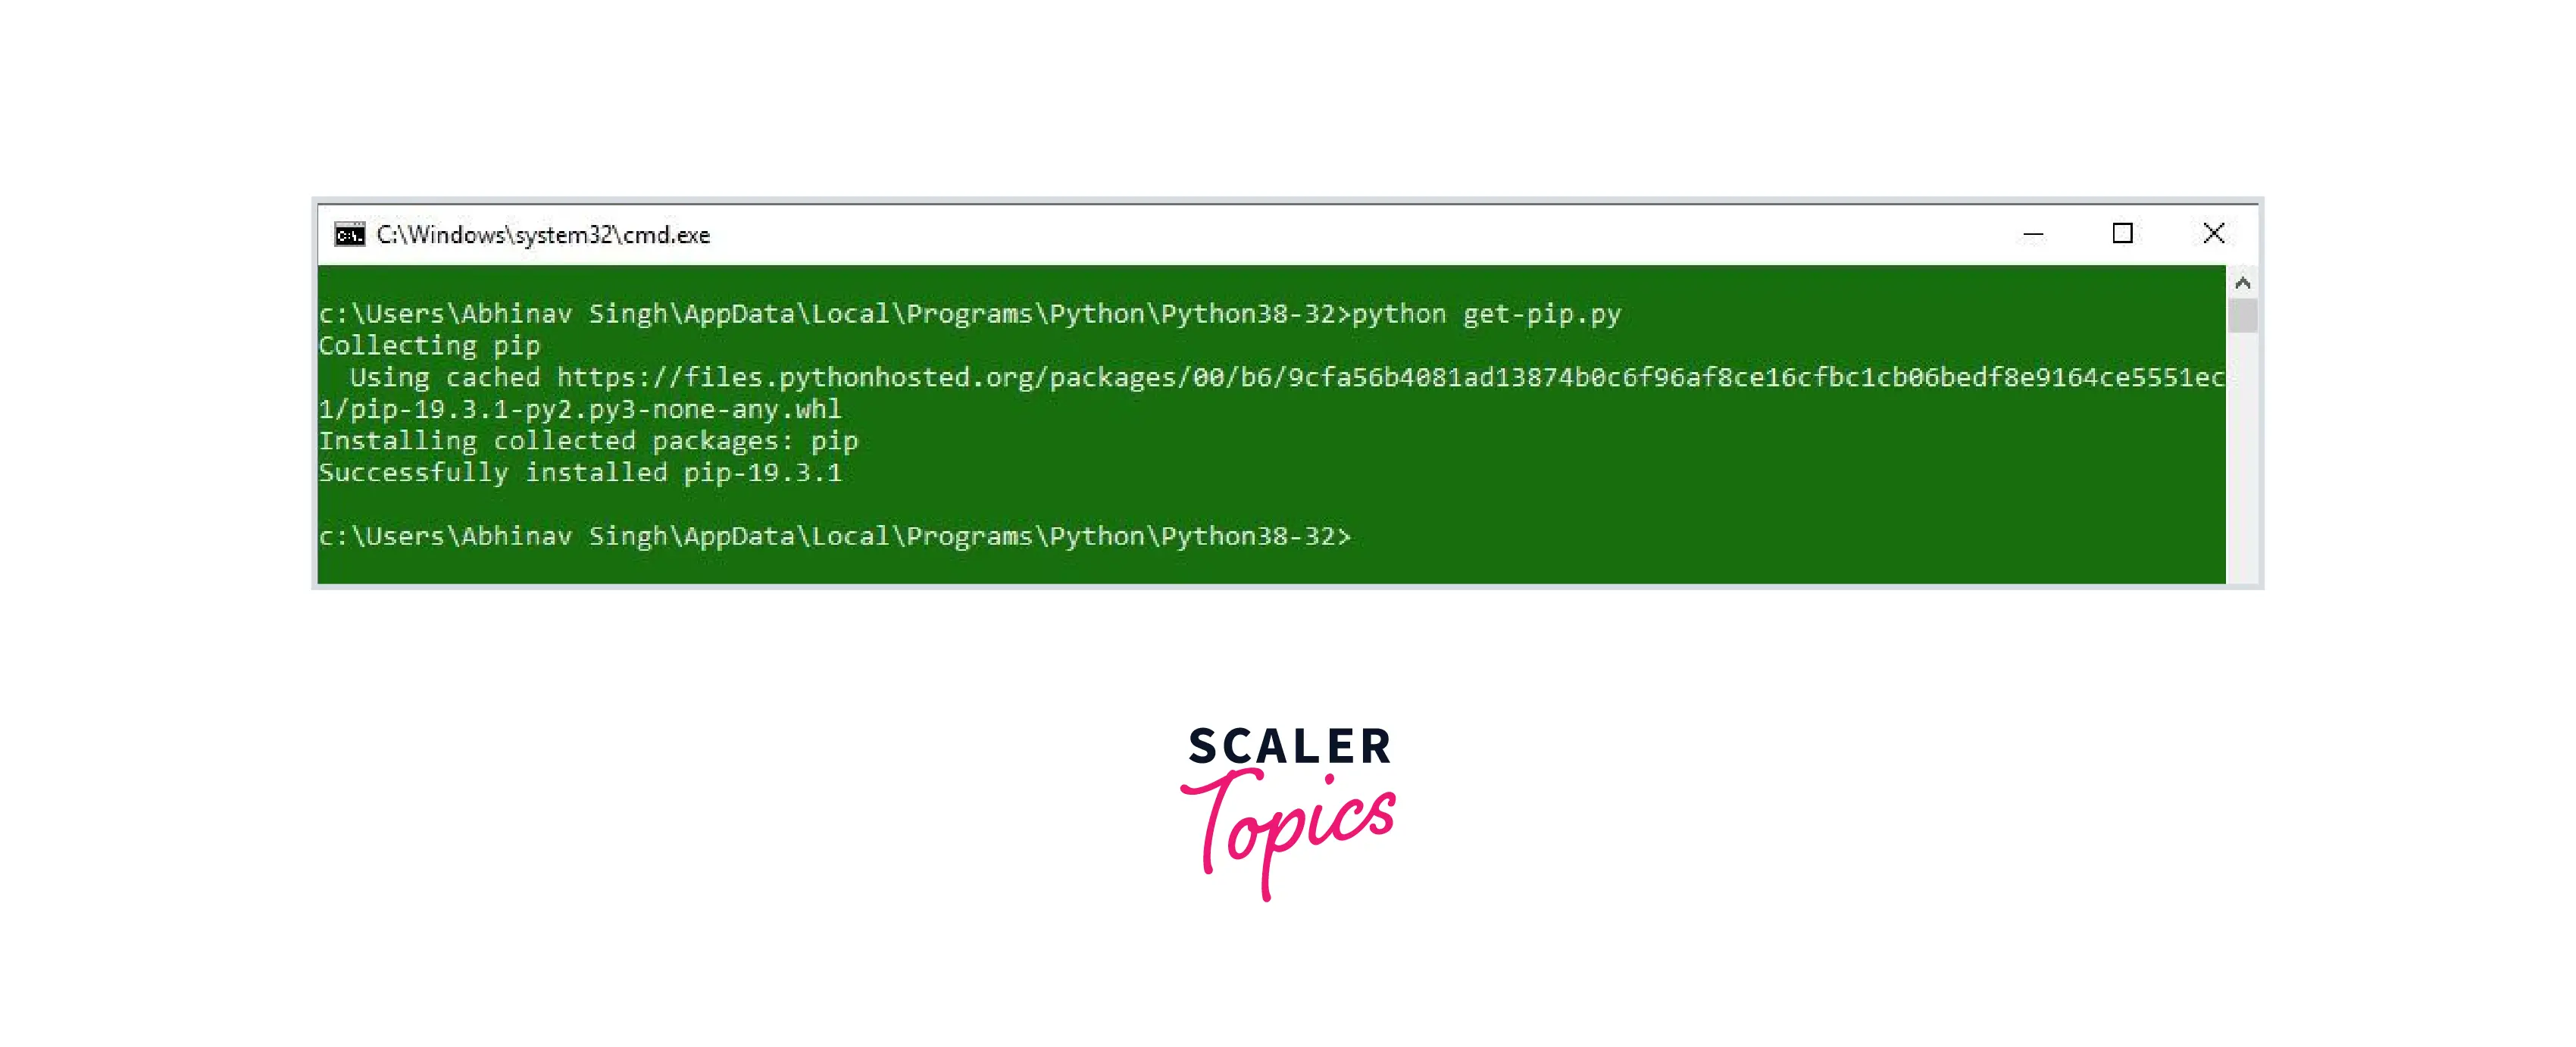
- For installing pip, download the get-pip.py file.
Run command python get-pip.py in the command prompt.
- For installing packages, Run the command pip install package-name** e.g.: **pip install NumPy
3. PIP & CONDA
Conda and pip are two different Python systems for packaging.
- Pip only has python libraries but conda has python libraries, c libraries, and also executables like c compilers, etc.
- pip uses python packages for installation while conda has its channels like Conda-forage etc. for installation.
- Shared libraries are wrapped inside wheels, while in conda, Shared libraries are additionally packaged.
NOTE- Wheels are built-package format for Python. It is a ZIP archive with .whl extension and has a specially structured filename. It is designed to have all of the files needed for a PEP 376 (Python Enhancement Proposal) compatible installation in a format that’s very similar to the on-disk format.
4. Reproducible Installs
The results of the running code may change if the libraries are updated, or the code may completely break. It is necessary to be able to recreate the package and version. The best ways to do this :
- Try to use a different python environment.
- Use different package installers and versions like:
- pip or pip3
- Conda etc.
Important Numpy Packages
Packages like Pandas depend on Numpy, but NumPy does not depend on any python packages. It does, however, require an accelerated linear algebra library, such as Intel MKL or OpenBLAS.
- OpenBLAS is used to build the NumPy wheels on PyPi, the wheel includes the OpenBLAS libraries.
- NumPy is built against Intel MKL in the conda defaults channel.
- When users install NumPy, a package called MKL is installed in their environment.
- In the conda-forage channel, NumPy is based on a fake “BLAS” package.
Upgrading NumPy
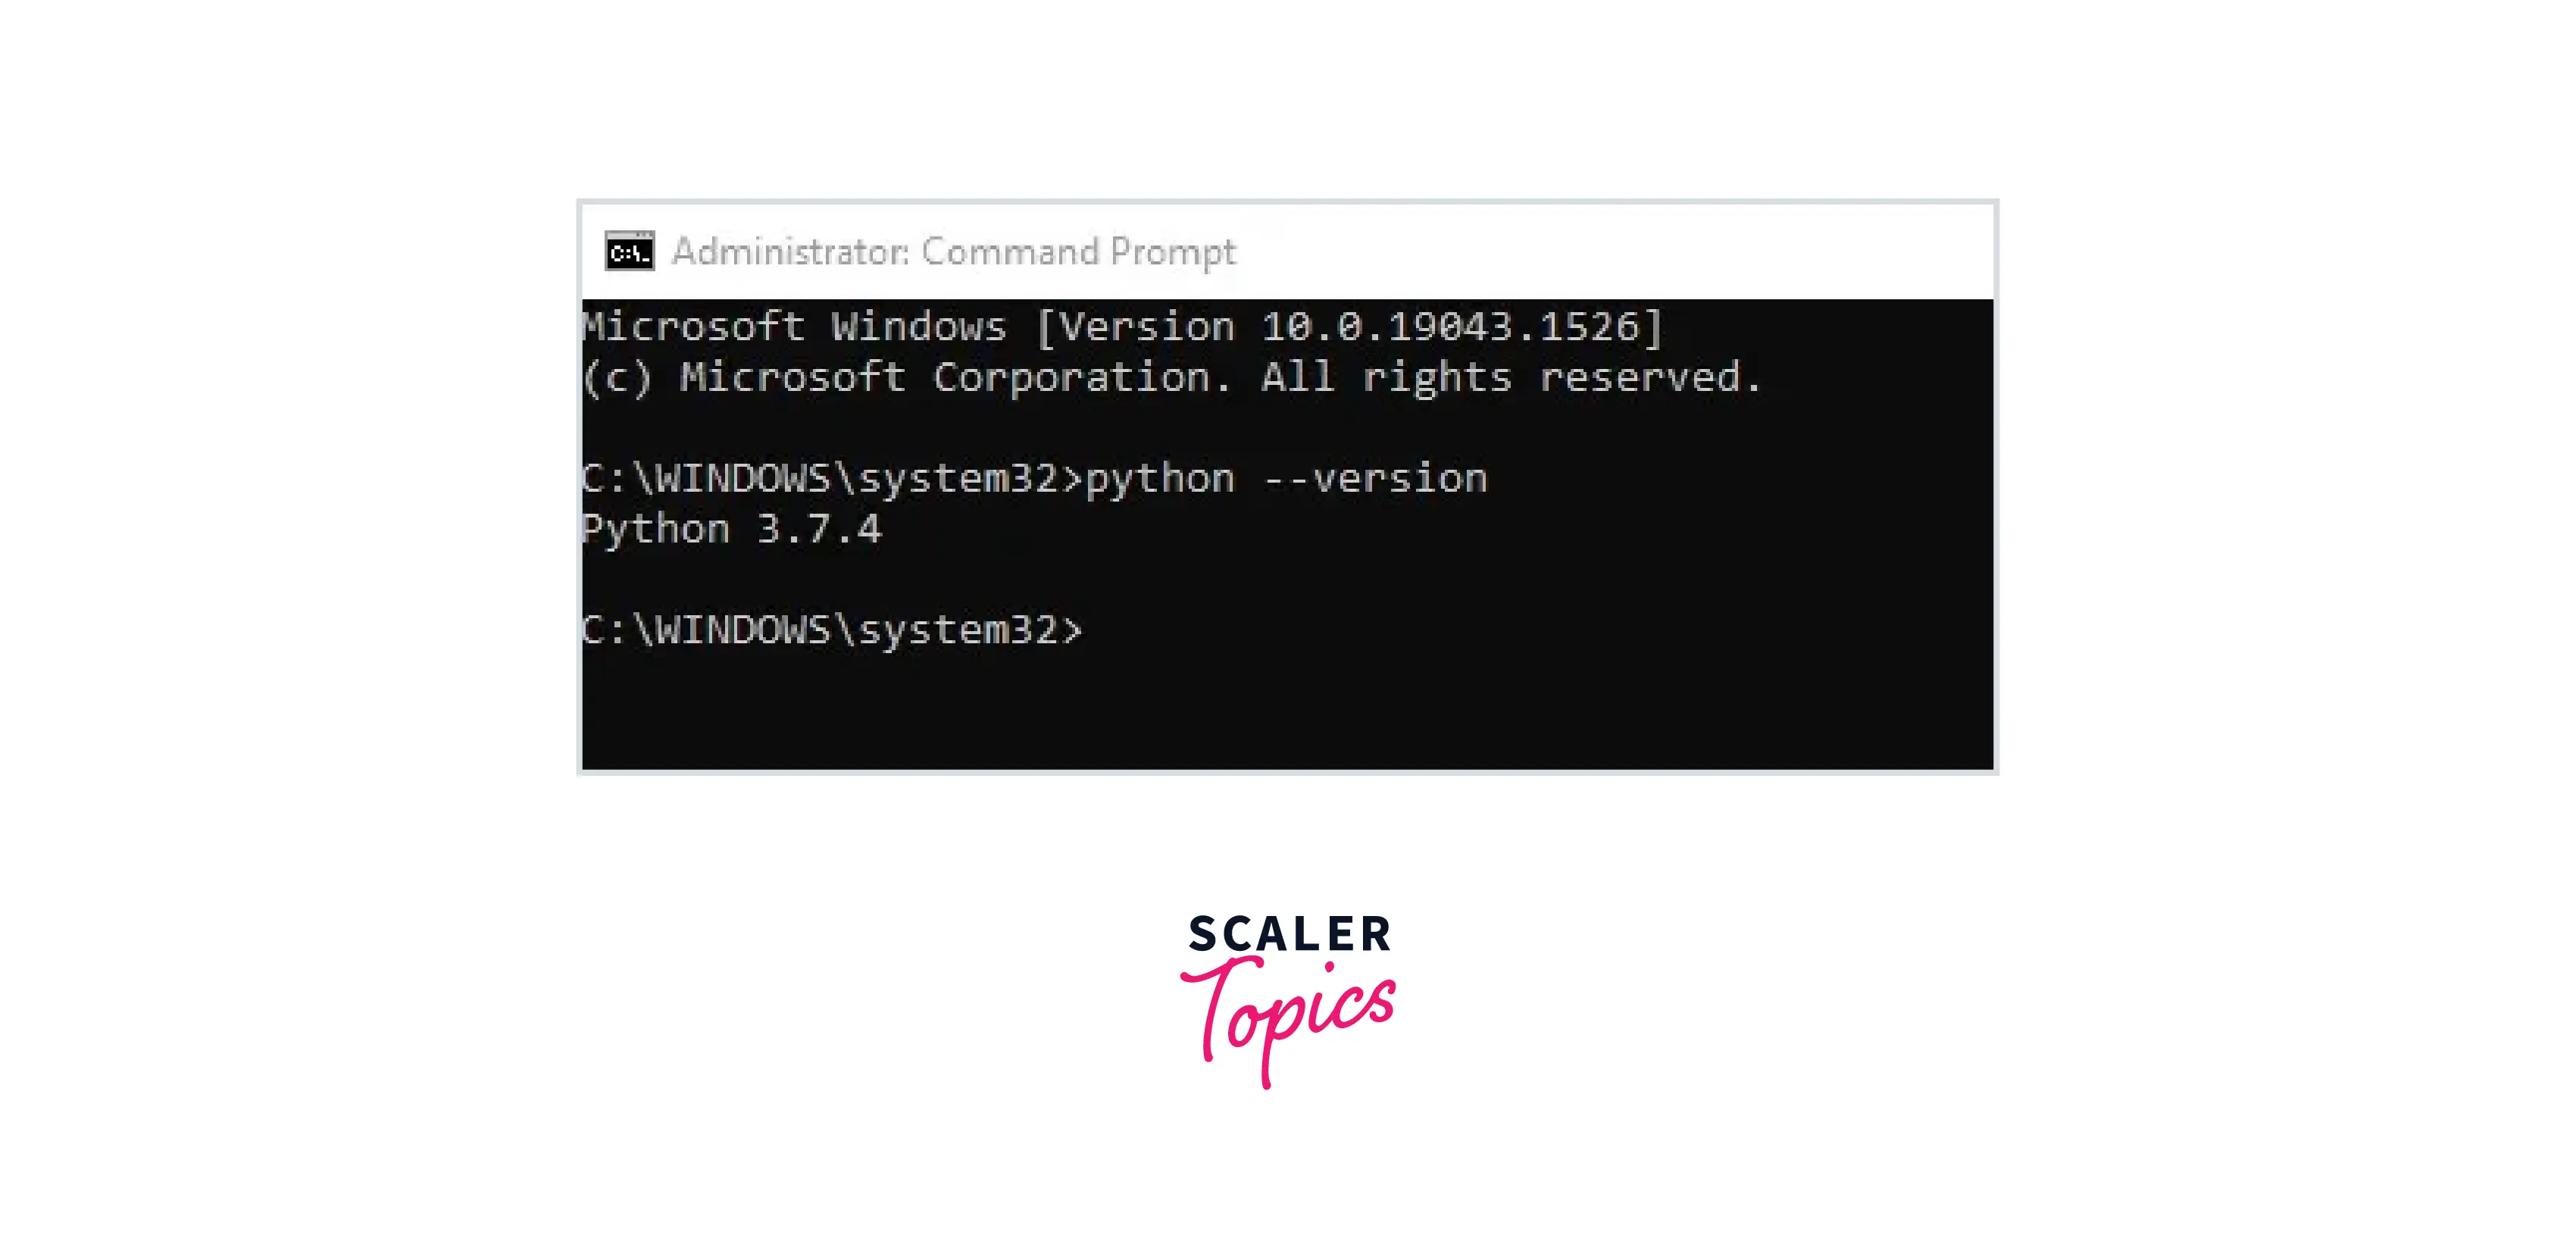
Check the Python version by typing the command:
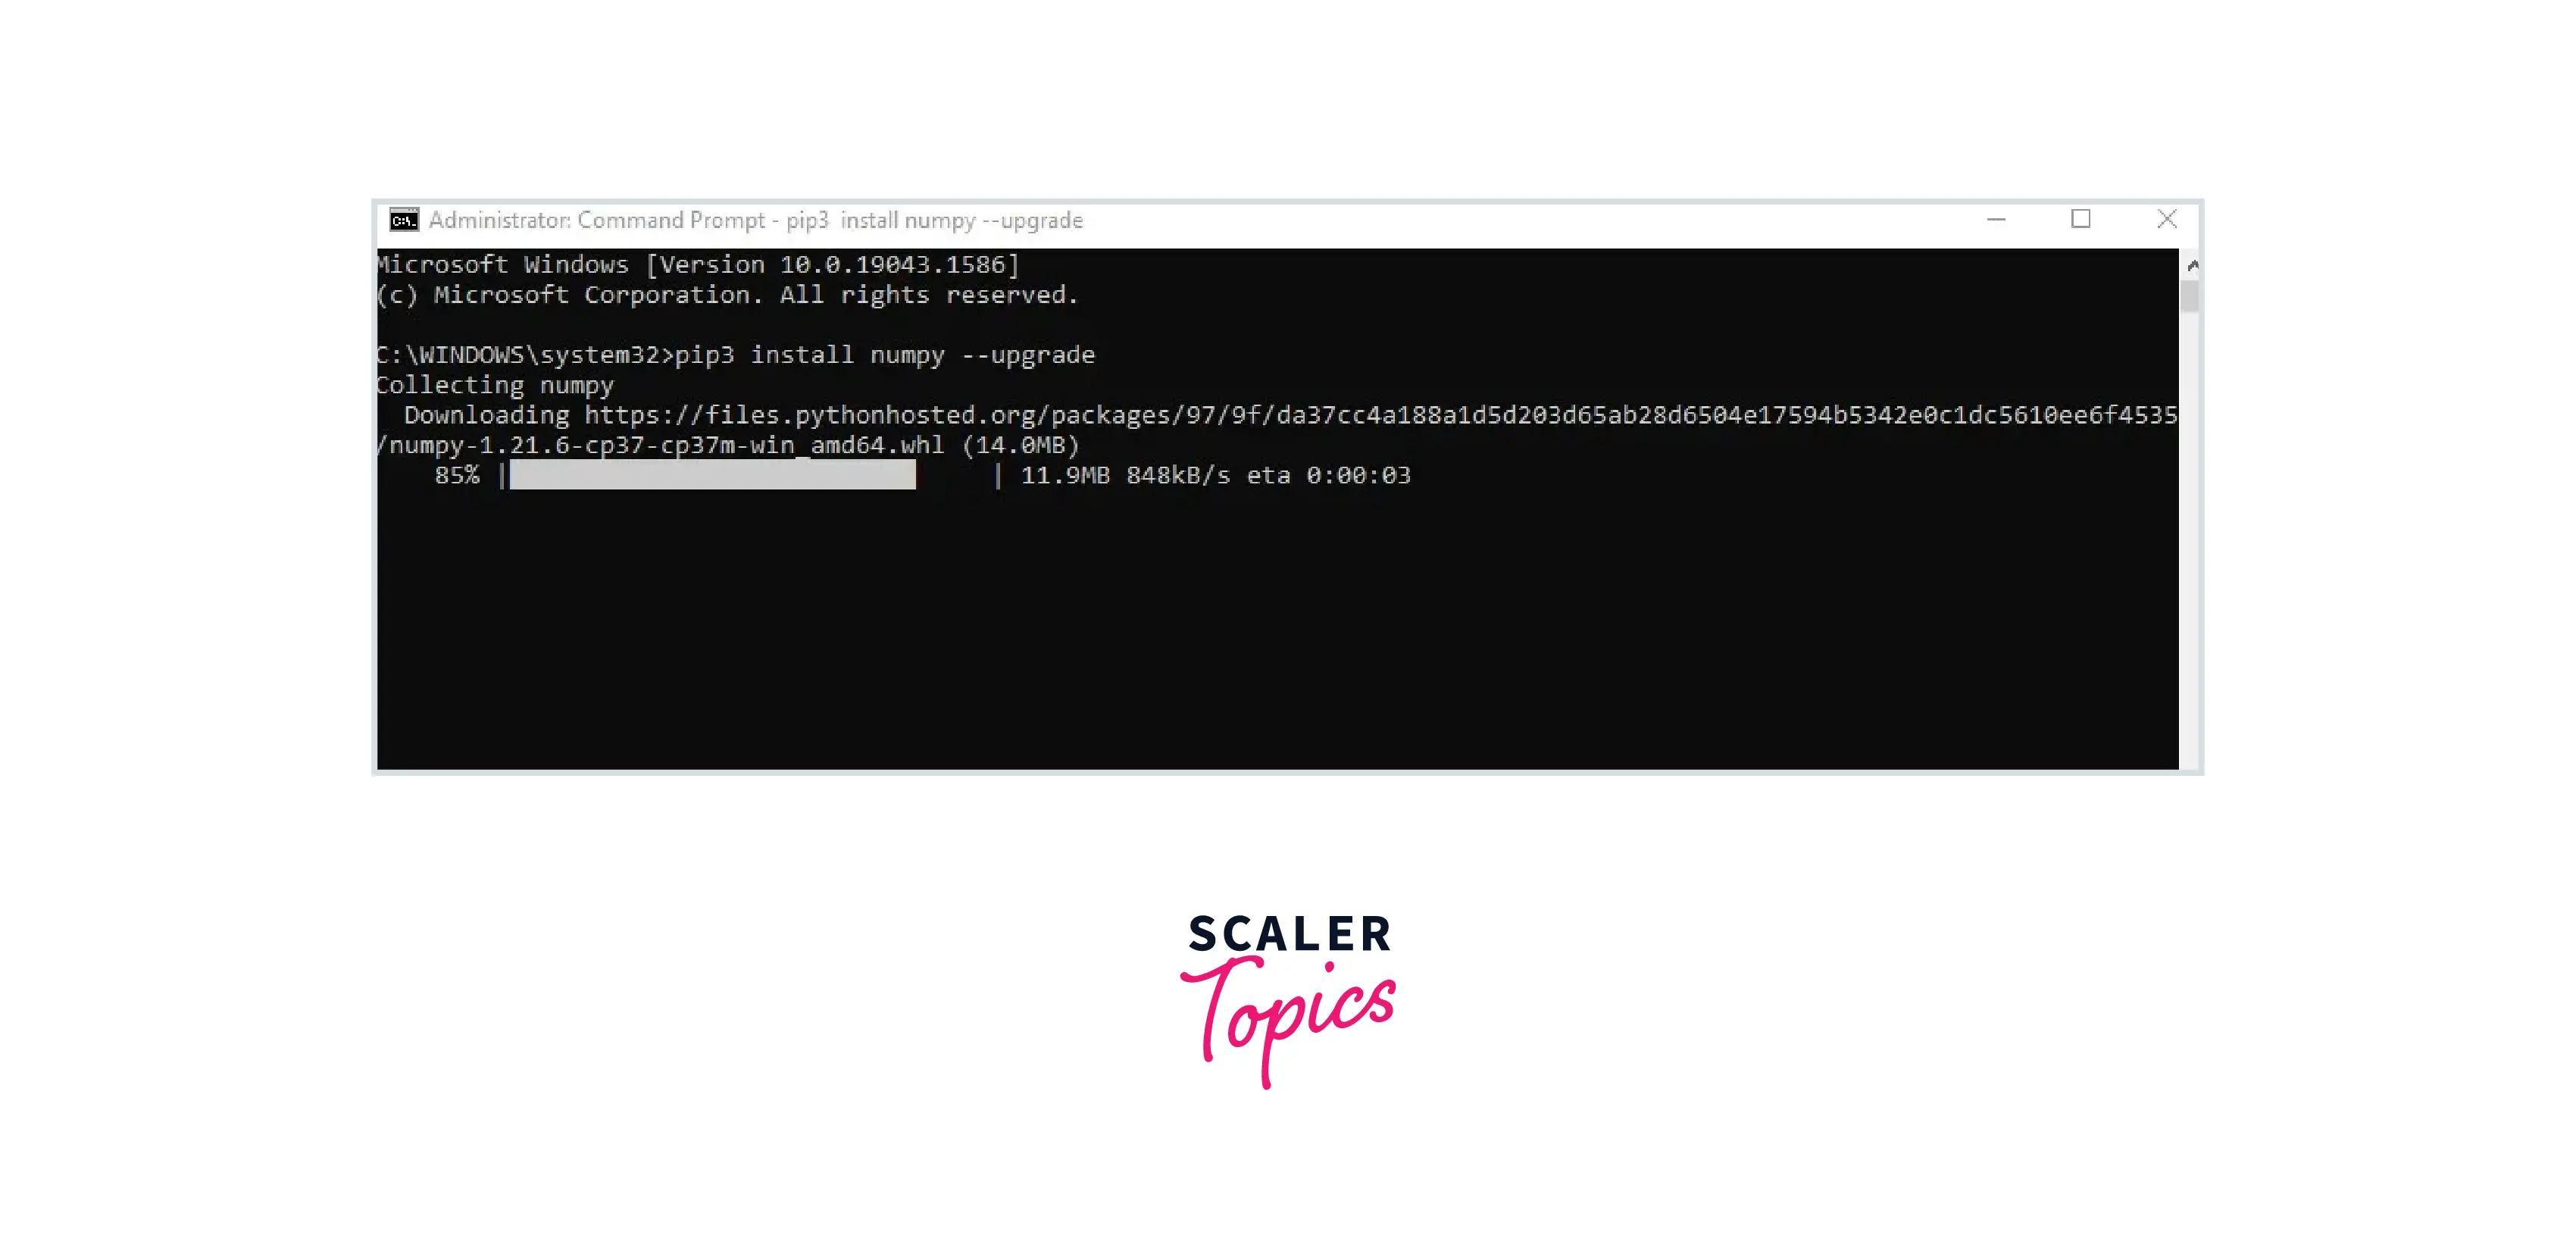
Upgrading NumPy for Windows
Upgrade by running run the following command in the command prompt:
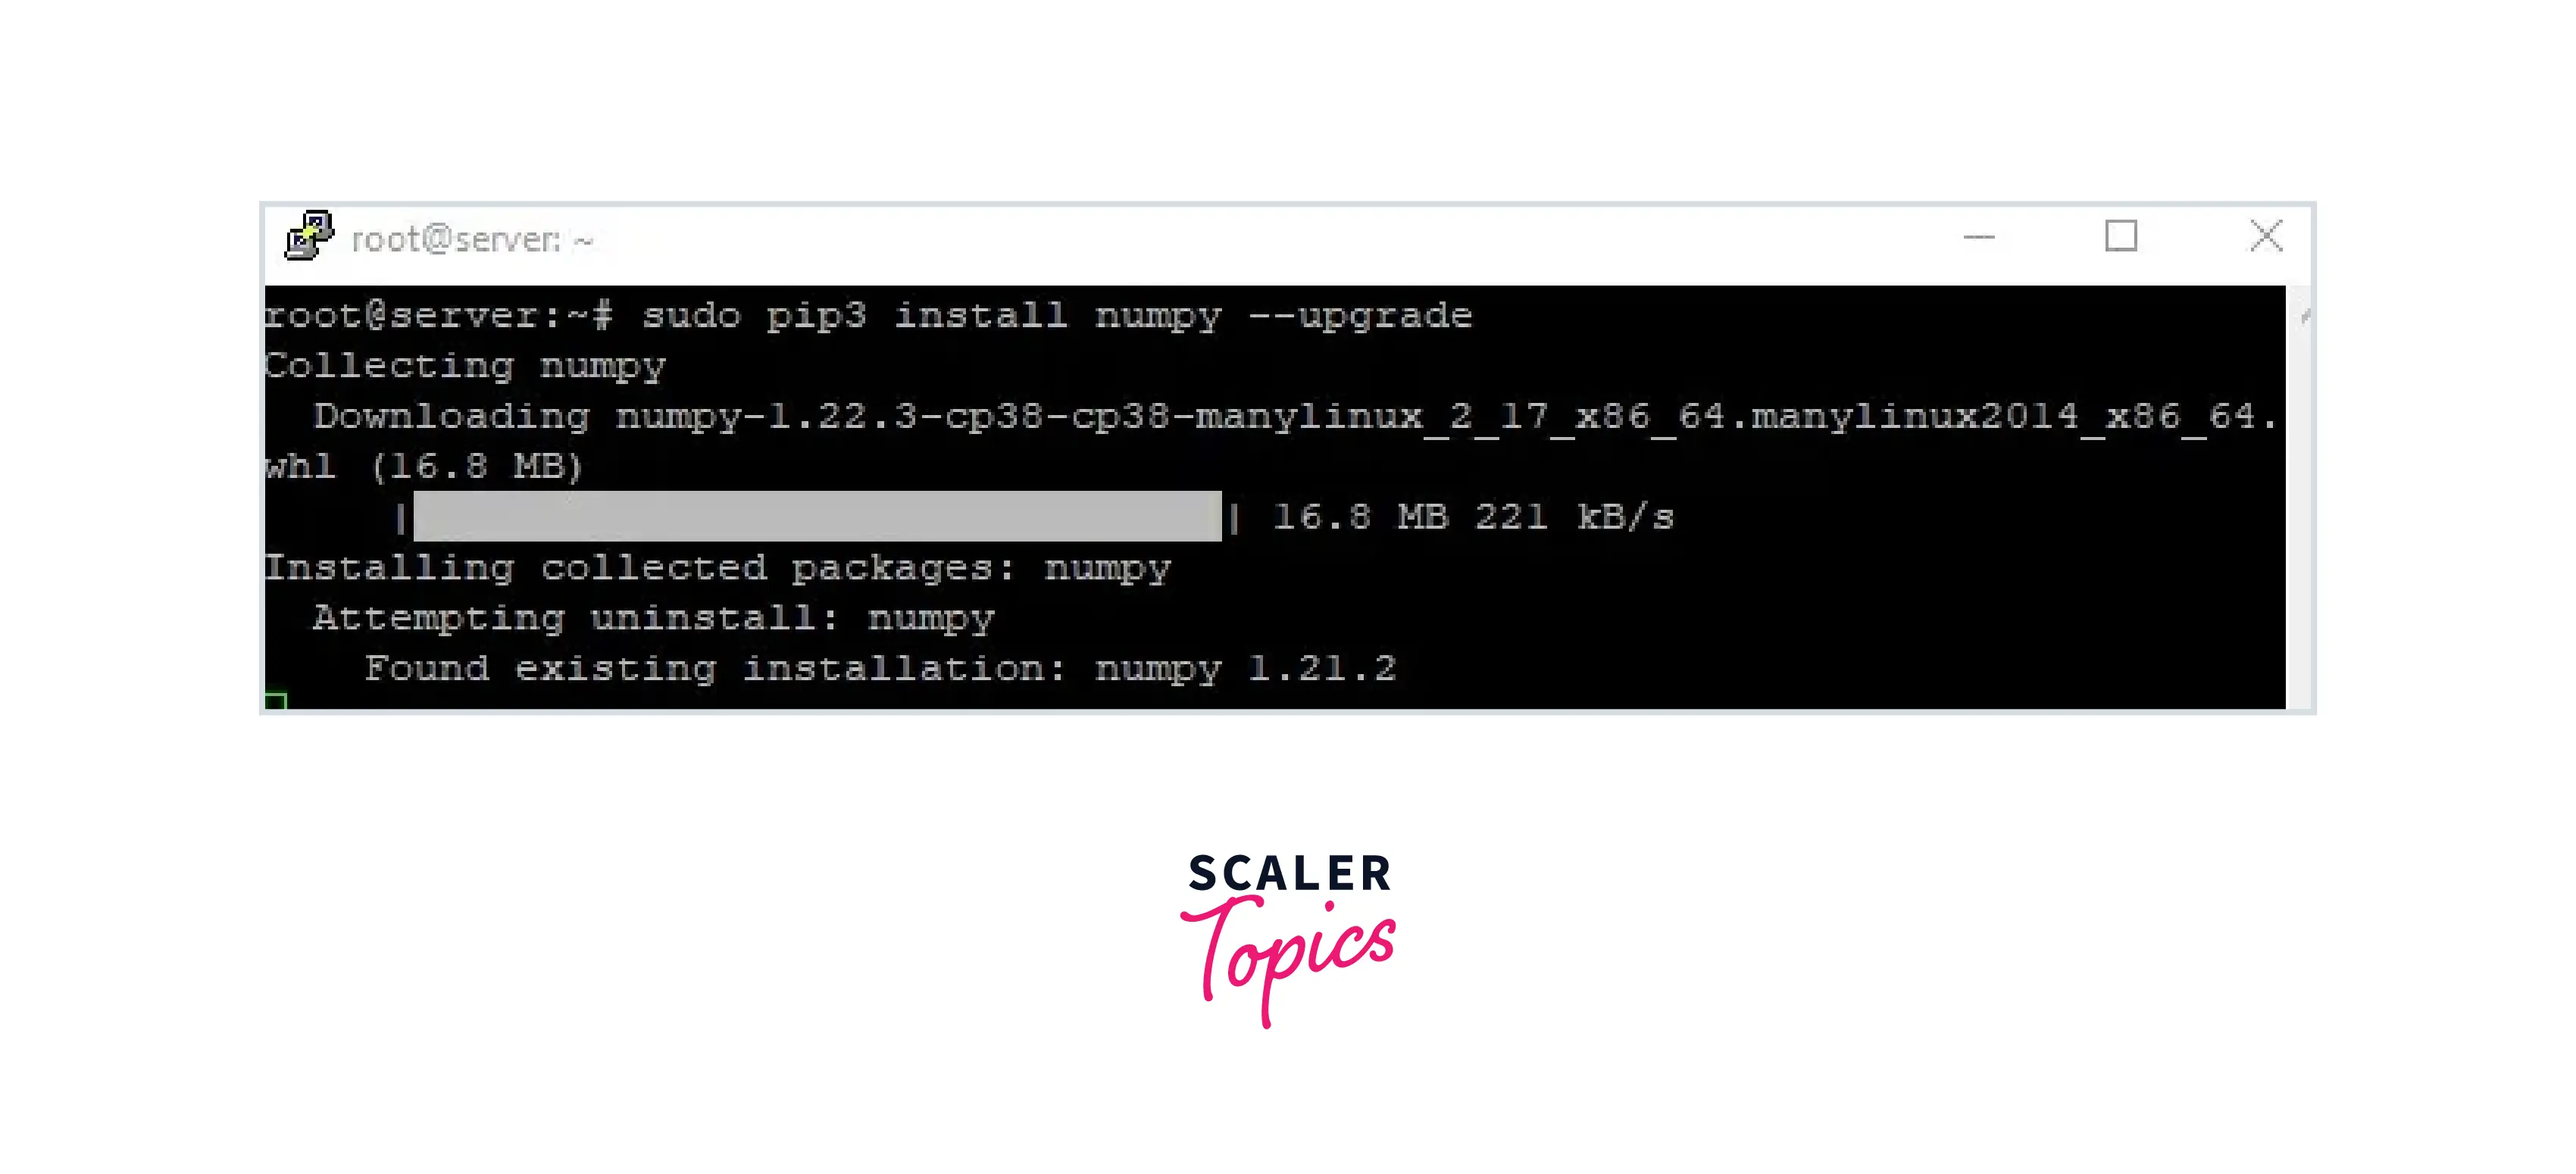
Upgrading NumPy for Linux
Run command
Troubleshooting
Troubleshooting is a problem-solving approach that is used to find and fix problems in complex electronic and software systems. Collecting information about the issues such as Undesirable behavior or lack of expected functionality is the first step of troubleshooting.
- It is the process of identifying the objects that are producing the problem from a list of possible reasons.
- This method often requires going beyond technical information and communicating with system end-users to determine which steps they must take to determine which element of the code, infrastructure, or configuration is causing the difficulties.
Let’s look at the example below:
An error occurred while importing NumPy c-extensions. To find the solution to the error, go to Troubleshooting approach.
IMPORTANT: PLEASE READ THIS FOR ADVICE ON HOW TO SOLVE THIS ISSUE!
Importing the numpy C-extensions failed. This error can happen for many reasons, often due to issues with your setup or how NumPy was installed.
We have compiled some common reasons and troubleshooting tips at:
https://numpy.org/devdocs/user/troubleshooting-importerror.html
Please note and check the following:
- The Python version is: Python3.10 from «/Users/ufukeskici/jupyter-notebook/test-project/MyDemoEnv/bin/python»
- The NumPy version is: «1.22.2»
and make sure that they are the versions you expect.
Please carefully study the documentation linked above for further help.
Original error was: dlopen(/Users/ufukeskici/jupyter-notebook/test-project/MyDemoEnv/lib/python3.10/site-packages/numpy/core/_multiarray_umath.cpython-310-darwin.so, 2): no suitable image found. Did find:
/Users/ufukeskici/jupyter-notebook/test-project/MyDemoEnv/lib/python3.10/site-packages/numpy/core/_multiarray_umath.cpython-310-darwin.so: mach-o, but wrong architecture
/Users/ufukeskici/jupyter-notebook/test-project/MyDemoEnv/lib/python3.10/site-packages/numpy/core/_multiarray_umath.cpython-310-darwin.so: mach-o, but wrong architecture
Additional details about the error to assist you in troubleshooting can be found below:
- Python version
- The Version of NumPy
PATH or PYTHONPATH environment variables may be needed to be checked. This can be done by running below code:
The following sections follow the list of the most commonly reported issues based on the setup.
Depending on the system/setup, a few concerns are reported often.
If none of the suggestions above assist, keep the following in mind:
- how did you set up Python?
- how did you set up NumPy?
- your computer’s operating system
- whether you have multiple Python versions installed or not
- Your compiler versions and, ideally, a build log if you built from the source.
Let’s discuss some most common issues that occur:
What Happens if NumPy is Not Installed Correctly
If Numpy is not installed correctly on your system or in the virtual environment that you are using, then it will raise some common types of errors. Let’s discuss one by one why these errors occur and how to solve them.
ModuleNotFoundError or No module named NumPy found
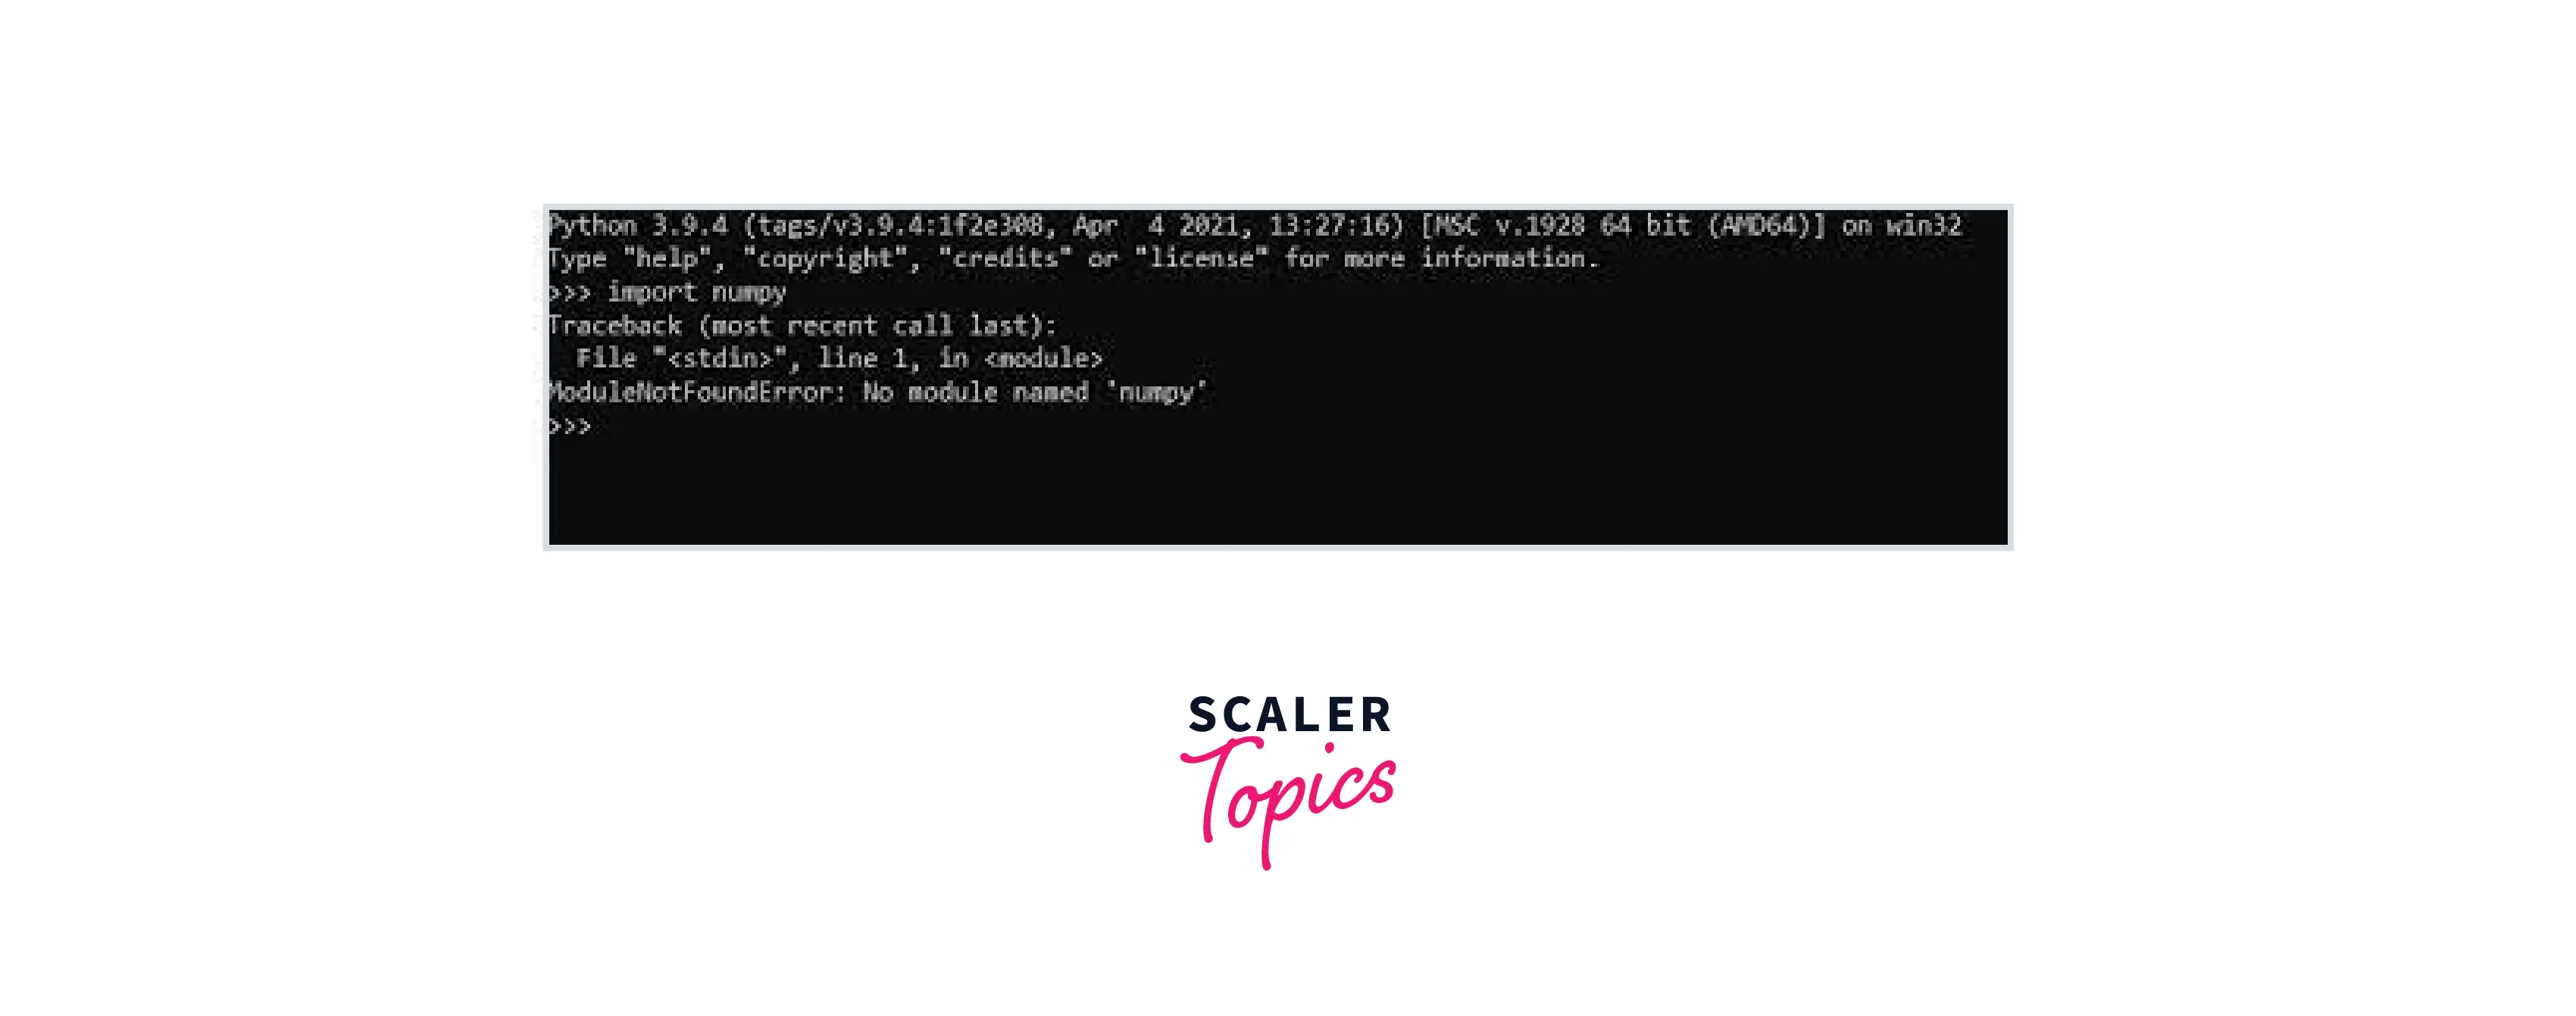
Numpy is not a built-in library in Python. Whenever we want to work with NumPy, we have to externally install it using pip according to different operating systems or virtual environments. Sometimes, when we try to execute or import numpy in Python, the first environment checks whether it is present in the site-packages folder or any directory. If not, it raises these types of errors like ImportError or «ModuleNotFoundError» which occur as » no module named numpy » as shown below.
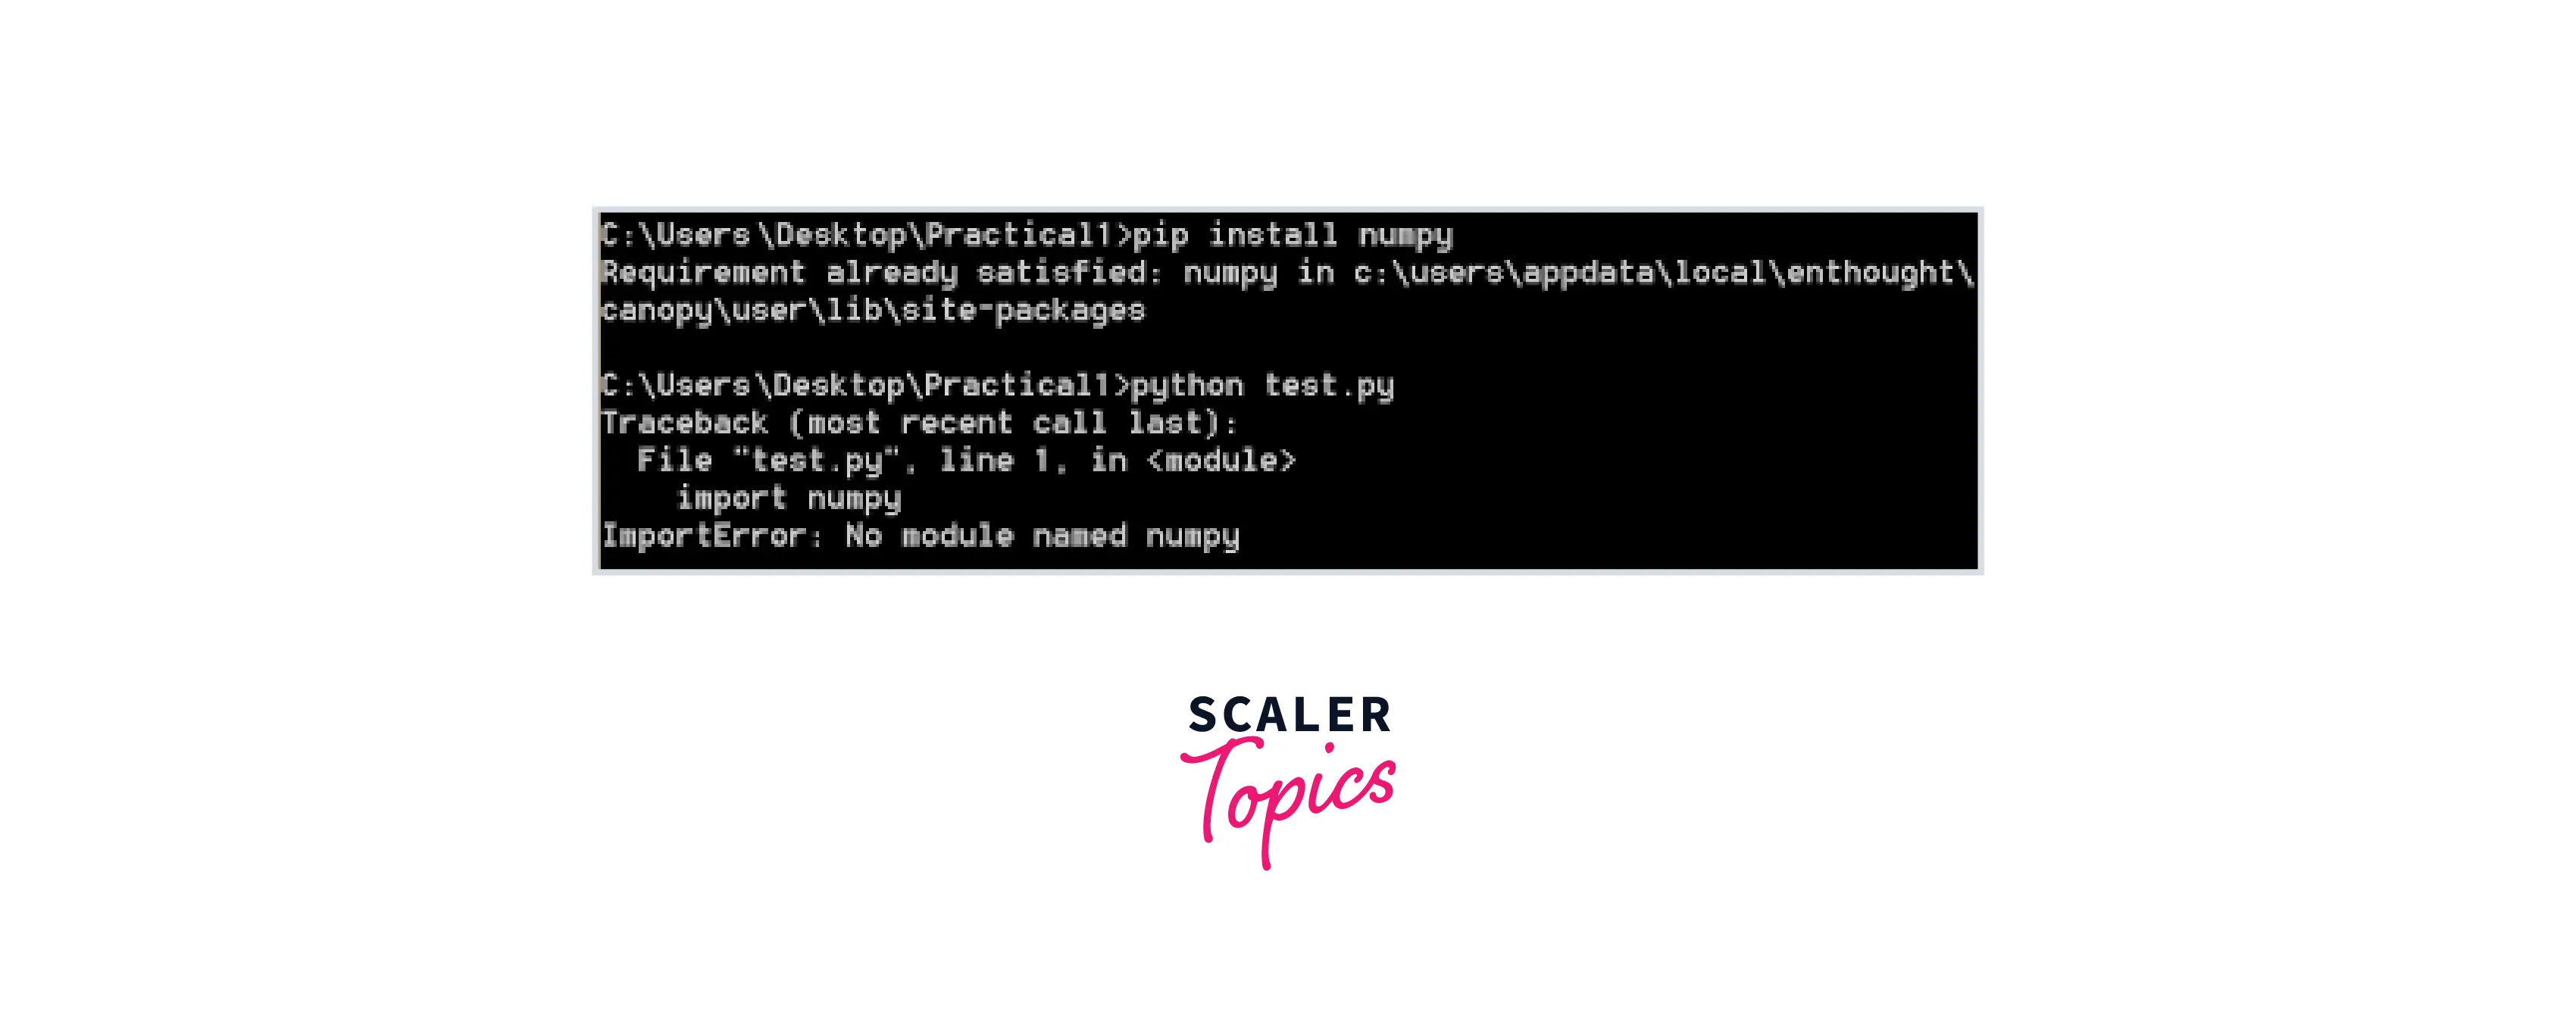
There are many reasons for this error, as discussed below:
- When Python is unable to recognize the NumPy library in the current environment,
- When there is an issue with the Python version, like installing more than one version of Python, it’s better to install the latest version.
- If python is not installed in the virtual environment that is used currently.
- If we declare the variable name as NumPy.
Let’s see the solutions to these types of errors.
For operating systems like Windows, Linux, or Mac, try to install and upgrade Numpy as shown above.
For Different Virtual Environments
Anaconda
The following steps need to be followed:
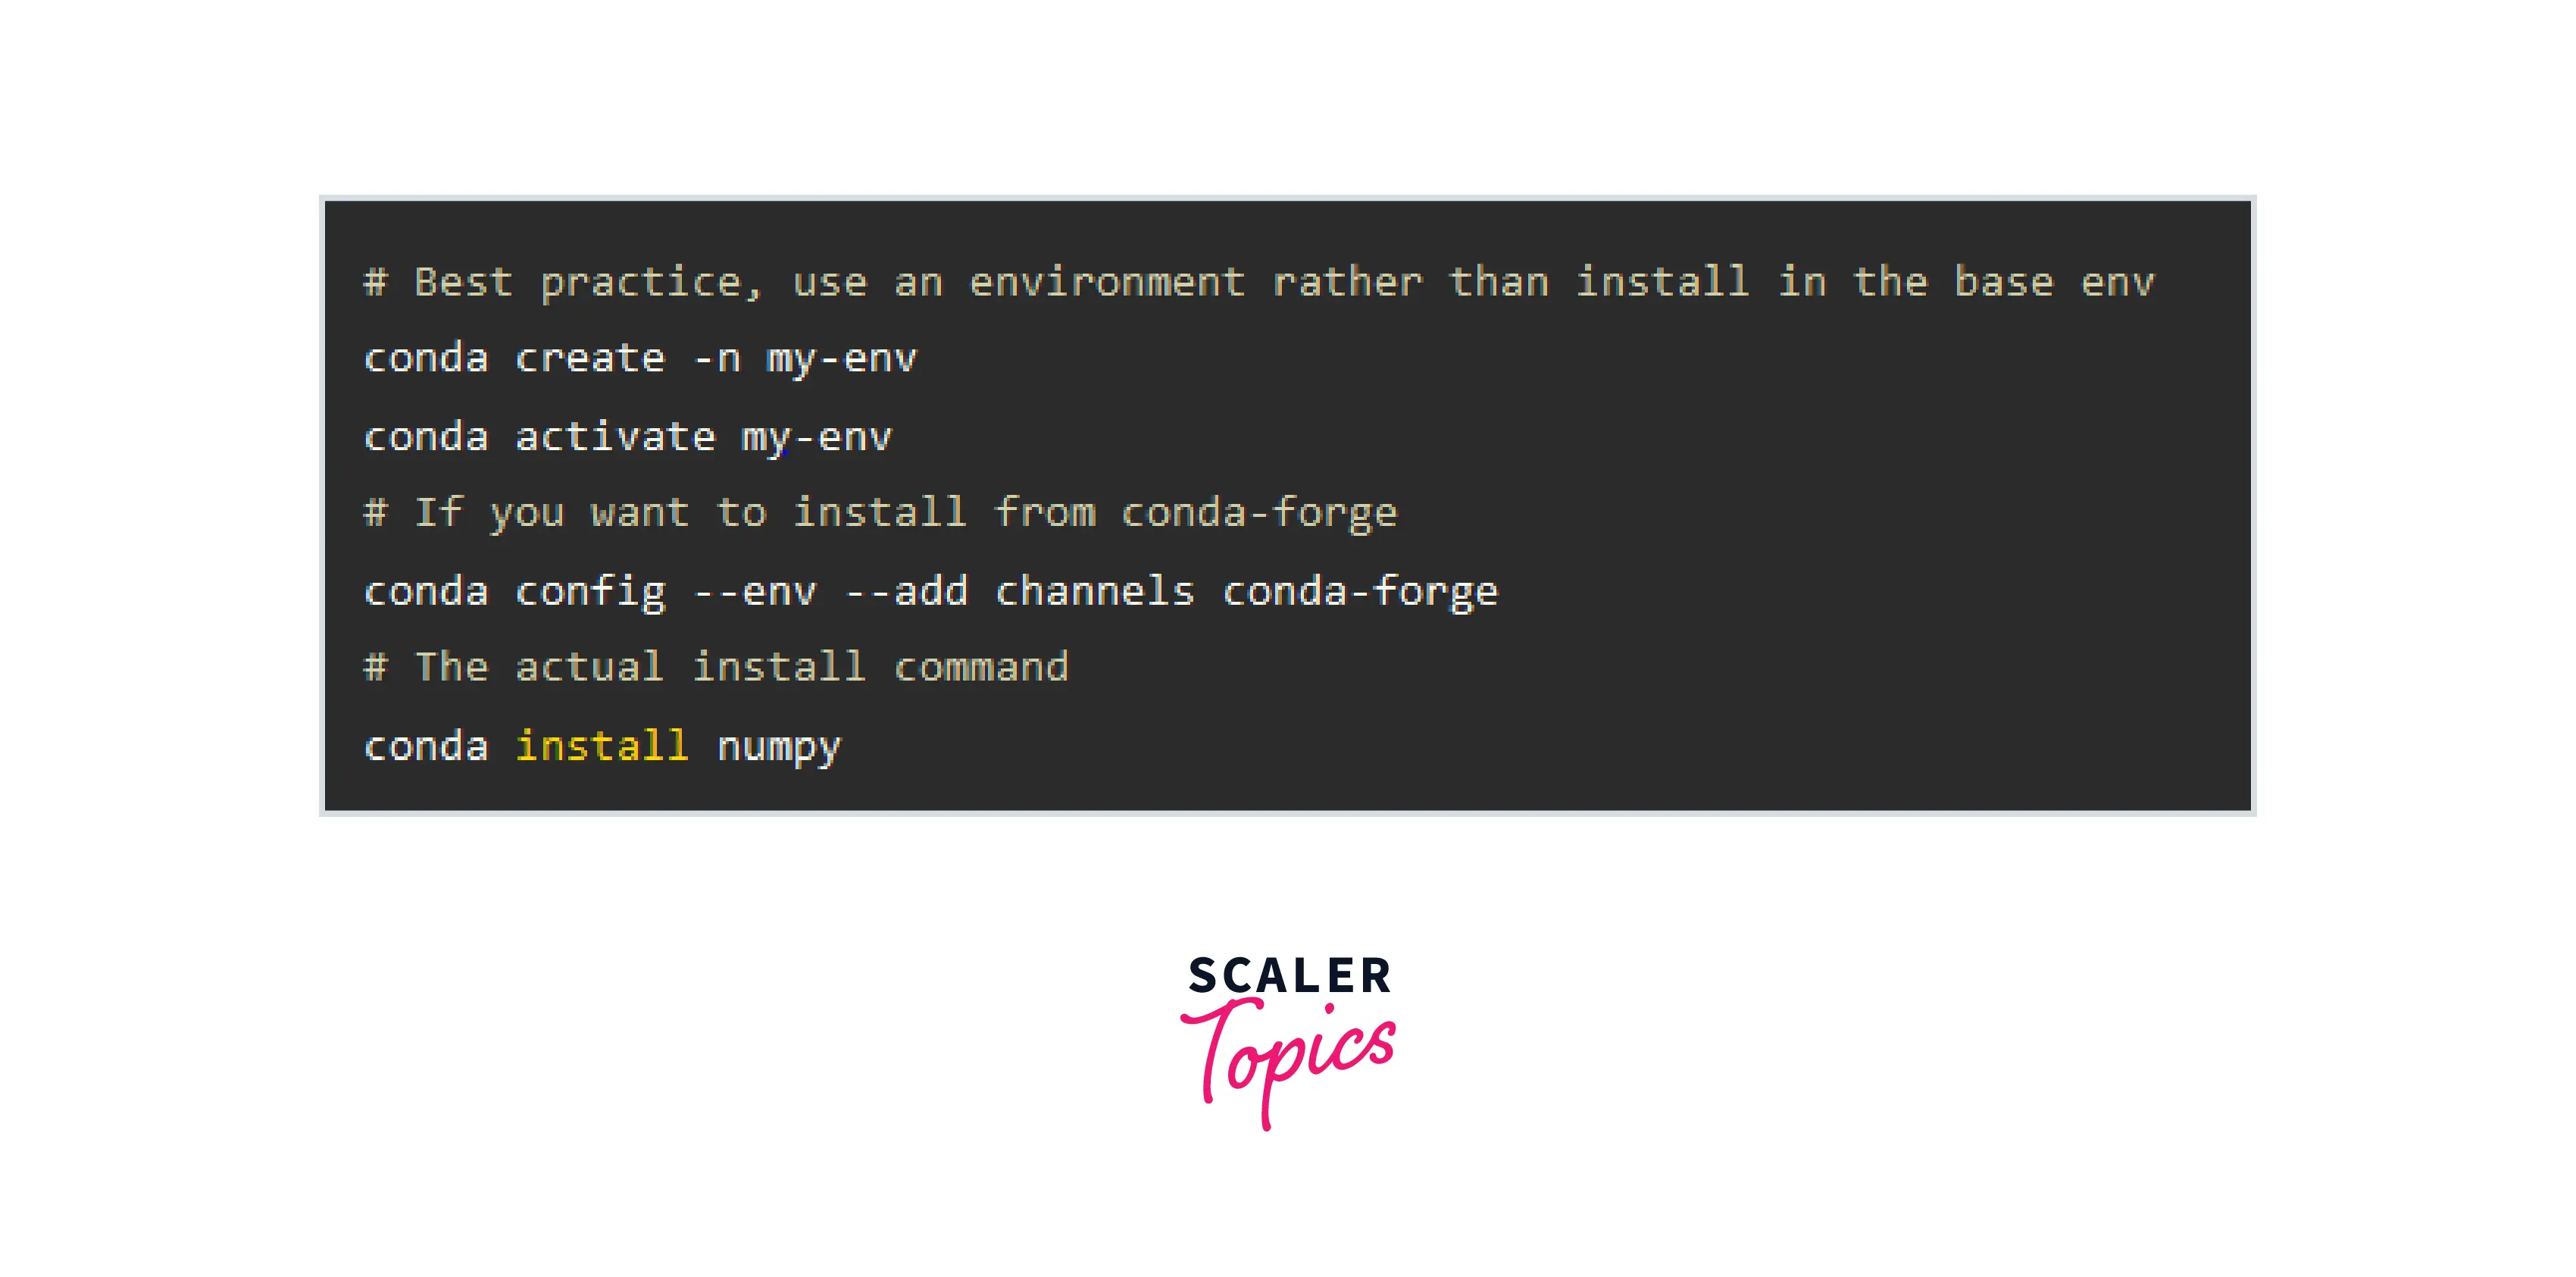
Step1: Launch the Anaconda Command Prompt.
Step 2: Use this command to activate your Conda Virtual Environment:
e.g., conda, activate my -env
Step 3: Run the following command to install Numpy:
- Your environment will download and compile the Numpy package.
Step 4: Close the Anaconda Command Prompt.
Step 5: Import Numpy by reopening Jupyter or another Python IDE of your choice.
Pycharm
Step 1: In the Pycharm environment, go to File and click on Settings.
Step 2: You will see > project: your_project_name. Click on it. You will see two options One is Project Interpreter, and the other is Project Structure.
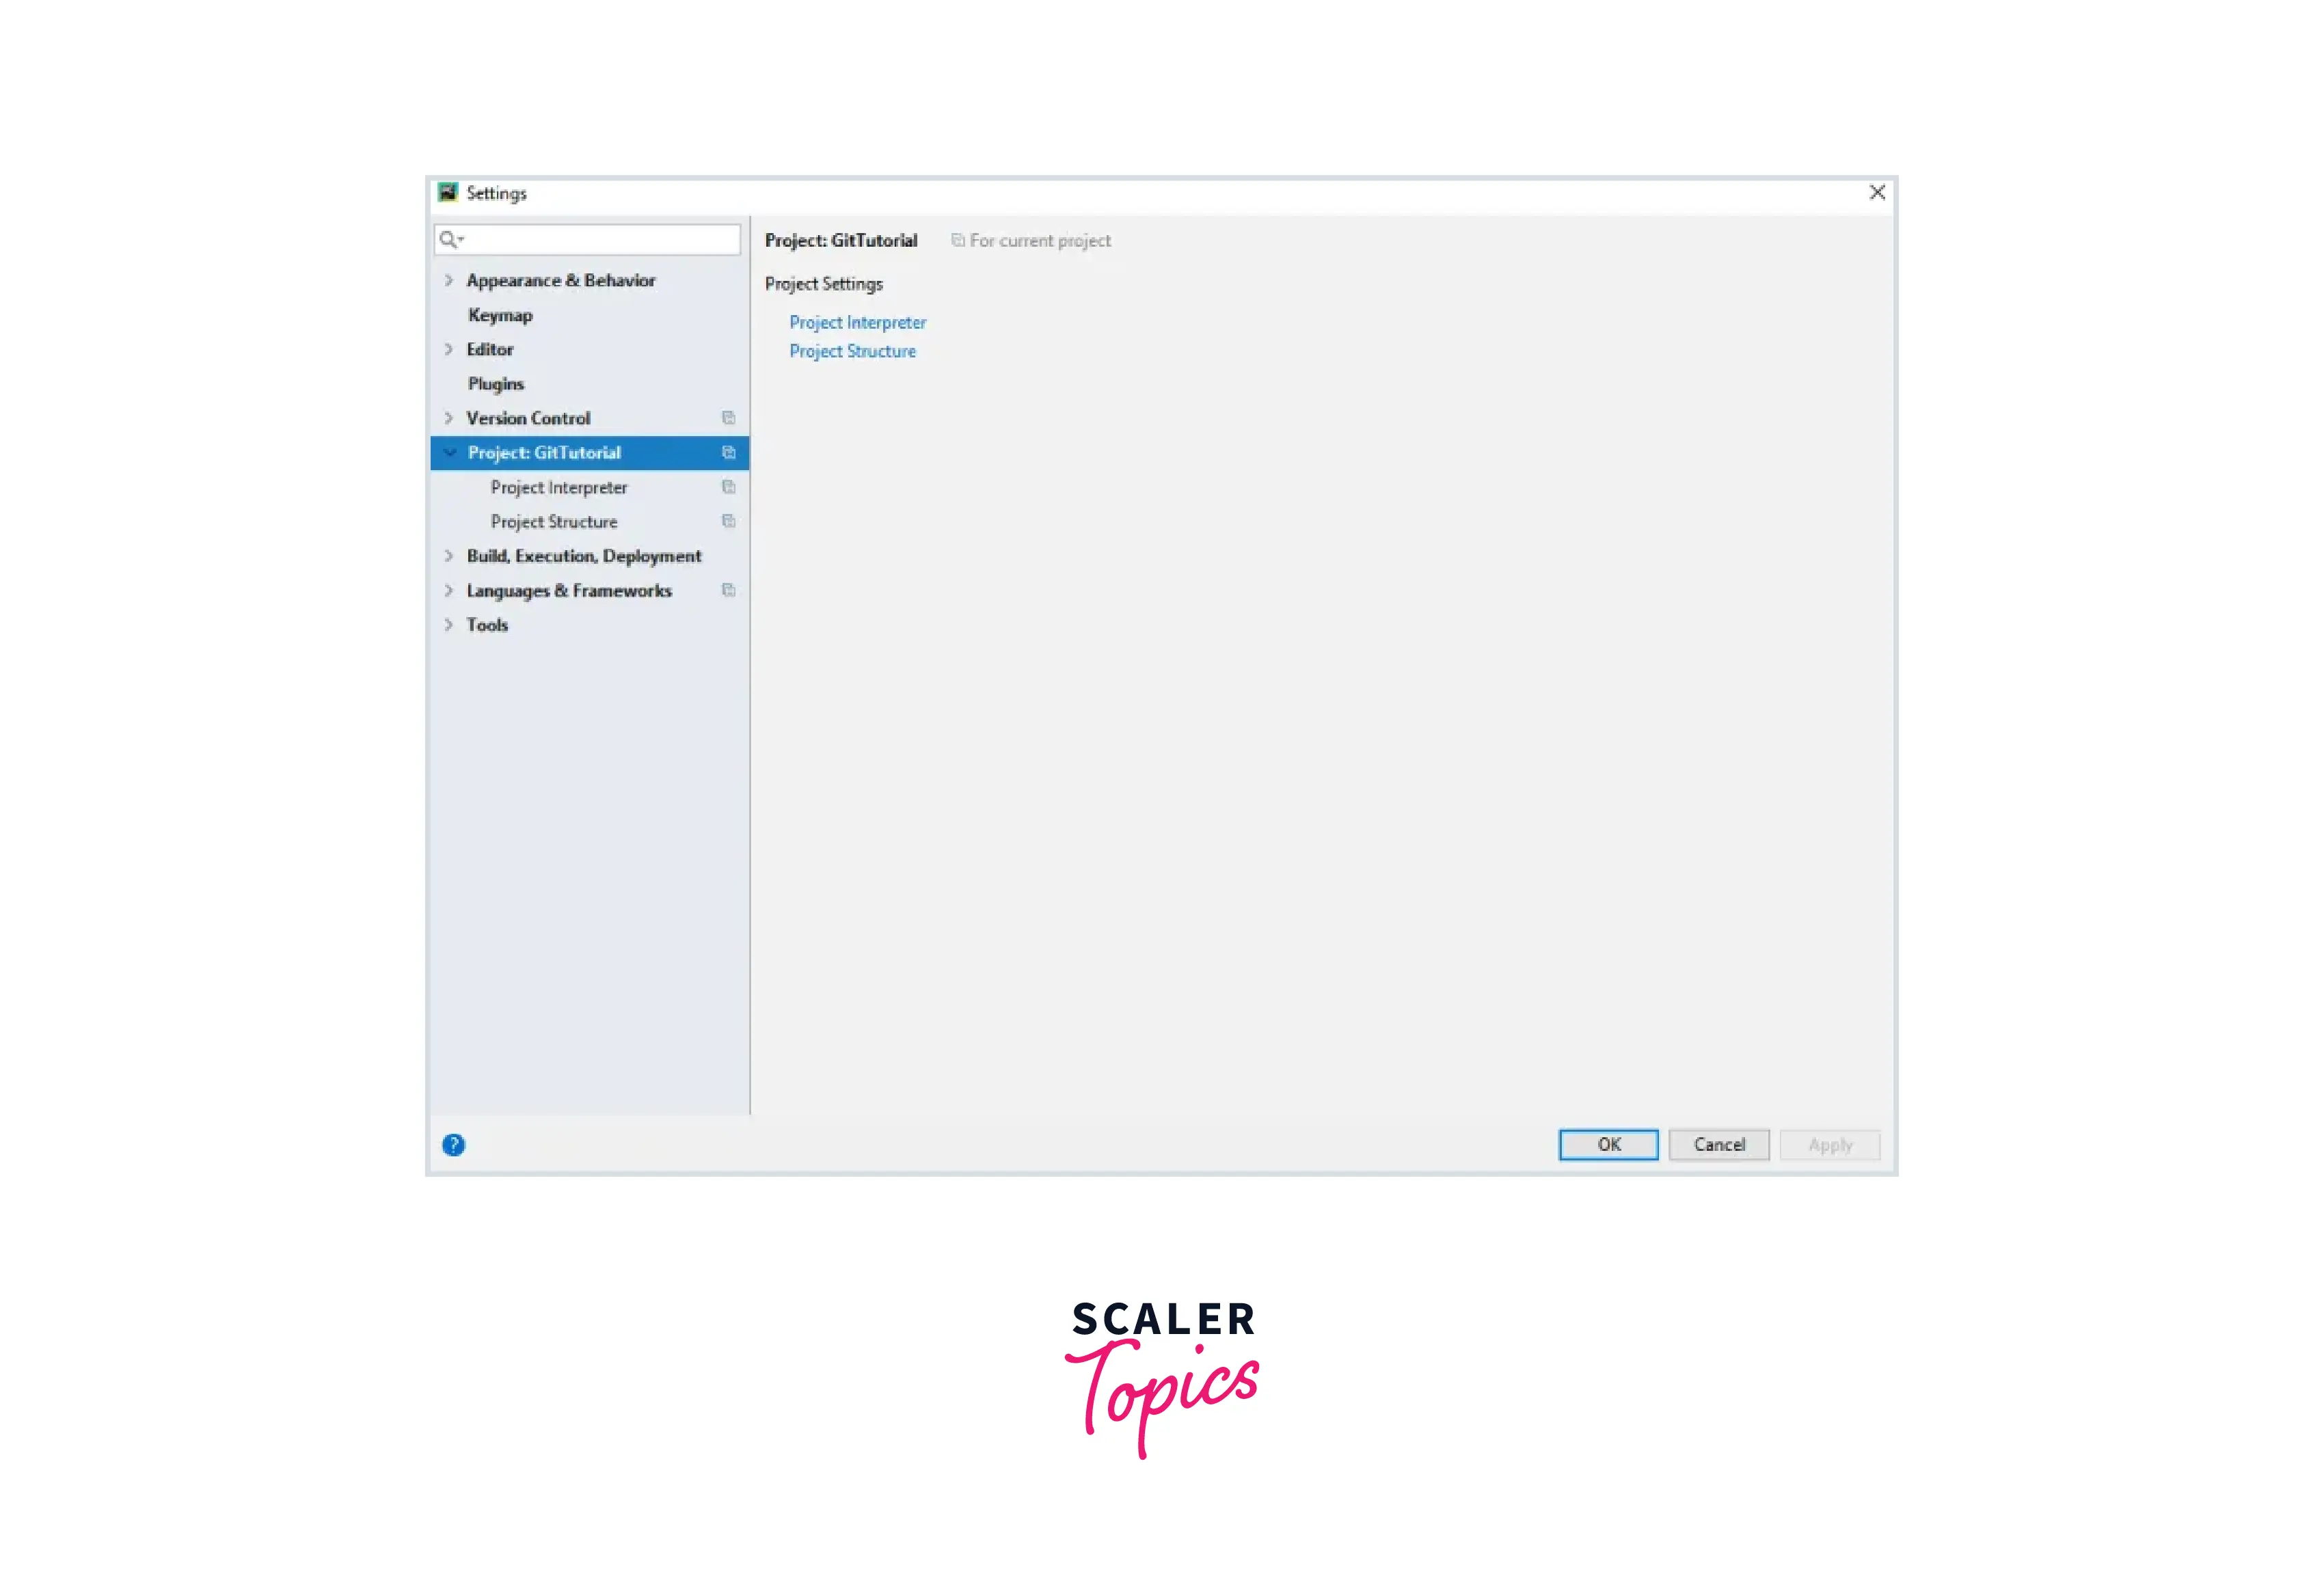
Step 3: Click on the Project Interpreter. You will see all the packages installed.

]
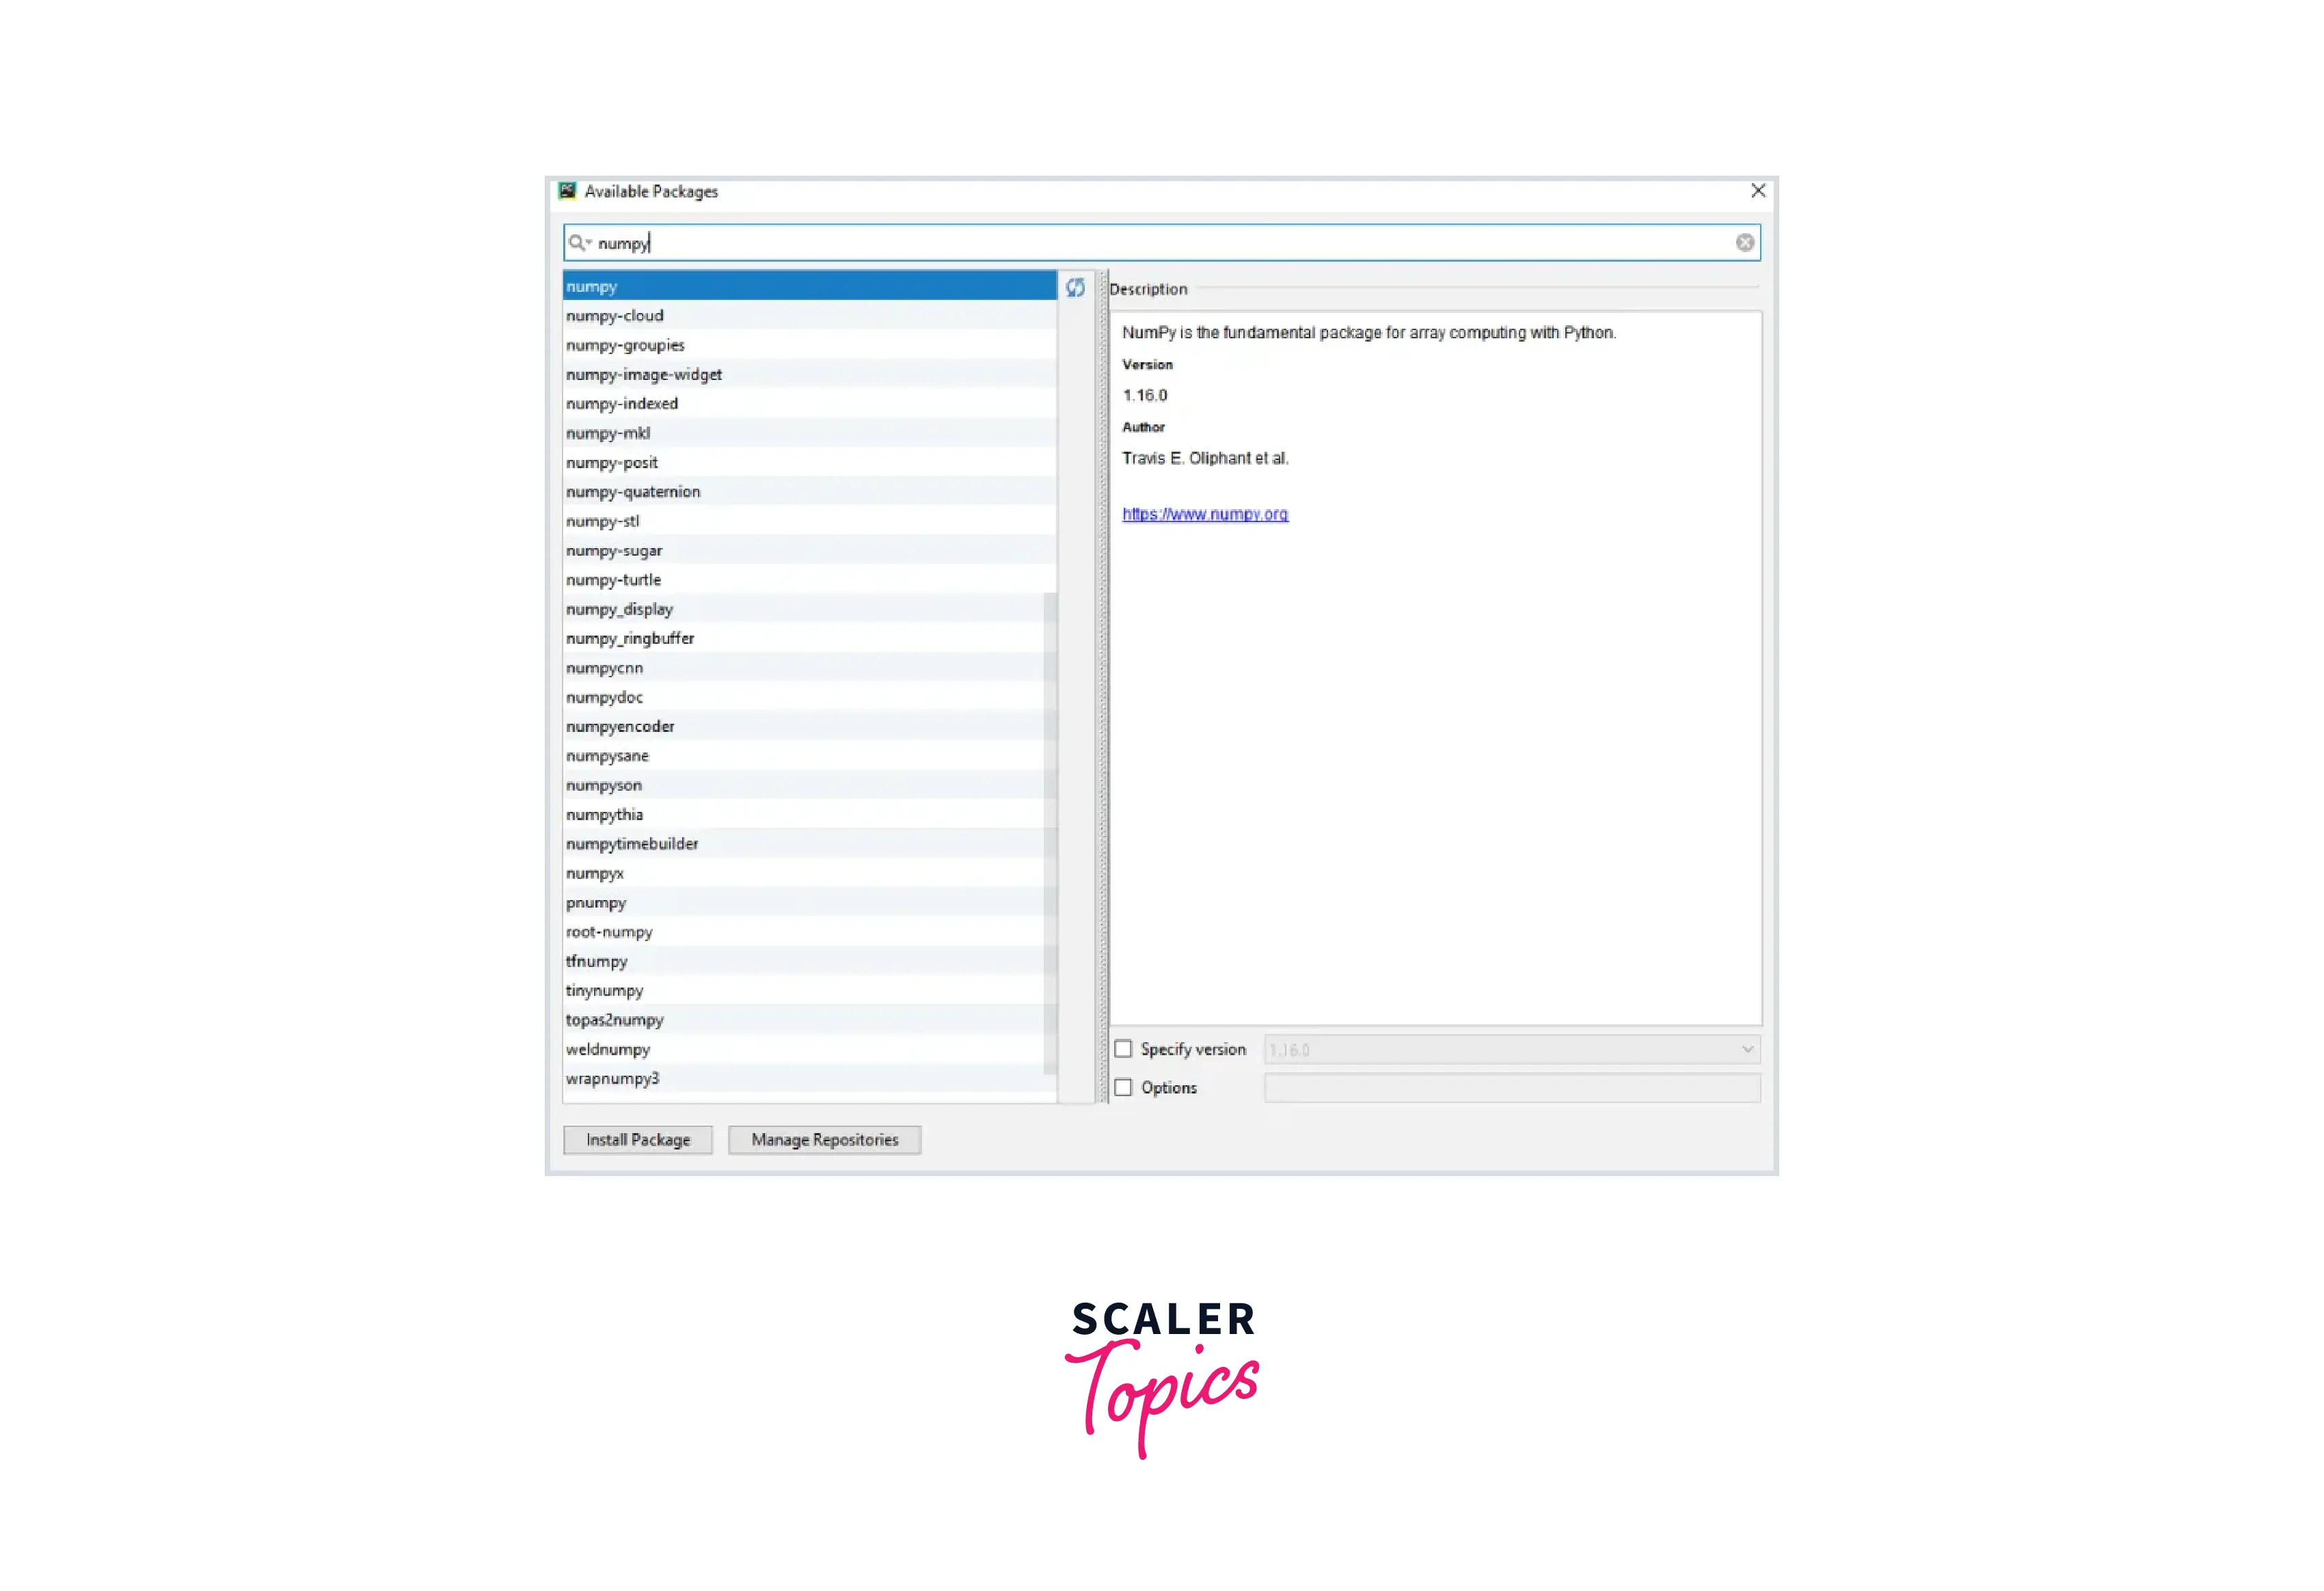
Step 4: You will see the + button. Click on it and search for numpy in the search field. You will see the NumPy package on the left side with its description and version on the right side. Be sure to check the author and URL of the package before selecting and installing the package.
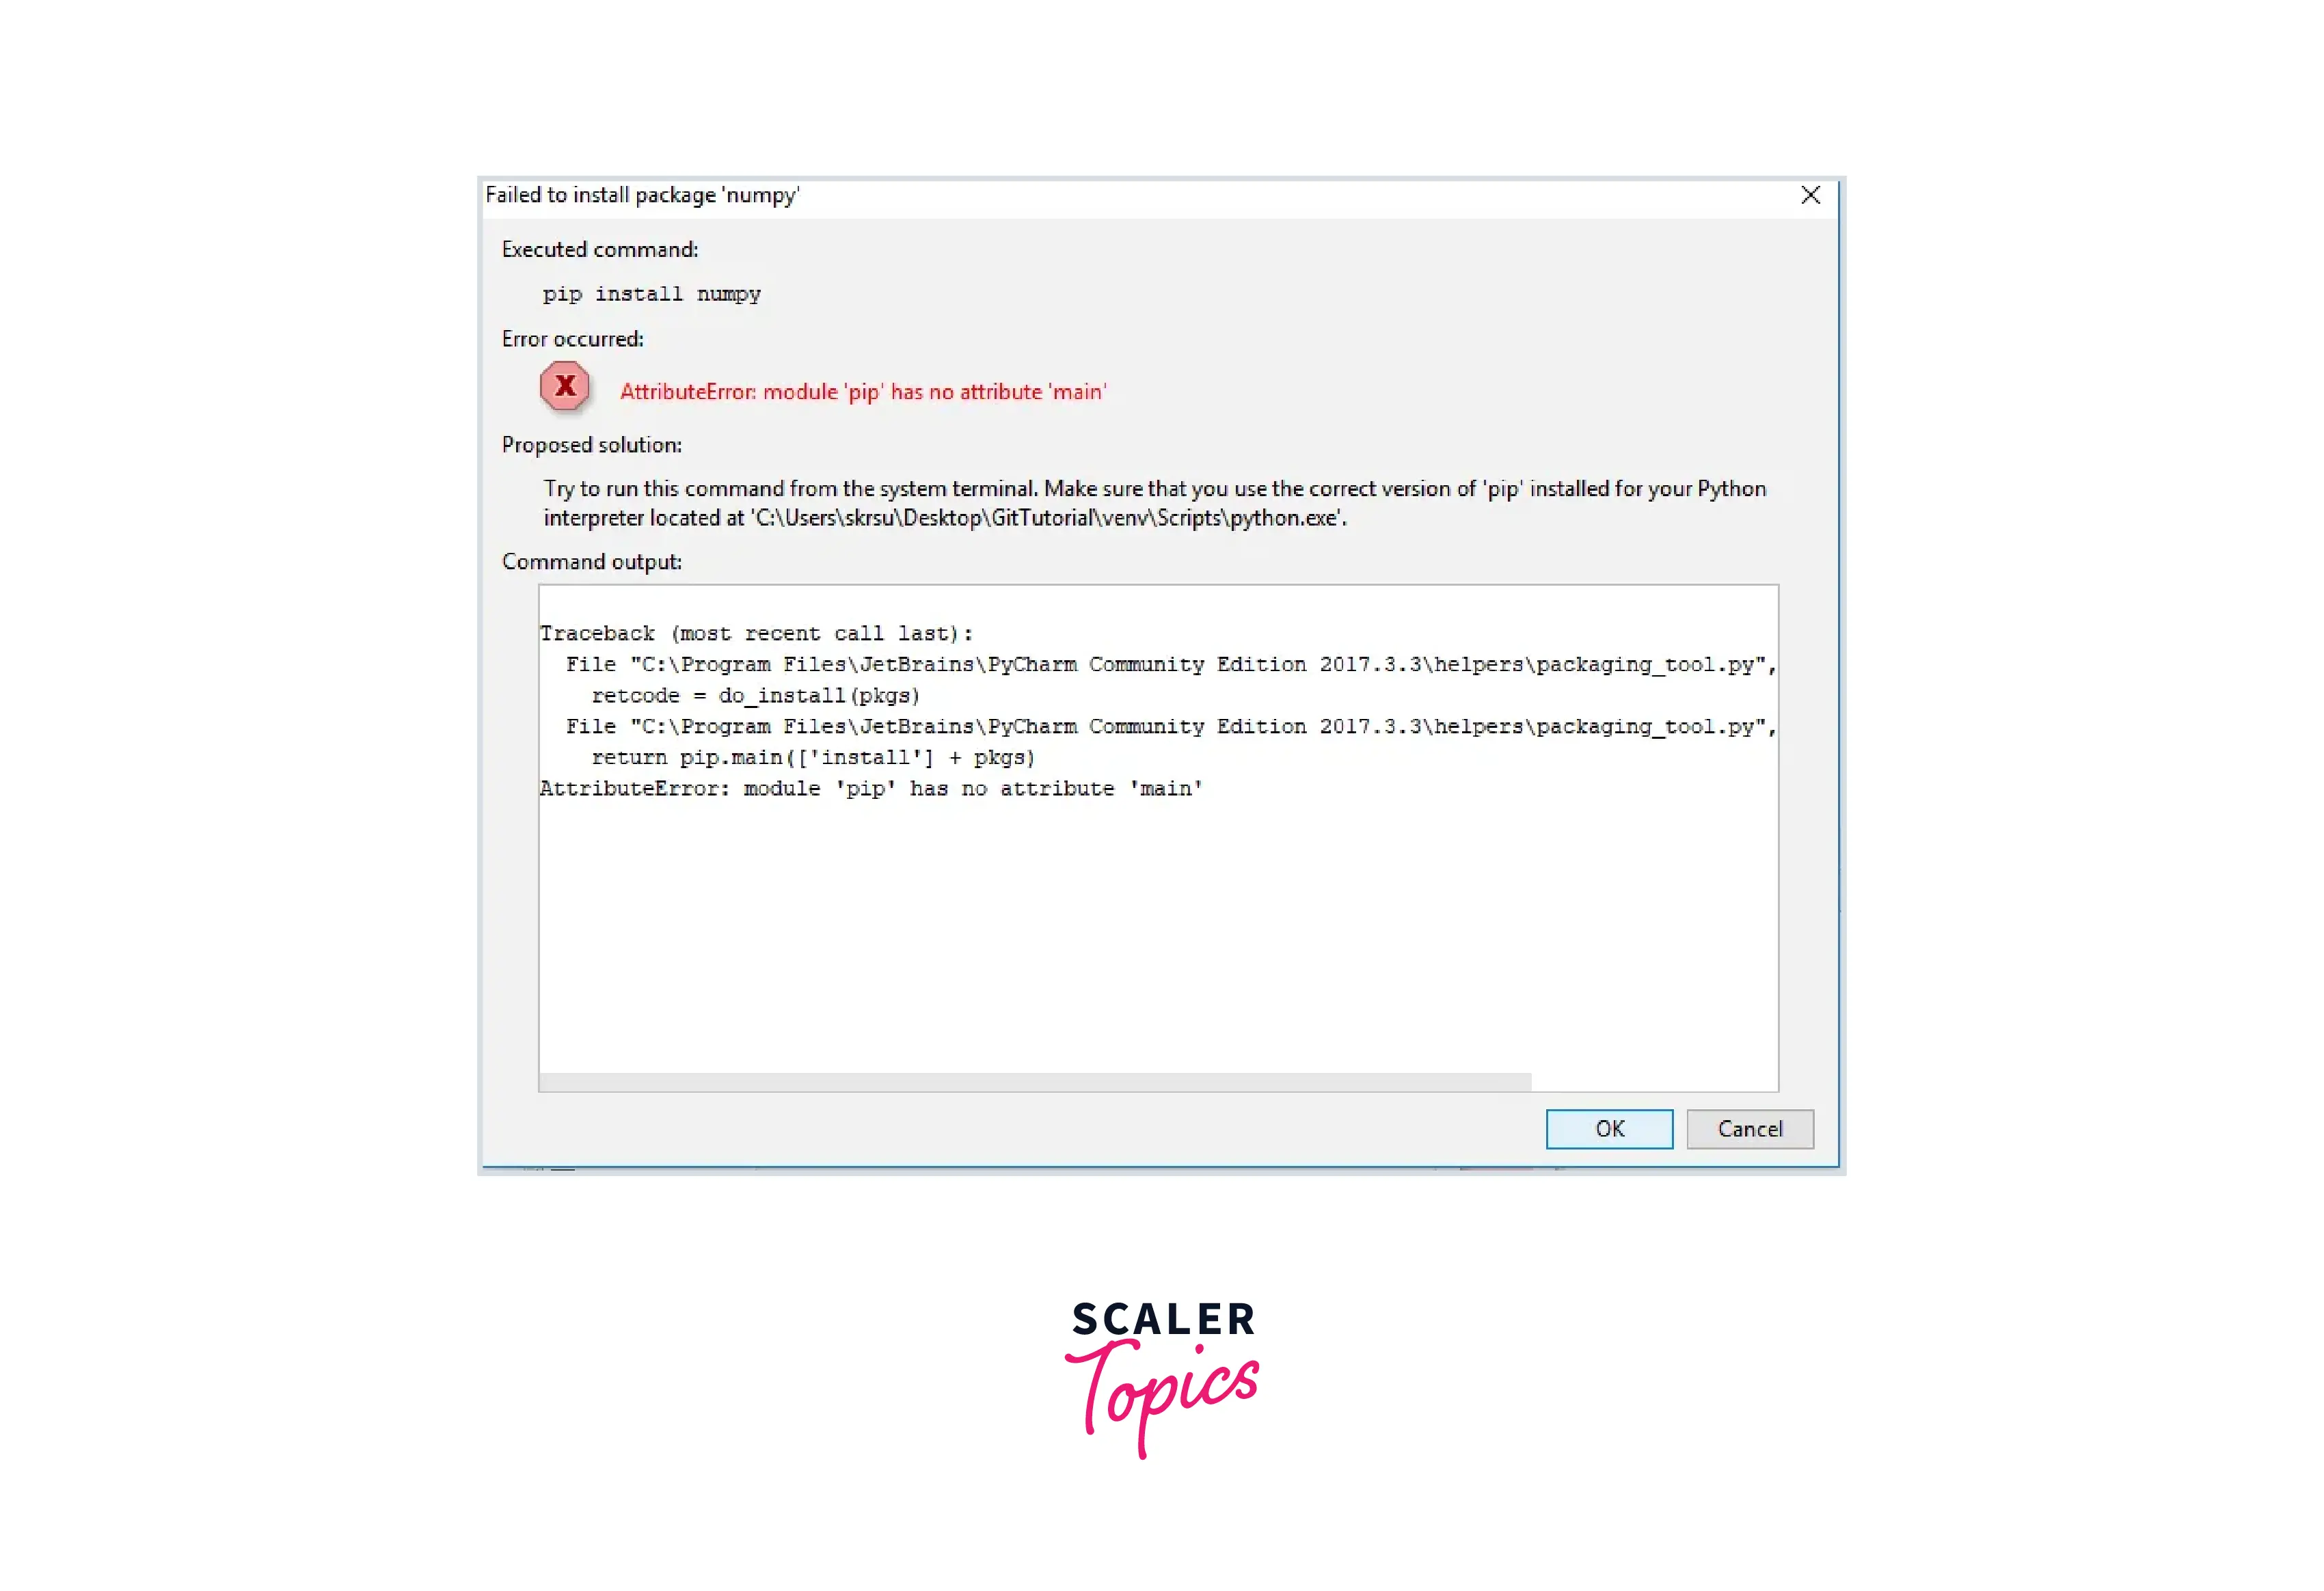
Step 5: In the bottom left corner, click on install packages after selecting numpy. The packages will be installed by it. During installation, If you find an error, then upgrade pip using the following command in the terminal.
Then use the following command to install the numpy.
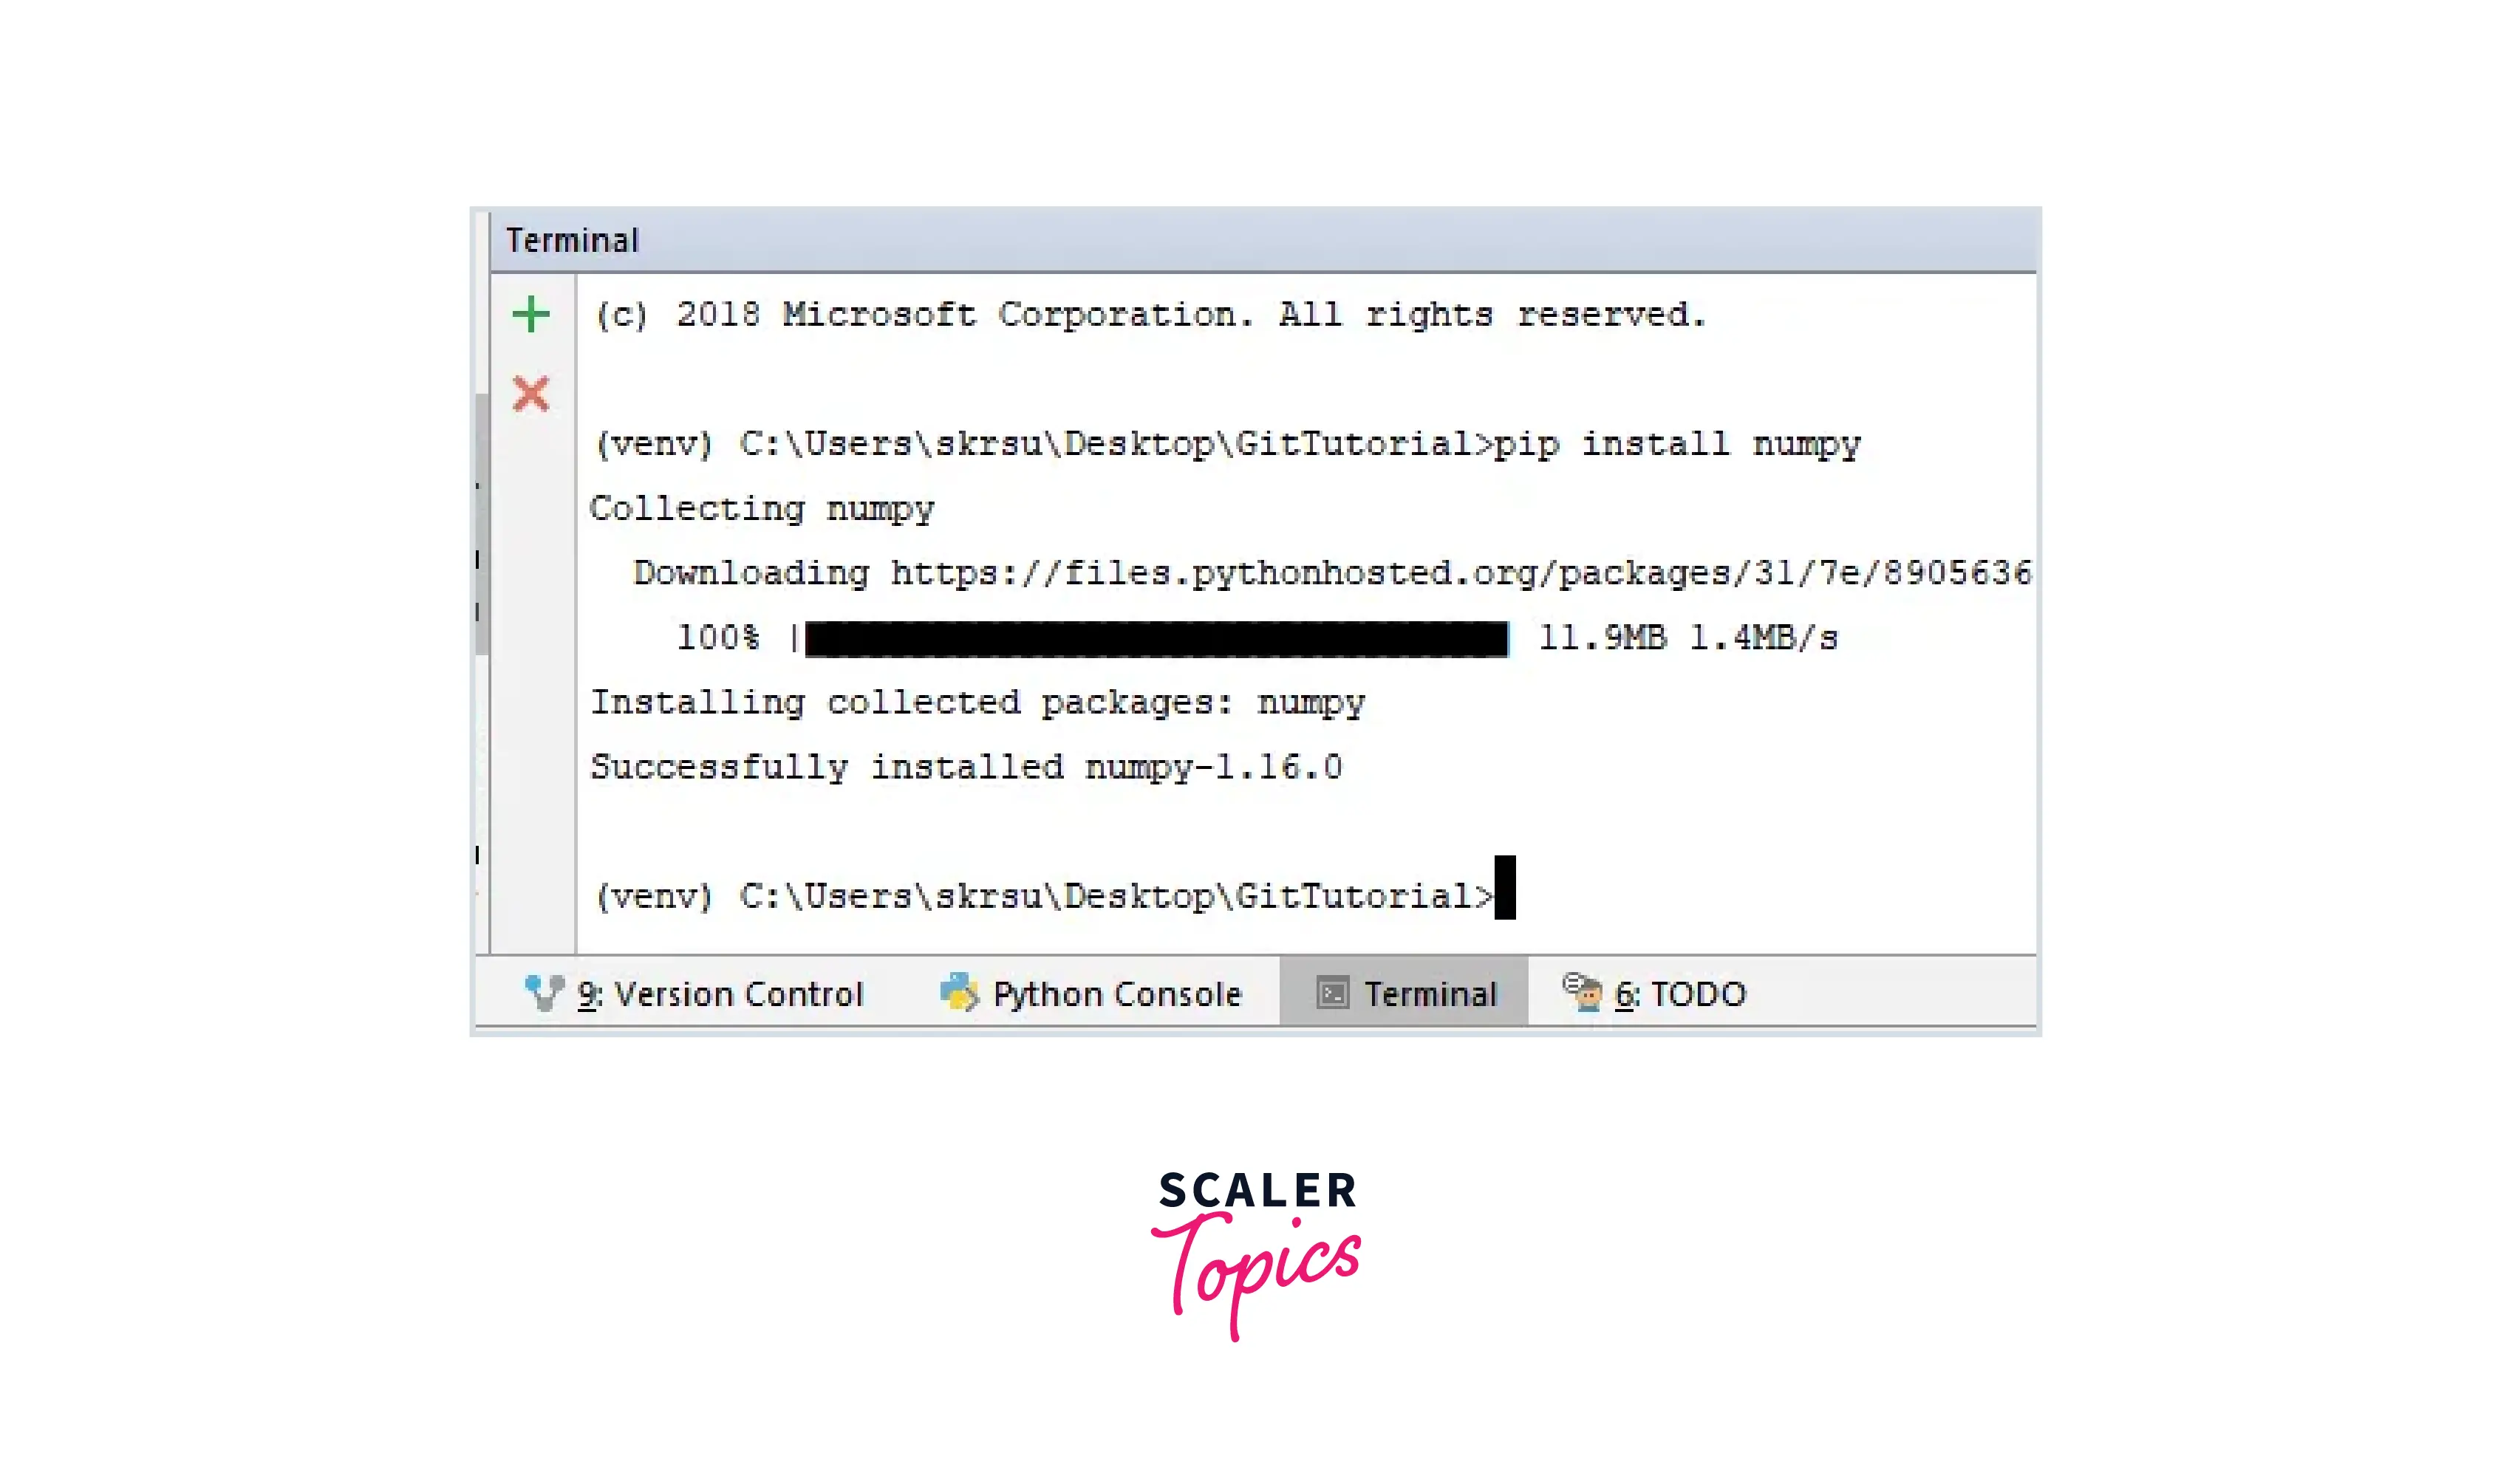
By running the following command, check that it is correctly installed or not:

VS Code
For example, In VSCode, you can press CTRL + Shift + P or (⌘ + Shift + P on Mac) to open the command palette.
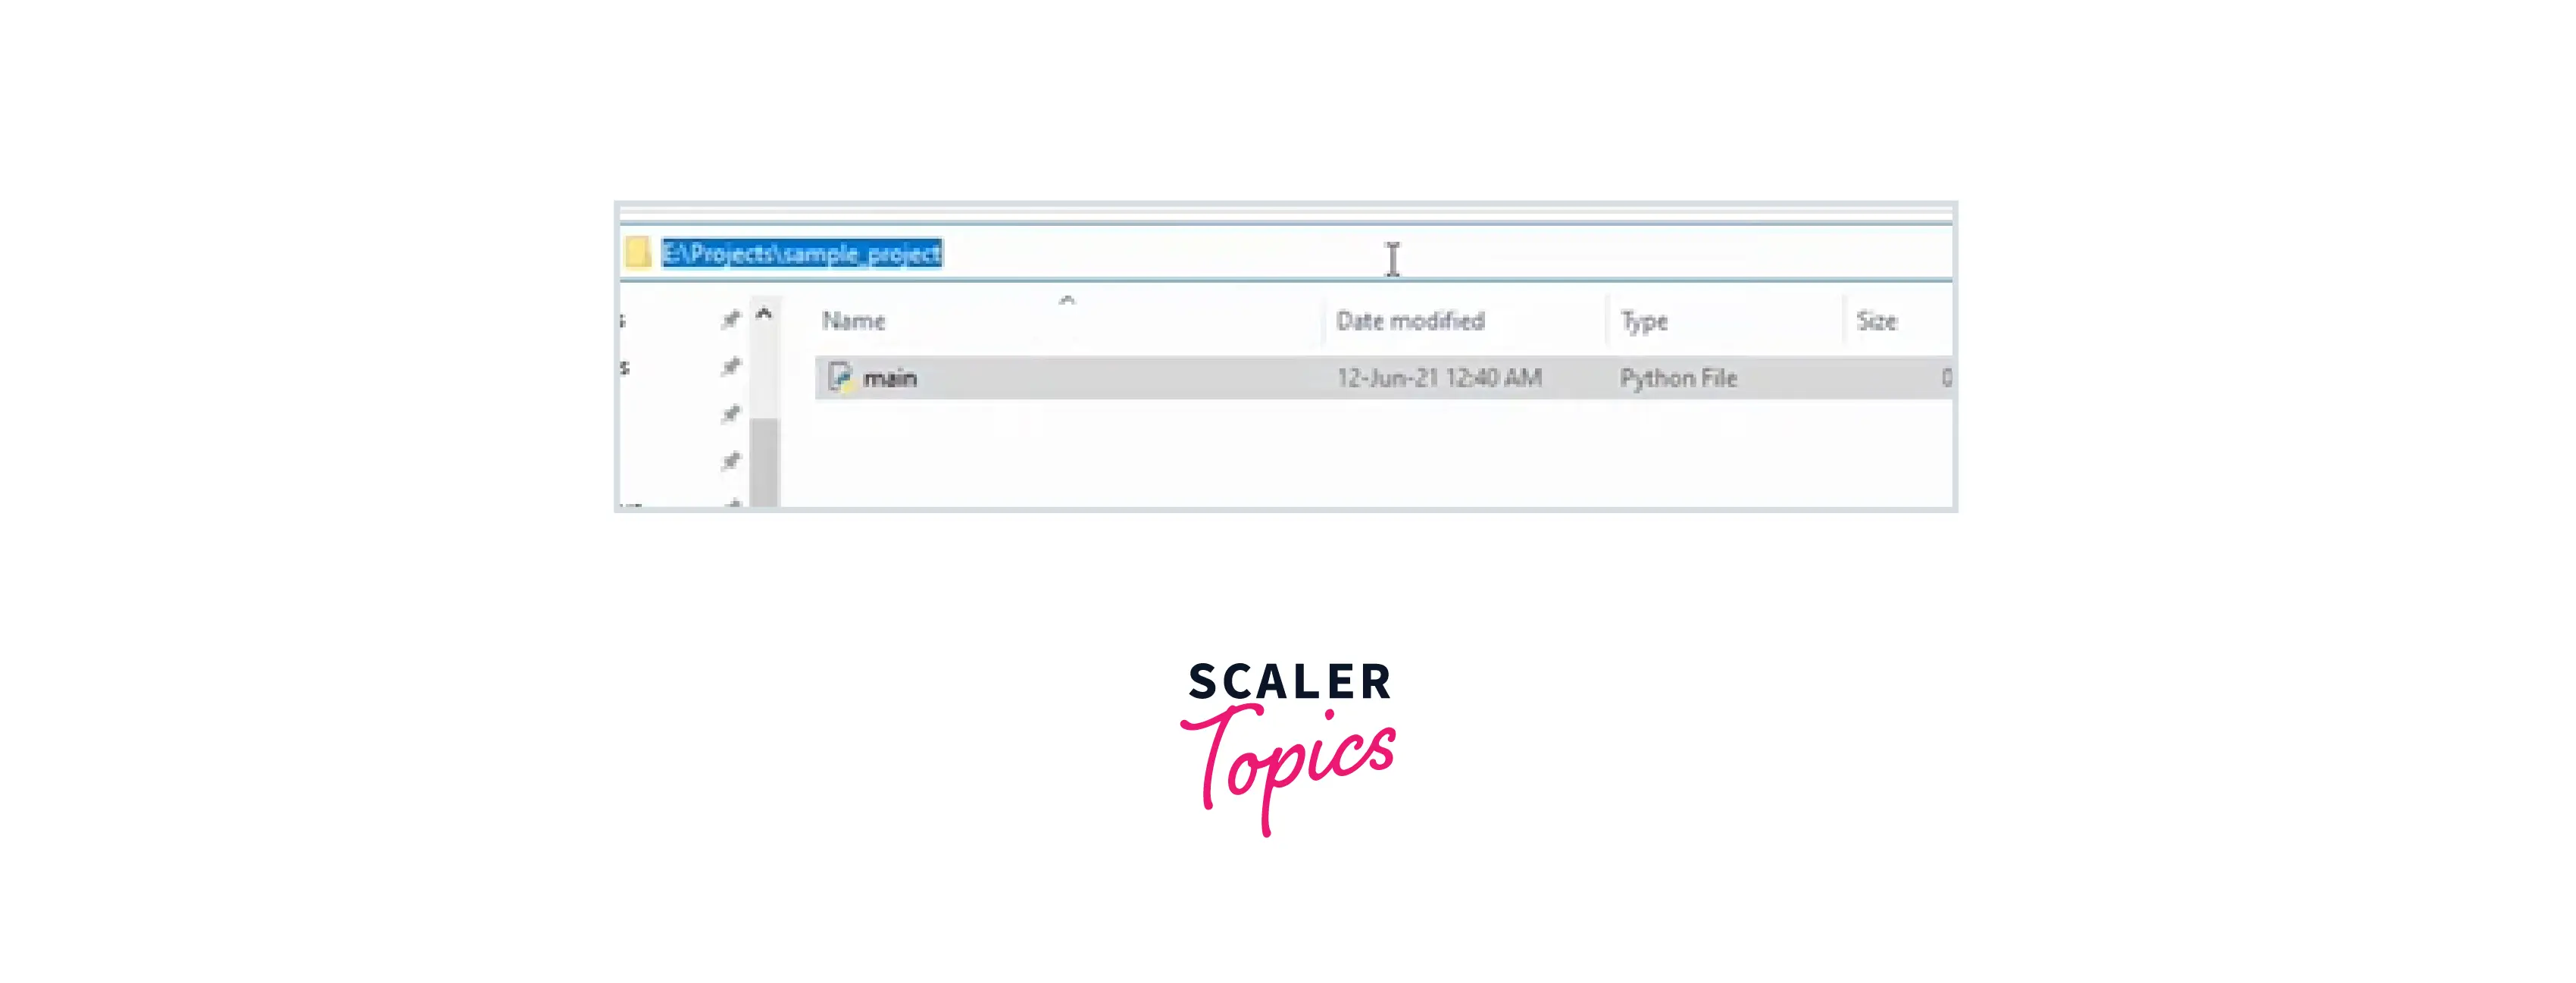
Step 1: Select the file path of the project that you have created eg:
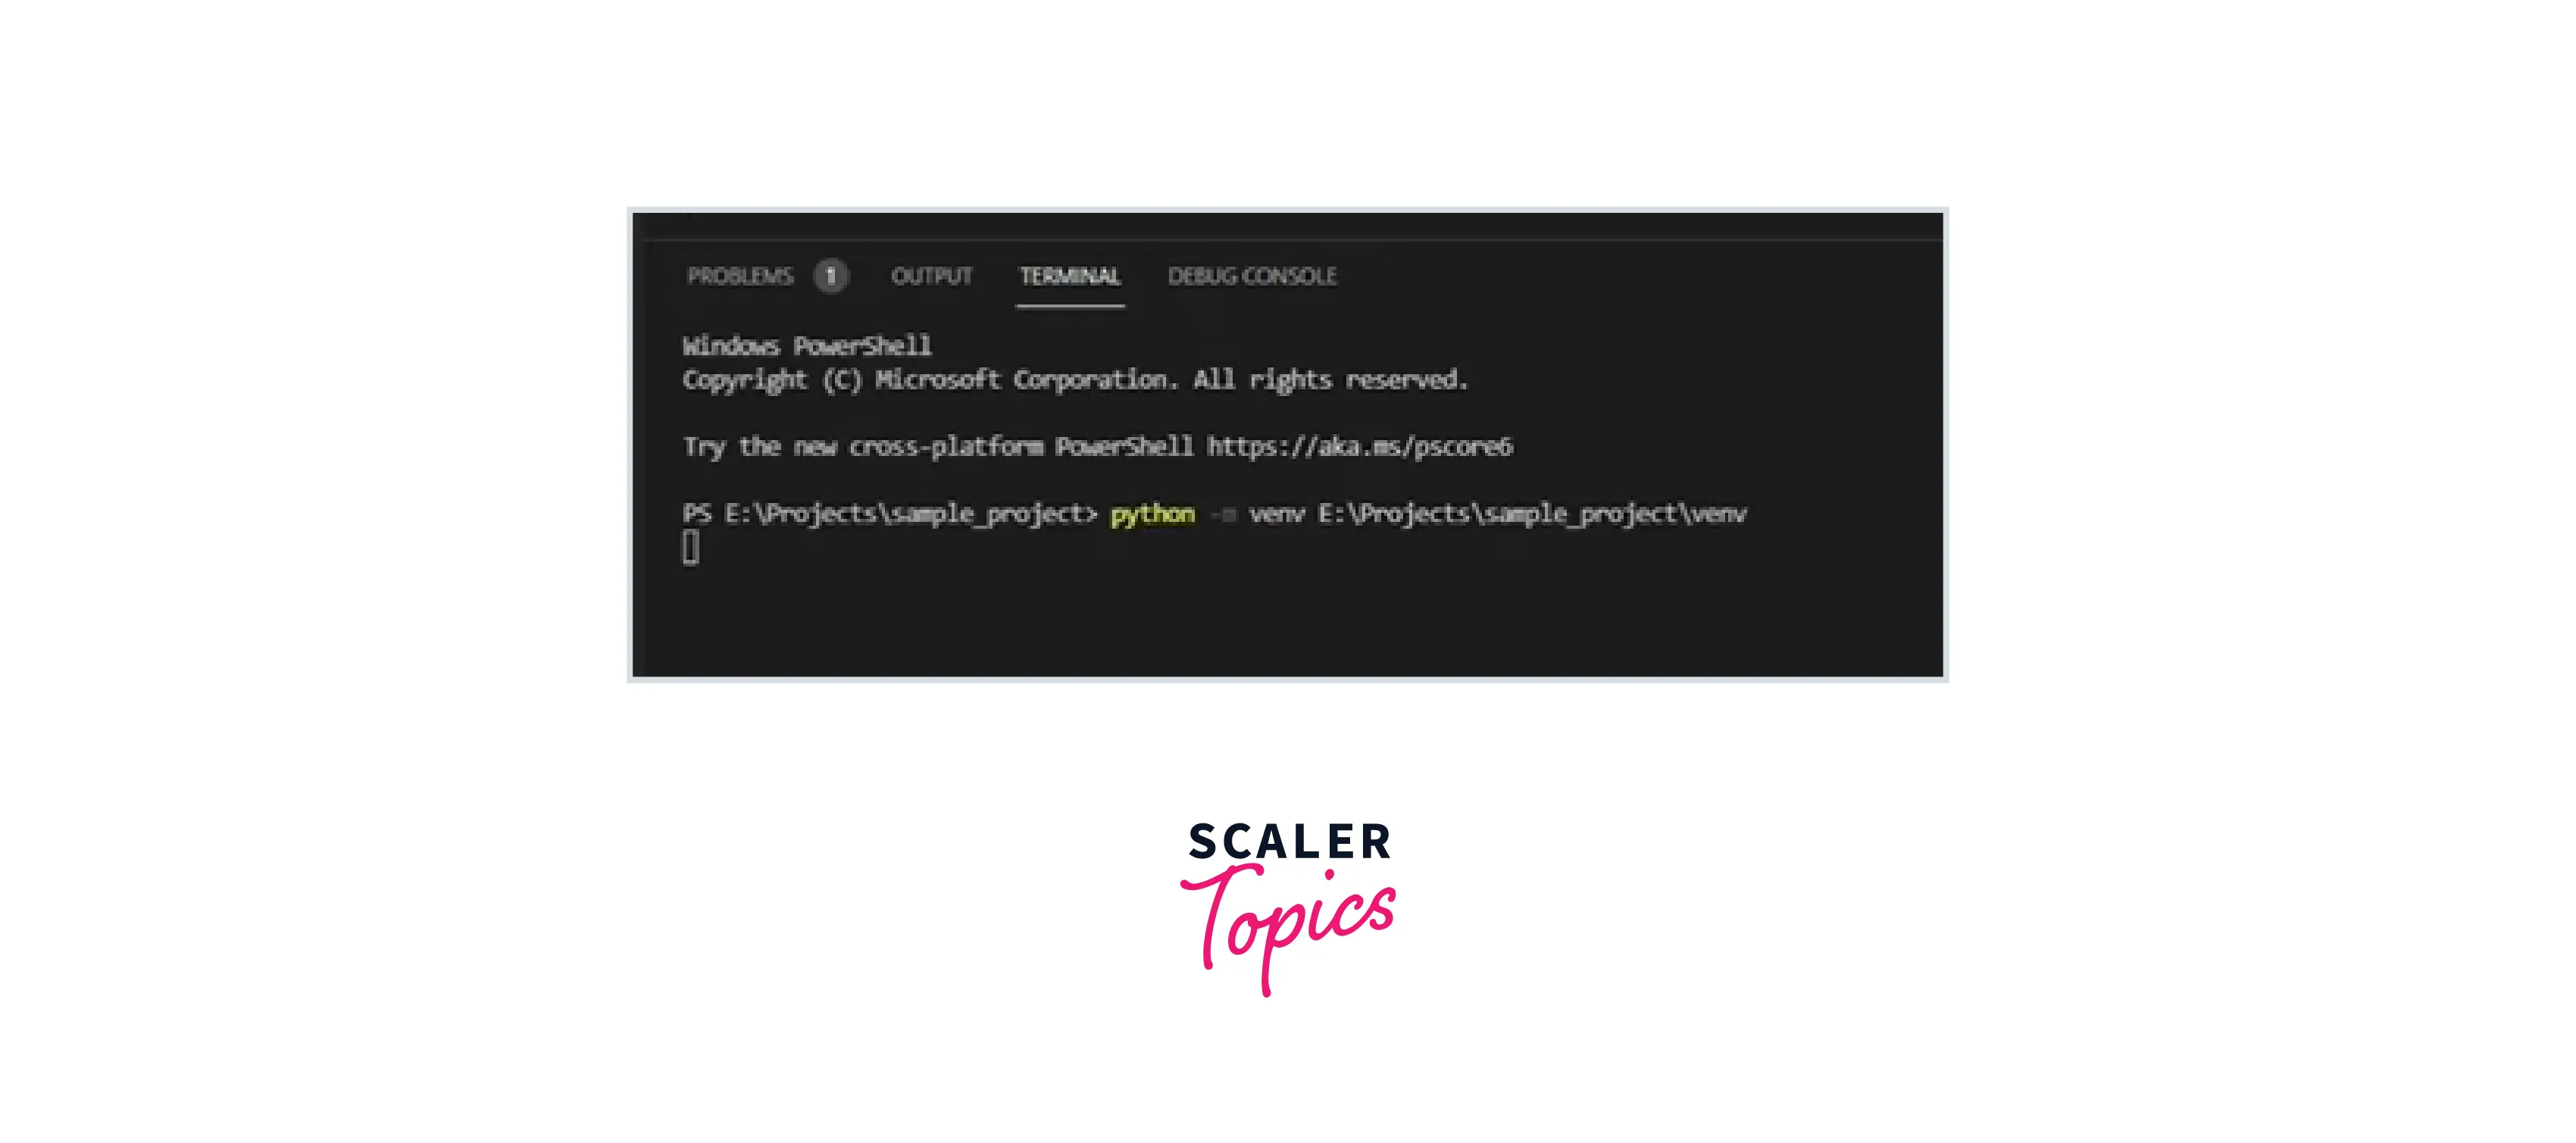
Step 2: Create a virtual environment by entering the command:
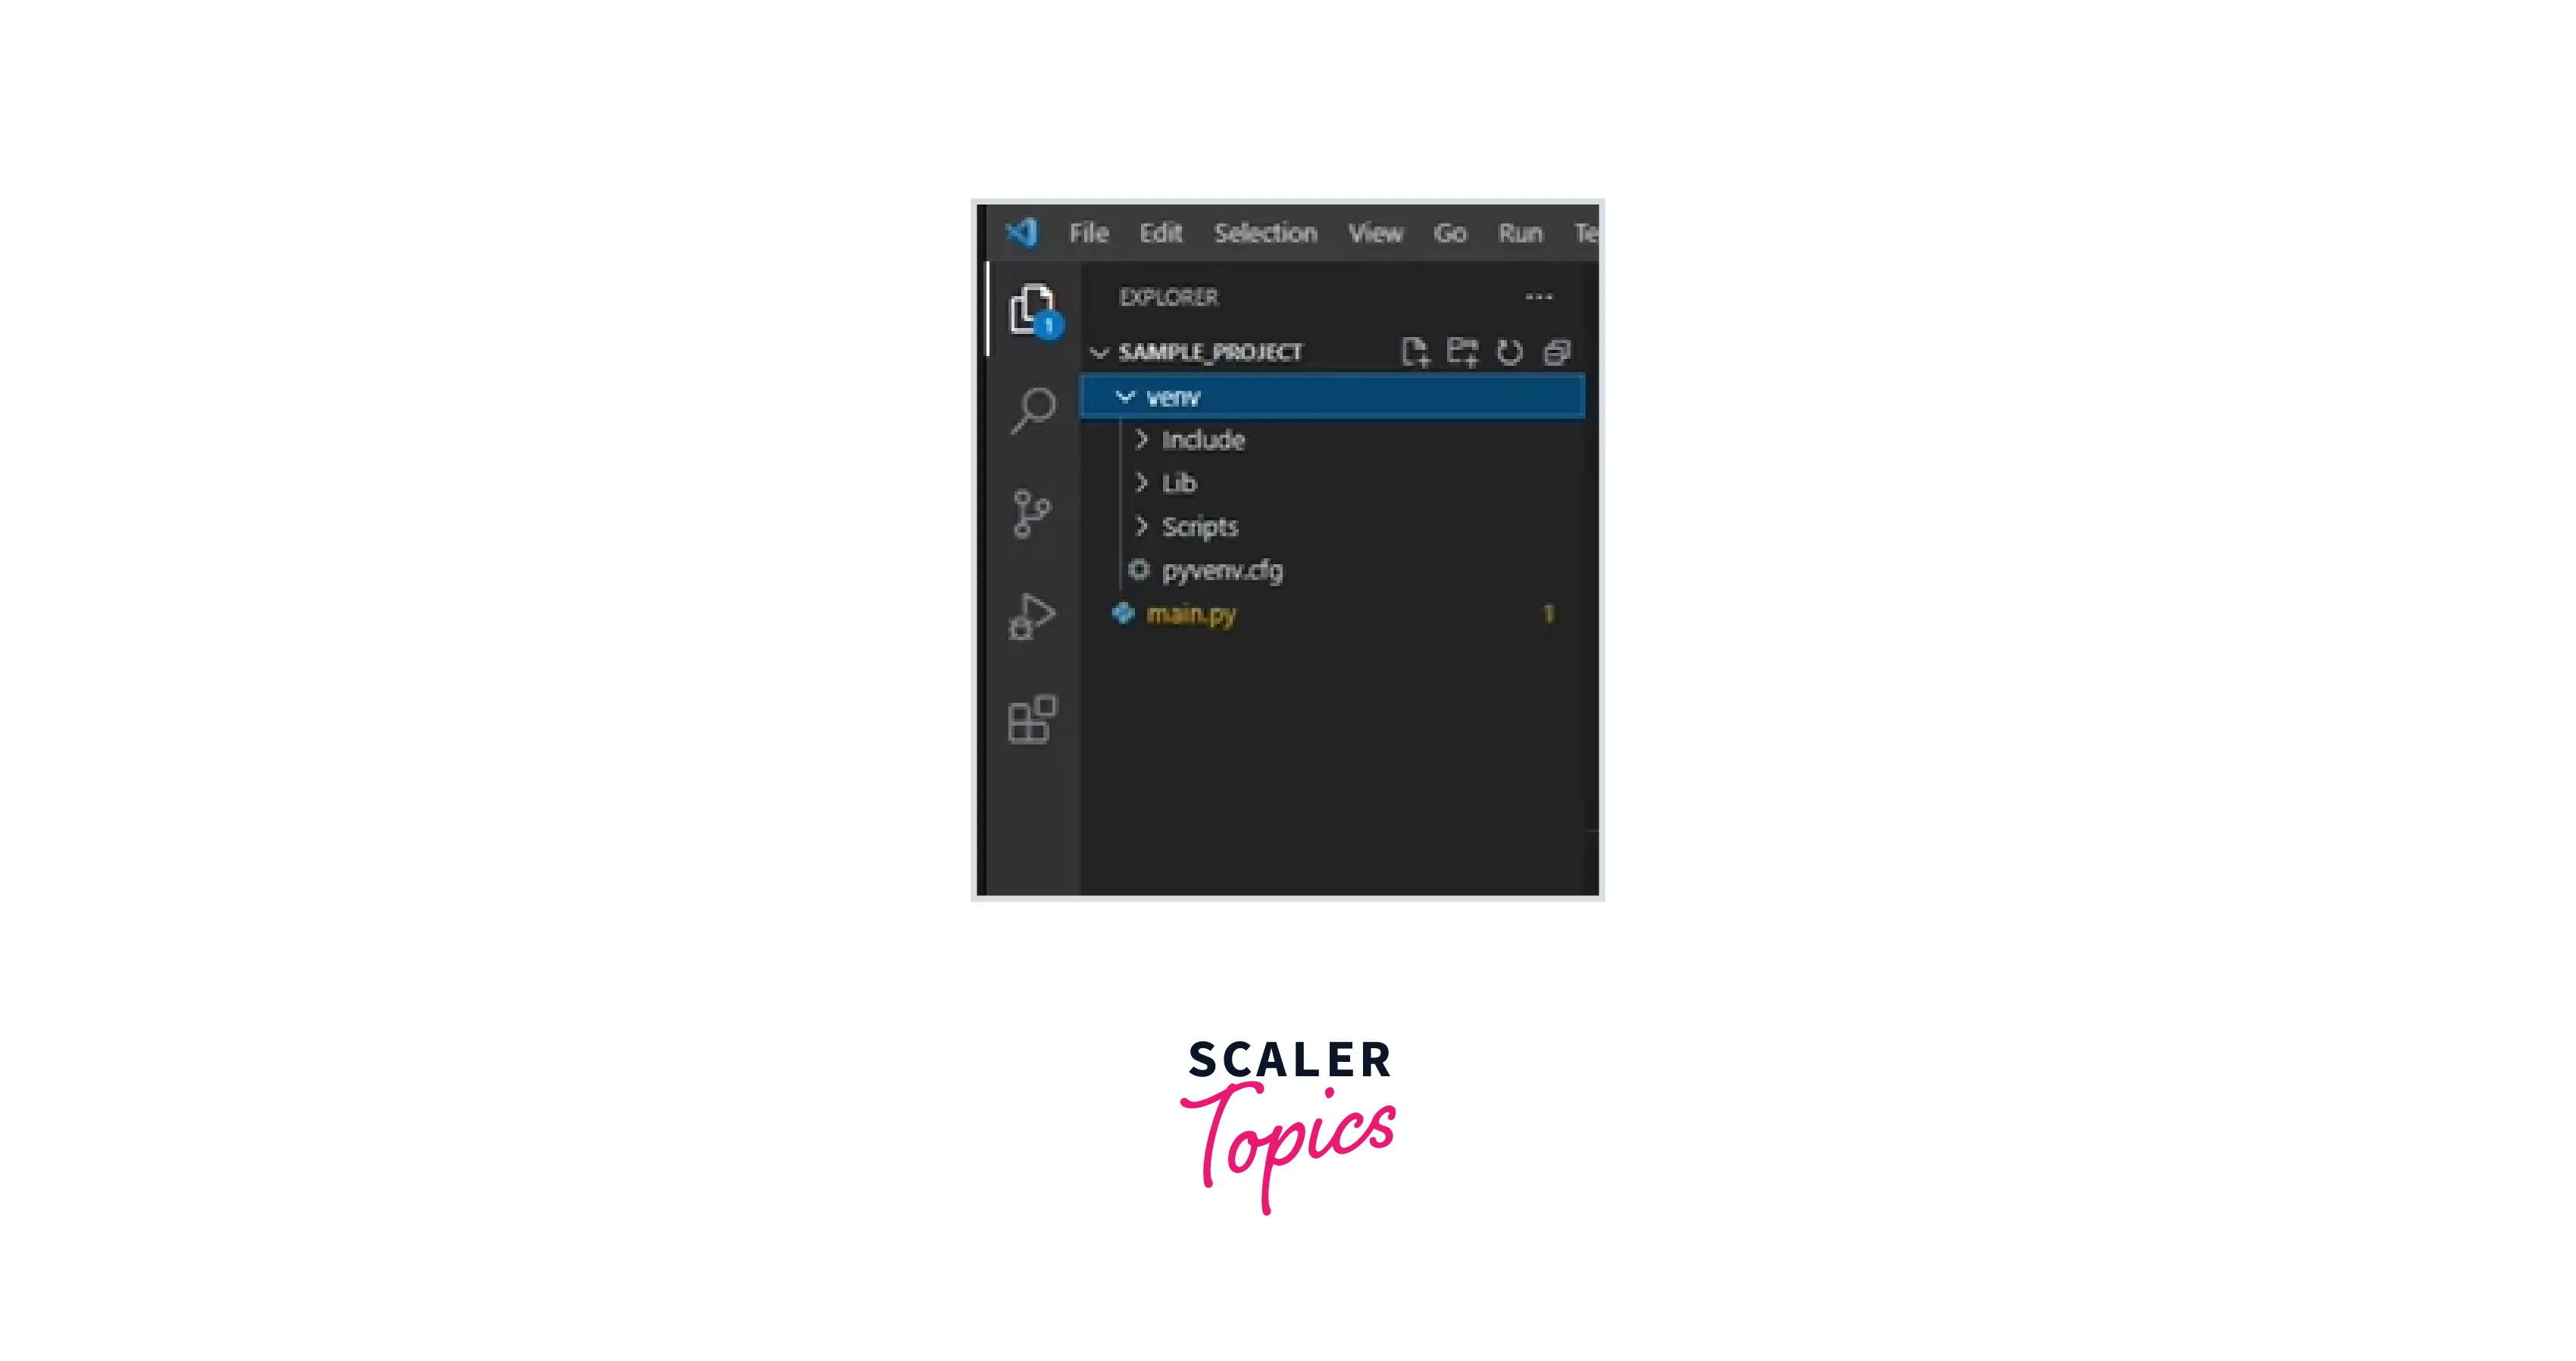
see, project file with all libraries is created as shown in the below image:
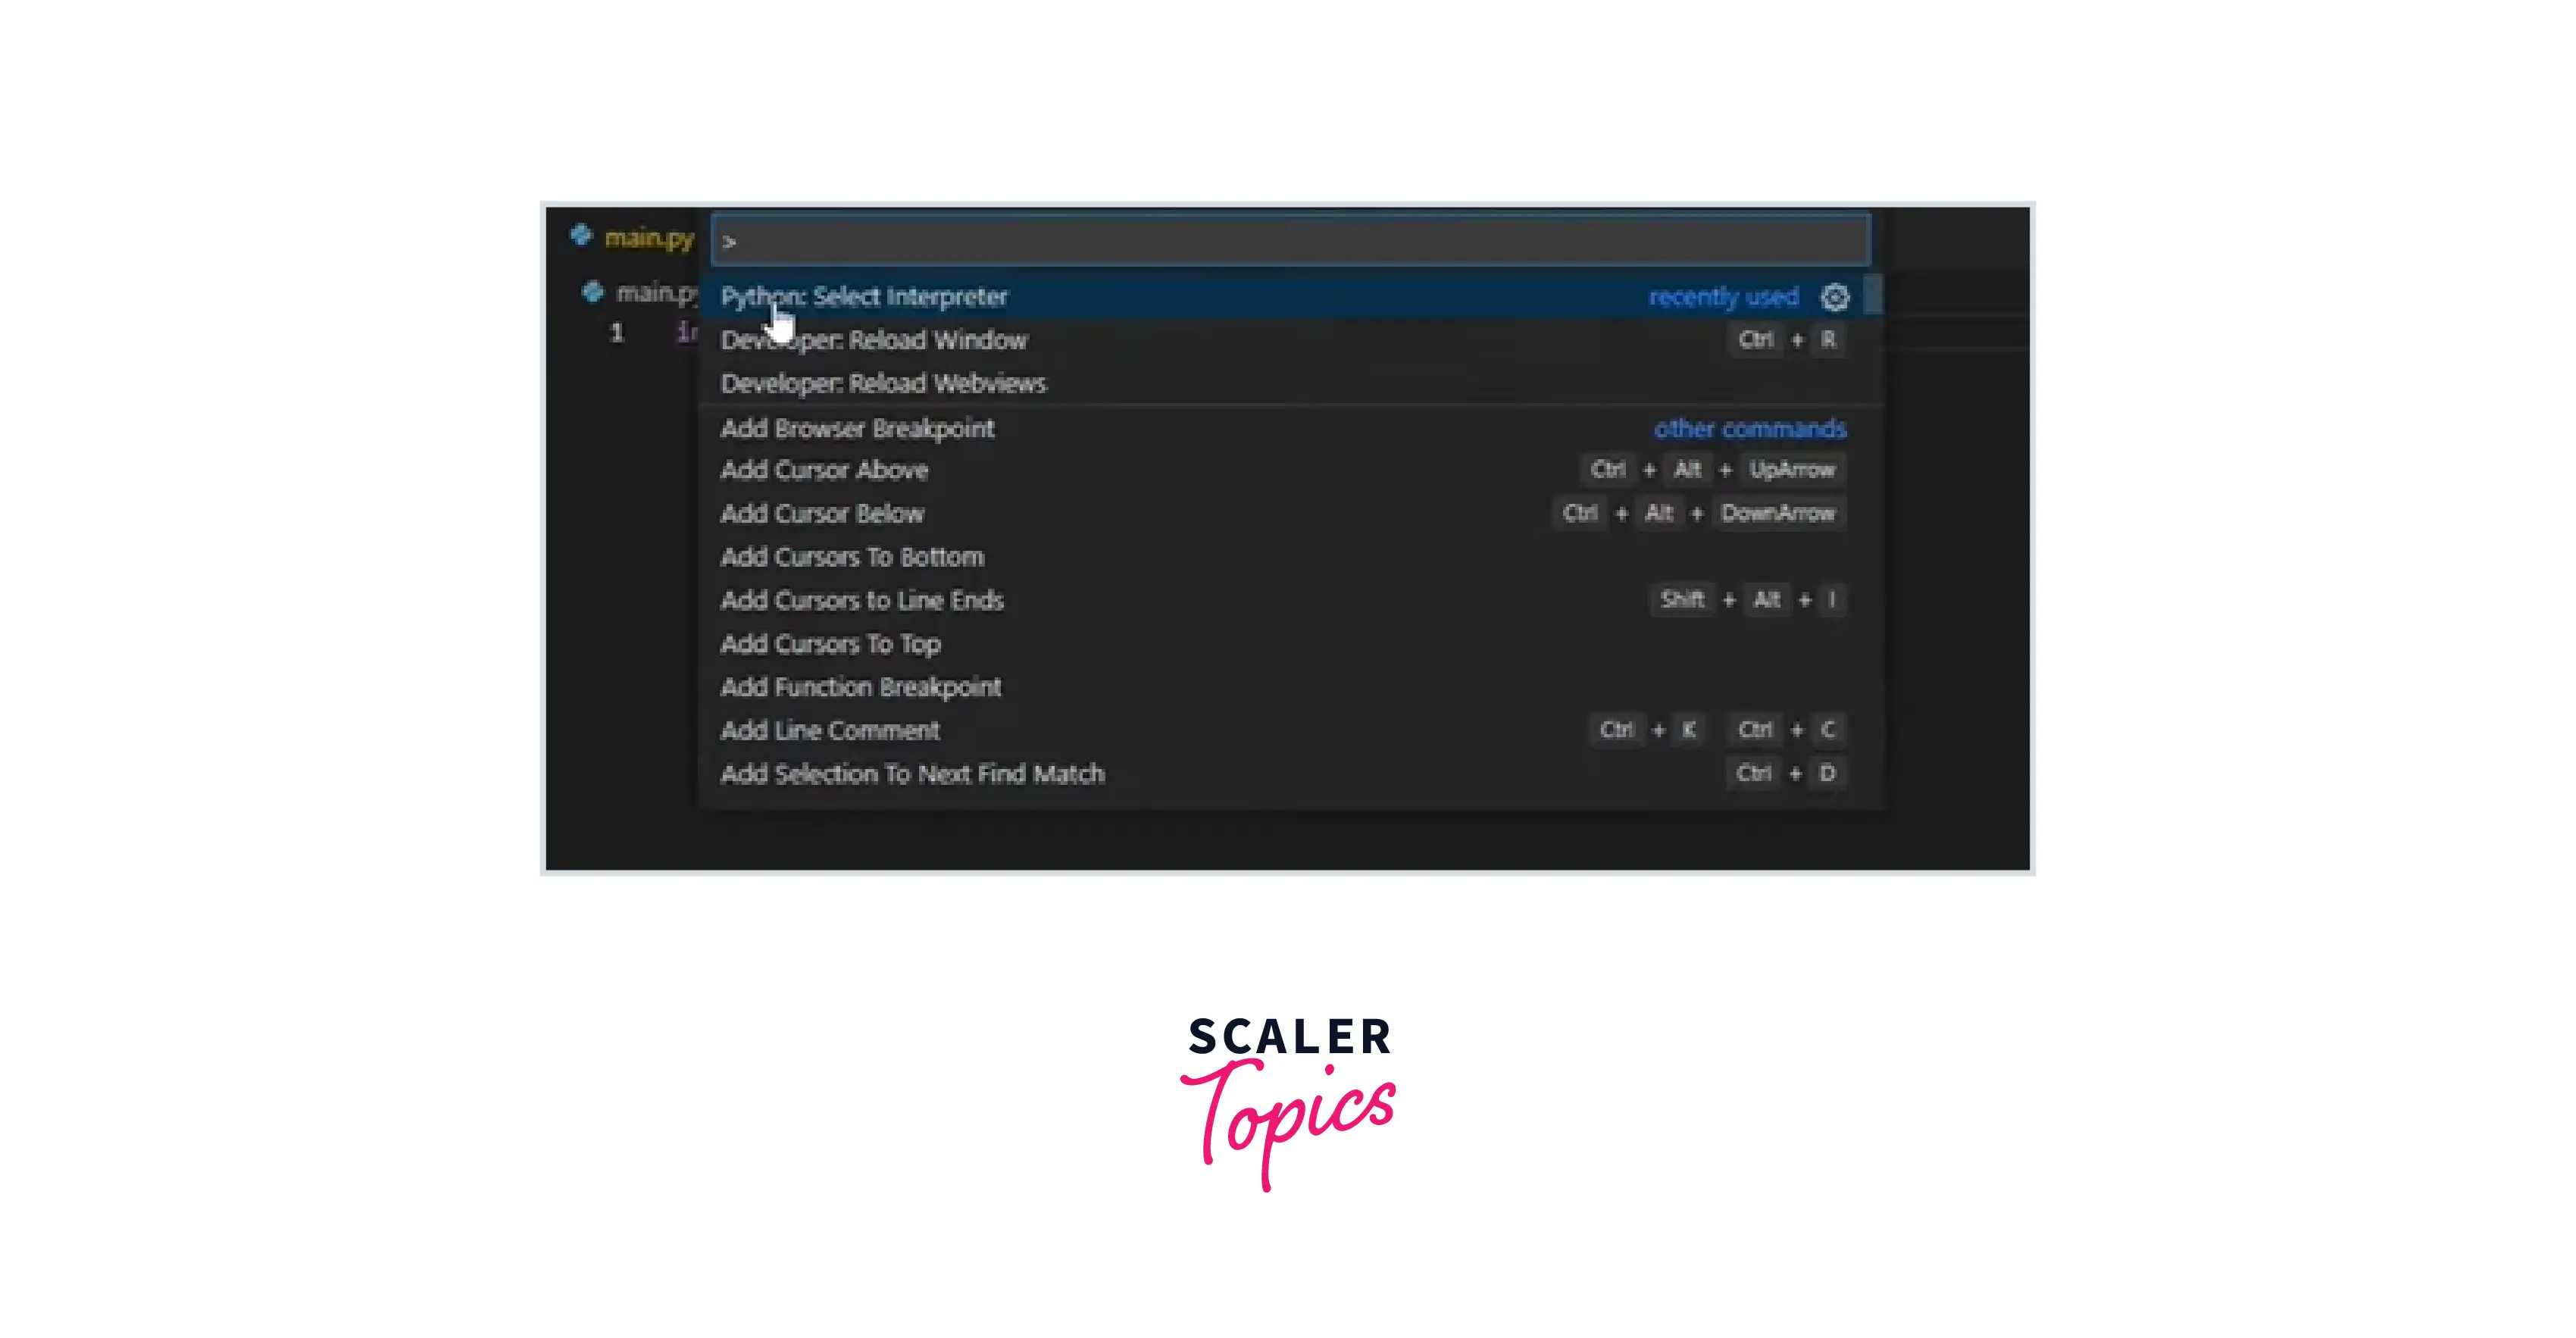
Now, we have to change interpreter by typing: ctrl+shift+p
Step 3: Select Interpreter from the dropdown as shown:
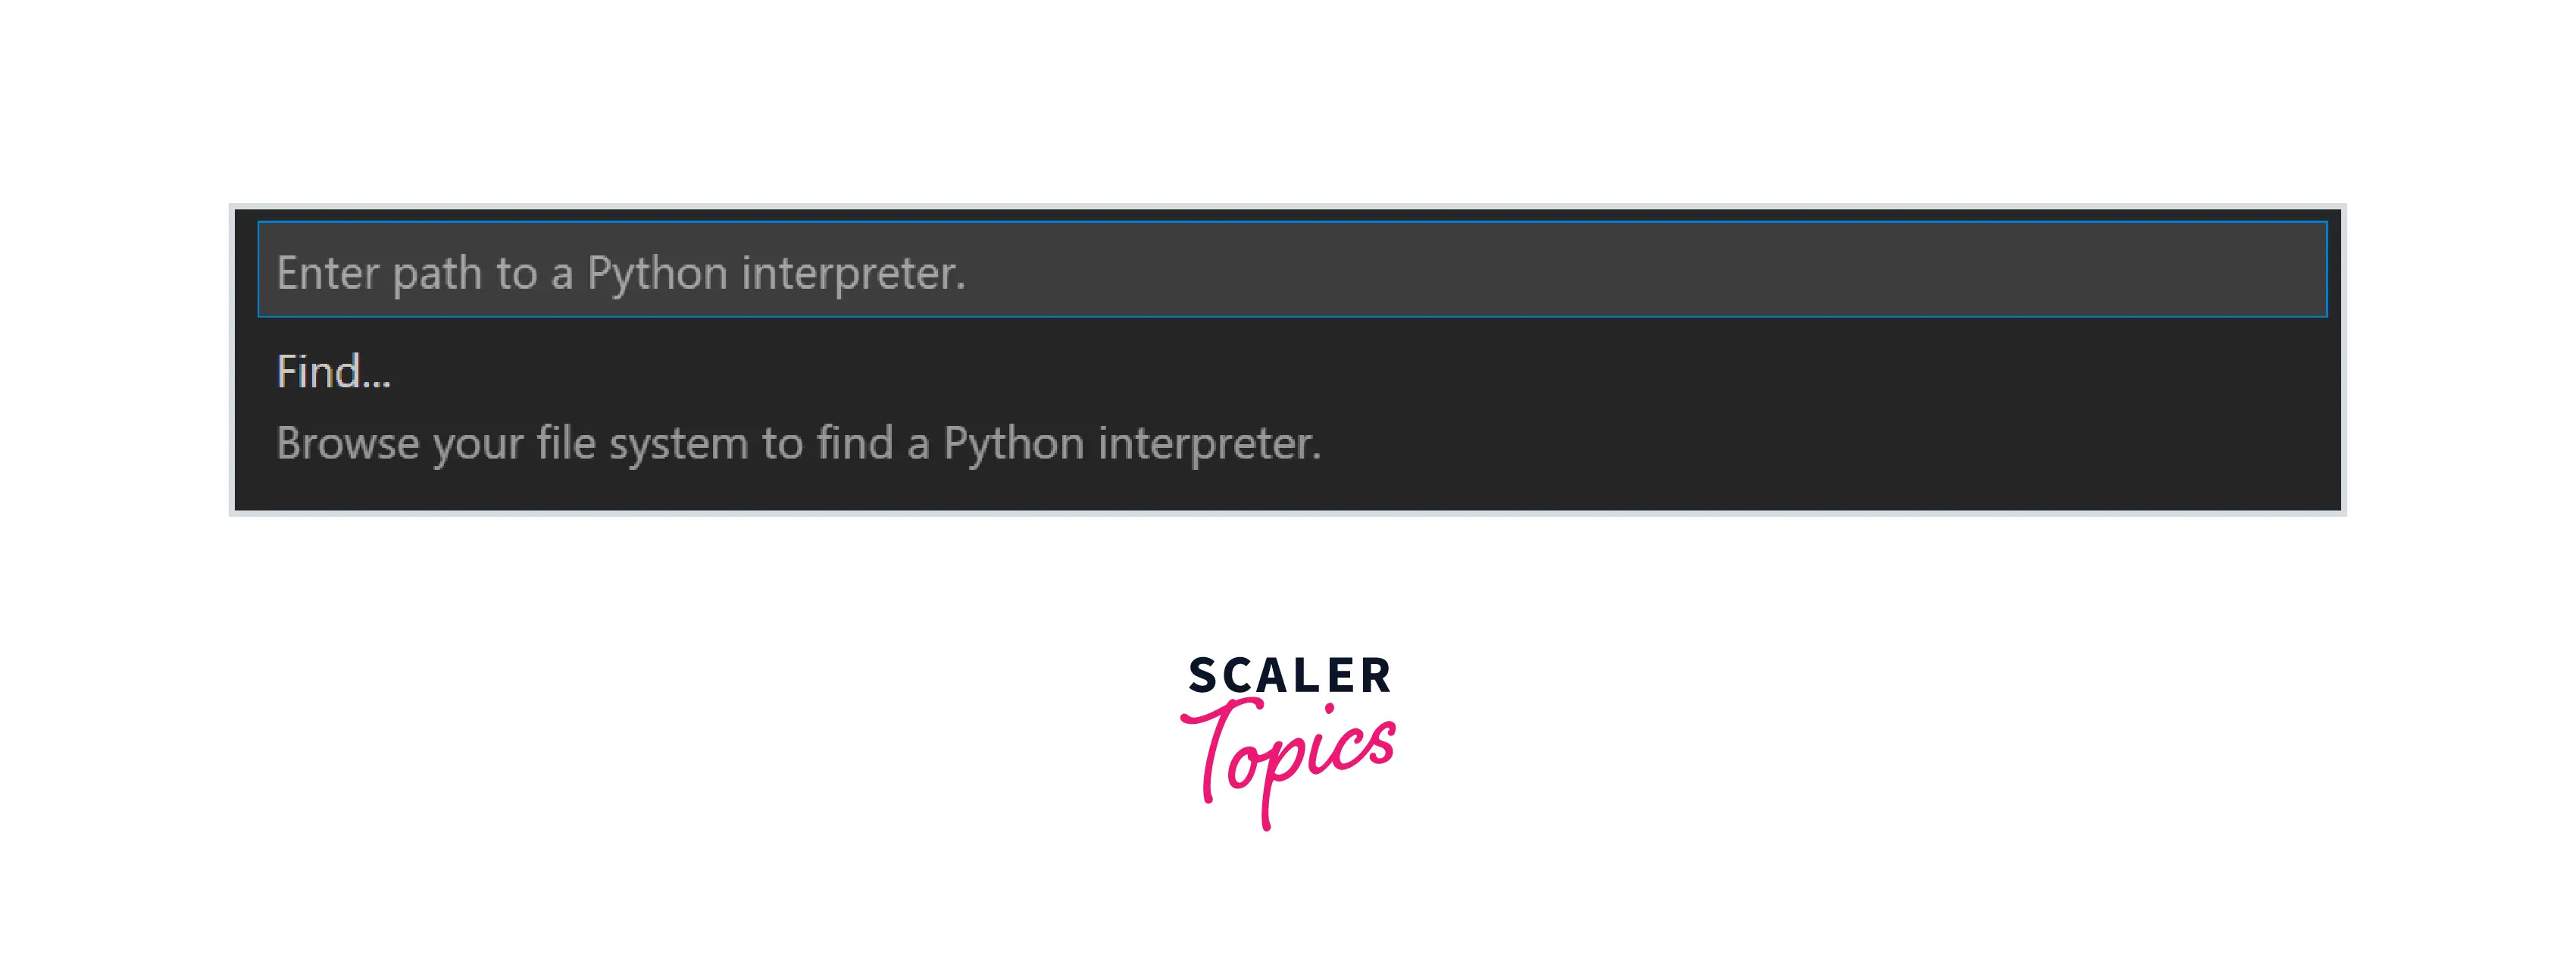
Step 4: Select ‘Enter intepreter path’ as shown:
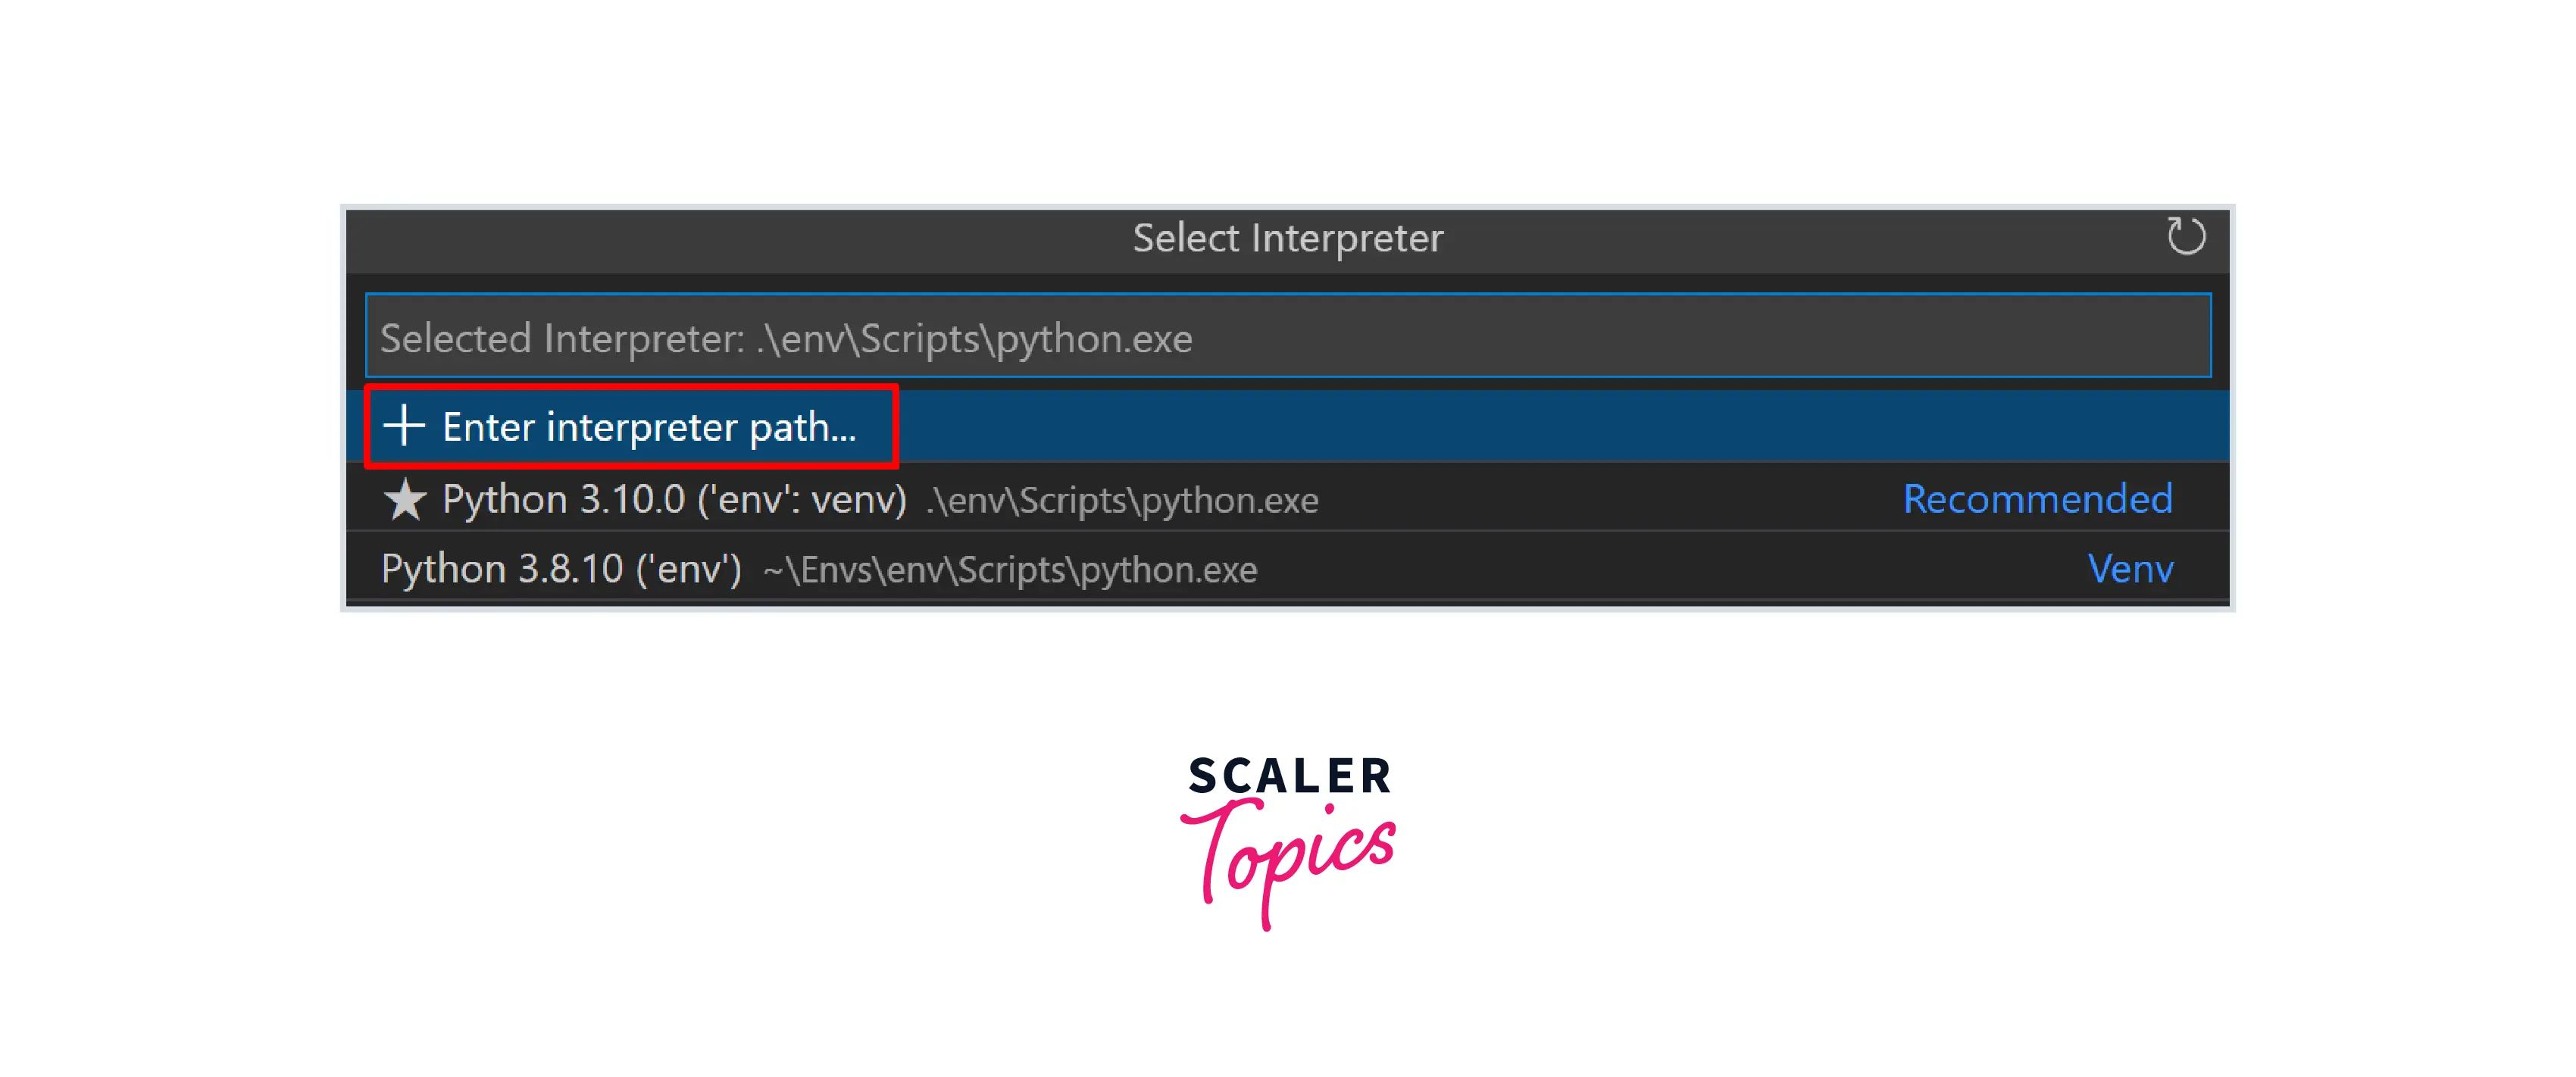
Step 5: Click on Find
- It takes you to the venv file as shown below:

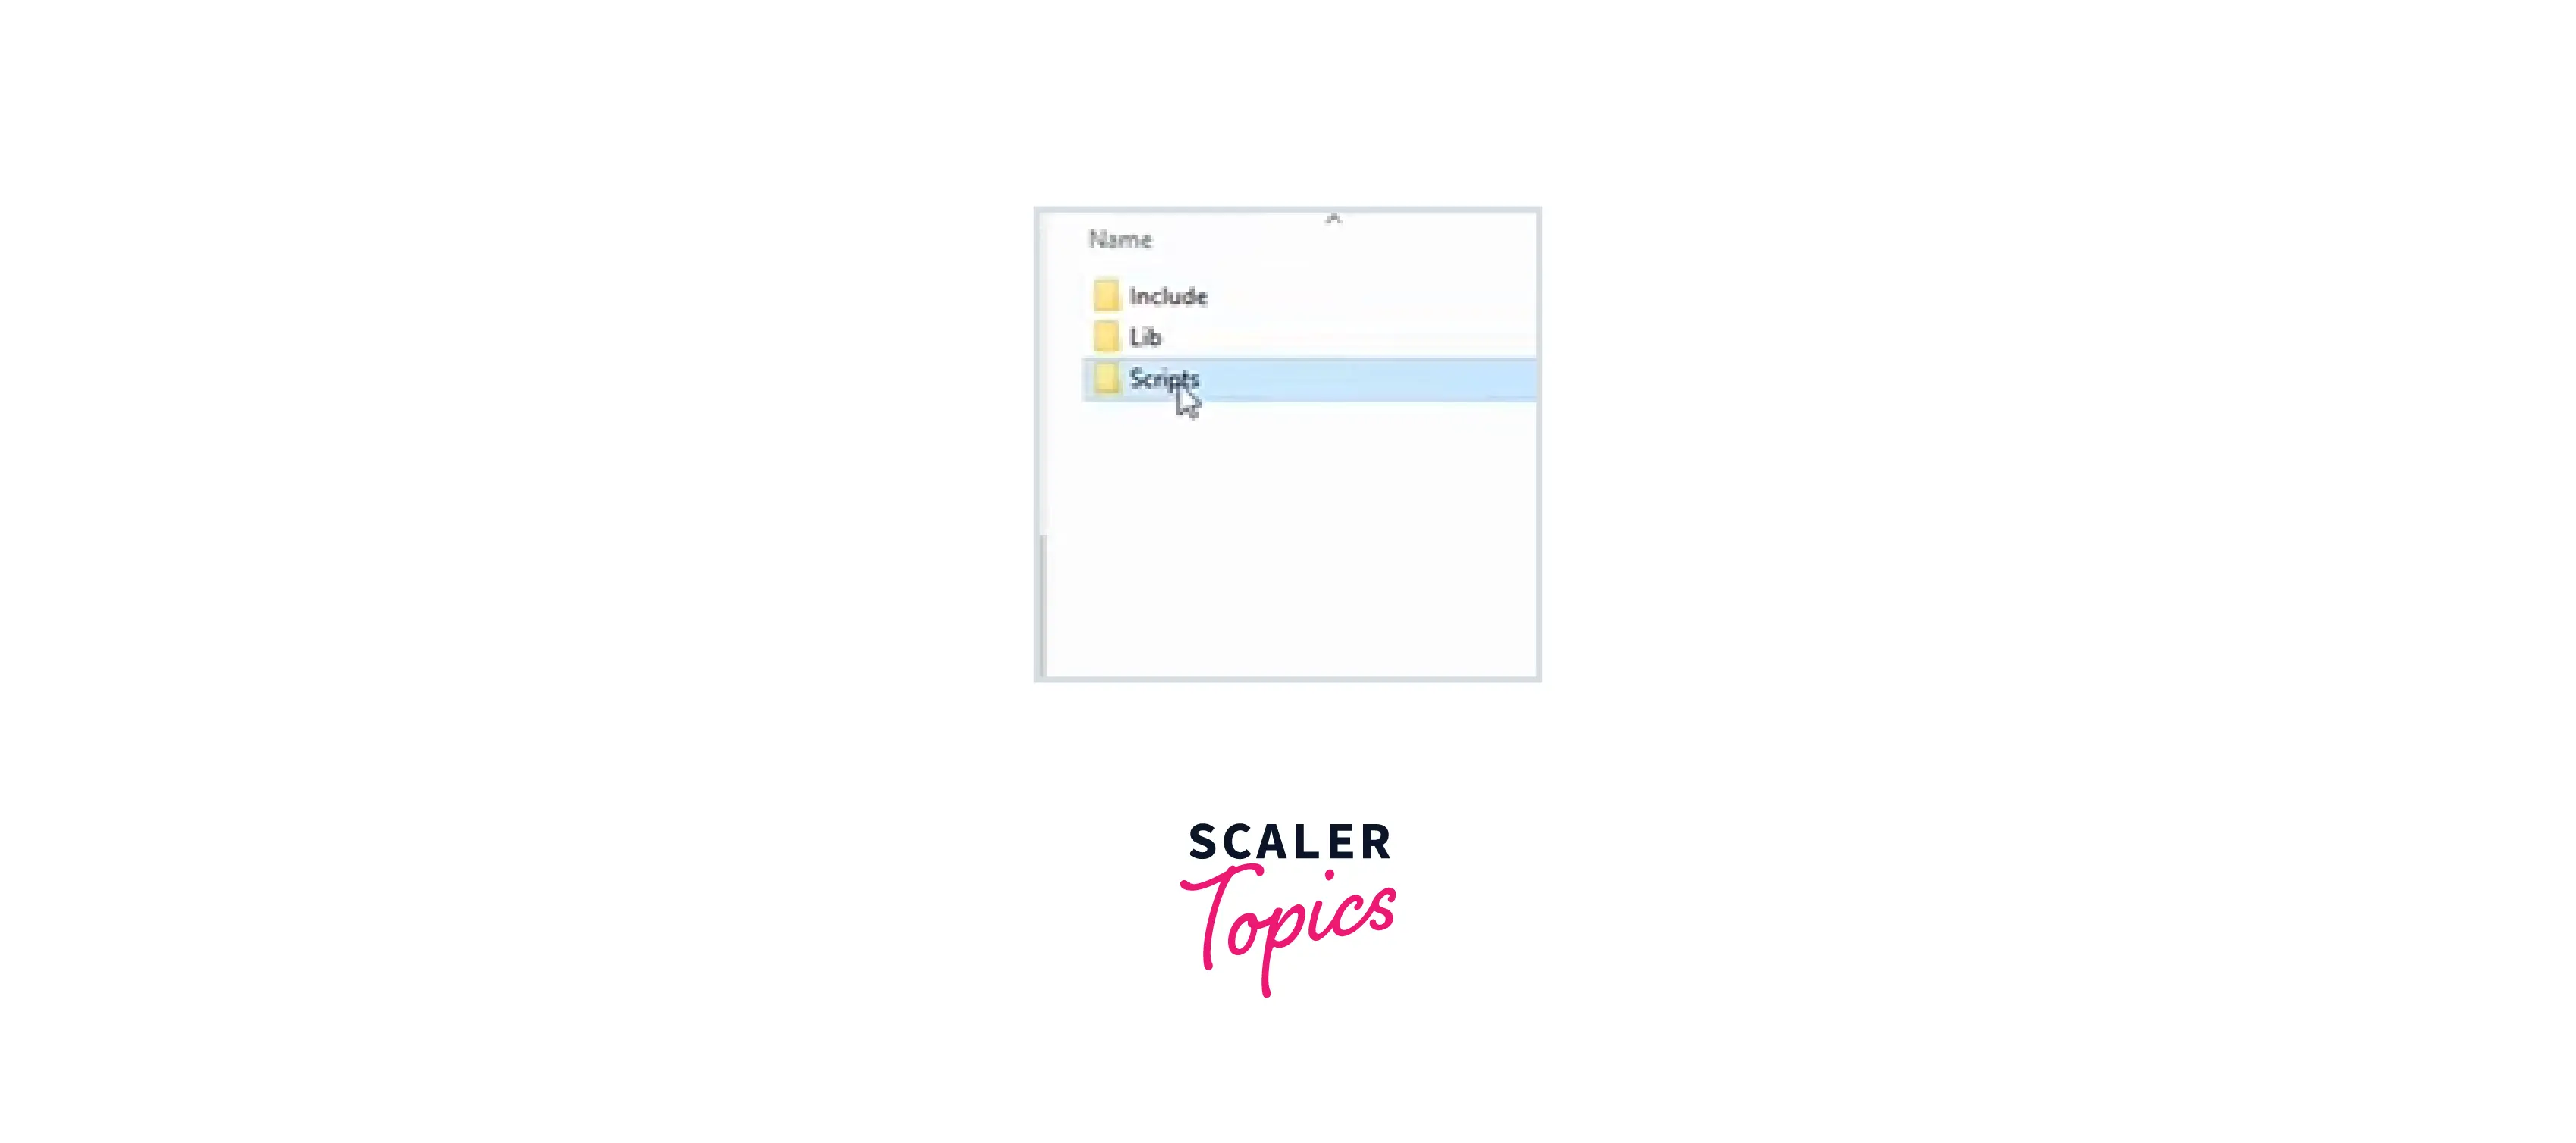
Step 6: After clicking on venv go to the scripts folder:
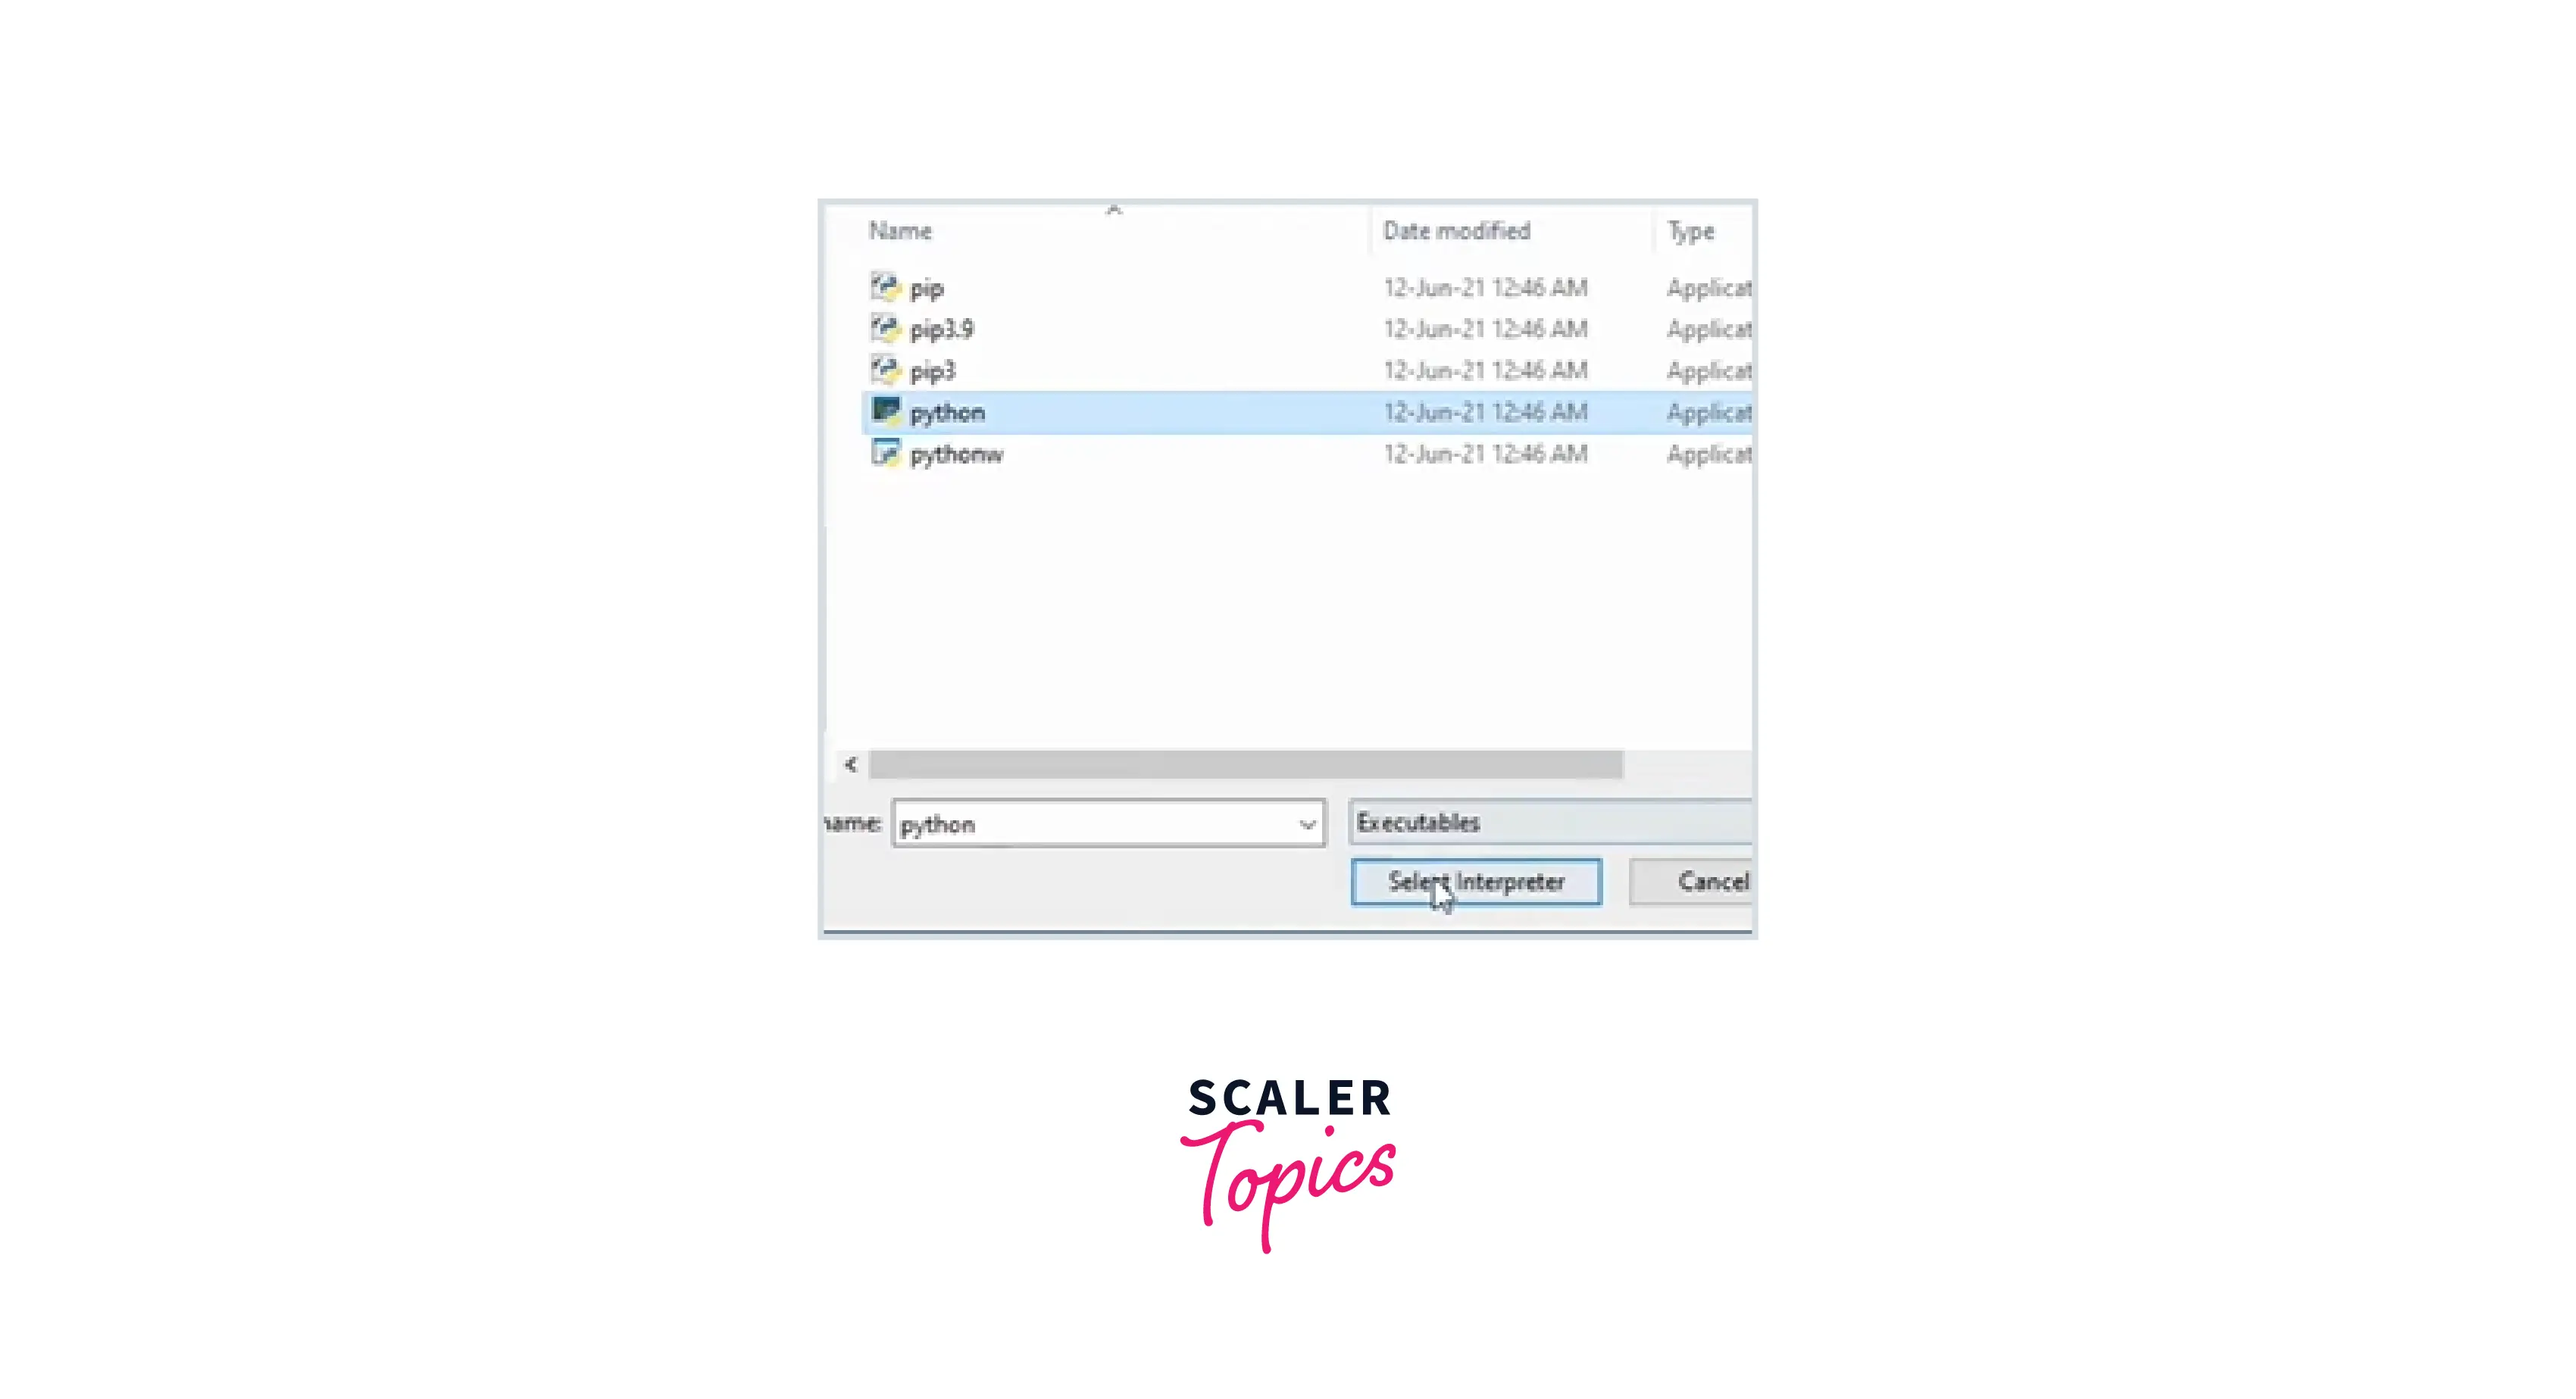
Step 7: Select python.exe file as interpreter as shown in below image:
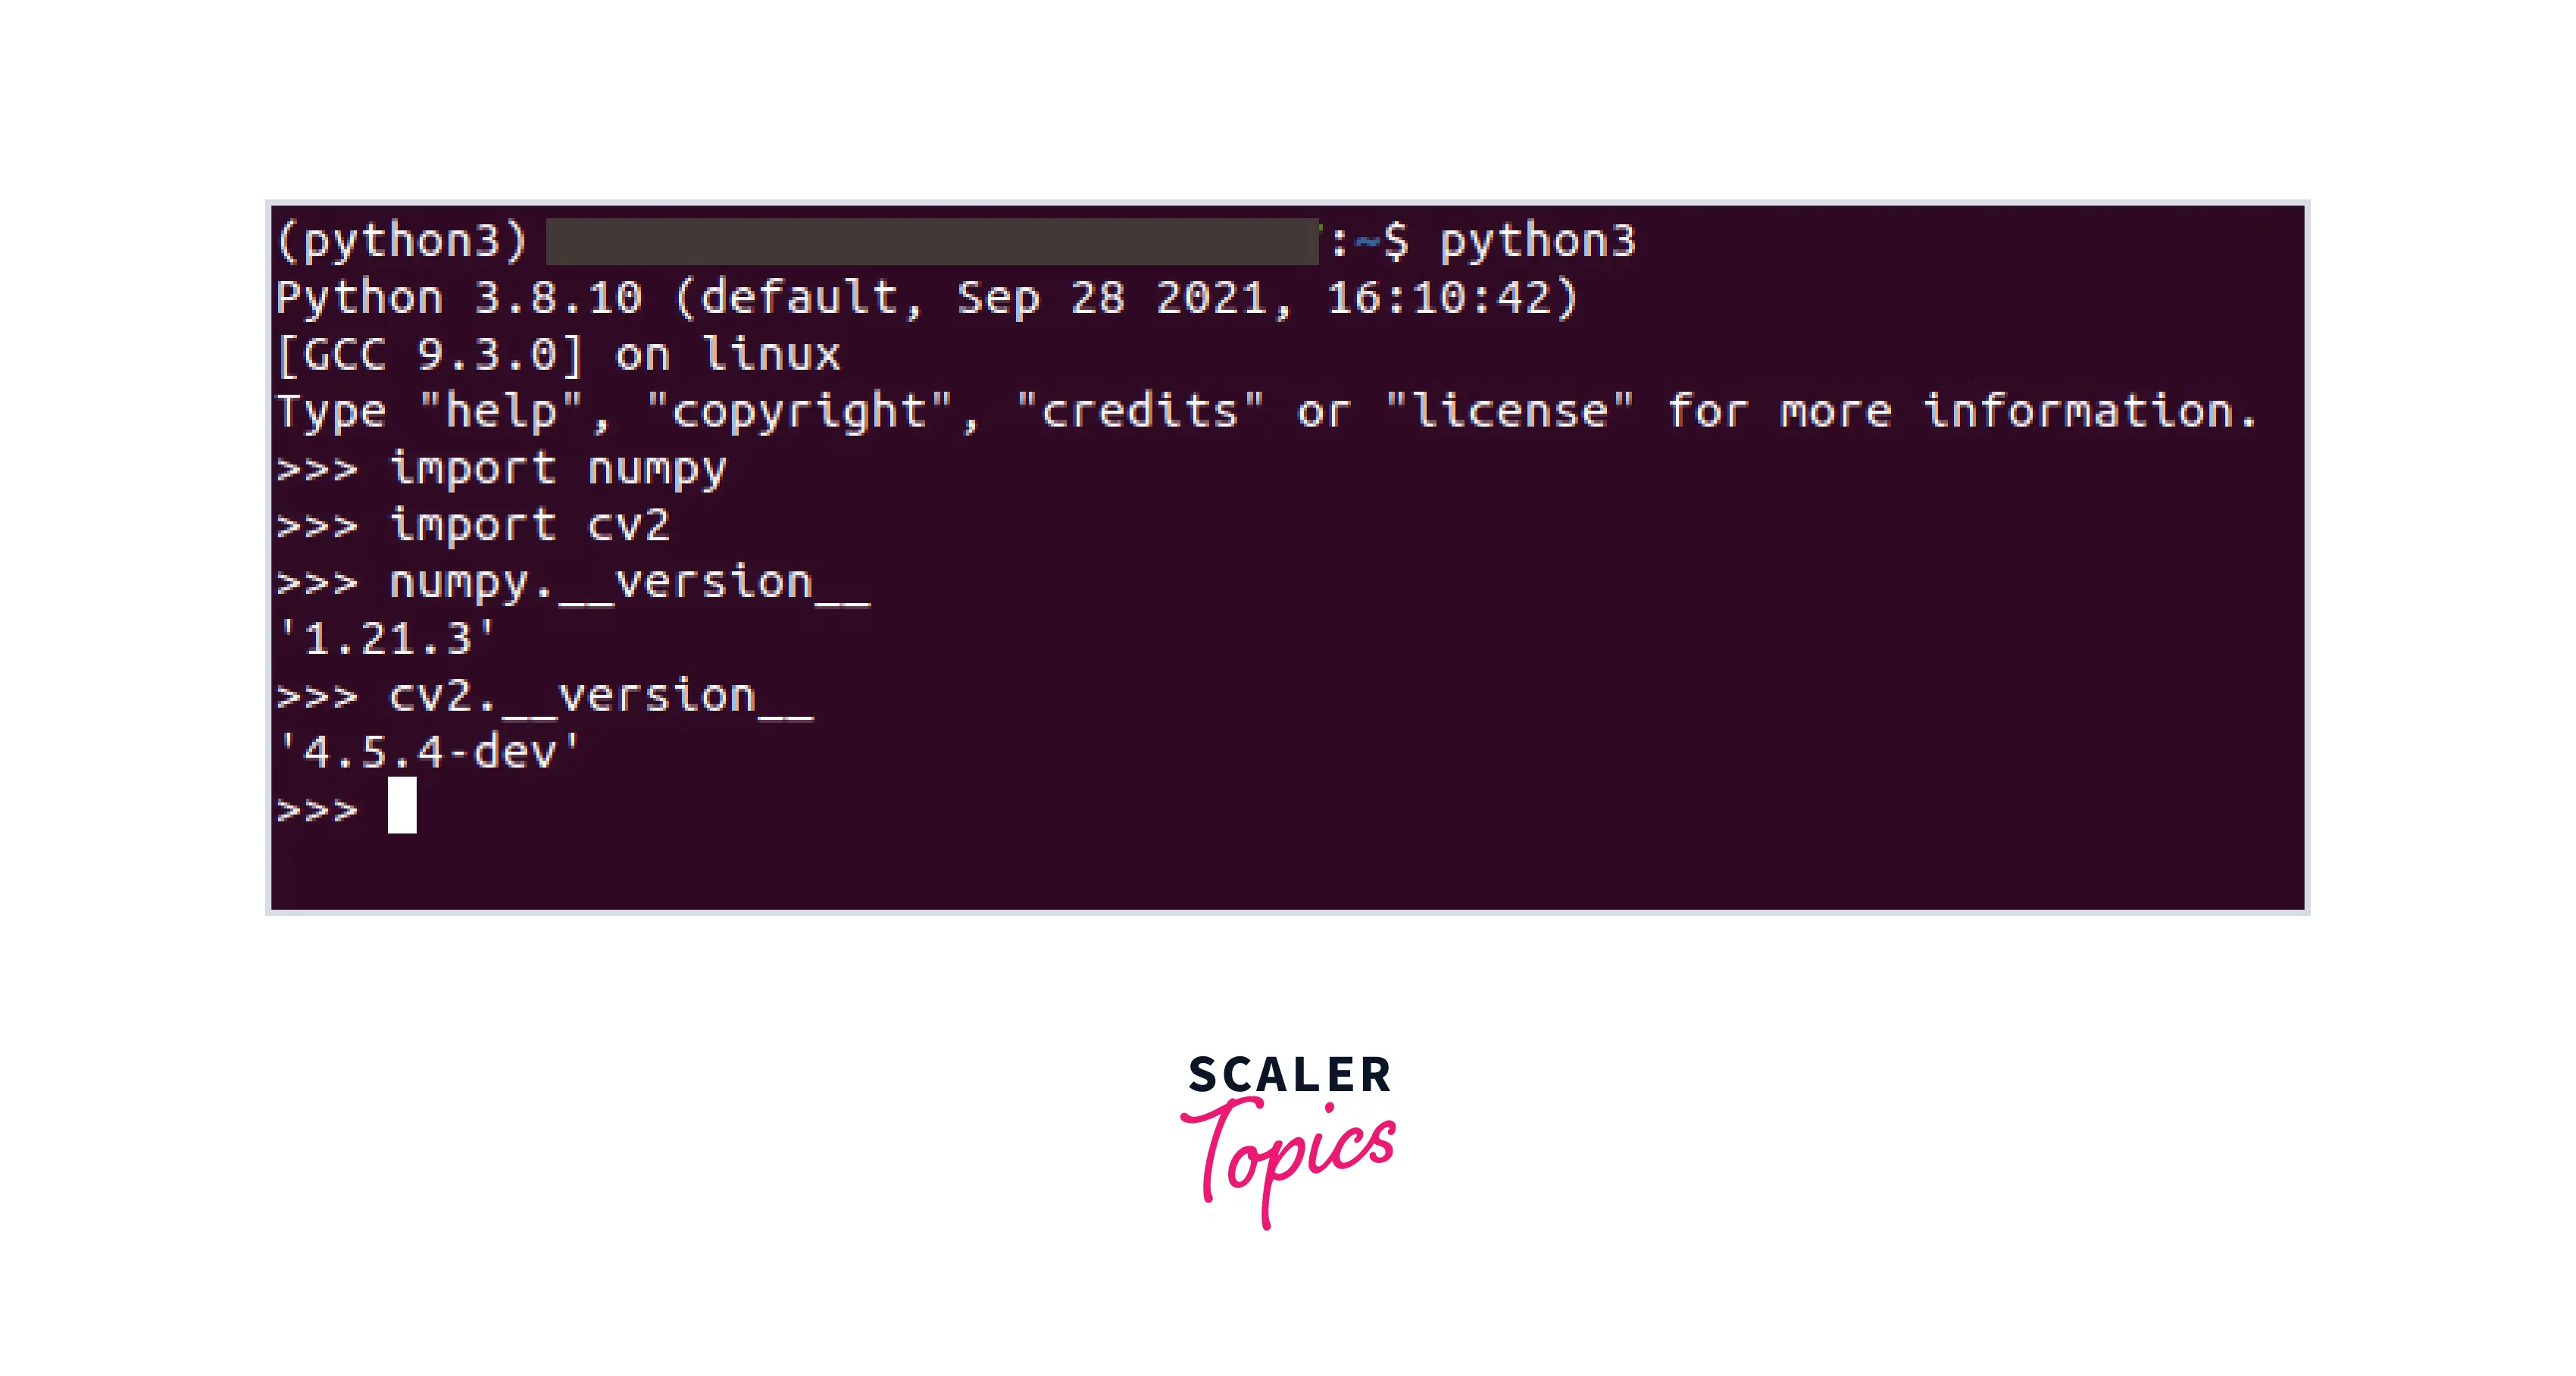
Once virtual environment is created. Now, go to the new terminal and type the command:
Now, you are ready to work with numpy in your Visual Studio code.
Import error numpy core multiarray failed to import
Numpy is used by the majority of machine learning and deep learning Python libraries, including cv2, matplotlib, pyinstaller, PyTorch, etc.
The majority of the time, we require multiple libraries to create our program. Sometimes we install each module separately to fulfill that requirement. According to its compatibility, each module then modifies the NumPy version.
Now, when we use two or more modules, both modules may use different versions of Numpy.
The system raises the «ImportError: numpy.core.multiarray failed to import» error when the dependable requirement is not met.
Let’s see how to solve this error:
Step 1: For can fix this error by updating the versions of our module. For this, first, we need to check the current version of python by typing the command python —version in the terminal.
Step 2: If python is not up to date, we first need to uninstall modules by running the following commands:
Step 3: Then install then again all the above libraries by entering the following commands:
Step 4: Now check the numpy, OpenCV, and other versions
Versions can be checked by using the following command:
—version— with the module or package as shown in the below image.
Conclusion
- Python and Compilers are prerequisites for installing NumPy.
- NumPy can be installed using different packages like conda and pip python packages. Pip contains python libraries. On the other hand, conda has python libraries, c libraries, and also executables like C compilers, etc.
- Numpy can be installed and upgraded on different operating systems like Mac, Linux, etc., using different commands.
- If code breaks or it’s results change because the libraries are updated, use Reproducible Installs. dora operating system.
Type command `pip install NumPy
- Troubleshooting is used to find and fix problems in complex electronic, and software systems.
Read More:
- type() function in Python.
- Types of Errors in Python.
- What is PIP in Python?.
- zip() in Python.
#статьи
-
0
Подробный гайд по самому популярному Python-инструменту для анализа данных и обучения нейронных сетей.
Иллюстрация: A Wolker / Pexels / Colowgee для Skillbox Media

Любитель научной фантастики и технологического прогресса. Хорошо сочетает в себе заумного технаря и утончённого гуманитария. Пишет про IT и радуется этому.
Богдан Островерхов
Пишет о сетях, инструментах для разработчиков и языках программирования. Любит готовить, играть в инди‑игры и программировать на Python.
NumPy — это открытая бесплатная Python-библиотека для работы с многомерными массивами, этакий питонячий аналог Matlab. NumPy чаще всего используют в анализе данных и обучении нейронных сетей — в каждой из этих областей нужно проводить много вычислений с такими матрицами.
В этой статье мы собрали всё необходимое для старта работы с этой библиотекой — вам хватит получаса, чтобы разобраться в основных возможностях.
- Что такое NumPy и зачем она нужна
- Как установить NumPy
- Самый простой способ — Anaconda
- Без лишних файлов — через PIP
- Подключаем NumPy
- Основы NumPy
- Как создавать массивы
- Базовые функции
- Доступ к элементам
- Создание специальных массивов
- Математические операции
- Статистические операции
- Копирование и организации
- Объединение массивов
- Перестановка осей и транспонирование
- Дополнительные возможности
- Что запомнить
NumPy не просто работает с многомерными массивами, но и делает это быстро. Вообще, интерпретируемые языки производят вычисления медленнее компилируемых, а Python как раз язык интерпретируемый. NumPy же сделана так, чтобы эффективно работать с наборами чисел любого размера в Python.
Библиотека частично написана на Python, а частично на C и C++ — в тех местах, которые требуют скорости. Кроме того, код NumPy оптимизирован под большинство современных процессоров. Кстати, как и у Matlab, для NumPy существуют пакеты, расширяющие её функциональность, — например, библиотека SciPy или Matplotlib.

Инфографика: Оля Ежак для Skillbox Media
Массивы в NumPy отличаются от обычных списков и кортежей в Python тем, что они должны состоять только из элементов одного типа. Такое ограничение позволяет увеличить скорость вычислений в 50 раз, а также избежать ненужных ошибок с приведением и обработкой типов.
Мы установим NumPy через платформу Anaconda, которая содержит много разных библиотек для Python. А ещё покажем, как это сделать через PIP.
NumPy можно также использовать через Jupyter Notebook, Google Colab или другими средствами — как вам удобнее. Поэтому выбирайте любой способ и пойдёмте изучать его.
Сначала надо зайти на официальный сайт Anaconda, чтобы скачать последнюю версию Python и NumPy: есть готовые пакеты под macOS, Windows и Linux.

Скриншот: Anaconda / Skillbox Media
Затем открываем установщик, соглашаемся со всеми пунктами и выбираем место для установки.
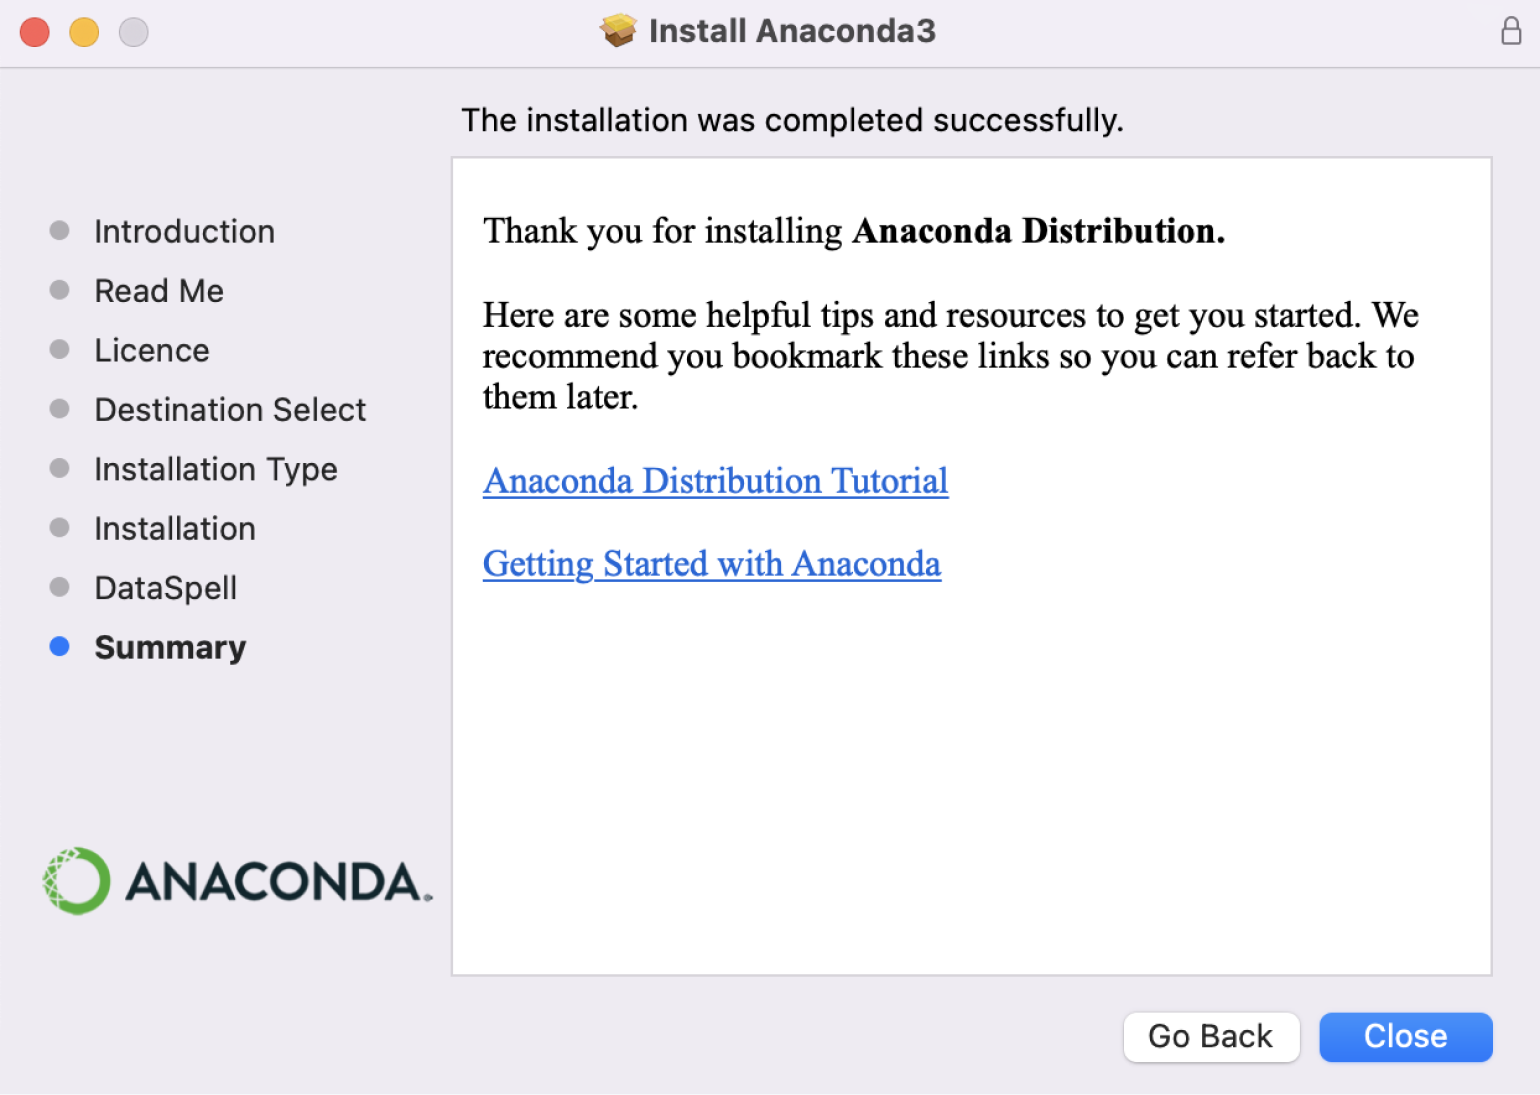
Скриншот: Anaconda / Skillbox Media
Чтобы убедиться, что Python точно установлен, открываем консоль и вводим туда команду python3 — должен запуститься интерпретатор Python, в котором можно писать код. Выглядит всё это примерно так:
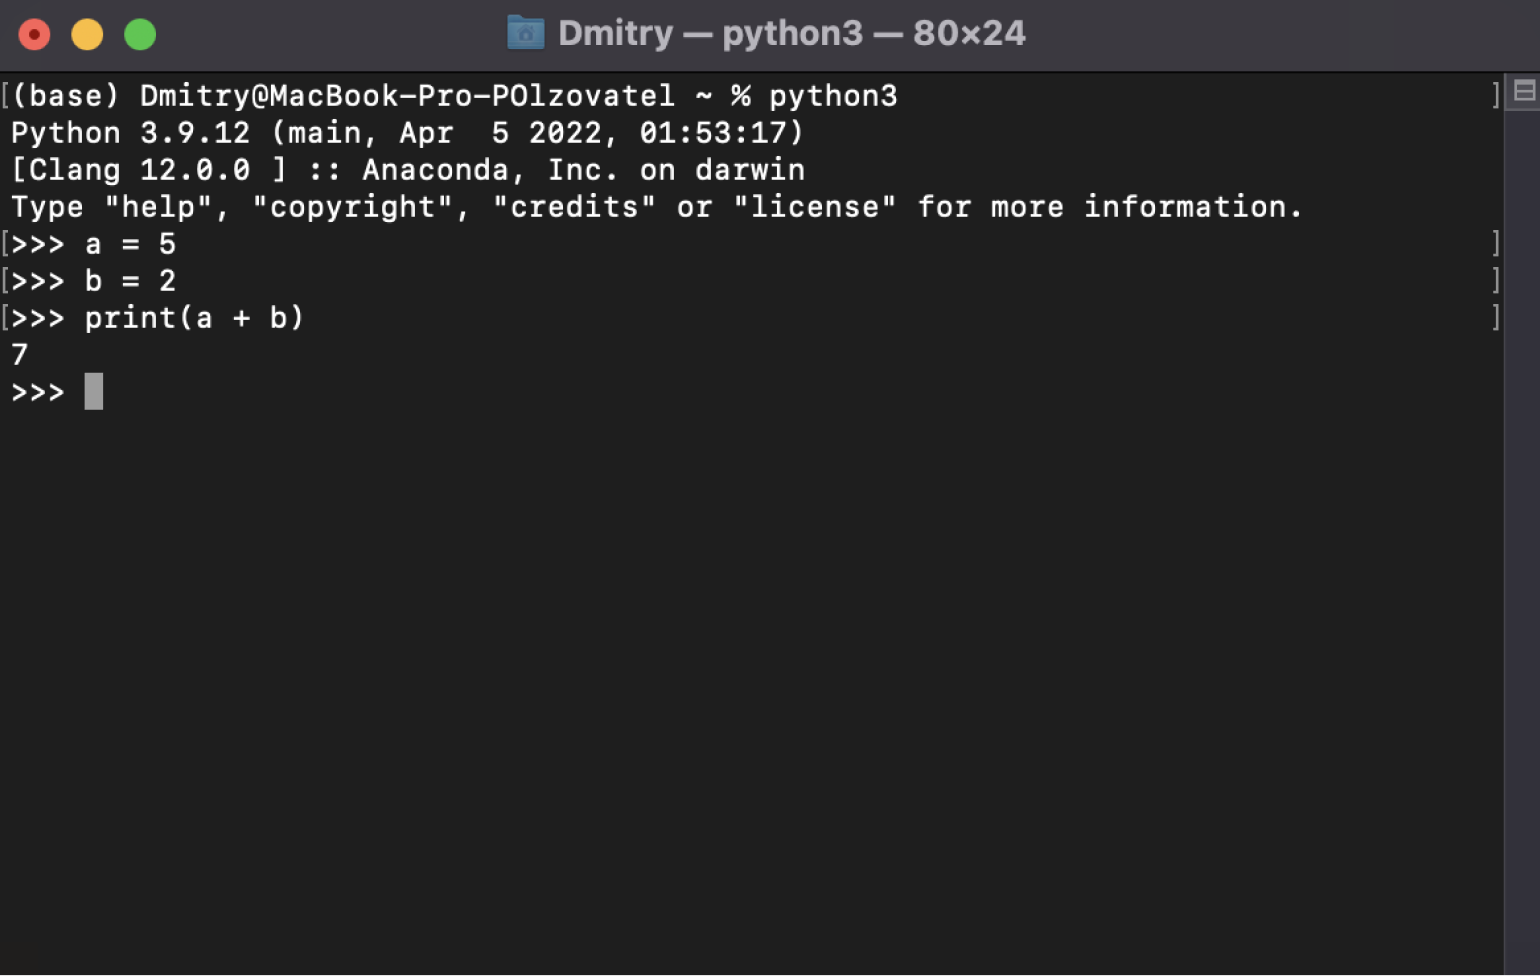
Скриншот: Skillbox Media
Anaconda уже содержит в себе много полезностей — например, NumPy, SciPy, Pandas. Поэтому больше ничего устанавливать не нужно. Достаточно проверить, что библиотека NumPy действительно работает. Введите в интерпретаторе Python в консоли такие команды — пока не важно, что это и как работает, об этом поговорим ниже.
import numpy as np
Следом вот это:
a = np.array([1,2,3])
А потом выводим значение переменной a — чтобы убедиться, что всё работает:
print(a)
Должно получиться что-то вроде вывода на скриншоте:
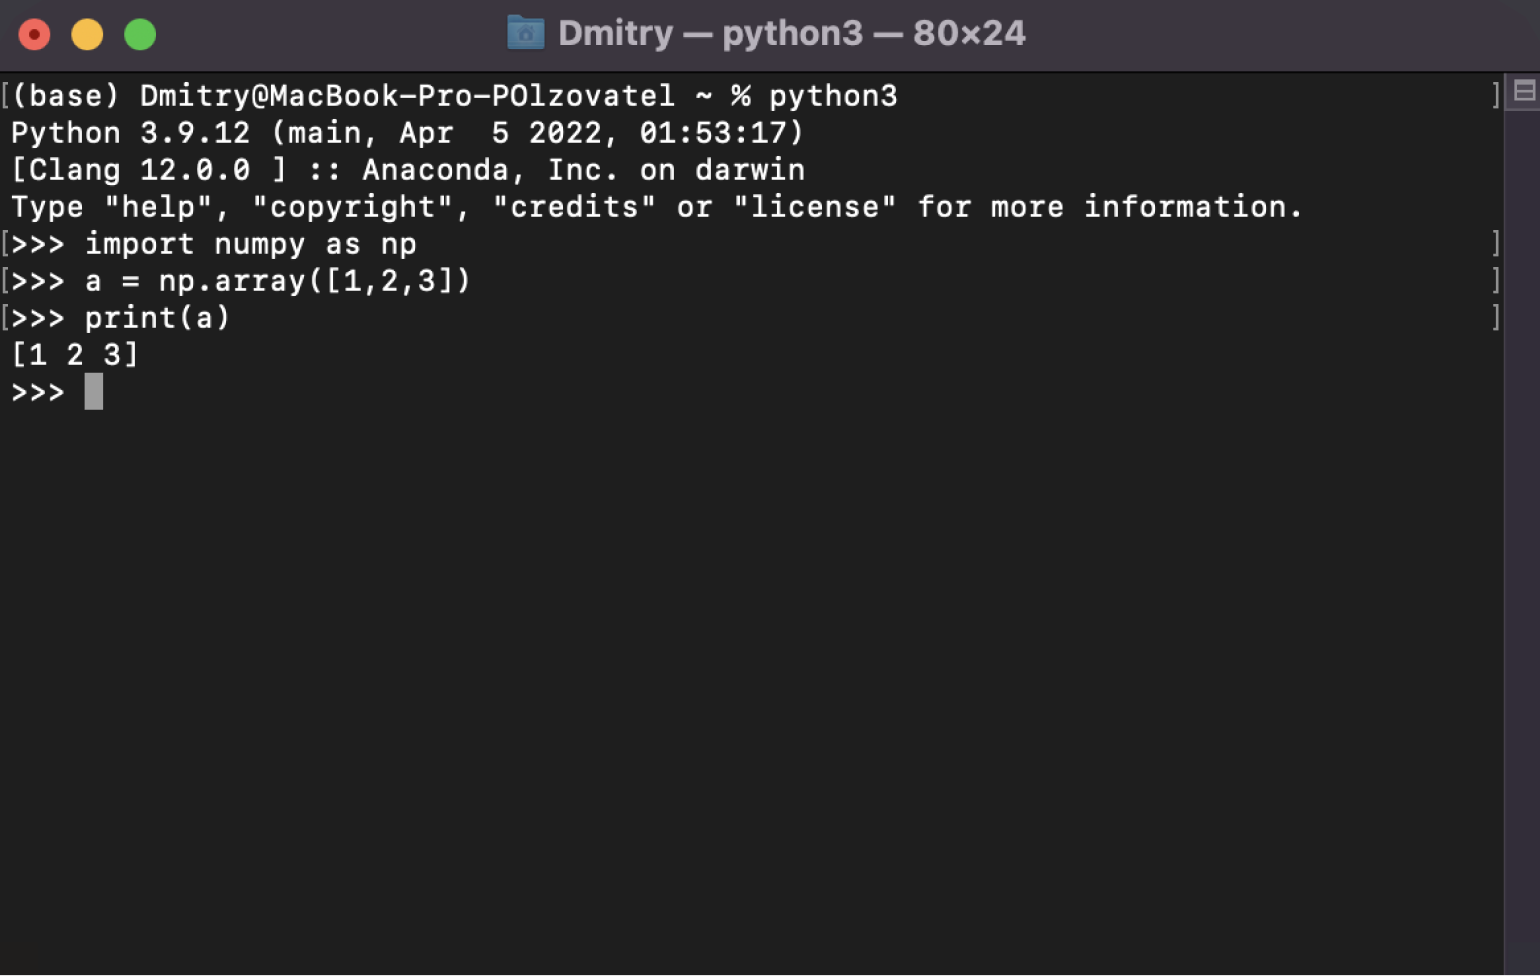
Скриншот: Skillbox Media
Если вам не хочется скачивать огромный пакет Anaconda, вы можете установить только NumPy с помощью встроенного питоновского менеджера пакетов PIP.
Для этого сначала нужно установить Python с официального сайта. Заходим на него, переходим во вкладку Downloads и видим справа последнюю актуальную версию Python:
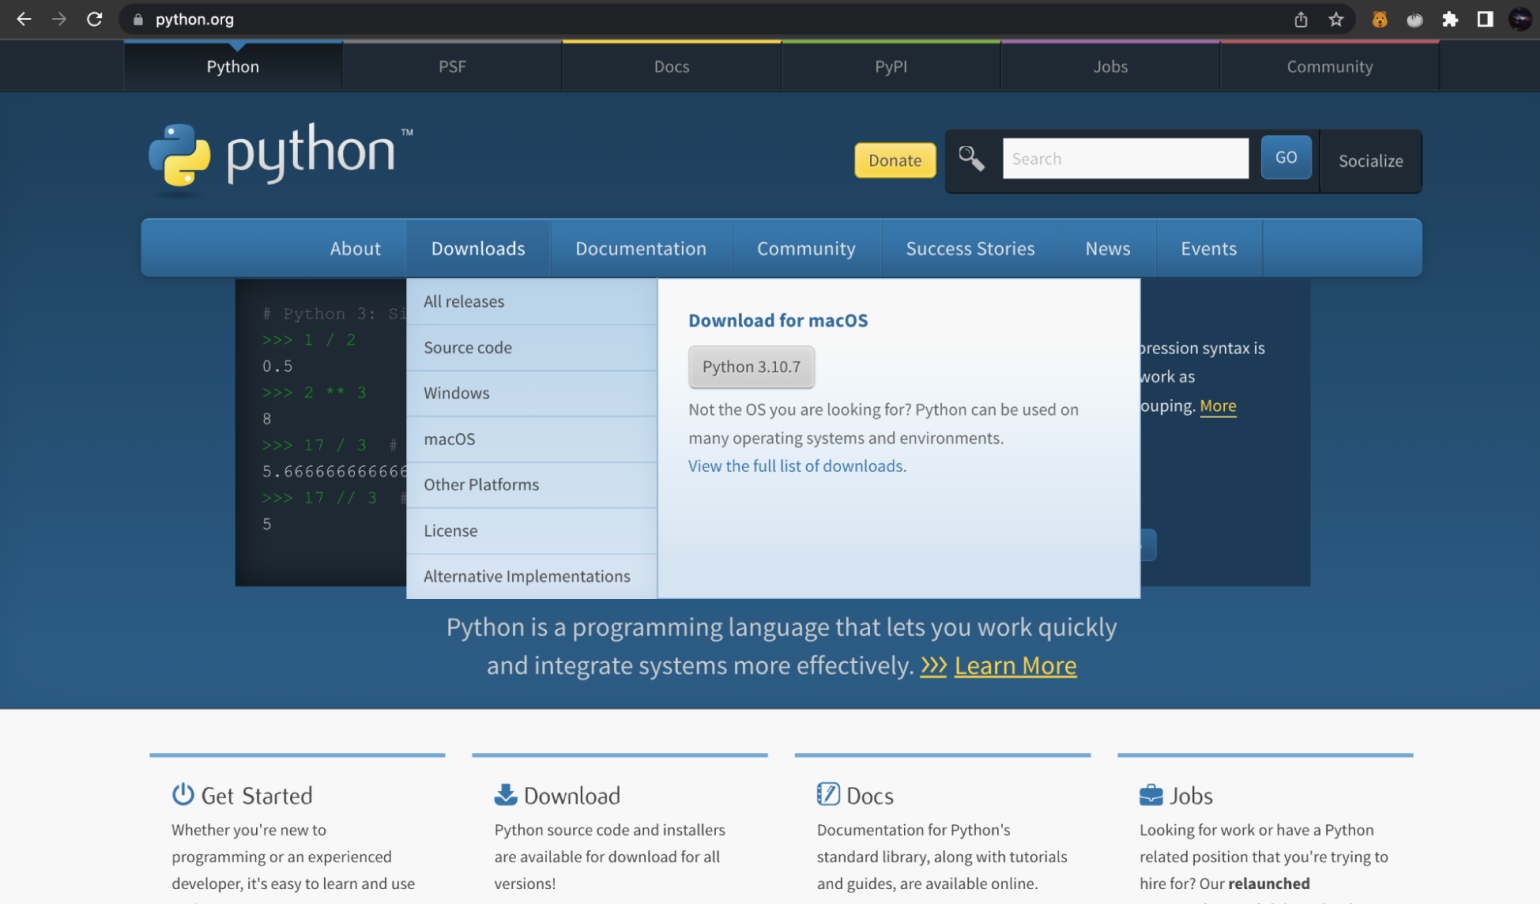
Скриншот: Skillbox Media
После этого начинается стандартная процедура: выбираем место установки и соглашаемся со всеми пунктами.
В конце нас должны поздравить.
Скриншот: Skillbox Media
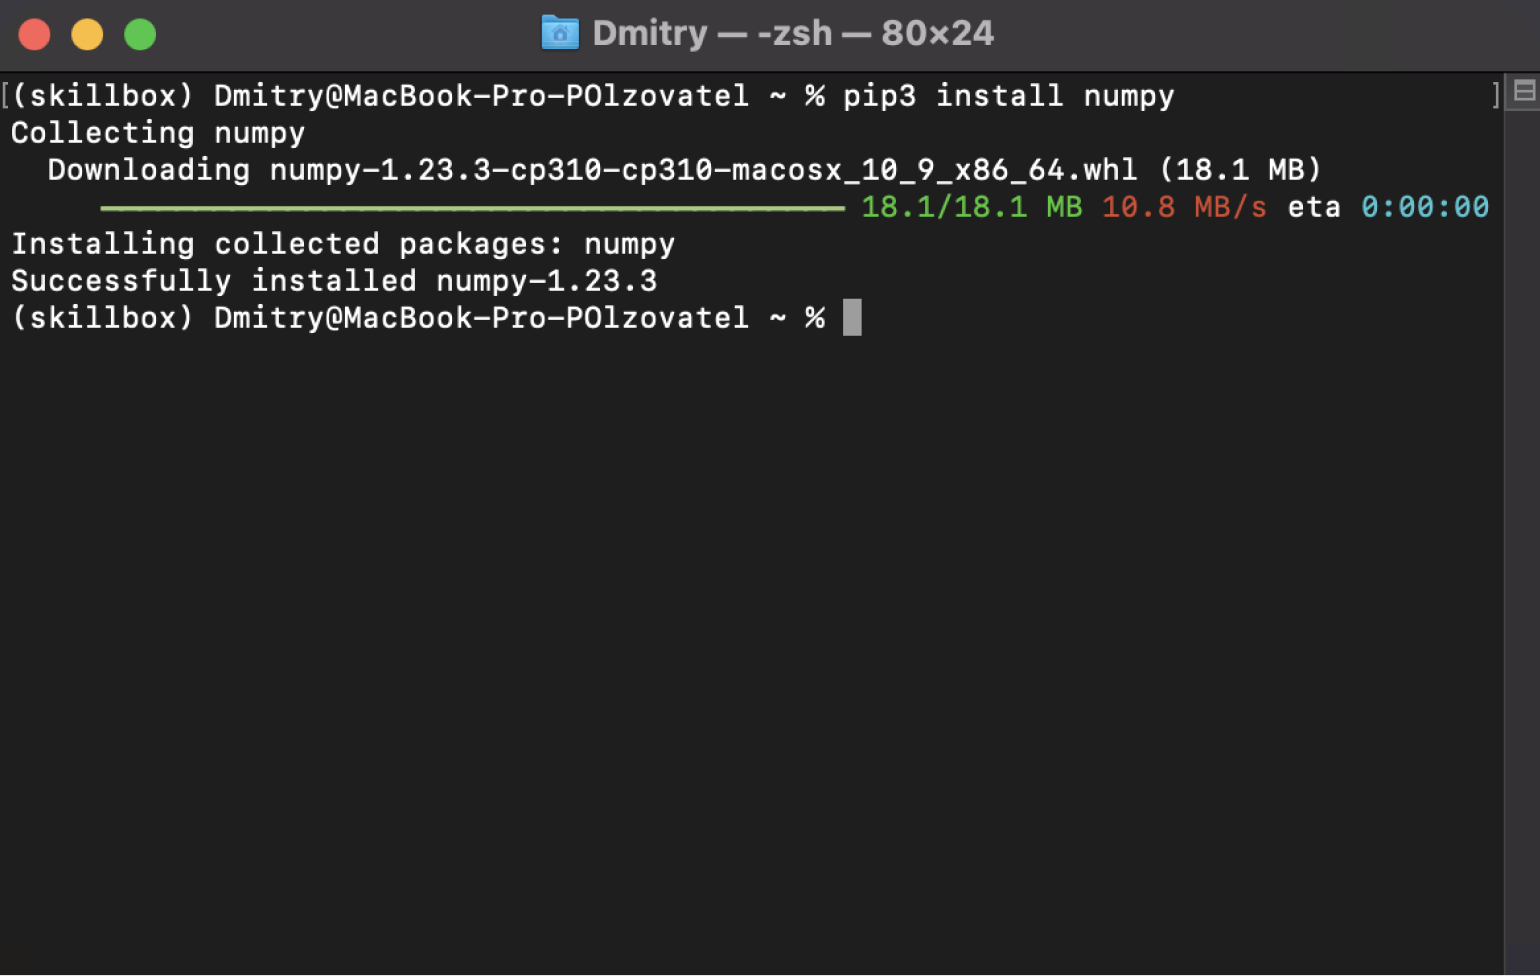
Теперь нужно скачать библиотеку NumPy. Открываем консоль и вводим туда команду:
pip install numpy
Скриншот: Skillbox Media
Если вдруг у вас выпала ошибка, значит, нужно написать другую похожую команду:
pip3 install numpy

Скриншот: Skillbox Media
Теперь у нас точно должна установиться NumPy. Правда, тут нас уже никто не поздравляет — лишь сухо отмечают, что установка завершилась успешно.
Скриншот: Skillbox Media
Перед тем как использовать NumPy, нужно подключить библиотеку в Python-коде — а вы думали, достаточно установить его? Нет, Python ещё должен узнать, что конкретно в этом проекте NumPy нам нужен.
import numpy as np
np — это уже привычное сокращение для NumPy в Python-сообществе. Оно позволяет быстро обращаться к методам библиотеки (две буквы проще, чем пять). Мы тоже будем придерживаться этого сокращения — мы же профессионалы! Хотя можно использовать NumPy и без присваивания отдельного сокращения или назвать её любыми приятными для вас буквами и символами. Но всё же рекомендуем следовать традициям сообщества, чтобы избежать недопонимания со стороны других программистов.
Теперь приступим к изучению базовых понятий и функций NumPy. А чтобы лучше усвоить изученный материал, рекомендуем внимательно изучать код, самостоятельно переписывать его и поиграться с параметрами и числами.
Главный объект библиотеки NumPy — массив. Создаётся он очень просто:
a = np.array([1, 2, 3])
Мы объявили переменную a и использовали встроенную функцию array. В неё нужно положить сам Python-список, который мы хотим создать. Он может быть любой формы: одномерный, двумерный, трёхмерный и так далее. Выше мы создали одномерный массив. Давайте создадим и другие:
a2 = np.array([[1, 2, 3], [4, 5, 6]])
a3 = np.array([[[1, 2, 3], [4, 5, 6]], [[7, 8, 9], [10, 11, 12]]])
Получилось огромное количество скобок. Чтобы понять, как всё это выглядит, воспользуемся функцией print:
print(a)
# [1 2 3]

print(a2)
# [[1 2 3]
#  [4 5 6]]

print(a3)
# [[[1 2 3]
#   [4 5 6]]
#  [[7 8 9]
#   [10 11 12]]]
Как мы видим, в первом случае получился двумерный массив, который состоит из двух одномерных. А во втором — трёхмерный, состоящий из двумерных. Если двигаться вверх по измерениям, то они будут следовать похожей логике:
- четырёхмерный состоит из трёхмерных;
- пятимерный — это несколько четырёхмерных;
- n-мерный — это несколько (n-1)-мерных.
Проще показать это на иллюстрации (главное, не потеряйтесь в измерениях):
Инфографика: Оля Ежак для Skillbox Media
В NumPy-массивы можно передавать не только целые числа, но и дробные:
b = np.array([1.4, 2.5, 3.7])

print(b)
# [1.4 2.5 3.7]
А если вы хотите указать конкретный тип, то это можно сделать с помощью дополнительного параметра dtype:
c = np.array([1, 2, 3], dtype='float32')

print(c)
# [1. 2. 3.]
Целые числа сразу были приведены к числам с плавающей точкой. Таких преобразований существует много — они нужны, чтобы не занимать лишнюю память. Например, числа int32 занимают 32 бита, или 4 байта, а int16 — 16 бит, или 2 байта. Программисты используют параметр dtype, когда точно знают, что их переменные будут находиться в диапазоне от −32 768 до 32 767.
Если реальные значения элементов массива выйдут за рамки явно указанного типа, то их значения в какой-то момент просто обнулятся и начнут отсчёт заново:
# Для примера определим переменную типа int16
a = np.int16(32000)
b = np.int16(768)

# Выполним сложение с переполнением
result = np.int16(a + b)

# Проверим результат, который сбросится до своего минимального значения -32768
print(result)
# Out: -32768
Теперь, когда мы умеем создавать массивы и задавать им разные значения, давайте узнаем, какие у них есть встроенные функции.
Допустим, у нас есть такой объект:
a = np.array([1,2,3], dtype='int32')

print(a)
# [1 2 3]
Чтобы узнать, сколько у него измерений, воспользуемся функцией ndim:
print(a.ndim)
# 1
Всё верно, ведь у нас одномерный массив, или вектор. Если бы он был двумерным, то и результат оказался бы другим:
b = np.array([[1, 2, 3], [4, 5, 6]])

print(b.ndim)
# 2
Хорошо, с размерностью понятно. А как посчитать количество строк и столбцов? Для этого есть функция shape:
print(a.shape)
# (3,)
Получилось слегка странно, но всему есть объяснение. Дело в том, что вектор — это всего лишь одномерный массив. У векторов в библиотеке NumPy есть только строки — или элементы. Поэтому функция shape выдала число 3.
С двумерными наборами данных ситуация понятнее:
print(b.shape)
# (2, 3)
В b две строки и три столбца.
Для трёхмерных и n-мерных массивов функция shape будет добавлять дополнительные числа в кортеже через запятую:
с = np.array([[[1, 2, 3], [4, 5, 6]], [[7, 8, 9], [10, 11, 12]]])

print(с.shape)
# (2, 2, 3)
Читается это так: в объекте c два трёхмерных массива с двумя строками и тремя столбцами.
Кроме размерностей, можно также узнать тип элементов — в этом поможет функция dtype (не путайте её с одноимённым параметром):
a = np.array([1,2,3], dtype='int32')

print(a.dtype)
# Out: int32
Если не присваивать тип элементам вручную, по умолчанию будет задан int32.
Ещё можно узнать количество элементов с помощью функции size:
print(a.size)
# 3
А через функции itemsize и nbytes можно узнать, какое количество байт в памяти занимает один элемент и какое количество байт занимает весь массив:
b = np.array([[1, 2, 3], [4, 5, 6]], dtype='int16')

print(b.itemsize)
# 2

print(b.nbytes)
# 12
Один элемент занимает 2 байта, а весь объект b из 6 элементов — 2 × 6 = 12 байтов.
В NumPy можно обращаться к отдельным элементам, строкам или столбцам, а также точечно выбирать последовательность нужных элементов. Рассмотрим всё подробнее.
Допустим, у нас есть двумерный массив:
a = np.array([[1, 2, 3, 4, 5, 6, 7], [8, 9, 10, 11, 12, 13, 14]])

print(a)
# Out:
# [[ 1  2  3  4  5  6  7]
#  [ 8  9 10 11 12 13 14]]
И мы хотим достать из него элемент, который находится в первой строке на пятом месте. Сделать это можно с помощью специального оператора []:
print(a[0, 4])
# 5
Почему 0 и 4? Потому что нумерация элементов в Python начинается с нуля, а значит, первая строка будет нулевой, а пятый столбец — четвёртым.
Если бы у нас был трёхмерный массив, обращение к его элементам было бы похожим:
c = np.array([[[1, 2, 3], [4, 5, 6]], [[7, 8, 9], [10, 11, 12]]])

print(c)
# Out:
# [[[ 1  2  3]
#   [ 4  5  6]]

#  [[ 7  8  9]
#   [10 11 12]]]

print(c[1, 1, 1])
# 11
Здесь мы сначала обратились ко второму двумерному массиву, а затем выбрали в нём вторую строку и второй столбец. Там и находилось число 11.
Кроме отдельных элементов, в библиотеке NumPy можно обратиться к целой строке или столбцу с помощью оператора :. Он позволяет выбрать все элементы указанной строки или столбца:
a = np.array([[1, 2, 3, 4, 5, 6, 7], [8, 9, 10, 11, 12, 13, 14]])

print(a[0, :])
# [1 2 3 4 5 6 7]

print(a[:, 0])
# [1 8]
В первом случае мы выбрали всю первую строку, а во втором — первый столбец.
Ещё можно использовать продвинутые способы выделения нужных нам элементов.
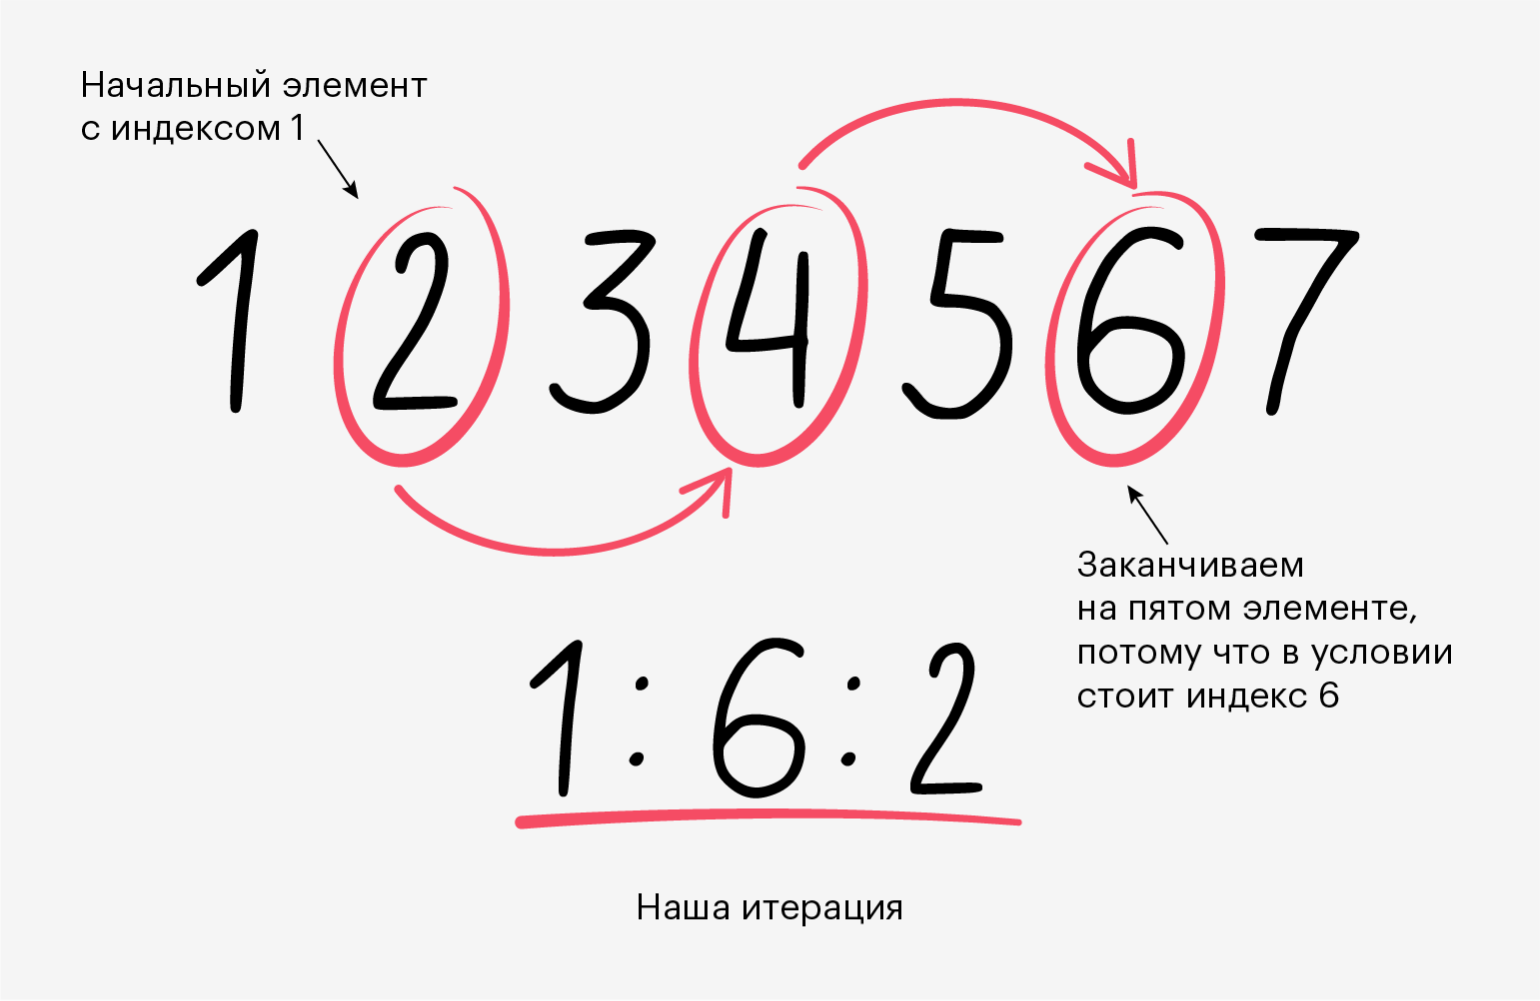
Кстати, оператор : на самом деле представляет собой сокращённую форму конструкции начальный_индекс:конечный_индекс:шаг.
Давайте остановимся на ней подробнее:
b = np.array([[1, 2, 3, 4], [5, 6, 7, 8]])

print(b[0, 1:4:2])
# [2 4]
Мы указали, что хотим выбрать первую строку, а затем уточнили, какие именно столбцы нам нужны: 1:4:2.
- Первое число означает, что мы начинаем брать элементы с первого индекса — второго столбца. В примере это число 2.
- Второе число — что мы заканчиваем итерацию на четвёртом индексе, то есть проходим всю строку.
- Третье число указывает, с каким шагом мы идём по строке. В нашем примере — с шагом в два элемента. То есть мы пройдём по элементам 1 и 3, которые соответствуют числам 2 и 4.
Давайте посмотрим на другой пример:
a = np.array([[1, 2, 3, 4, 5, 6, 7], [8, 9, 10, 11, 12, 13, 14]])

print(a)
# Out:
# [[ 1  2  3  4  5  6  7]
#  [ 8  9 10 11 12 13 14]]

print(a[1, 0:-1:3])
# [ 8 11]
Здесь мы использовали отрицательные индексы — они позволяют считать индексы элементов справа налево. –1 означает, что последний индекс — это последний столбец второй строки. Заметьте, что 6-й столбец не вывелся. Это значит, что NumPy не доходит до этого индекса, а заканчивает обход на один индекс раньше.
Инфографика: Оля Ежак для Skillbox Media
Ещё мы можем менять значения в NumPy-массиве с помощью той же операции доступа к элементам. Например:
c = np.array([[0, 2], [4, 6]])
c[0, 0] = 1

print(c)
# [[1 2]
#  [4 6]]
Мы заменили элемент из первой строки и первого столбца (элемент 0) на единицу. И наш список данных успешно изменился.
Кроме отдельных элементов, можно заменять любые последовательности элементов с помощью конструкции начальный_индекс:конечный_индекс:шаг и её упрощённой версии — :.
c = np.array([[0, 2], [4, 6]])
c[0, :] = [3, 3]

print(c)
# [[3 3]
#  [4 6]]
Теперь в переменной с вся первая строка заменилась на тройки. Главное при такой замене — учитывать размер строки, чтобы не возникло ошибок. Например, если присвоить первой строке вектор из трёх элементов, интерпретатор будет ругаться:
c = np.array([[0, 2], [4, 6]])

c[0, :] = [3, 3, 3]
print(c)
# Out:
# Traceback (most recent call last):
#   File "<stdin>", line 1, in <module>
#     c[0, :] = [3, 3, 3]
#         ~^^^^^^
# ValueError: could not broadcast input array from shape (3,) into shape (2,)
Текст ошибки сообщает, что нельзя присвоить одномерному массиву с размером 2 массив размером 3.
Мы научились создавать массивы любой размерности. Но иногда хочется создать их с уже заполненными значениями — например, забить все ячейки нулями или единицами. NumPy может и это.
Массив из нулей. Чтобы создать его, используем функцию zeros.
a = np.zeros((2, 2))

print(a)
# [[0. 0.]
#  [0. 0.]]
Первое, что нужно помнить, — как задавать размер. Он задаётся кортежем (2, 2). Если указать размер без скобок, то снова получим ошибку:
a = np.zeros(2, 2)

print(a)
# Out:
# Traceback (most recent call last):
#   File "<stdin>", line 1, in <module>
#     a = np.zeros(2, 2)
#         ^^^^^^^^^^^^^^
# TypeError: Cannot interpret '2' as a data type
А всё потому, что без скобок NumPy расценивает второй элемент (число 2) как тип данных, который должен быть указан для параметра dtype.
Если указать только одно число, создастся вектор размером два элемента. В этом случае уже не нужно ставить дополнительные скобки:
a = np.zeros(2)

print(a)
# [0. 0.]
Ещё стоит отметить, что элементам по умолчанию присваивается тип float64. Это дробные числа, которые занимают в памяти 64 бита, или 8 байт. Если нужны именно целые числа, то мы по старой схеме указываем это в параметре dtype — через запятую:
a = np.zeros(2, dtype='int32')

print(a)
# [0 0]
Массив из единиц. Он создаётся точно так же, как и из нулей, но используется функция ones:
b = np.ones((4, 2, 2), dtype='int32')

print(b)
# Out:
# [[[1 1]
#   [1 1]]

#  [[1 1]
#   [1 1]]

#  [[1 1]
#   [1 1]]

#  [[1 1]
#   [1 1]]]
Здесь мы создали трёхмерный массив из четырёх двумерных, каждый из которых имеет две строки и два столбца. А также указали, что элементы должны иметь тип int32.
Массив из произвольных чисел. Иногда бывает нужно заполнить массив какими-то отличными от нуля и единицы числами. В этом поможет функция full:
c = np.full((2, 2), 5)

print(c)
# [[5 5]
#  [5 5]]
Здесь мы сначала указали, какой размер должен быть у массива через кортеж, — (2,2), а затем число, которым мы хотим заполнить все его элементы, — 5.
Равно как и у функций zeros и ones, элементы по умолчанию будут иметь тип float64. А размер должен передаваться в виде кортежа — (2, 2).
Массив случайных чисел. Он создаётся с помощью функции random.rand:
d = np.random.rand(3, 2)

print(d)
# Out:
# [[0.22815968 0.61195664]
#  [0.85115576 0.36586858]
#  [0.32893068 0.6239481]]
Получилось что-то странное. Но так и должно быть — ведь NumPy генерирует случайные числа в диапазоне от 0 до 1 с восемью знаками после запятой.
Ещё одна странность — то, как задаётся размер. Здесь это нужно делать не через кортеж (3, 2), а просто указывая размерности через запятую. Всё потому, что в функции random.rand нет параметра dtype.
Чтобы создать массив случайных чисел, нужно воспользоваться функцией random.randint:
e = np.random.randint(-5, 10, size=(4, 4))

print(e)
# Out:
# [[ 4  2  2  1]
#  [ 0  4 -1 -4]
#  [-3 -4  3  9]
#  [-3  5  5 -5]]
У нас получился массив размером четыре на четыре — size=(4, 4) — с целыми числами из диапазона от –5 до 10. Как и в предыдущем случае, создаётся такой массив слегка странно — но такова жизнь NumPy-программистов.
Единичная матрица. Она нужна тем, кто занимается линейной алгеброй. По диагонали такой матрицы элементы равны единице, а все остальные элементы — нулю. Создаётся она с помощью функции identity или eye:
i = np.identity(4)

print(i)
# Out:
# [[1. 0. 0. 0.]
#  [0. 1. 0. 0.]
#  [0. 0. 1. 0.]
#  [0. 0. 0. 1.]]
Здесь задаётся только количество строк матрицы, потому что единичная матрица должна быть симметричной — иметь одинаковое количество строк и столбцов.
И всё также можно указать тип элементов с помощью параметра dtype:
i = np.identity(4, dtype='int32')

print(i)
# Out:
# [[1 0 0 0]
#  [0 1 0 0]
#  [0 0 1 0]
#  [0 0 0 1]]
Массивы из NumPy поддерживают все стандартные арифметические операции — например, сложение, деление, вычитание. Работает это поэлементно:
a = np.array([1, 2, 3, 4])

print(a)
#  [1 2 3 4]

print(a + 3)
#  [4 5 6 7]
К каждому элементу a прибавилось число 3, а размерность не изменилась. Все остальные операции работают точно так же:
a = np.array([1, 2, 3, 4])

print(a - 2)
#  [-1  0  1  2]

print(a * 2)
#  [2 4 6 8]

print(a / 2)
#  [0.5 1.  1.5 2. ] # Здесь тип элементов приведён к 'float64'

print(a ** 2)
#  [ 1  4  9 16]
Ещё можно проводить любые математические операции с массивами одинакового размера:
a = np.array([[1, 2], [3, 4]])
b = np.array([[2, 2], [2, 2]])

print(a + b)
# [[3 4]
#  [5 6]]

print(a * b)
# [[2 4]
#  [6 8]]

print(a ** b)
# [[ 1  4]
#  [ 9 16]]
Здесь каждый элемент a складывается, умножается и возводится в степень на элемент из такой же позиции массива b.
Кроме примитивных операций, в NumPy можно проводить и более сложные — например, вычислить косинус:
a = np.array([[1, 2], [3, 4]])

print(np.cos(a))
# [[ 0.54030231 -0.41614684]
#  [-0.9899925  -0.65364362]]
Все математические функции вызываются по похожему шаблону: сначала пишем np.название_математической_функции, а потом передаём внутрь массив — как мы и сделали выше.
Ещё можно применять различные операции из линейной алгебры, математической статистики и так далее. Давайте для примера перемножим матрицы по правилам линейной алгебры:
a = np.ones((2, 3))

print(a)
# [[1. 1. 1.]
#  [1. 1. 1.]]

b = np.full((3, 2), 2)
print(b)
# [[2 2]
#  [2 2]
#  [2 2]]

print(np.matmul(a, b))
# [[6. 6.]
#  [6. 6.]]
Не будем разбирать математическую составляющую — предполагается, что вы уже знакомы с математикой и используете NumPy для выражения операций языком программирования. Полный список всех поддерживаемых в библиотеке операций можно найти в официальной документации.
Если нужно вычислить среднее значение массива, его медиану, дисперсию или другие статистические показатели, то нам помогут агрегатные функции. В NumPy агрегатные функции — это методы, которые применяются к массиву и возвращают одно итоговое значение. Общая формула: агрегатор.массив().
У агрегатных функций есть необязательный параметр axis. Он указывает на ось, вдоль которой будет производиться вычисление. Напоминаем, что у массива может быть одна или несколько осей в зависимости от размерности:
- Ось (axis) 0. Это первая ось, которая соответствует направлению вниз по строкам. Если у нас двумерный набор данных и мы просуммируем элементы вдоль оси 0, то получим сумму элементов каждого столбца.
- Ось (axis) 1. Это вторая ось, которая проходит вдоль второго измерения массива. В двумерной структуре она соответствует направлению по столбцам. Если мы просуммируем элементы вдоль оси 1, то в результате получим сумму элементов каждой строки.
- Ось (axis) 2 и далее. Это дополнительные оси для массивов с тремя и более измерениями. Ось 2 — третья ось, ось 3 — четвёртая и так далее. Каждая последующая ось будет добавлять новое измерение и направление для массивов большей размерности.
Если мы используем агрегатную функцию sum без параметров, то она вернёт сумму всех элементов. А если указать sum (axis=0), то будет возвращена сумма элементов вдоль первой оси. Параметр axis не должен превышать количество осей массива. То есть для одномерного массива он не может превышать 0, для двумерного — 1 и так далее. Вот как это работает:
# Создаём двумерный массив
a = np.array([[1, 2, 3], [4, 5, 6]])

# Вычисляем сумму всех элементов массива
total_sum = a.sum()
print(total_sum)
# 21

# Вычисляем сумму элементов вдоль оси 0 (суммируем столбцы)
sum_along_axis0 = a.sum(axis=0)
print(sum_along_axis0)
# [5 7 9]

# Вычисляем сумму элементов вдоль оси 1 (суммируем строки)
sum_along_axis1 = a.sum(axis=1)
print(sum_along_axis1)
# [ 6 15]
Мы рассмотрели пример с агрегатной функцией sum, которая рассчитывает сумму всех элементов массива или оси. Теперь разберём другие агрегаторы.
С помощью функции mean можно вычислить среднее арифметическое значение — сумму выбранных элементов, делённую на их количество:
a = np.array([[1, 2, 3], [4, 5, 6]])

# Среднее арифметическое всех элементов массива
mean_all = a.mean()
print(mean_all)
# 3.5

# Среднее арифметическое элементов вдоль оси 0
mean_axis0 = a.mean(axis=0)
print(mean_axis0)
# [2.5 3.5 4.5]

# Среднее арифметическое элементов вдоль оси 1
mean_axis1 = a.mean(axis=1)
print(mean_axis1)
# [2. 5.]
Агрегаторы min и max находят минимальное и максимальное значение:
a = np.array([[1, 2, 3], [4, 5, 6]])

# Минимальное значение среди всех элементов массива
min_all = a.min()
print(min_all)
# 1

# Минимальное значение среди элементов вдоль оси 0
min_axis0 = a.min(axis=0)
print(min_axis0)
# [1 2 3]

# Минимум значение среди элементов вдоль оси 1
min_axis1 = a.min(axis=1)
print(min_axis1)
# [1 4]
Если воспользуемся функцией prod, то вычислим произведение элементов:
a = np.array([[1, 2, 3], [4, 5, 6]])

# Произведение всех элементов массива
prod_all = a.prod()
print(prod_all)
# 720

# Произведение элементов вдоль оси 0
prod_axis0 = a.prod(axis=0)
print(prod_axis0)
# [ 4 10 18]

# Произведение элементов вдоль оси 1
prod_axis1 = a.prod(axis=1)
print(prod_axis1)
# [  6 120]
Ещё посмотрим работу функции var, которая определяет дисперсию, — узнаем, насколько данные отличаются друг от друга и от среднего значения:
a = np.array([[1, 2, 3], [4, 5, 6]])

# Дисперсия всех элементов массива
var_all = a.var()
print(var_all)
# 2.9166666666666665

# Дисперсия элементов вдоль оси 0
var_axis0 = a.var(axis=0)
print(var_axis0)
# [2.25 2.25 2.25]

# Дисперсия элементов вдоль оси 1
var_axis1 = a.var(axis=1)
print(var_axis1)
# [0.66666667 0.66666667]
О других агрегаторах читайте в документации в разделе «Статистика».
Если в NumPy вы присвоите массив другой переменной, то просто создадите ссылку на него. Разберём на примере:
a = np.array([1, 2, 3])
b = a
b[0] = 5

print(b)
# [5 2 3]

print(a)
# [5 2 3]
Как мы видим, при изменении b меняется также и a. Дело в том, что массивы в NumPy — это только ссылки на области в памяти. Поэтому, когда мы присвоили a переменной b, на самом деле мы просто присвоили ей ссылку на первый элемент a в памяти.
Чтобы создать независимую копию a, используйте функцию copy:
a = np.array([1, 2, 3])
b = a.copy()
b[0] = 5

print(b)
# [5 2 3]

print(a)
# [1 2 3]
Для организации массива мы можем менять его форму (shape) и размер (size). Форма — это структура, которая представлена в виде кортежей и определяет количество элементов вдоль каждой оси. Размер — это общее количество элементов. Например, форма (2, 3) означает, что массив имеет две строки и три столбца. А вот размер 6 указывает на то, что внутри массива находится шесть элементов.
Ещё мы можем менять размер массива с помощью функции reshape:
a = np.array([[1, 2, 3, 4], [5, 6, 7, 8]])

print(a)
# Out:
# [[1 2 3 4]
#  [5 6 7 8]]

b = a.reshape((4, 2))
print(b)
# Out:
# [[1 2]
#  [3 4]
#  [5 6]
#  [7 8]]
Изначально размер a был 2 на 4. Мы переделали его под 4 на 2. Заметьте: новые размеры должны соответствовать количеству элементов. В противном случае Python вернет ошибку:
a = np.array([[1, 2, 3, 4], [5, 6, 7, 8]])

b = a.reshape((4, 3))
print(b)

# Out:
# Traceback (most recent call last):
#   File "<stdin>", line 1, in <module>
#     b = a.reshape((4, 3))
#         ^^^^^^^^^^^^^^^^^
# ValueError: cannot reshape array of size 8 into shape (4,3)
Ещё мы можем воспользоваться функцией resize, которая изменяет форму и размер. Если новый размер больше исходного, то элементы повторяться или заполняться нулями. Если, наоборот, новый размер будет меньше исходного, то лишние элементы функция отбросит:
a = np.array([1, 2, 3])
b = np.resize(a, (2, 4))

# Исходный массив
print(a)
# [1 2 3]

# Изменённый массив с повторяющимися данными
print(b)
# [[1 2 3 1]
#  [2 3 1 2]]
NumPy позволяет нам «наслаивать» массивы друг на друга и соединять их с помощью функций vstack и hstack:
v1 = np.array([1, 2, 3])
v2 = np.array([9, 8, 7])
v3 = np.vstack([v1, v2])

print(v3)
# Out:
# [[1 2 3]
#  [9 8 7]]
Здесь мы создали двумерный массив из двух векторов одинакового размера, которые «поставили» друг на друга. То же самое можно сделать и горизонтально:
h1 = np.ones((2, 4))
h2 = np.zeros((2, 2))
h3 = np.hstack((h1, h2))

print(h3)
# Out:
# [[1. 1. 1. 1. 0. 0.]
#  [1. 1. 1. 1. 0. 0.]]
К массиву из единиц справа присоединился массив из нулей. Главное — чтобы количество строк было у обоих одинаковым, иначе вылезет ошибка:
h1 = np.ones((2, 4))
h2 = np.zeros((3, 2))
h3 = np.hstack((h1, h2))

# Out:
# Traceback (most recent call last):
#   File "<stdin>", line 1, in <module>
#   File "<__array_function__ internals>", line 5, in hstack
#   File "/Users/Dmitry/opt/anaconda3/lib/python3.9/site-packages/numpy/core/shape_base.py", line 345, in hstack
#     return _nx.concatenate(arrs, 1)
#   File "<__array_function__ internals>", line 5, in concatenate
# ValueError: all the input array dimensions for the concatenation axis must match exactly, but along dimension 0, the array at index 0 has size 2 and the array at index 1 has size 3
Эта ошибка говорит, что количество строк не совпадает.
Для объединения трёхмерных массивов удобно использовать функцию dstack. Она принимает два одинаковых по размеру массива и объединяет их вдоль третьей оси:
a = np.array([[[1, 2, 3, 4],
               [5, 6, 7, 8],
               [9, 10, 11, 12]],

              [[13, 14, 15, 16],
               [17, 18, 19, 20],
               [21, 22, 23, 24]]])

b = np.array([[[25, 26, 27, 28],
               [29, 30, 31, 32],
               [33, 34, 35, 36]],

              [[37, 38, 39, 40],
               [41, 42, 43, 44],
               [45, 46, 47, 48]]])

result = np.dstack((a, b))

print("Shape of result:", result.shape)
# Shape of result: (2, 3, 8)

print("Resulting array:\n", result)
# Resulting array:
#  [[[ 1  2  3  4 25 26 27 28]
#   [ 5  6  7  8 29 30 31 32]
#   [ 9 10 11 12 33 34 35 36]]

#  [[13 14 15 16 37 38 39 40]
#   [17 18 19 20 41 42 43 44]
#   [21 22 23 24 45 46 47 48]]]
Мы объединили переменные a и b по третьей оси — взяли элементы из обоих массивов и расположили их вдоль новой оси. В результате образовался новый массив с увеличенной третьей размерностью.
Для объединения массивов по новой оси подойдёт функция stack:
a = np.array([[1, 2], [3, 4]])
b = np.array([[5, 6], [7, 8]])

result = np.stack((a, b), axis=0)
print(result)
# Out:
# [[[1 2]
#   [3 4]]

#  [[5 6]
#   [7 8]]]

result = np.stack((a, b), axis=1)
print(result)
# Out:
# [[[1 2]
#   [5 6]]

#  [[3 4]
#   [7 8]]]
Здесь мы создали новую первую ось и по ней объединили массивы. После мы выполнили объединение по второй оси. То есть функция stack позволяет нам добавлять измерение в любом месте, где потребуется.
В первом случае мы добавили новую ось перед существующими осями, создав новую ось 0. Предыдущая ось 0 стала осью 1. Таким образом, мы создали трёхмерный массив, где новая ось 0 имеет размер 2, поскольку мы объединили два массива. Оставшиеся оси сохранили свои размеры.
Во втором случае мы добавили новую ось в середину. Ось 0 осталась неизменной, а новая ось 1 была создана для объединения элементов вдоль предыдущей оси 1, которая теперь стала осью 2. Таким образом, мы создали трёхмерный массив, где новая ось 1 имеет размер 2.
Когда мы используем функцию stack, предыдущие оси сохраняют свои позиции и размеры, но их индексы увеличиваются на единицу, чтобы освободить место для новой оси.
Оси массива можно менять местами. Это может быть полезно, если нужно повернуть изображение. Один из частных случаев перестановки осей называется транспонированием — это когда строки и столбцы матрицы меняются местами. Для выполнения транспонирования есть метод transpose:
a = np.array([[1, 2, 3], [4, 5, 6]])
a_transposed = a.transpose()

print(a_transposed)
# Выводим транспонированную матрицу a:
# [[1 4]
#  [2 5]
#  [3 6]]

print(a.shape)
# Выводим форму исходной матрицы a:
# (2, 3)

print(a_transposed.shape)
# Выводим форму транспонированной матрицы a_transposed:
# (3, 2)
Вместо метода transpose для транспонирования матрицы можно использовать атрибут T. Это сделает код более компактным и читаемым:
a = np.array([[1, 2, 3], [4, 5, 6]])

print(a.T)
# Выводим транспонированную матрицу a:
# [[1 4]
#  [2 5]
#  [3 6]]

print(a.shape)
# Выводим форму исходной матрицы a:
# (2, 3)

print(a.T.shape)
# Выводим форму транспонированной матрицы a.T:
# (3, 2)
Методу transpose можно указать порядок индексов осей для перестановки их значений. Это удобно, если размерность массива включает более двух осей.
# Создаём исходный трёхмерный массив
original_array = np.array([[[1, 2, 3], [4, 5, 6]]])

# Транспонируем исходный массив с помощью перестановок осей
transposed_array = original_array.transpose(1, 2, 0)

# Первая ось (axis 0 в исходном массиве) становится третьей осью (axis 2 в транспонированном массиве)
# Вторая ось (axis 1 в исходном массиве) становится первой осью (axis 0 в транспонированном массиве)
# Третья ось (axis 2 в исходном массиве) становится второй осью (axis 1 в транспонированном массиве)

# Выводим транспонированный массив
print(transposed_array)
# [[[1]
#   [2]
#   [3]]

#  [[4]
#   [5]
#   [6]]]

# Выводим форму (shape) исходного массива
print(original_array.shape)
# (1, 2, 3)

# Выводим форму (shape) транспонированного массива
print(transposed_array.shape)
# (2, 3, 1)
NumPy поддерживает и другие функции, которые применяются реже, но знать о них полезно. Например, одна из таких функций — чтение файлов с жёсткого диска.
Чтение данных из файла. Допустим, у нас есть файл data.txt с таким содержимым:
1,2,3,5,6,7
8,1,4,2,6,4
9,0,1,7,3,4
Мы можем записать числа в NumPy-массив с помощью функции genfromtxt:
filedata = np.genfromtxt('data.txt', delimiter=',')
filedata = filedata.astype('int32')

print(filedata)
# Out:
# [[1 2 3 5 6 7]
#  [8 1 4 2 6 4]
#  [9 0 1 7 3 4]]
Сначала мы достали данные из файла data.txt через функцию genfromtxt. В ней нужно указать считываемый файл, а затем разделитель — чтобы NumPy понимал, где начинаются и заканчиваются числа. У нас разделителем будет ,.
Затем нам нужно привести числа к формату int32 с помощью функции astype, передав в неё нужный нам тип.
Булевы выражения. Ещё одна из возможностей NumPy — булевы выражения для элементов массива. Они позволяют узнать, какие элементы отвечают определённым условиям — например, больше ли каждое число массива 50.
Допустим, у нас есть массив a и мы хотим проверить, действительно ли все его элементы больше 5:
a = np.array([[1, 5, 8], [3, 4, 2]])

print(a > 5)
# Out:
# [[False False  True]
#  [False False False]]
На выходе — массив с «ответом» для каждого элемента: больше ли он числа 5. Если меньше или равно, то стоит False, иначе — True.
С помощью булевых выражений можно составлять и более сложные конструкции — например, создавать новые массивы из элементов, которые отвечают определённым условиям:
a = np.array([[1, 5, 8], [3, 4, 2], [2, 6, 7]])

print(a[a > 3])
# [5 8 4 6 7]
Мы получили вектор, состоящий из элементов массива a, которые больше трёх.
- NumPy — это библиотека для эффективной работы с массивами любого размера. Она достигает высокой производительности, потому что написана частично на C и C++ и в ней соблюдается принцип локальности — она хранит все элементы последовательно в одном месте.
- Перед тем как использовать NumPy в коде, его нужно подключить с помощью команды import numpy as np.
- Основа NumPy — массив. Чтобы его создать, нужно использовать функцию array и передать туда список в качестве первого аргумента. Вторым аргументом через dtype можно указать тип для всех элементов — например, int16 или float32. По умолчанию для целых чисел указывается int32, а для десятичных — float64.
- Функция ndim позволяет узнать количество измерений; shape — его структуру (сколько столбцов и строк); dtype — какой тип у элементов; size — количество элементов; itemsize — сколько байтов занимает один элемент; nbytes — сколько всего памяти занимает массив.
- К элементам можно обращаться с помощью оператора [], где указываются индексы нужного элемента. Важно помнить, что индексация начинается с нуля. А ещё в NumPy можно выбирать сразу целые строки или столбцы с помощью оператора : и его продвинутой версии — начальный_индекс:конечный_индекс:шаг.
- Функции zeros, ones, full, random.rand, random.randint, identity и eye помогают быстро создать массивы любого размера с заполненными элементами.
- Все арифметические операции, которые доступны в Python, применимы и к массивам NumPy. Главное — помнить, что операции проводятся поэлементно. А для сложных операций, таких как вычисление производной, также есть свои функции.
- Для статистических операций есть агрегатные функции. Они позволяют работать как с целым массивом, так и с его осями.
- NumPy-массивы нельзя просто присвоить другой переменной, чтобы скопировать. Для этого существует функция copy. А чтобы поменять структуру данных, можно применить функции reshape, vstack и hstack.
- Ещё в NumPy есть дополнительные функции — например, чтение из файла с помощью genfromtxt и булевы выражения, которые позволяют выбирать элементы из набора данных по заданным условиям.
Курс с трудоустройством: «Профессия Data-аналитик»
Узнать о курсе
NumPy is a Python library that stands for Numerical Python. It is widely used for performing numerical computations and provides support for large, multi-dimensional arrays and matrices. In addition to this, it offers a variety of mathematical functions to operate on these arrays efficiently. NumPy is commonly utilized by developers in areas like scientific computing, engineering, data science, and machine learning.
In this tutorial, we’ll demonstrate how to install NumPy using Python on Windows and Linux operating systems.
Installing NumPy Using Python on Windows
To install NumPy on Windows, first install Python and ensure it’s added to the PATH, confirm that pip is installed, and then use it to install NumPy. Finally, confirm the installation by checking NumPy’s version in the Python interpreter.
Let’s go through the following steps to learn how to install NumPy Python on Windows:
Step 1: Install Python on Widows
Visit the official Python website to download the latest Python version for your Windows system. After downloading, find the installer file and click the ‘Install’ button to begin the Python installation. Be sure to select the option to add Python to the PATH. Read our dedicated guide to learn more about installing Python on Windows.
You can check the Python version by executing the command below:
python --version

Step 2: Install Pip
Next, make sure pip for Python is installed on your Windows system. Pip is generally installed with Python. You can confirm its installation by running the following command:
pip --version

Step 3: Install NumPy Python Windows
Once Python and pip are successfully installed on your system, execute the command below to install NumPy on Windows:
pip install numpy

Step 4: Verify the NumPy Installation on Windows
Finally, you can confirm the NumPy installation on Windows by checking its version. For this purpose, first, open a Python interpreter by typing python in the CMD and then execute the following script:
import numpy
print(numpy.__version__)

The output confirms that numpy 2.1.3 has been successfully installed on our system.
Install NumPy with our Python Hosting!
Set up NumPy effortlessly using our optimized Python hosting, designed for seamless integration and exceptional performance in numerical computing.
Installing NumPy Using Python on Linux
NumPy is a commonly used Python library to perform numerical computations. You can follow the below-listed steps to install it on Linux using Python:
Step 1: Install Python
On most modern Linux distributions Python comes preinstalled. You can verify it by executing the following command in the terminal:
python3 --version

In case, Python is not installed on your Linux system, you can install it by running the following command:
sudo apt install python3
Step 2: Install Pip
After installing Python, make sure Pip is also installed on your system:
pip3 --version

If pip is not installed on your Linux system, you must read our dedicated guide on how to install pip on Windows and Linux.
Step 3: Install NumPy Python Linux
After pip is successfully installed, use it to install NumPy by running the following command:
pip3 install numpy
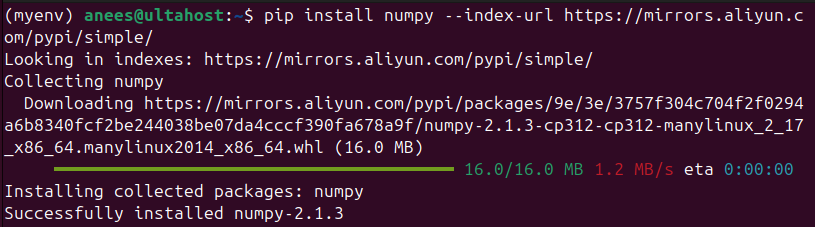
Alternatively, you can use a trusted PyPI mirror to install NumPy using Python on Linux:
pip3 install numpy --index-url https://mirrors.aliyun.com/pypi/simple/
Step 4: Verify the NumPy Installation
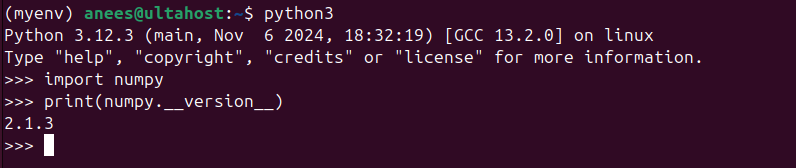
Now type python3 in the terminal to open the Python interpreter. After this, execute the following script to import numpy:
import numpy
Then run the command below to show the installed version of the NumPy on Linux:
print(numpy.__version__)
The output verifies that NumPy has been successfully installed on Linux:
This is how you can install NumPy using Python on Windows and Linux operating systems.
Conclusion
NumPy is a robust Python library designed for numerical calculations, offering support for large, multi-dimensional arrays and matrices, along with a range of mathematical functions. In this article, we discussed how to install NumPy on both Windows and Linux. On Windows, we covered installing Python, ensuring pip is set up, and using it to install NumPy. For Linux, we followed similar steps to verify Python and pip installations before installing NumPy via the terminal. These steps enable you to set up NumPy on your system and start using it for efficient numerical tasks.
Unlock high-performance computing with Ultahost’s high-speed Virtual Dedicated Servers, perfect for running Python libraries like NumPy. With customizable resources, Ultahost ensures seamless installation and optimal performance for your numerical computing projects.
FAQ
What is NumPy?
NumPy is a Python package designed for numerical analysis. It enables us to handle large, multi-dimensional arrays and matrices and provides an extensive set of mathematical functions for efficient array operations.
How do I install Python on Windows for NumPy?
To install Python on Windows, download the installer from the official Python website and make sure to check the option to add Python to the system PATH during installation.
How can I check if Python is installed on Windows?
You can check the Python version installed on your Windows system by running the python –version command in Command Prompt.
How do I install pip on Windows?
Pip is generally installed along with Python. To confirm if pip is installed, run the command pip –version. If pip is missing, you can install it using the get-pip.py script from the official website.
How do I install NumPy on Windows?
After installing Python and pip, you can install NumPy on Windows by running the pip install numpy command in Command Prompt.
How do I verify that NumPy is installed correctly on Windows?
To verify the installation, open the Python interpreter and execute import numpy to import numpy library and print(numpy.__version__) to display the installed version of NumPy.
How do I install NumPy on Linux?
After installing Python and pip, run the command pip3 install numpy to install NumPy on a Linux system.
NumPy (Numerical Python) is a powerful Python library for numerical computing. The library supports working with arrays, matrices, and various mathematical functions. NumPy is used for scientific computing, engineering, data science, and machine learning projects.
This guide shows how to install NumPy on various systems using different methods.

Prerequisites
- Access to the terminal.
- Python 3 installed and added to PATH.
- Either Conda or PIP installed for package management.
Note: This guide uses Ubuntu 22.04. The installation steps are similar accross different operating systems (Linux, macOS, and Windows). Windows users use the command prompt instead of the terminal and require administrator privileges to perform any installation.
How to Install NumPy via Terminal
The simplest way to install NumPy is via the terminal. Depending on the system requirements, you can use PIP or Conda to install the library.
The sections below show how to install it using both methods.
Install NumPy with PIP
To install NumPy using PIP, follow the steps below:
1. Open the terminal window.
2. Check if PIP is installed. Run the following command:
pip --version
The command shows the PIP version if the package manager is installed. If the version number does not show, run the following command to install PIP:
python -m ensurepipThe command automatically runs a PIP installation script. Alternatively, see one of our OS-specific installation guides:
- Install PIP on Ubuntu.
- Install PIP on Debian 12.
- Install PIP on Windows.
- Install PIP on macOS.
3. Use PIP to install NumPy. Run the following command:
pip install numpyWait for the installation to complete.
Note: This method installs NumPy globally. You can also use PIP to install NumPy inside a virtual environment or a Conda environment.
4. Test the installation with the following example code:
python3 -c "import numpy; print(numpy.__version__)"
The command runs the Python code in quotation marks. If the installation succeeds, the code imports the library and prints the NumPy version.
Install NumPy Using Conda
When using Conda to manage Python libraries, follow the steps below to install NumPy:
1. Open the terminal.
2. Check that Conda is installed:
conda --version
The command prints the Conda version. If not, download and install Anaconda or Miniconda.
3. Create a Conda environment:
conda create -n [environment_name]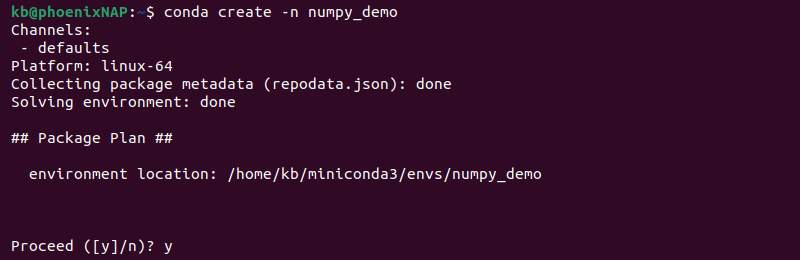
Replace [environment_name] with the actual environment name. Enter y when prompted to proceed.
Note: The installation does not require creating an evnironment, but it’s considered best practice to isolate Python projects for simpler dependency management.
4. Activate the environment with:
conda activate [environment_name]
Use the environment name from the previous step. The terminal window changes to the environment.
5. Install NumPy with the following command:
conda install numpy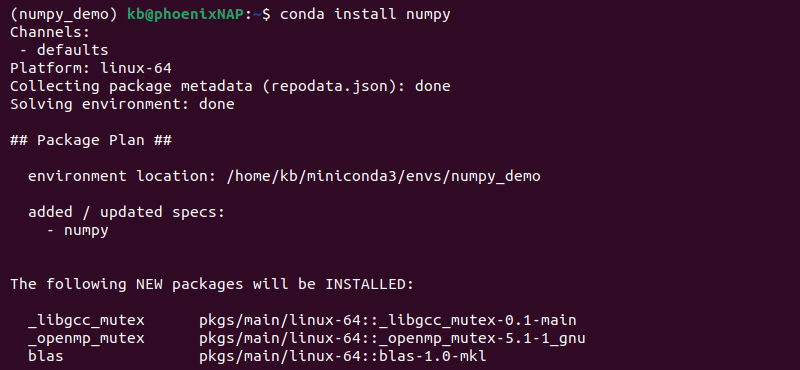
Enter y to confirm the installation when prompted.
6. Test the installation with:
python3 -c "import numpy; print(numpy.__version__)"
The command runs Python code that imports the NumPy library and prints the version number.
Build NumPy From Source
An advanced way to install NumPy is to build it from source. The method is meant for users with specific requirements and developers looking to contribute to the project.
Follow the steps below to build NumPy from source:
1. Clone the NumPy Git repository locally:
git clone https://github.com/numpy/numpy.git
The command clones the project into the numpy directory.
2. Navigate to the project directory:
cd numpy3. Initialize and update submodules with git submodule update:
git submodule update --init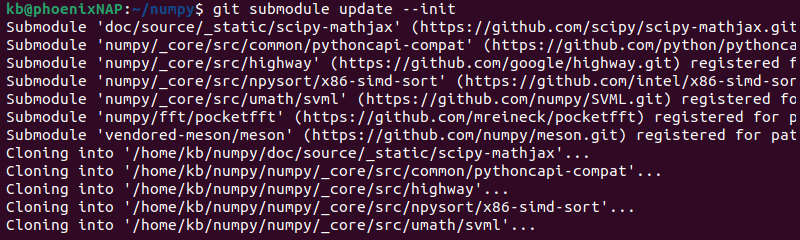
After this step, the submodule directories are fully functional.
4. Install the NumPy package from the current directory with:
pip install .
Wait for the installation to complete.
5. Navigate to the home directory, as running Python code from the installation directory will not work.
cd ..Alternatively, navigate to your project directory or any other location.
6. Test the NumPy installation:
python3 -c "import numpy; print(numpy.__version__)"
The command prints the NumPy dev version, indicating a successful installation.
How to Update NumPy
Update NumPy with PIP or Conda depending on the Python environment setup. See the examples below:
- PIP:
pip install --upgrade numpy
- Conda:
conda update numpyChoose a method that best aligns with your current environment and NumPy installation method.
Conclusion
This guide showed how to install NumPy on your system using two different methods: PIP and Conda.
Next, check out our introduction to Python Pandas. It is an open-source Python library built on top of NumPy and primarily used for data analysis.
Was this article helpful?
YesNo