
Newb’s Guide to installing Arch Next to Pre-installed Windows 10
The steps I took to dual boot Arch Linux alongside the preinstalled Windows 10 that came with my new Lenovo Ideapad. I used Ubuntu exclusively for the last 6 years so I’m Window’s illiterate. I don’t know a whole lot about the inner workings of Linux either.
Pre-Instllation Steps
Prepare the preinstalled Windows to share the system.
Verify the boot mode…
- Boot into Windows
- Press Win key and ‘R’ to start the Run dialog
- In the Run dialog type «msinfo32» and press Enter
- In the System Information windows, select System Summary on the left and check the value of BIOS mode item on the right.
- Make sure the value is UEFI, which means Windows boots in UEFI/GPT mode
Disable secure boot
- Open Settings (The gear icon in the start menu)
- Click «Updates & Security»
- In the «Recovery» menu, click «Restart now» under the «Advanced startup» header
- After restart, choose the «Troubleshoot» option.
- Choose «Advanced Options»
- Choose «UEFI Firmware Settings»
- Press the restart button to load the UEFI firmware
- In the Security settings find and disable Secure Boot
- In the Boot settings also find and disable Fast Boot
Disable Fast Startup
- Open Control Panel (Press Windows key, Type «Control Panel» and press enter)
- In the «View by» menu, choose «Small Icons» and click on «Power Options».
- Open «Choose what power buttons do» on the left side menu.
- Click «Change settings that are currently unavailable»
- Uncheck «Turn on Fast Startup» and save changes.
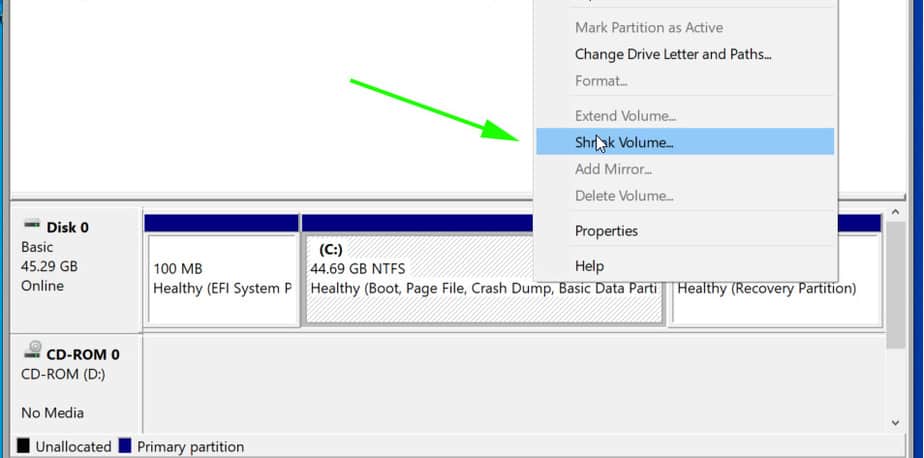
Shrink the Windows partition
- Press Windows Key + R and type diskmgmt.msc — hit enter
- Right click the C drive and choose «Shrink Volume»
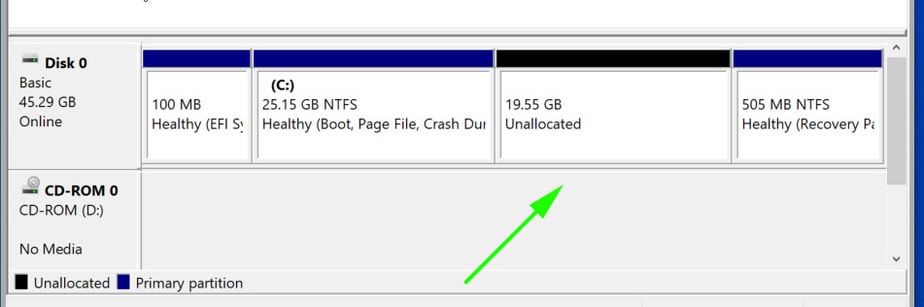
- Enter the amount of space to shrink the partition (I shrunk mine by 200000mb — 200 gigs)
- Click «Shrink»
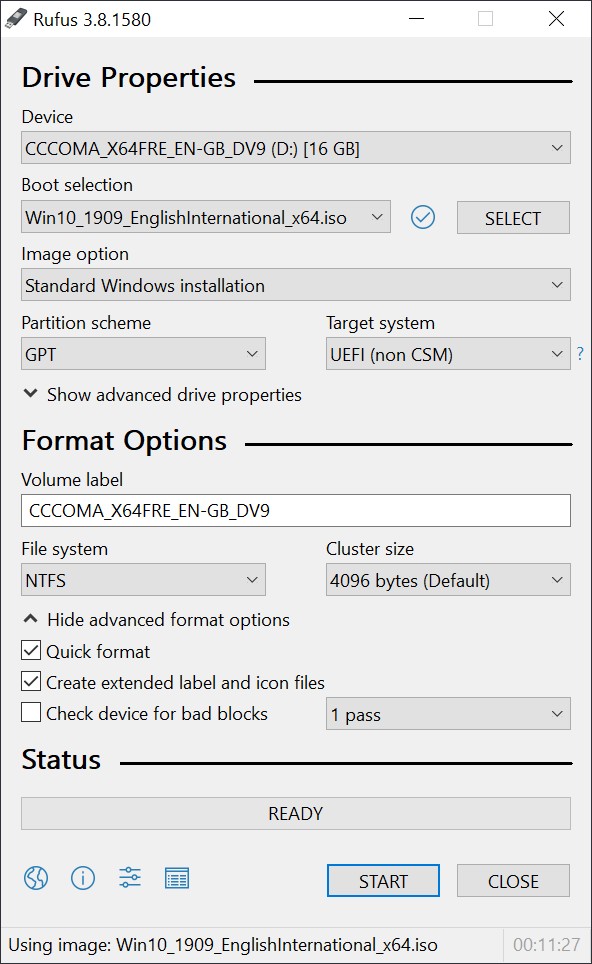
Make a bootable USB
- Choose a mirror from www.archlinux.org/download — I used the American pair.com mirror because it’s the first reputable domain I recognised.
- Download the .iso file.
- Download Rufus from https://rufus.akeo.ie/
- Plug in a new USB stick and open Rufus
- Select the USB drive and the downloaded Linux iso.
- Choose the GPT partition scheme, FAT32 file system
- Press start
Install Arch
We’re ready to boot and install Arch.
Boot the USB
- Plug in the USB
- Hold down the shift key while clicking Restart
- Choose «Troubleshoot» then «Advanced Options» then «UEFI Firmware Settings» then restart.
- In the Boot menu, find your bootable USB and move it up above the Windows boot manager so it will boot the USB first.
- Save and exit
Load keyboard layout & locale
- Type
loadkeys usat the command line and press enter - Type
locale-genat the command line and press enter
Hookup them internets
- At the command line type
rfkill unblock wifiand press enter - Type
iw devand press enter. It will tell you the name of the Wifi interface. - Type
wifi-menu <wifi_interface_name>(using your actual interface name) and press enter. - A UI will show allowing you to choose a network and log into it.
- After logging in,
ping google.comto verify the internets work. After a few packets are sent, CTRL+C to stop pinging — if it says no packets were lost then we’re good.
Partitioning
- First type
free -m, hit enter. Take note of the amount of total memory available. - Type
gdisk /dev/sdaand hit enter to start the GPT partitioning program - Create SWAP partition
- At the prompt, type
n, press enter to create a new partition - It will prompt for a partition number. Just hit enter to use the default.
- It asks where to start the first sector. Press enter to accept the default which is automatically the start of unallocated space.
- It asks for the last sector. Type
+12GB(I have 12 gigs of memory — if you have more or less you should adjust accordingly) and press enter. - If it says anything other than «Linux Filesystem» type
8200at the next prompt. Hit enter.
- At the prompt, type
- Create Root partition
- At the prompt, type
n, press enter to create a new partition - It will prompt for a partition number. Just hit enter to use the default.
- It asks where to start the first sector. Press enter to accept the default which is automatically the start of unallocated space.
- It asks for the last sector. Press Enter to accept the default and use all of remaining unallocated space.
- If it says anything other than «Linux Filesystem» type
8300at the next prompt. Hit enter.
- At the prompt, type
- At the prompt, type
W, press enter to write changes to the drive. When prompted, typeYand press enter to confirm.
Create SWAP space
- Type
gdisk -l /dev/sda, press enter and take note of the partition number of the Swap part. - Type
mkswap -L "Linux Swap" /dev/sda7(My swap partition was number 7 — if yours is 5 use /dev/sda5 instead). Hit enter. - Type
swapon /dev/sda7(again, using the apprpriate swap partition number). Hit enter. - Verify status of swap space by typing
free -mand press enter. If the last line starts with «Swap:» we’re good.
Format and mount the root partition
- Type
gdisk -l /dev/sda, press enter and take note of the partition number of the Root part. - Type
mkfs.ext4 -L /dev/sda8(My root partition was number 7 — if yours is 6 use /dev/sda6 instead). Hit enter. - Type
mount /dev/sda8 /mnt(again, using the apprpriate swap partition number). Hit enter.
Start the installation
- Type
pacstrap /mnt base, hit enter.
Mount the EFI partition
- Type
gdisk -l /dev/sda, press enter and take note of the partition number of the EFI part. - Type
mount /dev/sda1 /mnt/boot/efi(My efi partition was number 1 — if yours is 2 use /dev/sda2 instead). Hit enter.
Configure the system
- Type
genfstab -U /mnt >> /mnt/etc/fstab. Hit enter. - Type
cat /mnt/etc/fstab, press enter, to verify the file was created correctly. - Change root into the new installation: type
arch-chroot /mntand press enter.
Set the timezone
- Type
cd /usr/share/zoneinfo && lspress enter. Take note of the appropriate region and use it as follows… - Type
cd <region> && ls(replacing<region>with the most appropriate region.) press enter. Take note of the most appropraite city. - Type
ln -sf /usr/share/zoneinfo/<region>/<city> /etc/localtime(replacing<region>and<city>with the most appropriate region and city.) - Type
hwclock --systohc. Hit enter.
Set the host
- Create the file
/etc/hostnameand write your hostnme in it with nano or vim - Create the file
etc/hostsand populate it like this (replacingmyhostnamewith whatever you put in your hostname file.)
127.0.0.1	localhost
::1		localhost
127.0.1.1	myhostname.localdomain	myhostname
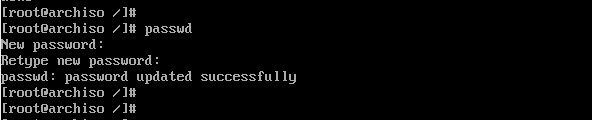
Create the root user’s password
- Type
passwdand press enter - Enter a new root password and press enter. verify it and press enter.
Create new initramfs image
- Type
mkinitcpio -p linux. Hit enter.
Install Grub bootloader
- Type
pacman -Syu grub efibootmgrand hit enter. - Type
pacman -Syu efibootmgrand hit enter. - Type
grub-mkconfig -o /boot/grub/grub.cfg. Hit enter. - Type
grub-install /dev/sda. Hit enter. - Verify the install… Type
ls -l /boot/efi/EFI/arch/. Hit Enter. If you see a file called grubx64.efi then all is well.
Create new user
- Type
useradd -s /bin/bash -m username(replace «username» with the new user’s name). Hit enter. - Type
passwd username(replace «username» with the new user’s name). Hit enter. - Enter and verify the password.
Install a desktop environment and some important packages
- Type
pacman -Syu gnome-desktop. Hit enter. - Type
pacman -Syu gdm. Hit enter. - Type
systemctl enable gdm. Hit enter. - Type
pacman -Syu xterm. Hit enter. - Type
pacman -Syu iw. Hit enter. - Type
pacman -Syu dialog. Hit enter. - Type
pacman -Syu vim. Hit enter. - Type
pacman -Syu wpa_supplicant. Hit enter. - Type
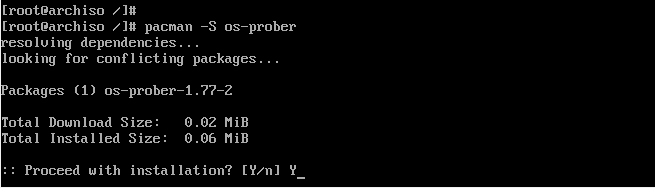
pacman -Syu os-prober. Hit enter. - Type
grub-mkconfig -o /boot/grub/grub.cfg. Hit enter.
Unmount and reboot
- Remove USB
- Type
exit. Hit enter. - Type
umount -R /mnt. Hit enter. - Type
reboot. Hit enter. - After a moment it will load back into Arch, this time with a desktop GUI.
In this guide, you will learn how to Dual boot Arch Linux with Windows 10 on UEFI system. This guide assumes that you already have Windows 10 installed on your system.
Prerequisites
Before you begin configuring the dual-boot setup, ensure that the following requirements are met:
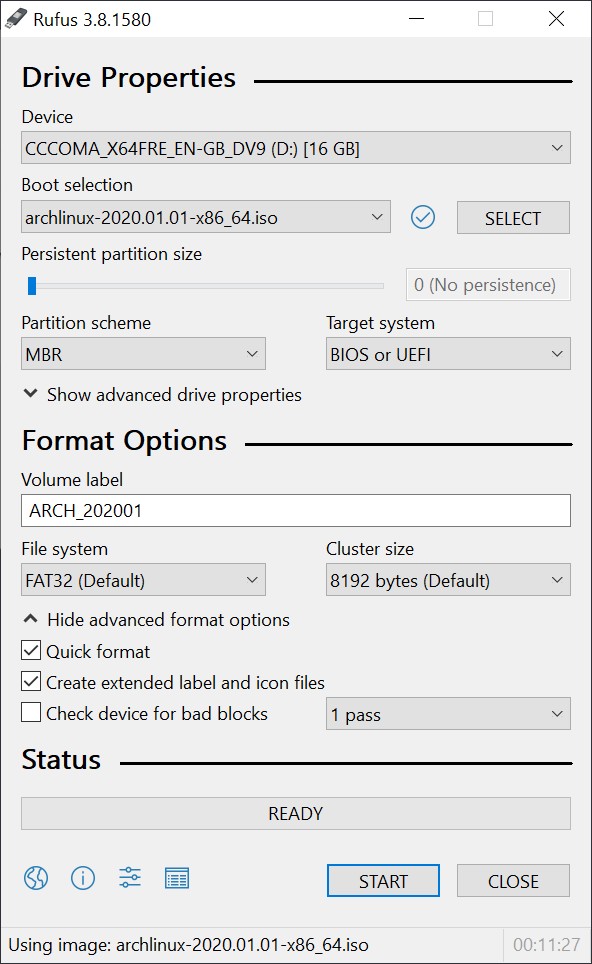
- A bootable installation medium of Arch Linux (Either USB or DVD). To download the latest Arch Linux ISO, proceed to the official Arch Linux download page. Once you have downloaded the ISO image, grab an 8GB USB drive and make it bootable using Rufus tool or any other application that can create a bootable USB drive.
- A fast and stable internet connection for downloading and installing software packages.
Step 1) Create a separate partition for installation of Arch Linux
For the dual boot setup to work, we need to create a separate partition on the hard drive on which Arch Linux will be installed. To do so, head over to the disk management utility by pressing Windows Key + R. In the dialogue box, type diskmgmt.msc and hit ENTER.
This launches the disk management utility displaying the various disk partitions on your hard drive. We are going to create an unallocated partition by shrinking the C drive. If you have a bigger partition than the C drive, feel free to use it for creating the separate partition,
So, we are going to right-click on drive C and select the ‘Shrink Volume’ option as shown
On the pop-up dialogue box that appears, we are going to specify the amount to shrink as shown. This is the amount that will be designated for the installation of Arch Linux. In our example, we have shrunk 20 GB of hard disk space will serve as the unallocated space.
Once you are satisfied, click on the ‘Shrink’ button.

Your unallocated space will be indicated as shown below. In our case, we have set aside approximately 20G for the installation of Arch Linux.
With the unallocated partition in place, plug in your bootable USB and reboot your PC.
Step 2) Configure BIOS to boot from bootable medium
Before you begin with the installation process, it’s prudent to set the boot priority in the BIOS to select your bootable medium as the most preferred option. Depending on your vendor, you can press the Esc, or F10 key to enter the BIOS and navigate to the boot priority Menu.
Also note that we are using the UEFI mode for installation.

Once you have selected your boot medium, press the ESC button to continue with the booting process.
Step 3) Begin the installation of Arch Linux
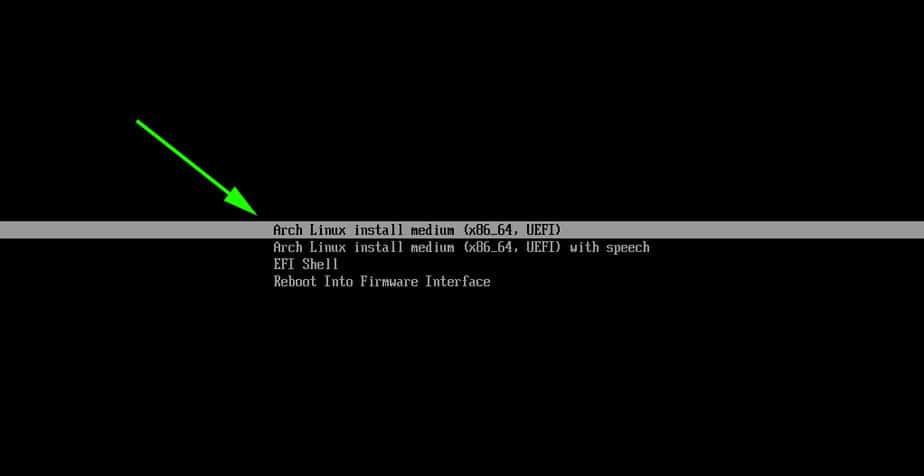
On the bootup screen, you will be presented with options as shown below. Select the first option – Arch Linux install medium (x86_64, UEFI) and hit ENTER.
This initialize Arch Linux as evidenced by the boot messages on the screen.
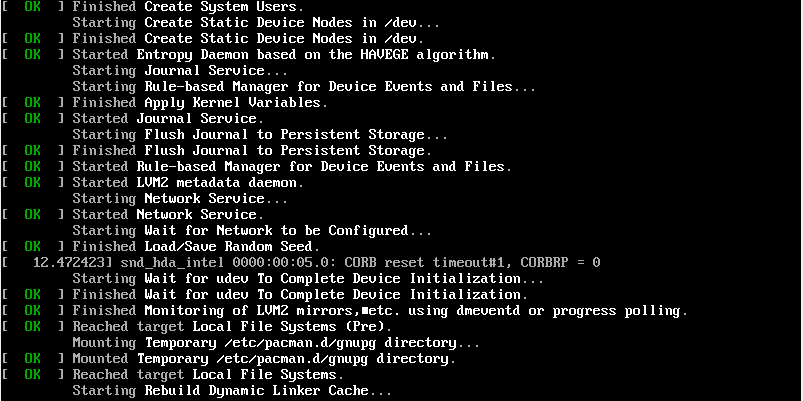
After a few seconds, this ushers you to the prompt as shown below.

To confirm that you have EFI support, run the command:
# ls /sys/firmware/efi/efivars
You should get some entries on the screen as shown. If nothing is listed on your screen, then it means you are using MBR and this guide won’t work for you in configuring up a dual boot setup.
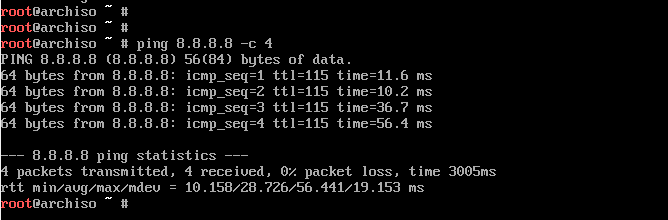
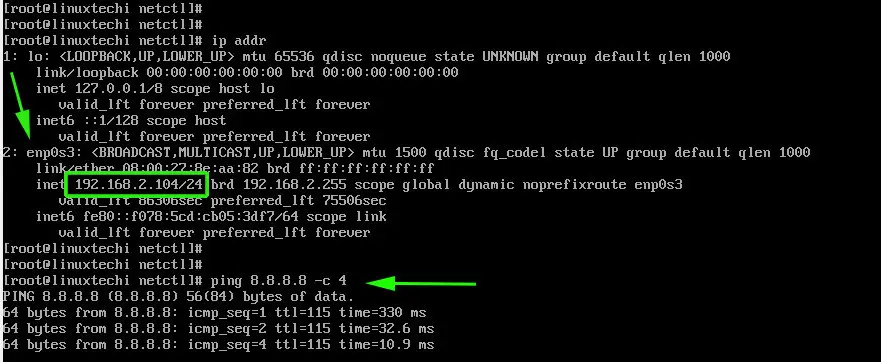
As you begin the installation, you might want to ensure that you have internet connectivity. Internet connectivity is crucial in setting time and date.
You can ping Google’s DNS as shown:
# ping 8.8.8.8 -c 4
You should get a positive reply as shown.
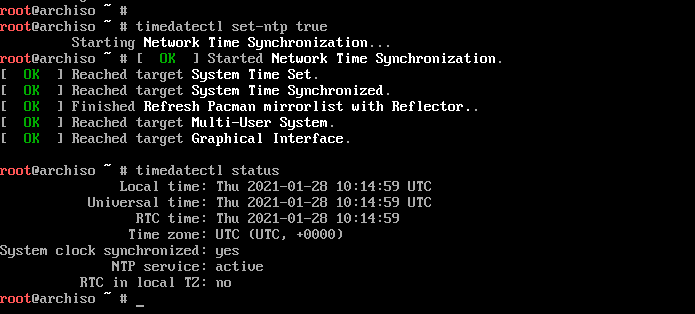
Step 4) Update time and date
Next, we are going to update the system time and date using the timedatectl command as shown.
# timedatectl set-ntp true
You can thereafter confirm the time and date using the command
# timedatectl status
Step 5) Create & format Linux partitions
Next, we are going to partition our hard drive and create some Linux partitions. An easy way of doing this is using the cfdisk utility. Run the command:
# cfdisk
This displays all the partitions available including Windows partitions.
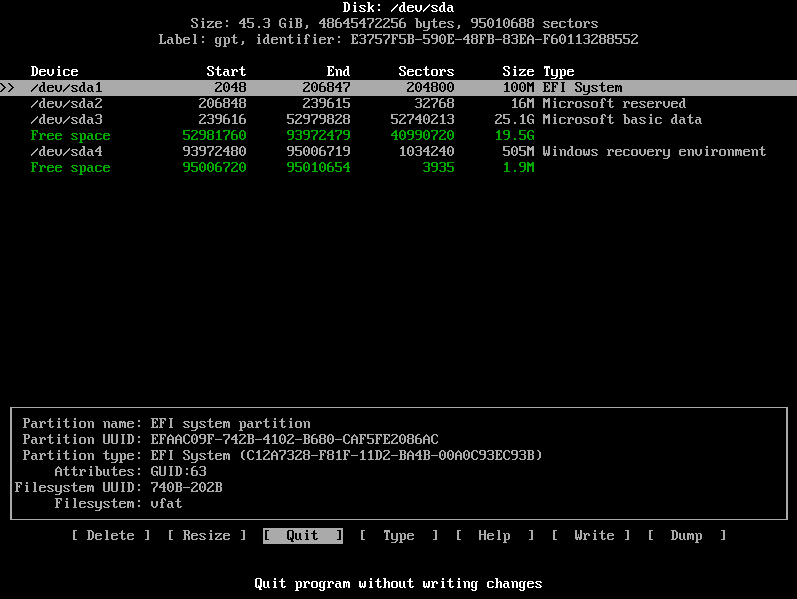
As you can see, we have some free space of 19.5G that we created earlier in step 1 from shrinking drive C on the Windows side. Using this partition, we shall create the following Linux partitions :
- Root partition / 12G
- swap partition 4G
To achieve this, we will navigate to the free space with 19.5G just after /dev/sda3 volume and hit ENTER. We will then specify the volume as 12G for the root partition as shown below. Then hit ENTER.
The root partition will be created with the Linux filesystem type as shown.
Next, we will create another partition for swap. Using the same method, we will proceed to the remaining free partition of 7G and select the ‘New’ option.
Specify the partition size as 4G
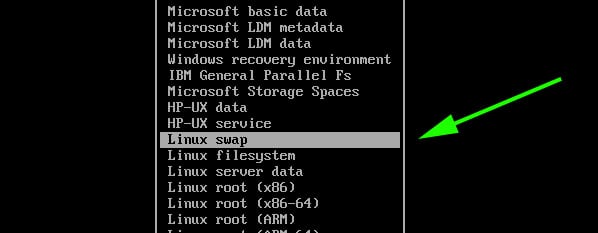
Since this will be our swap partition, we need to go the extra step and modify the partition type. Therefore, we will select the ‘type’ option and hit ENTER.
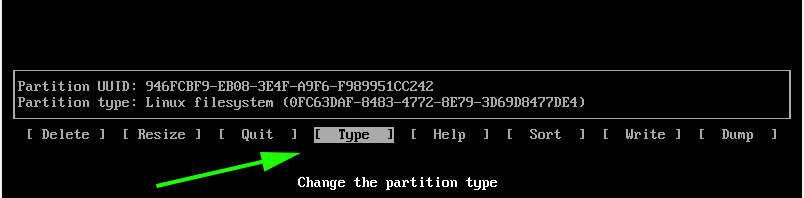
In the list that appears, select ‘Linux Swap’ and hit ENTER.
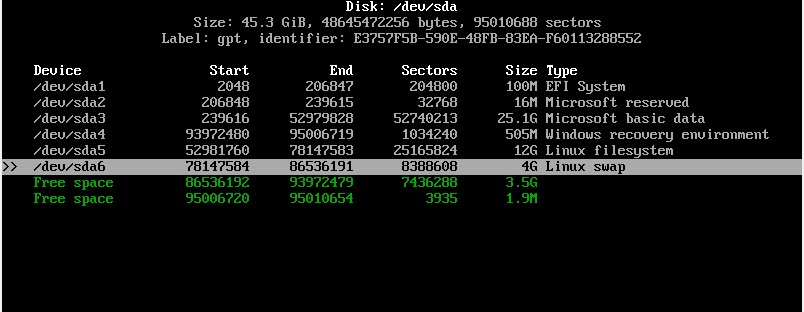
At this point, both the root and Linux swap partitions are created as seen from the partition table below.
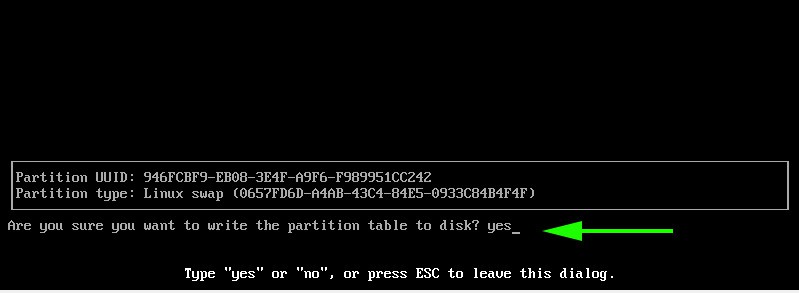
To save the partitions, select the ‘Write’ option and hit ENTER.
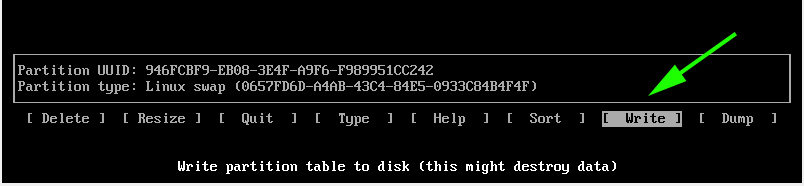
When prompted if you want to write the partition to disk, simply type ‘yes’ and hit ENTER.
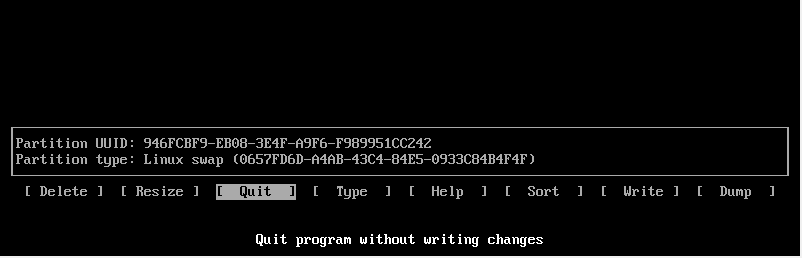
To exit cfdisk utility, select the ‘Quit’ option and hit ENTER.
Step 6) Format and mount the partitions
For the partitions to become usable and available for use, we need to format them and later mount them.
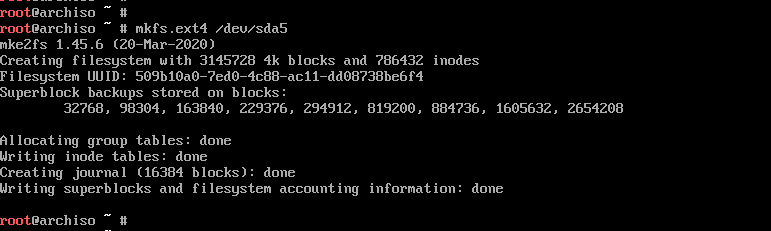
To format the root partition, run the command:
# mkfs.ext4 /dev/sda5
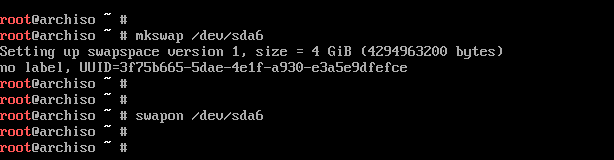
For swap partition, use the command:
# mkswap /dev/sda6
Then enable swap using the swapon command shown:
# swapon /dev/sda6
Next, mount the root partition to the /mnt directory
# mount /dev/sda5 /mnt
Additionally, we are going to create a directory for the EFI partition on which we will mount the Windows EFI system which , in our case is located on the /dev/sda1 partition.
# mkdir /mnt/efi
Then mount the EFI partition on the EFI mount point.
# mount /dev/sda1 /mnt/efi

Step 7) Install base system and other required Linux firmware packages
Next, we are going to install the central packages for our Linux system including the base and Linux-firmware packages.
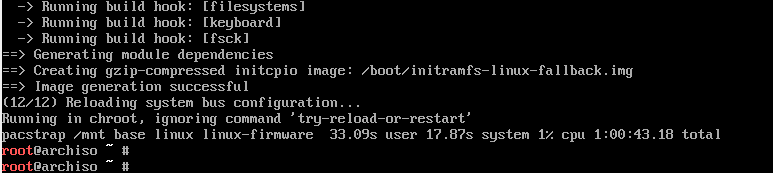
# pacstrap /mnt base linux linux-firmware

This is going to take quite some time. At this point, you can take a much-deserved break and head out for a stroll and grab some coffee. When the installation is successful, you should get the following output.
Step  Generate fstab file
 Generate fstab file
The next step will be to generate the fstab file on the /mnt directory as follows.
# genfstab -U /mnt >> /mnt/etc/fstab
Step 9) Setup timezone
After generating the ftab file, navigate to the newly created root filesystem
# arch-chroot /mnt
You can verify that you are in the root filesystem using the command as shown.
# ls
Time zone information is found in the /usr/share/zoneinfo/ directory. To set your timezone, create a symbolic link to the /etc/localtime
Path.
# ln -sf /usr/share/zoneinfo/US/Pacific /etc/localtime
Next, sync the hardware clock using the command:
# hwclock --systohc
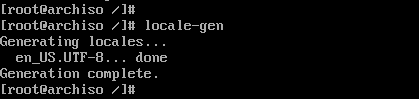
Step 10) Set up locale
The locale determines the system language, currency format, numbering and date on your system. This information is contained in the /etc/locale.gen file. So, open the file using the vim editor.
# vim /etc/locale.gen
NOTE: To install the vim editor, use the pacman command as follows:
# pacman -Sy vim
Once you have accessed the file, scroll and uncomment your preferred locale. In this case, we have decided to go with en_US.UTF-8 UTF-8
Save and exit the file. Next generate the locale configuration using the command.
# locale-gen
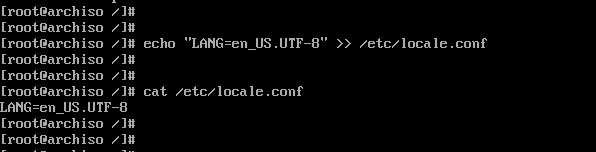
Next, create a new locale configuration file and save the locale as shown.
# echo "LANG=EN_US.UTF-8" > /etc/locale.conf
Step 11) Set up hostname
Next, we are going to configure the hostname of our Arch System. First, create a new file and specify the hostname as shown.
# echo linuxtechi > /etc/hostname

Afterwards, modify the /etc/hosts file as follows.
# echo "127.0.1.1 linuxtechi" >> /etc/hosts
Step 12) Install netctl Network Manager
To use the internet once the installation is complete and upon a reboot, we need to install a network manager. In this example we wil install the netctl network manager as follows
# pacman -Sy netctl
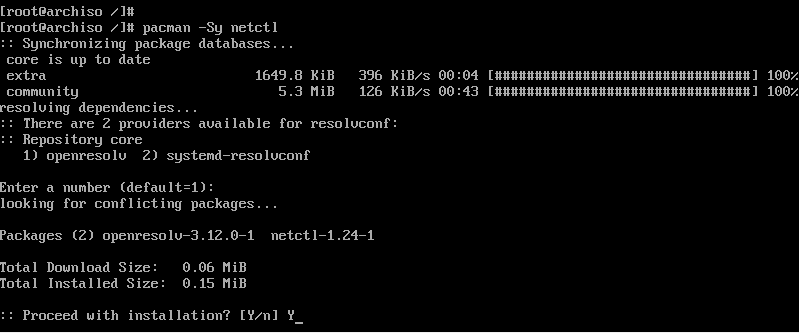
During the installation some optional dependencies for netctl are listed. We are going to install the following dependencies. These are:
- dhcpcd – For DHCP support
- wpa-supplicant – For wireless networking
- ifplugd – For wired connections networking
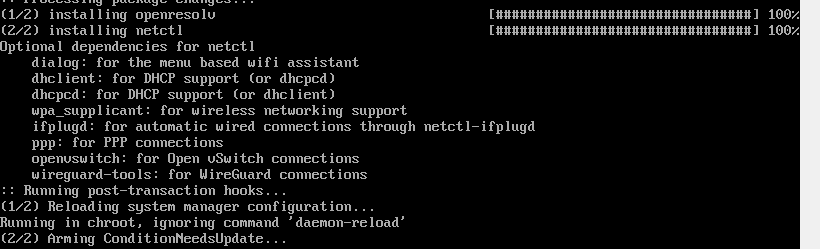
These dependencies will help you set up networking without a problem when you next boot in to Arch Linux.
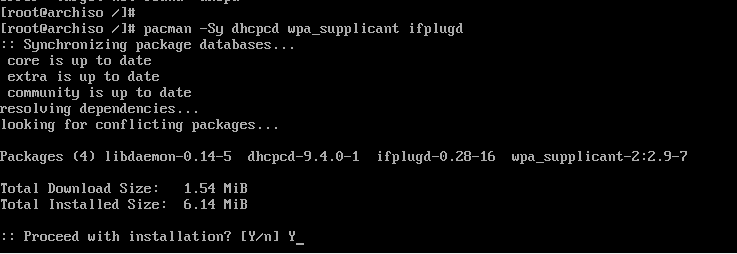
To install the optional dependencies, run the command below:
# pacman -Sy dhcpcd wpa-supplicant ifplugd
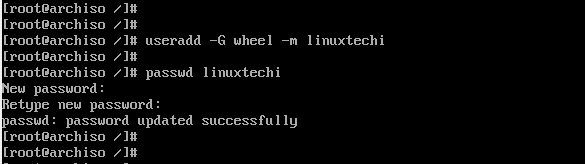
Step 13) Create a regular user
Next, we will create a regular user called linuxtechi and place him in the wheel group as follows.
# useradd -G wheel -m linuxtechi
The next step will be to assign a password to the user.
# passwd linuxtechi
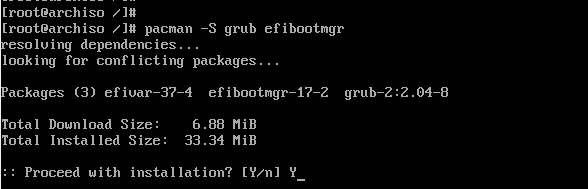
Step 14) Install GRUB bootloader
We are getting close to the finish line. In this step, we will install the grub bootloader to enable us boot into our Arch Linux system upon a reboot.
We will install the grub bootloader package alongside the efi boot manager package since we are using the UEFI mode.
# pacman -S grub efibootmgr
Next, install the os-prober package which will enable Arch Linux to detect the Windows operating system.
# pacman -S os-prober
Then install grub on the EFI directory as shown.
# grub-install --target=x86_64-efi --efi-directory=/efi --bootloader-id=GRUB

And install a grub configuration file as shown.
# grub-mkconfig -o /boot/grub/grub.cfg
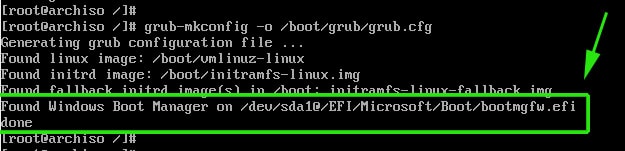
The last line is an indication that Arch has detected the presence of Windows Boot manager on /dev/sda1 partition. Perfect!
The finally, set a password for the root user as shown.
# passwd
Then exit and reboot your system.
# exit
# reboot
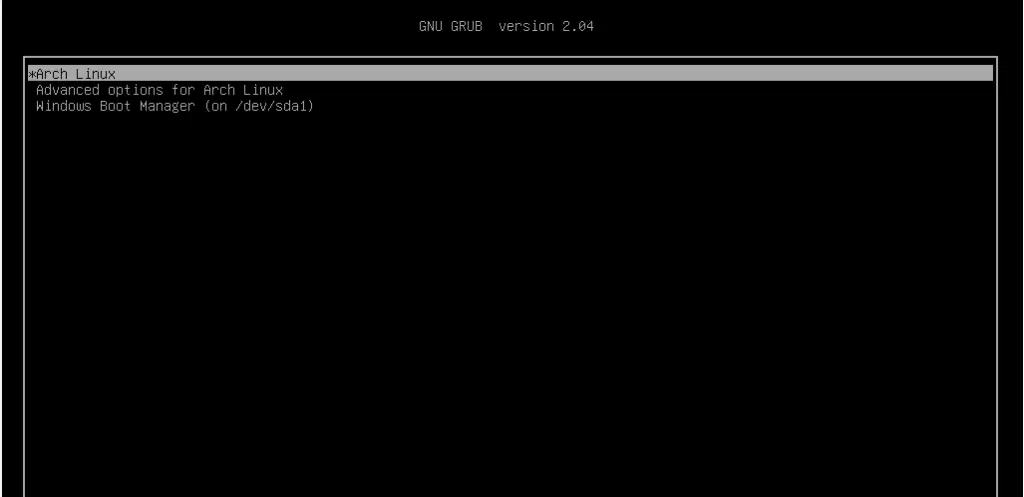
Step 15) Boot into Arch Linux
When booting, the GRUB bootloader will display various options including booting into Arch Linux, which is the first option, and also booting into Windows which is the last option in my case.
Log in as your regular user as shown
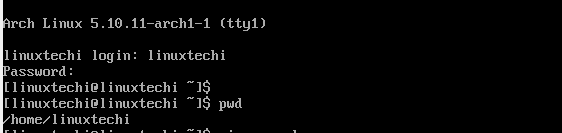
Step 16) Post Installation tasks
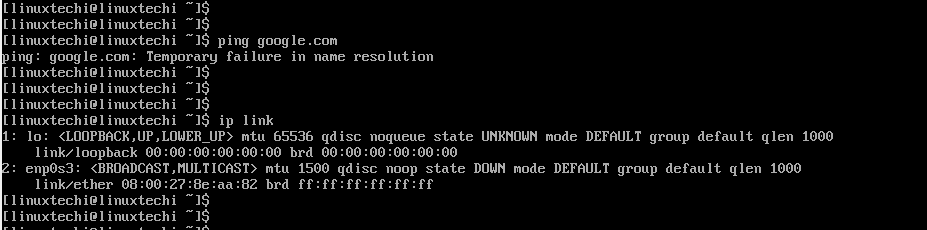
One of the things I noted when I logged in is that I do not have any internet connection. This is an issue caused by the default dhcp profile settings which need to be modified to accommodate the network interface attached to the Arch Linux system.
To find the interfaces attached run the command:
$ ip link
The output confirms that our network interface is enp0s3
We need to modify the ethernet-dhcp file in the /etc/netctl/examples/ path and edit out network interface.
But first, lets copy the file to the /etc/netctl directory.
Switch to the root user
# su
Copy the ethernet-dhcp file to the /etc/netctl directory.
# cp /etc/netctl/examples/ethernet-dhcp /etc/netctl/custom-dhcp-profile
Next, navigate to the /etc/netctl directory.
# cd /etc/netctl
Use the vim editor to edit the file.
# vim custom-dhcp-profile
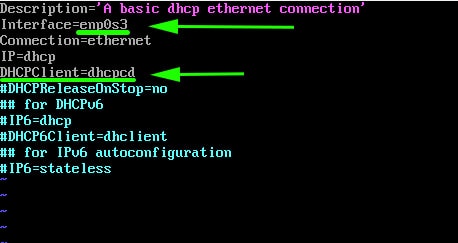
The interface attribute is set to eth0.
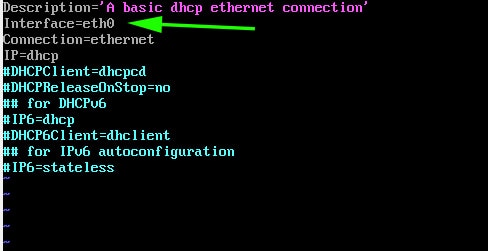
However, as we saw earlier, our network interface is enp0s3. Therefore, modify it to enp0s3. Additionally, uncomment the line starting with the DHCPClient parameter.
DHCPClient=dhcpcd
This enables the system to accept IP addresses using the dhcp service.
Save and exit the configuration file. Next, enable the custom dhcp profile.
# netctl enable custom-dhcp-profile

And finally enable the dhcp service.
# systemctl enable dhcpcd.service

Your interface should now pick an IP address from the router and you should have an internet connection.
You can install an X windows system as shown,
$ sudo pacman -S xorg xorg-server
Then install a display manager. For example, to install GNOME, run:
$ sudo pacman -S gnome
Then start and enable gdm service
$ sudo systemctl start gdm
$ sudo systemctl enable gdm
This brings us to the end of this lengthy topic. Hopefully, you are now in a position to Dual boot Arch Linux with Windows on UEFI system.
Read Also : How to Create and Configure Sudo User on Arch Linux
Установка Arch Linux рядом с Windows 10. UEFI.systemd-boot (без GRUB)
Предлагаю посмотреть на базовую установку Arch Linux 64 рядом с Windows UEFI с использованием менеджера загрузки systemd-boot
Исходные данные
Комп ASUS K53BR x64 с UEFI
Графика AMD
Оператива 4 Gb
Винт 465,8 Gb с системой разделов GPT
Установлена Windows 10 64-бит
Сеть WIFI
Требуется
Установка базовой системы Arch Linux 64-bit рядом с Windows 10. UEFI.
Использование менеджера загрузки systemd-boot.
Запускаемся с USB в режиме EFI
Проверяем режим EFI
efivar -l
Должны вывестись список строк.

Подключаем интернет
wifi-menu
Выбираем сеть, вводим пароль.
Проверяем наличие интернет
ping ya.ru
Должны начать выводиться списки загружаемых пакетов
Прерываем и выходим из ping командой ctrl+c

Синхронизация системных часов
timedatectl set-ntp true
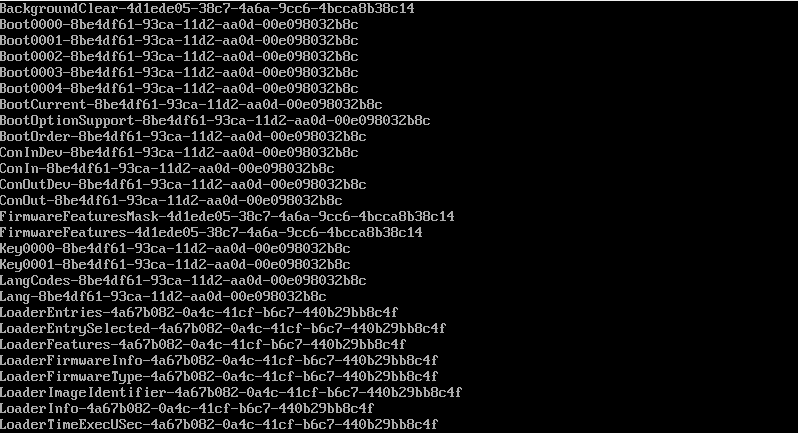
Посмотрим наши старые загрузочные записи (если есть)
efibootmgr

1. Видим, что загрузились через USB UEFI
2. Загрузчик Windows
3-5. Записи прочих загрузчиков. Если в свое время устанавливались другие дистрибутивы в раздел EFI, то таких записей может быть несколько. В любом случае визуально все можно понять.
Удаляем не нужные записи командой efibootmgr -b x -B, где x — номер записи в списке по последней цифре. В моем случае это записи 3,4,5.
efibootmgr -b 0 -B
efibootmgr -b 2 -B
efibootmgr -b 5 -B

Просмотрим разделы Windows
Видим, что раздел EFI находится на /dev/sda2. Сюда будем подключать наш загрузчик.
/dev/sda3 и /dev/sda4 — это, соответственно, диски C и D на Windows.

Разметка диска
cfdisk
На свободном месте добавляем разделы
Для root
new 20G type system linux подтверждаем write
Для swap
new 4.8G type linux swap подтверждаем write
Раздел /dev/sda2 с EFI не трогаем, раздел под /home я не создавал, так как пользоваться им практически не придется. Вся инфа лежит на windows разделе. Размер для root и swap, каждый выбирает на свое усмотрение.
Выходим из cfdisk через quit

Получaем разделы
root — sda5
boot — sda2
swap — sda6
Форматирование и подключение
#root
mkfs.ext4 /dev/sda5 -L «ARCH»
mount /dev/sda5 /mnt
#boot
mkdir -p /mnt/boot
mount /dev/sda2 /mnt/boot
#swap
mkswap /dev/sda6
swapon /dev/sda6
Просматриваем и проверяем разделы и подключение
cfdisk

Выходим из cfdisk
Обновляем пакеты
pacman -Syy
При обновлении пакетов видна скорость скачивания с сервера. Если устраивает,то следующий пункт можно пропустить.
Настройка сервера загрузки, как пример, для российского сервера.
nano /etc/pacman.d/mirrorlist
Вверху прописываем
Записываем изменения командой ctrl+o
Подтверждаем enter Выходим из редактора ctrl+x


Устанавливаем базовую систему и пакет для будущего использования AUR.
pacstrap /mnt base linux linux-firmware base-devel
Генерируем fstab
genfstab -U /mnt >> /mnt/etc/fstab
Просмотрим созданный fstab
nano /mnt/etc/fstab

Переходим в систему
arch-chroot /mnt
Устанавливаем редактор nano
pacman -S nano
Настроим локаль, время, имя компьютера
loadkeys ru
setfont cyr-sun16
nano /etc/locale.gen
Здесь раскомментирум строки
en_US.UTF-8 UTF-8
ru_RU.UTF-8 UTF-8
Записываем изменения командой ctrl+o
Подтверждаем enter
Выходим из редактора ctrl+x
locale-gen
nano /etc/locale.conf
Прописываем строку
LANG=ru_RU.UTF-8
Записываем изменения командой ctrl+o
Подтверждаем enter
Выходим из редактора ctrl+x
export LANG=ru_RU.UTF-8
nano /etc/vconsole.conf
Прописываем строки
KEYMAP=ru
FONT=cyr-sun16
Записываем изменения командой ctrl+o
Подтверждаем enter
Выходим из редактора ctrl+x
Настраиваем зону и системное время, как пример, для Россия Москва
ln -sf /usr/share/zoneinfo/Europe/Moscow /etc/localtime
hwclock —systohc
Настраиваем имя компьютера
nano /etc/hostname
Прописываем
userhost — имя вашего компьютера
Записываем изменения командой ctrl+o
Подтверждаем enter
Выходим из редактора ctrl+x
nano /etc/hosts
Прописываем строчку
127.0.1.1 userhost.localdomain userhost
Записываем изменения командой ctrl+o
Подтверждаем enter
Выходим из редактора ctrl+x

Устанавливаем пароль для root
passwd
Здесь же добавляю нового пользователя
useradd -G wheel -s /bin/bash -m username
где username — ваше имя пользователя
Открываем права для нового пользователя
nano /etc/sudoers
Раскомментируем строку %wheel ALL=(ALL) ALL
Записываем изменения командой ctrl+o
Подтверждаем enter
Выходим из редактора ctrl+x

Устанавливаем пароль для нового пользователя
passwd username
Устанавливаем дополнительные пакеты (и пакеты, которые вы считаете нужными)
pacman -S efibootmgr iw wpa_supplicant dialog netctl dhcpcd
Для работы с дисками
pacman -S ntfs-3g mtools fuse2
Запускаем менеджер загрузки
bootctl install
Будут созданы необходимые директории и точка входа загрузчика

Настраиваем менеджер загрузки
nano /boot/loader/loader.conf
Закомментируем все строки, добавим свои
default arch
timeout 5
editor 1
Инфа из WIKI

Получаем

Создаем файлы конфигурации
Для пользователей процессоров Intel нужно установить дополнительный пакет
pacman -S intel-ucode
nano /boot/loader/entries/arch.conf
title Arch Linux
linux /vmlinuz-linux
# initrd /intel-ucode.img # раскомментировать для пользователей Intel
initrd /initramfs-linux.img
options root=/dev/sda5 rw
Здесь sda5 — это наш примонтированный root раздел
Просмотрим последовательность при запуске системы
efibootmgr
Установим выбранную последовательность загрузки
efibootmgr -o 0,3,4,1 # в моем случае Arch будет первым

Выходим
exit
Отмонтируем диски
umount -R /mnt
Перегружаемся
reboot

Базовая система установлена. Остальное устанавливаем на свой вкус и цвет.
…далее
Arch «будет тем, что вы из него сделаете»
Удачи!
In this article you can read how to setup a PC that both runs
Windows 10 Pro and the latest Arch Linux (Januari 2020). After
following this guide you’ll have a PC that allows you to select
to boot either into Windows 10 or Arch Linux. All you need is a
free harddisk a Windows License and preferrably two USB sticks
that we use to install the Windows and Arch Linux ISO files
onto. We use Windows to create the bootable USB sticks but if
you’re running Mac, see the links below.
Prerequisites
- PC with ethernet connection.
- A harddisk onto which we install Windows and Arch Linux
- 1x USB stick for Arch Linux
- 1x USB stick for Windows 10.
- A PC that runs Windows.
- We assume you have a UEFI bios.
Create a bootable USB Installer for Arch Linux
You’re going to prepare two USB sticks, one will be used for the
Arch Linux installer and the other for the Windows 10
Installer. When you don’t have two USB sticks you’ll have to
reuse one; in this case first create this bootable Arch Linux USB
stick.
- Download the Arch Linux ISO.
- Select a server nearby your location
- Download the file with a name like
archlinux-2020.01.01-x86_64.iso. - Do not download the the bootstrap version
- Download the Rufus Windows application.
- Run Rufus:
- Device: select your USB stick
- Boot selection: press the SELECT button and brofwse to your arch iso file.
- Partition Scheme: GPT
- Target System: UEFI
- File system: FAT32
- Press START: Select
DD
Create a bootable USB Installer for Windows
To download the Windows 10 Pro ISO we can either use the
Windows Media Creation Tool
which also creates a bootable USB or trick the Windows website to
download the ISO file and use Rufus instead. The Windows Media
Creation Tool is known to be buggy and therefore we’re going to
use Rufus to create a bootable USB stick, just like we did for
the Arch Linux bootable USB stick.
By default when you try open the download page for the Windows 10
ISO, the Microsoft website forces you to use the Windows Media
Creation Tool; at least when you’re using Windows to download the
ISO. Luckily we can trick the website to pretend we’re visiting
the website from a Mac. When the Microsoft website thinks we’re
using a Mac it magically allows us to download the ISO.
- Use the Chrome browser and search for «Windows 10 Pro ISO»
- Open the link to something like: https://www.microsoft.com/software-download/windows10ISO
- Press
CTRL+SHIFT+Ito open the Developers Tools - Click the menu icon (3 dots) on the right of the Developer Tools
- Select More tools > Network Conditions
- Unselect the User agent [x] Select automatically setting.
- Select Safari — Mac
- Reload the page.
- Select Windows 10, press Confirm
- Select your language
- Select the 64-bit download
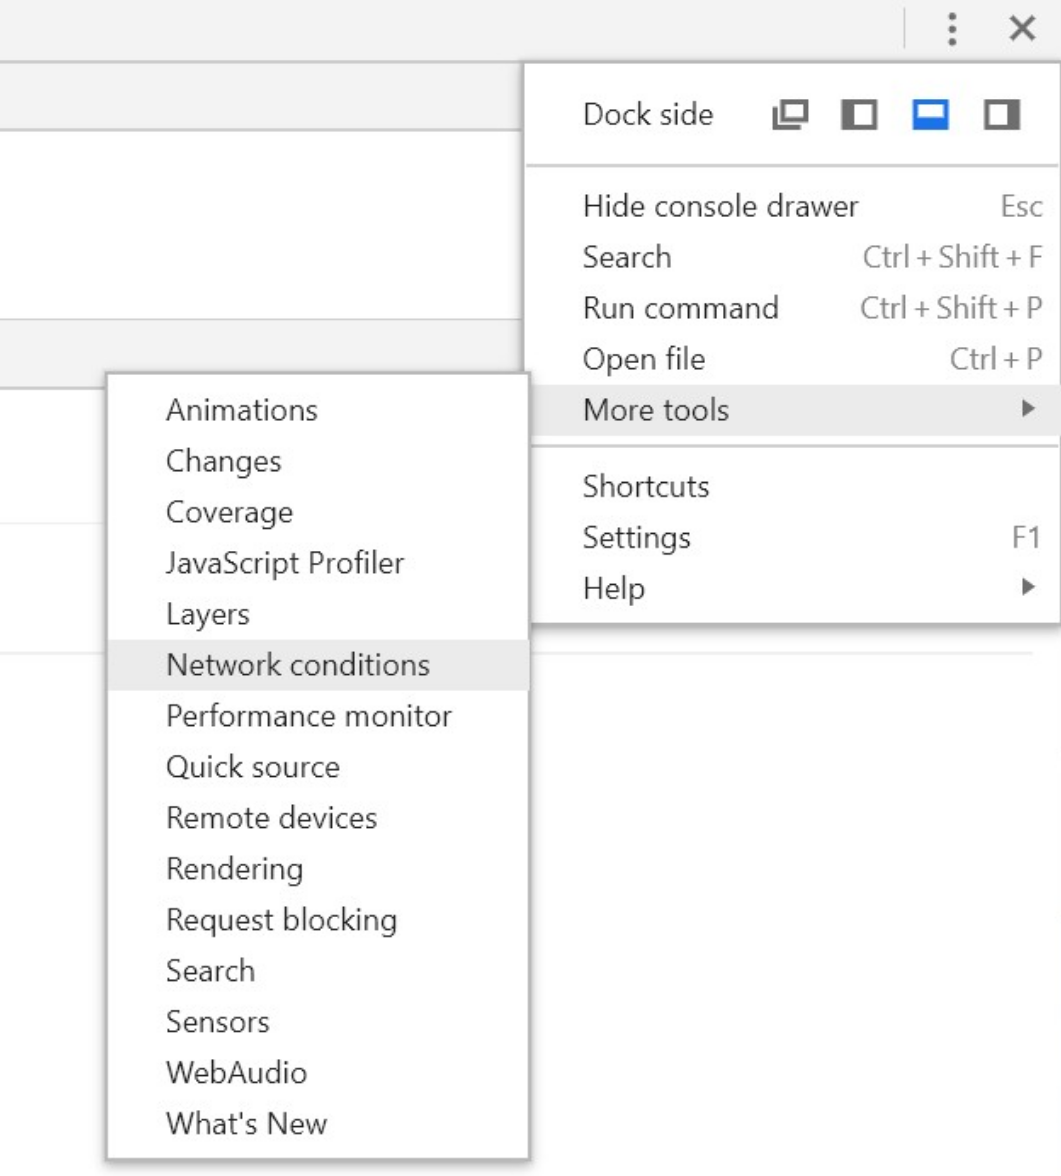
Open the network conditions via the Chrome Developer Tools
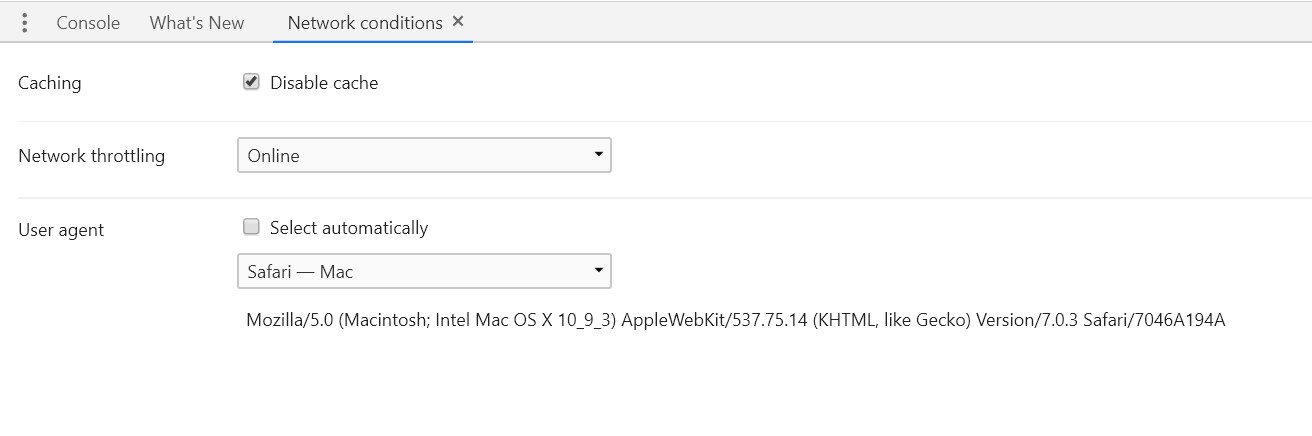
Select Safari on Mac as your user agent
Once you’ve downloaded the Windows 10 Pro ISO, open Rufus again
and place the USB stick in your PC. Note that all data on this
stick will be removed when we copy the Windows 10 Pro Installer
onto this bootable USB stick.
- Run Rufus
- Device: select your USB stick
- Bool selection: press SELECT and browse to your Windows ISO file.
- Partition Scheme: GPT
- Target System: UEFI
- File System: NTFS
- Press START
Install Arch Linux
Now that you have a bootable Arch Linux USB installer and a
bootable Windows 10 Pro USB installer you’ll have to install Arch
Linux first. This means that you have to start with the most
important step first: partitioning.
Partitioning is known to be difficult when you’re new to
Linux. Though let me tell you that it’s a lot easier than you
think. What might be a bit difficult is to choose the sizes
of your partitions. I’ll describe what I normally use and you can
follow along or choose your own partitions sizes.
I do assume that you’ve got one harddisk onto which you want to
install both Arch Linux and Windows 10 Pro. I use a 2TB SSD disk
where I choose 1TB for Arch Linux and 1TB for Windows.
When you’ve got more than one harddisk and you want to use
another harddisk to install Arch Linux and Windows 10 you have to
make sure that your UEFI bios boots from the harddisk onto which
we’re going to install Arch Linux and Windows.
Boot from the Arch Linux USB
- Put your USB stick with the Arch Linux installer into your PC
- Boot from USB
- Select
Arch Linux archiso x86_64 UEFI CD, press Enter
When your screen turns crazy after you have pressed Enter,
reboot and follow these steps instead:
- Boot from from USB
- Select «Arch Linux archiso x86_64 UEFI CD», press e
- Scroll to the end of the command and add
nomodeset - Press enter.

Partitioning your harddisk
To find your harddisk we use fdisk. You might have multiple
harddisks and at this point it doesn’t really matter which one
you use; this is up to you.
# fdisk -l
You’ll see a similar output as below. The Disk /dev/sdb is what
we’re after. We’ll use the /dev/sdb disk to install Arch Linux
and Windows. Note that my PC came pre-installed with Windows 10
Pro which uses a digital license. This means my motherboard has
the license baked into it and it’s safe to remove the existing
partitions. When you don’t have a digital license make sure you
have a copy of your Windows 10 License Key.
You’ll create three partitions. The boot partition, the root Arch
Linux partition and one that the Windows installer will use to
install Windows 10. I recommend writing the partitions numbers,
sizes and types down as you might want to refer to these when
installing Windows 10.
# fdisk -l

Disk /dev/sdb: 3.65 TiB, 4000787030016 bytes, 7814037168 sectors
Disk model: Samsung SSD 860
Units: sectors of 1 * 512 = 512 bytes
Sector size (logical/physical): 512 bytes / 512 bytes
I/O size (minimum/optimal): 512 bytes / 512 bytes
Disklabel type: gpt
Disk identifier: E413F59B-D9CB-4E10-A358-C5E7309DF4D9

Device          Start        End    Sectors  Size Type
/dev/sdb1        2048     526335     524288  256M EFI System
/dev/sdb2      526336 4295493631 4294967296    2T Linux filesystem
/dev/sdb3  4295493632 7814037134 3518543503  1.7T Microsoft basic data
Now that you know the disk name, you can run gdisk to partition your
disk. First we’ll remove all the existing partitions.
# gdisk /dev/sdb
Remove exiting partitions:
- Press `d`
- Partition number (1-2): 1 [PRESS ENTER]
- Press `d`
- Repeat for all your paritions.
Create the boot and main partion for Arch Linux:
- Press `n`
- Partition number: 1
- First sector: [PRESS ENTER]
- Last sector: +256M
- Hex code or GUID: ef00

- Press `n`
- Partition number: 2
- First sector: [PRESS ENTER]
- Last sector: 1T
- Hex code or GUID: 8300
Create the Windows Partition:
- Press `n`
- Partition number: 3
- First sector: [PRESS ENTER]
- Last sector: [PRESS ENTER}
- Hex code or GUID: 0700
Save and exit.
- Press `w`
- Do you want to proced: `y`
Lets see the created partitions:
# fdisk -l /dev/sdb

Disk /dev/sdb: 3.65 TiB, 4000787030016 bytes, 7814037168 sectors
Disk model: Samsung SSD 860
Units: sectors of 1 * 512 = 512 bytes
Sector size (logical/physical): 512 bytes / 512 bytes
I/O size (minimum/optimal): 512 bytes / 512 bytes
Disklabel type: gpt
Disk identifier: E413F59B-D9CB-4E10-A358-C5E7309DF4D9

Device          Start        End    Sectors  Size Type
/dev/sdb1        2048     526335     524288  256M EFI System
/dev/sdb2      526336 4295493631 4294967296    2T Linux filesystem
/dev/sdb3  4295493632 7814037134 3518543503  1.7T Microsoft basic data
Format the partitions:
# mkfs -t vfat /dev/sdb1
# mkfs -t ext4 /dev/sdb2
Setup and install Arch Linux base system
Mount system: you first mount the main system (/dev/sdb2) after which you
mount the boot partition (/dev/sdb1).
# mkdir /mnt
# mount /dev/sdb2 /mnt

# mkdir /mnt/boot
# mount /dev/sdb1 /mnt/boot
Setup base system:
# pacstrap /mnt base base-devel linux linux-firmware
# genfstab -U -p /mnt >> /mnt/etc/fstab
# arch-chroot /mnt
Install some core utilities:
# pacman -S emacs
# pacman -S git
# pacman -S kitty
# pacman -S dhcpcd
# pacman -S openssh
Configure timezone
# ln -sf /usr/share/zoneinfo/Europe/Amsterdam /etc/localtime
# hwclock --systohc

# emacs -nw /etc/locale.gen
-- uncomment: en_US.UTF-8 UTF-8

# locale-gen
# localectl set-locale LANG=en_US.UTF-8

# emacs -nw /etc/locale.conf
-- add the following lines:
LANG=en_US.UTF-8
LC_CTYPE=en_US.UTF-8
Hostname
# emacs -nw /etc/hostname
-- set your hostname, e.g. roxlu, arch, etc.)
Host file
# emacs -nw /etc/hosts

-- make sure it reads something like:
127.0.0.1 localhost
::1 localhost
127.0.1.1 yourhostname.localdomain yourhostname
Add your main account:
# useradd -m -g users -s /bin/bash roxlu
# gpasswd -a roxlu wheel
# passwd roxlu
Set root password:
# passwd
Install the rEFInd boot loader
I’ve been using the rEFInd boot loader for quite a while and have
been very happy with it; I like that it’s a graphical menu that
you can customise. So let’s install the rEFInd boot loader.
# pacman -S refind-efi
# refind-install
The refind-install util will copy some required files to the
boot partition for you but we still have to configure rEFInd to
make sure that it loads the correct files when booting. You have
to set the correct UUID in the /boot/refind_linux.conf.
We have to get the UUID of our root partition (not boot). You can
use the following command to get the UUID for the root partition:
# findmnt -no UUID /
3d72956e-db77-43b4-b299-14a0de20ea4c
To copy the UUID easily I’m using emacs that I use to create a
split window. In the right window I run M-x eshell in which I
execute findmnt -no UUID / and copy the UUID. In the left pane
I opened the /boot/refind_linux.conf. Now make sure that it reads
something similar as this:
# emacs -nw /boot/refind_linux.conf

-- create a split window
-- M-x eshell, and run `blkid /dev/sdb2` in
-- copy the UUID into `refind_linux.conf` so that it looks like:

"Boot with standard options"  "rw root=UUID=3d72956e-db77-43b4-b299-14a0de20ea4c"
"Boot to single-user mode"    "rw root=UUID=3d72956e-db77-43b4-b299-14a0de20ea4c single"
"Boot with minimal options"   "rw root=UUID=3d72956e-db77-43b4-b299-14a0de20ea4c"
Now verify that your boot partition is setup correctly. It should
look similar to this listing:
# cd /boot
# ls -1

EFI
initramfs-linux-fallback.img
initramfs-linux.img
refind_linux.conf
vmlinuz-linux
When you’re missing the kernel executable vmlinuz-linux or
any of the initramfs-* something went wrong. Try to reinstall
the kernel using:
# pacman -S linux
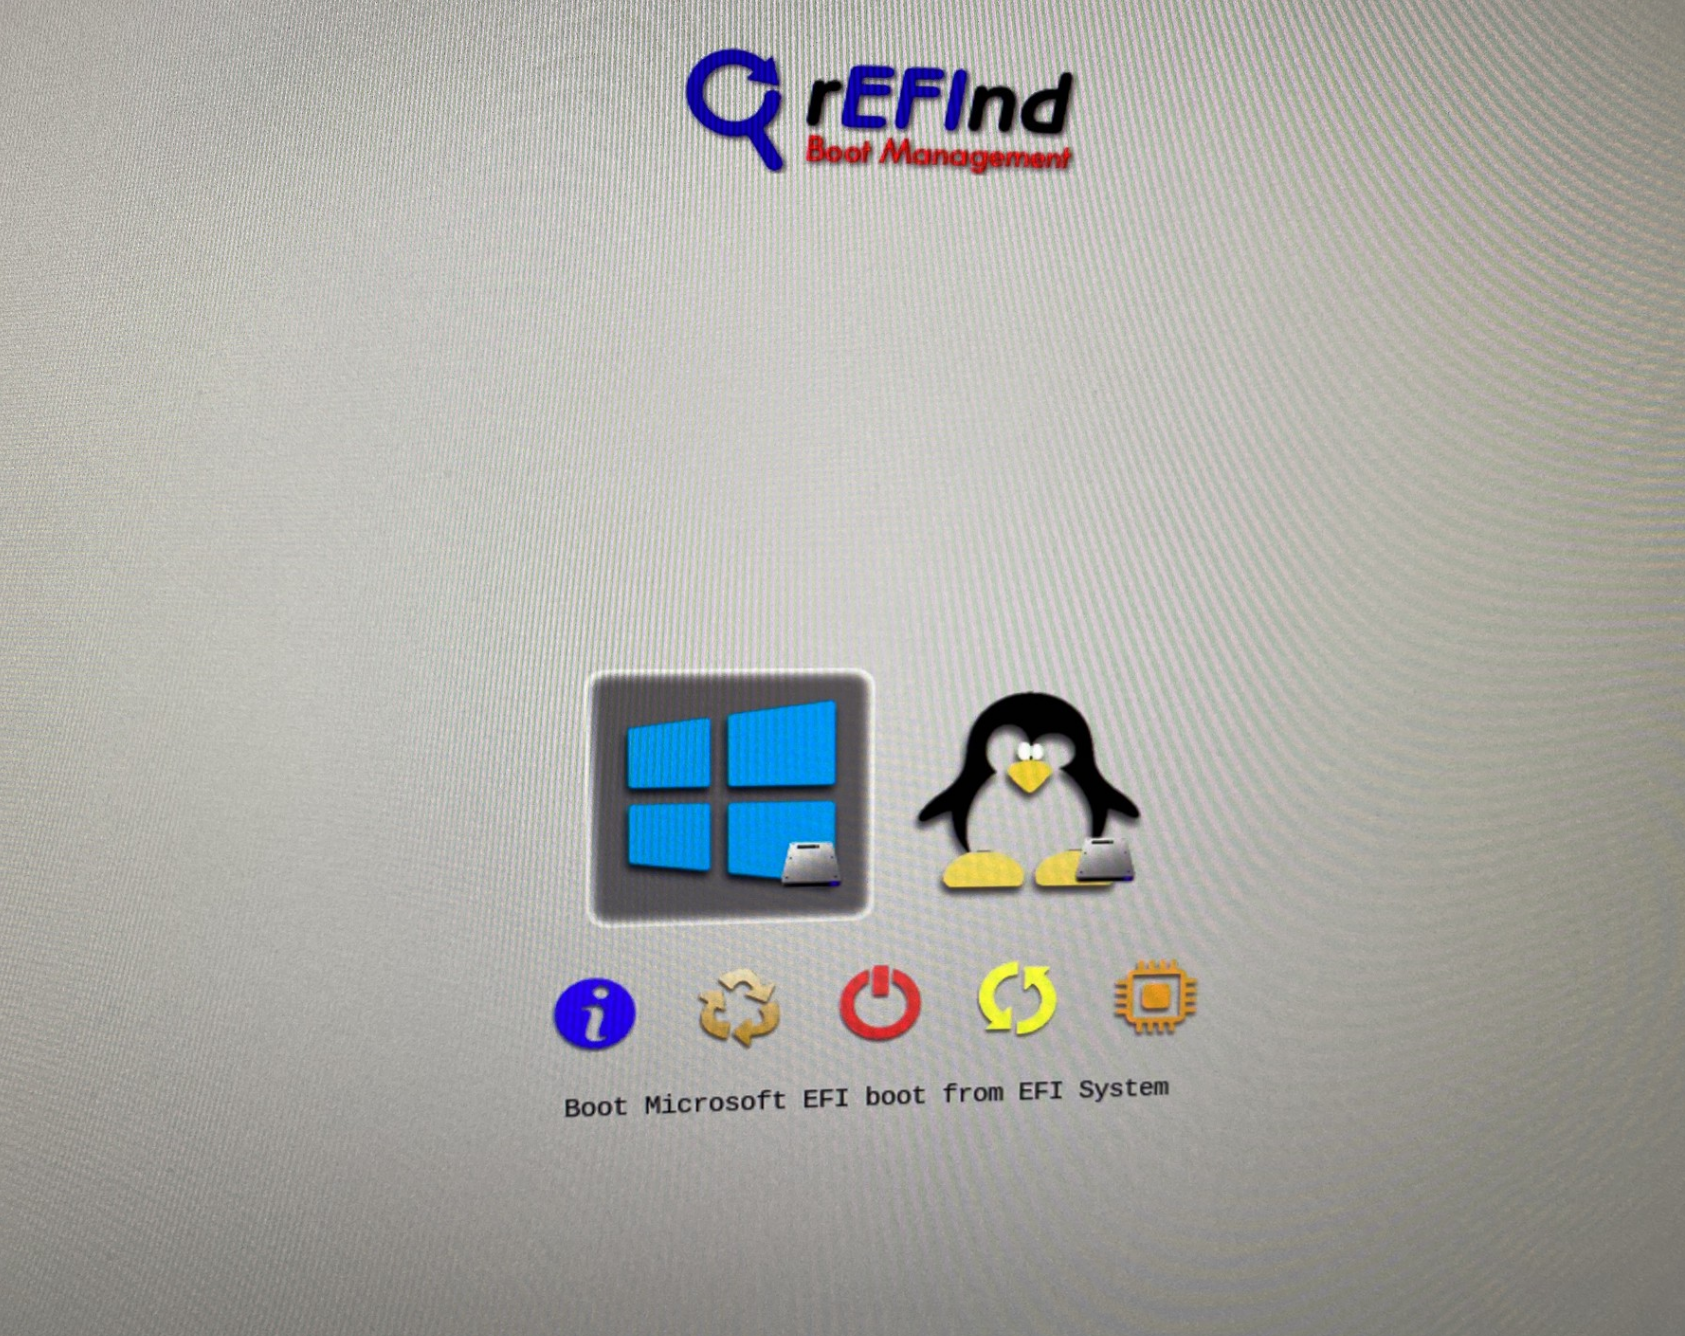
When you reboot now, you’ll get a similar menu as in the image above, but you’ll see only the Linux menu option, we’re going to add Windows later.
Setup networking using DHCP
I’m using DHCP to automatically configure my network. When you
don’t use DHCP you can set your IP manually but that’s out of the
scope of this document. To enable DHCP for a network interface, we’ll
check which one is currently in use. To do this we use the ip addr
command. Find the interface that you want to setup; this is most likely
the one which comes directly after the link/loopback interface with
a link designation like link/ether
 # ip addr

 3: eno1: <BROADCAST,MULTICAST,UP,LOWER_UP> mtu 1500 qdisc fq_codel state UP group default qlen 1000
    link/ether 00:d8:61:4f:ba:df brd ff:ff:ff:ff:ff:ff
    inet 192.168.0.178/24 brd 192.168.0.255 scope global noprefixroute eno1
       valid_lft forever preferred_lft forever
    inet6 fe80::5c2d:3270:4:9ca8/64 scope link
       valid_lft forever preferred_lft forever
In the example above, the name of our network interface is
eno1. Now, that you know the name of the network interface we
can enable DHCP on it. Note that below we use dhcpcd and
not dhcp.
# systemctl enable dhcpcd@eno1
Reboot
Remove the USB stick and exit the chroot environment, then
execute reboot. When your PC restarts you should see the rEFInd
boot menu that you need to start Linux.
# exit
# reboot
When you don’t get the rEFInd menu something went wrong. See the
next section which allows you to go back into your just installed
Arch Linux. When you do get the rEFInd boot menu: congrats, you
just installed Arch Linux successfully. Skip the next step and
continue with the Windows 10 Pro install.
Fixing errors when your boot menu is broken
Don’t worry, you don’t have to reinstall everything again. When
you don’t see the rEFInd boot menu after restarting you either
made an error while configuring rEFInd or creating the partitions.
When your partitions are incorrect, you might have to reinstall
Arch Linux again. When it’s something related to rEFInd, you
might be able to fix it by checking your configs again.
Here I’ll explain how you can go back into your just installed
Arch Linux so you’re able to verify some things and check the rEFInd
configuration.
- Put the Arch Linux bootable USB installer in your PC.
- Boot from the Arch Linux USB (see above how to do this).
-
Mount your installed Arch Linux and chroot into it. Make sure
to use the correct partitions that you used when partitioning
your filesystem.# mount /dev/sdb2 /mnt # mount /dev/sdb1 /mnt/boot # arch-chroot /mnt -
Now you’re back into your install and you can fix it!
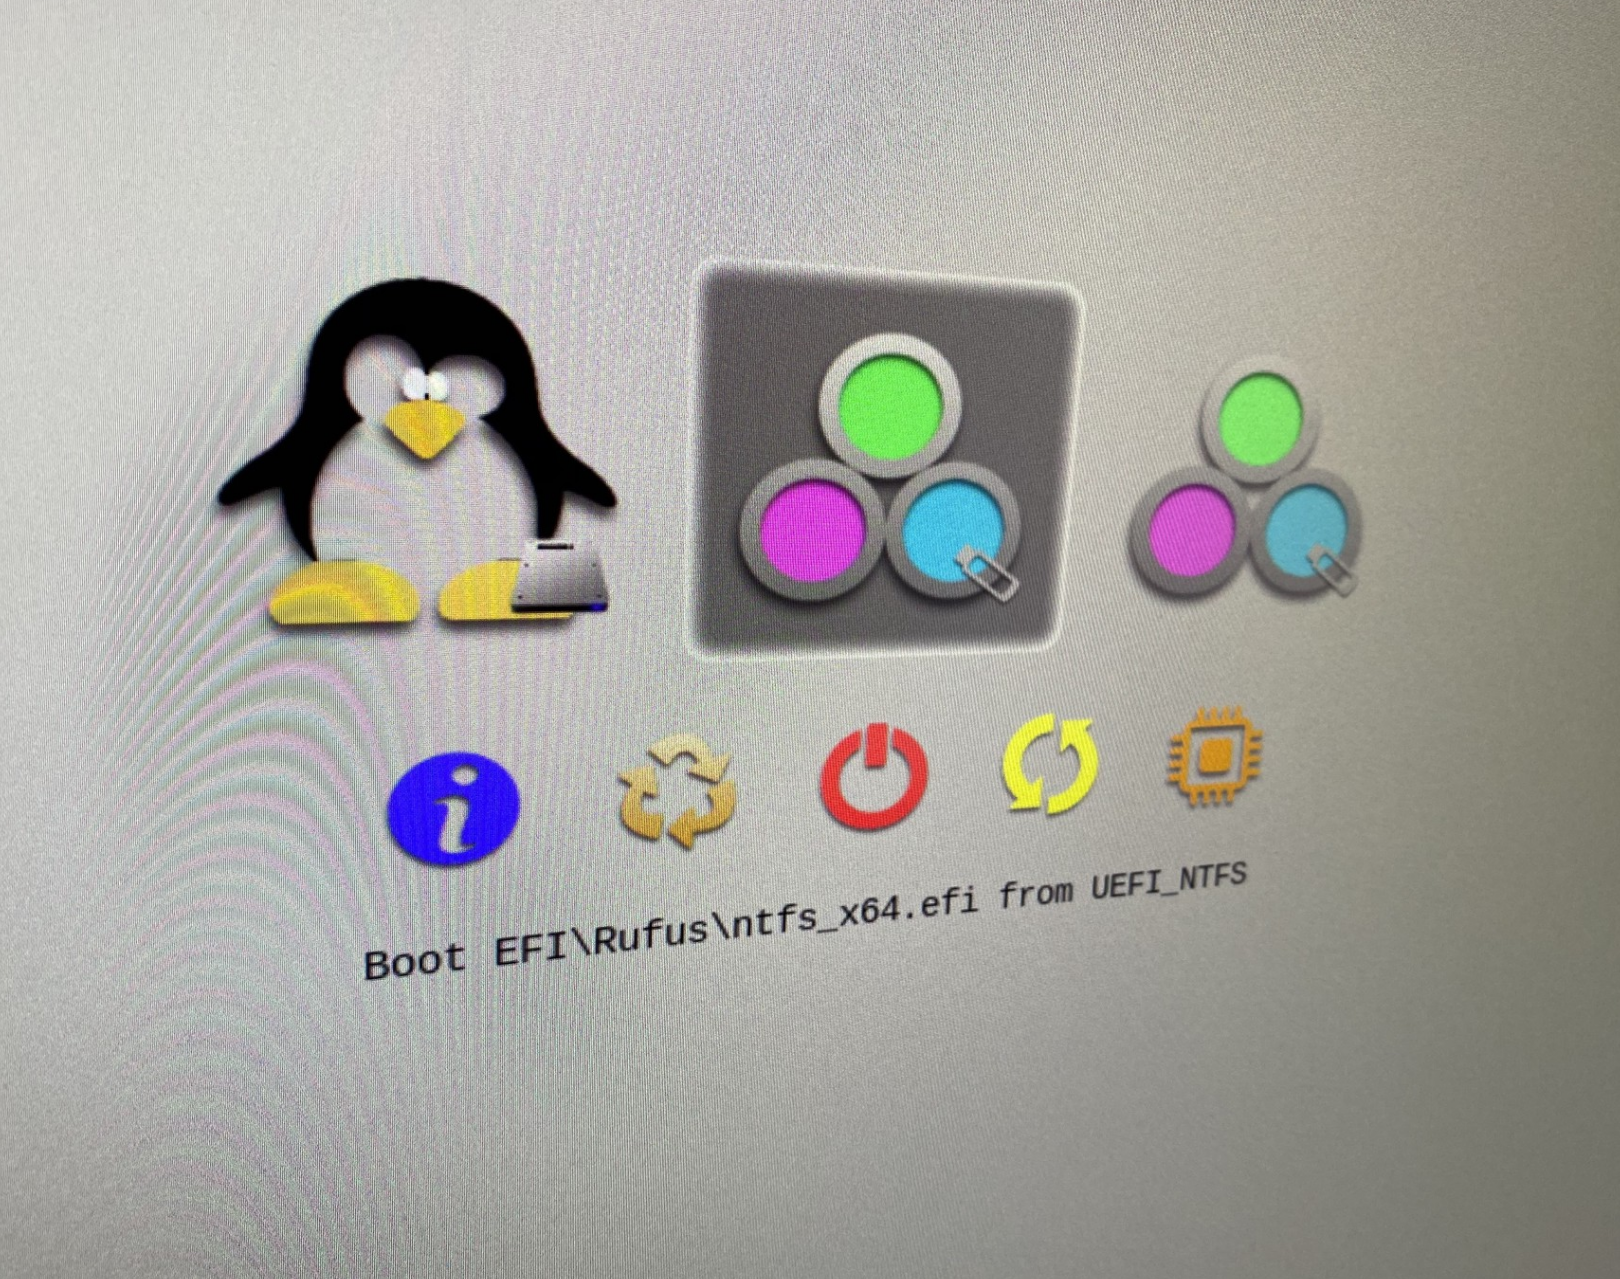
Install Windows 10 Pro
At this point you should be able to access the rEFInd boot menu
when you boot your PC. Now you instert the bootable Windows 10
Pro USB stick into your PC, remove the Arch Linux installer USB
and reboot. After the reboot, rEFInd will show you a couple of
extra options. I got two extra options for the Windows
installer. I selected the menu option with Boot
EFI\Rufus\ntfs_x64.efi from UEFI_NTFS
Installing Windows 10 is a pretty trivial and straightforward
process. The only thing which might be worth mentioning is the
partitioning step. When the installer starts, one of the first
screens will ask if you want to repair an existing installation
or do a advanced full install. Choose the advanced option and
when you’re asked to select the partition make sure to select the
one that you prepared when partitioning for Arch Linux.
Select the correct partition, press Next and follow the
screens from the installer. Once Windows has been installed
remove the USB key and restart. rEFInd will contain an extra
option for Windows 10 Pro.
Windows removed rEFInd: how to reinstall rEFInd?
It might happen that the Windows installer removed the rEFInd
boot menu and forced it’s own boot manager to be the default one.
This means that when we reboot we won’t get the rEFInd boot menu
anymore. You can fix this issue by reinstalling rEFInd.
- First boot into your Arch Linux installation as described above
in the Boot from the Arch Linux USB. - Next run
refind-installagain - Remove the USB stick
- Reboot
This should bring back the rEFInd boot menu and it will have two
options now, one for Windows 10 Pro and one for Arch Linux. Congratulations
you have successfully installed Arch Linux and Windows 10 Pro as a
dual boot on your PC with the rEFInd boot menu.
Now that you’ve got a nice setup, you might want to
create a self-hosted Unifi NVR

NAT Types
This is so exciting, in this article I dive into some of the different ways a NAT device translates addresses which is important for peer-to-peer connections.

Building Cabinets
In this post I dive into the design and construction of a cabinet with an interact LED strip. I also explain how I dynamically change the colors of the LEDs over TCP/UDP.

Compiling GStreamer from source on Windows
How to compile GStreamer on Windows from Source using Visual Studio 2019 and the meson build system.

Debugging CMake Issues
In this post I explain a process you can follow to debug issues with CMake by focusing on a specific target and making the output verbose.

Dual Boot Arch Linux and Windows 10
How to install Arch Linux and Windows 10 Pro as dual boot. A step by step tutorial how to create bootable installers, partition and setup a dual boot menu.

Mindset Updated Edition, Carol S. Dweck (Book Notes)
Paragraphs I marked from the book «Mindset» from Carol S. Dweck.
How to setup a self-hosted Unifi NVR with Arch Linux
A step by step HOW-TO that explain show to setup a Unifi Video Controller with an NFS share with Arch Linux.

Blender 2.8 How to use Transparent Textures
Follow this node setup when you want to use an image with transparency as a «sticker».
Compiling FFmpeg with X264 on Windows 10 using MSVC
A couple of steps to compile FFmpeg on Windows using MSVC.

Blender 2.8 OpenGL Buffer Exporter
The following Blender script creates a [name].h and [name].cpp for the selected object and stores the positions, normals and UVs.

Blender 2.8 Baking lightmaps
Light maps are a cheap way to add a lot of realism to you static scenes and have been used forever.

Blender 2.8 Tips and Tricks
Use Environment Map only for reflections; create a floor plane for a Product Render, diffuse texture for roughness and more!

Setting up a Bluetooth Headset on Arch Linux
Learn how to setup a Sennheiser PXC 550 Bluetooth headset on Arch Linux.

Compiling x264 on Windows with MSVC
Compile the excellent x264 source on Windows using MSYS2 and MSVC.

C/C++ Snippets
Is a number divisible by four?

Reading Chunks from a Buffer
Some thoughts on reading bytes from a file; handy for reading NALs.

Handy Bash Commands
Bash scripts: removing white space, lowercase filenames, backup using tar, etc.

Building a zero copy parser
Simple solution to parse data in a pretty performant way. Used this for a RTSP protocol parser.

Kalman Filter
A very simple yet powerful filter which works great when you have to smooth noisy data. Used for the Nike Rise 2.0 project.

Saving pixel data using libpng
Do you have raw RGBA data that you want to save? Use this snippet to save it into a PNG file.

Compile Apache, PHP and MySQL on Mac 10.10
Setup you own PHP, MySQL and Apache and with virtual document roots.

Fast Pixel Transfers with Pixel Buffer Objects
Using Pixel Buffer Objects (PBO) for fast asynchronous data transfers and OpenGL.

High Resolution Timer function in C/C++
Wait…… wait.. fast high resolution timer funtions (Windows, Linux, Mac)

Rendering text with Pango, Cairo and Freetype
My never ending obsession with font rendering. A complex beast to do well. Use Pango and FreeType for the heavy lifting.

Fast OpenGL blur shader
Make things look blurry … and fast using this OpenGL blur shader.

Spherical Environment Mapping with OpenGL
An old trick to get great lighting effects using Environment Maps and OpenGL.

Using OpenSSL with memory BIOs
OpenSSL is a great library with lots of abstractions. In this post I discuss how to break some of these abstractions and use your own memory buffers.

Attributeless Vertex Shader with OpenGL
A simple way to render a fullscreen quad without a vertex buffer with OpenGL.

Circular Image Selector
Some thoughts on a different way to select images from a huge collection in a compact UI.

Decoding H264 and YUV420P playback
Using libav to demux and playback with OpenGL.

Fast Fourier Transform
Analyse your audio using the Fastest Fourier Transform in the West.

OpenGL Rim Shader
Pretty glowy edges using a GLSL rim shader.

Rendering The Depth Buffer
Render the non-linear OpenGL Depth Buffer.

Delaunay Triangulation
Do you need to triangulate some shape: use the “Triangle” library.

RapidXML
RapidXML is a versatile and fast XML parser with a simple API. Check out these examples.
Git Snippets
Some simple GIT snippets; added here to remind myself.

Basic Shading With OpenGL
A couple of basic GLSL shaders with explanation.

Open Source Libraries For Creative Coding
Collection of great open source libraries for you creative programming projects.

Bouncing particle effect
Snippet that can be used to create a bouncy particle effect; basic, effective, simple but nice.

OpenGL Instanced Rendering
Want to render thousands and thousands of objects? Use OpenGL instanced rendering. The solution…the only solution.

Mapping a texture on a disc
Ever heard about projective interpolation related to texture mapping? Learn about this intertesting issue with OpenGL and texture mapping.

Download HTML page using CURL
When you want a quick solution to perform a HTTP(S) request CURL is always a quick an simple solution. Check out this example code.

Height Field Simulation on GPU
Although not a Navier-Stokes implementation … still a very nice and enjoyable effect.

OpenCV
Optical Flow: when doing anything with tracking you’ve probably heard of it. See this simple example code using OpenCV and OpenGL.

Some notes on OpenGL
FBOs and Depth Testing, using different Attachment Points, a YUV420p shader, …

Math
Meaning of the Dot Product in 3D graphics, calculating a perpendicular vector using Sam Hocevar’s solution, orientation matrix and more.

Gists to remember
Some gists that I want to remember, often use, etc…

Reverse SSH
Do you want to login, into a remote PC but the remote PC is behind a firewall? Then use this simple reverse SSH trick which doesn’t require changing your firewall rules.

Working Set
Having issues with your compiler? Or during linking? Check these common issues and their solutions. I also list several tools that you can use to get a some useful info.

Consumer + Producer model with libuv
Example of a common Multi Threaded Consumer/Producer Model using LibUV.

Parsing binary data
Learn about the basic of a binary protocol and how to create one easily yourself.
C++ file operation snippets
Reading a file into a string, vector, checking the file size, change to a position, etc. A collection of C++ file operation snippets.

Importance of blur with image gradients
Do you want to experiment with OpenGL and aligning Brush Strokes along Image Gradients? Then check out this post about the importance of blurring.

Real-time oil painting with openGL
Code snippet for fake «oil painting» effect with OpenGL using instanced rendering.

x264 encoder
Basic example on how to use libx264 to encode image data using libav

Generative helix with openGL
Screenshots of a project I worked on with that generates a DNA helix.

Mini test with vector field
Screenshots while experimenting with a vector field; nothing much to see here.

Protractor gesture recognizer
Testing the amazing One Dollar $1 gesture recognizer. The simplest and very good gesture recognizer.

Hair simulation
Example code that implements the «Fast Simulation of Inextensible Hair and Fur» paper from M. Müller, T.Y. Kim and N.Chentanez.

Some glitch screenshots
Glitch screenshots.

Working on video installation
Screenshots of some experiments of a video installation.

Generative meshes
I enjoy creating physics based simulations and render them on high res. Here are some experiments I did a time ago.

Converting video/audio using avconv
Examples that show you how to use avconv to manipulate video and audio files.

Auto start terminal app on mac
Automatically start you application whe Mac boots and make sure that it restarts your app when it exists. Handy for interactive installations.

Export blender object to simple file format
Export the selected object in Blender into a .h and .cpp file that prepresents the buffer.
1. Pre-Installation Preparation
Before touching partitions, back up any important files from your Windows system. Verify that Windows is installed in UEFI mode: in Windows press Win+R, run msinfo32, and ensure BIOS Mode is “UEFI” (Installing And Setting Up Arch Linux to Dual Boot Alongside Window 10 · GitHub). Also confirm Windows uses GPT, not MBR, in Disk Management. Next, disable “Fast Startup” in Windows (via Control Panel → Power Options) because it hibernates the disk and can block Linux from mounting it (Is it necessary to disable Fast Boot in Windows to dual boot with linux(EFISTUB)? — Unix & Linux Stack Exchange). In your PC’s UEFI/BIOS settings, disable Secure Boot if possible (this avoids bootloader signature issues) and Fast Boot (if present, to ensure the USB can boot).
Download the Arch Linux ISO from the official site and create a bootable USB. For example, use a tool like Rufus on Windows: select the ISO, set the partition scheme to GPT and file system to FAT32, and flash it (Installing And Setting Up Arch Linux to Dual Boot Alongside Window 10 · GitHub). This makes the USB UEFI-bootable. When done, reboot and enter your firmware’s boot menu (often by pressing a key like F12, F10, or Esc during startup) and choose the USB under UEFI devices (Installing And Setting Up Arch Linux to Dual Boot Alongside Window 10 · GitHub).
2. Booting Arch Linux in UEFI Mode
Boot the USB in UEFI mode. You should land at an Arch Linux prompt (typically as the root user, no password). If needed, set your keyboard layout (e.g. loadkeys us for US layout) and verify network connectivity next.
3. Internet Connection (Wi-Fi)
If you have a wired connection, it usually connects automatically via DHCP. Test it with ping -c 3 archlinux.org. For Wi-Fi, run:
rfkill unblock wifi
iw dev        # identify your wireless interface name (e.g. wlan0)
wifi-menu wlan0   # (or your interface name) to select and connect to a network
Enter fullscreen mode
Exit fullscreen mode
After connecting, verify with ping -c 3 archlinux.org. A working connection is required for package installation (Installing And Setting Up Arch Linux to Dual Boot Alongside Window 10 · GitHub).
4. Disk Partitioning
WARNING: Be careful not to delete your Windows partitions. You may have already shrunk the Windows partition from Windows Disk Management to make free space. If not, reboot into Windows, open Disk Management (diskmgmt.msc), right-click the Windows (C:) partition, and choose Shrink Volume to free up at least ~20–50 GB (20000–50000 MB) for Arch (Installing And Setting Up Arch Linux to Dual Boot Alongside Window 10 · GitHub).
Back in Arch’s live environment, list disks with fdisk -l to identify your drive (e.g. /dev/sda). Use cfdisk (or fdisk/gdisk) to partition. Select your disk (e.g. /dev/sda) and a GPT label:
cfdisk /dev/sda
Enter fullscreen mode
Exit fullscreen mode
In the cfdisk menu, create new partitions in the free space:
-
EFI System Partition (ESP): If Windows is already in UEFI mode, an EFI partition (around 100–500 MB, FAT32) should exist (often
/dev/sda1). We will reuse that for the bootloader. If not present, create a new small (e.g. 500 MB) FAT32 partition and set its type to “EFI System” (How to Install Arch Linux: A Beginner’s Practical Guide). -
Swap Partition: Create a Linux swap partition. For example, if you have 8 GB RAM, make 8–12 GB here. After selecting “New”, accept the defaults to start at free space and enter the size (e.g.
12G), then set its type to “Linux swap” (How to Install Arch Linux: A Beginner’s Practical Guide). - Root Partition: Use the remaining space to create an ext4 root partition. Again select “New”, accept the remaining free space, and set the type to “Linux filesystem” (ID 8300) (How to Install Arch Linux: A Beginner’s Practical Guide).
Write the changes (“Write” in cfdisk) and confirm. Then quit cfdisk (How to Install Arch Linux: A Beginner’s Practical Guide).
5. Format and Mount Partitions
Format each partition to its filesystem:
mkfs.fat -F32 /dev/sda1     # Format EFI partition as FAT32 (if newly created; skip if reusing Windows EFI)
mkswap /dev/sda2            # Format swap partition
swapon /dev/sda2            # Enable swap
mkfs.ext4 /dev/sda3         # Format root partition as ext4
Enter fullscreen mode
Exit fullscreen mode
(Adjust /dev/sdXN numbers to match your EFI, swap, and root partitions.) Format and activate swap as shown (How to Install Arch Linux: A Beginner’s Practical Guide); format root as ext4 (How to Install Arch Linux: A Beginner’s Practical Guide).
Next, mount the new root partition and EFI partition (bootloader space). For example:
mount /dev/sda3 /mnt       # Mount the root partition
mkdir -p /mnt/boot/efi     # Create a mount point for EFI
mount /dev/sda1 /mnt/boot/efi  # Mount the EFI (ESP) here
Enter fullscreen mode
Exit fullscreen mode
(This assumes /dev/sda1 is the EFI; use the correct device.) These commands are analogous to those shown in the guide (How to Install Arch Linux: A Beginner’s Practical Guide). Verify with lsblk that /mnt is your root and /mnt/boot/efi is your EFI.
6. Install the Base System
Install the core Arch system packages using pacstrap:
pacstrap /mnt base linux linux-firmware
Enter fullscreen mode
Exit fullscreen mode
This installs the base filesystem, the Linux kernel, and firmware for common devices (Comprehensive Arch Linux Installation Guide | Liquid Web). You can also add packages like base-devel or a text editor here (e.g. nano) as needed.
7. Configure the New System
Generate an fstab file so the system knows where to mount partitions on boot:
genfstab -U /mnt >> /mnt/etc/fstab
Enter fullscreen mode
Exit fullscreen mode
Review it with cat /mnt/etc/fstab to ensure it lists your root and EFI partitions correctly (Comprehensive Arch Linux Installation Guide | Liquid Web).
Now enter the new system environment with arch-chroot:
arch-chroot /mnt
Enter fullscreen mode
Exit fullscreen mode
You are now effectively “root” in your installed system. All following commands apply inside the new Arch system.
Timezone and Clock
Set your timezone, for example for New York:
ln -sf /usr/share/zoneinfo/America/New_York /etc/localtime
hwclock --systohc
Enter fullscreen mode
Exit fullscreen mode
This links the appropriate zoneinfo file and generates /etc/adjtime (Comprehensive Arch Linux Installation Guide | Liquid Web) (Comprehensive Arch Linux Installation Guide | Liquid Web). Replace the path with your region/city.
Locale
Edit /etc/locale.gen, uncomment your locale (e.g. en_US.UTF-8 UTF-8), then run:
locale-gen
echo LANG=en_US.UTF-8 > /etc/locale.conf
Enter fullscreen mode
Exit fullscreen mode
These commands (and uncommenting the locale) are shown in the guide (Comprehensive Arch Linux Installation Guide | Liquid Web) (Comprehensive Arch Linux Installation Guide | Liquid Web). This sets the system language.
Hostname and Hosts
Set a hostname by creating /etc/hostname with your chosen name. For example:
echo "archpc" > /etc/hostname
Enter fullscreen mode
Exit fullscreen mode
Then edit /etc/hosts and add lines:
127.0.0.1   localhost
::1         localhost
127.0.1.1   archpc.localdomain   archpc
Enter fullscreen mode
Exit fullscreen mode
Replace archpc with your hostname as shown (Comprehensive Arch Linux Installation Guide | Liquid Web).
Root Password and Initramfs
Set the root password:
passwd
Enter fullscreen mode
Exit fullscreen mode
Enter a secure password when prompted (Comprehensive Arch Linux Installation Guide | Liquid Web). Then rebuild the initial ramdisk:
mkinitcpio -P
Enter fullscreen mode
Exit fullscreen mode
This ensures the boot image is up-to-date (most tutorials include this step).
Create a Regular User (optional but recommended)
Create a normal user for daily use and add it to the “wheel” group (for sudo). For example:
useradd -m -G wheel -s /bin/bash username
passwd username
Enter fullscreen mode
Exit fullscreen mode
Give that user a password. Then install and enable sudo by editing /etc/sudoers with EDITOR=nano visudo and uncommenting the line %wheel ALL=(ALL) ALL.
8. Install the Bootloader (GRUB)
Install GRUB with UEFI support so you can boot Arch (and Windows). First, install the packages:
pacman -S grub efibootmgr os-prober
Enter fullscreen mode
Exit fullscreen mode
Here, os-prober helps detect Windows. Now install GRUB to the EFI directory and generate its config:
grub-install --target=x86_64-efi --efi-directory=/boot/efi --bootloader-id=GRUB
grub-mkconfig -o /boot/grub/grub.cfg
Enter fullscreen mode
Exit fullscreen mode
These commands create the GRUB UEFI entry (How to Install & Configure Arch Linux on UEFI Systems) (How to Install & Configure Arch Linux on UEFI Systems). If everything works, /boot/grub/grub.cfg will be generated and should include menu entries for both Arch and Windows. (If Windows is not listed, ensure os-prober was installed and re-run grub-mkconfig.)
9. Install KDE Plasma and SDDM
If you want a graphical desktop, install KDE Plasma and its apps. For a full set:
pacman -S plasma-meta kde-applications-meta
Enter fullscreen mode
Exit fullscreen mode
This pulls in the KDE desktop environment and standard KDE apps (How to Install Arch Linux: A Beginner’s Practical Guide). You may also install a graphical display server (xorg) if not already installed.
Enable the SDDM display/login manager (default for KDE) and networking (using NetworkManager, since you used NetworkManager earlier):
systemctl enable sddm
systemctl enable NetworkManager
Enter fullscreen mode
Exit fullscreen mode
This ensures KDE’s login screen and network service start at boot (How to Install Arch Linux: A Beginner’s Practical Guide). (You could also use dhcpcd or another network service if you prefer.)
10. Finalize and Reboot
Exit the chroot, unmount partitions, and reboot:
exit
umount -R /mnt
reboot
Enter fullscreen mode
Exit fullscreen mode
Remove the USB drive when the system shuts down. On reboot, you should see the GRUB menu offering Arch Linux and Windows. Select Arch to boot into your new system with KDE. Log in as your new user or root (depending on setup) and enjoy Arch Linux! (How to Install Arch Linux: A Beginner’s Practical Guide).
Common Pitfalls: Be careful not to overwrite the Windows partitions. Always confirm device names (/dev/sdX) before formatting. If GRUB doesn’t show Windows, ensure os-prober is installed and rerun grub-mkconfig. Disabling Fast Startup in Windows is essential; otherwise Linux will refuse to mount the Windows drive (Is it necessary to disable Fast Boot in Windows to dual boot with linux(EFISTUB)? — Unix & Linux Stack Exchange). Ensure your firmware is booting in UEFI mode (not legacy) for both OSes, or the dual-boot will fail.
Sources: Steps adapted from the official Arch Wiki and community guides (Comprehensive Arch Linux Installation Guide | Liquid Web) (How to Install Arch Linux: A Beginner’s Practical Guide) (How to Install Arch Linux: A Beginner’s Practical Guide) (How to Install & Configure Arch Linux on UEFI Systems) (How to Install Arch Linux: A Beginner’s Practical Guide), including Windows preparation notes (Is it necessary to disable Fast Boot in Windows to dual boot with linux(EFISTUB)? — Unix & Linux Stack Exchange) (Installing And Setting Up Arch Linux to Dual Boot Alongside Window 10 · GitHub).