
Apache Spark is an open-source framework for processing large volumes of batch and streaming data from multiple sources. It is used in distributed computing for machine learning, data analytics, and graph processing tasks.
Learn how to install Apache Spark on Windows and verify the installation works.

Prerequisites
- A system running Windows 10 or 11.
- A user account with administrator privileges.
- Access to Windows Command Prompt or PowerShell.
- A tool to extract .tar files, such as 7-Zip or WinRAR.
Install and Set Up Apache Spark on Windows
To set up Apache Spark, you must install Java, download the Spark package, and set up environment variables. Python is also required to use Spark’s Python API called PySpark.
If you already have Java 8 (or later) and Python 3 (or later) installed, you can skip the first step of this guide.
Step 1: Install Spark Dependencies
Using the Windows winget utility is a convenient way to install the necessary dependencies for Apache Spark:
1. Open Command Prompt or PowerShell as an Administrator.
2. Enter the following command to install the Azul Zulu OpenJDK 21 (Java Development Kit) and Python 3.9:
winget install --id Azul.Zulu.21.JDK -e --source winget && winget install --id Python.Python.3.9 -e --source winget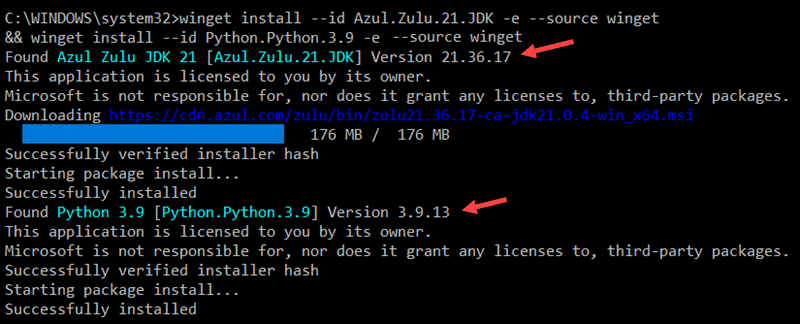
Adjust the command if you need a specific Java or Python version or a different OpenJDK vendor.
3. The OpenJDK installation is in the C:\Program Files\Zulu\zulu-21 folder by default. The space in the path can cause issues when launching Apache Spark. Avoid this by moving the installation to a folder without spaces. Use the following command to create a new Zulu folder in the root directory and move the installation:
mkdir C:\Zulu && robocopy "C:\Program Files\Zulu\zulu-21" "C:\Zulu\zulu-21" /E /MOVE4. Verify the installation by checking the Java and Python versions:
java -version && python --version
The output confirms your system is using OpenJDK 21 and Python 3.9.
Step 2: Download Apache Spark
To download the latest Apache Spark release:
1. Open a browser and navigate to the official Apache Spark download page.
2. The latest Spark version is selected by default. At the time of writing, the latest version is Spark 3.5.3 for Hadoop 3.3.
3. Click the spark-3.5.3-bin-hadoop3.tgz download link.
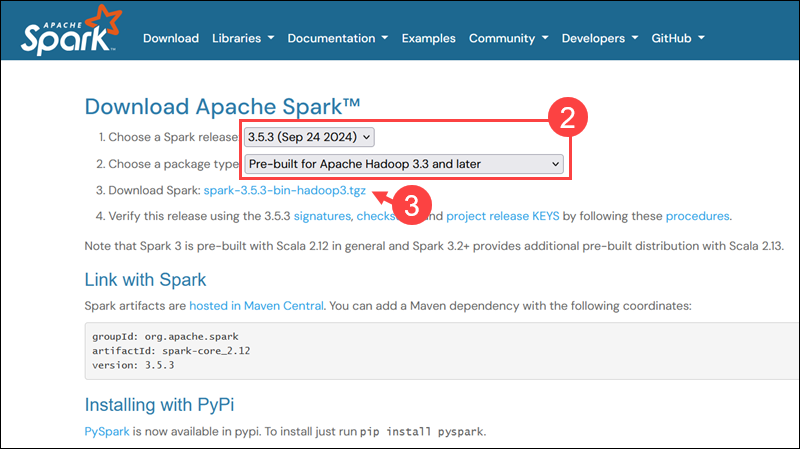
4. Select a location from a list of mirror servers to begin the download.
5. Save the file, for example, to the Downloads folder.
Step 3: Verify Spark Software File
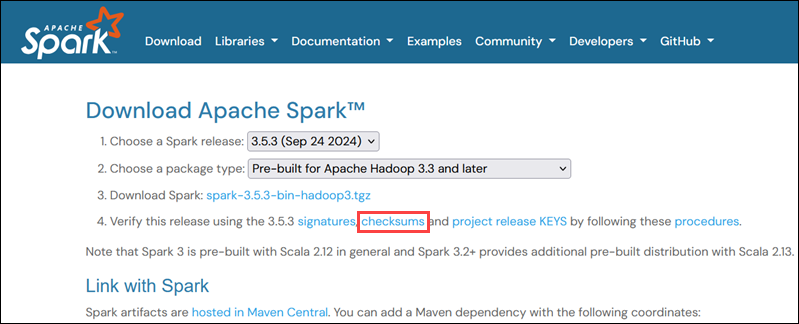
To verify that you are working with an unaltered, uncorrupted file, check its checksum:
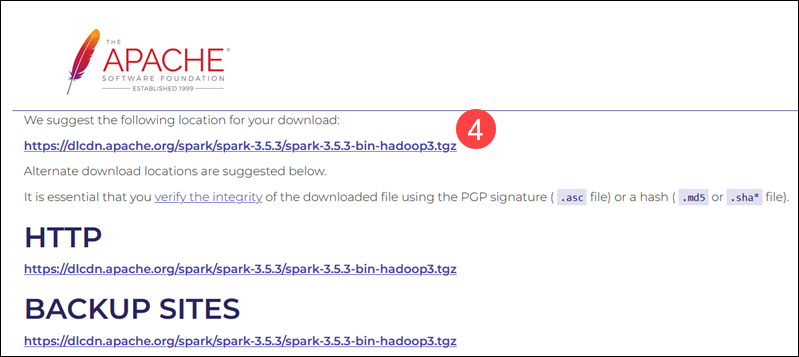
1. Navigate to the Spark Download page and open the checksums link, preferably in a new tab.
2. Open Command Prompt and use the cd command to navigate to the folder where you downloaded Apache Spark. For example, if the file is in the Downloads folder, enter:
cd C:\Users\username\DownloadsReplace username with your actual Windows username.
3. Use the following command to calculate the downloaded file’s checksum:
certutil -hashfile spark-3.5.3-bin-hadoop3.tgz SHA512
The system displays a long alphanumeric code followed by the message Certutil: -hashfile completed successfully.
4. Manually compare the checksum output with the one on the Apache Spark website.
If they match, the file is legitimate.
Step 4: Install Apache Spark
To install Apache Spark, extract the downloaded file to a desired location:
1. For example, create a new Spark folder in the root of the C: drive using the following command:
cd \ && mkdir Spark2. Use 7-Zip to extract the Spark .tar file from the .tgz compressed file and place it in the Spark folder:
"C:\Program Files\7-Zip\7z.exe" x "C:\Users\username\Downloads\spark-3.5.3-bin-hadoop3.tgz" -oC:\Spark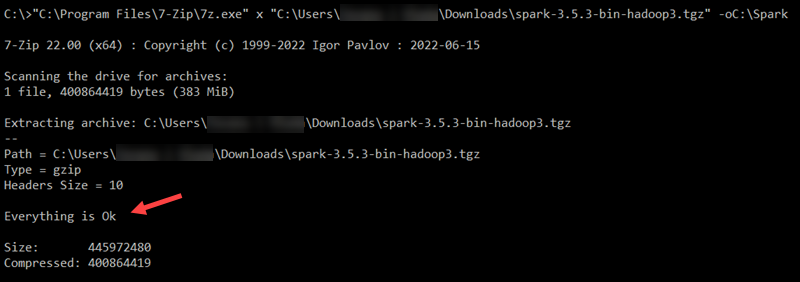
Replace username in the file path with your username.
Note: The file paths are wrapped in double quotes because the username and folder names contain spaces.
3. Extract the Spark binaries from the Spark .tar file:
"C:\Program Files\7-Zip\7z.exe" x "C:\Spark\spark-3.5.3-bin-hadoop3.tar" -oC:\Spark
4. Use the dir command to list the contents of the Spark folder:
cd C:\Spark && dir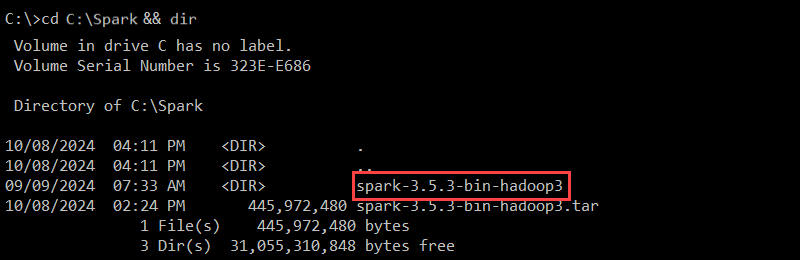
The spark-3.5.3-bin-hadoop3 folder contains the necessary files to run Spark.
Step 5: Add winutils.exe File
The winutils utility enables Apache Spark and other Hadoop-based tools to run on Windows. You need to download the winutils.exe file that matches the Hadoop version used by your Spark installation:
1. Create a hadoop\bin folder in the C: drive to store the winutils.exe file:
cd \ && mkdir C:\hadoop\bin2. Use the curl command to download the file from the winutils GitHub repository into the newly created folder:
curl --ssl-no-revoke -L -o C:\hadoop\bin\winutils.exe https://github.com/cdarlint/winutils/raw/master/hadoop-3.3.5/bin/winutils.exe
In this example, the Hadoop version is 3.3.5. If necessary, edit the command to correspond to the Hadoop version your Spark installation is using.
3. Verify that the file has been downloaded:
cd C:\hadoop\bin && dir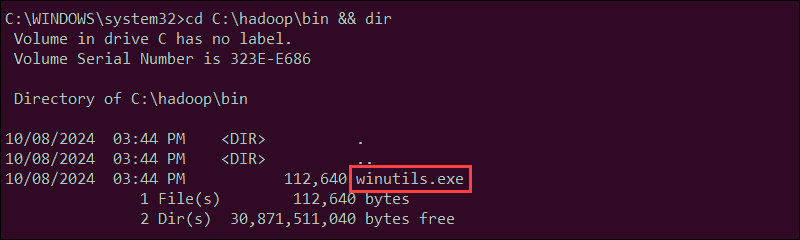
The winutils.exe file is listed in the folder.
Step 6: Configure Environment Variables
Add the Spark, Java, and Hadoop locations to your system’s Path environment variable to run the Spark shell directly from the CLI.
You can edit environment variables manually using the Windows UI. However, setting User Variables from Command Prompt can be faster and more efficient.
Use the setx command to set the SPARK_HOME User Variable:
setx SPARK_HOME "C:\Spark\spark-3.5.5-bin-hadoop3"To set HADOOP_HOME, enter:
setx HADOOP_HOME "C:\hadoop"To set JAVA_HOME, type:
setx JAVA_HOME "C:\Zulu\zulu-21"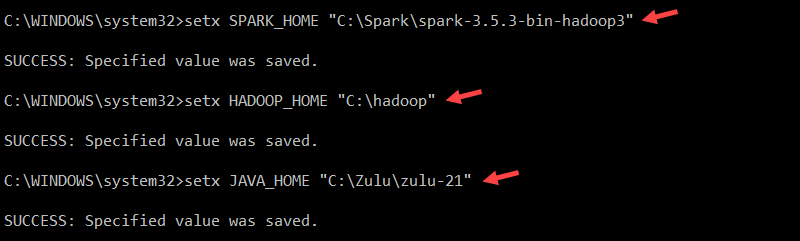
The paths in the commands are set based on the previous installation steps. If you used different versions and file paths, adjust the commands accordingly.
Enter the following command to retrieve the current Path from the registry and store it in the oldPath variable:
for /f "tokens=2*" %A in ('reg query "HKCU\Environment" /v Path') do set "oldPath=%B"Append the Spark, Hadoop, and Java paths to the Path variable without overwriting existing entries:
setx Path "%oldPath%;%SPARK_HOME%\bin;%HADOOP_HOME%\bin;%JAVA_HOME%\bin"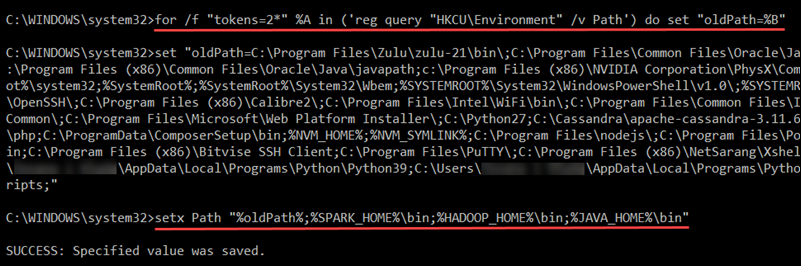
Restart Command Prompt to apply the changes. In rare instances, a full system reboot may be required.
Step 7: Launch Spark
To start the Spark Scala shell, enter the following:
spark-shellThis opens an interactive shell interface with Spark notifications and information. The output includes details about the Spark version, configuration, and available resources.
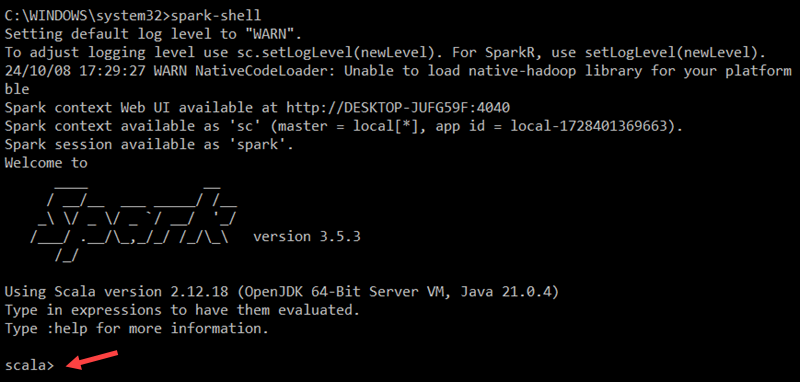
To access Spark’s Web UI, open a web browser and navigate to the following URL:
http://localhost:4040/You can replace localhost with the name or IP address of your system. The Spark Web UI provides details about running jobs, stages, and resource usage.
Use the following command to exit Spark and close the Scala shell:
:quitAlternatively, press CTRL+D while using the command prompt. Enter the following command to run Spark using Python:
pysparkThis launches the Spark shell with a Python interface.
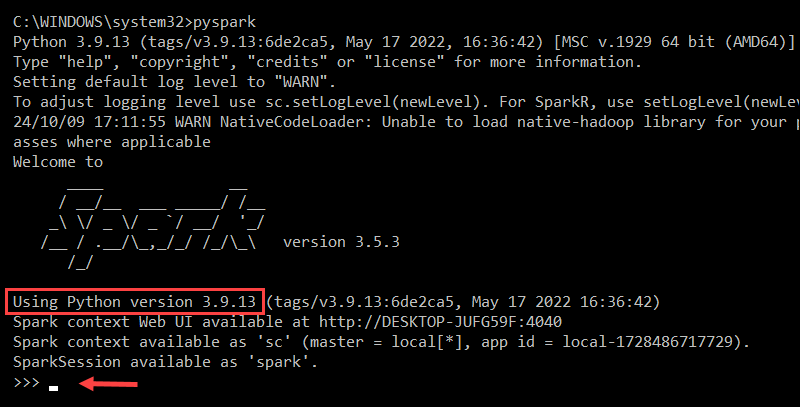
To exit pyspark, type:
quit()Test Spark
To test the Spark installation, use the Scala interface to read and manipulate a file. In this example, the name of the file is pnaptest.txt. Open Command Prompt and navigate to the folder with the file you want to use:
1. Launch the Spark shell:
spark-shell2. Load the file in the Spark context by defining a variable and specifying the file name (including its extension):
val x = sc.textFile("pnaptest.txt")The command loads the file into a Resilient Distributed Dataset (RDD), which allows you to perform actions and transformations on the data.
3. Enter the following command to perform an action on the RDD and view the contents of the file:
x.take(11).foreach(println)
Spark displays the first 11 lines of the file. You can adjust the number of lines by changing the number in the take() method.
4. Use the map transformation to create a new RDD based on the existing one. For example, reverse each line of the file using the following command:
val y = x.map(_.reverse)This creates a new RDD (y), where each original RDD (x) line is reversed.
5. Enter the following command to display the first 11 lines of the transformed RDD:
y.take(11).foreach(println)
The output prints 11 lines of the pnaptest.txt file, with each line reversed.
When ready, enter the :quit command or press CTRL+D to exit the Spark shell.
Conclusion
You now have a working installation of Apache Spark on Windows 10 or 11. This local setup is ideal for running basic tests and getting familiar with Spark’s core features.
Read about Spark DataFrames and Spark Streaming to explore more advanced functionalities.
Was this article helpful?
YesNo
Apache Spark is an open-source distributed computing platform that is used for big data processing, machine learning, and analytics. It is a powerful tool for data scientists and engineers to analyze and process large datasets. Installing Apache Spark on Windows 10 is a relatively straightforward process. This guide will walk you through the steps necessary to install Apache Spark on Windows 10.
1. Download the latest version of Apache Spark from the official website.
2. Extract the downloaded file to a folder of your choice.
3. Set the environment variables for Apache Spark.
4. Download and install Java Development Kit (JDK) 8 or higher.
5. Download and install Apache Hadoop.
6. Configure Apache Spark with Hadoop.
7. Start the Apache Spark shell.
Introduction
Apache Spark is an open-source framework that processes large volumes of stream data from multiple sources. Spark is used in distributed computing with machine learning applications, data analytics, and graph-parallel processing.
This guide will show you how to install Apache Spark on Windows 10 and test the installation.

Prerequisites
- A system running Windows 10
- A user account with administrator privileges (required to install software, modify file permissions, and modify system PATH)
- Command Prompt or Powershell
- A tool to extract .tar files, such as 7-Zip
Install Apache Spark on Windows
Installing Apache Spark on Windows 10 may seem complicated to novice users, but this simple tutorial will have you up and running. If you already have Java 8 and Python 3 installed, you can skip the first two steps.
Step 1: Install Java 8
Apache Spark requires Java 8. You can check to see if Java is installed using the command prompt.
Open the command line by clicking Start > type cmd > click Command Prompt.
Type the following command in the command prompt:
java -versionIf Java is installed, it will respond with the following output:

Your version may be different. The second digit is the Java version – in this case, Java 8.
If you don’t have Java installed:
1. Open a browser window, and navigate to https://java.com/en/download/.

2. Click the Java Download button and save the file to a location of your choice.
3. Once the download finishes double-click the file to install Java.
Note: At the time this article was written, the latest Java version is 1.8.0_251. Installing a later version will still work. This process only needs the Java Runtime Environment (JRE) – the full Development Kit (JDK) is not required. The download link to JDK is https://www.oracle.com/java/technologies/javase-downloads.html.
Step 2: Install Python
1. To install the Python package manager, navigate to https://www.python.org/ in your web browser.
2. Mouse over the Download menu option and click Python 3.8.3. 3.8.3 is the latest version at the time of writing the article.
3. Once the download finishes, run the file.

4. Near the bottom of the first setup dialog box, check off Add Python 3.8 to PATH. Leave the other box checked.
5. Next, click Customize installation.

6. You can leave all boxes checked at this step, or you can uncheck the options you do not want.
7. Click Next.
8. Select the box Install for all users and leave other boxes as they are.
9. Under Customize install location, click Browse and navigate to the C drive. Add a new folder and name it Python.
10. Select that folder and click OK.

11. Click Install, and let the installation complete.
12. When the installation completes, click the Disable path length limit option at the bottom and then click Close.
13. If you have a command prompt open, restart it. Verify the installation by checking the version of Python:
python --versionThe output should print Python 3.8.3.
Note: For detailed instructions on how to install Python 3 on Windows or how to troubleshoot potential issues, refer to our Install Python 3 on Windows guide.
Step 3: Download Apache Spark
1. Open a browser and navigate to https://spark.apache.org/downloads.html.
2. Under the Download Apache Spark heading, there are two drop-down menus. Use the current non-preview version.
- In our case, in Choose a Spark release drop-down menu select 2.4.5 (Feb 05 2020).
- In the second drop-down Choose a package type, leave the selection Pre-built for Apache Hadoop 2.7.
3. Click the spark-2.4.5-bin-hadoop2.7.tgz link.

4. A page with a list of mirrors loads where you can see different servers to download from. Pick any from the list and save the file to your Downloads folder.
Step 4: Verify Spark Software File
1. Verify the integrity of your download by checking the checksum of the file. This ensures you are working with unaltered, uncorrupted software.
2. Navigate back to the Spark Download page and open the Checksum link, preferably in a new tab.
3. Next, open a command line and enter the following command:
certutil -hashfile c:\users\username\Downloads\spark-2.4.5-bin-hadoop2.7.tgz SHA5124. Change the username to your username. The system displays a long alphanumeric code, along with the message Certutil: -hashfile completed successfully.

5. Compare the code to the one you opened in a new browser tab. If they match, your download file is uncorrupted.
Step 5: Install Apache Spark
Installing Apache Spark involves extracting the downloaded file to the desired location.
1. Create a new folder named Spark in the root of your C: drive. From a command line, enter the following:
cd \

mkdir Spark
2. In Explorer, locate the Spark file you downloaded.
3. Right-click the file and extract it to C:\Spark using the tool you have on your system (e.g., 7-Zip).
4. Now, your C:\Spark folder has a new folder spark-2.4.5-bin-hadoop2.7 with the necessary files inside.
Step 6: Add winutils.exe File
Download the winutils.exe file for the underlying Hadoop version for the Spark installation you downloaded.
1. Navigate to this URL https://github.com/cdarlint/winutils and inside the bin folder, locate winutils.exe, and click it.

2. Find the Download button on the right side to download the file.
3. Now, create new folders Hadoop and bin on C: using Windows Explorer or the Command Prompt.
4. Copy the winutils.exe file from the Downloads folder to C:\hadoop\bin.
Step 7: Configure Environment Variables
Configuring environment variables in Windows adds the Spark and Hadoop locations to your system PATH. It allows you to run the Spark shell directly from a command prompt window.
1. Click Start and type environment.
2. Select the result labeled Edit the system environment variables.
3. A System Properties dialog box appears. In the lower-right corner, click Environment Variables and then click New in the next window.

4. For Variable Name type SPARK_HOME.
5. For Variable Value type C:\Spark\spark-2.4.5-bin-hadoop2.7 and click OK. If you changed the folder path, use that one instead.

6. In the top box, click the Path entry, then click Edit. Be careful with editing the system path. Avoid deleting any entries already on the list.

7. You should see a box with entries on the left. On the right, click New.
8. The system highlights a new line. Enter the path to the Spark folder C:\Spark\spark-2.4.5-bin-hadoop2.7\bin. We recommend using %SPARK_HOME%\bin to avoid possible issues with the path.

9. Repeat this process for Hadoop and Java.
- For Hadoop, the variable name is HADOOP_HOME and for the value use the path of the folder you created earlier: C:\hadoop. Add C:\hadoop\bin to the Path variable field, but we recommend using %HADOOP_HOME%\bin.
- For Java, the variable name is JAVA_HOME and for the value use the path to your Java JDK directory (in our case it’s C:\Program Files\Java\jdk1.8.0_251).
10. Click OK to close all open windows.
Note: Star by restarting the Command Prompt to apply changes. If that doesn’t work, you will need to reboot the system.
Step 8: Launch Spark
1. Open a new command-prompt window using the right-click and Run as administrator:
2. To start Spark, enter:
C:\Spark\spark-2.4.5-bin-hadoop2.7\bin\spark-shellIf you set the environment path correctly, you can type spark-shell to launch Spark.
3. The system should display several lines indicating the status of the application. You may get a Java pop-up. Select Allow access to continue.
Finally, the Spark logo appears, and the prompt displays the Scala shell.

4., Open a web browser and navigate to http://localhost:4040/.
5. You can replace localhost with the name of your system.
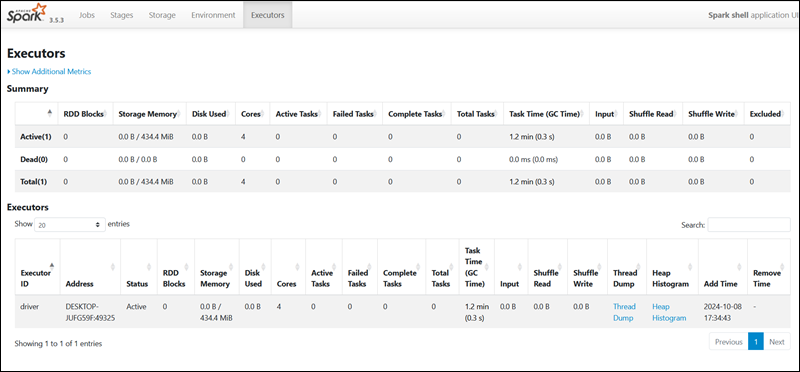
6. You should see an Apache Spark shell Web UI. The example below shows the Executors page.

7. To exit Spark and close the Scala shell, press ctrl-d in the command-prompt window.
Note: If you installed Python, you can run Spark using Python with this command:
pysparkExit using quit().
Test Spark
In this example, we will launch the Spark shell and use Scala to read the contents of a file. You can use an existing file, such as the README file in the Spark directory, or you can create your own. We created pnaptest with some text.
1. Open a command-prompt window and navigate to the folder with the file you want to use and launch the Spark shell.
2. First, state a variable to use in the Spark context with the name of the file. Remember to add the file extension if there is any.
val x =sc.textFile("pnaptest")3. The output shows an RDD is created. Then, we can view the file contents by using this command to call an action:
x.take(11).foreach(println)
This command instructs Spark to print 11 lines from the file you specified. To perform an action on this file (value x), add another value y, and do a map transformation.
4. For example, you can print the characters in reverse with this command:
val y = x.map(_.reverse)5. The system creates a child RDD in relation to the first one. Then, specify how many lines you want to print from the value y:
y.take(11).foreach(println)
The output prints 11 lines of the pnaptest file in the reverse order.
When done, exit the shell using ctrl-d.
Conclusion
You should now have a working installation of Apache Spark on Windows 10 with all dependencies installed. Get started running an instance of Spark in your Windows environment.
Our suggestion is to also learn more about what Spark DataFrame is, the features, and how to use Spark DataFrame when collecting data.
Introduction
This post is to help people to install and run Apache Spark in a computer with window 10 (it may also help for prior versions of Windows or even Linux and Mac OS systems), and want to try out and learn how to interact with the engine without spend too many resources. If you really want to build a serious prototype, I strongly recommend to install one of the virtual machines I mentioned in this post a couple of years ago: Hadoop self-learning with pre-configured Virtual Machines or to spend some money in a Hadoop distribution on the cloud. The new version of these VMs come with Spark ready to use.
A few words about Apache Spark
Apache Spark is making a lot of noise in the IT world as a general engine for large-scale data processing, able to run programs up to 100x faster than Hadoop MapReduce, thanks to its in-memory computing capabilities. It is possible to write Spark applications using Java, Python, Scala and R, and it comes with built-in libraries to work with structure data (Spark SQL), graph computation (GraphX), machine learning (MLlib) and streaming (Spark Streaming).
Spark runs on Hadoop, Mesos, in the cloud or as standalone. The latest is the case of this post. We are going to install Spark 1.6.0 as standalone in a computer with a 32-bit Windows 10 installation (my very old laptop). Let’s get started.
Install or update Java
For any application that uses the Java Virtual Machine is always recommended to install the appropriate java version. In this case I just updated my java version as follows:
Start –> All apps –> Java –> Check For Updates
In the same way you can verify your java version. This is the version I used:
Download Scala
Download from here. Then execute the installer.
I just downloaded the binaries for my system:

Download Spark
Select any of the prebuilt version from here
As we are not going to use Hadoop it make no difference the version you choose. I downloaded the following one:

Feel free also to download the source code and make your own build if you feel comfortable with it.
Extract the files to any location in your drive with enough permissions for your user.
Download winutils.exe
This was the critical point for me, because I downloaded one version and did not work until I realized that there are 64-bits and 32-bits versions of this file. Here you can find them accordingly:
32-bit winutils.exe
64-bit winutils.exe
In order to make my trip still longer, I had to install Git to be able to download the 32-bits winutils.exe. If you know another link where we can found this file you can share it with us.
Git client download (I hope you don’t get stuck in this step)
Extract the folder containing the file winutils.exe to any location of your preference.
Environment Variables Configuration
This is also crucial in order to run some commands without problems using the command prompt.
- _JAVA_OPTION: I set this variable to the value showed in the figure below. I was getting Java Heap Memory problems with the default values and this fixed this problem.
- HADOOP_HOME: even when Spark can run without Hadoop, the version I downloaded is prebuilt for Hadoop 2.6 and looks in the code for it. To fix this inconvenient I set this variable to the folder containing the winutils.exe file
- JAVA_HOME: usually you already set this variable when you install java but it is better to verify that exist and is correct.
- SCALA_HOME: the bin folder of the Scala location. If you use the standard location from the installer should be the path in the figure below.
- SPARK_HOME: the bin folder path of where you uncompressed Spark


Permissions for the folder tmp/hive
I struggled a little bit with this issue. After I set everything I tried to run the spark-shell from the command line and I was getting an error, which was hard to debug. The shell tries to find the folder tmp/hive and was not able to set the SQL Context.
I look at my C drive and I found that the C:\tmp\hive folder was created. If not you can created by yourself and set the 777 permissions for it. In theory you can do it with the advanced sharing options of the sharing tab in the properties of the folder, but I did it in this way from the command line using winutils:
Open a command prompt as administrator and type:

Please be aware that you need to adjust the path of the winutils.exe above if you saved it to another location.
We are finally done and could start the spark-shell which is an interactive way to analyze data using Scala or Python. In this way we are going also to test our Spark installation.
Using the Scala Shell to run our first example
In the same command prompt go to the Spark folder and type the following command to run the Scala shell:

After some executions line you should be able to see a similar screen:

You are going to receive several warnings and information in the shell because we have not set different configuration options. By now just ignore them.
Let’s run our first program with the shell, I took the example from the Spark Programming Guide. The first command creates a resilient data set (RDD) from a text file included in the Spark’s root folder. After the RDD is created, the second command just counts the number of items inside:

And that’s it. Hope you can follow my explanation and be able to run this simple example. I wish you a lot of fun with Apache Spark.
References
Why does starting spark-shell fail with NullPointerException on Windows?
Apache Spark checkpoint issue on windows
Configure Standalone Spark on Windows 10
Last Updated :
10 Apr, 2023
Apache Spark is a lightning-fast unified analytics engine used for cluster computing for large data sets like BigData and Hadoop with the aim to run programs parallel across multiple nodes. It is a combination of multiple stack libraries such as SQL and Dataframes, GraphX, MLlib, and Spark Streaming.
Spark operates in 4 different modes:
- Standalone Mode: Here all processes run within the same JVM process.
- Standalone Cluster Mode: In this mode, it uses the Job-Scheduling framework in-built in Spark.
- Apache Mesos: In this mode, the work nodes run on various machines, but the driver runs only in the master node.
- Hadoop YARN: In this mode, the drivers run inside the application’s master node and is handled by YARN on the Cluster.
In This article, we will explore Apache Spark installation in a Standalone mode. Apache Spark is developed in Scala programming language and runs on the JVM. Java installation is one of the mandatory things in spark. So let’s start with Java installation.
Installing Java:
Step 1: Download the Java JDK.

Step 2: Open the downloaded Java SE Development Kit and follow along with the instructions for installation.


Step 3: Open the environment variable on the laptop by typing it in the windows search bar.

Set JAVA_HOME Variables:
To set the JAVA_HOME variable follow the below steps:
- Click on the User variable Add JAVA_HOME to PATH with value Value: C:\Program Files\Java\jdk1.8.0_261.
- Click on the System variable Add C:\Program Files\Java\jdk1.8.0_261\bin to PATH variable.
- Open command prompt and type “java —version”, it will show below appear & verify Java installation.

Installing Scala:
For installing Scala on your local machine follow the below steps:
Step 1: Download Scala.
Step 2: Click on the .exe file and follow along instructions to customize the setup according to your needs.

Step 3: Accept the agreement and click the next button.

Set environmental variables:
- In User Variable Add SCALA_HOME to PATH with value C:\Program Files (x86)\scala.
- In System Variable Add C:\Program Files (x86)\scala\bin to PATH variable.
Verify Scala installation:
In the Command prompt use the below command to verify Scala installation:
scala

Installing Spark:
Download a pre-built version of the Spark and extract it into the C drive, such as C:\Spark. Then click on the installation file and follow along the instructions to set up Spark.


Set environmental variables:
- In User variable Add SPARK_HOME to PATH with value C:\spark\spark-2.4.6-bin-hadoop2.7.
- In System variable Add%SPARK_HOME%\bin to PATH variable.
Download Windows Utilities:
If you wish to operate on Hadoop data follow the below steps to download utility for Hadoop:
Step 1: Download the winutils.exe file.

Step 2: Copy the file to C:\spark\spark-1.6.1-bin-hadoop2.6\bin.
Step 3: Now execute “spark-shell” on cmd to verify spark installation as shown below:

1. Go to the Apache Spark website and download the latest version of Apache Spark.
2. Unzip the downloaded file.
3. Go to the unzipped folder and double-click on the file named «spark-2.4.3-bin-hadoop2.7.tgz«.
4. Apache Spark will be installed in the «C:\spark» directory.
5. Add the «C:\spark\bin» directory to your PATH environment variable.
6. Open a new command prompt and type «spark-shell» to launch the Apache Spark shell.
How do I install Apache Spark?
There are a few ways to install Apache Spark. The easiest way is to download it from the official website at https://spark.apache.org/downloads.html. Once you have downloaded the file, unzip it and you should see the following folder structure:
spark-2.4.4-bin-hadoop2.7
To install Spark, simply move the spark-2.4.4-bin-hadoop2.7 folder to the location you want it installed, such as /usr/local/spark. Once it is in the correct location, you can launch Spark by running the following command in your terminal:
/usr/local/spark/bin/spark-shell
You should see the following output:
Welcome to
____ __
/ __/__ ___ _____/ /__
_\ \/ _ \/ _ `/ __/ ‘_/
/___/ .__/\_,_/_/ /_/\_\ version 2.4.4
/_/
Using Scala version 2.11.12 (OpenJDK 64-Bit
How do I install Spark on my computer?
There are a few ways to install Spark on your computer. One way is to download the Spark binary from the Apache Spark website and extract it to your desired location. Another way is to use a package manager like Homebrew to install Spark.
How do I install PySpark on Windows 10?
There are a few ways to install PySpark on Windows 10. The easiest way is to use the Python package manager, pip. You can also install PySpark using the Anaconda distribution of Python. Finally, you can install PySpark by building it from source.
1. To install PySpark using pip, first ensure that you have Python and pip installed. You can check this by opening a command prompt and running the following commands:
python –version
pip –version
If you do not have Python and pip installed, you can download the Python 3.7.3 installer from the Python website and the pip installer from the pip website.
2. Once you have Python and pip installed, you can install PySpark by running the following command in a command prompt:
pip install pyspark
3. To install PySpark using the Anaconda distribution of Python, first ensure that you have Anaconda installed. You can check this by opening a command prompt and running the following command:
conda –version
If you do not have Anaconda installed, you can download the Anaconda installer from the Anaconda website.
Does Spark need JDK or JRE?
Spark does not need JDK or JRE, but if they are present on the system, Spark will use them.
Which IDE is best for Spark?
There is no one-size-fits-all answer to this question, as the best IDE for Spark depends on the specific needs and preferences of the user. However, some popular IDEs for Spark include Apache Zeppelin, Databricks, and IBM Data Science Experience.
Do I need Hadoop to install Spark?
No, you do not need Hadoop to install Spark.
Is there a desktop version of Spark?
Yes, there is a desktop version of Spark. You can download it from the official website.
Do I need Hadoop to run Spark?
No, you do not need Hadoop to run Spark. Spark can run on its own, or in conjunction with Hadoop.
Is Apache Spark and PySpark same?
No, Apache Spark and PySpark are not the same. Apache Spark is a framework for big data processing, while PySpark is a Python library that allows you to interface with Apache Spark.
Can I run Spark locally?
Yes, you can run Spark locally. The first step is to download Spark from the Apache Spark website. Once you have Spark downloaded, you can launch it by running the spark-shell command.
Is PySpark and Apache Spark same?
No, PySpark is not the same as Apache Spark. PySpark is a Python API for Spark that allows you to interface with the Spark framework. Apache Spark is a general purpose cluster computing system.
Which is better Python or Spark?
There is no definitive answer to this question as it depends on the specific needs of the user. However, Python is generally considered to be easier to learn and use than Spark, so it may be a better choice for those who are new to programming. Spark is faster and more powerful than Python, so it may be a better choice for those who need to process large amounts of data.
Can I use Spark on my laptop?
Yes, you can use Spark on your laptop. However, you may find that your laptop does not have the processing power or memory to run Spark effectively. In this case, you may want to consider using a cloud-based Spark service or installing Spark on a more powerful machine.