
Оснастка Active Directory Users and Computers (или ADUC) – это одна из наиболее часто используемых консолей управления объектами в домене Active Directory. Вы можете установить mmc оснастку ADUC как на Windows Server, так и на десктопные Windows 10 и 11. Консоль ADUC входит в состав набора компоненту администрирования Microsoft Remote Server Administration Tools (RSAT). В этой статье мы покажем, как установить и использовать консоль управление Active Directory Users and Computers в Windows.
Содержание:
- Установка оснастки RSAT Active Directory в Windows 10 и 11
- Как пользоваться консолью Active Directory?
- Подключение консоли ADUC к домену из рабочей группы
Установка оснастки RSAT Active Directory в Windows 10 и 11
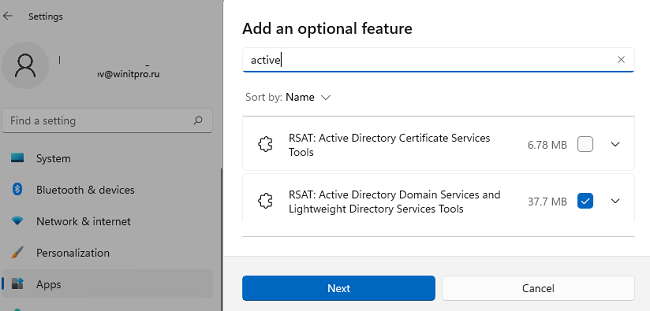
В современных версиях Windows 10 (начиная с билда 1809) и в Windows 11 инструменты администрирования RSAT устанавливаются онлайн в виде Features on Demand. Чтобы установить инструменты администрирования RSAT Active Directory в Windows 10/11, перейдите в Settings -> Apps -> Optional Features -> Add an optional feature (View features).
Наберите в поисковой строке Active Directory и выберите для установки компонент RSAT: Active Directory Domain Services and Lightweight Directory Services Tool.
Нажмите Next-> Install для начала установки.
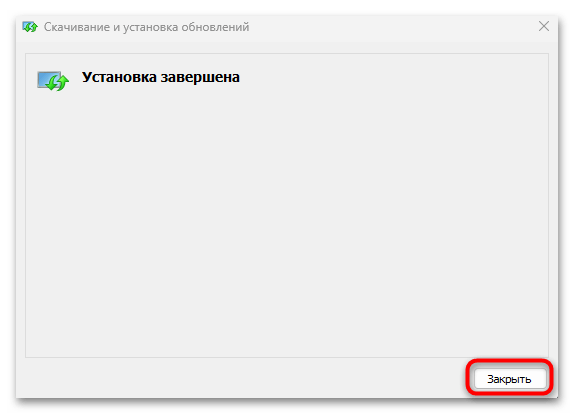
Windows подключится к серверам Microsoft, скачает и установит набор инструментов для управления Active Directory (включает в себя графические консоли Active Directory, утилиты командной строки и модуль Active Directory PowerShell).
Либо вы можете установить набор компонентов администрирования AD с помощью PowerShell:
Add-WindowsCapability –online –Name Rsat.ActiveDirectory.DS-LDS.Tools~~~~0.0.1.0
В изолированных сетях, в которых нет доступа в интернет, вы можете установить инструменты RSAT Active Directory с помощью ISO образа Windows 10 Features on Demand (образ FoD можно скачать из кабинета лицензирования Microsoft).
Для установки инструментов Active Directory, из сетевого каталога с содержимым образа FoD выполните команду:
Add-WindowsCapability -Online -Name Rsat.ActiveDirectory.DS-LDS.Tools~~~~0.0.1.0 -LimitAccess -Source \\fs01\Distr\Windows10-FOD\
В предыдущих билдах Windows 10, а также в Windows 8.1, установить RSAT можно с помощью MSU обновления. Скачать RSAT можно здесь:
- RSAT для Windows 10 1803/1709 — https://www.microsoft.com/en-us/download/details.aspx?id=45520
- RSAT для Windows 8.1 — https://www.microsoft.com/en-us/download/details.aspx?id=39296
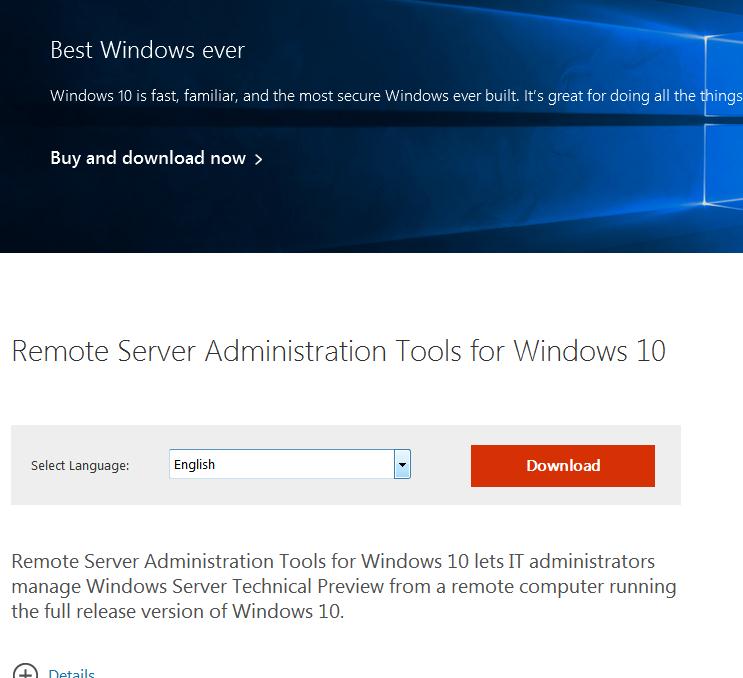
Скачайте версию файла RSAT в зависимости от разрядности вашей операционной системы и установите его. Дважды щелкните по файлу для начала установки:
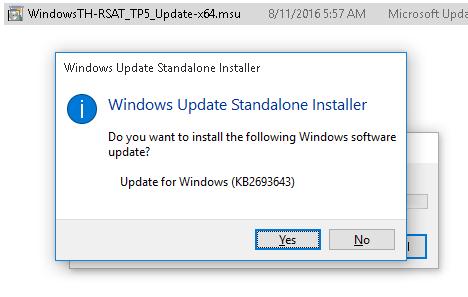
Или установите MSU файл RSAT из командной строки в «тихом» режиме:
wusa.exe c:\Install\WindowsTH-RSAT_TP5_Update-x64.msu /quiet /norestart
После окончания установки RSAT нужно перезагрузить компьютер.
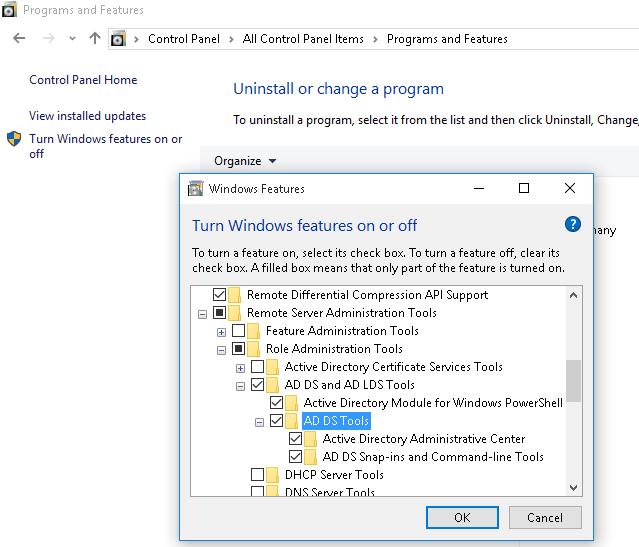
Осталось активировать необходимый функционал RSAT. Для этого:
- Щелкните ПКМ по кнопке Start и выберите Control Panel (Панель управления)
- Выберите Programs and Features (Программы и компоненты)
- В левой панели нажмите кнопку Turn Windows features on or off
- В дереве компонентов разверните Remote Server Administration Tools-> Role Administration Tools -> AD DS and AD LDS Tools
- Отметьте раздел AD DS Tools и нажмите OK.

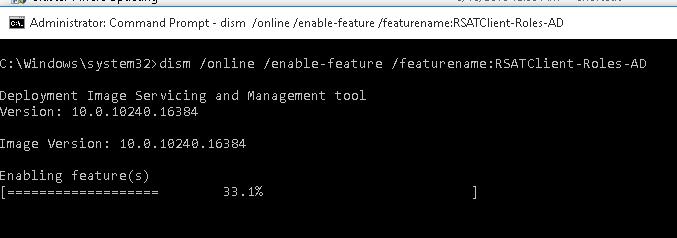
Установка оснастки ADUC также может быть выполнена из командой строки. Последовательно выполните 3 команды:
dism /online /enable-feature /featurename:RSATClient-Roles-AD
dism /online /enable-feature /featurename:RSATClient-Roles-AD-DS
dism /online /enable-feature /featurename:RSATClient-Roles-AD-DS-SnapIns
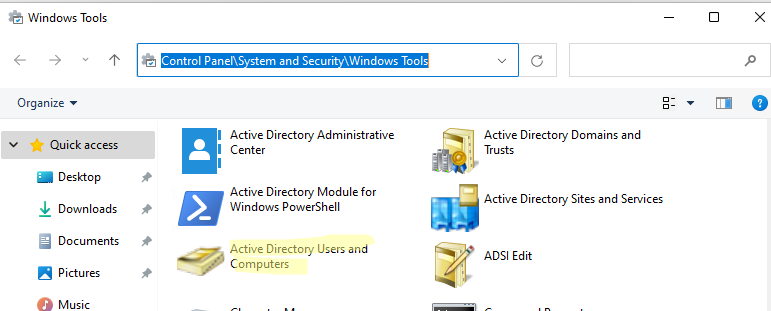
После установки оснасток управления, в разделе Administrative Tools панели управления (Control Panel\System and Security\Windows Tools) появится ссылка на консоль Active Directory Users and Computers.
Как пользоваться консолью Active Directory?
Чтобы запустить консоль ADUC, щелкните по ярлыку в панели управления или выполните команду:
dsa.msc
Все аутентифицированные пользователи домена могут использовать консоль ADUC для просмотра объектов Active Directory.
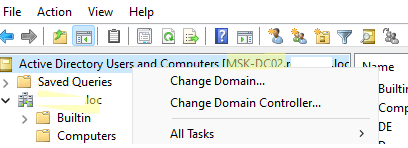
Если ваш компьютер состоит в домене Active Directory, то консоль ADUC подключится к контролеру домена, на основании текущего Logon сервера. Имя контроллера домена, с которого вы получаете информации указано в верху.
Вы можете подключиться к другому контроллеру домена AD или другому домену, щелкнув по корню консоли и выбрав пункт в контекстном меню.
В консоли Active Directory отображается древовидная структура организационных юнитов (Organizational Unit, OU) вашего домена (и отдельный раздел с сохраненными запросами/ Saved Queries AD).
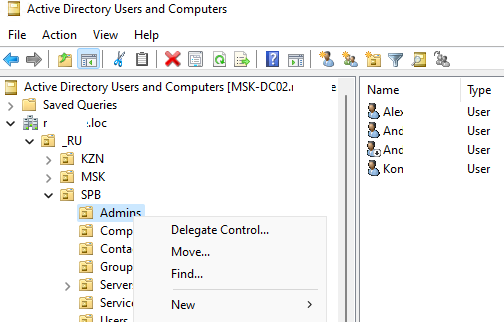
Администратор домена может создавать контейнеры (OU) в соответствии с физической или логической структуры предприятиями. С помощью контекстного меню можно создать новые объекты в AD (пользователей, группы, компьютеры, OU, контакты), переименовать, переместить или удалить объекты. В зависимости от типа объекта, который вы выбрали пункты контекстного меню могут отличаться.
Например, у пользователя есть опции на сброс пароля в AD или блокировку/разблокировку учетной записи.
Вы можете использовать контекстное меню Search для поиска объектов в AD.
Администратор может делегировать права на создание/редактирование/удаление объектов в Active Directory другим пользователям или группам.
С помощью меню View -> Add/Remove columns можно добавить атрибуты объектов, которые вы хотите отображать в консоли ADUC.
В консоли ADUC можно посмотреть или изменить свойства объектов домена. Например, можно открыть свойства пользователя и изменить его настройки. Часть свойств пользователя находится на соответствующих вкладках, а полный список атрибутов пользователя доступен на вкладке редактора атрибутов AD (Attribute Editor).
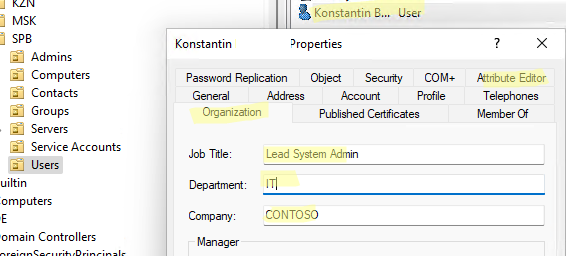
Можно добавить отдельную вкладку с фотографией пользователя AD.
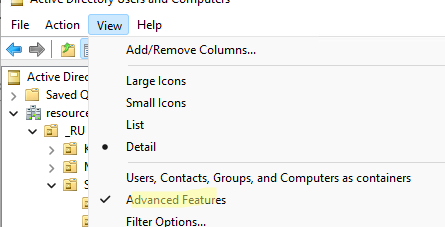
Чтобы показывать системные контейнеры и свойства объектов в оснастке AD (по умолчанию скрыты), включите опцию View -> Advanced features.
После этого у всех объектов появится ряд системных вкладок. Например, на вкладке Object можно получить каноническое имя объекта, дату создания учетной записи и включить опцию защиты от удаления (protect object from accidental deletion).
Подключение консоли ADUC к домену из рабочей группы
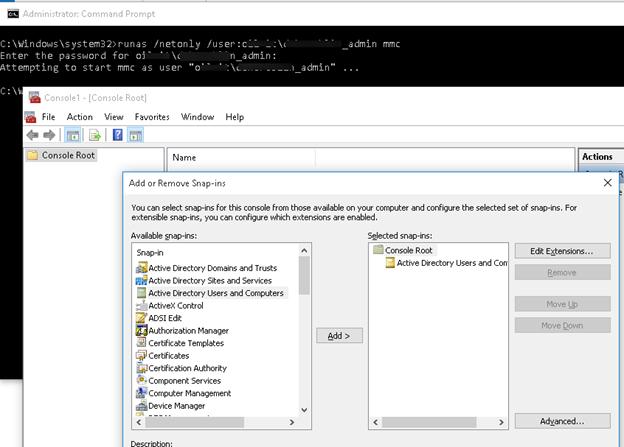
Если вы хотите подключится консолью ADUC к контроллеру домена с компьютера, который не включен в домен (состоит в рабочей группе), воспользуйтесь таким методом:
- Запустите командную строку и выполните команду запуска оснастки от имени другого пользователя:
runas /netonly /user:winitpro\aaivanov mmc - В пустой консоли MMC выберите File->Add/Remove Snap-In
- Перенесите оснастку Active Directory Users and Computers в правую панель и нажмите Add;

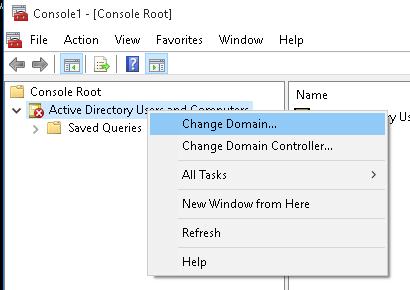
- Чтобы подключится к домену, щелкните по корню консоли и выберите Change domain. Укажите имя домена.

В результате консоль ADUC подключится к контроллеру домена, получит и отобразит структуру контейнеров (OU) данного домена Active Directory.
Все способы:
- Что такое Active Directory
- Способ 1: Консоль «Windows PowerShell»
- Способ 2: Штатные «Параметры»
- Способ 3: Ручная установка
- Подключение консоли к домену рабочей группы
- Решение возможных проблем
- Вопросы и ответы: 0
Что такое Active Directory
Active Directory – это хранилище, объединяющее все объекты сети, в том числе роутеры, компьютеры, профили пользователей, серверы или принтеры. По умолчанию программный компонент отсутствует в операционной системе Windows 10, поэтому его требуется сначала установить на компьютер, после чего можно работать с ним при помощи сервера или контроллера домена, где будет храниться вся информация об устройствах.
Использование Active Directory обеспечивает безопасность работы и взаимодействия объектов в одной сети – за счет контроллера домена есть возможность мониторить доступ к этим объектам, разрешать или блокировать различные действия. Также с помощью компонента удастся ограничить некоторые функции для конкретных юзеров, а все данные, хранящиеся на сервере, надежно защищены от доступа извне.
Прежде чем устанавливать Active Directory, ознакомьтесь с несколькими нюансами. Во-первых, программа используется на базе профессиональной редакции Windows 10, поэтому предварительно убедитесь, что на компьютере установлена именно она.
Подробнее: Просмотр версии ОС в Windows 10
Кроме того, каждый способ из нашей статьи предназначен для разных версий «десятки». Например, в версии Windows 10 Pro 1809 и выше можно воспользоваться самым простым методом – встроенной консолью «Windows PowerShell», выполнив несколько команд. В других случаях, например в версиях 1803 и ниже потребуется ручное скачивание и установка компонента, а также активация консоли через «Панель управления».
Способ 1: Консоль «Windows PowerShell»
Как уже упоминалось, установить Active Directory через консоль «Windows PowerShell» есть возможность в Windows 10 Pro версии 1809 и выше. Для начала стоит проверить, доступна ли установка компонента с помощью специальной команды. Если да, останется выполнить инсталляцию программы, в результате чего консоль будет не только добавлена, но и активирована:
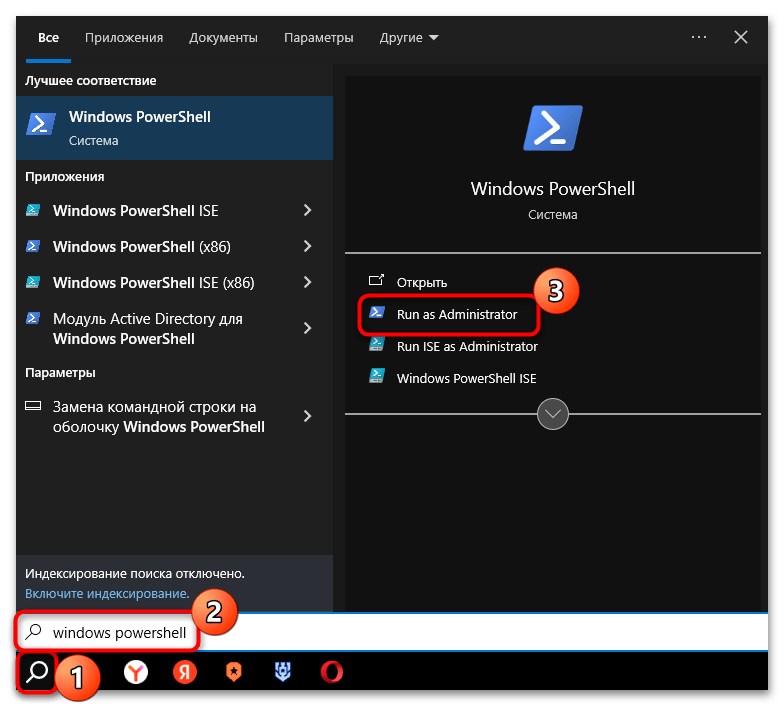
- Запустите консоль «Windows PowerShell» от имени администратора. Для этого можно воспользоваться строкой поиска, введя соответствующий запрос и выбрав нужный тип запуска.
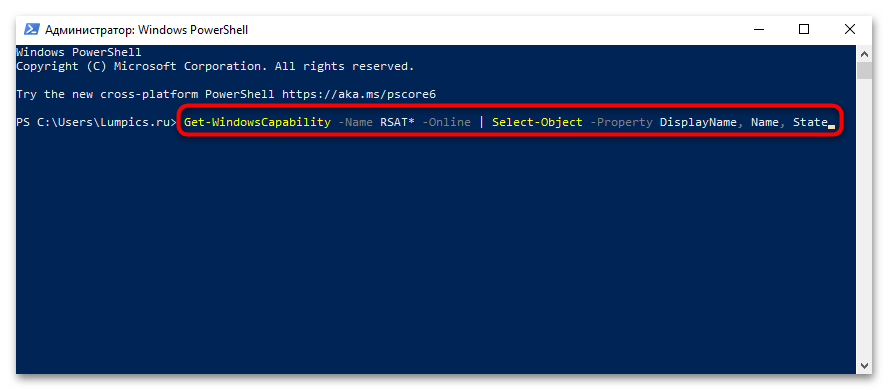
- Введите команду
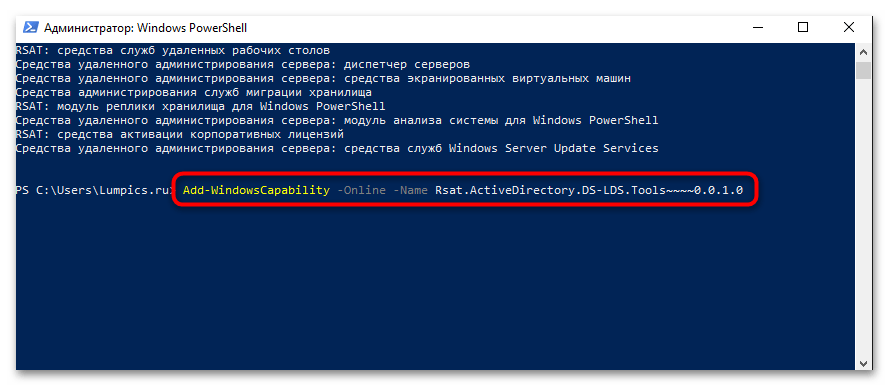
Get-WindowsCapability -Name RSAT* -Online | Select-Object -Property DisplayName, Name, Stateи нажмите на клавишу «Enter», чтобы просмотреть список доступных компонентов. Нас интересует строка “Rsat.ActiveDirectory.DS-LDS.Tools ~~~~ 0.0.1.0” – если она присутствует, переходите к следующему шагу. - Выполните
Add-WindowsCapability -Online -Name Rsat.ActiveDirectory.DS-LDS.Tools~~~~0.0.1.0, скопировав команду, вставив ее в окно и нажав на клавишу «Enter».
Как видите, необходимое программное обеспечение устанавливается парой простых команд, после чего следует перезагрузить компьютер и можно сразу пробовать подключить консоль к домену рабочей группы.
Способ 2: Штатные «Параметры»
Если предыдущий вариант не подходит, тогда проверьте, доступен ли для установки компонент в штатных «Параметрах». Этот способ актуален для Windows 10 Pro 1809 и более поздней версии:
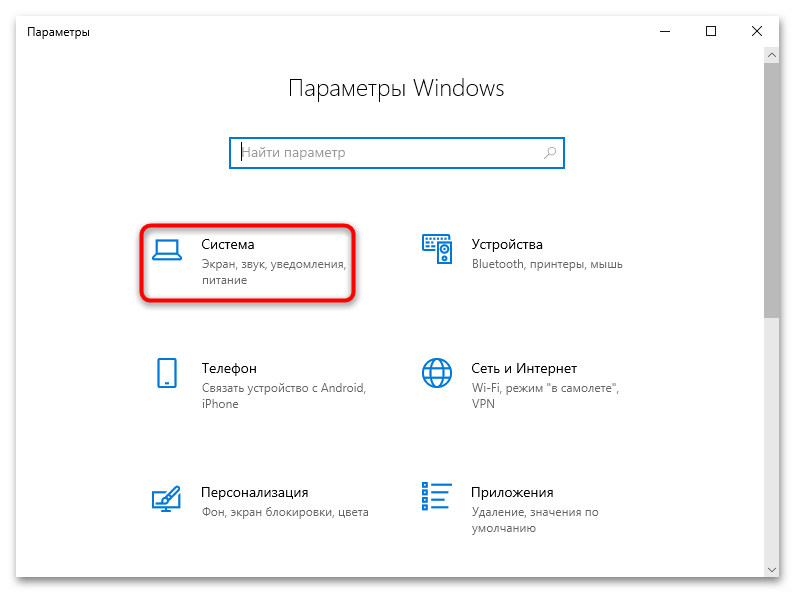
- Нажмите на кнопку «Пуск» и выберите запуск системных «Параметров».
- Выберите раздел «Система» в открывшемся окне.
- Через панель слева переключитесь на «Дополнительные компоненты», а в центральной части окна кликните по строке «Добавить компонент».
- Для более быстрого поиска в строку поиска вставьте запрос ниже. Когда отобразится результат, отметьте его галочкой, затем нажмите на кнопку «Установить»:
средства удаленного администрирования сервера: средства доменных служб Active Directory и служб облегченного доступа к каталогам

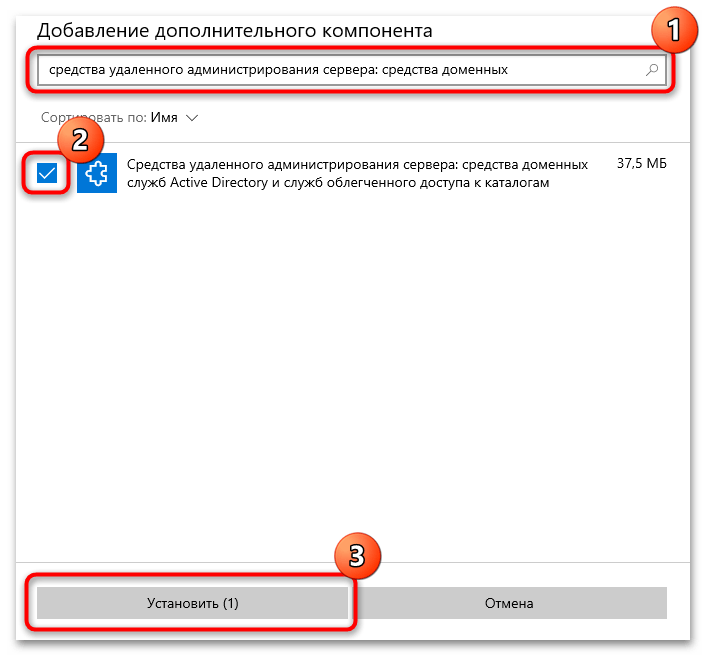
После инсталляции следует перезагрузить компьютер, и компонент станет доступен для использования – его активация произойдет в автоматическом режиме.
Способ 3: Ручная установка
В ранних версиях Windows 10 Pro (1803 и ниже) установка компонентов с помощью «Параметров» и консоли не предусматривается, поэтому инсталлировать Active Directory придется вручную, скачав файл с официального сайта Microsoft и активировав пакет в системе:
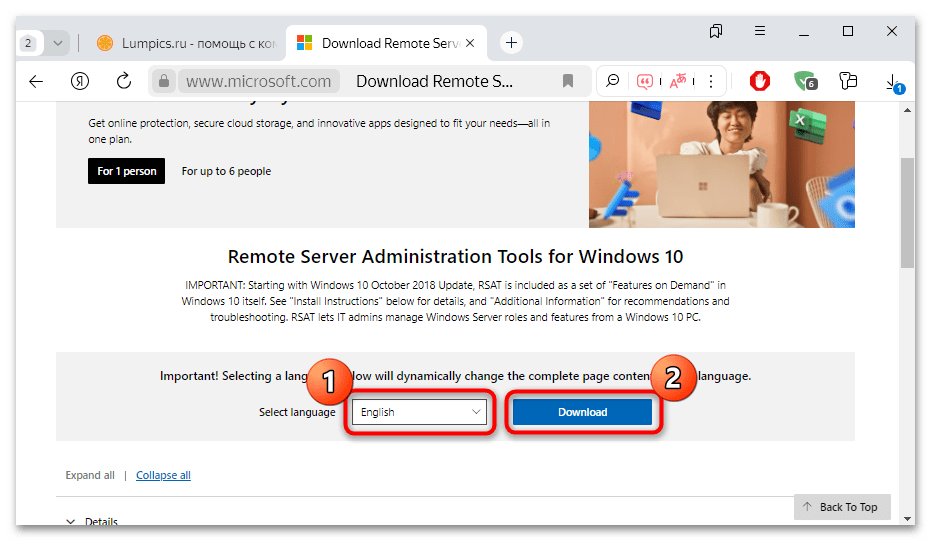
Скачать Active Directory с официального сайта
- Перейдите по ссылке выше, и попадете на страницу сайта Microsoft. Предпочитаемый язык оставьте «English» и нажмите на кнопку «Download».
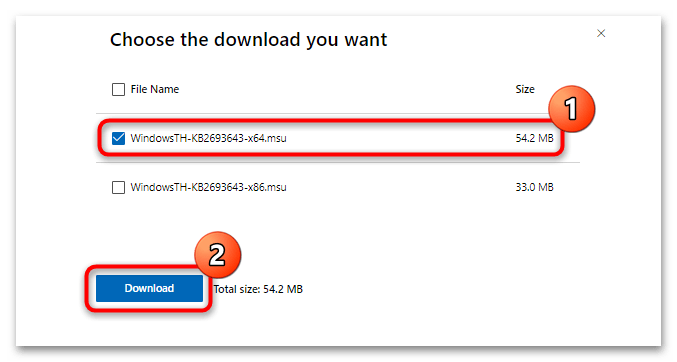
- В следующем окне понадобится выбрать версию программного пакета, которая соответствует разрядности вашей операционной системы, отметив ее галочкой. Нажмите на кнопку «Download» для запуска скачивания.
О том, как узнать разрядность операционки, мы писали ранее в отдельном материале.
Подробнее: Определяем разрядность используемой ОС Windows 10
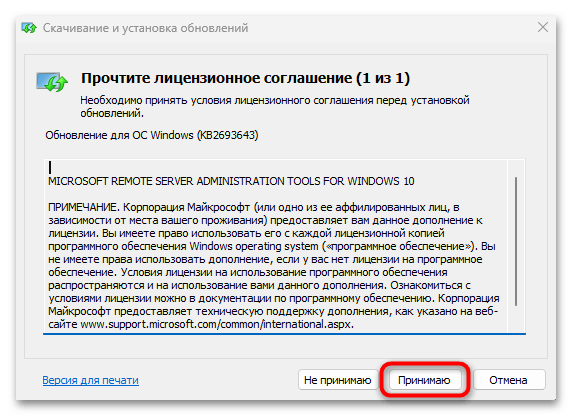
- Начнется процесс загрузки. Дождитесь, когда инсталляционный файл будет скачан, и запустите его двойным нажатием левой кнопкой мыши. Будет предложено установить обновление KB2693643 с помощью автономного установщика Windows (потребуется интернет-подключение). Согласитесь с этим шагом.
- Ознакомьтесь с лицензионным соглашением и примите его.
- После того как инсталляция будет завершена, закройте окно установщика.
По окончании установки Active Directory потребуется перезагрузить систему и вручную включить средства консоли. Сделать это можно двумя способами: через раздел с программами «Панели управления» или посредством нескольких команд в «Командной строке». В первом случае нужно действовать следующим образом:
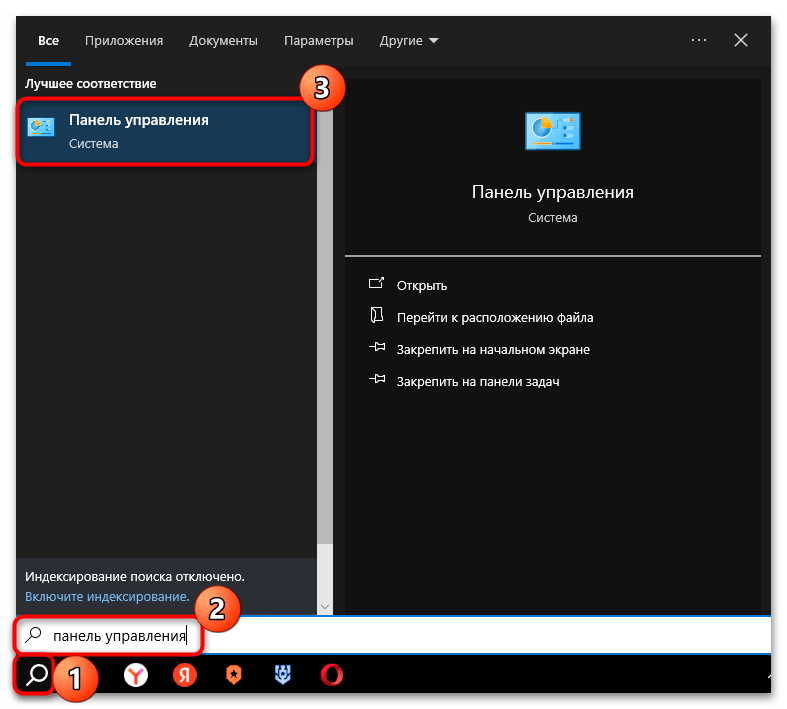
- Запустите классическую «Панель управления», отыскав средство в главном меню.
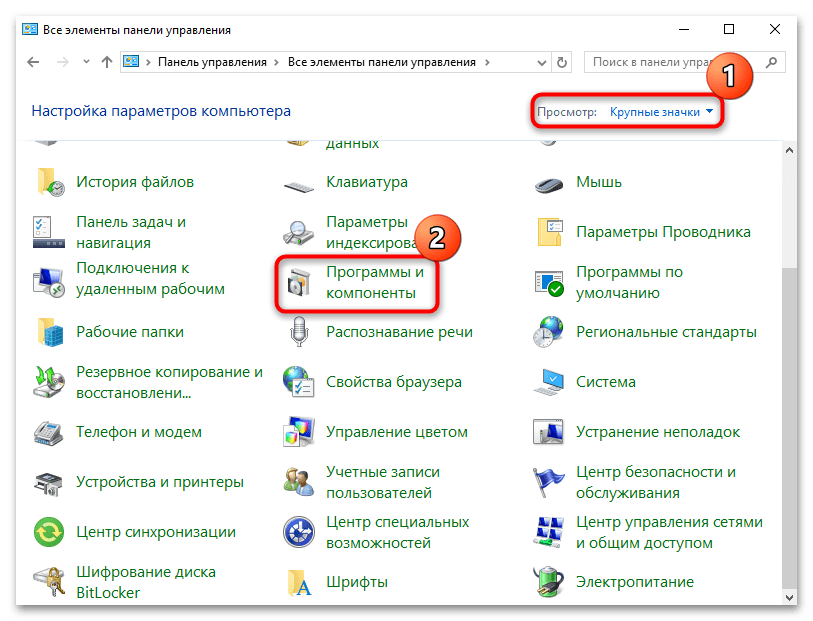
- В меню «Просмотр» для удобства выставьте отображение разделов как крупные или мелкие значки, затем выберите пункт «Программы и компоненты».
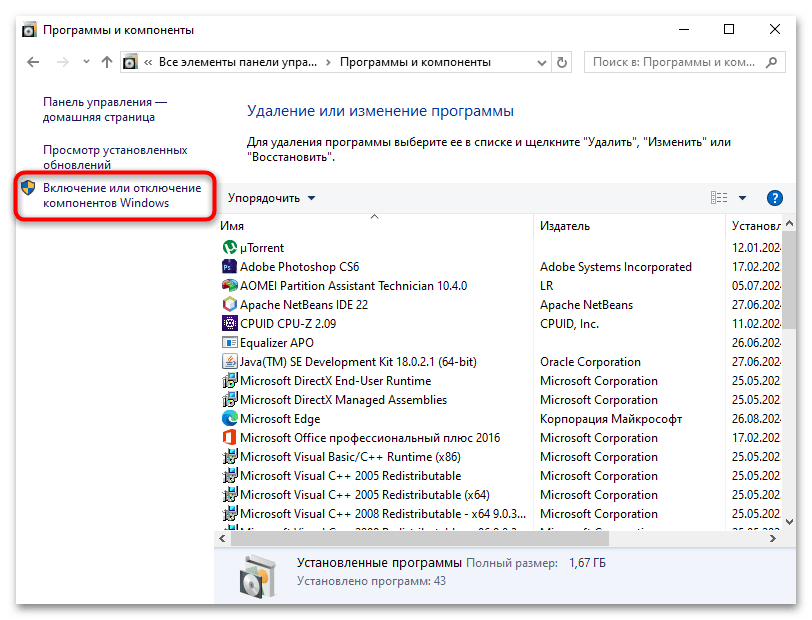
- На панели слева кликните по строке «Включение или отключение компонентов Windows».
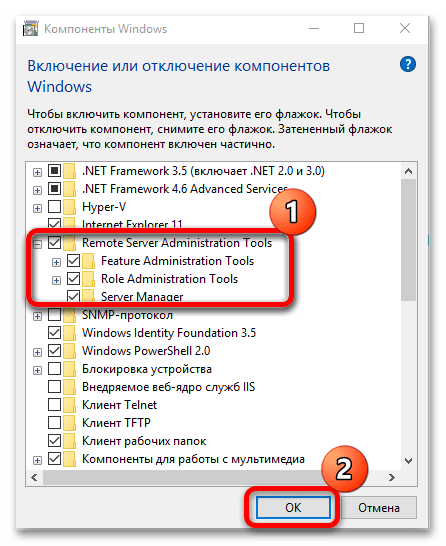
- Отобразится окно «Компоненты Windows», где надо отыскать папку «Remote Server Administration Tools». Отметьте ее галочкой, а также все подразделы, которые находятся внутри, и нажмите на кнопку «ОК» для подтверждения.
Другой метод предполагает выполнение нескольких команд, которые активируют в системе все компоненты оснастки Active Directory:
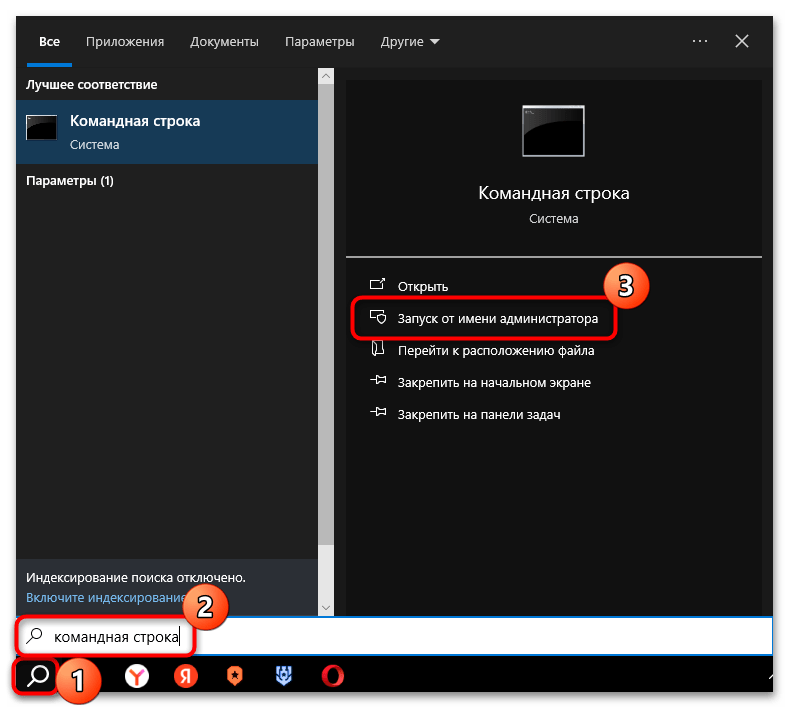
- Откройте «Командную строку» с расширенными правами. Для этого введите нужный запрос в строке системного поиска и из списка результатов на боковой панели выберите «Запуск от имени администратора».
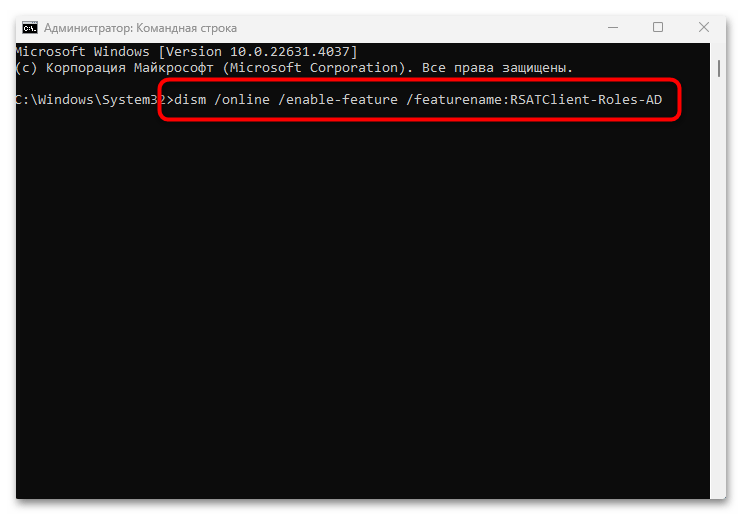
- Поочередно введите следующие команды, выполняя их нажатием на клавишу «Enter»:
dism /online /enable-feature /featurename:RSATClient-Roles-AD
dism /online /enable-feature /featurename:RSATClient-Roles-AD-DS
dism /online /enable-feature /featurename:RSATClient-Roles-AD-DS-SnapIns
В обоих случаях компьютер обязательно надо перезагрузить, чтобы новые настройки вступили в силу.
Кстати, проверить, активирован ли Active Directory, можно через «Панель управления». В разделе с инструментами администрирования должен появиться соответствующий пункт. Сам раздел находится по пути «Система и безопасность» — «Инструменты Windows».
Подключение консоли к домену рабочей группы
Установленную оснастку ADUC для полноценного использования также можно самостоятельно подключить к домену. Для этого используется специальная консоль MMC, предназначенная для управления различными оснастками операционки:
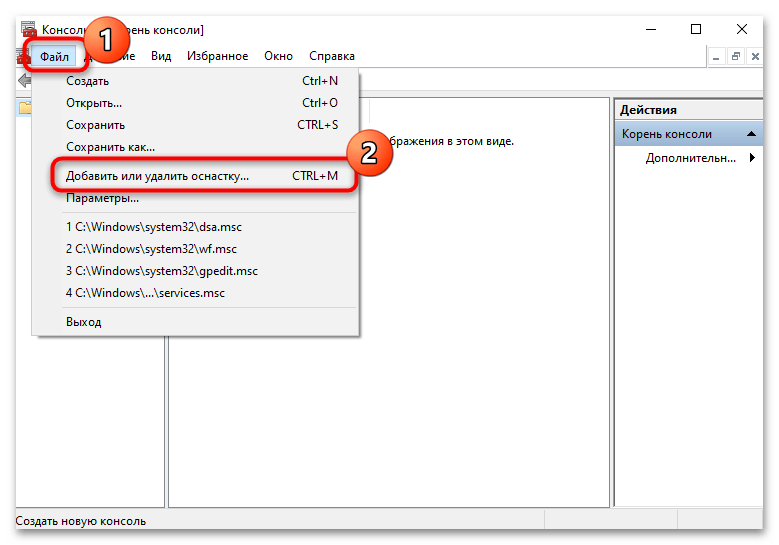
- Одновременно нажмите на клавиши «Win + R» для вызова окна «Выполнить», где введите запрос
mmcи нажмите на кнопку «ОК» или клавишу «Enter». - В открывшемся окне щелкните по вкладке «Файл» вверху и выберите пункт «Добавить или удалить оснастку» (также для этого действия предусматривается сочетание клавиш «Ctrl + M»).
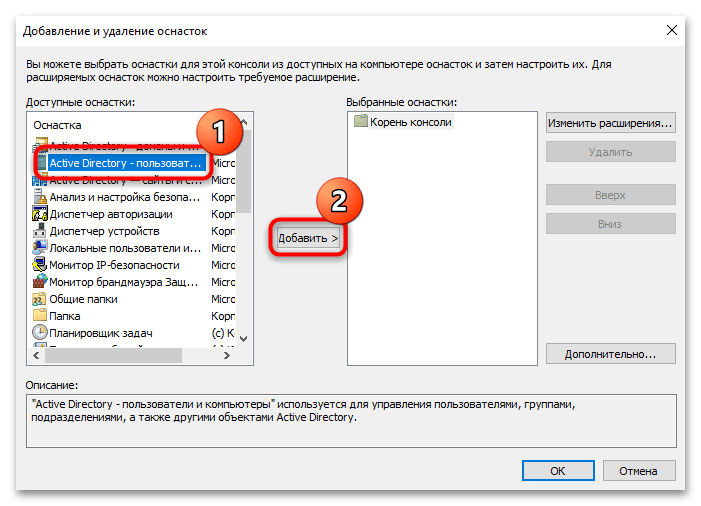
- На панели слева выделите кликом левой кнопкой мыши пункт «Active Directory — пользователи и компьютеры», нажмите на кнопку «Добавить».
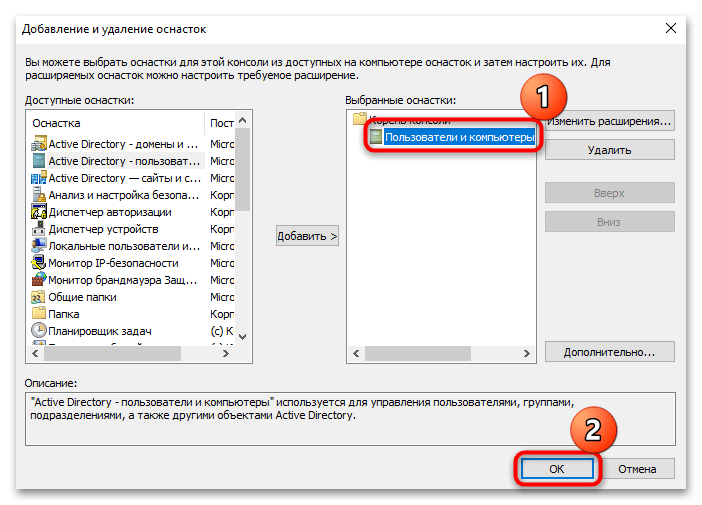
- В поле «Выбранные оснастки» появится новый пункт. Нажмите на «ОК», чтобы сохранить настройки.
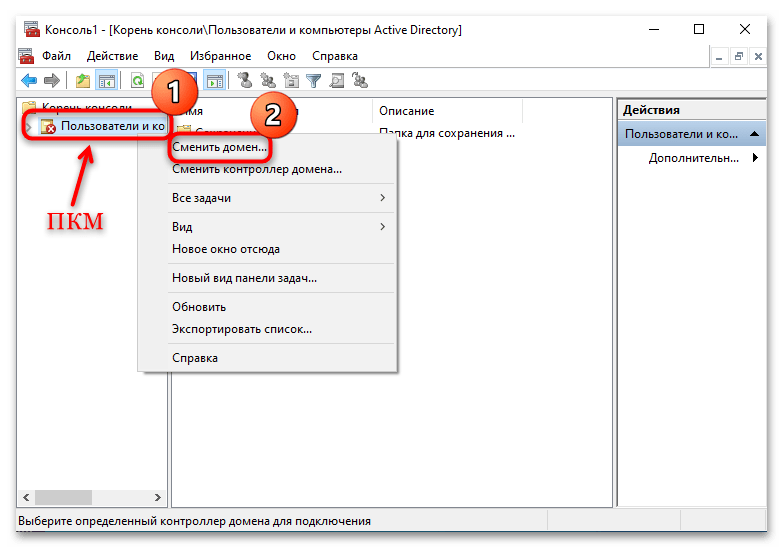
- Далее в окне консоли вы увидите добавленный инструмент, но изначально он еще не подключен к домену рабочей группы. Чтобы это сделать самостоятельно, щелкните по нему правой кнопкой мыши и из контекстного меню выберите пункт «Сменить домен».
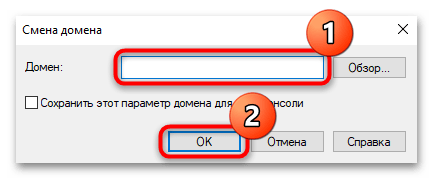
- В поле «Домен» нужно прописать домен рабочей группы и сохранить настройки.

Для запуска Active Directory в последующем можно пользоваться командой dsa.msc, вводя ее в окно «Выполнить» («Win + R») или меню «Пуск». Но также есть возможность в раздел со средствами администрирования Windows добавить оснастку вручную. Для этого в окне консоли MMC нажмите на кнопку «Файл» и выберите «Сохранить как». Задайте имя для оснастки и сохраните параметры. После перезагрузки компьютера созданный инструмент администрирования разместится в соответствующем разделе.

Читайте также: Настраиваем рабочую группу на компьютере Windows 10
Решение возможных проблем
Случается, что на этапе установки компонента Active Directory возникают различные проблемы. Например, при использовании Способа 1 после выполнения команды в «Windows PowerShell» появляется сообщение красного цвета с кодом ошибки 0x800f0954, как на скрине ниже.

А при попытке добавить компонент через штатные «Параметры» некоторые юзеры сталкиваются с той же ошибкой и описанием «Сбой установки».
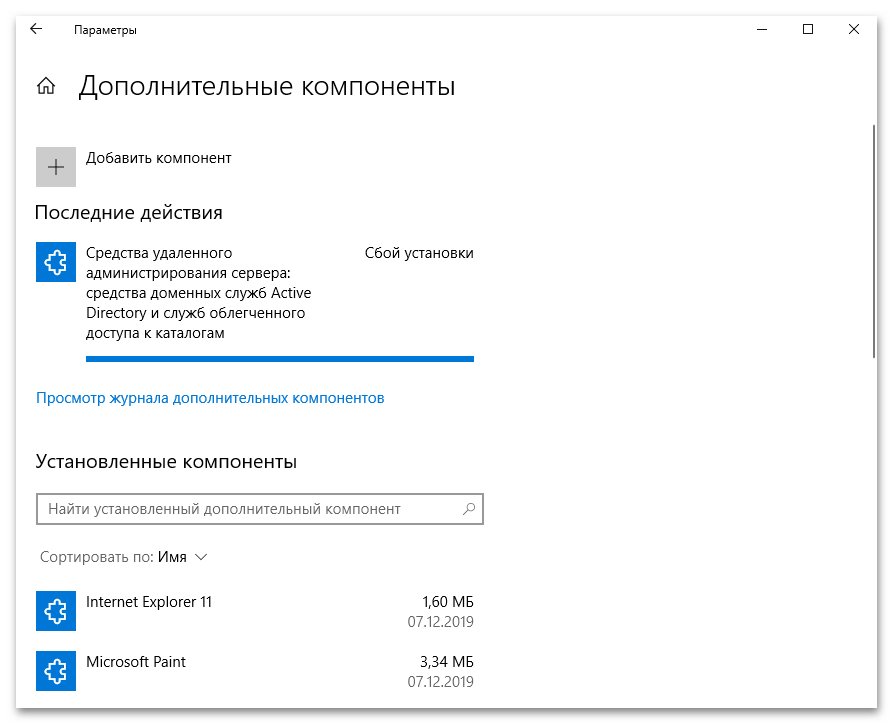
При этом ни «Журнал событий» Windows 10, ни какие-либо другие признаки не дают полноценного ответа на вопрос о решении неполадки. Чаще всего проблема кроется в политиках домена – например, компоненты Active Directory пытаются установиться через WSUS (сервис обновлений операционных системы и продуктов Microsoft, синхронизирующийся с сайтом компании для скачивания обновлений), но при этом там нужных пакетов нет. Исправить такую ситуацию иногда получается с помощью «Редактора локальной групповой политики»:
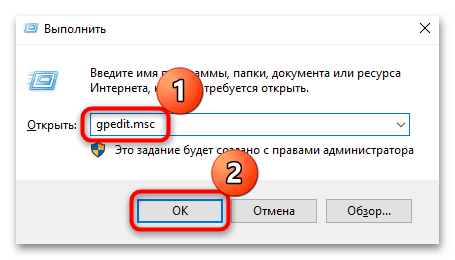
- Через окно «Выполнить» запустите оснастку командой
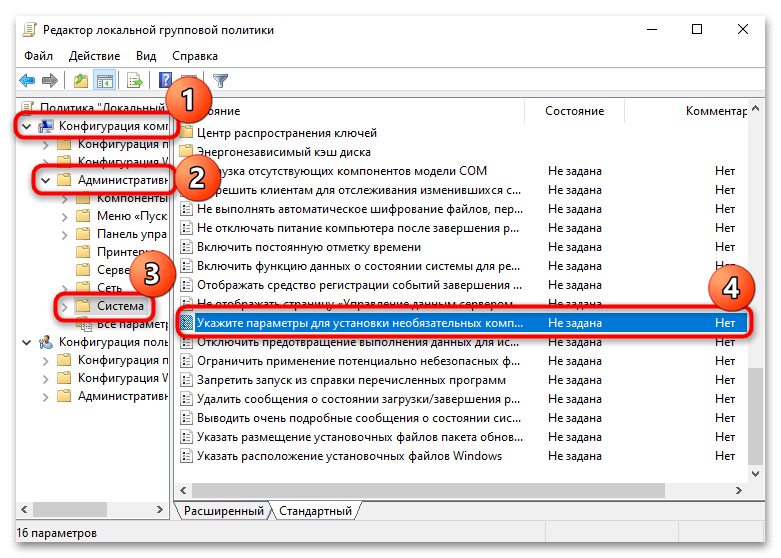
gpedit.msc. - Слева разверните меню «Конфигурация компьютера» — «Административные шаблоны» и выберите «Система». В центральной части окна дважды кликните левой кнопкой мыши по политике «Укажите параметры для установки необязательных компонентов и восстановления компонентов».
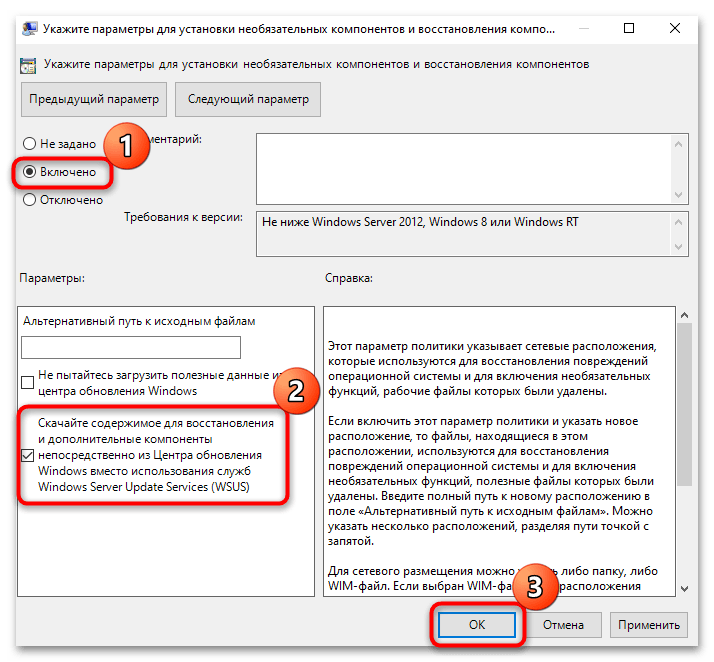
- В открывшемся окне, если надо, отметьте пункт «Включено», затем в поле «Параметры» поставьте галочку у параметра «Скачайте содержимое для восстановления и дополнительные компоненты непосредственно из Центра обновления Windows вместо Windows Server Update Services (WSUS)». Сохраните внесенные изменения.
Теперь повторите попытку установки Active Directory> через консоль или штатные «Параметры».
Кроме того, иногда во время настройки оснастки (в том числе при добавлении домена) появляются различные ошибки. В этом случае убедитесь, что пользователь имеет права администратора домена, а также выполнение и запуск программ осуществляются с расширенными правами.
Читайте также:
Используем учетную запись «Администратора» в Windows
Запуск программ от имени администратора
Наша группа в TelegramПолезные советы и помощь
Any Windows Server administrator must have used the Active Directory Users and Computers (ADUC) Microsoft Management Console on a Domain Controller (DC). Using this console, you can control and manage users, user groups, computers, and the Organizational Units (OUs) in the domain.
The ADUC console is no longer limited to servers anymore. You can install the Active Directory Users and Computers snap-in on a Windows 11 or Windows 10 computer as well, which performs the same functions as the original Server console. This snap-in is part of the Remote Server Administration Tools (RSAT) for Windows operating systems.
We have written separate posts for installing any RSAT tools on Windows 11 and Windows 10. This article focuses on installing specifically the Active Directory Users and computers snap-in on a Windows PC and then using it to manage your domain.
Table of Contents
How to Install Active Directory Users and Computers (ADUC) on Windows
All RSAT tools, including the Active Directory Users and Computers snap-in, allow you to manage the different Active Directory components as if you are on the server itself. This way, you do not always have to access the server, neither physically nor remotely, to perform an action.
You can download and install the Active Directory Users and Computers snap-in using the Settings app, from the Command Prompt, and Windows PowerShell.
Note: On Windows 10 v1803 and older, you must download and install all RSAT tools using the MSI files. You can find the MSI files for your version of Windows here.
Install Active Directory Users and Computers from Settings App
The easiest way to install the ADUC snap-in on a Windows PC is from the settings app. It does involve more steps than the other methods shared below, but this is the only method using the Windows GUI.
Use these steps to install the ADUC snap-in from the Settings app:
-
Navigate to the following:
Settings app >> Apps >> Optional Features
-
Click “View features.”
 Snap-In On Windows 11/10 1")
Add an optional feature -
Search for “Active Directory,” select “RSAT: Active Directory Domain Services and Lightweight Directory Services Tools,” and click Next.
Select Active Directory Users and Computers -
Click “Install.”
Install Active Directory Users and Computers from the Settings app -
Once installed, restart the computer.
 Snap-In On Windows 11/10 1")
 Snap-In On Windows 11/10 2")
 Snap-In On Windows 11/10 3")
The Active Directory Users and Computers snap-in will now be installed. If you prefer installing it using the command line, refer to the sections below. To learn how to use the snap-in, continue reading down.
Install Active Directory Users and Computers from Command Prompt
Below are the simple steps to install Active Directory Users and Computers snap-in using the Command Prompt:
-
Open an elevated Command Prompt instance.
-
Run the following command:
DISM /Online /Add-Capability /CapabilityName:Rsat.ActiveDirectory.DS-LDS.Tools~~~~0.0.1.0 Snap-In On Windows 11/10 4")
Install Active Directory Users and Computers snap-in using Command Prompt
 Snap-In On Windows 11/10 4")
The ADUC snap-in should now be installed. Run the following command in Command Prompt to confirm that the Active Directory Users and Computers snap-in has been installed:
DISM.exe /Online /Get-CapabilityInfo /CapabilityName:Rsat.ActiveDirectory.DS-LDS.Tools~~~~0.0.1.0 Snap-In On Windows 11/10 5")
You should see “Installed” in front of Status.
Install Active Directory Users and Computers from PowerShell
Use the following steps to install the Active Directory Users and Computer snap-in using PowerShell:
-
Launch an elevated PowerShell instance.
-
Run the following command to install ADUC:
Add-WindowsCapability -Online -Name Rsat.ActiveDirectory.DS-LDS.Tools~~~~0.0.1.0
Install Active Directory Users and Computers snap-in using PowerShell
 Snap-In On Windows 11/10 6")
The ADUC snap-in should now be installed. To confirm its status, run the following command in PowerShell:
Get-WindowsCapability -Online | Where-Object {$_.Name -like "RSAT.ActiveDirectory*"} Snap-In On Windows 11/10 7")
You should see “Installed” in front of State.
These are all the methods to install the Active Directory Users and Computers snap-in on a Windows 11/10 PC. Let us now continue to see how to use this tool.
How to Use Active Directory Users and Computers
How to Open Active Directory Users and Computers Snap-In
Now that Active Directory Users and Computers is installed, you can open it by searching for it in the Start menu, or running the following in the Run Command box:
dsa.mscAlternatively, you can also open the ADUC snap-in through the Control Panel at the following location:
Control Panel >> System and Security >> Windows Tools
 Snap-In On Windows 11/10 9")
If your computer is connected to a domain and you are logged in from an authorized domain account, then the ADUC snap-in will automatically connect to the server. However, if one is not connected, then you must connect to the Domain Controller.
Connect ADUC to Domain Controller
Use these steps to connect to a Domain Controller. You can also use these to change your domain/Domain Controller.
-
From the ADUC console, click “Action,” and then click “Change Domain Controller.”
Change or connect to Domain Controller The Change Directory Server window will now open.
-
Select the “This Domain Controller or AD LDS instance” radio button, then select the Domain Controller from the give list and click Ok.
Select and connect to Domain Controller
 Snap-In On Windows 11/10 10")
 Snap-In On Windows 11/10 11")
The ADUC will now connect to the Domain Controller and populate the fields.
 Snap-In On Windows 11/10 12")
Now that you are connected to the Domain Controller, you can now begin making changes and managing the different components of the domain.
Manage Users, Computers, Organizational Unit using ADUC
 Snap-In On Windows 11/10 13")
You can now begin adding new users, computers, printers, and Organizational Units to the domain. Simply right-click on the OU that you want to add the new device/user to, expand “New”, and select the element that you want to add.
Once you have selected the element to add, the respective window will open, where you can then configure the component to add.
You can now also use other operators to manage the users, devices, and other elements configured inside the domain directly from your Windows PC.
Additionally, you can also manage what you see inside the snap-in. Click “View” from the top menu and select the things that you want to see. You can then also click “Filter options” to open the advanced viewing options.
 Snap-In On Windows 11/10 14")
The list does not end here. There are a bunch of other management options you can perform directly from the ADUC snap-in on a Windows PC. We suggest that you play around to discover all the options. However, we advise caution and only use the console if you know what you are doing.
What is Active Directory Users and Computers Used For
By now, we have a pretty good understanding of what the ADUC snap-in can be used for. However, there is more to it than meets the eye. The Active Directory Users and Computers RSAT tool can be used to perform the following actions:
- Create and manage user accounts, computers, and Active Directory groups.
- View and edit AD object attributes with ADSI Edit.
- Search for AD objects.
- Change or reset user password in Active Directory.
- Create organizational units and build hierarchical structures for AD objects. You can also delegate administrative permission on these OUs to other domain users.
- Delegate administrative permissions.
- Raise domain functional level, and transfer FSMO roles with PowerShell to another domain controller.
From this, it is understood how useful the ADUC snap-in is for administrators that use Windows client PCs.
Active Directory Users and Computers (ADUC) is part of Microsoft’s Active Directory (AD). This system manages all the critical user details, such as names, emails, addresses, and crucial login information like passwords. In the IT world, when people talk about “Active Directory”, they’re often referring to ADUC. It’s the go-to tool for organizing and controlling access within your network.
If you want to learn more about Active Directory Users and Computers, consider enrolling in our free Active Directory Fundamentals course at the link below:
Course: Active Directory Fundamentals
This free course will teach you the fundamentals of Active Directory. You’ll learn how to create and…
10 Lessons
1 Quizzes
1 Labs
1 Hr
How to Install Active Directory Users and Computers on Windows 10
Installing Active Directory Users and Computers (ADUC) on Windows 10 is straightforward. The process varies slightly depending on your version of Windows 10, but it’s nothing too complicated. Let’s break it down into two parts based on the Windows 10 version you’re using.
Verify Your Version of Windows
Before proceeding with the installation steps outline below, be sure to confirm which version of Windows you have. It’s also important to note what edition of Windows you have since that will require different steps.
To verify your version of Windows, click the windows button, and search for “system info,” and select “System Information” from the search results:
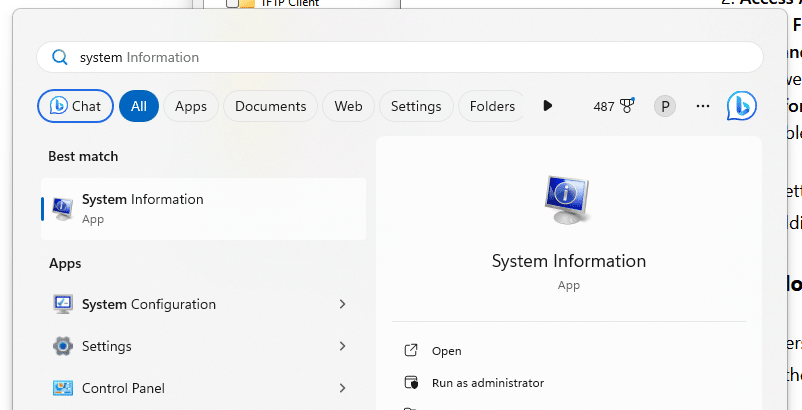
Look for “OS Name” and “Version”.

Install ADUC on Windows 10 Pro 1809+, and Windows 11 with PowerShell
If you’re using Windows 11 (Home or Pro), execute the following PowerShell command to see what you have available:
Get-WindowsCapability -Name RSAT* -Online | Select-Object -Property DisplayName, Name, StateThis returns a list shown below. I want to install the first option, which for my computer is “Rsat.ActiveDirectory.DS-LDS.Tools~~~~0.0.1.0”.
I can install this with the following PowerShell command:
Add-WindowsCapability -Online -Name Rsat.ActiveDirectory.DS-LDS.Tools~~~~0.0.1.0For Windows 10 Pro Version 1809 and Above without PowerShell
If you’re using Windows 10 Pro version 1809 or later, installing ADUC is part of adding the ‘RSAT: Active Directory Domain Services and Lightweight Directory Tools’ feature. Here’s how to do it:
- Open Settings: Click on the Start menu and select ‘Settings’.
- Access Apps & Features: Navigate to ‘Apps’ and then to ‘Optional Features’.
- Add a Feature: Click on ‘Add a feature’ at the top of the page.
- Find and Install RSAT Tools: Scroll or search for ‘RSAT: Active Directory Domain Services and Lightweight Directory Tools’. Select it and click ‘Install’.
- Wait for Installation: The installation might take a few minutes. Once done, you’ll have ADUC available to use.
This is a pretty hassle-free process, and it’s nice that Microsoft made these tools readily available without needing additional downloads.
For Windows 10 Version 1803 and Below
For older versions of Windows 10 or for Windows 10 Home, like version 1803 and below, you’ll need to download the RSAT package manually. Here’s how:
- Visit Microsoft’s Download Center: Search for ‘RSAT for Windows 10’ in your web browser and visit the Microsoft Download Center link.
- Download the RSAT Installer: Choose the correct version of the RSAT installer based on your Windows 10 version.
- Run the Installer: Once downloaded, run the installer and follow the on-screen instructions.
- Enable ADUC: After installation, go to ‘Control Panel’, select ‘Programs’, then ‘Turn Windows features on or off’. Here, check the box for ‘AD DS and AD LDS Tools’.
How to Start Active Directory Users and Computers (ADUC)
Once you’ve successfully installed Active Directory Users and Computers (ADUC) on your Windows 10 machine, the next step is to actually start using it. Launching ADUC is a breeze, and once you’re in, you’ll find a range of options to manage your network’s users and computers effectively. Let’s walk through how to get it up and running.
Accessing ADUC
To open ADUC, you’ll typically use the Windows search function:
- Open the Start Menu: Click the Windows icon on your taskbar.
- Search for ADUC: In the search bar, type “Active Directory Users and Computers”.
- Launch the Tool: Click on the ADUC application that appears in the search results.
If it’s your first time using ADUC, you might want to pin it to your Start menu or taskbar for quick access in the future. Simply right-click on the ADUC app in the search results and choose ‘Pin to Start’ or ‘Pin to Taskbar’.
Navigating the ADUC Interface
When you first open ADUC, you’ll be greeted with a tree-view of your Active Directory environment.

Here, you’ll see your domain and a series of folders representing various organizational units (OUs) and groups.
Navigating through this interface is straightforward. You can expand each OU to see the objects (like user accounts and groups) within them. Right-clicking on objects or the space in the console gives you a context-specific menu, offering various administrative tasks you can perform, like resetting passwords or creating new users.
Some Quick Tips
- Use the ‘Find’ Feature: If you’re looking for a specific user or group, the ‘Find’ function is incredibly handy. It’s a bit like using the search function on your computer – simple and efficient.
- Familiarize Yourself with Context Menus: Right-clicking on different items in the ADUC gives you a lot of options. Spend some time getting to know these – they’re great time-savers.
Basic Features and Functionalities of Active Directory Users and Computers
Active Directory Users and Computers (ADUC) is chock-full of features that can simplify the life of a network administrator. Understanding its core functionalities is key to leveraging its full potential. Let’s delve into some of the basic yet powerful features of ADUC.
User Account Management
At its core, ADUC is about managing user accounts. Here are some of the things you can do:
- Create New User Accounts: You can set up new user accounts, complete with detailed personal information and login credentials.
- Modify Existing Accounts: Need to update a user’s details or change their group memberships? It’s just a few clicks away in ADUC.
- Delete or Disable Accounts: When a user leaves or needs to be temporarily removed from the network, you can either disable or delete their account.
Group Management
Groups help organize your AD objects like Users and Computers. Create groups based on department, role, access needs, or anything else you can think of. This allows you to apply Group Policies Objects (or GPOs) to the specific groups and configure specific settings for that group.
Organizational Units (OUs)
OUs are like folders that help you organize and manage users, groups, and other AD objects more efficiently. Once you create an OU, like groups, you can apply specific Group Policy Objects to that organizational unit.
You can create OUs any way you see fit and whatever makes sense to you while organizing your domain, but it should be created with the idea that later you’ll come back and apply GPOs and apply security settings.
Finding and Managing Objects
ADUC comes with a robust search feature that lets you quickly find any object in your directory. It’s particularly useful when you’re managing a large number of users and groups.
Security and Permissions
Managing security settings and permissions is a big part of ADUC. You can:
- Set Permissions: Define what users can and cannot access.
- Manage Security Groups: Use security groups to apply permissions to a set of users.
Conclusion
That provides a basic overview of Active Directory Users and Computers including it’s installation. If you want a more indepth tutorial on Active Directory, you can check out our other blog post titled Active Directory 101: A Step-by-Step Tutorial for Beginners. If you want more formal training, consider our free Active Directory Fundamentals course below:
Course: Active Directory Fundamentals
This free course will teach you the fundamentals of Active Directory. You’ll learn how to create and…
10 Lessons
1 Quizzes
1 Labs
1 Hr
Leave a comment below and let us know what you thought in the comments below!
One of the main tools for performing administrative tasks in an Active Directory domain is the Active Directory Users and Computers (ADUC) MMC snap-in. The ADUC is a Microsoft Management Console snap-in dsa.msc which is used to manage users, groups, computers, and Organizational units in the AD domain.
In this article, we will look at how to install the Active Directory Users and Computers console on computers running Windows Server and desktop editions of Windows 10 and 11.
Installing Active Directory Users and Computers Snap-in on Windows Server
The ADUC console is automatically installed on a Windows server when it’s promoted to the domain controller as part of the Active Directory Domain Services (AD DS) role deployment. You can manually install the ADUC snap-in on any Windows Server member host.
You can install ADUC console on Windows Server 2022/2019/2016 using Server Manager (Add roles and features > Features > Remote Server Administration Tools > Role Administration Tools > AD DS and AD LDS Tools > AD DS Tools > AD DS Snaps-Ins and Command Line Tools) or with the PowerShell command:
Install-WindowsFeature -Name RSAT-ADDS-Tools

Check that the ADUC console is installed on Windows Server:
Get-WindowsFeature -Name RSAT-ADDS-Tools

How to Install ADUC on Windows 10 and 11
An ADUC snap-in can be installed as part of the Remote Server Administration Tools (RSAT) on the Pro and Enterprise editions of Windows 10 and Windows 11 (but not on the Home editions). You can install ADUC on Windows 10 and 11 by using the Settings app or with PowerShell.
Enable Active Directory Users and Computers Console on Windows 10 and 11
On modern versions of Windows 10 and 11 (with build 1809 and later), you can install the ADUC console from the modern Settings app.
- Press the Start menu > Settings > System;
- Select Optional Features > Add a feature;
- From the list of optional features, select RSAT: Active Directory Domain Services and Lightweight Directory Tools, and press Install.

- Windows will download the ADUC RSAT binary files and install them on your computer.
- You will need to restart your computer when the RSAT installation is complete.

The RSAT was distributed as a separate MSU update file in previous versions of Windows. For example, to install RSAT on Windows 10 1803, you must download and install the KB2693643 update. You can then enable a specific RSAT option using the Control Panel > Turn Windows Features On or Off applet (optionalfeatures.exe).
Install the ADUC Snap-in on Windows 10 or 11 Using PowerShell
You can use PowerShell to install the Active Directory console on Windows 10 and 11. Open an elevated PowerShell prompt and run the command to check whether the RSAT Active Directory feature is installed on your computer:
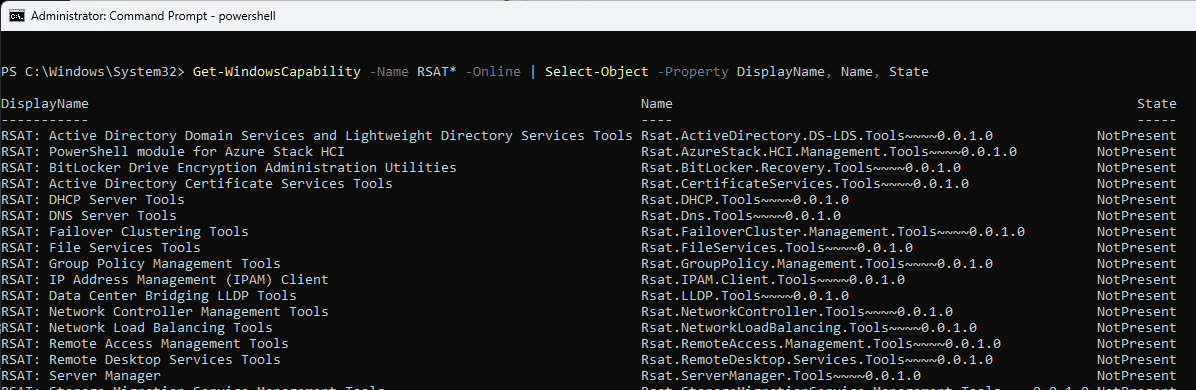
Get-WindowsCapability -Online | Where-Object {$_.Name -like "RSAT.ActiveDirectory*"}

In this case the RSAT: Active Directory Domain Services and Lightweight Directory Services Tools feature is not installed (State > NotPresent).
If the RSAT ActiveDirectory Tools feature is missing, you can install it:
Add-WindowsCapability -Online -Name Rsat.ActiveDirectory.DS-LDS.Tools~~~~0.0.1.0

You can also use the DISM command to install the RSAT ADUC feature:
DISM /Online /Add-Capability /CapabilityName:Rsat.ActiveDirectory.DS-LDS.Tools~~~~0.0.1.0

Check the AD RSAT status. The State should be changed to Installed.

Note. The PowerShell Active Directory module is also installed with the ADUC console.
Unable to Install RSAT Active Directory on Windows
The RSAT components in the latest versions of Windows are delivered as Features on Demand (FoD). Windows doesn’t store the local RSAT binaries on a local drive; instead, it downloads the RSAT files from the Microsoft Update servers. If your computer is in an isolated (disconnected) environment, you will receive an error when you try to install the ADUC snap-in:
0x800f0954

No features to install
You can use the FoD ISO image to install the RSAT components on offline computers. FoD DVD medias is available for download from your Volume License Servicing Center (VLSC) or on my.visualstudio.com.

Download and mount the FoD ISO image to a virtual drive (for example, to drive F:). You can then install the ADUC feature from local media using the command:
Add-WindowsCapability -online -name Rsat.ActiveDirectory.DS-LDS.Tools~~~~0.0.1.0 -source -Source "F:\" –LimitAccess
If you are using WSUS or SCCM to deploy Windows updates to client devices, you must enable the special GPO option to correctly install Features on Demand (including ADUC) on computers.
- Open the local Group Policy Editor (gpedit.msc) and go to Computer Configuration > Administrative Templates > System;
- Enable the GPO option Specify settings for optional component installation and component repair and check the Download repair content and optional features directly from Windows Update instead of Windows Server Update Services (WSUS);

- Update the Group Policy settings on the computer by using the command: gpupdate /force.

Without this option, Windows 11 will try to get RSAT from your local Windows Update Server (errors 0x8024402c and 0x800f081f).
How to Open and Use Active Directory (DSA.msc) Snap-in on Windows
To run the Active Directory snap-in on Windows 11, go to Start Menu > All Programs > Windows Tools.
On Windows 10 (and previous versions) the AD Management snap-ins are available in the Administrative Tools section of the Control Panel.

As you can see, it refers to the MMC console %SystemRoot%\system32\dsa.msc.
This means that you can quickly open the ADUC console by pressing Win+R, typing dsa.msc and clicking OK.

If your computer is joined to the Active Directory domain, the ADUC console will automatically connect to the nearest DC in your Active Directory site.
If the console can’t find the domain controller, you can use the PowerShell command to get the name of your LogonServer:
$env:LOGONSERVER
Right-click on the root in the ADUC console and select Change Domain Controller. Select the name of your logon DC from the list.
Always use the nearest domain controller when managing Active Directory from ADUC. The RSAT console may become slow when working with a domain controller at a remote site.
If you want to connect to AD using the dsa.msc snap-in from a non-domain joined computer, you must:
- Run the command:
runas /netonly /user:Domain_Name\Domain_USER mmc
- Select File > Add/Remove Snap-In;
- Add Active Directory Users and Computers snap-In to the right pane and press OK;

- Connect to the domain with right-click on ADUC > Connect to the domain and enter the domain name.


The ADUC snap-in should display your Active Directory domain structure.

You will see a standard set of Active Directory OUs and containers:
- Saved Queries — saved search criteria for quick searches against Active Directory (LDAP query supported);
- Builtin — built-in user accounts;
- Computers — default container for computer accounts;
- Domain Controllers — default container for domain controllers;
- ForeignSecurityPrincipals — contains information about objects from trusted external domains;
- Users — default container for user accounts.
Depending on the domain structure, the ADUC console may contain other containers. Some AD containers are not displayed by default. To display them, select View > Advanced Features in the top menu.

In the ADUC console, you can perform the following actions:
- Create and manage user accounts, computers, and Active Directory groups;
- View and edit AD object attributes with ADSI Edit;
- Search for AD objects;
- Change user password in Active Directory or reset it;
- Create Organizational Units and build hierarchical structures for AD objects. Enable or disable OU accidental deletion protection;
- Delegate administrative permission to OUs to non-admin domain users;
- Raise domain functional level, and move FSMO roles to another domain controller.
Cyril Kardashevsky
I enjoy technology and developing websites. Since 2012 I’m running a few of my own websites, and share useful content on gadgets, PC administration and website promotion.