
How to Add a Custom Mouse Cursor in Windows 11
Customizing your computer’s appearance can breathe new life into your experience, and one of the simplest yet most effective ways to do so is by changing your mouse cursor. In Windows 11, you have the ability to replace the default mouse pointer with a custom design that reflects your personality or suits your aesthetic preferences.
This detailed guide will walk you through the entire process, from selecting suitable cursor designs to implementing them in the Windows 11 operating system. Whether you are looking for a fun, whimsical cursor or something more streamlined and professional, this article will cover everything you need to know to get your custom mouse cursor up and running.
Understanding Mouse Cursors in Windows 11
Before we dive into how to change your mouse cursor, it’s essential to understand what mouse cursors actually are and how they function within Windows 11. By default, Windows comes with a specific set of mouse pointers that traverse through different actions, such as selecting text, adjusting settings, or clicking links. These pointers are part of a system scheme that dictates their appearance and behavior.
The Importance of the Mouse Cursor
The mouse cursor is not just a functional element; it also contributes significantly to the overall aesthetic of your desktop environment. A well-chosen cursor can enhance your user experience, reducing eye strain and improving your workflow. This customization option provides users the chance to express their individuality or align with their professional brand.
Finding Custom Mouse Cursors
The first step in enhancing your cursor is sourcing your desired designs. Custom mouse cursors can be found in various formats, including individual files or comprehensive cursor sets. Here are some reliable sources for downloading custom cursors:
Websites for Cursor Downloads:
- DeviantArt: A well-known community for artists, where you can find a plethora of unique cursor designs.
- Classics Cursor: This site specializes in classic Windows cursors, which may appeal to those who prefer a nostalgic style.
- Cursors-4u: Offers an extensive selection of cursor sets and individual files, sorted by categories.
- Cursor.cc: An online editor that allows you to create or modify cursor designs and download them in various formats.
- OpenCursor: A platform that holds royalty-free cursor designs that can be easily downloaded and applied.
Formats and Requirements
Most custom cursors will come in .cur (for regular cursor icons) or .ani (for animated cursors) formats. Ensure that the files you download are compatible with Windows 11 to avoid any issues during installation.
Preparing to Change Your Mouse Cursor
Once you’ve selected your custom cursors, it’s time to get them ready for installation. This section will guide you through the folder setup and backup process.
Step 1: Create a Cursor Folder
-
Create a Custom Folder: Open File Explorer and navigate to a convenient location, like your Desktop or Documents. Create a new folder named “Custom Cursors.”
-
Add Cursor Files: Copy and paste or move the downloaded .cur and .ani files into this new folder. Keeping your cursor files organized will simplify the installation process.
Step 2: Backup Your Current Cursor Scheme
Changing your mouse cursor can sometimes lead to unforeseen issues. Although Windows 11 allows easy switching back to the default cursors, it’s good practice to backup your current settings.
-
Open Mouse Properties: Search for “Mouse settings” in the Windows search bar and select it.
-
Go to Pointers tab: In the Mouse Properties window, switch to the “Pointers” tab.
-
Save Current Scheme: Click on the “Save As” button to save your current pointer scheme. Give it a recognizable name, such as “Default” or “Current Settings.”
Changing Your Mouse Cursor in Windows 11
Now that you have your cursors ready and your current scheme backed up, you can proceed to change the mouse cursor. Follow these steps:
Step 1: Open Mouse Settings
-
Access Settings: Right-click on the Start menu and select “Settings” or use the keyboard shortcut Win + I.
-
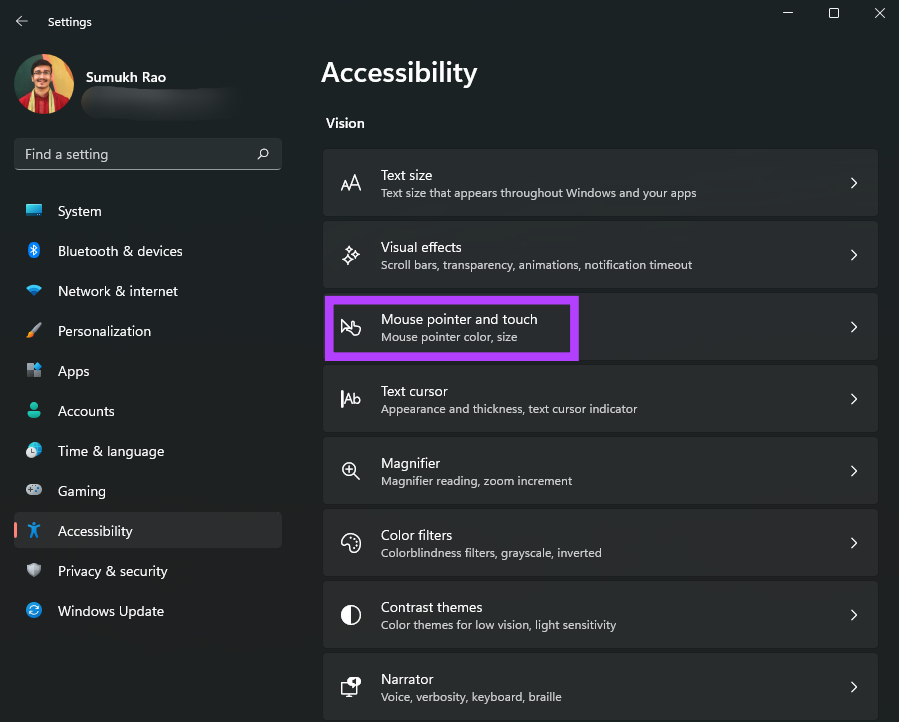
Navigate to Accessibility: In the Settings window, click on “Accessibility” from the sidebar.
-
Find Mouse Pointer and Touch: Scroll down until you find the “Mouse pointer and touch” option. Here, you can alter cursor color and size if desired, but we will focus on custom cursors.
Step 2: Open Mouse Properties
-
Go to Additional Mouse Options: Scroll down in the “Mouse pointer and touch” settings and click on “Additional mouse options.” This will take you to the classic Mouse Properties window.
-
Switch to Pointers Tab: You will land on the “Pointers” tab by default.
Step 3: Change the Cursors
-
Select a Pointer: In the Pointers tab, you will see a list of pointer states (Normal Select, Help Select, Working in Background, etc.).
-
Choose a Cursor to Replace: Click on the pointer state you wish to change, and then click the “Browse” button.
-
Locate Your Custom Cursor: A dialog box will open. Navigate to the “Custom Cursors” folder you created earlier and select the custom cursor you want to use.
-
Repeat as Necessary: Continue selecting each pointer state and substituting the default cursors with your custom ones from the folder.
Step 4: Save Changes
Once you’ve made your selections, it’s time to save your new cursor scheme:
-
Name Your Scheme: Click the “Save As” button and give your new cursor scheme a name that is easy to recognize.
-
Apply the Changes: Click the “Apply” button, followed by “OK.” Your custom mouse cursor should now be active.
Troubleshooting Cursor Issues
While the process of changing cursors is generally straightforward, you may run into some common issues. Here’s how to troubleshoot potential problems:
Issue 1: Cursor Not Changing
If you’ve followed the steps but find that your cursor has not changed, check the following:
- Ensure that the cursor files you downloaded are compatible (.cur or .ani formats).
- Double-check that you assigned the custom cursor to the correct pointer states in the Mouse Properties.
Issue 2: Cursors Displaying Incorrectly
Sometimes, cursors may appear distorted or may not show at all. To rectify this:
- Re-download the cursor files, as they may have been corrupted during the download process.
- Confirm that the cursor files are not located in a cloud sync folder that may restrict availability.
Issue 3: Reverting Changes
If you wish to revert back to your original mouse cursor settings, simply return to the Pointers tab in Mouse Properties, select the scheme you saved earlier, and click «Apply». Alternatively, select the «Windows Default» scheme to revert completely to the standard cursors.
Creative Ideas for Custom Cursors
With the technical aspects covered, let’s explore some creative ideas to ensure your custom cursors enhance your overall experience.
Professional Cursors for Work
If you’re using your computer for work-related tasks, opting for a more muted and professional cursor design can be beneficial. Look for sleek, minimalist cursor sets that maintain clarity and focus.
Fun and Whimsical Cursors
Custom cursors can also reflect your personality. Consider using fun themes, such as animated cursors shaped like animals, cartoons, or even your favorite video game characters to add a splash of creativity to your workspace.
Seasonal or Thematic Cursors
Changing your cursor according to various seasons or holidays (like Halloween or Christmas) can be a delightful way to keep your desktop fresh. Look for cursor designs that offer seasonal themes.
Accessibility Considerations
For individuals who may have difficulties with visibility, using high-contrast cursor designs or larger pointer sizes can improve usability. There are also cursors designed specifically for accessibility, making them easier to see and use.
Conclusion
Adding a custom mouse cursor in Windows 11 is a fun and straightforward process that can significantly enhance your user experience. By following the steps outlined in this article, you can personalize your computer’s interface while also expressing your unique style. Remember to maintain backups of your cursor settings and keep your installations organized to simplify future changes.
Embrace the opportunity to make your desktop feel like your own—a little personalization can go a long way in making technology more enjoyable and tailored to your needs.
Quick Tips
- To change the color and size of your mouse pointer in Windows 11, go to Settings > Accessibility > Mouse pointer and touch.
- You also have the option to use a custom icon as your mouse pointer in Windows 11 by accessing additional mouse settings.
How to Change the Color and Size of the Mouse Cursor
There are a few default cursor options in Windows 11 if you want to change the way the mouse pointer looks. You can choose from these default options and change the color and size of the cursor. Here’s how to do it.
Step 1: Press the Windows key + I to launch the Settings app and navigate to Accessibility > Mouse pointer and touch.
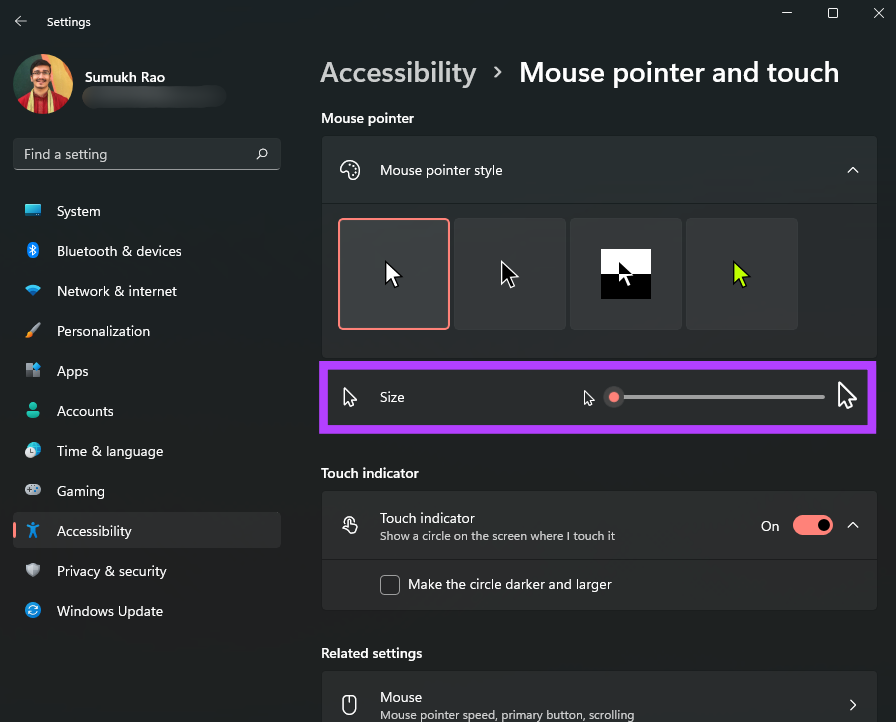
Step 2: You can choose from different types of mouse pointers. Select the one you like.

Step 3: Use the slider under the cursor style options to adjust the size of the mouse pointer.
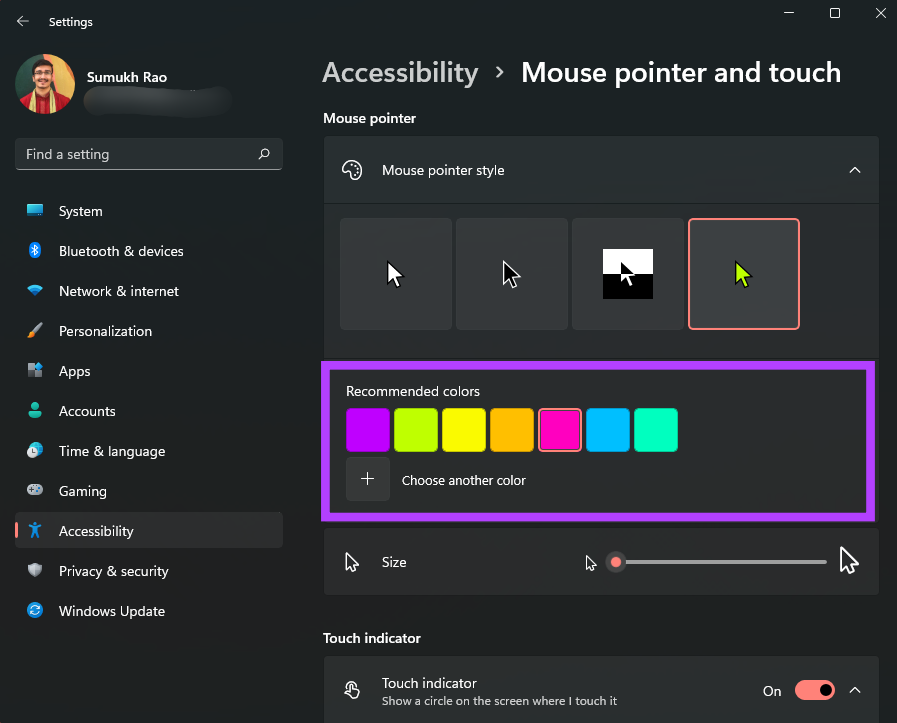
Step 4: The right-most mouse pointer style supports different colors. If the option is available, you will see a color palette to choose from.
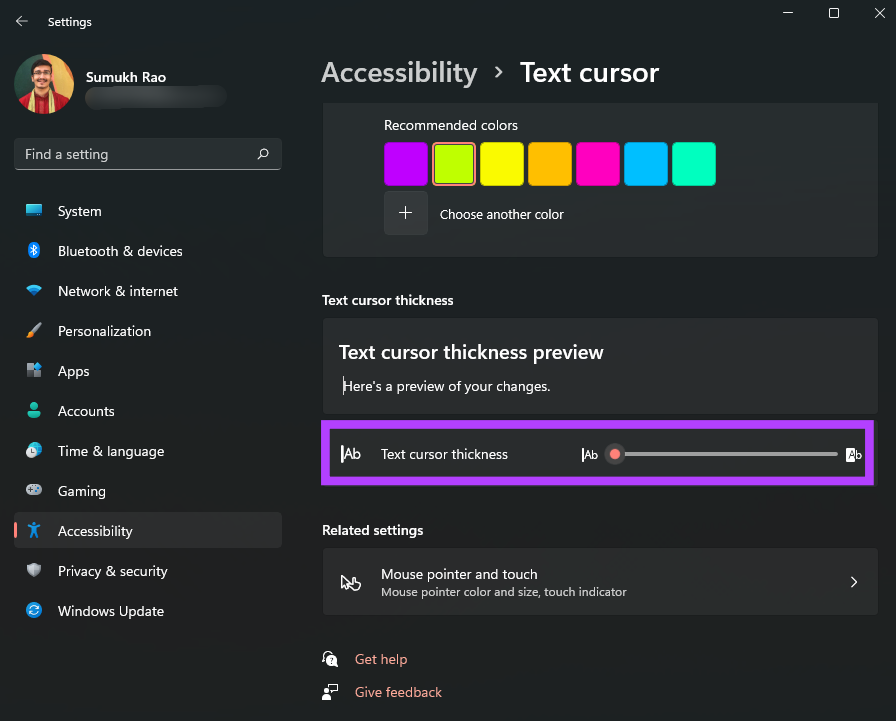
Step 5: Scroll down and click on Text cursor to modify it.

Step 6: You can enable or disable the text cursor indicator and change the color and size.
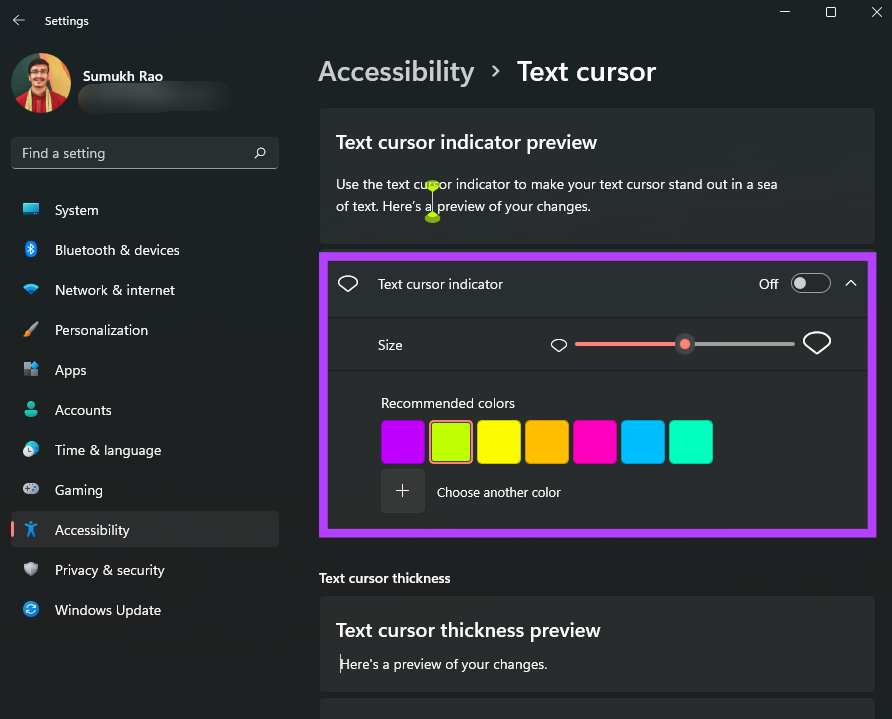
Step 7: There’s also a slider at the bottom to adjust the thickness of the text cursor.
How to Change the Mouse Cursor to a Custom Icon
If you love customizing the interface as per your choices, Windows 11 does let you completely change the mouse pointer’s look and shape as well. Here’s how to add a custom icon as your mouse pointer in Windows 11.
Step 1: Download a custom cursor pack or an icon that you wish to use as your cursor. There are plenty that you can find on the internet from various sources.
Step 2: Press the Windows key + I to launch the Settings app and navigate to Bluetooth & devices > Mouse.
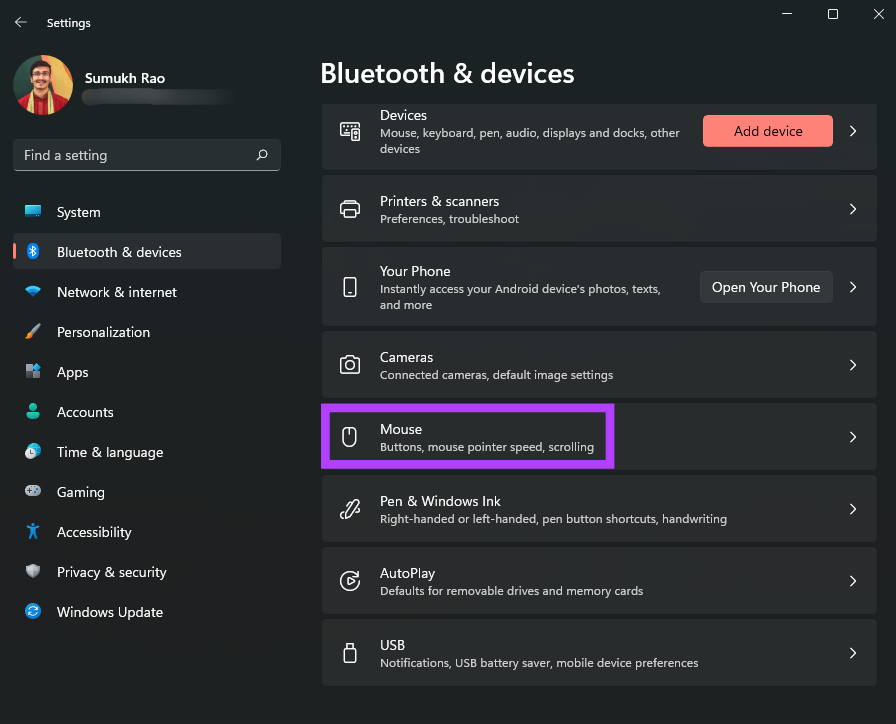
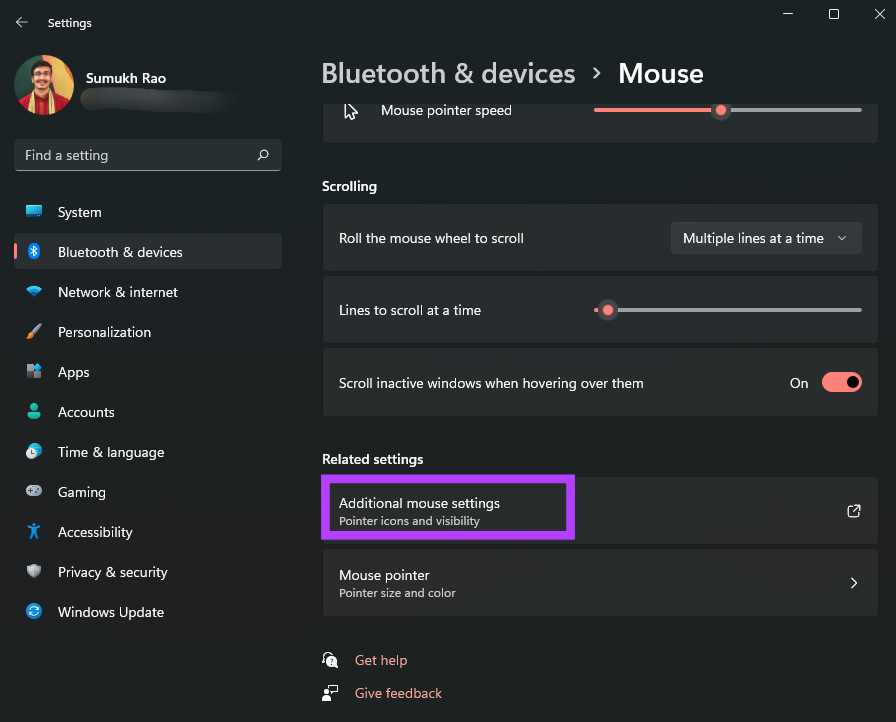
Step 3: Click on Additional mouse settings.
Step 4: Click on the Pointers tab at the top.
Step 5: In the Customize section, select the cursor type that you want to change. You can change all the cursor types listed here.
Step 6: Once you’ve selected the pointer to change, click on Browse.
Step 7: A file explorer window should pop up now. If you have downloaded a third-party cursor pack, you can navigate to the folder it is saved in.
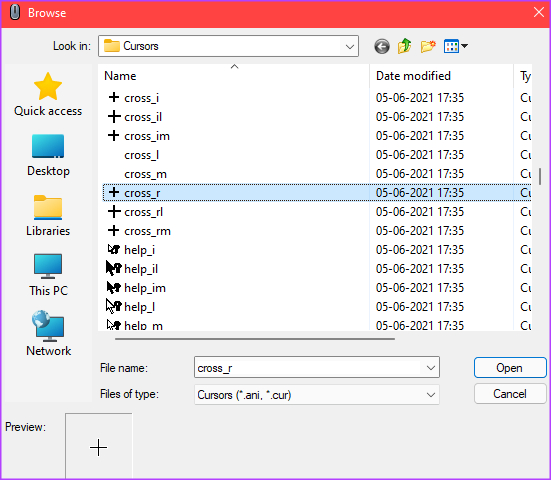
Step 8: Select the mouse pointer you want to use and then click on Open.

Step 9: Windows will change the mouse pointer to your pick. You may continue to select other options. Leave them as they are if you’re done making changes.
Step 10: After changing all the desired cursors, click on Apply and then on OK.
Windows will apply all the chosen changes to the mouse pointer. If you change your mind later, you can always follow the above steps and customize it to something else. To match your cursor customizations, check our guide on how to change icons on Windows 11 for an even more customized experience.
Was this helpful?
Thanks for your feedback!
The article above may contain affiliate links which help support Guiding Tech. The content remains unbiased and authentic and will never affect our editorial integrity.

26.08.2023
Содержание
- 1 Анимация курсора
- 2 Изменение размера и чувствительности курсора
- 3 Персонализация иконок указателя
- 4 Применение дополнительных курсоров
- 5 Оперативная настройка курсора
Необходимость разобраться в том, как изменить курсор мыши на Windows 11 может возникнуть по разным причинам. Среди таких причин отмечают работу с определенными приложениями, компьютерными играми, а также проблемы со зрением, при которых пользователь испытывает трудности распознавания курсора.
При этом новая ОС 11 версии предлагает пользователям множество вариантов для экспериментов. По желанию пользователю удастся выбрать другой цвет и размер указателя, выполняя несколько простых шагов:
- Заходим в «Настройки Windows».
- Выбираем пункт «Специальные возможности».
- Кликаем на вкладку «Указатель мыши и касание».
- Выбираем наиболее подходящий стиль и размер из актуального списка.
На выбор доступно несколько стандартных вариантов – белый указатель с черным контуром, перевернутый (такой тип курсора автоматически «подстраивается» по цвету с учетом оттенка страницы, на которую он наведен), черный с белой каемкой по краям и пользовательский (самостоятельная установка цветового оттенка).
Анимация курсора
Ховер-эффект или анимация при наведении курсора позволяет изменить стандартные решения на более интересные варианты. Таким образом, вниманию пользователя доступны следующие варианты:
- изменение изначальных цветовых оттенков;
- появление рамки, окантовки любого цвета;
- шейкер, когда указатель немного «дрожит»;
- затухание, подсветка;
- увеличение/уменьшение;
- вращение;
- тень и утолщение.
Вариантов достаточно много, а потому каждый пользователь может подобрать для себя наиболее подходящее решение, отталкиваясь от индивидуальных предпочтений.
Изменение размера и чувствительности курсора
Выбирая подходящие курсоры для Windows 11, пользователю может потребоваться выбор оптимального размера. Для этого нужно зайти в меню «Пуск», выбирая «Параметры». Затем, выполняем следующие действия:
- С левой стороны выбираем «Специальные возможности».
- На предложенной панели кликаем «Указатель мыши и сенсорный ввод».
- Выбираем пункт «Размер», где можно установить любые показатели от 1 до 15. Как правило, 1 установлен по умолчанию.
Что касается степени чувствительности, потребуется зайти в «Свойства мыши», выбирая вкладку «Кнопка мыши». В пункте «Параметры указателя» пользователи получают возможность отрегулировать точность указателя с целью исключить нежелательное дрожание стрелки.
Персонализация иконок указателя
Используя все возможности Windows 11 купить которую можно по выгодным ценам, пользователи интересуются, как можно заменить стандартные варианты курсора, выбирая собственные изображения.
Для этого нужно выполнить несколько простых и понятных действий:
- Скачиваем подходящий вариант на компьютер или лэптоп.
- Загруженный символ перемещаем в папку C: Windows Cursors.
- Выбираем необходимый вариант по уже известной вам схеме.
В результате можно создавать, добавлять собственные иконки, которые будут автоматически высвечиваться в актуальном списке.
Применение дополнительных курсоров
Все пользователи, которые выбрали Виндовс 11, автоматически получили возможность выбирать всевозможные варианты курсов для разных задач. Помимо установки дополнительных курсов, скаченных с разных интернет-порталов, можно быстро переключаться между курсорами с учетом активности.
Для установки нового указателя потребуется:
- Использовать комбинацию «Win+I» для быстрого входа в «Настройки Windows».
- Зайти в раздел «Персонализация», выбирая «Темы».
- Ознакомиться с текущей информацией, что высвечивается в верхней части экрана, нажимаем на пункт «Курсор мыши».
- В диалоговом окне системы кликнуть «Свойства», ознакомившись со всеми значками.
- Нажать «Схема», определившись с другой темой.
- Выбрать тему из предложенного списка и нажать «Применить».
С учетом всех сделанных правок значок моментально изменится. Чтобы включить режим активного курсора, достаточно нажать клавишу F7.
Оперативная настройка курсора
Выбирая «Пользовательский вариант», удастся определиться с тем списком, что был указан в пункте «Рекомендуемые цвета», нажимая на понравившийся. Если нажать «+», пользователь получает возможность применять другие цветовые оттенки. По завершению внесения всех изменений достаточно закрыть «Настройки». Таким образом, все настройки сохраняются автоматически. В отдельных ситуациях может потребоваться перезагрузка системы. Чаще всего это актуально в том случае, если пользователь самостоятельно загружал новые варианты курсора на компьютер или лэптоп.
При выборе темы потребуется нажать «Применить», что свидетельствует о выборе конкретных настроек. В системе Виндовс 11 предложен весьма разнообразный перечень курсоров с целью удовлетворить запросы каждого пользователя.
Changing your cursor in Windows 11 adds a personal touch to your computer experience. In this guide, you’ll learn how to make a custom cursor by downloading, installing, and applying a new cursor theme. This process is simple and enhances your user interface to reflect your style.
Creating a custom cursor in Windows 11 involves a few straightforward steps. This guide will help you download a new cursor pack, install it, and set it as your default cursor theme.
Step 1: Download a Cursor Pack
First, download a cursor pack from a trusted website.
You can find various cursor packs on websites like DeviantArt or Open Cursor Library. Choose a pack that you like and download the .zip file.
Step 2: Extract the Files
Next, extract the downloaded .zip file to a folder on your computer.
Right-click on the .zip file and select «Extract All.» Choose a location that is easy to remember, such as your Desktop or a dedicated folder.
Step 3: Open Mouse Settings
Now, open the Mouse settings on your computer.
Go to Settings > Devices > Mouse. Click on «Additional mouse options» on the right side of the screen.
Step 4: Change Pointers
In the Mouse Properties window, navigate to the Pointers tab.
Here, you’ll see a list of cursor roles (Normal Select, Help Select, etc.). Click on the role you want to change, then click Browse.
Step 5: Select New Cursors
Select the new cursor files from the extracted folder.
Navigate to the folder where you extracted your cursor files. Select the appropriate file for each role and click Open.
Step 6: Save Your Scheme
After you’ve customized all the roles, save your new cursor scheme.
Click «Save As,» give your scheme a name, and click OK. Then, click Apply to set your new cursor theme.
Once you’ve completed these steps, your new custom cursors will be active and ready to use.
Tips for How to Make a Custom Cursor in Windows 11
- Backup your original scheme: Before changing your cursor, save your current scheme so you can revert back if needed.
- Test different packs: Don’t be afraid to try different cursor packs to see what you like best.
- Icons consistency: Ensure your new cursors are consistent in style and size for a seamless look.
- Custom schemes: Name and save different schemes for different moods or themes.
- Accessibility: Consider using high-contrast cursors if you have difficulty seeing the default ones.
Frequently Asked Questions
Can I revert to the default cursor if I don’t like the new one?
Yes, you can revert to the default cursor by selecting the Windows Default scheme in the Mouse Properties window.
Are custom cursor packs safe to download?
Always download cursor packs from trusted websites to avoid malware. Websites like DeviantArt and Open Cursor Library are generally safe.
Do I need special software to change my cursor?
No, you don’t need special software. Windows 11 has built-in features to change your cursor.
Can I create my own cursor pack?
Yes, you can create your own cursor files using image editing software that supports .cur and .ani file formats.
Will changing the cursor affect my system performance?
No, changing your cursor will not affect system performance. It’s a simple visual change.
Summary of How to Make a Custom Cursor in Windows 11
- Download a cursor pack.
- Extract the files.
- Open Mouse settings.
- Change pointers.
- Select new cursors.
- Save your scheme.
Conclusion
So there you have it! Making a custom cursor in Windows 11 is a straightforward and fun way to personalize your computer experience. By following these steps, you can easily download and apply a new cursor theme that reflects your unique style. Whether you’re going for a sleek, modern look or something more whimsical, the choice is yours.
Don’t forget to explore different cursor packs and maybe even try your hand at creating your own. Remember, your computer is an extension of you, and customizing it makes your daily tasks more enjoyable. So go ahead, give your screen that personal touch!
If you have any further questions or run into any issues, feel free to revisit this guide. Happy customizing!
Matt Jacobs has been working as an IT consultant for small businesses since receiving his Master’s degree in 2003. While he still does some consulting work, his primary focus now is on creating technology support content for SupportYourTech.com.
His work can be found on many websites and focuses on topics such as Microsoft Office, Apple devices, Android devices, Photoshop, and more.