
Applies ToWindows 11 Windows 10
Чтобы установить новый микрофон, выполните указанные ниже действия:
-
Убедитесь, что микрофон подключен к компьютеру.
-
Выберите Пуск > Параметры > система > звук.
-
В разделе Параметры звука перейдите в раздел Входные данные, чтобы просмотреть подключенные микрофоны. Если это микрофон Bluetooth, выберите Добавить устройство.
Чтобы протестировать уже установленный микрофон, выполните приведенные ниже действия.
-
Убедитесь, что микрофон подключен к компьютеру.
-
Выберите Пуск > Параметры > система > звук.
-
В разделе Входные данные выберите микрофон, который требуется проверить.
-
В разделе Параметры ввода проверьте громкость ввода при разговоре в микрофон. Если панель перемещается во время речи, микрофон работает правильно.
-
Если панель не отображается, перейдите в раздел Тестирование микрофона и выберите Начать тест.
Открытие параметров
Нужна дополнительная помощь?
Нужны дополнительные параметры?
Изучите преимущества подписки, просмотрите учебные курсы, узнайте, как защитить свое устройство и т. д.
You’ve plugged in your microphone and want to know if it’s working at all? Here’re some tips for you to test microphone on Windows 10. Easily and quickly.
Try these tips
- How to test microphone on Windows 10?
- To install a new microphone
- To test a microphone that has already been installed
- How to fix microphone not working on PC?
Tip 1: How to test microphone on Windows 10?
Is this the first time you’ve connected the microphone to Windows 10? If so, you can follow the steps below to install the mic; If not, you can click here to see how to test a microphone that has already been installed.
To install a new microphone:
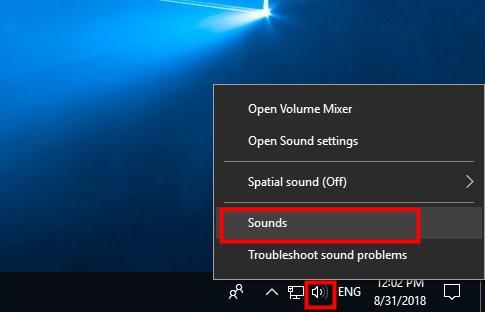
- Right-click the speaker icon on the bottom left of your screen, then select Sounds.

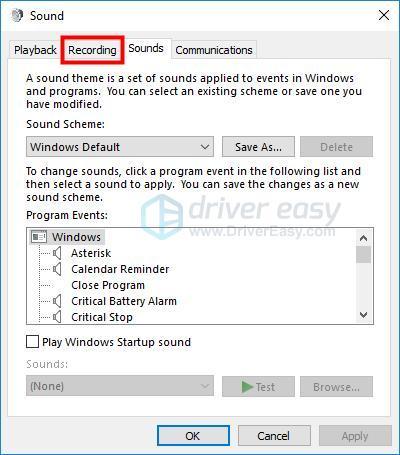
- Click the Recording tab.

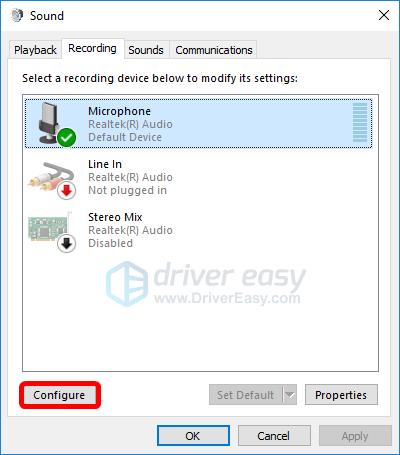
- Select the microphone you want to set up, and click the Configure button in the lower left.
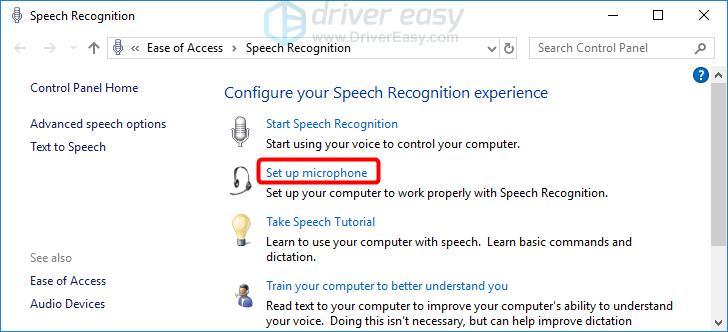
- Click Set up microphone.

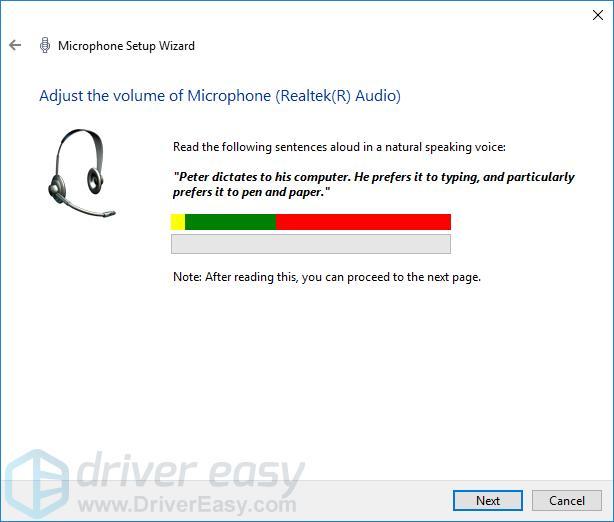
- Follow the steps of the Microphone Setup Wizard.

- When it’s complete, click Fininsh.

To test a microphone that has already been installed:
- Right-click the speaker icon in the bottom-right part of your screen, then select Sounds.
- Click the Recording tab.
- Try speaking into your microphone to test if it’s working properly. If it is, you should see a green bar rising next to it while you talk.

Another way to test microphone on Windows 10 is — if you want to speak something and quickly listen to your voices, you can use the pre-installed app Voice Recorder to test your microphone — you can refer to this article: Voice Recorder Windows 10 — How to use it & fix issues with it?
Note: If your mic isn’t working, you may need to update your audio driver.
Tip 2: How to fix microphone not working on PC?
- Update your audio driver
- Set microphone as default device
Solution 1: Update your audio driver
A missing or outdated audio driver may stop mic from working on PC. If you don’t have the time, patience or computer skills to update your audio driver manually, you can, instead, do it automatically with Driver Easy.
Driver Easy will automatically recognize your system and find the correct drivers for it. You don’t need to know exactly what system your computer is running, you don’t need to be troubled by the wrong driver you would be downloading, and you don’t need to worry about making a mistake when installing. Driver Easy handles it all.
- Download and install Driver Easy.
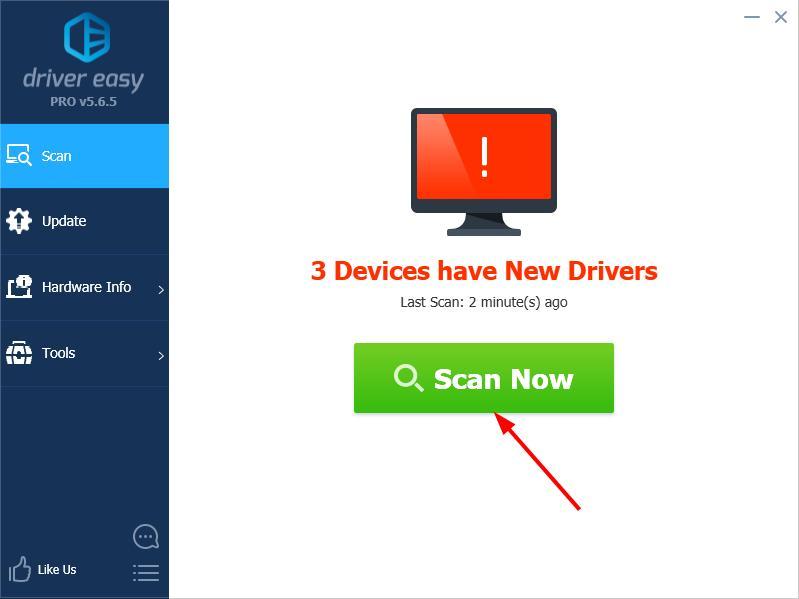
- Run Driver Easy and click Scan Now. Driver Easy will then scan your computer and detect any problem drivers.

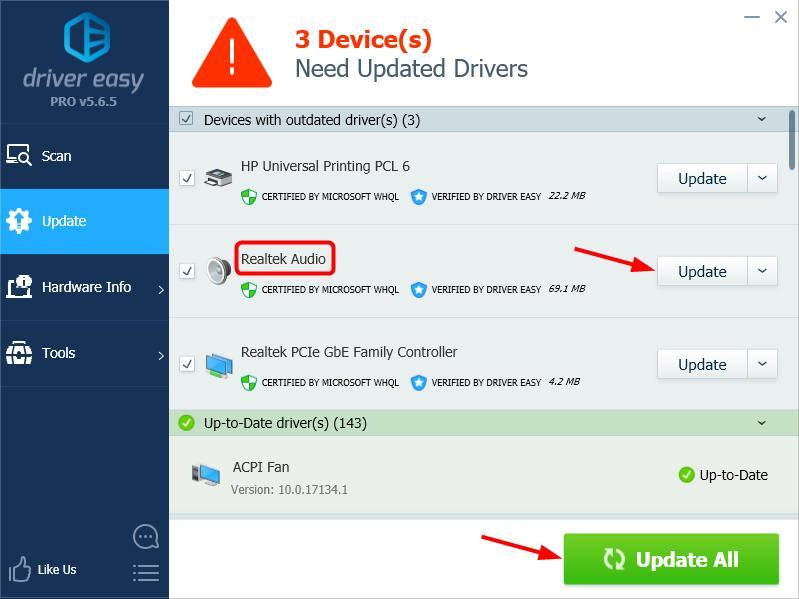
- Click the Update button next to your audio device to automatically download the correct version of its driver, then you can manually install it (you can do this with the FREE version).
Or click Update All to automatically download and install the correct version of all the drivers that are missing or out of date on your system. (This requires the Pro version which comes with full support and a 30-day money back guarantee. You’ll be prompted to upgrade when you click Update All.)
Note: If you need assistance, please contact Driver Easy’s support team at support@drivereasy.com.
Solution 2: Set microphone as default device
- Right-click the volume icon in the bottom-right part of your screen, then select Sounds.
- Click the Recording tab.
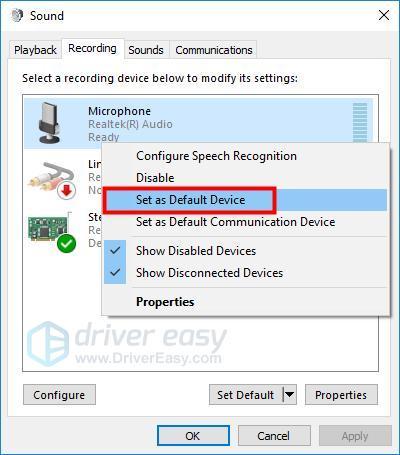
- Right-click on the device you want to use, and select Set as Default Device.
- Click OK.
If you have any question or suggestion, please feel free to leave a comment below.
In the era of remote work and virtual meetings, having a functional microphone is crucial. Whether you’re using LiveWebinar, Zoom, Microsoft Teams, or any other communication platform, the quality of your audio can significantly impact your interactions. This article will guide you through the process of testing your microphone on Windows 11, ensuring you’re heard loud and clear.

Connecting and Setting Up Your Microphone
Before you can test your microphone, you need to ensure it’s properly connected to your PC. This could be a USB microphone, a Bluetooth device, or even a built-in microphone on your laptop. If you’re using a Bluetooth device, make sure to pair it with your PC. For USB microphones, check that your USB ports are functioning correctly and that all cables are securely connected.
Once your microphone is connected, you need to set it as your input device. To do this, right-click the sound icon in the bottom-right area of the taskbar and select Sound settings. In the Sound menu, you should see your microphone appear in the Input menu. If it isn’t already, select it as your active input device.
Testing Your Microphone on Windows 11
With your microphone connected and set as the input device, you’re ready to test it. Windows 11 has a built-in tool for this purpose. Here’s how to use it:
- Open the Start menu and select Settings.
- In Settings, press System > Sound.
- Select your microphone in the Input section.
- In the Properties menu for your mic, check the input volume settings by moving the slider up or down.
- Confirm other settings, such as the audio format settings, as required.
- To begin testing your mic, press the Start test button.
- Speak into your microphone for a few seconds, then press Stop test.
If your microphone is functioning correctly, you should see a result percentage next to the Start test button. Ideally, this should be around 75% when you speak at a normal volume. If the result percentage is below 75%, you’ll need to move the input volume slider upwards to increase the volume.

Troubleshooting Tips
If you’re not seeing any microphone activity during the test, try disconnecting and reconnecting your microphone. If that doesn’t work, consider restarting your PC and running the test again. In some cases, you might need to install a driver for your microphone. Always ensure to download drivers from the official product website and run a malware scan on the downloaded files before setup.
With these steps, you should be able to test and adjust your microphone settings on Windows 11, ensuring clear and effective communication in all your virtual interactions.
Choose the Right Webinar Platform
It is also important to choose a webinar tool that will be secure and trustworthy in terms of delivering outstanding sound and video quality. LiveWebinar ensures that every communication is crystal clear, making your meetings professional and engaging. Offering also on-spot, quick customer care, LiveWebinar helps deal with the urgent technical issues of the organizers, giving them peace of mind. With LiveWebinar, not only do you benefit from top-notch audiovisuals, but you also invest in a reliable tool that protects your data, empowers your presentations, and enhances your virtual collaboration experience.
Sign up for free here and test us to see what quality and support looks like!
Also good to know:
You may be also interested in:
Due to the various problems that arise with microphones, it can often be necessary to perform a mic test, but those wondering how to hear yourself on mic in Windows 10 are often left stumped. Microsoft’s OS doesn’t make it especially intuitive to listen to microphone playback or play the microphone through speakers.
As well as testing, mic playback can be used to listen to a music player or other device connected to the microphone jack through your headphones or PC speakers. This can be useful if you have a device with poor speakers but an extensive music collection. Or you want to use your Windows notebook or tablet with connected speakers for karaoke or a megaphone. This tutorial will show you how to hear yourself on a mic and get playback from a mic so that you can do either at your leisure.
How to Hear Yourself on Mic on Windows 11
It only takes a few minutes to perform a mic test or get mic playback from an external device in Windows 10, but the feature is hidden behind un-intuitive settings menus.
- Open Sound settings
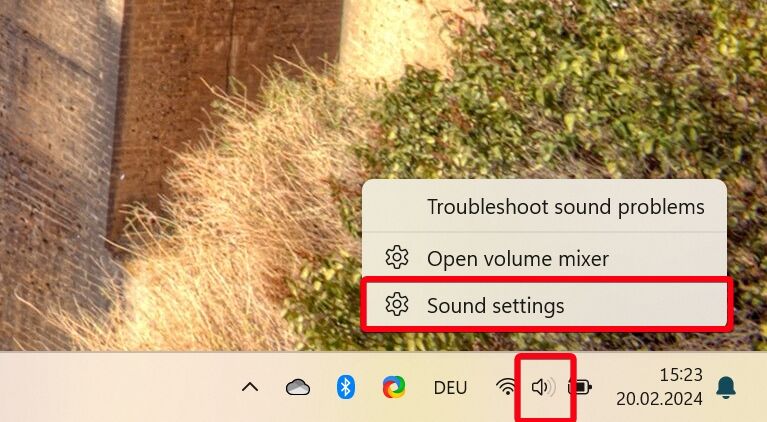
Right-click the volume icon on the bottom right of your taskbar and choose “Sound settings”.

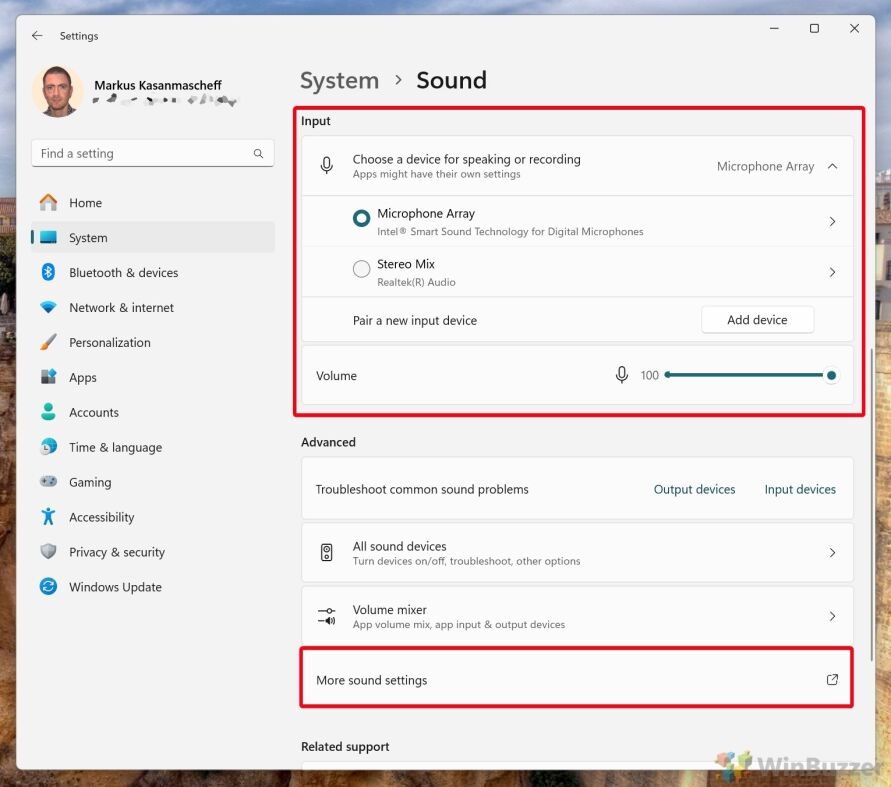
- Choose Input and open “More sound settings”
Under the “Input” heading, select your playback microphone from the drop down. Then scroll down and select “More sound settings”.

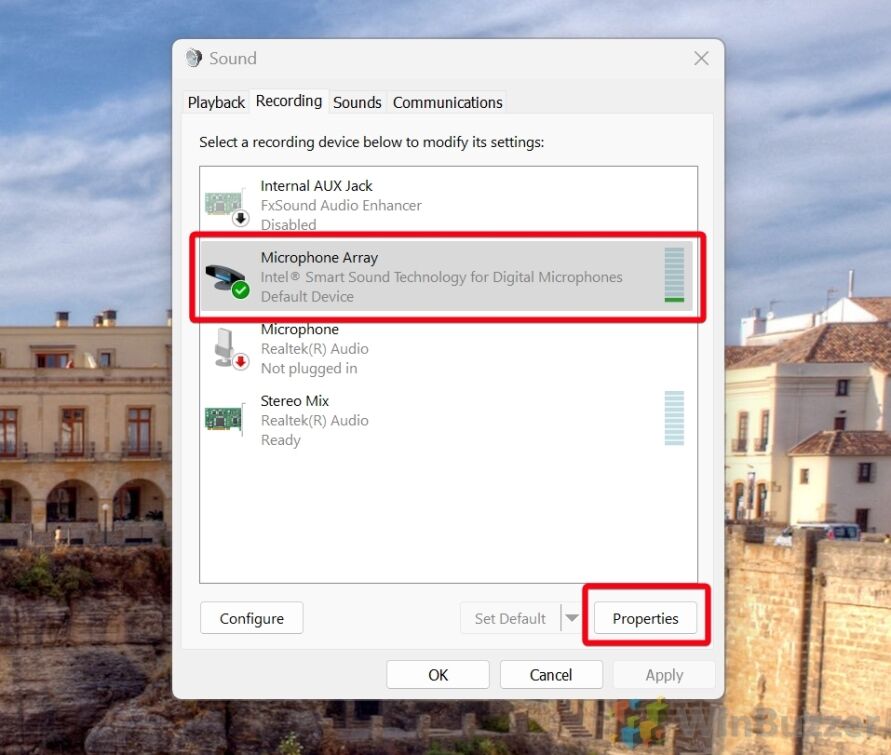
- Open Microphone PropertiesSwitch to the “Recording” tab, select your microsophone and click on “Properties“.

- Enable mic playback to hear your own mic
In the “Listen” tab, tick “Listen to this device”, then select your speakers or headphones from the “Playback through this device” dropdown. Press “OK” to save the changes. You’ll now hear your microphone through your headset or speaker.


How to Hear Yourself on Mic on Windows 10
It only takes a few minutes to perform a mic test or get mic playback from an external device in Windows 10, but the feature is hidden behind un-intuitive settings menus.
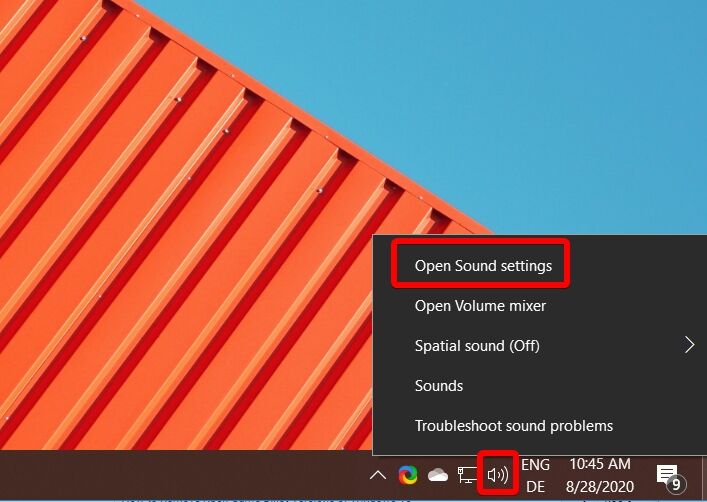
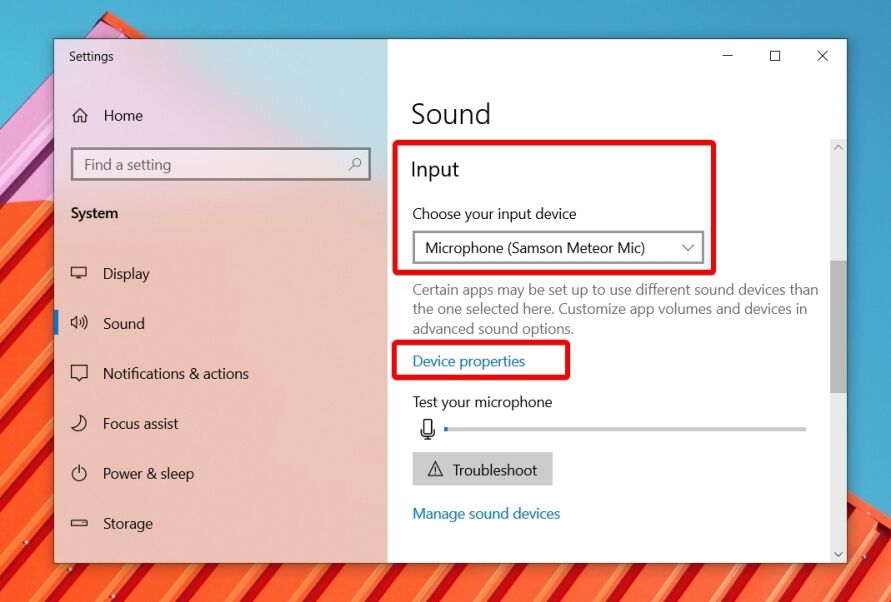
- Open Sound settings
Right-click the volume icon on the bottom right of your taskbar and choose “Open Sound settings”.

- View your microphone’s device properties
Under the “Input” heading, select your playback microphone from the drop down and then click “Device properties”.

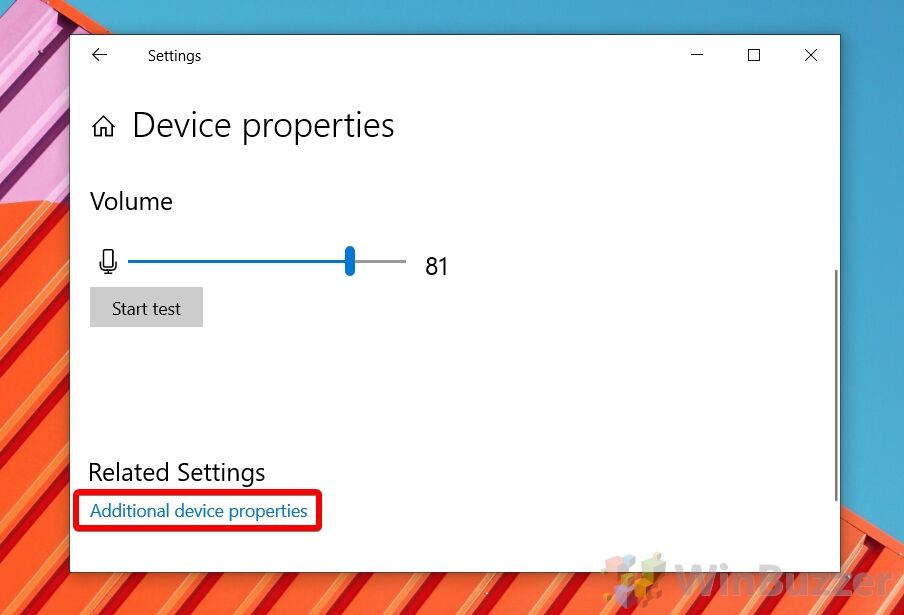
- Click “Additional device properties”

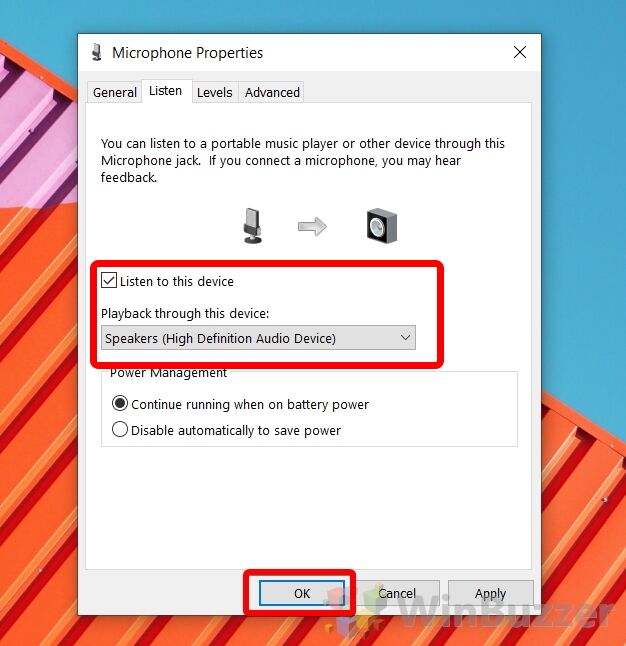
- Enable mic playback to hear your own mic
In the “Listen” tab, tick “Listen to this device”, then select your speakers or headphones from the “Playback through this device” dropdown. Press “OK” to save the changes. You’ll now hear your microphone through your headset or speaker.

FAQ – Frequently Asked Questions About Mic Playback on Windows
How can I reduce latency in mic playback to avoid hearing my voice with a delay?
Reducing latency in mic playback can be achieved by using hardware and software solutions. If you’re using an external audio interface, ensure it’s set to its lowest buffer size through its dedicated software control panel. For internal sound cards, access the sound settings by right-clicking the sound icon in the taskbar, navigating to the ‘Playback‘ or ‘Recording‘ devices, and adjusting the properties to use a lower buffer size or a faster sample rate. Additionally, consider disabling any unnecessary sound enhancements or effects in the ‘Enhancements‘ tab within the device properties as these can introduce additional latency.
Can I use mic playback to monitor my voice during recording sessions?
Yes, mic playback is ideal for voice monitoring during recording sessions, providing real-time audio feedback. This is particularly useful in scenarios requiring precise vocal control, such as singing or voice acting. To ensure minimal latency, which is crucial for effective monitoring, use an audio interface or a sound card with ASIO (Audio Stream Input/Output) drivers. Adjust the monitoring levels so that your voice blends well with the backing tracks, if any, without causing feedback or echo.
How do I switch the mic playback to a different audio device after the initial setup?
To switch your mic playback to a different audio device, first, access the Sound settings by right-clicking the sound icon on your taskbar and selecting ‘Sounds‘. Go to the ‘Recording‘ tab, double-click your microphone to open its properties, and navigate to the ‘Listen‘ tab. Here, you’ll find a dropdown menu under ‘Playback through this device‘, where you can select your new desired audio device. Click ‘Apply‘ and then ‘OK‘ to confirm the change. Remember, the device you choose must be properly connected and recognized by your system.
What should I do if my microphone is not showing up in the Sound settings?
If your microphone isn’t appearing in the Sound settings, first ensure it’s correctly connected to your computer and powered on, if necessary. Check different USB ports or audio jacks to rule out connection issues. Next, go to the Device Manager (you can search for it in the Start menu), look under ‘Audio inputs and outputs‘, and see if your microphone is listed. If not, check ‘Sound, video and game controllers‘ for any unidentified devices which might be your mic needing a driver update. If you find an unrecognized device, right-click it, select ‘Update driver‘, and follow the prompts. For USB microphones, also check under ‘Universal Serial Bus controllers’.
How can I share my microphone’s sound with others during a live stream or video conference?
Sharing your microphone’s sound during a live stream or video conference can be accomplished by using broadcasting software like OBS Studio or XSplit, which allow you to mix your microphone audio with other sources and stream the combined output. For video conferences, most modern conferencing software like Zoom or Microsoft Teams includes an option to share system audio during a screen share session; ensure your microphone is set as the default recording device in Windows Sound settings to include its audio. In OBS Studio, add a ‘Mic/Aux‘ audio source to your scene and adjust the mix levels to ensure your audience hears you clearly alongside any other audio sources.
What can I do if there’s a lot of background noise in my mic playback?
If you’re experiencing background noise in your mic playback, first attempt physical solutions like moving to a quieter location or using a directional microphone that picks up sound primarily from one direction. In your microphone’s properties within Windows Sound settings, you might find ‘Noise Suppression‘ or ‘Acoustic Echo Cancellation‘ options under the ‘Enhancements’ tab; enabling these can help reduce background noise. For more advanced noise reduction, consider using software solutions like Krisp or NVIDIA RTX Voice, which use AI to filter out background noise from your audio in real-time.
Why is there an echo when I use mic playback, and how can I fix it?
Echo during mic playback often results from the microphone picking up sound from your speakers, creating a feedback loop. To prevent this, use headphones instead of speakers when monitoring your mic playback. If using speakers is necessary, reduce their volume and keep the microphone as far away from them as possible. Additionally, check your microphone’s properties in the Sound settings for any ‘Echo Cancellation‘ options under the ‘Enhancements‘ tab, and ensure it’s enabled. In environments with hard surfaces, adding soft materials like carpets or curtains can also help reduce echo by absorbing sound.
How can I adjust the balance between my microphone input and system sounds during playback?
Balancing your microphone input with system sounds requires managing individual volume levels. Right-click the sound icon on your taskbar and open the ‘Volume Mixer‘ or ‘Open Sound settings‘ where you can find ‘App volume and device preferences‘. Here, you’ll see sliders for different applications and system sounds, allowing you to adjust their volume independently of your microphone. If you’re using communication software like Skype or Zoom, they often have their own audio settings where you can adjust the microphone and speaker levels within the application, providing more control over the balance during calls or meetings.
Is it possible to record the audio I hear during mic playback?
Recording audio during mic playback is possible but requires specific software that can capture both microphone input and system audio simultaneously. Software like Audacity (a free, open-source audio editor) can record your microphone and, with some configuration, can also record system audio at the same time. For more integrated solutions, OBS Studio allows for recording multiple audio tracks, including your microphone and desktop audio, which is ideal for content creation like tutorials or gameplay videos. Ensure you configure the software correctly to capture both audio sources and adjust the levels to balance the sound.
Can I enhance the quality of my mic playback with equalizer settings?
Enhancing the quality of your mic playback through equalization requires third-party software since Windows does not include a built-in microphone equalizer. Software like Equalizer APO, combined with a graphical interface like Peace GUI, allows for comprehensive control over your audio output, including mic playback. You can adjust frequencies to highlight or reduce certain aspects of your voice, such as bass tones or sibilance. It’s essential to use equalization sparingly, as over-adjustment can lead to unnatural sounding audio.
How do I troubleshoot issues with mic playback not working after setup?
If you’re facing issues with mic playback not functioning as expected, start by verifying all connections and ensuring your microphone and playback device are correctly configured in Windows Sound settings. Test your microphone with another device to rule out hardware issues. Revisit the ‘Listen‘ tab in your microphone’s properties to confirm ‘Listen to this device‘ is still checked and the correct playback device is selected. If the problem persists, restart your computer to resolve any temporary software glitches. Checking for driver updates for your audio devices through Device Manager can also resolve compatibility issues.
Can I use mic playback for live performances or public speaking?
Using mic playback for live performances or public speaking is feasible, but it requires careful setup to avoid feedback and ensure clear sound. Connect your computer to a PA system or external speakers, ensuring they’re positioned to minimize the chance of the microphone picking up its own output from the speakers. Test the setup at various volumes to find the optimal balance where your voice is amplified clearly without causing feedback. Consider using a directional microphone to focus on your voice and minimize ambient noise pickup.
How can I prevent feedback noise when using speakers for mic playback?
Preventing feedback noise when using speakers for mic playback involves strategic placement of your microphone and speakers, volume control, and potentially using feedback suppression technology. Ensure the speakers are facing away from the microphone and that the microphone is as far from the speakers as possible. Lower the speaker volume to the minimum level necessary for your needs, and consider using a directional microphone that captures sound from a specific direction, reducing the chance of picking up speaker output. Some PA systems and mixers come with built-in feedback suppression features that can automatically detect and reduce feedback frequencies.
What are some common reasons for experiencing low volume during mic playback?
Common reasons for low volume during mic playback include incorrect volume settings, improper configuration, or hardware issues. Ensure your microphone and playback device volumes are appropriately set in the Windows Sound settings and within any specific software you’re using. Check the ‘Levels‘ tab in your microphone’s properties to make sure the volume is set high enough and that any ‘Gain‘ or ‘Boost‘ options are adjusted to provide adequate volume without introducing distortion. If the issue persists, test your microphone and speakers with other devices to rule out hardware problems.
Related: How to Play Sound through Both Speakers and Headphones in Windows 11 or Windows 10
Playing sound through both speakers and headphones on Windows 11 or Windows 10 can enhance your audio experience, whether you’re gaming, watching movies, or listening to music. For example, you could be working at your PC but want to play your music for others in the house. Or, perhaps you’re producing music or a podcast and need to check what it sounds like on multiple devices. In our other guide, we show you how to use multiple audio outputs in Windows 11 or Windows 10 at the same time.
Related: How to Use Stereo Mix to Record System Audio on Windows 11 and Windows 10
Stereo Mix is a lesser-known, yet incredibly powerful feature embedded within the Windows operating system that allows you to record internal audio seamlessly. This feature is especially useful for content creators, educators, and anyone looking to capture system sounds, gameplay audio, or audio from online sources without the need for external recording devices. In our other guide, we show you how to enable Stereo Mix in Windows 11 and Windows 10 and how to use the feature to record system audio with recording apps and audio editors like Audacity.
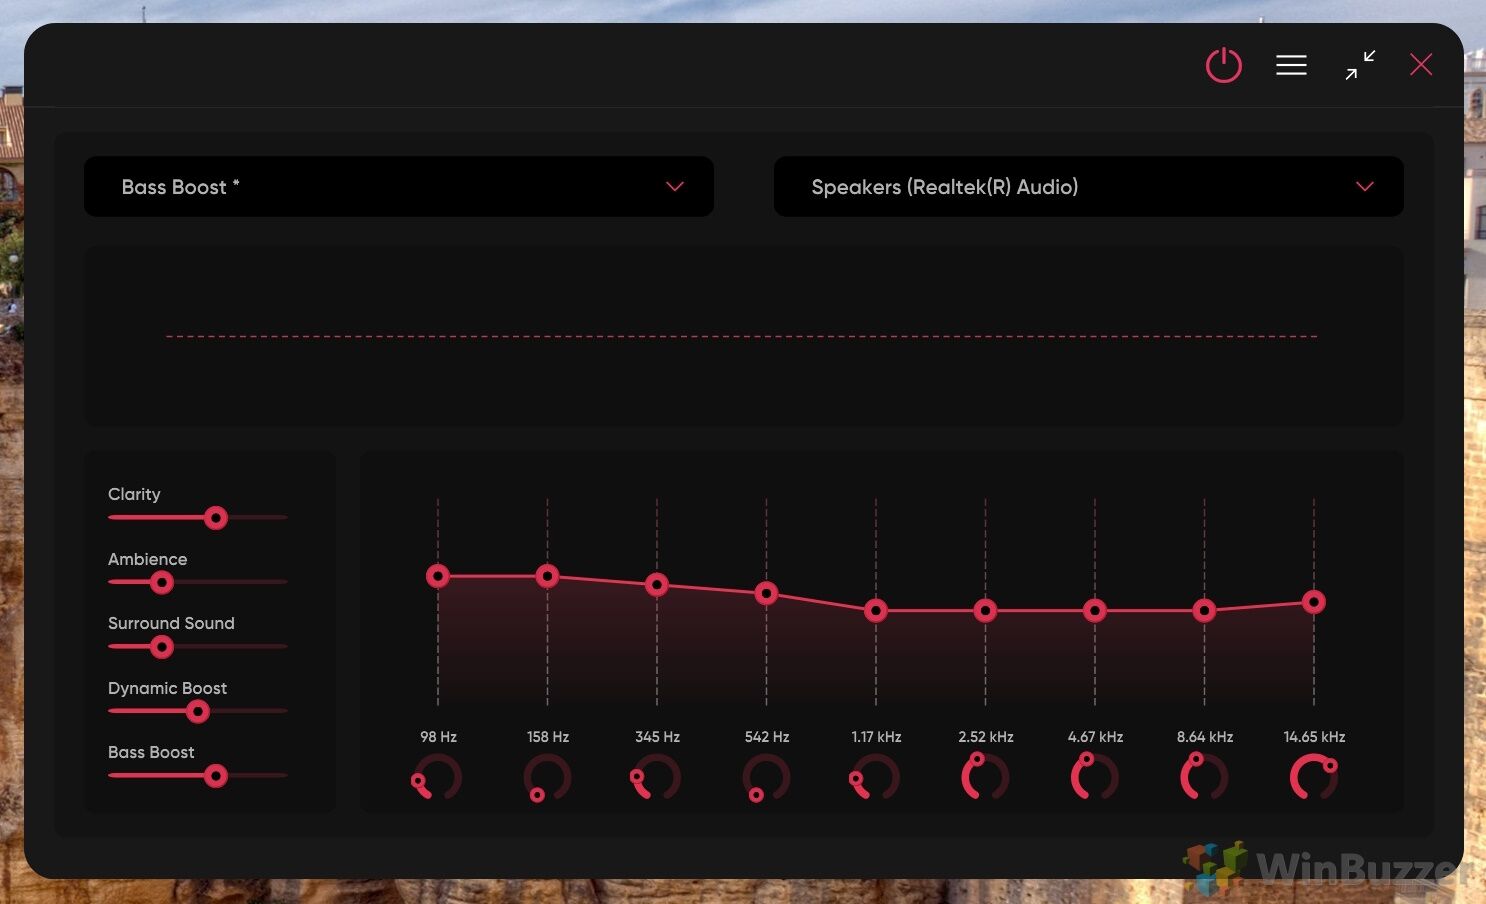
Related: The Best Free Windows Sound Equalizers
Navigating sound equalization on Windows 11 and Windows 10 can be a bit perplexing, primarily because Windows itself doesn’t offer a built-in audio equalizer. This absence often leads users to wonder about their options for customizing audio settings. Windows has no built in sound equalizer, but there are different free options available. In our other guide, we show you the best free Windows equalizers and help you decide which one to choose.
Last Updated on November 7, 2024 10:14 pm CET