
The Download
- The BIOS is a built-in tool that lets you select a speed and temperature threshold.
- You can also use the SpeedFan program for Windows 10 fan control.
- Another option is to use a fan controller. These can have touchscreens for controlling the fan speed.
This article explains how to control the CPU fan speed on Windows 10.
How to Control the CPU Fan on Windows 11
What Type of CPU Fan Do You Have?
Before you can officially take control of your CPU fan speed, you need to make sure that its connector lets you do so:
This involves opening your computer case. Wear an anti-static wristband or periodically touch something metal like the case to ground yourself and prevent static from shorting any of the hardware components.
-
Turn off the computer and disconnect the power cable from the wall.
-
Remove the side panel. There should be some screws that, when removed, let you pop the panel off.
-
Find your CPU cooler. It will likely be in the top third of your motherboard. Its fan should have a cable that runs away from it.
The end of that cable will tell you everything you need to know. If it’s a four-pin connector that plugs into a similar-looking cable before reaching the power supply unit (PSU), it’s plugged in using a two or 4-pin Molex connector.
If it’s a thinner cable that runs to your motherboard with a 3-pin female connector on the opposite end, then it’s a DC fan. If it runs to a 4-pin female connector, it’s a PWM fan.
Motherboard Fan Connectors: What They Are and How They Work
Here’s a quick explainer about those different types:
- Molex connectors take all their power from the PSU. They cannot be dynamically controlled and can only be limited using a resistor cable.
- 3-pin DC connectors also run at full power, but your motherboard can limit the voltage going to them, letting you change the speed.
- 4-pin PWM (pulse width modulation) can be dynamically controlled by software and hardware.
Use the BIOS for CPU Fan Control
The BIOS offers Windows 10 fan control options. Every BIOS is different, meaning the directions for controlling the fan may differ from computer to computer. Look for a tab or screen associated with Hardware monitoring, such as one called PC Health Status.
How to Enter BIOS
Look for a section that mentions CPU Fan. Then, try some of the settings below to see what adjustments you can make.
- Set the fan to your fan type (DC or PWM).
- Select a mode, such as Full speed, Performance, or Silent.
- Set a temperature threshold. Typically, you don’t want a CPU to go over 70 degrees, so make sure that your CPU fan runs fast once it gets that hot and preferably spins up quicker at lower temperatures.
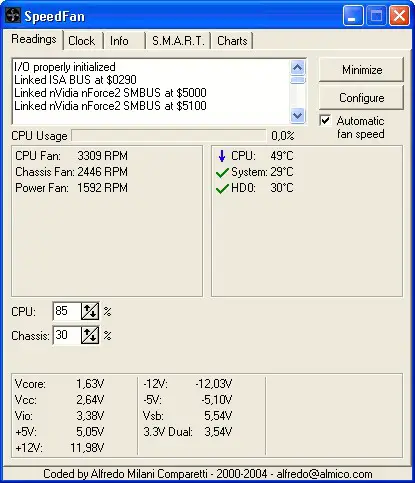
Use SpeedFan to Control the CPU Fan
If your motherboard can dynamically control fan speeds, you may be able to make deeper adjustments with third-party software. One of the most popular options is SpeedFan.
Monitor temperatures carefully! Setting fan speeds too low can overheat the computer.
-
Download SpeedFan and then install it like you would any other program.
-
Select Automatic fan speed to have SpeedFan automatically control your system. Otherwise, choose Configure and then select the Advanced tab.
-
Choose your CPU from the drop-down menu. The labeling isn’t ideal, so you may need to play around to find the right one for your system.
-
Find your CPU fan on the list based on what cable it connects to your motherboard and what port it connects to. Then set that to Manual by selecting the menu at the bottom, next to Set to.
To control every fan in your system, set them all to Manual.
-
Select OK and head back to the main SpeedFan page. Use the arrow keys next to your respective fan(s) to adjust the speed up and down. If it’s working correctly, you should see the RPM increase or decrease and hear your PC get louder or quieter, respectively.
Windows 10 Fan Control With a Fan Controller
If you want even more control over your CPU fan, consider a fan controller. Cases like NZXT’s H-series i versions have a built-in link box that gives you software control over your CPU fan, much like SpeedFan, but it’s even easier to use.
This solution also adds support for RGB lighting and multiple fan configurations, profiles, and fan curves.
Standalone fan controllers can give you more tangible controls. Some, like the Thermaltake Commander FT, provider touchscreen controls for the the computer’s various fans, and others have physical knobs and dials you can use to control them.
Thermaltake Technology Co., Ltd.
You’ll need to follow the included instructions for those, as their setup and management are unique to their respective designs.
When to Control the CPU Fan
If your PC is running fine and the fan noise doesn’t bother you, then no, there’s no need to change your CPU fan settings. But adjusting fan speeds can give you more control over how your system behaves if that’s important to you.
Maybe you prefer a quieter setup with the fan only speeding up when the temperature rises. On the other hand, keeping it at maximum speed all the time can help keep your CPU cool, which could allow for better overclocking.
FAQ
-
First, you’ll need to remove any ducts or ventilation systems above the CPU fan. Disconnect the fan power wire from the motherboard by pulling on the connector cable, not the wire. Remove the heat sink from the processor by unlatching the clip holding the heat sink in place. This should require little upward force.
-
To fix a CPU fan error, move your computer somewhere cooler to reduce the effects of overheating. Clean its air vents of any dust and debris, and clean the CPU fan. If you installed the CPU fan yourself, ensure it’s in the correct location. You may need to replace a faulty CPU fan.
-
To fix a computer fan that’s loud or making noise, start by cleaning the CPU fan with compressed air while ensuring the computer is upright and powered off. You should also clean the power supply fan and any case fans. You should also check Task Manager for processor-intensive programs that are driving CPU usage beyond its limits.
Thanks for letting us know!
Get the Latest Tech News Delivered Every Day
Subscribe
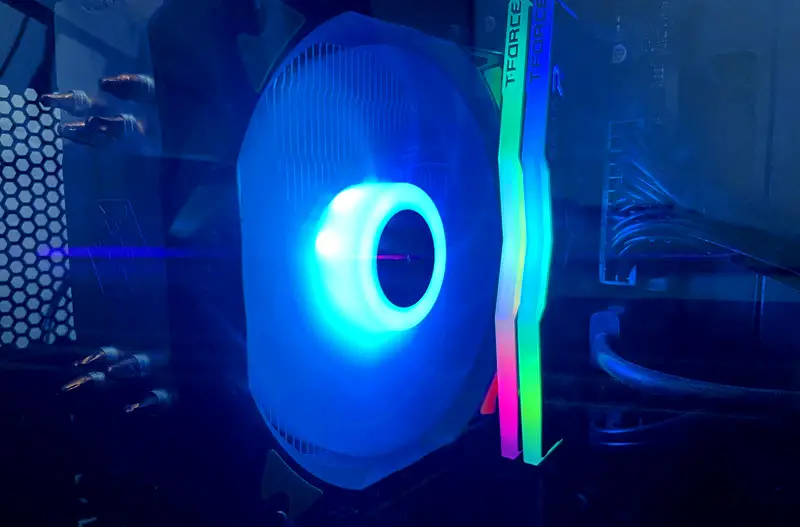
All the major hardware components of a PC, majorly CPU & GPU, generate an immense amount of heat during their working, especially when heavy resource-consuming applications are running. Heat is the main culprit behind permanent hardware damage due to over-heating, as dust just works as a catalyst for it. Primarily, an effective cooling system is required to handle the heating issues. To solve this issue, CPU fans are introduced, which cools down the heating effectively & efficiently. Today, a large variety of fans are available in the market, from small capacity to high capacity. And the PC fan speed is controllable by using various applications. So, keep reading this article to know how to perform fan control Windows 10 in detail.

A CPU fan is a crucial part of the computer hardware found in the motherboard, which can be a life-saver. Its most heroic function is to continuously cool down the hot CPU and prevent it from permanent damage due to burning out. It’s the CPU fan that saves the CPU and other nearby components from damage due to overheating and keeps the PC running.
- It not only provides cooling but also prevents dust from accumulating in the CPU.
- The power of CPU fans is measured in RPM, which decides the PC fan speed.
- It can be detached from the CPU and then attached back to the motherboard after cleaning.
- Higher the RPM higher the power of cooling. Also, gamers, graphic designers, animators, and VFX designers need the highest capacity and high-power fans to cool down their scorching CPU.
Fans are connected to the motherboard by:
- 3-pin DC connector: Speed can be altered by limiting the voltage.
- 4-pin PWM (Pulse Width Modulation) connector: Speed can be controlled using software easily.
We are here with the guide on how to control fan speed in Windows 10 and how to change CPU fan speed without BIOS. Follow these methods to control pc fan speed:
Method 1: Change Fan Speed Through Power Options
It is the only method in Windows 10 to optimize the fan speed. Follow these steps to perform the same.
1. Press Windows + X keys to open the Quick Link menu and select the Power Options.
2. Under Power & sleep menu, click on Additional power settings situated in the right pane.

3. This will open Power Options, and now click on Change plan settings beside Balanced (recommended).

4. Now, the Edit Plan Settings window appears. Click on Change advanced power settings.

5. This action will open a dialog box of Power Options containing services of different system components.
6. Scroll down and double-click on Processor power management.
7. Then, double-click on System cooling policy and choose Active from the drop-down menu in both On battery & Plugged in modes.

8. Now click on Apply then OK.
Note: Make sure to Activate the system cooling policy on both Battery & Plugged-in mode to fetch maximum fan performance.
It is the only method in Windows 10 OS that will help you in fan control Windows 10.
Also Read: 7 Ways to Fix CPU Fan Not Spinning
Method 2: Use SpeedFan Software
SpeedFan is a hardware monitoring program that is able to change fan speeds according to system temperatures. SpeedFan can read S.M.A.R.T. values and temperatures from the hard disk and can change the fan speed.
Note: This application will not detect all fan models. If you can’t find the fan listed there, then this method will not work. Also, do not alter the default CPU clock settings and other important settings of CPU, GPU & HDD to avoid causing trouble in the system.
1. Download SpeedFan 4.52 from the official website.

2. Then, install the downloaded app on your PC and launch it.
3. Now click on Configure.

4. Navigate to the Fans tab and see if the system fan is listed there.
Note: If any fan is detected by the program, then it will show it under the red-highlighted area, as shown below.

5. If you found the system fan listed there, then select it and explore the options it shows. After modifying the speed of the fan. Click OK.
Also Read: How to Check Your CPU Temperature in Windows 10
Method 3: Use HWiNFo Software
HWiNFo is an award-winning professional hardware analysis, monitoring, diagnosing, and reporting software for Windows and DOS. It is a highly trusted software that is even used by NASA. This real-time system monitoring software has won several awards and is trusted by Intel, AMD, Dell, and Asus. It is also totally free.
Follow the upcoming steps to install this software on your PC to learn fan control Windows 10:
Note: Do not change default system settings related to CPU, GPU & HDD. It may result in system instability. Only alter fan speed if you are sure about it.
1. Download HWiNFo portable or installer version from the official website.
Note: Portable versions run directly without installation.

2. Launch the application. Now, select the Sensors-only option and click on Run.
3. Wait for the program to fetch all the hardware-related information.
Note: This software does not detect the fan in our laptop due to some other reasons. That doesn’t mean it will not work for others also.
4. Once it is open, locate a Fan logo on the bottom and click on it.
5. Here you’ll find the specifications of the CPU fan, including its speed, RPM, temperature, etc. Choose the settings carefully and alter them with caution and follow the on-screen instructions.
Here, we explained the most possible working methods which can be the solution of how to change CPU fan speed without BIOS and that can be helpful in controlling PC fan speed in Windows 10.
Recommended:
- How to Test PSU with Multimeter
- 11 Best WiFi Temperature and Humidity Sensor
- Top 18 Best Fan Speed Controller Software
- Fix Windows 10 Bluetooth Mouse Lag
We hope that this guide was helpful and you were able to learn to control fan speed in Windows 10. Let us know which method worked the best for you. If you have any queries or suggestions, then feel free to drop them in the comments section.
If your CPU fan is making too much noise or it’s not running fast enough to cool down your PC, it’s time to change its speed.
Though you can change the CPU fan speed through BIOS, this article covers how you can achieve that without it.
It’s possible that you’re unable to change it via BIOS or you don’t want to mess up the process and brick your PC.
If you’re running Windows 10 or 11 on your desktop or laptop, this article will show you how to change CPU fan speed without BIOS.
Also, most of the tools allow the users to adjust, control, and monitor the CPU fan from the Operating System level without accessing BIOS – that means – we don’t need to restart the computer.
Why Should You Change the CPU Fan Speed?
If your CPU fan is unable to cool down your desktop components, you need to increase the speed. Doing so will result in better internal airflow inside your device. This can save your PC from overheating.
If your CPU fan is not functioning at the rate it’s supposed to, it’s necessary for you to manually increase the speed for cooling down.
On the other hand, if your fan is making too much noise, you may want to decrease its speed to an optimal level. However, keep in mind that reducing it too much may cause overheating.
Yes, it’s certainly possible to change the fan speed without accessing the BIOS. Though it’s still the recommended method of doing it, it’s not a requirement anymore.
There is a bunch of software and external hardware in the market that lets you control your CPU’s fan speed. We’ll talk about them in a moment.
There are multiple methods and products you can use to change the fan speed of your CPU. We will cover each one in-depth and tell you which one will be best for you so stay with us.
Method #1: Use CPU Fan Speed Monitor Software
Using software to control and change your CPU fan speed is pretty convenient. Especially if you’re not so techy, you don’t want to make mistakes and damage any of your PC components. With the proper software, you can just click buttons to monitor the fan speed.
That being said, using the software still needs some learning to do. That’s why our advice to you is to NOT skim through any of these parts and read them carefully. We will cover the best CPU fan speed software out there so that you can choose the one that fits your needs the best.
Fan Control
Fan Control is a highly customizable fan-controlling software dedicated to Microsoft Windows. It doesn’t require any installation on your side which makes it a perfect choice for beginners. It’s also completely free.
Since this will be your first time using a CPU fan controller software, we will guide you through the whole process of installing Fan Control.
Installing Fan Control
- Download the latest version from the official website.
- Extract the downloaded .zip file using software like 7zip to your desired location.
- Start the FanControl.exe application ( No installation required)
Features
- Easy and quick setup
- Low on resources
- Configurable graphs temperature range
- Various temperature sources such as CPU, GPU, motherboard, hard drives, etc
- Multiple fan curve functions
- Advanced tuning with steps. % for starting, stopping, hysteresis, and response time
- Mix fan curves or sensors together
- Customizable UI
- Ability to own multiple configurations
Fan Control also offers plugins so that you can inject any type of sensor into it.
If you’ve never used fan speed software before, this is our top recommendation for you.
SpeedFan
SpeedFan is another popular software for monitoring your computer’s fan speed. Apart from that, it can also report –
- The temperature of the chipset, CPU, and power circuits
- Voltages
- Hard Disk SMART data comparison
- Hardware health data, and statistical values
With SpeedFan, you can either set it to automatic mode which will control your fan speeds itself. However, you also have the freedom to manually set the configurations to your need.
If you consider yourself well-versed with CPU hardware, it’s always best to set it up yourself. But beware that the wrong settings can damage your components. So follow an expert guide to set up the software.
SpeedFan hasn’t received many updates in recent times. So the first thing you need to do is check your motherboard’s compatibility.
NoteBook FanControl
NoteBook FanControl is a cross-platform user-friendly fan control software. Its ability to adjust to different desktop models makes it a powerful tool for controlling your fan speed.
Installing and configuring it is super simple.
- Download the installation files from here.
- Run the NBFC installer file.
- Run NoteBook FanControl.exe
- Select one of the configs and press Apply. That’s it.
NBFC automatically starts controlling your system. You can edit the config in the Config Editor to suit your need.
NOTE: If you have Secure Boot enabled, make sure to disable it first.
HW Monitor
HW Monitor is a hardware monitoring program that reads the main PC system health sensors.
Some of its best features include –
- Monitoring CPU and GPU-level hardware
- SSD/hard disks monitoring via S.M.A.R.T.
- Memory modules with thermal sensors monitoring
The setup file comes with an installation guide which you can follow for setting it up properly. HW Monitor is regularly updated so your laptop or computer should be compatible with it.
ZOTAC FireStorm
FireStorm is an advanced fine-tuning software from ZOTAC that is designed to easily adjust your CPU elements. These include
- Fan control
- Memory speed
- Clock speed
- GPU monitoring
If you’re already using ZOTAC hardware, this software can be your best choice since you will the highest compatibility.
Other Mention Worthy Software
We’ve gone through some of the best fan control software out there. There are many others we won’t cover in-depth but they are worth mentioning. You can check them out –
- MSI Afterburner
- Open Hardware monitor
- Argus Monitor
- HWiNFO
- EasyTune 5
- Corsair Link
- Thinkpad Fan Controller (TPFanControl)
Method #2: Use an External Fan Controller Device
If you don’t like the idea of using complicated software for adjusting the CPU fans, you can opt for external fan-controlling tools. They are easier to set up, don’t need much technical knowledge, and work as well or even better than software.
Here are some of our recommendations you can look at –
Noctua NA-FC1
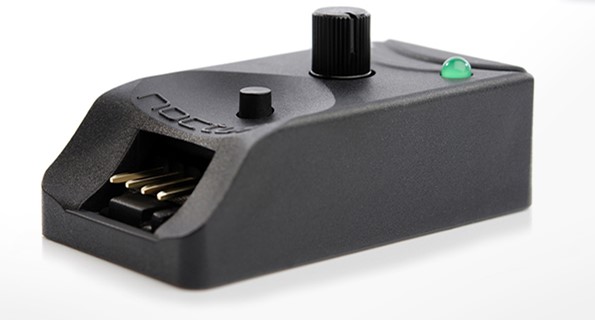
Noctua NA-FC1 is a Pulse Width Modulation-based, a compact speed controller for 4-pin PWM fans.
You can use its own configuration or manually reduce speed yourself.
Features
- PWM-based control enables more efficiency in controlling speed. The fan’s starting voltage doesn’t matter.
- Manual control for setting PWM duty cycles.
- Lowering the motherboard’s PWM control curve to ensure silent operation. This is especially helpful for high-speed PWM fans.
- Control up to three 4-pin PWM fans with the 3-way splitter cable.
- Power supply adaptor to keep your motherboard safe.
- A solid 6-year manufacturer’s warranty
Get the Noctua NA-FC1
Thermaltake Commander F6
Thermaltake’s Commander F6 RGB is a gorgeous system temperature and fan speed control device.
With 16 different illumination display colors, it can make monitoring your desktop or laptop’s internal measurements a breeze and fun. You can also personalize your visual environment to suit your taste.
Features
- Adjustable Output Voltage.
- Detail monitoring of the temperature and control fan speed accordingly.
- Six 30W separate fan control channels allow precise cooling control with minimal noise.
- The built-in alarm function will notify you about malfunctions and overheating.
Get Thermaltake Commander F6
CORSAIR Commander PRO
The CORSAIR iCUE Commander PRO promises to turn your PC’ case into a smart case. Get flexible control over your system’s performance. Set up fan curves that adjust according to your device’s needs.
Features
- Control up to six case fans.
- Allows for up to 6x 3-pin DC or 4-pin PWM fans
- Zero-RPM fan mode for total silence operation
- Two customizable RGB lighting channels
- Four repositionable temperature sensors for accurate monitoring
Get CORSAIR iCUE Commander PRO
Which Fan Speed Controlling Method is Best For You?
Although it’s recommended to change the fan speed using BIOS, it’s understandable if it doesn’t work sometimes.
If you’re tight on budget and don’t mind going through some expert tutorials, you can get one of the software we mentioned.
If you want more convenience and freedom in controlling the CPU fan speed, getting an external speed controller is the way to go.
What Speed is Good For Your CPU Fan?
An optimal speed that keeps your PC cool enough but is also not too loud
You generally set fan curves according to your preferences based on noise and temperature. It’s certainly not universal, and random numbers are not helpful when you run a completely different setup than someone else.
Some users like to set their fans to 600rpm unless it gets really hot during summer, then they set a higher RPM.
Other users set it so that the max daily temperature stays under 75 °C and if they have thermal headroom then they lower the fans to lower the noise.
As you can see it depends on your device, room, and geography, among other factors.
So our advice for you is to make your own fan curve accordingly.
Read Also: What are red USB Ports on the Motherboard
This article shows you the different ways you can change the CPU Fan speed without BIOS in Windows 10 and 11 machines. It’s crucial that you have access to multiple ways to control the CPU fan speed so that if one method fails, you can rely on the other.
If you have any questions regarding CPU fan speed or any tool we mentioned here, let us know in the comments down below.
Want to keep your PC running smoothly and quietly? Understanding how to control fan speed on Windows can be crucial, whether you’re trying to reduce noise or prevent overheating. While your computer’s fans automatically adjust speed based on system demands, you might sometimes want more control.
In this guide, we’ll walk you through the built-in methods for managing fan speeds using the Control Panel and BIOS and explore some of the best fan control software options available. Read on to learn how to fine-tune your PC’s cooling system for optimal performance and comfort.
The Ultimate Guide to PC Fans: Types, Functions, and More
It can be helpful to understand the kinds of fans that are in your PC, and what they do, before you learn how to control fan speed on Windows. Most fan controls are specific to the CPU, but knowing all the options can be handy if one of them malfunctions. Most PCs have the following fans:
- CPU fans: These fans are located on the central processing unit. They move air away from the processor. They may also bring in cool air, as they move the hot air that is blown out by the case fan.
- Case fans: They get rid of the hot air released into the PC casing by other fans, keeping it from overheating.
- GPU fans: These also bring cooler air into the PC, pushing hot air out, which will then be blown out by the case fan.
- PSU fans: These are for the power supply unit, which creates a lot of heat due to its heavy power demands. This fan moves cooler air into the PC and moves heat out.
- Laptop fans: This guide will be discussing PC fans, specifically, but it is worth noting that laptop fans work very differently, with fans usually located beneath the laptop, blowing the air inside.
How to Find out What Kind of CPU Fan You Have
Locating your fans can be useful for troubleshooting or repair purposes. Here are the steps:
- Turn off your computer and unplug the power cable.
- Remove the PC panel on the left side (when you are facing the computer). You will likely see a few screws that will need to be removed.
- Locate your CPU cooler. It should have a fan on it with an attached cable. It is likely mounted on top of your CPU.
- Look for any model number, brand information, or other identification. This will help you research specific troubleshooting tips and can even be useful when you need to replace this part.
- If you’re having trouble identifying the CPU fan, or it’s too difficult for you to see, contact the manufacturer of your PC for information. Be sure to have your PC model information close by, so they can look up the corresponding hardware for you.
Simple Ways to Manage Fan Speed on a PC
Now that we have all the basics out of the way, it is time to get into the nitty-gritty details. If you are eager to learn how to control fan speed on PC Windows, be careful. This is a delicate system and if your PC or laptop overheats, you might permanently damage the hardware. That being said, there are several troubleshooting tactics to control your CPU fan speed.
Method #1: Control Panel
By adjusting your laptop or PC’s power settings, you can lower the workload placed on your system. This means the fan doesn’t have to work as hard to keep everything cool, which improves performance. Here are the steps:
- Search for Control Panel from the Start menu, then click it in the results.
- Within the Control Panel, search for and click on Hardware and Sound.
- Find and click Power Options and a new window will pop up.
- Click Change Plan Settings.
- Click Change Advanced Power Settings and a new box opens
- Go to Process Power Management and click the + sign to reveal options
- Click System Cooling Policy and make sure it is set to Active
- Save changes by clicking Apply and then Ok
Method #2: BIOS
BIOS (Basic Input/Output System), is a program motherboards use to manage data between the computer’s OS (operating system) and attached devices, such as the keyboard, mouse, and printer. There’s a lot more to it, but for our purposes we’ll discuss how BIOS helps control fan speed. UEFI (unified extensible firmware interface) is very similar to BIOS but is found in newer computer models. It does mostly the same things, it’s just more advanced. For this article, we’ll be using the term BIOS, but UEFI could easily be substituted.
Most BIOS allow you to see and adjust the speed of your CPU fan. Here’s how:
Warning: Always be careful when dealing with the BIOS utility. It’s easy to do something wrong and cause a huge headache for yourself. Follow these steps carefully and you’ll be fine.
1. Turn off your computer.
2. Turn your computer back on, and repeatedly press whatever key launches the BIOS settings. Depending on the model of your system, the key might be different. Try F2, F10, F12, Delete, or ESC. You should be able to look up the exact key if you know your model information.
3. Find the menu that shows the settings for the fan. Every PC is different. It could be under Overclocking, Advanced, Hardware Monitor, PC Health, Fan Control, etc.
4. Find something similar to CPU Fan Speed Control, then toggle this to enabled if it isn’t already.
5. Select your desired fan speed, which is often expressed in a percentage, meaning 100 percent is maximum speed. Note: There are other fans in your system besides the CPU, such as a GPU (graphics processing unit) fan, etc. to take note of.
6. Save your changes before leaving BIOS.
Method #3: Third-Party Software
Another method to consider for how to control fan speed on Windows is through the use of a third-party app. Which one you use depends on your hardware and Windows version. There are various kinds of third-party apps out there that can help control your fan speed. We’ve narrowed down the most popular and helpful options, but feel free to do your own research and pick what you think is best.
Here’s how to control fan speed on a PC using SpeedFan, which is said to work with really old Windows versions up through more modern ones, including Windows 10:
1. Install SpeedFan and run it.
2. Select Configure from the Readings tab.
3. Select the Fans tab and wait for the app to find and list your fans.
4. Select the fan you want to control.
5. Use the response curve to control the fan speed.
Tip: Fans turn on when your system heats up. The response curve maps heat with fan speed. The hotter the system runs, the faster the fans will run. Many of the software options will have response curves represented.
If SpeedFan isn’t the right fit for you, consider another free option, appropriately named Fan Control. This one works on Windows 11 and Windows 10. Follow these steps to use this portable fan control software:
- Download and extract the contents of the ZIP download and open FanControl.exe from the folder.
- Accept the default prompts that display upon opening the program.
- Press the plus sign on the right and create a linear curve.
- Name the fan curve and then select it. You’ll need the name later.
- Choose Min. fan speed and then pick a percentage to set its idle speed, or click Max. fan speed. You can also set the temperature range.
- Toward the top of the app, find the fan that corresponds with the fan in your computer, and press Enable to ensure it’s on.
- Click the Selected fan curve menu and pick the name for the fan curve you just made.
Method #4 Using the Manufacturer’s Proprietary Software
Depending on the model of your PC, some manufacturers have specific software that is designed to monitor their hardware, such as fan speeds and system temperatures. This is often called OEM (original equipment manufacturer) software.
Look into your PC model and type and see if there is software you can download to help you gain information about your fan speeds and internal temperatures. Your motherboard may also come with its own software for these purposes, so look into your make and model and see if there are any downloadable utilities. You may not be able to directly control the fan speeds this way, but at least you’ll have an idea of what is going on and why it may be overheating.
Other Troubleshooting Methods
Other possibilities for how to control fan speed on PC Windows could include:
- Swapping out your fans can be a quick solution when the fan itself is faulty.
- If your system sensors are misreading the temperatures of your PC, the fans may not be at the right speed for the actual temperature needs. Look for third-party software or other solutions to see if your temperatures are being misread by the standard sensors.
- If applicable, see if the thermal paste has degraded or needs to be reapplied. This will help to keep the CPU cooler and negate the need for the fan to work as hard.
- Contact customer support from your PC manufacturer. They may have some insight into common malfunctions or next-steps.
Why is it Important to Manage Fan Speed on PC?
Managing a PC’s fan speed is crucial for maintaining the optimal performance and longevity of your hardware components. When your computer’s internal temperature rises, which is common during intense gaming or heavy processing tasks, fans work harder to cool down the system. By controlling fan speed, you can ensure that your computer remains at a safe temperature, preventing overheating that could otherwise damage your hardware, or cause unwanted instability.
Effective fan management also contributes to a quieter overall experience. If your fans are running at full speed constantly, they can be quite noisy, which might be distracting or annoying. By adjusting fan speeds based on the actual temperature needs, you can reduce unnecessary noise, making your PC quieter when it’s not under heavy load and only ramping up when necessary.
Proper PC fan speed also helps with energy efficiency. Fans that run at full speed all the time consume more power, which can lead to higher energy bills and increased wear and tear on the fan itself. Optimizing its speed to align with your PC’s temperature requirements not only means extending the lifespan of your components, but it also helps manage your energy consumption.
Tip: Depending on the type of computer you have, it might be possible to easily remove the case and access the fan yourself for cleaning. You’ll need to be cautious not to disturb any other components, and if you’re not comfortable, you can find a professional to do so for you. If you’re feeling brave, however, use compressed air or a soft cloth to eliminate debris, dust, or even animal hair. Eliminating this debris improves fan function.
Frequently Asked Questions About Fan Speed for PC
How do I control the RPM of my computer fan?
To control the RPM of your computer fan, adjust the settings in your BIOS/UEFI or use software like SpeedFan, HWiNFo, or MSI Afterburner.
What is the best fan curve for CPU temp?
The best fan curve for CPU temperature typically increases fan speed as the temperature rises, starting from a lower speed at idle and ramping up to maximum as temperatures approach the CPU’s thermal limits.
Why is my CPU fan so loud?
Your CPU fan may be loud due to dust buildup, high speeds, or because it’s running at maximum RPM to cool a high-temperature CPU.
Why does my PC fan speed automatically increase?
If you have unexplained fan speed increases, wait until this happens again and then open Task Manager by pressing the Control + Shift + Escape keys. From there, look at the currently running programs and processes and see if there is a culprit for excess CPU usage or similar resource drains. It could be an app or demanding software that is putting a strain on the system.
There could be other processes running in the background that cause the fan speed to increase without obvious explanation. Think antivirus scans, updates, and other applications that suck up plenty of resources.
How do I reduce the temperature of my CPU?
We already covered checking the thermal paste and cleaning out dust and debris from the PC, but here are some additional possible fixes for reducing your CPU temperature:
- Put your PC somewhere with better ventilation. If it’s in an enclosed cabinet or space without airflow, this could cause it to overheat and overwork your fan.
- For better ventilation, you could try taking off your PC’s side panel and see if this increased air exposure resolves the problem
- Make sure the heat sink is positioned correctly. Otherwise, the CPU will not get the full cooling benefit
- Replace your CPU cooler if necessary
Can overclocking cause issues with fan speed?
Absolutely. Overclocking is a way to improve your PC performance by intentionally pushing the default clock speed of the CPU past the manufacturer’s parameters. This boosts PC performance, allowing relatively outdated computers to improve their response times and functions. It’s especially common for PC gamers who don’t have the best CPU for gaming to get the most out of their system. Unfortunately, it can also lead to increased heat production and other CPU strains. If you’ve started having issues after overclocking your PC, try returning to default settings and see if that resolves the fan problem.
Heidi Edwards
Generalist/Tech Writer
Versatile copywriter Heidi Edwards, a marketing graduate from WGU, crafts compelling content across diverse sectors, from eco-conservation to tech. Self-taught in WordPress and graphic design, she runs the successful Aultman Group.
Уровень сложностиПростой
Время на прочтение8 мин
Количество просмотров304K

Каждый владелец компьютера сталкивался с шумом вентиляторов. Хорошо, когда они качественные, не шипят и не гудят, а материнская плата каким-то чудом сама управляет ими в оптимальном режиме, и все довольны.
Но зачастую всё совсем не так. Запуская даже лёгкую нагрузку, вентиляторы взвывают на пару секунд, а иногда какой-то Карлсон на определённых оборотах входит в резонанс с корпусом, и здесь хоть вешайся.
Казалось бы, скачай софт от материнской платы, настрой всё и будь доволен? Все те, кто реально пользовался софтом от материнских плат, прекрасно понимают, насколько ошибочно это предложение, а также насколько софт от вендоров громоздкий, кривой и негибкий.
В этой статье я опишу очень небольшую утилиту для управления вентиляторами в ПК, которая поразила меня своей гибкостью, и вот уже многие годы является второй в списке на установку в свежую систему. Почему второй? Потому что первым делом в систему ставится браузер, желательно огнелис.
Загрузка и установка
Для скачивания софта можно пройти как на официальный сайт приложения, так и на GitHub-страницу, где выкладываются релизы. Да, к сожалению, софт закрытый и не имеет открытого исходного кода, но зато на том же гите можно открыть Issue, если какая-то из ваших железок не поддерживается или работает неправильно.
Как и любой софт, который попадает на мой ПК, этот не оказался исключением и перед запуском был просканирован антивирусами. Единственная угроза была в исполняемом файле и то от ноунейм-антивируса с приставкой AI в названии (отчёт virustotal).
Никаких специальных установщиков здесь нет. Просто распаковываем архив в папку, которая никуда не будет перемещаться (например, C:/FanControl) и запускаем FanControl.exe. Программа требует права администратора!
Перед работой я советую как минимум выключить софт от материнской платы, который позволяет управлять вентиляторами! Но лучше всего будет его удалить насовсем, так как он более не пригодится.
Если вы также планируете управлять вентиляторами ВИДЕОКАРТЫ, то сто́ит удалить софт для видеокарты от вендоров, а при использовании MSI AFTERBURNER заранее выключить программное управление вентилятором в настройках!
После запуска программа просит единожды согласиться с условиями её использования.

Сканирование устройств и начало работы
А далее предложит произвести автоматическое определение доступных к управлению вентиляторов, их датчиков оборотов, а также температурных датчиков в системе. Обязательно соглашаемся, иначе всё это придётся делать вручную.

На следующем этапе нам предложат выбрать сенсоры, которые будут определены программой.
Чем больше сенсоров знает софт, тем больше времени и производительности ПК будет уходить на сбор их данных (на самом деле там абсолютные копейки), но при этом больше датчиков будет доступно для более гибкой настройки.
Здесь выбор зависит от конкретных задач компьютера. Например, на скриншоте ниже стоят дефолтные галочки, которые идеальны для обычного домашнего ПК.
Если планируется управлять охлаждением у NAS, где нет видеокарты, но при этом важны температуры дисков, то можно поставить галку на Storage. Если вы занимаетесь разгоном DDR5-памяти или у вас горячая серверная ECC-память, то галка Memory позволит собирать данные с планок, которые имеют датчики температуры.
Отдельно стоит сказать про галки для видеокарты Nvidia. По стандарту сбор данных и управление идёт через NvApiWrapper. Это абсолютно нормальный способ управления вентиляторами в рамках разрешённых параметров, НО иногда эти заводские рамки не очень адекватные. Например, ваша видеокарта начального уровня и так слабо греется, но не имеет функции Fan Stop, которая может полностью выключить вентилятор, дабы карта работала в пассивном режиме.
В таком случае здесь предусмотрена галка Nvidia 0% hardware curve override, которая позволяет полностью игнорировать все ограничения производителя и управлять вентиляторами на полную. Но будьте с ней осторожны! Вентиляторы требуют разгона перед запуском, и неправильная настройка кривой вентилятора может обернуться повреждением железа!

После выбора нужных датчиков программа проведёт тестирование и соотношение датчиков и вентиляторов. Этот процесс обычно занимает не более 2 минут.

По прошествии процесса калибровки нам предложат назвать каждый из вентиляторов. Для удобства есть ползунки, которые управляют оборотами вентилятора в данный момент.
Тянем ползунок на максимум, слушаем/смотрим, какой вентилятор закрутился быстрее остальных, определяем его и вписываем удобное нам название.

Когда все вентиляторы определены и названы как нам надо, можно нажать ОК. Тогда откроется следующее окно с базовыми настройками приложения.
Полезно будет включать его автозапуск в свёрнутом виде, а также поставить галку на скрытие несуществующих вентиляторов (это можно сделать далее).
К сожалению, здесь нет возможности поставить автозапуск приложения, но о том, как это сделать, я также напишу далее.

Быстрый старт
Перед подробным и скучным описанием каждого из элементов, я опишу простейший процесс настройки процессорного вентилятора, который будет брать температуру с самого горячего ядра процессора и настраивать вентилятор по графику.
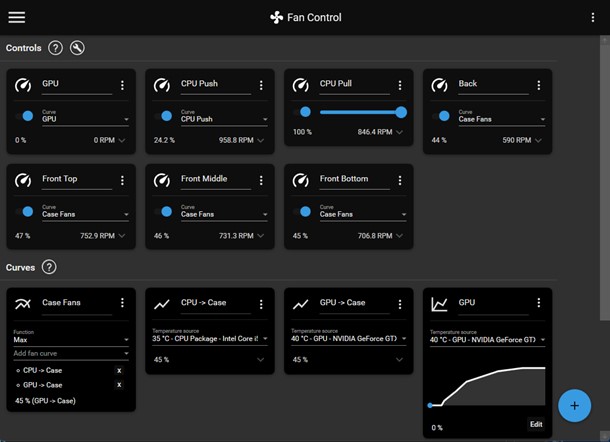
Нажимаем на зелёную кнопку + в правом нижнем углу и выбираем Graph.
Для удобства меняем его название на что-то понятное, и в графе Temperature Source выбираем CPU CORE MAX (температура самого горячего ядра).

Теперь в карточке процессора выбираем наш график и нажимаем на переключатель, дабы процессорный вентилятор начал соблюдать значения из этого графика.
Далее на карточке с графиком нажмём на кнопку EDIT и настроим график как душе угодно.
В открывшемся окне можно настроить кривую соотношения скорости вентилятора и температуры процессора (или другого узла, который вы выбрали в поле источника температуры).

Поздравляю, вы прекрасны! Теперь ваш вентилятор процессора управляется графиком, который вы выставили сами!
Ну и под конец настройки стоит добавить софт в автозагрузку. К сожалению, никаких галочек в софте нет, поэтому делаем по старинке. Вызываем запуск приложения через Win-R, вписываем shell:startup и жмём Enter. У нас откроется папка автозапуска. В неё можно положить ярлык, ведущий на EXE-файл программы.
ОБЯЗАТЕЛЬНО СОХРАНЯЕМСЯ (CTRL+S), так как программа не сохраняет ничего сама!
Изучаем разделы подробнее
На главном экране программы всё минималистично, и пользователю открывается вид на 3 набора карточек.
- В первом (Controls) будет список вентиляторов, которыми программа смогла управлять.
- Во втором (Speeds) будут отображаться обороты того или иного вентилятора, которые программа смогла найти в системе.
- В третьем (Curves) можно увидеть созданные нами карточки для управления вентиляторами.

Описание карточек из раздела Controls
▍ Раздел Controls
Как уже говорил ранее, в панели Controls расположены карточки вентиляторов, которыми программа смогла управлять.
На само́й карточке доступны базовые данные:
- Поле ИМЯ, которое можно редактировать после нажатия на него
- Поле Curve, в которое мы далее будем указывать кривую для работы вентилятора
- Переключатель поля Curve (если он выключен, то вентилятор управляется материнской платой, а не программой)
- Текущий процент оборотов
- Текущие обороты в секунду
- Стрелка у поля оборотов, которая открывает подробные настройки поведения вентилятора
- Многоточие, открывающее дополнительные настройки вентилятора
Если нажать многоточие, то откроется список настроек.
- Manual control — переключает управление вентилятором в простой ползунок 0–100% без какой-либо привязки к датчику
- Force apply
- Hide — прячет вентилятор из списка
- Remove paired sensor — «развязывает» сенсор и вентилятор, просто убирая значение RPM из карточки
- Pair speed sensor auto… — автоматически привязывает сенсор к вентилятору
- Detect fan start auto… — автоматически настраивает минимальные обороты, с которых стартует вентилятор
- Detect fan stop auto… — автоматически определяет обороты, на которых вентилятор выключается

Если же нажать на стрелочку в карточке, то откроются настройки вентилятора. Некоторые из них были определены ещё при первом запуске программы при калибровке.
- Step UP — максимальная скорость повышения оборотов % в секунду
- Step UP — максимальная скорость понижения оборотов % в секунду
- Start % — с какого %PWM вентилятор стартует
- Stop % — с какого %PWM вентилятор останавливается
- Offset % — сдвиг %
- Minimum % — минимальный процент оборотов ниже которого нельзя выставить значения
Я бы не трогал все настройки, кроме первых двух, так как эти параметры были подобраны софтом во время первичной калибровки вентиляторов.
А вот первые настройки можно и нужно покрутить. Например, можно настроить так, что при резкой нагрузке (вы открыли тяжёлую программу, но её загрузка длилась буквально пару секунд) вентилятор наращивал свои обороты не резко, а очень плавно, буквально по паре процентов в секунду, за счёт чего вы не услышите резкий и секундный взлёт самолёта.
Вторая настройка (step Down) позволяет настроить скорость снижения оборотов вентилятора после активной нагрузки. Например, вы скомпилировали программу, нагрузка на процессор резко упала, как и его температура, вентилятор как обычно сбросил обороты, но при этом VRM-платы, SSD, чипсет и даже диски могут всё ещё быть разогретыми. Плавное падение оборотов позволит продуть систему после такой активной нагрузки, что точно лишним не будет (есть другой способ сделать это же плавное затухание, но сохранив «отзывчивость» вентилятора, об этом поговорим далее).
▍ Раздел Speeds
Карточки в разделе Speeds буквально отображают скорость того или иного вентилятора. Настроек здесь нет, можно разве что переименовать карточку, либо совсем скрыть её.
Подробное описание карточек из разделов Curves и Sensors
▍ Раздел Curves
Карточки здесь можно переименовывать, скрывать, а также удалять и создавать.
Сто́ит сказать, что здесь очень гибкая система, которая позволяет брать данные с нескольких датчиков температуры, применять базовую математику к значениям, а потом использовать полученные данные и по кривой конвертировать их в процент вентилятора, притом любого!
▍ Раздел Sensors
Данный раздел появится, когда мы добавим новые карточки, которые выступают в качестве сенсоров. Их значения можно использовать в карточках Curves как источник температуры. При этом карточки этого раздела позволяют манипулировать данными с сенсоров.
Изучаем карточки Curves и Sensors
Начнём с раздела Sensors, так как здесь меньше всего карточек, но именно они позволяют манипулировать данными с нескольких датчиков.
▍ Sensors — Mix
Данная карточка является одной из основных при настройке корпусных вентиляторов. Она позволяет взять данные с неограниченного числа датчиков в системе и произвести базовую математику с этими данными.
- Average — среднее значение температуры между выбранными датчиками
- Max — максимальное значение температуры между выбранными датчиками
- Min — минимальное значение температуры между выбранными датчиками
- Sum — сумма температуры всех выбранных датчиков
- Sabstract — вычесть значение темперы всех датчиков
При этом в карточку MIX можно добавлять не только реальные сенсоры, но и результаты других SENSOR-карточек.

▍ Sensors — Time Average
Название карточки говорит само за себя. В настройках карточки можно указать датчик и время усреднения его результатов.
▍ Sensors — Offset
Данная карточка позволяет добавить значение к температуре с датчика. Офсет может быть как положительный, так и отрицательный. Это полезно в случае таких устройств, как чипсет, который на бюджетной плате может быть часто разогрет до 50 градусов, но при этом греется под нагрузкой в редких ситуациях (например, чтение и запись дисков, подключённых через чипсет), но при этом есть желание реагировать на его температуру при помощи вентиляторов.
▍ Sensors — File
Очень интересная карточка, которая позволяет считывать значение из файла и предоставлять его как сенсор в программе FanControl.
Достаточно прямо в программе создать и сохранить файл в любое удобное место. Поддерживаются как целые числа, так и числа с плавающей запятой, но кол-во знаков после запятой ограниченно одним.
▍ Curves — Linerar
Позволяет получить простейший график из двух точек. Бонусом доступна настройка гистерезиса, а также скорости реакции.
▍ Curves — Graph
Более сложный график с неограниченным кол-вом точек.

▍ Curves — Mix
Всё та же карточка MIX, как из сенсоров, но теперь позволяет манипулировать оборотами, полученными из карточек curve. Все настройки также идентичны карточке Sensors — mix.
▍ Curves — Trigger
Карточка переключает значение оборотов между IDLE и LOAD состояниями, по преодолению порогов IDLE TEMP и LOAD TEMP.
▍ Curves — Flat
Просто значение оборотов в процентах. Можно использовать для внесения значения в дельнейшие расчёты в остальных кривых или сенсорах.
▍ Curves — Sync
Позволяет получить скорость вентилятора (в процентах) и использовать его в дальнейших расчётах. Также можно указать офсет.
▍ Curves — Auto
Простейшая и буквально линейная кривая между минимальным и максимальным значением. Отличается от Linear карточки, чуть более гибкими настройками и гистерезисом.
Заключение
Поздравляю! Теперь вы знаете об удобной программе, которая позволяет получить один из самых простых, быстрых и гибких способов управления охлаждением в системе.
Скидки, итоги розыгрышей и новости о спутнике RUVDS — в нашем Telegram-канале 🚀
