
Дарья Сидорова
Windows 10 позволяет настраивать размер и цвет указателя мыши, чтобы сделать его более заметным и упростить навигацию. Рассказываем, как это сделать.
Как изменить размер курсора
Перейдите в «Параметры» → «Специальные возможности» → «Мышь». Быстро открыть приложение «Параметры» можно комбинацией Windows + i.
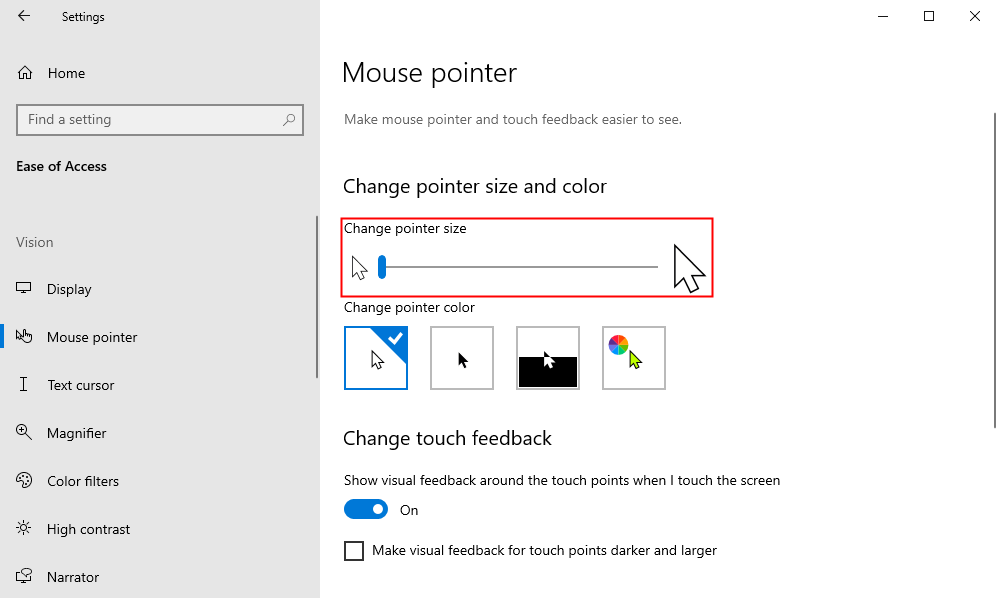
Настройте ползунок в разделе «Изменение размера указателя мыши». Можно выбрать размер от 1 до 15. По умолчанию установлен наименьший размер.
Как изменить цвет указателя
Это можно сделать в том же разделе: «Параметры» → «Специальные возможности» → «Мышь». Доступно четыре варианта: белый (по умолчанию), черный, инвертированный (становится черным на белом фоне и наоборот) и выбранный цвет.
Читайте по теме:
7 способов сделать скриншот на Windows 11
Как отключить уведомления с советами и предложениями на Windows 11
Как узнать пароль от Wi-Fi
В последнем варианте по умолчанию установлен салатовый цвет. Но можно выбрать любой другой. Для этого на появившейся панели с рекомендуемыми цветами нажмите «Выбрать цвет указателя».
Текстовый курсор (тот, что похож на заглавную английскую I с более длинными засечками) изменится в соответствии с этими настройками.
Как настроить текстовый курсор
Как было сказано выше, изменения для обычного курсора по умолчанию применяются и к текстовому. Но у второго есть и собственные варианты настройки. Откройте «Параметры» (Windows + i) → «Специальные возможности» → «Текстовый курсор».
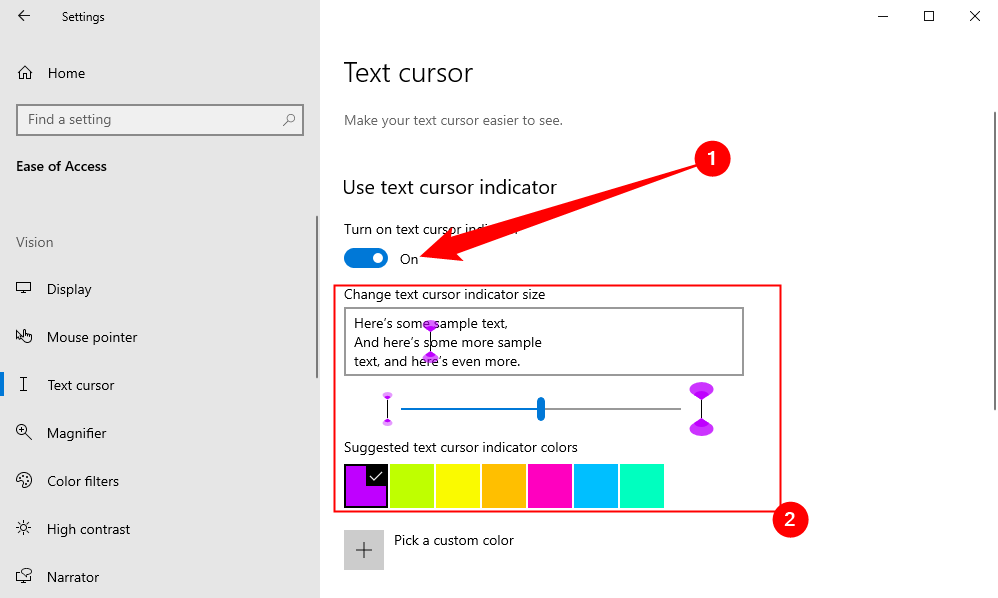
Нажмите на переключатель рядом с «Включить индикатор текстового курсора» — сверху и снизу курсора появятся конусы. После этого также можно настроить их цвет.
Индикаторы текстового курсора отлично работают в Microsoft Edge и Firefox, но могут вести себя некорректно, например, в Google Chrome.
В разделе «Специальные возможности» также можно настроить индикатор касания для компьютеров с сенсорным экраном.
Источник.
Фото на обложке: Pixel-Shot / Shutterstock
Нашли опечатку? Выделите текст и нажмите Ctrl + Enter
Sign in to your MUO account
The mouse pointer is a fundamental part of how you interact with your PC. A pointer that’s too small or dull can seriously affect your productivity, and the default Windows 10 mouse pointer may appear small and unappealing.
At times, you might find it difficult to locate the default mouse pointer on your computer screen. Windows 10 has some exciting features that allow you to configure your mouse pointer size and color. In addition to this, you have the option to download third-party mouse pointers.
Why You Should Configure Your Mouse Settings
There are several reasons why you should configure your mouse pointer settings.
For example, if you have vision impairments, it may be a little harder for you to use the default Windows mouse pointer. Changing the pointer size and color can help make your mouse pointer stand out clearly on the screen.
It can be hard for you to clearly see the mouse pointer at its default size on high-resolution monitors. Reducing your screen resolution could turn out to be an ineffective solution. While you can configure the mouse DPI settings to make your mouse easier to use, the ability to make your mouse pointer bigger and colorful can be very helpful.
Here’s how you can change your mouse pointer size and color in Windows 10.
1. Change the Mouse Pointer Size and Color Via Device Settings
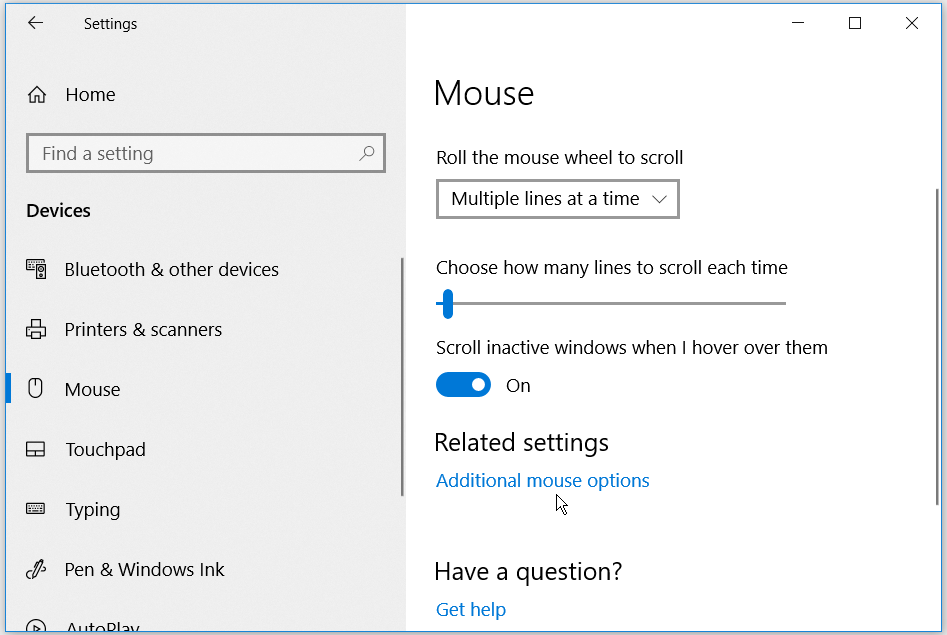
Open the Mouse Properties window by navigating to Windows Start Menu > PC Settings > Devices > Mouse > Additional mouse options.
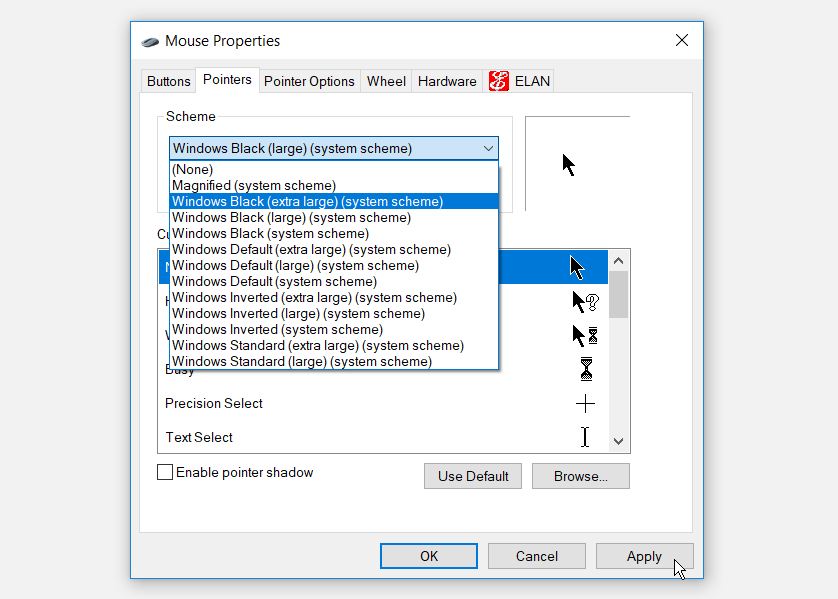
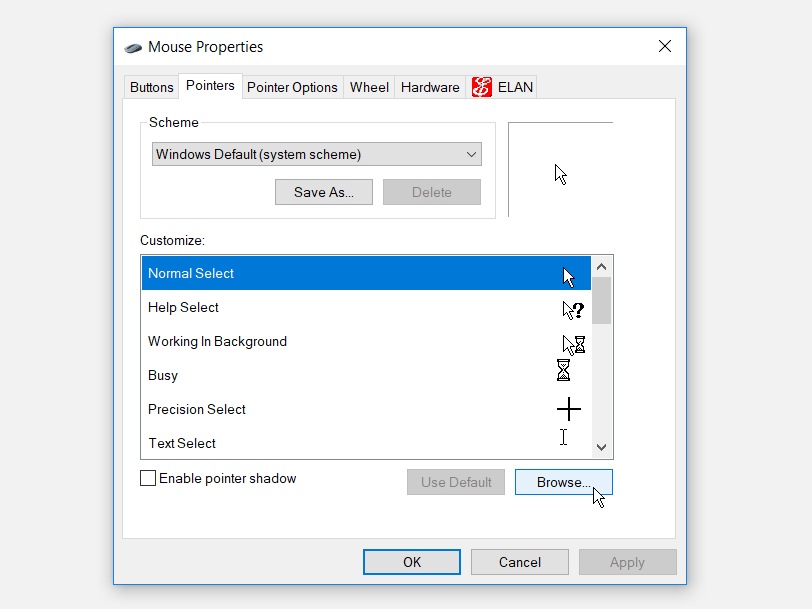
In the window that pops up, click the Pointers tab. Select your desired mouse pointer scheme from the drop-down list under Scheme. Click Apply and then click OK to save the changes. You’ll be able to see a preview of the pointer scheme in the Customize box.
If you want to change your mouse pointer size and color back to their default settings, you can click the Use Default button.
2. Change the Mouse Pointer Size and Color Via Ease of Access Settings
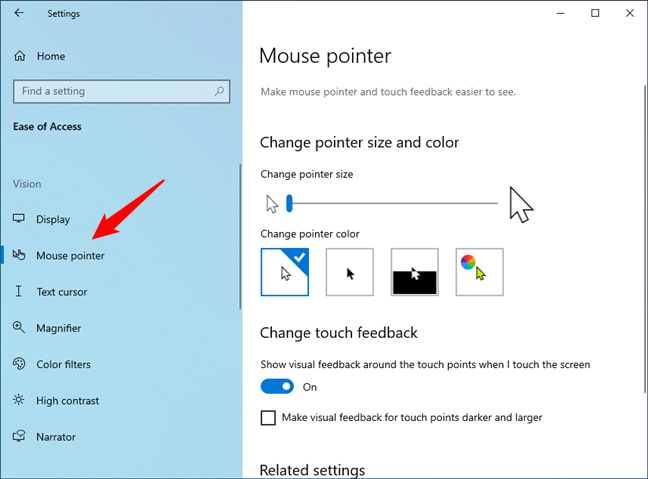
Open the Mouse pointer window by navigating to Windows Start Menu > PC Settings > Ease of Access > Mouse pointer.
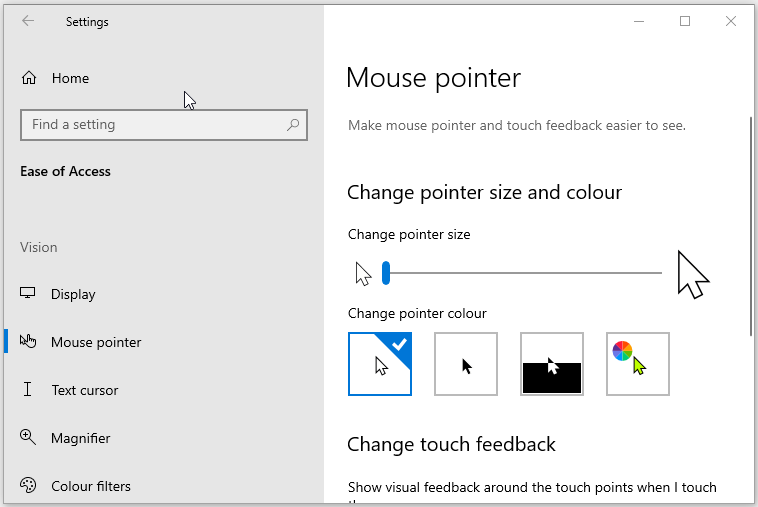
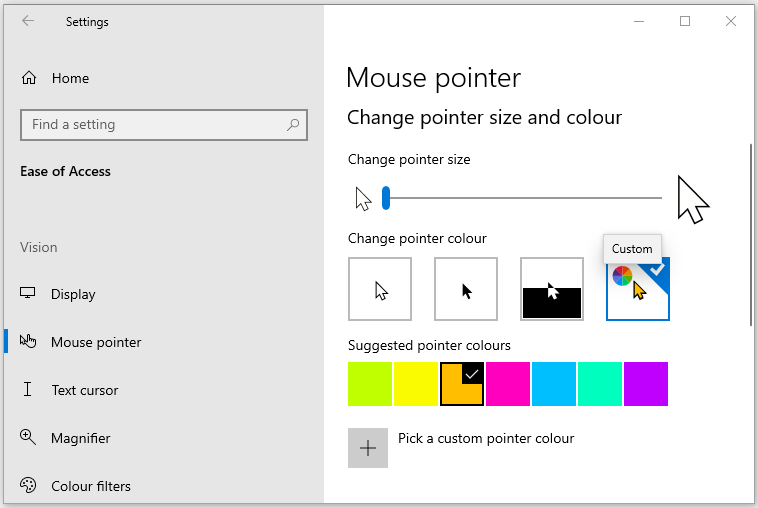
You can change your pointer size by dragging the slider under Change pointer size. Choose a pointer size from 1 to 15, where 1 is the default size. You can change your pointer color by selecting any of the four options under Change pointer color.
On the four different color options to choose from:
- The first option is the default white mouse pointer with a black border.
- The second option is a black pointer with a white border.
- The third option is an inverted pointer, which appears white on a black background and vice versa. The inverted pointer setting can help you identify the pointer with ease on any type of background.
- The fourth option allows you to choose any pointer color of your choice.
If you choose the fourth option under the Change pointer color section, you’ll be able to choose a color from the Suggested pointer colors. If you don’t like these options, you can pick your own color by clicking Pick a custom pointer color.
3. Change the Mouse Pointer Size and Color Via the Control Panel
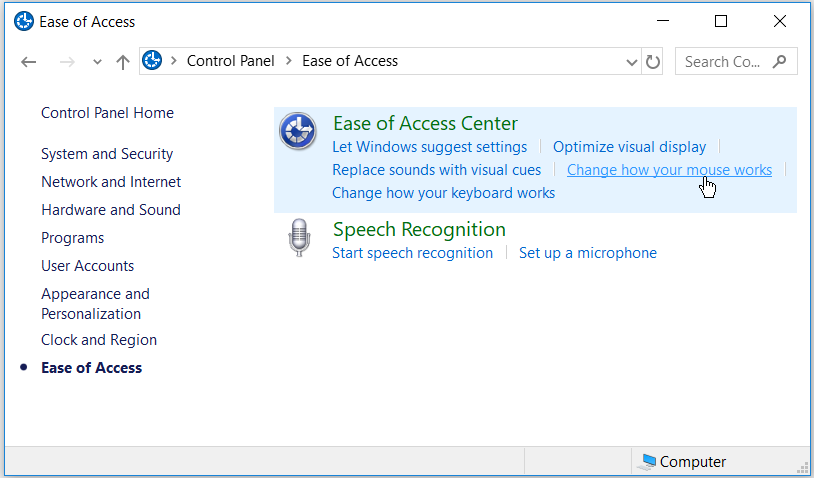
Open the Control Panel by typing Control Panel in the Start Menu search bar and selecting the Best match. When you’re on the Control panel, navigate to Ease of access > Change how your mouse works.
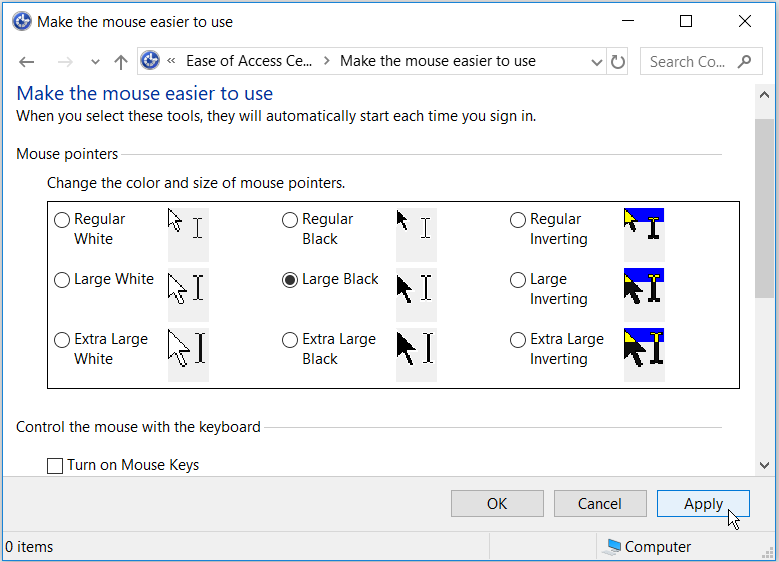
Under Mouse pointers, you can change the size and color of your mouse pointer by selecting any of the options that appear. When you’ve made a choice, click Apply and then click OK to save your changes.
4. Change the Mouse Pointer Size and Color via the Registry Editor
Press the Windows Key + R to open the Run command dialog box. Type Regedit and click Enter to open the Registry Editor. When you’re on the User Account Control prompt, click the Yes button to continue.
In the Registry Editor, navigate to HKEY_CURRENT_USER > Control Panel > Cursors.
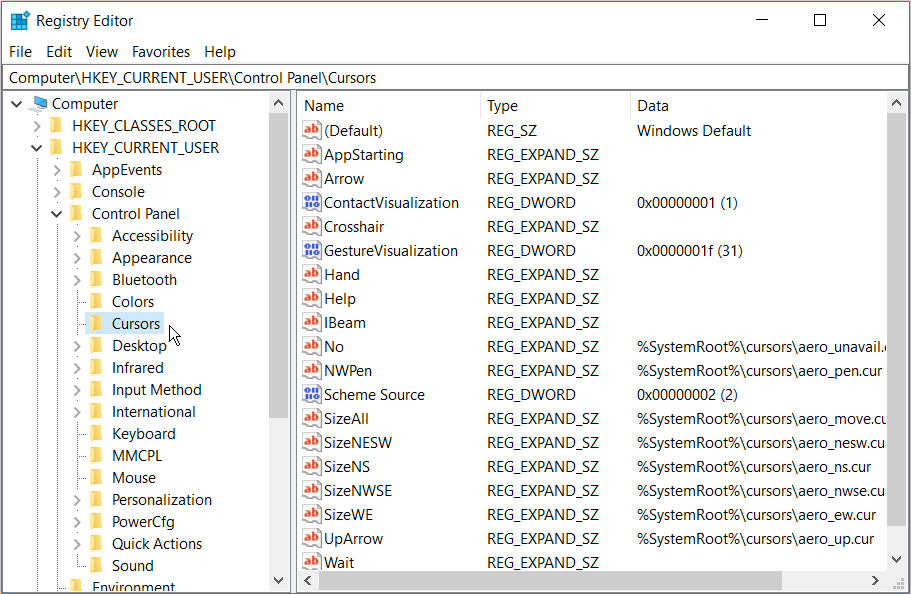
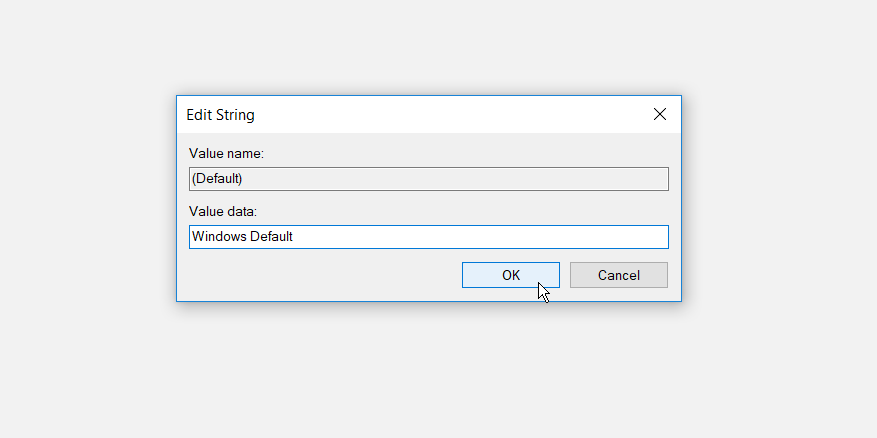
To Select a Pointer Scheme, double-click the (Default) string value in the right-hand side panel. By default, the value data for this string will be Windows Default. The other pointer scheme options you can put as data values are as follows:
- Magnified
- Windows Black (extra large)
- Windows Black (large)
- Windows Black
- Windows Default (extra large)
- Windows Default (large)
- Windows Inverted (extra large)
- Windows Inverted (large)
- Windows Inverted
- Windows Standard (extra large)
- Windows Standard (large)
To change the pointer scheme, simply type in the name of your desired pointer scheme in the Value data box and click OK to finish.
When you finish, close the Registry Editor and restart your computer to apply the changes.
5. Download Third-Party Mouse Pointers
If you’re looking for something more unique than the default Windows pointers, you can install third-party mouse pointers. There are many sites where you can download free attractive pointers, but you must look for safe sites for downloading Windows software.
Here’s how you can get started with installing third-party mouse pointers:
- Download your pointers from a trusted site such as Open Cursor Library.
- Extract your downloaded pointers file to any folder of your choice. To make things simple, you can extract your downloaded pointers to the Cursors folder on your PC. You can navigate to this folder by clicking This PC > Local Disk (C:) > Windows > Cursors.
- To select your downloaded pointers, open the Mouse Properties window by navigating to Windows Start Menu > PC Settings > Devices > Mouse > Additional mouse options.
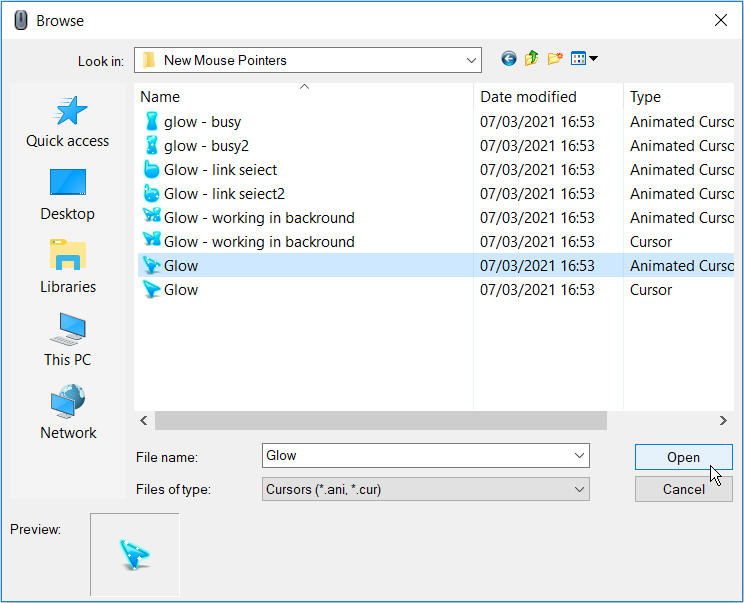
- Click the Pointers tab in the Mouse Properties window. In the Customize box, select the first default mouse pointer and click Browse. This will help you look for the folder containing your new mouse pointers.
When you land on the mouse pointers folder, select your preferred mouse pointer and click Open. This will change the first default mouse pointer that you selected within the Customize box.
From here, select the other default mouse pointers in the Customize box and replace them with the relevant ones you’ve downloaded. When you finish, click Apply and click OK in the Pointers tab to save the changes.
What Are Your Favorite Mouse Pointer Sizes and Colors?
Changing your mouse pointer size and color is easy if you follow the tips in this article. As you can see, Windows 10 makes it easy for you to configure your mouse pointer settings.
You can also expand your options by downloading your favorite third-party mouse pointers. You can even take things a step further by creating your own custom mouse pointers.

- To change mouse size on Windows 10, open Settings > Ease of Access > Cursor & pointer, and choose the pointer size.
- You can also use the Control Panel using the “Mouse” properties.
On Windows 10, the mouse pointer is an essential feature that helps us to navigate the desktop more efficiently. However, if the pointer is too small or too big, depending on your requirements or screen resolution, you can change the size in a few ways.
The easiest way to complete this configuration is through the Settings app, but it’s possible to change the mouse settings from the Control Panel.
In the guide, I’ll explain the steps to change the mouse pointer size using the Settings app and Control Panel on Windows 10.
- Change pointer size on Windows 10 from Settings
- Change pointer size on Windows 10 from Control Panel
Change pointer size on Windows 10 from Settings
To change the mouse pointer size on Windows 10, use these steps:
-
Open Settings on Windows 10.
-
Click on Ease of Access.
-
Click on Cursor & pointer.
-
Choose the pointer size with the slider under the “Change pointer size and color” section.


Once you complete the steps, the pointer will automatically switch to your selected size.
Change pointer size on Windows 10 from Control Panel
To change the pointer size through the Control Panel on Windows 10, use these steps.
-
Open Control Panel.
-
Choose the Large icons option from the “View by” menu on the top right.
-
Click on Mouse.

-
Under the ” Scheme ” section, select the pointer size by choosing one of the mouse schemes, including the system scheme (small), large, or extra large.

-
Click the Apply button.
-
Click the OK button.


After completing the steps, the new mouse pointer size will apply to your computer.
Mauro Huculak is a
Windows How-To Expert and founder of
Pureinfotech
(est. 2010). With over 21 years as a technology writer and IT Specialist,
Mauro specializes in Windows, software, and cross-platform systems such as Linux, Android, and macOS.
Certifications:
Microsoft Certified Solutions Associate (MCSA),
Cisco Certified Network Professional (CCNP),
VMware Certified Professional (VCP),
and
CompTIA A+ and Network+.
Mauro is a recognized Microsoft MVP and has also been a long-time contributor to Windows Central.
You can follow him on
YouTube,
Threads,
BlueSky,
X (Twitter),
LinkedIn and
About.me.
Email him at [email protected].
Sign in to your How-To Geek account
Quick Links
-
How to Change Your Cursor Size
-
How to Change Your Cursor Color
-
Add Color to Your Text Cursor
Summary
- Windows 10 now allows you to customize the mouse cursor’s size and color, choosing from a range of options, making it easier to see and navigate.
- You can change the cursor size by going to Settings > Ease of Access > Mouse Pointer and adjusting the slider. Sizes range from 1 to 15.
- To change the cursor color, go to Settings > Ease of Access > Mouse Pointer and select a color from the options provided, or choose a custom color.
Windows 10 lets you increase the mouse cursor’s size and change its color. Want a black mouse cursor instead? You can choose that! Want a huge red cursor that’s easier to see? You can choose that, too!
How to Change Your Cursor Size
To change the size of your cursor, head to Settings > Ease of Access > Mouse Pointer. (You can press Windows+i to open the Settings application quickly.)
Drag the slider under «Change the Pointer Size» to adjust the size of your cursor. By default, the mouse pointer is set to the smallest size. You can choose a size from 1 to 15 (which is very large).
How to Change Your Cursor Color
The cursor color options are found in the same place as cursor size options. Navigate to Settings > Ease of Access > Mouse Pointer.
Choose a new color in the «Change Pointer Color» section. There are four options here: white with a black border (the default), black with a white border, inverted (for example, black on a white background or white on a black background), or your selected color with a black border.
If you choose the color option, a lime green cursor is the default. However, you can choose any color you like. From the «Suggested Pointer Colors» panel that appears, select «Pick a Custom Pointer Color,» and then choose the one you want.

The special text cursor (the one that looks like a capital I with extra wide serifs) will respect the changes you make to the cursor settings. If you ever want to tweak your mouse cursor again, just return to this menu and select the white cursor again.
Add Color to Your Text Cursor
Any changes to your regular cursor will be applied to your text cursor by default, but the text cursor also has a few customization options of its own. Open the Settings app (Windows+i), then head to Ease of Access > Text Cursor.
Click the toggle next to «Turn on Text Cursor Indicator» to enable cones at the top and bottom of your text cursor. Once you do that you can customize the color of the text cursor indicators, too.
The text cursor indicators don’t work uniformly in every application. We found they worked perfectly in Microsoft Edge and Firefox, but didn’t work correctly in Google Chrome’s omnibar, for example.
If you decide you don’t like the text cursor indicator, just hit the toggle again to disable it. If you have a PC with a touch screen, you can also control the visual touch feedback that appears when you tap the screen in the accessibility section.
Windows 11 and Windows 10 both have some exciting new options that allow you to change the mouse pointer size and color. Have you grown tired of the dull white or black mouse pointer? Are you having trouble seeing the standard size mouse cursor on your screen? Would you prefer one in a lively color, maybe one that matches your wallpaper? How about making it up to three times bigger or making it thicker when typing? Here is how to get to the mouse size settings and how to change your pointer’s size and color in Windows:
NOTE: We wrote this tutorial using the initial release of Windows 11 (version 21H2 build 22000), as well as Windows 10 (version 21H2 build 19044). If you’re using an older version of Windows 10, you might have to install the latest updates to get access to all the features presented.
How to access the mouse size settings in Windows
First, we’ll show how this is done in Windows 11 and then in Windows 10. Scroll to the section that fits your version of Windows.
1. Go to the “Mouse pointer and touch” settings in Windows 11
In Windows 11, in order to change the mouse pointer size, color, or thickness, you’ll need to first get to the appropriate page from the Settings app. Fortunately, that’s easy to do: open Settings (press Windows + I on your keyboard), select Accessibility on the left sidebar, and click or tap on “Mouse pointer and touch” on the right side of the window.
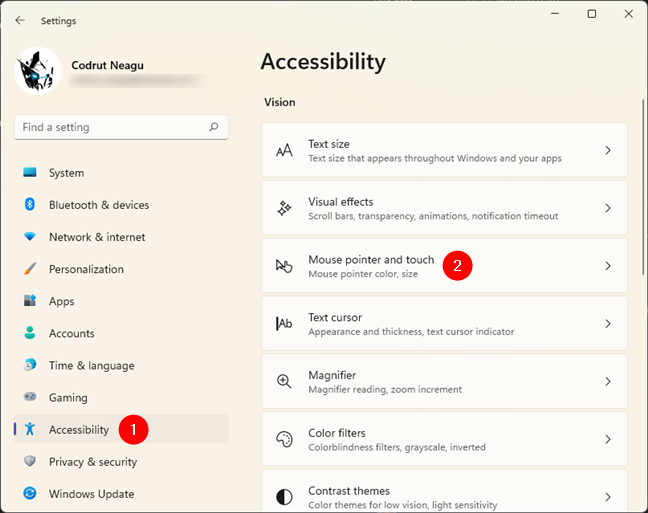
Mouse pointer and touch in the Settings app
2. Go to the “Mouse pointer” in Windows 10
If you’re using Windows 10, open the Settings app on your Windows 10 PC or device. A quick way to do that is to press Windows + I on your keyboard. In Windows Settings, click or tap Ease of Access.
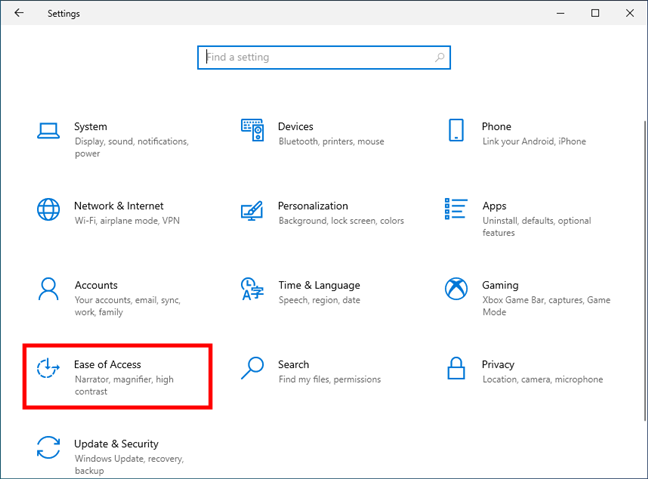
The Ease of Access section of the Settings app
Select Mouse pointer in the list of options on the left.
Windows 10’s Mouse pointer settings
NOTE: From here on, the steps to change the pointer size, color, and thickness are similar (almost identical) in Windows 11 and Windows 10.
How to change the size of the mouse pointer
If you’re on Windows 11, look at the Mouse pointer area from the Mouse pointer and touch settings page. There, you’ll find a slider called simply Size. In Windows 10, the slider is called “Change pointer size” and is found in the “Change pointer size and color” section from the Mouse pointer page. By default, both Windows 11 and Windows 10 use the smallest pointer size available, but you can use the aforementioned slider to choose any dimension from 1 to 15, which can make your pointer up to three times bigger than the standard size.
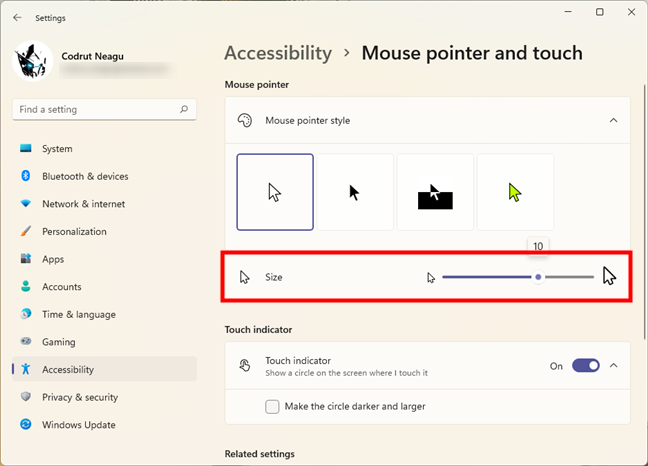
Use the slider to change the pointer’s size
As indicated by the graphics, moving the slider to the right makes the pointer bigger, while dragging it to the left turns it into a smaller one.
How to change the mouse pointer color
Don’t close the Settings app yet: on the same page, you’ll also find the color options for your mouse pointer. In Windows 11, it’s called “Mouse pointer style,” while in Windows 10, it’s called “Change pointer color.” It’s the same thing, even if the naming is slightly different. All you have to do to change your mouse cursor color is to choose one of the four available options.
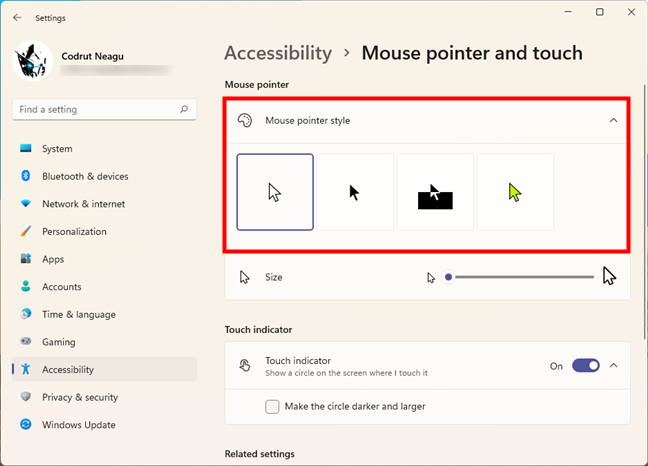
Change the pointer color in Windows
As indicated by the graphics used, the first two options are white with a black border (which is the default) and black with a white border. The third, illustrated as black on a white background and white on a black background, has an inversion effect, ensuring your mouse pointer is always visible, by changing it to a color complementary to the color you’re hovering over. This does not just happen for black and white: hovering with your pointer on a blue background makes it turn orange, a red background turns it cyan, and so on.
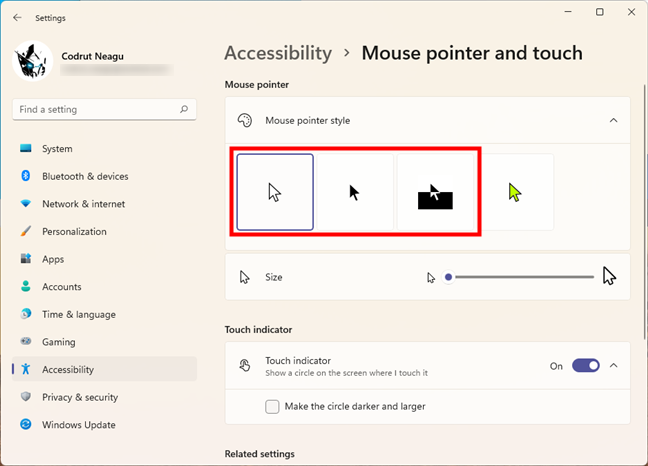
The first three mouse pointer styles are predefined
The fourth and last mouse pointer style adds a black border to the color of your choice. Clicking or tapping on it reveals a rainbow of recommended pointer colors you can choose from. If you like a color from the list, click or tap on it.
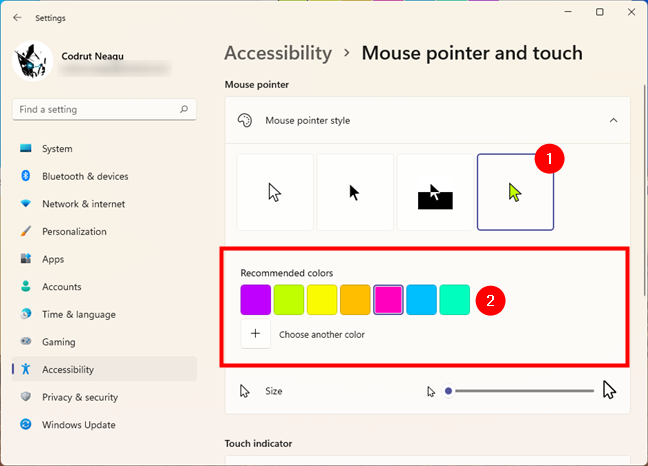
Choose one of the recommended pointer colors for a fun cursor
If you have a different color in mind, click or tap the plus button under the recommended colors. In Windows 11, it’s called “Choose another color,” while in Windows 10 it’s named “Pick a custom pointer color.”
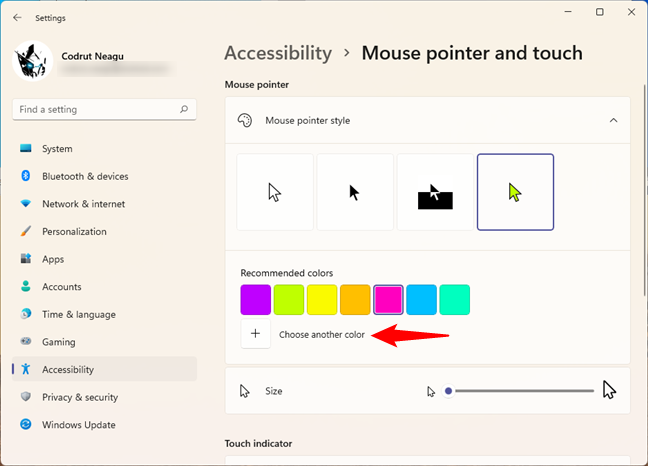
Choose another color for the mouse pointer
In the new color selection window that pops up, choose any color you like from the whole RGB spectrum. You have absolute freedom in your choice, and a slider at the bottom helps you fine-tune the color you choose.
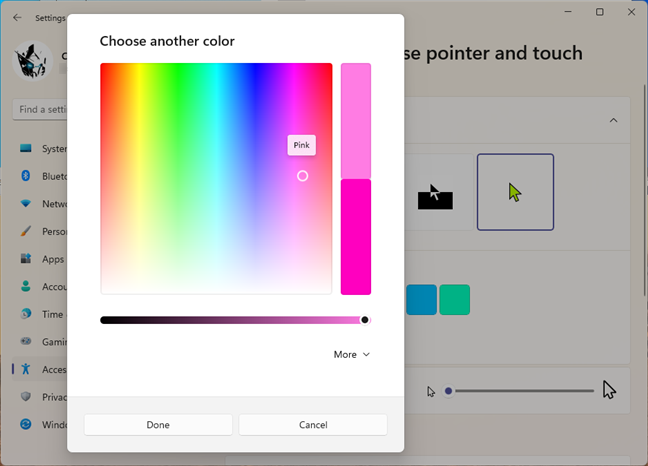
Click or tap anywhere to select a color and see its name
If you need to be accurate, and you already know the RGB code of the color that you want to use, click or tap More.
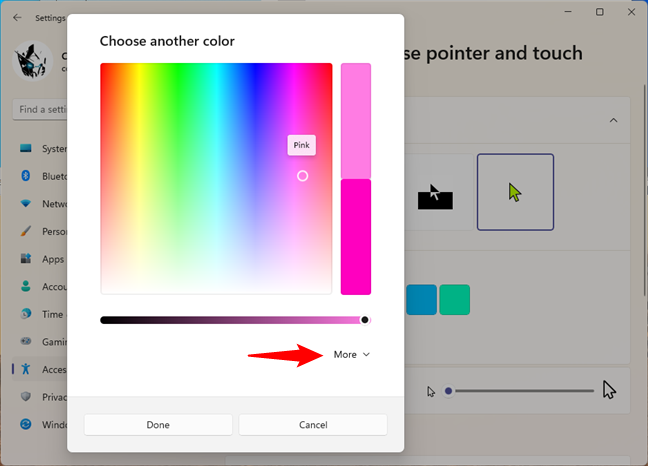
Pick a custom mouse pointer color
Additional options are shown, where you can enter the code of the color that you want to use. Your changes are displayed in real-time, so, when you are satisfied, press Done and enjoy your new pointer.
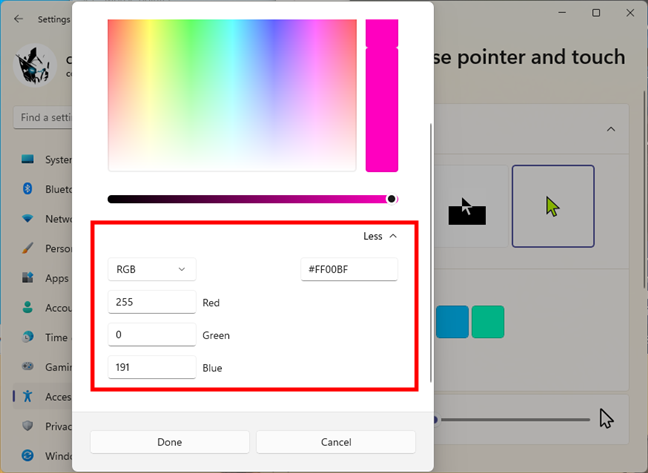
Enter the code for a custom mouse pointer color
NOTE: If you are not satisfied with your pointer’s appearance, see how to use custom mouse cursors and pointers in Windows. And, if you want to learn more about personalizing your mouse, read: How to configure the mouse in Windows.
How to change the text cursor thickness when typing
There is one other pointer setting that you might want to customize, and it’s important, especially if you spend time writing on your Windows computer or device: the blinking cursor used when typing text. If you spend a substantial amount of time in the company of letters or numbers, as we do, you might appreciate the option to make this cursor more visible, by adjusting its thickness.
In the Settings app, go back to the Accessibility section in Windows 11, or Ease of Access in Windows 10. Then, click or tap on Text cursor.

Open the Text cursor settings
In either operating system, scroll on the right side of the Settings window until you find the slider called “Text cursor thickness.” Move the slider and watch the preview box to make your decision.
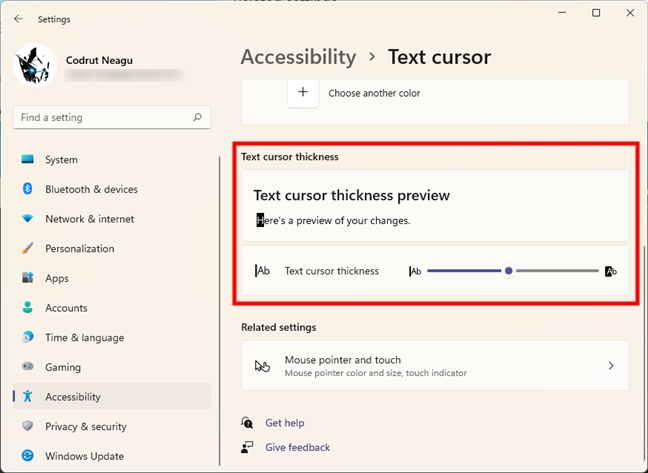
Move the slider to adjust the cursor’s thickness
From now on, the mouse cursor while typing will be as thick or thin as you’ve decided, hopefully making it easier for you to write on your computer.
Bonus for old-school users: How to change the mouse pointer size and color from the Control Panel
You can also customize your pointer from the more limiting options available from the Control Panel, although these are less useful than those from the Settings app. To customize the mouse cursor’s size and color, open the Control Panel and go to the “Ease of Access” section.
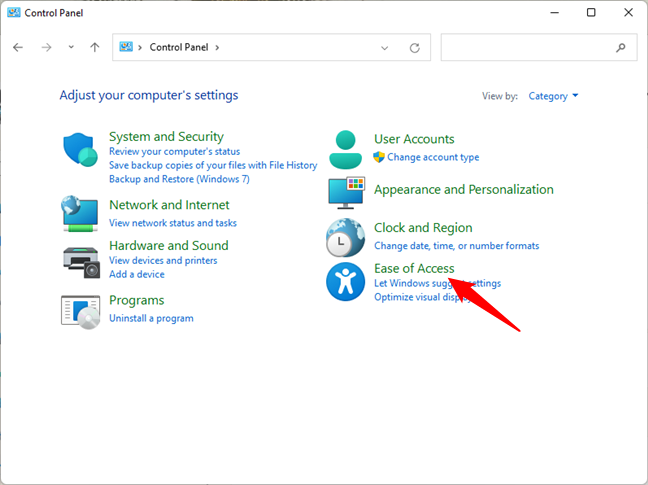
The Windows 11 Control Panel
In the section called “Ease of Access Center,” click or tap on the “Change how your mouse works” link.
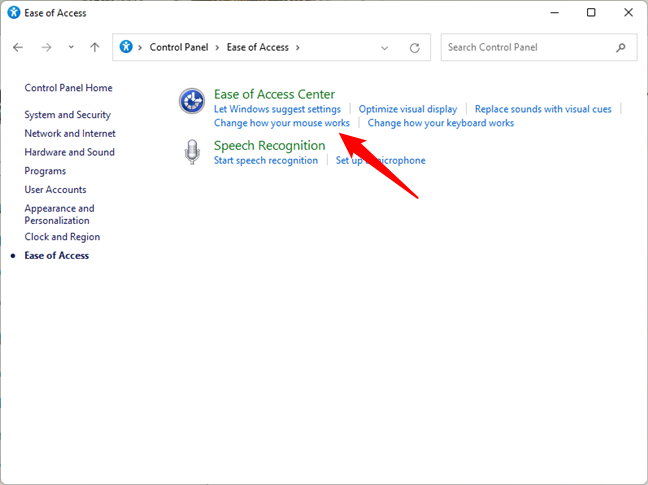
Ease of Access settings
A window named “Make the mouse easier to use” opens. Here you can find a series of mouse-related settings, starting with the size and color of your mouse pointer. In the Mouse pointers section, you can choose from three different mouse cursor colors and from three different sizes for each color. The third one has an inversion effect, which changes your mouse color for maximum visibility, depending on what color you are hovering over. Choose the size and the color that you want to use.
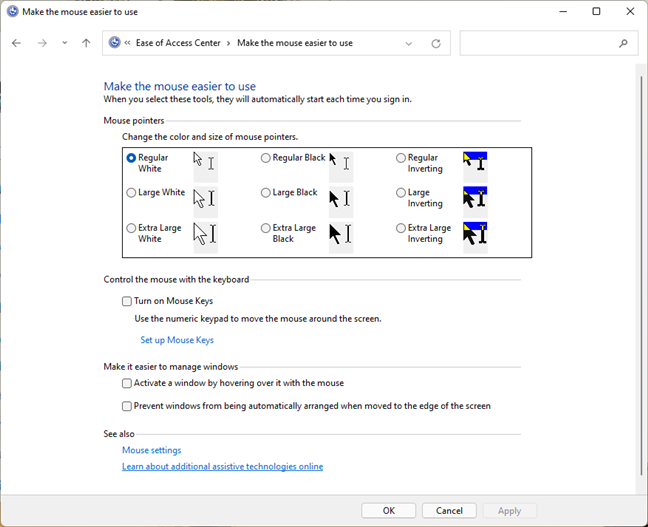
Make the mouse easier to use in Windows
Do not forget to press OK or Apply for your changes to take effect. You can now close the Control Panel and enjoy using your new mouse pointer.
What mouse pointer size and color do you use?
While writing this tutorial, I was pleasantly surprised by Windows’ option to turn the cursor the opposite color of the background, thus ensuring maximum visibility at all times. I decided to stick with it for now. What about you? How did you customize your mouse pointer? Did you choose a cheerful color or a larger pointer size? Let me know in a comment below.