
Are you looking for ways to improve the playback of your media in Windows Media Player 12? We’ll show you how to do that by using the enhancements in WMP 12.
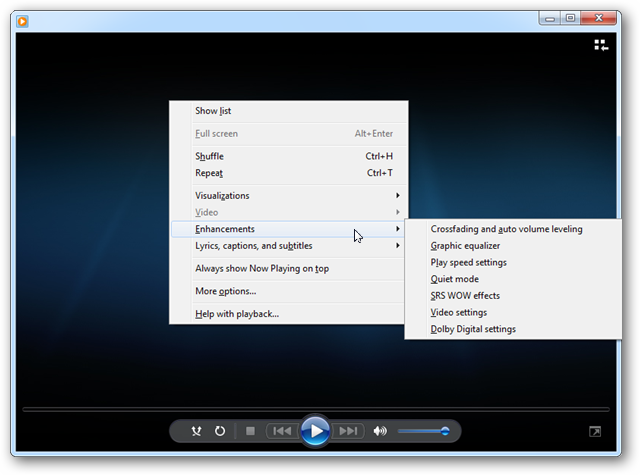
If you are in Library mode, you’ll need to click the icon at the lower right to switch to Now Playing mode.
Right-click anywhere in Media Player while in Now Playing mode, select Enhancements, and select any of the available options.
You can switch between the individual enhancements by clicking the right and left buttons at the top left.
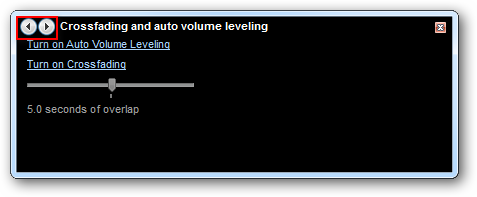
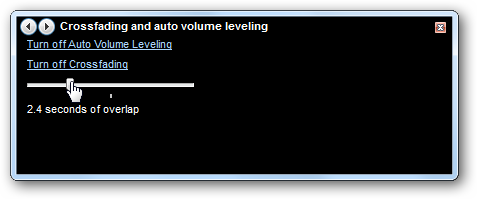
Crossfading and Auto Volume Leveling
The Auto Volume Leveling setting is just a simple toggle on and off. If your MP3 or WMA files have volume leveling information values.
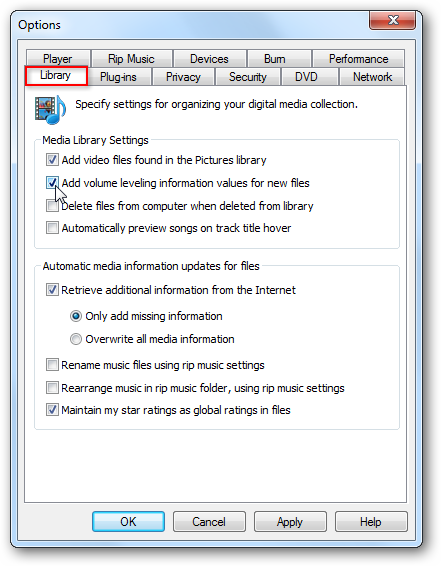
You can automatically add volume leveling information values to all files you add to your library by switching to Library view, going to Tools > Options, and selecting Add volume leveling information values for new files on the Library tab. Click OK when finished.
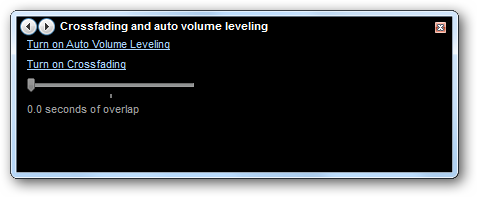
Crossfading will gradually decrease the volume of the song that is ending (fade out) and increase volume of the song that is beginning. Click Turn on Crossfading and then click and drag the slider left or right change the amount of overlap between tracks.
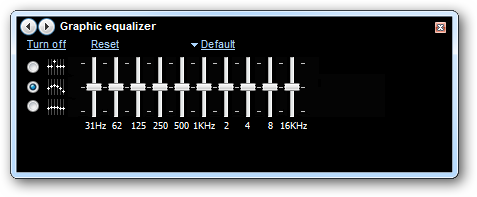
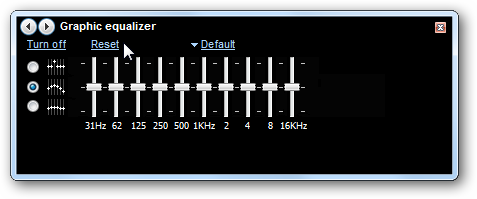
Graphic Equalizer
The graphic equalizer is toggled on and off by clicking Turn on / Turn off at the top left.
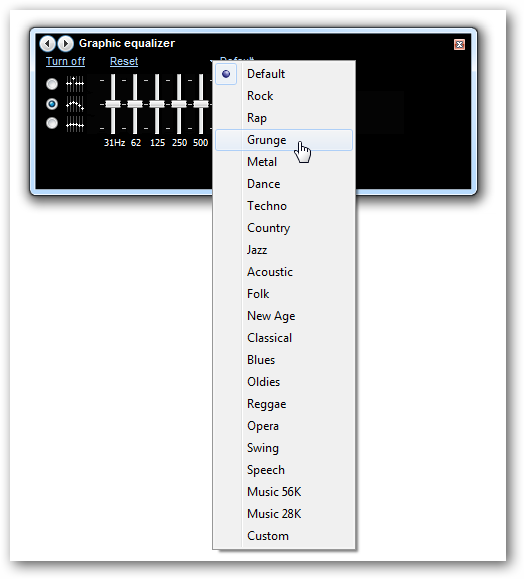
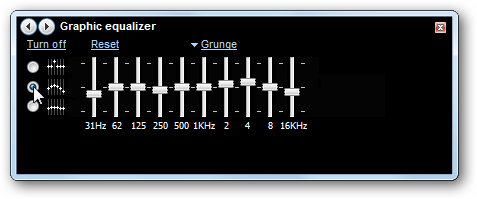
You can select pre-defined equalizer settings by music genre by clicking the Default list.
The radio buttons on the left allow you to move the sliders individually, in a loose group or a tight group.
You can always return to the default settings by clicking Reset.
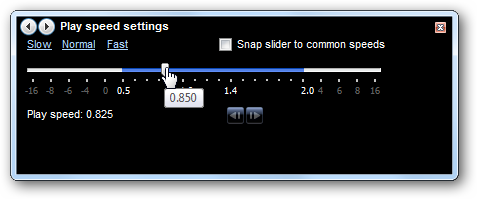
Play Speed Settings
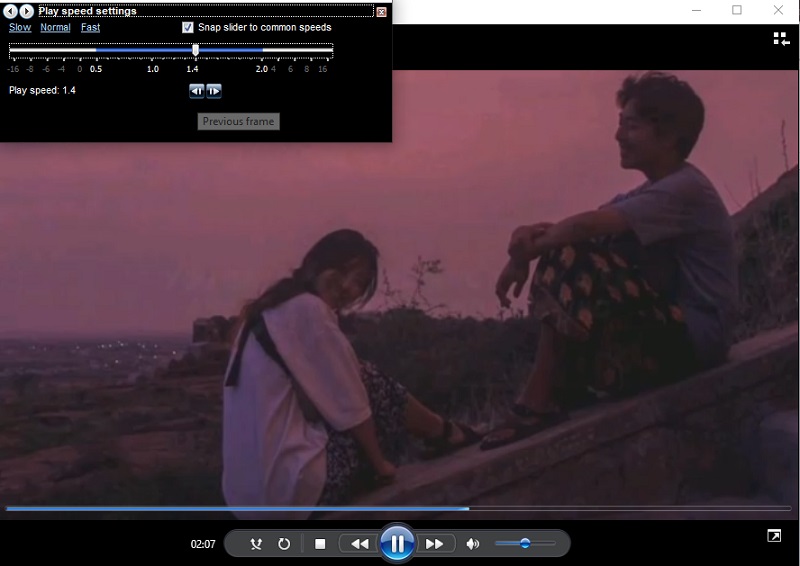
Choose a pre-defined settings by clicking Slow, Normal, or Fast.
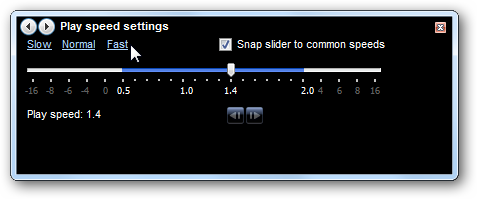
Uncheck the Snap slider to common speeds the move the slider right and left to your desired speed. If nothing else, these settings provide a little fun and amusement.
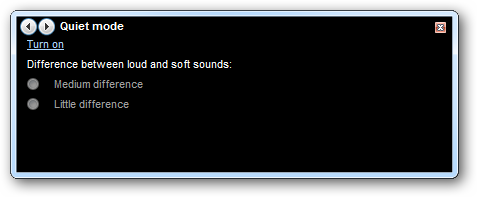
Quiet Mode
Quiet mode will level out any sharp volume highs and lows within a single track. Simply toggle the setting on or off and select whether you prefer Medium difference or Little difference by selecting one of the radio buttons.
SRS WOW effects
SRS WOW effects enhance low-frequency and stereo sound performance. Click Turn on to enable the TruBass and WOW Effect sliders.
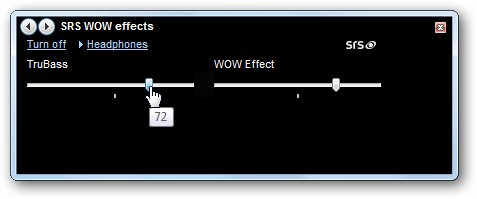
You can also optimize for your speaker type. Click to switch between Regular, Large, and Headphones.

Video Settings
Video Settings allow you to adjust the Hue, Brightness, Saturation, and Contrast.
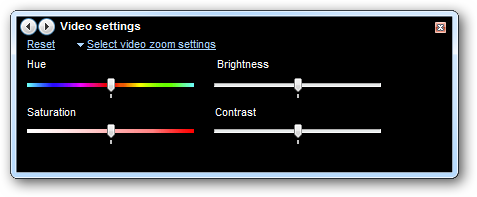
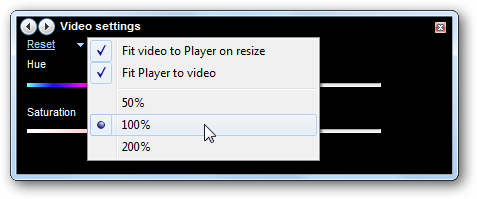
You can also adjust the zoom settings by clicking Select video zoom settings.
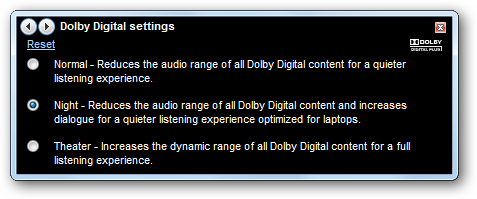
Dolby Digital Settings
Choose between Normal, Night, and Theater settings to adjust the audio for Dolby Digital content. This setting will only effect media with Dolby Digital sound.
Looking for more ways to improve your media experience in WMP 12? Check out how to update metadata and cover art and how to share media with other Windows 7 computers on your home network.
Fix buffering problems in WMP that cause videos to stutter and freeze
Updated on January 28, 2021
What to Know
- Switch to Library view and select Tools > Options > Performance. Select Buffer and set it to 10 seconds. Select Apply > OK.
- Disable UDP: Go to Options > Network and uncheck the RTSP/UDP setting. Select Apply > OK.
- Have internet issues? Go to Options > Player and turn on Connect to the Internet (Overrides Other Commands).
If you see choppy video playback or constant buffering while streaming video from websites, your Windows Media Player (WMP) installation might need a bit of tweaking. Instructions in this article apply to Windows Media Player 12 on Windows 10, Windows 8.1, and Windows 7.
Perform an Internet Connection Speed Test
For this, you can use a free service such as SpeedTest.net to test just how fast your internet connection really is. Ideally, you’ll want your broadband/cable speed to be:
- 3 Mbps or higher for standard definition (SD) video streaming.
- 5 Mbps or higher to stream high-definition (HD) video (720p+).
Once you’ve done this test, look at the download speed result to see if your connection is fast enough to stream video. If you are getting at least 3 Mbps, hen tweaking Windows Media Player is the next step.
Tweaking Windows Media Player to Optimize Video Streaming Performance
In the following steps, we’ll show you which settings in WMP to adjust to improve playback when watching video streams from websites.
-
Switch to library view mode if not already displayed.
You can hold down the CTRL key and press 1 to access Library view.
-
Select Tools and choose Options.
If you don’t see the main menu bar at the top of WMP’s screen, it has probably been disabled. To toggle the menu display, hold down the CTRL key and press M. Alternatively, hold down the ALT key and press T to display the tools menu. You can then press the letter ‘O’ key to get to the settings menu.
-
On the options screen, select the Performance tab.
-
Select the radio button next to Buffer in the Network Buffering section.
-
The default setting is 5 seconds. Type «10» in the box to increase it.
Using too much buffer time (step 4) can impact WMP and overall system performance, so it’s wise to change the buffer value in small increments until you’ve got satisfactory video streaming.
-
Select the Apply button and then OK to finish.
Other Ways to Improve Video Streaming Playback
If you find that video playback still isn’t ideal, then there are further tweaks you can do to try and improve this. These are:
Disable UDP Protocol
Some home routers that use NAT don’t forward UDP packets correctly. This can result in buffer looping, freezing, etc. To combat this, you can disable UDP in Windows Media Player. To do this:
-
Go to WMP’s Options menu and click the Network tab.
-
In the protocols section, clear the RTSP/UDP setting.
-
Select Apply and then OK to save.
Tweak WMP’s Connection to The Internet
If you are having streaming problems that seem to be related to your Internet connection, then try the following:
-
Go to WMP’s options menu and select the Player tab.
-
In the Player Settings section, make sure that the Connect to the Internet (Overrides Other Commands) option is enabled.
-
Select Apply and then OK to finish.
Only enable this feature if you’re having Internet connection problems. This is because enabling this setting will keep certain WMP services connected to the Internet all the time, rather than just when WMP is used.
Thanks for letting us know!
Get the Latest Tech News Delivered Every Day
Subscribe

Как ускорить видеоклипы в проигрывателе Windows Media? При использовании проигрывателя Windows Media эта проблема возникает у значительного числа людей. Причина в том, что у приложения есть возможность скрывать определенные элементы на экране во время игры. Из-за этого, если вы не очень хорошо разбираетесь в технологиях, вы не сможете найти эту опцию в проигрывателе Windows Media. Однако вам не о чем беспокоиться, так как в этой статье вы найдете пошаговое руководство по изменению скорости воспроизведения в проигрывателе Windows Media. Продолжайте читать, и вы увидите, что здесь всего три простых действия.
- Часть 1. Ускоряет ли проигрыватель Windows Media видео
- Часть 2. Как навсегда изменить скорость видео
- Часть 3. Часто задаваемые вопросы об ускорении видео в проигрывателе Windows Media
Часть 1. Ускоряет ли проигрыватель Windows Media видео
Microsoft Windows Media Player — это полнофункциональный мультимедийный проигрыватель, предустановленный во всех версиях Windows. Этот проигрыватель может воспроизводить все виды файлов и полностью функционирует. Эта программа позволяет пользователям просматривать фотографии, воспроизводить музыку с компакт-диска или музыкального файла и просматривать видеофайлы. Пользователи также могут воспроизводить музыку из музыкального файла. Проигрыватель Windows Media может читать и воспроизводить почти все типы мультимедийных файлов, которые вы можете найти на компьютерах. Он может не только воспроизводить аудио- и видеоклипы, но также имеет возможность изменять скорость повторного воспроизведения файлов. Он предполагает, что единственный способ добиться желаемого эффекта в Windows Media Play — это ускорить видео, а не применять его напрямую. Так как это единственный способ получить задуманный результат, ознакомьтесь с тонкостями, как ускорить проигрывание фильмов и DVD с помощью софта, о чем мы более подробно поговорим ниже.
Шаг 1: Получите проигрыватель Windows Media на вашем устройстве Windows и выберите видео вкладку из списка параметров в левой части окна. Он просмотрит все видеофайлы, которые вы сохранили на своем компьютере, и найдет каждый из них. Сначала вы увидите список видео в основном пользовательском интерфейсе. Из этого списка вы можете выбрать фильм, который хотите посмотреть.
Шаг 2: Вы можете открыть фильм, щелкнув по нему правой кнопкой мыши, или вы можете нажать кнопку Играть кнопку в нижней центральной части пользовательского интерфейса. Кроме того, он позволяет одновременно ускорять несколько видео в проигрывателе Windows Media с помощью списка воспроизведения.
Шаг 3: Щелкните правой кнопкой мыши видео, которое хотите улучшить, затем выберите Улучшения вариант из меню, которое появляется при переходе в игровое окно.
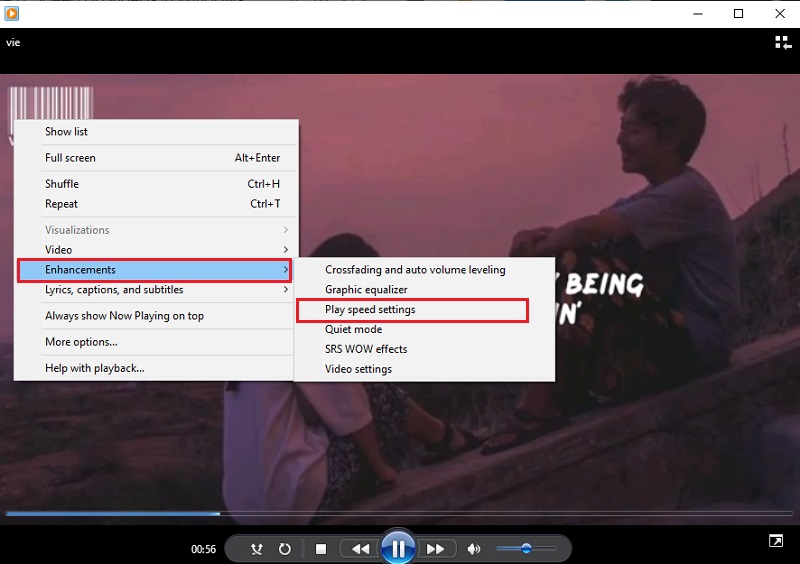
Чтобы изменить темп воспроизведения фильма, выберите Играть возможность настройки скорости. Переместите ползунок вправо, чтобы ускорить воспроизведение фильма в проигрывателе Windows Media. Кроме того, он предлагает несколько настроек, таких как Медленный, нормальный, а также Быстрый, каждый из которых увеличивает
Часть 2. Как навсегда изменить скорость видео
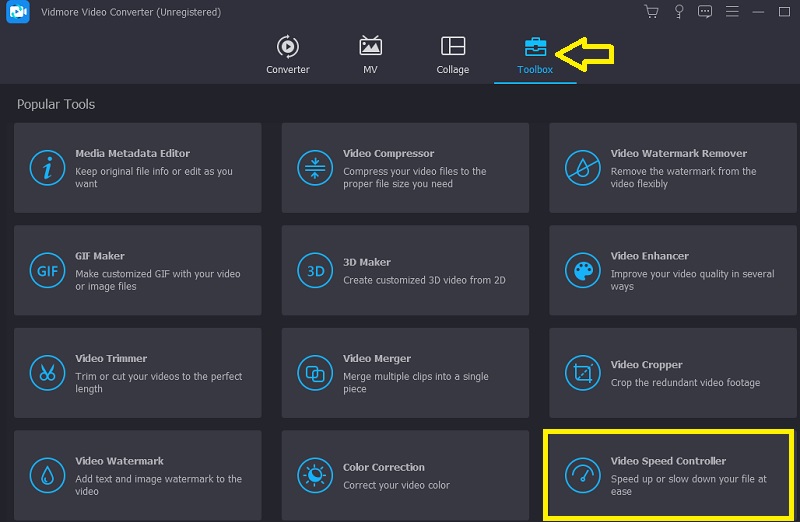
Видео конвертер Vidmore это полный регулятор скорости видео, который вы должны использовать, когда вам нужно ускорить фильмы. Вы можете сделать это, применив эффект ускорения, а не воспроизводить фильмы снова на высокой скорости. Он предлагает скорости в диапазоне от 0,25% до 8% от исходной скорости. Постоянное изменение настроек видео и звука в проигрывателе Windows Media отличается от ускорения видео в этой программе. Из-за этого эта программа значительно поможет вам, если вы хотите воспроизвести видео в другом темпе без необходимости заново настраивать его с нуля.
Вы также можете изменить частоту кадров видео, не нарушая его регулярность или качество. Прежде чем экспортировать фильмы, вы также можете использовать этот контроллер скорости видео, чтобы изменить формат видео, отредактировать их, вырезать или обрезать. Все эти параметры редактирования и обрезки доступны перед экспортом видео. Он предоставит вам руководство, которое поможет вам понять, как его использовать.
Шаг 1: Когда вы загрузили Vidmore Video Converter на свой Mac или ПК, вы можете установить его и сразу начать использовать. Следующим этапом является обеспечение корректной работы программного обеспечения.
Если вы хотите получить доступ к Ящик для инструментов, выберите его в главном меню. Когда вы будете готовы замедлить свои фильмы, выберите Контроллер скорости видео и нажмите кнопку +.
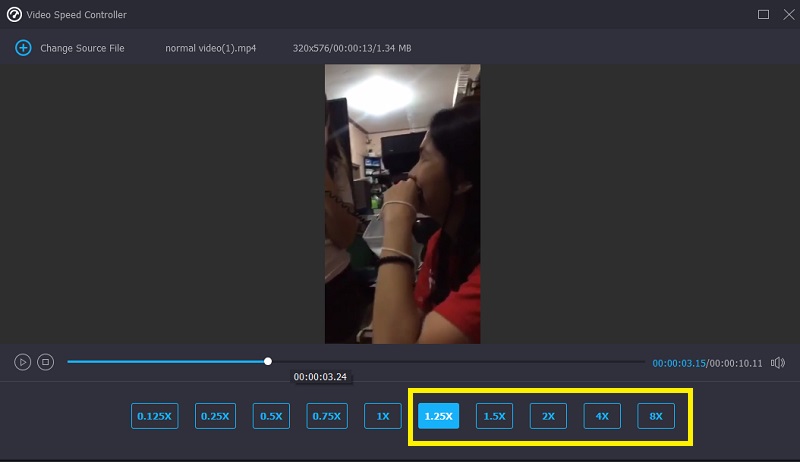
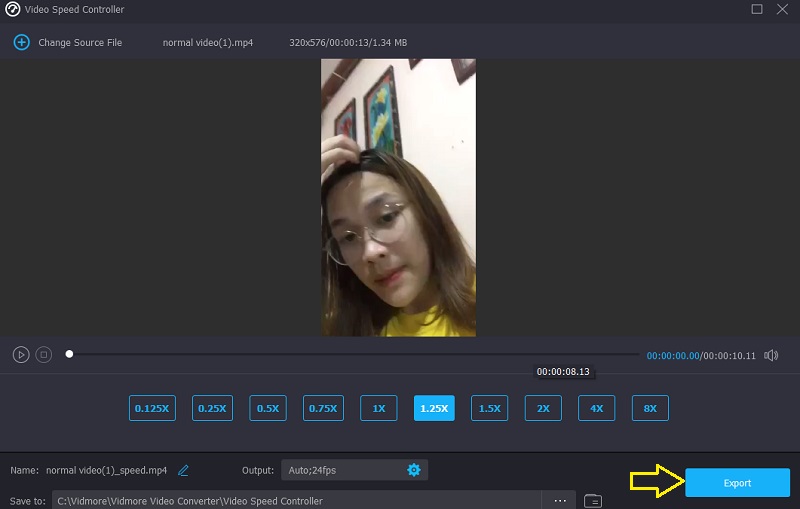
Шаг 2: После этого вы сможете выбрать желаемую скорость. Живая демонстрация рассматриваемого эффекта будет показана на основном экране непосредственно перед тем, как вам будет предложено экспортировать его. Вы можете настроить их в любой момент на скорость, чтобы убедиться, что она удовлетворяет вашим потребностям.
Шаг 3: После завершения создания фильмов вам будет предложено выбрать параметры вывода, которые вы хотите использовать для видео. После этого выберите каталог, который вы хотите использовать в качестве места хранения. После того, как вы сделали свой выбор, вы можете нажать кнопку в порядке символ, чтобы сохранить изменения в настройках.
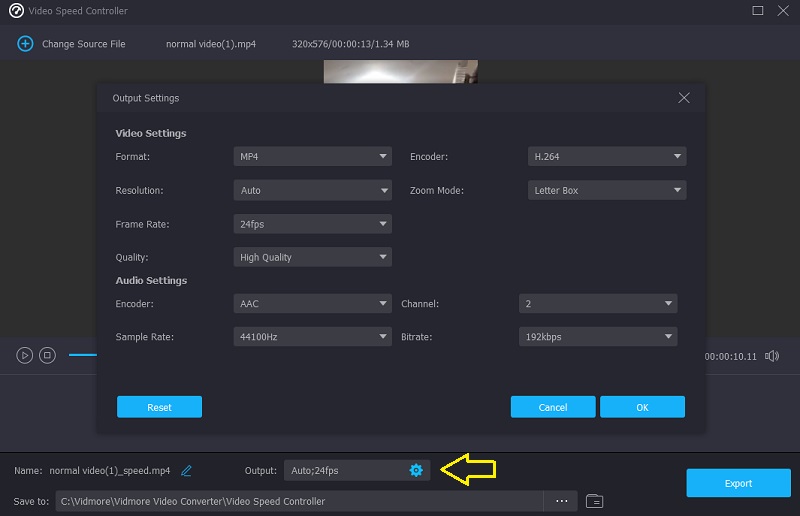
Выберите видео, которое хотите сохранить, а затем выберите Экспорт вариант из выпадающего меню.
Часть 3. Часто задаваемые вопросы об ускорении видео в проигрывателе Windows Media
Как исправить проигрыватель Windows Media, чтобы изменить скорость воспроизведения?
Запустите панель управления, выберите раскрывающееся меню «Просмотр» и выберите параметр «Крупные значки», чтобы просмотреть все доступные возможности. Чтобы войти в библиотеку проигрывателя Windows Media, выберите «Просмотреть все» в меню «Устранение неполадок» после выбора параметра «Устранение неполадок». После этого выберите параметр «Применить это исправление», чтобы фильмы в WMP запускались быстрее.
Какой медиаплеер Mac позволяет регулировать скорость воспроизведения видео?
QuickTime Player — лучший вариант, если вам нужен медиаплеер для вашего Mac, позволяющий увеличить скорость воспроизведения.
Совместим ли проигрыватель Windows Media с редактированием видео?
Проигрыватель Windows Media был разработан для работы только на устройствах с операционной системой Windows. Можно обрезать или изменить часть медиафайла прямо в проигрывателе Windows Media. Он не поставляется с какими-либо дополнительными инструментами редактирования, кроме этого.
Выводы
Проигрыватель Windows Media может ускорить видео и аудиоклипы, только если вы знаете, как управлять скрытой настройкой. И это подводит нас к основной цели этой части, которая состоит в том, чтобы проинструктировать вас о том, как изменить скорость воспроизведения видео в проигрывателе Windows Media. Тем не менее, Vidmore Video Converter является важной частью программного обеспечения, если вы ищете более простой в использовании инструмент для редактирования.
The Windows operating system comes equipped with a lot of built-in tools and applications to make the user experience more satisfactory and enjoyable. Among other applications is a media player called the Windows Media Player, which you can use to play video and audio files, such as MP4, MOV, MP3, etc.
The Windows Media Player (WMP) supports native display resolutions and is updated fairly regularly along with Windows updates. It has a simple interface that most users find easy to use. For people who only seek to play video and audio files (without much customization to audio or video playback), this should be sufficient. But sometimes, a simple media player like this might cause a few issues when playing video files.
You may encounter stuttering, lagging, or slow playback of video files on WMP, and it may be quite inconvenient if you don’t have a backup media player installed. If you encounter such issues, we can assure you that there’s no need to install another media player. WMV issues can be fixed with a few simple steps that are detailed in this post. But before we go to the fixes, let’s take a brief look at why these issues show up in the first place.
WMP is a lightweight application, which means it doesn’t hog up much system resources to run. There might be a few exceptions when running on outdated systems or higher resolution videos, but otherwise, users don’t report facing any issues when playing videos on WMP. So why do issues like laggy or slow video playback occur on it? Let us take a look at some of the common reasons:
- Background applications – If you’re running any background application that is consuming a majority of your memory and CPU resources, this might lead to your video playback slowing down or stuttering.
- Outdated version – If you are running an older version of Windows like Windows 7, 8, or 8.1, you will not get frequent updates for your applications. Eventually, this might lead to faulty playback.
- Malware – Some malware or virus can be consuming your system resources, making your computer perform worse.
- Outdated drivers – When your graphic card’s drivers are outdated, you may encounter glitches and lag in your video playback.
- Corrupted video file – A corrupted video file will fail to play or play slow or with a lot of lag and stuttering.
Now that we’ve seen the reasons, let’s proceed with some of the most common fixes to the issue.
How to fix slow video playback in WMP issue?
1. Use an anti-malware software
Malware or viruses can affect how your application or files behave. This might be the reason why your computer might be performing poorly, leading to issues with the media player. We suggest installing anti-malware software and getting rid of all the malware before proceeding with any further steps.
2. Close the background applications
If you are running any memory-intensive applications in the background while playing a video file on WMP, we suggest you close them to prevent the lagging video playback.
Note: You can also open Task Manager by right-clicking on your Taskbar at the bottom of your screen to see which unwanted application is taking the most resources and terminate them from there. But this is recommended for advanced users only; there are some vital system tasks there, which when closed abruptly, can potentially crash your computer.
3. Update WMP
Running an outdated WMP can result in videos playing slowly. We suggest you visit the official Windows website and install the latest version of the player to prevent any video playback glitches, slowing, and lagging issues.
4. Update your Windows and drivers
If you are running Windows 10, you must update it regularly. Windows releases updates for its applications and drivers on a weekly or fortnightly basis. We suggest you keep an eye out for these updates and follow through regularly.
5. Audio syncing issue
If you’re facing some simple audio syncing issues in the media player, they can be easily fixed. Audio sync issues can make the video viewing experience poor and may seem like you have laggy video playback. Follow these steps to fix this issue:
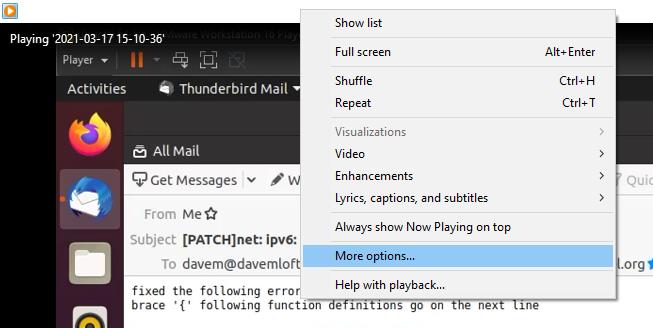
- Go to the media player and right-click on the top bar to open the following drop-down menu. Choose More options from this menu.
- A dialog box will appear on your screen. Navigate to the Performance tab and check the box that says Drop frames to keep audio and video in sync, and click on OK to proceed.
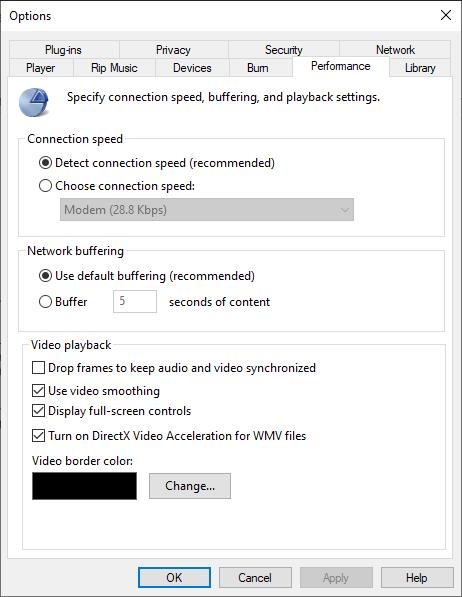
Now you should technically not face any issues with audio and video going out of sync in WMP. However, if you’re still seeing a poor playback performance, there might be an issue with the file itself. It may be damaged or corrupted.
In such a scenario, fixing the file might be the only solution. And luckily, we’ve got just the tool that can help you with the task.
6. Repair corrupted video file
As a quick fix, try playing the file with another media player to see if that works. If it still plays slowly or the player crashes, you can be sure that the file is corrupted. The final full-proof technique that you can use is repairing the file with Stellar Repair for Video.
Stellar Repair for Video is a competent and reliable tool specially designed to enable users to repair corrupted video files of any format, including MP4, MOV, MKV, etc. The software is compatible with Windows and macOS and is effective and safe to use. It supports repairing files saved on most storage media, including SD cards, HDD, SSD, etc. It’s very simple to use and comes with a free trial for you to try it before buying.
Allow us to show you how to use the software to repair your corrupted video files.
Downloading and installing Stellar Repair For Video
- Go to the official website page for Stellar Repair for Video and click on the Free Download button.
- After the download completes, double-click on the .exe file to run the installer.
- Once the installation is completed, launch the application and follow these steps to repair your corrupted video files.
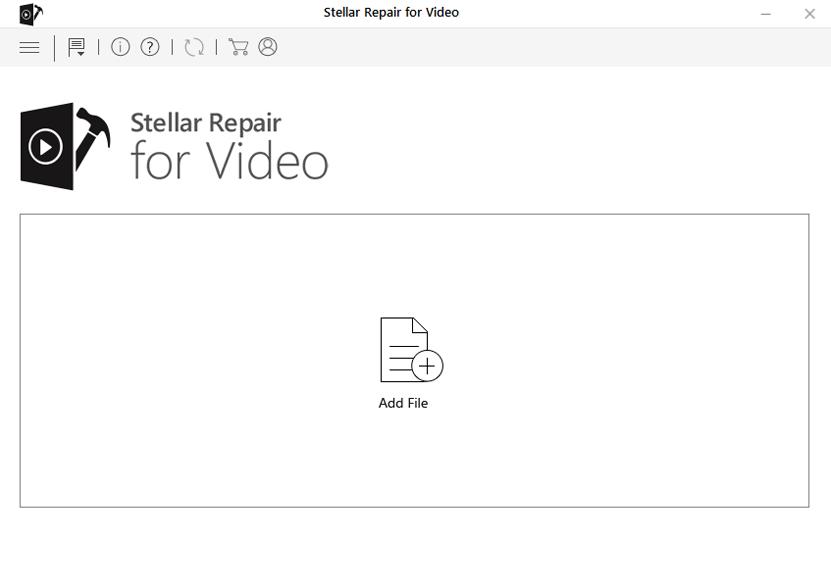
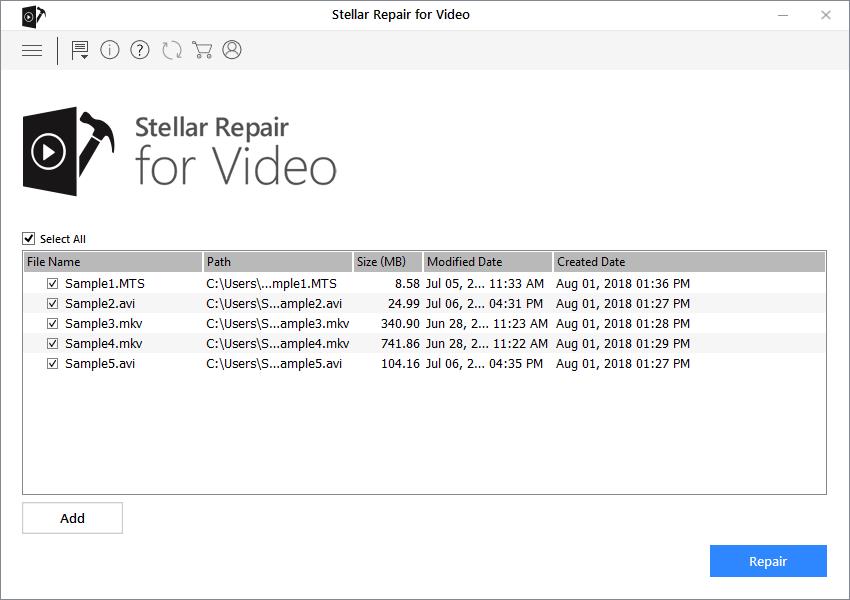
- On the software’s interface, click on the box that says “Add File” to add the video file that needs to be repaired. You can also add multiple files here.
- After adding the files to the tool, click on the “Repair” button to start the repair process.
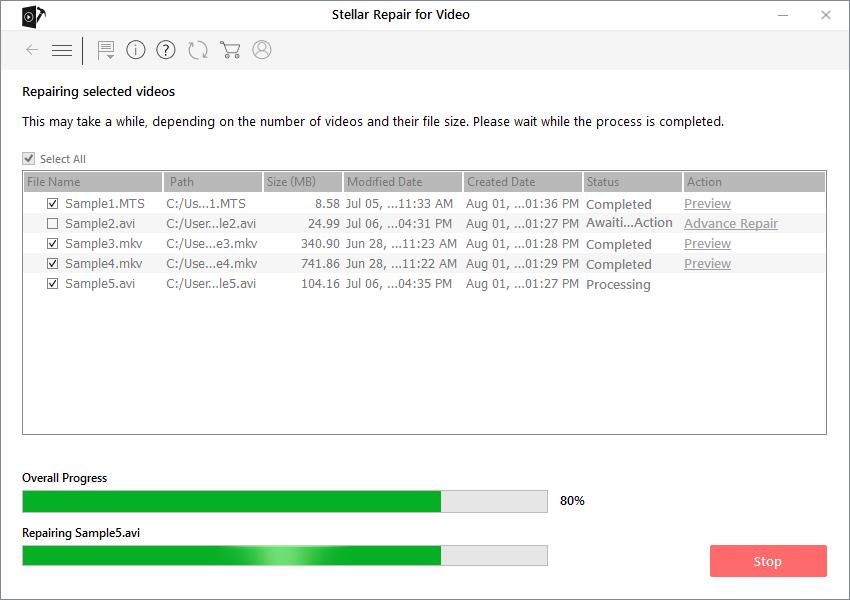
- When the repairing process has begun, a progress bar will show how much of the added files have been repaired.
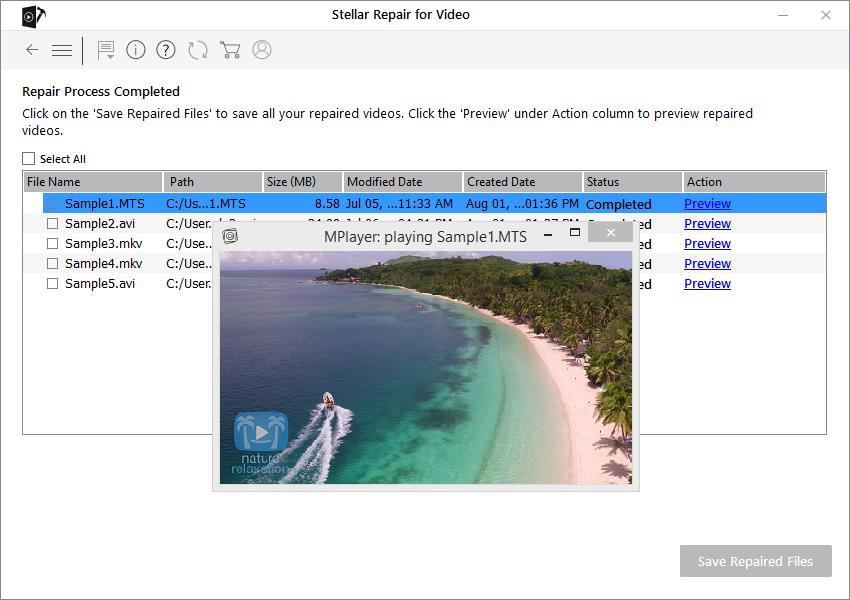
- After the video files have been repaired, you can preview them before saving them to your computer.
This is how you can fix corrupted video files. Once you’ve repaired the damaged videos, try playing them on WMP to see if the slow or laggy playback has been fixed. We’re sure it would have, if not (and if the video is very critical), we suggest you consult professionals for a deeper look.
Conclusion
It can be quite annoying when a video shows glitches or lags, or worse, fail to play. But more often than not, understanding why you may be encountering such issues can help fix them. We hope the solutions that we provided for WMP playback issues in this post were helpful. In case of corrupted video files, a simple application like Stellar Repair for Video can be a life-saver.
Was this article helpful?
YES0
NO
Улучшаем качество изображения и звука
Для WMP (Windows media player) существует мощный плагин wmp framerate doubler: http://sourceforge.net/projects/srdoublerwmpplg/
Там есть и исходники на CVS.
Для качественного деинтерлейса рекомендую использовать алгоритм YADIF, который входит в пакет K-Lite Codec Pack.
Звук
Можно ресемплировать вплоть до 96кГц: Ресемплирование->Ресемплировать если поток < 96000. Изменить на 96000.
Также, имеет смысл настроить в конфигурации кодека ffdshow->ввод-вывод->32 бит с плавающей точкой.
Ещё: ffdshow->Обработка->32 бит с плавающей точкой.
Для вытягивания звука до приемлемого уровня при низком битрейте подойдут такие настройки:
Хотя, так усердствовать с Bandwidth extender чревато появлением треска. Всё надо в меру.
Видео
Выкидываем всё на свалку и ставим пакет программ Smooth Video Pack.
Данный пакет программ позволяет смотреть видео на компьютере с повышенной плавностью.
Настройки смотрим как правильно выставить тут: http://svp-help.narod.ru/quickstart.htm
Всё чудесно работает на любой машине, только чем слабее — тем менее качественное будет удвоение кадров.
Надо обязательно сделать следующие вещи:
- Смотреть только через Media Player Classic. Неважно — идущий с пакетом или из K-Lite Mega Codec Pack
- Использовать WMR7: Вид — Настройки… — Воспроизведение — Вывод — выбрать VMR7 (windowed) — ОК.
- В справке написано, что отключить встроенные декодеры, но эфект становится только хуже. Т.е. если отключить встроенные декодеры в MPC — то картинка дёргается, а если не отключать — то всё плавно.
- Подключать фильтр ffdShow RAW при проигрывании любого видео: по меню Вид — Настройки… — Внешние фильтры — нажать кнопку Добавить, выбрать из списка ffdshow raw video filter — выбрать в радиогруппе значение Предпочесть — ОК; Проверил — всё нормально.
Покупаете 4-ядерный процессор и смотрите любимые фильмы в обалденном качестве! Для каждого разрешения можно подкрутить настройки в выпадающем меню программы, которое найдёте в систмном трее (область внизу справа экрана, где часы тикают). Жмите правую кнопку — там сверху будет меню Профили настроек алгоритмов. Чтобы изменить настройки по-умолчанию для конкретного разрешения — тыкните на соответствующую позицию.
- 320×240
- Алгоритм обработки: Качественный алгоритм
- Повышение плавности: Удвоение кадров
- Точность прогнозирования движения: До полу-пиксела
- Размер блоков: 16×16 пикселей
- Перекрытие блоков: 0,5 блока
- Радиус поиска движения: 1 блок пикселей
- Подавление контурных артефактов: Простое + Статич. вектора
- Степень подавления артефактов: Высокая
- 320×240
- Алгоритм обработки: Качественный алгоритм
- Повышение плавности: Удвоение кадров
- Точность прогнозирования движения: До пиксела
- Размер блоков: 16×16 пикселей
- Перекрытие блоков: 0,25 блока
- Радиус поиска движения: 1 блок пикселей
- Подавление контурных артефактов: Простое + Статич. вектора
- Степень подавления артефактов: Высокая
И так далее — упрощая качество обработки, перекрытие блоков, подавление контурных артефактов…
Linux Ubuntu/KUbuntu/XUbuntu и прочее
Здесь также можно настроить мультисэмплинг (удвоение кадров). В двух плейерах реализованы алгоритмы удвоения кадров (double frame rate). Самый совершенный алгоритм YADIF только в одном из них — SMPlayer.
Как выглядит работа алгоритмов деинтерлейса можно увидеть здесь: http://guru.multimedia.cx/deinterlacing-filters/
Только в SMPlayer доступны через меню и YADIF с удвоением кадров и программное масштабирование. При этом процессор загружен минимально.
P.S.
Рекомендую освоить настройку самостоятельно. Пригодится как для себя, так и помогать улучшать отношения с начальством и противоположным полом 
Самый качественный режим визуализации для видеоплейера это madVR — он растягивает картинку с максимальным качеством. Чтобы его активировать — скачайте последние K-Lite Mega Codec Pack и в настройках Media Player Classic выставьте View->Options->Output->madVR.
Но под Linux’ом пробовал использовать OpenGL-канву и тут эффект от бикубической интерполяции был явно ощутим!
TV
На диком Западе знающий народ покупает дорогие Sony Bravia последних серий и смотрят в результате дешёвые DVD-диски с качеством HD-TV. Все остальные фирмы нервно курят в сторонке. Плазма конечно круче, но кому охота иметь постоянно включённым утюг? Можно придраться конечно к качеству (громкости) звука у Bravia, но лучше купить домашний кинотеатр и не возникать.
Для ЖК телевизоров больших размеров (от 40″ и более) — нет ничего лучше Sony и их 200-герцовых телевизоров.
Что касается 32-37 дюймов — то тут на первом месте Samsung с его 6-й серией и сверхмощными чипами. Программное обеспечение обновляется через Internet и с флешки, 100Hz и обалденная яркость. Из субъективных впечатлений — плохого качества MPEG4-фильмы проигрываются с качеством почти HDTV, да ещё плавно как если бы фильм был снят на 50 кадрах/сек. У Samsung’а есть масса улучшателей изображения — улучшатели границ и удалятели шумов — всё вырубить. Начиная с 9-й серии ТВ Samsung могут даже записывать видео на флешку или подключённый внешний диск.
Если выбирать по степени навороченности технологиями — то круче Samsung, хотя качество картинки у Sony всё-таки выше, но это относится только к ЖК-экранам. На LED-варианте в выигрыше наверное будет всё-таки Samsung с их мегатехнологиями.
Без внешних колонок смотреть ТВ не рекомендую. Качество встроенных колонок паршивенькое. Берите систему 2.1 (колонки + сабвуфер) от A4Tech AS-302 и будете получать полные впечатления. Ещё можно рекомендовать что-то из этого.