
Все способы:
- Способ 1: Регулировка громкости на наушниках
- Способ 2: Проверка физических неисправностей
- Способ 3: Регулировка громкости в ОС
- Способ 4: Проверка дополнительных параметров звука
- Способ 5: Обновление звукового драйвера
- Способ 6: Использование средств улучшения звука
- Вопросы и ответы: 0
Способ 1: Регулировка громкости на наушниках
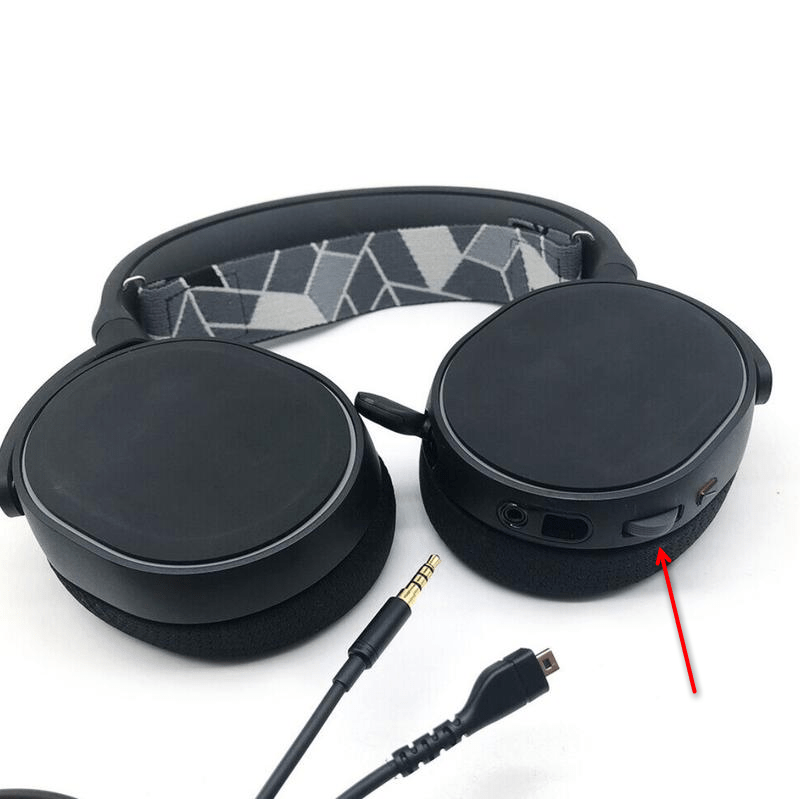
Одна из частых причин тихой работы наушников — низкий уровень громкости, установленный на самом устройстве. Сейчас практически все современные, как музыкальные, так и игровые девайсы имеют либо колесико на одной из сторон, либо кнопки в этом же месте, либо кнопки на специальной плате, расположенной на кабеле. Внимательно ознакомьтесь со спецификацией своих наушников, попробуйте найти кнопки или колесико, затем выполните регулирование и проверьте, удастся ли таким способом увеличить громкость в Windows 11.
Способ 2: Проверка физических неисправностей
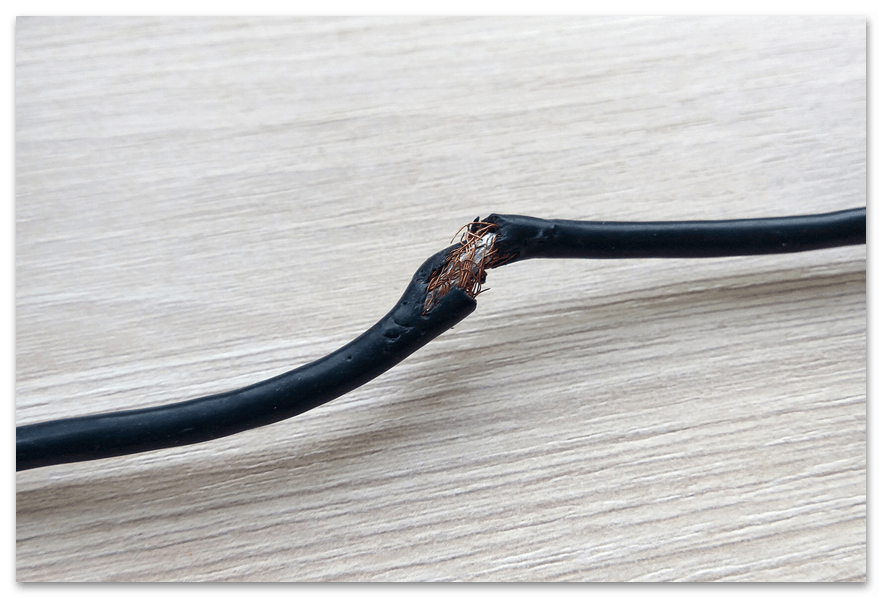
Иногда пользователи даже не замечают, что кабель на наушниках перегнулся в одном месте или начались проблемы с оплеткой. Обычно такие проблемы возникают около штекера или возле соединения с амбушюрами. Приводит такая неисправность к ухудшению звука, его отсутствию в одном из наушников или искажению частот, что тоже отражается на громкости. Мы советуем внимательно посмотреть на всю длину кабеля и узнать, нет ли на нем видимых физических дефектов.
Отдельно стоит отметить, что при наличии нескольких доступных разъемов 3,5 мм вы можете попробовать подключить наушники к другому свободному порту, чтобы исключить проблему с его неисправностью. Это может быть как порт на вашем мониторе, так и материнской плате или передней панели корпуса системного блока.
Способ 3: Регулировка громкости в ОС
Теперь, если предыдущие способы не помогли решить ситуацию, понадобится обратиться непосредственно к операционной системе и проверить, можно ли увеличить громкость в наушниках через ее настройки. Рассмотрим как работу с общим ползунком громкости, так и с дополнительным меню, где есть регуляторы для всех работающих приложений.
- Вы можете нажать по кнопке на панели задач для вызова меню с настройками, среди которых есть и общий регулятор громкости. Передвиньте его немного вправо, если значение еще не максимальное, и проверьте, удалось ли решить проблему.
- Еще можно проверить громкость через «Параметры», открыв приложение путем нажатия по его значку в списке закрепленных «Пуска».
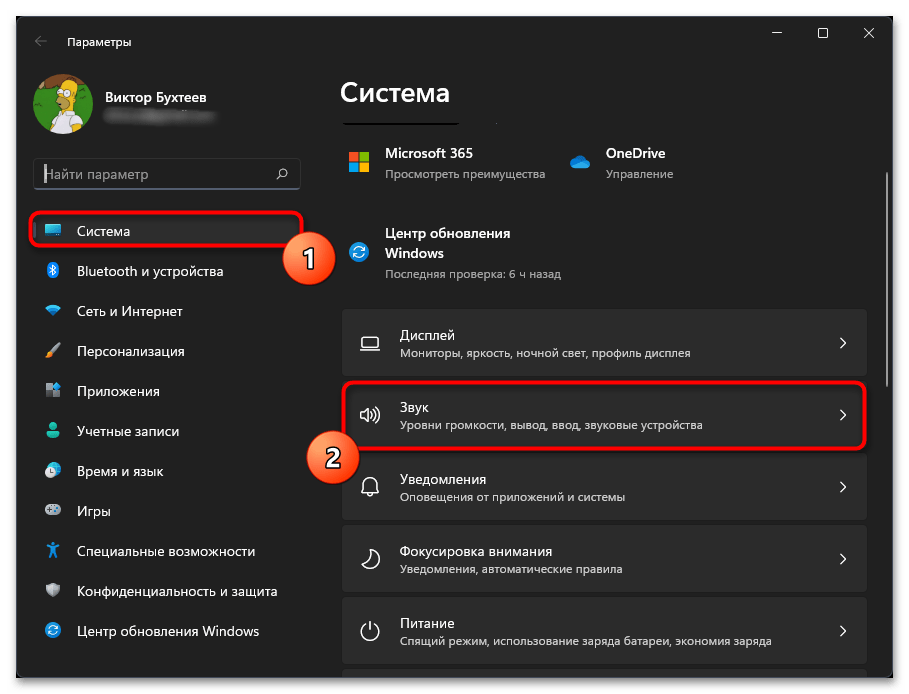
- Выберите раздел «Система» и разверните категорию «Звук».
- В ней убедитесь в правильности выбранного устройства воспроизведения, затем отрегулируйте громкость и попробуйте включить «Монозвук», что может оказаться полезным для небольшого усиления звучания.
- Опуститесь по списку и нажмите по «Громкость» для перехода к списку всех работающих приложений.
- Проверьте громкость каждой из программ и отрегулируйте ее, если это будет нужно. Такой метод часто помогает в ситуациях, когда в самой Виндовс 11 и в других приложениях громкость нормальная, а в каком-то конкретном — слишком низкая.


Способ 4: Проверка дополнительных параметров звука
Улучшения или параметры дискретизации, установленные для устройства воспроизведения в Windows 11, могут негативно сказываться на громкости, немного или даже ощутимо занижая ее. Особенно это будет заметно в тех случаях, когда речь идет о наушниках с не самыми хорошими звуковыми характеристиками. Мы советуем ознакомиться с этими дополнительными параметрами и изменить их для проверки настроек громкости.
- В том же меню настроек звука нажмите по ссылке «Дополнительные параметры звука».
- На первой вкладке под названием «Воспроизведение» найдите «Динамики» или «Гарнитуру», с которой сейчас осуществляется вывод звука. Дважды кликните по оборудованию левой кнопкой мыши.
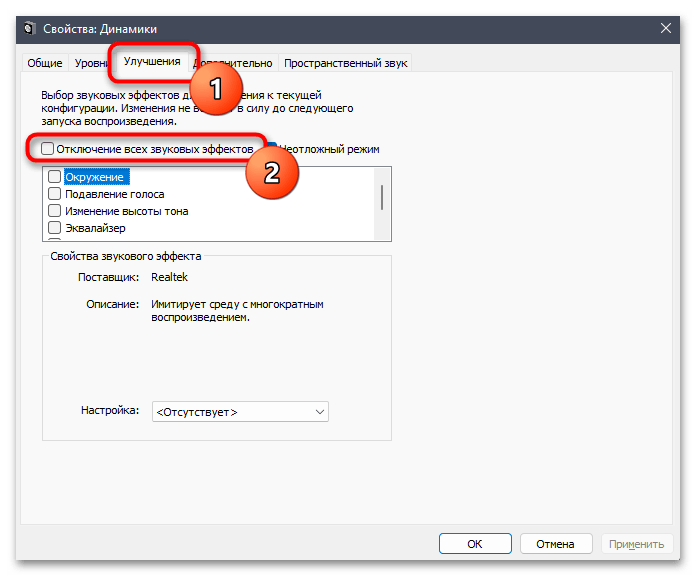
- Перейдите на вкладку «Улучшения», установите галочку возле пункта «Отключение всех звуковых эффектов» и примените изменения. Затем приступите к воспроизведению звуков и проверке громкости.
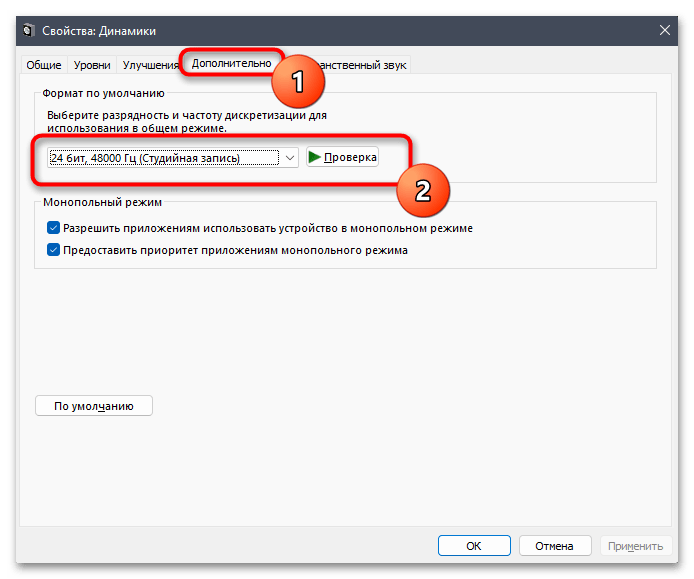
- Еще можно перейти на вкладку «Дополнительно», чтобы изменить формат по умолчанию, выбрав другую разрядность и частоту дискретизации. В некоторых случаях отличные от установленного параметры оказывают положительное влияние на громкость наушников.


Способ 5: Обновление звукового драйвера
Отсутствующий или устаревший звуковой драйвер редко становится причиной тихого звука на наушниках в Windows 11, однако такую причину исключать нельзя. Поэтому мы советуем самостоятельно проверить наличие обновлений и установить их. Использовать можно самые разные методы, начиная от штатного и заканчивая применением специальных программ. Более детально об этом читайте в другой статье по следующей ссылке.
Подробнее: Обновление звукового драйвера в Windows 11

Способ 6: Использование средств улучшения звука
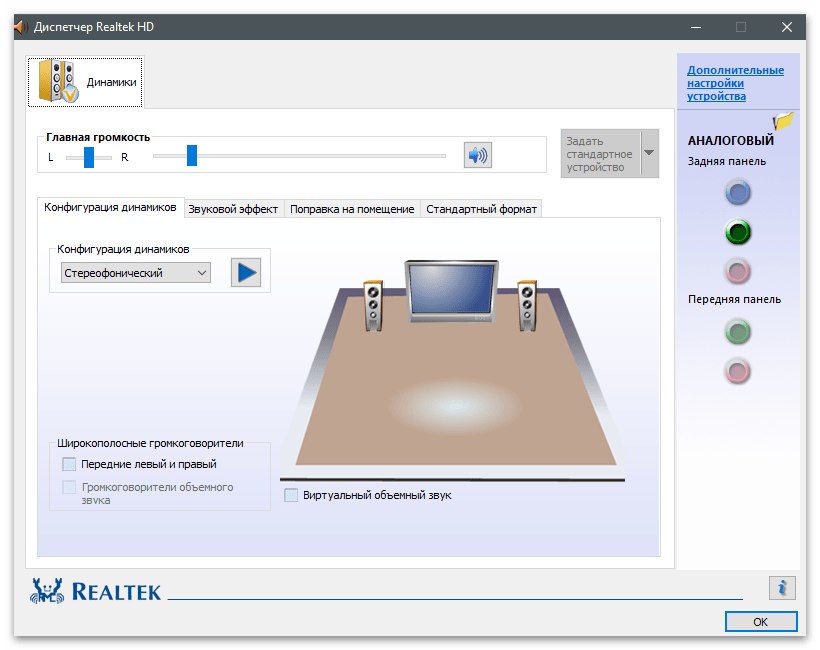
Последний метод является комплексным, поскольку подразумевает использование разных средств для улучшения звука в наушниках. Иногда помогает установка драйвера от Realtek, в других случаях проблема решается после добавления специальных кодеков. Каждая из рекомендаций описана в материале, доступном по следующему заголовку.
Подробнее: Улучшение звука в наушниках на компьютере
К этому же методу можно отнести использование программ для усиления звука. Некоторые предназначены именно для этой цели, а другие являются настраиваемыми эквалайзерами с нужными функциями. Вы можете выбрать любой понравившийся софт и проверить, как он повлияет на звук в ваших наушниках. Обзор на самые действенные решения такого рода вы найдете далее.
Подробнее: Программы для усиления звука на компьютере
Наша группа в TelegramПолезные советы и помощь
In this guide, we will look into three ways that can improve the sound quality coming off the headphones or speakers in Windows 11 PC. This includes configuring the following features on your device – “Enhance Audio”, Spatial Sound, and Mono Audio.
There are several aspects that deter the overall sound quality on Windows 11. Whether it is the speaker or headphone that you are using, hardware, or device drivers, they all combine to have a say in producing the poor audio quality on your device.

Considering you have already updated your sound drivers, and are using high-quality headphones, we present you with some additional ways that can enhance the audio on Windows 11 PC. Let’s dive into these useful methods one by one –
Fix: Sound Issues on Windows [Complete Guide]
On Windows 11, there are several ways that you may intend to improve the overall sound quality on your device. We have compiled a list of three such features that can help to boost the audio coming from your PC. They are as follows –
- Enhance Audio
- Enable Spatial Sound
- Enable Mono Audio
1] Enable “Enhance Audio” on Windows 11
This is the first and foremost setting that you must enable on Windows 11 and check if this serves your purpose. Turning this feature On will automatically boost the sound quality on your device. Here’s how you may enable “Enhance audio” on Windows 11 –
- Press WinKey + I to launch the Settings app.
- Click System > Sound (right pane).

- Scroll below and click over the option – “All sound devices” under Advanced.
- Click Speakers inside Output devices.

- Here, you will find a setting to Enhance Audio under “Output settings”.
- Slide its toggle switch to the right to improve sound quality in Windows 11.

Restart your PC next and check if this enhances the audio quality on your computer.
How to Enable or Disable Windows 10 Startup Sound
2] Enable Spatial Sound in Windows 11
Spatial sound is basically an audio format that provides an immersive audio experience over headphones (wired or Bluetooth) or external speakers.
In the case of an external speaker, it feels like the sound is coming from all corners as opposed to previously coming from the speaker itself. Similarly, if you enable Spatial sound over a headphone, this too improves the sound quality to a larger extent.
Though you may enable spatial sound on any headphone or speaker, it works best only on the supported devices.
Note: To turn On this feature on Windows 11, you need to first connect a headphone/speaker to your device.
- Right-click over the Windows icon and select Settings.
- Click System and then Sound.
- On the right pane, you may find two options to choose from.
- Click over the option – “Headphones”.

- Scroll down to “Spatial Sound” and use the drop-down menu to select “Windows Sonic for Headphones”.

- That’s it, you may now enjoy an immersive audio experience over your connected headphone.
Tip: This setting won’t work if you have enabled the Mono audio on your PC. So, disable mono audio first then only you may turn the spatial sound in Windows 11.
3] Turn On Mono Audio in Windows 11
Another important feature that can help to improve the sound quality in Windows 11 is the usage of mono audio. When one enables this setting, the system combines the left and right audio channels to provide a single sound.
Here’s how you may enable mono audio on Windows 11 –
- Open the Settings page by pressing Win + I.
- Click System and then Sound on the right pane.
- Look for a setting “Mono audio” under the Output section.

- When found, slide its toggle switch to the right.
That’s it, the system will now convert the stereo sound into a single channel, hence the name – mono audio.
Windows 11 comes with several new audio features and settings including the new Enhanced Audio setting that is able to automatically improve sound quality when turned on. It also includes several audio enhancements such as Bass Boost, Virtual Surround, Room Correction and Loudness Equalization. However, Sound Equalizer enhancement is not included in Windows 11 by default.
This guide will show you how to add the audio Equalizer Settings in Windows 11 Sound Control Panel. We will also show you 2 other popular third party sound equalizer software for Windows 11 you can use if the former doesn’t work.
Also see: How to Boost Volume Above 100% in Windows 11
How to open sound equalizer settings in Windows 11
To add the Equalizer enhancement (as shown in the screenshot above) to the Sound Control Panel in Windows 11, follow the steps below.
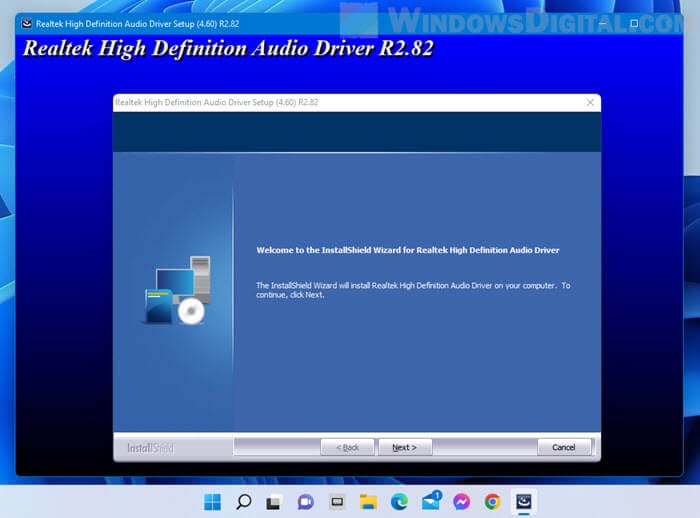
1. You need to first download and install Realtek HD Audio Codecs Software Driver. On the download page, select the setup with the description that best matches your Windows version (Windows 10 version will work for Windows 11, and Windows 11 are usually 64-bit). If the download is too slow, you can download from an alternative source instead at: https://realtek-download.com/download-hd/.
See also: How to Update Realtek Drivers in Windows 11
2. Once downloaded, run the installer to install the Realtek High Definition Audio Codecs Software Driver. When the installation has completed, restart your computer.
3. Once restarted, to open the sound equalizer settings in Windows 11 via Advanced Sound Settings, right-click the Sound icon from the taskbar and select Sound settings.
4. In the Sound settings window, scroll down and look for “More sound settings” option and select it.
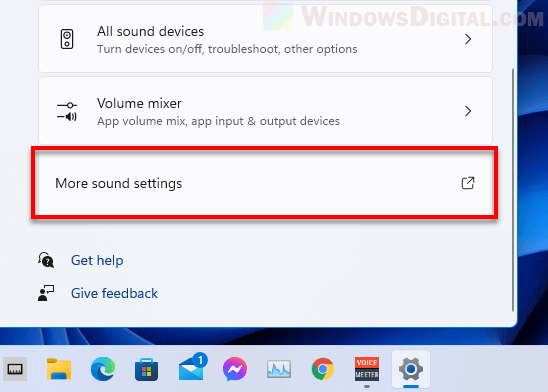
5. In the Sound control panel window, right-click the Speaker or Headphones you are currently using, and then select Properties.
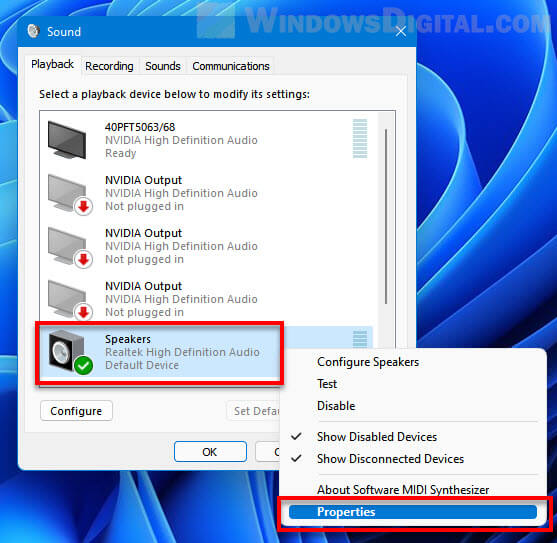
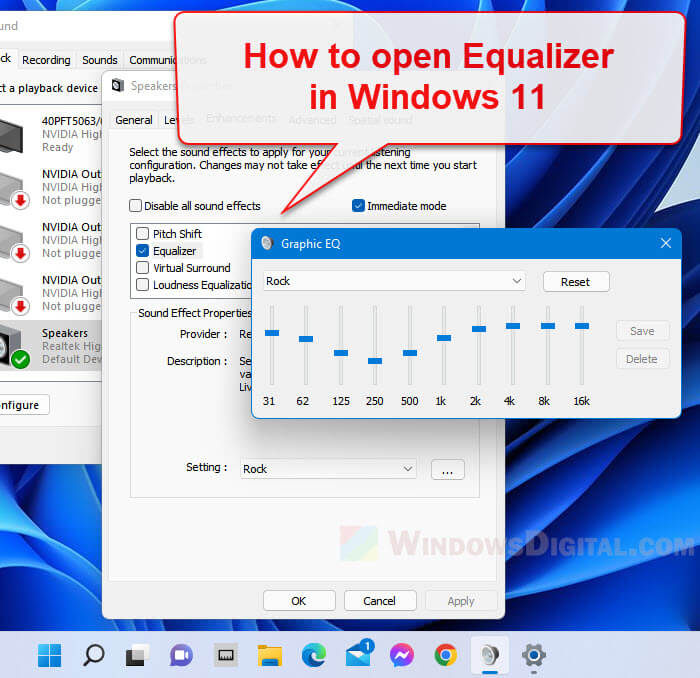
6. Next, select the Enhancements tab. Make sure “Disable all sound effects” option is disabled (otherwise you will not be able to enable any audio enhancement including the equalizer settings). In the list of enhancements, enable Equalizer. While selecting Equalizer, you can change the Windows 11 sound equalizer setting to a preset setting such as Rock, Live, Pop, Classical, Bass, Treble, Powerful, etc.
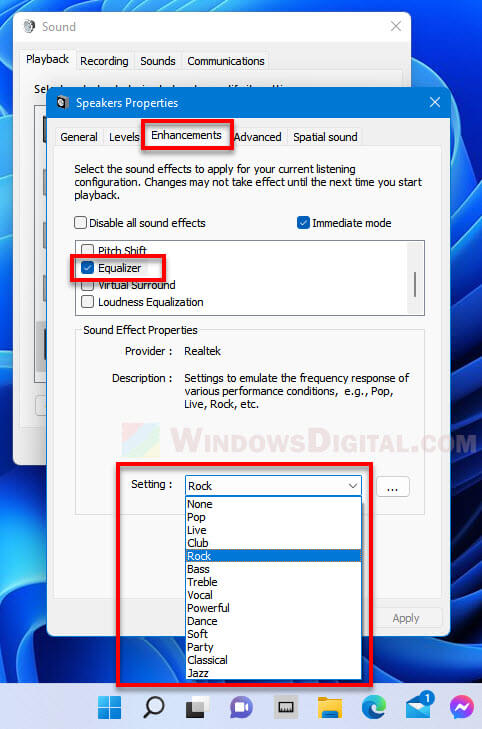
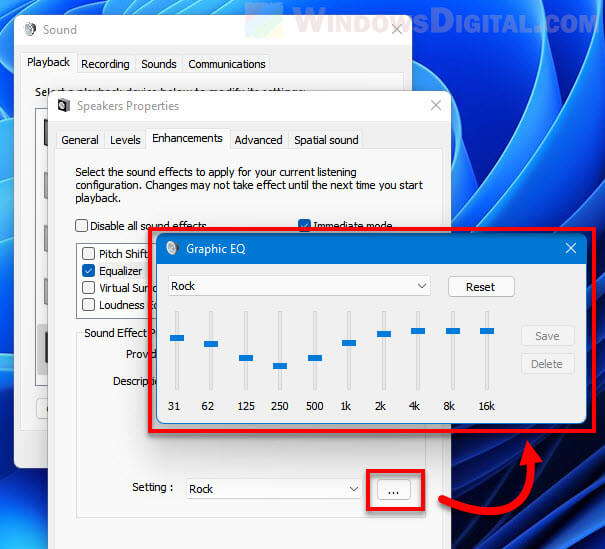
To manually customize your own sound equalizer setting, click the triple dotted option button next to the preset Setting to open the graphical equalizer (Graphic EQ) window. From there you can adjust the audio equalizer settings to your preference in Windows 11.
Also read: How to Change Volume of Different Apps on Windows 11
Other audio equalizer software for Windows 11
Since there is no built-in sound equalizer in Windows 11, we will have to rely on a third party audio equalizer software. The easiest way to get sound equalizer settings in Windows 11 is by installing Realtek HD Audio Driver as shown in the instructions above.
If that doesn’t work or if the audio equalizer by Realtek does not satisfy your need, you can try to use other audio equalizer software instead. Listed below are 2 of the most popular and free sound equalizer software for Windows 11.
Equalizer APO
While there are many audio enhancer software that provides graphical equalizer feature for Windows 11, most of these software are usually not free. However, there is a simple equalizer tool that is actually open-source and free to use, and is one of the most popular sound equalizer tools for Windows. It is called Equalizer APO.
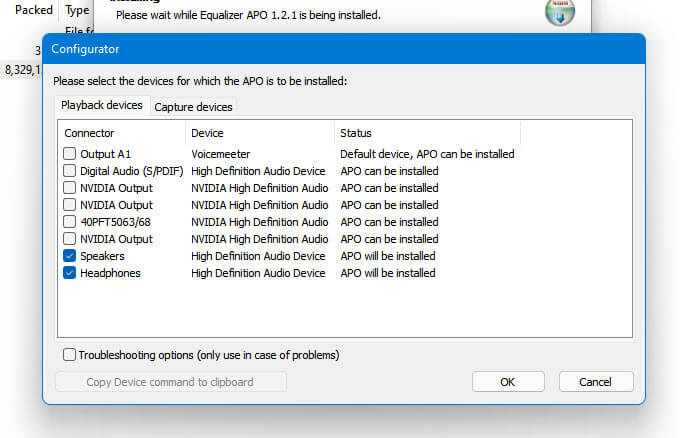
You can get Equalizer APO from https://equalizerapo.com/download.html. When you install the software, the setup will prompt you to select the playback devices you want to use with APO.
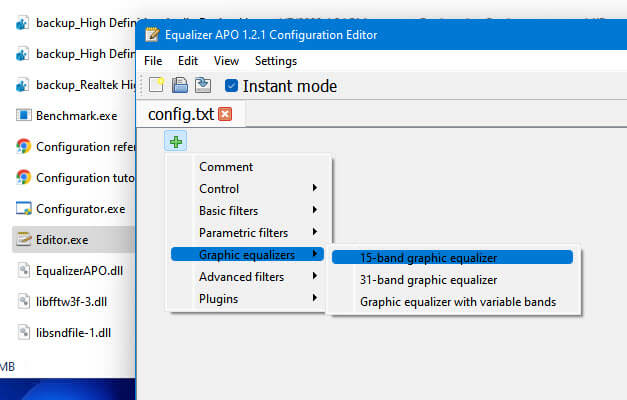
Once installed, to open the graphical equalizer in APO, go to its installation folder (usually at “C:\Program Files\EqualizerAPO“) and open the Editor.exe file. In the Equalizer APO Configuration Editor window, click the add button (plus) and select Graphic equalizers > 15-band, 31-band, or graphic equalizer with variable bands (whatever you prefer).
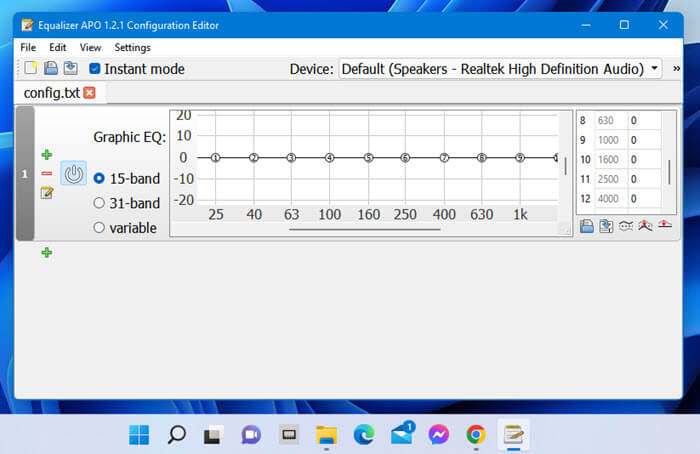
From there you can adjust the sound equalizer for Windows 11. Once you have done adjusting the sound equalizer, Click File > Save in the Equalizer APO Configuration Editor window to save the changes.
Related: How to Increase or Boost Microphone Volume in Windows 11
FxSound
FxSound is another extremely easy to use and free audio enhancer software that also provides graphical equalizer for Windows 11. It provides a very user-friendly interface that even users who are not very computer-literate would be able to use the tool. You can get FxSound from https://www.fxsound.com/.
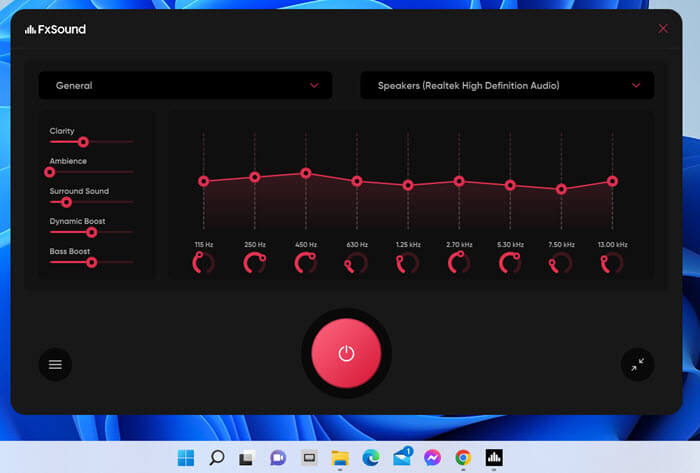
There is no specific guide needed for this tool. As soon as you open the tool, you will immediately see all the available sound enhancement options and graphic EQ on the main interface of the app. You just need to choose the speaker or headphones you want to apply the settings to and then click the power button to activate the changes.
Frequently Asked Questions
How do I change the equalizer in Windows 11?
You need to install the required audio codec software driver first, and then access the equalizer settings via Sound Control Panel in Windows 11.
How do I adjust bass and treble in Windows 11?
After installing the required audio codec, you can use the equalizer settings via Sound Control Panel to adjust the bass and treble in Windows 11.
Where is the equalizer in Windows 11?
The equalizer settings in Windows 11 can be found via Sound Settings > More Sound Settings > Speaker Properties > Enhancements > Equalizer, after you’ve installed the required audio codec driver.
Windows 11 default audio controls are quite barebone with basic options to increase/decrease system and individual apps volume. If you want to take complete control over audio in Windows 11, you need a third-party audio manager.
I personally can’t imagine using my PC with default volume settings. A third-party app lets me use an equalizer to adjust frequencies to my needs and even add effects for that extra oomph. Not to mention, you can considerably boost volume using these apps in case you have smaller speakers like a laptop’s built-in speakers.
But don’t get yourself limited to the volume boost; many noteworthy features can bring music to your ears with just a few slides and toggles 🙂.
To help you find the right app to manage the audio of your Windows 11 PC, I am listing some of the best audio managers for Windows 11.
FxSound
I love FxSound’s equalizer as it not only lets you change frequencies but also teaches you how increasing/decreasing each frequency will affect your experience. Just hover your mouse cursor over each band, and a simple explanation will pop up.
There is also a sound effects section, including ambiance, dynamic boost, bass boost, and more effects to enhance the audio further.

The more important function of the app is the presets that automatically adjust the equalizer and sound effects to make specific content pleasing. This includes presets for gaming, TV, voice, transcriptions, volume boost, bass boost, and more. You can even create your own presets and save them to use later or export/import them to share with others.
The free version gives complete control over the equalizer and sound effects, and you can adjust them as you like. However, you need to get a paid subscription to use presets and create custom presets. As long as you don’t mind adjusting the equalizer yourself, you can use this app for free.
Highlight Features
- Easy to adjust equalizer using built-in explanation.
- 9-band equalizer.
- 5 sound effects
- Beautiful yet simple interface.
- Presets to cover different types of audio content.
- Easy to turn on/off using a keyboard shortcut or the big power button.
I would recommend FxSound to anyone who wants a simple audio manager that is easy to use and gets the job done with minimum intervention.
Letasoft Sound Booster
Letasoft Sound Booster is a no-nonsense application exclusively meant for one thing: volume-boosting on Windows. You get just a sliding volume bar with a checkbox to enable/disable it. In addition, you can also assign hotkeys for quick management.

It assures a 100-500% boost in the regular volume. Though the exact figures might be different, the simplicity of the application makes it a no-brainer for sound boosting.
Letasoft Sound Booster supports autostart, and in our brief testing, we didn’t find any distortion. Finally, you can try it with a free 14-day trial period.
ViPER4Windows
ViPER4Windows is a must-have, fantastic tool for audiophiles.

You’ll see Music, Movie, and Freestyle mode for tweaking. The first two modes have settings suitable to their class, whereas the Freestyle has everything to experiment with. But you should try its Post-Volume slider if you’re only interested in volume-boosting on Windows.
You also can activate ViPER for selected input/output devices with a configurator.exe which comes bundled with the original installation.
But the best thing apart from the excellent features is that this is 100% free.
DeskFX
A powerful sound enhancer app for Windows 11, which is completely free for personal use. DeskFX comes with a 20-band equalizer which can be adjusted using 3 different methods, including graphics, parametric, and visual. You have complete control over how many bands you want to use at a time.
There are a bunch of presets too, which can be further customized by changing different frequencies depending on the preset you selected, like slope or amplitude, etc. It also comes with many sound effects like chorus, bass boost, reverb, echo, compressor, and more.

One thing I really like about DeskFX is its ability to add a single sound effect multiple times to make it more potent. You can even change the frequency of each added effect separately. Furthermore, you can create custom presets and save them or easily import/export them.
Highlight Features
- 20-band equalizer.
- Multiple methods to adjust equalizer frequency.
- Customizable presets.
- Over a dozen audio effects.
- Apply an effect multiple times.
- Free for home users.
The only thing I don’t like about DeskFX is that you can’t minimize it to the system tray to work from there. So you have to deal with an app icon on your taskbar that you probably won’t access often.
Equalizer APO
Equalizer APO is arguably the most powerful audio manager app that is completely free to use. However, it’s a bit difficult to use as you need to configure text files to adjust frequencies and other settings. You can load the config.txt file to make edits inside the app.
The graphical equalizer option lets you select a 15-band and 31-band equalizer that you can customize by moving the frequencies up or down. You can even create custom equalizers where you add bands on the graph on command and adjust as needed.

There is a dedicated setting to amplify volume, and there are a bunch of filters too. Besides enhancing audio, it can also control input/output devices and switch output channels.
Highlight Features
- Up to 31-band equalizer.
- Create custom equalizers.
- Boost volume.
- Add parametric filters.
- Correct loudness.
- VST plugin support.
If you are interested in using Equalizer APO, I highly recommend you check the app’s documentation, as it provides step-by-step information on how to use the tool. For those who just want to use this app to boost volume or use the basic equalizer, you can use Peace Equalizer. This is a GUI app for Equalizer APO but comes with limited functionality.
Breakaway Audio Enhancer
Breakaway doesn’t offer many customization options, but if you want a simple app that works fine without much intervention, then Breakaway is for you. It doesn’t have an equalizer, but you get 16 presets that you can apply and customize.
Once you select a preset, you’ll see 5 bars to adjust the preset’s range, power, speed, bass boost, and bass shape. There is a simple explanation of how each of these compressions will affect the preset. You can easily experiment by increasing/decreasing each compression using the mouse scroll wheel.

The names of these presets don’t really explain their use very well. So you should listen to each preset to see which one you like. Also, I wish you could save a preset after adjusting its compression levels. However, in most cases, you’ll be using the same compression levels anyway, so it’s not a big deal.
There is also a volume booster bar that you can adjust to further increase volume. A visualizer on the right side shows both input and output sound, which is great to get an idea of how much Breakaway is enhancing the audio.
Highlight Features
- Easy to use.
- 16 presets.
- Adjust preset compression levels.
- 3 different visualizers.
- Volume booster.
You can test the app using a fully-featured 30-day trial period, and afterward, you have to buy the app for $29.95.
Boom 3D
Boom 3D is both an audio manager and an audio player. It has a nice 3D surround sound feature which you can edit to switch the position of the 3D sound and the strength. On top of that, its 31-band equalizer ensures that you get the best audio experience.
It also has dozens of presets that you can customize after applying and easily reset if needed. Personally, I like applying a preset and increasing its intensity to boost volume and applied effects. There is an interesting advanced equalizer setting that lets you adjust the connection between two bands.

At the bottom, you can manage and play audio files on your PC and even create/manage playlists. From the same section, you can access local and international radio too, that will play in the Boom 3D interface. All the audio enhancements apply to the radio too.
You can also switch input and output devices quickly from the Boom 3D interface.
Highlight Features
- 31-band equalizer.
- Powerful 3D surround sound feature.
- Add effects like ambiance, fidelity, pitch, etc.
- Built-in audio player and radio.
- 20+ presets.
- Edit presets and boost frequency.
For such a powerful audio manager, Boom 3D is pretty cheap, only $12.5 for lifetime access on a single PC. You can try out the fully-featured app for 30 days before buying. And, if you want a more detailed look at this app, check out our Boom 3D review.
EqualizerPro
EqualizerPro is considered a top music equalizer for Windows 7/8/8.1/10 to improve sound quality. It is ideal for preamp volume control, custom presets, ten band equalizer, easy on/off switch, bass boost effect, and 20+ equalizer presets.
EqualizerPro has made it easy to control pitch and tone for users by moving the bands and getting the best outcome. It amplifies low frequencies for smooth, clean, and enhancing bass tone. The software also comes with several presets, including Vocal Booster, Jazz, Rock, and features allowing users to create presets as per their requirements.
While we come to the end of the main list of audio managers for Windows 11, I’ve got a little bonus for our readers.
Bonus Apps 🎁
Along with these best audio managers for Windows, I would also mention two apps that can further enhance your audio experience.
Sound Booster: This app can boost your PC audio up to 5x without any distortion. I have even used this app alongside other sound manager apps, and it still considerably boosted volume. If you have small speakers, you will indeed find this a helpful app.
Sound Equalizer: If most of your audio is played inside the browser, this Chrome extension is all you might need. It has a powerful equalizer and many other effects to enhance audio right inside Chrome. One thing I like about this extension is that it lets you boost effects to maximum even if the sound gets distorted. So if you are one of those daredevils who like to experiment and go beyond, give it a shot.
While these two apps don’t have the same level of features as the others listed here, they’re still pretty useful in specific use cases.
To Conclude 👨💻
As DeskFX is completely free for personal use and offers everything you need to enhance audio, it should be the go-to choice for most users. However, FxSound and Boom 3D are just too good when it comes to usability and customization. And for the audio fanatics, Equalizer APO has everything.
You can trust Geekflare
At Geekflare, trust and transparency are paramount. Our team of experts, with over 185 years of combined experience in business and technology, tests and reviews software, ensuring our ratings and awards are unbiased and reliable. Learn how we test.
More For Your Audio Needs
-
Best Audio Software to Record, Edit, Mix and More
-
Check Your PC Audio and Speaker Easily With These Online Sound Test Tools
Среди прочих проблем с воспроизведением звука одна из самых частых — слишком низкая громкость воспроизведения, иначе говоря, тихий звук: иногда только в отдельных программах, иногда в системе в целом, проблема может наблюдаться и в колонках, и в наушниках.
В этой инструкции о том, чем может быть вызвана проблема тихого звука в Windows 11 и 10 и способах исправить проблему.
Простые способы решения проблемы низкой громкости
Прежде чем приступить к каким-то дополнительным способам исправления, рекомендую проверить следующие вещи, особенно если до недавних пор громкость была нормальной, а проблем с воспроизведением не наблюдалось.
Рекомендую серьёзно отнестись к каждому пункту и перепроверить, даже если вы уверены, что всё в порядке:
- Если тихий звук наблюдается только в отдельной программе, загляните в микшер громкости (правый клик по значку динамика — открыть микшер громкости): возможно, низкая громкость выставлена отдельно для этой программы.

- Проверьте регуляторы громкости на колонках, мониторе (в меню монитора), если такие присутствуют и звук выводится через них.
- Проверьте подключение во всех узлах вашего устройства воспроизведения: коннекторы должны быть плотно подключены к звуковой карте, устройству воспроизведения, если колонки сами по себе модульные и соединяются кабелями, проверьте подключение кабелей между ними: часто проблема оказывается именно в этом, особенно если недавно проводилась уборка, оборудование двигалось.

- Если воспроизведение выполняется в проигрывателе с собственными параметрами громкости, эквалайзером или иными настройками воспроизведения, внимательно изучите их.
- В случае, если вы столкнулись с проблемой на наушниках, которые подключены к передней панели ПК, проверьте, изменится ли ситуация, если подключить их к выходу звуковой карты на задней панели.


Если все указанные подходы не изменили ситуацию, переходим к следующим шагам.
Параметры устройств воспроизведения
Следующий шаг — заглянуть в параметры устройств воспроизведения и поэкспериментировать с настройками:
- Нажмите клавиши Win+R на клавиатуре, либо нажмите правой кнопкой мыши по кнопке «Пуск» и выберите пункт «Выполнить», введите mmsys.cpl и нажмите Enter.
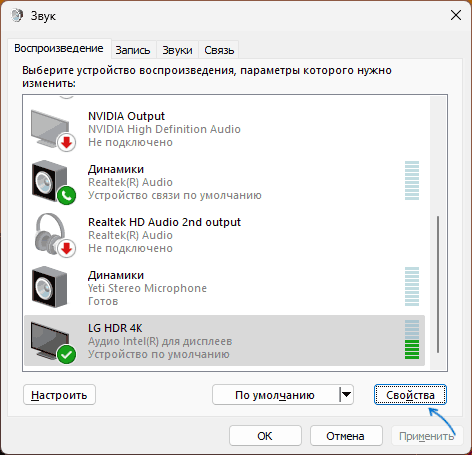
- Перейдите на вкладку «Воспроизведение», выберите ваше устройство воспроизведения и нажмите кнопку «Свойства».

- Попробуйте менять настройки, применяя изменения с помощью кнопки «Применить»: ситуацию может изменить отключение пространственного звука и дополнительных эффектов (вкладка присутствует не для всех звуковых карт), изменение формата по умолчанию на вкладке «Дополнительно».

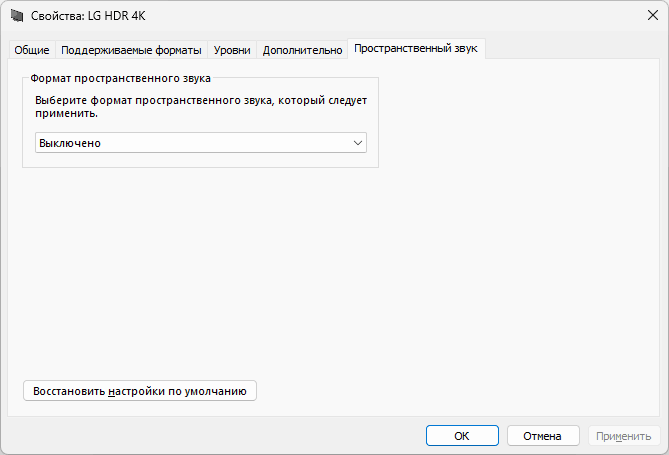
Возможно, на одном из шагов громкость воспроизведения придёт в норму.
ПО управления звуком
При наличии установленных приложений для управления звуковой картой: Realtek Audio Control, Nahimic и других, откройте их и внимательно изучите все настройки: эквалайзеры, конфигурацию динамиков и другие.
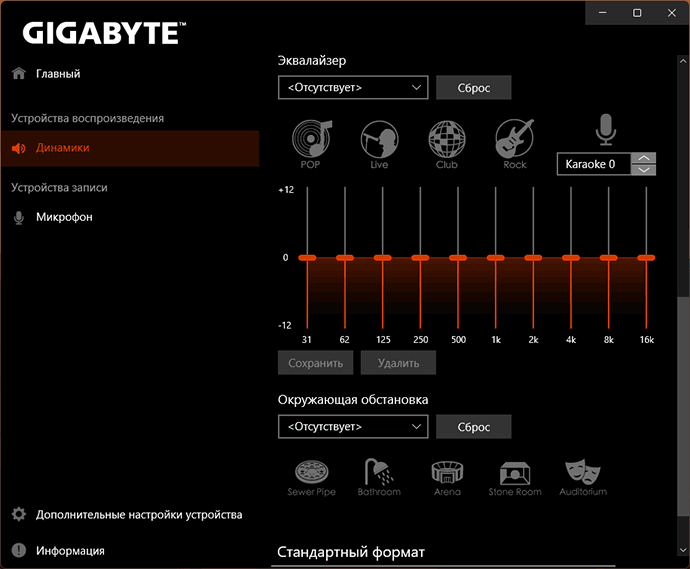
При наличии возможности включения и отключения различных эффектов и «улучшений», попробуйте их отключить и понаблюдать, даст ли это нужный эффект.
Драйверы звуковой карты
Windows 11/10 автоматически устанавливает и обновляет драйверы звука. Обычно, всё работает исправно, но не всегда. Если вы не устанавливали драйверы звуковой карты вручную, рекомендую это сделать:
- Зайдите на страницу поддержки вашей модели материнской платы (для ПК) или ноутбука, найдите раздел «Загрузки» (Downloads).
- Найдите драйвер звука (даже если он не для вашей версии Windows, с большой вероятностью он будет работать), скачайте его и запустите установку.


После установки желательно перезагрузить компьютер, а затем проверить, восстановилась ли громкость.
Некоторые дополнительные нюансы, которые могут влиять на громкость звука при воспроизведении:
- В случае, если тихий звук наблюдается в наушниках, то это может быть результатом загрязнения мембраны, иногда — износа их компонентов, повреждения кабелей. Проверить, в этом ли дело легко: если то же самое наблюдается при подключении наушников к другим устройствам воспроизведения, причина, видимо, именно в них.
- Тихий звук на ноутбуке, особенно если он такой с момента покупки — возможно, не является какой-либо неисправностью или результатом неправильных настроек: акустика на многих ноутбуках оставляет желать лучшего.
- Если проблема наблюдается при воспроизведении какого-то определенного контента (например, конкретного видео или музыкального альбома), возможно, сама запись была произведена с таким уровнем громкости.
- Если до недавнего времени проблем с громкостью не наблюдалось, а система не переустанавливалась, могут помочь точки восстановления системы.
Некоторые дополнительные материалы сайта, связанные с решением проблем со звуком в Windows: Что делать, если пропал звук в браузере, Не работает звук в Windows 11 — решение.