

Across Windows 10, you’ll find a bunch of animations that give you the illusion of movement and make the experience feel a little smoother.
One of these animations is the sliding effect when opening menus. For the most part, the default setting should be optimal for most users, but you can further adjust the animation timing to make your device feel a little more responsive by tweaking the Registry.
In this Windows 10 guide, we walk you through the steps to adjust the speed of the menu animation to make the experience feel a little faster.
If you want to speed up or slow down the animation of menus on Windows 10, use the following steps.
Warning: This is a friendly reminder that editing the Registry is risky, and it can cause irreversible damage to your installation if you don’t do it correctly. We recommend making a full backup of your PC or make sure to create a backup of the Registry before proceeding.
- Use the Windows key + R keyboard shortcut to open the «Run» command.
- Type regedit, and click OK to open the Registry.
- Browse the following path:
HKEY_CURRENT_USER\Control Panel\DesktopQuick Tip: On Windows 10, you can now copy and paste the path in the Registry’s address bar to quickly jump to the key destination. - Double-click the MenuShowDelay key, and specify a new delay value, in milliseconds, to adjust the menu animation speed. (For example, if you want to speed up the animation, use something significantly below 400, such as 75, 100, or 125. If you want to slow down the speed of the animation, use a value above 400, up to 4,000.)Quick Tip: Setting the «MenuShowDelay» value to 0 will disable the animation entirely.
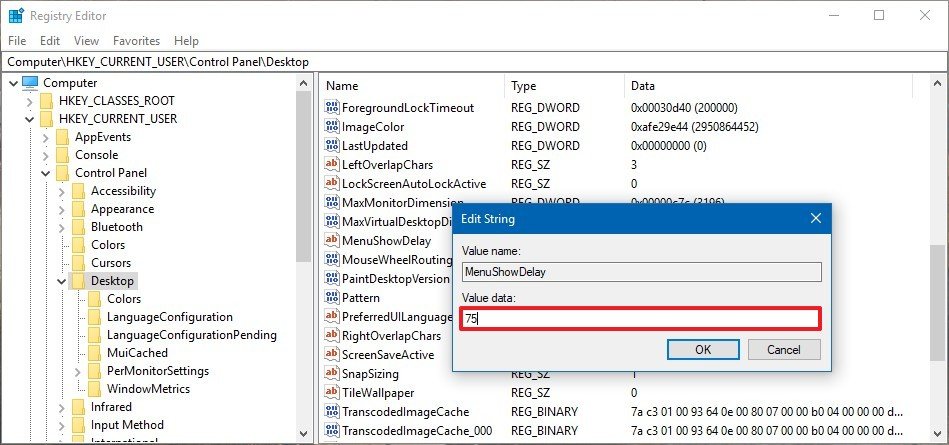
- Click the OK button.
Once you complete these steps, restart your computer, right-click the desktop, and hover over the sub-menus to test the new configuration.
If you want to revert the changes or make further adjustments, you can use the same instructions but make sure to change the value on step No. 4. If you want to revert the changes to the original settings, on step No. 4, make sure to set the value back to 400.
All the latest news, reviews, and guides for Windows and Xbox diehards.
This guide is focused on Windows 10, but this setting has been available for a long time, which means that these steps will work on Windows 8.1, Windows 7, and older versions.
More Windows 10 resources
For more helpful articles, coverage, and answers to common questions about Windows 10, visit the following resources:
- Windows 10 on Windows Central – All you need to know
- Windows 10 help, tips, and tricks
- Windows 10 forums on Windows Central
Mauro Huculak has been a Windows How-To Expert contributor for WindowsCentral.com for nearly a decade and has over 15 years of experience writing comprehensive guides. He also has an IT background and has achieved different professional certifications from Microsoft, Cisco, VMware, and CompTIA. He has been recognized as a Microsoft MVP for many years.
Windows 11 and 10 include several visual effects and animations that make using the operating system feel a little more friendly. The duration of these animations enables users to understand the speediness of the overall computer.
When you hover over an item in a menu, there is a delay of 400 milliseconds (1000 milliseconds = 1 second) for the submenu to pop up with an animation effect. However, if you want a more responsive and sharper experience, you can reduce that delay by tweaking the registry to speed up menu animations on Windows 11 and 10.
In this gearupwindows article, you will learn to speed up menu animations in Windows 11 and 10.
How to Increase the Speed of Menu Animations in Windows 11 or 10?
To speed up menu animations in Windows 11 or 10, use these steps:-
Step 1. First, open Registry Editor.
Step 2. Then, browse to the following key in the left sidebar of Registry Editor:-
HKEY_CURRENT_USER\Control Panel\Desktop
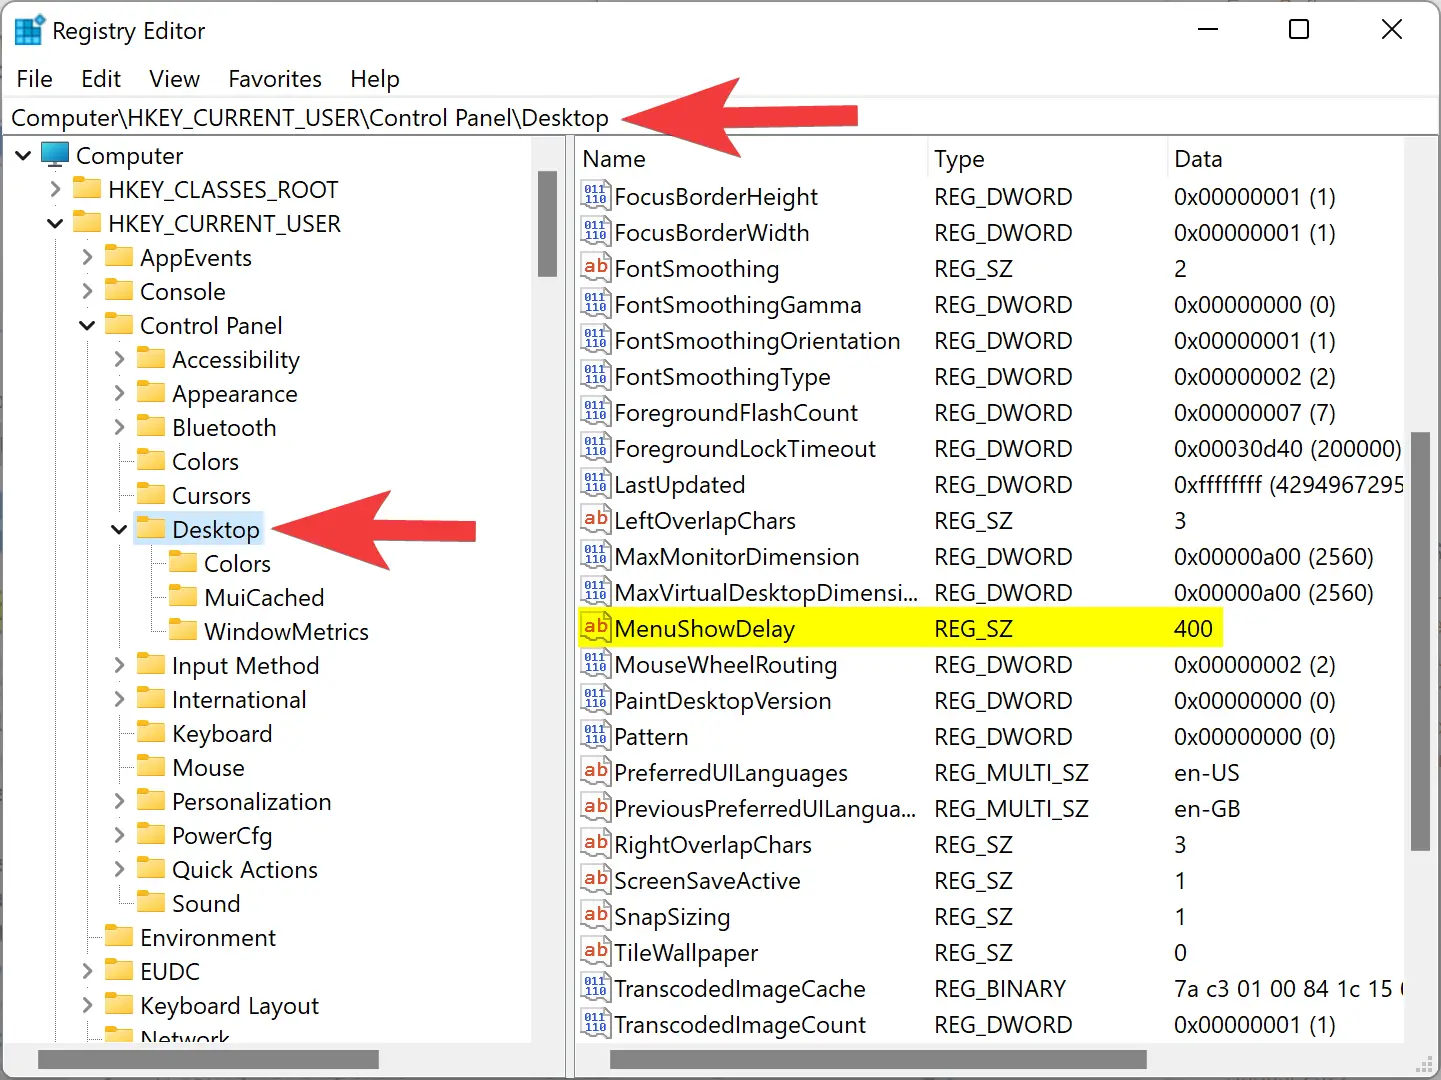
Step 3. On the right side pane, double-click on the MenuShowDelay REG_SZ to edit its “Value data.”
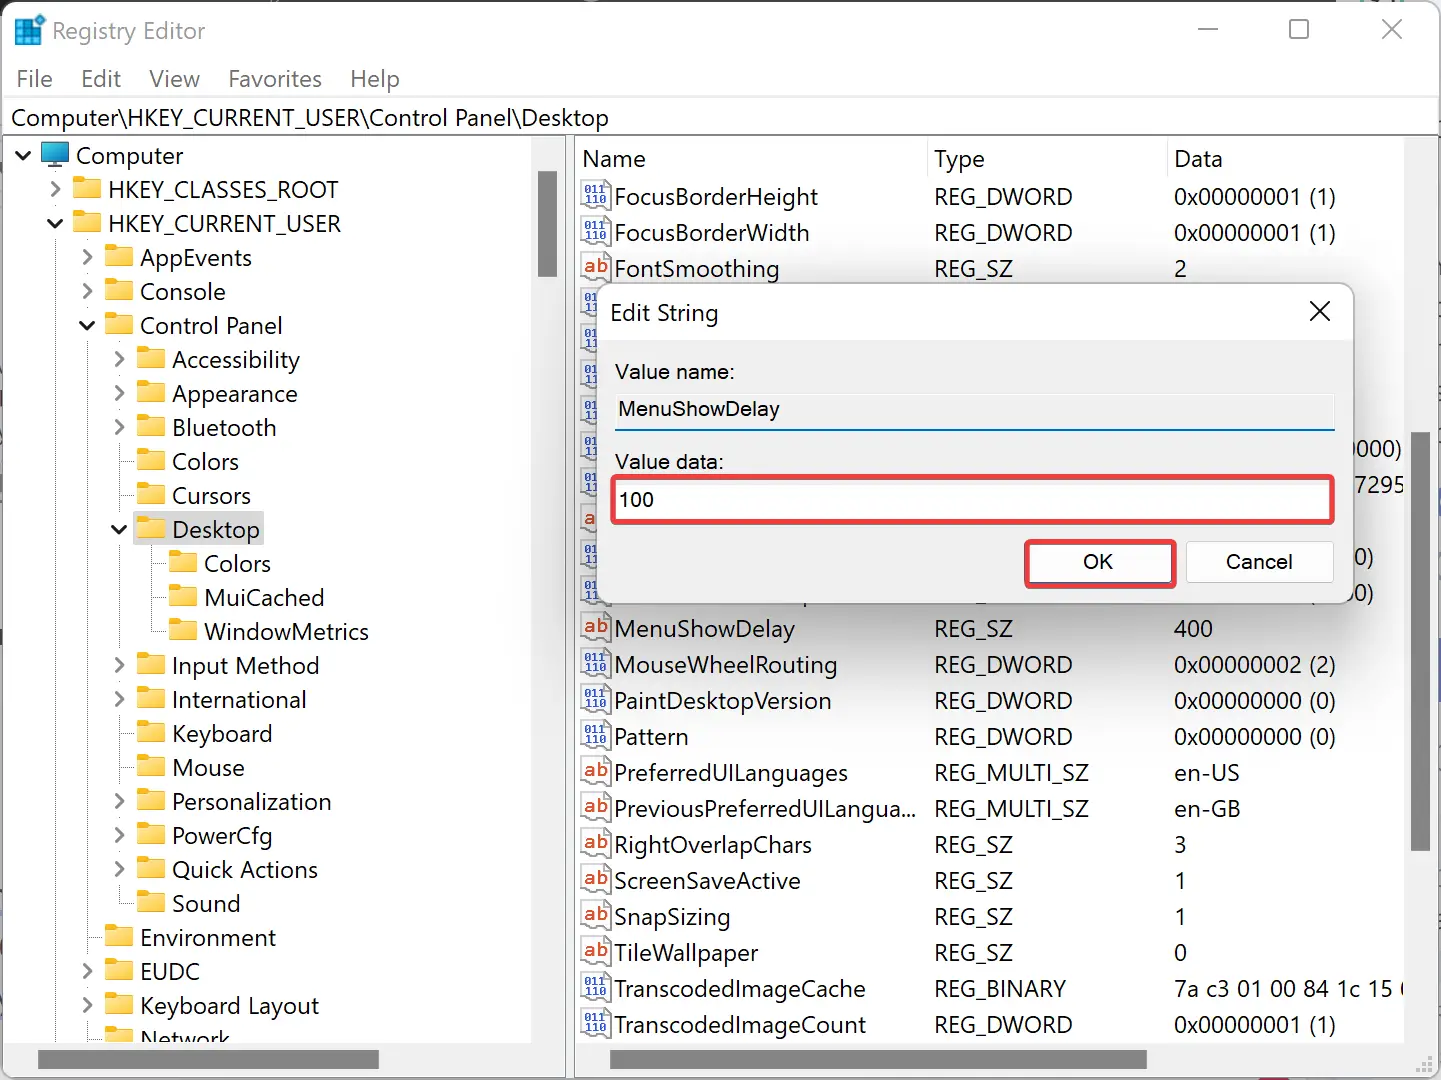
Step 4. By default, the menu animation duration is set to 400 milliseconds (1000 milliseconds = 1 second). To speed up the animation, you can change this value to a lower number, such as 100. You can also set the “MenuShowDelay” value to 0 if you don’t want any delay appearing in the submenu pop-up.
Step 5. Next, click the OK button.
Step 6. Finally, reboot your computer to apply the changes.
Once you complete the above steps, the menu will appear at your set time.
How to Completely Disable Animations in Windows 11 or 10?
If you’re using an old computer and animations make your Windows 11/10 slow, you can completely turn off animations in your Windows machine.
To turn off animations in Windows 11 or 10, use these steps:-
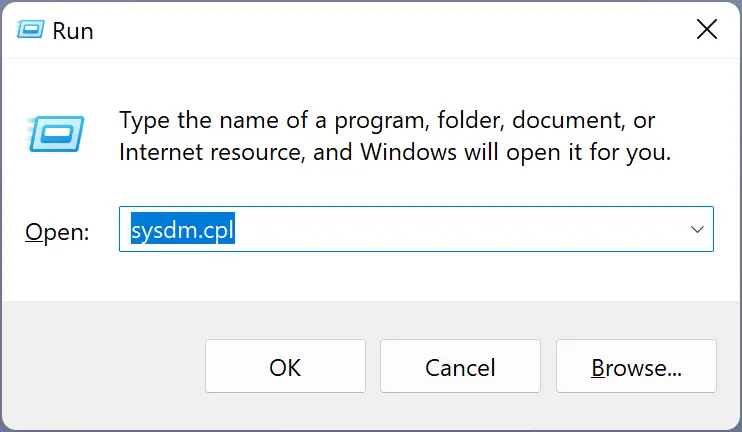
Step 1. Open the System Properties window.
To do that, simultaneously press Windows + R keys on the keyboard to open the Run dialog box. Then, type sysdm.cpl and hit Enter key on the keyboard.
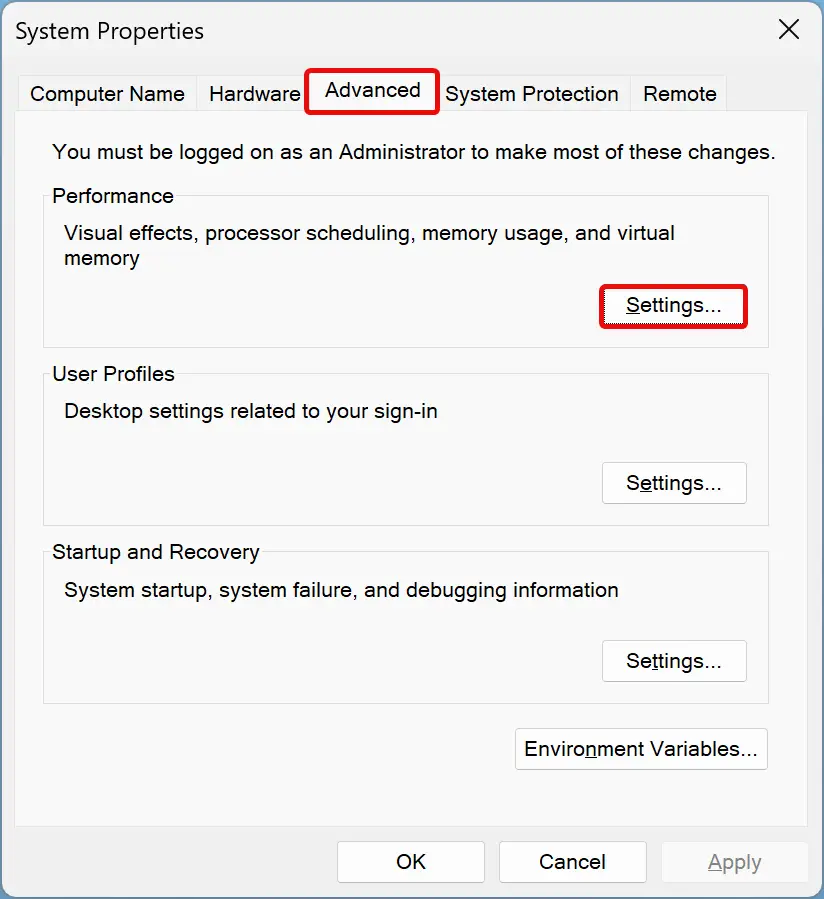
Step 2. Then, move to the Advanced tab in the “System Properties” window and click the Settings button under the “Performance” section to open the Performance Options window.
Step 3. Here, switch to the Visual Effects tab and select Adjust for best performance radio button.
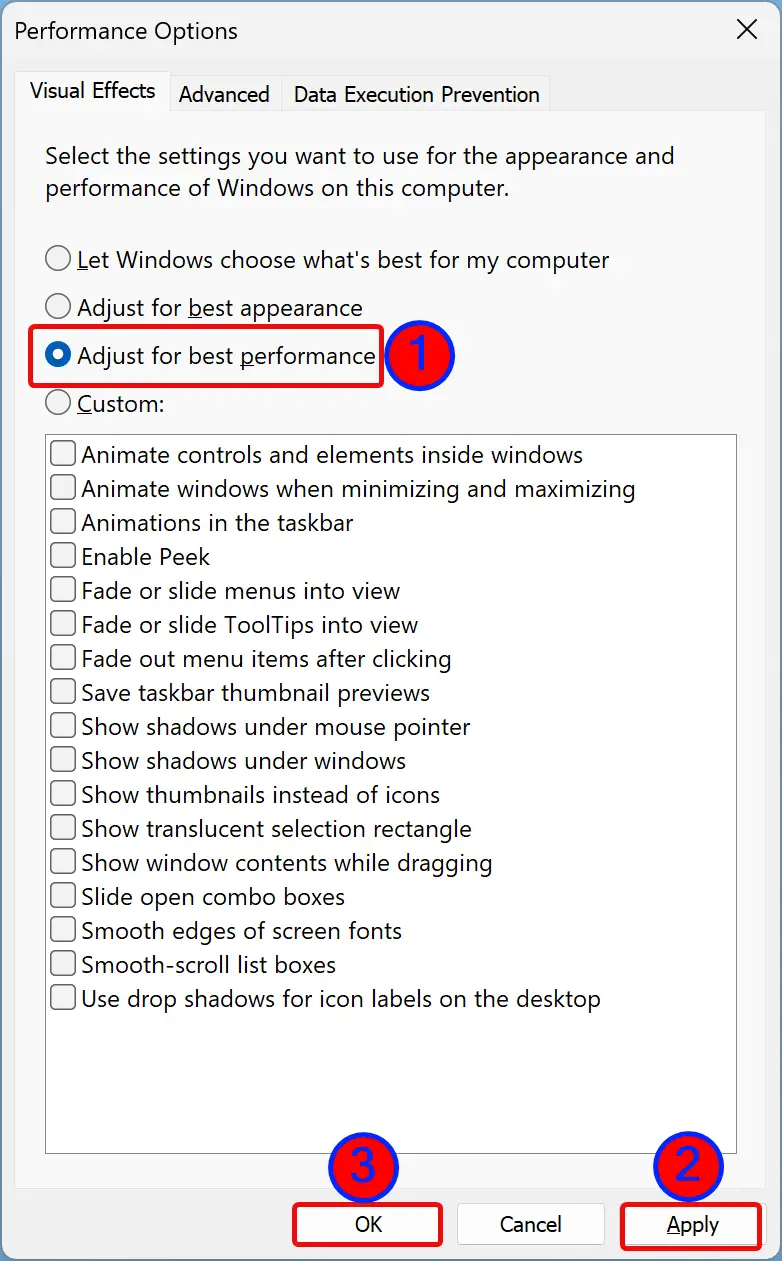
Step 4. Click the Apply button.
Step 5. Click the OK button.
Step 6. Click the OK button.
Once you complete the above steps, all animations and visual effects will be disabled immediately.
Conclusion
In conclusion, Windows 11 and 10 come with various visual effects and animations that enhance the overall user experience. However, some users may prefer a more responsive and sharp experience. This article provided steps to speed up menu animations in Windows 11 and 10 by tweaking the registry and completely disabling animations for older computers. By following these steps, users can customize their Windows operating system to their preferences and improve their overall productivity.
Home > Guides > Fix Windows 10 Animations Laggy

In this guide, we will be taking a look at what you can do to fix your Windows 10 animations being laggy, glitchy, and slow.
Encountering sluggishness due to lagging animation effects in Windows 10 can be frustrating, but fear not! We’ve put together this guide to help you troubleshoot and potentially resolve this issue, allowing you to fix your Windows 10 system’s performance.

Understanding Windows 10 Animation Effects
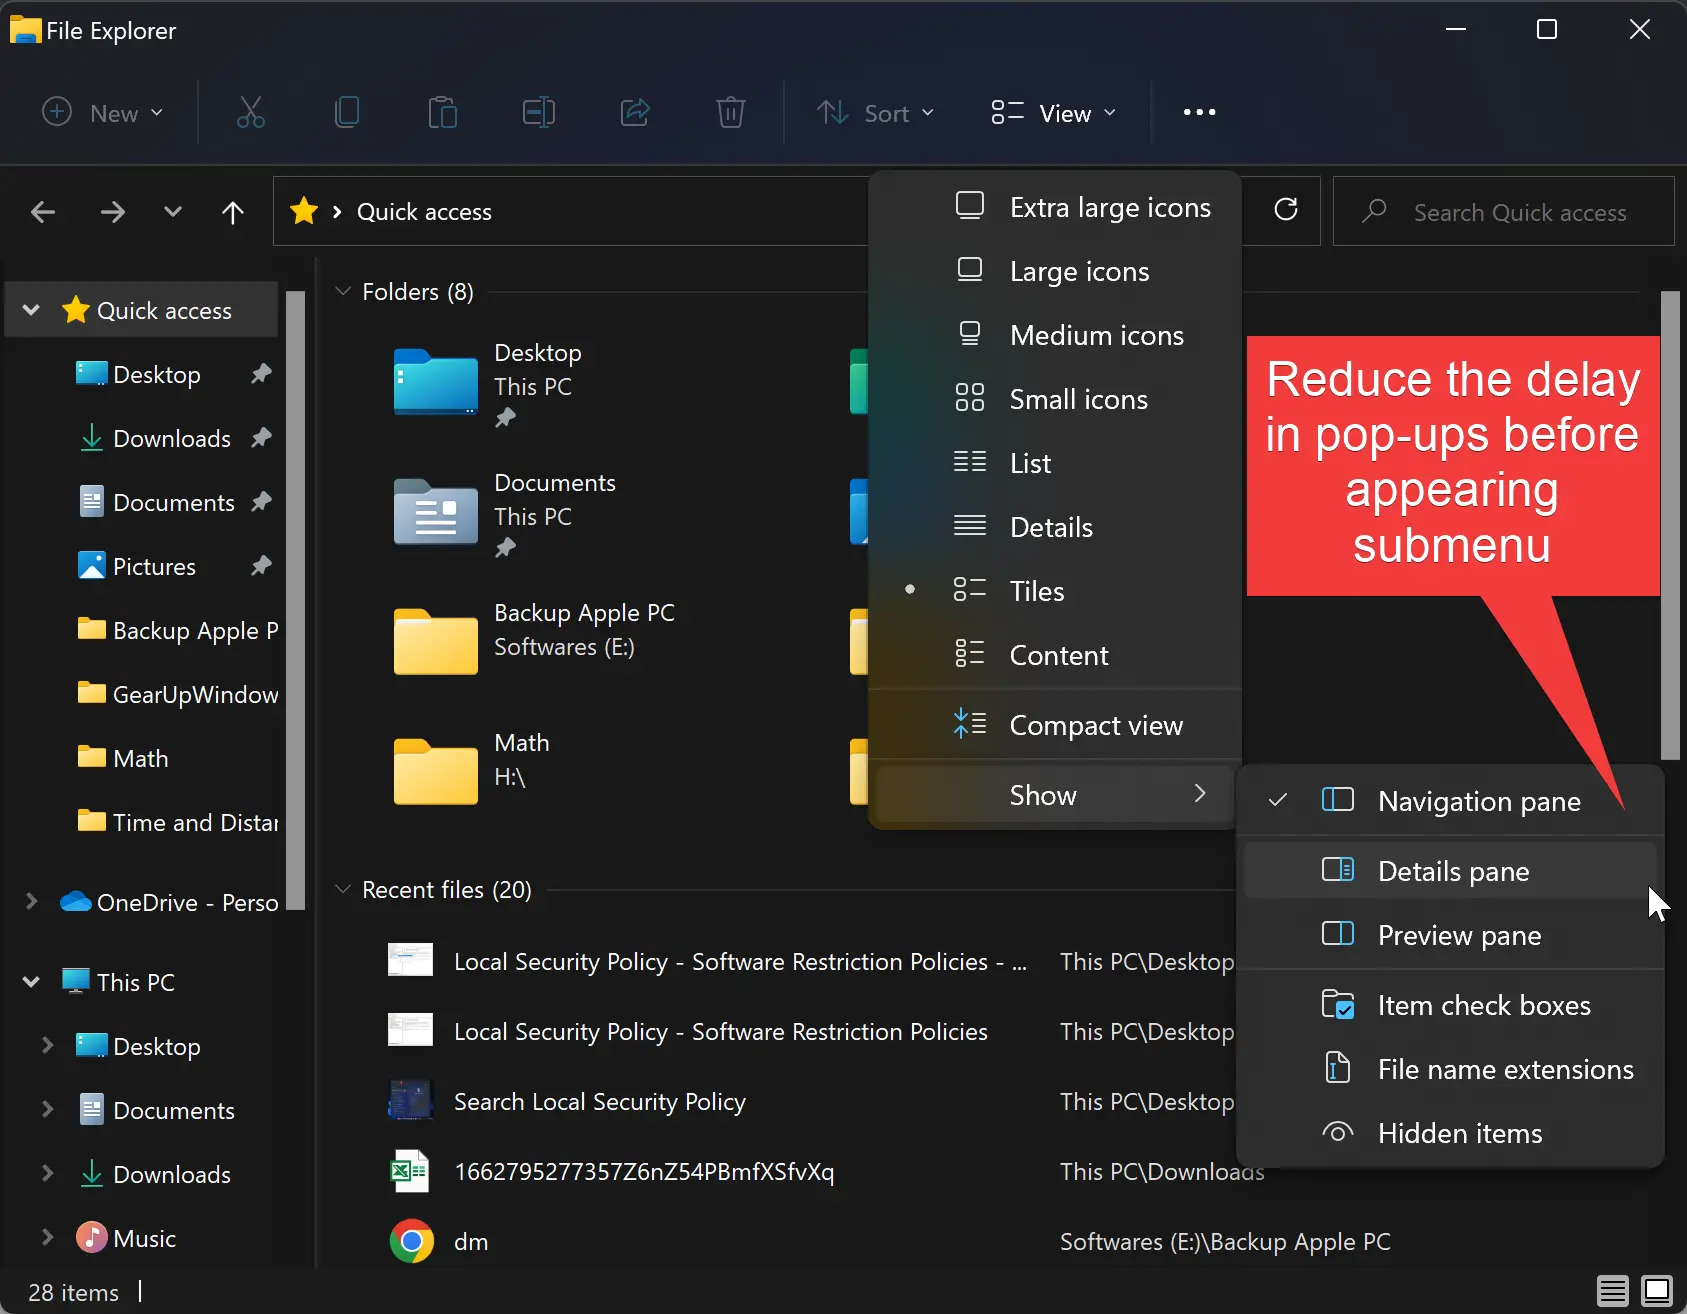
Windows 10’s animation effects serve to beautify the user interface, offering a more dynamic experience. Whether you’re navigating File Explorer or minimizing and maximizing applications, these animations add a smooth, visually appealing element to your interactions. Key animation features include:

- Animating controls and elements within windows
- Animating window transitions during minimization and maximization
- Taskbar animations
- Fading or sliding menus and tooltips into view
- Fading out menu items post-selection
- Sliding open combo boxes
- Smooth-scrolling in list boxes
Reasons Behind Laggy Animations
Several factors could be contributing to the laggy animation effects on your Windows 10 device, ranging from outdated graphics drivers, and hardware barely meeting minimum requirements, to recent updates potentially disrupting animation performance.
Do Animation Effects Affect Performance?
Yes, enabling animation effects can indeed impact the overall performance of Windows 10, potentially causing lag if your system isn’t sufficiently equipped to handle them.
How To Fix Windows 10 Animations Laggy
Do each method below until one resolves the problem on your Windows computer.

Updating Windows 10
First and foremost, ensure your system is up-to-date with the latest Windows 10 updates, which might include fixes for known issues affecting performance:
- Access Settings via the start menu
- Navigate to Windows Update > Check for updates
Updating Your GPU Driver
Graphics performance issues can often be remedied by updating your graphics card driver. The process varies depending on your GPU manufacturer (NVIDIA, Intel, AMD), so follow the appropriate guidance for your hardware. Use the below links if you are unsure how to update your driver.
- How to install NVIDIA Drivers
- How to install Intel Drivers
- How to install AMD Drivers
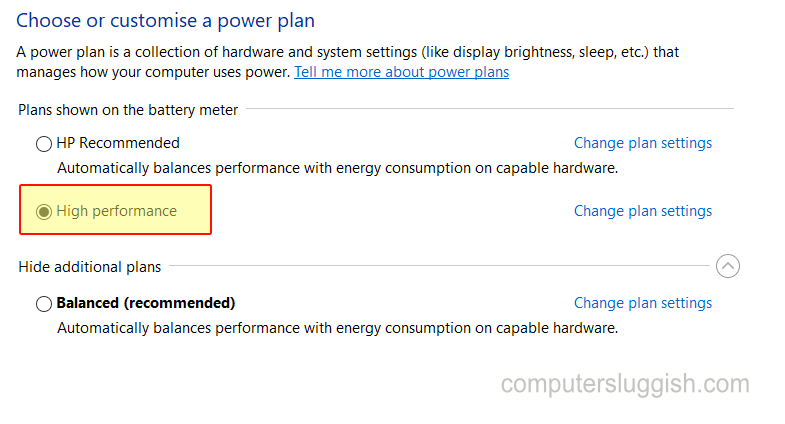
Adjusting Power Plan
A power-saving mode can limit performance. To mitigate lag:
- Right-click the start menu > Power Options
- Switch to “Best performance” mode
Reducing Animation Effects
For a balance between aesthetics and performance, consider disabling non-essential animation effects:
- Search for “Adjust the appearance and performance of Windows” in the start menu
- In the “Visual Effects” tab, deselect animations you can live without
- Apply and OK

Final Thoughts
Following these steps should alleviate the lag associated with Windows 10’s visual effects, improving your system’s responsiveness. If animations still slow down your computer, consider disabling them or upgrading your hardware for a more seamless experience.
Skip to content
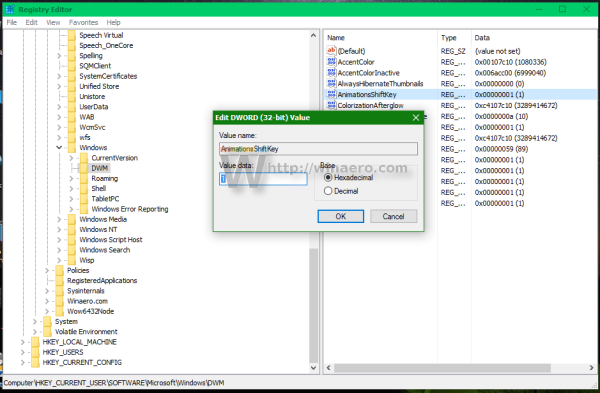
In Windows Vista, Microsoft introduced the DWM (Desktop Window Manager) which implements fancy animation effects, transparency and Aero skins for window frames. Ever since Vista, it allows you to slow down window animations by pressing the Shift key (the animation you see when any dialog or window appears on screen, or when minimizing, or closing a window). This is a hidden feature that has to be enabled with a registry tweak. Read the rest of this article to learn how to enable it.
To slow down window animations in Windows 10 with the Shift key, you need to do the following.
- Open Registry Editor.
- Navigate to the following key:
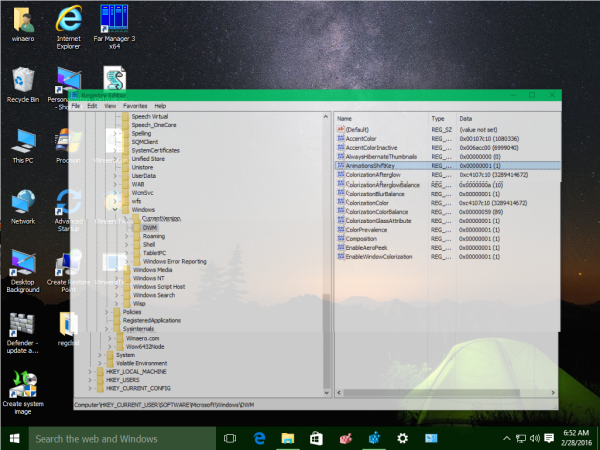
HKEY_CURRENT_USER\Software\Microsoft\Windows\DWM
See how to jump to the desired registry key with one click.
- You should create here a new DWORD value AnimationsShiftKey. Set it to 1.

Well, you are almost done. Now log off and log in back into your Windows user account to see the change.
Try holding down the Shift key on the keyboard and try to minimize any window by pressing the Minimize button in the title bar:
How to reset animations to their defaults
Just remove AnimationsShiftKey mentioned above and log off from Windows. That’s it.
If you don’t like to use Registry Editor, try out my all-in-one application Winaero Tweaker software. It supports the AnimationsShiftKey feature in Appearance -> Slow Down Animations:

Use the appropriate checkbox to enable/disable animations slowdown.
The same can be done in Windows 8.1, Windows 8, Windows Vista and Windows 7.
Support us
Winaero greatly relies on your support. You can help the site keep bringing you interesting and useful content and software by using these options:
If you like this article, please share it using the buttons below. It won’t take a lot from you, but it will help us grow. Thanks for your support!
На чтение4 мин
Опубликовано
Обновлено
Windows 10 предлагает множество визуальных эффектов и анимаций, которые делают работу на компьютере более приятной и привлекательной. Однако, некоторые пользователи могут столкнуться с проблемами, связанными с низким качеством анимаций или неплавным их выполнением. Если вы хотите улучшить качество анимаций в Windows 10, в этой статье мы поделимся с вами полезными советами и рекомендациями.
1. Проверьте наличие драйверов
Первым шагом для улучшения качества анимаций в Windows 10 является проверка наличия и установка актуальных драйверов для вашей графической карты. Устаревшие или несовместимые драйверы могут быть причиной неправильного отображения анимаций. Посетите официальный сайт производителя вашей графической карты и загрузите последние версии драйверов для своей модели.
2. Измените настройки анимаций
Windows 10 предлагает различные настройки анимаций, которые можно изменить в разделе «Система» в настройках компьютера. Вы можете отключить или изменить интенсивность анимаций для достижения лучшего качества и плавности. Экспериментируйте с этими настройками, чтобы найти оптимальное сочетание, которое будет удовлетворять ваши потребности.
3. Включите режим производительности
Если у вас все еще возникают проблемы с качеством анимаций, попробуйте включить режим производительности в Windows 10. Этот режим отключает некоторые визуальные эффекты и анимации, чтобы снизить нагрузку на систему. Откройте «Параметры системы» и перейдите на вкладку «Дополнительные параметры системы». В разделе «Производительность» выберите опцию «Настройки» и установите флажок рядом с «Наследовать настройки производительности из настроек Windows».
Следуя этим полезным советам и рекомендациям, вы сможете повысить качество анимаций в Windows 10 и сделать работу на вашем компьютере более комфортной и эстетичной.
Как улучшить качество анимаций в Windows 10
1. Измените настройки анимаций
В Windows 10 есть возможность настроить скорость анимаций. Вы можете сделать их более быстрой или, наоборот, более медленной. Для этого откройте меню Пуск, перейдите в раздел «Настройки» и выберите «Система». Затем перейдите в раздел «Дисплей» и найдите опцию «Расширенные настройки отображения». Нажмите на нее и выберите «Опции производительности». В настройках анимаций можно изменить скорость «Переходов между приложениями» и «При показе списка в окне».
2. Отключите анимации в Chrome
Если вы используете веб-браузер Chrome, вы можете отключить анимации, что поможет ускорить его работу. Для этого откройте Chrome, введите в адресной строке chrome://flags и нажмите Enter. Найдите опцию «Преобразование анимаций» и выберите значение «Выключено». После этого перезапустите Chrome, чтобы изменения вступили в силу.
3. Обновите графический драйвер
Устаревший или несовместимый графический драйвер может быть причиной плохого качества анимаций в Windows 10. Чтобы улучшить качество анимаций, проверьте наличие последних обновлений для вашего графического драйвера. Для этого откройте меню Пуск, перейдите в раздел «Параметры» и выберите «Обновление и безопасность». Затем перейдите в раздел «Обновление Windows» и нажмите на кнопку «Проверить наличие обновлений». Если найдутся обновления для графического драйвера, установите их.
4. Очистите временные файлы
Накопление временных файлов может замедлить работу компьютера и влиять на качество анимаций. Чтобы очистить временные файлы, откройте меню Пуск, перейдите в раздел «Настройки» и выберите «Система». Затем перейдите в раздел «Хранилище» и нажмите на кнопку «Освободить место сейчас». В открывшемся окне выберите файлы, которые вы хотите удалить, и нажмите на кнопку «Удалить файлы».
Эти простые советы помогут вам улучшить качество анимаций в Windows 10 и сделать работу на компьютере более плавной и эффективной.
Советы по настройке и оптимизации анимаций в операционной системе
1. Выберите подходящую скорость анимацийВ Windows 10 вы можете регулировать скорость анимаций, чтобы они соответствовали вашим предпочтениям. Слишком медленные анимации могут замедлить работу системы, а слишком быстрые анимации могут казаться неразборчивыми. Рекомендуется выбрать оптимальную скорость, которая удовлетворяет ваши потребности и предпочтения. |
2. Отключите лишние анимацииWindows 10 по умолчанию предлагает различные анимации, такие как анимация открытия и закрытия окон, анимация меню Пуск и т.д. Если вы хотите повысить производительность системы, вы можете отключить некоторые из этих анимаций. Для этого перейдите в настройки Windows, найдите раздел «Система» и выберите «О нас» и перейдите в раздел «Дополнительные параметры системы». В разделе «Визуальные эффекты» вы можете отключить или включить различные анимации. |
3. Используйте аппаратное ускорениеWindows 10 поддерживает аппаратное ускорение, которое может повысить производительность анимаций на вашем компьютере. Убедитесь, что драйверы вашей видеокарты установлены и обновлены на последнюю версию. Также убедитесь, что в настройках Windows аппаратное ускорение включено. |
4. Оптимизируйте ресурсы системыЕсли ваш компьютер испытывает проблемы с производительностью анимаций, рекомендуется оптимизировать ресурсы системы. Закройте ненужные программы и процессы, освободите оперативную память и очистите жесткий диск от временных файлов. Также рекомендуется проверить компьютер на наличие вирусов и вредоносного ПО. |
Следуя этим советам, вы сможете настроить анимации в Windows 10 таким образом, чтобы они были гладкими, красивыми и не замедляли работу системы. Это позволит вам получить максимальный комфорт и удовлетворение при использовании операционной системы Windows 10.