
Sometimes, we need to change the boot drive for some reason. However, not every user knows the process of how to change the Boot drive of Windows 10. If you are one of those newbies looking to change the boot drive of your computer system for the first time? Don’t worry this guide will help you to change your boot drive using the recovery tool and BIOS settings.
Before we go any further, let us help you understand what a boot drive is and what are the most common reasons to replace a boot drive.
🔗Further reading: How to Change Primary Hard Drive Windows 10 Easily & Quickly
What Is A Boot Drive?
A boot drive is a storage device containing the computer operating system. It is used to boot a computer in the form of a CD-ROM drive, USB flash disk, floppy disc drive, and DVD drive. A hard disk is the most common type of boot drive.
The operating system is pre-installed in a new computer, and you can directly boot it. On the other hand, an old computer needs to replace the disk to upgrade its storage and functionality. However, it is not possible to boot a computer unless the necessary boot files are stored on the disk. Due to the following reasons, you may need to change the boot drive in your windows computer:
- Windows Installation: If you want to install a new operating system to a formatted drive, you will need to use it as a bootable device. You must copy the Windows installer to the disk and pick it as a boot drive to activate the installation.
- Upgrade HDD to SSD: If you are looking to upgrade the performance of your computer/laptop using a new SSD, you will need to move the boot drive into it.
- Need a Recovery Drive: If your hard drive is damaged or failing, you can use a new disk to recover the data operating the windows tool. It will help you to give a kick start to your computer even if it does not start. To do so, you will need to change the recovery drive to boot your computer with no data loss.
- Operate Bootable Antivirus: When powerful malware or virus hits your system, it stops you from using the Windows operating system and other programs. The only way to fix the problem is to use combat bootable antivirus stored on a hard drive or flash drive.
No matter what is the reason for changing the boot drive, we will help you anyway. Follow the methods and steps to change the Boot drive Windows 10.
How to Change Boot Drive Windows 10?
As we mentioned earlier, there are three easy ways to change the boot drive. One is using a professional boot tool, and the other is Advanced Options and System Configuration. Go through the given methods by following the step-by-step guide.
- Method 1. Change the Boot Drive via a Third-Party Tool
- Method 2. Change the Boot Drive via Advanced Options
- Method 3. Change the Boot Drive via System Configuration
Method 1. Change the Boot Drive via a Third-Party Tool
If you are not familiar with the operation of Windows, a third-party smart tool — EaseUS Partition Master, can enable you to change the boot drive under UEFI easily. The tool provides a quick and easy operation, even if you are new to knowing how to change the boot drive in Windows 10.
Step 1. Launch EaseUS Partition Master on your computer and navigate to the «Boot Repair» section in «Toolkit.»
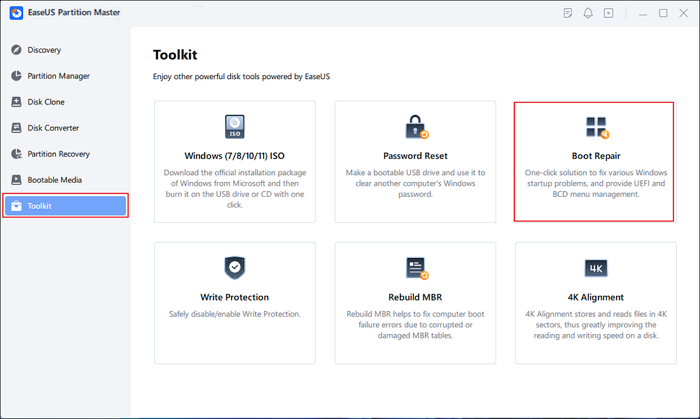
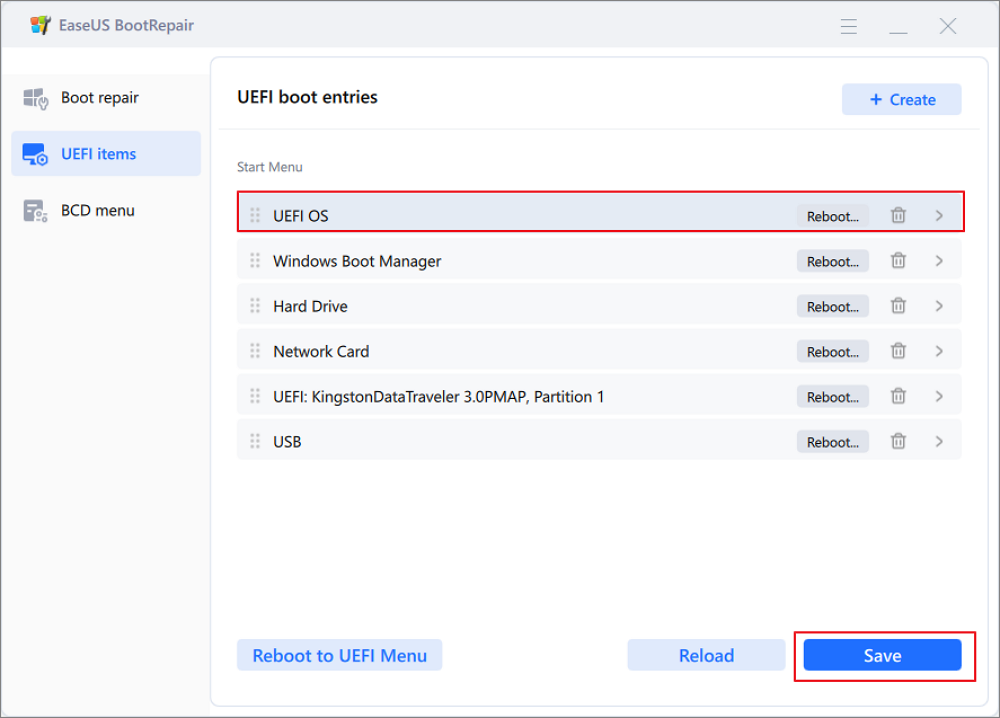
Step 2. Go to the «UEFI items» tab and change the boot order by dragging the drive to the first position.
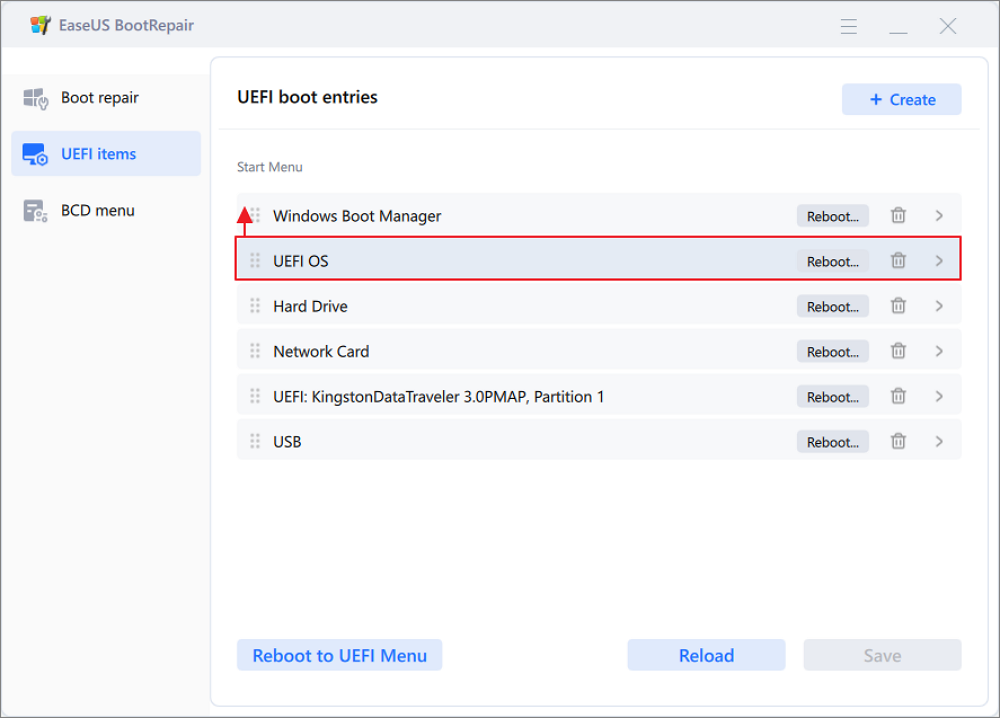
Step 3.Click «Save» to apply the changes. Then, your OS is set to boot from the new hard drive.
Note:If you hit on the «Reboot» button after the drive, the OS can boot from this disk at the next time for once.
In addition, as a wonderful Windows boot repair tool, EaseUS Partition Master offers some additional advanced features such as repairing the boot drive, fixing the computer’s blue screen, and other issues. Download it, and you can use it any time you meet the errors.
Method 2. Change the Boot Drive via Advanced Options
The easiest way to change the boot drive is to enter UEFI firmware via advanced options. Here are the steps to follow:
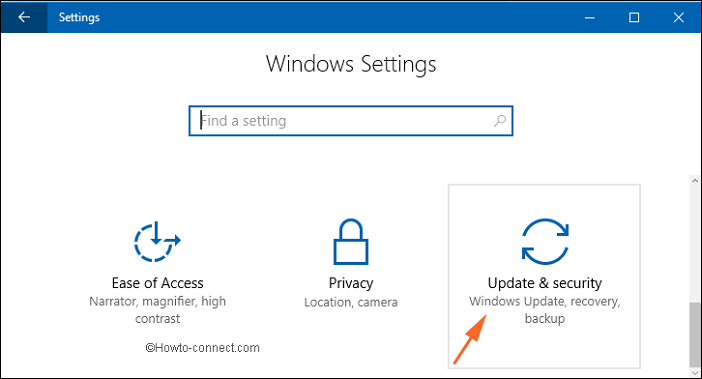
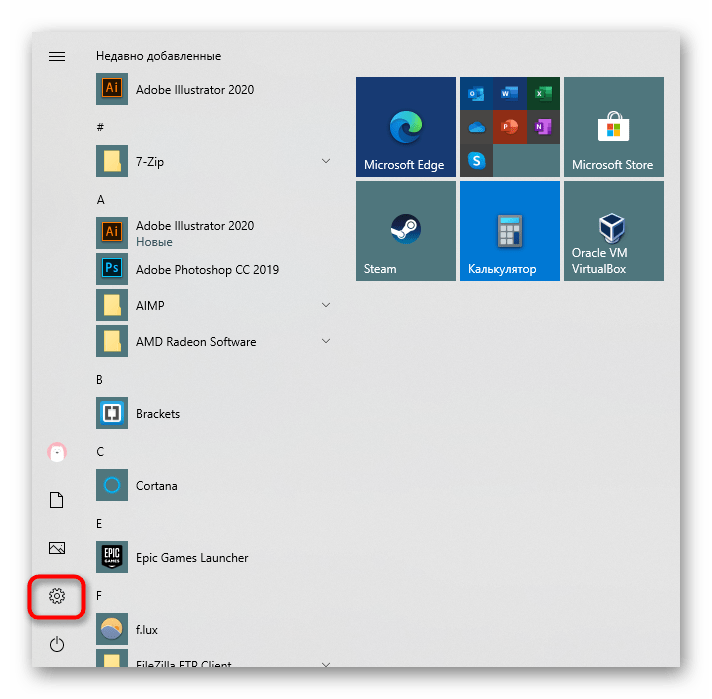
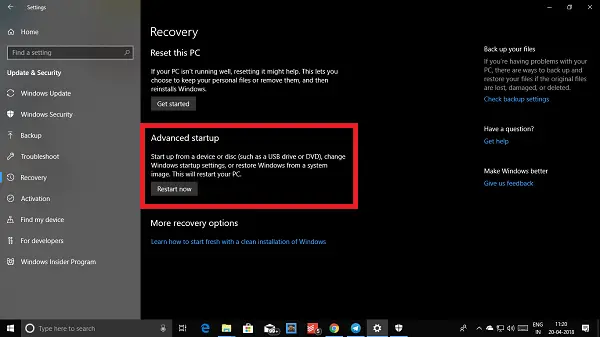
Step 1: Explore the Settings by clicking the gear icon on the left side of the Windows screen.
Step 2: Click the «Update & Security» option.
Step 3: Select «Recovery» from the left side menu, then tap «Restart Now.»
Step 4: Select the Troubleshoot option, then click «Advanced Options.»
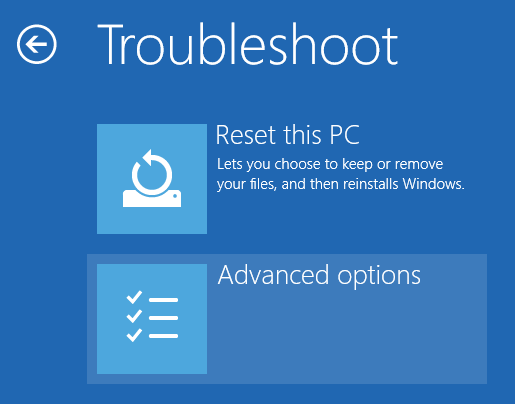
Step 5. In the end, choose «UEFI Firmware Settings» to make changes.
Step 6. It will restart your computer. Once the system boots up, it will take you to the Firmware settings.
Step 7. Switch to Boot Tab and select your desired boot drive from the list and place it on the top.
Note: Use the arrow keys or the + & — buttons to change the boot order.
Step 8. Press F10 to Save and Exit.
Method 3. Change the Boot Drive via System Configuration
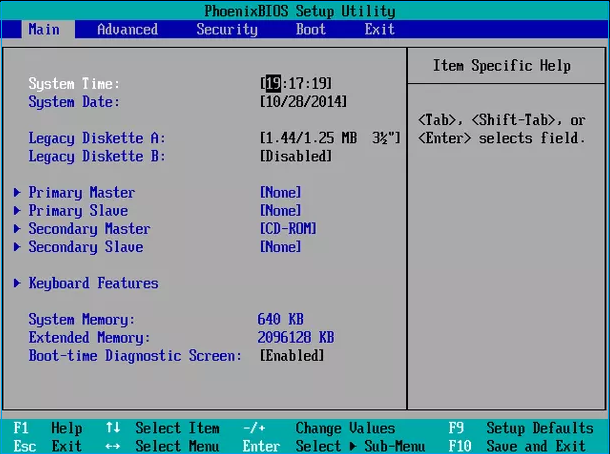
You can also change your boost drive through the diskpart command in System Configuration. Use the BIOS settings or UEFI firmware by pressing any compatible Function key from F1 to F12.
Note: Different computers/laptops access BIOS from different Fn keys. Restart the computer to log in to BIOS settings and go through the steps below:
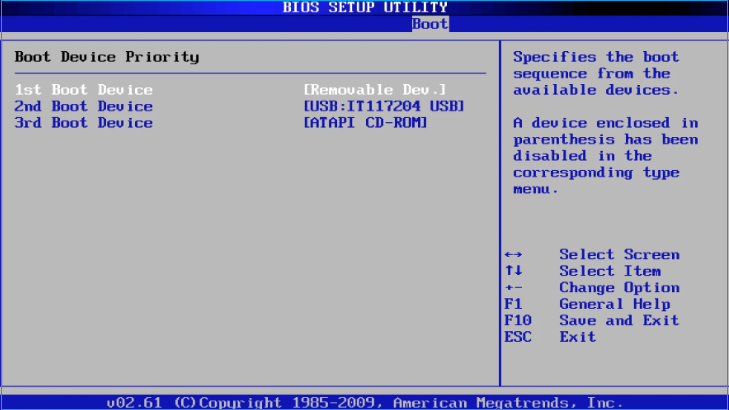
Step 1. Press the correct function key to access the BIOS Setup
Step 2. Hit Enter to access the Boot submenu.
Note: All the BIOS utilities may differ a little but the menu settings are generally listed horizontally. You will get the menu option at the top, hardware options in the middle, and BIOS modification at the bottom of the screen.
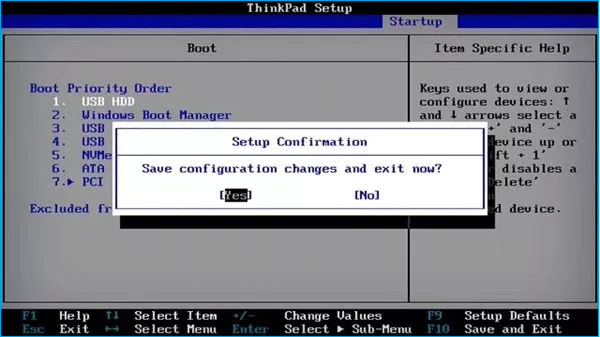
Step 3. To find the Boot order and select the drive, use the Arrow key to push the drive in the first place. To move the gadget up or down, press the + and — keys.
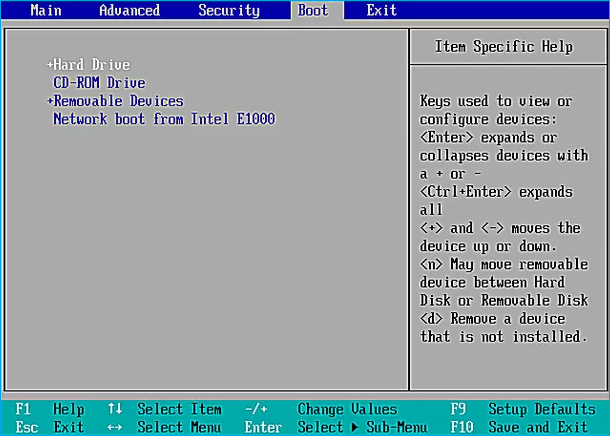
Step 4. Change the Boot order accordingly, and press the F10 key to choose «Save and Exit.»
Step 5. Select «Yes» to confirm your changes and start your computer.
Concluding Thoughts
Changing your boot drive gives you multiple advantages to enjoy the efficient and definitive functionality of the computer system. You should not feel annoyed if you have not gone through the boot drive changing process. Thus, we have added the essential information about how to change Boot Drive Windows 10. Simply choose any of the mentioned methods, and follow each step correctly.
FAQs about Changing Boot Drive Windows 10
Follow the FAQ section for additional queries about how to change boot Drive Windows 10.
1. Why I cannot use SSD to boot?
You cannot use the SSD to boot due to the failure of resetting the boot order in the BIOS utility. Connect your SSD, then restart your computer. Press the correct function key to open the BIOS menu. Use + and — keys to move up and down. Choose the SSD and press F10 to save and exit.
2. How do I fix no bootable devices found?
Reconnect the device and restart your computer. After restart, press the relevant key, Esc, Del, or F1…F12 to open BIOS settings. Go to the boot tab and change the boot order. To do so, use the Arrow key and place the hard drive in the first position.
3. Does the boot drive have to be a C drive?
Generally, the computer system uses the C drive as the boot drive, but you can change the boot drive from BIOS settings.
Все способы:
- Вариант 1: Изменение места сохранения файлов
- Вариант 2: Изменение загружаемой операционной системы
- Вопросы и ответы: 37
Под «установкой диска D основным» понимается 2 разных задачи: сохранение всех файлов на этот диск или автоматическая загрузка второй операционной системы, установленной на D, при включении компьютера. Далее мы разберем оба варианта, а вы сразу же переходите к тому, который отражает ваш запрос.
Вариант 1: Изменение места сохранения файлов
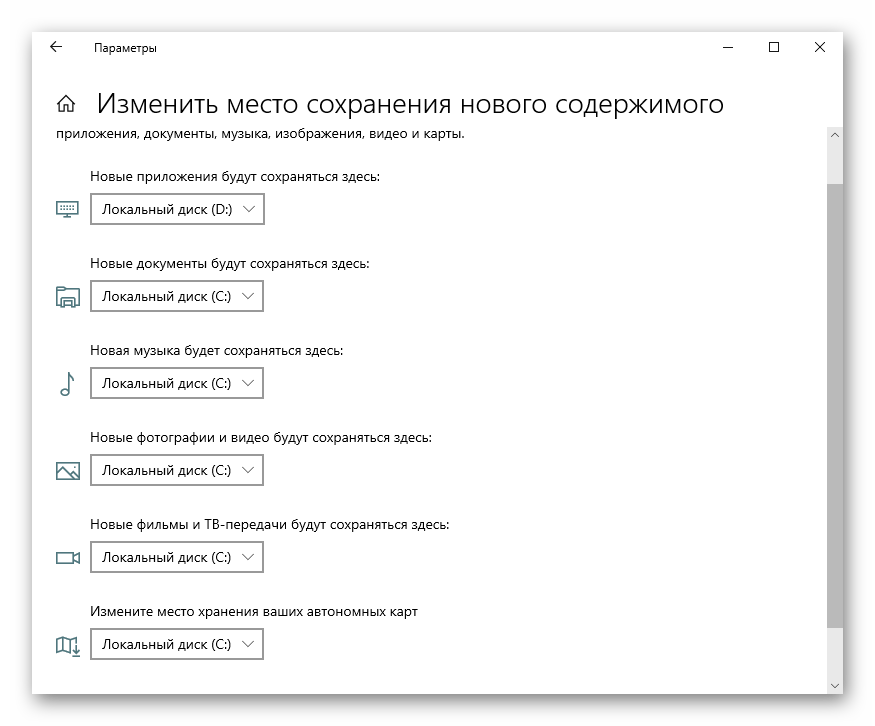
Сейчас практически у всех пользователей жесткий диск разбит на два логических (C и D), либо этими буквами именуются действительно два разных накопителя. В обоих случаях, особенно в связке SSD + HDD, где твердотельный накопитель маленького объема, на системном диске C рано или поздно перестает хватать места для скачивания любых пользовательских файлов. Операционная система Windows 10 позволяет изменить их место сохранения на диск D. После этого критически важные обновления для ОС продолжат скачиваться на C, а вот все малозначимые и не влияющие на работоспособность Виндовс файлы начнут сохраняться на D.
- Откройте «Пуск» и перейдите в «Параметры».
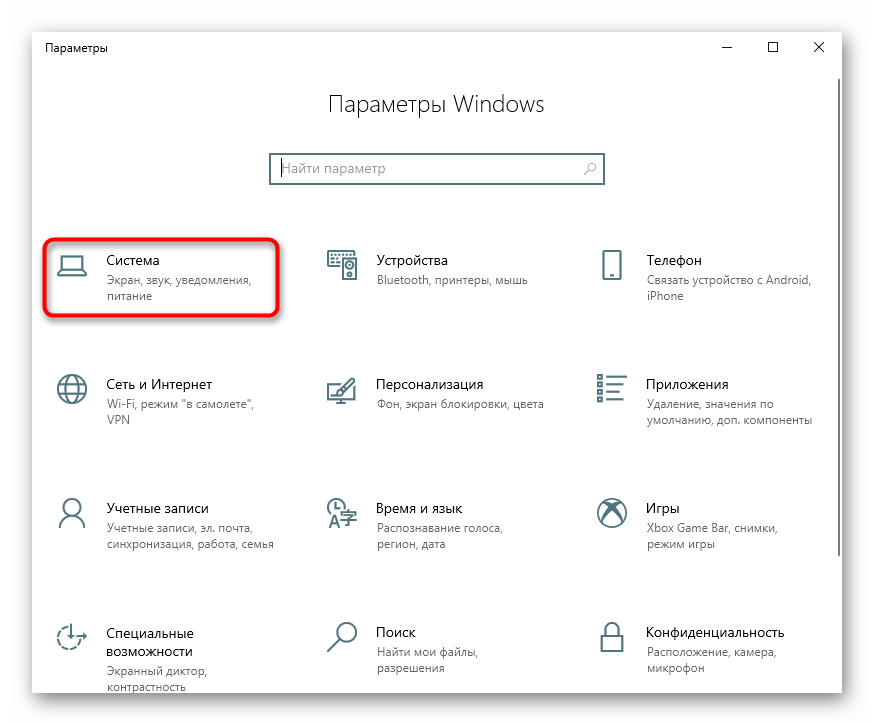
- Перейдите в первый же раздел «Система».
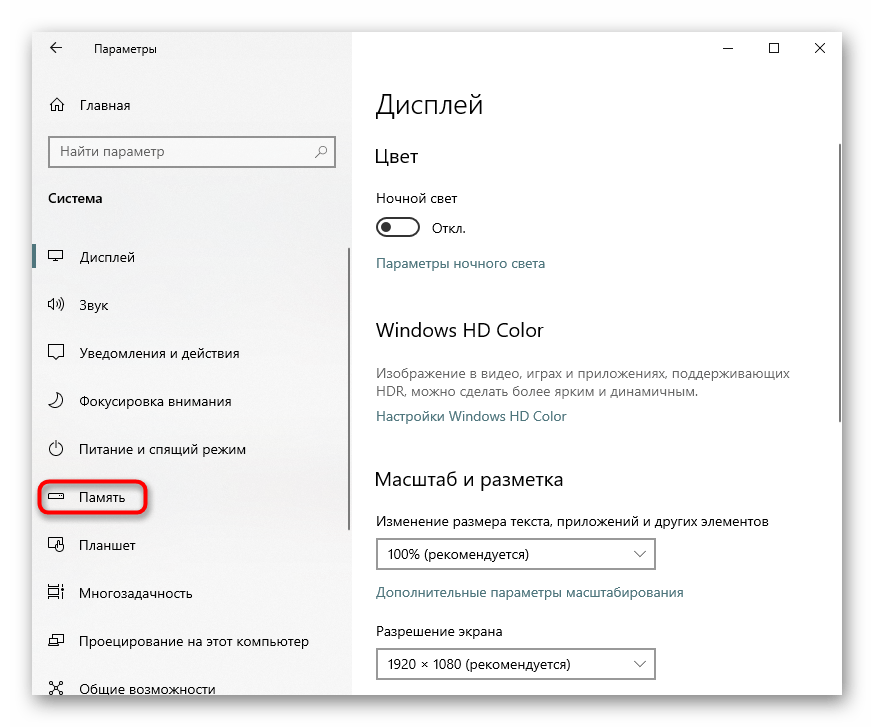
- Тут вам нужен подраздел «Память», находящийся на панели слева.
- Найдите кликабельную ссылку «Изменить место сохранения нового содержимого».
- Здесь представлен список всего, что можно переносить на диск D.
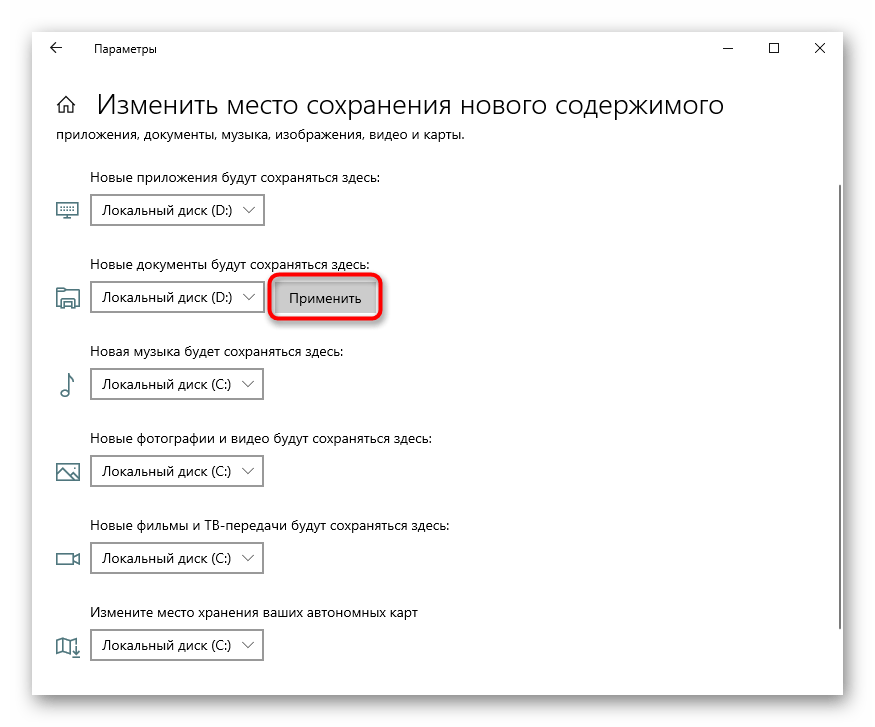
- Измените все или некоторые пункты, не забывая каждый раз нажимать «Применить». После этого окно можно просто закрыть.

Но не забывайте, что это были только лишь основные настройки: многие программы, преимущественно браузеры, продолжат сохранять все в указанную ранее папку. Обычно это диск C, поэтому не забывайте зайти в настройки своего веб-обозревателя и изменить там путь, по которому происходит скачивание на ваш компьютер. То же самое касается торрент-клиентов, игровых клиентов и других приложений, подразумевающих загрузку.
Инструкция никак не повлияет на независимые установщики новых программ: по умолчанию они всегда будут предложить выполнить инсталляцию на диск C, поэтому вам каждый раз потребуется вручную менять путь. Изменить это на автоматический выбор D, к сожалению, получится только редактированием реестра.
Внимание! Не рекомендуем выполнять дальнейшие действия пользователям без опыта и без особой необходимости! Изменение параметра реестра может привести к нарушению работоспособности Windows и проблемам с запуском некоторых программ!
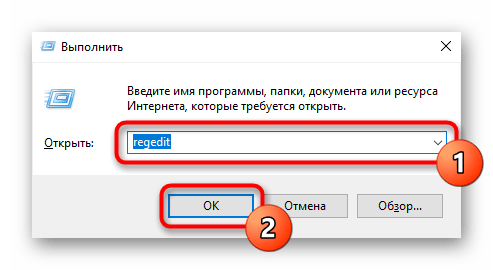
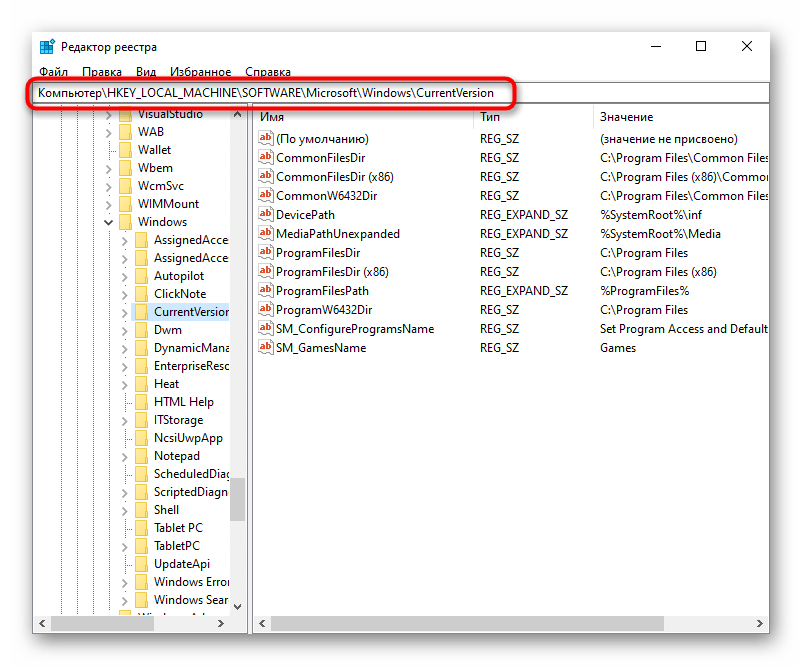
- Сочетанием клавиш Win + R вызовите окно «Выполнить»,где введите
regedit. Нажмите «ОК». - Скопируйте и вставьте в адресную строку следующий путь:
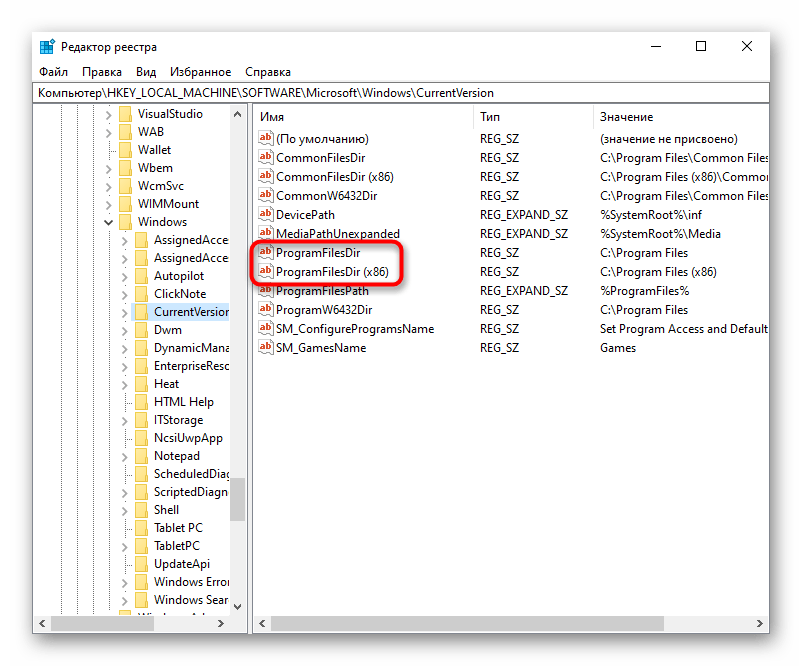
HKEY_LOCAL_MACHINE\SOFTWARE\Microsoft\Windows\CurrentVersion, после чего нажмите Enter. - Сперва понадобится выбрать параметр «ProgramFilesDir», а потом — «ProgramFilesDir (x86)». Если система 32-битная, то редактироваться будет только последний параметр.
- Откройте его, кликнув дважды ЛКМ, и в поле «Значение» измените букву с C на D. В 64-битной системе то же самое понадобится проделать и со вторым параметром.
- Останется только перезагрузить компьютер для применения изменений.

Вариант 2: Изменение загружаемой операционной системы
У некоторых юзеров, напротив, на два разных диска (C и D) установлены две операционные системы. И если из них по умолчанию загружается та, что установлена на диске С, это можно легко изменить через «Конфигурацию системы».
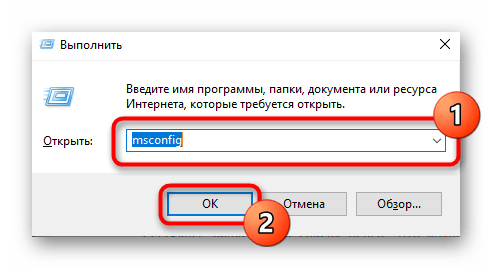
- Нажмите сочетание клавиш Win + R и впишите команду
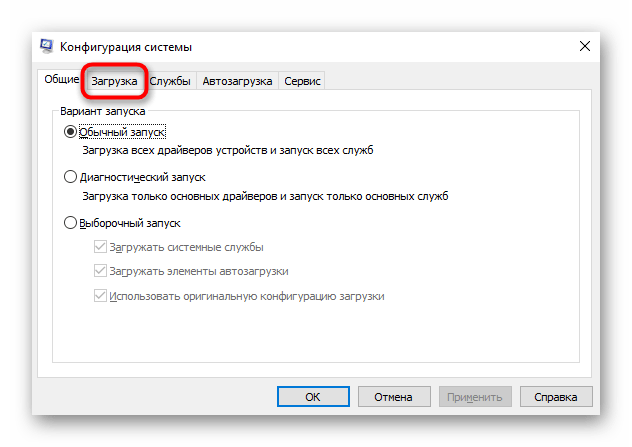
msconfig, после чего кликните «ОК». - Переключитесь на вкладку «Загрузка».
- Выделите ту ОС, что установлена на диске D, и нажмите кнопку «Использовать по умолчанию». Подтвердите изменения кнопкой «ОК».
- Перезапустите ПК.

Чтобы изменить загружаемую операционную систему и отключить уведомление о выборе ОС при включении компьютера, можно поступить несколько иначе.
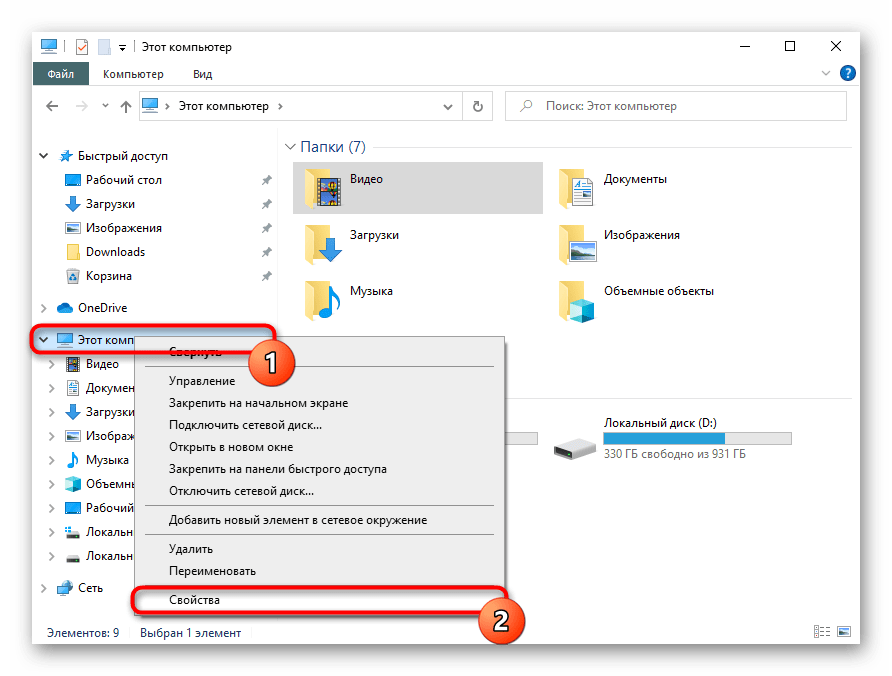
- Нажмите по ярлыку «Этот компьютер» правой кнопкой мыши и перейдите в «Свойства». Если его нет на рабочем столе, откройте «Проводник» и сделайте то же самое, воспользовавшись левой панелью.
- Опять же, через левую панель переключитесь в «Дополнительные параметры системы».
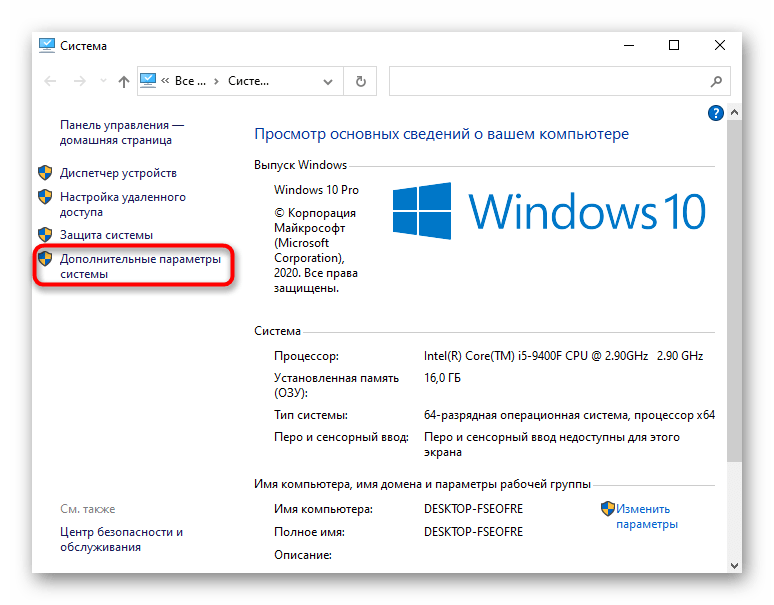
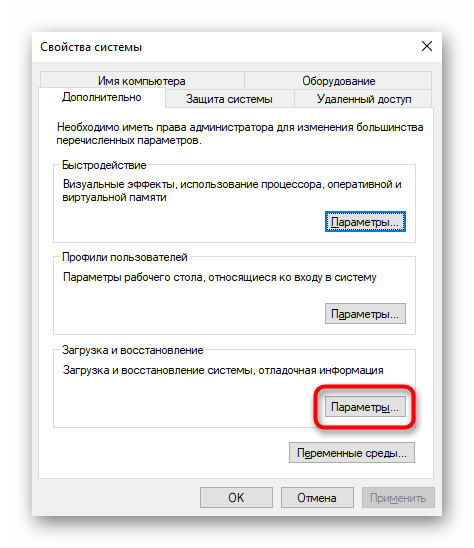
- На вкладке «Дополнительно», открытой по умолчанию, найдите блок «Загрузка и восстановление» и перейдите в «Параметры».
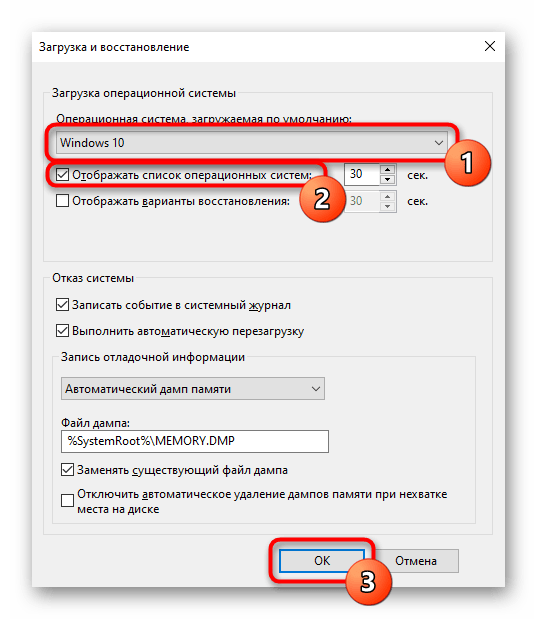
- Здесь через выпадающее меню измените ОС, загружаемую по умолчанию, на ту, что инсталлирована на диск D, а затем снимите галочку с пункта «Отображать список операционных систем». Сохраните изменения на «ОК». Они вступят в силу после перезагрузки ПК.
Наша группа в TelegramПолезные советы и помощь
Download Article
Navigate your app storage settings with our guide
Download Article
The “C” drive is the default installation location destination in Windows. Anything you install there will use up your computer’s storage. Windows 10 allows you to install Windows Store apps on an external hard drive, instead, if you’d like to. This wikiHow will teach you how to make the switch.
Changing Default Installation Location: Quick Steps
- Click the Windows icon to open the Settings panel.
- Select System.
- Choose Storage from the panel on the left.
- Click “Change where new content is saved” under “More storage settings.”
- Choose a new drive from the dropdown menu under “New apps will save to.”
- Click Apply to save your changes.
-

1
Go to the Settings panel. Open the Start menu by clicking on the Windows icon and hit the Settings gear icon from the left side.
- Alternatively, press ⊞ Win+I to quickly launch the Settings panel.
-

2
Click on the System settings. It’s the first option with a laptop icon.
Advertisement
-
3
Select the Storage option from the left panel. It will be the sixth option in there.
-

4
Navigate to the “More storage settings” section. Click on the Change where new content is saved option, under the More storage settings title.
-

5
Select a drive from the New apps will save to box. Click on the This PC (C:) box and choose a drive from the list.
- Make sure that your drive has the essential storage to install new apps in the future.
-

6
Click on the Apply button to save your changes. Now you can install Windows Store apps on your desired hard drive. Finished!


Advertisement
Ask a Question
200 characters left
Include your email address to get a message when this question is answered.
Submit
Advertisement
-
You can also move the Windows Store apps to another drive from the “Apps & features” settings.
Thanks for submitting a tip for review!
Advertisement
References
About This Article
Thanks to all authors for creating a page that has been read 113,518 times.
Is this article up to date?
По умолчанию большинство браузеров и программ при скачивании по умолчанию используют системную папку «Загрузки», которая фактически находится в C:\Users\Имя_пользователя\Downloads (C:\Пользователи\Имя_Пользователя\Загрузки). Однако, это не всегда удобно: например, перемещение этой папки может пригодиться, когда у вас в Windows 10 несколько пользователей, но требуется, чтобы все они использовали одну папку для скачиваемых файлов.
В этой инструкции для начинающих о том, как изменить папку «Загрузки» в Windows 10 (а точнее — её расположение по умолчанию, т.е. переместить папку, в том числе и на другой диск), а также некоторая дополнительная информация, которая может оказаться полезной при действиях с этой папкой.
Изменение расположения папки «Загрузки»
Для того, чтобы переместить папку «Загрузки» в Windows 10 достаточно выполнить следующие простые шаги:
- В проводнике Windows 10 нажмите правой кнопкой мыши по папке «Загрузки» и откройте её свойства.

- На вкладке «Расположение» нажмите «Переместить» и выберите другую папку на компьютере, где вы хотите расположить папку загрузок. Внимание: не указывайте в качестве папки загрузок корень какого-либо диска, это может вызвать проблемы в дальнейшем.
- Нажмите кнопку «Применить» и в диалоговом окне ответьте, требуется ли переместить в новую папку уже имеющиеся в папке «Загрузки» файлы (это может занять время) или не нужно.

- Дождитесь окончания перемещения файлов (если вы выбрали этот вариант) в новую папку.
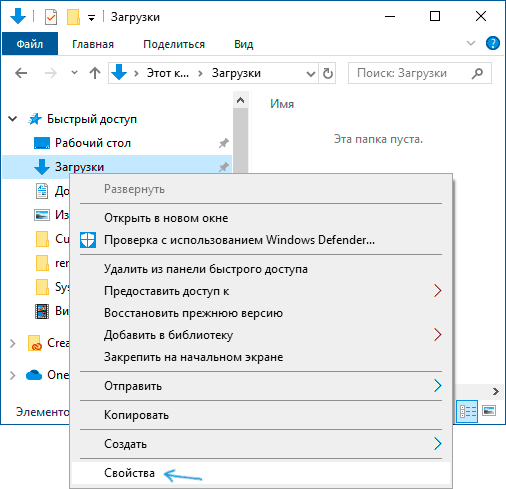

На этом процесс будет завершен: браузеры и другие программы, которые скачивают файлы в системную папку «Загрузки» теперь будут скачивать их в новую, указанную вами папку.
Изменение папки загрузок в браузерах и программах
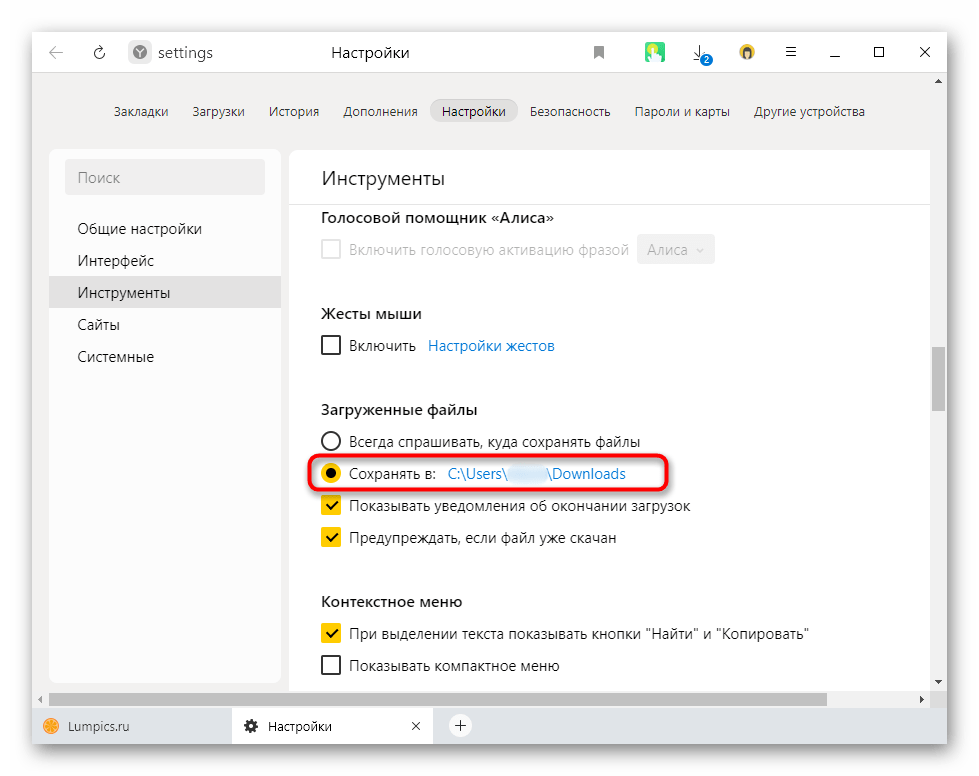
Большинство браузеров и многие другие программы, скачивающие файлы из Интернета, имеют собственные настройки, позволяющие указать, куда именно их следует загружать по умолчанию. Обычно, используется заданная системой папка, но не всегда.
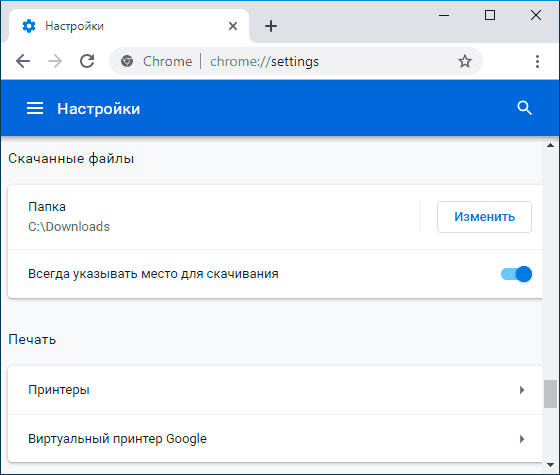
В разных программах это реализовано по-разному, но почти всегда нужные параметры можно найти в настройках. Например, в Google Chrome потребуется открыть настройки, открыть дополнительные параметры и указать папку в разделе «Скачанные файлы», как на скриншоте выше (а можно включить параметр, чтобы всякий раз при скачивании запрашивалось расположение, куда нужно размещать файл).
Отключение группировки по дате в папке «Загрузки»
В последней версии Windows 10 файлы в папке «Загрузки» по умолчанию группируются по дате, что не всегда удобно для использования.
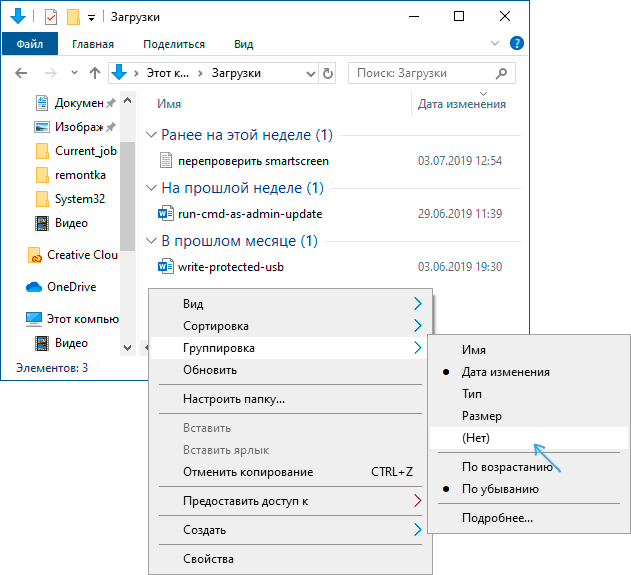
Чтобы включить стандартный вид, находясь в этой папке нажмите в пустом месте проводника правой кнопкой мыши, выберите пункт «Группировка», а затем — пункт «Нет».
Также может быть интересно: Как переместить папку загрузки обновлений в Windows 10, Как изменить папку загрузок в Google Chrome.
Download Windows Speedup Tool to fix errors and make PC run faster
When your PC boots up, the first thing that loads up is the UEFI Firmware or the BIOS. It does a lot of things which also includes the option to which hardware to use to boot the Windows. If you want to boot from a USB drive or an external drive, you need to change the boot order on Windows 11/10. The usual default is set to the first hard drive connected to the PC.
Prior to Windows 11/10, it was possible only by rebooting your PC and then press a unique key like F2 or DEL on your keyboard to get into BIOS. In Windows 10, Microsoft has inbuilt a recovery system that allows you to do many things. One of the options is to boot into BIOS making it a lot easier in case you always miss pressing the key.
In this guide, we will show how you can boot into Windows 11/10 firmware settings (UEFI/BIOS), and change the boot order easily.
Windows 11/10 Recovery System allows you to get into your UEFI/BIOS settings from the OS and change your boot order. You can choose to boot from a USB drive or DVD Drive. This comes in handy during fresh installation or upgrading using an ISO.
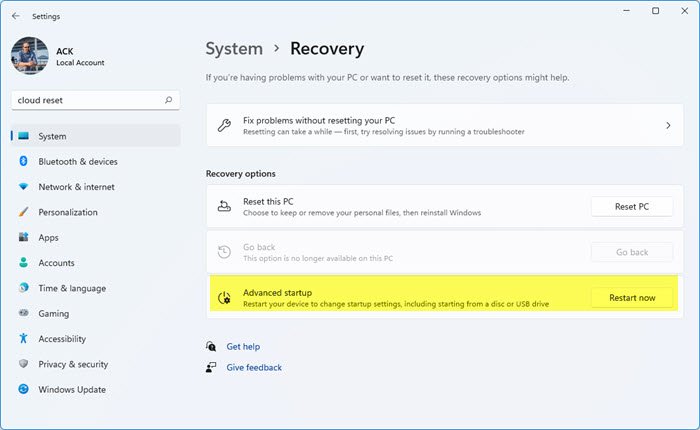
Windows 11 users need to press Win+I to open Settings > System Recovery and click on Restart now button against Advanced Startup.
Windows 10 users, open Settings > Update & Security > Recovery Advanced Startup and click on Restart now.
This feature lets you:
- Boot Windows from a device or disk (such as a USB drive or DVD).
- Change your PC’s Firmware Settings.
- Configure Windows Startup Settings.
- Restore Windows from a System Image.
When you click on Restart Now, it will reboot your PC, and offer you all these Advanced Options. Click, and wait till you get these options. Select Troubleshoot > Advanced Options. This screen offers further options which include System Restore, Startup repair, Go back to the previous version, Command Prompt, System Image Recovery, and UEFI Firmware Settings.
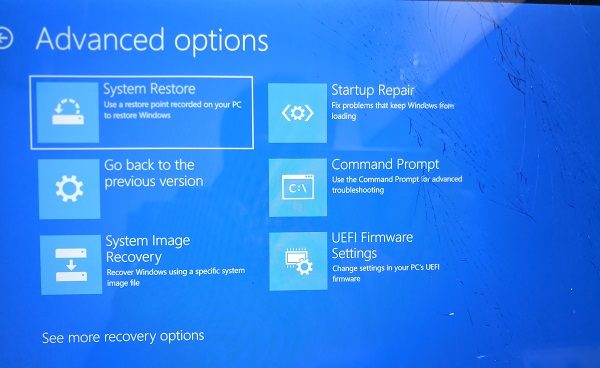
Select UEFI Firmware Settings, and it will let you restart your PC. Once the computer boots up, it will take you to the Firmware settings.
- Switch to Boot Tab.
- Here you will see Boot Priority which will list connected hard drive, CD/DVD ROM and USB drive if any.
- You can use the arrow keys or + & – on your keyboard to change the order.
- Save and Exit.

Now when you boot it will follow the sequence which you have set in your BIOS or UEFI Firmware Settings.
See: How to change Boot Menu Timeout in Windows
This comes in very handy when you want to boot from a DVD drive that has Windows 11/10 Installation files or if you have another Windows installed on a secondary hard disk.
Read: How to change default operating system in Windows
Note: It seems if you have a Bluetooth keyboard, it will not work here. You will need a hard-wired keyboard to navigate and change the options. Also, the touch doesn’t work either.
Read: Change Time to display the list of operating systems & Recovery Options in Windows.
Anand Khanse is the Admin of TheWindowsClub.com, a 10-year Microsoft MVP (2006-16) & a Windows Insider MVP (2016-2022). Please read the entire post & the comments first, create a System Restore Point before making any changes to your system & be careful about any 3rd-party offers while installing freeware.