
Добрый день! Не подскажите как изменить винду 10? В общем у меня стоял русский язык, я поменял на японский язык, как мне теперь сделать, что бы винда была на русском языке? Делал для японских игр, просто игры загружаю и там язык установки японский, я не могу установить игру иначе. А как сделать мне обратно винду на русскую? Внизу у меня русский язык, английский и японский. В общем винду поменять на русскую назад? А можно как ни будь сделать что бы винда быстро переключалась с японского на русский для японских игр у них установка на их родном языке идет бывает игра установилась, а запустить не можешь нужна локаль японская. ОС Windows 10
Категория: Система
Автор вопроса: Гость
Просмотров: 18927
Ответы специалистов и комментарии пользователей
vitalist
/ Виталий Владимирович
10.04.2019, 09:48
Идёшь Пуск — Параметры — Время и язык:
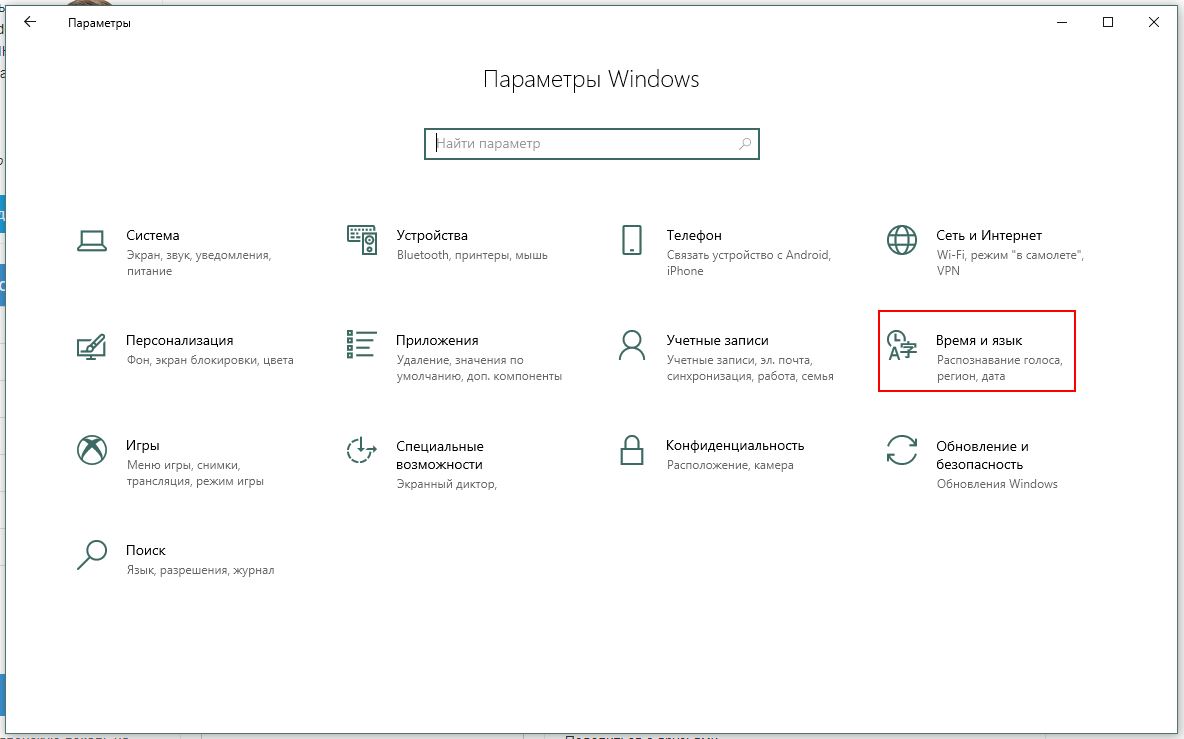
Здесь открываем строку «Язык» и в появившемся окне можно сделать всё то, о чём ты писал в своём вопросе:
Голосов:
0
Для ответа в данной теме, войдите на сайт под своим логином или зарегистрируйтесь.
Как удалить японские шрифты (локаль)
Возникла проблема с установкой игры — Burnout Paradise: The Ultimate Box, когда ставил первый раз было всё нормально, но было мало памяти(1 Gb) и игра тормозила, поэтому удалил, а сейчас ( Сделал 2 Gb и хочу протестировать память) вылетает при установке, японские шрифты удалил:
Приложение MSI — удалил, считая что оно мешает установке, но тем не менее, чуда не произошло.
И ещё вопрос: как обновить систему не снося её, просто если учесть что у меня стоит на данное время в компьютере, то установка затянется на целый день.
Диск не лицензионный, помимо Windows, там ещё куча других программ. Сегодня утром попытался обновить систему, но ничего не получилось, по крайней мере игру поставить не смог.
Вот коммент одного из пользователей ТВР
If you’re wondering how to change the language on your PC, read on for instructions on how to change the Japanese locale in Windows 10. If you want to play Japanese games on your PC, you’ll need to switch the system locale to Japan, since many games don’t display the text in Japanese unless the game’s language is set to Japanese. To change the system locale, you need to log in as an administrator.
Start by going to Start > Control Panel. Click on Regional and Language Options. Double-click on the Regional and Language Options icon. Choose the Administrative language settings. Then, click on Change system locale. You may be prompted to enter your administrator password. Once you’ve made the change, restart your computer. Your changes should take effect soon. If you’re not sure how to change the locale, refer to your Windows documentation.
How Do I Enable Japanese Locale in Windows 10?
To enable Japanese localization on your computer, open Control Panel and click the Regional and Language Options icon. Then, click the language that you prefer. Choose Japanese in the drop-down list. Then, click OK. Then, click OK again. The Japanese Locale will now be set. Now, you should be able to see the Japanese text on your PC. In this article, we will show you how to enable Japanese Locale in Windows 10.
Changing your keyboard layout is as easy as setting up the Japanese input language. To switch from English to Japanese, open the keyboard and click the “A” icon. You should now see the Hiragana character on the keyboard. This is an important step, as typing in Japanese is not easy. Once you’re done, restart your computer. After the restart, you’ll be able to type in Japanese.
To change the system locale of your PC, go to Control Panel. Then, find the Language for non-Unicode programs. Look for the drop-down list under “Change system locale.” You should find the Language of Non-Unicode Programs” and click on it. Then, click on “Change system locale” and select Japanese. After you click the “Change” button, you’ll be able to see the language that Windows uses.
How Do I Change My System Locale in Windows 10?
To change the system locale, open the Control Panel and click on the Language, Region, and time settings. You will then see the Language drop-down menu. Click the Change system locale option and select the Japanese language. This setting will also change the language of programs that don’t support Unicode. After selecting the Japanese language, click OK to save the changes. You can then restart your computer to make the changes take effect.
In the lower right corner of the desktop, click the Language icon and then select “Change system locale.” You will then see the Japanese keyboard. To select it, click the Japanese IME icon that has a stylized “J” in a circle. To type in Japanese, click the “a” icon, which will display Romaji or kana. If you are not logged in as an administrator, click the Windows Update button.
The system locale is an important setting that affects the way your computer interprets non-Unicode text. It can cause problems with non-Unicode applications, like browsers, and even files. In such cases, you should check the BETA option to use Unicode UTF-8 for worldwide language support. Once you’ve done this, the Japanese language will be supported by Windows 10.
How Do I Change My Windows Language to Japanese?
If you have recently moved to Japan and want to learn Japanese, you can change your Windows language to Japanese. Japanese is supported by Windows 10, but it doesn’t come with instructions for setting up the Japanese input method. As a result, users assume that they can use Japanese input in the same way they would any other language. The fact is, though, that switching your Windows language to Japanese might not be as straightforward as it looks.
To change the language of Windows, go to your system’s settings and find the “Language” setting. Click on this link and choose “Japanese” as the language. If you select “Japanese”, you will have to log out of your current account and sign in as the user you’ve changed your language to. After this, your PC will display everything in Japanese. To switch back to English, simply log out and sign in again.
How Do I Change My Locale to Japan?
How do I change the language on Windows 10? The system locale allows non-Unicode programs to use the language that the user has selected. By default, the operating system sets the locale to the default en-US locale, so Japanese text in a game will not appear. To change the system locale, start by logging in to your computer as an administrator. Note that changing the system locale will not affect the language that appears on menus or dialog boxes, nor will it affect programs that use Unicode.
In addition to Windows’ system locale, the Japanese keyboard layout can be set in the start menu. In addition, you can also change the language of Windows programs using the Shift-JIS keyboard shortcut. Switching the locale does not harm your PC, but you may experience a few inconveniences. The Japanese keyboard layout will change, but the start menu will still be displayed in English. Although this can be frustrating, many programs are now Unicode-aware and will continue to work properly.
How Do I Run a Japanese Locale?
If you have a game that is in Japanese, you might be wondering how to run it on Windows 10. First, you need to install the Japanese language. This will install the corresponding system locale (also known as the non-Unicode program configuration) on your system. Once installed, you should be able to change the system locale to Japanese (Japan). Once this is complete, restart your system. The game should now run without any problems. If not, you may break your system.
Once the installer has completed, a dialog box should appear asking you if you want to run the program in a different locale. Type Japan in the search box to find it. Uncheck the box to save space. The installer will take a few seconds to install. Once installed, the Japanese locale is enabled on your system. If you don’t want to use this language on Windows 10, you can use a program that is available in Japanese.
What is Japanese Locale?
You may be wondering “What is Japanese Locale Windows 10?” If so, you may want to download the application. It is a free download that lets you play games in a specific language. However, there are some disadvantages to using this program. Using it will cause your games to have text errors, or they might even crash. It is not recommended for playing Visual Novels. You can find a free version of this program at the Microsoft Download Center.
If you’re not familiar with the process, you can change your system’s locale to Japanese using the Region and Language Options icon in the Control Panel. After choosing the locale, click on the “Change region and language settings” tab. Select “Japanese.”
Is Changing System Locale Safe?
If you want to change the language on your computer, you can do this easily. Open the Regional and Language Options (RLO) in the Control Panel and double-click on the Regional and Language Options icon. Once you are in the Regional and Language Options pane, click on the Administrative tab, then click on Change system locale. Then, choose the new language in the drop-down menu and click Change. After doing this, restart your computer.
It’s not a bad idea to change your system locale. If you’re switching from one language to another, you’ll be able to access the same program as long as you change your system locale. To do this, first log into Windows as the user who needs to change the system locale. After this, click the Change language button on the System Settings menu. Once you click the Change language button, the new language will be displayed on your PC.
You can also change the language on your computer by modifying the language settings in the Control Panel. If you’re not using Unicode, it’s worth checking if the language you’re using is supported by the system. By default, the operating system will translate all the text on your computer as UTF-8, but you can change the language settings to your preferences. It’s a good idea to check this before you change it because the result might not be what you expected.
Learn More Here:
1.) Windows Help Center
2.) Windows – Wikipedia
3.) Windows Blog
4.) Windows Central
В Windows 10 может быть установлено более одного языка ввода и интерфейса, при этом после последнего обновления Windows 10 многие столкнулись с тем, что стандартным способом в параметрах некоторые языки (дополнительные языки ввода, совпадающие с языком интерфейса) не удаляются.
В этой инструкции подробно о стандартном методе удаления языков ввода через «Параметры» и о том, как удалить язык Windows 10, если он не удаляется этим способом. Также может быть полезно: Как установить русский язык интерфейса Windows 10.
Простой метод удаления языка
Стандартно, при отсутствии каких-либо багов, языки ввода Windows 10 удаляются следующим образом:
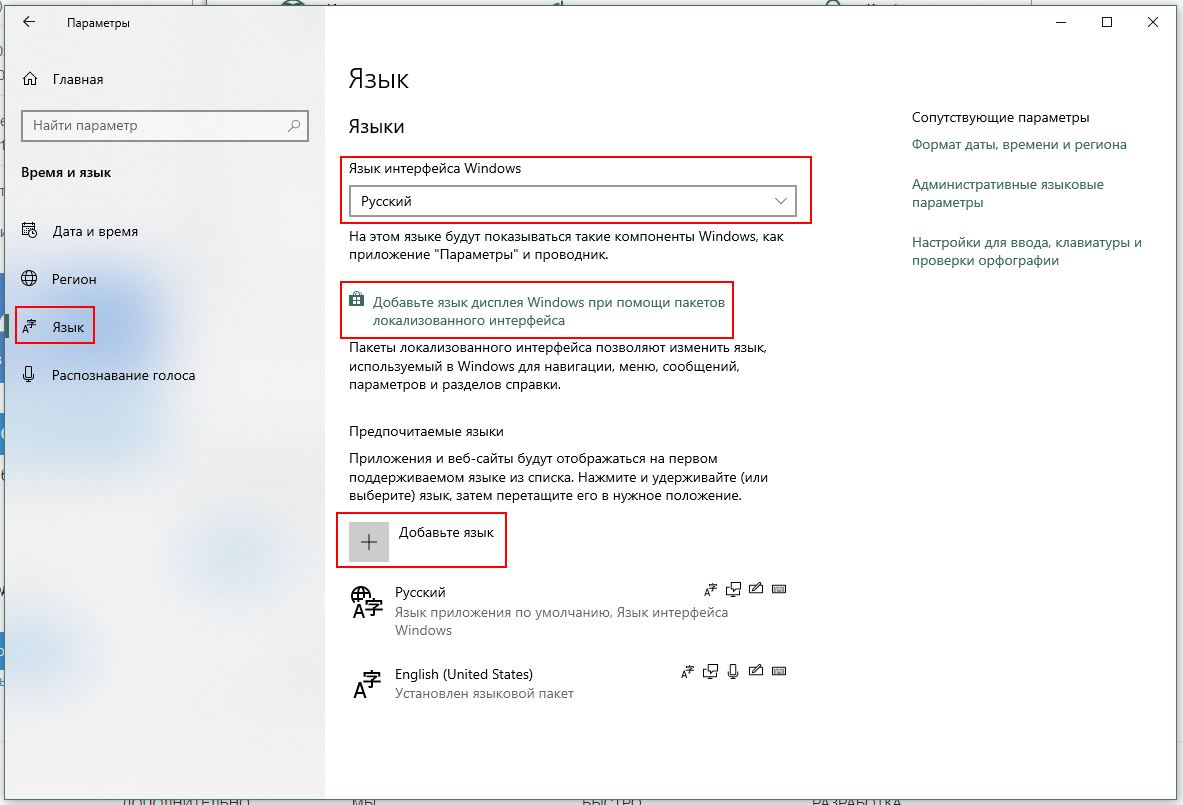
- Зайдите в Параметры (можно нажать быстрые клавиши Win+I) — Время и язык (также можно нажать по значку языка в области уведомлений и выбрать пункт «Настройки языка»).
- В разделе «Регион и язык» в списке «Предпочитаемые языки» выберите тот язык, который нужно удалить и нажмите кнопку «Удалить» (при условии, что она активна).


Однако, как было отмечено выше, в том случае, если есть более одного языка ввода, совпадающих с языком интерфейса системы — кнопка «Удалить» для них не активна в последней версии Windows 10.
К примеру, если язык интерфейса «Русский», а в установленных языках ввода у вас есть «Русский», «Русский (Казахстан)», «Русский (Украина)», то все они не будут удаляться. Тем не менее, есть решения и для такой ситуации, которые описаны далее в руководстве.
Как удалить ненужный язык ввода Windows 10 с помощью редактора реестра
Первый из способов побороть баг Windows 10, связанный с удалением языков — использовать редактор реестра. При использовании этого способа, языки будут удалены из списка языков ввода (т.е. не будут использовать при переключении клавиатуры и отображаться в области уведомлений), но останутся в списке языков в «Параметрах».
- Запустите редактор реестра (нажмите клавиши Win+R, введите regedit и нажмите Enter)
- Перейдите к разделу реестра HKEY_CURRENT_USER\Keyboard Layout\Preload
- В правой части редактора реестра вы увидите список значений, каждое из которых соответствует одному из языков. Они расположены по порядку, также, как и в списке языков в «Параметрах».

- Нажав правой кнопкой мыши по ненужным языкам, удалите их в редакторе реестра. Если при этом будет неверная нумерация порядка (например, останутся записи под номерами 1 и 3), восстановите её: правый клик по параметру — переименовать.
- Перезагрузите компьютер или выйдите из системы и снова зайдите.

В результате ненужный язык исчезнет из списка языков ввода. Однако, удален полностью не будет и, более того, может снова появится в языках ввода после каких-либо действий в параметрах или очередного обновления Windows 10.
Удаление языков Windows 10 с помощью PowerShell
Второй способ позволяет полностью убрать ненужные языки в Windows 10. Для этого будем использовать Windows PowerShell.
- Запустите Windows PowerShell от имени администратора (можно через меню, открываемое правым кликом по кнопке «Пуск» или используя поиск на панели задач: начните вводить PowerShell, затем нажмите правой кнопкой мыши по найденному результату и выберите «Запуск от имени администратора». По порядку введите следующие команды.
-
Get-WinUserLanguageList

(В результате вы увидите список установленных языков. Обратите внимание на значение LanguageTag для языка, который нужно удалить. В моем случае это будет ru_KZ, вы в своей команде на 4-м шаге замените на своё.)
-
$List = Get-WinUserLanguageList
-
$Index = $List.LanguageTag.IndexOf("ru-KZ") -
$List.RemoveAt($Index)
-
Set-WinUserLanguageList $List -Force


В результате выполнения последней команды ненужный язык будет удален. При желании тем же образом вы можете удалить другие языки Windows 10, повторив команды 4-6 (при условии, что вы не закрывали PowerShell) с уже новым значением Language Tag.
В завершение — видео, где описываемое показано наглядно.
Надеюсь, инструкция была полезна. Если же что-то не получается, оставляйте комментарии, я постараюсь разобраться и помочь.
ЯПОНСКАЯ ЛОКАЛЬ — КАК ЗАПУСКАТЬ И УСТАНАВЛИВАТЬ ЯПОНСКИЕ ИГРЫ
Locale Emulator Скачать — GITHUB.COM
Инструкция:
1. Скачайте архив. Извлеките все файлы в нужное место на вашем диске. Запустите LEInstaller.exe и выберите один из вариантов:
Установить для текущего пользователь:действует только для текущего пользователя, не требует прав администратора;
Установка для всех пользователей:самый надежный выбор, требуются права администратора;
Portable:необходимые файлы были извлечены при запуске LEInstaller.exe.
Просто закройте окно.
Теперь вы увидите меню «Locale Emulator» в контекстном меню при щелчке правой кнопкой мыши по файлам. Запускайте нужный вам вариант при запуске .exe файла.
P.S. Во многих случаях, в помине запуска игры и её .exe файла, вам придется запускать через локаль саму установку игры.
