
-
Home
-
News
- How to Uninstall WSL on Windows 11 & Windows 10? See a Guide!
How to Uninstall WSL on Windows 11 & Windows 10? See a Guide!
By Vera | Follow |
Last Updated
If you need to uninstall Windows Subsystem for Linux, you can do this task on Windows 10/11. It is not simple as program uninstallation. Refer to this post from MiniTool and find the guide on how to uninstall WSL easily.
About WSL
Windows Subsystem for Linux, also known as WSL, is a feature in Windows operating system that is primarily designed for developers, especially web developers. WSL enables you to run a Linux system with Linux command-line tools and GUI apps on Windows 11/10. This won’t break anything important on your PC.
In the earlier time, Microsoft released the first version – Windows Subsystem for Linux (WSL) that supports a direct translation between Linux and Windows. While WSL2 uses a lightweight virtual machine to integrate it into your Windows workflow. Any Linux distribution can run on either the WSL 1 or WSL 2 architecture, which depends on their configuration.
To run a Linux system on Windows 10/11, you need to install WSL and here a related post is helpful – How to Install Windows Subsystem for Linux (WSL) on Windows 11.
When anything goes wrong or you no longer need to use this platform, you may want to uninstall WSL. Well then, can you uninstall WSL from your computer? It is possible and just follow the guide below now.
Tips:
Experience a faster system with MiniTool System Booster – your solution to effortless program uninstallation.
MiniTool System Booster TrialClick to Download100%Clean & Safe
How to Uninstall WSL on Windows 10/11
How to uninstall WSL on Windows 11/10? It is not easy to completely remove WSL from your PC since this isn’t similar to uninstalling a program. You need to do three steps – delete the Linux distro, uninstall other components and disable this platform. Do the operations about WSL uninstall Ubuntu in order:
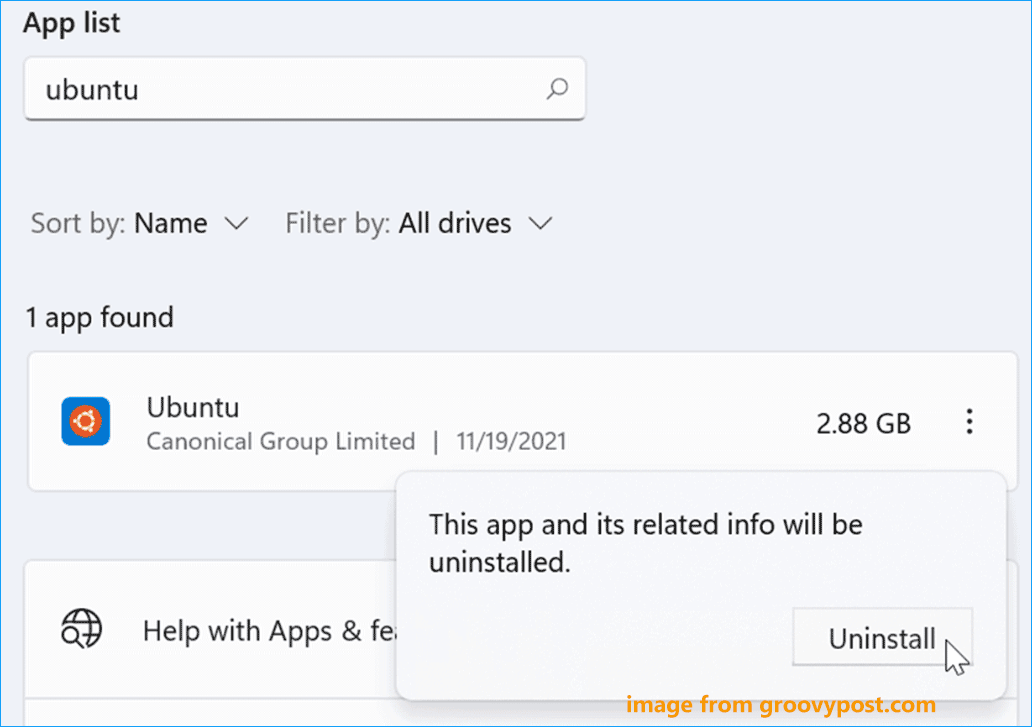
Step 1: Uninstall Linux Distro
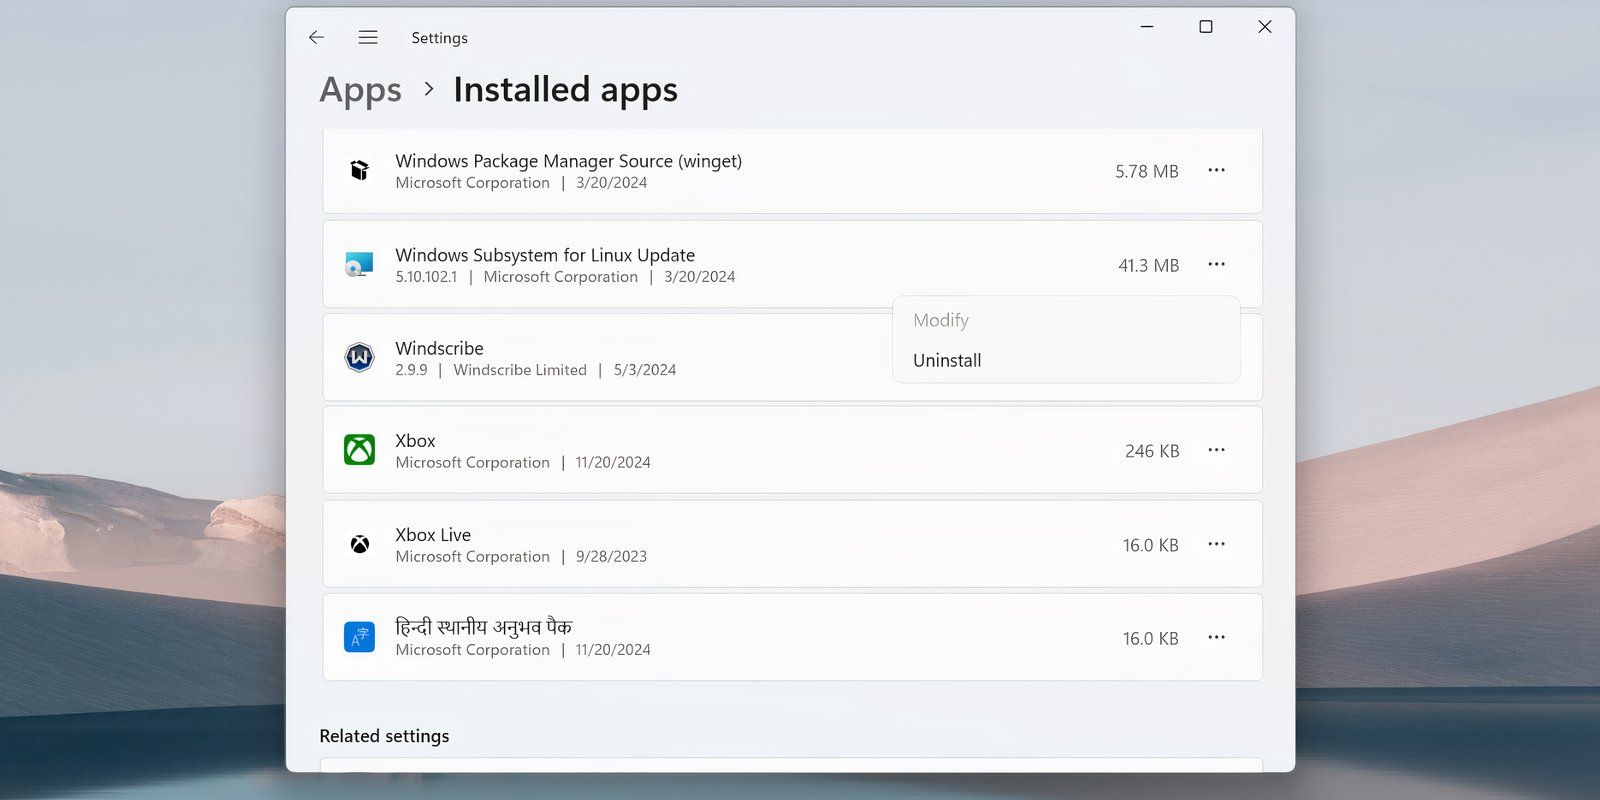
1. In Windows 11/10, press Win + I at the same time to open Settings.
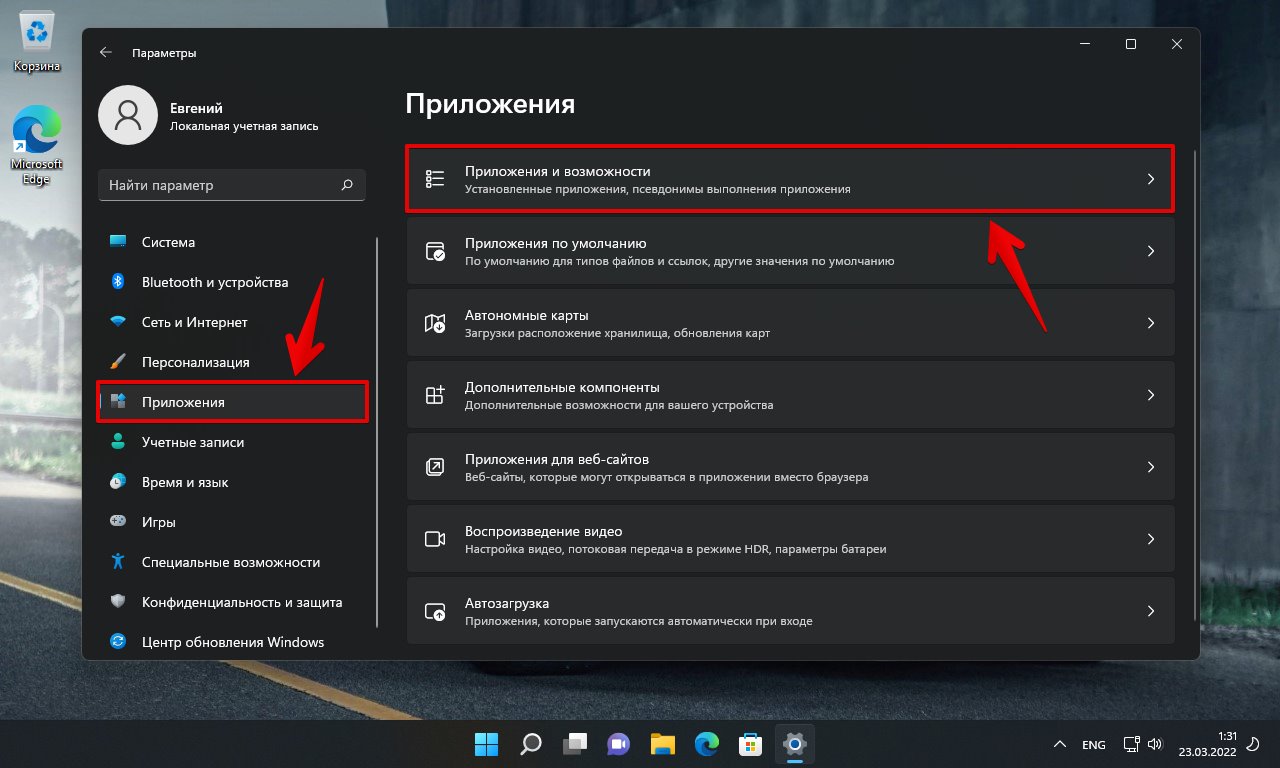
2. Go to Apps > Apps & features.
3. Choose a Linux distribution like Ubuntu and click Uninstall (Windows 10). For Windows 11, click the three dots and click Uninstall. Then, click Uninstall again to confirm the operation.
Tips:
You can type the Linux distribution like Ubuntu into the text of App list to find your installation.
Step 2: Delete Windows Subsystem for Linux Components
After uninstalling the Linux distribution from Windows 11/10, other elements of the Windows Subsystem for Linux functionality should be also removed.
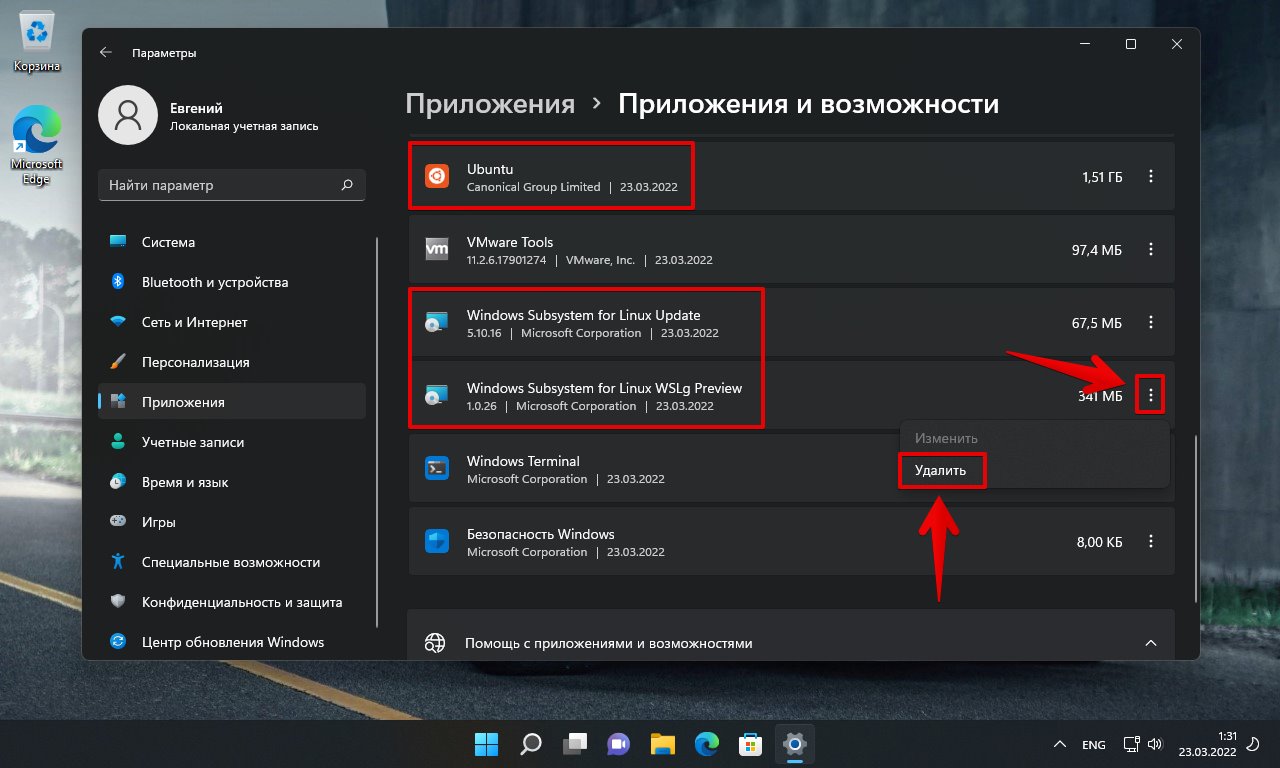
1. In the Settings window, go to App > Apps & features.
2. Choose Windows Subsystem for Linux WSLg Preview and click Uninstall > Uninstall. In Windows 11, you need to click three dots and click Uninstall.
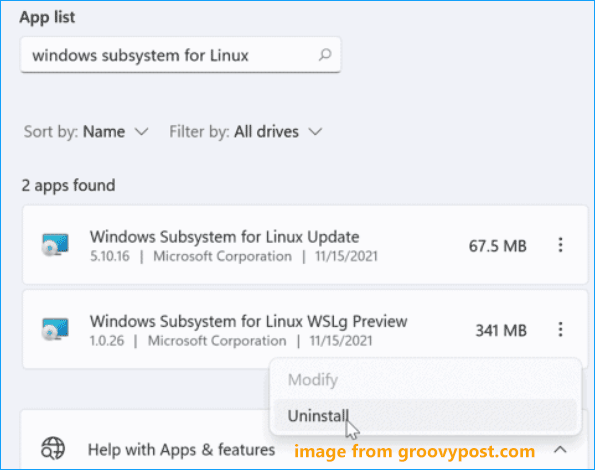
3. Find Windows Subsystem for Linux Update and uninstall it.
Step 3: Disable Windows Subsystem for Linux
This is the last step you should do and see what you should do:
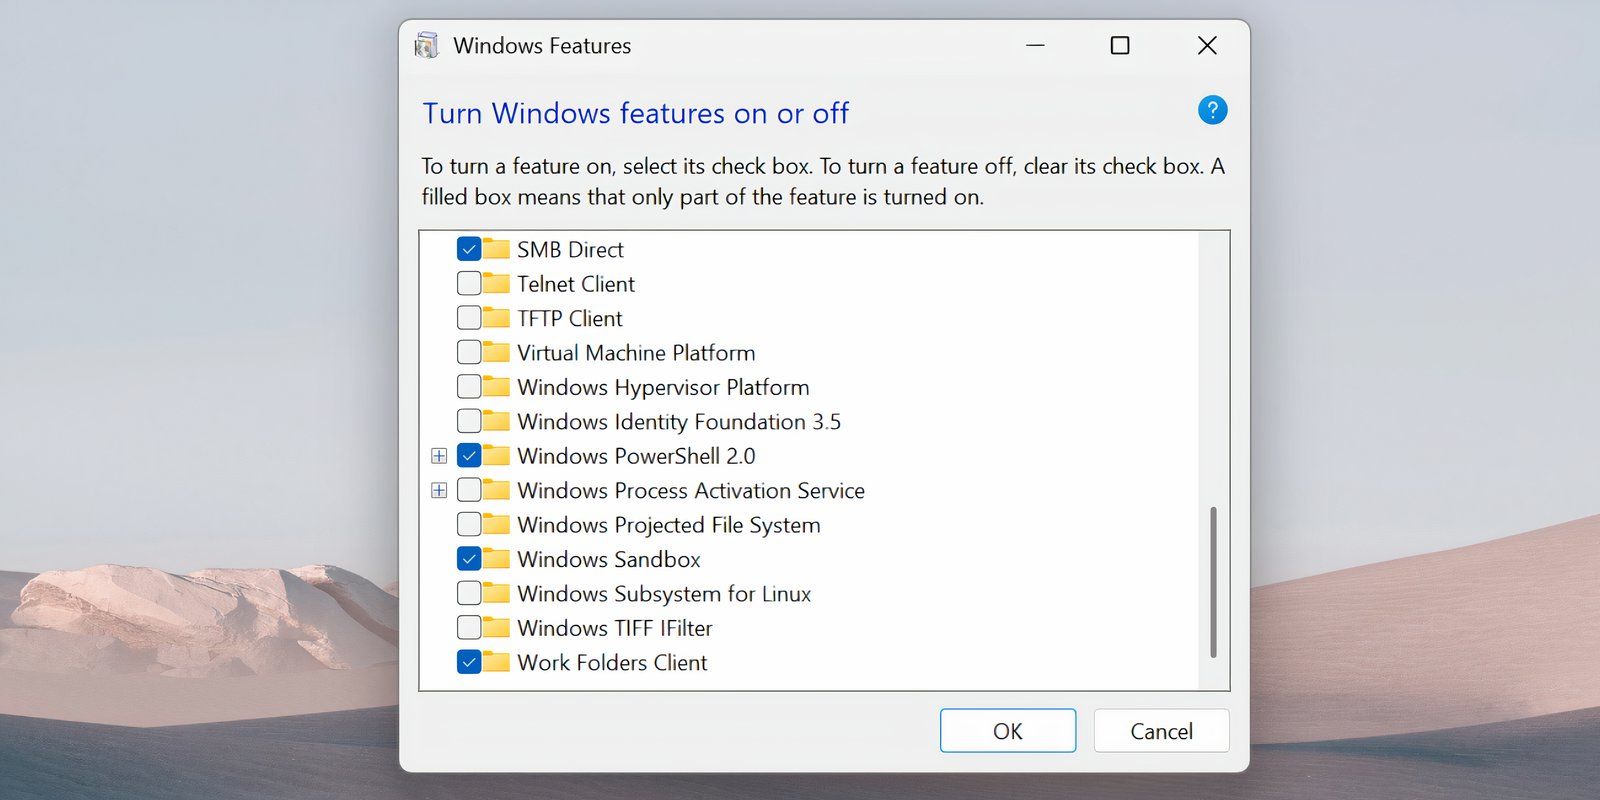
1. In Windows 11/10, click System > Optional features and click More Windows features under the Related settings section to open Windows Features.
Tips:
Alternatively, you can type windows features into the search box and click Turn Windows features on or off.
2. In the Windows Features interface, locate Virtual Machine Platform and Windows Subsystem for Linux, then uncheck the boxes of these two options.
3. Click OK to save the changes and restart your computer.
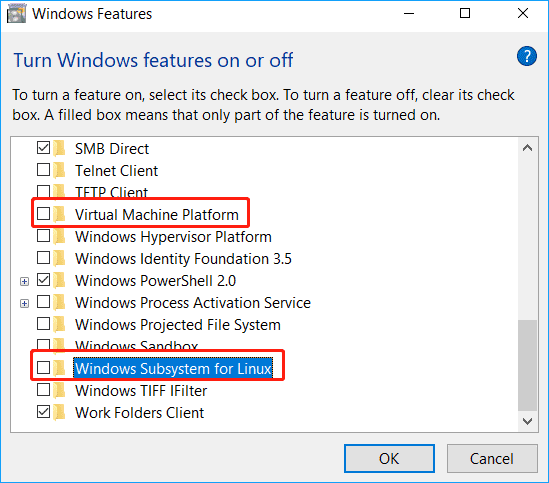
After the restart, you completely uninstall WSL on Windows 11/10. If you change your mind and want to run a Linux distribution like Ubuntu, you can still reinstall WSL on your computer.
About The Author
Position: Columnist
Vera is an editor of the MiniTool Team since 2016 who has more than 7 years’ writing experiences in the field of technical articles. Her articles mainly focus on disk & partition management, PC data recovery, video conversion, as well as PC backup & restore, helping users to solve some errors and issues when using their computers. In her spare times, she likes shopping, playing games and reading some articles.
How to Remove WSL2 from Windows 11
Windows Subsystem for Linux (WSL) is a compatibility layer for running Linux binary executables natively on Windows 11 and other Windows versions. WSL2, in particular, brings improved performance and full system call compatibility. However, if for any reason you need to remove WSL2 from your Windows 11 installation, whether due to performance issues, software incompatibility, or personal preference, this article will guide you through the process step-by-step.
Understanding WSL2
Before diving into the uninstallation process, it’s essential to understand what WSL2 is and its components. WSL2 is an enhanced version of the original WSL, offering a real Linux kernel and improved file system performance. WSL2 allows developers and users to run a complete Linux distribution on Windows without the need for a virtual machine or dual-boot configuration.
Reasons for Removing WSL2
There are several valid reasons why someone might want to uninstall WSL2 from their Windows system:
-
Storage Space: WSL2, depending on the distributions installed, can consume significant disk space. Users looking to free up space might consider removing it.
-
Performance Issues: In some cases, users may experience performance degradation. This could be due to resource conflicts between WSL and other applications.
-
Compatibility Problems: Certain applications may not function well when WSL is enabled, especially if they require exclusive access to system resources.
-
No Longer Required: If a user has transitioned to using native Linux or another virtualization method, WSL2 may no longer serve a purpose.
Prerequisites for Removing WSL2
Before proceeding, ensure you have backed up any important data stored in your WSL2 instances. Removing WSL will also erase all distributions and any content stored within them.
Step-by-Step Guide to Remove WSL2 from Windows 11
Step 1: Open Windows Settings
- Click on the Start button or press the Windows key.
- Select Settings (the gear icon) from the Start menu.
Step 2: Access the Apps Features
- In the Settings window, navigate to the Apps section.
- Click on Optional features found within the Apps menu.
Step 3: Uninstalling WSL
- Scroll down the list of installed features until you find Windows Subsystem for Linux.
- Click on it to expand the options, then click Uninstall. Confirm any prompts that may appear.
Step 4: Uninstalling Linux Distributions
Once WSL has been removed, you may also need to uninstall any Linux distributions you have installed. Follow these steps:
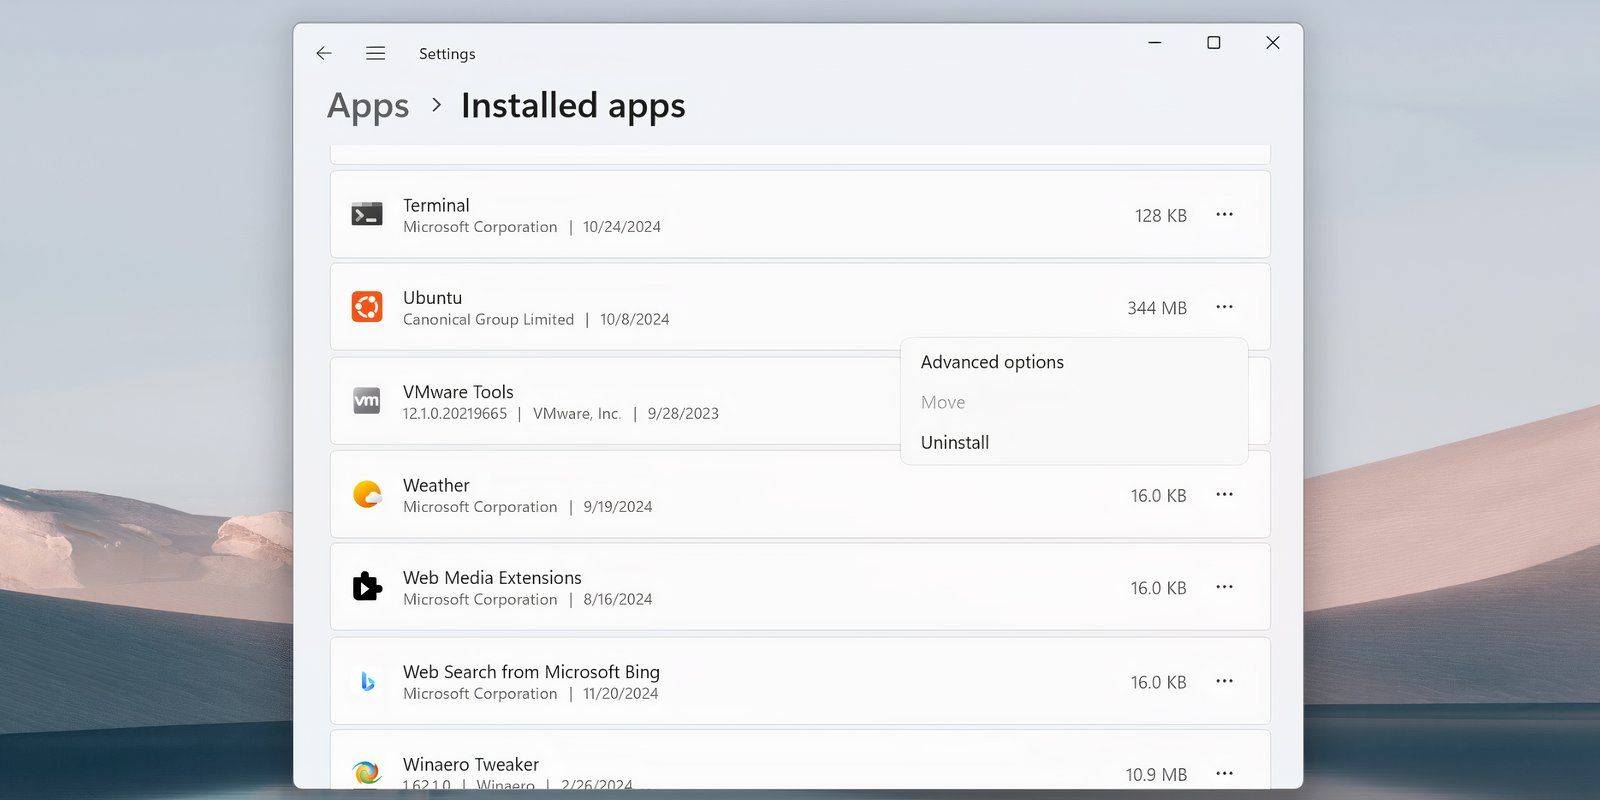
- Return to the Apps section in the Settings.
- Click on Installed apps or Apps & features.
- Scroll down the list to find the Linux distributions you’ve installed (such as Ubuntu, Debian, etc.).
- Click on the distribution you want to uninstall, then select Uninstall. Confirm the action when prompted.
Step 5: Disable the Virtual Machine Platform
WSL2 utilizes the Virtual Machine Platform. Disabling this will help remove any lingering components of WSL2.
- Open the Control Panel by searching for it in the Start menu.
- Click on Programs and then on Turn Windows features on or off.
- In the Windows Features window, find and uncheck Virtual Machine Platform.
- Click OK and wait for the process to complete.
- You will likely need to restart your computer to finish this step.
Step 6: Optional – Checking if WSL is Fully Removed
After removing WSL, you may want to check if all components are gone:
- Open PowerShell as administrator.
- Type
wsl --listand press Enter. If WSL is removed, you should see a message stating that WSL is not recognized as a command.
Troubleshooting Common Issues
While most users will find the uninstallation process straightforward, some may encounter issues. Here are some common problems and their solutions:
-
Error Messages During Uninstallation:
- If you receive an error when trying to uninstall WSL, make sure your system is up to date. Check for Windows updates and install them, then try again.
-
Distributions Not Uninstalling:
- Ensure you run the uninstallation process from the Admin account. If you do not have the necessary permissions, you won’t be able to remove certain components.
-
WSL Commands Still Recognized:
- If after following the steps, WSL commands still work, make sure to check the Environment Variables. Sometimes, paths may need to be manually removed.
-
Virtual Machine Platform Re-Enabling:
- If you find that the Virtual Machine Platform is automatically re-enabling after a restart, it may be related to other applications like Docker or Hyper-V that depend on it. Make sure these applications are not set to automatically use that feature.
Final Thoughts
Removing WSL2 from Windows 11 is a straightforward process that can be completed in just a few steps. This operation will allow you to reclaim system resources and storage space, ultimately streamlining your Windows environment according to your preferences. Whether it’s due to performance issues or simply no longer needing the capabilities offered by WSL2, the above steps will guide you towards a successful uninstallation. Remember to always back up important data before deleting any applications or features from your system.
Additional Resources
For users who may eventually want to re-enable WSL2 or need help with related subjects, consult the official Microsoft documentation on WSL. It provides comprehensive guides and troubleshooting tips for managing WSL environments effectively.
- Компьютеры
- IT
- Cancel

Резюме
Подсистема Windows для Linux (WSL) позволяет запускать дистрибутивы Linux в виртуальной среде на вашем ПК. Удалить ее не так просто; необходимо удалить дистрибутивы, связанные приложения и функции Windows. Вот как я удалил WSL со своего компьютера.
Удалите все установленные дистрибутивы Linux на Windows
Этот шаг не будет актуален для всех, но если вы установили несколько дистрибутивов Linux, сначала следует их удалить. Это поможет убедиться, что на вашем компьютере не останется файлов, связанных с установками Linux, когда вы будете удалять WSL.
Удалите компоненты WSL
После удаления всех версий Linux вы можете удалить приложение WSL и его связанные компоненты. Как и на предыдущем шаге, вы можете удалить WSL так же, как и любое другое приложение на Windows 11 или 10.
Перейдите в Настройки > Приложения > Приложения и функции и прокрутите вниз до конца списка приложений, чтобы найти Подсистема Windows для Linux. Нажмите на кнопку Дополнительно и выберите Удалить. На Windows 10 кликните на названии приложения и затем выберите Удалить.
Если вы увидите какие-либо дополнительные компоненты WSL, такие как обновление WSL или предварительная версия WSLg, удалите их тем же способом.
Удалите WSL и платформу виртуальных машин
Последний этап процесса — удалить основные файлы WSL и отключить опцию в панели дополнительных функций Windows.
WSL теперь должен быть полностью удален с вашего компьютера. Он не будет получать автоматические обновления, и вы не сможете взаимодействовать с ним никаким образом. Если вам потребуется это в будущем, вот как установить WSL через Microsoft Store на компьютере с Windows.
Если вам понравилась эта статья, подпишитесь, чтобы не пропустить еще много полезных статей!
Вы также можете читать меня в:
- Telegram: https://t.me/gergenshin
- Яндекс Дзен: https://dzen.ru/gergen
- Официальный сайт: https://www-genshin.ru
Для того, чтобы удалить WSL переходим в «Параметры» Windows 11, нажав горячие клавиши «Win+I». В окне параметров в левой части меню щелкаем по пункту «Приложения», а затем по плитке «Приложения и возможности».
Удаляем «Ubuntu», «Windows Subsystem for Linux Update» и «Windows Subsystem for Linux WSLg Preview» — напротив каждого удаляемого элемента нажимаем на кнопку с тремя точками и во всплывающем меню выбираем «Удалить».
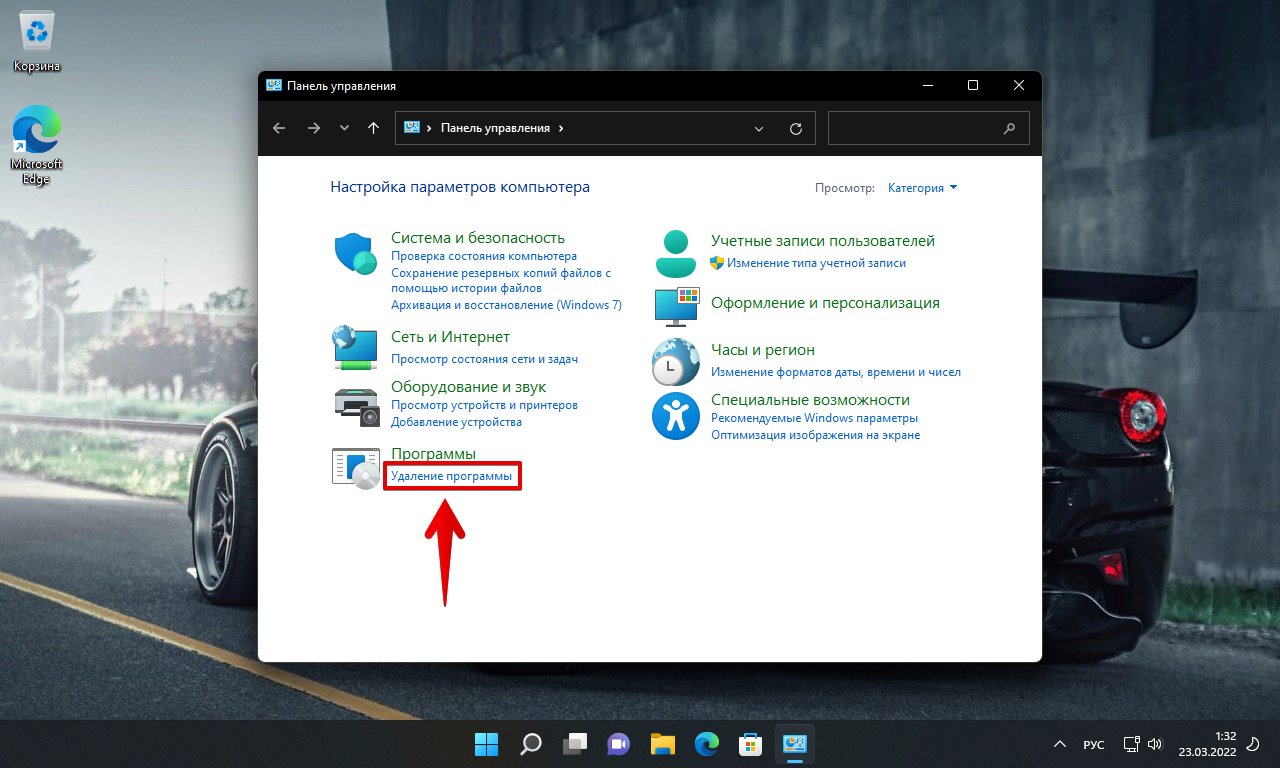
Затем переходим в «Панель управления» — воспользуемся поиском Windows 11, в поисковой строке набираем запрос «Панель управления» и щелкаем по найденному приложению в разделе «Лучшее соответствие».

В окне панели управления щелкаем по ссылке «Удаление программы».
Затем щелкаем по «Включение или отключение компонентов Windows» в правой части окна «Программы и компоненты».
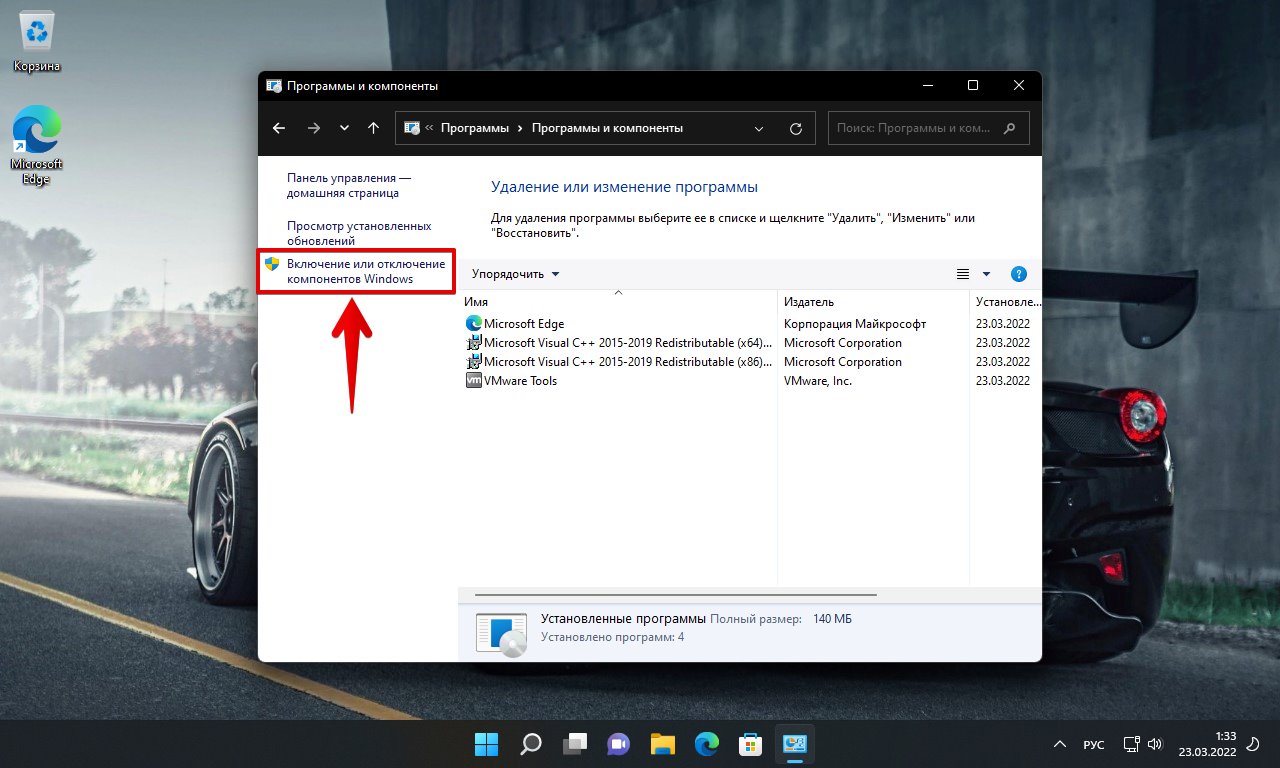
В окне «Компоненты Windows» снимаем галочку с «Подсистема Windows для Linux» и нажимаем кнопку «ОК».

Для завершения удаления нажимаем кнопку «Перезагрузить компьютер».

После перезагрузки WSL будет удалена с нашего ПК.
- To uninstall WSL on Windows 11, open Settings > Apps > Installed apps and remove the Linux distros and “Windows Subsystem for Linux” components. Finally, open Settings > System > Optional features > More Windows Features and remove the WSL and virtual machine components.
UPDATED 1/27/2025: On Windows 11, it’s possible to uninstall the Windows Subsystem for Linux (WSL), but it requires multiple (in-order) steps. Although Microsoft has streamlined the installation with a single command or using the Microsoft Store, removing the platform is not as simple as clicking an “Uninstall” button.
If you want to uninstall WSL from your computer completely, you must remove the Linux distros, uninstall additional components, and disable the platform components.
Although the ability to run Linux on Windows 11 is a useful feature for developers and users who need access to both platforms, there might come a time when you no longer need the platform or may need to reset it to fix problems. Whatever the reason, you can permanently remove WSL by uninstalling all the components in order.
In this guide, I will teach you the steps to remove the Windows Subsystem for the Linux platform from Windows 11.
Completely uninstall WSL from Windows 11
To uninstall the Windows Subsystem for Linux from Windows 11, you first want to remove the distros, platform components, and the remaining operating system features.
1. Remove Linux distros
To uninstall a distro of Linux from WSL on Windows 11, use these steps:
-
Open Settings on Windows 11.
-
Click on Apps.
-
Click the Installed apps page.
-
Select the Linux distribution.
-
Click the menu (three-dotted) button on the right and the Uninstall option.

-
Click the Uninstall option again.

Once you complete the steps, repeat the instructions to remove any remaining distro as necessary.
2. Remove Windows Subsystem for Linux components
To uninstall the WSL Linux kernel and GUI components on Windows 11, use these steps:
-
Open Start.
-
Search for PowerShell, right-click the top result, and click the Run as administrator option.
-
Type the following command to view all the installed apps and press Enter:
Get-AppxPackage MicrosoftCorporationII.WindowsSubsystemForLinux | Remove-AppxPackage

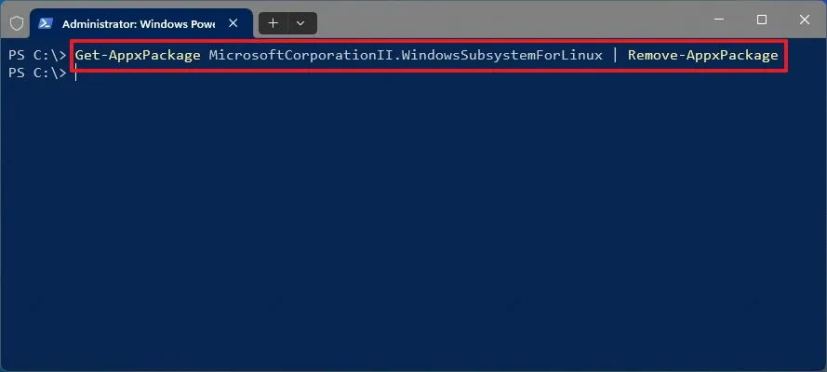
After you complete the steps, you can uninstall the platform from Windows 11.
In the past, Windows 11 offered an option on Settings > Apps > Installed apps to remove the “Windows Subsystem for Linux” component, but then, it was relocated to Settings > System > System Components. However, in this location, the component no longer includes the option to uninstall. As a result, the alternative is to remove the WSL component with PowerShell.
3. Remove WSL from Windows 11
To uninstall the Windows Subsystem for Linux components from Windows 11, use these steps:
-
Open Settings.
-
Click on System.
-
Click the Optional features page.
-
Click the “More Windows features” option under the “Related settings” section.
-
Clear the “Virtual Machine Platform” option.
-
Clear the “Windows Subsystem for Linux” option.

-
Click the OK button to uninstall the features.
-
Click the Restart now button.


Once you complete the steps, the Windows Subsystem for Linux will be completely removed from Windows 11.
You can also follow these instructions in my video tutorial on my YouTube channel. (Remember to like and subscribe.)
If, after uninstalling the platform, the Linux entry remains on File Explorer, you can use these instructions to remove the entry with Registry.
Update January 27, 2025: This guide has been updated to ensure accuracy and reflect changes to the process.