
Need Space in PC or only want to remove or uninstall Restore windows photo viewer On PC ( Windows 7, 8, 10, and Mac )? but how to, after it still having files in C: drive? If the application run on the pc, windows 7, 8, & 10 so you can uninstall using Control Panel or CMD Or If this applicaion run in Mac so you know that how to uninstall in MAC. With this article, you will able to delete or kick out all of those files also after uninstalling the Restore windows photo viewer.
Are you bored, or tired of using Restore windows photo viewer? Now, wanna kick-off this software from your PC ( Windows 7, 8, 10, and Mac )? There is no condition to follow up before installing, so, you can remove it without getting any confusion about it.
There are 10 methods that users can adapt if they want to uninstall Restore windows photo viewer :
Method #1
- Go to Start Menu, then click on the Control Panel.
- In Control Panel, under programs, go through the list of the ones that are installed on your computer
- Right-click on Restore windows photo viewer, and then click on uninstall a program
- Follow the prompt on the screen, and you will get to see a progress bar that will take you to remove the Restore windows photo viewer from the computer.


Method #2
The second method involves uninstaller.exe, through which Restore windows photo viewer can be uninstalled. Just follow the instructions below to execute this step:
- Go to the installation folder of Restore windows photo viewer.
- Find a file that is named uninstall.exe or unins000.exe
- Double click on the file, and then follow the instructions that appear on the screen.


Method #3
The third method involves System Restore. For those who don’t know, System Restore is a utility, which helps the user restore their system to its previous state. System Restore removes all those programs, which interfere with the operation and performance of the computer.


If you have created a system restore point before you installed Restore windows photo viewer, then you can use this software to restore the system, and remove such unwanted programs. However, before you do so, make sure that you save all the important data.Follow the steps below to know more from this method:
- Close all the files and programs, which are currently running on your PC
- Open Computer from the desktop, and then select Properties
- System Window will open
- On the left side and click on System Protection
- System Properties will open.
- Then do click on the option of System Restore, and a new window will again open.
- Now, choose the ‘different restore point’ option, and click on Next.
- You have to select a date and time from the given options; when you select a date, the drivers that you installed after the chosen date won’t work.
- Click on Finish and then Confirm the ‘Restore Point’ on the screen.
- When you click Yes to confirm, the Restore windows photo viewer would be uninstalled.
Method #4
If you have an antivirus, then you can use it to uninstall Restore windows photo viewer.There is much malware or Restore windows photo viewer software in the computer applications that we download nowadays. They have become very difficult to remove from the system, like Trojan and spyware.
- If you cannot remove Restore windows photo viewer with the above methods.
- It means that there is malware or Restore windows photo viewer in it, and only a good antivirus can be used for removing it.
You can either download Norton Antivirus or AVG antivirus, as these are reputable software and will surely remove the malware, Restore windows photo viewer on the system.

Method #5
If you want to uninstall Restore windows photo viewer, then you can do so using Command Displayed in the Registry. A registry is a place where all the settings of Windows, along with information, are stored. This also includes the command to uninstall a software or program.
You can try this method with Restore windows photo viewer as well, but it is a very risky method. If you make any mistake and delete the wrong information, then the system is most likely to crash. It would become difficult for you to bring it back from deletion.

To execute this method, To follow the steps given below:
- Hold Windows + R together, and then Run command
- When the command box opens, type Regedit in the box and then click on OK
- You have to navigate and find the registry key for the Restore windows photo viewer
- You will see an uninstall string on the next window; double click on it, and also copy ‘Value Data’
- Again hold Windows + R keys, and run the Command; paste the value data that you just copy and click on OK
Follow what comes on the screen and then uninstall Restore windows photo viewer.
Method #6
The seventh method is to uninstall the Restore windows photo viewer using a third-party uninstaller.
At times, those who don’t have any knowledge of computer language, won’t be able to manually uninstall the software fully.
Many files occupy the hard disk of the computer, so it is best to use third-party software to uninstall them.

Method #7
There are some codes that users can type into the command prompt, and they would be able to uninstall the Restore windows photo viewer. For example, if they want to remove the package, then just type.
sudo apt-get remove Restore windows photo viewer
If you want to uninstall Restore windows photo viewer and its dependencies as well, then type:
sudo apt-get remove –auto-remove Restore windows photo viewer
For those who don’t know, some of the dependencies of Restore windows photo viewer are GCC-5, libc6, libgcc1, Restore windows photo viewer dev, and gc++-5.

Method #8
If the user wants to remove the configuration and data files of Restore windows photo viewer, then they need to run the following code on the Command Prompt:
sudo apt-get purge Restore windows photo viewer

Method # 9
It depends on you that are you willing to kick-out the data or you want to remove the configuration data or data files, along with the dependencies, then the following code is most likely to work for you:
sudo apt-get auto-remove -purge Restore windows photo viewer

To uninstall Restore windows photo viewer on mac because anytime we need space or only want to remove from pc due to some viruses and also many problems which are needed to remove or uninstall from pc.
So I will show you some steps of uninstalling Restore windows photo viewer on the mac so follow my this step or method if you have still confusion so you may contact with us for uninstall of Restore windows photo viewer on pc or mac.
How to Uninstall Restore windows photo viewer on Mac?
For uninstalling Restore windows photo viewer on the mac so as I told you that there is a simple method to uninstall apps on mac. As there are installed some apps on your Mac and now you want to remove or uninstall from your pc successfully and want to install some other apps on my mac so follow my these steps to uninstall Restore windows photo viewer on mac.
Method #1
In method 1, you have to open mac on your pc as I’m showing in the image follow the images to uninstall Restore windows photo viewer on your mac.

In the image, there is a Restore windows photo viewer app on your mac dashboard and now we have to uninstall it from our mac we will uninstall this app and will remove it in of mac now double-click-on-app showing in the image.

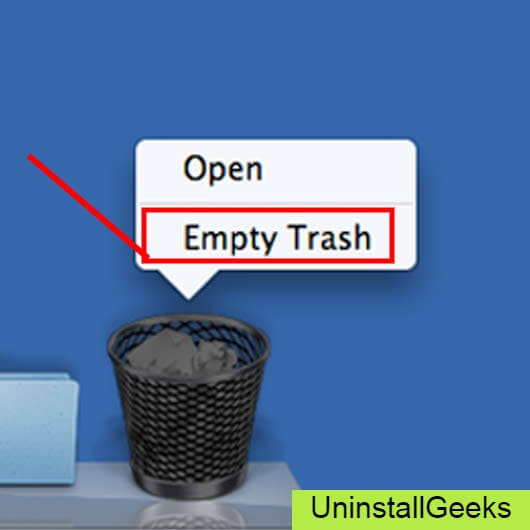
Now you double-clicked on the app mac will ask that are you sure to uninstall Restore windows photo viewer click on the Delete button so go to Trash of mac to uninstall completely from mac. Showing in image trash bin click on trash bin and go inside there will be Restore windows photo viewer which we had to delete before so have to uninstall completely from mac.

Not right-click on trash to remove all data or app which we had uninstalled before seeing in the image. Click on Empty Trash the whole data which is in the trash will auto remove successfully.
Now we uninstalled Restore windows photo viewer on the mac so as you see that how to uninstall or remove any app on the mac so if you liked this so share once. This method doesn’t require any antivirus or uninstaller software from them we are to uninstall.
I described only a simple method of uninstalling Restore windows photo viewer on mac. This method more people are using but some people take it is too hard uninstalling in mac but in this step, anyone can understand this simple method.
How To Install?
For those who don’t know much about Restore windows photo viewer, they might lean more towards uninstalling it. These Restore windows photo viewer create an environment, where users can create a high GPU-accelerated application. If you want to install this Restore windows photo viewer, then make sure that your system is compatible with it.
Firstly, verify that the system you are using has a Restore windows photo viewer capable GPU, and then download the Restore windows photo viewer. Install it, and then test that the software runs smoothly on the system. If it doesn’t run smoothly, then it could be because its communication with the hardware is corrupted.


Conclusion
There are other methods of uninstalling the Restore windows photo viewer as well as in pc or windows, but these could be difficult for those, who don’t have much technical expertise. Execute these methods, and they will surely work. These methods don’t require the user to have much knowledge of the technical side of an operating system. They can follow simple steps and uninstall Restore windows photo viewer.
Windows Registry Editor Version 5.00

[HKEY_LOCAL_MACHINE\SOFTWARE\Microsoft\Windows Photo Viewer\Capabilities\FileAssociations]
".jpg"="PhotoViewer.FileAssoc.Jpeg"
".wdp"="PhotoViewer.FileAssoc.Wdp"
".jfif"="PhotoViewer.FileAssoc.JFIF"
".dib"="PhotoViewer.FileAssoc.Bitmap"
".png"="PhotoViewer.FileAssoc.Png"
".jxr"="PhotoViewer.FileAssoc.Wdp"
".bmp"="PhotoViewer.FileAssoc.Bitmap"
".jpe"="PhotoViewer.FileAssoc.Jpeg"
".jpeg"="PhotoViewer.FileAssoc.Jpeg"
".gif"="PhotoViewer.FileAssoc.Gif"

[HKEY_CLASSES_ROOT\PhotoViewer.FileAssoc.Bitmap]
"ImageOptionFlags"=dword:00000001
"FriendlyTypeName"=hex(2):40,00,25,00,50,00,72,00,6f,00,67,00,72,00,61,00,6d,\
  00,46,00,69,00,6c,00,65,00,73,00,25,00,5c,00,57,00,69,00,6e,00,64,00,6f,00,\
  77,00,73,00,20,00,50,00,68,00,6f,00,74,00,6f,00,20,00,56,00,69,00,65,00,77,\
  00,65,00,72,00,5c,00,50,00,68,00,6f,00,74,00,6f,00,56,00,69,00,65,00,77,00,\
  65,00,72,00,2e,00,64,00,6c,00,6c,00,2c,00,2d,00,33,00,30,00,35,00,36,00,00,\
  00

[HKEY_CLASSES_ROOT\PhotoViewer.FileAssoc.Bitmap\DefaultIcon]
@="%SystemRoot%\\System32\\imageres.dll,-70"

[HKEY_CLASSES_ROOT\PhotoViewer.FileAssoc.Bitmap\shell]

[HKEY_CLASSES_ROOT\PhotoViewer.FileAssoc.Bitmap\shell\open]

[HKEY_CLASSES_ROOT\PhotoViewer.FileAssoc.Bitmap\shell\open\command]
@=hex(2):25,00,53,00,79,00,73,00,74,00,65,00,6d,00,52,00,6f,00,6f,00,74,00,25,\
  00,5c,00,53,00,79,00,73,00,74,00,65,00,6d,00,33,00,32,00,5c,00,72,00,75,00,\
  6e,00,64,00,6c,00,6c,00,33,00,32,00,2e,00,65,00,78,00,65,00,20,00,22,00,25,\
  00,50,00,72,00,6f,00,67,00,72,00,61,00,6d,00,46,00,69,00,6c,00,65,00,73,00,\
  25,00,5c,00,57,00,69,00,6e,00,64,00,6f,00,77,00,73,00,20,00,50,00,68,00,6f,\
  00,74,00,6f,00,20,00,56,00,69,00,65,00,77,00,65,00,72,00,5c,00,50,00,68,00,\
  6f,00,74,00,6f,00,56,00,69,00,65,00,77,00,65,00,72,00,2e,00,64,00,6c,00,6c,\
  00,22,00,2c,00,20,00,49,00,6d,00,61,00,67,00,65,00,56,00,69,00,65,00,77,00,\
  5f,00,46,00,75,00,6c,00,6c,00,73,00,63,00,72,00,65,00,65,00,6e,00,20,00,25,\
  00,31,00,00,00

[HKEY_CLASSES_ROOT\PhotoViewer.FileAssoc.Bitmap\shell\open\DropTarget]
"Clsid"="{FFE2A43C-56B9-4bf5-9A79-CC6D4285608A}"

[HKEY_CLASSES_ROOT\PhotoViewer.FileAssoc.JFIF]
"EditFlags"=dword:00010000
"ImageOptionFlags"=dword:00000001
"FriendlyTypeName"=hex(2):40,00,25,00,50,00,72,00,6f,00,67,00,72,00,61,00,6d,\
  00,46,00,69,00,6c,00,65,00,73,00,25,00,5c,00,57,00,69,00,6e,00,64,00,6f,00,\
  77,00,73,00,20,00,50,00,68,00,6f,00,74,00,6f,00,20,00,56,00,69,00,65,00,77,\
  00,65,00,72,00,5c,00,50,00,68,00,6f,00,74,00,6f,00,56,00,69,00,65,00,77,00,\
  65,00,72,00,2e,00,64,00,6c,00,6c,00,2c,00,2d,00,33,00,30,00,35,00,35,00,00,\
  00

[HKEY_CLASSES_ROOT\PhotoViewer.FileAssoc.JFIF\DefaultIcon]
@="%SystemRoot%\\System32\\imageres.dll,-72"

[HKEY_CLASSES_ROOT\PhotoViewer.FileAssoc.JFIF\shell]

[HKEY_CLASSES_ROOT\PhotoViewer.FileAssoc.JFIF\shell\open]
"MuiVerb"=hex(2):40,00,25,00,50,00,72,00,6f,00,67,00,72,00,61,00,6d,00,46,00,\
  69,00,6c,00,65,00,73,00,25,00,5c,00,57,00,69,00,6e,00,64,00,6f,00,77,00,73,\
  00,20,00,50,00,68,00,6f,00,74,00,6f,00,20,00,56,00,69,00,65,00,77,00,65,00,\
  72,00,5c,00,70,00,68,00,6f,00,74,00,6f,00,76,00,69,00,65,00,77,00,65,00,72,\
  00,2e,00,64,00,6c,00,6c,00,2c,00,2d,00,33,00,30,00,34,00,33,00,00,00

[HKEY_CLASSES_ROOT\PhotoViewer.FileAssoc.JFIF\shell\open\command]
@=hex(2):25,00,53,00,79,00,73,00,74,00,65,00,6d,00,52,00,6f,00,6f,00,74,00,25,\
  00,5c,00,53,00,79,00,73,00,74,00,65,00,6d,00,33,00,32,00,5c,00,72,00,75,00,\
  6e,00,64,00,6c,00,6c,00,33,00,32,00,2e,00,65,00,78,00,65,00,20,00,22,00,25,\
  00,50,00,72,00,6f,00,67,00,72,00,61,00,6d,00,46,00,69,00,6c,00,65,00,73,00,\
  25,00,5c,00,57,00,69,00,6e,00,64,00,6f,00,77,00,73,00,20,00,50,00,68,00,6f,\
  00,74,00,6f,00,20,00,56,00,69,00,65,00,77,00,65,00,72,00,5c,00,50,00,68,00,\
  6f,00,74,00,6f,00,56,00,69,00,65,00,77,00,65,00,72,00,2e,00,64,00,6c,00,6c,\
  00,22,00,2c,00,20,00,49,00,6d,00,61,00,67,00,65,00,56,00,69,00,65,00,77,00,\
  5f,00,46,00,75,00,6c,00,6c,00,73,00,63,00,72,00,65,00,65,00,6e,00,20,00,25,\
  00,31,00,00,00

[HKEY_CLASSES_ROOT\PhotoViewer.FileAssoc.JFIF\shell\open\DropTarget]
"Clsid"="{FFE2A43C-56B9-4bf5-9A79-CC6D4285608A}"

[HKEY_CLASSES_ROOT\PhotoViewer.FileAssoc.Jpeg]
"EditFlags"=dword:00010000
"ImageOptionFlags"=dword:00000001
"FriendlyTypeName"=hex(2):40,00,25,00,50,00,72,00,6f,00,67,00,72,00,61,00,6d,\
  00,46,00,69,00,6c,00,65,00,73,00,25,00,5c,00,57,00,69,00,6e,00,64,00,6f,00,\
  77,00,73,00,20,00,50,00,68,00,6f,00,74,00,6f,00,20,00,56,00,69,00,65,00,77,\
  00,65,00,72,00,5c,00,50,00,68,00,6f,00,74,00,6f,00,56,00,69,00,65,00,77,00,\
  65,00,72,00,2e,00,64,00,6c,00,6c,00,2c,00,2d,00,33,00,30,00,35,00,35,00,00,\
  00

[HKEY_CLASSES_ROOT\PhotoViewer.FileAssoc.Jpeg\DefaultIcon]
@="%SystemRoot%\\System32\\imageres.dll,-72"

[HKEY_CLASSES_ROOT\PhotoViewer.FileAssoc.Jpeg\shell]

[HKEY_CLASSES_ROOT\PhotoViewer.FileAssoc.Jpeg\shell\open]
"MuiVerb"=hex(2):40,00,25,00,50,00,72,00,6f,00,67,00,72,00,61,00,6d,00,46,00,\
  69,00,6c,00,65,00,73,00,25,00,5c,00,57,00,69,00,6e,00,64,00,6f,00,77,00,73,\
  00,20,00,50,00,68,00,6f,00,74,00,6f,00,20,00,56,00,69,00,65,00,77,00,65,00,\
  72,00,5c,00,70,00,68,00,6f,00,74,00,6f,00,76,00,69,00,65,00,77,00,65,00,72,\
  00,2e,00,64,00,6c,00,6c,00,2c,00,2d,00,33,00,30,00,34,00,33,00,00,00

[HKEY_CLASSES_ROOT\PhotoViewer.FileAssoc.Jpeg\shell\open\command]
@=hex(2):25,00,53,00,79,00,73,00,74,00,65,00,6d,00,52,00,6f,00,6f,00,74,00,25,\
  00,5c,00,53,00,79,00,73,00,74,00,65,00,6d,00,33,00,32,00,5c,00,72,00,75,00,\
  6e,00,64,00,6c,00,6c,00,33,00,32,00,2e,00,65,00,78,00,65,00,20,00,22,00,25,\
  00,50,00,72,00,6f,00,67,00,72,00,61,00,6d,00,46,00,69,00,6c,00,65,00,73,00,\
  25,00,5c,00,57,00,69,00,6e,00,64,00,6f,00,77,00,73,00,20,00,50,00,68,00,6f,\
  00,74,00,6f,00,20,00,56,00,69,00,65,00,77,00,65,00,72,00,5c,00,50,00,68,00,\
  6f,00,74,00,6f,00,56,00,69,00,65,00,77,00,65,00,72,00,2e,00,64,00,6c,00,6c,\
  00,22,00,2c,00,20,00,49,00,6d,00,61,00,67,00,65,00,56,00,69,00,65,00,77,00,\
  5f,00,46,00,75,00,6c,00,6c,00,73,00,63,00,72,00,65,00,65,00,6e,00,20,00,25,\
  00,31,00,00,00

[HKEY_CLASSES_ROOT\PhotoViewer.FileAssoc.Jpeg\shell\open\DropTarget]
"Clsid"="{FFE2A43C-56B9-4bf5-9A79-CC6D4285608A}"

[HKEY_CLASSES_ROOT\PhotoViewer.FileAssoc.Gif]
"ImageOptionFlags"=dword:00000001
"FriendlyTypeName"=hex(2):40,00,25,00,50,00,72,00,6f,00,67,00,72,00,61,00,6d,\
  00,46,00,69,00,6c,00,65,00,73,00,25,00,5c,00,57,00,69,00,6e,00,64,00,6f,00,\
  77,00,73,00,20,00,50,00,68,00,6f,00,74,00,6f,00,20,00,56,00,69,00,65,00,77,\
  00,65,00,72,00,5c,00,50,00,68,00,6f,00,74,00,6f,00,56,00,69,00,65,00,77,00,\
  65,00,72,00,2e,00,64,00,6c,00,6c,00,2c,00,2d,00,33,00,30,00,35,00,37,00,00,\
  00

[HKEY_CLASSES_ROOT\PhotoViewer.FileAssoc.Gif\DefaultIcon]
@="%SystemRoot%\\System32\\imageres.dll,-83"

[HKEY_CLASSES_ROOT\PhotoViewer.FileAssoc.Gif\shell]

[HKEY_CLASSES_ROOT\PhotoViewer.FileAssoc.Gif\shell\open]

[HKEY_CLASSES_ROOT\PhotoViewer.FileAssoc.Gif\shell\open\command]
@=hex(2):25,00,53,00,79,00,73,00,74,00,65,00,6d,00,52,00,6f,00,6f,00,74,00,25,\
  00,5c,00,53,00,79,00,73,00,74,00,65,00,6d,00,33,00,32,00,5c,00,72,00,75,00,\
  6e,00,64,00,6c,00,6c,00,33,00,32,00,2e,00,65,00,78,00,65,00,20,00,22,00,25,\
  00,50,00,72,00,6f,00,67,00,72,00,61,00,6d,00,46,00,69,00,6c,00,65,00,73,00,\
  25,00,5c,00,57,00,69,00,6e,00,64,00,6f,00,77,00,73,00,20,00,50,00,68,00,6f,\
  00,74,00,6f,00,20,00,56,00,69,00,65,00,77,00,65,00,72,00,5c,00,50,00,68,00,\
  6f,00,74,00,6f,00,56,00,69,00,65,00,77,00,65,00,72,00,2e,00,64,00,6c,00,6c,\
  00,22,00,2c,00,20,00,49,00,6d,00,61,00,67,00,65,00,56,00,69,00,65,00,77,00,\
  5f,00,46,00,75,00,6c,00,6c,00,73,00,63,00,72,00,65,00,65,00,6e,00,20,00,25,\
  00,31,00,00,00

[HKEY_CLASSES_ROOT\PhotoViewer.FileAssoc.Gif\shell\open\DropTarget]
"Clsid"="{FFE2A43C-56B9-4bf5-9A79-CC6D4285608A}"

[HKEY_CLASSES_ROOT\PhotoViewer.FileAssoc.Png]
"ImageOptionFlags"=dword:00000001
"FriendlyTypeName"=hex(2):40,00,25,00,50,00,72,00,6f,00,67,00,72,00,61,00,6d,\
  00,46,00,69,00,6c,00,65,00,73,00,25,00,5c,00,57,00,69,00,6e,00,64,00,6f,00,\
  77,00,73,00,20,00,50,00,68,00,6f,00,74,00,6f,00,20,00,56,00,69,00,65,00,77,\
  00,65,00,72,00,5c,00,50,00,68,00,6f,00,74,00,6f,00,56,00,69,00,65,00,77,00,\
  65,00,72,00,2e,00,64,00,6c,00,6c,00,2c,00,2d,00,33,00,30,00,35,00,37,00,00,\
  00

[HKEY_CLASSES_ROOT\PhotoViewer.FileAssoc.Png\DefaultIcon]
@="%SystemRoot%\\System32\\imageres.dll,-71"

[HKEY_CLASSES_ROOT\PhotoViewer.FileAssoc.Png\shell]

[HKEY_CLASSES_ROOT\PhotoViewer.FileAssoc.Png\shell\open]

[HKEY_CLASSES_ROOT\PhotoViewer.FileAssoc.Png\shell\open\command]
@=hex(2):25,00,53,00,79,00,73,00,74,00,65,00,6d,00,52,00,6f,00,6f,00,74,00,25,\
  00,5c,00,53,00,79,00,73,00,74,00,65,00,6d,00,33,00,32,00,5c,00,72,00,75,00,\
  6e,00,64,00,6c,00,6c,00,33,00,32,00,2e,00,65,00,78,00,65,00,20,00,22,00,25,\
  00,50,00,72,00,6f,00,67,00,72,00,61,00,6d,00,46,00,69,00,6c,00,65,00,73,00,\
  25,00,5c,00,57,00,69,00,6e,00,64,00,6f,00,77,00,73,00,20,00,50,00,68,00,6f,\
  00,74,00,6f,00,20,00,56,00,69,00,65,00,77,00,65,00,72,00,5c,00,50,00,68,00,\
  6f,00,74,00,6f,00,56,00,69,00,65,00,77,00,65,00,72,00,2e,00,64,00,6c,00,6c,\
  00,22,00,2c,00,20,00,49,00,6d,00,61,00,67,00,65,00,56,00,69,00,65,00,77,00,\
  5f,00,46,00,75,00,6c,00,6c,00,73,00,63,00,72,00,65,00,65,00,6e,00,20,00,25,\
  00,31,00,00,00

[HKEY_CLASSES_ROOT\PhotoViewer.FileAssoc.Png\shell\open\DropTarget]
"Clsid"="{FFE2A43C-56B9-4bf5-9A79-CC6D4285608A}"

[HKEY_CLASSES_ROOT\PhotoViewer.FileAssoc.Wdp]
"EditFlags"=dword:00010000
"ImageOptionFlags"=dword:00000001

[HKEY_CLASSES_ROOT\PhotoViewer.FileAssoc.Wdp\DefaultIcon]
@="%SystemRoot%\\System32\\wmphoto.dll,-400"

[HKEY_CLASSES_ROOT\PhotoViewer.FileAssoc.Wdp\shell]

[HKEY_CLASSES_ROOT\PhotoViewer.FileAssoc.Wdp\shell\open]
"MuiVerb"=hex(2):40,00,25,00,50,00,72,00,6f,00,67,00,72,00,61,00,6d,00,46,00,\
  69,00,6c,00,65,00,73,00,25,00,5c,00,57,00,69,00,6e,00,64,00,6f,00,77,00,73,\
  00,20,00,50,00,68,00,6f,00,74,00,6f,00,20,00,56,00,69,00,65,00,77,00,65,00,\
  72,00,5c,00,70,00,68,00,6f,00,74,00,6f,00,76,00,69,00,65,00,77,00,65,00,72,\
  00,2e,00,64,00,6c,00,6c,00,2c,00,2d,00,33,00,30,00,34,00,33,00,00,00

[HKEY_CLASSES_ROOT\PhotoViewer.FileAssoc.Wdp\shell\open\command]
@=hex(2):25,00,53,00,79,00,73,00,74,00,65,00,6d,00,52,00,6f,00,6f,00,74,00,25,\
  00,5c,00,53,00,79,00,73,00,74,00,65,00,6d,00,33,00,32,00,5c,00,72,00,75,00,\
  6e,00,64,00,6c,00,6c,00,33,00,32,00,2e,00,65,00,78,00,65,00,20,00,22,00,25,\
  00,50,00,72,00,6f,00,67,00,72,00,61,00,6d,00,46,00,69,00,6c,00,65,00,73,00,\
  25,00,5c,00,57,00,69,00,6e,00,64,00,6f,00,77,00,73,00,20,00,50,00,68,00,6f,\
  00,74,00,6f,00,20,00,56,00,69,00,65,00,77,00,65,00,72,00,5c,00,50,00,68,00,\
  6f,00,74,00,6f,00,56,00,69,00,65,00,77,00,65,00,72,00,2e,00,64,00,6c,00,6c,\
  00,22,00,2c,00,20,00,49,00,6d,00,61,00,67,00,65,00,56,00,69,00,65,00,77,00,\
  5f,00,46,00,75,00,6c,00,6c,00,73,00,63,00,72,00,65,00,65,00,6e,00,20,00,25,\
  00,31,00,00,00

[HKEY_CLASSES_ROOT\PhotoViewer.FileAssoc.Wdp\shell\open\DropTarget]
"Clsid"="{FFE2A43C-56B9-4bf5-9A79-CC6D4285608A}"

[HKEY_LOCAL_MACHINE\SOFTWARE\Microsoft\Windows Photo Viewer]

[HKEY_LOCAL_MACHINE\SOFTWARE\Microsoft\Windows Photo Viewer\Capabilities]
"ApplicationDescription"="@%ProgramFiles%\\Windows Photo Viewer\\photoviewer.dll,-3069"
"ApplicationName"="@%ProgramFiles%\\Windows Photo Viewer\\photoviewer.dll,-3009"
How can Uninstall Restore Windows Photo Viewer Completely from Computer
Restore Windows Photo Viewer removal has been a tough problem on your PC? Do you need an effective way to uninstall Restore Windows Photo Viewer quickly with simple steps? Don’t worry, you will be able to solve the problem via the following removing instructions of the program.
Get Bloatware Uninstaller Now
Restore Windows Photo Viewer may be great in providing its specific function for the users, but it also can turn out to be a problem when the program get some running issues or you don’t want to keep it on your computer any more. In this case, removing Restore Windows Photo Viewer will be the common and also effective means to resolve the problem, and the real difficulty just come out when people try to uninstall Restore Windows Photo Viewer from their PCs.
What usually make people to remove Restore Windows Photo Viewer
- Restore Windows Photo Viewer is not compatible with other installed applications
- Program gets a corrupted issue unexpectedly
- Restore Windows Photo Viewer is not as good as the user expected, and need to be erased from the computer
- Restore Windows Photo Viewer should be uninstalled first and reinstalled on the PC
- The application is regarded by the user and some websites as a suspect malware
Most common problems of removing the software
- Restore Windows Photo Viewer program is not available on the Windows uninstall panel
- Restore Windows Photo Viewer can’t be removed from the Windows and always receive a notification
- Nothing happen when click on the uninstall button on Windows
- Restore Windows Photo Viewer or the related process still keep running on the computer after removing it
- Some files and traces of the program still can be found
- Removing process running for a long time and does not come to the end
If must be a headache if encountering such a problem on the computer, and there are still many other problems people might come across when perform the program removal on their own computers. Therefore, you should know the right way about how to uninstall Restore Windows Photo Viewer from PC, or the way to fix/avoid the removing issue on the computer. Here are just several options that can support you to remove the application well.
How can uninstall Restore Windows Photo Viewer well on PC? Check these guides
Option 1: Use the product’s uninstall tool
There are many applications in nowadays provides an uninstall process on the program’s installation folder, or the publisher gets an uninstaller which is specifically used to remove its own products. To remove Restore Windows Photo Viewer in this way, please refer to the following uninstall instructions:
- 1. Right-click on Restore Windows Photo Viewer icon on the desktop, and select «Open file location»
- 2. Scroll down the list of files and find the uninstall process, usually named «uninst000», «Uninstall», or «Uninstaller»
- 3. Double click on the uninstall process to start the removal
- 4. Follow the uninstall wizard to finish the removal, and restart your computer
- 5. Open the directory of the installation folder again, and make sure everything has been cleared well
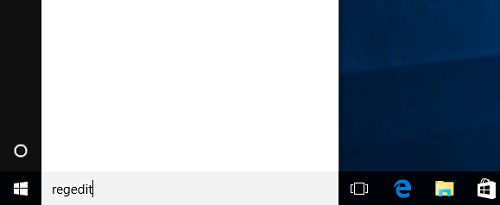
- 6. Click on the Windows button on the bottom-left-corner, and enter «regedit» on the search box
-

- 7. Click to open «regedit» or Registry Editor on the search result
-
- 8. Unfold the registry group inside, and find out those registry keys or entries which contains the program’s name
- 9. Back up these files, and then remove them from your computer system

Note: once problems occur after deleting the registry, please restore the back-up registry to Registry Editor.
When using the publisher’s uninstaller, you should download and install the uninstall application additionally, and choose to uninstall Restore Windows Photo Viewer from its interface. Similar to the above removal, you should restart your computer after finish the uninstall process, and clear its remnants again which are still staying on the PC.
Things you need to know about Registry Editor
Registry Editor is a place that stores many important registry keys and entries which closely related to the system operation and program’s performance on the computer, removing a wrong file inside usually cause serious problem for the system, so you should be very careful when you have to manually delete some registries inside.
Get Bloatware Uninstaller Now
Option 2:Remove it with Windows uninstall feature
Windows system provide an uninstall feature in Control Panel that support the user to remove unwanted program on the PC, to access this applet in different operating system, you can follow these instructions:
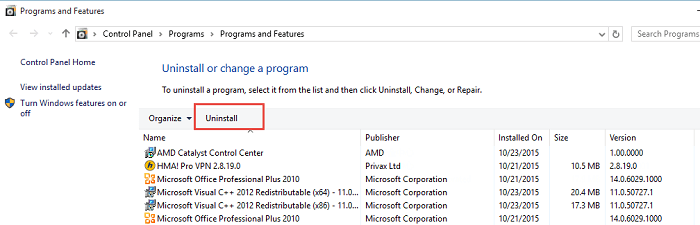
- 1. Open the uninstall panel on Windows system
- 2. Select Restore Windows Photo Viewer on the programs list, click on Remove/Uninstall button
-
- 3. Confirm the program removal, and complete the removing steps with guides
- 4. When finish, reboot the computer
- 5. The same to the removing steps in Option 1, you should clear the leftovers in the installation folder as well as Registry Editor
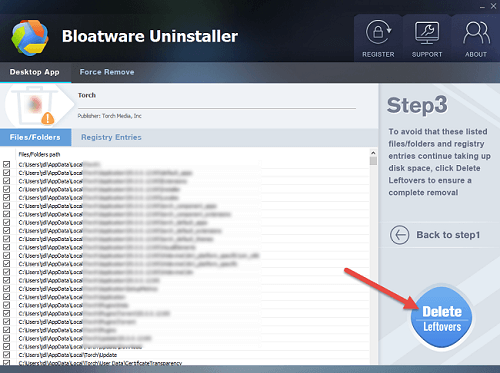
Option 3:Uninstall Restore Windows Photo Viewer with Bloatware Uninstaller
If you want to totally avoid the risky manual removal of registry, and handle Restore Windows Photo Viewer uninstall more easily and quickly, taking a professional uninstall tool will be a great help for you, because it can count all of the files (including registry keys and temporary files) and provide a complete and automatic removal, thus, many risky and annoying manual steps could be skipped can you can totally remove Restore Windows Photo Viewer on the PC more quickly.
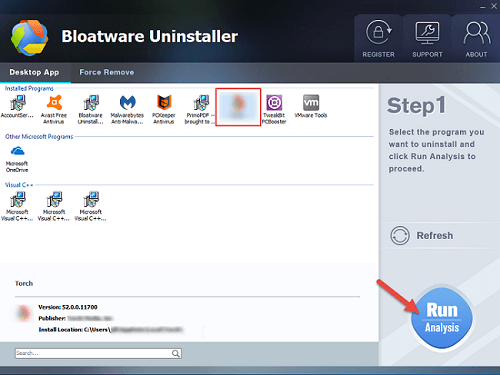
Bloatware Uninstaller is an advanced uninstall utility that can give a good example about how uninstall Restore Windows Photo Viewer well:
- 1. Install and launch the uninstaller on PC
- 2. Find and select Restore Windows Photo Viewer from the programs list, and click on Scan button
-
- 3. When all of files being detected, click on the uninstall or remove button
-
- 4. Follow the uninstall wizard to remove all of components from the computer
-
- 5. Exit the uninstaller when finish, and reboot the computer system

Get Bloatware Uninstaller Now
This is a very effective way to uninstall Restore Windows Photo Viewer and other applications, while the manual removal usually resulted in an unsuccessful removal, and the most important point is it is much easier for the common user to take and get rid of the program they want. So it is currently the best way we found and would like to recommend you to remove unneeded programs with a good app uninstaller.
Рекомендуем: Как отключить иконку Защитника Windows, в Windows 10?
Windows 10, как и Windows 8 устанавливаются с определенным набором универсальных или современных (UWP) приложений. Погода, OneNote, Люди, Деньги, Windows Store, Ваш телефон, Groove Музыка, Камера, Office, Skype, Календарь и Почта, Калькулятор, Будильник, Кино и ТВ, Диктофон. Это неполный список приложений, установленных в ОС Windows 10.
При первом входе в систему, Windows 10 устанавливает эти приложения для вашей учетной записи пользователя.
Некоторые из предустановленных приложений, таких как Калькулятор, Погода, Почта необходимы для большинства пользователей, в то время как другие не представляют никакой ценности. Такие приложения, как Люди, Спорт, Фотографии и Paint 3D абсолютно бесполезны для большинства пользователей ПК, поскольку есть доступные и лучшие альтернативы. Например, классический Photo Viewer (Просмотр фотографий Windows) для многих лучше, чем новое приложение «Фотографии».
Вы, возможно, заметили, что есть приложения, которые не могут быть удалены с помощью панели управления или настроек в Windows 10. Для удаления этих приложений нужно использовать PowerShell или сторонние утилиты. Если приложения UWP вам не нужны или вы пользуетесь своим набором программ, вот как удалить их.
Как удалить приложения в Windows 10.
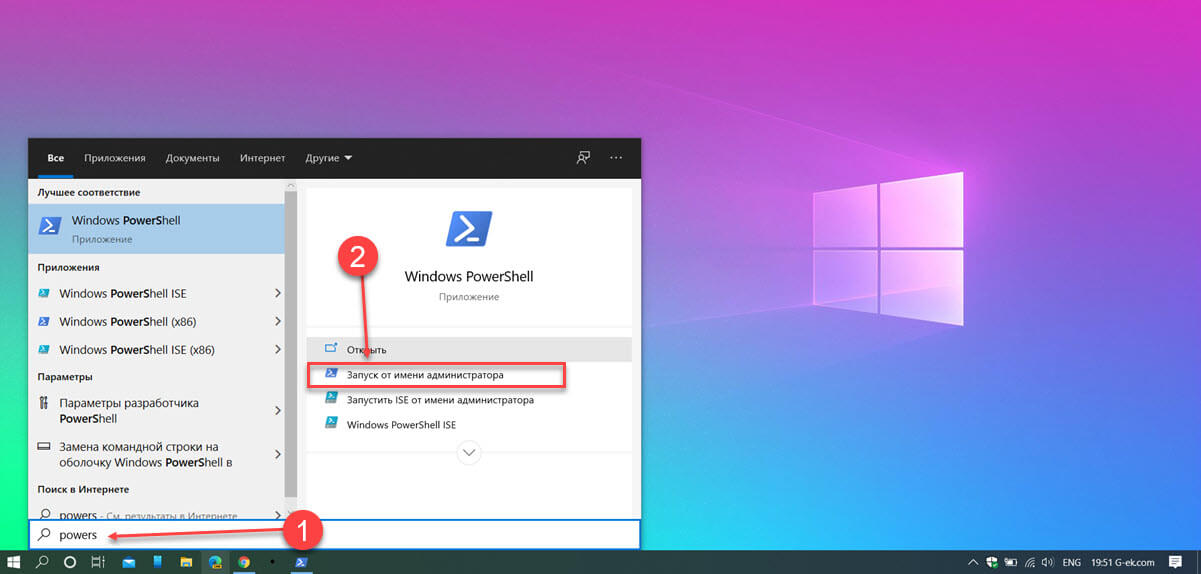
Чтобы удалить приложения установленные по умолчанию в Windows 10, вам необходимо открыть PowerShell от имени Администратора.
Шаг 1: Откройте меню «Пуск» (нажмите Win клавишу на клавиатуре) и введите Powershell. В результатах поиска, выберите «Запуск от имени администратора». Или вы можете нажать Ctrl+Shift+Enter чтобы открыть его в качестве администратора. Открытие PowerShell от имени администратора важно, в противном случае выполнение команды будет терпеть неудачу.
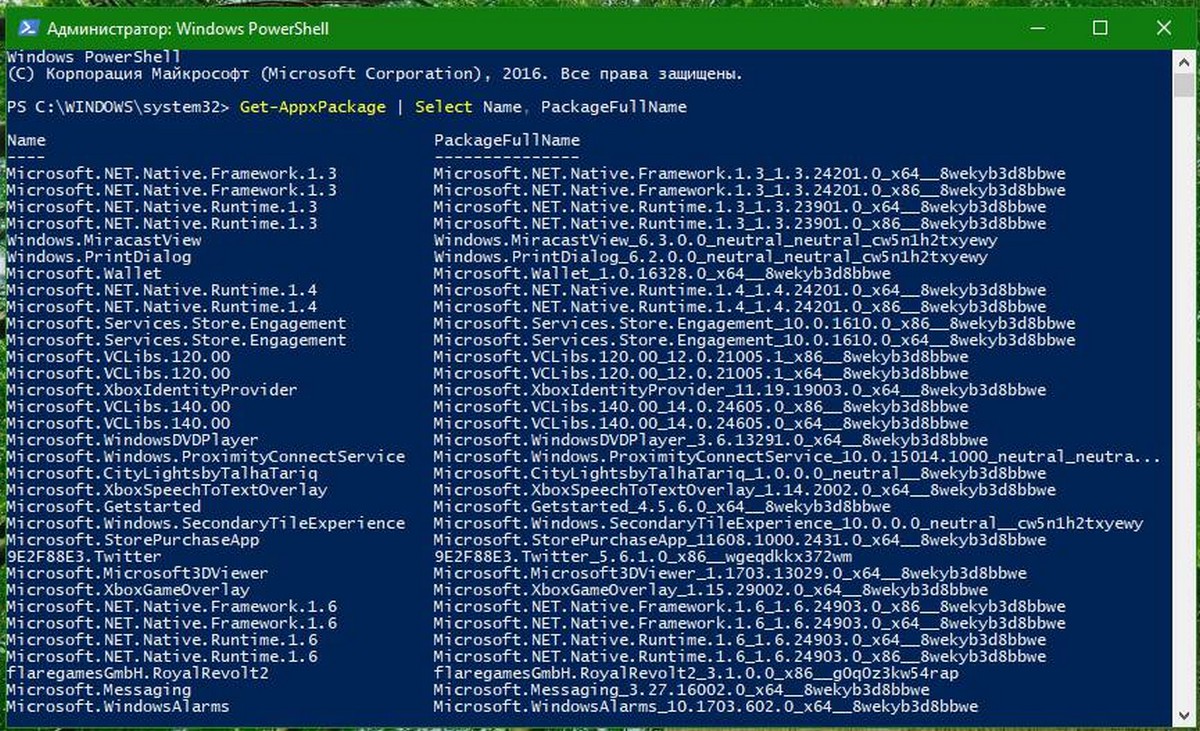
Шаг 2: Давайте посмотрим список всех установленных универсальных приложений для текущей учетной записи пользователя. Введите или скопируйте вставьте следующую команду:
Get-AppxPackage | Select Name, PackageFullName
Вы получите Список установленных пакетов приложений
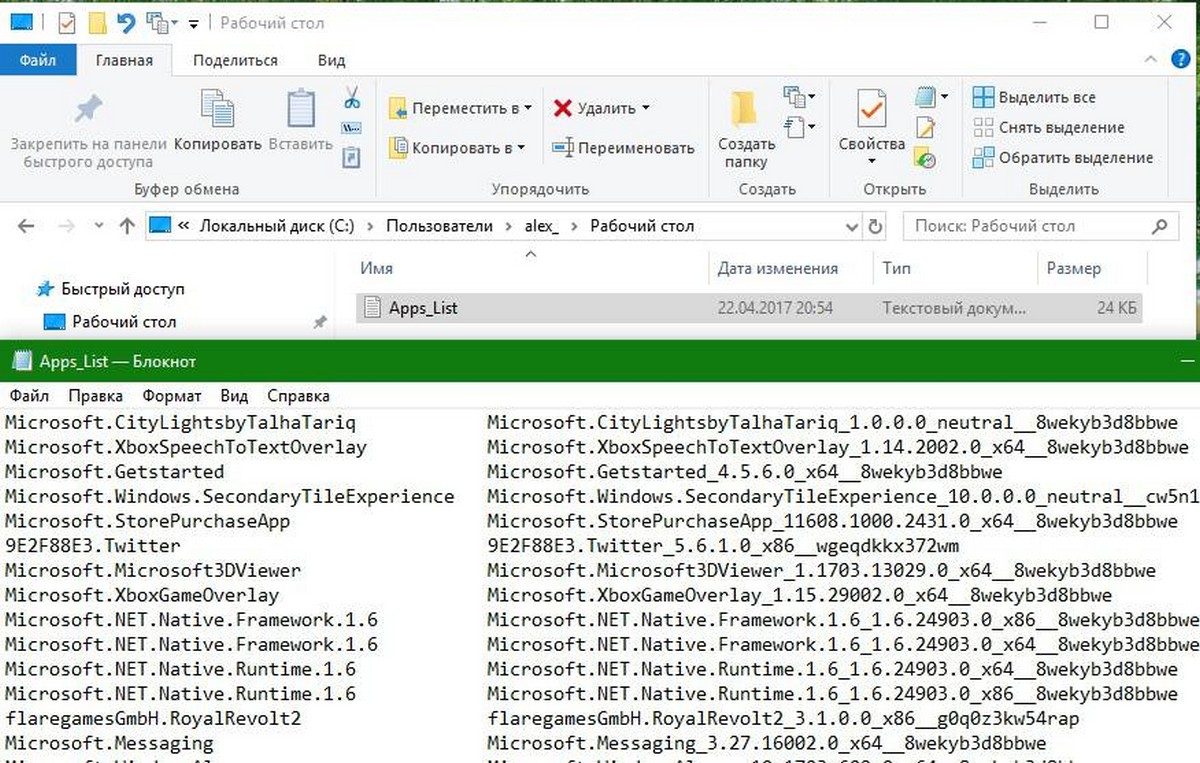
Шаг 3: Для удобства, вы можете сохранить его в файл, вывод команды выглядит следующим образом:
Get-AppxPackage | Select Name, PackageFullName >"$env:userprofile\Desktop\Apps_List.txt"
Список приложений, будет сохранен в файле — Apps_List.txt, на рабочем столе.
Шаг 4: Теперь вы можете использовать этот список для удаления отдельных приложений с помощью следующей команды:
Remove-AppxPackage «PackageFullName»
Например, я удалю Minecraft с помощью команды:
Remove-AppxPackage Microsoft.MinecraftUWP_1.0.700.0_x64__8wekyb3d8bbwe

Вы так-же, можете использовать комбинацию командлетов Get-AppxPackage и Remove-AppxPackage в одной команде, чтобы удалить приложение, не указав его полное имя пакета. Вместо этого, вы можете использовать шаблоны. Следующая команда делает то же самое, как и команда выше но выглядит намного проще:
Get-AppxPackage *Minecraft* | Remove-AppxPackage
Краткий список команд, которые вы можете использовать, чтобы удалить определенные приложения в Windows 10.
Удалить приложение 3D Builder
Get-AppxPackage *3dbuilder* | Remove-AppxPackage
Удалить приложение Будильники и часы
Get-AppxPackage *WindowsAlarms* | Remove-AppxPackage
Удалить приложение App Connector
Get-AppxPackage *Appconnector* | Remove-AppxPackage
Удалить Asphalt 8: Airborne
Get-AppxPackage *Asphalt8Airborne* | Remove-AppxPackage
Удалить приложение Калькулятор
Get-AppxPackage *WindowsCalculator* | Remove-AppxPackage
Удалить приложение Почта и Календарь
Get-AppxPackage *windowscommunicationsapps* | Remove-AppxPackage
Удалить приложение камеры
Get-AppxPackage *WindowsCamera* | Remove-AppxPackage
Удалить приложение Candy Crush Soda Saga
Get-AppxPackage *CandyCrushSodaSaga* | Remove-AppxPackage
Удалить приложение Facebook
Get-AppxPackage *Facebook* | Remove-AppxPackage
Удалить приложение Обращение за помощью
Get-AppxPackage *WindowsFeedbackHub* | Remove-AppxPackage
Удалить приложение Улучшите свой Office,
Get-AppxPackage *officehub* | Remove-AppxPackage
Удалить приложение Получить Skype
Get-AppxPackage *Microsoft.SkypeApp* | Remove-AppxPackage
Удалить приложение Советы
Get-AppxPackage *Getstarted* | Remove-AppxPackage
Удалить приложение Groove Музыка
Get-AppxPackage *ZuneMusic* | Remove-AppxPackage
Удалить приложение Карты
Get-AppxPackage *WindowsMaps* | Remove-AppxPackage
Удалить приложение Skype
Get-AppxPackage *Messaging* | Remove-AppxPackage
Удалить приложение Microsoft Solitaire Collection
Get-AppxPackage *MicrosoftSolitaireCollection* | Remove-AppxPackage
Удалить приложение Бумажник Microsoft
Get-AppxPackage *Wallet* | Remove-AppxPackage
Удалить приложение Платные данные Wi-Fi и сотовой связи
Get-AppxPackage *OneConnect* | Remove-AppxPackage
Удалить приложение Кино и ТВ
Get-AppxPackage *ZuneVideo* | Remove-AppxPackage
Удалить приложение Netflix
Get-AppxPackage *Netflix* | Remove-AppxPackage
Удалить приложение Новости
Get-AppxPackage *BingNews* | Remove-AppxPackage
Удалить приложение OneNote
Get-AppxPackage *OneNote* | Remove-AppxPackage
Удалить Paint 3D приложение
Get-AppxPackage *MSPaint* | Remove-AppxPackage
Удалить приложение Pandora
Get-AppxPackage *PandoraMediaInc* | Remove-AppxPackage
Удалить приложение Люди
Get-AppxPackage *People* | Remove-AppxPackage
Удалить приложение Телефон
Get-AppxPackage *CommsPhone* | Remove-AppxPackage
Удалить приложение Фото
Get-AppxPackage *Photos* | Remove-AppxPackage
Удалить приложение Skype Preview
Get-AppxPackage *SkypeApp* | Remove-AppxPackage
Удалить приложение Спорт
Get-AppxPackage *bingsports* | Remove-AppxPackage
Удалить приложение Sticky Notes
Get-AppxPackage *MicrosoftStickyNotes* | Remove-AppxPackage
Удалить Магазин с текущей учетной записи -(НЕ РЕКОМЕНДУЕТСЯ)
Get-AppxPackage *WindowsStore* | Remove-AppxPackage
Удалить приложение Sway
Get-AppxPackage *Office.Sway* | Remove-AppxPackage
Удалить приложение Twitter
Get-AppxPackage *Twitter* | Remove-AppxPackage
Удалить приложение 3D-Просмотр
Get-AppxPackage *Microsoft3DViewer* | Remove-AppxPackage
Удалить приложение Запись голоса
Get-AppxPackage *soundrecorder* | Remove-AppxPackage
Удалить приложение Погода
Get-AppxPackage *bingweather* | Remove-AppxPackage
Удалить приложение Xbox
Get-AppxPackage *XboxApp* | Remove-AppxPackage
Удалить приложение Xbox One SmartGlass
Get-AppxPackage *XboxOneSmartGlass* | Remove-AppxPackage
Как удалить приложение для всех учетных записей пользователей?
Чтобы удалить приложение из всех учетных записей пользователей, измените нужную команду следующим образом:
Get-AppxPackage -allusers *PackageName* | Remove-AppxPackage
Как удалить приложение для новых учетных записей пользователей?
Каждый раз, когда вы создаете нового пользователя, приложения по умолчанию будут установлены заново для этого пользователя. Для того, чтобы удалить приложения для новых учетных записей, которые будут созданы в будущем, выполните следующую команду в Powershell.
Get-AppxProvisionedPackage –online | where-object {$_.packagename –like "*PackageName*"} | Remove-AppxProvisionedPackage –online
Замените участок PackageName на нужное имя приложения.
Совет: Посмотрите наше руководство, Короткая команда для удаления всех приложений в Windows 10, за исключением Магазина.
Удалить приложение с помощью «Параметров» и меню «Пуск».
Некоторые Универсальные приложения могут быть удалены с помощью Приложения «Параметры». Кроме того, вы можете использовать этот способ для удаления не только приложений, но и классических программ.
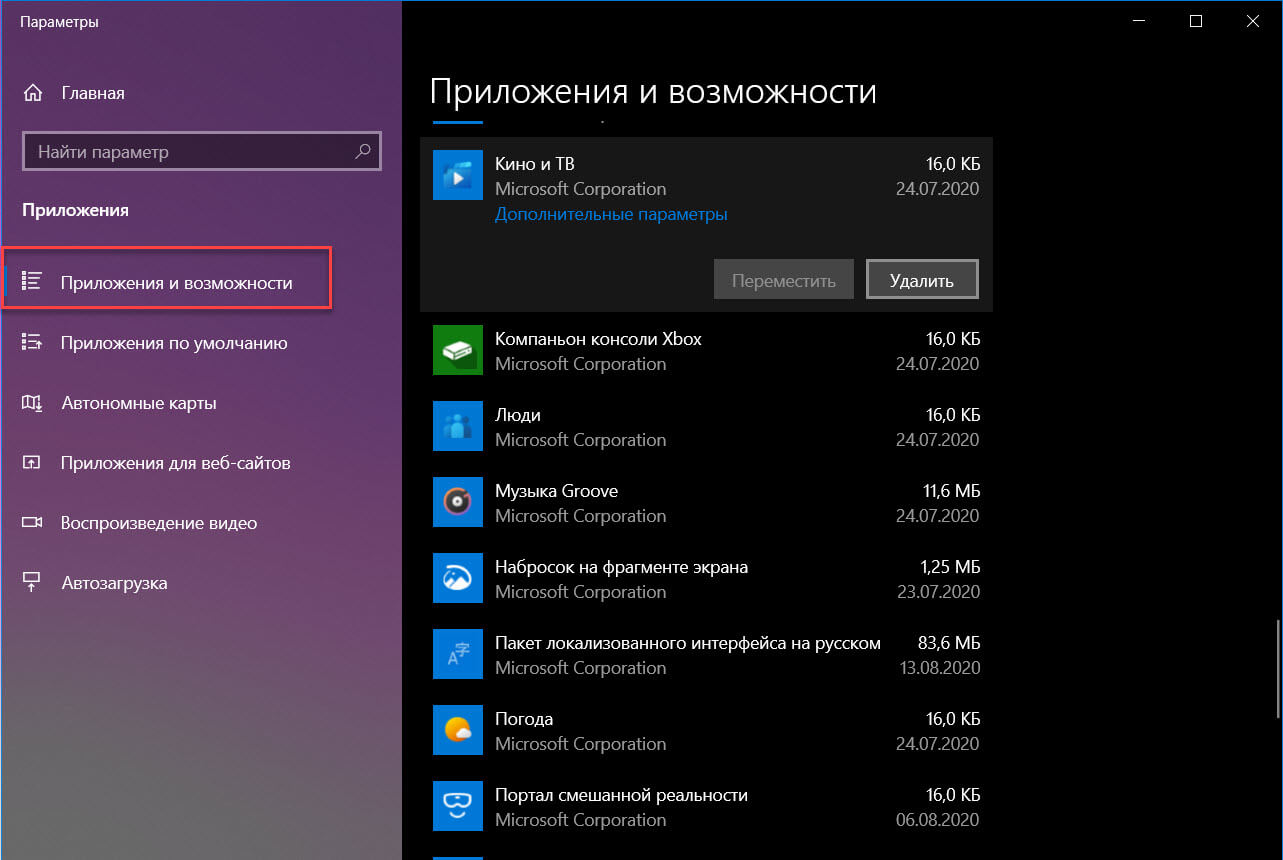
- Откройте «Параметры» нажав сочетание клавиш Win + I
- Перейдите в раздел «Приложения» → «Приложения и возможности».
- Найдите приложение, которое вы хотите удалить в списке и выберите его.
- Кнопка «Удалить» появится под именем приложения. Нажмите на нее, чтобы удалить приложение.
И напоследок, Windows 10 позволяет удалять некоторые приложения прямо из меню «Пуск».
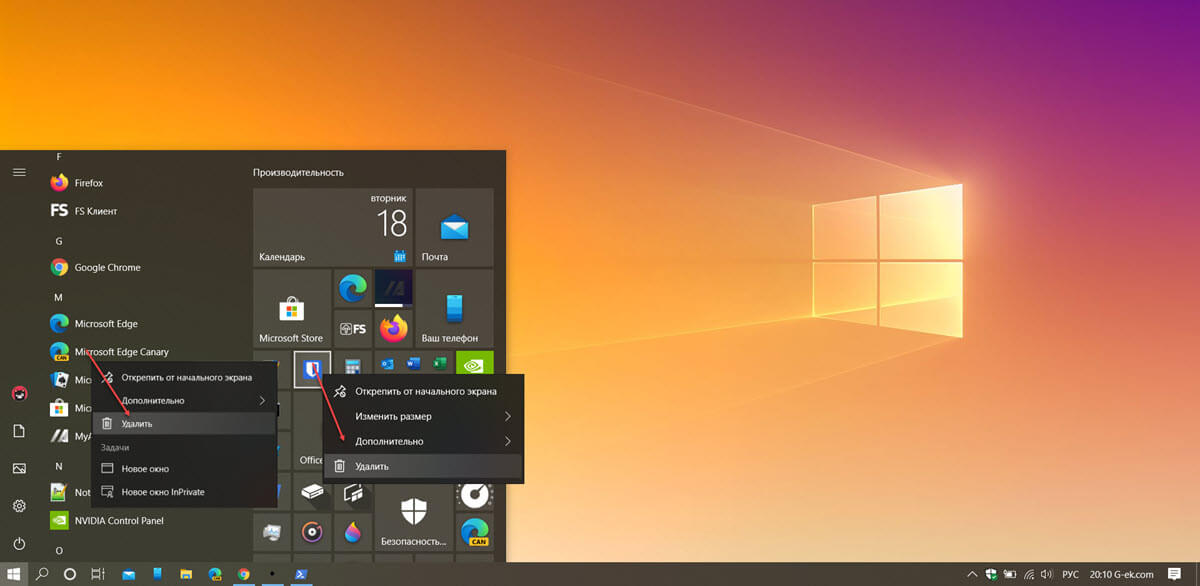
Найдите нужное приложение в списке приложений слева или если приложение имеет плитку, кликните правой кнопкой мыши на плитку или на приложение в списке. И удалите его с помощью команды контекстного меню «Удалить». Это работает как для UWP (приложений из Магазина) так и классических настольных приложений.
Все!