

Windows Ink is a new pen experience that Microsoft is introducing with the Windows 10 Anniversary Update. At the core of Windows Ink, there is the same pen support that the operating system has included for years, but there are a number of new improvements.
It all starts with the Windows Ink Workspace that acts as the central hub to access the new Sticky Notes to create notes and reminders using Cortana, and you can also draw on a whiteboard or on a screenshot using Sketchpad or Screen sketch. In addition, Microsoft has promised to keep improving the experience to make it easier for developers to implement Windows Ink support on their apps.
If you own a Surface Book, Surface Pro 4, or similar device that includes support for an active pen, the Windows Ink experience will be enabled by default. However, as with any feature, the new improvements may not be for everyone, and this Windows 10 guide, we’ll walk you through the steps to disable Windows Ink Workspace completely from your device.
How to disable Windows Ink Workspace using Group Policy
There are multiple ways to disable Windows Ink Workspace, but the quickest way to completely turn off the experience is by using the Local Group Policy Editor — that’s of course if you’re using Windows 10 Pro, Enterprise, or Education.
- Use the Windows key + R keyboard shortcut to open the Run command.
- Type gpedit.msc and click OK.
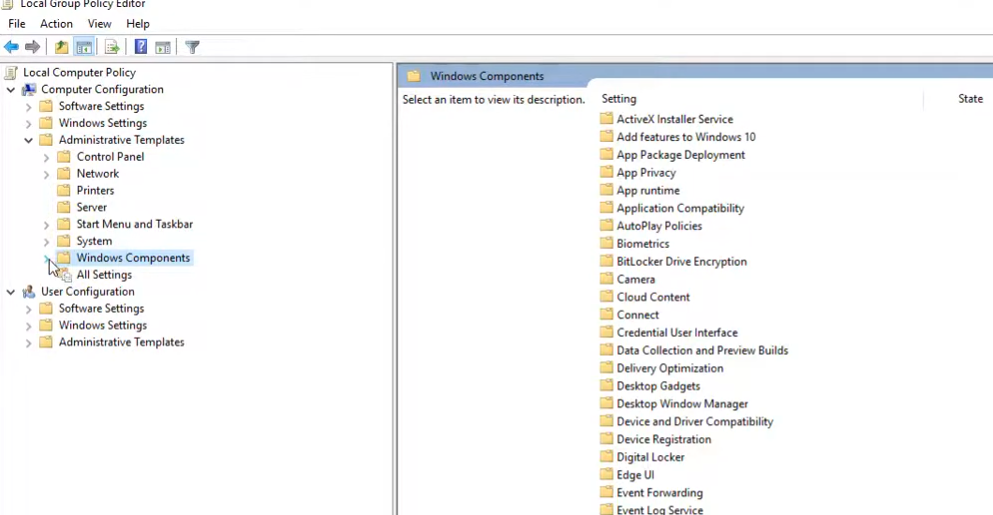
- Select Computer Configuration.
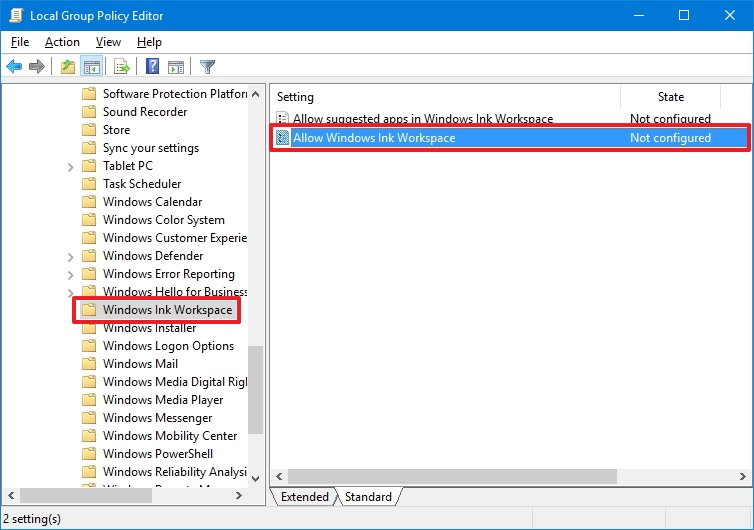
- Expand the following path: Administrative Templates\Windows Components\Windows Ink Workspace.Note: It’s worth pointing out that if you see two «Windows Ink Workspace» entries, you must choose to configure the second one. Otherwise, the instructions will not work.
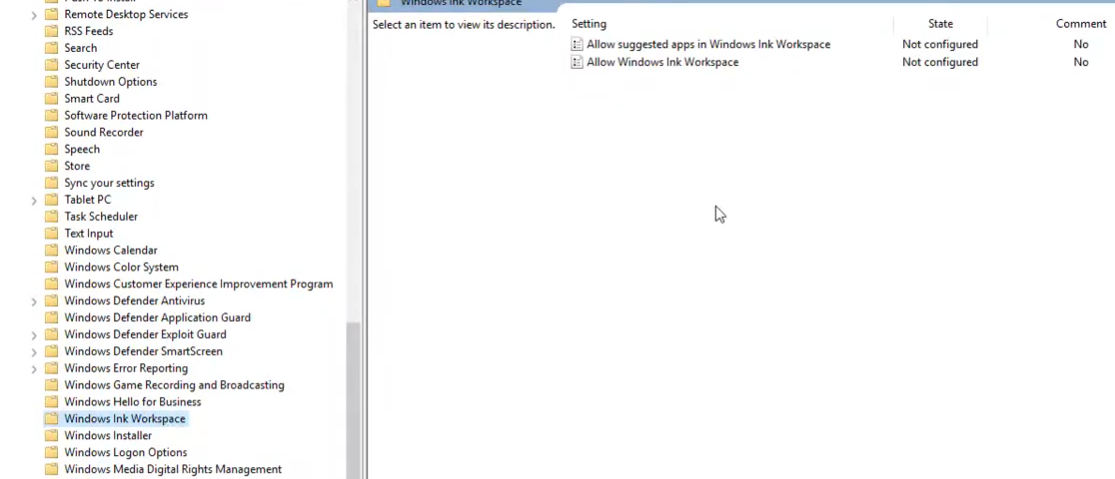
- On the right side, double-click the Allow Windows Ink Workspace setting.
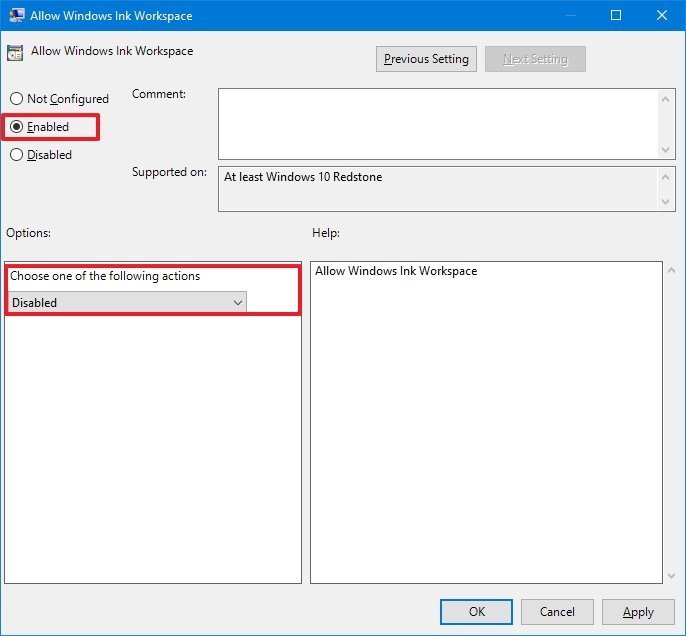
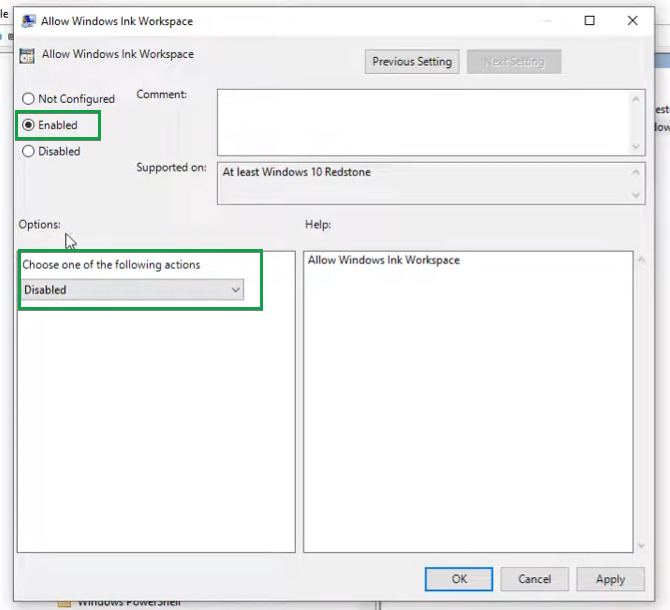
- Check the Enabled option.
- Under Options, select Disabled from the drop-down menu.
- Click Apply.
- Click OK.
- Restart your computer to see the new changes.
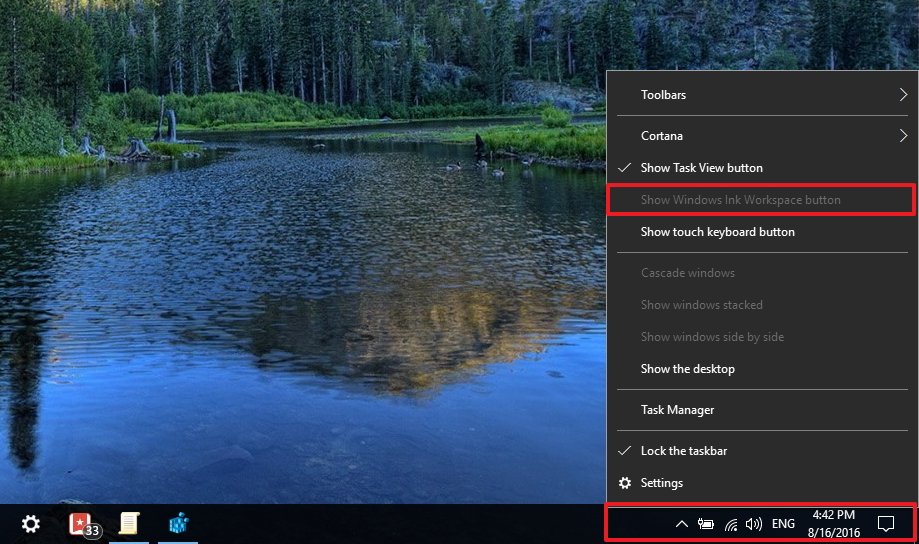
Once you restart your device, the Windows Ink Workspace icon will no longer be available in the taskbar. And you’ll notice that the «Show Windows Ink Workspace button» option on the taskbar context menu will become unavailable.
To revert the changes follow the steps mentioned above, but this time on step 8 select the Not Configured option instead.
How to disable Windows Ink Workspace using the registry
The Local Group Policy Editor is not a feature available on Windows 10 Home, but you can achieve the same results using the registry (if you’re up to the challenge).
All the latest news, reviews, and guides for Windows and Xbox diehards.
Important: Before you make any changes to the registry, make sure to understand that these changes may cause irreversible damage to your installation if they’re not done properly. It’s recommended that you do a full backup of your computer before proceeding. You’ve been warned!
- Use the Windows key + R keyboard shortcut to open the Run command.
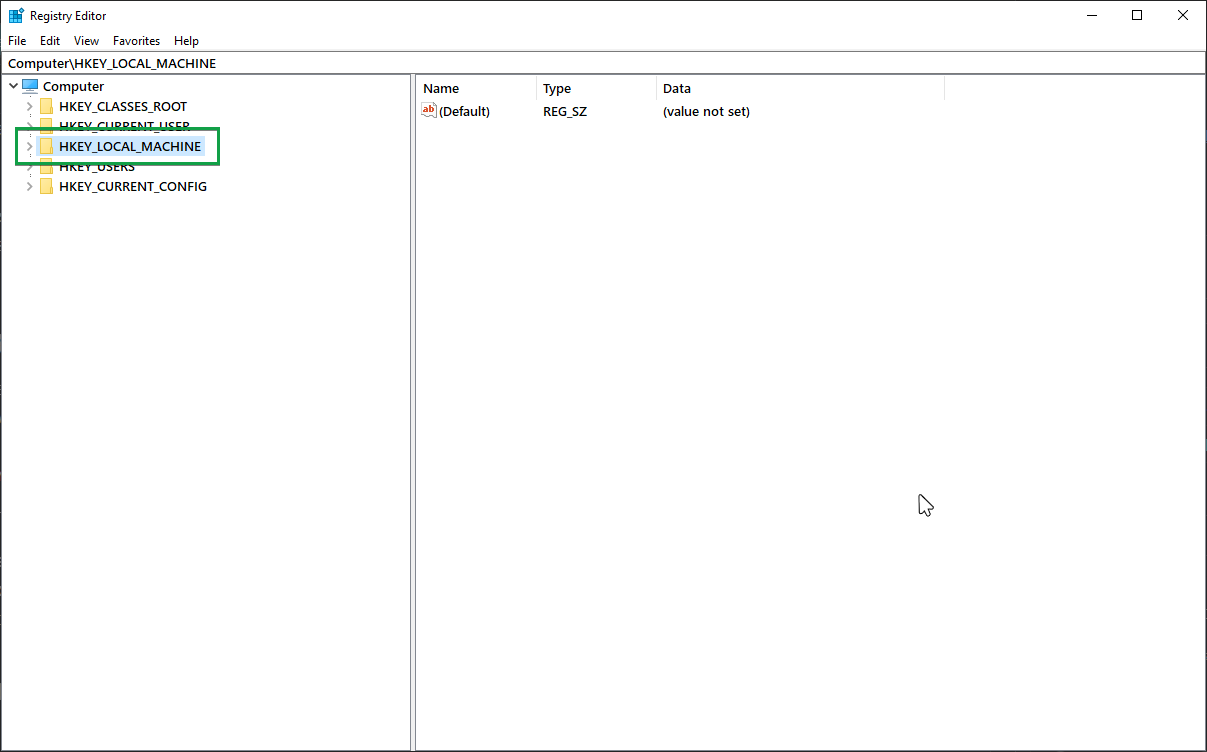
- Type regedit, and click OK to open the Windows registry.
- Browse the following path:
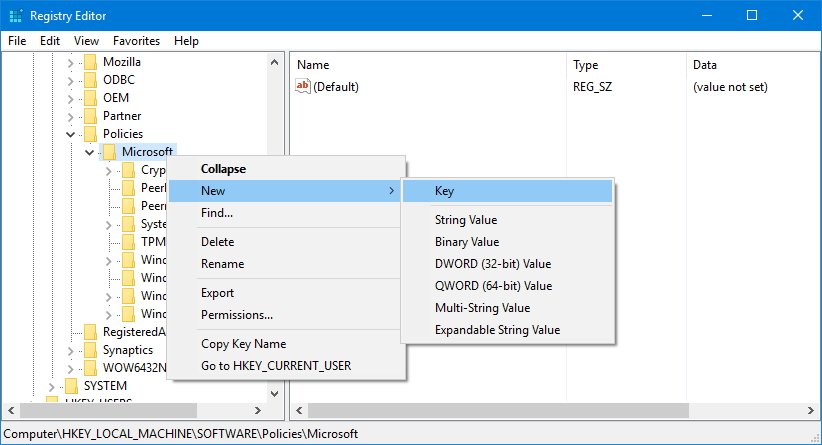
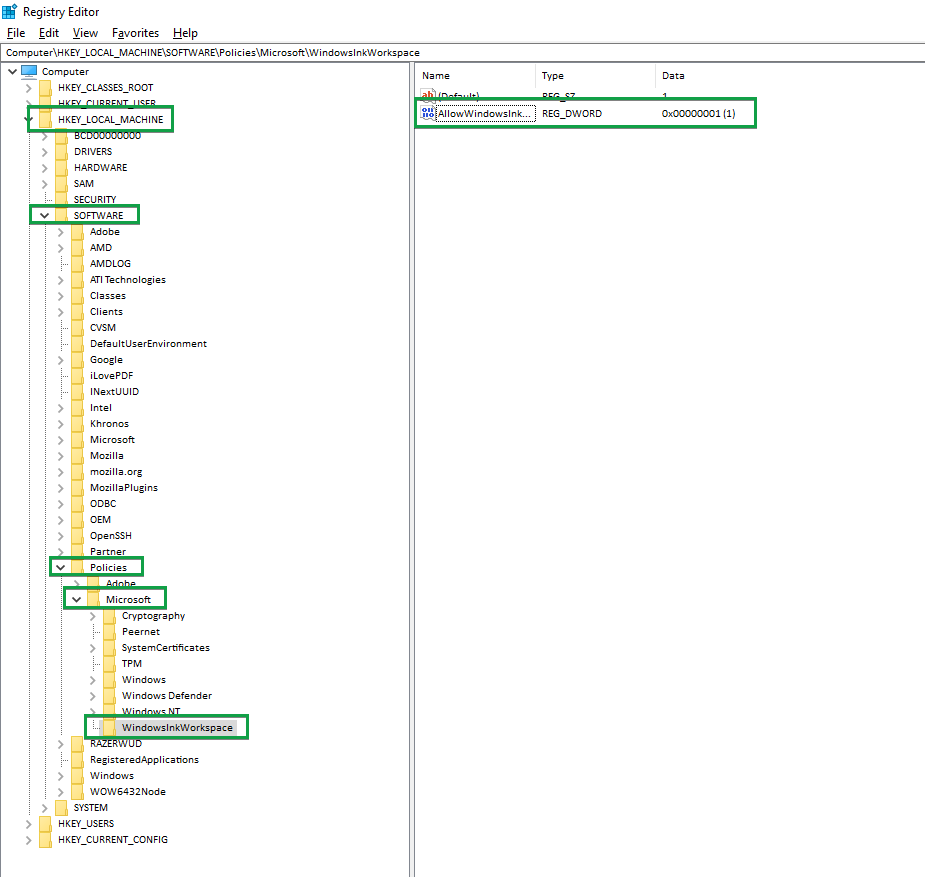
HKEY_LOCAL_MACHINE\SOFTWARE\Policies\Microsoft\WindowsInkWorkspace - If you don’t see the WindowsInkWorkspace key (folder), then do the following:
- Right-click the Microsoft key, select New, and click Key.
- Name the new key WindowsInkWorkspace.
- Click OK.
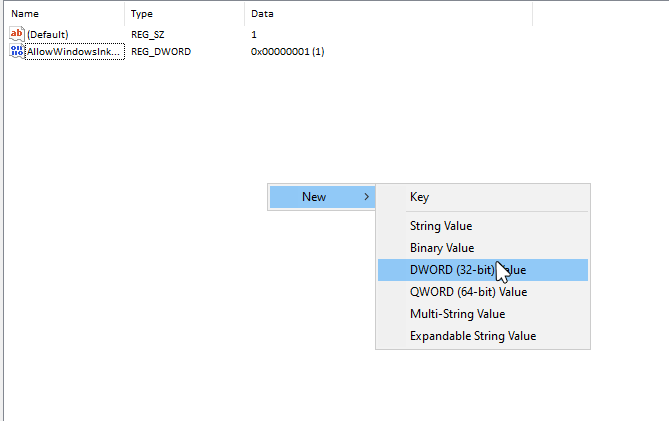
- Right-click on the right side, select New, and click DWORD (32-bit) Value.
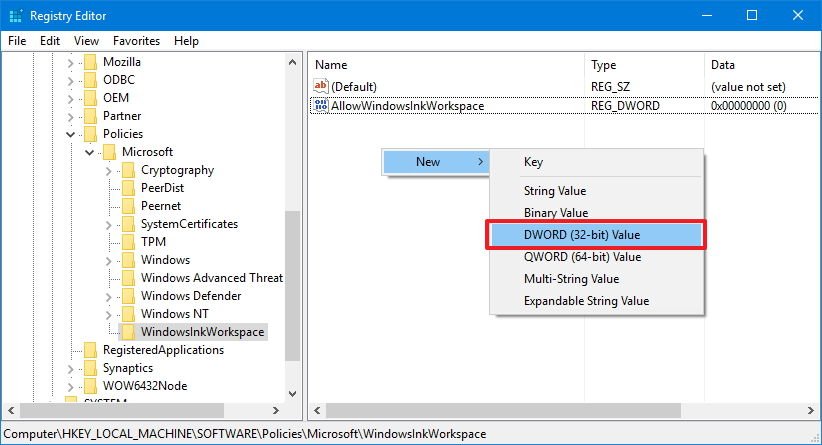
- Name the key AllowWindowsInkWorkspace.
- Click OK.
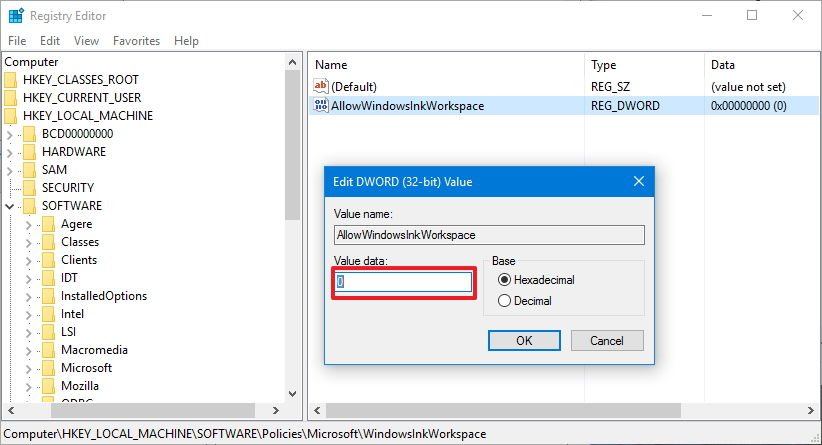
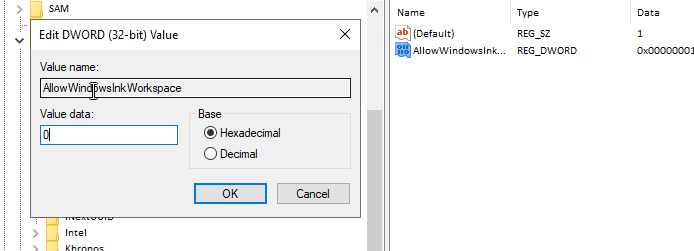
- Double-click the key and make sure its value is set to 0, which means disabled.
- Restart your computer to apply the changes.
Once you restart your device, identically as the process done with the Local Group Policy Editor, the Windows Ink Workspace icon will no longer be available in the taskbar. And you’ll notice that the «Show Windows Ink Workspace button» option on the taskbar context menu will become unavailable.
To enable Windows Ink Workspace again, simply follow the steps mentioned above and on step 9 make sure to change the value from 0 to 1, and restart your computer.
Wrapping things up
It’s important to note that after you’ve disabled Windows Ink Workspace, you won’t be able to launch Sketchpad or Screen sketch, but you’ll still be able to use Sticky Notes, as it’s a regular Windows Store app.
In addition, disabling the experience doesn’t remove the Pen & Windows Ink settings page from the Settings app. If you had the pen shortcuts configured to open Windows Ink Workspace, the pen button functions will fall back to open the OneNote app for all the options.
Do you use Windows Ink Workspace on the regular basis? Would you consider disabling the feature? Tell us in the comments below.
More Windows 10 resources
For more help articles, coverage, and answers on Windows 10, you can visit the following resources:
- Windows 10 on Windows Central – All you need to know
- Windows 10 Anniversary Update
- Windows 10 help, tips, and tricks
- Windows 10 forums on Windows Central
Mauro Huculak has been a Windows How-To Expert contributor for WindowsCentral.com for nearly a decade and has over 15 years of experience writing comprehensive guides. He also has an IT background and has achieved different professional certifications from Microsoft, Cisco, VMware, and CompTIA. He has been recognized as a Microsoft MVP for many years.
Rick Akura
Learn how to turn off or disable Windows Ink Workspace in Windows 10 using the Registry Editor or Group Policy Editor in simple steps.
Windows Ink, or Microsoft Ink or Pen & Windows Ink, is a suite of software that allows you to use a digital pen or finger to write and draw on your computer screen. You can edit text, write notes, and, draw, capture a screenshot of your desktop, mark up, crop, and share your creations. There’s even an option to use Windows Ink from the Lock screen so you can use the feature even if you aren’t logged in to your device.
This is a really cool feature that gives users the ability to handwrite on their computers or draw on their computers. For some users, though, it isn’t a feature they will ever use. Can you disable Windows Ink, and if so, how do you disable Windows Ink?
How to Use Window Ink
To access the built-in apps that come with Windows Ink, tap or click the Windows Ink Workspace icon on the right end of the Taskbar. It looks like a digital pen. This will open a sidebar. There are three options: Sketch Pad (to free draw and doodle), Screen Sketch (to draw on the screen), and Sticky Notes (to create a digital note). Click the Windows Ink Workspace icon on the Taskbar and from the sidebar to choose:
- Click Sketch Pad or Screen Sketch.
- Click the Trash icon to begin a new sketch.
- Click or tap a tool from the toolbar like a pen or highlighter.
- Click the arrow under the tool, if available, to choose a color.
- Use your finger or compatible pen to draw on the page.
- Click the Save icon to save your drawing, if desired.
- To create a Sticky Note, click Sticky Notes and type your notes with a keyboard or a compatible Windows pen.
Windows Ink is compatible with many popular Microsoft Office apps and lets you perform tasks like deleting or highlighting words in Microsoft Word, writing a math problem, writing in OneNote, or marking up slides in PowerPoint.
What if, as mentioned above, you want to know how to disable windows ink workspace?
How to Disable Windows Pen Ink
Follow the steps below to disable Windows Ink in Windows 10. These steps are easy and will allow you to disable the Windows Ink workspace in just a few seconds.
If you don’t have a digital pen or you want to remove the Windows Ink Workspace icon from your taskbar, there are two very simple ways to disable Windows Ink Workspace in Windows 10. Here they are:
Solution 1: Disable Windows Ink Workspace in Windows 10 Using Group Policy
- Open the Local Group Policy Editor. Navigate to: Computer Configuration ->Administrative Templates ->Windows Components ->Windows Ink Workspace.
- In the right pane, double-click Allow Windows Ink Workspace to open its properties.
- Check the Enabled option. Next, select Disabled from the drop-down menu under the Options section.
-
Click on Apply and then OK. Restart your PC to make the changes to take effect.
Solution 2: Disable Windows Ink Workspace in Windows 10 Using Registry Tweak
- Press Windows Key + R to open the Run command
- From the run utility window, type Regedit and click Ok to open the registry.
- Next, navigate to the following path: HKEY_LOCAL_MACHINE\SOFTWARE\Policies\Microsoft
- If you can’t locate the WindowsInkWorkspace folder, then do the following:
—Right-click the Microsoft key in the left pane, and then select New -> Key.
-Name the Key as WindowsInkWorkspace and click OK. - Right-click empty space in the right pane, select New -> DWORD (32-bit) Value.
- Name the DWORD value as AllowWindowsInkWorkspace. Leave its value data as 0.
- Restart your computer. Once signed back in, you should see Windows Ink Workspace disabled.

To enable Windows Ink Workspace again, just follow the steps above and change the DWORD AllowWindowsInkWorkspace value from 0 to 1, and restart your computer.
The Windows Ink workspace feature is a cool feature to use, but if you want to disable it, use one of the methods above and you will have no problem getting it done.
If you are using Wacom tablets and want to know how to disable Windows Ink Wacom features, simply uninstall the Wacom software. That is a program and hardware that is separate from Windows 10. It is an ink and art program that comes in many different styles. You can read the manual for uninstalling these devices individually or visit the Wacom website to learn more about their various programs and devices.
Readers help support Windows Report. We may get a commission if you buy through our links.
Read our disclosure page to find out how can you help Windows Report sustain the editorial team. Read more
If you’re not a great fan of Windows Ink Workspace, you might want to disable it on your Windows 10 PC. In this guide, you will find out step-by-step solutions on how to do that.
In Windows 10 Anniversary update Microsoft introduced a new Windows Ink workspace feature to improve the pen experience. With the help of this feature tablet users whose stylus or pen can write on their device just like on paper.
If the supported pen or stylus is identified by your Windows 10 device, the Windows Ink icon will automatically appear in the system tray or in the notification area on the taskbar.
Windows Ink Workspace offers you a variety of features like you can create sticky notes, write notes on the web pages, take a screenshot of the Windows screen using screen sketch or sketchpad, create reminders using Cortana, you can draw anything on the whiteboard, edit any image and more.
Even on the Microsoft surfaces device, it is integrated with Microsoft Office, Edge, and Maps. It is really a useful feature for those whose devices are supported by a stylus or pen.
How can I disable Windows Ink Workspace on Windows 10?
In case, your device does not support a pen or stylus, then you will not find it useful and definitely want to disable Windows Ink Workspace on your Windows 10. Here is how to do it:
-
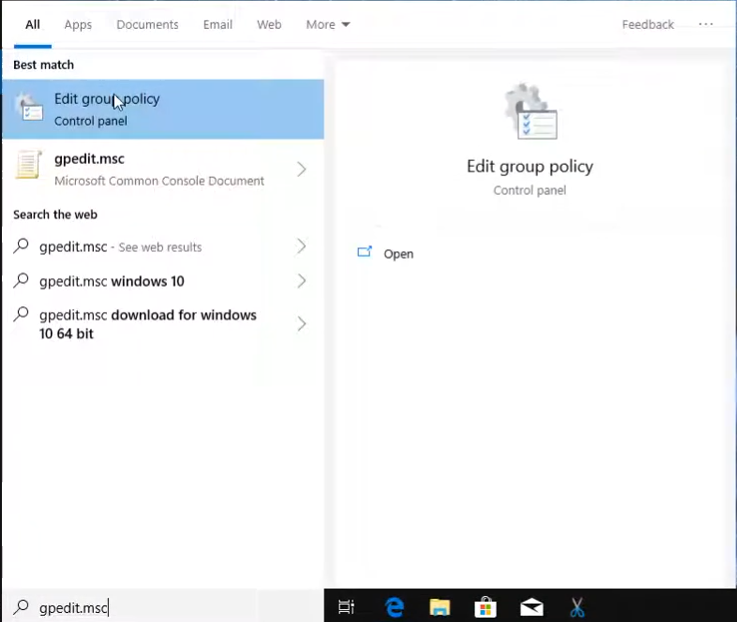
1. Press the Windows Key to open the Start Menu and type gpedit.msc in the search box.
-
2. Click on the result to launch the Group Policy Editor.
-
3. When the UAC pop-up appears, click Yes to continue.
-
4. Navigate to the following path:
Computer Configuration ->Administrative Templates ->Windows Components ->Windows Ink Workspace -
5. On the right pane, look for Allow Windows Ink Workspace Settings and double-click on it.

-
6. Another window will open where you need to switch from “Not configured” to “Enabled” settings.

-
7. Under action settings, switch from ON to Disabled.
-
8. After that, click on Apply and then OK to save the changes.
Disable Windows Ink Workspace using Group Policy Editor
A good method to disable Windows Ink Workspace is to use Group Policy Editor. It is a built-in administration tool which allows you to configure settings on your PC.


- Microsoft updates Copilot app with guided tour for new users
- Microsoft wants Windows 10 users to upgrade to Windows 11 or Copilot + PCs
- Deleting ‘inetpub’ folder lets hackers permanently stop Windows updates, Microsoft warns
- The latest KB5055612 for Windows 10 22H2 brings huge stability to the OS
- Microsoft April 2025 Patch Tuesday: Fixes for 134 security vulnerabilities, one exploited Zero-Day
Disable Windows Ink Workspace on Windows 10 (Home Edition)
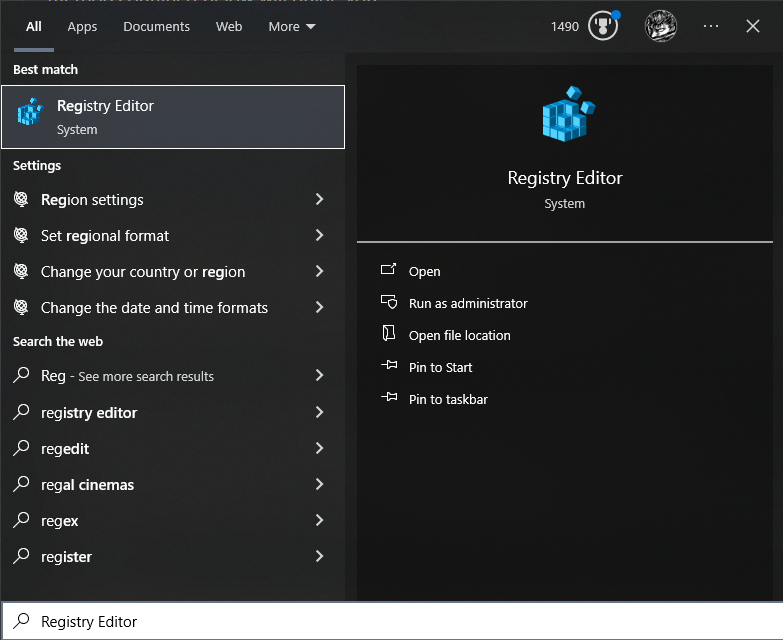
- Launch Registry Editor by typing regedit in the Windows 10 search bar. When you see Regedit run command at the top of the result, click to run it.
- In the Registry Editor navigate to the following Registry key:
HKEY_LOCAL_MACHINE\SOFTWARE\Policies\Microsoft\WindowsInkWorkspace
Note: If there is no WindowsInkWorkspace Registry Key, Simply create one manually.
- Select WindowsInkWorksapce Key.
- Here on the right panel make a right-click and select New-> DWORD (32-bit Value) to create a 32-bit DWORD value and name it AllowWindowsInkWorkspace.

Make sure its Value Data is set to be 0, confirm this by making a right-click on the same value.

- Once done, you need to Sign out and Sign-in back to your Windows account to apply the changes.


Some users reported that they noticed the changes after restarting their devices. So if Signing out and Sign-in didn’t work for you, then you can also reboot your device.
That’s it.
By applying the above registry hack, you can disable the Windows Ink Workspace feature from your Windows 10 PC.
In case, you want to enable the Windows Ink Workspace feature back, then you simply need to delete the AllowWindowsInkWorkspace parameter from the Registry Editor.
Let us know in the comments, if you’re a great fan of Windows Ink Workspace or not?
Claudiu Andone
Windows Toubleshooting Expert
Oldtimer in the tech and science press, Claudiu is focused on whatever comes new from Microsoft.
His abrupt interest in computers started when he saw the first Home Computer as a kid. However, his passion for Windows and everything related became obvious when he became a sys admin in a computer science high school.
With 14 years of experience in writing about everything there is to know about science and technology, Claudiu also likes rock music, chilling in the garden, and Star Wars. May the force be with you, always!
Windows Ink, although an impressive feature, isn’t necessary for every user, and its random pop-ups can be frustrating for some. Users who regularly utilize it have reported issues such as brush lag, unresponsive or erratic movement, blank gray screens, and other interruptions in their workflow.
The random appearances of the workspace and other bugs are often due to a faulty or outdated digital touch device connected to the system. To use the workspace to its full potential, you should update or replace your device. However, if you choose to disable the Ink workspace, the following methods will guide you.
1. Disabling Ink Workspace via Regedit
You can disable the Ink Workspace by altering its policy’s value in the registry editor. Doing so will stop the ink service until you revert the value to its default setting.
Note: Exercise caution when working with the registry editor. Consider making a registry back before performing this method.
- Open the Windows search bar and type “Registry Editor”.

- Navigate to “HKEY_LOCAL_MACHINE”.

- Expand the dropdown and follow this path: HKEY_LOCAL_MACHINE > SOFTWARE > Policies > Microsoft > WindowsInkWorkspace.

- Locate the registry entry named “AllowWindowsInkWorkspace”, right-click on it, and then select Modify.
- In the prompt that appears, change the value to ‘0′.

If there is no existing registry for the Ink workspace:
- Right-click within the WindowsInkWorkspace key.
- Select New and then click DWORD (32-bit) Value to create a new registry entry.

- Name the new registry “AllowWindowsInkWorkspace” and set its value to ‘0’ as previously described.
2. Disabling Ink Workspace via Group Policy Editor
The Group Policy Editor allows you to modify the configuration of any running Windows service, such as the Ink Workspace, and to disable it on your computer.
Note: The Group Policy Editor is not typically needed by individual users, so it is disabled by default in the Windows 10 Home edition. If you want to install and use it, follow this guide.
- Type “gpedit.msc” into the search bar and open Edit Group Policy from the search results.

- Click to expand the Computer Configuration section, then navigate: Administrative Templates > Windows Components.

- Locate Windows Ink Workspace in the list.
- Access the setting named “Allow Windows Ink Workspace”.

- In the properties, select the Disabled option and then click OK.

3. Disabling Ink Workspace via the Services Tab
The Ink Workspace is a Microsoft service that can be enabled or disabled according to a user’s personal preference. The system configuration’s Services tab allows you to prevent the service from loading upon system startup.
- Type “msconfig” into the Windows search bar.
- Select “System Configuration” from the search results.

- Go to the “Services” tab from the menu bar.
- Uncheck “Touch Keyboard and Handwriting Panel Service” to disable it.
- Click “Apply” and then OK.


Kevin Arrows
Kevin Arrows is a highly experienced and knowledgeable technology specialist with over a decade of industry experience. He holds a Microsoft Certified Technology Specialist (MCTS) certification and has a deep passion for staying up-to-date on the latest tech developments. Kevin has written extensively on a wide range of tech-related topics, showcasing his expertise and knowledge in areas such as software development, cybersecurity, and cloud computing. His contributions to the tech field have been widely recognized and respected by his peers, and he is highly regarded for his ability to explain complex technical concepts in a clear and concise manner.
How to Use (or Disable) the Windows Ink Workspace on Windows 10
As digital interaction becomes more dynamic, Windows 10 introduces various tools to enhance user engagement, particularly for touchscreen and stylus users. Among these features is the Windows Ink Workspace, a centralized hub designed for pen input that provides enhanced capabilities for drawing, sketching, note-taking, and more. In this article, we will explore the different functionalities of the Windows Ink Workspace, how to effectively use it, and, if desired, steps to disable it.
Understanding Windows Ink Workspace
The Windows Ink Workspace is an integrated feature in Windows 10 that is designed to enhance the productivity of users who primarily operate with a stylus or touch-enabled devices. Since its release, it has aimed to provide a seamless experience for sketching, annotating, and creating notes, effectively bridging the gap between traditional writing and digital workflows.
The core components of the Windows Ink Workspace include:
- Sticky Notes: A digital tool for jotting down reminders, thoughts, and quick notes.
- Sketchpad: A simple surface to draw and create with a stylus or finger, equipped with various brushes and colors.
- Screen Sketch: A utility that allows users to capture screenshots and annotate them directly, making it especially useful for explanations, presentations, and online collaborations.
Getting Started with Windows Ink Workspace
Before diving into its features, let’s walk through the steps required to access and enable the Windows Ink Workspace.
-
Verify Compatibility:
Ensure your device is compatible with the Windows Ink Workspace. This feature is best utilized on devices equipped with a touchscreen or stylus. While some functionalities may work with a mouse, the experience is optimized for pen input. -
Enable Windows Ink Workspace:
By default, Windows Ink Workspace is enabled on most capable devices. However, it’s worth checking:- Go to Settings > Devices > Pen & Windows Ink.
- Ensure that options related to the pen are set to your preference, such as the pen shortcuts.
-
Accessing Windows Ink Workspace:
- You can quickly access the Windows Ink Workspace by clicking on the pen icon in the taskbar. If you don’t see the icon, it may need to be enabled:
- Right-click on the taskbar and select Show Windows Ink Workspace Button.
- You can quickly access the Windows Ink Workspace by clicking on the pen icon in the taskbar. If you don’t see the icon, it may need to be enabled:
Utilizing Windows Ink Workspace Features
Now that you have access to the Windows Ink Workspace, let’s delve deeper into how to make the most of its components.
1. Sticky Notes
Sticky Notes are perfect for quick notes and reminders. Here’s how to use them efficiently:
-
Creating a Sticky Note:
- Click on the Sticky Notes icon in the Windows Ink Workspace.
- A new note will pop up on your screen. Start typing with your keyboard or use your pen to write.
-
Managing Sticky Notes:
- You can resize or move the Sticky Note anywhere on your desktop by clicking and dragging its border.
- To save it, simply close it. The note will remain in the Sticky Notes app for access later.
- You can also apply formatting (like bold or colored text) and list items or reminders.
-
Syncing with the Cloud:
- Sticky Notes can sync with Microsoft OneNote and your Microsoft account, allowing access across multiple devices.
- Just ensure you have enabled syncing settings in the Sticky Notes application.
2. Sketchpad
Sketchpad provides a canvas for creativity. Whether sketching ideas or creating artwork, here’s how to harness its potential:
-
Launching Sketchpad:
- Open Windows Ink Workspace and select Sketchpad.
-
Tools Overview:
- The Sketchpad offers various tools: pens, pencils, highlighters, and an eraser. You can also adjust the thickness and opacity of the tools.
- There’s an option to change colors, featuring a full palette to choose from.
-
Using the Canvas:
- Simply tap or draw on the canvas with your stylus or finger. You can create, export, or delete any of your sketches.
- To save your creations, select the Save option, and choose a file format (PNG or JPEG).
-
Erasing:
- Touch the eraser tool to remove any mistakes or unwanted lines, making revisions effortless.
-
Sharing Creations:
- Finished sketches can be shared via email or other apps by choosing the share button or exporting them.
3. Screen Sketch
This feature is invaluable for annotating, helping with collaboration, particularly in education or professional settings.
-
Capturing Screenshots:
- Open Windows Ink Workspace and select Screen Sketch. You can also take a screenshot using
Windows + Shift + Sand access tools directly afterward. - This allows you to capture your entire screen or a selected portion.
- Open Windows Ink Workspace and select Screen Sketch. You can also take a screenshot using
-
Annotating:
- After capturing, use the pen tools to annotate. Draw, highlight, or type directly on the screenshot.
- You can also use a ruler for straight lines and various colors to enhance your notes.
-
Saving and Sharing:
- Once you’re satisfied with your annotations, save the images or share them directly through compatible apps.
Customization for Enhanced Experience
After understanding how to use the Windows Ink Workspace features, it’s essential to customize the workspace to suit your preferences:
-
Change Pen Settings:
- Back in Settings > Devices > Pen & Windows Ink, you can adjust the pressure sensitivity and assign different functions to your pen buttons enabling shortcuts that best fit your workflow.
-
Adjust Workspace Settings:
- Explore the options to customize how you interact with the Windows Ink Workspace. This includes gesture control and shortcuts customization.
Disabling the Windows Ink Workspace
While many users find welcoming benefits in the Windows Ink Workspace, others may prefer to disable the feature to streamline their user experience. Here’s how to do it effectively:
-
Disabling from Settings:
- Open the Settings app.
- Navigate to Devices > Pen & Windows Ink.
- Disable the options under the “Pen shortcut” or uncheck “Show the Windows Ink Workspace icon in the taskbar.”
-
Removing from the Taskbar:
- Right-click on the taskbar, select Toolbars, and uncheck Windows Ink Workspace to remove it from view.
-
Using Group Policy or Registry Editor (Advanced Users):
- If you are part of an organization, your IT administrator can disable the Windows Ink Workspace using Group Policy settings for all users.
- Alternatively, advanced users familiar with the Windows Registry Editor can navigate to specific keys to disable this feature, though this should be done with caution.
Troubleshooting Common Issues
Despite its robustness, users may encounter some issues while using the Windows Ink Workspace. Here are a few tips to diagnose and address common problems:
-
Pen Not Responding:
- Ensure your device drivers are up to date. Check under Device Manager to update or reinstall pen drivers.
- Verify that your pen’s battery is charged if it is not a passive stylus.
-
Workspace Not Opening:
- Restart your device; sometimes, a simple reboot can resolve glitches.
- If the taskbar icon is missing, check the settings as mentioned earlier to re-enable it.
-
Loss of Features:
- Ensure that your OS is updated to the latest version of Windows 10 as updates often include bug fixes for the Windows Ink Workspace.
Conclusion
The Windows Ink Workspace is an innovative feature that caters to a diverse range of users, enhancing productivity and creativity through intuitive tools. By efficiently utilizing features like Sticky Notes, Sketchpad, and Screen Sketch, Windows 10 empowers users, particularly those working with stylus inputs, to create, capture, and share ideas seamlessly.
Whether you find immense value in this workspace or choose to disable it for a more simplified interface, understanding how to navigate its features can significantly enhance your overall user experience on Windows 10. Regardless of your choice, the digital landscape continues to evolve, and tools like the Windows Ink Workspace pave the way for more adaptable and interactive technology solutions.