
Точки восстановления в Windows — удобная и полезная функция, которая часто может помочь решить проблемы, возникшие в результате действий, которые привели к изменению реестра, системных файлов и, как итог, ошибкам в работе системы.
Однако иногда может потребоваться очистить место, занимаемое ими на диске — удалить старые или все точки восстановления. В этой инструкции о том, как это сделать в Windows 11 и 10. На сайте также присутствуют подробные инструкции про использование функции: Точки восстановления Windows 11, Точки восстановления Windows 10.
Защита системы
Первый способ удаления точек восстановления — использование настроек в окне «Свойства системы» на вкладке «Защита системы». Шаги будут следующими:
- Нажмите клавиши Win+R на клавиатуре, либо нажмите правой кнопкой мыши по кнопке «Пуск» и выберите пункт «Выполнить», введите sysdm.cpl и нажмите Enter.

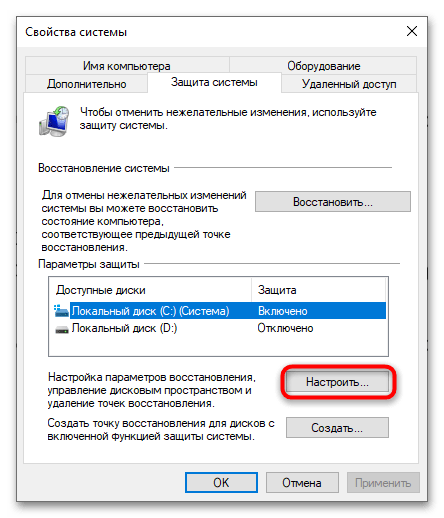
- Перейдите на вкладку «Защита системы», убедитесь, что выбран диск, для которого включена защита системы и нажмите кнопку «Настроить».

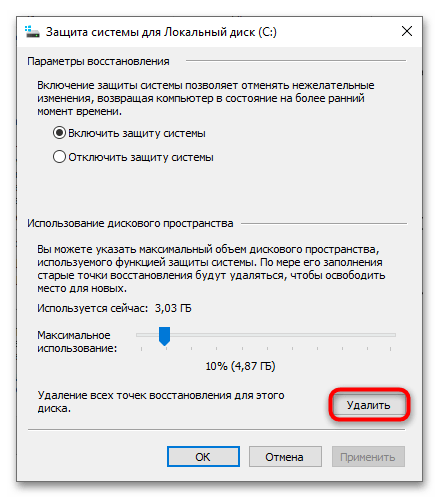
- Нажмите кнопку «Удалить» для удаления точек восстановления.

- Прочтите предупреждение и, если хотите подтвердить удаление, нажмите кнопку «Продолжить».


В результате точки восстановления будут удалены.
Учитывайте, что этот способ позволяет удалить сразу все имеющиеся точки восстановления на диске, но не отдельные. Однако, вы можете удалить все точки восстановления кроме последней или даже конкретные выбранные точки способами, описанными далее.
Очистка диска
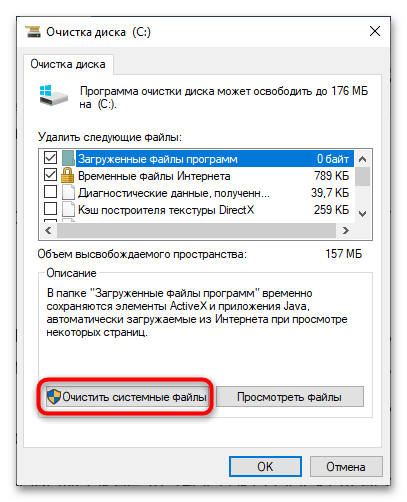
Встроенная утилита «Очистка диска» присутствует во всех последних версиях Windows и позволяет, помимо прочего, удалить все точки восстановления за исключением последней.
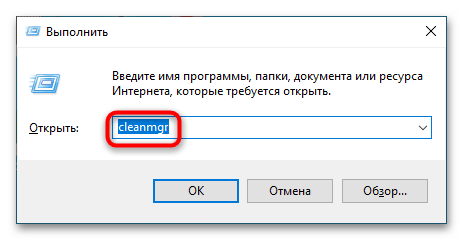
- Нажмите клавиши Win+R на клавиатуре, введите cleanmgr и нажмите Enter.
- При необходимости выберите диск (если их несколько, выберите системный), после чего нажмите кнопку «Очистить системные файлы» (также может потребоваться выбор диска).
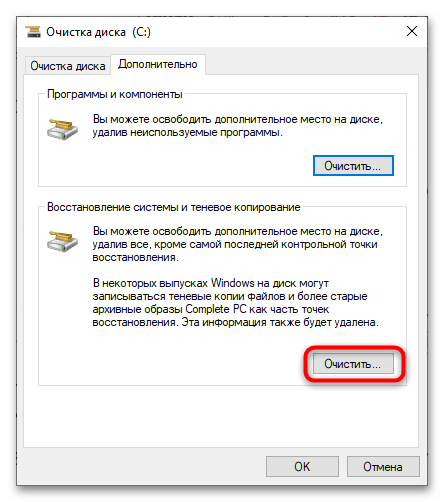
- Перейдите на вкладку «Дополнительно» и нажмите кнопку «Очистить» в разделе «Восстановление системы и теневое копирование».

- Подтвердите удаление всех точек восстановления, кроме самой последней.

Готово, в результате все старые точки восстановления будут удалены. На близкую тему может быть полезным: Очистка диска встроенными средствами Windows 11.
Удаление выбранных точек восстановления
Если требуется удалить конкретные точки восстановления, можно воспользоваться командами командной строки:
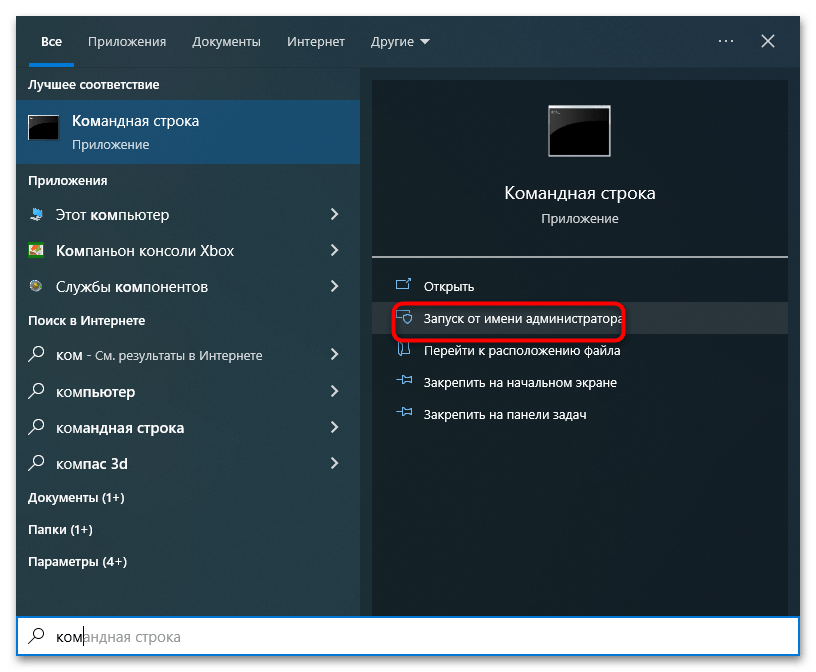
- Запустите командную строку от имени администратора (как это сделать).
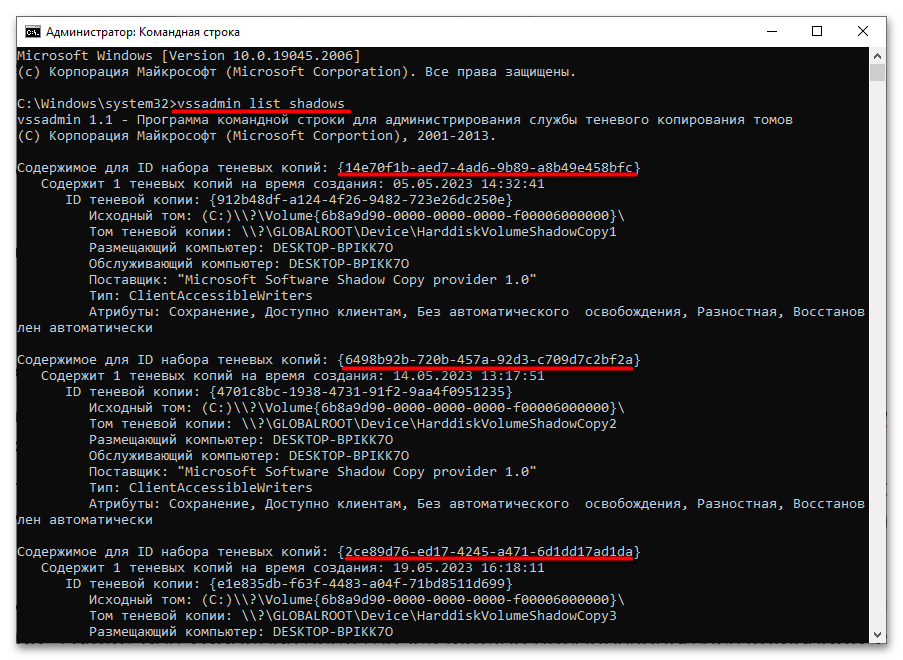
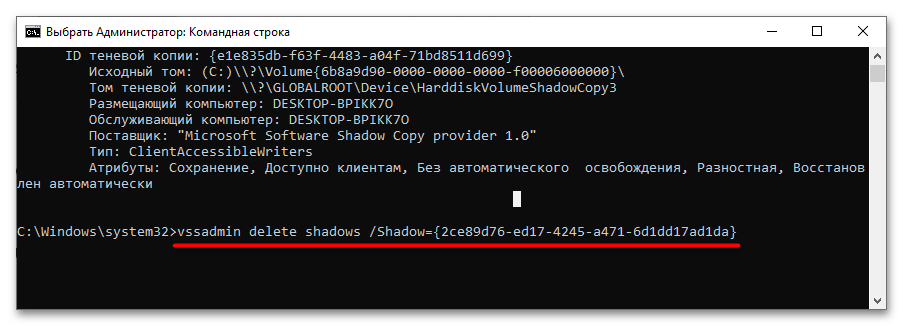
- Введите команду
vssadmin list shadows
и нажмите Enter.

- В результате будут показаны все точки восстановления, хранящиеся на диске, и информация о них. Для удаления конкретной точки восстановления вам потребуется её ID, отображающийся в результатах, который следует использовать в команде (фигурные скобки также указываем):
vssadmin delete shadows /shadow={ID}

Повторив команду для всех точек восстановления, которые требуется удалить, вы очистите от них диск, также они исчезнуть из окна «Восстановление системы».
Некоторые дополнительные нюансы, касающиеся удаления точек восстановления в Windows:
- Старые точки восстановления в Windows 11/10 удаляются автоматически по мере того, как кончается место, выделенное для них на диске в настройках защиты системы.
- Некоторые программы для очистки диска от ненужных файлов могут автоматически удалять все точки восстановления. Я бы этого делать не рекомендовал, они могут пригодиться: многие проблемы с Windows можно было бы решить быстрее при их наличии.
- Вы можете увидеть точки восстановления с типом «Архив» в списке точек восстановления, которые не удаляются описанными способами. Фактически, это не точки восстановления, а метаданные, указывающие на диски с резервными копиями. Удалить их можно в «Панель управления» — «Резервное копирование и восстановление» (если диск с резервной копией подключен), либо в командной строке в среде восстановления с помощью команд:
CD "C:\System Volume Information\WindowsImageBackup"
DEL Catalog\*.*
DEL SPPMetadataCache\*.*
Если у вас остаются вопросы, касающиеся удаления точек восстановления в Windows, вы можете задать их в комментариях ниже, я постараюсь помочь.
Все способы:
- Способ 1: Настройки защиты системы
- Способ 2: Очистка диска
- Способ 3: Командная строка
- Способ 4: Сторонние программы
- CCleaner
- Restore Point Creator
- Вопросы и ответы: 2
Способ 1: Настройки защиты системы
Удалить точки восстановления можно в параметрах защиты системы – там же, где включается, отключается и настраивается сама защита логических дисков.
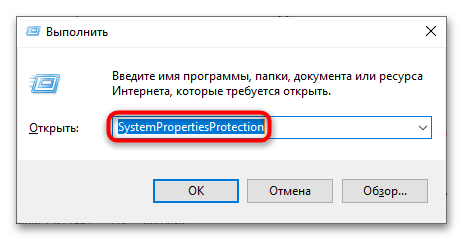
- Попасть в раздел «Защита системы» можно как из свойств ярлыка «Этот компьютер», так и короткой командой
SystemPropertiesProtection, выполненной в вызванном нажатием клавиш Win + R диалоговом окошке быстрого запуска. - В открывшемся окне свойств системы выделите том, точки восстановления которого хотите удалить, и нажмите кнопку «Настроить».
- В следующем окне нажмите кнопку «Удалить».
- Подтвердите удаление всех точек восстановления.

Также обратите внимание, что все точки восстановления будут удалены, если отключить функцию защиты раздела.
Способ 2: Очистка диска
В отличие от предыдущего, этот способ позволяет удалить все точки восстановления, кроме последней.
- Запустите встроенную утилиту «Очистка диска» через поиск или короткой командой
cleanmgr, выполненной в диалоговом окошке «Выполнить» (Win + R). - Укажите в открывшемся окошке диск, точки восстановления которого желаете удалить, и нажмите «ОК».
- В новом окне «Очистка диска» нажмите кнопку «Очистить системные файлы».
- Опять выберите раздел и нажмите «ОК».
- Переключитесь в открывшемся окне на вкладку «Дополнительно» и нажмите кнопку «Очистить» в блоке «Восстановление системы и теневое копирование».
В результате работы утилиты будут удалены временные файлы Windows и точки восстановления кроме одной – последней.
Способ 3: Командная строка
Использование для удаления точек восстановления «Командной строки» является не слишком удобным и практичным решением с точки зрения рядового пользователя.
- Запустите «Командную строку» от имени администратора из поиска Windows.
- Выведите список всех точек восстановления, выполнив команду
vssadmin list shadows. Скопируйте идентификатор точки восстановления, которую хотите удалить. - Сформируйте и выполните команду
vssadmin delete shadows /Shadow={ID}, где ID – скопированный на предыдущем шаге идентификатор. Подтвердите удаление, введя в консоли «Y» и нажав клавишу Enter.
Если нужно удалить остальные точки восстановления, повторите команду удаления, указав ID ненужных теневых копий. Также для удаления всех точек можно воспользоваться командой vssadmin delete shadows /all /quiet либо delete shadows /For=буква диска: /all /quiet, если нужно избавиться от всех теневых копий на конкретном диске.

В последнем случае в команду добавляется параметр /For, в качестве значения которого указывается буква диска.
Способ 4: Сторонние программы
Удаление теневых копий в Windows 10 также поддерживается некоторыми сторонними приложениями-чистильщиками общего назначения, например CCleaner. Существуют для этих целей и специализированные инструменты, к примеру Restore Point Creator.
CCleaner
Популярный программный продукт, предназначенный для очистки и оптимизации Windows. Одной из возможностей этой программы является удаления всех точек восстановления, кроме последней.
Скачать CCleaner
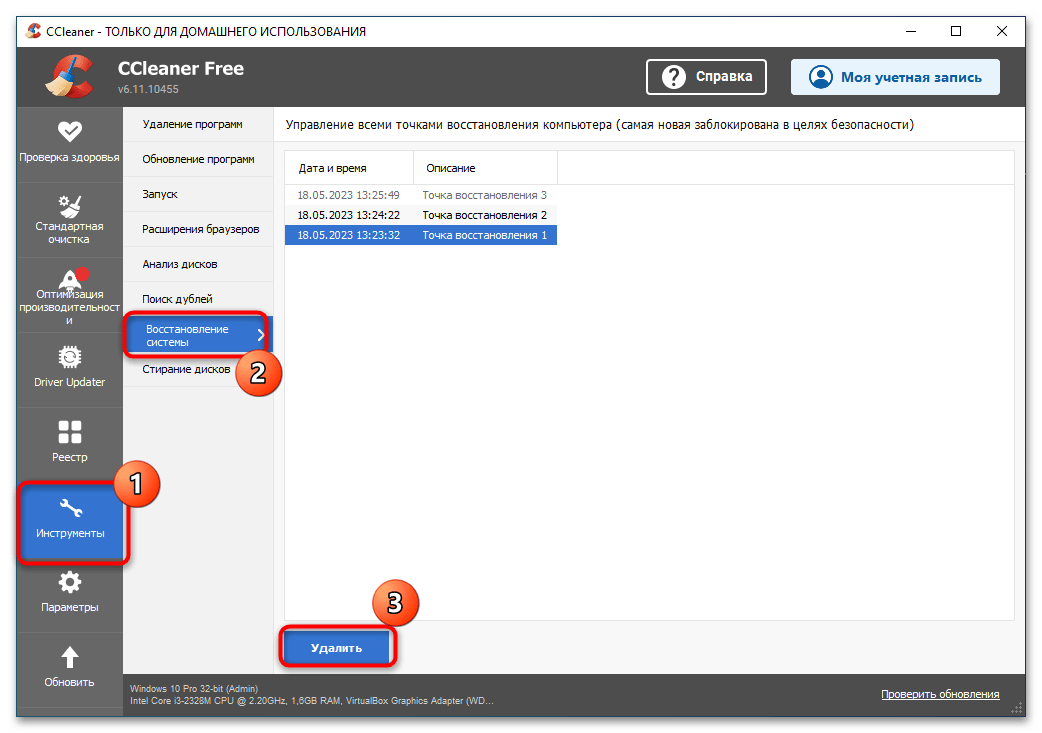
- Скачайте приложения с сайта разработчика и установите. Запустив программу, перейдите в раздел «Инструменты» → «Восстановление системы».
- Выделите ненужные точки восстановления и нажмите «Удалить».
Restore Point Creator
Специализированная бесплатная утилита, предназначенная для управления точками восстановления. Инструментом поддерживается создание, просмотр, монтирование и удаление точек восстановления. В настоящее время Restore Point Creator более не поддерживается разработчиком, однако программа по-прежнему доступна для скачивания со сторонних ресурсов.
- Скачайте Restore Point Creator с доверенного источника и установите.
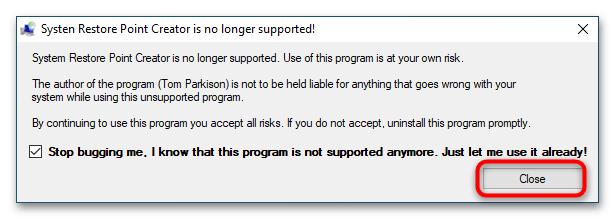
- Запустив утилиту, нажмите в информационном окне кнопку «Close».
- Выделите в основном рабочем окне приложения ненужную точку восстановления и нажмите кнопку «Delete Selected Restore Point».
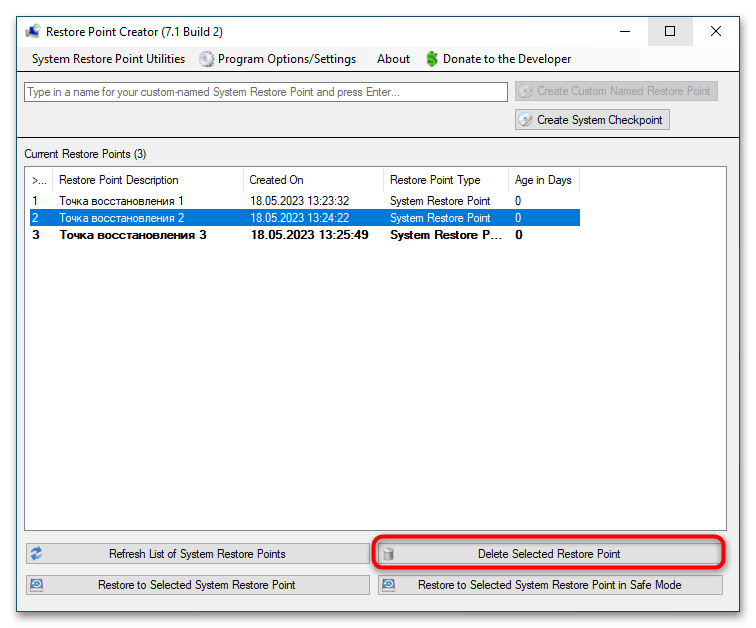
К сожалению, как и большинство других сторонних инструментов, Restore Point Creator не позволяет удалять абсолютно все точки восстановления. Самая последняя теневая копия удалена не будет.
Наша группа в TelegramПолезные советы и помощь
Sign in to your MUO account

Creating system restore points is a good way to protect your Windows 10 data. It helps you return your PC to its previous state. Using a restore point can also help remove any recently downloaded files that are infected with malware.
The only problem is that creating multiple system restore points consumes too much disk space. So, you might want to decide which system restore points are worth keeping and which ones you should delete.
Here’s how you delete system restore points on your PC.
1. Delete Multiple System Restore Points Using Disk Cleanup
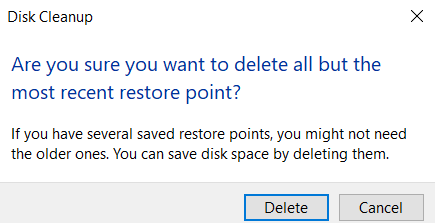
If you want to delete all but the recent system restore point, you can use the Disk Cleanup tool. To get started, here are the steps you can follow:
- Press Windows key + R, type cleanmgr, and press Enter.
- Select the drive you want to clean up and press OK.
- Press the Clean up system files button.
- In the next window, navigate to the More Options tab.
- Press the Clean up button under the System Restore and Shadow Copies option.
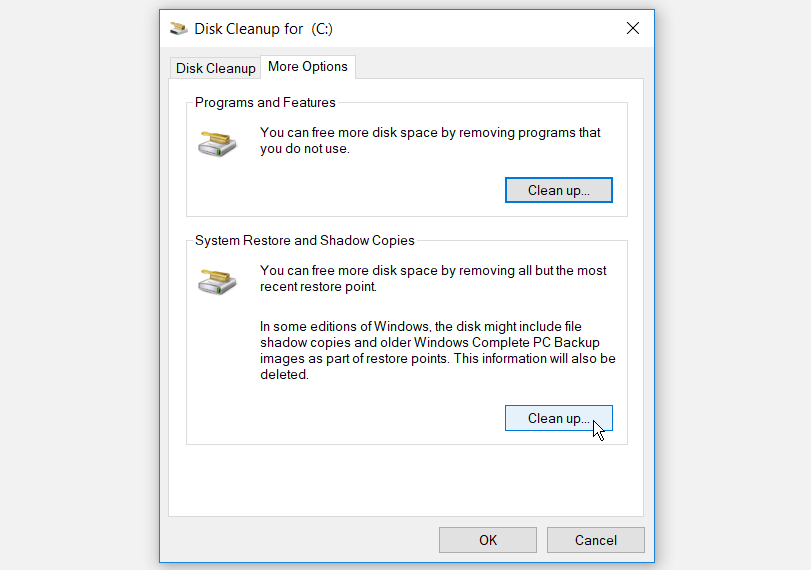
Press OK and restart your PC to apply these changes.
2. Delete Multiple System Restore Points Using System Protection Settings
If you want to delete multiple restore points, you can do this via System Protection Settings. However, note that you won’t be able to restore your PC to its previous state if you do this.
- Press Windows key + R, type SystemPropertiesProtection, and press Enter.
- Navigate to the System Protection tab.
- Select the drive from where you want to delete system restore points.
- Press the Configure button.
- In the next window, press the Delete button.
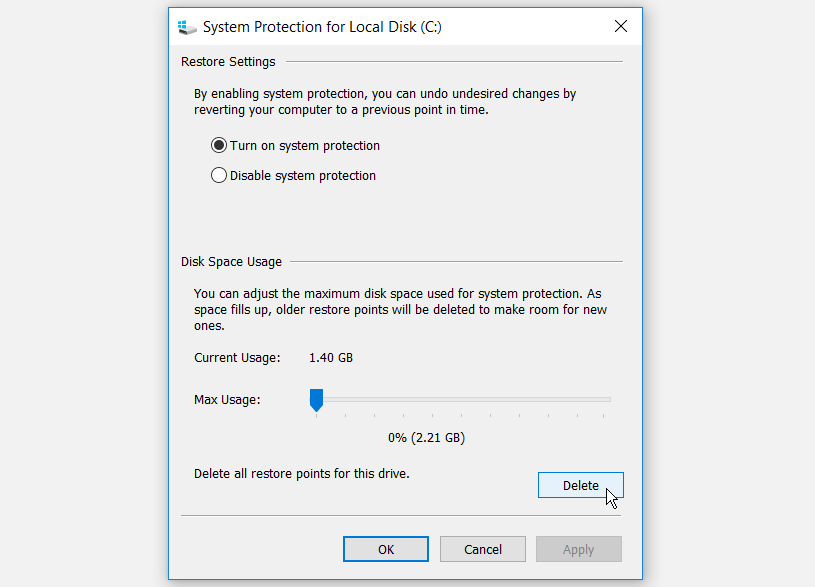
Press Apply and then press OK.
3. Delete Specific Restore Points Using the Command Prompt
Deleting system restore points is safe, but you need to be mindful about which restore points you should delete. The Command Prompt can help you pick and delete specific restore points.
Here’s how you can use this tool:
- Press Windows Key + R to open the Run command dialog box.
- Type CMD and press Ctrl + Shift + Enter to open an elevated Command Prompt.
- Enter the command below and press Enter to show a complete list of system restore points on your PC.
vssadmin list shadows
Your system restore points will be labeled by Shadow Copy IDs. To delete a specific restore point, copy its shadow ID and execute the following command:
vssadmin delete shadows /Shadow={shadow copy ID}
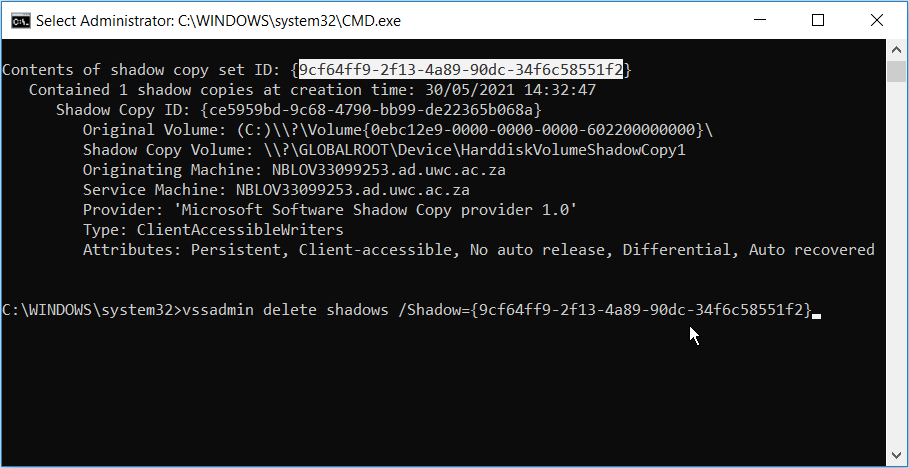
Press Enter and then press Y to continue.
Should you wish to delete all your system restore points, enter the following command and press Enter:
vssadmin delete shadows /all
Another way to delete your specific restore points is by using a third-party tool. Restore Point Creator is a great tool you can use for this. It’s a free and lightweight app that’s fully compatible with Windows 10. It provides an intuitive interface that makes it easy to create and manage your restore points.
- To get started, download and install Restore Point Creator.
- Run the tool and select the specific restore point you want to delete.
- Press the Delete Selected Restore Point button on the bottom-right corner of the screen.
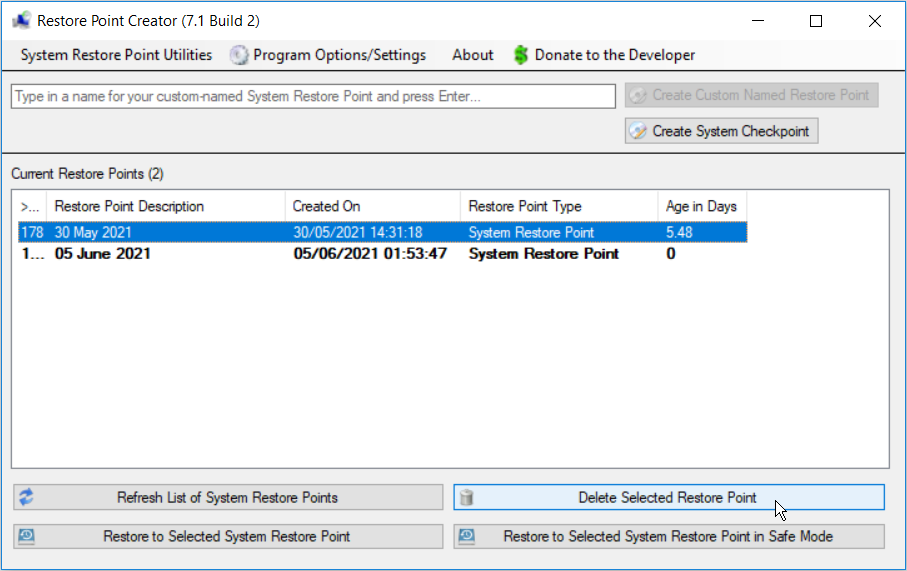
Should you wish to delete multiple restore points, highlight all of them and press the Delete Selected Restore Point button.
Return Your PC to Its Previous State With a System Restore Point
System restore points can rescue you in case something goes wrong with your PC. You simply use the restore point, and your PC returns to its normal state. What’s important is to manage these restore points and delete the ones you don’t need.
Also, you shouldn’t worry about manually creating multiple restore points to keep your data safe. You can automatically create daily restore points. Should you wish to delete a specific daily system restore point, simply apply any of the methods we’ve provided.
Last Updated :
03 Jul, 2024
System restore points are useful for reverting your Windows 10 system to a previous state in case of issues, but they can also take up valuable disk space. Deleting unnecessary system restore points can help free up space and improve system performance.
In this guide, we will show you how to delete a system restore point on Windows 10 using various methods. Follow our step-by-step instructions to manage your system restore points efficiently.
What is a System Restore Point?
A System Restore Point is like a snapshot of your computer at a specific moment. It saves settings and important files. If something goes wrong, you can use it to go back in time and undo the changes, restoring your computer to a previous, working state.
Why delete System Restore Point?
Deleting System Restore Points is not typically recommended, as they serve as backups for your computer’s settings and files. However, if you need to free up disk space or encounter issues with existing points, you may choose to delete a specific restore point. Be cautious, as this action removes potential recovery options for your system.
Steps to Delete a System Restore Point
Step 1: Go to the search bar and type Create a restore point. Then, click on the utility that pops up.

Step 2: On the System Properties utility, you will be automatically in the System Protection tab. Now, follow these two steps:
- Step 2.1: Under Protection Settings, you will see a list of available drives. Click on the drive whose restore points are to be deleted.
- Step 2.2: Find the Configure button at the bottom of your screen and click on it to proceed.

Step 3: Click on the Delete button, located at the bottom ofoperate your screen, to delete all restore points for your chosen drive.

Deleting All but the Most Recent Restore Point
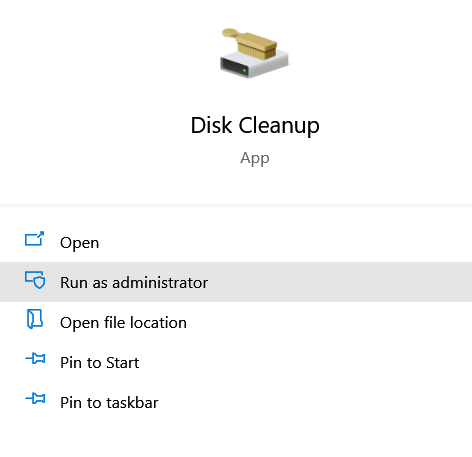
Step 1: Type Disk Cleanup in the search bar. The utility will pop up on your screen. Click Run as administrator to use the app with administrative privileges. (It’s important)
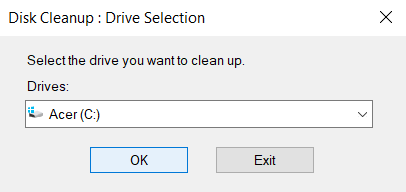
Step 2: Choose the drive on which you want to perform the cleanup operation and hit OK.
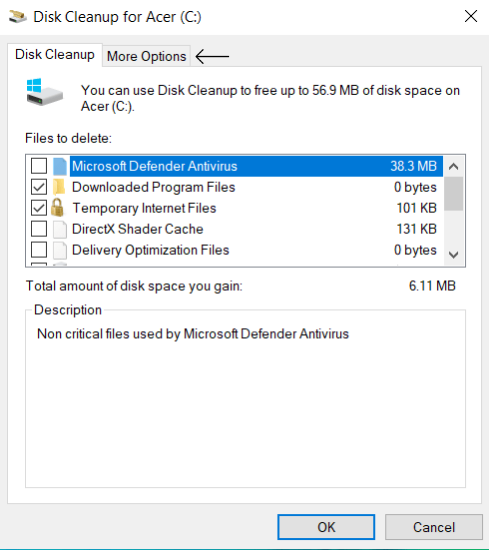
Step 3: On the page that pops up, you will see a tab named More Options. Click on it to go to the tab.
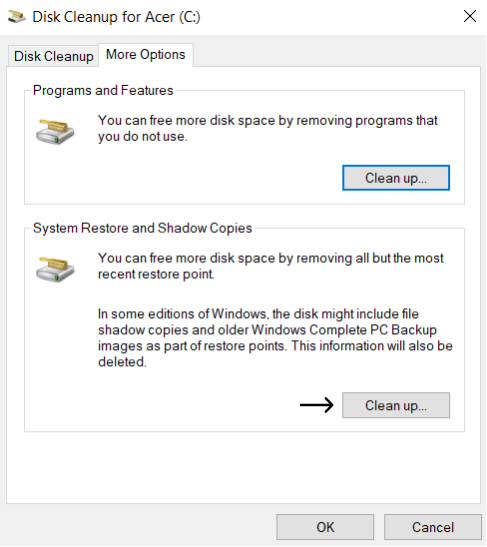
Step 4: Under System Restore and Shadow Copies, you will see a Clean-up button. Click on it to proceed.
Step 5: Click on Delete in the confirmation box to operate.
Conclusion
Deleting system restore points on Windows 10 is a straightforward process that can help you reclaim valuable disk space and maintain system performance. By following the steps outlined in this guide, you can easily remove unnecessary restore points and keep your system optimized. Regularly managing your system restore points ensures that you have enough space for new backups and essential data.
Also Read
- How to create a System Restore point in Windows 10
- How to Delete Temporary Files in Windows 10?
- How to Show Hidden Files and Folders in Windows 10?
System restore point feature has been part of Windows operating system for a long time. The feature allows you to quickly restore your Windows PC to an earlier date without losing your personal files. For instance, if your PC starts acting up today, you can restore your PC to a previous date (when your PC was working well) to fix all issues under 10 minutes.
Depending on the disk space allocated to the restore point feature and number of restore points created, the system restore point feature might be consuming few hundred MBs to GBs of disk space on your PC.

If your PC is running out of free disk space, you might want to delete all or specific old restore points to free up disk space on Windows 10 PC.
Like its predecessors, Windows 10 also includes options to delete all restore points and delete all but the most recent restore point. If you want to delete individual restore points, you need to use free third-party utilities.
WARNING: While deleting restore points is safe, remember that you won’t be able to restore your PC to an earlier date. We suggest you delete all restore points only when your PC is running out of disk space.
Refer to the given below directions to figure out how to delete restore points in Windows 10.
Method 1 of 3
To delete individual restore points, refer to the directions in Method 3 of this article.
Step 1: Type Sysdm.cpl in the Start/taskbar search field and then press Enter to open System Properties dialog.

Step 2: Switch to the System Protection tab. In the Protection Settings section, select a drive, and then click Configure button. Please note that restore point feature is separate for all drives on your PC.

Step 3: Finally, in the Disk Space Usage section, click the Delete button. Click Continue button when you see the warning dialog to continue deleting all restore points for the selected drive.


Now, to delete restore points from all drives, please repeat step 2 and step 3 again.
NOTE: As you can see in the picture, you can reduce the disk space allocated to the system restore feature.
After deleting all restore points, we recommend you create a new restore point so that you can restore your PC to the current date if and when required.
Method 2 of 3
Delete all but the most recent restore point in Windows 10
An option in Windows 10 and earlier versions allows you to delete old restore points but keep the most recent restore point.

Please refer to our how to delete all but most recent restore point guide to delete all restore points but the keep the most recent one.
Method 3 of 3
Delete individual restore points in Windows 10
There may be times when you want to delete specific restore points rather than deleting all restore points. Although there is no provision in Windows 10 to delete select restore points, you can use third-party tools to delete specific restore points.
Restore Point Creator is a free utility designed to help Windows users to manage system restore points, including deleting individual restore points. The program is easy to use and is fully compatible with Windows 10. Download, install, run, select a restore point to delete and then click Delete Selected Restore Point button.

Download Restore Point Creator