
Almost every person in today’s generation uses Bluetooth to connect their phones or computers with other external output devices like speakers, headsets, computers, and other such devices. Most computers and laptops come with in-built Bluetooth adapters and drivers. But if you want to connect any external Bluetooth headphone or device then you have to install its Bluetooth driver. Drivers are the bridge between your computer OS and your Bluetooth device.
That Bluetooth driver is also required for its smooth functioning and can allow the exchange of data conveniently. Thus, if you face a connection or an issue with the signal, the reason could be the faulty driver or adapter.
It is essential to take care of your Bluetooth driver precisely because of this reason. There are also other troubleshooting methods, but some other standard procedures are to uninstall and reinstall the Bluetooth driver in windows 10.
How to Uninstall Bluetooth Driver in Windows 10
Bluetooth is the easiest way for computers to connect with other devices which are not on the same network. It also allows the users to do everything. Some people don’t have a network, and they can easily connect with any device by using Bluetooth technology.
To install a new version of Bluetooth drivers, you have to first remove old Bluetooth drivers.
Here is a step-by-step guide to uninstall Bluetooth drivers.
Step 1: Press the Window key + x to pop out the Power Use Menu.
Step 2: Go to the Device Manager from the list.
Step 3: Once you click it and the manager opens, locate the Bluetooth driver.

Step 4: Right-click on the driver.
Step 5: There will be a pop-up catalog. From the list, choose “Uninstall.”
Step 6: Click on “delete the driver software for this device.”
Step 7: Click on “OK.”
Once it’s over, restart your pc to see if the system fixed the error.
Now that you have uninstalled the driver and rebooted your system, it is time to reinstall the driver. Follow the step-wise guide thoroughly to avoid mistakes and ensure surety.
First of all, you have to find the correct driver for your Bluetooth device. Most of the manufacturers have official websites from which users can download the latest version of Bluetooth drivers.
If you are using Windows 10 then you don’t need to worry about this. Because Windows 10 update will automatically download and install the latest version of all drivers including your Bluetooth driver. The Windows 10 operating system gives a new way for users to download and install new updates.
The new application features and updates available have made it easier for users to access all the important applications and have a new way to access all the important updates for the operating system itself. So first install all pending updates.
Step 1: Navigate to the Windows 10 setting app.
Step 2: Go to Update and Security.

Step 3: Go to the Windows Update page and click on “Check for updates.”

Step 4: Windows 10 will download and reinstall the app automatically without the need for the user.
This step is the final step, reboot your system, and it should be good as new!
Use 3rd party Driver Updater Tools
If you don’t want to waste time downloading and installing Bluetooth drivers, then you can use driver updater tools like Driver Easy and Driver Talent. These driver updater softwares will scan your entire system and update all required drivers on your Windows 10.
All you have to do is just install any Driver updater tool and scan your PC.
Once the scan is completed, click on Update All.
It will start downloading and updating the new Bluetooth driver.
Related Posts:
- How to Fix Disney Plus Error Code 90
- How to Change PS4 Controller Colors
- Xbox One Error Codes
Final words
Hopefully, you found this article informative, and it helped you understand how to fix the issue with your Bluetooth!
Bluetooth is an essential utility that allows accessing any external device without using any cord-like Headphones, speakers, Mobile, etc. Most computers have an in-built Bluetooth adapter these days. However, it may stop working sometimes even after turning on the Bluetooth.
As a result, you won’t be able to access a particular device or receive the Bluetooth device not working error message. Today, in this post, we elaborate on ways to either Uninstall or Reinstall the Bluetooth driver on Windows 11 or 10 PC.
The following bug appears mainly due to the existence of a corrupt or outdated Bluetooth driver. To optimize this issue, it would be better to uninstall its driver and later reinstall its recent version as per the device’s model number.
Note: Before moving ahead to remove the Bluetooth driver, one should create a restore point for the entire system. This helps to roll back the device driver in case the new changes lead to some additional issues.
To uninstall or reinstall the Bluetooth driver in Windows 11/10, use the following workarounds –
Uninstall the Bluetooth driver
Sometimes, the running drivers may become corrupt and thus start causing unnecessary bugs and errors. If that’s the case, the best thing is to uninstall the specific driver and then reinstall the same. To know whether a driver is obsolete or not, search for a yellow mark next to the list of drivers inside Device Manager. Here are the steps to uninstall the Bluetooth driver –
- Go to the Start and type Control Panel, and hit on the same result.
- Under the Programs and Features section, locate the Bluetooth device.
- When found, right-click on it and click Uninstall from the top ribbon.
Once the device is properly removed, you should uninstall the Bluetooth driver as well. To do so, use the steps –
- Right-click on the Windows icon and select Run.
- In the text box, type
devmgmt.mscand hit the OK button. - Click the “>” to expand the Bluetooth entry.
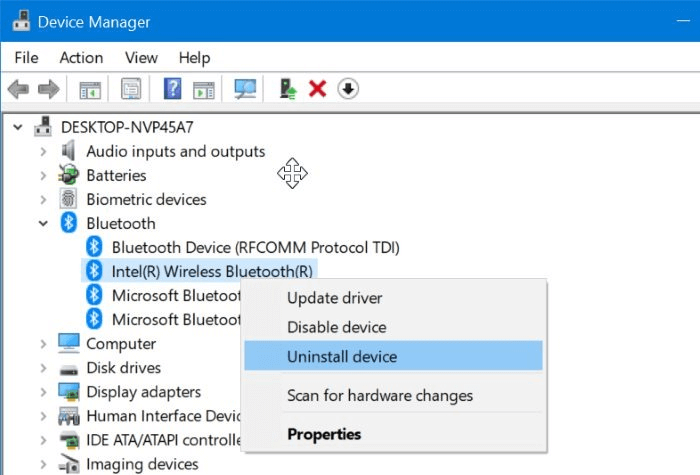
- Now, right-click on the Bluetooth driver and select Uninstall device on the context menu.

- On the confirmation window, ensure the correct software which you want to delete and hit the Uninstall button.
- Once the Bluetooth driver is completely removed and your PC is ready to install the latest driver.
Check the Bluetooth running driver version
The model number of a driver helps in identifying a suitable file for the computer. Hence, before installing the driver, do check the latest version of the wireless device. Here’s how to proceed –
- Right-click on Windows and select Device Manager.
- On the succeeding screen, expand the Bluetooth.
- Afterward, right-click on the existing Bluetooth driver and select Properties. A few examples are – Realtek Bluetooth Adapter, Intel Wireless Bluetooth, etc.
- Now, go to the Driver tab on the Properties window.
- Here, you can see the detailed information, and note down your Bluetooth adapter version.
- You may then download the latest driver as per the above information.
Reinstall the Bluetooth driver
1] Install the Bluetooth driver automatically
After connecting the PC to the available network, the system will automatically look for a suitable Bluetooth driver and download the same. All you need is to click on the flagged Bluetooth device present on the navigation panel.
On the succeeding window, select the .exe file suitable for your device’s version and press the install button.
If you want to update any other driver simultaneously that is either missing or outdated, click Update All.
Note: The default installation of the driver is applicable only if it is set as Automatic under the Windows update services.
2] Install the Bluetooth driver via Settings
A few companies provide the driver’s update along with the monthly patches. As this comes directly from Microsoft, you must keep your Windows 10 OS to its latest build version following the below steps –
- Press Win & I to launch the Settings app.
- Select the Update & Security section thereafter Windows Update.
- Navigate to the right pane and click Download to install any pending updates. See the snapshot below –

- Doing this will re-install any missing drivers or update the corrupt ones.
Make sure to Restart the PC so that changes made so far come into effect.
Start the Bluetooth Services
Before proceeding to restart the Bluetooth device, make sure its status is set as Automatic and Running under Windows Update Services. Here’s how to do this –
- Jointly press Win and S to launch the Search dialog.
- In the text bar, type Services then click on the well-matching result.
- Here, locate the Bluetooth User Support Services on the right pane.
- Next, right-click on it and select Properties using the context menu.

- Now, select Automatic under the Startup type drop-down menu.
- If the Services Status reads Stopped, hit Start then OK.
Lastly, Reboot your PC so that changes till far come into effect from the next sign-in.
How do I manually reinstall Bluetooth drivers?
Earlier, users take the help of Device Manager to search for Bluetooth driver updates on their devices. However, as Device Manager is not of any use in Windows PC, one may visit Windows Update and hit Check for updates. If this query indeed results in finding any Bluetooth driver update, you will get to know about it under Optional updates.
When you see the optional updates link, click over it, check all the boxes, and hit “Download and install”. Make sure to reboot your PC after you’re done applying optional updates.
In the realm of technology, Bluetooth connectivity is a dominant force. It allows devices to communicate seamlessly without the hassle of wires. However, there may be instances when you find yourself needing to remove Bluetooth drivers from your Windows 10 system. Reasons such as upgrading drivers, troubleshooting connection issues, or simply freeing up system resources could drive this necessity. In this guide, we’ll take you through the comprehensive steps to completely remove Bluetooth drivers in Windows 10, ensuring you can manage your Bluetooth setup optimally.
Understanding Bluetooth Drivers in Windows 10
Before diving into the removal process, it’s important to understand what Bluetooth drivers are and their role in your system.
Bluetooth drivers are software programs that allow your Windows 10 operating system to communicate with Bluetooth devices, such as keyboards, mice, headphones, and more. They act as a bridge, translating the data from the device into a format that your computer can understand.
When these drivers become corrupted or outdated, you may experience connectivity issues or degraded performance. In such cases, removing the old drivers and installing new ones can be the perfect solution.
There are several reasons you might want to completely remove Bluetooth drivers from your Windows 10 system:
- Error Troubleshooting: If you are facing persistent Bluetooth connectivity issues, removing the drivers can often resolve these problems.
- Driver Updates: Newer versions of drivers may be released that include important fixes and improvements. Removing the old drivers first can help in smooth installation of updated versions.
How to Completely Remove Bluetooth Drivers from Windows 10
This section will guide you through the entire process of removing Bluetooth drivers in Windows 10. Follow these steps carefully, and you will achieve a clean removal of your Bluetooth drivers.
Step 1: Access the Device Manager
To begin the removal process, you need to access the Device Manager in Windows 10. Here’s how:
- Right-click on the Start menu located on the taskbar.
- Select Device Manager from the list that appears.
Once you’ve accessed the Device Manager, you can view all the hardware components installed on your machine.
Step 2: Locate Bluetooth Devices
In the Device Manager window:
- Look for the section labeled Bluetooth. Click on the arrow next to it to expand the list of Bluetooth devices connected to your computer.
- Identify the Bluetooth device driver you wish to remove. It could be something like Intel Wireless Bluetooth, Broadcom Bluetooth, or any other name associated with your Bluetooth hardware.
Step 3: Uninstall the Device
Once you have identified the Bluetooth driver you want to remove, proceed to uninstall it.
- Right-click on the specific Bluetooth device driver.
- Select Uninstall device from the context menu.
- You will see a confirmation dialog box asking if you want to uninstall the driver. Check the box that says Delete the driver software for this device if you want to completely remove the driver software from your system.
- Click Uninstall to confirm.
This action will uninstall the driver, but there are times when remnants may remain in the system, especially in case of corrupted installations that need deeper removal mechanisms.
Step 4: Remove Drivers Using Command Prompt
To ensure that all traces of the Bluetooth drivers are eliminated, we can use the Command Prompt alongside the Device Manager.
- Press Win + X and then select Command Prompt (Admin) or Windows PowerShell (Admin).
- Type the following command and press Enter:
pnputil.exe -e
This command lists all the installed drivers on your system. Look for the one associated with your Bluetooth device.
- Note the published name of the driver, which usually looks something like oemxx.inf. Now, you can remove the driver using the command:
pnputil.exe -d oemXX.inf
Replace oemXX.inf with the actual driver name you noted in the earlier step.
This command deletes the specified driver from your system completely.
Step 5: Clean Up Residual Files
To complete the removal process, you’ll want to ensure that no residual files remain:
- Press Win + R to open the Run dialog.
- Type %temp% and press Enter. This opens the Temp folder containing temporary files.
- Delete any files inside this folder that are related to your Bluetooth driver.
Next, clean the registry entries associated with the Bluetooth drivers. Be cautious – modifying the registry can have significant impacts on your system.
- Press Win + R again, type regedit, and press Enter.
-
In the Registry Editor, navigate to:
HKEY_LOCAL_MACHINE\SYSTEM\CurrentControlSet\Services
-
Look for entries with names related to your Bluetooth driver. If you are certain they reference the Bluetooth drivers you’ve just uninstalled, right-click on the entry and select Delete.
It’s advisable to back up your registry before you proceed with any deletion.
Step 6: Restart Your Computer
Once you have completed the uninstallation and cleanup, it’s time to restart your computer. This reboot ensures that any processes related to the Bluetooth drivers are completely cleared from your system memory and prepares your computer for new installations.
Reinstalling Bluetooth Drivers
Now that you’ve removed your Bluetooth drivers, you may want to reinstall them. You can download the latest drivers directly from the manufacturer’s website or use Windows Update.
Using Windows Update
- Navigate to Settings by clicking on the Start menu and selecting the gear icon.
- Click on Update & Security.
- Select Windows Update and click on Check for updates. If updates are available, Windows will automatically download and install them.
Downloading from Manufacturer’s Website
- Visit the website of your Bluetooth hardware manufacturer.
- Locate the Support or Downloads section.
- Search for your device model and download the latest driver compatible with Windows 10.
- Install the downloaded driver by following the prompts.
Conclusion
Removing Bluetooth drivers in Windows 10 may seem daunting, but with the right guidance, the process becomes manageable. Whether you face connectivity issues or are preparing your system for the latest driver updates, knowing how to completely uninstall Bluetooth drivers can help you maintain optimal performance.
Remember, it’s always advisable to back up your important files and create restore points before making significant changes to system configurations, including the removal of drivers. With this knowledge in hand, you can confidently manage your Bluetooth drivers and ensure your Windows 10 environment runs smoothly. Happy troubleshooting!
What are Bluetooth drivers and why would I need to remove them?
Bluetooth drivers are software components that enable your device to communicate with Bluetooth hardware. They act as a bridge between the operating system and the Bluetooth devices, allowing you to connect peripherals such as headphones, mice, keyboards, and smartphones. In some cases, outdated or corrupted Bluetooth drivers can lead to connectivity issues or poor performance, making it necessary to remove and reinstall them.
Removing Bluetooth drivers may also be essential if you’re troubleshooting problems related to Bluetooth connectivity. For instance, if your Bluetooth device was working previously and suddenly stopped connecting, it could be due to a driver issue. Uninstalling the drivers can provide a clean slate, making it possible for Windows 10 to install the latest drivers automatically, which may resolve the problem.
How can I find my Bluetooth drivers on Windows 10?
To locate your Bluetooth drivers in Windows 10, you can access the Device Manager. To do this, right-click on the Start button and select “Device Manager” from the menu. In the Device Manager window, look for the “Bluetooth” section. Expanding this section will display all installed Bluetooth devices along with their corresponding drivers.
Once you find the Bluetooth section, you can right-click on a specific device to view its properties or uninstall it. The properties window will provide additional information about the driver version and date, helping you determine whether the driver might need to be updated or removed entirely.
What steps should I follow to completely remove Bluetooth drivers?
To completely remove Bluetooth drivers in Windows 10, you should first open the Device Manager. Locate the “Bluetooth” section, right-click on the desired Bluetooth device, and select “Uninstall device.” Ensure that you check the option that says “Delete the driver software for this device” if it appears. This action will remove the driver from your system completely.
After the uninstallation process is complete, you may want to restart your computer to ensure all changes take effect. Once you boot up the system again, Windows 10 may automatically reinstall a compatible Bluetooth driver for you, or you can manually download the latest drivers from the manufacturer’s website if needed.
What should I do if my Bluetooth device is still not working after removing the drivers?
If your Bluetooth device is still experiencing issues after you’ve removed the drivers and allowed Windows to reinstall them, there are several troubleshooting steps you can take. First, ensure that your Bluetooth device is powered on and in pairing mode, as the connection may not establish if it is turned off or not discoverable. You should also check the device’s battery, as low power levels can affect connectivity.
If the device remains unresponsive, consider checking for updates for Windows 10. Sometimes, pending system updates can affect hardware functionality. Navigate to “Settings,” then click on “Update & Security,” and check for updates. If any updates are available, install them and restart your device. Additionally, try connecting another Bluetooth device to see if the issue is with your Bluetooth hardware rather than the initial device.
Is it safe to remove Bluetooth drivers from my computer?
Yes, it is generally safe to remove Bluetooth drivers from your computer, especially if you are doing so to resolve an issue. Windows 10 is designed to handle driver installations and will typically reinstall the appropriate driver automatically once you reboot your system. However, before removing Bluetooth drivers, it’s advisable to ensure that you have alternative connection methods available, such as USB or wired connections, if needed.
That said, be aware that uninstalling Bluetooth drivers will temporarily disable Bluetooth functionality until the driver is reinstalled. If you are unsure about the process, consider creating a system restore point prior to making any changes. This way, if something goes wrong, you can revert your system to its previous state without lasting consequences.
Can I reinstall Bluetooth drivers manually after removing them?
Absolutely, you can manually reinstall Bluetooth drivers after removing them. If Windows 10 does not automatically reinstall the drivers upon restart, you can do so by visiting the manufacturer’s website for your Bluetooth adapter or laptop. Most manufacturers provide driver downloads in the support section of their websites. Locate your device and download the latest version of the Bluetooth driver that is compatible with your version of Windows 10.
Once downloaded, navigate to the file and run the installer. Follow the on-screen instructions to complete the installation process. After successfully reinstalling the drivers, it’s a good practice to restart your computer again to ensure everything is functioning correctly. You can then check the Device Manager to confirm that the Bluetooth driver is properly installed and functioning.
Bluetooth is often used to connect the computer with other Bluetooth devices (like a headset, speakers, mobile devices, etc.) or pair mobile devices to other mobile or fixed devices basically to share documents. If you are having issues with Bluetooth, then you can reinstall the Bluetooth Driver in Windows.
Bluetooth is an essential device in any system, and there can be several times that the Bluetooth of the Windows 11 and Windows 10 PC does not function correctly. However, at times, the Bluetooth device doesn’t work as expected, and you may have to reinstall the Bluetooth driver. This post will guide how to do that.
Why Bluetooth Causes Issues Sometimes?
Sometimes, the Bluetooth does not connect to the external devices or does not successfully pair with the Bluetooth of the secondary devices that may lead to problems. It could be due to corrupted Bluetooth adapter drivers. So, the best way to fix the Bluetooth-related issues is by reinstalling the Bluetooth driver. But first, you need to uninstall the Bluetooth drivers before opting to reinstall the latest version of the Bluetooth driver.

How to Uninstall and Reinstall Bluetooth Drivers in Windows
If the Bluetooth driver is incompatible or corrupt, you will not be able to connect your Bluetooth devices to Windows 11/10. Even if you can connect them to the Windows Bluetooth signal, you might face other issues like connection drops and reduced audio quality.
If that ever happens to you, read further to solve and fix those issues. There are two ways to perform this activity—reinstall the Bluetooth driver manually or reinstall the Bluetooth driver automatically.
How to Uninstall the Bluetooth Driver
To reinstall the drivers, we first need to uninstall them completely from our system. We can do this using Device Manager that allows you to view and manage your PC’s hardware.

So, firstly follow these steps given below to uninstall your current Bluetooth driver.
- Open the Run window by pressing Win + R on your keyboard.
- Type devmgmt.msc in the blank field and press the Enter Key
- Expand the Bluetooth category by double-clicking on it.
- Right-click on the Bluetooth driver and select the Uninstall device option.
- Select the Delete the driver software for this device option in the checkbox and click the Uninstall button.
- Restart your computer.
After the Bluetooth driver’s uninstallation is complete, you can reinstall the Bluetooth driver on Windows 11 and Windows 10.
Reinstalling Bluetooth driver manually.
You can manually install the driver by downloading from the OEM website or using the Device Manager to find a suitable driver.
Download driver from Bluetooth OEMs Website
If Windows does not automatically install the required Bluetooth driver, you can go to the PC manufacturer’s website to reinstall the Bluetooth driver manually by the given method.
- Please find the relevant Bluetooth driver as per your system requirement and download it.
- Run the setup file to install the Bluetooth driver on your Windows.
- Restart the computer after the installation is complete.
Reinstall using Device Manager

The Device Manager can also help to reinstall the Bluetooth drivers on your Windows 10. Here is how you can do it:
- Open Device Manager (Win + X, followed by M) > Click the Scan for hardware changes option from the top menu.
- Windows will now automatically detect the missing Bluetooth driver and then install it on your computer.
Reinstall using Windows Update

- Open Settings > Update & Security > Windows Update
- Look for a link—View optional updates under the update button.
- In the next Windows, expand the Driver Updates. It may have a list of updates available. You can choose to install if you are facing an issue manually.
Reinstalling Bluetooth driver automatically using Windows Update
The most appropriate method to reinstall the Bluetooth driver on your Windows 10 computer is the Windows Update process. To do this, you can follow the steps below:
- Open the Windows Settings > click on Update & Security > Windows Update > Check for updates button.
- Windows will automatically download the latest version of the Bluetooth driver.
It may not often be, but running into a Bluetooth issue is a possibility in Windows. Your first step should be to remove the connected Bluetooth device from Windows and pair it again. If this doesn’t work, then reinstalling the drivers might help you.
Install using Third-Party Driver Software
If nothing else works, you can use any third-party software in the list to download and install the latest version of the driver. You can also choose to install an older version that works with your version of Windows. These applications keep track of the latest releases and can automatically update the driver as they are released.
I hope the post was easy to follow, and you were able to reinstall the Bluetooth driver in Windows 11 and Windows 10.
Why did my Bluetooth disappear from Windows?
Method 1: Check the status of the Bluetooth service
- Right-click the Start menu, then select Device Manager.
- Ensure that there is a Bluetooth Device under the Network adapter and Bluetooth. If there is, then Bluetooth is installed on the computer.
Method 2: Re-enable your Bluetooth driver software in Device Manager
- You can open the quick-access menu by simultaneously pressing the Windows key and the X key on your keyboard.
- From there, click Device Manager.
- In the Bluetooth section, right-click the Bluetooth driver software. Select Disable device. If prompted, click Yes.
- Once it is done, right-click on the device again and choose Enable device this time.
- Hold down the Windows logo key and the I key together to bring up the Settings window on your keyboard. You should see an option for Bluetooth.
How do I uninstall Bluetooth drivers?
- Open the Run window by pressing Win + R on your keyboard.
- Type devmgmt.msc in the blank field and press the Enter Key
- Expand the Bluetooth category by double-clicking on it.
- Right-click on the Bluetooth driver and select the Uninstall device option.
- Select the Delete the driver software for this device option in the checkbox and click the Uninstall button.
- Restart your computer.
Is it correct to leave Bluetooth on all the time?
Certainly not. Bluetooth should be turned off when not in use as it can be an entry point for hackers to get into your device. It was okay to leave the wireless connection on before hackers discovered a new way to access people’s phones via Bluetooth.

Bluetooth adapter helps to connect the PC to other Bluetooth devices (like a headset, speakers, mobile devices, etc) that facilitates data transfer wirelessly. There can be several times that the Bluetooth of the Windows 10 computer does not function correctly. On numerous occasions, the Bluetooth does not connect to the external devices or does not successfully pair with the Bluetooth of the secondary devices.
This could be due to corrupted Bluetooth adapter drivers. The best way to fix the Bluetooth related issues is by reinstalling the Bluetooth driver. You need to uninstall the Bluetooth drivers before opting to reinstall the latest version of the Bluetooth driver.
This article will take you through the various methods to reinstall Bluetooth drivers on your Windows 10 system.
You can go through the complete guide on how to reinstall Bluetooth drivers below.
Method 1: Uninstalling the Bluetooth Driver
Before reinstalling the Bluetooth drivers, you have to uninstall the Bluetooth driver. This is how you can do it:
Step 1: First of all, you have to open the Device Manager. Search for the Device Manager in the Windows search box.
Step 2: Locate the Bluetooth component first.
Step 3: Expand the Bluetooth category by double-clicking on it. It will display all the network adapters associated with your computer.
Step 4: Right-click on the Bluetooth driver and select the “Uninstall device” option from the context menu.
Step 5: When you get the prompt to confirm your action, then hit the “Uninstall” button and tick the box stating “Delete the driver software for this device.”
Step 6: Wait for the uninstallation process to complete.
Step 7: After the Bluetooth driver uninstalls, all you need to do is just give your system a restart.
Also Know: How To Fix “Bluetooth Peripheral Device Driver Not Found” Error
Method 2: Reinstall the Bluetooth Driver on Windows 10 Computer
After the uninstallation of the Bluetooth driver is complete, then you can reinstall the Bluetooth driver on your Windows 10 system. There are multiple ways to do so:
Way 1: Via the PC Manufacturer’s Bluetooth Website
You can go to the PC manufacturer’s website to reinstall the Bluetooth driver manually. But you will need to dedicate your time to this.
You can find the relevant Bluetooth driver as per your system requirement and download it. Furthermore, you can run the setup file to install the Bluetooth driver on your Windows 10 PC. You can keep following the on-screen instructions to finish the process of uninstallation.
Finally, restart the Windows 10 PC and connect your Bluetooth devices with your PC.
Way 2: Via Windows Update
Another method to reinstall the Bluetooth driver on your Windows 10 computer is via the Windows Update process. To do this, you can follow the steps below:
- Launch the Windows Settings.
- Click on the “Update & Security” section on the Settings app.
- Click on the Windows Update and then press on the “Check for Updates” button.
- Windows will automatically download the latest version of the Bluetooth driver.
- Restart your system later.

Also Read: How to Update Outdated Drivers on Windows 10, 8, 7
Way 3: Via the Device Manager
The Device Manager can also be used to reinstall the Bluetooth drivers on your Windows 10 PC. Here is how you can do it:
- You can go to the Action tab of the Device Manager.
- Click the “Scan for hardware changes” option.
- Windows will automatically detect the missing Bluetooth driver and then install it on your PC.
Way 4: Via the Best Driver Updater Tool
The best way to install the Bluetooth driver again on your PC after uninstalling it is with the help of the best free driver updater program.
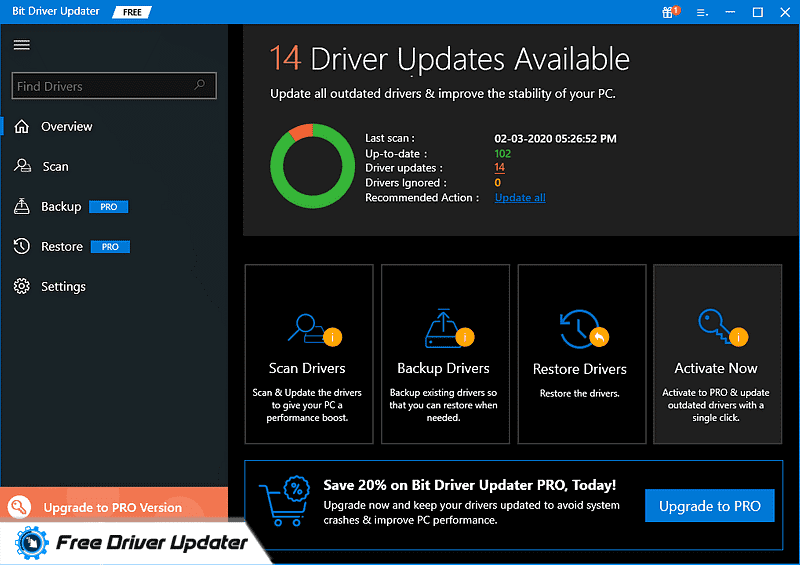
You can install an effective program like the Bit Driver Updater tool on your system. This driver updater tool is capable of scanning and detecting the missing drivers on your system. You can click the Update button available in the tool and then the tool will automatically download and reinstall the latest Bluetooth driver on your Windows 10 system.
Final Words: Uninstalled and Reinstalled Bluetooth Driver Successfully!
From this blog, you have learned how to uninstall and reinstall the Bluetooth driver successfully. This is the best way to solve the problem with the built-in Bluetooth adapter when it is not functioning properly.
Let us know if you have any other suggestions or queries. We look forward to your comments, suggestions, and questions.