
Удаление файлов и папок в OneDrive
Applies ToOneDrive (для работы или учебы) «Мой Office» для iPhone OneDrive (для дома или персональный) OneDrive (для работы или учебы), предоставляемый 21Vianet OneDrive для Mac OneDrive для Windows
Вы можете удалить определенные файлы или фотографии в Microsoft OneDrive или удалить целые папки и все элементы в них. При необходимости вы можете восстановить удаленные файлы из корзины OneDrive.
-
На панели задач выберите проводник .
-
Выберите папку OneDrive, выберите элементы, которые нужно удалить, и нажмите клавишу Delete на клавиатуре.

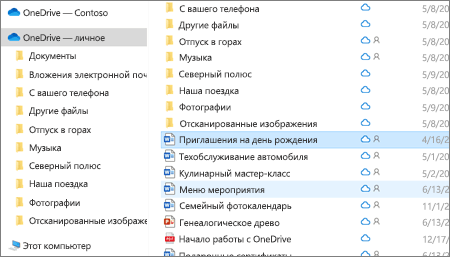
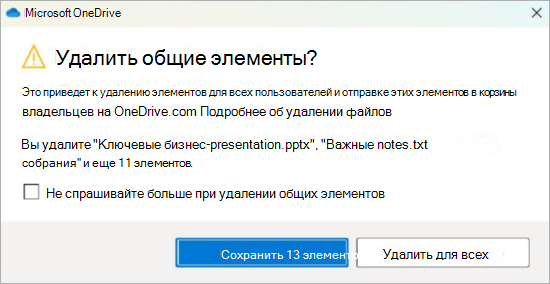
При удалении элемента, к которому был предоставлен общий доступ, вы удалите его для всех. OneDrive может предложить вам подтвердить, было ли это намеренно:
Удаление из OneDrive, но не с компьютера
Если вы хотите сохранить файл, фотографию или папку на компьютере, но не на OneDrive, используйте средство поиска проводник или Mac, чтобы переместить файл за пределы папки OneDrive в другую папку на компьютере.
Удаление с компьютера, но не с OneDrive
Если вы хотите сохранить файл, фотографию или папку на OneDrive, но не на компьютере (так как вы не хотите, чтобы он занимает место), поместите файл в папку OneDrive, а затем включите параметр Файлы по запросу (Windows) или Файлы по запросу (Mac). Файл по-прежнему будет отображаться в папке OneDrive на компьютере, но он не займет места на жестком диске.
Вы также можете выбрать папки OneDrive для синхронизации с компьютером , чтобы на компьютере отображались только определенные папки.
Удаление с OneDrive и компьютера
Если файл или папка в вашей OneDrive, используйте проводник или Mac Finder, чтобы найти и удалить файл, фотографию или папку.
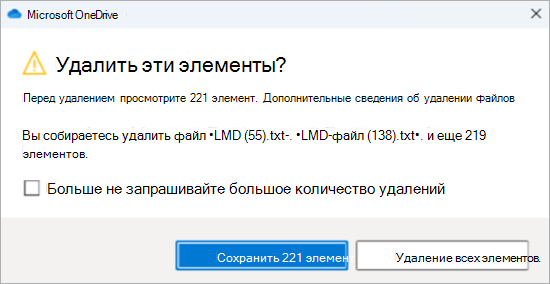
При одновременном удалении большого количества файлов OneDrive может предложить подтвердить, было ли это намеренно.
После удаления файлов из OneDrive и корзины OneDrive может возникнуть небольшая задержка при просмотре, что отражается в доступности хранилища вашей учетной записи OneDrive.
Войдите в учетную запись Майкрософт и просмотрите квоту хранилища.
Примечание: Если срок действия подписки На Microsoft 365 истек, вам потребуется продлить подписку, чтобы снова получить ту же квоту хранилища.
Войти
См. также
Восстановление удаленных файлов и папок в OneDrive
Восстановление предыдущей версии файла, хранящегося в OneDrive
Восстановление OneDrive
Выбор папок OneDrive для синхронизации с компьютером
Дополнительные сведения
Нужна дополнительная помощь?
Нужны дополнительные параметры?
Изучите преимущества подписки, просмотрите учебные курсы, узнайте, как защитить свое устройство и т. д.
Clearing the OneDrive cache on Windows 10 can help resolve various issues, like synchronization problems or corrupted files. This quick guide will walk you through the process. Grab your mouse and keyboard, and let’s get started!
The following steps will help you clear the OneDrive cache on your Windows 10 computer. This process involves stopping OneDrive, deleting specific files, and then restarting the application. Don’t worry; it’s straightforward!
Step 1: Stop OneDrive
First, you need to stop OneDrive from running.
Right-click the OneDrive icon in the system tray, then select «Close OneDrive.»
Stopping OneDrive ensures that no files are in use or locked by the application. This step is crucial to avoid any conflicts while deleting cached files.
Step 2: Open File Explorer
Next, open File Explorer.
Press the Windows key + E to open File Explorer directly.
File Explorer is where you navigate to the OneDrive cache folder. Knowing your way around File Explorer makes the following steps easier.
Step 3: Navigate to the OneDrive Folder
Find the OneDrive folder on your system.
Go to C:UsersYourUsernameAppDataLocalMicrosoftOneDrive.
This path leads you directly to the location where OneDrive caches files. Make sure you replace «YourUsername» with your actual username.
Step 4: Delete the Cache Folder
Locate and delete the cache folder.
Find the folder named «Cache» and press Delete.
Deleting this folder removes all cached files, which can resolve sync issues and refresh OneDrive’s local cache.
Step 5: Restart OneDrive
Finally, restart OneDrive.
Click Start, type «OneDrive,» and hit Enter to open the app.
Restarting OneDrive will prompt it to rebuild the cache from scratch, ensuring a fresh start.
After completing these steps, OneDrive will create a new cache folder. This should fix any issues you were experiencing, like sync problems or corrupted files.
Tips for Clearing OneDrive Cache Windows 10
- Make sure you back up important files before deleting the cache to avoid accidental data loss.
- Ensure you have administrative rights on your computer to delete system folders.
- Regularly clearing the cache can help keep OneDrive running smoothly.
- If issues persist, consider reinstalling OneDrive.
- Always keep OneDrive and Windows updated to minimize potential glitches.
Frequently Asked Questions
Why should I clear my OneDrive cache?
Clearing the cache can resolve sync issues, remove corrupted files, and free up space.
Will deleting the cache delete my files on OneDrive?
No, it won’t delete your files on OneDrive. It only removes local cached copies.
How often should I clear my OneDrive cache?
There’s no set frequency, but doing it once every few months can help maintain performance.
What if I can’t find the AppData folder?
AppData is a hidden folder. You need to enable «Show hidden files» in File Explorer settings.
Can I automate the cache clearing process?
There isn’t a built-in method, but you can use scripts to automate this task if you’re comfortable with coding.
Summary
- Stop OneDrive.
- Open File Explorer.
- Navigate to the OneDrive folder.
- Delete the cache folder.
- Restart OneDrive.
Conclusion
Clearing the OneDrive cache on Windows 10 is a straightforward process that can help resolve various issues, from synchronization problems to corrupted files. By following the simple steps outlined above, you can ensure that your OneDrive runs smoothly and efficiently.
Regular maintenance, such as clearing the cache, is vital for keeping your system in top shape. If you encounter persistent issues, don’t hesitate to explore further troubleshooting steps or seek professional help. Keeping your software up-to-date and performing regular clean-ups can prevent many common problems.
For more tips on maintaining your Windows 10 system and getting the most out of OneDrive, keep an eye out for our future articles. Happy caching!
Kermit Matthews is a freelance writer based in Philadelphia, Pennsylvania with more than a decade of experience writing technology guides. He has a Bachelor’s and Master’s degree in Computer Science and has spent much of his professional career in IT management.
He specializes in writing content about iPhones, Android devices, Microsoft Office, and many other popular applications and devices.
Read his full bio here.
(Updated 02-11-2024)
As mentioned in earlier posts, the majority of my colleagues have 2 GB of storage space in their OneDrive and some struggle to stay within those limits.
So, we are currently helping them with cleaning up and giving them some tips on how to keep within boundaries. It may be interesting for you as well!
1. Empty the Recycle Bin
You may want to start with a clean slate, so let’s empty the Recycle Bin first. If, during cleaning, you accidentally delete too much, you will have fewer documents to search through for restoring. Also, emptying the recycle bin will free up space!

2. Check the size of your OneDrive
It helps to know how much stuff you have, and how much you need to remove. So, click on the Gear wheel top right, click “OneDrive settings” and then select “More settings”. You will pass a useful screen with notification options – worth looking at but out of scope for this post.
Then click “Storage metrics”.

On the next page you will see the lists in your OneDrive site collection (it is a SharePoint site collection, after all) and the amount of free space is shown top right.

3. Move shared documents to SharePoint or Teams
Sharing documents in OneDrive to collaborate on is great as long as the document is not final. Once it is final, please move it to a SharePoint site so it can be part of the team’s collective knowledge and make room in your OneDrive.
Do not hoard shared OneDrive documents – if you leave the organization your OneDrive will disappear with all its content. (After a period when your manager can access it.) We frequently get questions about lost shared documents as many people appear not to be aware of this. 😦
Do you plan on leaving the organization soon? Check out this post to see what to do – and start now.
So, check out which documents you share and with whom. Do you still need them at all? Do you still need to share them or are they ready to live elsewhere?

If you want to move the documents to SharePoint, go back to your “My One Drive” section, select them and then click “Move To” from the grey bar and select the SharePoint site where they will live. (Make sure you follow that site so it appears as one of your first choices). The documents will be deleted from your OneDrive in the process. (If you want to know how Copy To and Move To work, read my earlier post and also my post about the risks)

If you have many documents to move, you may either want to do it in smaller batches or use Copy To and delete the documents after you have checked that they have all safely arrived at their SharePoint destination.
And if you no longer need the documents you share, you can just delete them.
4. Create or Request a SharePoint or Teams site
In case you have no location at your disposal, create or request a SharePoint site or a Team (which comes with a SharePoint site) so you can share documents with your project team or department.
5. Find the largest and the oldest documents
Unfortunately you will have to do this by folder, as you can not create views without folders. Although OneDrive is a SharePoint site, it misses some cool SharePoint functionality, such as the option to add metadata columns and create views, or the possibility to add templates. (note to self: submit to User Voice 🙂 )
The following paragraph has been added in May 2020:
* Please be aware that Microsoft365 adds folders to your OneDrive when you use certain applications. The “Attachments” folder to store email attachments is one, but Apps (contains Forms documents), Microsoft Teams Data, Microsoft Teams Chat files and Pictures can also contain a lot of documents that you may not be aware of. Read my post on this topic*
Open a folder and click on the pull-down arrow next to the File size column and click on “Larger to smaller”. Determine whether the largest files need to stay on your OneDrive. They may fit on your SharePoint or Teams site as well, so you can Move them there, or perhaps they can be deleted.

Then sort for the oldest documents by clicking the pull-down arrow next to the Modified column and selecting “Older to newer”. Generally you will have accumulated quite a lot of documents in your career. When projects have been completed or interest has waned, you might as well move them to a SharePoint archive site, a records center (in that case they should have been moved there long ago!) or delete them.
6. Remove versions
This can make sense for very large documents that you have worked on intensively and that you want to keep. There may be several versions that take up space.
Select the document, click the … to the right of the name, and select “Version History” from the menu.

You will now see the versions.
If you are still working on the document, it may be safer to remove the oldest versions only.

If your document is final, you can delete all versions and keep the latest version only. If there are many versions involved, the quickest route is to go to the Storage Metrics (see par. 2), click on “Documents” and drill down until you see the document.

Click “Version history” on the right of the document and then you will see an option to delete all versions in one go, leaving the last one.

7. Move private files to a personal location
While it is all too common to have a mix of private and organizational docs on your systems, your OneDrive is primarily meant for organizational stuff. Your private info should not be here, especially if it takes up valuable storage space. You also do not want to lose it when you leave the organization, right? So, move your personal files and photo’s to your private OneDrive (now with extra-secure Personal Vault), iCloud, Google Drive, a USB stick or another place.
8. Empty the Recycle Bin and check storage
Hopefully this has helped you get below that 2 GB. If you, you need to repeat and be a little more strict this time around!
9. Repeat regularly
In order to stay below the limit, go through these steps again on a regular basis.
10. Bonus tip: Give your folders different colours
(Added December 2023)
If you have many folders and would like to see in one glance what is what, you can now give your folders different colours. How cool is that?
Greg Zelfond explains how to do it and what to look out for: https://sharepointmaven.com/how-to-color-code-folders-in-sharepoint-and-onedrive/
11. Bonus tip: Remove outdated Microsoft Lists
(Added November 2024)
With the introduction of Microsoft Lists another element has been added to your OneDrive site. (That is the SharePoint site around the Document Library that you know as your OneDrive).
You can find the Site Contents for your OneDrive with this URL (where you replace my name and tenant name with yours):
https://ellenvanaken-my.sharepoint.com/personal/ellen_ellenvanaken_onmicrosoft_com/_layouts/15/viewlsts.aspx?view=14
Lists will have a name like “Event_4c67fc13-24ce-4440-9dfc–5582bdd052d8″ and you can delete them with the : after the name, or from the MicrosoftLists landing page. They are generally not too heavy in GB’s but it will be less clutter.

What a List looks like in Site Settings and how to delete it.
If you need to move a list to a SharePoint site, try exporting it to Excel and them importing the Excel in the Microsoft Lists application. It does not always work correctly but that is currently the best you can do.
12. Bonus tip: Move or delete Personal SharePoint Pages
(Added November 2024)
Your Personal SharePoint Pages live in a SitePages library in your OneDrive site. You can find it by using the Site Contents URL as mentioned above. Check if they are still relevant and recreate them in a SharePoint site if they are or should be shared. They will not take up tons of space, but it is less clutter!
13. Bonus tip: Clean up your Site Assets library
(Added November 2024)
With the introduction of Personal SharePoint Pages, you may have images added to your Site Assets library. When you use an image from Web Search, or upload your own image, OneDrive will create a new folder called “Site Pages” which will contain one folder per page containing the image(s). I blogged about this earlier. This may be a hidden source of growth of your OneDrive site. Open the library and remove the images you no longer need.
Do you have tips?
Do you have experience with colleagues whose OneDrive fills up quickly? Any suggestions that we can use?
Nowadays, almost every website and application builds a cache. The cache is useful to reduce resource load time and increase efficiency. OneDrive is no exception. OneDrive app builds a cache to simplify the file syncing process and make it quick.
Cleaning OneDrive cache is important. However, with deduplication of OneDrive you can clear a lot of storage space and organize your One drive files. You can use the Sorcim’s Cloud Duplicate Finder web-app.
However, if your Internet connection drops constantly while your files are being synced online, it can cause the cache to become corrupted. When that occurs, the file sync may not work smoothly or OneDrive may behave unexpectedly. The solution is to clean up your cache.
Cleaning Up OneDrive Cache
Unfortunately, some OneDrive editions (such as desktop and iOS apps) do not have a direct option to clean up your cache. To clean the cache on your desktop app, you would need to reset the application or reinstall it. To clean the OneDrive cache on an iOS-based device, you would need to reinstall it. This will fix any underlying issues and you will need to sign in to your account again.
If you’re using the OneDrive app on an Android smartphone, it’s simple and straightforward. There is a direct way to clean up your cache without impacting the app configuration or reinstalling the app.
Will I Lose Any Data While Cleaning Cache, or Resetting/ Reinstalling OneDrive App?
Short & simple answer: No, you would not.
Cleaning up the OneDrive cache, resetting the OneDrive app or reinstalling OneDrive does not affect any data stored on your OneDrive cloud account. It only deletes the local files downloaded from the OneDrive server, along with the cache and other app configurations. Your files on the OneDrive cloud account will be accessible as before.
A] Reset OneDrive in Windows
OneDrive Sync App for Desktop
Method 1: Using Command Prompt
- Click on the Search box on the taskbar.
- Type Command Prompt in the search box and open it.
- In the Command Prompt window, type wsreset.exe
- Press Enter.
- Once the command executes, close the Command Prompt. It may take around 10 seconds.
Method 2: Using Command Prompt
- Open Command Prompt.
- Type the following command: %localappdata%\Microsoft\OneDrive\onedrive.exe /reset
- Press Enter.
Note: If the above command didn’t work, your app path may be different. Try one of the following alternate commands:
- C:\Program Files\Microsoft OneDrive\onedrive.exe /reset
- C:\Program Files (x86)\Microsoft OneDrive\onedrive.exe /reset
Method 3: Reinstall OneDrive
For Windows 11:
- Click the Start button and then select Settings.
- Click on the Apps tab, followed by Apps & Features.
- Scroll down and locate the Microsoft OneDrive application.
- Click on More > Uninstall.
- Re-install the OneDrive app.
For Windows 10:
- Click on the Start button.
- Right-click on the OneDrive app.
- Select the Uninstall option.
- Re-install the OneDrive app.
OneDrive Microsoft Store App
Microsoft Store is available for only Windows 10 and Windows 11 users. If you’re already using OneDrive from the Microsoft Store, there is a direct way to reset it.
- Click on the Start button.
- Type the following: apps:onedrive
- Click on App Settings > Reset.
B] Reset OneDrive Mac App
- Exit OneDrive.
- Click on the cloud icon on the top tray.
- Choose Settings > Quit OneDrive.
- Locate the OneDrive application from the Applications folder.
- Right-click on the OneDrive app and select Show package contents.
- Select Contents > Resources.
- Double-click on ResetOneDriveApp.command or ResetOneDriveAppStandalone.command
C] Clear OneDrive Android App Cache
- Open the main menu.
- Tap on Settings.
- Tap on Applications > Manage Applications.
- Scroll down and tap the OneDrive app.
- Tap on Force Stop.
- Tap on the Clear Cache button.
- Did that fix your OneDrive issue? If not, repeat the above steps and then tap on the Clear Data button.
D] Reset OneDrive iOS App
- Press and hold the OneDrive icon.
- Tap on the X symbol.
- When you’re prompted to confirm, tap the Delete App option.
- Press and hold the Sleep/ Wake and Home buttons together. Release them after 8-12 seconds.
- Now re-install the OneDrive app from the App Store.
Файловое хранилище от компании Microsoft вообще-то ничем не хуже конкурентов. Но очень часто бывает так, что пользователь уже давно использует для хранения своих файлов Dropbox или Google Drive и отказываться от них не собирается. В этом случае OneDrive в Windows 10 можно рассматривать в качестве лишнего груза, от которого необходимо избавиться. В этой статье вы узнаете, как это сделать.
Программа OneDrive входит в стандартный состав Windows 10, так что вы становитесь её обладателем даже без своего согласия. Обнаружив в системном лотке новый значок в виде облачка, опытный пользователь непременно щёлкнет по нему правой кнопкой мыши и выберет пункт «Выход». Однако этой меры будет явно недостаточно, и фоновые процессы, обеспечивающие функционирование этой службы, всё равно останутся запущенными.
В том случае, если вы не используете сейчас и не собираетесь в будущем использовать OneDrive, можно полностью удалить соответствующее приложение со своего компьютера. Однако перед тем как начать, хочу обратить ваше внимание, что эта служба интегрирована в систему. В моём случае удаление OneDrive прошло гладко и без последствий, но это не даёт гарантию, что точно так же произойдёт у вас.
Внимание!
OneDrive является одним из системных компонентов Windows 10. Редакция и автор не несут ответственности за возможные последствия, которые могут наступить в случае удаления программы.
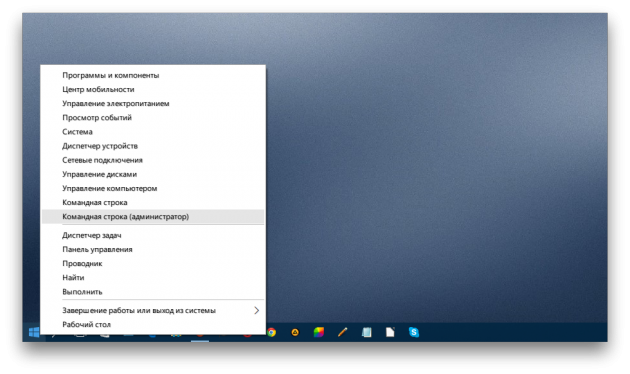
1. Откройте окно терминала с правами администратора. Для этого щёлкните правой кнопкой мыши по кнопке «Пуск» и выберите в появившемся меню пункт «Командная строка (администратор)».
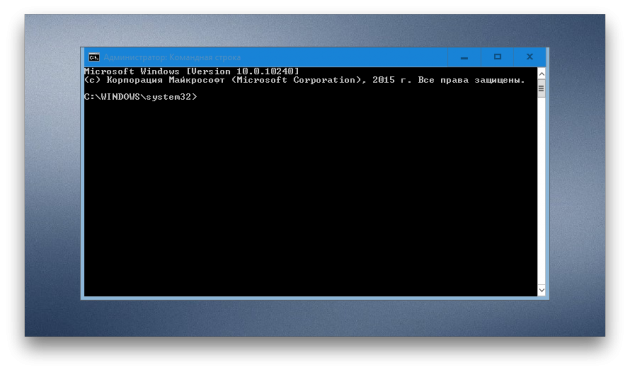
2. Выгрузите из памяти OneDrive следующей командой:
taskkill /f /im OneDrive.exe
3. Введите команду деинсталляции программы OneDrive. Для 32-битных систем она будет следующая:
%SystemRoot%\System32\OneDriveSetup.exe /uninstall
А для 64-битных — такая:
%SystemRoot%\SysWOW64\OneDriveSetup.exe /uninstall
После этого вы не увидите никаких диалоговых окон или полос прогресса, удаление происходит в тихом режиме. Однако если вы попробуете найти и запустить программу OneDrive, то это у вас не получится. В то же время папка этого приложения с хранящимися там файлами останется на вашем компьютере.
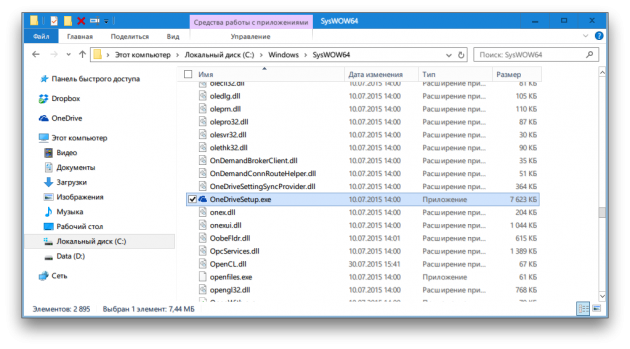
Если же в будущем вы измените своё мнение и решите использовать OneDrive, то вернуть программу на место не составит никакого труда. Откройте «Проводник», введите в адресную строку %SystemRoot%\SysWOW64\ и запустите в целевом каталоге файл OneDriveSetup.exe.
А вы используете файловый сервис от компании Microsoft или предпочитаете конкурентов? Почему?