
If the copy of VMware Tools got corrupted, you couldn’t perform a successful update and there will be some residual files. These residual files will prevent you from reinstalling VMware Tools. Thus, you need to uninstall VMware Tools completely first. This tutorial provides 4 ways.
VMware Tools is a set of services and modules that enable multiple features of VMware products to better manage guest operating systems and enable seamless user interaction with them. However, some users want to uninstall VMware Tools for the following reasons:
- After upgrading VMware Fusion, the VMware Tools installer does not launch automatically when Windows boots.
- The VMware Tools installer fails to launch even after you click Install VMware Tools in the Virtual Machine menu.
- VMware Tools does not install correctly.
Below are the error messages you may receive:
Error: “The feature you are trying to use is on an unavailable network resource. Click OK to try again, or enter an alternate path to a folder containing the installation package “VMware Tools64.msi” in the box below.
Error: VGAuthservice and Alias Manager cannot be installed.
Error: A network error occurred while attempting to read from the file C:\Windows\Installer\VMware Tools.msi.
Next, let’s see how to remove VMware Tools on Windows 11/10.
Way 1: Via MiniTool System Booster
How to uninstall VMware Tools Windows 11? First, you can try a professional uninstall tool – MiniTool System Booster. It can uninstall any programs such as Windows built-in apps, any stubborn programs, bloatware, bundled software, etc.
It can also disable startup items, permanently delete files, wipe the entire drive, recover accidentally deleted files, optimize your Internet speed, etc. Now, we will introduce how to uninstall VMware Tools with MiniTool System Booster.
Step 1: Download and install the MiniTool System Booster Trial edition. Then, you can use it free for 15 days.
MiniTool System Booster TrialClick to Download100%Clean & Safe
Step 2: Launch it to enter its main interface and click the drop-down menu to choose Toolbox.
Step 3: Under the File Management part, choose Advanced Uninstaller.
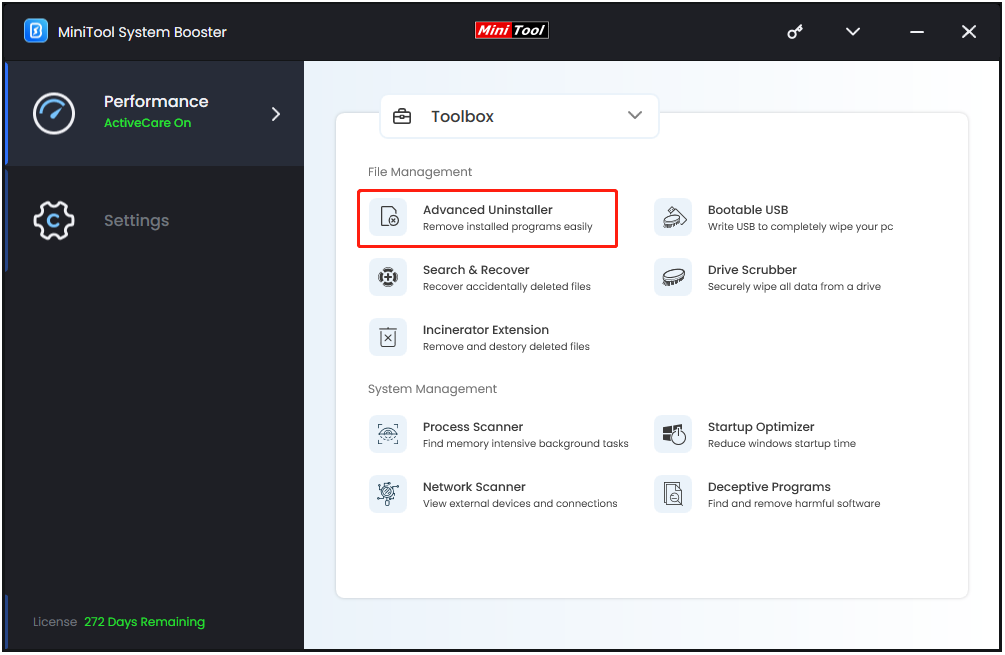
Step 4: Then, you can see the installed programs have been listed. Find VMware Tools and click the UNINSTALL button

Step 5: After uninstalling VMware Tools, you can perform a deep cleanup to remove the resident files and free up space including cleaning up the Windows, registry, internet, RAM, and more.
Way 2: Via Control Panel
If you prefer using Control Panel, that option is still available in both Windows 10 and Windows 11. Follow the steps to uninstall VMware Tools via Control Panel.
Step 1: Type Control Panel in the Search box and click Open to launch it.
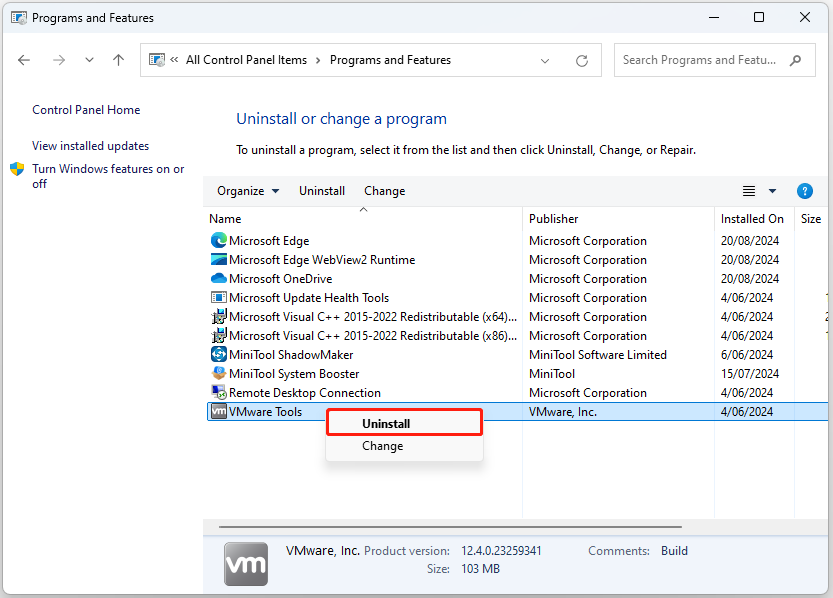
Step 2: Change the view method to Category. Click Uninstall a program under the Programs part.
Step 3: Find and right-click VMware Tools and click Uninstall.
Step 4: Follow the on-screen instructions to uninstall it.
Way 3: Via Settings
Another method to uninstall VMware Tools Windows 11 from your PC includes using the Settings application to access the installed apps.
Step 1: Press the Windows + I keys together to open Settings.
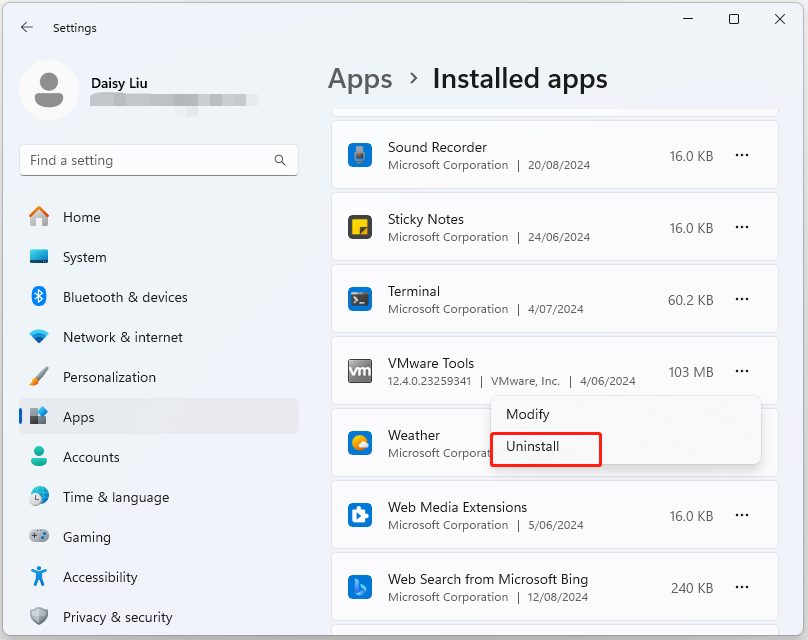
Step 2: Go to App > Installed apps. The installed apps are listed here including the Windows pre-installed programs.
Step 3: Find VMware Tools and you click the app menu (three-dots) button. Then, click the Uninstall button.
Way 4: Manually Delete VMware Tools
In addition to the above methods to remove VMware Tools, you can also delete VMware Tools manually. Here are the steps for that:
Step 1: Launch VMware Playstation and power on the Virtual Machine.
Note:
Please back up the virtual machine before proceeding with the further steps.
Step 2: Press the Windows + E keys together to open File Explorer.
Step 3: Manually delete VMware Tools installation files under these locations:
- C:\Program Files\VMware
- C:\Program Files\Common Files\VMware
- C:\Program Data\VMware
- C:\users\username\App data\VMware
Step 4: Then, press the Windows + R keys together to open the Run dialogue box. Type regedit in it and click OK.
Stpe 5: Go to the following path:
HKEY_LOCAL_MACHINE\SYSTEM\CurrentControlSet\Services

Step 6: Delete all VMware-related items including vmci, vm3dmp, vmaudio, vmhgfs, vmmemctl, vmmouse, VMRawDisk, VMTools, vmusbmouse, vmvss, vmware physical disk helper services, VMwareCAF*.
Step 7: Go to HKEY_LOCAL_MACHINE\SOFTWARE\VMware.Inc and delete the Delete VMware.Inc folder.
Step 8: Open Device Manager and remove the VMware SVGA driver. Then, restart your PC.
After removing Vmware Tools completely, you can reinstall it to experience the latest features. Here is how to do that:
Step 1: Run your VMware Workstation as the administrator.
Step 2: Log in to one of the virtual machines and wait for it to load.
Step 3: Go to the VM tab and click the Reinstall VMware Tools… option to continue.
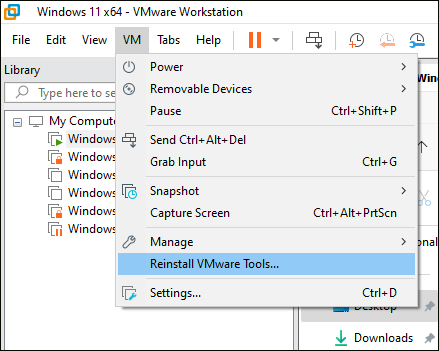
Step 4: Wait for it to finish the reinstallation.
Related post: Install VMware Tools Greyed Out? Easy and Useful Fixes Here!
Bottom Line
We have shown you how to uninstall VMware Tools. Just try one way to fully uninstall it if you have a need. It’s recommended to choose the MiniTool software. Besides, you can also know how to reinstall VMware Tools.
# This script will manually rip out all VMware Tools registry entries and files for Windows 2008-2019
# Tested for 2019, 2016, and probably works on 2012 R2 after the 2016 fixes.
# This function pulls out the common ID used for most of the VMware registry entries along with the ID
# associated with the MSI for VMware Tools.
function Get-VMwareToolsInstallerID {
foreach ($item in $(Get-ChildItem Registry::HKEY_CLASSES_ROOT\Installer\Products)) {
If ($item.GetValue(‘ProductName‘) -eq ‘VMware Tools‘) {
return @{
reg_id = $item.PSChildName;
msi_id = [Regex]::Match($item.GetValue(‘ProductIcon‘), ‘(?<={)(.*?)(?=})‘) | Select-Object —ExpandProperty Value
}
}
}
}
$vmware_tools_ids = Get-VMwareToolsInstallerID
# Targets we can hit with the common registry ID from $vmware_tools_ids.reg_id
$reg_targets = @(
«Registry::HKEY_CLASSES_ROOT\Installer\Features\«,
«Registry::HKEY_CLASSES_ROOT\Installer\Products\«,
«HKLM:\SOFTWARE\Classes\Installer\Features\«,
«HKLM:\SOFTWARE\Classes\Installer\Products\«,
«HKLM:\SOFTWARE\Microsoft\Windows\CurrentVersion\Installer\UserData\S-1-5-18\Products\«
)
$VMware_Tools_Directory = «C:\Program Files\VMware«
$VMware_Common_Directory = «C:\Program Files\Common Files\VMware«
# Create an empty array to hold all the uninstallation targets and compose the entries into the target array
$targets = @()
If ($vmware_tools_ids) {
foreach ($item in $reg_targets) {
$targets += $item + $vmware_tools_ids.reg_id
}
# Add the MSI installer ID regkey
$targets += «HKLM:\SOFTWARE\Microsoft\Windows\CurrentVersion\Uninstall\{$($vmware_tools_ids.msi_id)}«
}
# This is a bit of a shotgun approach, but if we are at a version less than 2016, add the Uninstaller entries we don’t
# try to automatically determine.
If ([Environment]::OSVersion.Version.Major -lt 10) {
$targets += «HKCR:\CLSID\{D86ADE52-C4D9-4B98-AA0D-9B0C7F1EBBC8}«
$targets += «HKLM:\SOFTWARE\Microsoft\Windows\CurrentVersion\Uninstall\{9709436B-5A41-4946-8BE7-2AA433CAF108}«
$targets += «HKLM\SOFTWARE\Microsoft\Windows\CurrentVersion\Uninstall\{FE2F6A2C-196E-4210-9C04-2B1BC21F07EF}«
}
# Add the VMware, Inc regkey
If (Test-Path «HKLM:\SOFTWARE\VMware, Inc.«) {
$targets += «HKLM:\SOFTWARE\VMware, Inc.«
}
# Add the VMware Tools directory
If(Test-Path $VMware_Tools_Directory) {
$targets += $VMware_Tools_Directory
}
# Thanks to @Gadgetgeek2000 for pointing out that the script leaves some 500mb of extra artifacts on disk.
# This blob removes those.
If(Test-Path $VMware_Common_Directory) {
$targets += $VMware_Common_Directory
}
# Create a list of services to stop and remove
$services = Get-Service —DisplayName «VMware*«
$services += Get-Service —DisplayName «GISvc«
# Warn the user about what is about to happen
# Takes only y for an answer, bails otherwise.
Write-Host «The following registry keys, filesystem folders, and services will be deleted:«
If (!$targets -and !$services ) {
Write-Host «Nothing to do!«
}
Else {
$targets
$services
$user_confirmed = Read-Host «Continue (y/n)«
If ($user_confirmed -eq «y«) {
# Stop all running VMware Services
$services | Stop-Service —Confirm:$false
# Cover for Remove-Service not existing in PowerShell versions < 6.0
If (Get-Command Remove-Service —errorAction SilentlyContinue) {
$services | Remove-Service —Confirm:$false
}
Else {
foreach ($s in $services) {
sc.exe DELETE $($s.Name)
}
}
# Remove all the files that are listed in $targets
foreach ($item in $targets) {
If(Test-Path $item) {
Remove-Item —Path $item —Recurse
}
}
Write-Host «Done. Reboot to complete removal.«
}
Else {
Write-Host «Failed to get user confirmation«
}
}
Are you in need of uninstalling VMware Tools to fix some problems? Are you looking for an effective solution to completely uninstall it and thoroughly delete all of its files out of your PC? No worry! This page provides detailed instructions on how to completely uninstall VMware Tools.
Possible problems when you uninstall VMware Tools
* VMware Tools is not listed in Programs and Features.
* You do not have sufficient access to uninstall VMware Tools.
* A file required for this uninstallation to complete could not be run.
* An error has occurred. Not all of the files were successfully uninstalled.
* Another process that is using the file stops VMware Tools being uninstalled.
* Files and folders of VMware Tools can be found in the hard disk after the uninstallation.
VMware Tools cannot be uninstalled due to many other problems. An incomplete uninstallation of VMware Tools may also cause many problems. So, it’s really important to completely uninstall VMware Tools and remove all of its files.
How to Uninstall VMware Tools Completley?
Method 1: Uninstall VMware Tools via Programs and Features.
When a new piece of program is installed on your system, that program is added to the list in Programs and Features. When you want to uninstall the program, you can go to the Programs and Features to uninstall it. So when you want to uninstall VMware Tools, the first solution is to uninstall it via Programs and Features.
Steps:
a. Open Programs and Features.
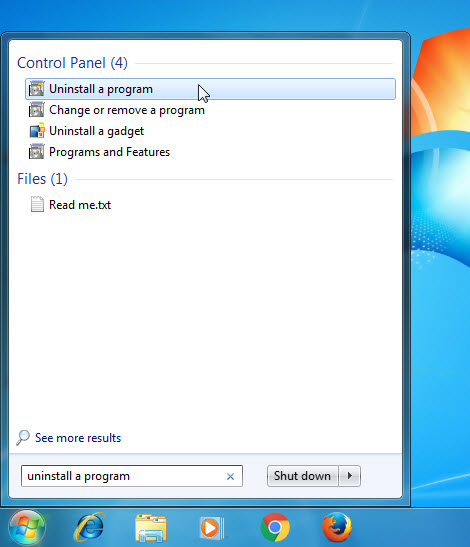
Windows Vista and Windows 7
Click Start, type uninstall a program in the Search programs and files box and then click the result.
Windows 8, Windows 8.1 and Windows 10
Open WinX menu by holding Windows and X keys together, and then click Programs and Features.
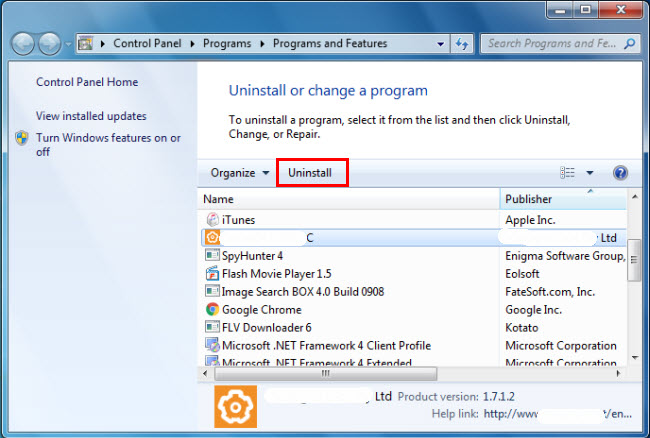
b. Look for VMware Tools in the list, click on it and then click Uninstall to initiate the uninstallation.
Method 2: Uninstall VMware Tools with its uninstaller.exe.
Most of computer programs have an executable file named uninst000.exe or uninstall.exe or something along these lines. You can find this files in the installation folder of VMware Tools.
Steps:
a. Go to the installation folder of VMware Tools.
b. Find uninstall.exe or unins000.exe.
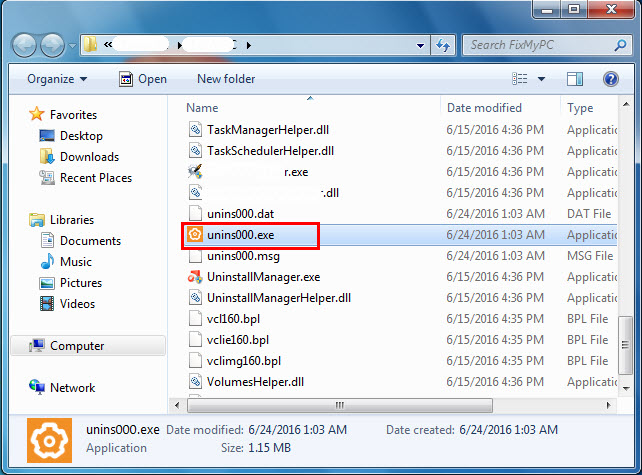
c. Double click on its uninstaller and follow the wizard to uninstall VMware Tools.
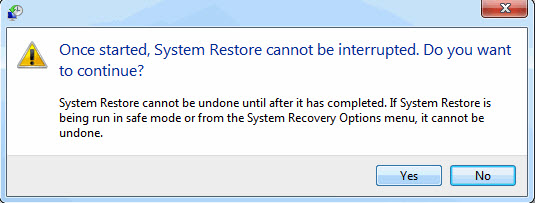
Method 3: Uninstall VMware Tools via System Restore.
System Restore is a utility which comes with Windows operating systems and helps computer users restore the system to a previous state and remove programs interfering with the operation of the computer. If you have created a system restore point prior to installing a program, then you can use System Restore to restore your system and completely eradicate the unwanted programs like VMware Tools. You should backup your personal files and data before doing a System Restore.
Steps:
a. Close all files and programs that are open.
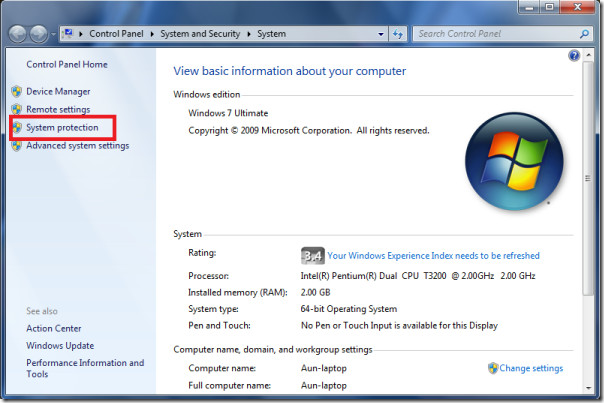
b. On the desktop, right click Computer and select Properties. The system window will display.
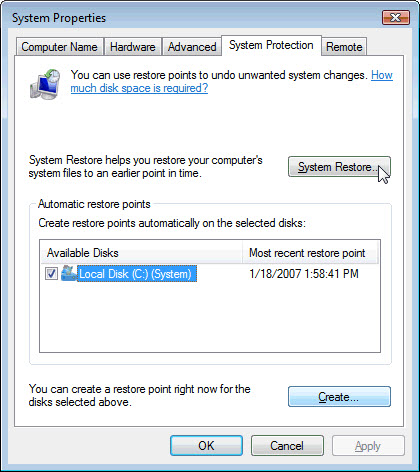
c. On the left side of the System window, click System protection. The System Properties window will display.
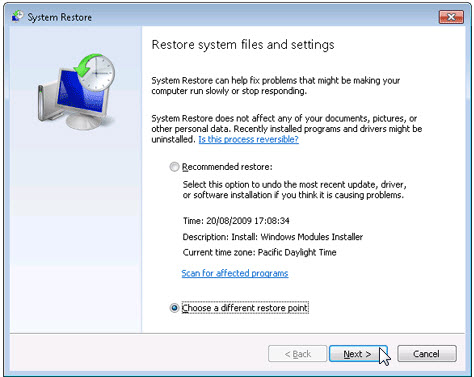
d. Click System Restore and the System Restore window will display.
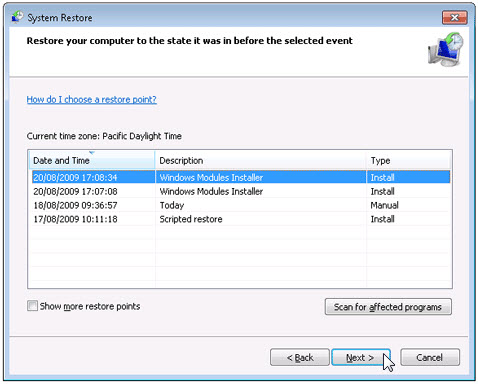
e. Select Choose a different restore point and click Next.
f. Select a date and time from the list and then click Next. You should know that all programs and drivers installed after the selected date and time may not work properly and may need to be re-installed.
g. Click Finish when the «Confirm your restore point» window appears.
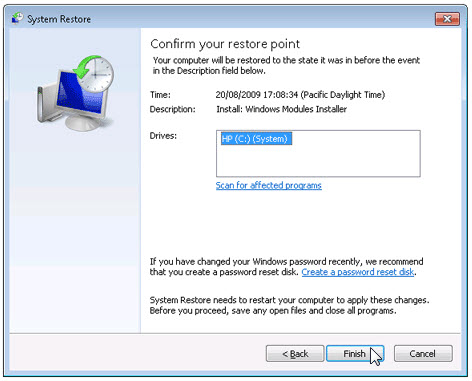
h. Click Yes to confirm again.
Method 4: Uninstall VMware Tools with Antivirus.
Nowadays, computer malware appear like common computer applications but they are much more difficult to remove from the computer. Such malware get into the computer with the help of Trojans and spyware. Other computer malware like adware programs or potentially unwanted programs are also very difficult to remove. They usually get installed on your system by bundling with freeware software like video recording, games or PDF convertors. They can easily bypass the detection of the antivirus programs on your system. If you cannot remove VMware Tools like other programs, then it’s worth checking whether it’s a malware or not.
Method 5: Reinstall VMware Tools to Uninstall.
When the file required to uninstall VMware Tools is corrupted or missing, it will not be able to uninstall the program. In such circumstance, reinstalling VMware Tools may do the trick. Run the installer either in the original disk or the download file to reinstall the program again. Sometimes, the installer may allow you to repair or uninstall the program as well.
Method 6: Use the Uninstall Command Displayed in the Registry.
When a program is installed on the computer, Windows will save its settings and information in the registry, including the uninstall command to uninstall the program. You can try this method to uninstall VMware Tools. Please carefully edit the registry, because any mistake there may make your system crash.
Steps:
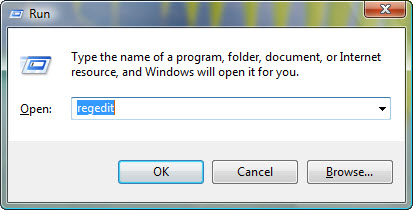
a. Hold Windows and R keys to open the Run command, type in regedit in the box and click OK.
b. Navigate the following registry key and find the one of VMware Tools:
HKEY_LOCAL_MACHINE\SOFTWARE\Microsoft\Windows\CurrentVersion\Uninstall
c. Double click on the UninstallString value, and copy its Value Data.
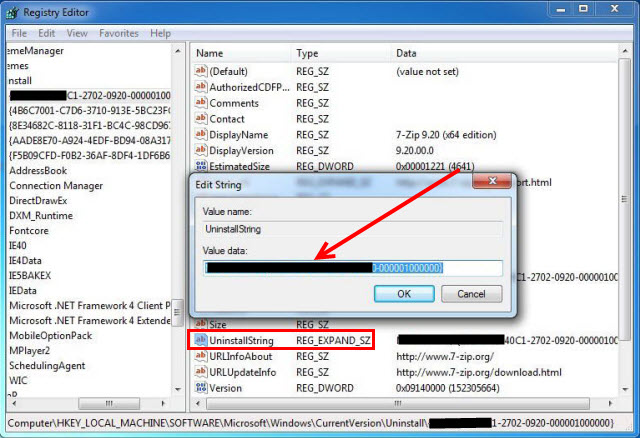
d. Hold Windows and R keys to open the Run command, paste the Value Data in the box and click OK.
e. Follow the wizard to uninstall VMware Tools.
Method 7: Uninstall VMware Tools with Third-party Uninstaller.
The manual uninstallation of VMware Tools requires computer know-how and patience to accomplish. And no one can promise the manual uninstallation will completely uninstall VMware Tools and remove all of its files. And an incomplete uninstallation will many useless and invalid items in the registry and affect your computer performance in a bad way. Too many useless files also occupy the free space of your hard disk and slow down your PC speed. So, it’s recommended that you uninstall VMware Tools with a trusted third-party uninstaller which can scan your system, identify all files of VMware Tools and completely remove them. Download this powerful third-party uninstaller below.
In today’s post I’ll show How to remove VMware Tools manually. I was migrating some VMs to newly deployed ESXi host, and I was also upgrading to the latest Virtual Hardware some guest Os. After I wanted to update VMware tools in those VMs, but I run into a problem.
Then I had a trouble with VMware Tools. No matter what I was doing I had an error saying that there is a network error while attempting to read from the file c:\windows\Installer\Vmware Tools.msi. I could not go further and basically I was stuck.
The screenshots looked like this…
To resolve this trouble, you’ll have to to the following:
01. Open the Windows Registry editor. Click Start > Run. Type “regedit” press Enter.
02. Browse to HKLM \Software\Microsoft\Windows\CurrentVersion\uninstall.
03. There you’ll have to search for the branch with a key named DisplayName and has a value of VMware Tools . Do a search, because the branch won’t tell you much… (see img.) You must Delete the branch associated with that entry. Make sure that you not to a mistake and DO NOT delete the entire uninstall branch…

04. Browse to HKLM\Software\Classes\Installer\Products . Search for the branch with the key named ProductName and has a value of VMware Tools . Delete the branch associated with that entry.
05. Then Browse again to HKEY_CLASSES_ROOT\Installer\Products and look for the branch with the key named ProductName and has a value of VMware Tools . Delete the branch associated with that entry.
06. Browse to HKLM \Software\VMware. Delete the branch called VMware Tools .
07. Delete also the sub-folder from c:\Program files\Vmware\VMware Tools
Update:
Windows 7, Windows 8 and Windows 2012 Server virtual machines
Start the virtual machine and log on as the Administrator. Take a full backup of the registry prior to editing it. Do not skip this step. Open the Windows Registry editor. Click Start, type regedit, and press Enter.
Note: On Windows 8, you need to type the above command within the Run prompt. This can be accessed by using the following hot key combination, Windows Key + R.
Delete these registry keys if they exist:
HKEY_CLASSES_ROOT\Installer\Features\B634907914A56494B87EA24A33AC1F80
HKEY_CLASSES_ROOT\Installer\Products\B634907914A56494B87EA24A33AC1F80
HKEY_CLASSES_ROOT\CLSID\{D86ADE52-C4D9-4B98-AA0D-9B0C7F1EBBC8}
HKEY_LOCAL_MACHINE\SOFTWARE\Classes\Installer\Features\B634907914A56494B87EA24A33AC1F80
HKEY_LOCAL_MACHINE\SOFTWARE\Classes\Installer\Products\B634907914A56494B87EA24A33AC1F80
HKEY_LOCAL_MACHINE\SOFTWARE\Microsoft\Windows\CurrentVersion\Installer\UserData\S-1-5-18\Products\B634907914A56494B87EA24A33AC1F80
HKEY_LOCAL_MACHINE\SOFTWARE\Microsoft\Windows\CurrentVersion\Uninstall\{9709436B-5A41-4946-8BE7-2AA433CAF108}
HKEY_LOCAL_MACHINE\SOFTWARE\VMware, Inc.
Source: It came from a KB found at VMware’s Knowledge Base article here.
This article will serve as an informative guide and give you a clear understanding of how to perform silent or interactive installs and uninstalls of VMware Tools using the Powershell App Deployment Toolkit. The PowerShell App Deployment Toolkit can be used to replace your WiseScript, VBScript and Batch wrapper scripts with one versatile, re-usable and extensible tool. This tool is an absolute must for Microsoft Endpoint Manager Configuration Manager (MEMCM) / (SCCM) Administrators or anyone who is responsible for packaging and deploying software.
How to Install VMware Tools Using the PowerShell App Deployment Toolkit
- Download the Powershell App Deployment Toolkit 3.8.4:
- https://github.com/PSAppDeployToolkit/PSAppDeployToolkit/releases/download/3.8.4/PSAppDeployToolkit_v3.8.4.zip
- Download the zip file to a folder created at (C:\Downloads)
- Open Windows PowerShell by Right-Clicking on Windows PowerShell and selecting Run as Administrator
- Enter the following command to remove the Zone.Identifier:
Unblock-File -Path C:\Downloads\PSAppDeployToolkit_v3.8.4.zip
- Enter the following command to extract the contents of the zip file:
Expand-Archive -Path C:\Downloads\PSAppDeployToolkit_v3.8.4.zip -DestinationPath C:\Downloads\PADT
- Enter the following commands to copy the AppDeployToolkit & Files folders to “C:\Downloads\VMwareTools”:
Copy-Item -Path "C:\Downloads\PADT\Toolkit\AppDeployToolkit" -Destination "C:\Downloads\VMwareTools\AppDeployToolkit" -RecurseCopy-Item -Path "C:\Downloads\PADT\Toolkit\Files" -Destination "C:\Downloads\VMwareTools\Files"
You should now see the AppDeploymentToolkit folder with files & the empty Files folder at “C:\Downloads\VMwareTools”
Next we’ll want to download both the 32-bit & 64-bit EXE installers for VMware Tools.
- Navigate to: https://packages.vmware.com/tools/releases
- Select the version of your choice, click Windows, then x86
- Download & Copy the VMware-tools-x.y.z-i386.exe to “C:\Downloads\VMwareTools\Files\”
- Navigate to: https://packages.vmware.com/tools/releases
- Select the version of your choice, click Windows, then x64
- Download & Copy the VMware-tools-x.y.z-x86_64.exe to “C:\Downloads\VMwareTools\Files\”
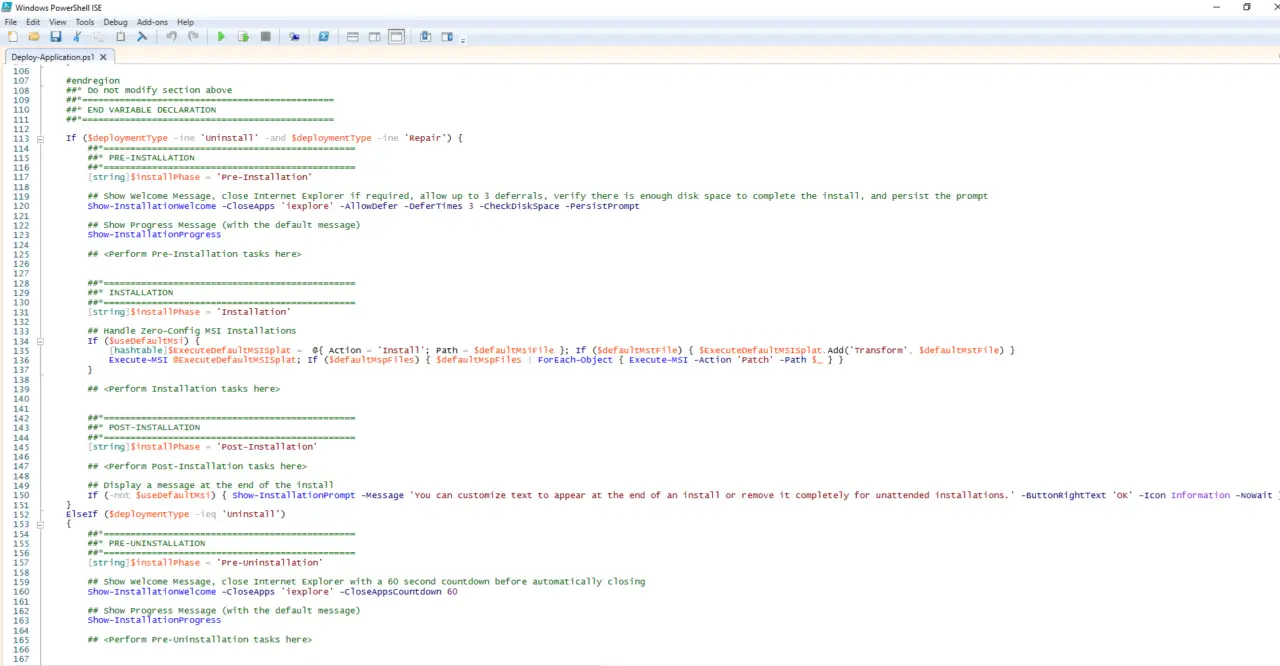
- Copy the PowerShell script below to “C:\Downloads\VMwareTools“ & name it Deploy-VMwareTools.ps1
<#
.SYNOPSIS
	This script performs the installation or uninstallation of VMware Tools.
	# LICENSE #
	PowerShell App Deployment Toolkit - Provides a set of functions to perform common application deployment tasks on Windows.
	Copyright (C) 2017 - Sean Lillis, Dan Cunningham, Muhammad Mashwani, Aman Motazedian.
	This program is free software: you can redistribute it and/or modify it under the terms of the GNU Lesser General Public License as published by the Free Software Foundation, either version 3 of the License, or any later version. This program is distributed in the hope that it will be useful, but WITHOUT ANY WARRANTY; without even the implied warranty of MERCHANTABILITY or FITNESS FOR A PARTICULAR PURPOSE. See the GNU General Public License for more details.
	You should have received a copy of the GNU Lesser General Public License along with this program. If not, see <http://www.gnu.org/licenses/>.
.DESCRIPTION
	The script is provided as a template to perform an install or uninstall of an application(s).
	The script either performs an "Install" deployment type or an "Uninstall" deployment type.
	The install deployment type is broken down into 3 main sections/phases: Pre-Install, Install, and Post-Install.
	The script dot-sources the AppDeployToolkitMain.ps1 script which contains the logic and functions required to install or uninstall an application.
.PARAMETER DeploymentType
	The type of deployment to perform. Default is: Install.
.PARAMETER DeployMode
	Specifies whether the installation should be run in Interactive, Silent, or NonInteractive mode. Default is: Interactive. Options: Interactive = Shows dialogs, Silent = No dialogs, NonInteractive = Very silent, i.e. no blocking apps. NonInteractive mode is automatically set if it is detected that the process is not user interactive.
.PARAMETER AllowRebootPassThru
	Allows the 3010 return code (requires restart) to be passed back to the parent process (e.g. SCCM) if detected from an installation. If 3010 is passed back to SCCM, a reboot prompt will be triggered.
.PARAMETER TerminalServerMode
	Changes to "user install mode" and back to "user execute mode" for installing/uninstalling applications for Remote Destkop Session Hosts/Citrix servers.
.PARAMETER DisableLogging
	Disables logging to file for the script. Default is: $false.
.EXAMPLE
    PowerShell.exe .\Deploy-VMwareTools.ps1 -DeploymentType "Install" -DeployMode "NonInteractive"
.EXAMPLE
    PowerShell.exe .\Deploy-VMwareTools.ps1 -DeploymentType "Install" -DeployMode "Silent"
.EXAMPLE
    PowerShell.exe .\Deploy-VMwareTools.ps1 -DeploymentType "Install" -DeployMode "Interactive"
.EXAMPLE
    PowerShell.exe .\Deploy-VMwareTools.ps1 -DeploymentType "Uninstall" -DeployMode "NonInteractive"
.EXAMPLE
    PowerShell.exe .\Deploy-VMwareTools.ps1 -DeploymentType "Uninstall" -DeployMode "Silent"
.EXAMPLE
    PowerShell.exe .\Deploy-VMwareTools.ps1 -DeploymentType "Uninstall" -DeployMode "Interactive"
.NOTES
	Toolkit Exit Code Ranges:
	60000 - 68999: Reserved for built-in exit codes in Deploy-Application.ps1, Deploy-Application.exe, and AppDeployToolkitMain.ps1
	69000 - 69999: Recommended for user customized exit codes in Deploy-Application.ps1
	70000 - 79999: Recommended for user customized exit codes in AppDeployToolkitExtensions.ps1
.LINK
	http://psappdeploytoolkit.com
#>
[CmdletBinding()]
Param (
	[Parameter(Mandatory=$false)]
	[ValidateSet('Install','Uninstall','Repair')]
	[string]$DeploymentType = 'Install',
	[Parameter(Mandatory=$false)]
	[ValidateSet('Interactive','Silent','NonInteractive')]
	[string]$DeployMode = 'Interactive',
	[Parameter(Mandatory=$false)]
	[switch]$AllowRebootPassThru = $false,
	[Parameter(Mandatory=$false)]
	[switch]$TerminalServerMode = $false,
	[Parameter(Mandatory=$false)]
	[switch]$DisableLogging = $false
)

Try {
	## Set the script execution policy for this process
	Try { Set-ExecutionPolicy -ExecutionPolicy 'ByPass' -Scope 'Process' -Force -ErrorAction 'Stop' } Catch {}

	##*===============================================
	##* VARIABLE DECLARATION
	##*===============================================
	## Variables: Application
	[string]$appVendor = 'VMware, Inc.'
	[string]$appName = 'VMware Tools'
	[string]$appVersion = ''
	[string]$appArch = ''
	[string]$appLang = ''
	[string]$appRevision = ''
	[string]$appScriptVersion = '1.0.0'
	[string]$appScriptDate = 'XX/XX/20XX'
	[string]$appScriptAuthor = 'Jason Bergner'
	##*===============================================
	## Variables: Install Titles (Only set here to override defaults set by the toolkit)
	[string]$installName = ''
	[string]$installTitle = 'VMware Tools'

	##* Do not modify section below
	#region DoNotModify

	## Variables: Exit Code
	[int32]$mainExitCode = 0

	## Variables: Script
	[string]$deployAppScriptFriendlyName = 'Deploy Application'
	[version]$deployAppScriptVersion = [version]'3.8.4'
	[string]$deployAppScriptDate = '26/01/2021'
	[hashtable]$deployAppScriptParameters = $psBoundParameters

	## Variables: Environment
	If (Test-Path -LiteralPath 'variable:HostInvocation') { $InvocationInfo = $HostInvocation } Else { $InvocationInfo = $MyInvocation }
	[string]$scriptDirectory = Split-Path -Path $InvocationInfo.MyCommand.Definition -Parent

	## Dot source the required App Deploy Toolkit Functions
	Try {
		[string]$moduleAppDeployToolkitMain = "$scriptDirectory\AppDeployToolkit\AppDeployToolkitMain.ps1"
		If (-not (Test-Path -LiteralPath $moduleAppDeployToolkitMain -PathType 'Leaf')) { Throw "Module does not exist at the specified location [$moduleAppDeployToolkitMain]." }
		If ($DisableLogging) { . $moduleAppDeployToolkitMain -DisableLogging } Else { . $moduleAppDeployToolkitMain }
	}
	Catch {
		If ($mainExitCode -eq 0){ [int32]$mainExitCode = 60008 }
		Write-Error -Message "Module [$moduleAppDeployToolkitMain] failed to load: `n$($_.Exception.Message)`n `n$($_.InvocationInfo.PositionMessage)" -ErrorAction 'Continue'
		## Exit the script, returning the exit code to SCCM
		If (Test-Path -LiteralPath 'variable:HostInvocation') { $script:ExitCode = $mainExitCode; Exit } Else { Exit $mainExitCode }
	}

	#endregion
	##* Do not modify section above
	##*===============================================
	##* END VARIABLE DECLARATION
	##*===============================================

	If ($deploymentType -ine 'Uninstall' -and $deploymentType -ine 'Repair') {
		##*===============================================
		##* PRE-INSTALLATION
		##*===============================================
		[string]$installPhase = 'Pre-Installation'

		## Show Welcome Message
		Show-InstallationWelcome

		## Show Progress Message (with the default message)
		Show-InstallationProgress

        ## Remove Any Existing Versions of VMware Tools
        Remove-MSIApplications -Name 'VMware Tools'

		##*===============================================
		##* INSTALLATION
		##*===============================================
		[string]$installPhase = 'Installation'

        If ($ENV:PROCESSOR_ARCHITECTURE -eq 'x86'){
        Write-Log -Message "Detected 32-bit OS Architecture." -Severity 1 -Source $deployAppScriptFriendlyName

        ## Install VMware Tools on 32-bit System
        $ExePath32 = Get-ChildItem -Path "$dirFiles" -Include VMware-tools*i386.exe -File -Recurse -ErrorAction SilentlyContinue
        If($ExePath32.Exists)
        {
        Write-Log -Message "Found $($ExePath32.FullName), now attempting to install $installTitle."
        Show-InstallationProgress "Installing VMware Tools. This may take some time. Please wait..."
        Execute-Process -Path "$ExePath32" -Parameters "/S /v""/qn REBOOT=R ADDLOCAL=ALL""" -WindowStyle Hidden
        }

        }
        Else
        {
        Write-Log -Message "Detected 64-bit OS Architecture" -Severity 1 -Source $deployAppScriptFriendlyName

        ## Install VMware Tools on 64-bit System
        $ExePath64 = Get-ChildItem -Path "$dirFiles" -Include VMware-tools*64.exe -File -Recurse -ErrorAction SilentlyContinue
        If($ExePath64.Exists)
        {
        Write-Log -Message "Found $($ExePath64.FullName), now attempting to install $installTitle."
        Show-InstallationProgress "Installing VMware Tools. This may take some time. Please wait..."
        Execute-Process -Path "$ExePath64" -Parameters "/S /v""/qn REBOOT=R ADDLOCAL=ALL""" -WindowStyle Hidden
        }
        }

		##*===============================================
		##* POST-INSTALLATION
		##*===============================================
		[string]$installPhase = 'Post-Installation'

	}
	ElseIf ($deploymentType -ieq 'Uninstall')
	{
		##*===============================================
		##* PRE-UNINSTALLATION
		##*===============================================
		[string]$installPhase = 'Pre-Uninstallation'

		## Show Welcome Message
		Show-InstallationWelcome

        ## Show Progress Message (With a Message to Indicate the Application is Being Uninstalled)
        Show-InstallationProgress -StatusMessage "Uninstalling $installTitle. Please Wait..."


		##*===============================================
		##* UNINSTALLATION
		##*===============================================
		[string]$installPhase = 'Uninstallation'

        ## Uninstall Any Existing Versions of VMware Tools
        Remove-MSIApplications -Name 'VMware Tools'


		##*===============================================
		##* POST-UNINSTALLATION
		##*===============================================
		[string]$installPhase = 'Post-Uninstallation'


	}
	ElseIf ($deploymentType -ieq 'Repair')
	{
		##*===============================================
		##* PRE-REPAIR
		##*===============================================
		[string]$installPhase = 'Pre-Repair'

		##*===============================================
		##* REPAIR
		##*===============================================
		[string]$installPhase = 'Repair'


		##*===============================================
		##* POST-REPAIR
		##*===============================================
		[string]$installPhase = 'Post-Repair'


    }
	##*===============================================
	##* END SCRIPT BODY
	##*===============================================

	## Call the Exit-Script function to perform final cleanup operations
	Exit-Script -ExitCode $mainExitCode
}
Catch {
	[int32]$mainExitCode = 60001
	[string]$mainErrorMessage = "$(Resolve-Error)"
	Write-Log -Message $mainErrorMessage -Severity 3 -Source $deployAppScriptFriendlyName
	Show-DialogBox -Text $mainErrorMessage -Icon 'Stop'
	Exit-Script -ExitCode $mainExitCode
}
Ok, all the hard work is done and now you can install or uninstall VMware Tools using one single PowerShell script. Simply change the DeploymentType parameter to install or uninstall. Logging functionality is built-in automatically and you can view the log files under “C:\Windows\Logs\Software”.
VMware Tools NonInteractive Install (PowerShell)
NonInteractive means Very Silent, i.e. no blocking apps. This is automatically set if it is detected that the process is not running in the user session and it is not possible for anyone to provide input using a mouse or keyboard.
- Open Windows PowerShell by Right-Clicking on Windows PowerShell and selecting Run as Administrator
- Change the directory to “C:\Downloads\VMwareTools”
- PS C:\Downloads\VMwareTools>
- Enter the following command:
Powershell.exe -ExecutionPolicy Bypass .\Deploy-VMwareTools.ps1 -DeploymentType "Install" -DeployMode "NonInteractive"
VMware Tools Silent Install (PowerShell)
Silent means no dialogs (progress and balloon tip notifications are suppressed).
- Open Windows PowerShell by Right-Clicking on Windows PowerShell and selecting Run as Administrator
- Change the directory to “C:\Downloads\VMwareTools“
- PS C:\Downloads\VMwareTools>
- Enter the following command:
Powershell.exe -ExecutionPolicy Bypass .\Deploy-VMwareTools.ps1 -DeploymentType "Install" -DeployMode "Silent"
VMware Tools Interactive Install (PowerShell)
Interactive means the install will show dialogs including progress and balloon tip notifications.
- Open Windows PowerShell by Right-Clicking on Windows PowerShell and selecting Run as Administrator
- Change the directory to “C:\Downloads\VMwareTools“
- PS C:\Downloads\VMwareTools>
- Enter the following command:
Powershell.exe -ExecutionPolicy Bypass .\Deploy-VMwareTools.ps1 -DeploymentType "Install" -DeployMode "Interactive"
How to Uninstall VMware Tools Using the PowerShell App Deployment Toolkit
VMware Tools NonInteractive Uninstall (PowerShell)
NonInteractive means Very Silent, i.e. no blocking apps. This is automatically set if it is detected that the process is not running in the user session and it is not possible for anyone to provide input using a mouse or keyboard.
- Open Windows PowerShell by Right-Clicking on Windows PowerShell and selecting Run as Administrator
- Change the directory to “C:\Downloads\VMwareTools“
- PS C:\Downloads\VMwareTools>
- Enter the following command:
Powershell.exe -ExecutionPolicy Bypass .\Deploy-VMwareTools.ps1 -DeploymentType "Uninstall" -DeployMode "NonInteractive"
VMware Tools Silent Uninstall (PowerShell)
Silent means no dialogs (progress and balloon tip notifications are suppressed).
- Open Windows PowerShell by Right-Clicking on Windows PowerShell and selecting Run as Administrator
- Change the directory to “C:\Downloads\VMwareTools“
- PS C:\Downloads\VMwareTools>
- Enter the following command:
Powershell.exe -ExecutionPolicy Bypass .\Deploy-VMwareTools.ps1 -DeploymentType "Uninstall" -DeployMode "Silent"
VMware Tools Interactive Uninstall (PowerShell)
Interactive means the install will show dialogs including progress and balloon tip notifications.
- Open Windows PowerShell by Right-Clicking on Windows PowerShell and selecting Run as Administrator
- Change the directory to “C:\Downloads\VMwareTools“
- PS C:\Downloads\VMwareTools>
- Enter the following command:
Powershell.exe -ExecutionPolicy Bypass .\Deploy-VMwareTools.ps1 -DeploymentType "Uninstall" -DeployMode "Interactive"
Always make sure to test everything in a development environment prior to implementing anything into production. The information in this article is provided “As Is” without warranty of any kind.