
Uninstalling a package is as important as installing it, so it’s crucial to handle it with care.
In this article, we will be going through how the uninstallation process works in an enterprise environment. Let’s start by looking at scenarios you could face where you need to uninstall an MSI package.
Uninstalling a specific MSI package in the enterprise environment — Scenarios
In an enterprise environment, there are situations that require uninstalling a specific package. Some of these scenarios include:
- When an end-user moves to another department, some of the applications are not needed anymore, so they have to be removed from their device.
- When an application is inactive and must be removed from all devices.
- When we need to upgrade an application to its new version and the old version must be uninstalled to be replaced by the new version.
How to uninstall an MSI package?
As with installation, uninstallation of an application requires admin privileges. Within an enterprise environment, IT administrators are responsible for the management of the applications, which is usually done using application management tools such as SCCM (MEMCM) or Intune.
Here are some of the options you have when you need to uninstall an MSI package, either manually or from the command-line.
All of these require administrative rights.
1. How to uninstall the MSI package if you have access to the original MSI
If you have access to the original MSI that was used to install the package, then you can simply right-click on it and select Uninstall.

2. Uninstalling the MSI using the cached MSI
All the MSI packages installed on the device are cached in %SystemRoot%\Installer folder.
The easiest way to find out which one is your MSI package is to switch to the Details view, add Subject and Author columns to the view, and search for your product name and company/vendor name.

3. Using the AddRemoveProgram / Apps&Features interface entry
Most of the MSIs installed on the device have an entry in Program and Features (formerly known as AddRemovePrograms) which you can use to uninstall your package.
You can access the Program and Features in three ways:
1. By going to the Control Panel and clicking on Uninstall a program (make sure you selected View by Category)

2. By going to Control Panel and clicking on Programs and Features (here make sure you selected View by Small/Large icons)

3. By using the appwiz.cpl run command

If you are on Windows 10, you can go to Windows Settings, then click on Apps and once you are there, you will see the full list of the installed apps.

4. Uninstalling an MSI from the command line using the msiexec.exe command
If you have access to the original MSI, then you can use the msiexec /x <path to the MSI file> command to uninstall your application.
Windows Installer technology uses msiexec.exe for both the installation and uninstallation of MSI packages.
It is recommended to turn on logging and log all information, including verbose information. You can do that by adding /l*v <path to the log file> parameters to your uninstall command line.
msiexec /x <path to the MSI file> /l*v <path to the log file>
When working without a UI during the uninstallation process, you can use the /qn parameter.
msiexec /x <path to the MSI file> /qn /l*v <path to the log file>
5. How to uninstall the MSI with msiexec using the ProductCode (also known as Product GUID)
If you know the ProductCode, you can use that to uninstall your application. The command line is similar to the one above. The only difference is that you use the ProductCode instead of the path to the MSI file.
This scenario is useful if you don’t have access to the MSI file but know the ProductCode.
msiexec /x <{ProductCode}>
The same msiexec parameters apply.
6. How to uninstall an MSI via PowerShell Start-Process cmdlet
You can use the Start-Process cmdlet to start the msiexec.exe process.
Then, use the —ArgumentList parameter to specify the parameters value to be used when the Start-Process cmdlet starts the msiexec.exe process.
Start-Process "C:\Windows\System32\msiexec.exe" -ArgumentList "/x <ProductCode> /qn /l*v <path to the log file" -Wait
7. How to uninstall an MSI via Powershell Get_WmiObject classes (Win32_Product)
To find the application that you want to uninstall, you can use the -Filter property. Then, to uninstall it, use the Get_WmiObject method of the Win32_Product class.
To use this method, you need Windows Management Instrumentation (WMI) so that the Windows Installer provider can retrieve all the installed products. This initiates a consistency check, which verifies and repairs the installation if needed.
$app = Get-WmiObject -Class Win32_Product -Filter "Name = '<ProductName>'"
$app.Uninstall()
How to silently uninstall an MSI package?
Windows Installer technology uses msiexec.exe for both the installation and uninstallation of MSI packages, and the Display options parameters are applicable to both.
The most common silent uninstall msiexec parameters are:
- /quiet — no UI required (quiet mode)
- /passive — shows only a progress bar (unattended mode)
- /qb — shows only basic UI
- /qb! — show only basic UI and hide Cancel button
- /qn — no UI
To perform a silent uninstall of your MSI package, all you have to do is add the required parameter to the msiexec command.
For example:
msiexec /x <{ProductCode}> /qn
Conclusion
As you can see, you have many options to choose from when it comes to uninstalling a Windows Installer MSI package.
There is no one-size-fits-all approach here, and it is up to you to decide which option is easiest and most convenient for you, depending on your needs.
Written by
Horatiu Vladasel
Horatiu is a Software Packager/Sequencer with over 10 years experience, who has worked as a Software Packager at IBM and is currently offering software packaging services to companies such as BT or Nationwide.
Upgrade & Secure Your Future with DevOps, SRE, DevSecOps, MLOps!
We spend hours on Instagram and YouTube and waste money on coffee and fast food, but won’t spend 30 minutes a day learning skills to boost our careers.
Master in DevOps, SRE, DevSecOps & MLOps!
Learn from Guru Rajesh Kumar and double your salary in just one year.
Get Started Now!
deployexpert created the topic: How to remove Microsoft Windows Installer (MSI)?
How to remove Microsoft Windows Installer (MSI)?
Certification Courses
DevOpsSchool has introduced a series of professional certification courses designed to enhance your skills and expertise in cutting-edge technologies and methodologies. Whether you are aiming to excel in development, security, or operations, these certifications provide a comprehensive learning experience. Explore the following programs:
- DevOps Certification — Learn the fundamentals and advanced concepts of DevOps practices and tools.
- DevSecOps Certification — Master the integration of security within the DevOps workflow.
- SRE Certification — Gain expertise in Site Reliability Engineering and ensure reliability at scale.
- MLOps Certification — Dive into Machine Learning Operations and streamline ML workflows.
- AiOps Certification — Discover AI-driven operations management for next-gen IT environments.

Explore our DevOps Certification, SRE Certification, and DevSecOps Certification programs at DevOpsSchool. Gain the expertise needed to excel in your career with hands-on training and globally recognized certifications.
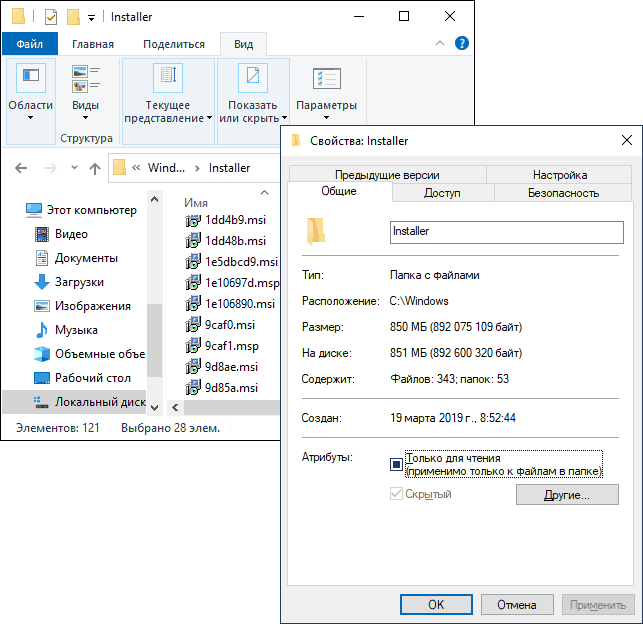
Если вы используете какие-либо программы для анализа содержимого диска, то можете обнаружить, что в Windows 10 скрытая системная папка C:\Windows\Installer занимает много места: иногда сотни мегабайт, а иногда и гигабайты, отсюда и вопрос — что это за папка и что с ней можно, а чего нельзя делать.
В этой инструкции о том, можно ли удалять папку Windows\Installer, файлы в ней, к чему это может привести и есть ли возможность уменьшить занимаемое этой папкой место на жестком диске или SSD. Также может быть интересным: Как очистить место на диске C.
- Можно ли удалить C:\Windows\Installer
- Как очистить папку Windows\Installer в Windows 10
- Видео инструкция
Можно ли удалять файлы из C:\Windows\Installer в Windows 10
Если вы загляните в папку C:\Windows\Installer (папка скрыта по умолчанию, но в нее легко попасть, введя в адресную строку проводника путь к папке, либо включив показ и скрытых и защищенных системных файлов Windows 10), в ней вы обнаружите набор файлов с расширениями .msi и .msp, а также папки: состоящие из кодов и отдельные с расширением .tmp.
Можно ли это всё удалить? Короткий ответ: нет, не следует. Вы можете безопасно удалить лишь папки .tmp, но они и не занимают много места. Однако, существует возможность в какой-то степени очистить эту папку, о чем в следующем разделе.
А сначала о том, что представляют собой эти файлы в Windows\Installer — это файлы установщиков программ (тех, что установлены на вашем компьютере), использующих для установки службу «Установщик Windows» и они используются когда программа обновляется или когда вы её, наоборот, удаляете через «Панель управления» — «Программы и компоненты». Также они могут использовать для функции «Исправить установку». Соответственно, при их удалении могут возникнуть проблемы при выполнении этих задач.
Как очистить папку Windows\Installer
Иногда случается, что в этой папке присутствуют установщики программ .msi и .msp, более не используемые нигде в системе и такие файлы можно удалить, но для этого нужно определить, какие именно это файлы. Примечание: теоретически далее описанные шаги могут привести к нежелательным последствиям.
Для этого можно использовать бесплатную утилиту PatchCleaner, официальный сайт разработчика — https://www.homedev.com.au/Free/PatchCleaner (для загрузки используйте вкладку «Downloads» в верхней части описания программы).
После запуска PatchCleaner, утилита проанализирует содержимое указанной папки и, если среди файлов в C:\Windows\Installer окажутся файлы, которые более не используются (они будут отображены в разделах «Excluded by filters» и «Orphaned». Такие файлы можно сразу удалить (Delete) или переместить в указанную папку «Move» (лучше сначала использовать второй вариант, чтобы убедиться, что всё работает как прежде).
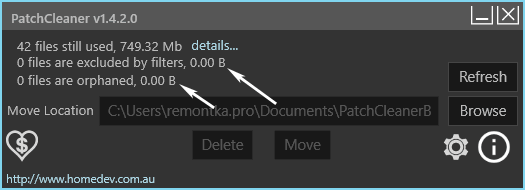
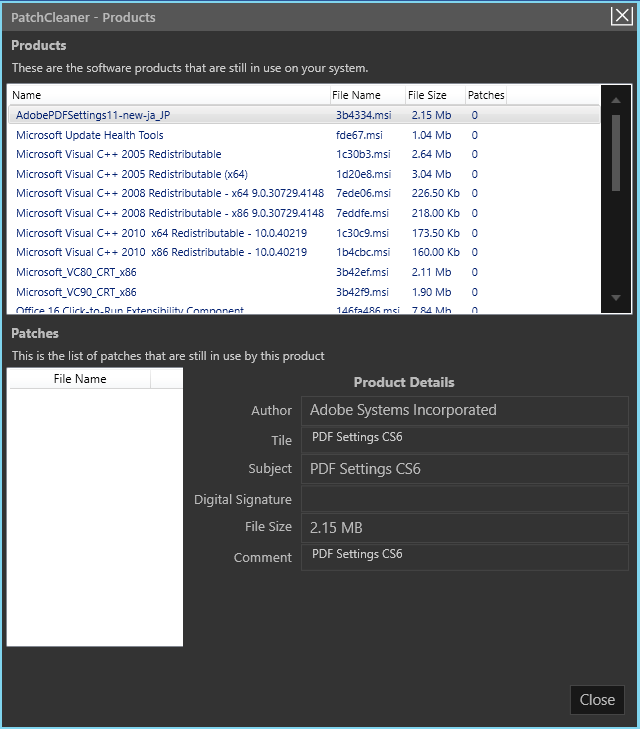
Также, если нажать по «Details» рядом с количеством найденных файлов, в том числе используемых в настоящее время (still used), можно увидеть информацию о том, каким программам соответствуют найденные файлы .msi и .msp, сколько места на диске они занимают и, возможно, принять решение об удалении некоторых из этих программ, если вы ими более не пользуетесь и они не требуются для правильного функционирования другого ПО.

Видео инструкция
Надеюсь, информация была полезной. К слову, о больших папках в Windows 10: вы можете очистить папку DriverStore\FileRepository.
What is Windows Installer folder? Is it safe to delete files in this folder? This post of MiniTool Partition Wizard will tell you how to safely free up space with the help of the Windows Installer cleanup utility.
About Windows Installer Folder
In this section, several topice related to Windows Installer folder are talked about. After reading the content below, you will have an overall understanding of Windows Installer folder.
What is the Windows Installer folder?
Windows Installer folder is a protected folder with System & Hidden attributes, which can be found under the Windows folder. When you install a program in Windows, its .msi setup package will be copied to the Installer folder.
The Installer directory is a cache location for installer data files of various applications installed on the PC. When you repair, uninstall, or reinstall the program via Apps & Features in Settings or Programs & Features in Control Panel, you are required to use the .msi package from the Windows Installer folder to do these operations.
Once the corresponding setup package (.msi or .msp) file isn’t found, Windows prompts the error “The installation source for this product is not available. Verify that source exists and that you can access it.”
Common issues with the Installer folder
However, you may find that the Installer directory grows and consumes a massive amount of hard disk space. This phenomenon often occurs and it can be seen in many forums or communities. Well, here is a true example.
On my SSD machine, the C:\Windows\Installer folder is massive and takes up about 15% of my total disk space. Is there a way to clean up that folder without killing Windows 8.1/10? Tucking away the installers on the OS partition seems wasteful. -superuser.com
Can you delete all files in this folder?
The answer is negative because the Windows Installer folder contains important files for the accurate run of the system. If you delete these files, you can’t work with your PC. Actually, you should never delete the contents of the C:\Windows\Installer folder randomly.
Windows installer patches sometimes may get orphaned during the process of software uninstallation. When a program is uninstalled, the corresponding .msi package is left behind in the Windows Installer folder. Then these orphaned packages can be deleted.
Besides, many unnecessary files created during normal operations can also be removed. Based on the above fact, you can conduct a Windows Installer folder cleanup Windows 10 with offered methods in this post.
Method 1: Delete Orphaned .MSI Files via PatchCleaner
How to find the orphaned .msi files? PatchCleaner identifies orphaned files in the Windows Installer folder and offers you the option to delete these files or move them to a different location. Follow these steps to use this Windows Installer Clean up tool.
Step 1: Click here to download PatchCleaner。
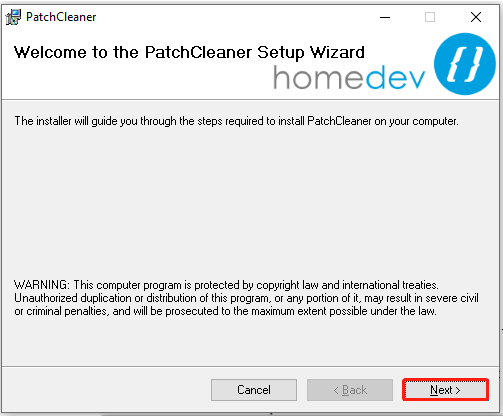
Step 2: After downloading it, double-click on its setup file and follow the pop-up instructions to install it.
Step 3: When the installation process ends, run it by double-clicking on its icon on the desktop. Then you can see the corresponding sizes of used, excluded, and orphaned files in the Installer folder.
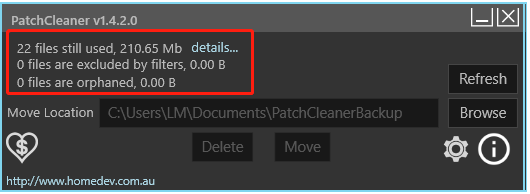
Step 4: You can click details behind each file category to see the detailed information if there are any files. For instance, here is the details of “in use” or valid program entries.
Step 5: If there are any orphaned files on your computer, click details to learn the detailed information. Then you can either delete the orphaned setup package or move it to another folder and then delete it safely after a few days.
How to safely clean up Windows Installer folder? In addition to PatchCleaner, there are some other Windows Installer cleanup programs to do that.
You might also be interested in this: 10 Best Free PC Cleaners to Clean up and Speed up Your Computer
Method 2: Make Use of Windows Settings
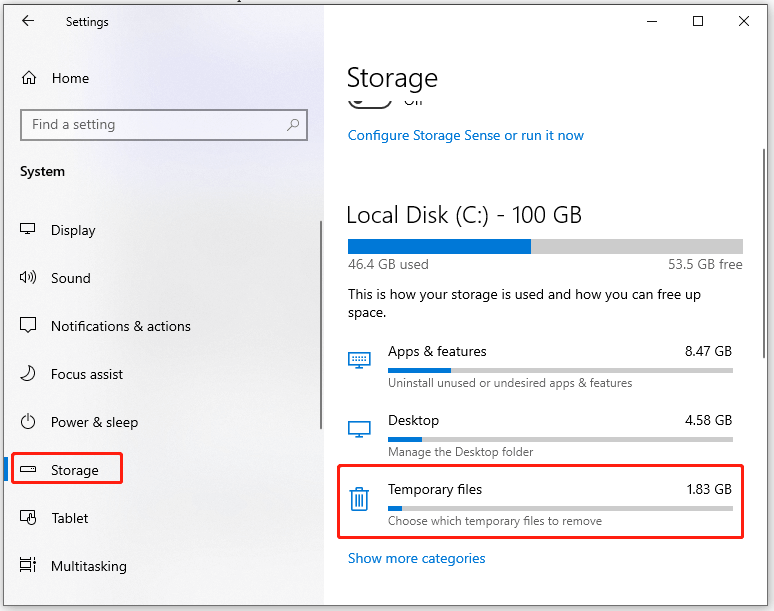
Step 1: Open Settings by holding the Windows and I keys at the same time.
Step 2: In the Settings window, click System.
Step 3: Click Storage under the System tab, and then move to the right side of the window and tap Temporary files to continue.
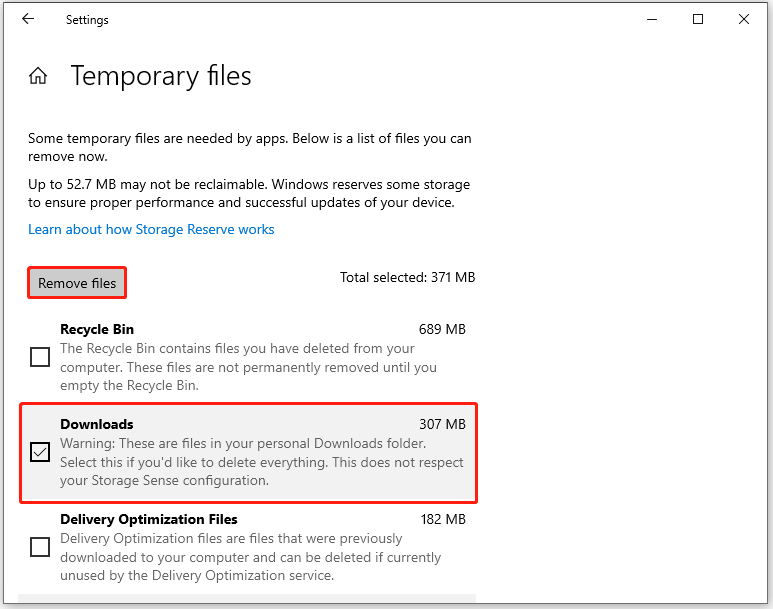
Step 4: Choose file types like Windows Update Cleanup and Downloads from the list, and then click on the Remove files option to execute the operation.
Method 3: Run Disk Cleanup
Disk Cleanup is a built-in utility on Windows devices. It can help you clean up system files safely. It is a free Windows Installer cleanup utility. You can free up space via Disk Cleanup using these steps.
Step 1: Open File Explorer by pressing Windows and E keys.
Step 2: Click on This PC in the left pane, and then find and right-click on the C drive and choose Properties.
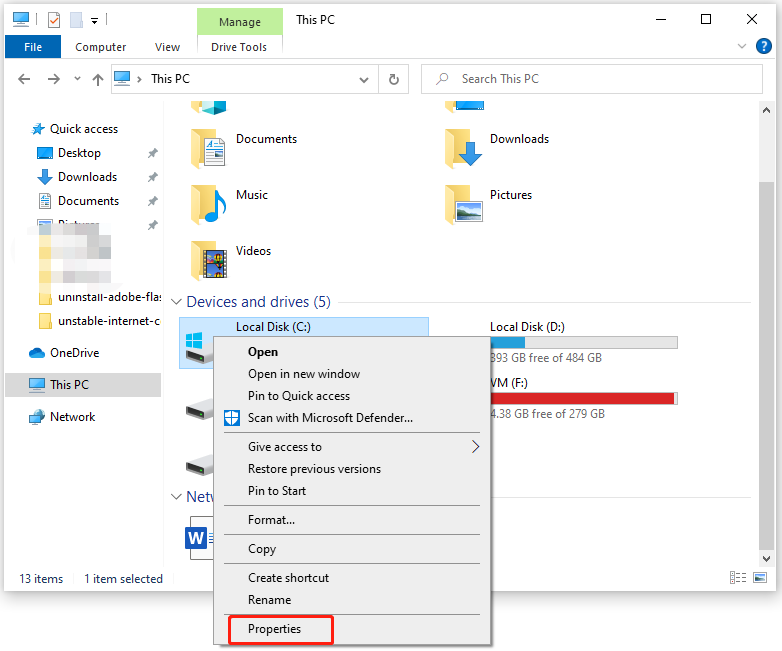
Step 3: Tap Disk Cleanup in the Properties window.
Step 4: After you click on Clean up system files, the utility will immediately calculate the disk space that you can free up from the selected drive.
Step 5: Choose files to delete and click OK to carry out the operation.
What is safe to delete in Disk Cleanup? According to your situation, you can delete files including Windows Update cleanup, Windows Upgrade log files, system error memory dump files, system archived Windows error reporting, system queued Windows error reporting, DirectX shader cache, delivery optimization files, device driver packages, system restore points, Recycle Bin, previous Windows installations, and temporary Windows installation files in Disk Cleanup.
You can directly delete unimportant files like Windows Defender, downloaded program files, temporary Internet files, thumbnails, etc.
Further reading:
Though Windows Settings and Disk Cleanup can help you do the Windows Installer folder cleanup job, they probably can’t reach your expectation. What’s more, some errors might appear while you’re using Settings or Disk Cleanup. According to user reports, errors like Settings not working, Settings app not opening, Disk Cleanup won’t open/work, Disk Cleanup stuck on Windows Update Cleanup, etc.
In cases like that, you need a third-party program to find and delete unused files in the Windows Installer folder. MiniTool Partition Wizard is an ideal option. For more information, move to the next section right now!
Related article: How to Clean up Your Computer? Top 8 Methods for You
Find what is taking up your hard drive space with a professional disk space analyzer and then delete unused files or folders. MiniTool Partition Wizard is such a tool. Its Space Analyzer feature enables you to know what is exactly consuming your disk space.
Learn your hard disk usage and delete space-consuming and useless files with this free Windows Installer cleanup utility now!
Step 1: Download and install MiniTool Partition Wizard by clicking the button below and follow the on-screen instructions.
MiniTool Partition Wizard FreeClick to Download100%Clean & Safe
Step 2: Launch this app to enter its main interface.
Step 3: Click on the Space Analyzer feature in the top bar.
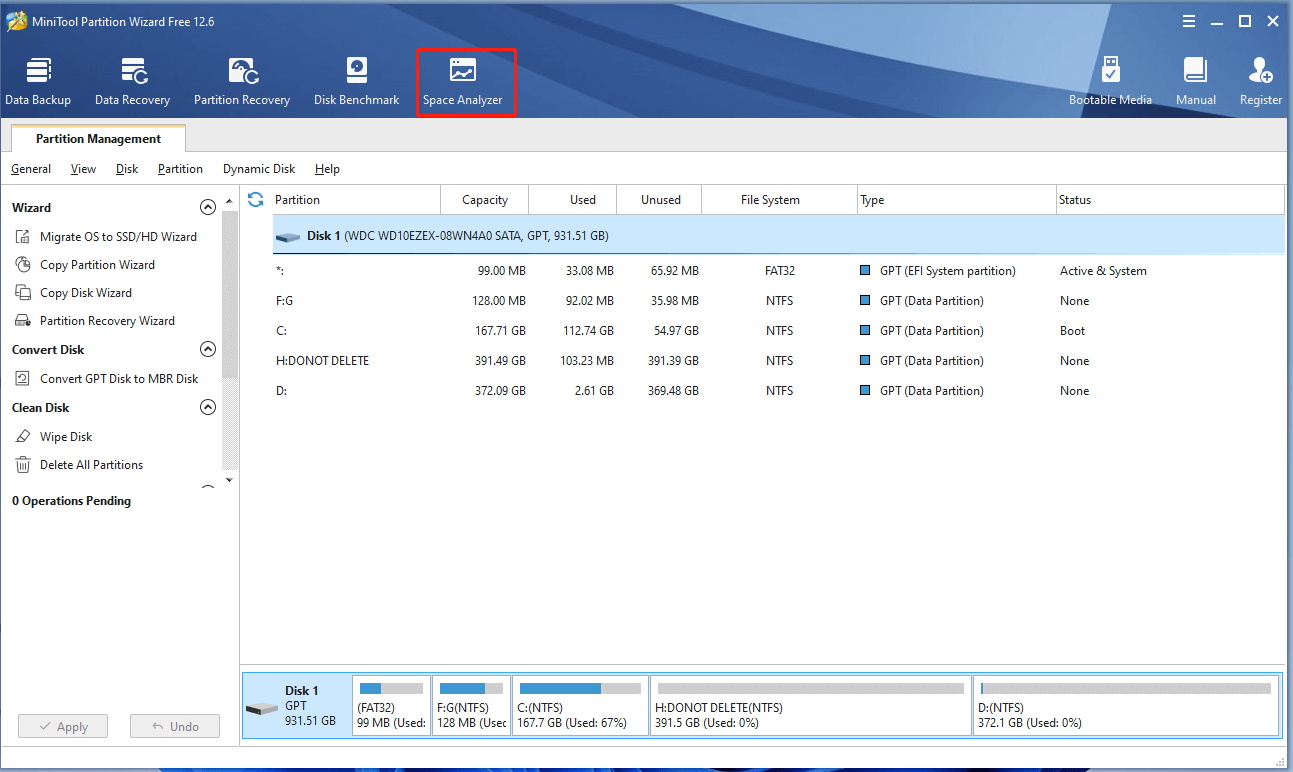
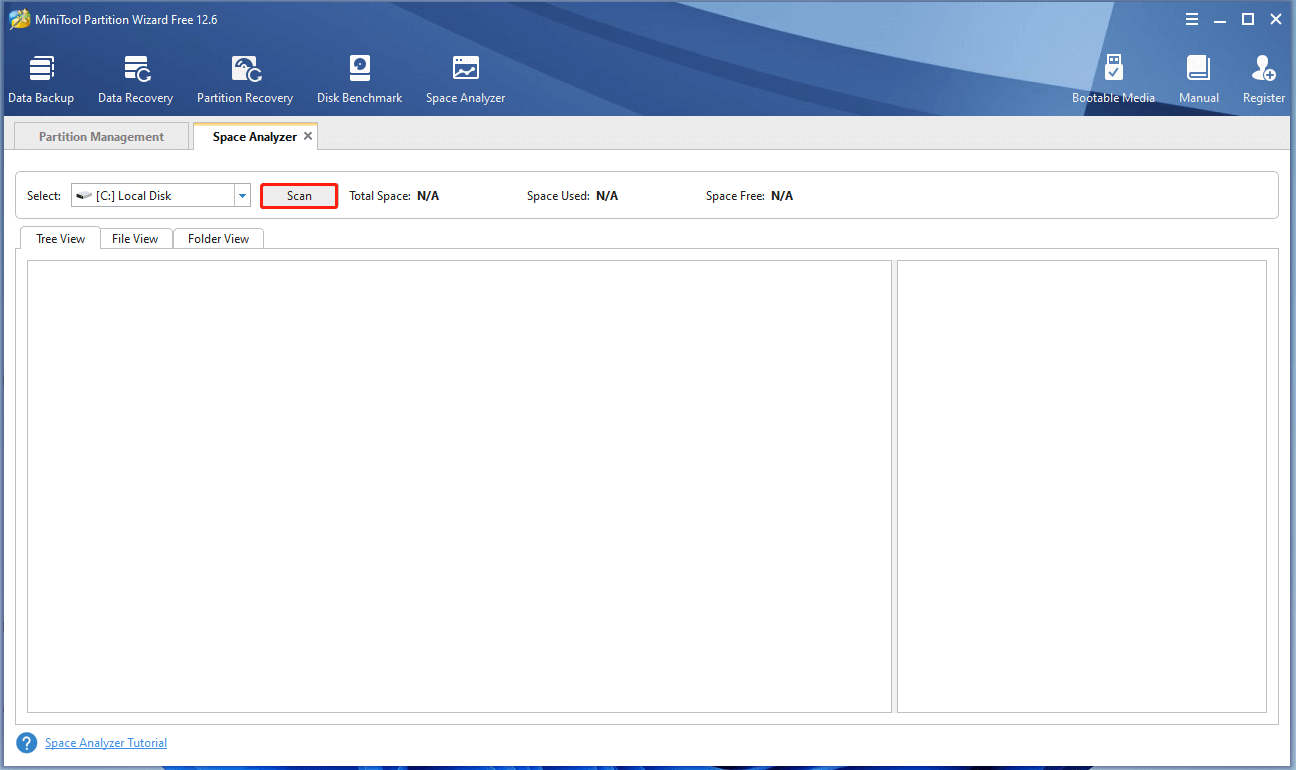
Step 4: In the next window, choose C from the drop-down menu and click Scan. Then the program will automatically scan the selected drive.
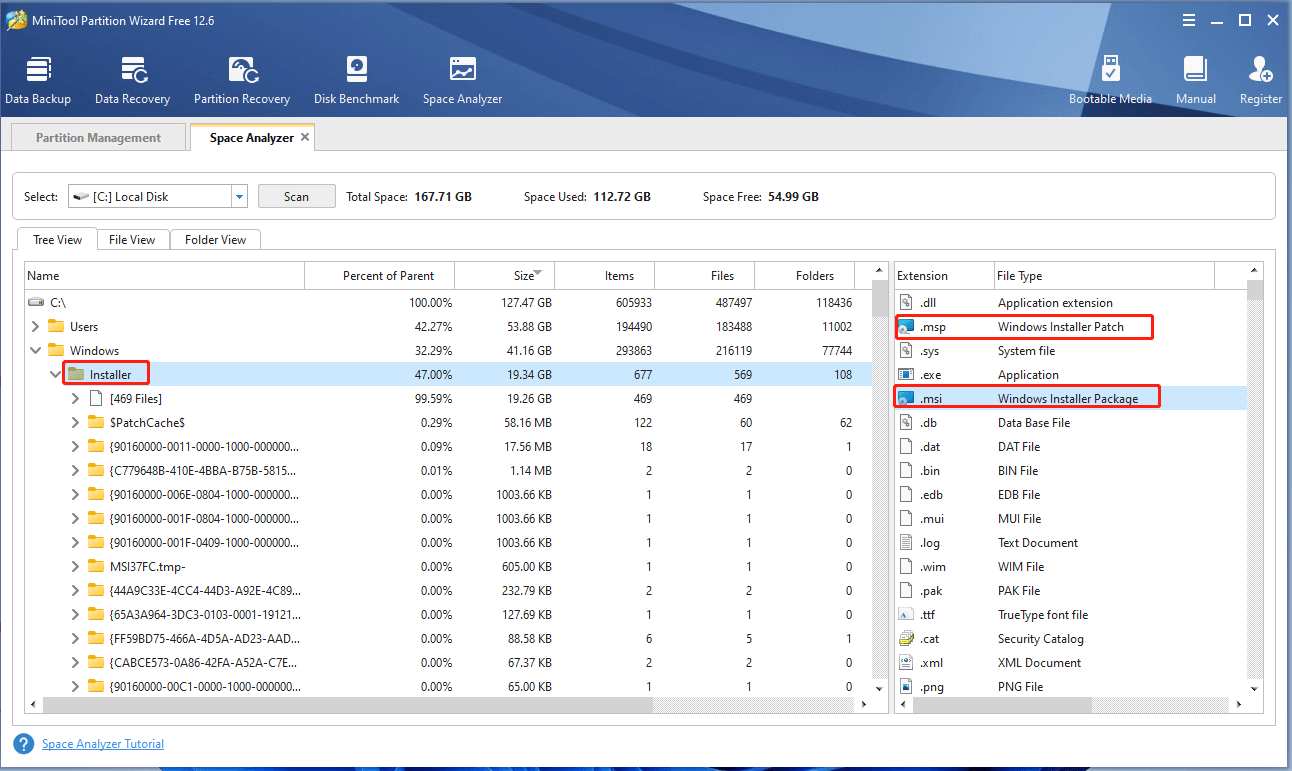
Step 5: After a while, you will receive the result. Expand the Windows folder to find the Installer folder. Likewise, expand the Installer folder to display its content. You can find the target files by using .msi or .msp file filters.
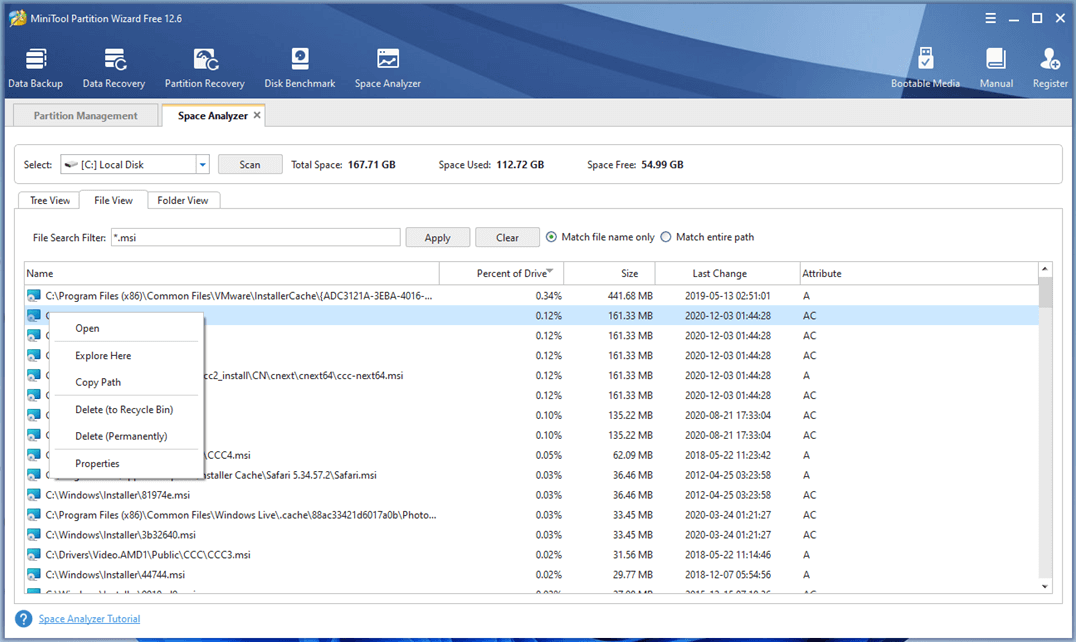
Step 6: Right-click on the unused .msi or .msp files and click Delete (to Recycle Bin) or Delete (Permanently) based on your need.
Method 5: Run Commands in CMD
In addition to the above methods, you can also perform Windows Installer folder clean up by running rmdir or rd command in CMD. Both commands can delete entire directories/folders. Besides, they work in the same way.
Here, we show you how to clean up Windows Installer folder via the rmdir command.
Step 1: Type cmd in the search box and then click Run as administrator under the searched Command Prompt app.
Step 2: In the Command Prompt window, type the command: cd <path of the folder>and hit Enter. Please remember to change the path of the directory and set it to the path of the folder. For instance, if the Windows Installer folder is located on the Desktop, you should type cd desktop and press Enter to run it.
Step 3: Delete the Windows Installer folder by running this command: rdmir Windows Installer. Type the command in the Command Prompt and hit the Enter key to execute it. After the command is executed, the Windows Installer folder will be removed.
Further reading:
To delete a directory via the rmdir command, type rmdir <directory name> and hit Enter. Please note that any directories deleted with the rmdir command can’t be recovered. You should think twice before executing the operation.
Also read: Ultimate Guide to Resolve Can’t Delete Files from SD Card Error
How to perform a Windows Installer folder cleanup Windows 10 smoothly? Here are 5 methods to do that. Pick one based on your preference.Click to Tweet
Bottom Line
You will learn what a Windows Installer folder is and how to safely execute a Windows Installer folder cleanup from this post. You can either clean up Windows Installer folder with a Windows built-in tool or an expertized Windows Installer folder cleanup utility.
Is this post helpful for you? Do you encounter any difficulties while executing the cleanup operation? Well, please share your questions in the following comment area. If you have any doubts about MiniTool Partition Wizard, directly contact us by sending an email to [email protected].