
Download Windows Speedup Tool to fix errors and make PC run faster
This post will show you how to delete Printer Ports in Windows 11/10. When you connect a printer to your PC, it installs its dedicated drivers and ports. But if you keep changing or using different printers, the previously installed drivers and ports consume space and clutter your device. Keep reading this post if you want to delete these unused printer ports.

Follow any of these methods to delete Printer Ports form your Windows 11/10 PC:
- Using Windows Settings
- Using Device Manager
- Using Registry Editor
- Using Command Prompt
Now let’s see these in detail.
1] Using Windows Settings
Here’s how you can delete printer ports from Windows Settings:
- Press the Windows key + I to open Settings.
- Navigate to Bluetooth & devices > Printers & scanners and click on the printer you want to delete.
- Here, scroll down and click on Printer properties.
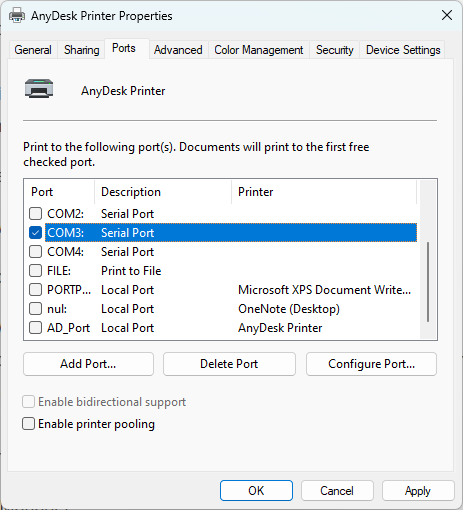
- The Printer Properties Dialog will now open; navigate to Ports.
- Select the port you want to delete and click on Delete ports.
2] Using Device Manager

Follow these steps to delete printer ports using the Device Manager:
- Click on Start, search for Device Manager, and open it.
- Expand the Print queues section.
- Here, right-click on the printer you want to delete.
- Click on Uninstall device to remove the printer and its files.
3] Using Registry Editor
In this method we’ll be using the Registry Editor to delete the printer ports. Here’s how:
- Click on Start, search regedit, and hit Enter.
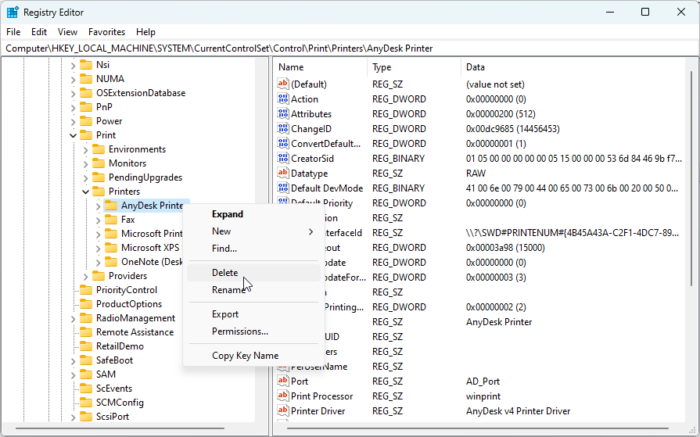
- Once the Registry Editor opens, navigate to the following path:
HKEY_LOCAL_MACHINE\SYSTEM\CurrentControlSet\Control\Print\Printers
- A subkey with your printer’s name will be present; right click on the subkey and select Delete.
4] Using Command Prompt
To remove a print port using Command Prompt in Windows, follow these steps:
- Open the Command prompt as an Admin.
- Type the following command and hit Enter. Replace the <PortName> with the port you want to delete.
printerport delete <PortName>
- Close the Command Prompt and restart your device.
You’ve now successfully deleted printer ports in Windows 11/10.
We hope this post helped you.
Read: How to change Printer Port in Windows 11/10 the easy way
How do I delete an existing printer port?
To delete an existing printer port, open Settings, navigate to Bluetooth & devices > Printers & scanners and select the printer you want to delete. Scroll down to select Printer properties and navigate to Ports. Here, select the port to delete and click Delete ports.
How do I clear a port in Windows?
Open the registry Editor and navigate to the following path:HKEY_LOCAL_MACHINE\SYSTEM\CurrentControlSet\Control\COM Name Arbiter
Right-click on b, select Modify, set the Value data as 0, and click on OK to save the changes.
Anand Khanse is the Admin of TheWindowsClub.com, a 10-year Microsoft MVP (2006-16) & a Windows Insider MVP (2016-2022). Please read the entire post & the comments first, create a System Restore Point before making any changes to your system & be careful about any 3rd-party offers while installing freeware.
Readers help support Windows Report. We may get a commission if you buy through our links.
Read our disclosure page to find out how can you help Windows Report sustain the editorial team. Read more
Today we’ll show you how to uninstall a printer port in Windows 10. When you change printers, unused ports may remain on your system. It’s important to remove these to avoid interference with new printers.
Let’s get started.
How do I remove a printer port in Windows 10?
1. Stop and restart the Printer Spooler
- Press Windows + R key to open the Run dialog box, type services.msc, and click on OK to open the Service Manager.
- Double-click on the Print Spooler service, select Stop from the new window, and click OK.

- Right-click on Print Spooler again, select Start from the new window, and click OK.


Restarting the Printer Spooler will break any impediments that may prevent you from deleting the Printer port. Check our article on what to do if the Local print spooler service is not running on your PC.
2. Uninstall Printer using the Control Panel
- Left-click the Start button, type Control Panel, then select it from the result.
- Navigate to Hardware and Sound.

- Click on Devices and Printers and select the printer device you want to remove.

- Right-click on the printer, select Remove device from the drop-down and click Yes to confirm the action.


So, this is how to remove a printer in Windows 10. Read our guide on fixing the Windows driver not available error on your PC if you cannot access the printer driver.
3. Delete the Printer port from Control Panel
- Left-click the Start button, type Control Panel, then select it from the result.
- Navigate to Hardware and Sound and click on Devices and Printers.
- Tap on any listed printer devices, then select Printer server properties.

- Click on the Ports tab, select the port you want to delete, and then click Delete port.


The above steps will remove the Printer port from your PC. However, there’s a possibility that you will run into an error saying delete printer port access denied.
Alternatively, you can read our guide on what to do if you can’t remove the Printer in Windows 10 if you run into any issues.
4. Uninstall the printer device
- Press Windows + I key to open the Settings app.
- Click on Apps, search for the printer software, and click on it.

- Select Uninstall from the drop-down and click on Uninstall to confirm the action.

- Restart your PC.


- Fix: PRIMARY_TRANSPORT_CONNECT_FAILED Error
- ERROR_IO_PRIVILEGE_FAILED: How to Fix
5. Remove the Printer Port from the Registry
- Press Windows + R keys to open the Run dialog box, type regedit, and click on OK to open the Registry Editor.
- Copy and paste the following path into the registry box:
HKEY_LOCAL_MACHINE\SYSTEM\Currentcontrolset\Control\Print\printers\
- Right-click on the Printer Name and select Delete from the drop-down.
- Restart your PC and check if the printer port is completely deleted.

6. Remove printer from Device Manager
- Press Windows + X and select Device Manager.
- Expand Print queues and locate the printer you want to delete.

- Right-click on the printer, select Uninstall device, and confirm the action.
- Restart your PC.

We hope that our guide offered you the complete methods on how to remove a printer in Windows 10 and its ports.
Also, users may run into printer port is in use errors, making it inaccessible.
Further, you can read our guide on fixing the problem with the printer setup on the PC. Also, our readers may be interested in our article about what to do if your printer won’t recognize your router.
In conclusion, follow all the solutions to find the best way to delete the printer port. If you have any questions on this guide or other queries in general, kindly leave them in the comments section.
Henderson Jayden Harper
Windows Software Expert
Passionate about technology, Crypto, software, Windows, and everything computer-related, he spends most of his time developing new skills and learning more about the tech world.
He also enjoys gaming, writing, walking his dog, and reading and learning about new cultures. He also enjoys spending private time connecting with nature.
Delete a USB virtual printer port using the Device Manager on your PC.
A USB virtual printer port is simply a printer that is linked by software to a USB port. Because the port is virtual, it is not a physical port, which can make the concept confusing for some users to grasp. If you have a USB virtual printer port installed on your computer that you never use, delete it so it doesn’t consume unnecessary space on your computer’s memory. If you want to delete a USB virtual printer port, you can do so through your computer’s Device Manager.
Step 1
Click the “Start” button followed by “My Computer.” Select “Control Panel,” then click “System.” Click the “Hardware” tab followed by the “Device Manager” button.
Step 2
Locate the USB virtual printer port that you want to delete within the list of devices in «Device Manager.» Click on either the “Printers” or “Ports” submenu to find the printer port if it is not listed on the main list.
Step 3
Click on the USB virtual printer port to highlight it, then press the «Delete» key.
If you are unable to delete TCP/IP Printer Port from the computer, the problem is due to the Printer still being in use, which should be clear from “The requested resource is in use” error message.
However, Windows is also known to come up with “The requested resource is in use” error message, when there is actually no such Printer attached to the Port.
In such cases, the problem could be due to a reference to a previously used Printer still being available in the registry, which is making Windows behave as if the Printer is attached to the computer.
If you are unable to delete an unused Printer Port from the computer due to “The requested resource is in use” error message, you should be able to fix the problem using the following methods.
Advertisement
1. Restart Print Spooler
In a majority of cases, Stopping and Restarting the Print Spooler service should fix the Error Message and allow you to delete TCP/IP Printer port on your computer.
1. Press Win + R keys to open Run Command.
2. In the Run Command window, type services.msc and click on OK.
3. On the next screen, right-click on Print Spooler service and click on Stop.

Next, right-click on Print Spooler again and click on Restart.
After this, you should be able to remove the printer port from your computer.
2. Remove Printer Port from Registry
If restarting the Print Spooler Service did not help, you will have to delete the printer in registry.
1. 1. Press Win + R keys to open Run Command.
2. Type regedit in the Run Command window and click on OK.
Advertisement
3. Navigate to HKEY_LOCAL_MACHINE\SYSTEM\CurrentControlSet\Control\Print\Printers\PrinterName > Right-click on the Printer Name and click on Delete.

After deleting the Printer from registry, make sure that you Restart the computer.