
Все способы:
- Способ 1: Самостоятельное изменение владельца элементов
- Способ 2: Создание и установка REG-файла
- Способ 3: Использование программы TakeOwnershipEx
- Вопросы и ответы: 0
Обратите внимание на то, что учетную запись TrustedInstaller из Windows 10 удалить нельзя, поскольку она является системной и от нее зависит выполнение многих стандартных операций. Единственное, что вы можете сделать при взаимодействии с этим аккаунтом, — удалить его права из конкретной папки или файла, назначив владельцем себя. В большинстве случаев такого результата и хотят добиться пользователи, сталкивающиеся с проблемами, когда на экране появляется уведомление о том, что TrustedInstaller заблокировал выполнение, изменение или удаление какого-либо файла.
Способ 1: Самостоятельное изменение владельца элементов
Если вы не желаете использовать файлы редактирования реестра или специальные программы, избавиться от TrustedInstaller в Windows 10 для конкретной директории или файла можно путем настроек параметров безопасности элемента. Необходимо указать свою учетную запись в качестве владельца и присвоить полный доступ, после чего любые связи с TrustedInstaller исчезнут и эта учетная запись не сможет заблокировать действия с переназначенными файлами.
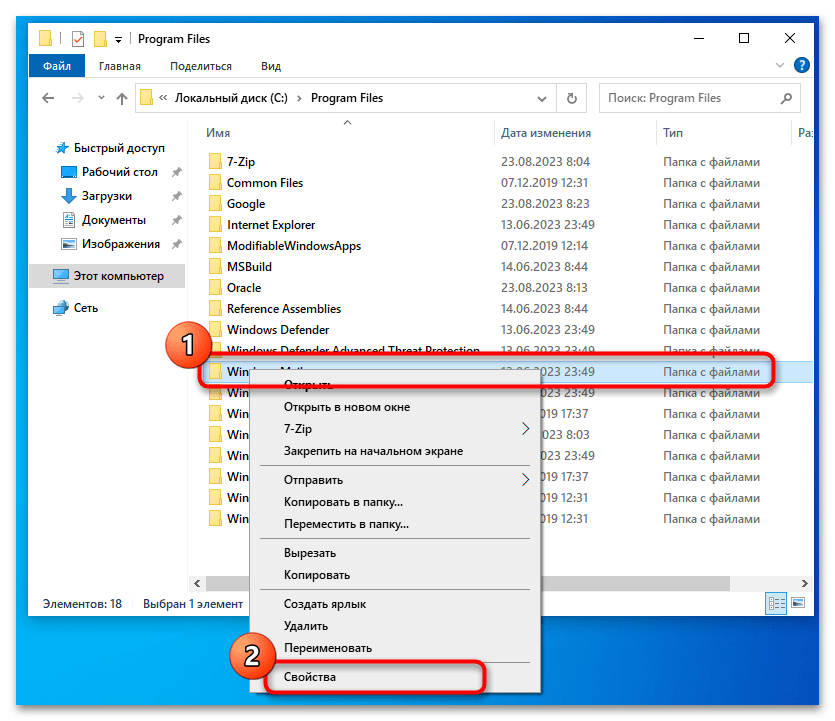
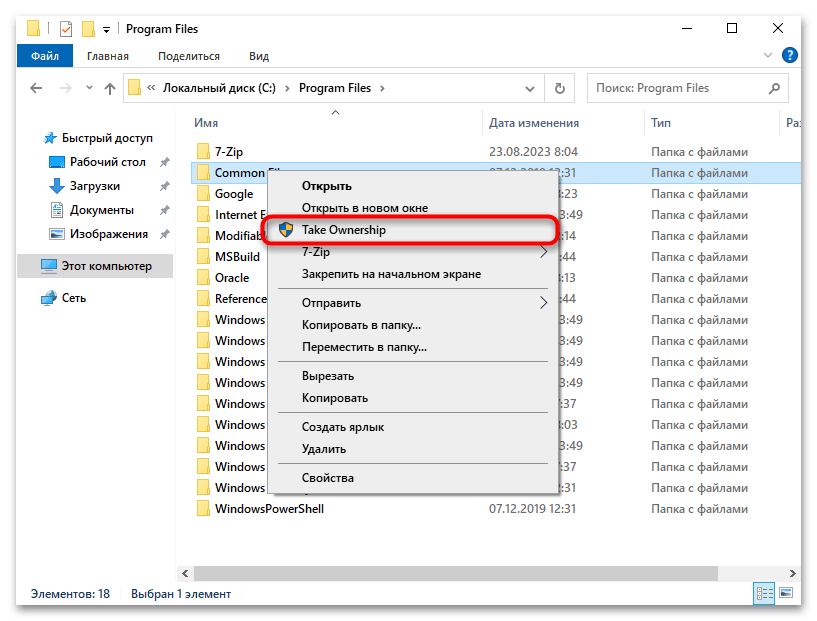
- Найдите каталог или файл через «Проводник», нажмите по нему правой кнопкой мыши для вызова контекстного меню и из него выберите пункт «Свойства».
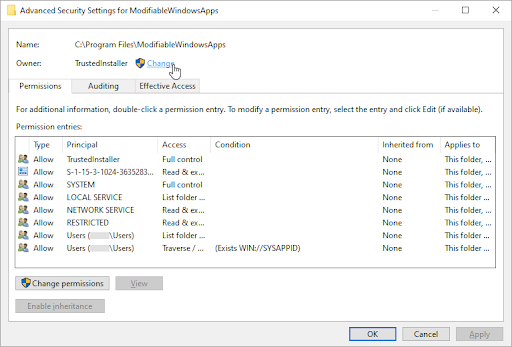
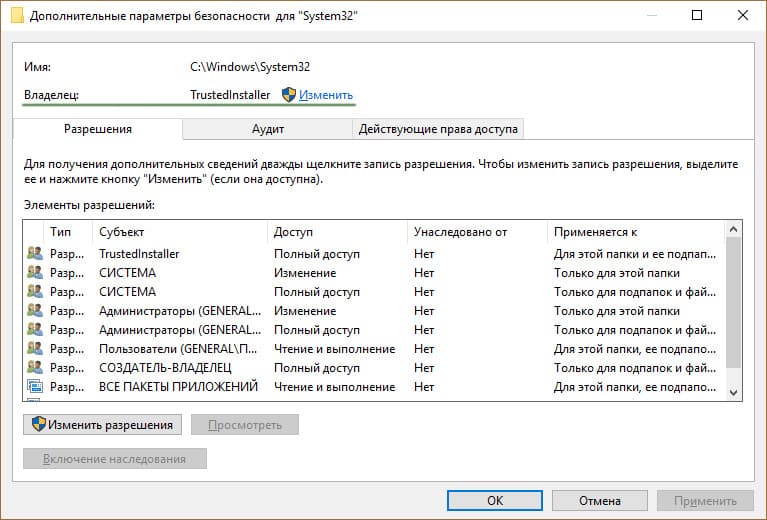
- Перейдите на вкладку «Безопасность» и нажмите по «Дополнительно» для открытия расширенных параметров безопасности.
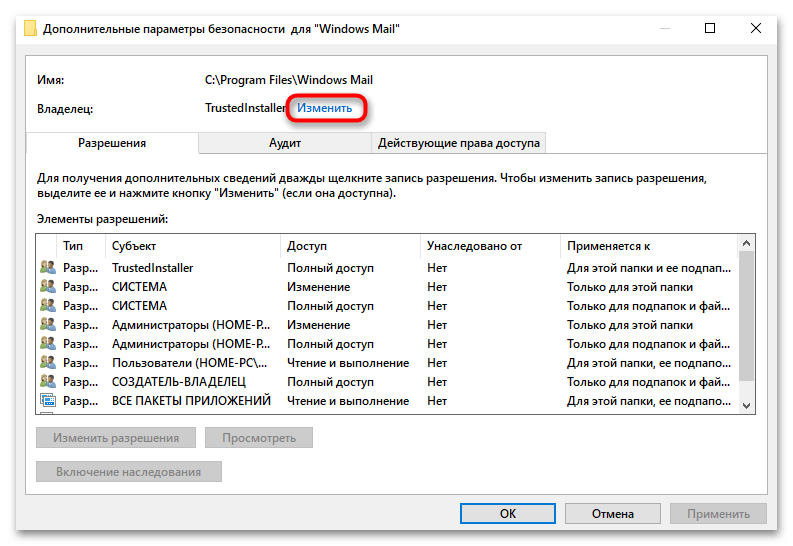
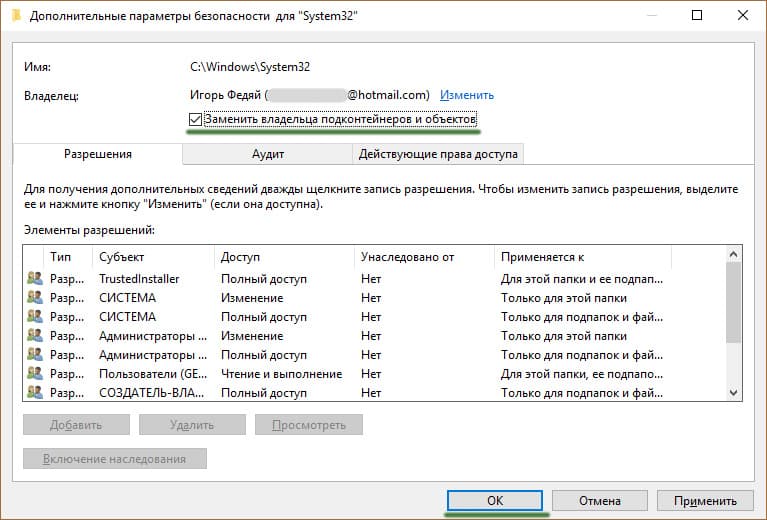
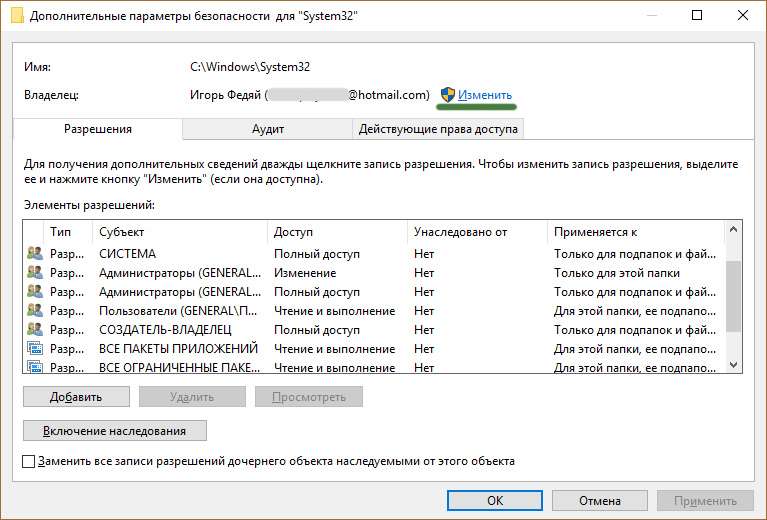
- Напротив строки «Владелец» вы увидите, что им сейчас является как раз TrustedInstaller. Эту ситуацию необходимо исправить, поэтому нажмите по кнопке «Изменить».
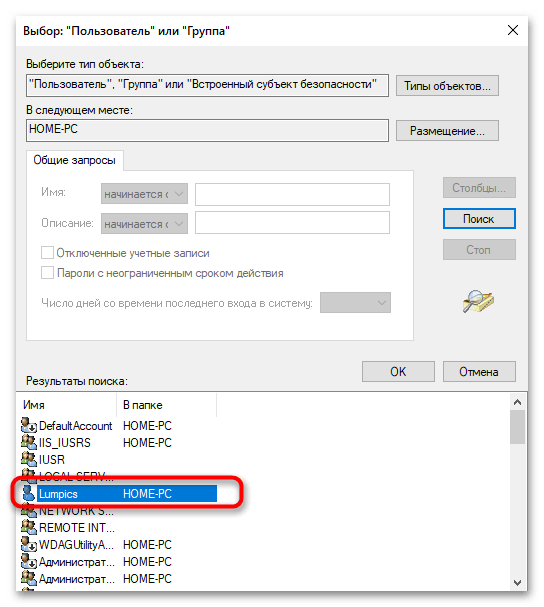
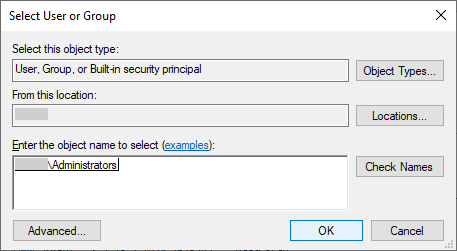
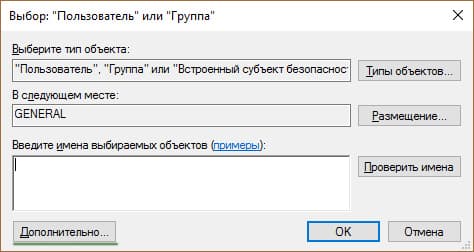
- В следующем окне вы можете ввести расположение и полное имя своей учетной записи в форме, но это не всегда удобно и можно допустить ошибку. Поэтому рекомендуем нажать «Дополнительно» для открытия нового окна поиска учетных записей.
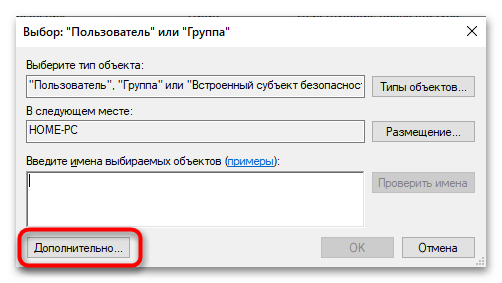
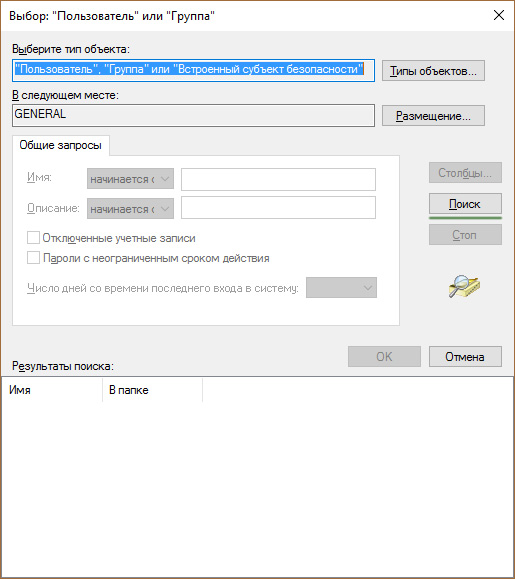
- В нем запустите процесс поиска, кликнув по кнопке с соответствующим названием.
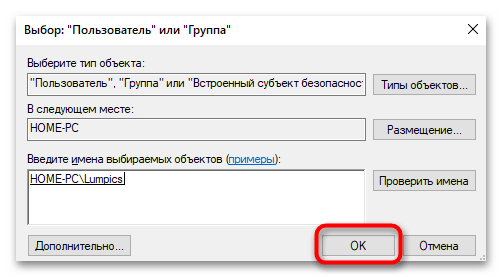
- Из списка обнаруженных профилей выберите свой, нажмите по нему дважды, подтверждая установку его как владельца для каталога или конкретного файла.
- Вы будете возвращены в предыдущее меню, где просто подтвердите внесенные только что изменения.
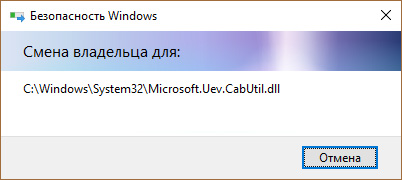
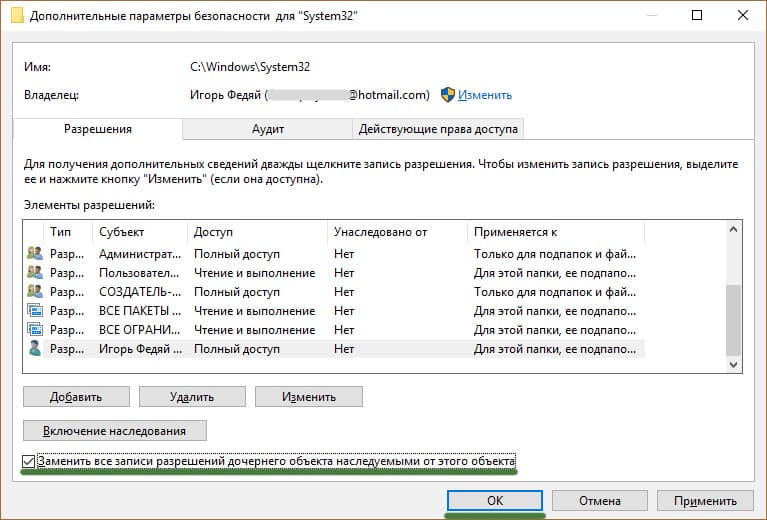
- В «Дополнительные параметры безопасности для» обязательно поставьте галочку возле пункта «Заменить владельца подконтейнеров и объектов», после чего обязательно щелкните по «Применить», чтобы изменения вступили в силу.
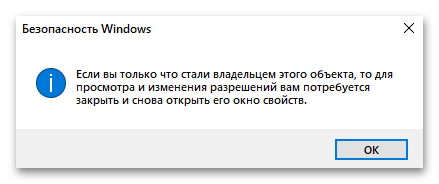
- Вы получите уведомление о том, что теперь ваша учетная запись является владельцем объекта. Закройте все окна, чтобы применились все изменения и обновились свойства.
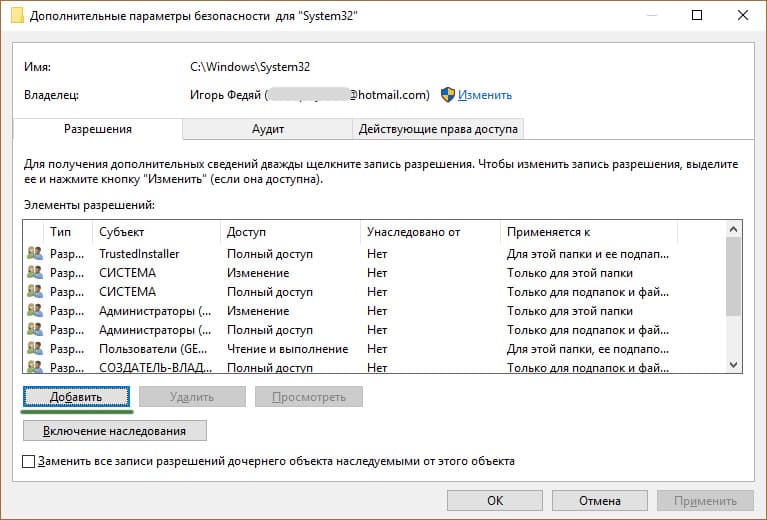
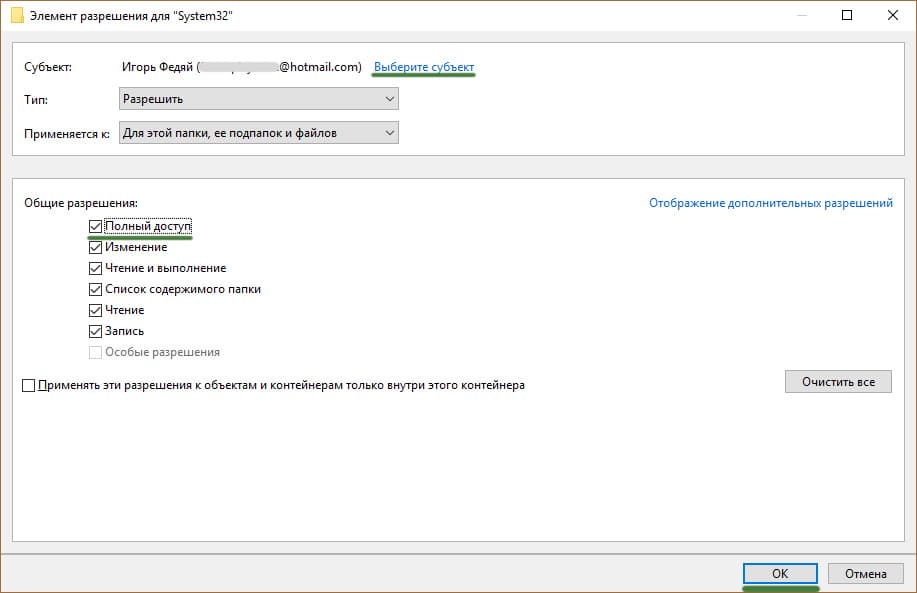
- Далее на той же вкладке «Безопасность» необходимо проверить права доступа, чтобы не было никаких других конфликтов при взаимодействии с файлами. Для этого здесь отведена кнопка «Изменить».
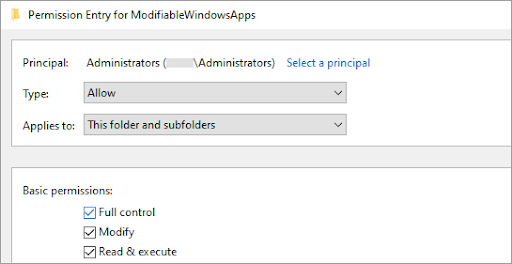
- После нажатия по ней в следующем окне нажмите «Добавить».
- Точно так же выполните поиск своей учетной записи в аналогичном окне.
- Выберите ее из списка групп и пользователей, затем поставьте галочку возле пункта «Полный доступ» и примените изменения.

Способ 2: Создание и установка REG-файла
Если вы собираетесь регулярно избавляться от TrustedInstaller для системных файлов и папок, переназначая владельца на себя и внося необходимые изменения, можно значительно упростить данный процесс. Заключается он в ручном добавлении функции переназначения владельца на себя через контекстное меню файла или папки. При вызове сценария все изменения будут внесены автоматически, а вам останется только дождаться выполнения всех команд.
- Для работы с будущим REG-файлом через поиск в «Пуске» найдите приложение «Блокнот» и запустите его.
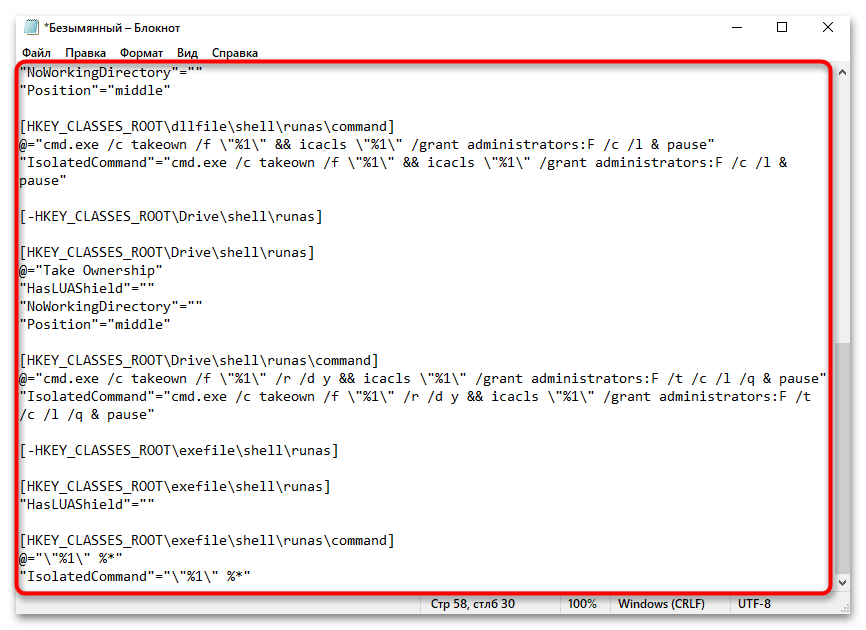
- Вставьте оставленное ниже содержимое, которое и является основной для внедрения необходимых функций.
Windows Registry Editor Version 5.00
[-HKEY_CLASSES_ROOT\*\shell\runas]
[HKEY_CLASSES_ROOT\*\shell\runas]

@="Take Ownership"

"HasLUAShield"=""

"NoWorkingDirectory"=""

"Position"="middle"
[HKEY_CLASSES_ROOT\*\shell\runas\command]

@="cmd.exe /c takeown /f \"%1\" && icacls \"%1\" /grant administrators:F /c /l & pause"

"IsolatedCommand"="cmd.exe /c takeown /f \"%1\" && icacls \"%1\" /grant administrators:F /c /l & pause"
[-HKEY_CLASSES_ROOT\Directory\shell\runas]
[HKEY_CLASSES_ROOT\Directory\shell\runas]

@="Take Ownership"

"HasLUAShield"=""

"NoWorkingDirectory"=""

"Position"="middle"
[HKEY_CLASSES_ROOT\Directory\shell\runas\command]

@="cmd.exe /c takeown /f \"%1\" /r /d y && icacls \"%1\" /grant administrators:F /t /c /l /q & pause"

"IsolatedCommand"="cmd.exe /c takeown /f \"%1\" /r /d y && icacls \"%1\" /grant administrators:F /t /c /l /q & pause"
[-HKEY_CLASSES_ROOT\dllfile\shell\runas]
[HKEY_CLASSES_ROOT\dllfile\shell\runas]

@="Take Ownership"

"HasLUAShield"=""

"NoWorkingDirectory"=""

"Position"="middle"
[HKEY_CLASSES_ROOT\dllfile\shell\runas\command]

@="cmd.exe /c takeown /f \"%1\" && icacls \"%1\" /grant administrators:F /c /l & pause"

"IsolatedCommand"="cmd.exe /c takeown /f \"%1\" && icacls \"%1\" /grant administrators:F /c /l & pause"
[-HKEY_CLASSES_ROOT\Drive\shell\runas]
[HKEY_CLASSES_ROOT\Drive\shell\runas]

@="Take Ownership"

"HasLUAShield"=""

"NoWorkingDirectory"=""

"Position"="middle"
[HKEY_CLASSES_ROOT\Drive\shell\runas\command]

@="cmd.exe /c takeown /f \"%1\" /r /d y && icacls \"%1\" /grant administrators:F /t /c /l /q & pause"

"IsolatedCommand"="cmd.exe /c takeown /f \"%1\" /r /d y && icacls \"%1\" /grant administrators:F /t /c /l /q & pause"
[-HKEY_CLASSES_ROOT\exefile\shell\runas]
[HKEY_CLASSES_ROOT\exefile\shell\runas]

"HasLUAShield"=""
[HKEY_CLASSES_ROOT\exefile\shell\runas\command]

@="\"%1\" %*"
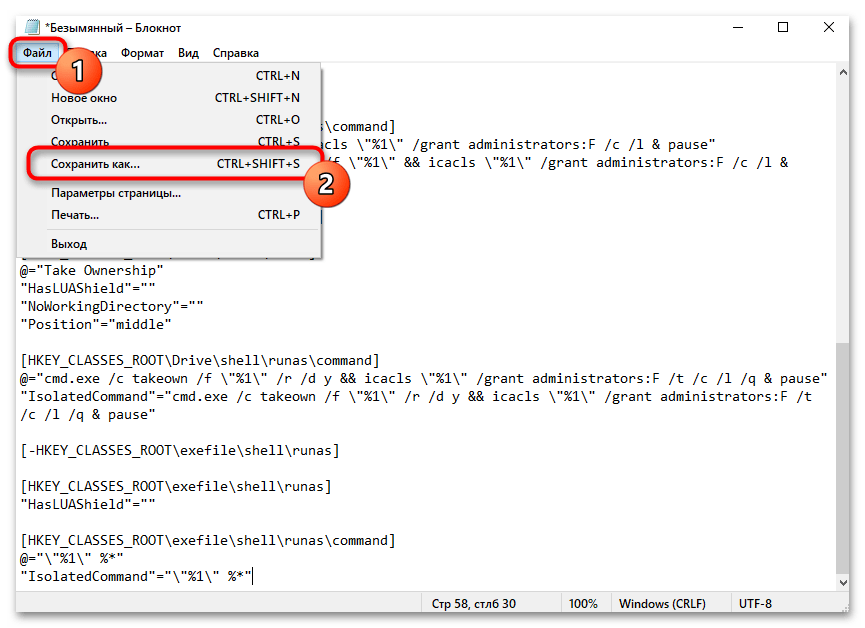
"IsolatedCommand"="\"%1\" %*" - После этого итоговый файл необходимо сохранить, для чего вызовите меню «Файл» и выберите вариант «Сохранить как».
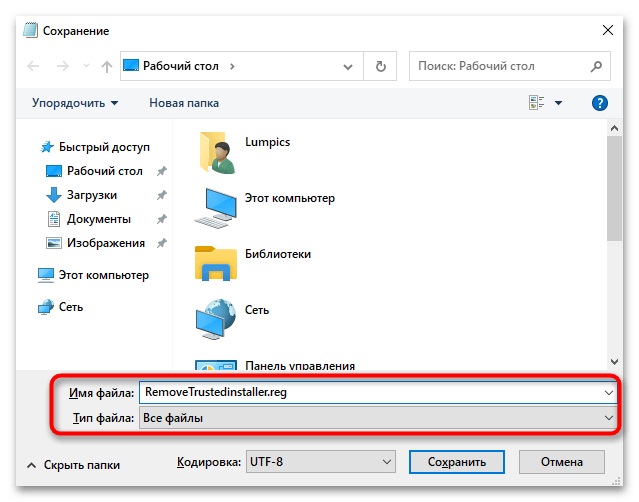
- Задайте для него любое название, но обязательно установите формат как «.reg», а также тип файла отметьте как «Все файлы».
- Поместите этот объект на рабочий стол или в любое удобное место на компьютере. Как будете готовы, дважды щелкните по нему для запуска.
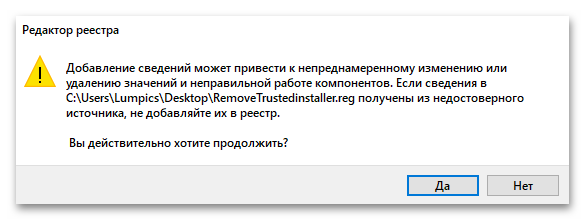
- Появится предупреждение о том, что будут внесены изменения в реестр. Подтвердите его, кликнув по «Да».
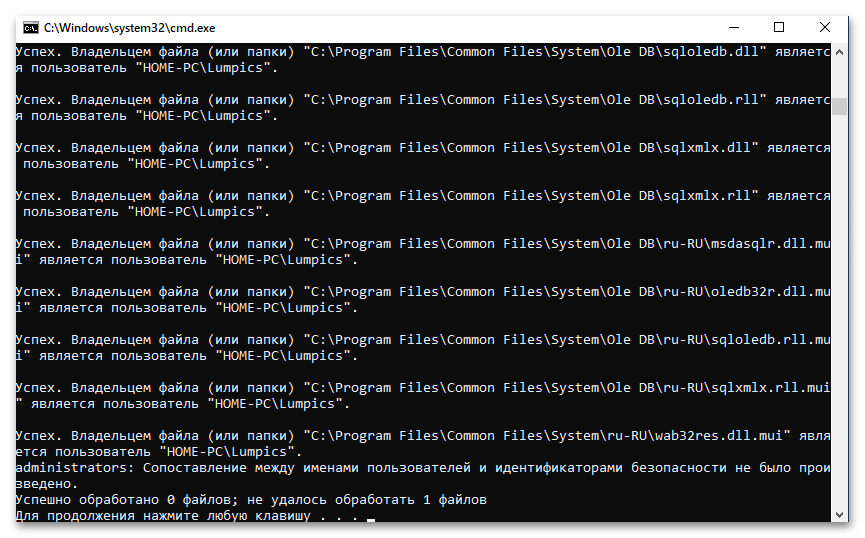
- Теперь вы можете нажать правой кнопкой мыши по любому каталогу или файлу и в контекстном меню найти пункт «Take Owership», который и отвечает за переназначение владельца на текущий профиль.
- При выполнении откроется «Командная строка» и все операции будут выполнены автоматически. Вам нужно только дождаться появления строки «Для продолжения нажмите любую клавишу» и нажать по этой самой любой клавише, чтобы консоль была закрыта.
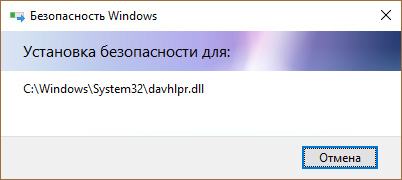
Во время выполнения операции вы можете увидеть сообщение о том, что некоторые файлы не были обработаны, однако появляющиеся выше сообщения «Успех» свидетельствуют о том, что изменения вносятся успешно. По завершении вам просто достаточно проверить владельца папки или файлов, чтобы убедиться в корректности работы REG-файла.

В будущем, если вы захотите убрать этот пункт из контекстного меню «Проводника», все изменения можно будет откатить. Для этого запустите «Блокнот» так, как это было показано выше, однако на этот раз вставьте другой код.
Windows Registry Editor Version 5.00
[-HKEY_CLASSES_ROOT\*\shell\runas]

[-HKEY_CLASSES_ROOT\Directory\shell\runas]

[-HKEY_CLASSES_ROOT\dllfile\shell\runas]

[-HKEY_CLASSES_ROOT\Drive\shell\runas]

[-HKEY_CLASSES_ROOT\exefile\shell\runas]

[HKEY_CLASSES_ROOT\exefile\shell\runas]

"HasLUAShield"=""
[HKEY_CLASSES_ROOT\exefile\shell\runas\command]

@="\"%1\" %*"

"IsolatedCommand"="\"%1\" %*"
Точно также сохраните его в формате REG, запустите и подтвердите внесение изменений. Если пункт в контекстном меню все еще присутствует, просто перезагрузите компьютер и проверьте еще раз.
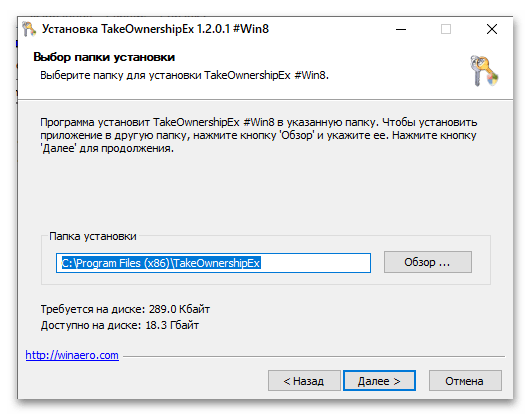
Способ 3: Использование программы TakeOwnershipEx
Программа TakeOwnershipEx от известного разработчика разных твикеров для операционных систем Windows как раз предназначена для того, чтобы добавить в контекстное меню «Проводника» примерно такой же пункт, который мы создавали вручную выше, но она делает это автоматически, без необходимости самостоятельно вмешиваться в реестр. При удалении программы и пункт из контекстного меню тоже исчезнет.
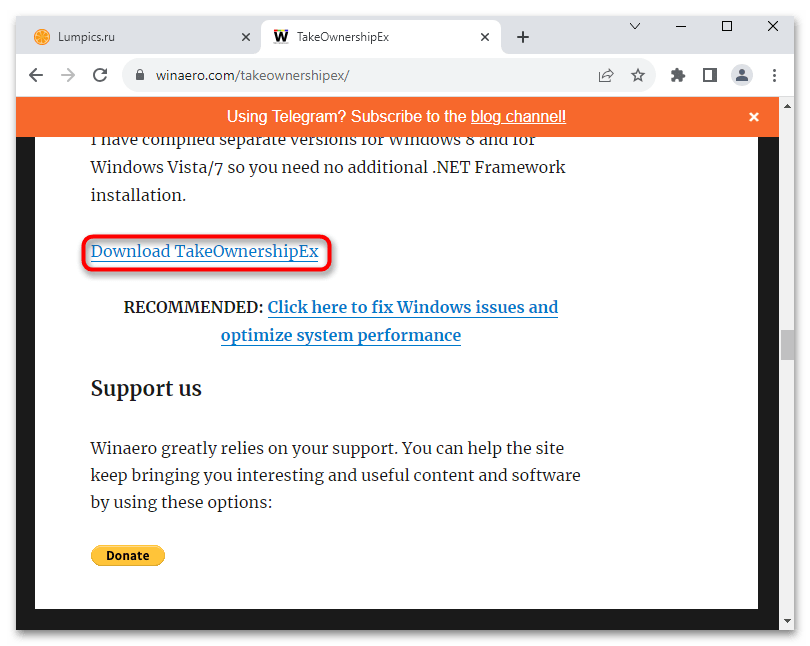
Скачать TakeOwnershipEx с официального сайта
- Перейдя на официальный сайт по ссылке выше, вы найдете ссылку «Download TakeOwnershipEx», по которой и нужно нажать для скачивания программы.
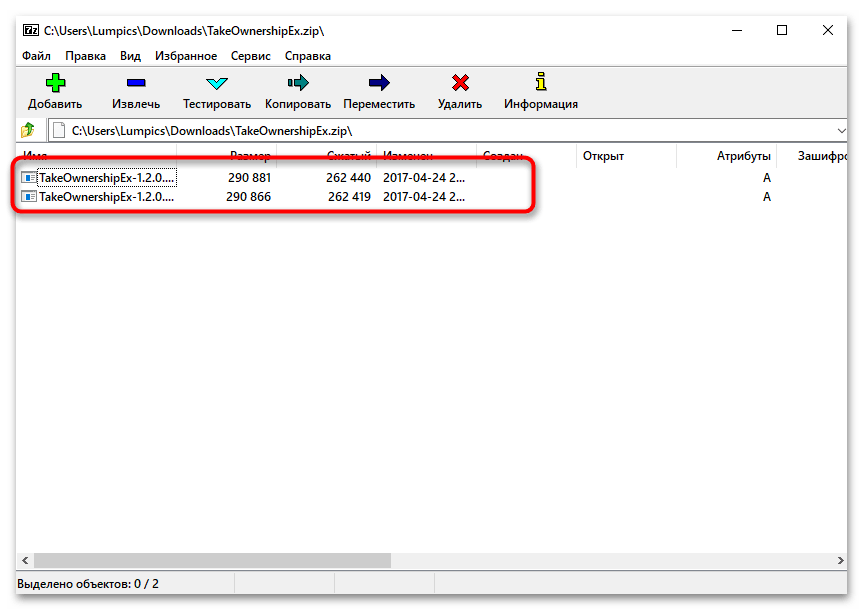
- Полученный архив откройте через любую удобную для вас программу и запустите оттуда исполняемый файл установщика, соответствующий разрядности установленной операционной системы.
- Процесс установки стандартный, единственное — мы не рекомендуем менять путь, его лучше оставить стандартным.
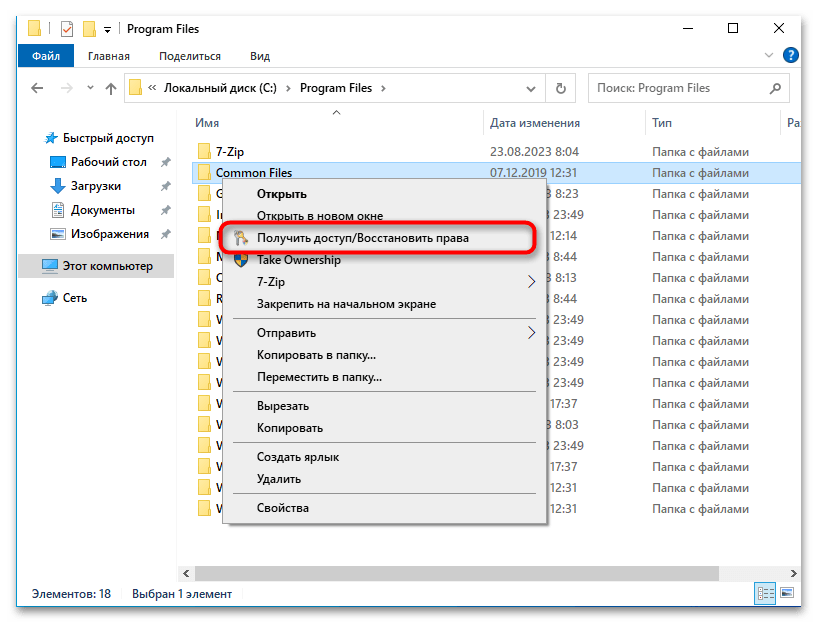
- После установки нажмите по любому каталогу или файлу правой кнопкой мыши. Вы увидите пункт «Получить доступ/Восстановить права». Эта функция как раз и поможет избавиться от TrustedInstaller, став владельцем элемента и получив полные права на его управление.
Наша группа в TelegramПолезные советы и помощь
Rick Akura
Are you experiencing issues with TrustedInstaller on Windows 10? In this article, you’ll learn what is TrustedInstaller and how to its high CPU usage.
Are you experiencing issues with TrustedInstaller on Windows 10? In this article, you’ll learn what is TrustedInstaller, how to remove it, and how to fix TrustedInstaller high CPU usage issues.
Windows 10 is made up of hundreds of components, all coming together to provide a good user experience. However, in some cases, these components may seem more of a headache than a blessing. Recently, many came online to share their experiences and report issues with a component called TrustedInstaller.
Many users have expressed their frustrations with the TrustedInstaller not allowing them to delete or modify files in some system locations. In some cases, TrustedInstaller uses high CPU resources and slows down the computer.
In this post, you’ll learn what the TrustedInstaller is and how to fix or remove the TrustedInstaller in Windows 10.
Table of Contents
- What Is the TrustedInstaller in Windows 10?
- Should I Remove TrustedInstaller?
- How To Fix TrustedInstaller Corruption and High CPU Usage
- Method 1. Run the System File Checker (SFC Scan)
- Method 2. Use a System Restore Point
- Method 3. Run a Malware Scan
- Final Thoughts
What Is the TrustedInstaller in Windows 10?
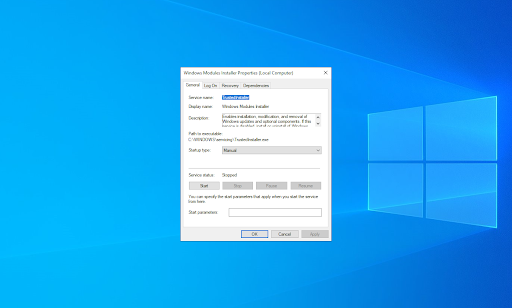
The TrustedInstaller is a Windows Modules Installer component, responsible for helping you install, modify and remove updates and other Windows components. It’s essentially a built-in, hidden “user account” in Windows 10, as well as Windows 8 and Windows 7.
It “owns” some of your system files, such as various files in your Program Files folder, and your Windows folder. This, in and of itself, doesn’t cause many issues, but some users have been fed up with the component blocking them from editing or deleting some folders and files.
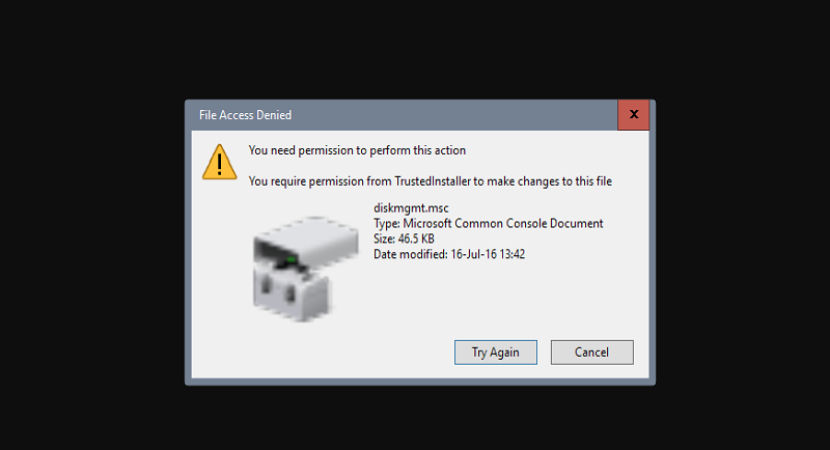
For example, when trying to rename a folder, you may come across the following error: “You require permission from TrustedInstaller to make changes to this folder”. You might think that there’s nothing you can do to fix this, as TrustedInstaller is not a real user. However, we have some workarounds and methods to help you.
Should I Remove TrustedInstaller?
No, you shouldn’t remove TrustedInstaller under any circumstances. TrustedInstaller is not malware, and it can’t harm your computer other than causing CPU consumption.
It’s a necessary part of your operating system, responsible for handling complex operations within Windows 10. Without it, your system will end up corrupted, often beyond repair. If someone tells you to delete the TrustedInstaller, don’t listen to their instructions.
If you require access to system files, instead of removing the TrustedInstaller, you can take ownership of files and folders. This is a completely safe way of bypassing the TrustedInstaller protection, as long as you stay mindful of what files you can and can’t modify.
How To Take Ownership of Your Files
While the TrustedInstaller account owns your system files, it’s possible to regain ownership of them if you want to modify them. Take into account that the module often prevents you from causing issues. For example, if you rename the System32 folder, your operating system will stop working. TrustedInstaller blocks you from renaming this folder in order to prevent damage.
Warning: Only proceed with these steps if you’re an advanced user and know what you’re doing. We highly recommend creating a system restore point and backing up important files before modifying any system folder.
- Open the File Explorer. This can be done by clicking on the Explorer icon in your taskbar, or by pressing the Windows + E keys on your keyboard.
-
Locate the file or folder you want to take ownership of. Right-click on it, and then choose Properties from the context menu.

-
A new window will appear. Here, switch to the Security tab, and then click on the Advanced button to access special permission and settings.
-
Click on the Change link next to the current owner of the folder or file, which should be TrustedInstaller. You’ll need administrative permissions to be able to do this.
-
Type Administrators in the Enter the object name to select field, then click on the Check Names button. The system should automatically input the full name. When done, click the OK button.
-
Make sure to place a checkmark next to the Replace owner on subcontainers and objects option. This is going to apply the modification to all files and folders within the main one.
-
Afterward, select a group selected and click on the Edit button. A new window should open up.
-
Click on Select a principal and choose the Administrators group as you did in Step 5. Place a checkmark next to the Full Control option to grant administrator accounts full permissions to the folder and its files.
- Click the OK button twice to save your changes and exit the advanced properties window. Now, you should be able to work with the folder and/or files you previously couldn’t delete or modify.


Repeat these steps for any more folders and/or files you want to modify. You should be able to edit and delete system files now. If you feel that you often need to repeat these steps, we highly recommend looking into downloading a .reg file that adds the “Take Ownership” option to your right-click context menu.
How To Fix TrustedInstaller Corruption and High CPU Usage
In some cases, the TrustedInstaller service or account may become corrupted. This can lead to many issues, especially because the account is tied to system files. If you think that the TrustedInstaller is using too much CPU or it has been corrupted, follow the methods below to fix it.
These corruptions can be caused by abrupt shutdowns, a new Windows Update, or malware infections. To ensure your files are safe, use an antivirus app like Kaspersky Anti-virus 2021.
Method 1. Run the System File Checker (SFC Scan)
The System File Checker (SFC) is a troubleshooting tool available in Windows 10 by default. It’s able to automatically detect corrupted system files, and repair them to working order. You can use the SFC scan to potentially fix any corruption with the TrustedInstaller account.
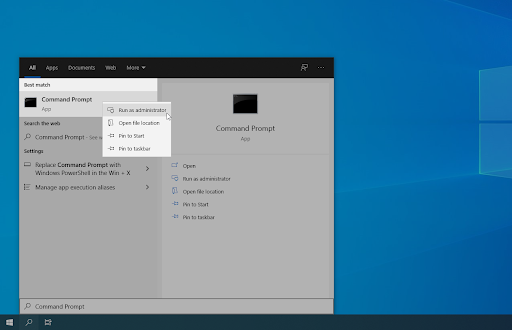
- Open the search bar in your taskbar by clicking on the magnifying glass icon. You can also bring it up with the Windows + S keyboard shortcut.
-
Type in Command Prompt. When you see it in the results, right-click on it and choose Run as Administrator. If you need help, check out our How to make a local user an administrator in Windows 10 guide.
- When prompted by the User Account Control (UAC), click Yes to allow the app to launch with administrative permissions.
-
Once the Command Prompt window is open, type in the following command and press Enter to execute it: sfc /scannow
- Wait for the SFC scan to finish scanning your computer and repairing any corrupt files it locates. This may take a long time; ensure that you don’t close the Command Prompt or shut down your computer.
- Restart your device once the command has been executed.
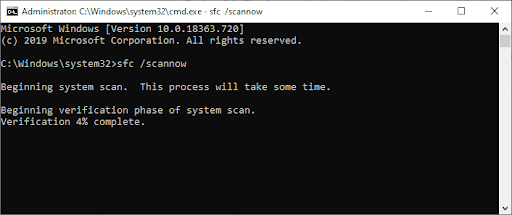
The TrustedInstaller should function as intended now. If you still experience high CPU usage or any similar issues tied to the module, continue reading.
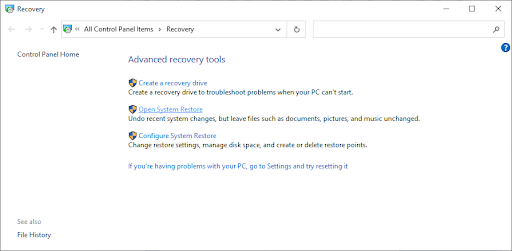
Method 2. Use a System Restore Point
If you feel that your system is functioning poorly and the System File Checker isn’t able to help, we recommend rolling back to a restore point. If you or your system created a suitable restore point, you’ll be able to return to it and continue using your computer with the settings at that time. This could fix TrustedInstaller corruptions.
- Open the search bar in your taskbar by clicking on the magnifying glass icon. You can also bring it up with the Windows + S keyboard shortcut.
-
Type in System Restore and click on Recovery from the search results. This should be on the top, in the Best match category.
-
Click on the Open System Restore link in the Advanced recovery tools section.
-
Follow the on-screen instructions to restore a past point in time. You can select a restore point yourself, or use the recommended one. Make sure to check what files and applications will be affected when you restore your system.
- After choosing the options you’re happy with, click on the Finish button and wait for Windows 10 to restore your computer.

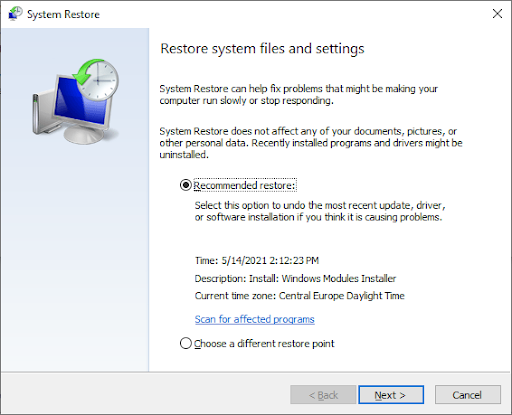
After completing the restoration process, check if TrustedInstaller is still causing high CPU usage. Don’t see an improvement? Continue reading to ensure your system isn’t infected with malicious malware.
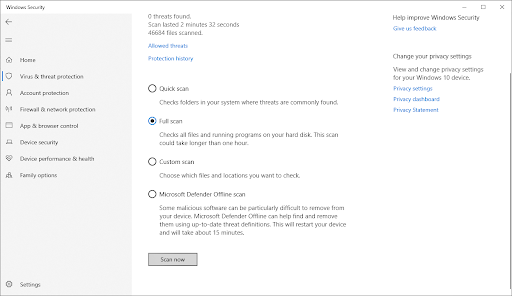
Method 3. Run a Malware Scan
While highly unlikely, there is a small chance that TrustedInstaller.exe is infected with malware, or it was replaced by malicious software. If you want to stay safe, we recommend running a full system scan for malware.
We’ll be using the built-in Windows Defender to conduct a system scan, however, a more focused third-party antivirus solution may work better.
- Open the search bar in your taskbar by clicking on the magnifying glass icon. You can also bring it up with the Windows + S keyboard shortcut.
-
Type in Windows Security and launch it from the search results.
-
Switch to the Virus & Threat Protection tab using the home screen or the menu in the left-side pane. Click on the Scan Options link.
-
Select the Full scan option. This is going to check every single file on all of your drives to ensure no threats can hide. Take note that this scan may last over 1-2 hours, depending on how many files you have on your system.
- Click on the Scan now button to begin the scan. If a threat is detected, Windows 10 will automatically quarantine or remove it entirely. You can review the scan results afterward.


Final Thoughts
We hope this post has helped you understand what the TrustedInstaller is on your computer and whether you should remove it. If you need further help, our Help Center offers hundreds of guides to assist you. Return to us for more informative articles, or get in touch with our experts for immediate assistance.
One More Thing
Would you like to receive promotions, deals, and discounts to get our products for the best price? Don’t forget to subscribe to our newsletter by entering your email address below! Be the first to receive the latest news in your inbox.
You May Also Like
» What is the WMI Provider Host? Is it Safe?
» What is Microsoft Visual Studio? Where can I download it?
» What is Werfault.exe and how to fix it on Windows 10?
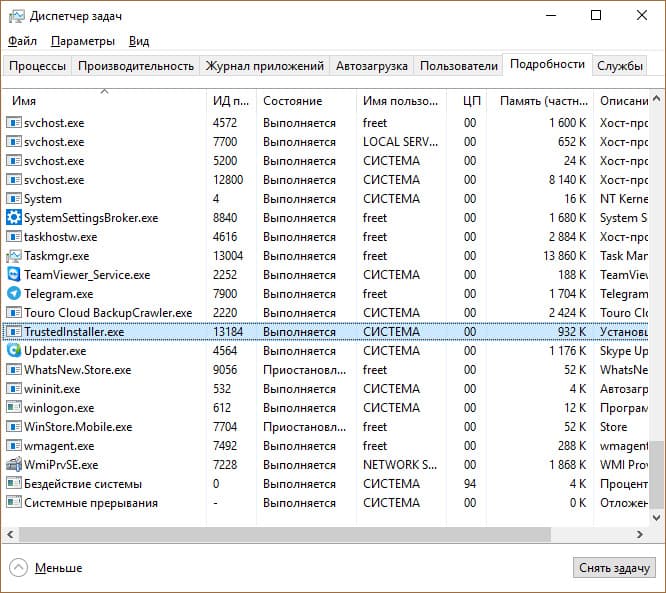
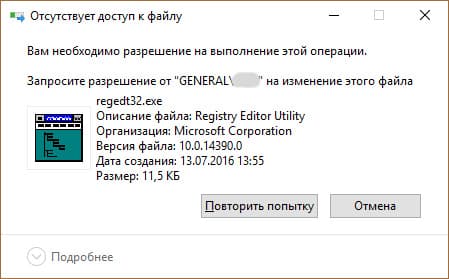
Пользователи Windows 10 и предыдущих версий при попытке внести изменения в файлы сталкиваются с проблемой. На экране появляется уведомление: “Вам необходимо разрешение на выполнение этой операции. Запросите разрешение от “TrustedInstaller” на изменение этого файла”. Что это такое – TrustedInstaller и как получить это “разрешение” опишу в этой статье.

Что это такое?
TrustedInstaller – это служба Windows для установки модулей, что работает по технологии Windows Resource Protection. Также, служба отвечает за безопасность доступа к системным файлам. На деле, пользователи сталкиваются с ней только при попытке удаления, изменения и чтения файлов и папок в системе, к которым необходимо получить доступ. Служба TrustedInstaller ставит себя в роль “владельца папки” и отбирает права у администраторов системы, тем самым образуя защиту от внешнего воздействия.
Пользователи также сталкиваются с TrustedInstaller.exe – это исполняемый файл-процесс, который отвечает за обновления компонентов Windows. Он может нагружать систему, когда собраны доступные обновления.
Как отключить службу?
Для того, чтобы получить доступ к нужной папке и обойти системную защиту, необходимо наделить правами доступа текущего администратора (стать владельцем, отключив права TrustedInstaller). Чтобы это сделать, выполните несколько несложных операций:
- Нажмите ПКМ по папке и выберите “Свойства”. Вкладка “Безопасность” – нажмите “Дополнительно”.
- В окне “Дополнительные параметры безопасности”, напротив пункта “Владелец” нажмите “Изменить”.

- В открывшемся окне нажмите “Дополнительно”.

- В этом окне нажмите “Поиск”.

- Выберите владельца (ваш профиль администратора) и нажмите “ОК”.
- В последующем окне подтвердите выбор.
- Для смены владельца содержимого директории, поставьте галочку напротив “Заменить владельца подконтейнеров и объектов” и нажмите “ОК”.
- Подождите некоторое время, пока изменения вступят в силу (если в папке много вложенных файлов и папок).


Служба успешно отключена, но для того чтобы взаимодействовать с папкой, нужно обойти еще одну защиту. Хоть я стал владельцем папки, удалять или изменять ее содержимое я не могу. При удалении файла, теперь нужно запросить разрешение у самого себя.
Для этого назначим правами владельца папки используемый профиль администратора:
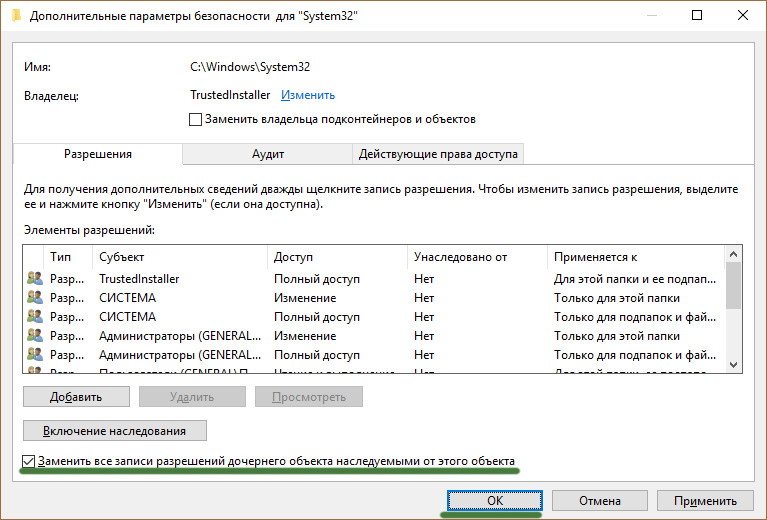
- Зайдите в “Свойства” папки → вкладка “Безопасность” и нажмите “Дополнительно”.
- Посмотрите, есть ли ваш профиль в списке “Элементы разрешений”. Если нет, нажмите “Добавить”.
- В открывшемся окне нажмите “Выберите субъект”. Воспользуйтесь поиском и выберите свой профиль. Поставьте галочку напротив “Полный доступ” и подтвердите изменения, нажав “ОК”.

- Теперь выставите галочку “Заменить все записи разрешений дочернего объекта наследуемыми от этого объекта” и нажмите “ОК”. В открывшемся окне безопасности также жмем два раза “Да”.
- Подождите некоторое время, чтобы изменения вступили в силу.
Теперь можно без препятствий удалять или изменять файлы. Единственной защитой от изменений файла или папки может оказаться пункт “только для чтения”.
Важно! Не изменяйте/удаляйте системные папки и файлы. Это может привести к нестабильной работе системы. Перед работой с системными файлами сделайте точку восстановления Windows.
Как включить службу обратно?
Совет! После работ с файлами и папками, рекомендую вернуть права TrustedInstaller обратно. Это повысит защиту системы.
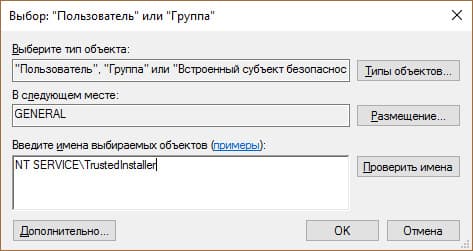
Возврат делается в таком же точно порядке, только для пользователя “TrustedInstaller”, но с некоторым нюансом:
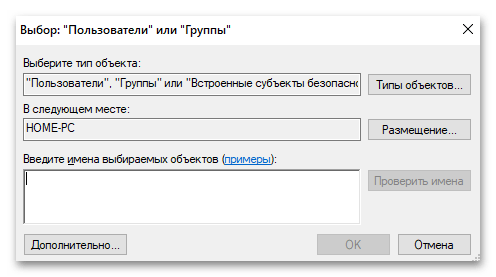
- Заходим в “Свойства” папки → вкладка “Безопасность” → Дополнительно. Нажмите “Изменить” напротив пункта “Владелец”.
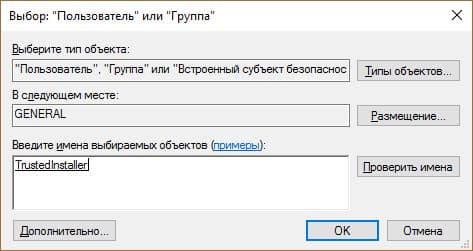
- В открывшемся окне в поле “Введите имена выбираемых объектов” введите
NT SERVICE\TrustedInstaller
и нажмите “Проверить имена”.

- После подтягивания нужного пользователя нажмите “ОК”.
- Не забудьте поставить галочку, как показано на скриншоте. Подтвердите свои действия кнопкой “ОК”.
- Дождитесь, когда изменения вступят в силу.

Как отключить файл-процесс .exe?
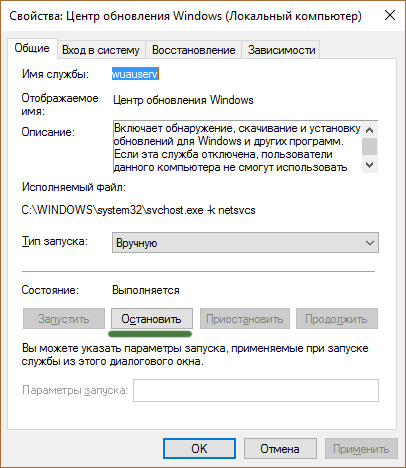
Если процесс TrustedInstaller.exe сильно нагружает систему, вы можете его отключить. Чтобы это сделать:
- Правой кнопкой мыши по Пуск → Панель управления → Администрирование → Службы.
- Найдите “Центр обновления Windows” и остановите службу.

- Тоже самое проделайте с службой “Фоновая интеллектуальная служба передачи (BITS)”.
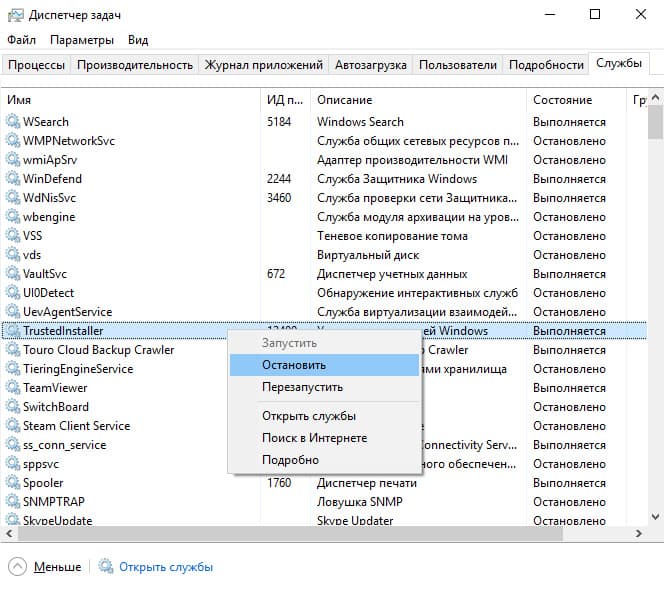
- Нажмите Ctrl+Shift+Esc → вкладка “Службы” → остановить TrustedInstaller.

Важно! В редких случаях под упомянутым файлом .exe может скрываться вирус. Если исполняемый процесс сильно нагружает ресурсы ПК, проверьте систему на наличие вирусов.
Возник вопрос по статье? Пишите об этом в комментариях или используйте специальную форму.
How To Remove TrustedInstaller From Windows 10/8/7
It is very irritating when you are doing the critical work on your Laptop/PC, and it gets slow. One of the reasons for getting a quiet PC is Trustedinstaller, which I confirmed when my friend came to check my laptop. There was just six months old with the latest Window 10, and it starts getting slow. But you should know first before removing the real logic behind Trustedinstaller is that it has a place with Windows Modules installer Service.
I asked my friend that my laptop is still new and why it is troubling me. He described that when we run massive games or graphic software, the processor of your PC gets load. During that time when you get an update while connected with the internet and your PC has automatic update option selected. Trustedinstaller started pressuring the processor and took the maximum percentage of processes. In this way, your Laptop/PC gets slow, this sometimes looks that your PC is intact with the Malware or virus.
If you decide to remove Trustedinstaller for your Laptop/PC, then the best and secure way is mentioned in this article. You can ask any question before going through the process.
Things keep in mind before removing the TrustedInstaller:
- Back entire files included damaged files.
- Cloud backup is the secure solution which provides less chance to lose files.
- Cloud backup takes time, so never restart or cancel during backup.
Remove TrustedInstaller From Windows
You should know that if TrustedInstaller.exe belongs to Windows Modules Installer, then it may have another location. Otherwise, the extra supported modules can perform malicious and unwanted activities on your windows computer.
Step #1. To isolate and remove TrustedInstaller.exe, boot your PC in safe mode
Step #2. Appears the “Run” window. Type “MSConfig” into it and press OK.
Step #3. Go to the section “Boot.” Select ‘Safe Boot’ and click ‘Apply’ and ‘OK. ‘
Step #4. Click “Restart” to enter Safe Mode when prompted.
Step #5. The words are written on the edges of your screen allow you to recognize Safe Mode.
Step #6. Now Clean any registers produced on your computer by TrustedInstaller.exe. Usually on Windows computers, if you want to learn targeted registries, share in comments, and we provide the list.
Step #7. Type “Regedit” and press OK again to open the Run Window.
Step #8. When you open it, the Run and RunOnce keys, those places are shown above, can be navigated freely.
Step #9. By right-clicking on it and removing it, you can remove the virus value.
Step #10. Now finding files created by TrustedInstaller.exe, press “Window + R” on your keyboard and write explorer.exe in the Execute text box, then click the OK button.
Step #11. From the fast access bar, click on your PC. Usually, this is a monitor icon, and its name is either “My Computer,” “My PC,” or “This PC” or whatever you call it.
Step #12. Navigate to the search box at the top right of the display of your PC and type “file extension:” and then type the extension of the file. If you’re searching for malicious executables, “file extension: exe” may be an instance. Leave a room and type the name of the file you think the malware has produced after doing so.
Step #13. We suggest waiting in the navigation box for the green loading bar to fill up in case the PC searches for the file and has not discovered it yet.
Step #14. Please boot back to normal mode if you’re safely at the moment. It will allow you to install and use programs on your PC effectively.
If you still think that your PC has still any threats, then you can install Anti-malware tools. It will scan and remove any remaining malware, which causes slow the computer.
Final Words:
In this article, we discussed how you could remove trustedinstaller.exe from your computer. The reason for that your PC is intact with malware and getting slow. If you disagree, then share in the comment box with the idea. And we will update with the related information convey from you. If this article helps you with the slow PC problem, then share your experience in the comment box. And also don’t forget to share this windows related information to your friend & family, so they then easily handle windows slow issue.