
This post from MiniTool introduces how to delete shadow copies in your Windows 11/10/Server. After deleting them, your PC can obtain more space. Now, refer to this post to delete your shadow copies.
What Is Shadow Copy
Shadow Copy is known as VSS or Volume Snapshot Service. It creates backup copies or snapshots of computer files and volumes, even if they are in use. It is available in Windows XP, Vista, 7, 8, 10, 11, and Windows Server 2003, 2008 (R2), 2012, 2016, 2019, and 2022.
Your shadow copies are usually located on the C:/ partition and stored in the System Volume Information folder.
Why Should You Delete Shadow Copies
Why should delete shadow copies? There are two main reasons:
- Take up a lot of storage space: Excessive volume shadow copies can take up a lot of storage space, which can lead to low disk space, slow computer performance, and even system instability.
- Possess security risks: Volume shadow copies may bring some security risks. For example, attackers may find SAM files in volume shadow copies and read user password hashes, and even use them to log in to remote servers.
How to Delete Shadow Copies on Windows 11/10/Server?
Way 1: Via System Properties
To delete shadow copies on Windows 10/11/Windows Server, you can use System Properties. Here are the steps:
For Windows 11/10
Step 1: Press the Windows + R keys together to open the Run dialogue box.
Step 2: Type SystemPropertiesProtection in the box and press Enter to open the System Properties window.
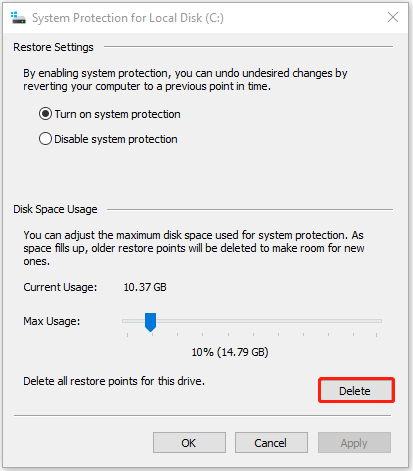
Step 3: Now, you are under the System Protection tab. Click the Configure… button.
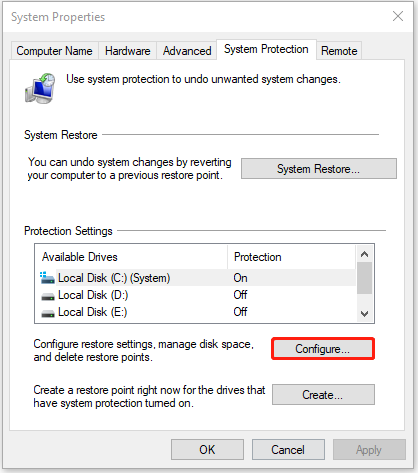
Step 4: Click the Delete button. When you see a warning message, please click the Continue button to delete all shadow copies.
For Windows Server
Step 1: Open File Explorer by pressing the Windows + E keys together.
Step 2: Click This PC and right-click your C drive to choose Configure Shadow Copies….
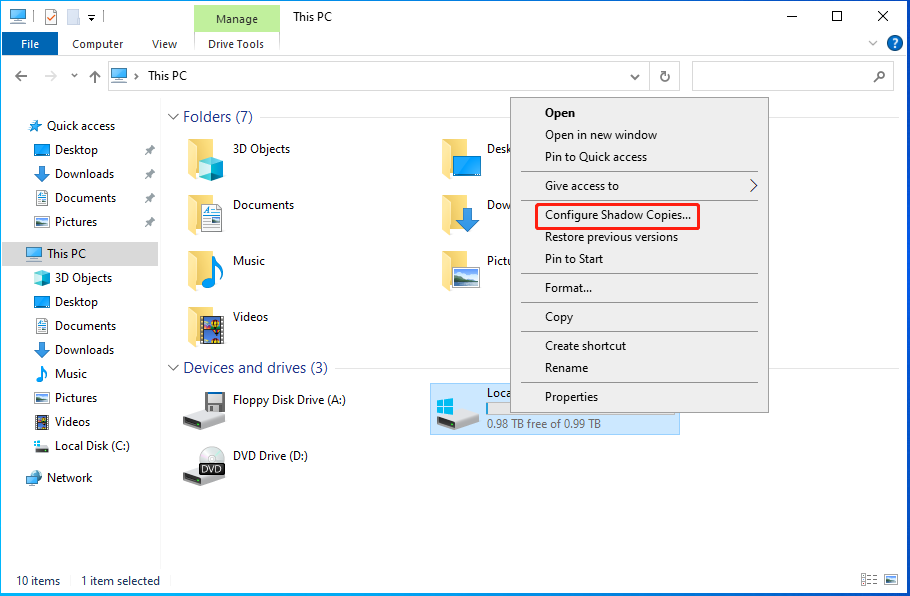
Step 3: Select the shadow copy you want to delete and click the Delete Now button to continue. When you receive a warning message, click Yes to allow it to make changes.
Alt-delete shadow copies on Windows Server
Way 2: Via Disk Cleanup
The method can be applied to Windows 11/10 and Windows Server, that is, delete shadow copies via Disk Cleanup.
Step 1: Type Disk Cleanup in the Search box and click the best-matched result to open it.
Step 2: Choose the drive or partition that you want to delete shadow copies and click OK.
Step 3: Go to the More Options tab. Under the System Restore and Shadow Copies part, click the Clean up… button.
Step 4: When you receive the message, click the Delete button to continue.
Way 3: Via Command Prompt
The vssadmin command can delete all shadow copies or specific shadow copies from a volume. The following provides information about the parameters and meanings of vssadmin.
- /for=: Specifies the volume for which the shadow copy is to be deleted.
- /oldest: Deletes only the oldest shadow copy.
- /all: Deletes all of the shadow copies for the specified volume.
- /shadow=: Deletes the shadow copy specified by ShadowID. To get the shadow copy ID, use the vssadmin list shadows command.
- /quiet: Specifies that the command will not display messages while it is running.
Then, you can remove shadow commands using vssadmin in Command Prompt.
Step 1: Type cmd in the Search box and choose Run as administrator in the right panel.
Step 2: Enter the following command based on your needs.
1. To delete all shadow copies on a specific volume, type the below command and press Enter.
vssadmin delete shadows /for=c: /all
2. To delete a specific shadow copyfrom any volume, type the below command and press Enter.
vssadmin delete shadows /shadow=[Shadow ID].
3. To delete the oldest shadow copy on a specific volume, type the below command and press Enter.
vssadmin delete shadows /for=c: /oldest
Step 3: Type exit and press Enter to exit Command Prompt.
Resize Shadow Storage to Delete
You can also resize shadow storage to delete shadow copies via vssadmin command. This operation will delete all your shadow copies on the specified volume.
Here is the Syntax:
vssadmin resize shadowstorage /for= /on= [/maxsize=]
- ForVolumeSpec: Specifies the volume for which to adjust the maximum amount of storage space.
- OnVolumeSpec: Specifies the volume storage.
- Maxsize: Should be 1MB or larger and accept the following suffixes: KB, MB, GB, TB, PB, and FB. Or you can use percentages with “%” to define. If no suffix is provided, in bytes.
There is how to run this command:
- Type cmd in the Search box and choose Run as administrator in the right panel.
- Then input the command for example:
vssadmin Resize ShadowStorage /For=C: /On=C: /Maxsize=600MB
Way 4: Delete Shadow Copies using PowerShell
How to delete shadow copies on Windows Server/Windows 11? The last method for you is via PowerShell.
Step 1: Type PowerShell in the Search box and choose Run as administrator.
Step 2: To delete shadow copies using PowerShell, type the command: shadowcopy delete /nointeractive.
As the alternative to Windows’ built-in backup utility using Volume Shadow Copy, MiniTool ShadowMaker is worth recommending.
The backup software is an all-in-one data protection and disaster recovery solution for PCs. It is compatible with Windows 7/8/8.1/10/11 and Windows Servers. It allows you to back up your systems, important files, folders, partitions, and even the whole disk. Once a disaster occurs, you can restore data with a copy of the backup.
MiniTool ShadowMaker also lets you create bootable media to restore your system to a normal state when your computer fails to boot. It’s easy to use MiniTool Media Builder and MiniTool PXE Boot Tool to maintain hard drives. You can download MiniTool ShadowMaker Trial to back up the system.
MiniTool ShadowMaker TrialClick to Download100%Clean & Safe
Back up System
Step 1: Launch the software and select Keep Trial on the lower right.
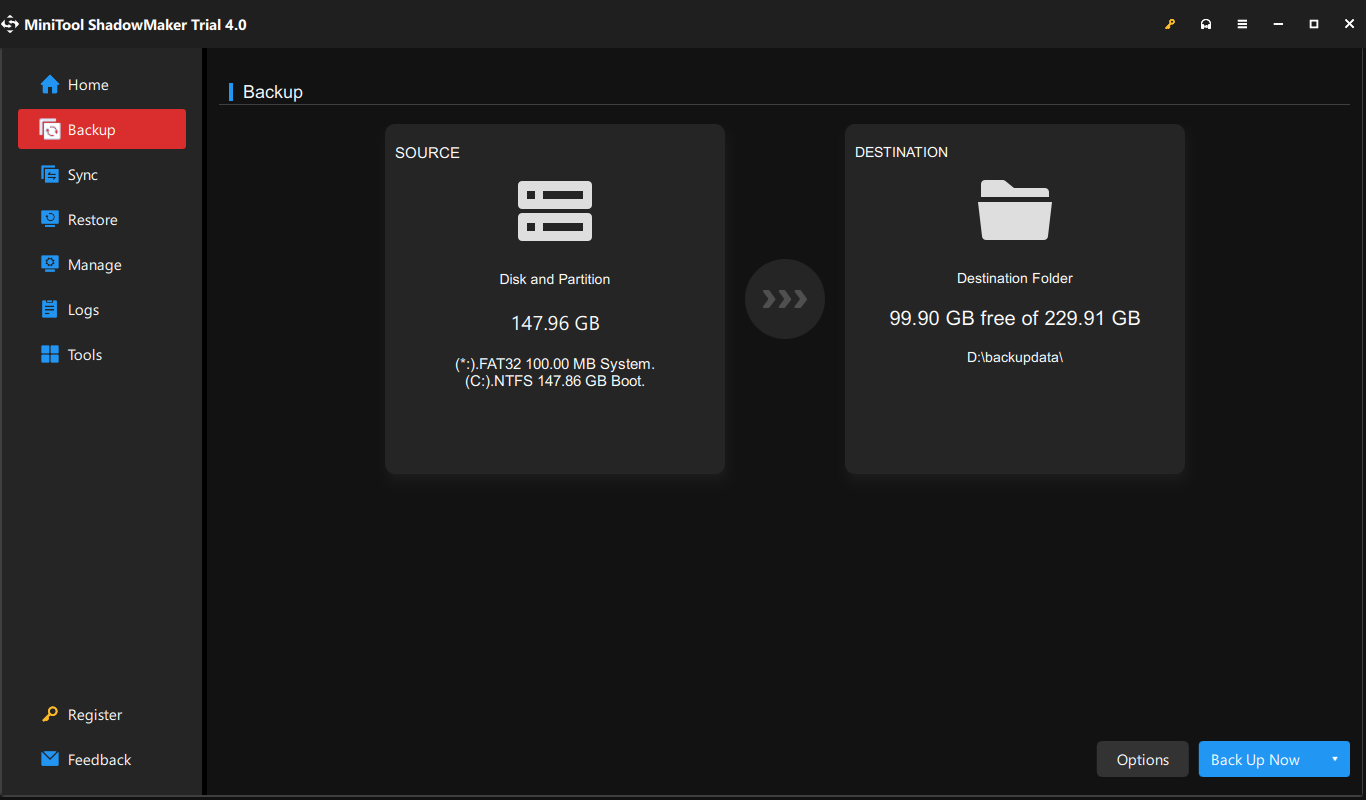
Step 2: On its main interface, switch to the Backup tab.
Step 3: Go to the SOURCE part on the left. Here, your system is selected by default, and you don’t need to choose it.
Step 4: Click the DESTINATION rectangle on the right and select the address where you plan to save the image file in the pop-up window. It’s recommended to choose the external hard drive as the backup destination.
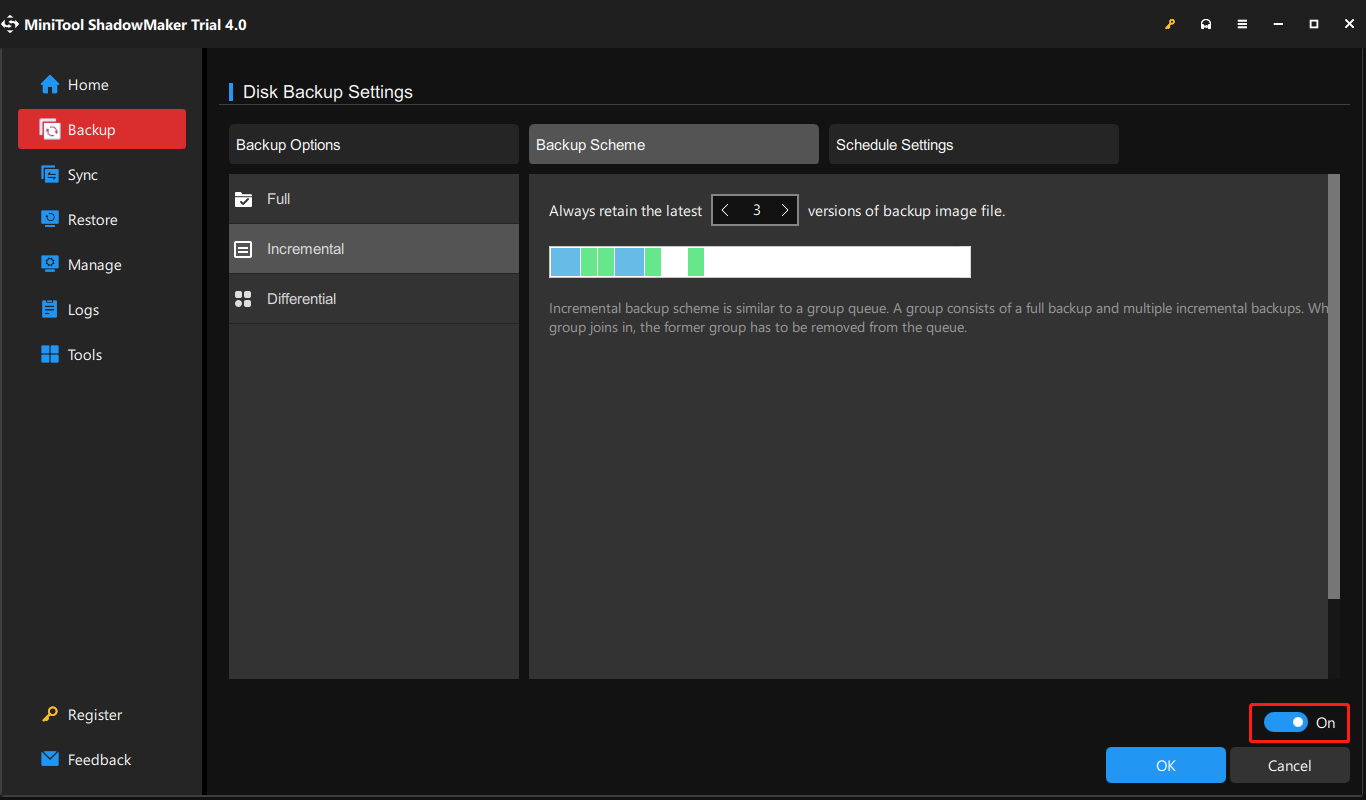
Step 5: Then, on the lower right, click Options > Backup Scheme. It is turned off by default. So, you need to turn it on in the bottom right corner first and then set up your backup type there. You can decide how many backup image versions to keep on your backup destination.
Step 6: When all settings are done, just click Back Up Now in the lower right and it will redirect you to the Manage tab. There, you can view the status of your backup. Just wait until it finishes.
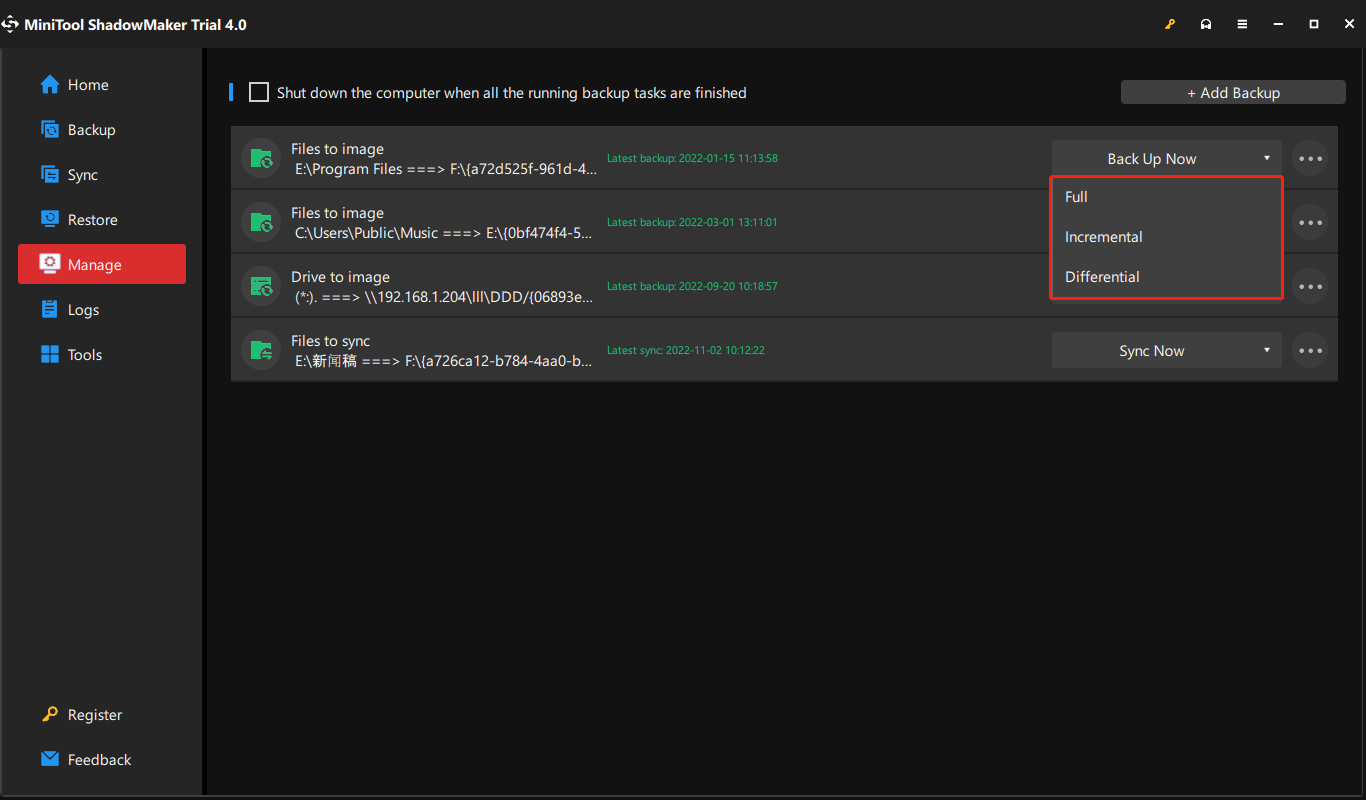
If you already created a full backup, you can set further full, incremental, or differential backup based on it from the Manage section.
Way 1. Click the inverted triangle beside Back Up Now and choose the backup type you prefer.
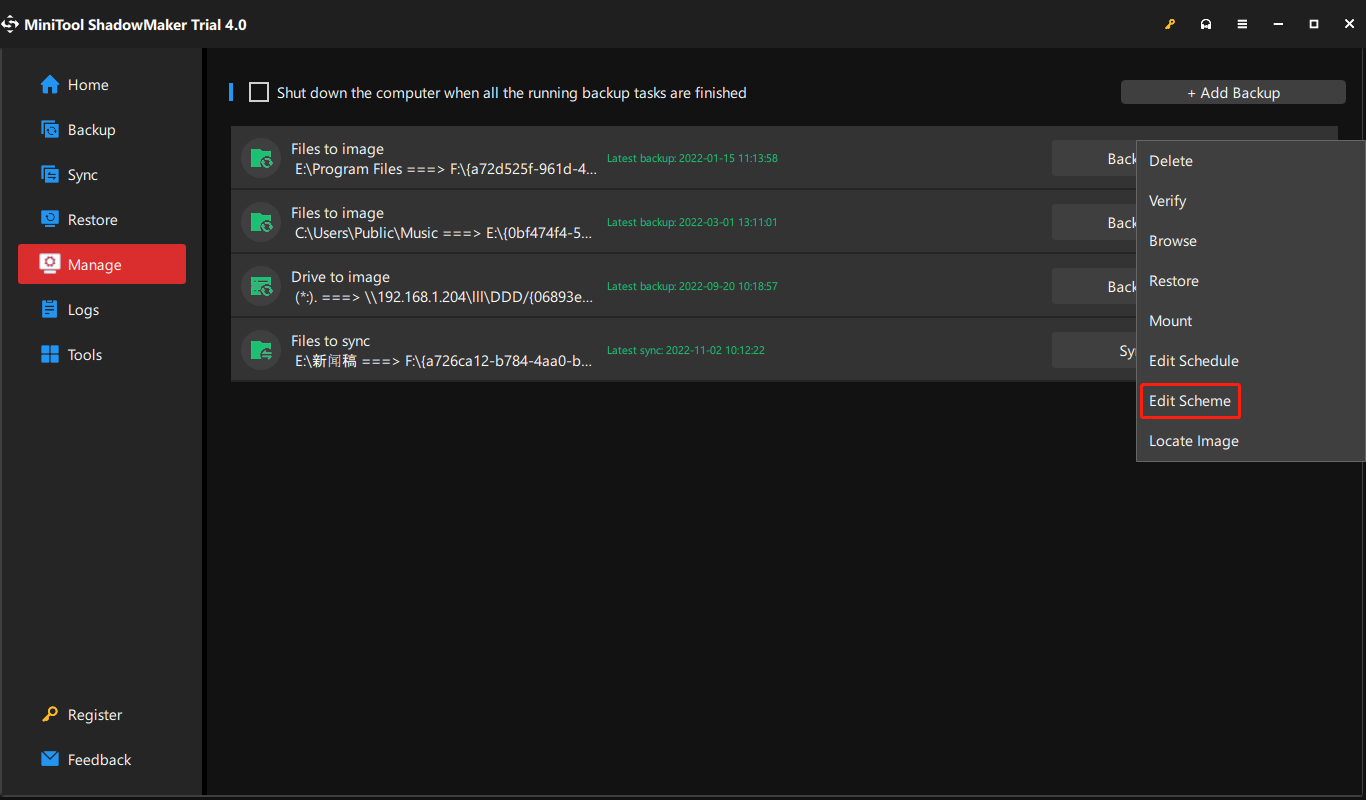
Way 2. Click on the three slashes on the right end of the backup task graphic bar and select Edit Scheme. Then, follow above Step 5 to finish the settings.
Besides different backup types based on how the backup performs, MiniTool ShadowMaker also supports most backup types classified by data types or data carriages listed at the start of this article. Moreover, MiniTool ShadowMaker enables you to set a schedule to automatically back up your important data daily, weekly, monthly, or even on the event (when you log on or log off the computer).
Restore the System from an External Hard Drive
MiniTool ShadowMaker is helpful to restore your computer in case of unexpected disasters. How to do this job?
Tips:
Tip: First of all, please use the Media Builder feature of MiniTool ShadowMaker to create a bootable disc to boot your computer. Then, you can start a system recovery in WinPE.
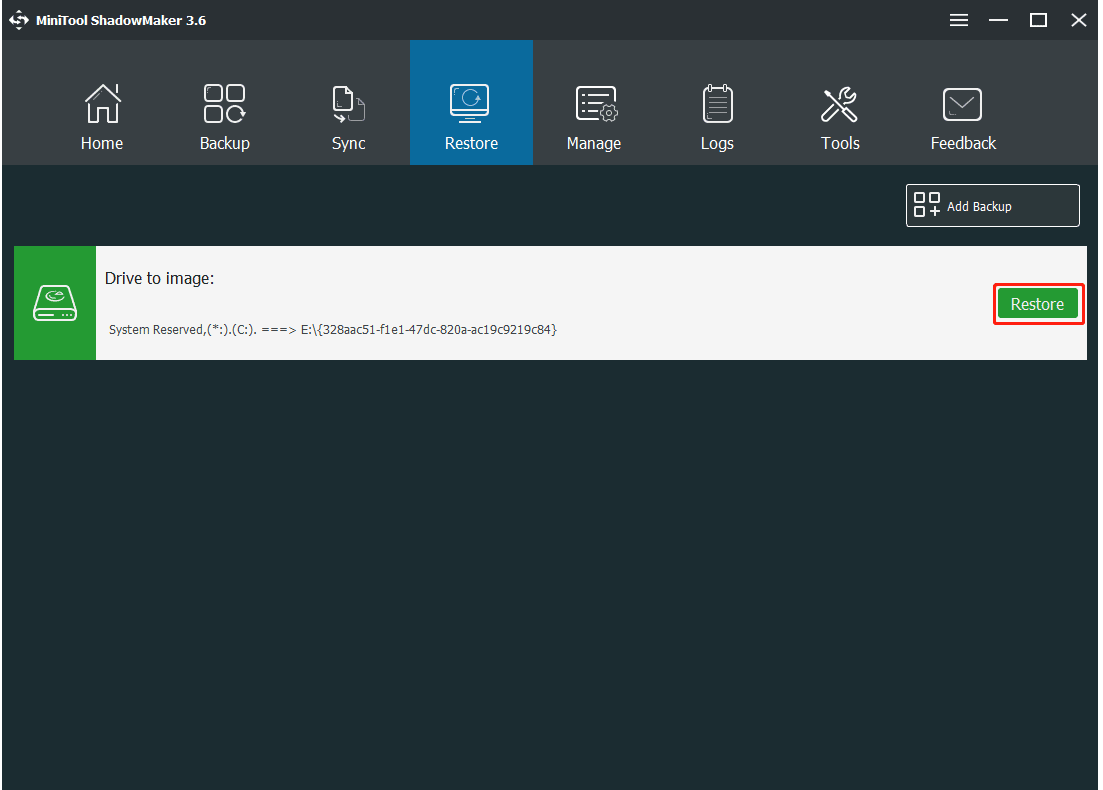
Step 1: In the Restore page, find the system image or system disk image you have created and click the Restore button.
Step 2: The backup time will be shown, choose the backup version and click Next to continue.
Step 3: Next, choose all system partitions as well as MBR and Track 0 to restore. The MBR and Track 0 option is essential for the restore, otherwise, the system will fail to boot after restoration. Therefore, please be sure to check it.
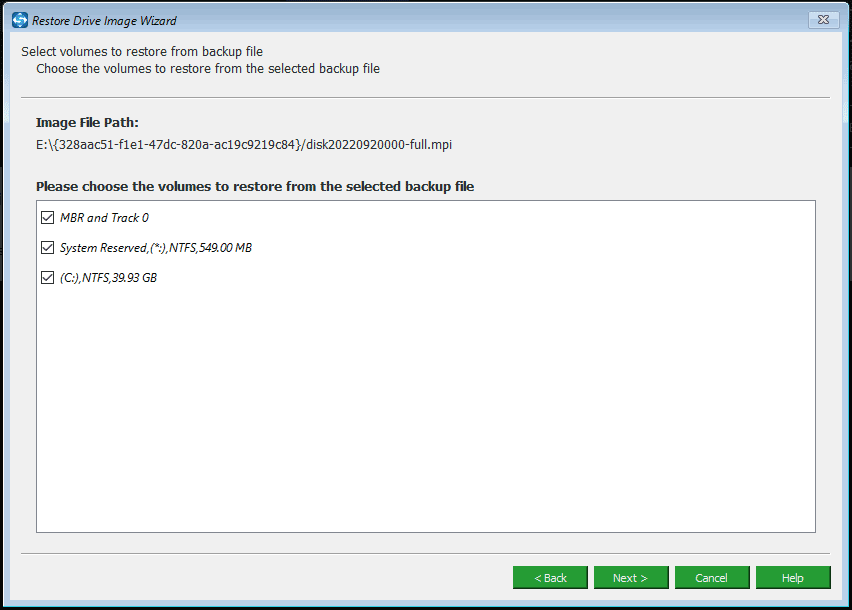
Step 4: Choose the disk you want to restore the image file to and this freeware will tell you the drives that will be overwritten during restoration. Click OK to the next step.
Step 5: Now the software is performing the system image recovery process. After the operation, restart your computer and it can run properly.
Bottom Line
To sum up, this article has shown you how to delete shadow copies to free up space in your Windows 11/10/Server. It also told you how to perform a backup to keep your system and data safe with MiniTool ShadowMaker.If you encounter any question or have any suggestion, feel free to contact us via [email protected].
How to Delete Shadow Copies FAQ
Does shadow copy take up space?
Windows uses the Volume Shadow Copy service to make a copy of the hard drive for restoration from System Restore. Sometimes this takes up too much space, especially with small hard drives, so you may want to reduce the disk space used by shadow copy storage.
How do Windows shadow copies work?
A shadow copy is a snapshot of a volume that replicates all data held on that volume at a well-defined moment in time. VSS identifies each shadow copy by a persistent GUID. A shadow copy set is a collection of shadow copies of various volumes taken simultaneously.
What is the difference between Restore Point and Shadow Copy?
Any data not transferred to the disk will be lost when the snapshot is taken. However, when you use a restore point, you’re not making a new copy of the disc in question; instead, you’re instructing Windows to start recording changes to it and backing up the original so you can go back to it if something goes wrong.
System Restore is the tool helping you to load back an earlier Windows state in order to bypass an unavoidable error occurring in Windows 11 and 10. Volume Shadow Copy or VSS is a service that creates snapshots of data in a volume useful for restoration. Eventually, when these files unnecessarily take up huge space, PC performance slows down, unfortunate lags occur, and various unexpected trouble appear. You can read a post Windows 11 or 10 Services to Disable for Performance to resolve this.
Usually, there are two types of shadow copies present in Windows 11 or 10 namely DiskShadow and VssAdmin. Restore points can be deleted along with these files using disk clean up too, from the System Properties as well as by through a command. Try out any methods from the below section and remove them before these become a cause of imminent trouble.
Delete System Restore and Shadow copies
Here is How to Delete System Restore and Shadow copies in Windows 11 or 10 –
1] Using Disk Cleanup
This is the easiest way –
- Press the Windows logo key.
- Type cleanmgr.
- Hit Enter.
- Select the (C:) and click OK.
- Click the Clean up system files on the next wizard.
- From the upcoming popup where C: is preselected, hit OK button.
- Select the More Options tab on the next window.
- Finally, Click on the Cleanup….
- Once a confirmation popup floats, click Delete option.
- It might take a while to complete this process, restart Windows 11 or 10 once it ends.
2] Delete System Restore and Shadow copies via cmd Command
Another easy way to Clean up Shadow copies is to execute significant commands in the Elevated Command Prompt. For that, you have to follow the below steps –
- Press Win+S and type cmd.exe.
- Hit Ctrl + Shift + Enter.
- After UAC prompts for permission, give the consent by clicking Yes.
- Type in following command –
vssadmin delete shadows /for=<ForVolumeSpec>*
Note – replace the * sign with any of the following –
/oldest – Delete the oldest shadow copy.
/all – Delete all of the specified volume’s shadow copies.
ShadowID – Delete the shadow copy by ShadowID
/quiet – Specify no messages return after finishing the command.
- Press the Enter.
- Hit Y key once asked to choose between (Y/N).
- Once the shadow copies are deleted, you will see a confirmation message in the Command Prompt window.
3] From System Properties
You can also delete all the unnecessary Restore points using options from System Properties window. For that, try following the below workarounds –
- Press Win+Q, type “sysdm.cpl” without quote and then hit Enter.
- When the System Properties window is upfront, jump into the System Protection tab.
- Go to the Protection Settings area.
- Click on the desired disk partition i.e. Local Disk (C:) (System).
- Click Configure option from here.
- Select Delete.
- Click the Continue button once the confirmation message pops up.
This will immediately delete System Restore and Shadow copies in Windows 11 and 10.
Methods:
1] Using Disk Cleanup
2] Via Command prompt
3] From System Properties
That’s all!!
By Timothy Tibbetts |
Shadow Copy or Volume Shadow Copy Service (VSS) is a part of Windows 10, 8, 7, and Vista that takes a snapshot of your entire drive manually or automatically. If you manage your own backups, you can disable this service.
Shadow Copy or Volume Shadow Copy Service (VSS) is a great way to restore corrupted or accidentally deleted files, including a Ransomware attack or other malware.
Video tutorial:
Press the Windows Key + R, type in services.msc, and press Enter.
Scroll down to Volume Shadow Copy, and double-click it.
If running, click Stop.
Click on the dropdown box next to Service status.
Click on Disabled.
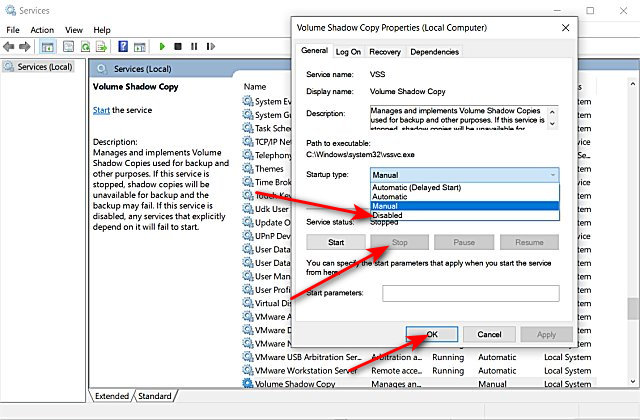
Click on OK.
Similar:
comments powered by Disqus
If you have enabled system protection, the system will activate volume shadow copies service that may take up a certain amount of space in your drive which will not be visible in the folder structure.
If you need more space, you can either delete the shadow copies or disable the service to make more space available to you in the partition.
Let’s discuss when and how to enable or disable system protection (Volume Shadow Copy).
Table of Contents
What is Shadow Copy?
As the name implies, Shadow Copy is a backup copy of the original file or folder which is copied even when the file is in use. Shadow Copy service may backup multiple versions of each file or folder which is scheduled to be backed up.
Shadow Copy is also called Volume Snapshot Service or simply VSS.
The Shadow Copy feature has been included in Windows since Windows Server 2003.
Shadow Copies are created when the system is configured to store old versions of the files and folders on your partition. The older versions are saved as hidden files that are used to revert back to an older state of the same file/folder, undoing all the changes since then. Moreover, they can also be used to restore deleted files and folders.
How to create Volume Shadow Copies
The Shadow Copies that are created of any of the selected volumes are stored locally. Hence, to ensure that the device does not run out of space, it is important to manage them correctly.
Here is how you can set up Volume Shadow Copies of any of the volumes within your hard drive.
- Navigate to the following location:
Control Panel -> System & Security -> System -> System Protection - Now, in the System Protection tab under Protection Settings, select the volume you wish to create a shadow copy of and then click Configure

- In the new window, select Turn on System Protection under Restore settings.
- Under Disk space usage, adjust the slider to allow maximum space usage the Shadow Files are permitted to use. If the files take up space beyond allowed, the system will automatically delete the old ones to make room for the newer ones.

- Now back in the System Properties window, click on Create to create a new restore point for the selected volume.

- Now enter a name for this restoration point and then click Create.

Allow the computer some time to create the Volume Shadow Copy.


You have now successfully created a restoration point that can be used to revert the files and folders of the selected volume to a previous state.
How to restore from a Volume Shadow Copy
Once you have configured the device to create Volume Shadow Copies, they can be used to revert the partition files and folder to an earlier state. Here is how you can do so.
- Navigate to the following:
Control Panel -> System & Security -> System -> System Protection - Click on System Restore.

- On the System Restore Wizard, click on Next.
- On the next screen, select a valid restoration point from the list and then click Next.

- On the next screen, click on Finish and then allow the computer to restore to its selected state. Note that this would require the computer to restart.


Once the computer restarts, you will notice that the files and folders within the volume associated with the restoration point would have been reverted to an older state. Any deleted items would now be returned, and anything newly created would disappear from the volume.
How to delete Volume Shadow Copies
As we mentioned earlier, Shadow Copies can often take up significant amounts of space on your hard drive. They then need to be deleted and removed in order to make room for new material.
Here are a few methods through which you can delete all the existing Volume Shadow Files.
Delete Volume Shadow Copies using the wizard
- Navigate to the same location from used to set up and delete these files, which is:
Control Panel -> System & Security -> System -> System Protection - Now select the drive you wish to delete all the restoration points of, and then click Configure.
- Now click on Delete at the bottom of the new window.

- Click Ok on the confirmation dialog box.

All existing Volume Shadow Copies of that particular volume will now no longer exist.
Delete Volume Shadow Copies using Command Prompt
The VSSAdmin command is used to manage the Volume Shadow Copy Service, which in turn can be used to delete all the existing Shadow Copies of a specified volume. Follow the steps below to delete the Volume Shadow Copies using the Command Prompt.
- Open Command Prompt with Administrative Privileges.
- Enter the following command:
vssadmin delete shadows /For=C:
Change the volume alphabet to the one you wish to delete all the restoration points of. - Upon confirmation, enter Y.


This is a quick and easy method to delete all existing Shadow Files in case they are taking over your hard drive.
If however, you decide not to delete everything, rather resize the allowed space for the Shadow Copies, simply re-adjust the slider in the properties as mentioned above in the article, or use any one of the following commands in the Command Prompt:
vssadmin Resize ShadowStorage /For=C: /On=C: /MaxSize=900MBvssadmin Resize ShadowStorage /For=C: /On=C: /MaxSize=20%vssadmin Resize ShadowStorage /For=C: /On=C: /MaxSize=UNBOUNDED
Note that this command can be used in the context of literal size, that is, in MBs, in percentages, or by using “UNBOUNDED” to remove the limit entirely.
Moreover, by changing the drive letter in front of “/On=”, you can create the new Shadow Files of one volume on another, utilizing the other volume’s space while saving up the original partition.
Closing Words
Creating Volume Shadow Copies is very much like using the File History feature on Windows 10, but with fewer configurations and complexity. Using the VSSAdmin command, it is possible to remap the Shadow Files onto another partition, or even an external hard drive to create and maintain all the restoration points.
Volume shadow copy is a feature on all versions of the Microsoft Windows operating systems that allows backup copies of files or folders on a specified volume, either automatically or manually. To disable the volume shadow copy, the service has to be stopped. The service can be stopped from the volume shadow copy properties window and Windows administrative tools.
What is Volume Shadow Copy?
Volume Shadow Copy, also known as Snapshot Service or VSS, is a feature embedded in Windows 2003 and later in all releases of Microsoft Windows. This technology allows you to make manual or automatic backup copies or snapshots of a file or folder on a specific volume. Shadow Copy technology requires the file system to be NTFS.
Note that once the volume shadow copy is disabled, there is no use for previous versions of a file or folder element. To lighten the properties of a file or folder, you must remove the previous versions tab through changes in the registry. If disk space poses a problem, you can edit the disk space allocated to shadow copies so that you don’t have to disable the volume shadow copy.
How to disable Volume Shadow Copy?
- Click Start and type
services.mc
into the search bar.
- Hit Enter.
- An option for Volume Shadow Copy will appear. Double-click on the icon.
- Change the startup type to Manual, and then click Stop.
- Move to the Recovery tab:
- Set the First failure, Second failure, and Subsequent failures options to Take No Action.
- Press OK to confirm.
How to edit the disk space allocated to Shadow Copy?
If you do not want to disable shadow copies and would prefer to customize the maximum disk space allocated to this service, here’s a quick tutorial.
- Go to your Start menu, and navigate to All Programs > Accessories.
- Right-click on the Command Prompt > Run as administrator.
- Next, type the following command:
vssadmin resize shadowstorage/On = C: / For = C: / maxsize = 3GB
Note:
- The / On = C: indicates that the photos will be saved on the C drive.
- The / For = C: indicates that the photographs are those of the C drive.
- The / maxsize = 3 GB indicates the size allocated to instant snapshots. In this case, that total is 3 GB.
Confirm by pressing OK.
How to disable previous Shadow Copy versions?
Now that the service is disabled, all Previous Versions are useless. In order to lighten the menu and properties of elements, it is best to remove it. However, before proceeding with this, it is highly recommended that you back up your registry:
- Open the Registry Editor and locate the following key:
HKEY_LOCAL_MACHINE\SOFTWARE\Policies\Microsoft\
- Create a new key with the name PreviousVersions by going to the Edit menu > New > Key.
- Next, create a new DWORD (32-bit) under the latter key by using the name DisableLocalPage. You can do this by going to the Edit menu > New > DWORD (32-bit).
- Double-click this value and put 1 in the data fields.
Do you need more help with Windows 10? Check out our forum!