
Фильтр SmartScreen встроенного в Windows антивируса Microsoft Defender призван предотвращать запуск потенциально небезопасных файлов, особенно программ, скачанных из Интернета: он реагирует не только на файлы, которые действительно предоставляют угрозу, но и, например, малоизвестные «неопознанные» утилиты, скачанные в сети. Также он защищает от посещения потенциально небезопасных сайтов в браузере Microsoft Edge.
При желании вы можете отключить фильтр SmartScreen в Windows 11, чтобы предупреждения вида «Система Windows защитила ваш компьютер» не появлялись. В этой инструкции подробно о способах это сделать. Также может быть полезным: Как отключить Microsoft Defender в Windows 11.
Способы отключения фильтра SmartScreen
При срабатывании фильтра SmartScreen для программ, скачанных из Интернета, пользователь обычно видит следующее предупреждение с текстом «Фильтр SmartScreen в Microsoft Defender предотвратил запуск неопознанного приложения», хотя возможны и иные варианты.

Для запуска программы в этом случае можно нажать по ссылке «Подробнее», а затем — кнопку «Выполнить в любом случае». Это не всегда удобно и, если вы решили отключить эту функцию, можно использовать один из следующих методов.
Безопасность Windows
Первый способ отключения фильтра SmartScreen — использование параметров в окне «Безопасность Windows». Шаги будут следующими:
- Откройте «Безопасность Windows» с помощью значка в области уведомлений или используя поиск в панели задач.
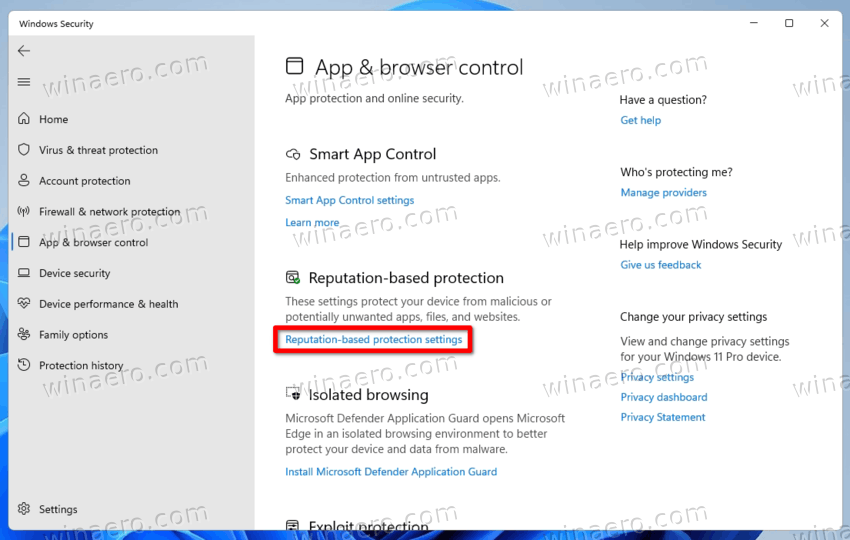
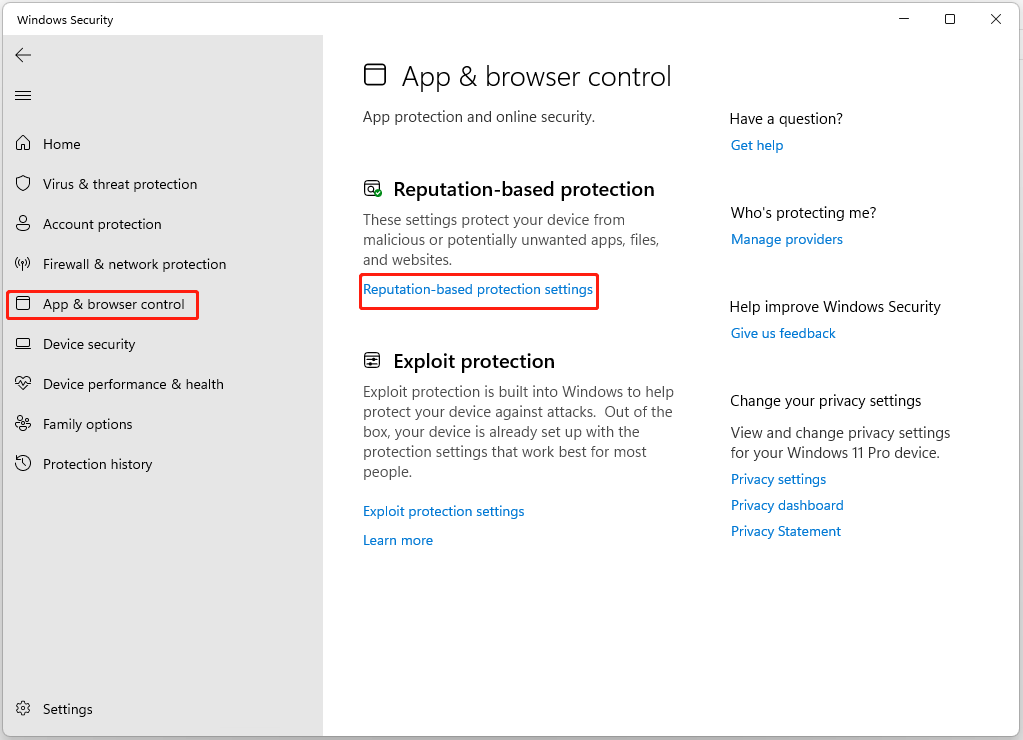
- Откройте раздел «Управление приложениями и браузером».

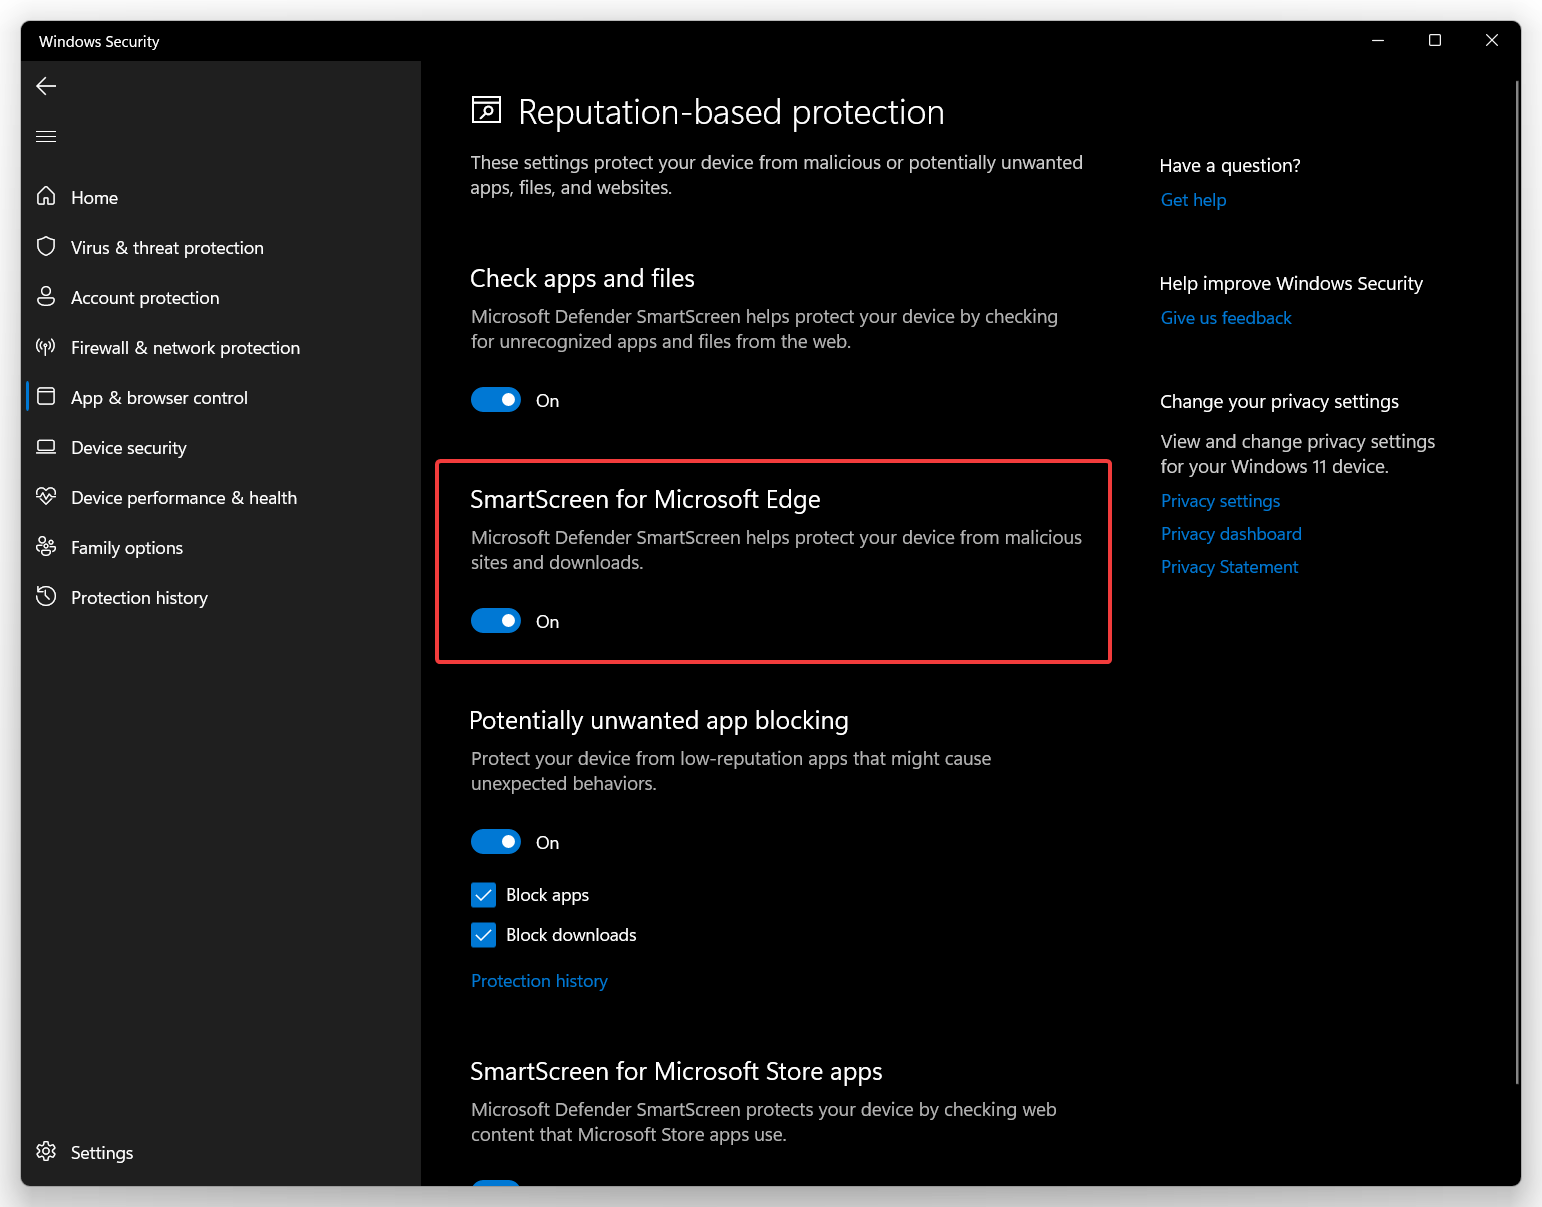
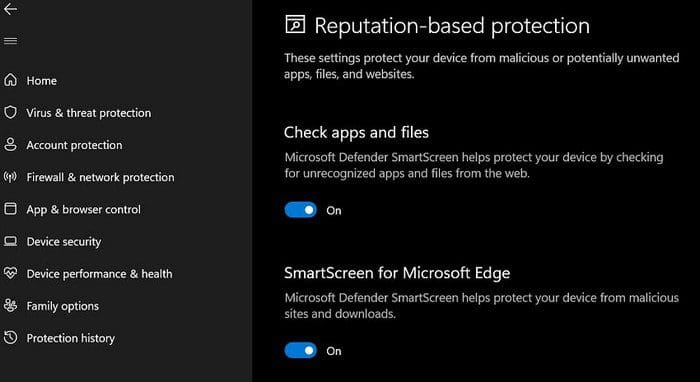
- В разделе «Защита на основе репутации» нажмите «Параметры защиты на основе репутации».

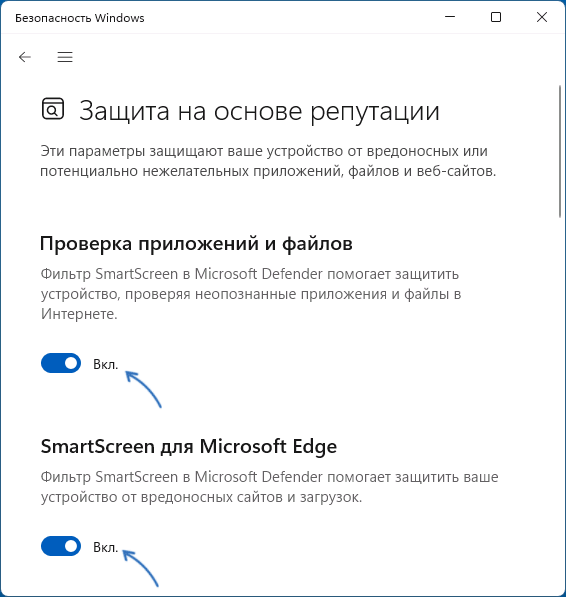
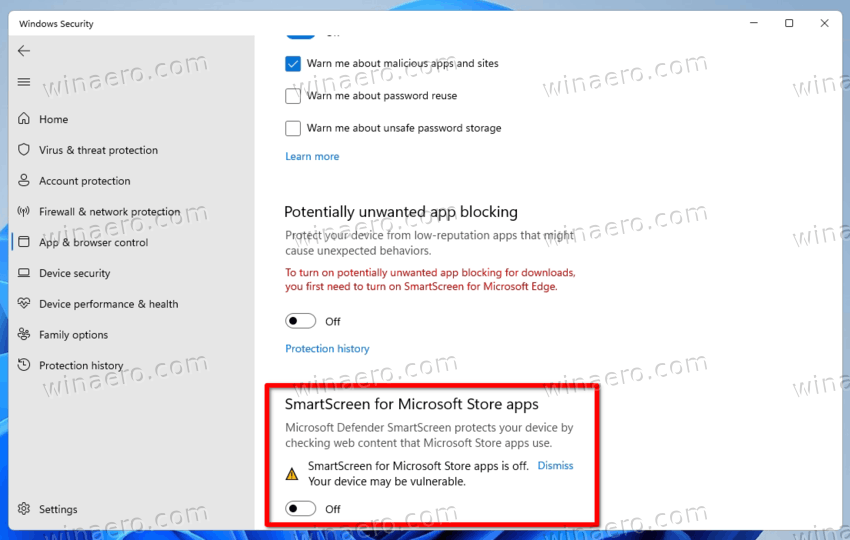
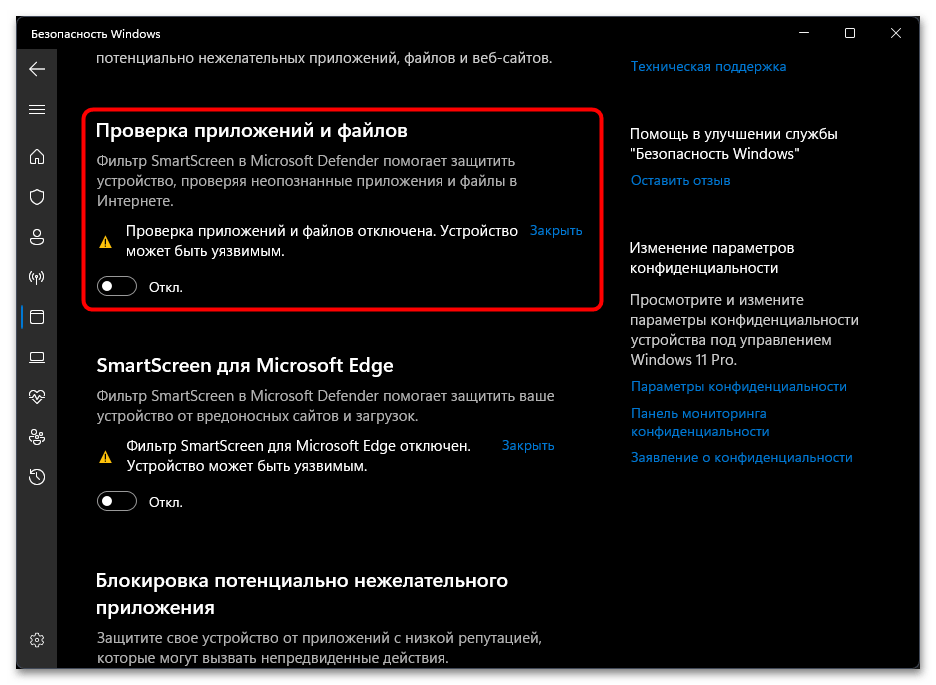
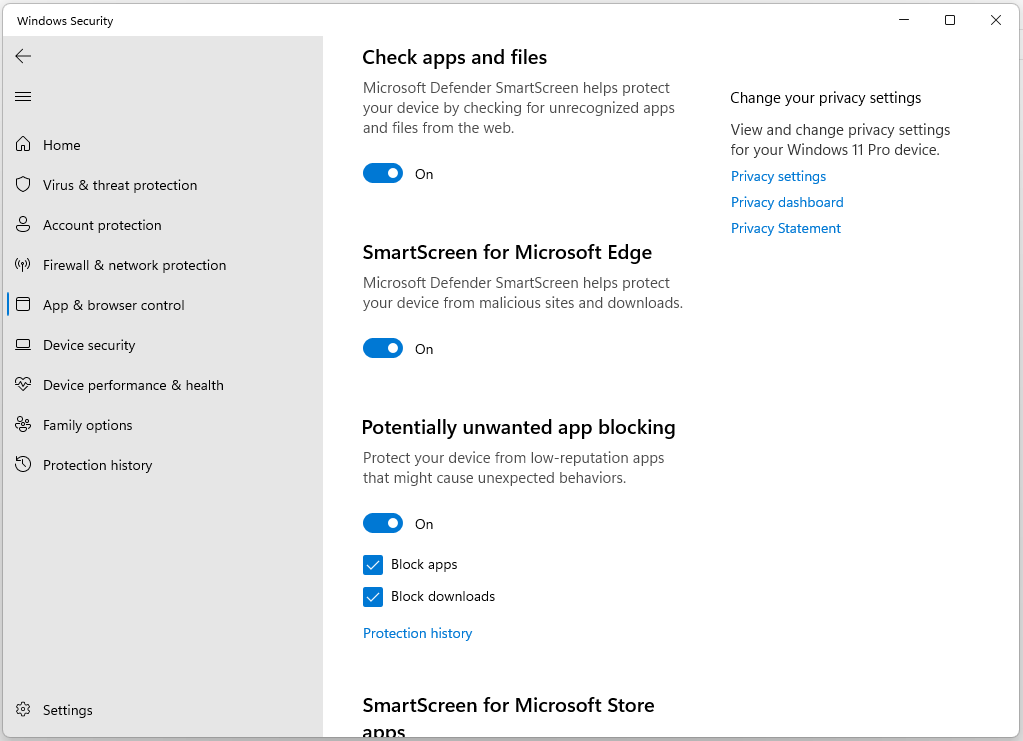
- Отключите фильтр SmartScreen в пункте «Проверка приложений и файлов», а если требуется — то и фильтр SmartScreen для Microsoft Edge.

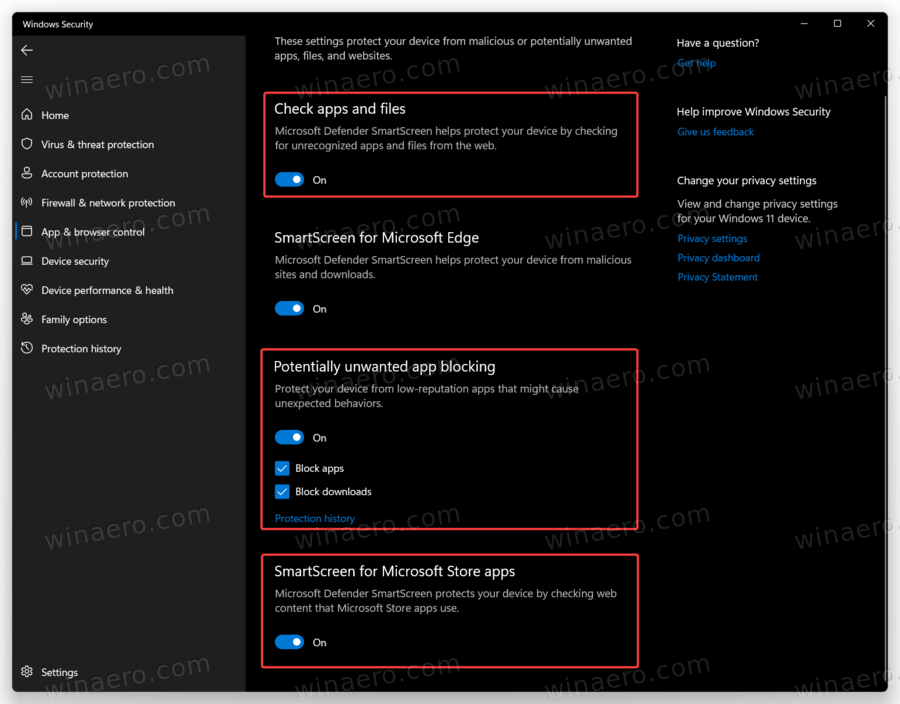
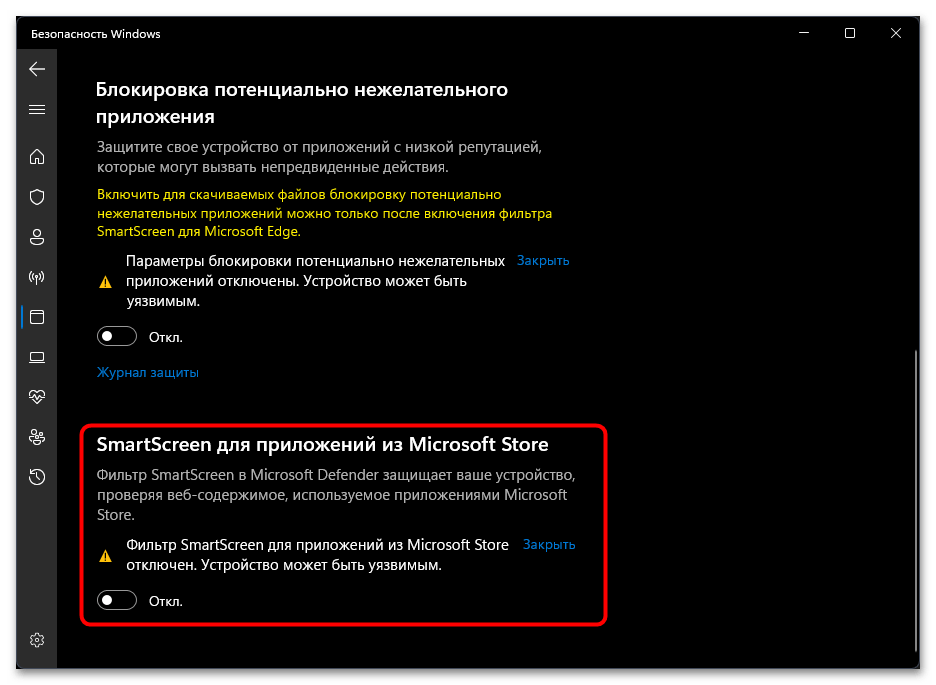
- Пролистайте список доступных настроек ниже: там доступны ещё две опции: блокировка потенциально нежелательных приложений и фильтр SmartScreen для приложений из Microsoft Store, которые тоже можно отключить. С вниманием отнеситесь к первой из них: она предназначена для блокировки тех приложений, которые часто действительно являются нежелательными: например, могут внедрять рекламу или скачивать дополнительные, ненужные пользователю программы.


В большинстве случаев этих настроек достаточно и какие-либо другие действия для отключения функции предпринимать не нужно, однако есть и дополнительные варианты выполнить необходимое действие.
Реестр Windows
Отключить фильтр SmartScreen можно в редакторе реестра Windows 11. Чтобы сделать это вручную, выполните следующие шаги:
- Нажмите клавиши Win+R на клавиатуре, введите regedit и нажмите Enter
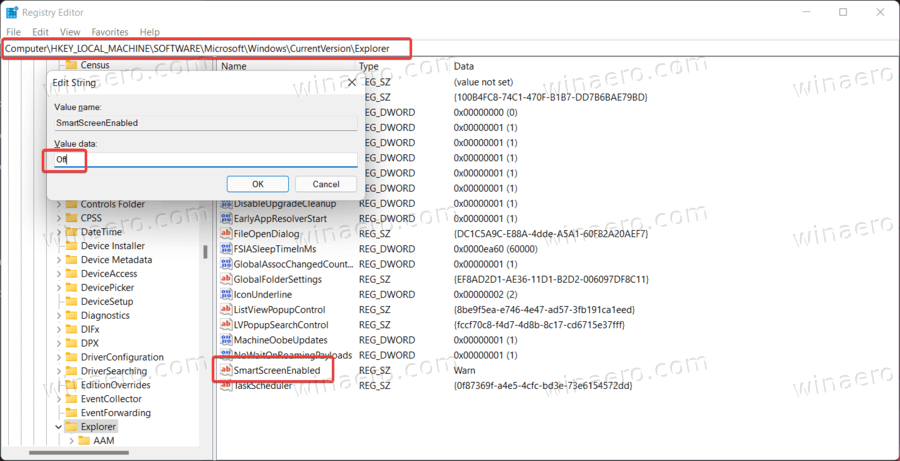
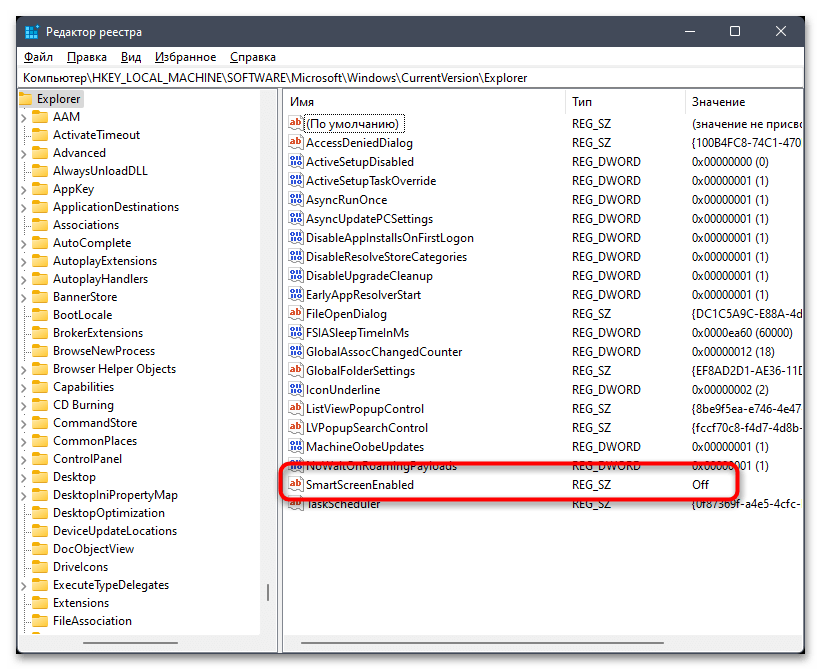
- Перейдите к разделу реестра
HKEY_LOCAL_MACHINE\SOFTWARE\Microsoft\Windows\CurrentVersion\Explorer
- Дважды нажмите по параметру SmartScreenEnabled и измените его значение на Off. При отсутствии параметра с таким именем, нажмите правой кнопкой мыши в правой панели редактора реестра выберите пункт Создать — Строковый параметр и создайте параметр с указанным именем.

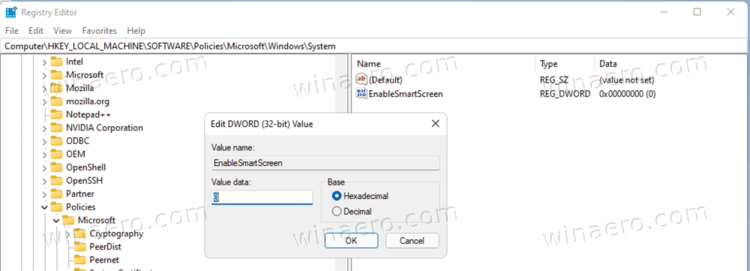
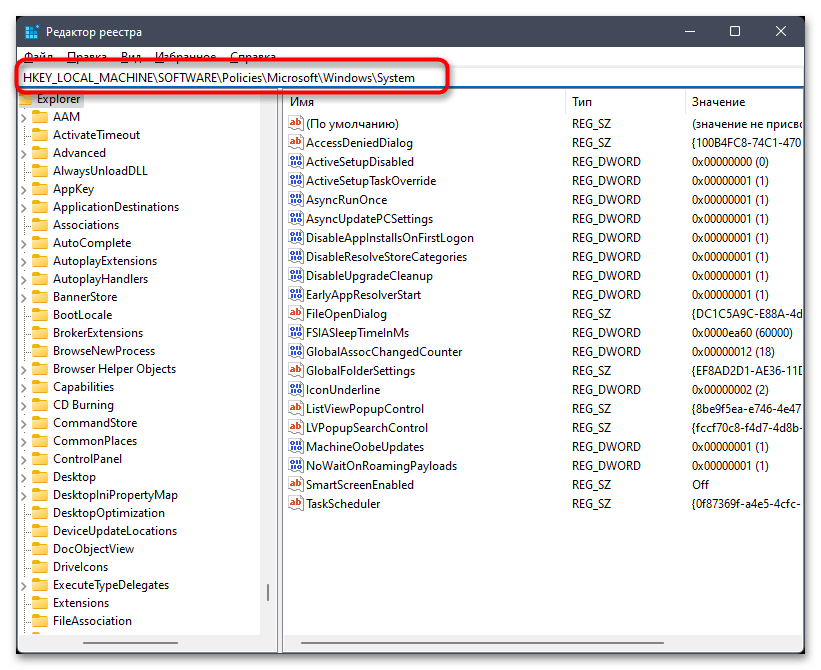
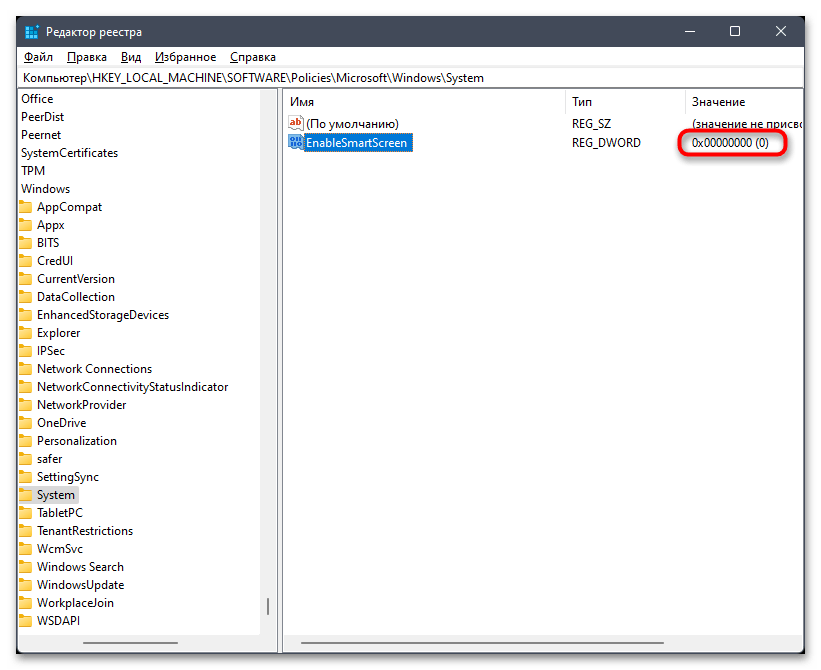
- Дополнительно может иметь смысл создать параметр DWORD с именем EnableSmartScreen и значением 0 в разделе реестра
HKEY_LOCAL_MACHINE\SOFTWARE\Policies\Microsoft\Windows\System

Также вы можете создать REG-файл со следующим кодом для отключения фильтра SmartScreen:
Windows Registry Editor Version 5.00

[HKEY_LOCAL_MACHINE\SOFTWARE\Microsoft\Windows\CurrentVersion\Explorer]
"SmartScreenEnabled"="Off"
[HKEY_LOCAL_MACHINE\SOFTWARE\Policies\Microsoft\Windows\System]
"EnableSmartScreen"=dword:00000000
"ShellSmartScreenLevel"=-
После чего «запустить» этот файл и согласиться с добавлением данных в реестр.
Редактор локальной групповой политики
Если на вашем компьютере установлена Windows 11 Pro или Enterprise, вы можете использовать редактор локальной групповой политики для отключения SmartScreen для проверки файлов из Интернета:
- Нажмите клавиши Win+R, введите gpedit.msc и нажмите Enter.
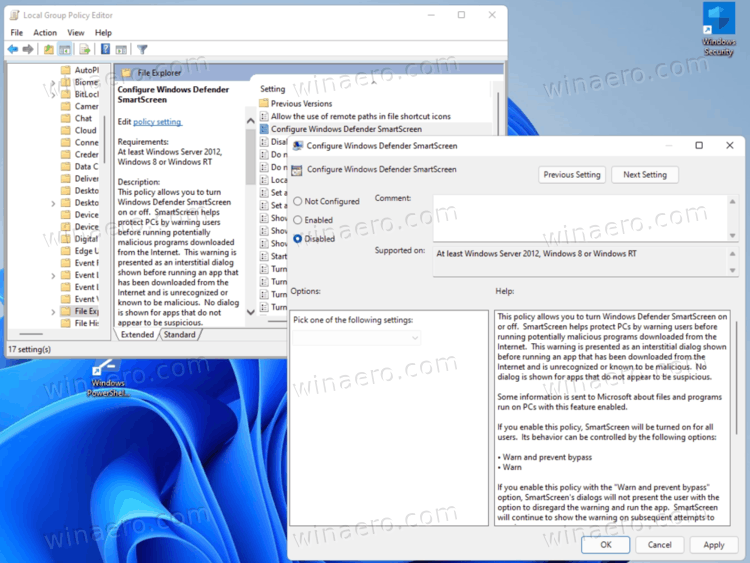
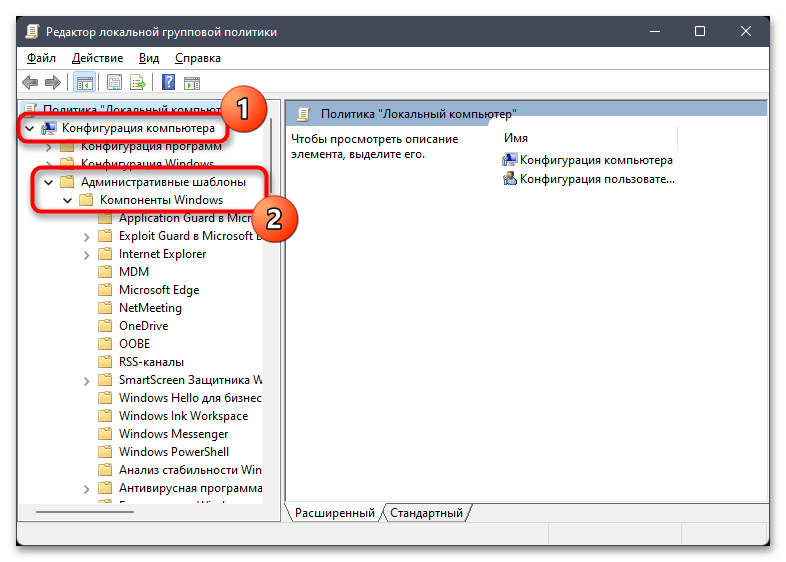
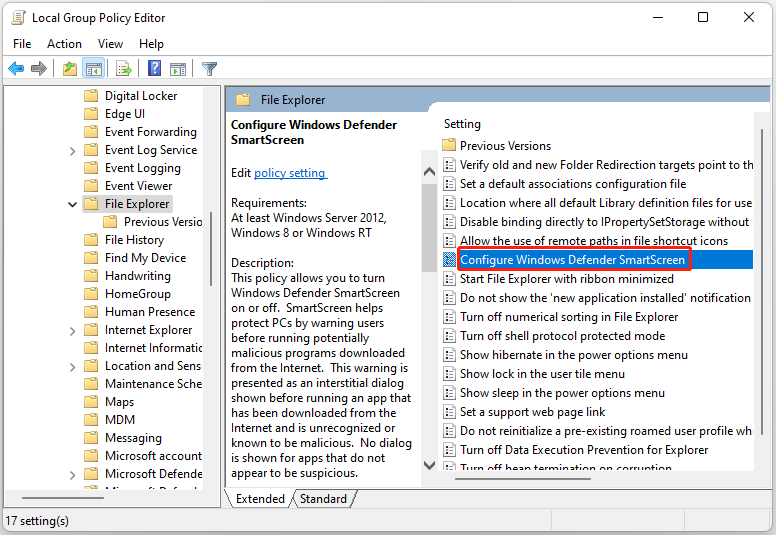
- Перейдите в раздел Конфигурация компьютера — Административные шаблоны — Компоненты Windows — Проводник.
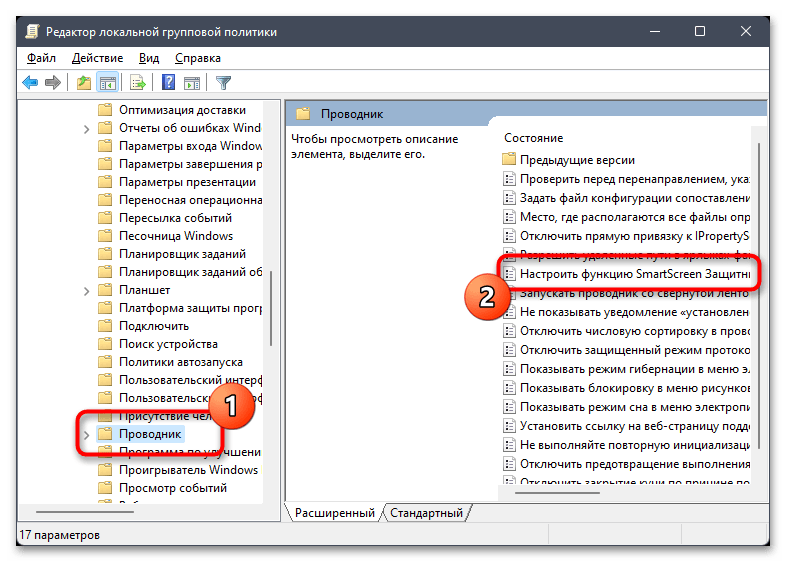
- Дважды нажмите по параметру «Настроить функцию SmartScreen» Защитника Windows.

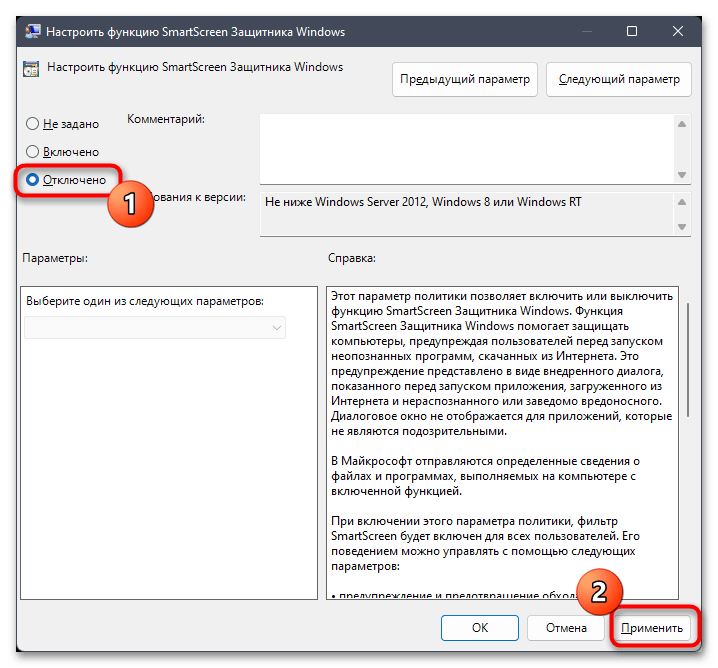
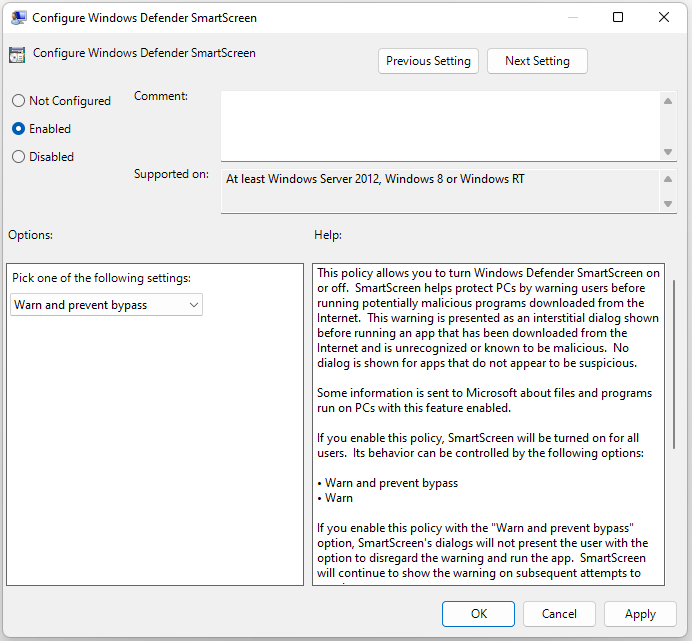
- Установите значение «Отключено» для него, затем примените настройки.

- Дополнительные политики фильтра SmartScreen можно найти в разделе Конфигурация компьютера — Административные шаблоны — Компоненты Windows — SmartScreen защитника Windows. Например, в подразделе Explorer можно отключить политику с тем же названием «Настроить функцию SmartScreen», а в разделе «Microsoft Edge» — отключить SmartScreen для этого браузера.


SmartScreen в настройках Microsoft Edge
Если вы пользуетесь браузером Microsoft Edge и задача — отключить SmartScreen в этом браузере, сделать это можно в его настройках:
- Откройте меню Microsoft Edge и перейдите в пункт «Настройки».
- Откройте раздел настроек «Конфиденциальность, поиск и службы», также можно ввести edge://settings/privacy в адресную строку и нажать Enter, чтобы сразу попасть в нужный раздел настроек.
- Пролистайте страницу настроек внизу до раздела «Безопасность».
- Отключите «Фильтр SmartScreen в Microsoft Defender».


В том же разделе настроек есть опция отключения блокировки скачивания потенциально нежелательных приложений: отключать ли её — на ваше усмотрение.
Завершая статью, обращаю ваше внимание на то, что к отключению встроенных функций безопасности Windows 11 и других версий ОС не стоит прибегать без необходимости и четкого осознания возможных последствий.
Today, we’ll review how to disable Windows SmartScreen in Windows 11. It is a built-in security filter that Windows uses to check every single file you download and run against a special database. If the file is unknown to the database, it shows a warning when you downloading such a file. If you try to open it, Windows SmartScreen shows a nag screen with an additional confirmation.
So, Windows SmartScreen guards your browser and computer by preventing you from downloading and running potentially malicious files and programs. While the idea behind Windows SmartScreen is good, there are two primary issues with it. First, Windows SmartScreen often generates false positives even for safe apps. If the system cannot find any information about the program you try to run, it will prevent it from opening by default, thinking it is better safe than sorry. The same is true for any application that does not have digitally signed binaries. Once that happens, any attempt to open a program will end up with the following message:
Windows protected your PC by preventing this potentially malicious app from running.
The second problem with Windows SmartScreen is privacy related. Not everyone is happy with Microsoft scanning your computer and knowing what apps and files you are using.
Note: There is no need to permanently disable Windows SmartScreen if you want to run a rare program once or twice. In such a case, you can simply override the message and force Windows to open the app you need. Click «More Info,» then click Run Anyway. The same idea applies to when Windows says it can’t reach Windows SmartScreen right now.
There are three ways to disable the SmartScreen filter on Windows 11. First of all, you can use the Windows Security app, that includes all the options to turn it off. Second, there is a Registry tweak that you can apply. Finally, there is also a Group Policy option, along with a corresponding Registry options. You can use any of them, depending on what works best in your situation.
Disable SmartScreen in Windows 11 with the Security app
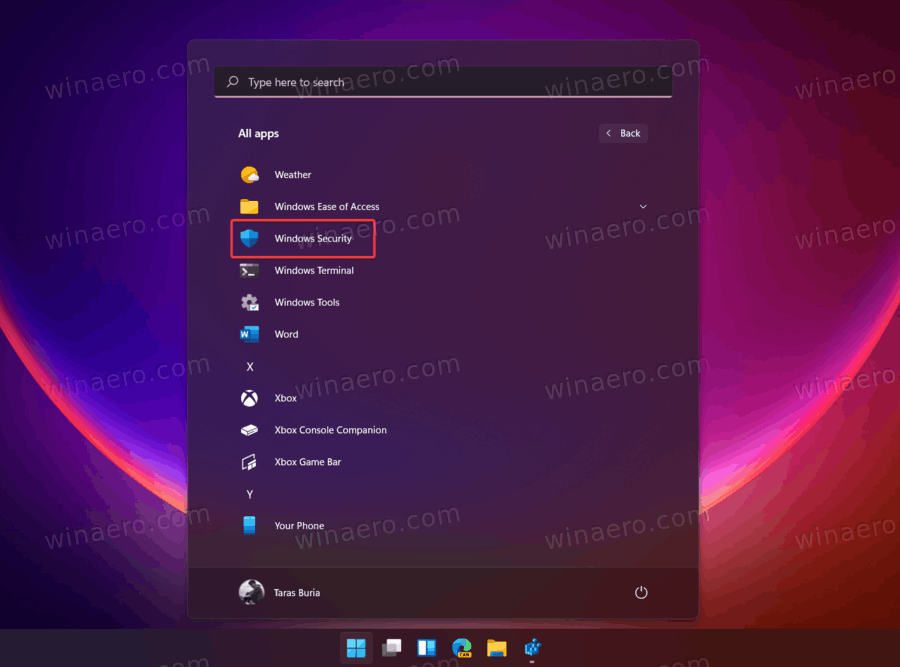
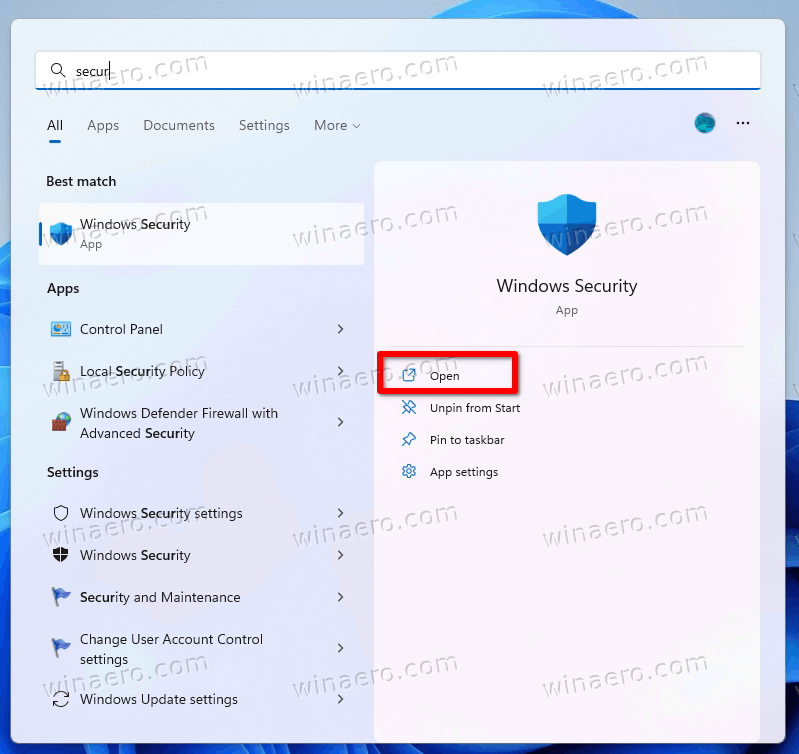
- Open the Start menu and click the All Apps button.
- In the list of apps, find Windows Security and open it. You can also use Windows Search (Win + S) or the app’s icon in the notification area.

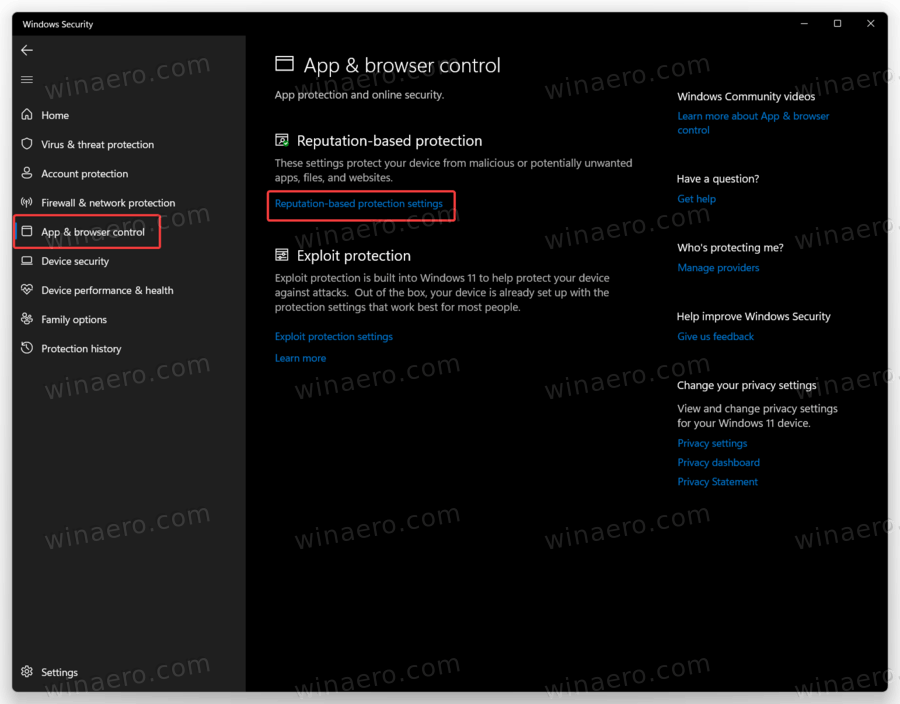
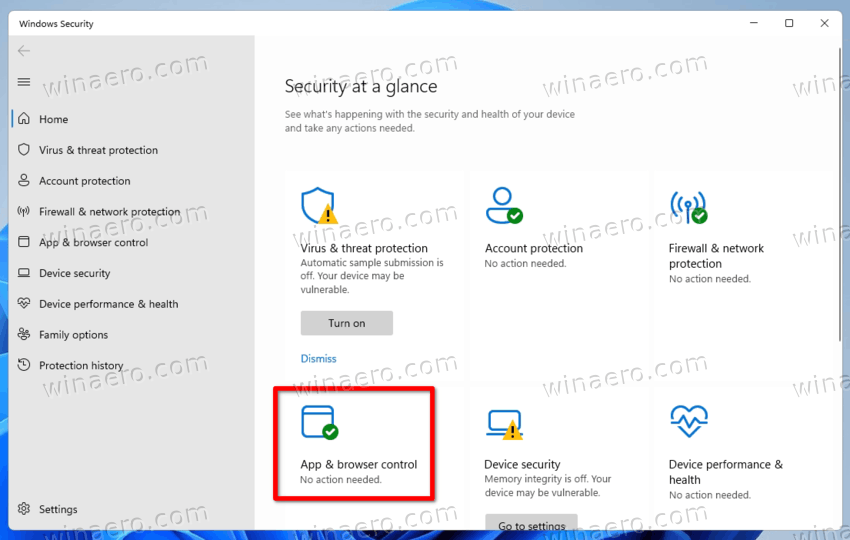
- Once in Windows Security, open the App & browser control section.
- Click the Reputation-based protection settings link.

- Disable the following toggles: Check apps and files, Potentially unwanted app blocking, and SmartScreen for Microsoft Store apps.
You are done!
Note that Windows User Account Control will ask for your permission to disable Windows SmartScreen. Click Yes when prompted.
Using Registry Editor
Although the first method is more convenient and user-friendly, you can disable Windows SmartScreen in Windows 11 using Registry Editor.
- Press Win + R and enter
regeditto launch Windows Registry Editor. - Go to
HKEY_LOCAL_MACHINE\SOFTWARE\Microsoft\Windows\CurrentVersion\Explorer. - On the right side of the window, find the
SmartScreenEnabledstring value (REG_SZ) and double-click it to open.
- Set the value data to
Off.
You have now the SmartScreen feature disabled. Here are the ready-for-use registry files that allow you to disable Windows SmartScreen with a single click.
Ready-to-use registry files
- Download these files in a ZIP archive and unpack wherever convenient for you.
- Open the
Disable SmartScreen in Windows 11.regfile and confirm changes. - To restore default values and enable SmartScreen in Windows 11, open the
Enable SmartScreen in Windows 11.regfile.
Finally, for system administrators and advanced users, Microsoft has included a special Group Policy option that allows configuring the SmartScreen feature on Windows 11. You can use it do turn off the SmartScreen for all users.
Disable SmartScreen in Windows 11 with Group Policy
- Open the Local Group Policy Editor app; for that, press the Win + R keys and type
gpedit.mscin the Run box. - In the left pane, navigate to Computer Configuration > Administrative Templates > Windows Components > File Explorer.
- Double-click the Configure Windows Defender SmartScreen policy in the right pane.
- Set the policy to Disabled and click on the Apply and OK buttons.

- Restart Windows 11 to activate the change.
You are done. The SmartScreen is now turned off for all user accounts of your computer.
If your Windows 11 edition doesn’t include the gpedit.msc tool, or for some other reason you can use a special Registry tweak. It will apply the same restrictions as the above reviewed policy.
Turn off Windows 11 SmartScreen with a Registry tweak for Group Policy
- Open the Registry editor app (Win + R >
regedit). - Navigate to the following branch:
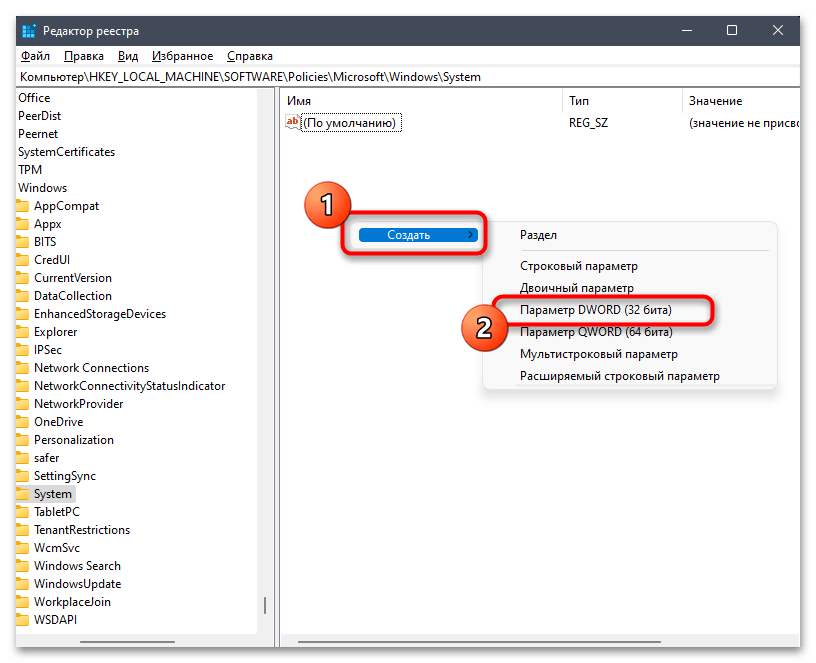
HKEY_LOCAL_MACHINE\SOFTWARE\Policies\Microsoft\Windows\System. If this key is missing, then create it manually. - Right-click the empty space on the right, and select New > DWORD (32-bit) value from the context menu.
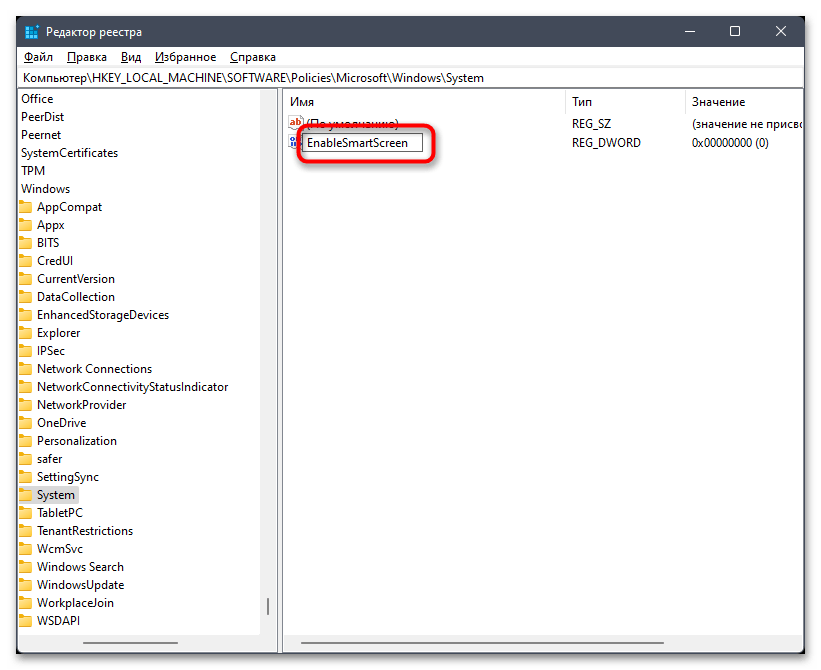
- Name the value as EnableSmartScreen, and leave its value data as 0.

- Restart Windows 11.
You are done. You can undo the change at any moment later by removing the EnableSmartScreen value and then restarting Windows 11.
Again, for your convenience, you can download these ready-to-use Registry files.
Ready-to-use Registry files
- Download the following ZIP archive with REG files.
- Extract it to any folder of your choice, e.g. right on your Desktop.
- Double-click the file
Disable Windows 11 SmartScreen with Group Policy.reg. to apply the restriction. - Confirm the UAC prompt.
- Restart Windows 11.
You are done. The undo tweak is also available in the ZIP archive. To re-enable SmartScreen, open the Enable Windows 11 SmartScreen with Group Policy.reg file and confirm the UAC request.
Disable SmartScreen in Microsoft Edge
Windows allows managing SmartScreen separately for the operating system and the Edge browser. If you want, you can disable Windows SmartScreen just for Microsoft Edge.
To disable Windows SmartScreen in Microsoft Edge, do the following.
- Open the Windows Security app using the search or the list of all apps in the Start menu.
- Go to the App & browser control section.
- Click the Reputation-based protection settings link.
- Turn off the SmartScreen for Microsoft Edge option.

That will disable built-in security measures that keep you off potentially harmful websites and downloads.
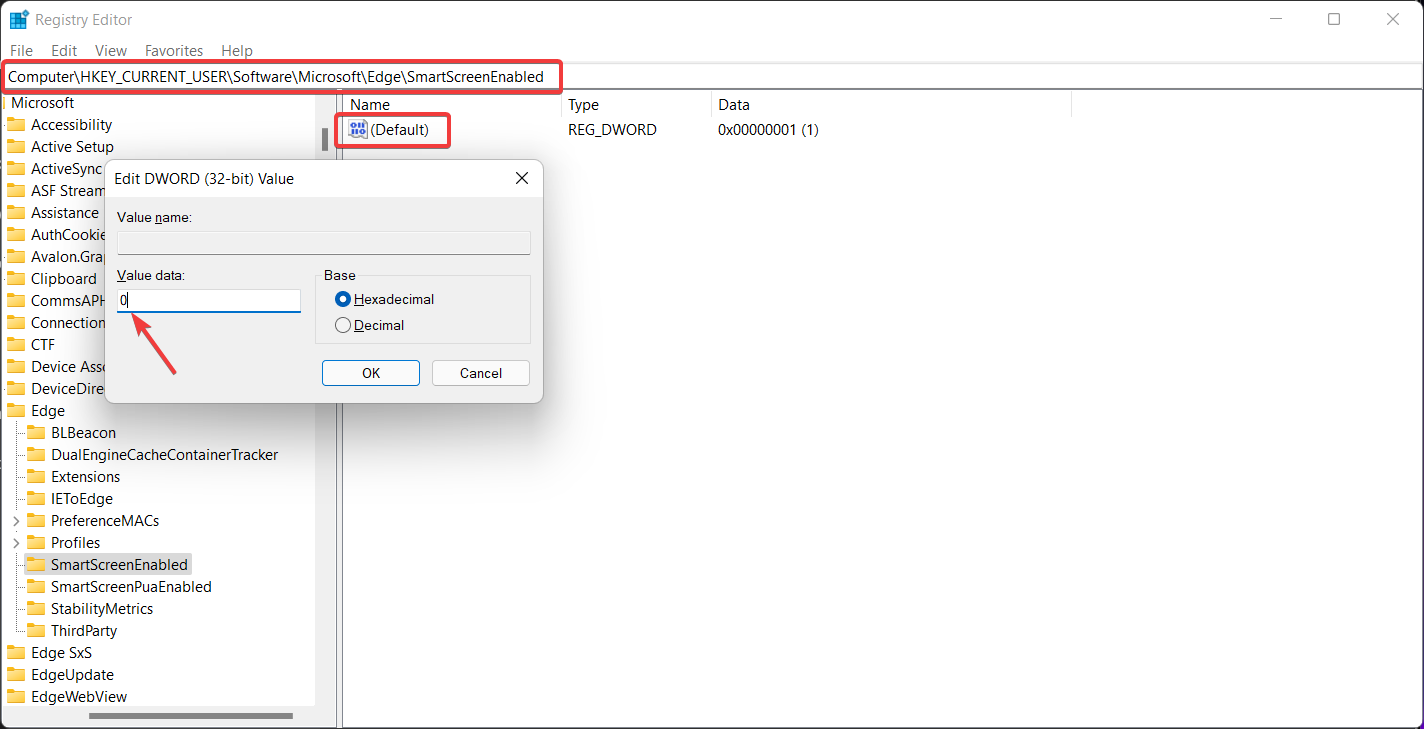
Disable SmartScreen for Microsoft Edge in the Registry
- Launch Windows Registry Editor using the Win + R shortcut and the
regeditcommand. - Go to the following address:
HKEY_CURRENT_USER\Software\Microsoft\Edge\SmartScreenEnabled. - On the right side of the window, double-click the (Default) value and change its value data from 1 to 0.

- Click OK to save changes.
You can apply the described above changes in Windows Registry using prebuilt reg-files. They allow disabling Windows SmartScreen in Microsoft Edge with a single click.
Ready-to-use registry files
- Download REG files in a ZIP archive using this link.
- Unpack files wherever convenient.
- Open the
Disable SmartScreen in Microsoft Edge.regfile and confirm changes. - If you need to re-enable SmartScreen in Microsoft Edge, open the
Turn on SmartScreen in Microsoft Edge.regfile.
That is how you disable SmartScreen in Windows 11 and Microsoft Edge.
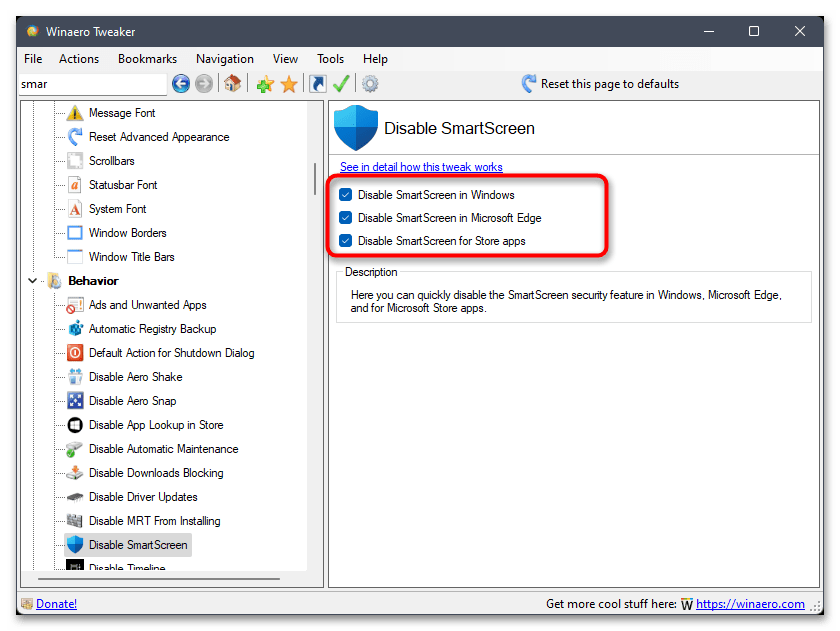
Winaero Tweaker
Finally, you can use Winaero Tweaker, my freeware app to disable the SmartScreen filter in both Windows Explorer and Microsoft Edge. It comes with the following options:
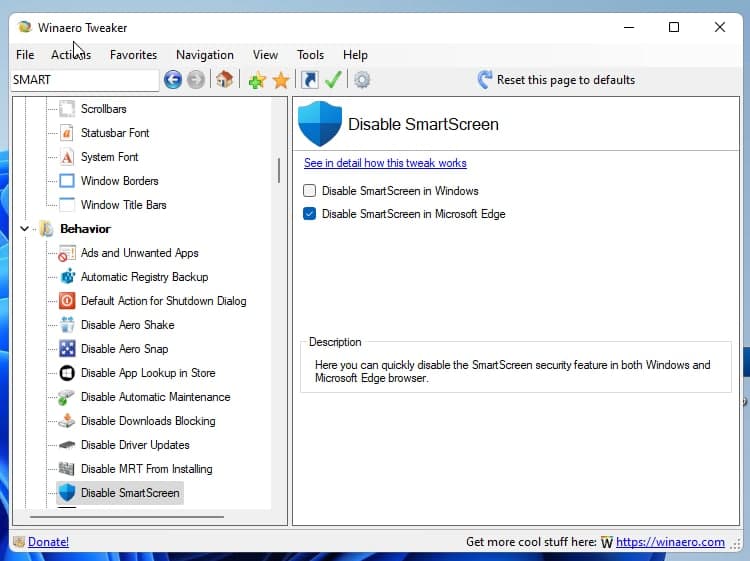
The appropriate options are under the «Behavior» section in the left navigation tree. Check the desired options to disable the feature. Winaero Tweaker also supports exporting and importing its settings, so you can quickly restore your preferences or move them to a new PC.
Download Winaero Tweaker here.
Disable SmartScreen for Microsoft Store apps
By default, the SmartScreen feature in Microsoft Defender always protects your device from unwanted or dangerous activity of apps installed from the Microsoft Store. It will show a warning if some app connects or downloads something from a potentially dangerous website. You will be able to continue and dismiss the warning. Alternatively, you can turn off this behavior.
To disable SmartScreen for Microsoft Store apps, do the following.
- Find the Windows Security app in Windows Search or in the Start menu, and run it.

- Click on the App & browser control button.

- On the next page, click the Reputation-based protection settings link.
- Finally, turn off the SmartScreen for Microsoft Store apps option.
Done. If you need to automate this process for multiple computers via a REG or batch file, here is how you can get that done.
The registry file method
Open the Registry editor (regedit.exe) to the following key:
HKEY_CURRENT_USER\Software\Microsoft\Windows\CurrentVersion\AppHost
Here, create two 32-bit DWORD values, EnableWebContentEvaluation and PreventOverride. Leave both as 0.
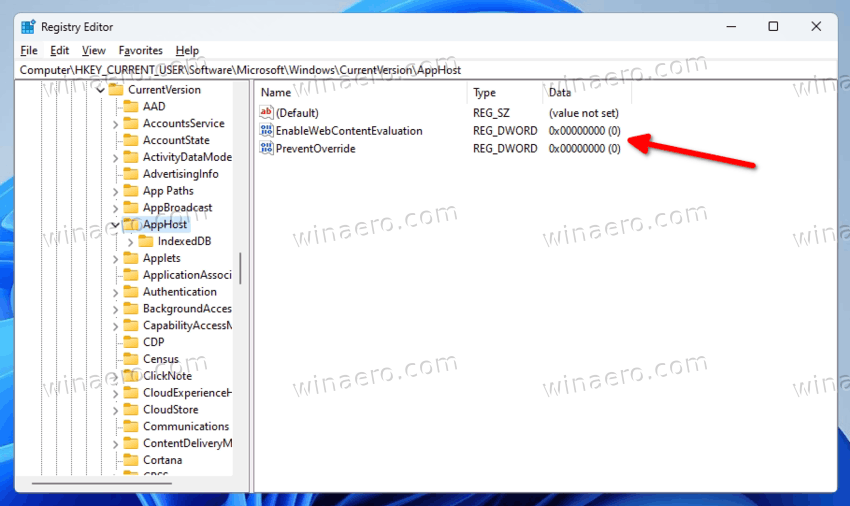
To enable SmartScreen for Microsoft Store apps, set EnableWebContentEvaluation to 1. Don’t change PreventOverride, it should be remain set to 0.
You can download ready-to-use REG files from this link.
The archive includes two files:
-
Disable SmartScreen for Microsoft Store apps.reg— disables the SmartScreen feature for Store apps. -
Enable SmartScreen for Microsoft Store apps.reg— enable the feature (default).
Enable Windows SmartScreen in Windows 11
To turn Windows SmartScreen back on in Windows 11, you can repeat all the steps above and toggle on all the options you have previously disabled.
More specifically:
- Set the Group Policy to «Not configured».
- If you used REG files, use the appropriate «Enable *.reg» undo tweak.
- Finally, you can restore Windows SmartScreen from the home screen of the Windows Security app if you have disabled it using it.
To enable Windows SmartScreen in Windows 11, do the following.
- Open the Windows Security app from the Start menu or system tray.
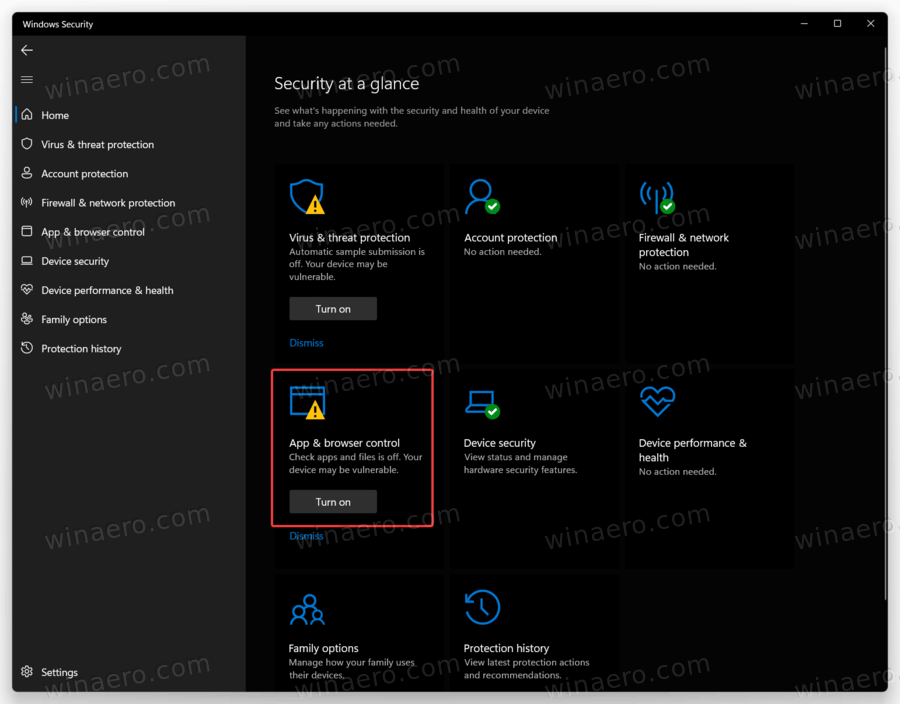
- On the Home tab, where the app shows security at a glance, find the App & browser control button. You will notice a yellow exclamation point indicating potential security risks due to disabled SmartScreen.
- Click Turn On. Select Yes on the UAC prompt, and after that, Windows 11 will enable SmartScreen automatically.
That’s it.
Support us
Winaero greatly relies on your support. You can help the site keep bringing you interesting and useful content and software by using these options:
If you like this article, please share it using the buttons below. It won’t take a lot from you, but it will help us grow. Thanks for your support!
Все способы:
- Способ 1: Выбор настроек через «Параметры»
- Способ 2: Редактирование реестра
- Вариант 1: Создание REG-файла
- Вариант 2: Использование «Редактора реестра»
- Способ 3: Редактирование локальной групповой политики
- Способ 4: Настройка для Microsoft Edge
- Способ 5: Использование Winaero Tweaker
- Вопросы и ответы: 0
Способ 1: Выбор настроек через «Параметры»
Самый простой метод управления SmartScreen в Windows 11 — поиск нужных настроек для отключения через «Параметры». Это подразумевает взаимодействие с графическим интерфейсом и реализацию всего нескольких простых действий. Такими манипуляциями можно легко деактивировать как общий SmartScreen, так и защиту Microsoft Edge и Microsoft Store, что тоже будет продемонстрировано в следующей инструкции.
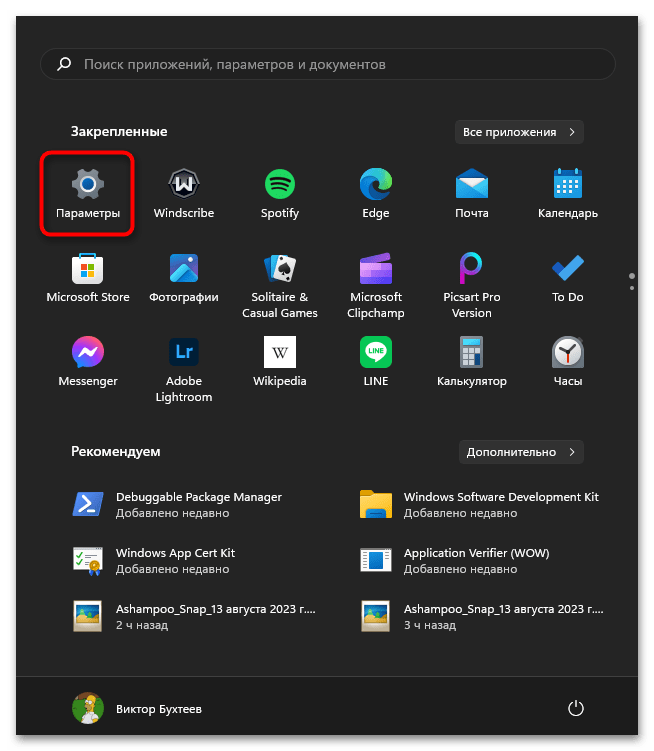
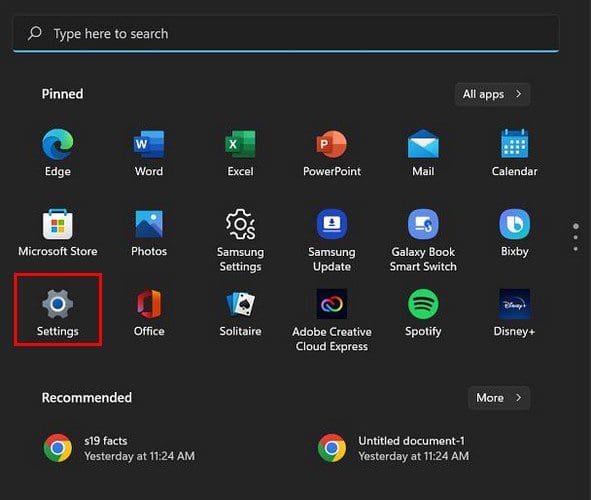
- Откройте «Пуск» и нажмите по значку с изображением шестеренки, чтобы перейти в «Параметры».
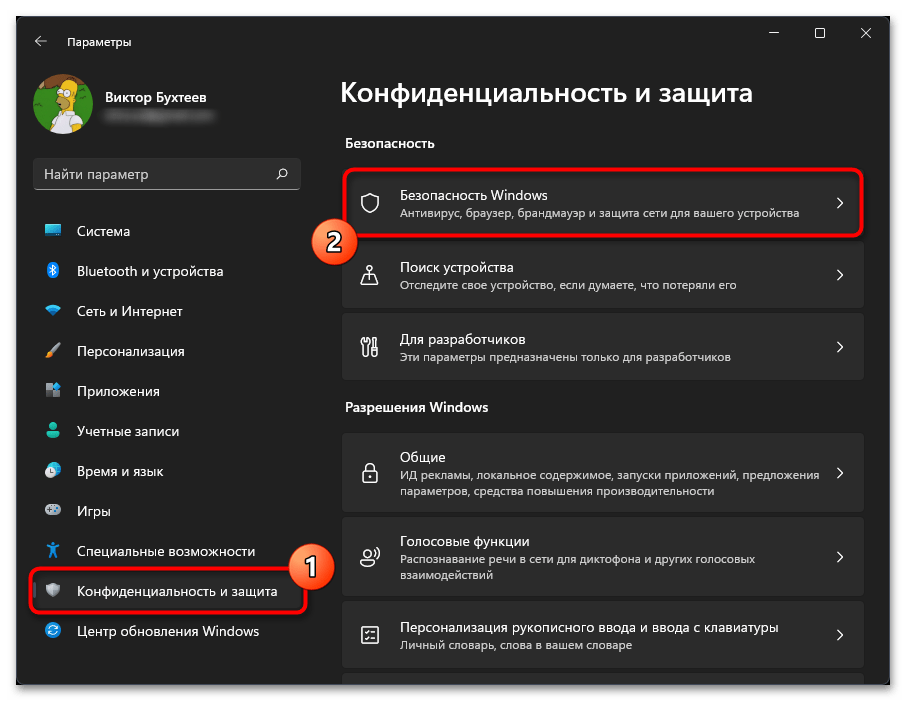
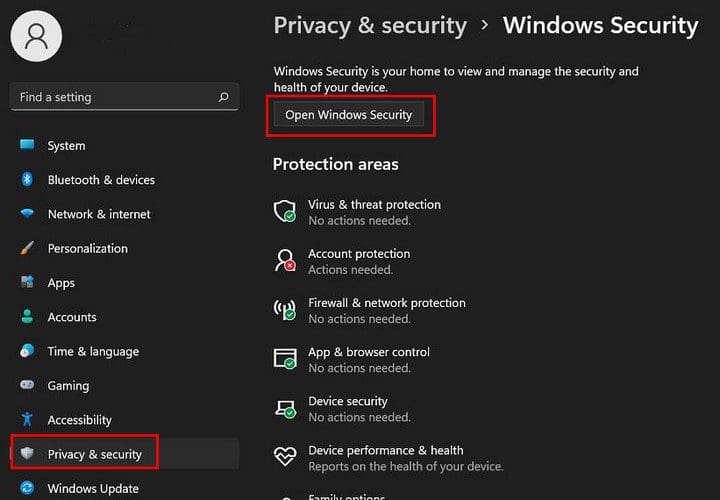
- На панели слева выберите раздел «Конфиденциальность и защита», затем щелкните по категории «Безопасность Windows».
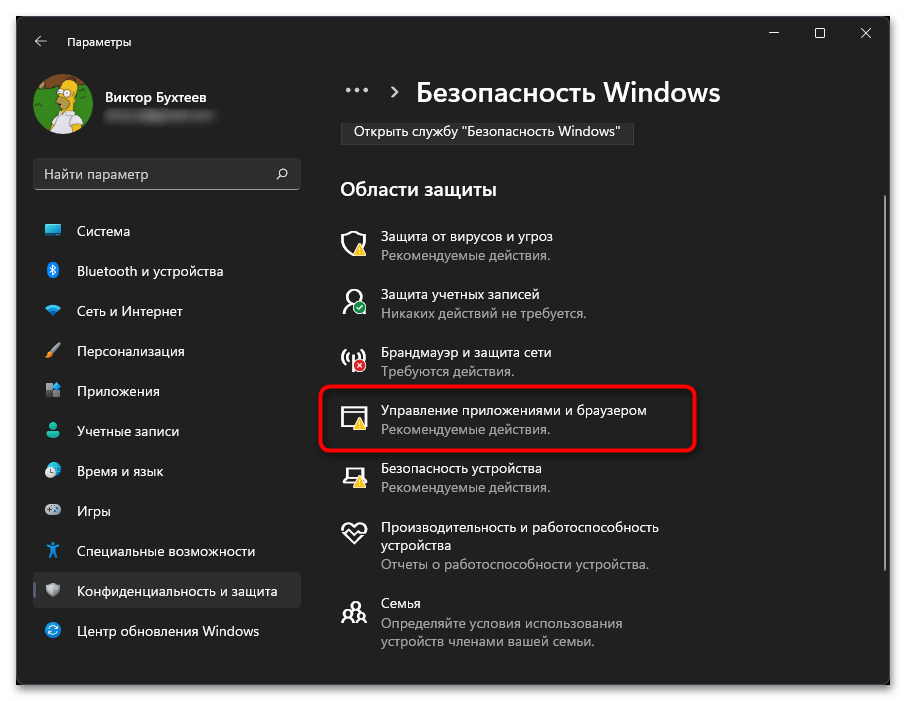
- В списке областей защиты вас интересует «Управление приложениями и браузером».
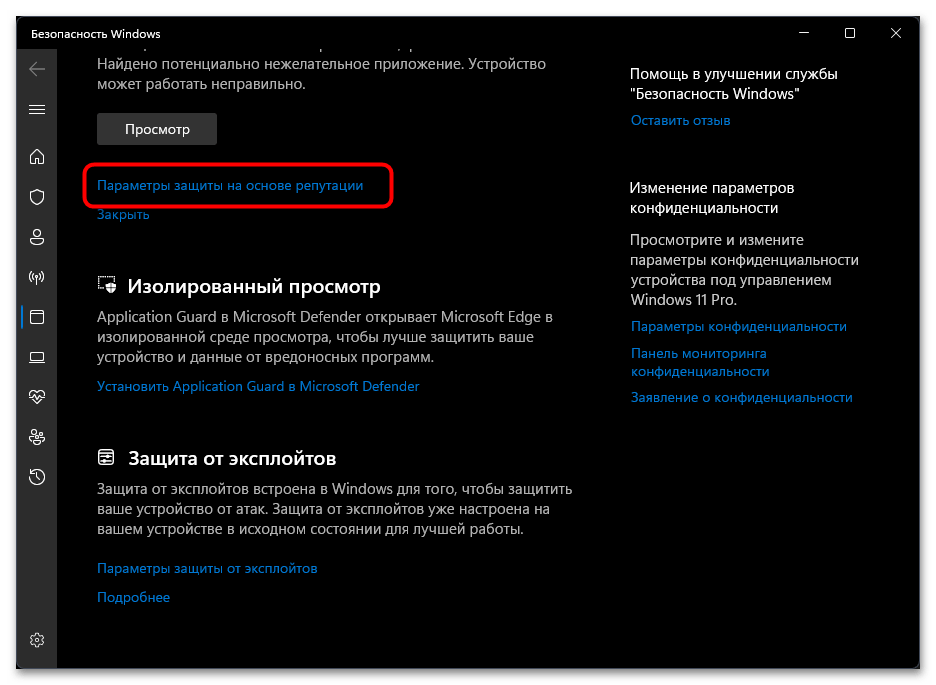
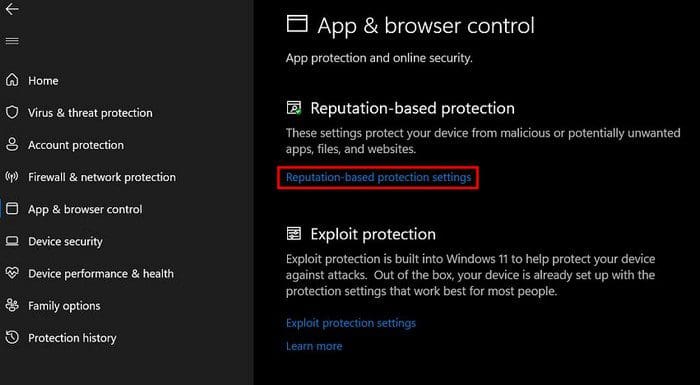
- В следующем окне нажмите по ссылке «Параметры защиты на основе репутации».
- Отключите проверку приложений и файлов, что и есть фильтр SmartScreen. Для этого передвиньте переключатель в соответствующее положение.
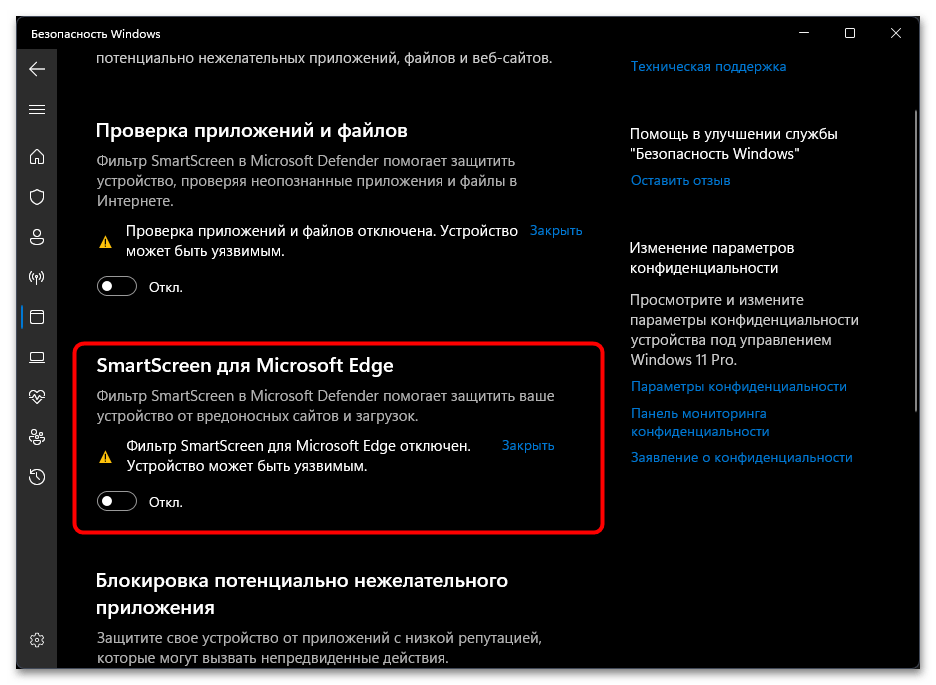
- Ниже вы найдете еще одну настройку с названием «SmartScreen для Microsoft Edge». По ней уже понятно, что предназначен этот фильтр для стандартного браузера. Имеет смысл отключать его в том случае, если вы используете данный веб-обозреватель как основной.
- Еще ниже вы найдете «SmartScreen для приложений из Microsoft Store». Обычно никаких конфликтов с работой данного фильтра при скачивании приложений из магазина не возникает. Однако если вы решили его отключить, чтобы обойти какие-то ограничения, учитывайте, что содержимое приложений не будет проверено на безопасность.
Способ 2: Редактирование реестра
В некоторых случаях пользователь может заметить, что после отключения SmartScreen предыдущим методом проблемы с работой приложений сохраняются или даже настройки возвращаются к стандартным после перезагрузки компьютера. Тогда может потребоваться выбор более действенного способа, которым является предлагаемый. Отредактировать реестр можно как через специальный REG-файл, который внесет изменения автоматически, так и вручную.
Вариант 1: Создание REG-файла
Преимущество использования REG-файла заключается в том, что вы можете просто скопировать ключи и настройки для параметров, вставить их в текстовый документ, затем сохранить его в нужном формате. После запуска все настройки будут применены автоматически, а вам не понадобится заходить в «Редактор реестра» и самостоятельно искать все настройки.
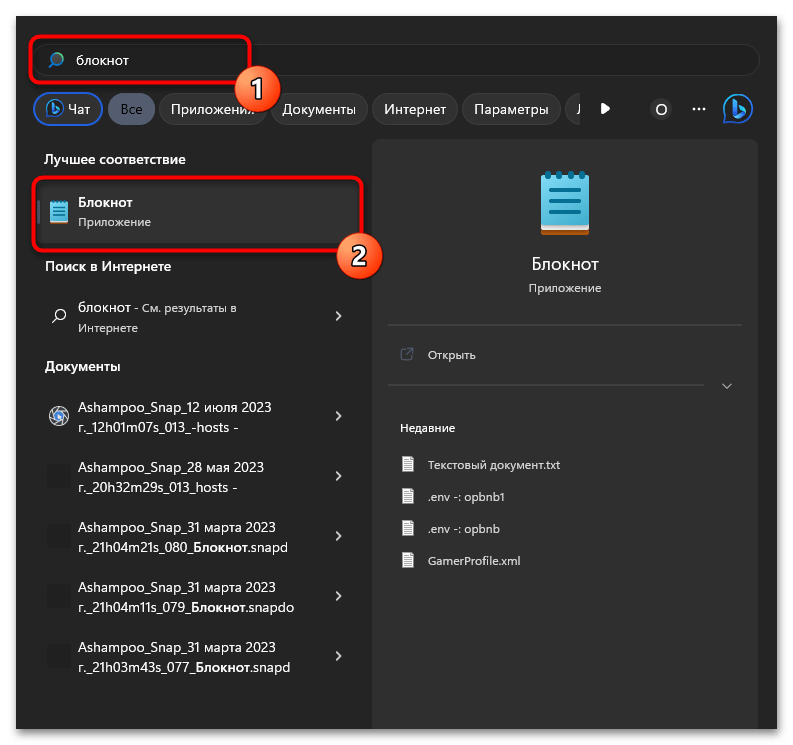
- Если хотите воспользоваться таким методом, через поиск в «Пуске» отыщите «Блокнот» и запустите данное стандартное приложение.
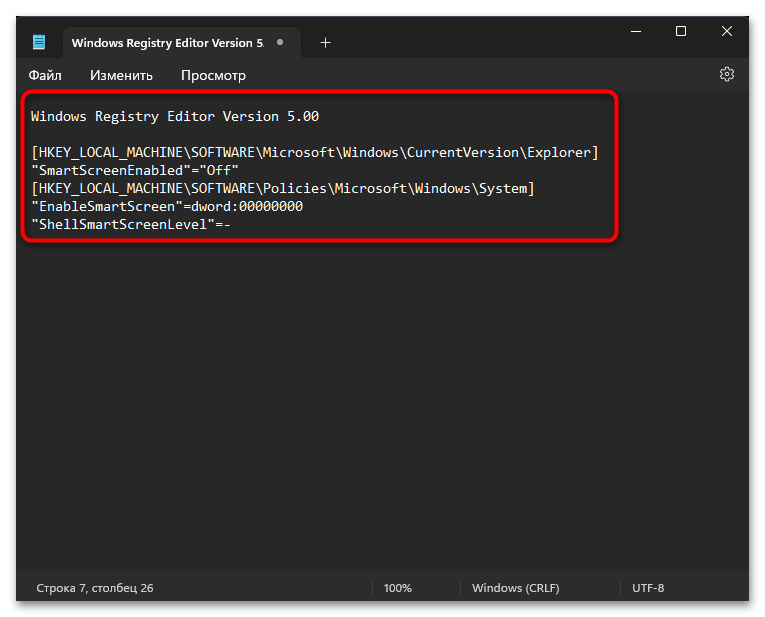
- Скопируйте и вставьте следующее содержимое:
Windows Registry Editor Version 5.00

[HKEY_LOCAL_MACHINE\SOFTWARE\Microsoft\Windows\CurrentVersion\Explorer]

"SmartScreenEnabled"="Off"

[HKEY_LOCAL_MACHINE\SOFTWARE\Policies\Microsoft\Windows\System]

"EnableSmartScreen"=dword:00000000
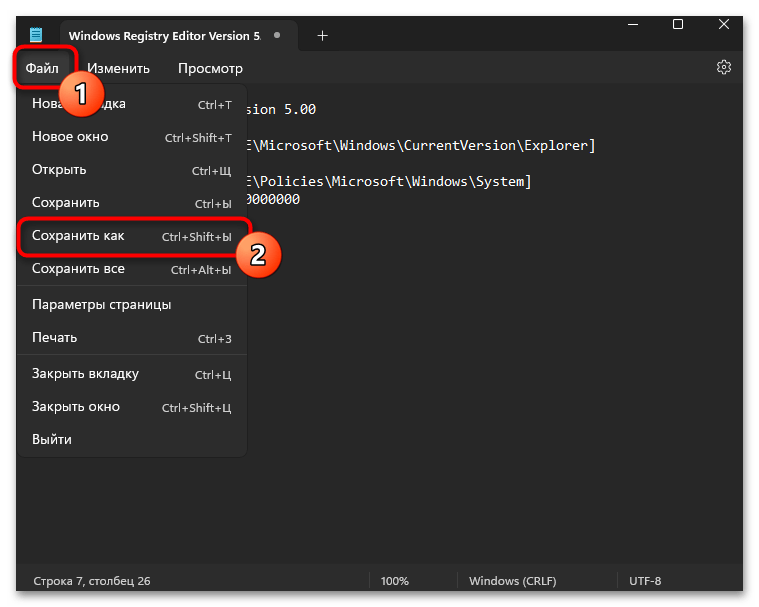
"ShellSmartScreenLevel"=- - После этого вызовите меню «Файл» и из появившегося списка выберите вариант «Сохранить как».
- Задайте для файла любое удобное имя на латинице, но в конце обязательно добавьте
.reg, а также тип файла укажите как «Все файлы (*.*)». Сохраните REG-файл на рабочем столе или в любой папке на компьютере. - Запустите его, дважды кликнув левой кнопкой мыши по самому элементу.
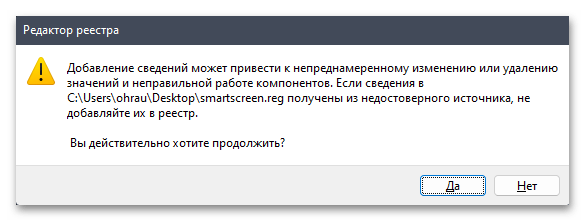
- Прочитайте предупреждение об изменениях и подтвердите их. Новые настройки вступят в силу сразу же после перезагрузки компьютера.

Вариант 2: Использование «Редактора реестра»
Не все пользователи хотят использовать подобный файл для внесения изменений в реестр. Некоторым удобнее просто отыскать параметры и самостоятельно задать для них соответствующие значения. Для таких случаев мы подготовили следующую инструкцию, выполнив которую, вы добьетесь полного отключения SmartScreen на вашем компьютере с Windows 11.
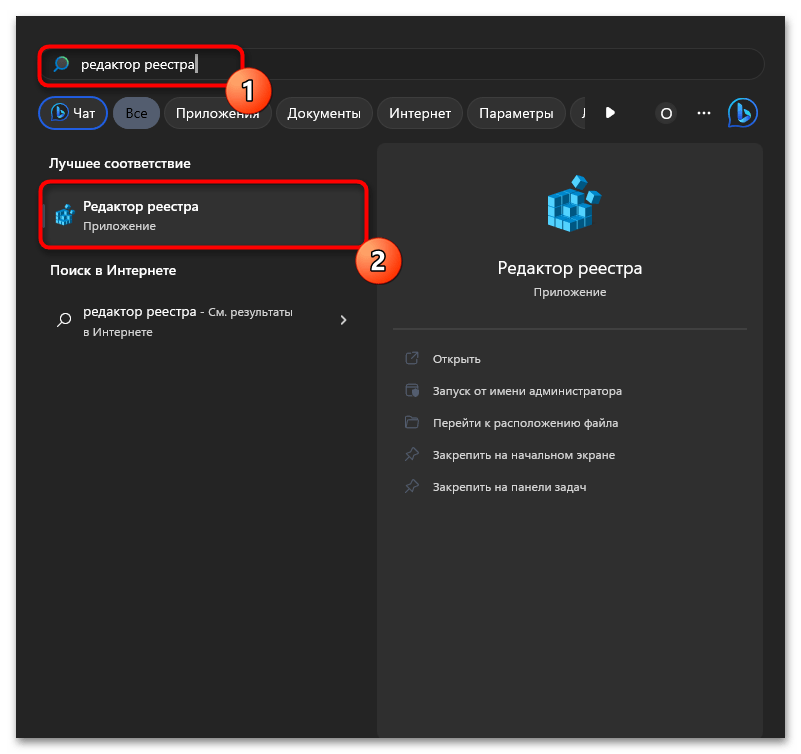
- Откройте «Пуск», найдите стандартное приложение «Редактор реестра» и запустите его.
- В адресную строку вставьте путь
HKEY_LOCAL_MACHINE\SOFTWARE\Microsoft\Windows\CurrentVersion\Explorerи перейдите по нему. - В этом пути вас интересует параметр «SmartScreenEnabled», по которому следует нажать дважды, чтобы открыть окно со значением для редактирования.
- Его установите как «Off», сохраните изменения и переходите далее.
- Рассмотрим еще один путь —
HKEY_LOCAL_MACHINE\SOFTWARE\Policies\Microsoft\Windows\System. В нем хранятся параметры, связанные с локальными групповыми политиками. Создадим отдельный для SmartScreen, поскольку не все юзеры при выборе другого метода отключения смогут воспользоваться «Редактором локальной групповой политики». - В этом пути щелкните правой кнопкой мыши по пустому месту справа, наведите курсор на «Создать» и выберите пункт «Параметр DWORD (32 бита)».
- Задайте для него название «EnableSmartScreen».
- По умолчанию для этого параметра должно стоять значение «0», которое и нужно в нашем случае. Поэтому дальнейшие изменения можно не вносить, остается только перезагрузить компьютер.


Способ 3: Редактирование локальной групповой политики
Метод с редактированием локальной групповой политики подойдет обладателям редакций Windows 11 Pro и Enterprise, поскольку в младших данный компонент управления системными параметрами попросту отсутствует. Для взаимодействия понадобится вызвать меню со всеми политиками, отыскать там требуемые и внести соответствующие изменения.
- Щелкните правой кнопкой мыши по «Пуску» и из появившегося меню выберите «Выполнить».
- Введите команду
gpedit.mscи нажмите Enter для ее активации. - В новом окне редактора выберите ветку «Конфигурация компьютера», затем — каталог «Административные шаблоны» и папку «Компоненты Windows».
- Найдите директорию «Проводник», в которой дважды щелкните по политике с названием «Настроить функцию SmartScreen Защитника Windows».
- Задайте для нее значение «Отключено» и примените изменения.
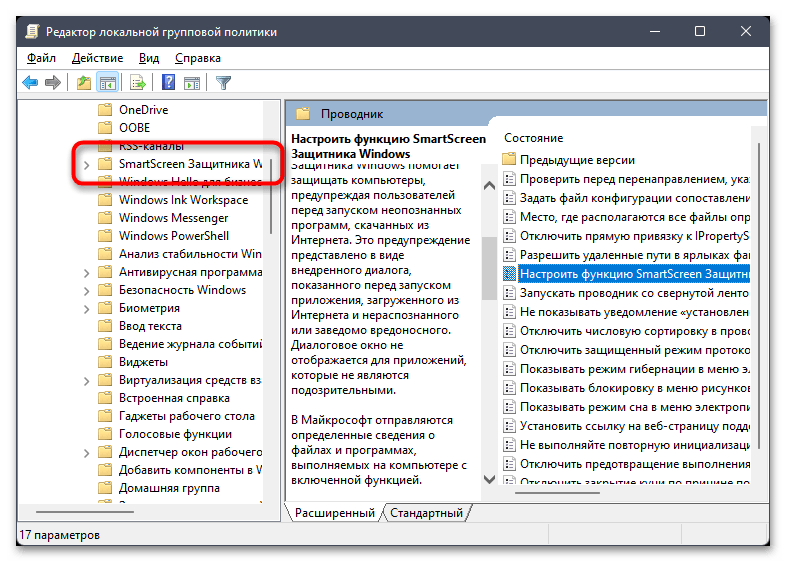
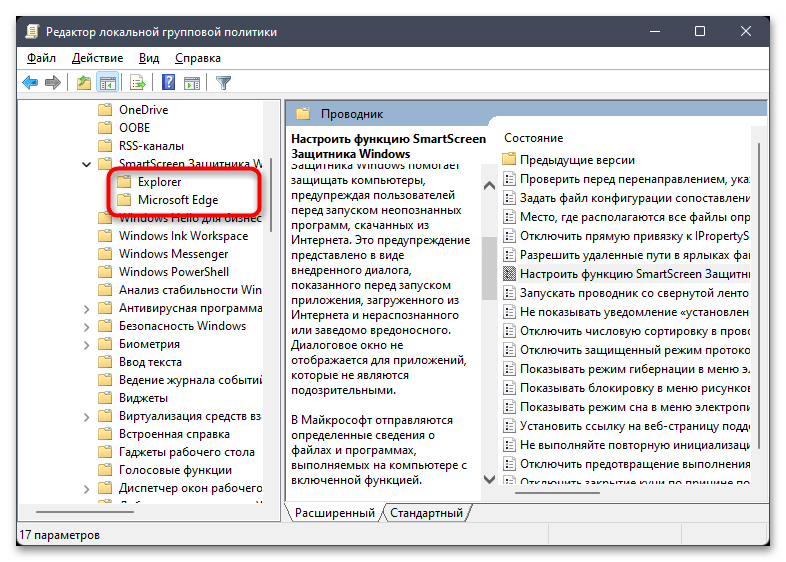
- Если вас интересуют дополнительные параметры, включая изменение поведения настройки для Microsoft Edge, в каталоге «Компоненты Windows» разверните папку «SmartScreen Защитника Windows».
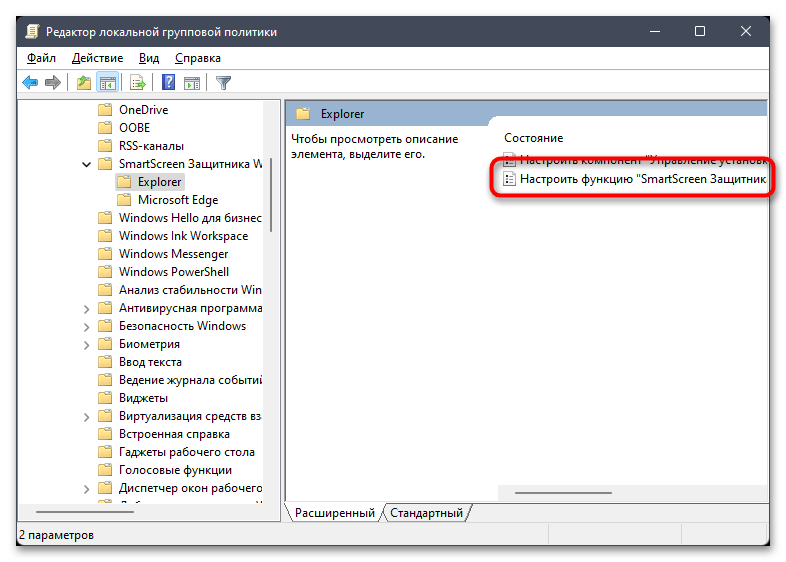
- Выберите каталог для настройки SmartScreen всего «Проводника» или только «Microsoft Edge».
- Точно так же отыщите политику с названием «Настроить функцию SmartScreen Защитника Windows» и отключите ее. По завершении обязательно перезагрузите компьютер, чтобы настройки вступили в силу.

Способ 4: Настройка для Microsoft Edge
Выше мы уже показали два метода того, как можно отключить SmartScreen и для Microsoft Edge. Однако данное действие можно выполнить еще одним путем: используя меню с настройками самого веб-обозревателя. Это и будет продемонстрировано в следующей инструкции.
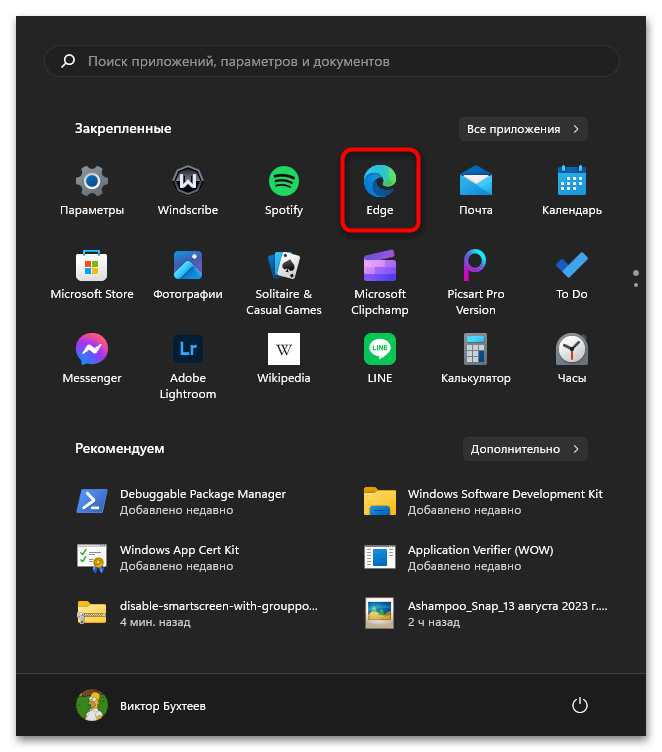
- Запустите Edge любым удобным для вас методом — например, отыскав его среди списка закрепленных значков в «Пуске».
- Далее на верхней панели нажмите кнопку с тремя точками для вызова меню браузера, из которого выберите пункт «Настройки».
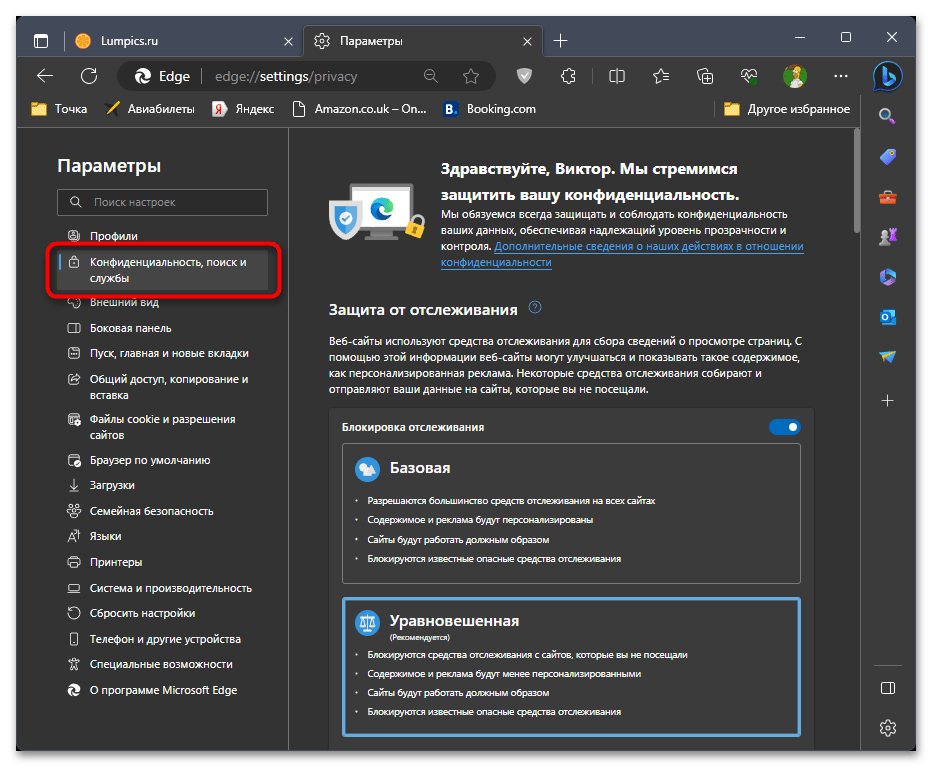
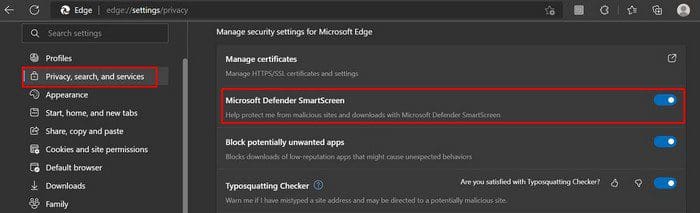
- Слева перейдите к разделу «Конфиденциальность, поиск и службы».
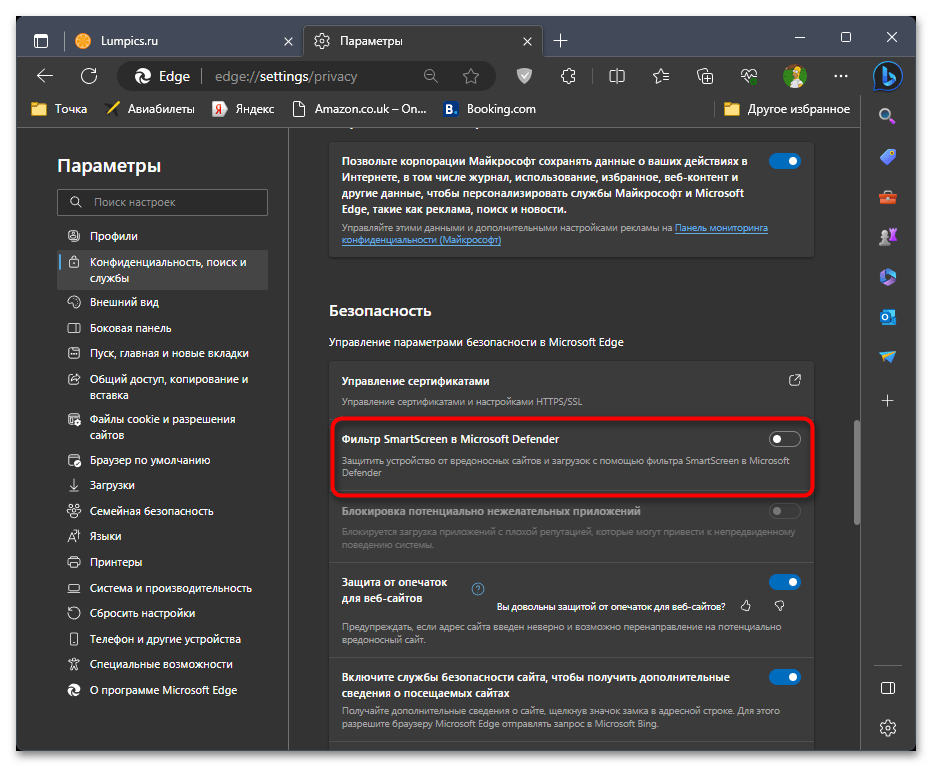
- В блоке «Безопасность» справа найдите настройку с названием «Фильтр SmartScreen в Microsoft Defender» и деактивируйте ползунок.

Дополнительно стоит рассмотреть выполнение аналогичных действий, но уже через редактирование реестра, поскольку редко, из-за различных ограничений внутри самой ОС, внесенные только что изменения могут не сохраниться. Обращаться к реестру нужно только в том случае, если вы действительно столкнулись с проблемой отключения SmartScreen для Edge через его настройки.
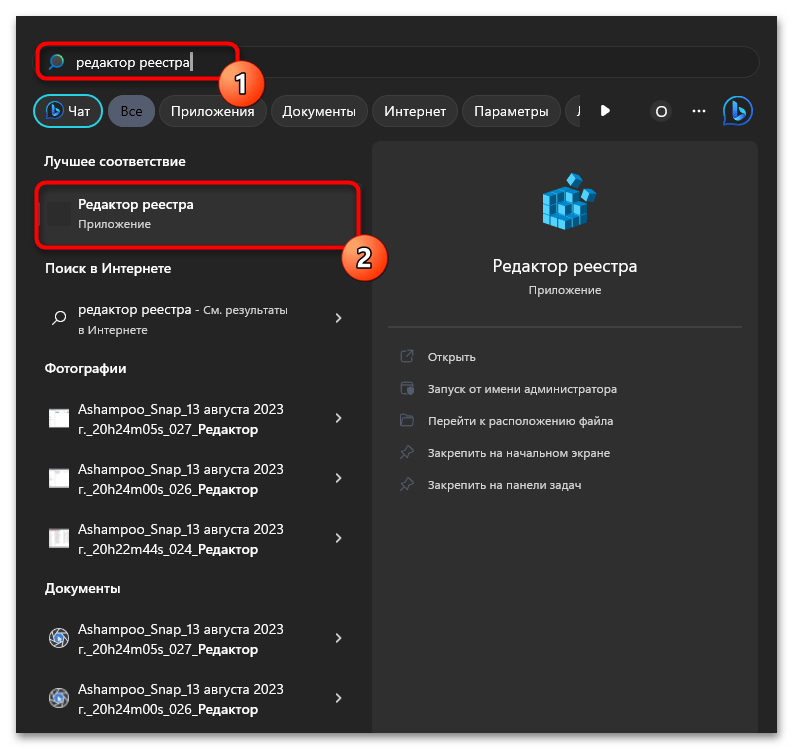
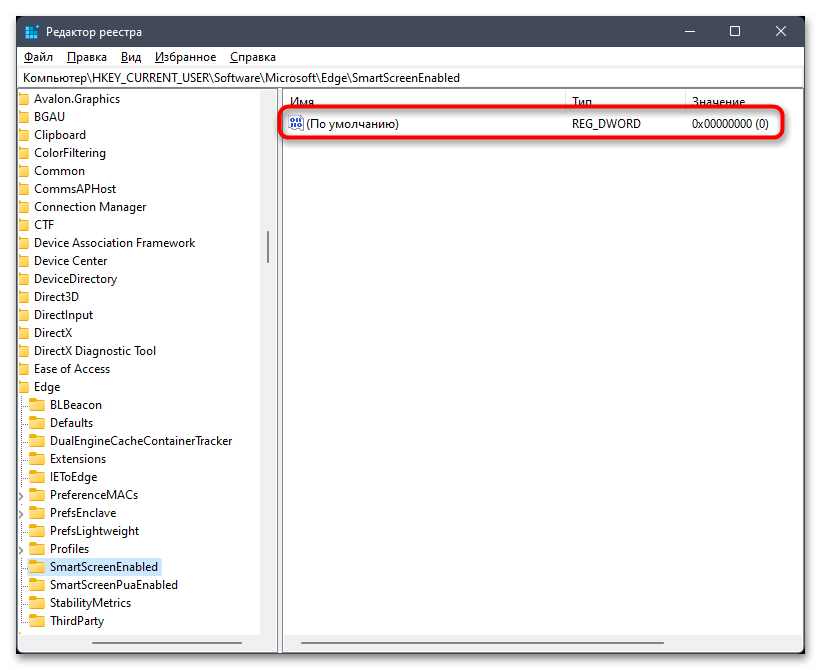
- Запустите «Редактор реестра», отыскав приложение через поиск в «Пуске».
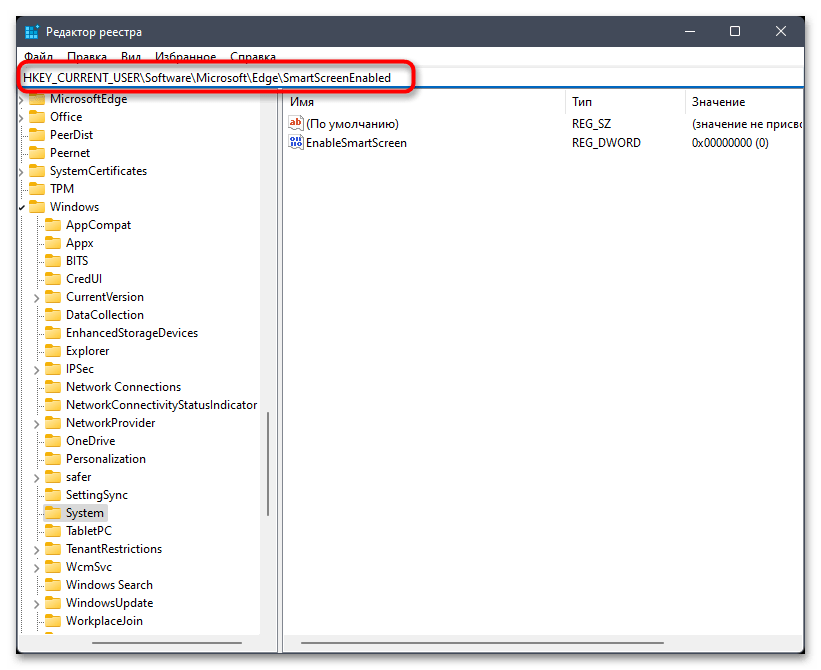
- В нем перейдите по пути
HKEY_CURRENT_USER\Software\Microsoft\Edge\SmartScreenEnabled. - Внутри этого ключа будет только стандартный параметр, значение которого должно стоять как «0».
- Если это не так, щелкните по параметру дважды и самостоятельно измените значение на нужное.
Способ 5: Использование Winaero Tweaker
Winaero Tweaker — известная программа от сторонних разработчиков, предназначенная для автоматизации изменения системных настроек. Основное внимание здесь уделено тем параметрам, редактирование которых через графический интерфейс затруднено или невозможно. Относится это и к отключению SmartScreen, для чего в Winaero Tweaker можно выбрать компоненты деактивации и просто подтвердить действие. Все остальные изменения произойдут в автоматическом режиме путем внесения изменений в реестр со стороны программы.
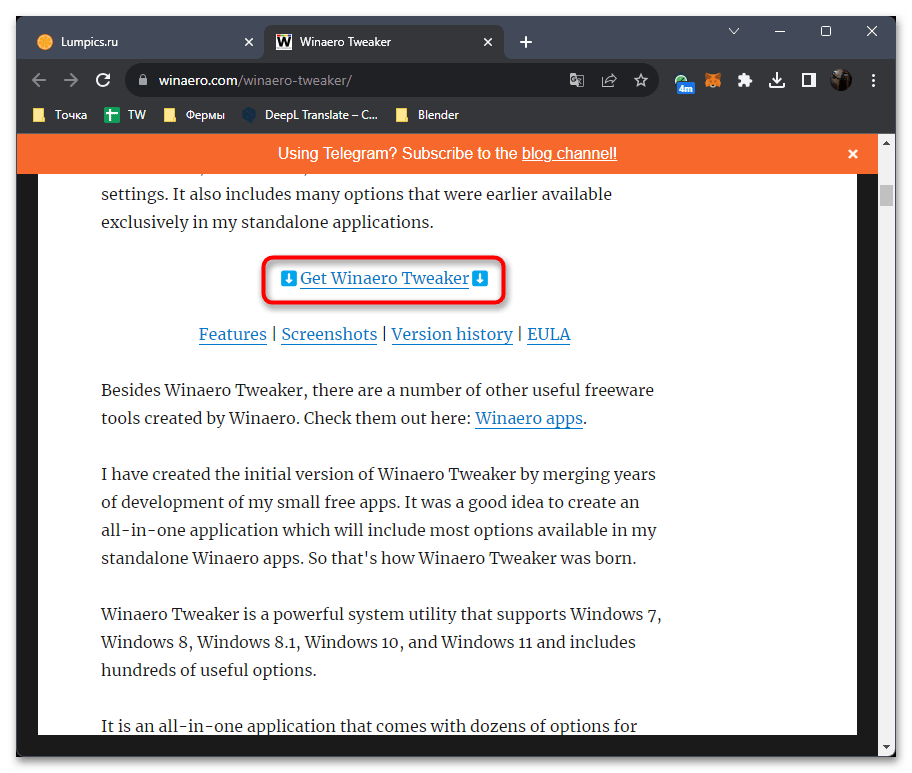
Скачать Winaero Tweaker с официального сайта
- Воспользуйтесь ссылкой выше для перехода на официальный сайт Winaero Tweaker. Нажмите кнопку «Get Winaero Tweaker» для скачивания программы.
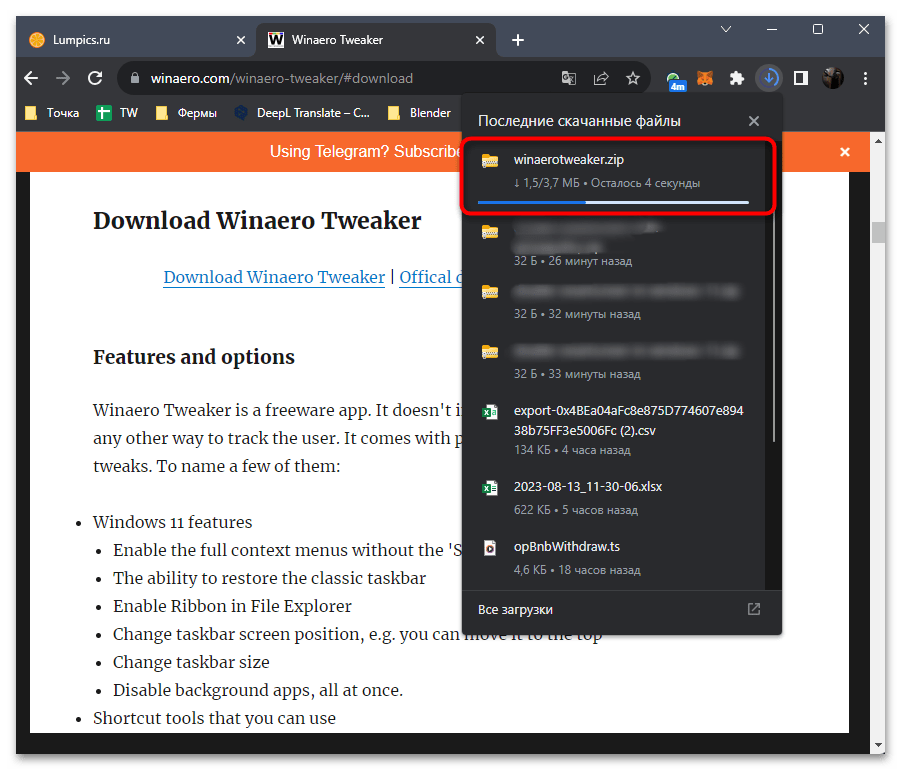
- По завершении загрузки распакуйте полученный архив в любое удобное место на компьютере.
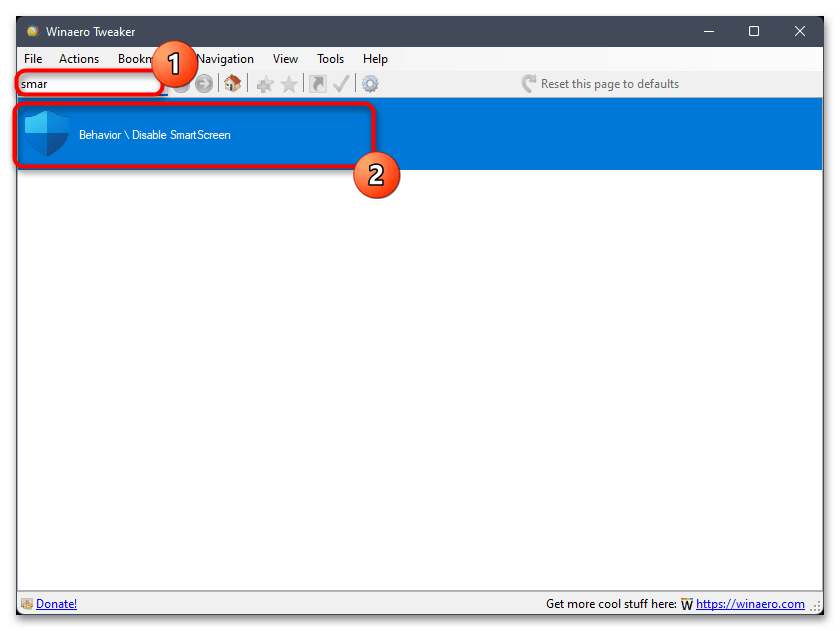
- В этом каталоге отыщите исполняемый файл «Winaero Tweaker.exe» и дважды нажмите по нему для запуска.
- Для простоты навигации воспользуйтесь поиском, чтобы найти параметр «Disable SmartScreen».
- Поставьте галочки возле всех нужных фильтров и при появлении окна о необходимости перезагрузки ПК выполните это действие.

Если во время использования Windows 11 вы получаете ошибку «Фильтр SmartScreen сейчас недоступен», вам нужно либо держать SmartScreen всегда включенным, либо искать метод исправления этой ошибки, вызванной разными системными сбоями. Более детально об этом читайте в другом материале на нашем сайте по ссылке ниже.
Подробнее: Решение ошибки «Фильтр SmartScreen сейчас недоступен» в Windows 11
Наша группа в TelegramПолезные советы и помощь
In Windows 11, you’ll see a program called SmartScreen. It’s there to keep your computer safe. When you use Microsoft Edge, it’s automatically enabled to warn you when you enter a site where you could be a victim of phishing or that the site isn’t safe. But, if it’s something you want to disable, you’ll see the steps to do so later on.
Contents
- 1 What Does SmartScreen Do?
- 2 How to Turn off SmartScreen in Windows 11
- 2.1 How to Turn On or off SmartScreen Through Internet Properties
- 2.2 How to Turn Off/on SmartScreen on Edge Browser
- 2.3 Conclusion
What Does SmartScreen Do?
Before you turn it off, it’s best to know what it does. If, after finding out what it does and you still want to turn it off, you can continue to the next section. Besides the previously mentioned, SmartScreen will show you a warning message that the site is not safe and will give you the options to continue or to go back. It will do the same thing with the downloads.
SmartScreen has a list that compares the sites you visit. If it’s on the list of the dangerous ones, that’s when you’ll see the warning message. The good news is that you can customize SmartScreen to inspect apps/files that are not recognized.
It goes a little further than that since it can also protect you from apps on the Microsoft Store that aren’t ranked very high and that have caused other users issues. But, you might still want to disable it since maybe it’s blocking trustworthy apps, which you don’t have to deal with if you turn it off. If you still want to disable it, follow these steps.
How to Turn off SmartScreen in Windows 11
The Easiest way:
Since you have more important things to do, here is the fastest way to turn off the SmartScreen feature. You’ll need to go into Settings. You can access Settings using your preferred method or press the Windows and I keys.
Once you are in Settings, click on Privacy and Security, followed by Windows Security. Click on the Open Windows Security option at the top, and then click on the App and browser control tab that’ll be to your left.
Look for a section called Reputation-based protection. Beneath that section, click on its Settings.
Here you’ll see all the different filters you can disable or enable. Look through them and simply toggle them on or off. Make sure to carefully read the description below them to see if that’s what you want to turn off. That’s all there is to it. You can go back and make any changes by following these steps.
How to Turn On or off SmartScreen Through Internet Properties
Note: If you are running on a newer version of Windows, you might now have the option to do the following steps.
If turning off the Windows Defender SmartScreen is easier by going through the Internet Properties, here are the following steps.
- Open Run ( Win + R)
- Type Control
- Click OK (Control Panel will open)
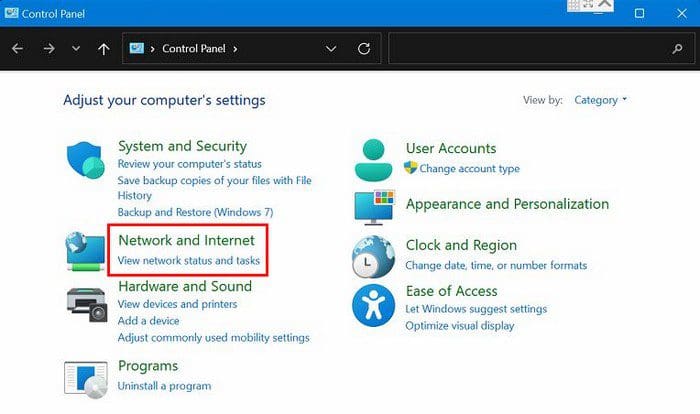
- Network and Internet
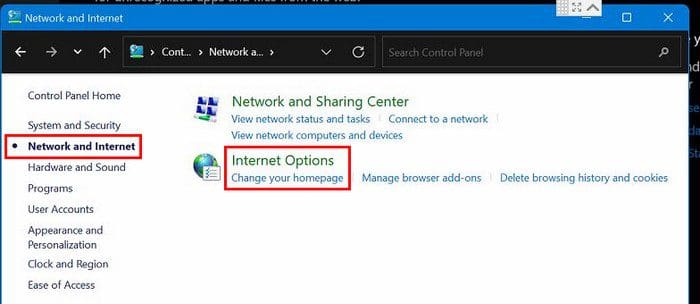
- Internet Options
- Advanced Tab
- Go to the Security Section
- Uncheck Enable Windows Defender SmartScreen
- Click Apply and then OK
How to Turn Off/on SmartScreen on Edge Browser
You also have the option of turning it off in the Microsoft Edge Browser. You can do this by following these steps. Go to Settings by clicking on the dots at the top right.
Go to Privacy, search, and services (it’ll be on your left side). Go to the Security section, where you should find the option to turn off or on the Microsoft Defender SmartScreen option.
Keep in mind that if you turn it on in the future, don’t forget to enable the Block potentially unwanted apps option.
Conclusion
The Windows Defender SmartScreen is very useful, but when it starts to block trustworthy apps, it makes you think if it’s worth keeping enabled. By following these steps, you can turn it off when you want or back on. You also have the steps to turn off this program on the Edge browser as well. How useful do you think it is? Share your thoughts in the comments below, and don’t forget to share the article with others on social media.
-
Home
-
News
- How to Enable/Disable SmartScreen on Windows 11? Here Are 3 Ways!
By Daisy | Follow |
Last Updated
SmartScreen can keep your computer safe and many users want to know how to enable/disable SmartScreen on Windows 11. If you are one of them, you can refer to this post from MiniTool. Here are 3 ways.
Microsoft Defender SmartScreen is a part of Windows Security. It helps you protect against common threats by warning against downloading or installing potentially malicious files from other computers. This feature is enabled by default in Windows. However, sometimes you may want to enable or disable SmartScreen on Windows 11 by yourself.
Tips:
Whether using SmartScreen or not, it’s recommended to back up your important data regularly to protect it since downloading malicious apps may cause your data loss. To do that, you can try the free backup software – MiniTool ShadowMaker. It can back up files, folders, systems, and disks.
MiniTool ShadowMaker TrialClick to Download100%Clean & Safe
The following part introduces 3 ways for you to enable or disable SmartScreen on Windows 11.
Way 1: Via Settings
You can go to Windows Security settings to enable or disable SmartScreen on Windows 11. Here is how to do that:
1. Press the Windows + I keys together to open the Settings application.
2. Click Privacy & security > Windows Security > Open Windows Security.
3. Go to the App & browser control part. Under Reputation-based protection, click Reputation-based protection settings.
4. Then, you can enable or disable Check apps and files and Potentially unwanted app blocking. The other two filters are for Microsoft Edge and Microsoft Store apps.
Way 2: Via Local Group Policy Editor
You can turn on or off the Windows Defender SmartScreen using Local Group Policy Editor.
1. Press Windows + R to open Run. Type gpedit.msc and click OK to open Group Policy Editor.
2. Go to the following path:
Computer Configuration > Administrative Templates > Windows Components > File Explorer
3. Find the Configure Windows Defender SmartScreen option in the right panel.
4. Double-click it. Then, you can click Enabled or Disabled and click Apply and OK to save the changes.
Way 3: Via Registry Editor
You can also turn on or off the Windows Defender SmartScreen using Registry Editor. Follow the guide below:
1. Press the Windows logo key and the R key at the same time to open the Run dialog.
2. Type regedit and then press Enter to open Registry Editor. You’ll be prompted for permission and please click Yes to open it.
3. Go to the following path:
HKEY_LOCAL_MACHINE\SOFTWARE\Policies\Microsoft\Windows\System
4. From the left-hand side, right-click the System Registry key and choose New > DWORD (32-bit) value, and name it as EnableSmartScreen.
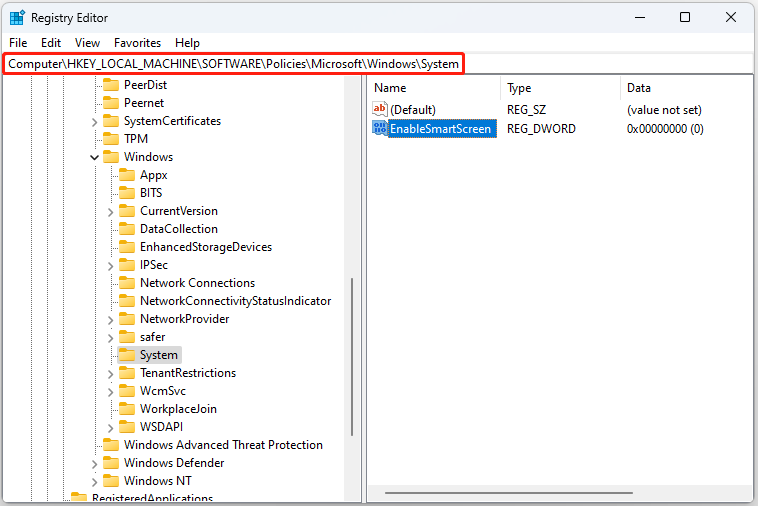
5. Then, double-click it to change its value data to 0.
Final Words
How to enable or disable SmartScreen on Windows 11? This post provides 3 ways and you can choose one of them based on your needs. I hope that this post can be useful to you.
About The Author
Position: Columnist
Having been an editor at MiniTool since graduating college as an English major, Daisy specializes in writing about data backups, disk cloning, and file syncing as well as general computer knowledge and issues. In her free time, Daisy enjoys running and going with friends to the amusement park.