
Если по той или иной причине вы хотите не просто остановить службу Windows 10, но и удалить её, сделать это можно двумя простыми способами, о которых пойдет речь в этой инструкции. В обоих случаях для удаления потребуются права администратора.
Обратите внимание: удаление некоторых служб, особенно если они имеют отношение к работе ОС может либо не получиться, либо привести к нежелательным последствиям, поэтому удаляйте службы лишь в том случае, если уверены в том, что делаете.
Удаление служб Windows 10 в командной строке
Первый способ — использование командной строки для удаления служб. Он не всегда срабатывает, но начать следует именно с него. Порядок действий будет следующим:
- Нажмите клавиши Win+R, введите services.msc и нажмите Enter. В списке служб найдите ту, которую нужно удалить, дважды нажмите по имени службы, остановите её (если она останавливается) и посмотрите на имя службы вверху вкладки «Общие».

- Запустите командную строку от имени Администратора. В Windows 10 для этого можно начать набирать «Командная строка» в поиске на панели задач, а затем нажать по найденному результату правой кнопкой мыши и выбрать «Запустить от имени Администратора».

- В командной строке введите команду sc delete имя_службы и нажмите Enter.

- Если всё прошло успешно, вы получите информацию об успехе удаления службы, закройте командную строку и, желательно, перезагрузите компьютер.


К сожалению, данный метод работает не всегда. В этом случае можно использовать еще один метод удаления служб.
Как удалить службу Windows 10 в редакторе реестра
Этот метод удаления служб может иметь более нежелательные последствия, поскольку вы имеете возможность удалить даже те службы, которые необходимы Windows 10 для работы. Шаги удаления службы Windows 10 в редакторе реестра:
- Так же, как в предыдущем случае посмотрите имя службы в services.msc
- Нажмите клавиши Win+R, введите regedit и нажмите Enter.
- В открывшемся редакторе реестра перейдите к разделу HKEY_LOCAL_MACHINE\SYSTEM\CurrentControlSet\Services
- Внутри этого раздела найдите подраздел с именем службы, которую нужно удалить. Удалите этот подраздел.

- Перезагрузите компьютер.

На этом удаление службы будет завершено.
Все способы:
- Удаление служб
- Способ 1: «Командная строка»
- Способ 2: Реестр и файлы служб
- Заключение
- Вопросы и ответы: 1
Службы (сервисы) – это особые приложения, работающие в фоновом режиме и выполняющие различные функции – обновление, обеспечение безопасности и работы сети, включение мультимедийных возможностей и многие другие. Сервисы бывают как встроенными в ОС, так и могут быть установлены извне пакетами драйверов или софтом, а в некоторых случаях и вирусами. В этой статье мы расскажем, как удалить службу в «десятке».
Удаление служб
Необходимость выполнить данную процедуру обычно возникают при некорректной деинсталляции некоторых программ, добавляющих свои службы в систему. Такой «хвост» может создавать конфликты, вызывать различные ошибки или продолжать свою работу, производя действия, приводящие к изменениям параметров или файлов ОС. Довольно часто подобные сервисы появляются во время вирусной атаки, а после удаления вредителя остаются на диске. Далее мы рассмотрим два способа их удаления.
Способ 1: «Командная строка»
В нормальных условиях решить поставленную задачу можно с помощью консольной утилиты sc.exe, которая предназначена для управления системными службами. Для того чтобы дать ей правильную команду, сначала необходимо выяснить имя сервиса.
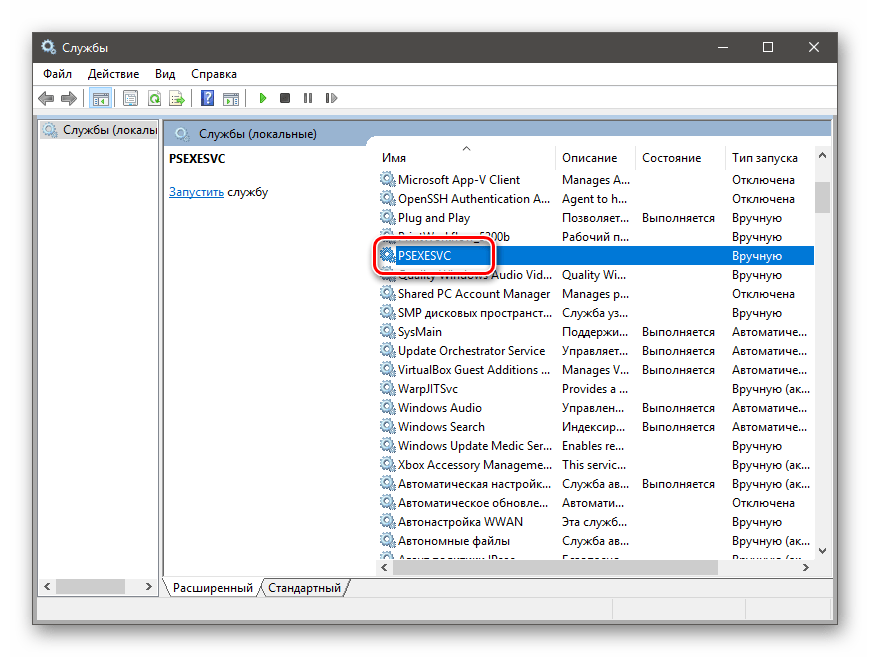
- Обращаемся к системному поиску, нажав на значок лупы возле кнопки «Пуск». Начинаем писать слово «Службы», а после того, как появится выдача, переходим к классическому приложению с соответствующим названием.

- Ищем целевой сервис в списке и кликаем дважды по его названию.

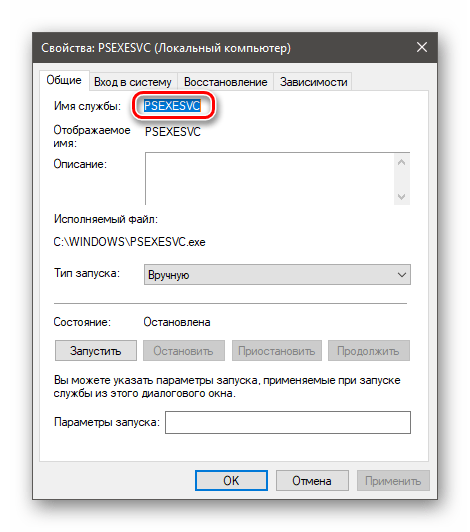
- Имя располагается в верхней части окна. Оно уже выделено, так что можно просто скопировать строку в буфер обмена.

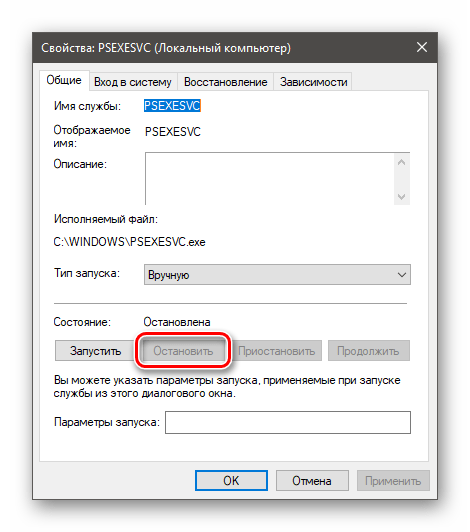
- Если служба запущена, то ее нужно остановить. Иногда сделать это невозможно, в таком случае просто переходим к следующему шагу.
- Закрываем все окна и запускаем «Командную строку» от имени администратора.
Подробнее: Открытие командной строки в Windows 10
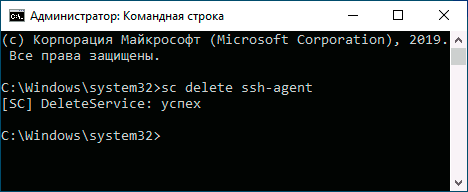
- Вводим команду для удаления с помощью sc.exe и жмем ENTER.
sc delete PSEXESVCPSEXESVC – имя сервиса, которое мы скопировали в пункте 3. Вставить его в консоль можно, нажав в ней правую кнопку мыши. Об успешном выполнении операции нам скажет соответствующее сообщение в консоли.


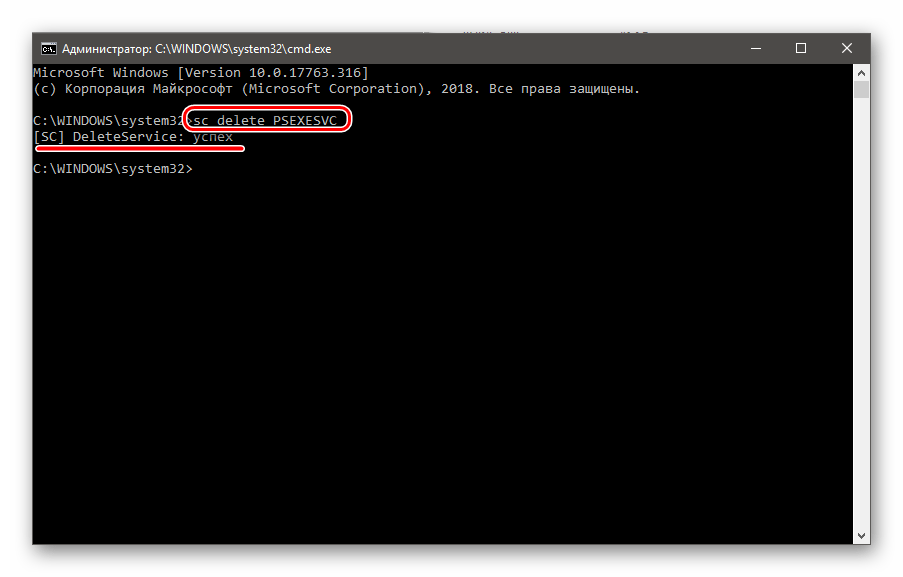
На этом процедура удаления завершена. Изменения вступят в силу после перезагрузки системы.
Способ 2: Реестр и файлы служб
Случаются ситуации, когда невозможно удалить сервис приведенным выше способом: отсутствие такового в оснастке «Службы» или отказ при выполнении операции в консоли. Здесь нам поможет ручное удаление как самого файла, так и его упоминания в системном реестре.
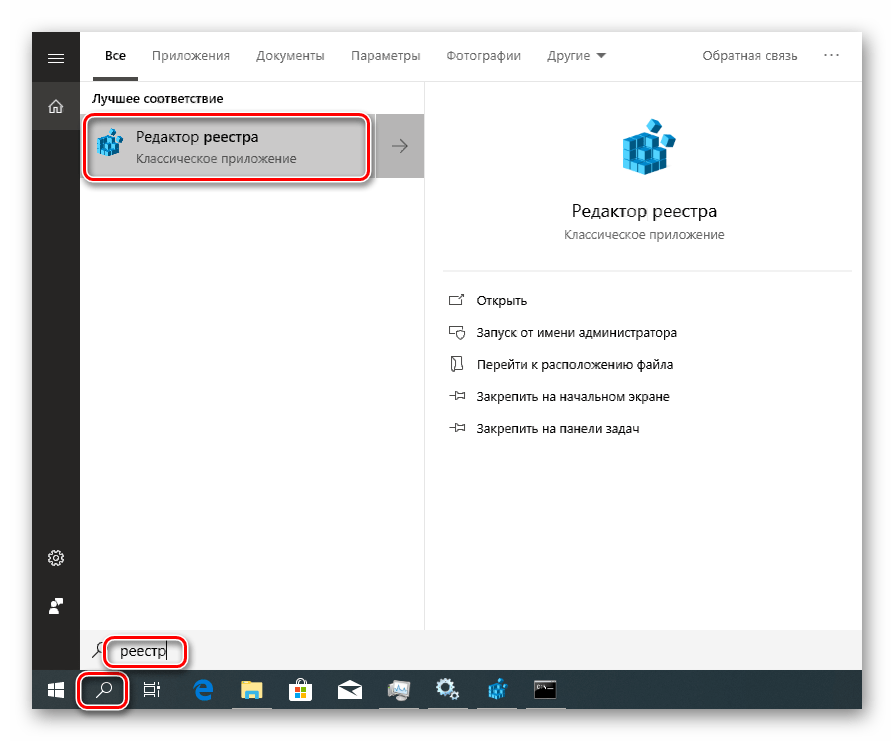
- Снова обращаемся к системному поиску, но на этот раз пишем «Реестр» и открываем редактор.

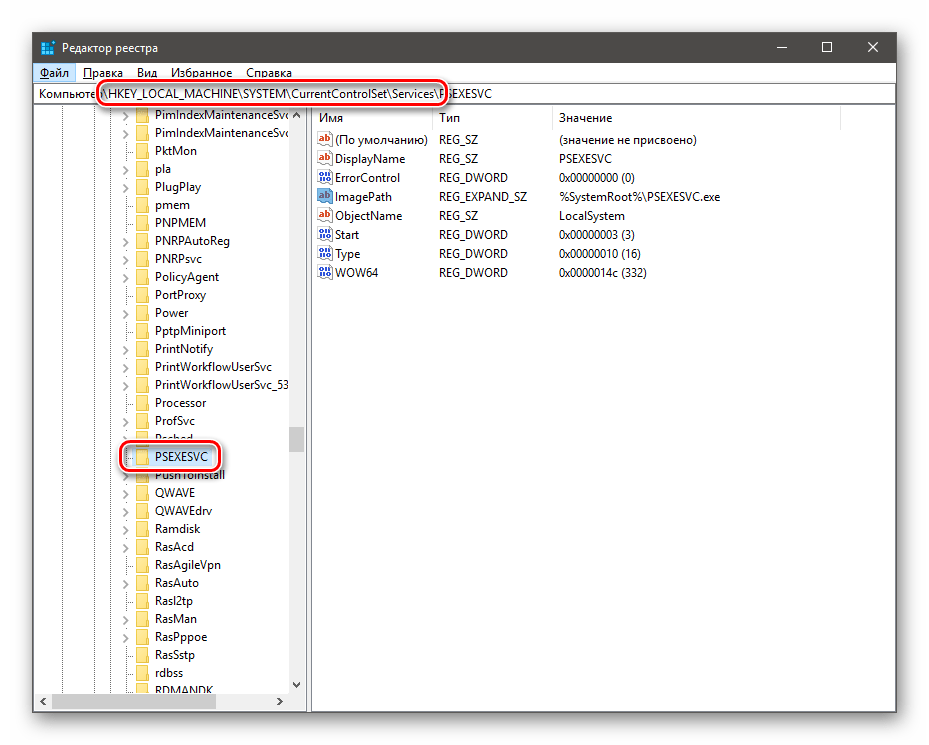
- Переходим в ветку
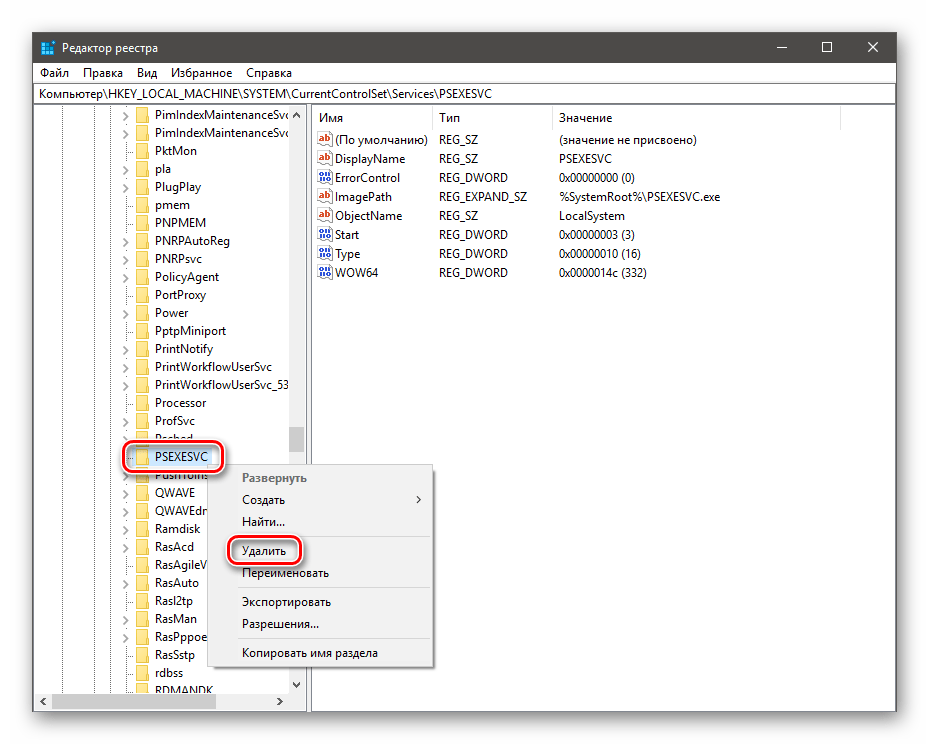
HKEY_LOCAL_MACHINE\SYSTEM\CurrentControlSet\ServicesИщем папку с тем же названием, что и наша служба.

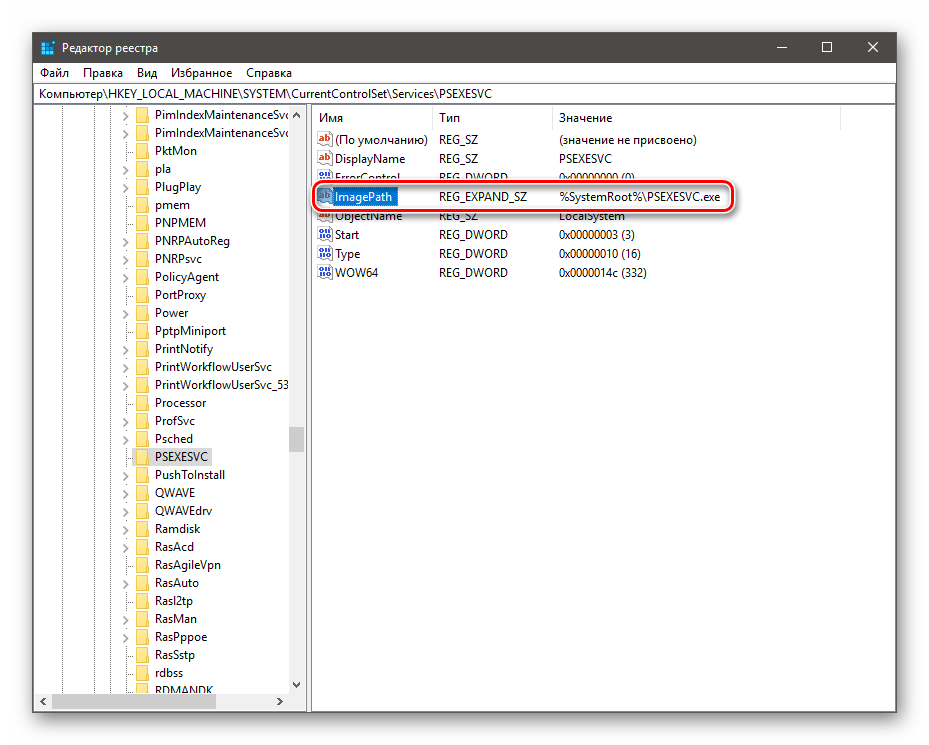
- Смотрим на параметр
ImagePathОн содержит путь к файлу службы (%SystemRoot% — это переменная среды, указывающая путь к папке
«Windows», то есть«C:\Windows». В вашем случае буква диска может быть другая).
Читайте также: Переменные среды в Windows 10
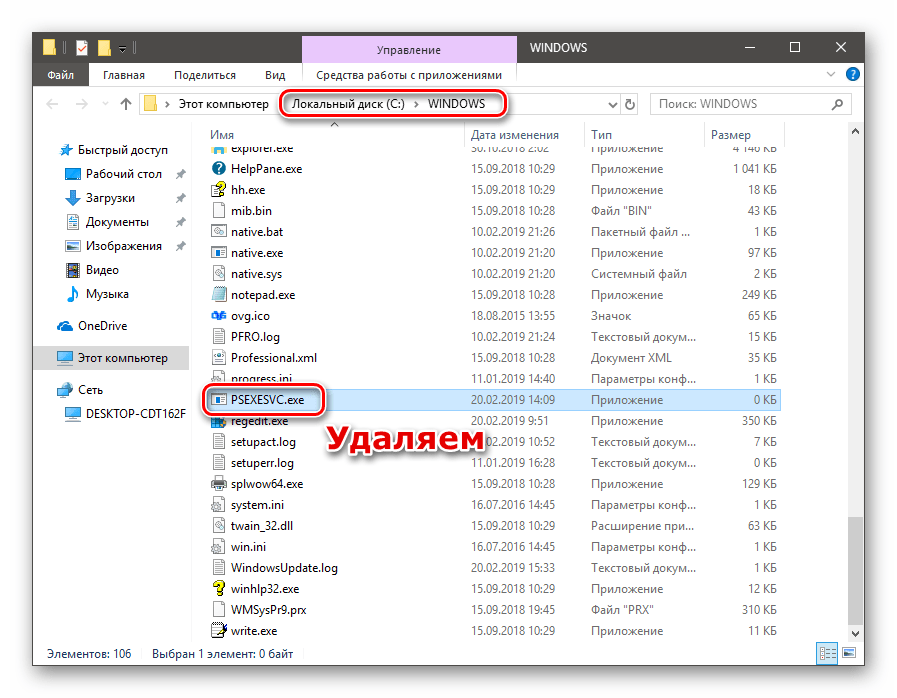
- Переходим по этому адресу и удаляем соответствующий файл (PSEXESVC.exe).

Если файл не удаляется, попробуйте сделать это в «Безопасном режиме», а в случае неудачи ознакомьтесь со статьей по ссылке ниже. Также почитайте комментарии к ней: там приведен еще один нестандартный способ.
Подробнее:
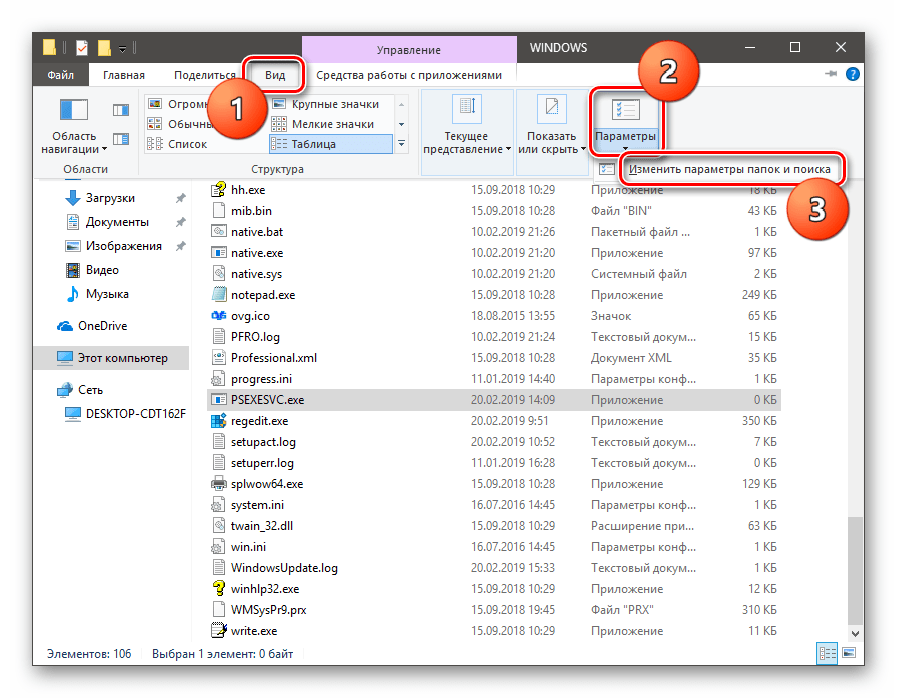
Как зайти в безопасный режим на Windows 10Если файл не отображается по указанному пути, возможно, он имеет атрибут «Скрытый» и (или) «Системный». Для отображения таких ресурсов нажимаем кнопку «Параметры» на вкладке «Вид» в меню любой директории и выбираем «Изменить параметры папок и поиска».
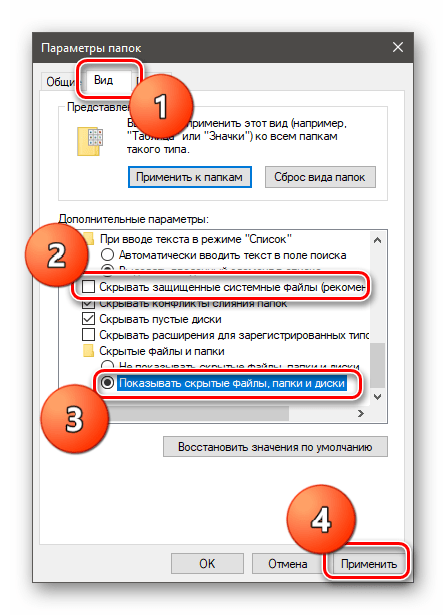
Здесь, в разделе «Вид» снимаем галку возле пункта, скрывающего системные файлы, и переключаемся на отображение скрытых папок. Жмем «Применить».

- После того, как файл будет удален, или не найден (такое бывает), или путь к нему не указан, возвращаемся в редактор реестра и целиком удаляем папку с именем службы (ПКМ – «Удалить»).

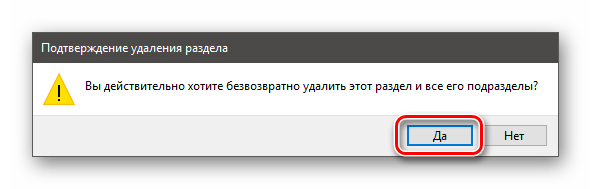
Система спросит, действительно ли мы хотим выполнить данную процедуру. Подтверждаем.

- Перезагружаем компьютер.
Заключение
Некоторые службы и их файлы после удаления и перезагрузки появляются снова. Это говорит либо об их автоматическом создании самой системой, либо о действии вируса. Если имеется подозрение на заражение, проверьте ПК специальными антивирусными утилитами, а лучше обратитесь к специалистам на профильных ресурсах.
Подробнее: Борьба с компьютерными вирусами
Прежде чем удалять сервис, убедитесь, что он не является системным, так как его отсутствие может значительно повлиять на работу Windows или привести к полному ее отказу.
Наша группа в TelegramПолезные советы и помощь
Services are kind of like the backbone of the operating system and the apps that run on it. But, sometimes you might need to remove a service. Maybe you’re troubleshooting, trying to speed up your computer a little bit, or getting rid of a service that was left behind by a program you’ve already uninstalled.
In this guide, we’ll show you how to safely delete a service in Windows 11 or Windows 10 using Command Prompt (CMD). We’ll also talk about what to watch out for and how to make sure you don’t mess things up.
Why delete a service?
So, why would you want to delete a service sometimes?
- Getting rid of a program that left its service behind.
- Removing a service that’s causing problems or clashing with others.
- Trying to make your computer run slightly faster by getting rid of services you don’t need.
You should know what a service does before you decide to delete it. If you remove something important, it can cause serious issues.
Also see: 30+ Windows 11 Services to Disable for Gaming Performance
What happens if you delete a service in Windows 11 or 10?
After deleting a service, the programs or even the system itself that rely on the removed service will not be able to use the functions provided by the service. Most will stop working right away, while some will have issues with part of their features.
Some programs will automatically restore the service when it finds that it’s missing, while for the others that don’t, you will need to reinstall the app in order to bring back the service should you need to.
Therefore, please think twice before deleting a service because you might cause more harm than good if many things need that specific service to work. A smart way would be to create a system restore point first prior to removing any service in Windows. This way, if something goes south, you can still go back to how things were.
If you just want to turn the service off instead of deleting it, check out: How to disable startup services on Windows 11 or 10.
Opening Command Prompt as administrator
Before we start deleting anything, we need to open Command Prompt as an admin, because you need special permissions to delete services.
- Hit the Start button or press the Win key.
- Search for “cmd” or “Command Prompt”.
- Right-click Command Prompt in the results and choose Run as administrator. If it asks for permission, click Yes.
Useful tip: Run CMD, PowerShell or Regedit as SYSTEM in Windows 11

List services using “sc query” command
First off, we need to find the service you want to delete. We’ll use the sc query command to see all the services on your computer.
In Command Prompt, type this and hit Enter:
sc query type= service
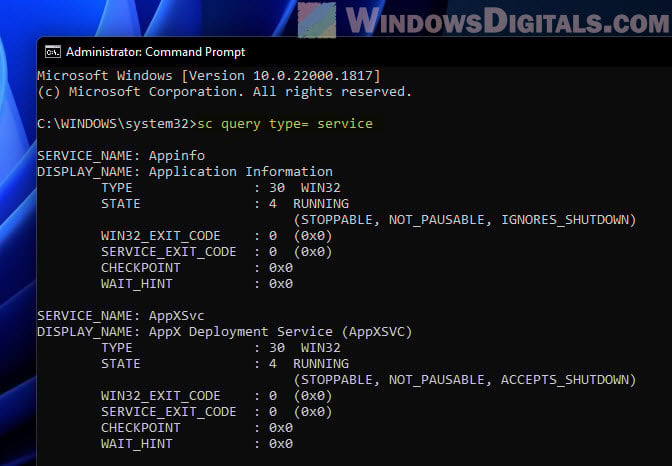
This will show you a list of all services, with their SERVICE_NAME and DISPLAY_NAME. Note down the SERVICE_NAME of the one you want to delete.
Checking service dependencies
Before getting rid of a service, you need to see if other services rely on it. Deleting a service that other services need can cause unwanted problems.
To check a service’s dependencies, type this in Command Prompt, swapping <SERVICE_NAME> with the service’s name:
sc qc <SERVICE_NAME>
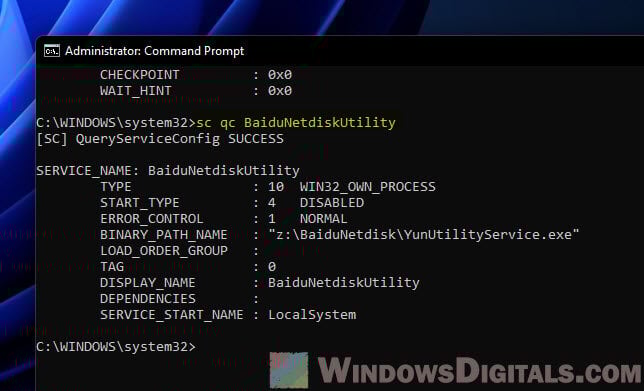
Look for the DEPENDENCIES section. If it’s empty, you’re good to go to the next step.
Stop a service using “sc stop” command
Before deleting a service, we need to stop it if it’s running. We’ll use the sc stop command for this. Just type the following, but use the name of the service you’re stopping instead of <SERVICE_NAME>:
sc stop <SERVICE_NAME>
For instance, to stop “SampleService”, you’d write:
sc stop SampleService
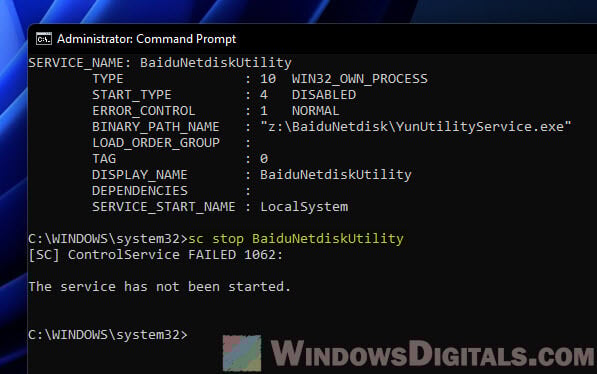
Hit Enter. If it stops successfully, you’ll get a message saying so. If it wasn’t running, it’ll tell you that too.
Note: Stopping a service could affect other things that depend on it. Make sure you know what you’re doing before you hit stop.
Delete a service using “sc delete” command
After stopping the service and checking it has no dependencies, you can delete it. Just type the following in Command Prompt. Replace <SERVICE_NAME> with the service’s name.
sc delete <SERVICE_NAME>
If you’re deleting “SampleService”, here’s what you’d type:
sc delete SampleService
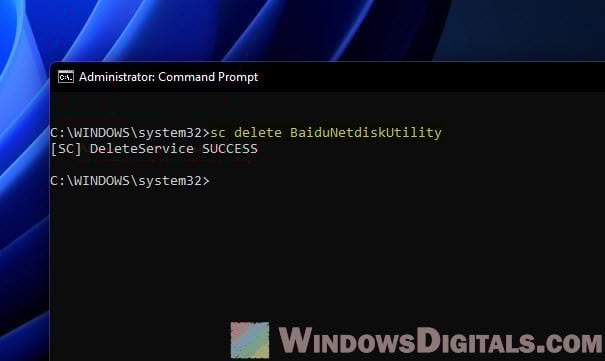
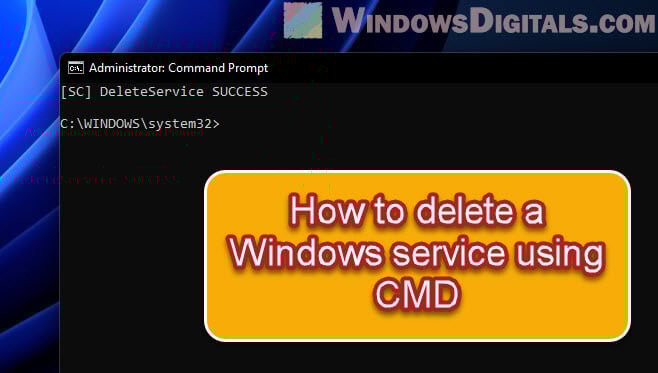
Press Enter. If everything goes right, you’ll see a message saying the service was deleted.
Related resource: How to Delete a Ghost File or Folder in Windows 11/10
Document changes made to services
When you delete or change a service, keep a record of what you did. Write down which service you stopped, modified, or deleted and why. This can be very useful if you need to troubleshoot in the future or if you need to reverse the changes. It also helps if someone else, like your system admin, needs to know what was changed on the system.
Check with a pro if you’re not sure
If you’re not completely confident about what a service does or whether it’s safe to delete it, you should definitely ask for opinion from an expert first. Whether it’s a tech-savvy friend or a professional, getting a second opinion can prevent catastrophic mistakes that might be very difficult to fix.
Everyone knows you need to delete bloatware and other useless applications to improve your PC’s performance. But services are a bit trickier to deal with.
These low-level processes run in the background, silently taking up valuable computing resources. Since they aren’t apps, you can’t just head to Add or Remove Programs to uninstall them.
So how do you get rid of services on a Windows computer? Here are some methods.

What Are Services?
Modern applications are complex and multifaceted. Various processes are needed to keep any app running, from the UI you interact with to the background threads that handle the inner workings of the program.
These services are hidden processes that do the heavy lifting, reading files from memory and displaying the window you see.
The Windows operating system owns a slew of services that deal with the nitty-gritty of keeping your computer running. Most of these services are essential to the functioning of your PC and can’t be safely removed without impacting performance.
How Can You See All Services Installed on Your Computer?
Before you start trying to remove services, it would be a good idea to see which services are running on your PC. Of course, since they don’t appear on disk as installed applications, you have to try another method.
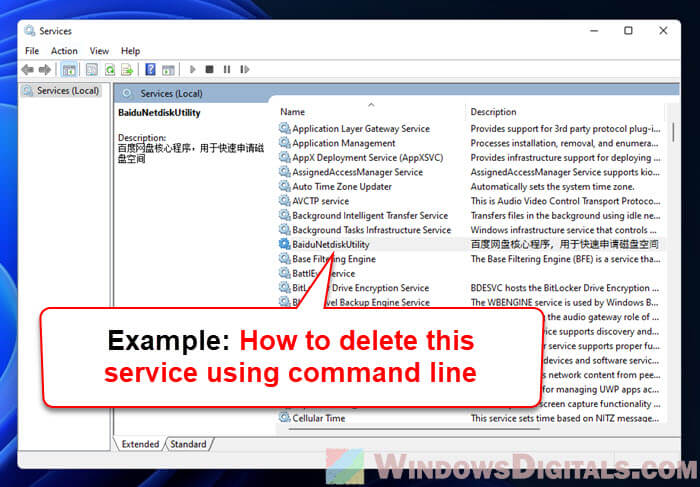
- The services.msc utility is the easiest way of viewing all the installed services on a Windows computer. You can locate it by entering “services” in the Start menu search bar.

- Running the Services app gives you a Window with an alphabetical list of services along with a short description, status, and startup time of each.

You can also use the Task Manager to view any running services, but that doesn’t give you much information on them. The services.msc utility displays all services, even if they aren’t running at the moment, and provides a description to help you understand its purpose.
Should You Remove Services in Windows?
Services in Windows can be divided into two main categories – Windows services and third-party services.
For the most part, it isn’t a good idea to try and remove a Windows service. Many of these services perform essential functions, and deleting them can crash the computer.
Third-party services, on the other hand, are created by installed applications. And while you do want services associated with useful applications to keep running, it’s a good idea to remove everything else to improve performance.
Even some Windows services fall into this category and can be stopped and removed without affecting core system functionality. But if unsure, always let Windows services remain.
Method 1: Using the Windows Registry
The easiest way to remove any service (even though it might seem a bit daunting) is to use the Windows Registry. The registry is where the OS and many applications store their low-level settings – including the services to start. You can simply navigate to the Services key and delete any of the services listed there, and it will stop working.
- To edit the registry, you need to use the Registry Editor tool. Just enter “regedit” in the Start Menu search bar to find it.

- Regedit is easy to use. All keys are arranged like folders in Windows File Explorer and navigated the same way. You can expand the keys to view their subkeys (or subdirectories) and their values.

- For services, you need to navigate to HKEY_LOCAL_MACHINESYSTEMCurrentControlSetServices

- All the services on your computer are represented by keys in this directory. Simply right-click on the key you want to remove and select Delete.

The next time you reboot your PC, the service will no longer run.
Method 2: From the Command-Prompt
The command-line terminal offers another easy way to delete services. Remember that this method requires you to enter the service name you wish to remove, so you must find that out first.
- Open Command Prompt by typing “cmd” in the Start Menu search bar. Use the Run as administrator option as some commands require admin privileges.

- If you’re unsure about the name of the service you wish to delete, you can list all services in cmd. Simply enter sc queryex type=service state=all

- To delete a service, use the command sc delete name, where the name should be replaced with the actual name of the service in question. You’ll get a SUCCESS message if the operation is successful.

Method 3: Windows PowerShell
For many users, PowerShell commands are more useful and convenient than the command prompt. PowerShell cmdlets are infinitely reusable, allowing system administrators to perform everyday tasks by running a single script.
- Open PowerShell by searching for it in the Start Menu bar. You may want to run it as an administrator for full privileges.

- PowerShell can display the names of all the services installed on your system too. It can be a handy way of viewing the accurate name of the service you want to remove in case you don’t remember it. Just use the command Get-Service to view the services list.

- The command for deleting a service is the same as in Command Prompt: sc delete name where the name is to be replaced with the name of the service in question. Unlike cmd, PowerShell only gives error messages, so the only hint of the command being successful is seeing nothing.

Method 4: With Autoruns Utility
If fiddling with registry keys and terminal commands is not your thing, you can try out Autoruns. This is a Microsoft utility designed to configure auto-start applications on your computer, including both Windows and third-party apps.
It is surprisingly comprehensive, displaying all extensions, notifications, and services. You also can remove services with Autoruns, which is easier than using terminal commands.
- To begin, download Autoruns from the official website.

- It’s a portable app, so all you have to do is extract the downloaded zip file and run it.

- After accepting the license agreement, you will be presented with the main screen of Autoruns, which immediately starts scanning the system.

- Switch to the Services tab to view all services registered on your computer. Autoruns also tells you whether the service’s publisher is verified or not, helping you weed out scrupulous third-party services easily.

- Right-click on any service you want to remove and select Delete from the drop-down menu that appears.

- Autoruns will confirm whether you want to delete the service and warn you that this action is irreversible. Select OK to continue.
- Some services will require elevated privileges to be deleted, denying access otherwise. You can Run as Administrator to fix that issue.
What Is the Best Way to Remove Services in Windows?
Unnecessary services can slow down your computer by using up processing cycles and memory better used elsewhere. You can significantly improve system performance and startup times by removing them from your computer.
But since services aren’t exactly applications, they can’t be uninstalled in the usual ways. You must remove their respective key using the Registry Editor or the sc delete command from the Command Prompt or PowerShell.
Or better yet, use the Autoruns utility. It is perhaps the only user-friendly way of removing services from Windows and works like a charm. As a bonus, Autoruns lets you clean the Startup list as well, removing any bloatware that might be slowing down boot times.
Related Posts
- How to Fix a “This file does not have an app associated with it” Error on Windows
- How to Fix an Update Error 0x800705b4 on Windows
- How to Resolve “A JavaScript error occured in the main process” Error on Windows
- How to Fix the Network Discovery Is Turned Off Error on Windows
- How to Change Folder Icons in Windows
В этой статье мы познакомимся с простым способом, позволяющим удалить любую службу в Windows 7 средствами самой операционной системы без использования сторонних программ.
Прежде чем начать, необходимо уяснить несколько моментов:
- При удалении службы она навсегда исчезнет из системы, и восстановить ее непросто, а в ряде случаем просто невозможно
- Удаление определенных служб может вызвать неработоспособность тех или иных программ. Поэтому не стоит удалять службу, если вы на 100% не уверены за что она отвечает.
- Не удаляйте системные службы Windows 7, т.к. это может привести к неработоспособности всей системы
Также попытаемся понять, в каких случаях возникает необходимость в удалении службы Windows.
- Зачастую программы при удалении из системы оставляют свои службы нетронутыми, и каждый раз при загрузке компьютера система пытается запустить такую службу, однако из-за отсутствия исполняемых или библиотечных файлов сделать этого не может, генерируя ошибку.
- Некоторые вирусы и трояны для маскировки своих деструктивных действий могут создать в системе новую службу. И даже если, ваш антивирус удалит тело вируса, служба может остаться, и ее придется удалять вручную.
- Возможно также ситуация, когда производительность системы снижается вследствие наличия большого количества процессов, работающих в виде служб, и вы решили удалить (а не просто остановить) ряд ненужных более служб в Windows 7.
Чтобы удалить службу в Windows 7, нужно знать ее имя. Для чего откройте окно управления службами Start -> Settings -> Control Panel-> Systems and Maintenance->Administrative Tools->Services.
В появившемся окне служб найдите ту службу, которую вы планируете удалить (в моем примере это “Adobe Lm Service”)

Дважды щелкните по выбранной службе и в появившемся окне свойств в поле «Service name» будет отображено ее имя (у меня имя службы — Adobe LM Service, т.е. оно совпадает с именем в списке служб, но обычно это не так), скопируйте его в буфер обмена.
Затем остановите службу, нажав кнопку «Stop»

Удаляем службу в Windows из командной строки
Откройте окно командной строки (cmd.exe) с правами администратора («Run as administrator»). Чтобы удалить службу в Windows 7 можно воспользоваться системной командой sc. Команда sc.exe – это утилита командной строки, которая используется в Windows 7/Vista/XP для создания, редактирования и удаления служб. Согласно документации TechNet, sc.exe:
sc.exe (Service Controller) осуществляет взаимодействие с установленными службами, получая и задавая их параметры. Утилиту SC.exe можно использовать для тестирования и отладки программ, работающих как службы. Свойства служб хранятся в реестре, параметры команды SC.exe позволяют модифицировать значения этих свойств, а также управлять запуском и остановкой служб. Возможности SC.exe во многом сходны с mmc консолью Services, расположенной в «Панели Управления».
Синтаксис команды удаления службы выглядит так:
sc delete ServiceName
Если имя службы содержит пробелы (как в нашем случае), его нужно взять в кавычки:
sc delete “Adobe LM Service”

В случае успешного выполнения команды sc delete в командной строке должно появиться сообщение [SC] DeleteService SUCCESS
Теперь, если в консоли управления службами нажать F5, вы увидите, что служа удалена и в списке не значится.

Удаляем службу с помощью редактора реестра
Альтернативный метод удаления служб в Windows 7 подразумевает использование редактора реестра.
Откройте редактор реестра (regedit.exe), и перейдите в ветку HKEY_LOCAL_MACHINE\SYSTEM\CurrentControlSet\Services. В ней содержится список всех служб, установленных в системе.
Найдите имя ветки реестра, соответствующее имени удаляемой службы.
Удостоверьтесь, что в значениях DisplayName and ImagePath содержатся, соответственно имя и путь к исполняемому файлу службы, которую вы планируете удалить.

Щелкните правой конкой мыши по имени найденной ветки реестра с именем службы и выберите «Delete». После чего служба будет удалена из системы.