Исправим вместе с вами ошибки, настроем драйверы, удалим вирусы и другое
Как удалить скайп для бизнеса с компьютера полностью windows 10
Удаление Skype для бизнеса
Applies ToOffice 365 для малого бизнесаАдминистратор Microsoft 365Skype для бизнесаSkype для бизнеса на MacSkype для бизнеса Online, предоставляемый 21Vianet
Шаг 1. Отключение автоматического запуска Skype для бизнеса
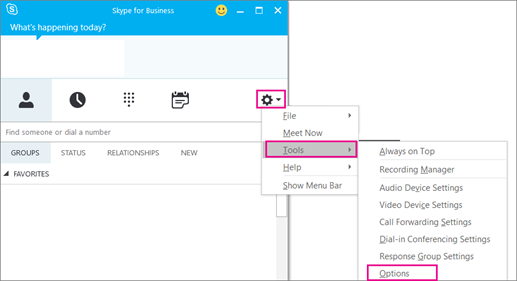
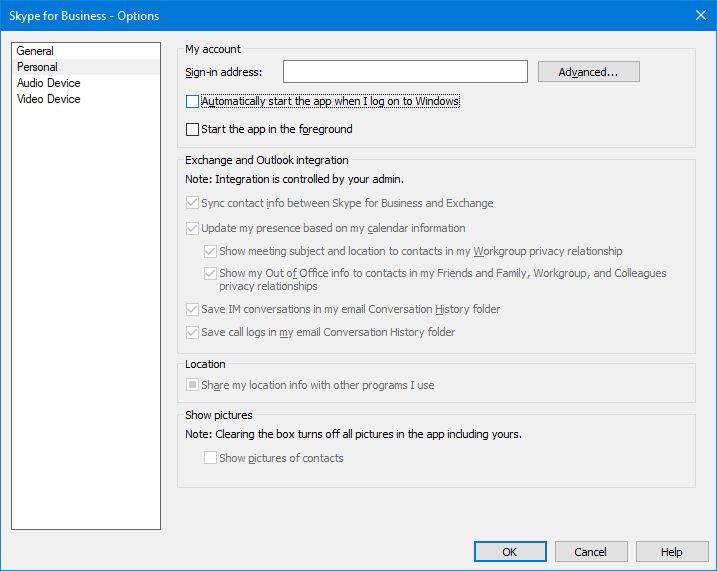
В Skype для бизнеса щелкните значок параметров и выберите Сервис > Параметры.
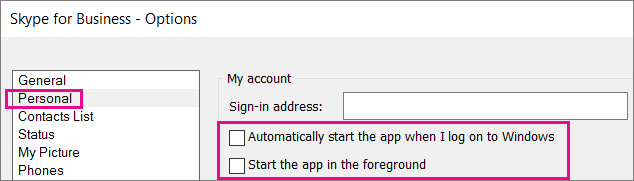
Выберите Личные, затем снимите флажки Автоматически запускать приложение при входе в Windows и Открывать приложение поверх остальных окон. Затем нажмите ОК.
Выберите Файл > Выйти.
Приложение Skype для бизнеса останется на вашем компьютере, но больше не будет запускаться.
Шаг 2. Удаление Skype для бизнеса с компьютера
Внимание! Если вы пользуетесь версией Microsoft 365Skype для бизнеса, вы не сможете удалить ее с компьютера, не удалив остальные приложения из набора Office. Это связано с тем, что она интегрирована с другими приложениями Office. Следующие инструкции предназначены для пользователей с автономными версиями Skype для бизнеса.
Выберите Панель управления > Программы > Программы и компоненты > Удаление или изменение программы.
Выберите Skype для бизнеса > Удалить. Если вы не видите Skype для бизнеса в списке, это означает, что вы используете версию, интегрированную с другими приложениями Microsoft 365. Единственный способ удалить эту версию — удалить все приложения Office с вашего компьютера.
В диалоговом окне «Продолжить?» выберите Удалить.
После завершения процесса удаления нажмите Закрыть.
См. также
Удаление Skype для бизнеса на мобильном устройстве
Установка Skype для бизнеса
Нужна дополнительная помощь?
Нужны дополнительные параметры?
Изучите преимущества подписки, просмотрите учебные курсы, узнайте, как защитить свое устройство и т. д.
I have founded company in 2011 with mission to provide IT & Software experience worldwide.
Subscribe to our YouTube channel, to get our best video reviews, comparisons and performance tips:
Skype for Business is an enterprise communication platform created by Microsoft. It is a part of the Microsoft Office 365 suite and, thus, integrates with all suite components. The app has both useful features and significant disadvantages, e.g. high RAM consumption, automatic launch. Actually, you could stop it in the Task Manager, yet often users wish to get rid of it. In this brief post, you’ll find several ways to uninstall Skype for Business in Windows 10, such as manually, via registry, third-party software.
Note that it won’t be possible to remove Skype for Business in case it has been introduced as a Microsoft Office 365 component. Then you’d have to wipe the whole suite. The following step-by-step instructions are only relevant for a standalone version. Also, pay attention to special uninstaller tools, as it ensures effective leftovers cleaning afterwards. Some of the top professional tools are Revo, Geek, IObit, ZSoft, etc. We’ve taken Revo and Geek to demonstrate how to uninstall Skype for Business, while more can be found at 7 best uninstallers.
3 ways to uninstall Skype for Business in Windows 10
#1. Via Settings.
Open the Start menu.
Click Settings.
Click Apps in Settings.
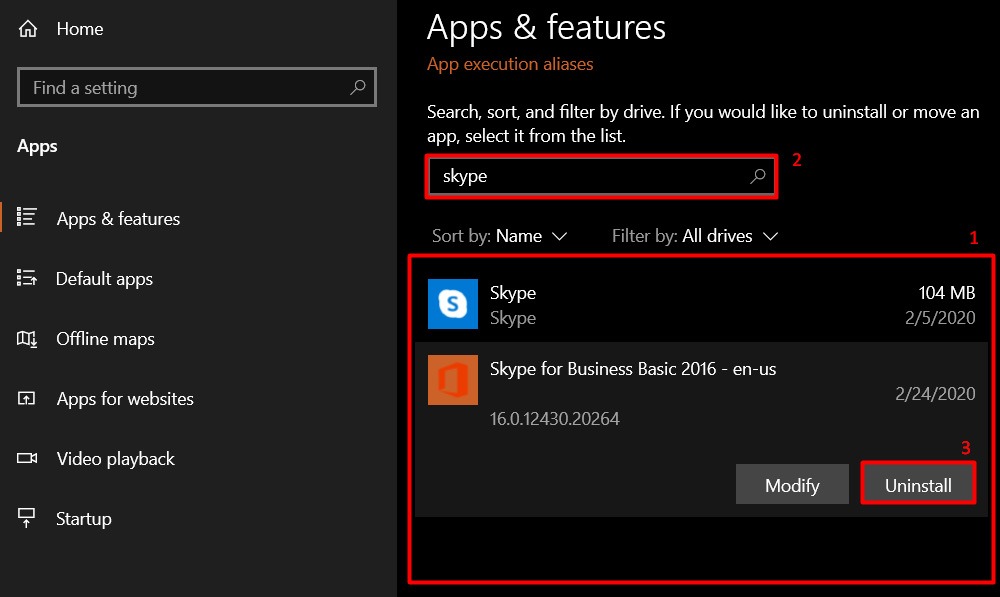
Find and select Skype for Business, click the Uninstall button. Click Uninstall again in a pop-up to confirm.
#2. Via Control Panel.
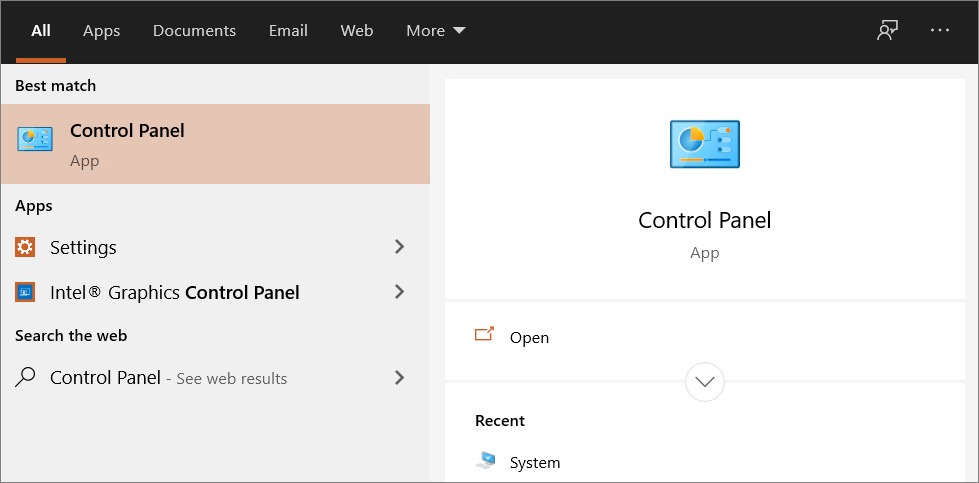
Enter Control Panel in the taskbar search and select this item. Select Programs – Programs and Features.
Select Skype for Business program from the list, and then click the Uninstall button. Follow on-screen instructions.
#3. Via registry.
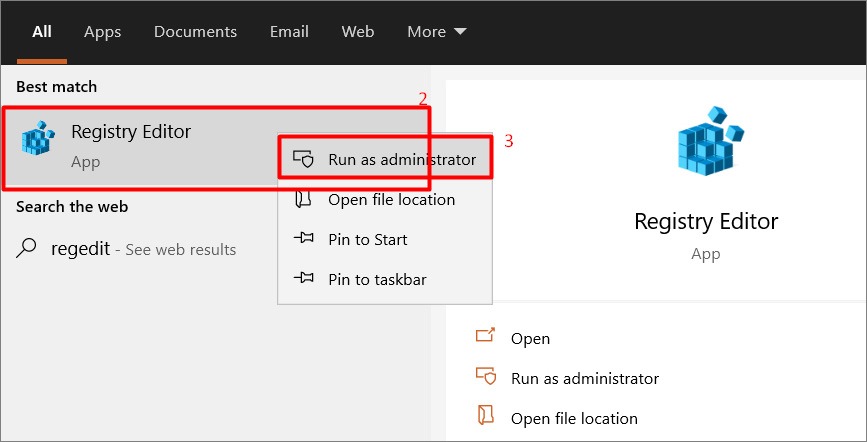
Enter regedit (or Registry Editor) in the taskbar search box and find the registry editor. Right-click it and hit Run as Administrator option.
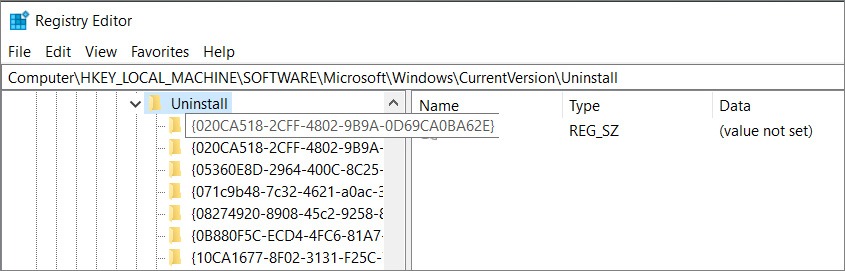
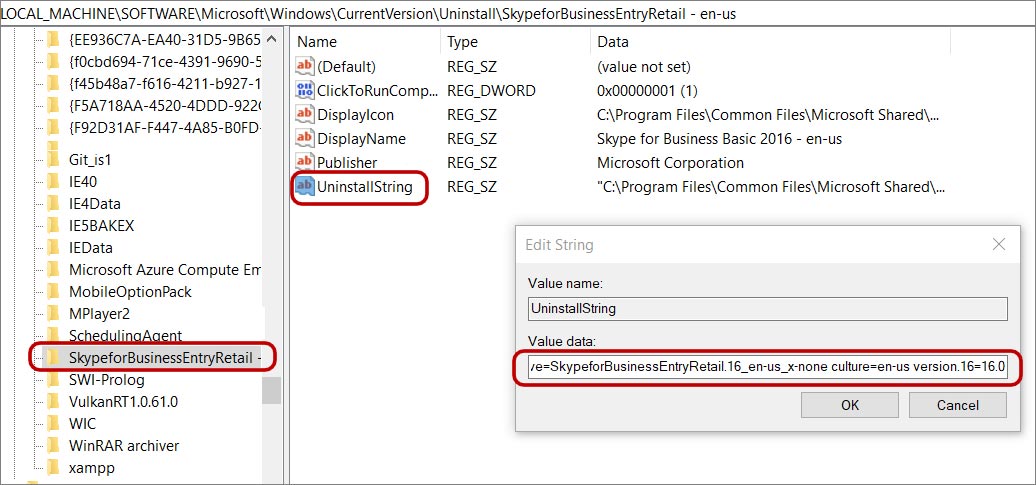
Use the registry editor to view the following registry key: HKEY_LOCAL_MACHINE \ SOFTWARE \ Microsoft \ Windows \ CurrentVersion \ Uninstall
Then choose the Skype folder, double-click the UninstallString registry setting, copy the value filed and close the registry editor.
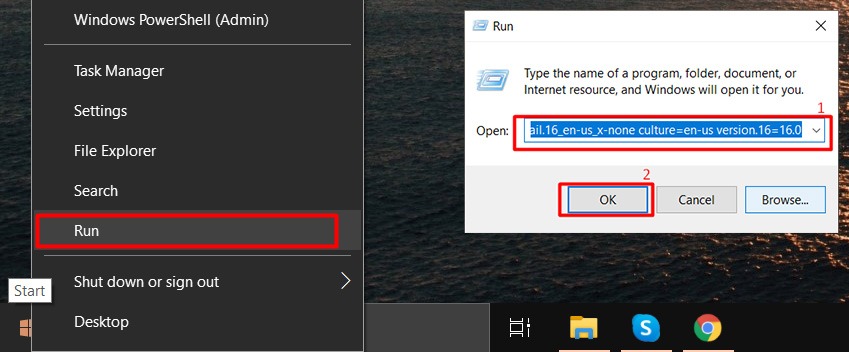
Right-click the Start menu and press Run.
Insert the copied value (CTRL+V) into the text field and click OK.
Read more about PC optimization and malware cleaning in our best pc optimization and best antimalware software articles.
How to remove Skype using uninstaller tools
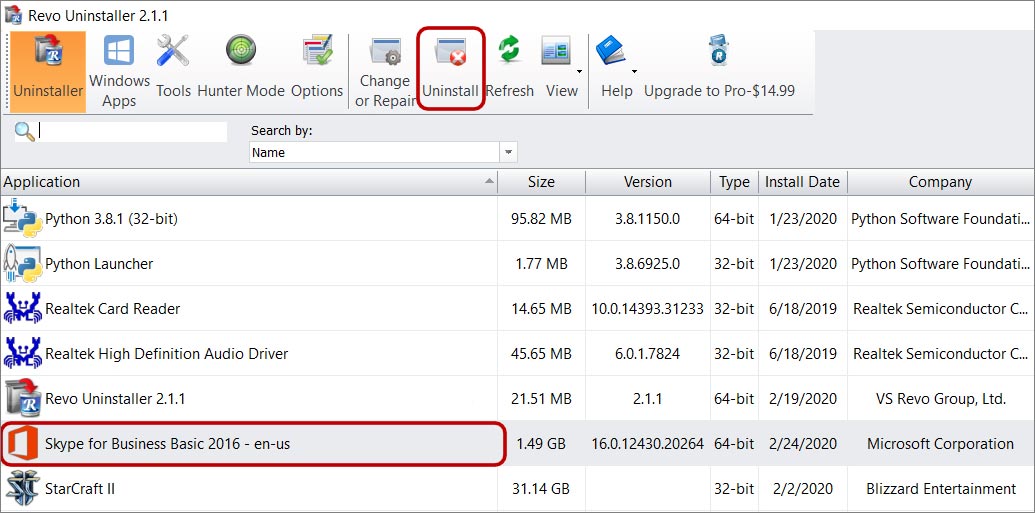
#1. Revo Uninstaller.
Launch Revo, find Skype for Business.
Right-click it and hit the Uninstall option in the pop-up window or hit Uninstall option in the top menu.
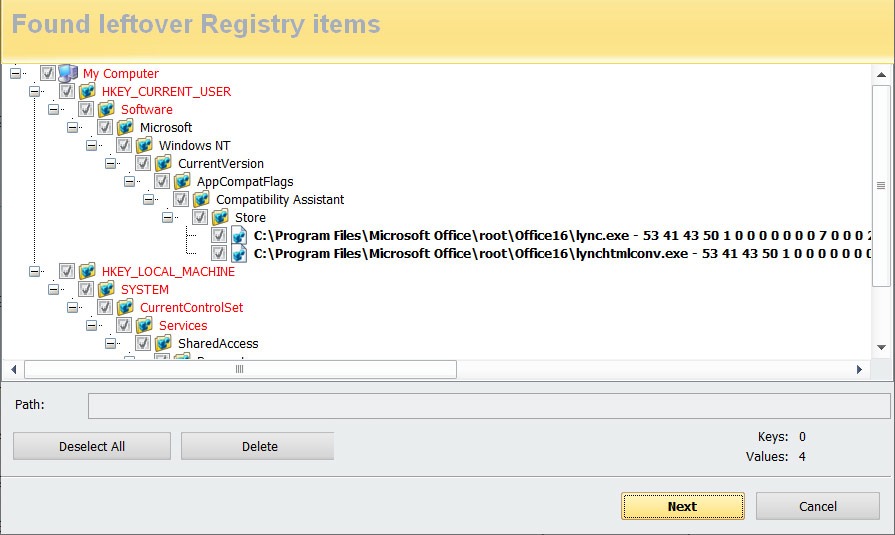
Wait a minute, then choose the scanning mode for leftover files, folders and registry items, and press the Scan button.
Then select all detected leftover registry items you want to remove, click Delete, then click the Next button.
Continue to delete, then click the Finish button to complete the uninstallation process.
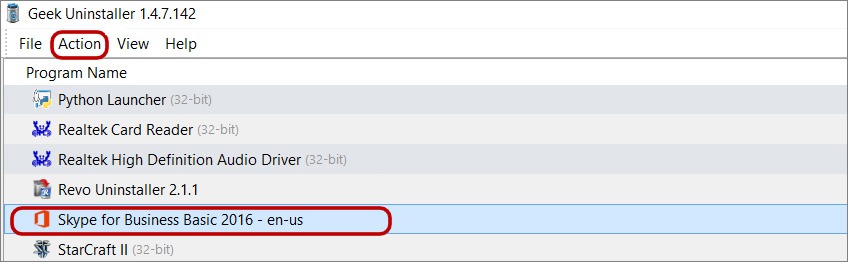
#2.Geek Uninstaller.
Launch Geek, select Skype for Business to uninstall.
Right-click it or hit the Action item in the top menu, then click Uninstall in the pop-up window.
Proceed to uninstall Skype by confirming the action.
Read more about PC optimization and malware cleaning in our best pc optimization and best antimalware software articles.
ThinkMobiles is one of most trusted companies conducting IT & software reviews since 2011.
Our mission
is to provide best reviews, analysis, user feedback and vendor profiles.
Learn
more about review process.
Skype for Business is a popular communication tool used by many individuals and businesses around the world. However, there may come a time when you no longer need or want to use Skype for Business on your Windows 10 computer. Whether it’s due to a switch to a different communication tool or simply to declutter your system, removing Skype for Business is a relatively simple process. In this blog post, we will guide you through the steps to uninstall Skype for Business from your Windows 10 device.
Video Tutorial:
The Challenge of Removing Skype for Business from Windows 10
When it comes to uninstalling Skype for Business from Windows 10, there are a few challenges that users may encounter. One common issue is that Skype for Business comes pre-installed on Windows 10 devices, especially those provided by companies or educational institutions. This means that even if you have never actively used Skype for Business, it may still be present on your system. Another challenge is that the default Windows 10 uninstallation method may not completely remove all traces of Skype for Business, leaving behind residual files and settings.
Things You Should Prepare for
Before diving into the methods of removing Skype for Business from your Windows 10 computer, there are a couple of things you should prepare for. First, make sure that you have administrative access to your computer, as you will need administrative privileges to uninstall programs. Additionally, it’s always a good idea to back up any important files or data on your computer, just in case something goes wrong during the uninstallation process. By taking these precautions, you can ensure a smooth and hassle-free removal of Skype for Business.
Method 1. How to Uninstall Skype for Business via Control Panel
Uninstalling Skype for Business from Windows 10 can be done through the Control Panel. Follow these steps to remove it:
1. Press the Windows key on your keyboard and type «Control Panel» to search for it.
2. Click on the «Control Panel» search result to open the Control Panel window.
3. In the Control Panel, click on the «Programs» category.
4. Under the «Programs and Features» section, click on «Uninstall a program.«
5. Scroll down the list of installed programs and locate «Skype for Business» or «Microsoft Office» if it’s bundled with it.
6. Right-click on «Skype for Business» (or «Microsoft Office«) and select «Uninstall» from the context menu.
7. Follow the on-screen prompts to complete the uninstallation process.
Pros:
1. Easy to access through the Control Panel.
2. Removes the main Skype for Business application.
Cons:
1. May not remove all residual files and settings.
2. Bundled with Microsoft Office, so uninstalling Microsoft Office will also remove Skype for Business.
Method 2. How to Remove Skype for Business via PowerShell
If the Control Panel method didn’t completely remove Skype for Business, you can try using PowerShell, a powerful command-line tool in Windows, to uninstall it. Here’s how:
1. Press the Windows key on your keyboard and type «PowerShell» to search for it.
2. Right-click on «Windows PowerShell» in the search results and choose «Run as administrator.«
3. In the PowerShell window, type the following command and press Enter:
Get-WmiObject -Query «SELECT * FROM Win32_Product WHERE Name LIKE ‘Skype for Business%’» | ForEach-Object { $_.Uninstall() }
4. Wait for the command to execute and uninstall Skype for Business.
Pros:
1. Removes Skype for Business using a powerful command-line tool.
2. Can potentially remove residual files and settings.
Cons:
1. Requires administrative access to run PowerShell as an administrator.
2. May not completely remove all traces of Skype for Business.
Method 3. How to Uninstall Skype for Business via the Office Deployment Tool
If you want to ensure a thorough removal of Skype for Business and its associated components, you can use the Office Deployment Tool provided by Microsoft. Follow these steps:
1. Go to the Microsoft Office Deployment Tool website and download the latest version of the tool.
2. Run the downloaded setup file and extract the Office Deployment Tool to a folder on your computer.
3. Open File Explorer and navigate to the folder where you extracted the Office Deployment Tool.
4. Right-click on the «configuration.xml» file and choose «Edit» to open it in a text editor.
5. Locate the «» line in the file and remove the comment tags (««) that surround it.
6. Save the changes to the «configuration.xml» file.
7. Open PowerShell as an administrator (follow the steps in Method 2).
8. In the PowerShell window, navigate to the folder where you extracted the Office Deployment Tool.
9. Run the following command:
setup.exe /configure configuration.xml
10. Wait for the command to execute and uninstall Skype for Business.
Pros:
1. Complete removal of Skype for Business and associated components.
2. Allows for customization of the Office Deployment Tool.
Cons:
1. Requires additional software download and setup.
2. Involves modifying a configuration file, which may be intimidating for some users.
Method 4. How to Uninstall Skype for Business via Third-Party Uninstaller
If none of the previous methods worked for you, or if you’re looking for a more advanced solution, you can consider using a third-party uninstaller tool. These tools are designed specifically to thoroughly remove stubborn programs from your computer. Here are the general steps to follow:
1. Research and choose a reputable third-party uninstaller tool (e.g., Revo Uninstaller, IObit Uninstaller).
2. Download and install the third-party uninstaller tool on your computer.
3. Open the uninstaller tool and let it scan your system for installed programs.
4. Locate «Skype for Business» in the list of installed programs and select it.
5. Follow the instructions provided by the uninstaller tool to remove Skype for Business.
Pros:
1. Specialized in removing stubborn programs.
2. Can potentially remove all traces of Skype for Business.
Cons:
1. Requires downloading and installing additional software.
2. Some third-party uninstaller tools may be paid or have limited free versions.
Why Can’t I Remove Skype for Business?
If you’re facing difficulties in uninstalling Skype for Business from your Windows 10 computer, there could be a few reasons why:
1. Skype for Business is bundled with other Microsoft Office applications, and uninstalling Microsoft Office will also remove Skype for Business. In this case, ensure that you truly want to uninstall Skype for Business and consider the impact on other Office applications.
2. Some residual files and settings may remain on your computer even after uninstalling Skype for Business using standard methods. To address this, try using alternative uninstallation methods like PowerShell or third-party uninstaller tools.
Additional Tips:
1. Restart your computer after removing Skype for Business to ensure that all changes take effect.
2. Regularly check for updates to your operating system and installed software to stay current and minimize compatibility issues.
3. Consider alternative communication tools like Microsoft Teams or Zoom, which offer similar functionality to Skype for Business.
5 FAQs about Removing Skype for Business from Windows 10
Q1: Can I reinstall Skype for Business after removing it?
A: Yes, you can reinstall Skype for Business if you decide to use it again in the future. You can download it from the official Microsoft website or through the Microsoft Office suite if you have it installed.
Q2: Will removing Skype for Business affect my other Microsoft Office applications?
A: Removing Skype for Business should not directly affect other Microsoft Office applications. However, if you uninstall Microsoft Office, all associated applications, including Skype for Business, will be removed.
Q3: Can I use another communication tool alongside Skype for Business?
A: Yes, you can use multiple communication tools simultaneously. For example, you can have Skype for Business and Microsoft Teams installed on the same computer and use them based on your preferences and requirements.
Q4: Is it safe to use third-party uninstaller tools?
A: Reputable third-party uninstaller tools are generally safe to use. However, it’s always a good practice to research and choose a trusted tool from a reliable source to minimize the risk of malware or unwanted software.
Q5: Can I remove Skype for Business from Windows 10 Home edition?
A: Yes, you can remove Skype for Business from Windows 10 Home edition using the same methods mentioned in this blog post. However, it’s worth noting that the availability and functionality of certain features may differ between Windows 10 editions.
In Conclusion
Removing Skype for Business from your Windows 10 computer is a straightforward process, but it may require some additional steps to ensure a complete removal. By following the methods outlined in this blog post, you can successfully uninstall Skype for Business and free up space on your device. Remember to consider alternative communication tools and keep your software updated to stay connected and productive.
Skype for Business is a great enterprise messaging and video tool developed by Microsoft. That said, perhaps your company is now using an alternative like Zoom or Microsoft Teams, and you want to uninstall Skype for Business.
If so, we’re here to help. You might find it a bit trickier to uninstall than other software, so we’re going to show you all the ways to uninstall Skype for Business on Windows 10.
How to Stop Skype for Business From Starting Automatically
Are you sure you want to uninstall Skype for Business completely? If you might use it again in the future, you might prefer to simply stop the program from opening automatically when you log in to Windows.
To do this:
Open Skype for Business.
Click the cog icon (if you click the dropdown, click Tools > Options).
Click Personal.
Uncheck Automatically start the app when I log on to Windows.
Click OK.
Now you will need to manually open Skype for Business each time you want to use it.
Do You Have Permission to Uninstall Skype for Business?
Skype for Business is primarily an enterprise program, so it’s likely installed on your work computer.
If so, you might not have the ability to uninstall Skype for Business. Your system administrator can restrict your user account from carrying out certain actions; uninstalling Skype for Business might be one of those.
Even if your account has no restrictions, it’s wise to check with your IT administrator before uninstalling Skype for Business. Doing so might cause them a headache down the line.
1. Uninstall Skype for Business via Settings
Before trying anything advanced, attempt to uninstall Skype for Business like you would any other app or program.
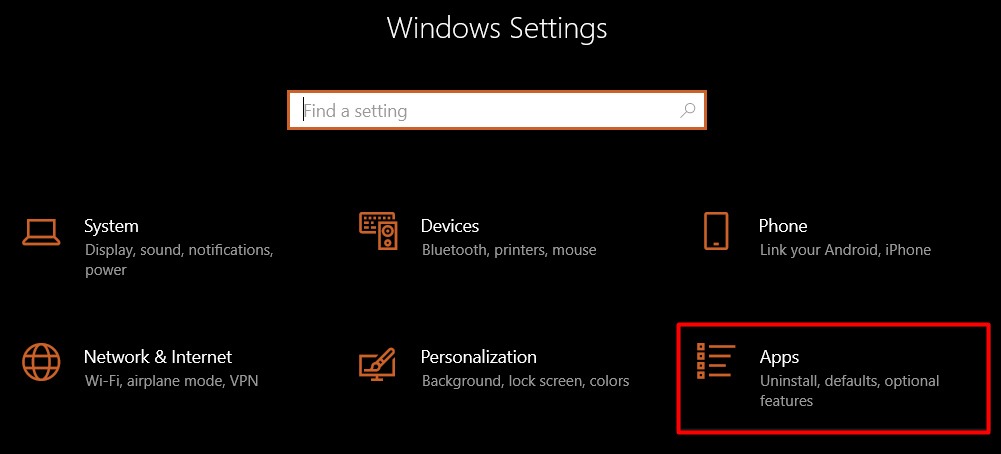
Press Windows Key + I to open Settings.
Click Apps.
Within the Search this list field, input Skype for Business.
If Skype for Business appears, select it and click Uninstall.
If you don’t see Skype for Business here, it’s because you’re using a version that is integrated with other Microsoft 365 apps.
If you want, you can uninstall Microsoft 365 or Office from here, but obviously, that will remove other programs like Word, PowerPoint, and Access that you probably want to keep. As such, keep reading.
2. Install Office Without Skype for Business
Though the standard Office installation doesn’t let you choose not to install Skype for Business, you can use an advanced technique to achieve it.
First, uninstall Office using the steps described above. Alternatively, go to the «Uninstall Office from a PC» Microsoft support page and use the second option to download the Office uninstall support tool.
Next, download the Office Deployment Tool. Open it and choose where to extract the files to. This will give you three configuration.xml files and a setup.exe file.
Decide which configuration file you need: x64 is for 32-bit systems, x86 is for 64-bit systems, and Enterprise is if you are installing Office Enterprise edition.
Right-click the configuration file and choose Open with > Notepad.
First, look for the line that begins with:
Add OfficeClientEdition=
Amend the opening of the line as follows, replacing C:\Office with the path of where you extracted the files:
Add SourcePath="C:\Office" OfficeClientEdition=
Next, look for these two lines (your product ID may be «ProPlus2019Volume» instead of «OF365ProPlusRetail» and your language ID may be different):
Product ID="O365ProPlusRetail"
Language ID="en-us"
Paste this line beneath:
ExcludeApp ID="Lync"
Then save the file.
Do a system search for Command Prompt and click Run as administrator.
Input this into Command Prompt:
cd C:\Office
Again, replace the C:\Office path with where you extracted the files.
Then, run the following commands one after another (replace the configuration file name with whichever you are using), which may take some time:
Chances are that after learning its advantages, you might not want to remove Skype for Business from your PC at all. So, first, let’s delve into the reasons why and explore how to tailor your Skype for Business settings for a more enjoyable experience. But if you decide to stick with your initial decision to uninstall Skype for Business , we’ll guide you through the steps to do it.
Unlocking the Potential of Skype for Business
Before diving into how to delete Skype for Business , let’s acknowledge its positive aspects. Skype for Business offers several compelling features that can enhance your business communication:
Effortless meetings: Conduct meetings with large groups, accommodating up to 250 contacts.
Wide-ranging broadcasting: Reach wider audiences by broadcasting your meetings to up to 10,000 people.
Recording capabilities: Capture and revisit your meetings or broadcasts with the recording feature.
Integration with Microsoft Office: Seamlessly consolidate your communications by integrating with Microsoft Office apps.
Configurability: Easily customize Skype for Business to meet your specific needs.
Security and reliability: Experience enhanced levels of security and reliability.
However, perfection eludes even the best, and Skype for Business is no exception. Its persistent tendency to start at boot, run in the background, and inundate users with notifications can be a bit irritating. Fear not, though, as we’ll explore ways to tailor your Skype for Business settings for your enjoyment.
Tailoring Your Skype for Business Experience
While Skype for Business brings efficiency to business communication, some users may find it intrusive. Below are some Skype for Business tweaks that can improve your experience.
Tweak 1: Preventing automatic startup
Open your Skype for Business app.
Sign in if you haven’t already.
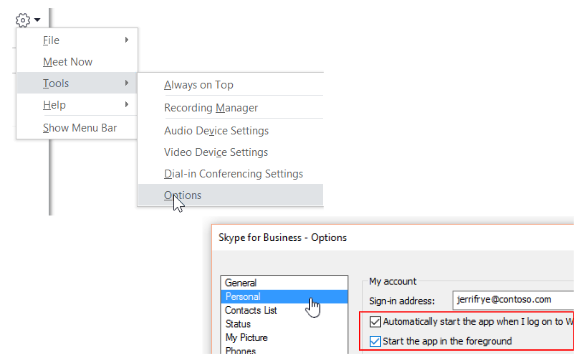
Locate the Wheel button, click the down arrow, and navigate to Tools > Options.
In the Personal tab, uncheck “Automatically start the app when I log on to Windows” and “Start the app in the foreground.”
Click OK to save changes.
Images: support.microsoft.com
Also Read: Quick Tips: How to Disable Startup Programs in Windows 10
Tweak 2: Managing background processes
Right-click on the Skype for Business icon in the system tray.
Select Exit to ensure it doesn’t run continuously in the background.
Use Task Manager (Ctrl + Alt + Delete > Task Manager > Processes) to confirm Skype for Business is inactive.
Also Read: How to Stop Apps from Running in the Background on Windows 10 PC?
Signing out for a breather
Open Skype for Business.
Click File, and select Sign Out.
Image: answers.microsoft.com
Tweak 3: Customizing notifications
Access Skype for Business.
Click the Wheel icon, go to Tools > Options > Alerts.
Tailor where alerts appear and allow only urgent notifications.
Customize invites and communications for contacts not using Skype for Business.
Fine-tune status alerts for specific contacts or disable them altogether.
How to Uninstall Skype for Business on Windows 10
Despite these adjustments, if you still desire to uninstall Skype for Business from your Windows 10 computer, we’re here to arm you with the know-how.
Open Skype for Business.
Choose the tools icon and navigate to Tools > Options.
In the Personal tab, uncheck “Automatically start the app when I log on to Windows.”
Right-click on the Skype For Business icon in the system tray and choose Exit to stop background processes.
Open Task Manager (Ctrl + Alt + Delete), go to Processes, and ensure there are no active Skype entries.
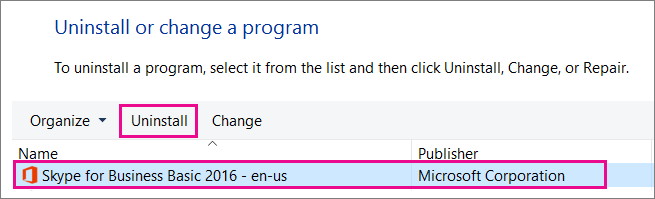
If you decide to remove Skype from Windows 10 completely, go to Control Panel > Programs > Programs and Features.
Find Skype for Business (or Skype for Business Basic), select it, and click the Uninstall button.
Confirm the removal by clicking Uninstall again.
Image: support.microsoft.com
Further Reading: How to Uninstall Programs and Delete Unnecessary Files in Windows 10
How to uninstall Skype for Business on Windows 11
To uninstall Skype for Business from Windows 11, the process is similar: Follow steps 1-5 from the Windows 10 instructions.
If you decide to uninstall completely, access Control Panel > Programs > Programs and Features.
Locate Skype for Business (or Skype for Business Basic), select it, and click the Uninstall button.
Confirm the removal by clicking Uninstall again.
Image: support.microsoft.com
Check out this video on how to uninstall programs the right way to avoid any leftovers on your Windows PC.
Conclusion
In conclusion, whether you’re opting for fine-tuning settings or deciding to completely uninstall Skype for Business, this guide ensures you have full control over your Windows experience. Embrace the customization, bid farewell to intrusions, and enjoy a seamless digital journey.
Have thoughts or questions on this topic? Share your comments, and let’s enhance your Windows experience together!
FAQ
How can I prevent Skype for Business from automatically starting when I log on to Windows?
Open Skype for Business, sign in if needed, click on the Wheel button, navigate to Tools > Options > Personal tab, and uncheck “Automatically start the app when I log on to Windows.”
How do I sign out of Skype for Business temporarily?
Open Skype for Business, click File, and select Sign Out.
Can I customize notifications in Skype for Business to reduce interruptions?
Yes, access Skype for Business, click the Wheel icon, go to Tools > Options > Alerts, and customize where alerts appear. You can also tailor notifications to allow only urgent ones.