
Пост
Опубликовано Обновлено

Автор Максим Макаров
просмотров 1 мин. чтения
Удалить шифрованный EFI раздел в Windows 7/10, создать новый раздел из командной строки.
Раздел EFI — обязательный для GPT разметки на системах с UEFI. Стандартный размер раздела EFI равен 100MB, но на дисках расширенного формата 4K Native (секторы 4KB) он увеличен до 260MB.
Стандартной утилитой Управление дисками в Windows не удастся удалить шифрованные EFI тома.
Но в операционной системе есть консольная утилита Diskpart.
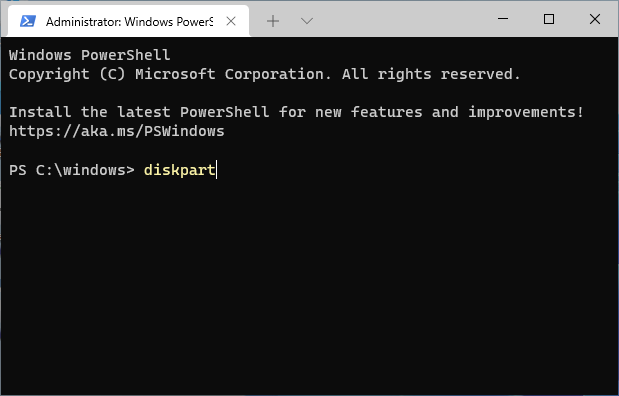
Запускаем командную строку (cmd) от имени администратора и выполняем команду diskpart
Удалить шифрованный EFI
Команды diskpart для удаления разделов:
list disk– смотрим список дисковselect disk 1– выбираем диск 1clean– удаление всех разделов или томов на дискеlist partition– проверка, что все разделы удалены
Создать новый раздел
Команды diskpart для создания нового раздела:
list disk— смотрим список дисковselect disk 1— выбираем диск 1create partition primary size=n(n — размер раздела в мегабайтай)assign letter=H— добавляем метку к дискуformat fs=ntfs quick— быстрое форматирование в формат NTFS
Комманды diskpart
Авторский пост защищен лицензией CC BY 4.0 .
Популярные теги
As you probably know, in order to be able to store files on a hard drive, it needs to be prepared first: it needs to be initialized, partitioned, and formatted just the right way. If you’ve bought an external drive in a store, the preparation has probably been already done by the drive manufacturer. However, what if you want the drive to be prepared differently? For example, you may want to re-format the drive, or change the partitions that it has. The way to do such tasks in Windows is to use the Disk Management tool that comes preinstalled with Windows.
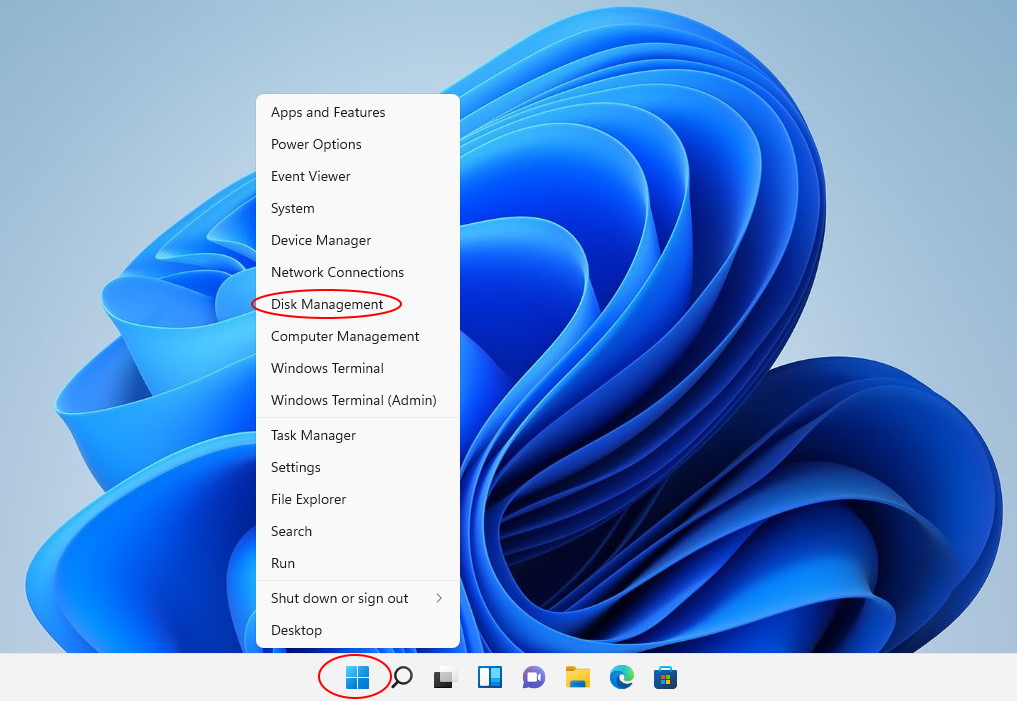
It’s easy to open Disk Management, but the procedure is slightly different in different versions of Windows. If you have a newer version of Windows, such as Windows 11 or 10 right-click on the Start Menu, and choose Disk Management from the menu displayed. (If you have Windows 7, run Windows Explorer, right-click on Computer, choose Manage from the menu, then select Disk Management under Storage.)
Before you continue, first things first: Disk Management is a very powerful tool, and with great power comes great responsibility! If you are not very experienced with computers, you can look, but better not touch and let someone more knowledgeable to do the job. Because with Disk Management it’s very easy to destroy your partitions and lose your files, if you don’t know what you are doing.
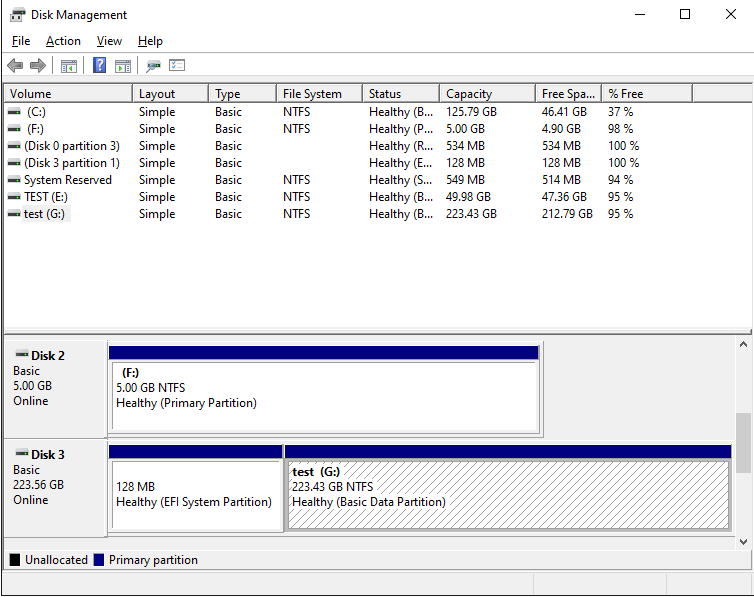
The most important thing when using the Disk Management tool is to make sure you can identify the disk you want to manage in the list. Usually you can do it by the total size of the disk displayed, although it may be confusing. For example, in this example, a hard drive that’s described as a 240 GB drive by the manufacturer, is shown to have only 223.56 GB by Windows. (Apparently, the disk manufacturers and Windows have a different understanding of what a «gigabyte» is.) Also, if you have several disks of the same size attached, it may get even more confusing. If in doubt, better unplug all external drives except for the one you actually want to work with, to make sure you are not accidentally erasing data on a wrong disk!
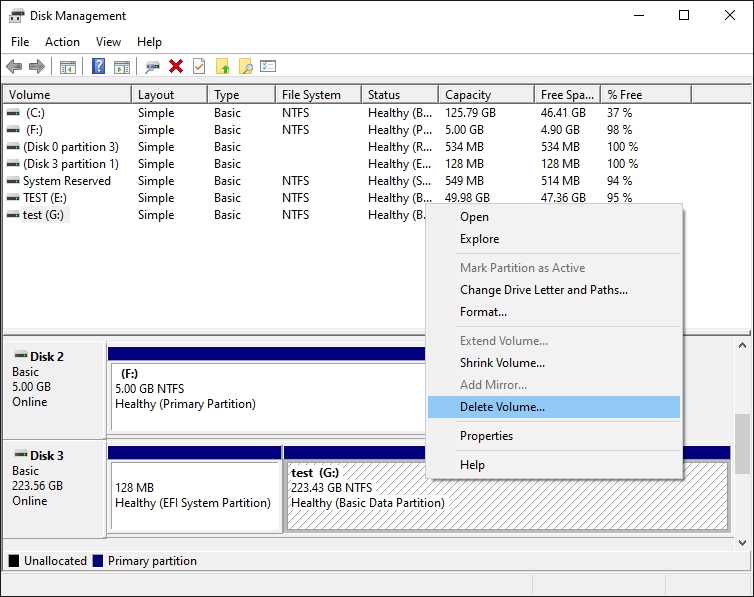
In our case, the 240 GB disk (shown as 223.56 GB disk in the list) is Disk 3 (let’s remember this number, we will need it a bit later.) It has two partitions, one is a 128MB EFI partition that has no drive letter assigned, and another NTFS partition of the size 223.43 GB, that has the label test and the drive letter G:. Although these two partitions looks similar, they are treated very differently by Windows. If you right-click on the normal NTFS partition, you should see the normal menu that lets you perform various tasks on that partition, including the Delete Volume command:
However, if we right-click on the first EFI partition, the menu we get is completely disabled:
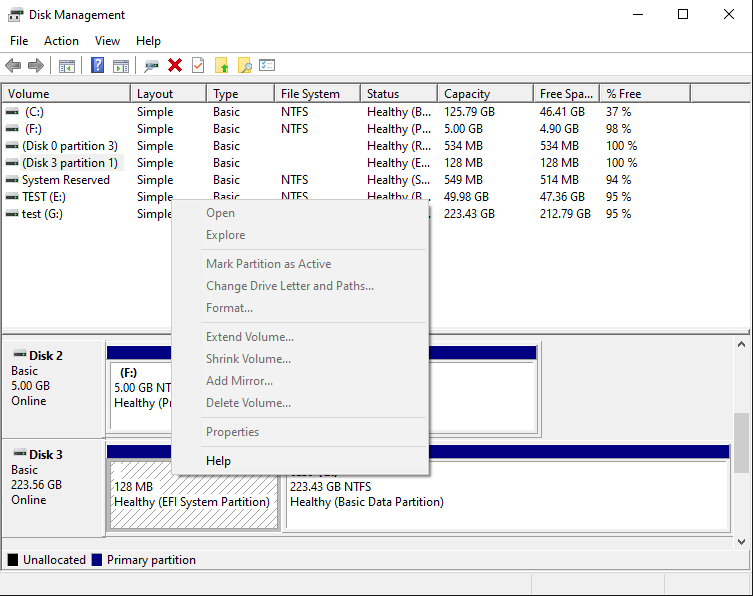
As you can see, the system partition is protected in such a way that even the powerful Disk Management tool cannot do anything to it. Note that it’s not because the partition is EFI, it’s because the tool that created that partition had marked it in a way that prohibits other tools to tamper with it. However, what if we want to delete the EFI system partition and re-initialize the disk from scratch?
While the Disk Management tool is helpless in this situation, fortunately Windows offers another tool, DISKPART, that can do things to the disks that Disk Management can’t. The tricky part is, that DISKPART is a command-line tool, that requires us to type commands into its command prompt to make it do what we want.
The procedure of getting to the DISKPART tool is slightly different in different versions of Windows. First, you need to open Windows command prompt in the «administrator» mode. In the recent versions of Windows you can simply right-click on the Start button and choose one of the command offered:
- Windows Terminal (Admin)
- Power Shell (Admin)
- Command Prompt (Admin)

If you have an older version of Windows such as Windows 7, you can open the command prompt in the administrator mode as follows: click the Start button and enter cmd in the search box; make sure that cmd is highlighted on the menu displayed, but do not press the Enter key yet; instead, press the Ctrl and Shift keys together, and while keeping them depressed, press Enter. The Ctrl+Shift combination should force the command prompt to open in the «administrator» mode.
When the command prompt window opens, start the DISKPART tool by entering the diskpart command into the command prompt window:
This should display the DISKPART command prompt. The first command we should use is list disk that should display the list of the disks currently connected to the computer:
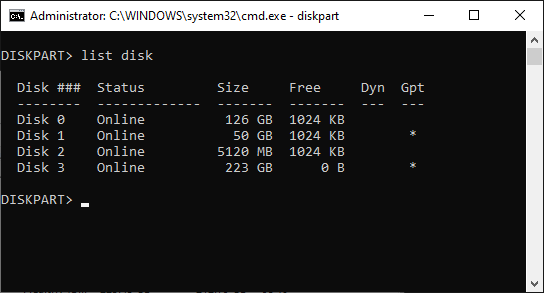
Again, it’s very important to properly identify the disk we want to work with in the list. Our 240 GB disk is still listed as Disk 3 with the capacity 223 GB. (Notice that it is listed as having 0B free. This is because all available disk space is currently allocated for the two partitions we’ve discussed above.) Once we are sure that this is the disk we want to re-initialize, we need to select it, by entering the command select disk 3 (yes, that’s how selection is usually done when using the command line tools!). Then, let’s use the list disk command again, to confirm that the disk in question is indeed now selected:
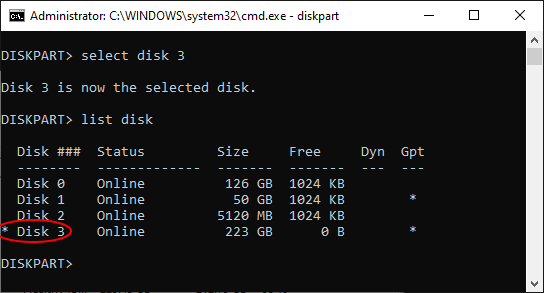
After double-checking that Disk 3 is now selected (it should have the star character * in front of its label), it’s time to finally issue the command that will erase everything on the disk 3, including the protected partition. The command that does that is clean. Note that this command erases everything on the selected disk, all partitions, protected or not. If you still have files on other partitions of disk 3 that you want to keep, you should exit now and backup those files, because after using the clean command all such files will be erased without a trace!
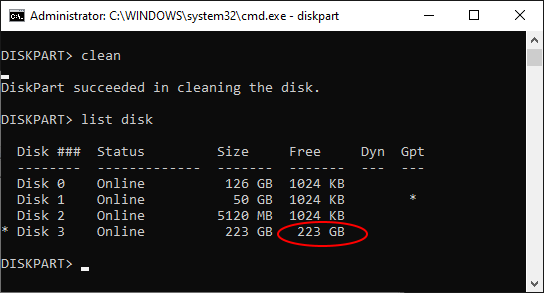
After the clean command is done (it should take no more than a few seconds), we get a fresh disk with all partitions erased. We can exit the DISKPART command prompt (by typing exit into its command line), and go back to the Disk Management tool (see above how to open it.) When it starts, it automatically detects the presence of the clean disk and prompts us to initialize it:
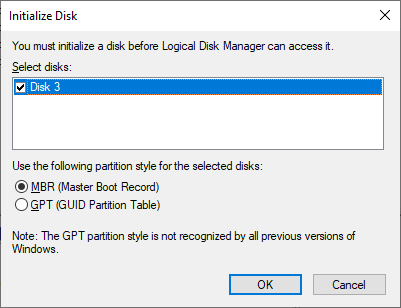
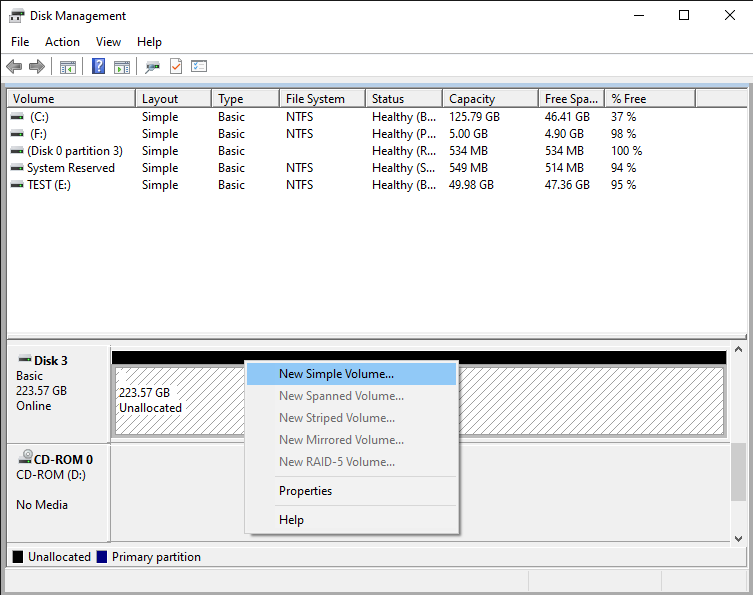
Press OK and the newly cleaned disk will appear in the list. The difference is, the protected EFI partition is gone! (The normal NTFS partition that used to be on the disk 3, is gone, too.) The disk is now ready for you to start creating partitions, formatting them, and do other things as needed:
Note that if you are trying to erase the system disk that hosts the C: drive where Windows itself is installed and running, then even the powerful DISKPART command can’t work: Windows simply refuses to erase the drive from which it is running. To erase such a disk, you need to physically remove it from the computer, attach it to another computer as an external drive, and then use DISKPART on that computer to erase the disk.
Happy disk managing!
If you want to link to this article, you can use this HTML code: <a href=»https://www.winability.com/delete-protected-efi-disk-partition/»>How to delete a protected EFI system partition with Windows 11, 10, 8, or 7</a>
Read more
Попался мне странный жесткий диск. Все разделы удалил, но один, стандартными средствами (Дисковая утилита и Управление дисками) на 200 метров не смог.

В контекстном меню пункт Удалить том… неактивен.
Удалить шифрованный EFI раздел в Windows 7 можно консольной программой diskpart.
1. Запустить cmd от имени администратора
2. Ввести в cmd – diskpart. Запустится diskpart в новом окне
3. Далее вводим команды в diskpart:
list disk – смотрим список дисков
select disk # – выбираем нужный диск. вместо # указываем номер диска
clean – удаление всех разделов или томов на диске
list partition – проверка, что все разделы удалены

4. Проверяем результат в Управление дисками.

5. Все разделы удалены.
Далее инициализируем диск и потом все как обычно.
Join @AdmNtsRu on Telegram
После замены в MacBook Pro жесткого диска на SSD, HDD остался не у дел. Разделы с HDD стандартными средствами (Дисковая утилита и Управление дисками) MacOS и Windows не удалить.

В контекстном меню пункт Удалить том… неактивен.
Удалить шифрованный EFI раздел в Windows 7 можно консольной программой diskpart.
1. Запустить cmd от имени администратора
2. Ввести в cmd – diskpart. Запустится diskpart в новом окне
3. Далее вводим команды в diskpart:
list disk – смотрим список дисков select disk # – выбираем нужный диск. вместо # указываем номер диска clean – удаление всех разделов или томов на диске list partition – проверка, что все разделы удалены

4. Проверяем результат в Управление дисками.

5. Все разделы удалены.
Перейти к содержимому
Попался мне странный жесткий диск, кажись там линух был или MacOS. Все разделы удалил, но один, стандартными средствами (Дисковая утилита и Управление дисками) на 200 метров не смог.

В контекстном меню пункт Удалить том… неактивен.
Удалить шифрованный EFI раздел в Windows 7 можно консольной программой diskpart.
1. Запустить cmd от имени администратора
2. Ввести в cmd – diskpart. Запустится diskpart в новом окне
3. Далее вводим команды в diskpart:
list disk – смотрим список дисков
select disk # – выбираем нужный диск. вместо # указываем номер диска
clean – удаление всех разделов или томов на диске
list partition – проверка, что все разделы удалены

4. Проверяем результат в Управление дисками.

5. Все разделы удалены.
Далее инициализируем диск и потом все как обычно.
теги:
раздел efi
efi разделы
efi раздел диске
efi раздел windows
таблица mbr разделов системе efi
раздел gpt efi
системный раздел efi
шифрованный efi раздел
удалить раздел efi
создать efi раздел
отформатировать efi раздел
шифрованный efi системный раздел
раздел efi mac
efi раздел mac os
загрузочный раздел efi
отформатировать efi раздел fat32
отформатировать системный раздел efi fat32
системный раздел efi отформатирован ntfs
создание efi раздела
отформатируйте системный раздел efi формате fat32
установлено системный раздел efi
efi разделы жесткого диска
восстановление efi раздела
удалить шифрованный efi раздел
как восстановить раздел efi
открыть шифрованный раздел efi
как удалить шифрованный efi системный раздел
размер efi раздела
раздел с efi в linux
удаление раздела efi
смонтировать efi раздел