
Существуют ли какие-то различия между сетевым диском и сетевым расположением? На первый взгляд может показаться, что нет, т.к. они оба служат для быстрого доступа к ресурсам, однако отличия все же имеются. Если сетевому диску можно присвоить букву диска, то сетевому расположению букву присвоить нельзя. Сетевой диск ведет только на ресурсы, найденные внутри сети, а сетевое расположение может добавлять пути на веб-сайты и FTP-серверы.
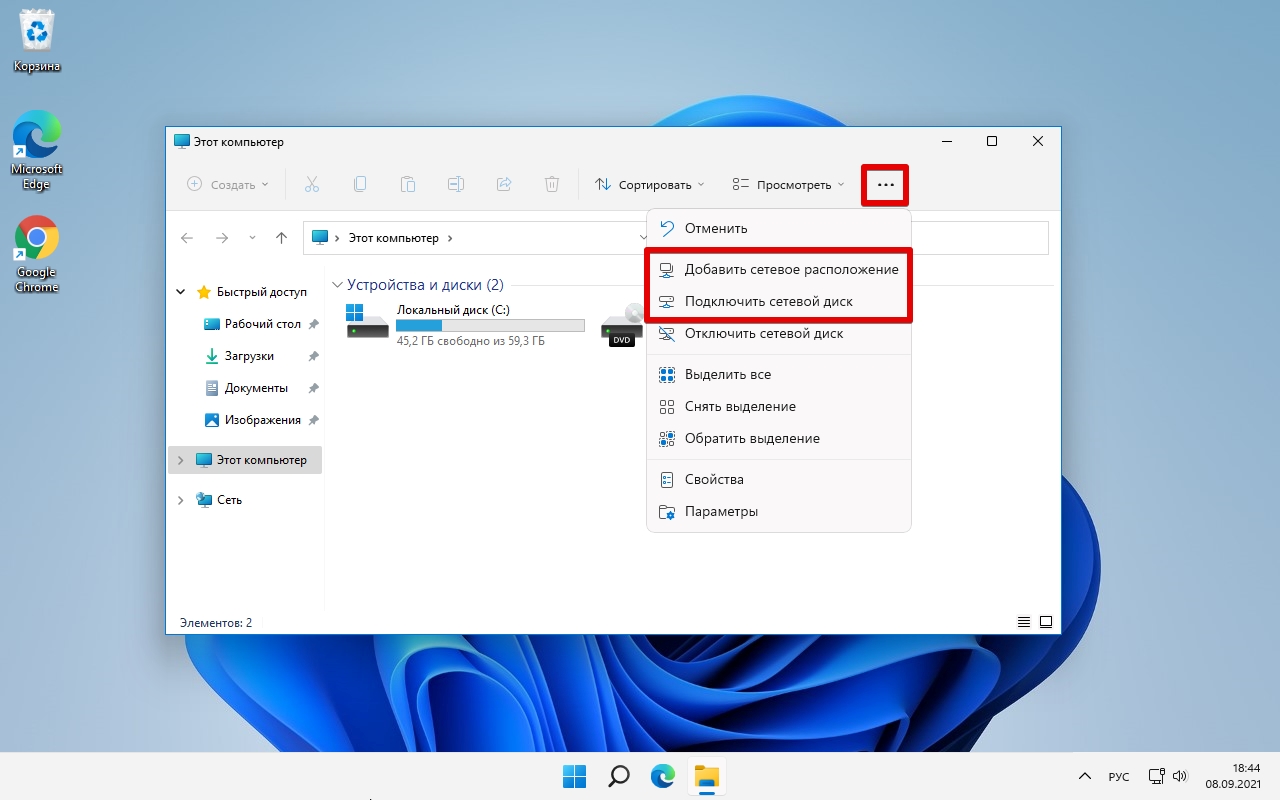
Для создание этих элементов переходим в окно «Этот компьютер», которое можно найти, вызвав проводник (Win+E).
Находим кнопку «Подробнее» (три точки) и щелкаем по ней, здесь можно выбрать — «Добавить сетевое расположение» или «Подключить сетевой диск».
Для подключения сетевого диска выбираем соответствующий пункт меню. Появится окно подключения сетевого диска, в котором можно указать букву диска и выбрать папку, к которой хотим подключится (в моем случае это «\\server\share»).
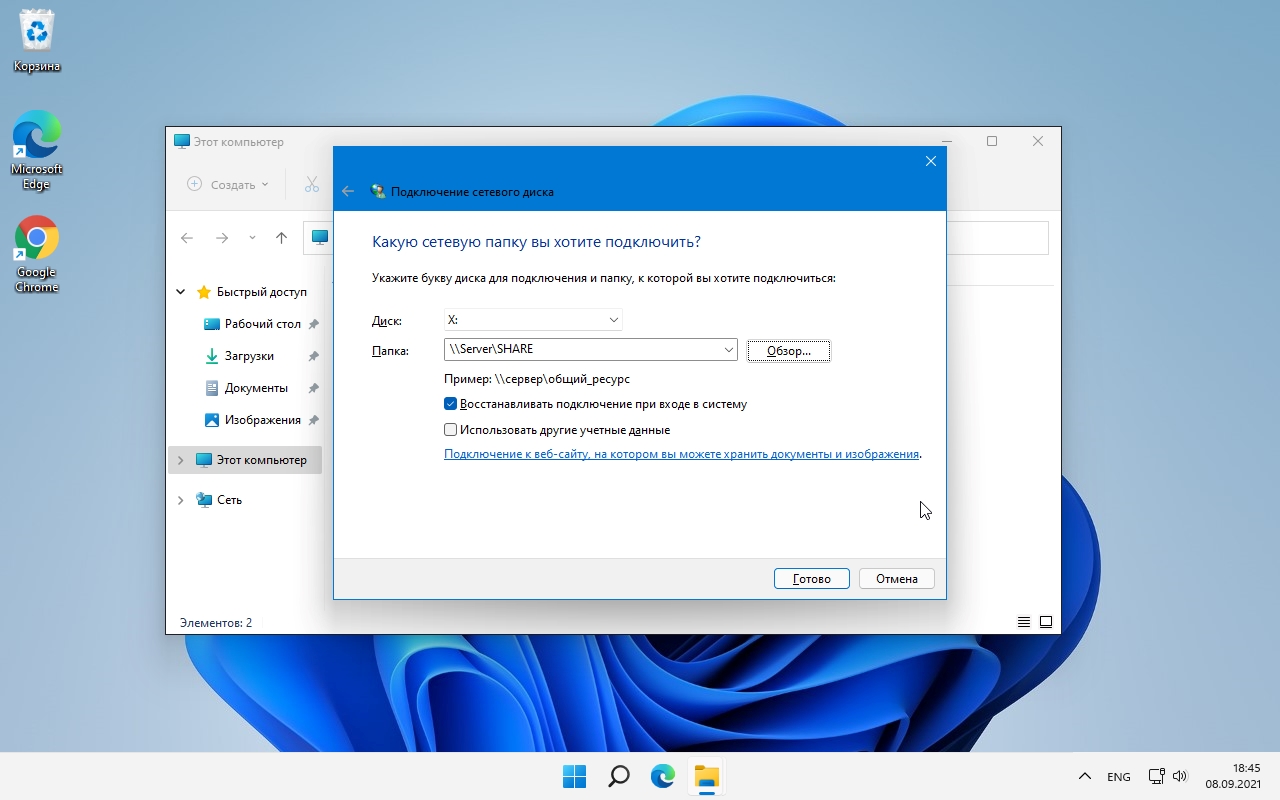
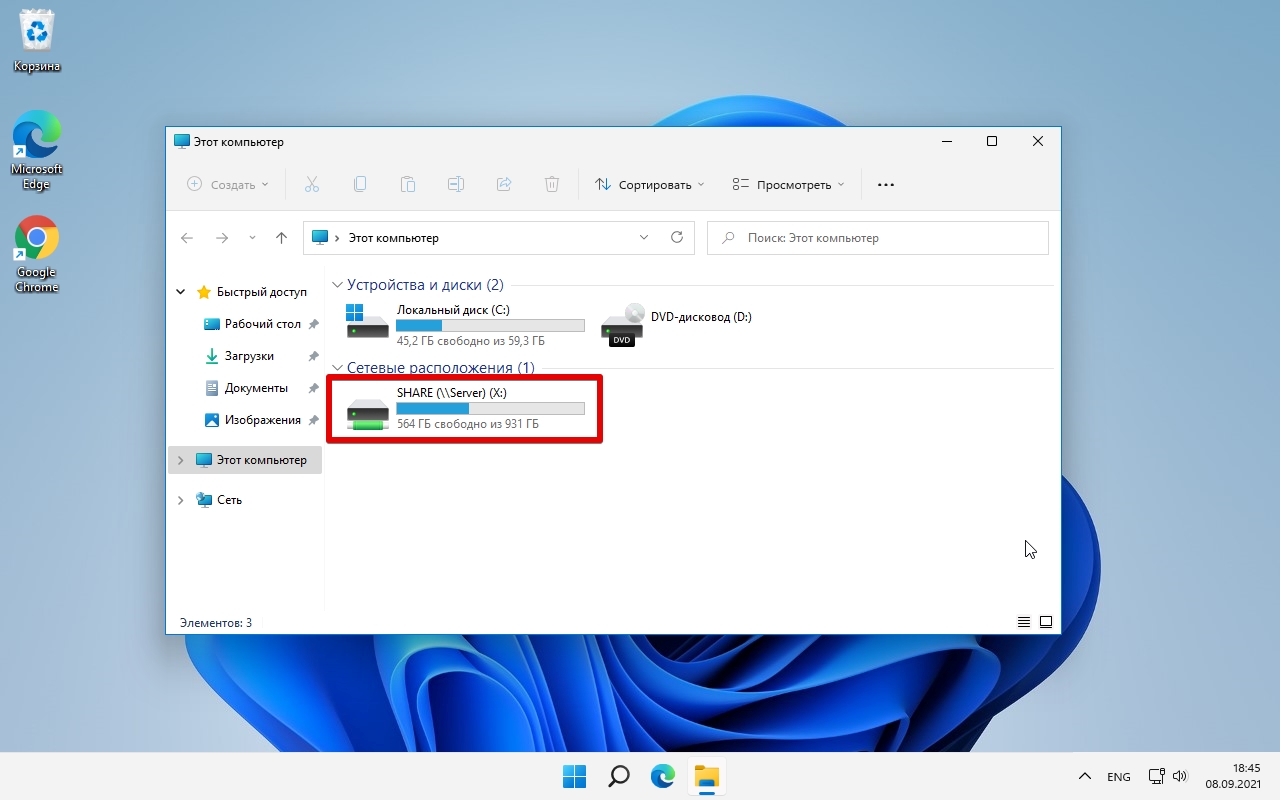
Заполнив все параметры, нажимаем кнопку «Готово». В окне сразу появится новый элемент — сетевой диск.
Подключаем сетевое расположение в Windows 11
Аналогично, находим кнопку «Подробнее» (три точки)
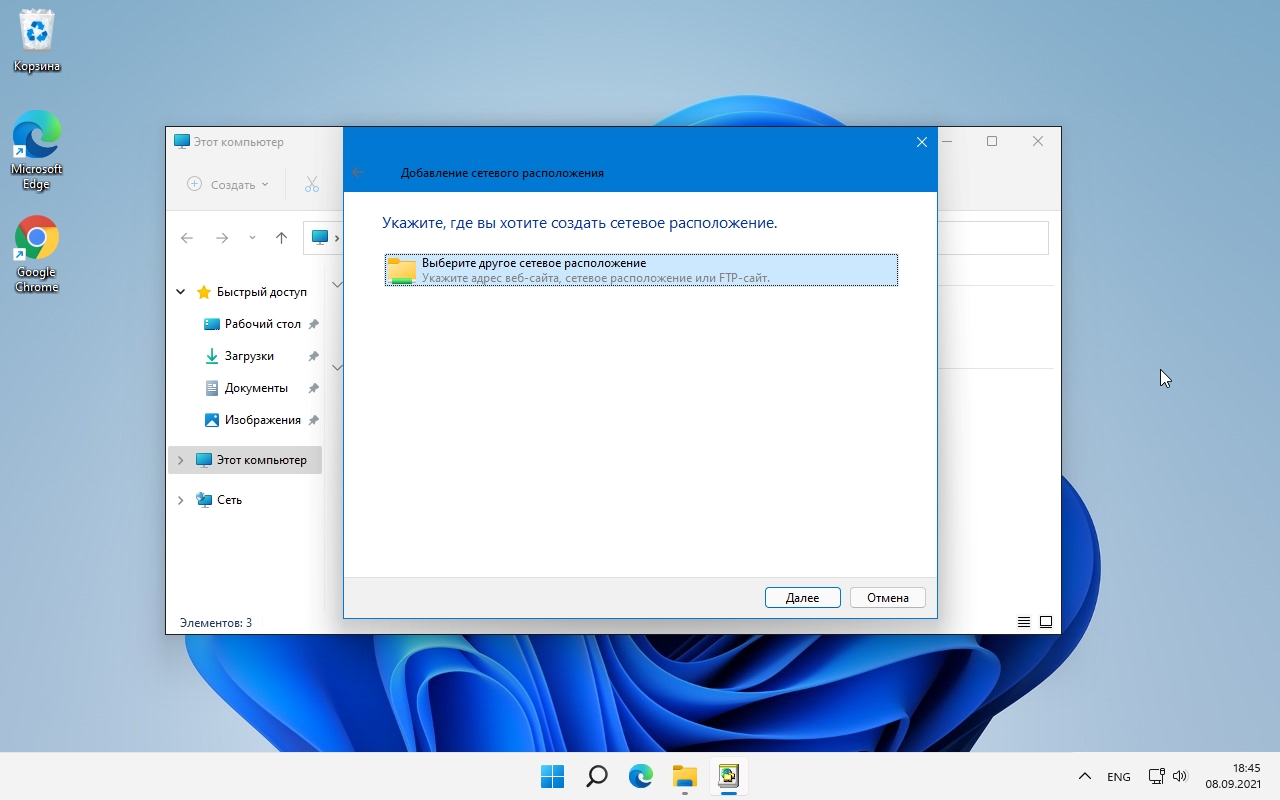
и вместо добавления сетевого диска выбираем «Добавить сетевое расположение». Появится новое окно — «Мастер добавления сетевого расположения». Щелкаем кнопку «Далее».

Снова щелкаем кнопку «Далее».
Теперь необходимо указать сетевой адрес, указываем через кнопку «Обзор…», либо вводим с клавиатуры в текстовое поле вручную.
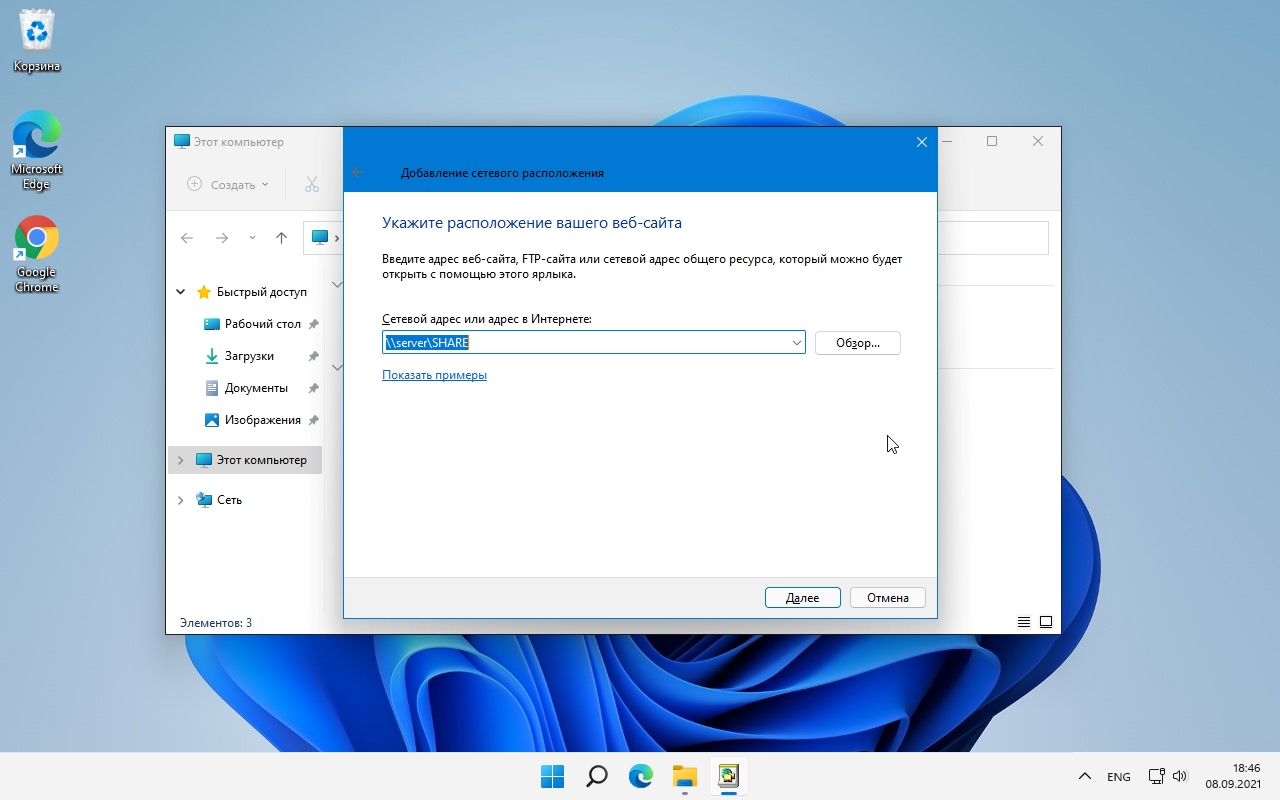
Следующим шагом необходимо указать имя для сетевого размещения. Указанным именем будет называться ярлык, который мы добавим. Указав имя, нажимаем «Далее».

В окне «Завершение работы мастера добавления сетевого расположения» доступна только одна опция — «Открыть это расположение в сети после нажатия кнопки Готово», т.е. здесь оставляем, либо снимаем чек, чтобы после завершения настроек не открывалась папка, которую мы добавляем. Щелкаем кнопку «Готово».

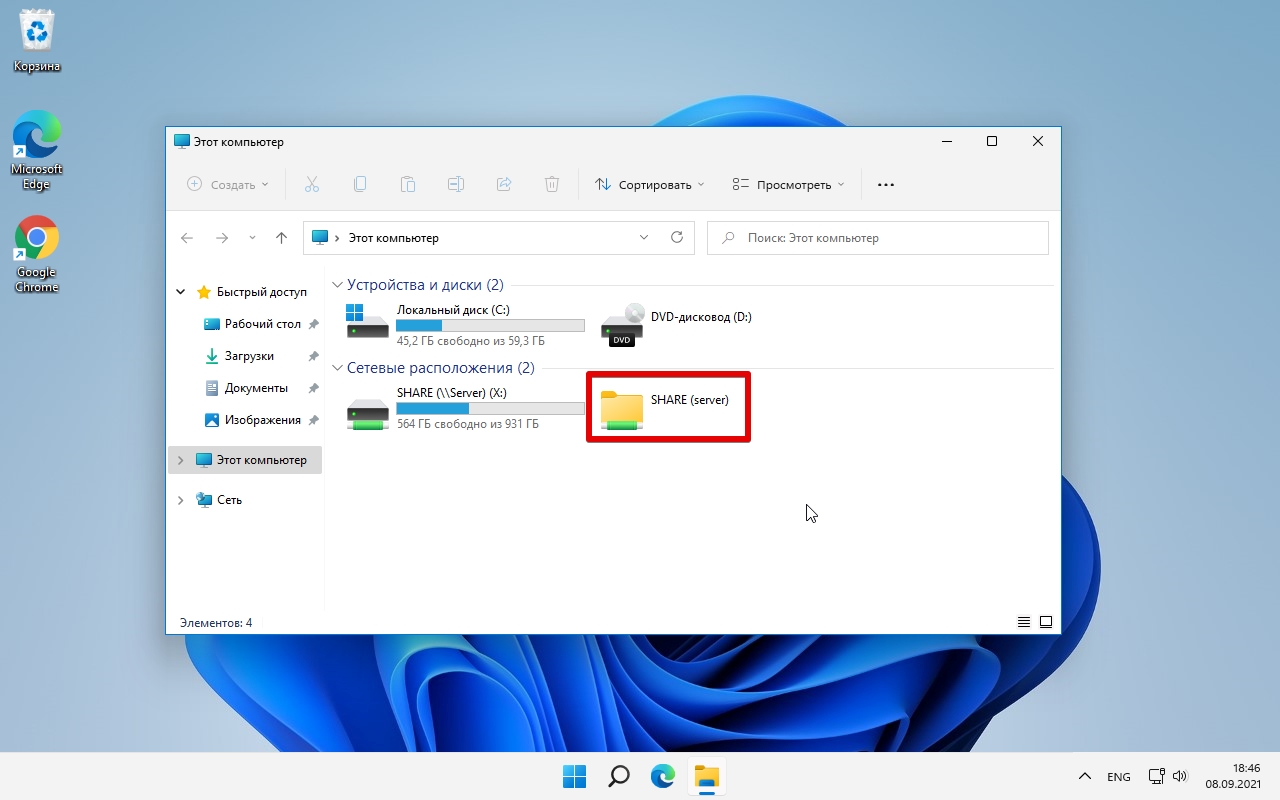
Как мы видим, ярлык сетевого расположения отличается от ярлыка сетевого диска, хоть практически они выполняют примерно одни и те же функции.
Как удалить сетевое расположение в Windows 11
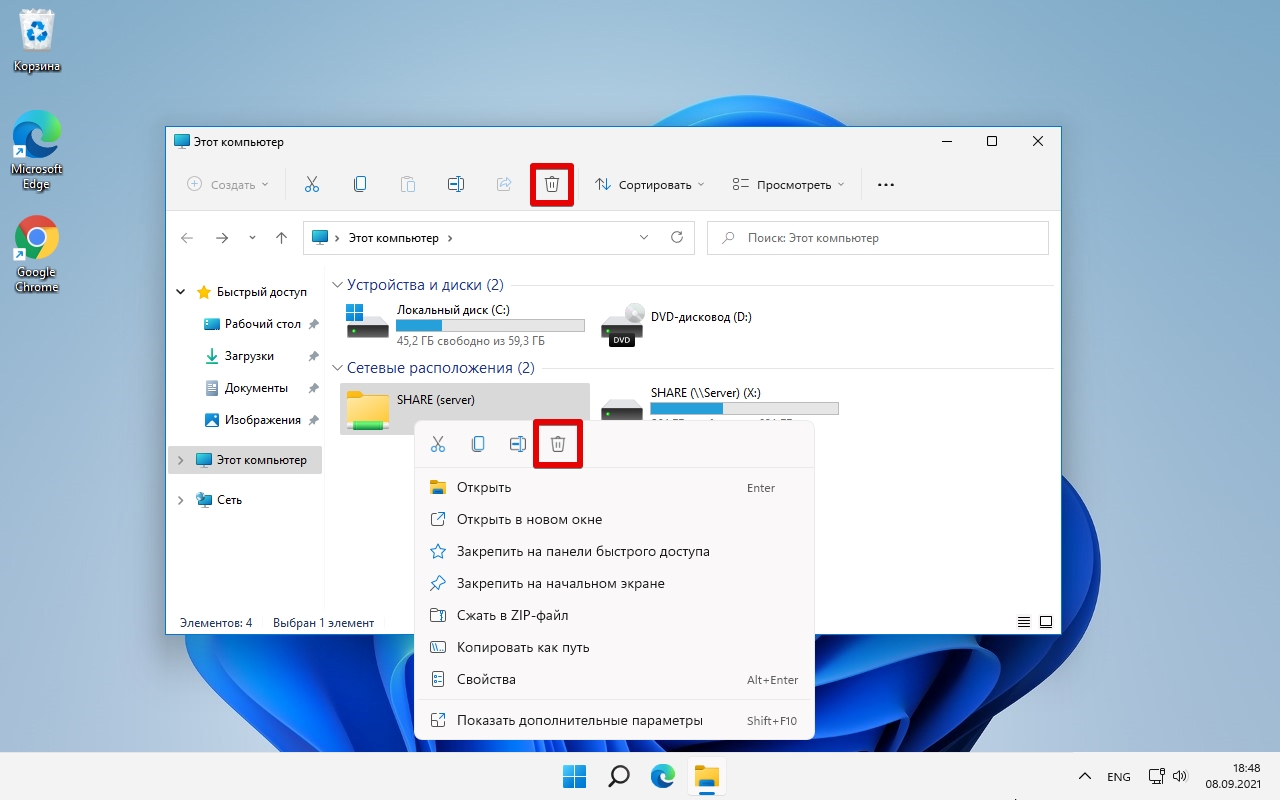
Для удаления щелкаем правой кнопкой мыши по созданному ранее ярлыку, а затем щелкаем по любой из кнопок с изображением корзины.
Как отключить сетевой диск в Windows 11
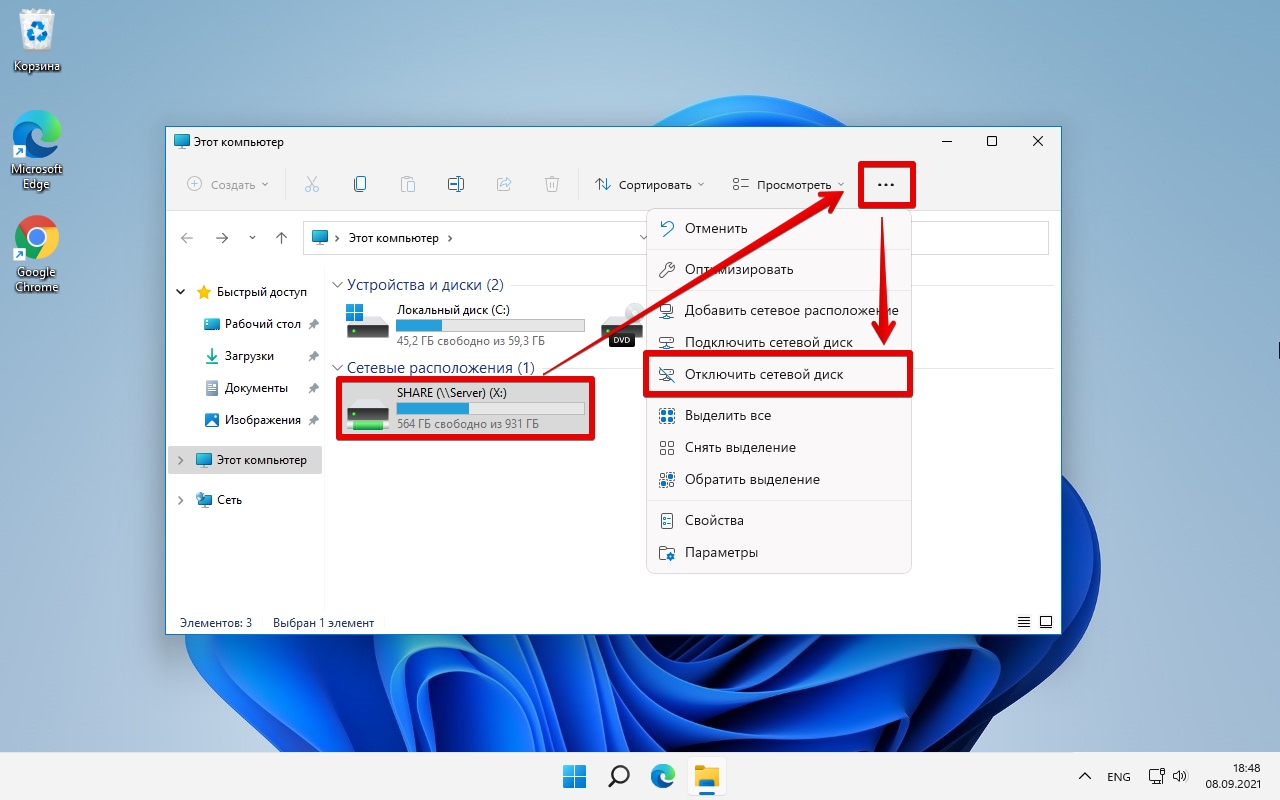
Для отключения сетевого диска, выбираем его, затем кликаем мышью по кнопке «Подробнее» (троеточие) — «Отключить сетевой диск».
Key Points
- Windows Explorer (Win 10/11): Open This PC, right-click the mapped share under “Network locations,” and click Disconnect.
- Command Prompt: Run
net use X: /delete(replace X with your mapped drive letter). - PowerShell: Use
Remove-PSDrive -Name X(no colon after the drive letter). - Shortcuts: Right-click and delete shortcuts pinned to Desktop or Quick access.
- Troubleshooting:
-
- If removal fails, open Command Prompt/PowerShell as Administrator and retry.
- Deleting a mapped drive does not delete the actual files; it only removes the reference.
-
- Manage at Scale: Enforce permissions, back up critical data, and consider tools like NinjaOne for centralized oversight of Windows endpoints and shares.
This guide demonstrates how to delete a network share on Windows 10 and Windows 11 with step-by-step instructions for removing mapped network drives. It explains several methods, additional tools, and how to troubleshoot network share deletion.
What are Windows network shares
A network share allows access to files and folders between computers over a local network or VPN. Network shares are commonly used in business and education environments to share files between users for collaboration and to keep them stored in a safe, controlled (and backed-up) location. They are also increasingly common at home when connected to VPNs for remote work or sharing media with smart devices.
On Windows, it is common practice to permanently assign a network share to a local drive letter so that it’s always available in Windows Explorer. By doing this, the network share can be accessed just like your regular hard drive or a plugged-in USB stick using a drive letter (for example, instead of having to go to the network location \serverpathtoshare you can just navigate to the share mapped to the Z: drive). This is known as mapping a network drive. This saves the time and hassle of having to manually navigate to the network share (or type it in).
However, sometimes these shares can get disconnected or are no longer required: the location of a share may change, you may no longer have permission to access it, or you simply may no longer need to use the files on it. In some instances, shares are created on a Windows machine with the files on an external device that is later removed, but the share remains present (but unavailable).
Even when the share that was mapped to a network drive has been deleted, the mapped network drive needs to be manually removed.
Step-by-step guide to deleting network shares
To remove a network share on Windows, follow the relevant instructions below. If these basic instructions do not work for you, follow on for further troubleshooting steps using the Command Line.
How to delete network share mapping in Windows 11
The process to delete a network share that is mapped to a drive letter on Windows 11 is as follows:
- Open the File Explorer (you can always find it by right-clicking on the Start button).
- Click on This PC in the left navigation pane.
- Under Network locations, Right-click on the mapped network share that you want to remove.
- Click Disconnect.
This will remove the mapped shared drive, freeing up the drive letter for use. To restore the network drive, you will need to navigate back to its network address and re-map it.
How to delete network share mapping in Windows 10
The steps to remove a network share on Windows 10 that is mapped to a drive in Explorer are identical to Windows 11.
Deleting mapped network shares from the Command Prompt
To delete Windows shares that you’ve mapped to a network drive, use the net use command:
net use DRIVE_LETTER: /delete
Replace DRIVE_LETTER with the mapped network drive letter you want to delete (note that you also need to include the colon symbol).
For example, to delete a mapped network drive at the location Z:, run the following command:
net use Z: /delete
Deleting mapped network shares from PowerShell
To delete a mapped network drive in PowerShell, use the Remove-PSDrive cmdlet with the following syntax:
Remove-PSDrive -Name DRIVE_LETTER
Unlike net use, you don’t include the colon with the drive letter when running this command. For example, to delete the Z drive network share mapping, you would run:
Remove-PSDrive -Name Z
Deleting network share shortcuts
If you have a shortcut to network share on your Desktop or pinned to Quick Access in Windows Explorer, you can simply right-click to delete it as you would any other shortcut.
Troubleshoot network share deletion
If a mapped share does not disappear after deletion, try running Command Prompt or PowerShell as Administrator to remove it. To do this, right-click on the Start menu and open the Command Prompt or PowerShell as Admin, and then run the above commands.
A network share that has had its drive mapping removed will no longer appear in Explorer under This PC. Once you delete a mapped network share on Windows, any shortcuts you have created to files or folders on it will stop working.
Deleting a mapped network drive does not delete the files on it, it’s just removing the reference to it. Deleting files stored in a network share does delete them from the share, possibly permanently. A robust backup solution will protect you from accidental data loss if you are sharing files among multiple users.
Efficiently managing and securing Windows Shares at scale
If you are managing network shares and drive mappings for a fleet of devices, it’s important that both access is controlled and files are kept secure.
Users should only have access to the files they require to prevent sensitive information from being over-shared or leaked. Implementing permissions across your network also prevents users from accidentally interfering with the work of others. In addition to this, you should take advantage of the centralized nature of file shares in order to back up all the vital data and ongoing work for your organization.
NinjaOne provides a unified remote monitoring and management solution that automates and streamlines your IT operations, granting you visibility over your entire IT portfolio and ensuring that security policies are deployed and enforced.
by
·
Published
· Updated
Windows 11 lets users add a folder or drive on a connected network as a Network Drive. As a result, they can access the drive or folder easily instead of locating it on the network and then accessing its contents. But, once you’re done with these network folders, you should better remove them and continue using your PC as usual. Here’s how to remove a network drive in Windows 11.
How To Remove A Network Drive?
Windows 11 users can try multiple ways to remove a network drive. Let’s find out how each method works.
Removing Network Drive From The File Explorer
You can remove the network drive from the file explorer using the steps below:
- Open File Explorer
- Click the three dots button and select the “Disconnect Network Drive” option
- The “Disconnect Network Drives” Window will appear, locate the network drive you want to disconnect, and select it
- Click OK to disconnect
There is another option to remove the connected network drive from File Explorer. For this:
- Open File Explorer
- Click Network or This PC
- Right-click the mapped network drive
- Click “Show More options”
- Click Disconnect
The drive will be removed and won’t show up in This PC.
Removing Network Drive From Command Prompt Or Windows Terminal
The second method you can use is to remove the mapped drive using your Windows Terminal or command prompt. Follow the steps below for this:
- Go to the File Explorer and note down the letter used by the drive you intend to remove
- Launch Command Prompt or Windows Terminal with admin privileges (Win + X)
- In the Command Prompt, type the command below and hit enter:
net use z: /delete
- Go to the File Explorer again and check, the mapped drive won’t appear.
Removing Network Drive From Registry
It is also possible to remove the connected network drive from the registry. However, before you proceed with this method, ensure that you have created a registry backup or a restore point. In case something is accidentally deleted, you’ll be able to bring your system back to its previous working state using that backup or restore point. Below are the steps to follow:
- Press Win + R to launch the Run Prompt
- Type regedit and press Shift+Enter for launching the registry editor as an admin
- Go to the path below:
##Server_Name#Share_Name
- That’s where all your mapped network entries exist, just right-click the folder and hit delete
- Confirm by clicking Yes
You can now go to the File Explorer or refresh it if already opened, and you won’t see the Network Drive anymore.
Removing Network Drive By Clearing Mapped Network Drive Cache
In Windows 11, a cache is maintained for all the drives connected from a network. It helps ensure that they load quickly and there is no wait whatsoever. You can clear this cache using the command prompt. Follow the steps below:
- Open Command Prompt
- Type the following command and hit enter:
.net use D: /delete
You can replace D with the letter used by your Network Drive. This method may not work for network location mappings like web servers or FTP servers.
So, if you have to remove a network drive in Windows 11, follow any of the methods described above. You’ll be able to do it successfully.
When you want to remove network drives from your Windows 10 or 11 computer you could use explorer. Another option is to use the Net Use command. This way you can remove all network connections easily with a single command on your own computer a remove one.
In this article, I will explain how you can use the Net Use Delete command to remove a single, or all network connections.
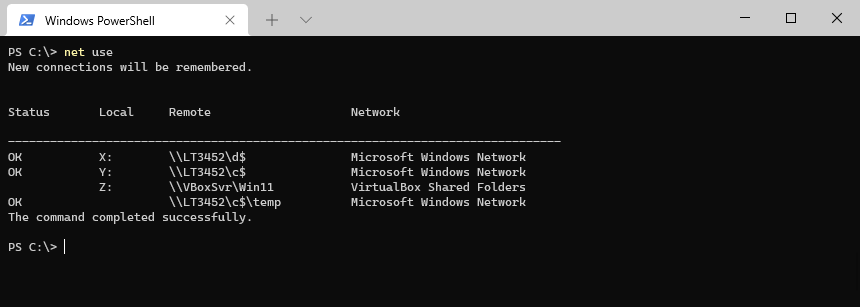
Before we are going to remove the network connections, let’s first take a look at the existing network connections on our computer with Net Use. You can use the Net Use command in Command Prompt or in Windows PowerShell.
To list all existing connections type:
Net use
Remove a single network connection
To remove a single network connection with net use we can type net use x: /delete. Where x: is the drive letter of the network drive that you want to remove:
Net use x: /delete

# or in short
net use x: /d
Delete Network Connection without a drive letter
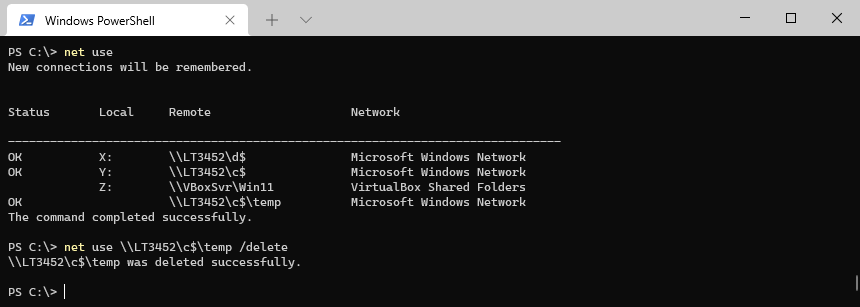
On some occasions, you might have a network connection without a drive letter. These connections can also be removed with the net use command. Instead of using the drive letter we then have to use the remote path.
So the remove the drive mapping to \\LT3452\C$\temp from the above screenshot we can use the following command:
net use \\LT3452\c$\temp /delete
Net Use Delete All
It’s also possible to delete all active network connections from a computer. For this, we can use the command net use * /delete.
net use * /delete

# or in short:
net use * /d
Net use * /delete Force
When you run the delete command with the wildcard to delete all connections, you will be prompted to confirm the deletion. To force the delete command we can add the parameter /yes to it to delete the network connections silently:
# Force delete of all network connections
net use * /delete /yes

# or in shot:
net use * /d /y
Wrapping Up
The net use delete command is really useful when you want to clean up network connections on a computer with a script or before you apply new network connections. If you want to learn more about the command net use, then make sure you read this article where I explain more about it.
If you have any questions, just drop a comment below!
You may also like the following articles

This tutorial will show you how to disconnect a mapped network drive for your account in Windows 11.
You can Map a network drive to access shared files on it from File Explorer in Windows without having to look for it or type its network address each time.
Contents
- Option One: Disconnect Selected Mapped Network Drive from Command Bar in File Explorer
- Option Two: Disconnect Mapped Network Drive by Right Click on Network Drive in File Explorer
- Option Three: Disconnect Mapped Network Drive from Command Bar in File Explorer
- Option Four: Disconnect Mapped Network Drive from This PC in Navigation Pane of File Explorer
- Option Five: Disconnect Mapped Network Drive using Command
- Option Six: Disconnect All Mapped Network Drives using Command
Option One
Disconnect Selected Mapped Network Drive from Command Bar in File Explorer
1 Open This PC in File Explorer (Win+E).
2 Select the mapped network drive. (see screenshot below)
3 Click/tap on the See more (3 dots) button on the command bar, and click/tap on Disconnect network drive.

Option Two
Disconnect Mapped Network Drive by Right Click on Network Drive in File Explorer
1 Open This PC in File Explorer (Win+E).
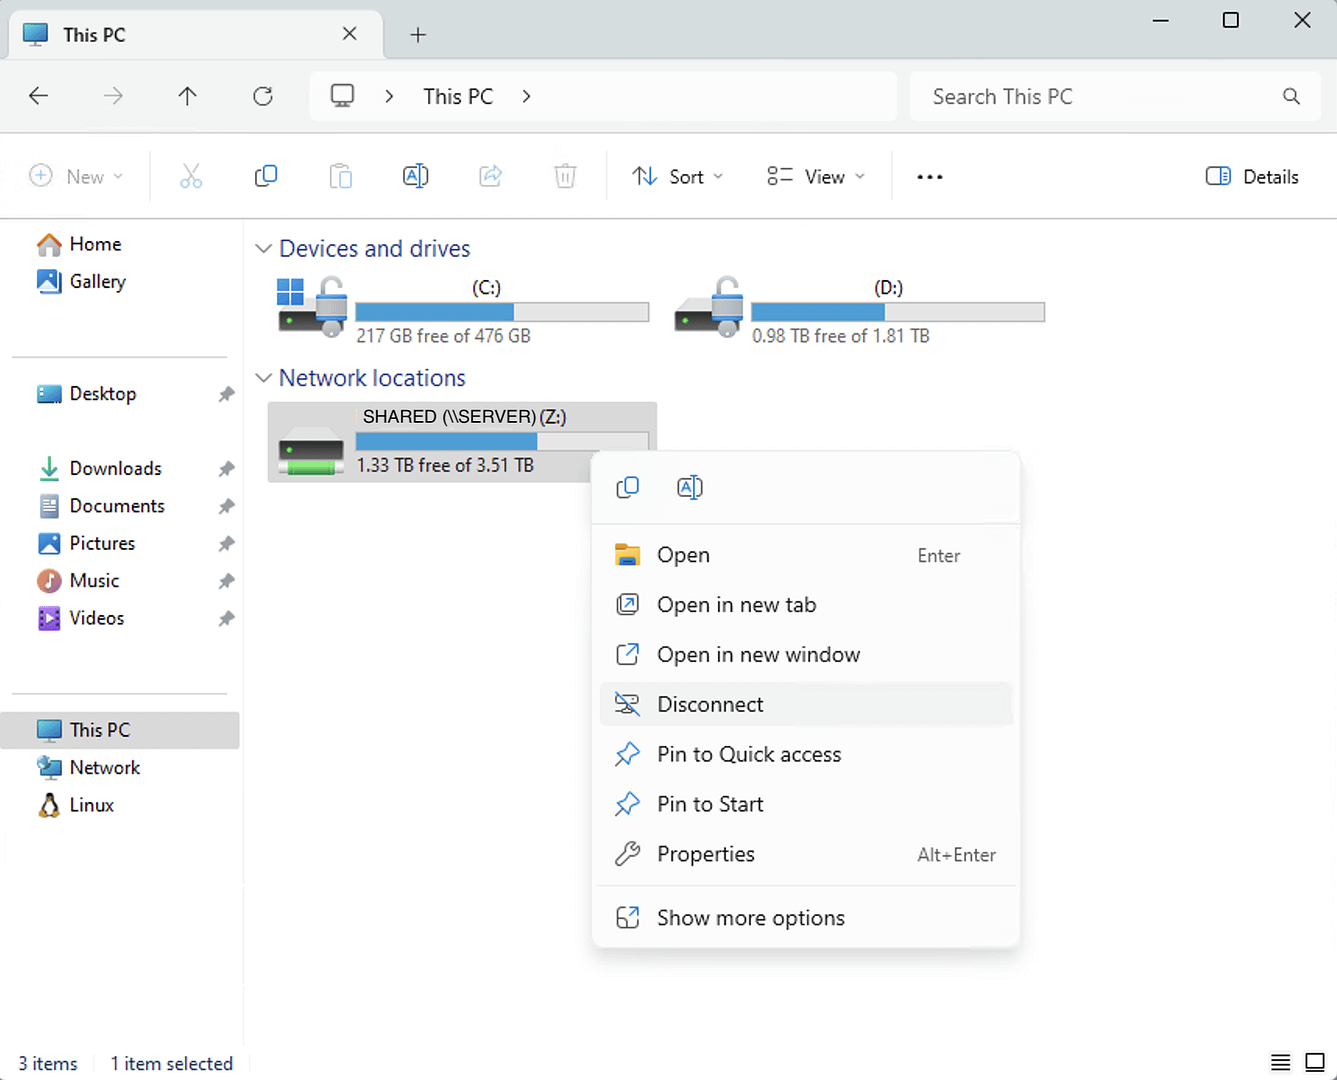
2 Right click or press and hold on the mapped network drive, and click/tap on Disconnect. (see screenshot below)

Option Three
Disconnect Mapped Network Drive from Command Bar in File Explorer
1 Open This PC in File Explorer (Win+E).
2 Click/tap on the See more (3 dots) button on the command bar, and click/tap on Disconnect network drive. (see screenshot below)

3 Select the mapped network drive you want to disconnect, and click/tap on OK.

Option Four
Disconnect Mapped Network Drive from This PC in Navigation Pane of File Explorer
1 Open This PC in File Explorer (Win+E).
2 Right click or press and hold on This PC in the navigation pane, and click/tap on Disconnect network drive. (see screenshot below)

3 Select the mapped network drive you want to disconnect, and click/tap on OK.
Option Five
Disconnect Mapped Network Drive using Command
1 Open Windows Terminal, and select either Windows PowerShell or Command Prompt.
2 Type the command below into Windows Terminal, and press Enter. (see screenshot below)
net use <drive letter>: /Delete
Substitute <drive letter> in the command above with the actual drive letter (ex: «Z») of the mapped network drive you want to disconnect.
For example: net use Z: /Delete

Option Six
Disconnect All Mapped Network Drives using Command
1 Open Windows Terminal, and select either Windows PowerShell or Command Prompt.
2 Copy and paste the command below into Windows Terminal, and press Enter. (see screenshot below)
net use * /Delete /Y

That’s it,
Shawn Brink