
10615
Windows 11, как и предыдущие версии этой операционной системы при подключении к Wi-Fi сети запоминает ее и сохраняет необходимые параметры (имя, пароль) для подключения к этой сети в будущем. Это удобно, так как нам не нужно каждый раз выбирать необходимую беспроводную сеть, вводить пароль и т. д., все подключается автоматически, или вручную но без ввода пароля.
Но не редко возникает необходимость удалить Wi-Fi сеть на Windows 11, то есть сделать так, чтобы система «забыла» профиль определенной Wi-Fi сети. И в этой статье я покажу три способа, с помощью которых можно это сделать. Для чего нужно удалять информацию о Wi-Fi сети? Причины бывают разные. Например, после смены пароля от Wi-Fi могут возникнуть проблемы с подключением и функция «забыть сеть» и повторное подключение решает эту проблемы. Бывает, что Windows 11 подключается к какой-то сети автоматически, а нам не нужно, чтобы она это делала – удаляем профиль этой сети и проблема решена. Возможно вы просто не хотите, чтобы кто-то видел к каким сетям вы подключались.
Способ 1: самый простой и быстрый
Нужно нажать на иконку Wi-Fi сети в трее (возле часов), затем возле кнопки «Wi-Fi» нажать на стрелку чтобы открыть список Wi-Fi сетей, которые доступны для подключения. Там же будет сеть к которой вы сейчас подключены. После чего нажимаем правой кнопкой мыши на сеть которую хотим удалить и выбираем «Забыть».

Единственно, что в этом списке не будут отображаться Wi-Fi сети к которым вы раньше подключались, но сейчас они вне зоны действия. Поэтому, лучше использовать второй способ. Там у нас будет доступ ко всем сетям, которые «запомнила» Windows 11.
Способ 2: управление известными Wi-Fi сетями
В параметрах Windows 11 есть отдельный раздел, там есть список всех Wi-Fi сетей к которым вы раньше подключались. Можно посмотреть свойства, изменить параметры каждой отдельной сети, а так же можно ее удалить.
- Нажмите правой кнопкой мыши на кнопку «Wi-Fi» и выберите «Перейти к параметрам».
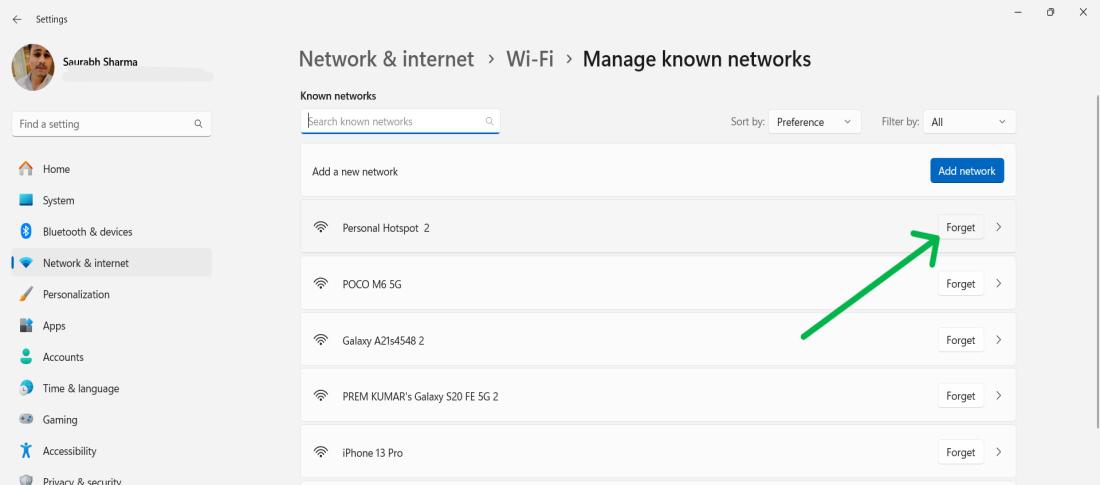
Или зайдите в Пуск – Параметры – Сеть и Интернет – Wi-Fi – Управление известными сетями. - Найдите в списке Wi-Fi сеть которую нужно удалить и напротив нее нажмите на кнопку «Забыть».

Профиль Wi-Fi сети будет удален и она исчезнет из списка известных сетей. В дальнейшем, для повторного подключения к этой сети нужно будет ввести пароль.

Способ 3: через командную строку
Не самый простой способ, но возможно кому-то он пригодится.
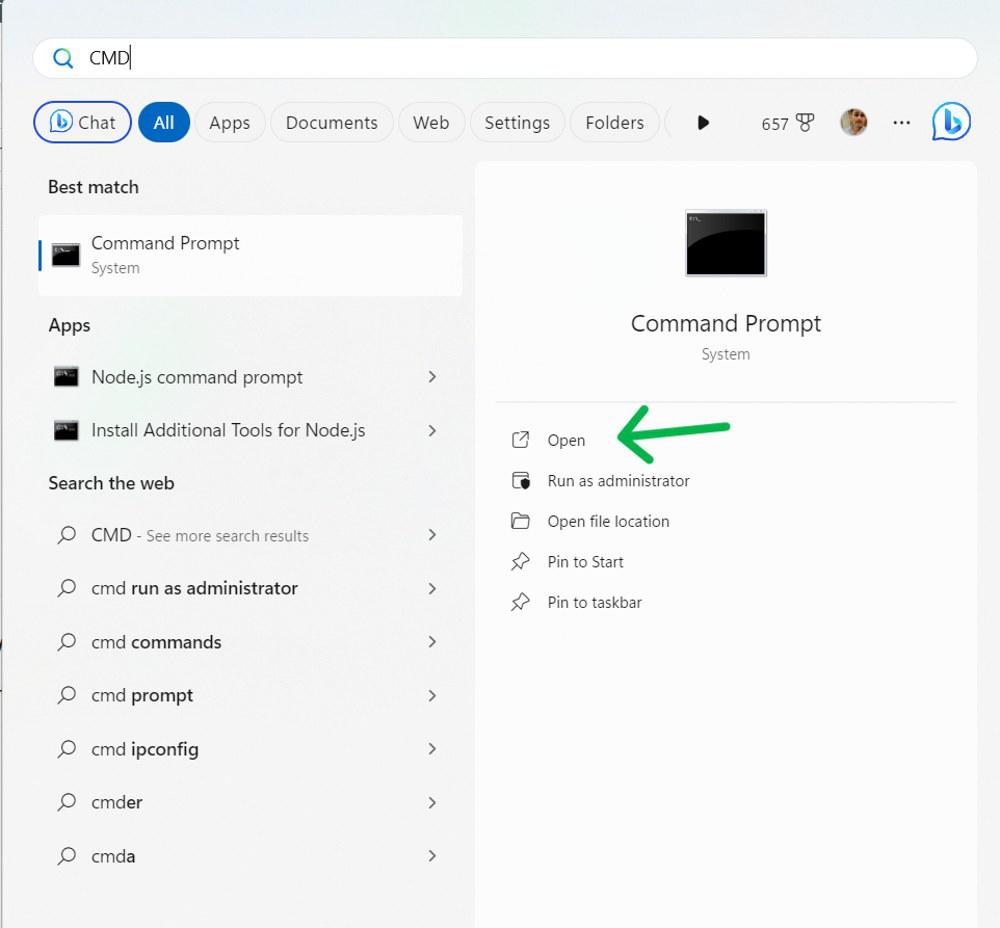
- Нужно запустить командную строку. Я обычно открываю Пуск, начинаю писать «командная стройка» и запускаю ее от имени администратора.

- Копируем, вставляем в командную строку и выполняем (нажав Enter) следующую команду:
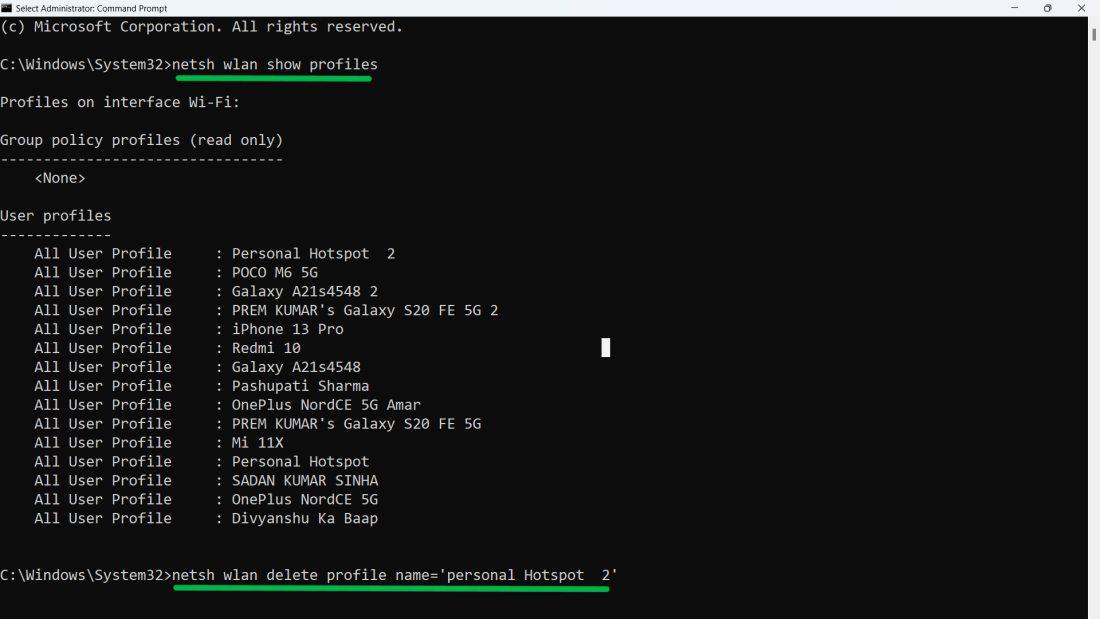
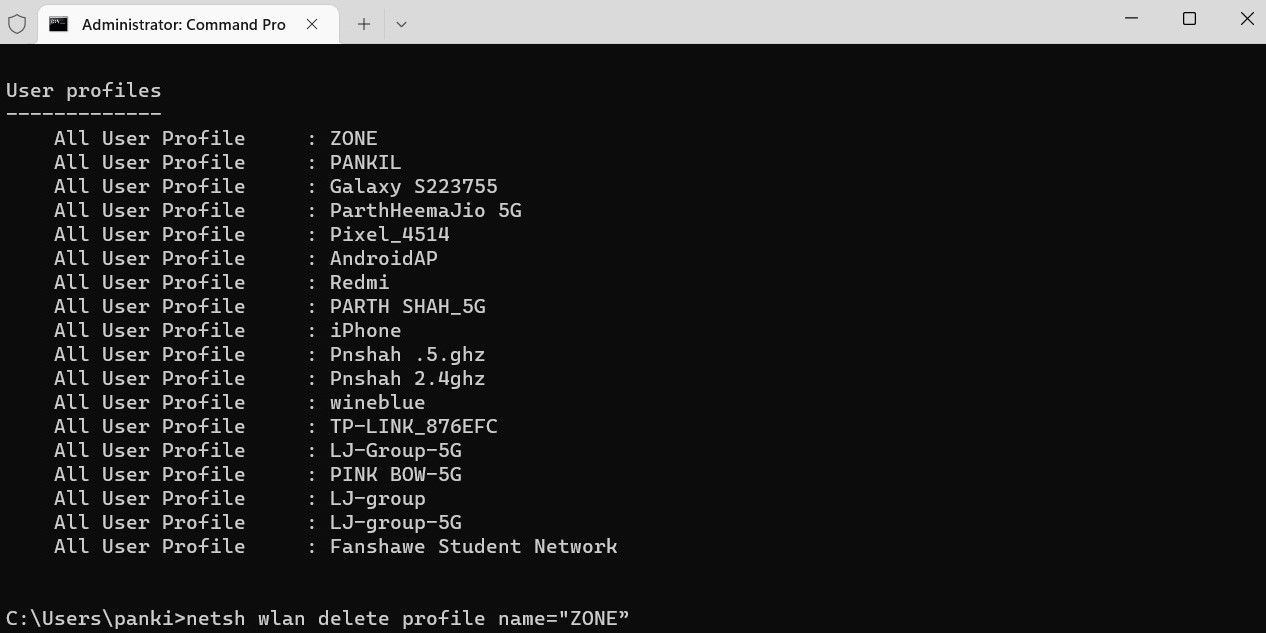
netsh wlan show profiles
С помощью этой команды мы получаем список имен всех Wi-Fi сетей, которые сохранены в системе. Если вы знаете имя сети которую нужно «забыть», то можно обойтись без этой команды.

- Для удаления профиля беспроводной сети нужно выполнить следующую команду:
netsh wlan delete profile name=XXX
Где XXX – имя Wi-Fi сети. У меня в примере это сеть «MERCUSYS_A84E».

Все получилось, сеть удалена.


На этом все. С удовольствием отвечу на ваши вопросы в комментариях. Если у вас есть чем дополнить эту стать, возможно я что-то упустил – пишите в комментариях.
Last Updated :
22 Oct, 2024
Knowing how to forget a network in Windows 11 is useful when removing previously connected Wi-Fi networks from your device. This can help in cases where you need to clear saved network settings or troubleshoot connectivity issues. In this guide, we will walk you through the steps to forget Wi-Fi in Windows 11 and effectively manage your Wi-Fi connections.
How to Forget a Network in Windows 11
- Method 1: Forget a Network in Windows 11 Using Quick Settings
- Method 2: Forget a Network in Windows 11 Using Settings App
- Method 3: Forget a Network in Windows 11 Using CMD
- Method 4: Forget a Network in Windows 11 Using PowerShell
- How to Delete All Known Network Profiles via Command Prompt?
How do I Remove or Forget a Wifi Network?
Managing your Wi-Fi network connections in Windows 11 is crucial for security and convenience. This guide presents various methods to forget a Wi-Fi network from your system.
Whether you prefer a quick approach or a more detailed setting menu, we’ve got you covered. We’ll explore four methods: using quick settings (Simple and Fast), using the settings app (More Options), using Command Prompt (Advanced Users), and using PowerShell (Advanced Users).
Method 1: Forget a Network in Windows 11 Using Quick Settings
Here’s how to forget a wifi network in Windows 11 using Quick Settings:
Step 1: Press Win + A to open Quick Settings.
Step 2: Click the arrow next to the Wi-Fi icon.
Step 3: Right-click the network you want to forget.
Step 4: Select «Forget» and confirm.

Method 2: Forget a Network in Windows 11 Using Settings App
Here’s how to forget a WIFI network in Windows 11 using Settings Apps:
Step 1: Open Settings by pressing (Win + I)
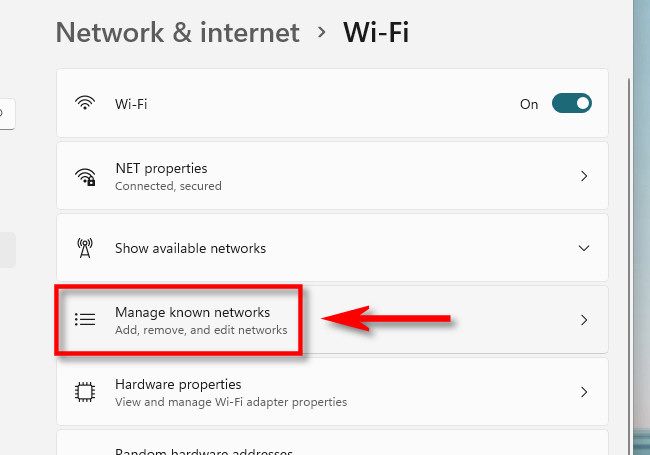
Step 2: Navigate to «Network & Internet.» Then click «Wi-Fi»
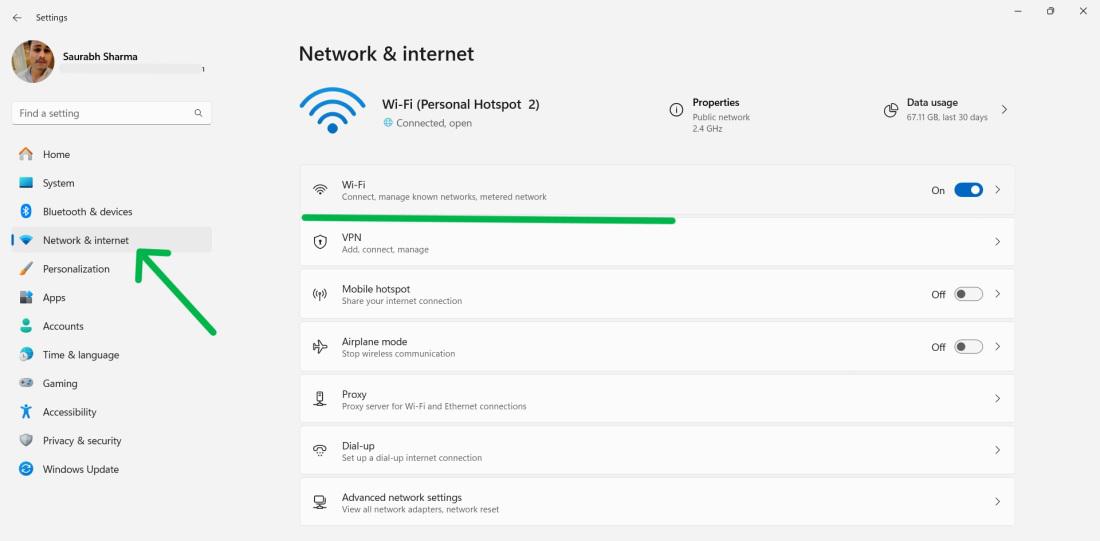
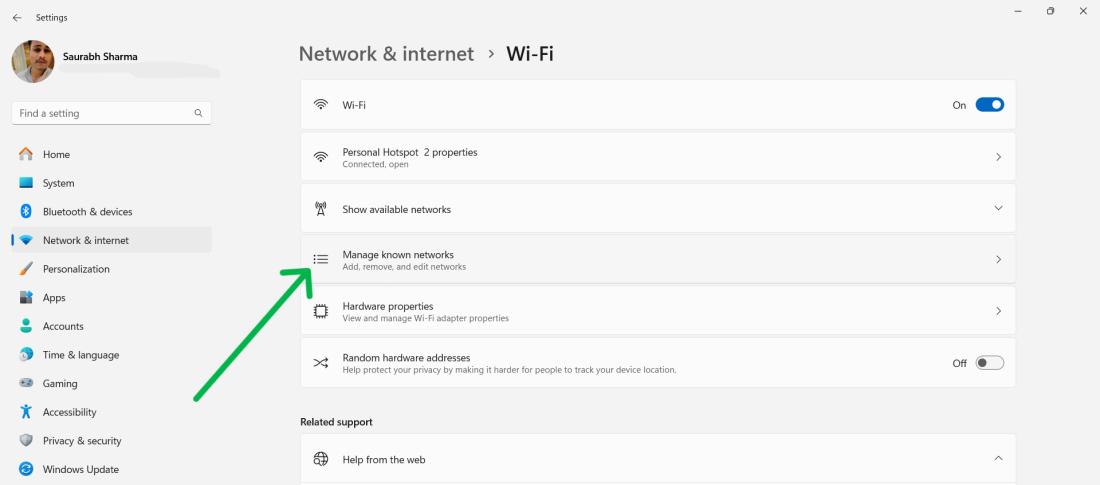
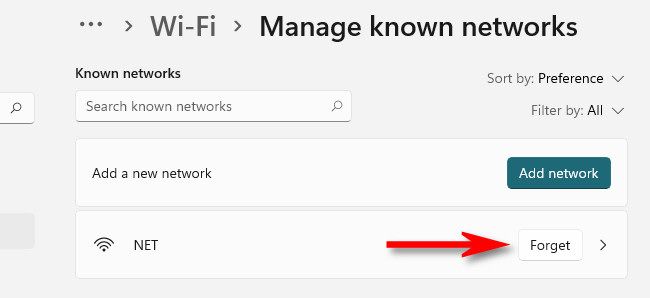
Step 3: Then, Click on «Manage known networks.»
Step 4: Find the network you want to forget and click «Forget.»
Step 5: Confirm your choice.
Method 3: Forget a Network in Windows 11 Using CMD
Here’s how to forget a WIFI network in Windows 11 using CMD:
Step 1: Press Win + S to open the search bar on your computer
Step 2: Then, On the search bar type «CMD» After that click on «Run as administrator»
Step 3: Enter the following command to list saved networks.
netsh wlan show profiles
Step 4: Run the following command to check for the specific network.
netsh wlan delete profile name= 'network_name'
Method 4: Forget a Network in Windows 11 Using PowerShell
Here’s how to forget a WIFI network in Windows 11 using PowerShell:
Step 1: Press Win + S to open the search bar on your computer
Step 2: Then, On the search bar type «Windows PowerShell» After that click on «Run as administrator«
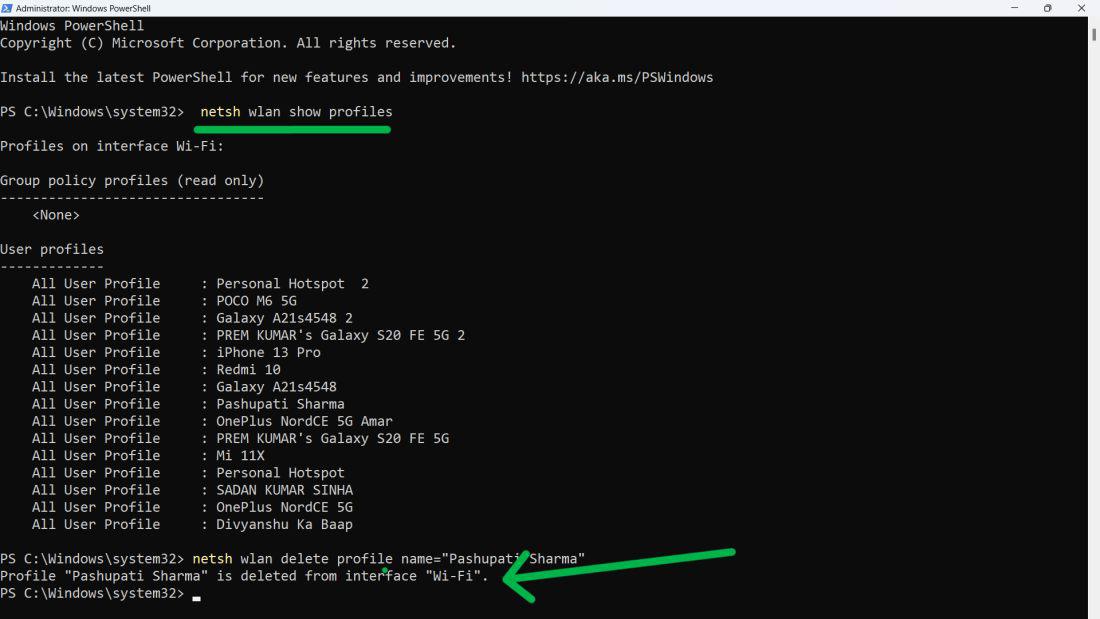
Step 3: Type this command to view all networks
netsh wlan show profiles
Step 4: Run the following command to check for the specific network.
netsh wlan delete profile name= 'network_name'
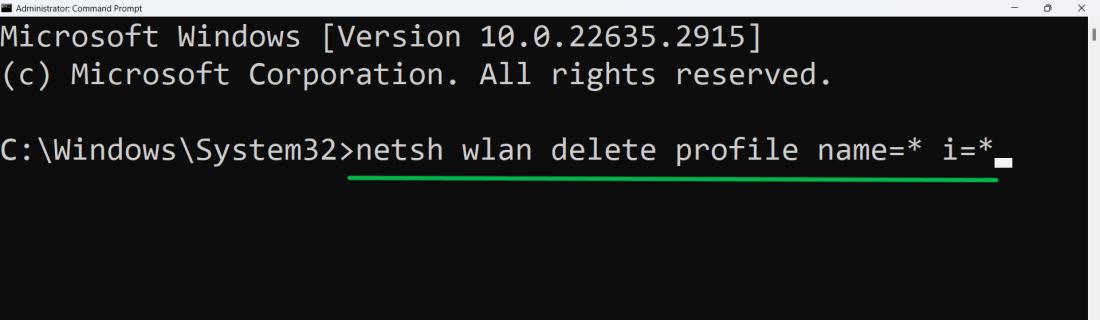
Method 5: How to Delete All Known Network Profiles via Command Prompt?
If you want to delete all known network profiles from your Windows PC. Then open CMD and execute this simple command. Follow the detailed steps mentioned below.
Step 1: Press Win + S to open the search bar on your computer.
Step 2: Then, On the search bar type «CMD» After that click on «Run as administrator».
Step 3: In CMD type this command.
netsh wlan delete profile name=* i=*
Conclusion
Being able to forget a network in Windows 11 ensures that your system won’t automatically connect to an unwanted or outdated Wi-Fi network. This simple process of removing a network in Windows 11 can improve your network management and offer more control over your device’s connectivity. Next time you need to clear old networks refer back to these easy steps.
By default, Windows 11 remembers any Wi-Fi network you connect to. This allows Windows to automatically connect to the network whenever it is in range. If you don’t want that to happen, you can simply remove the network from your PC.
From time to time, you may want to remove some old Wi-Fi networks that you once connected to but never will again. In this guide, we’ll show you four different ways to remove a saved Wi-Fi network from Windows 11.
The Benefits of Removing Old Wi-Fi Networks From Windows 11
While having a long list of saved Wi-Fi networks isn’t necessarily a bad thing, there may be times when you want to remove specific Wi-Fi networks from your PC.
For example, if you previously connected your PC to a free public network but do not intend to use it again, it is best to simply remove the network. Or perhaps you don’t want your PC to automatically connect to a specific network when it’s in range. Besides, forgetting and rejoining a network also happens to be an effective solution for fixing minor connection issues.
Over time, your PC may accumulate a long list of Wi-Fi networks that you won’t be connecting to. In such cases, it makes sense to remove old and unused Wi-Fi networks from your PC.
1. Remove a Saved Wi-Fi Network Using the Quick Settings Panel
The Quick Settings panel on Windows provides access to some commonly used settings. It also makes it simple to remove a saved Wi-Fi network from Windows 11.
Press Win + A to open the Quick Settings panel. Click the sideways-facing arrow next to the Wi-Fi button. You’ll see a list of Wi-Fi networks, including the one to which you’re currently connected. Right-click on the network you want to remove and select Forget.

Like using the Quick Settings on Windows? Check out how to customize the Quick Settings panel on your Windows 11 computer.
2. Remove a Saved Wi-Fi Network via the Settings App
If the Wi-Fi network you want to remove is not nearby, it will not appear in the Quick Settings panel. In that case, you can use the Windows 11 Settings app to remove it.
To forget a Wi-Fi network via the Settings app:
- Press Win + I to open the Settings app.
- Navigate to the Network & internet tab and click on Wi-Fi.
- Click on Manage known networks.
-
Click the Forget button next to a network to delete it.

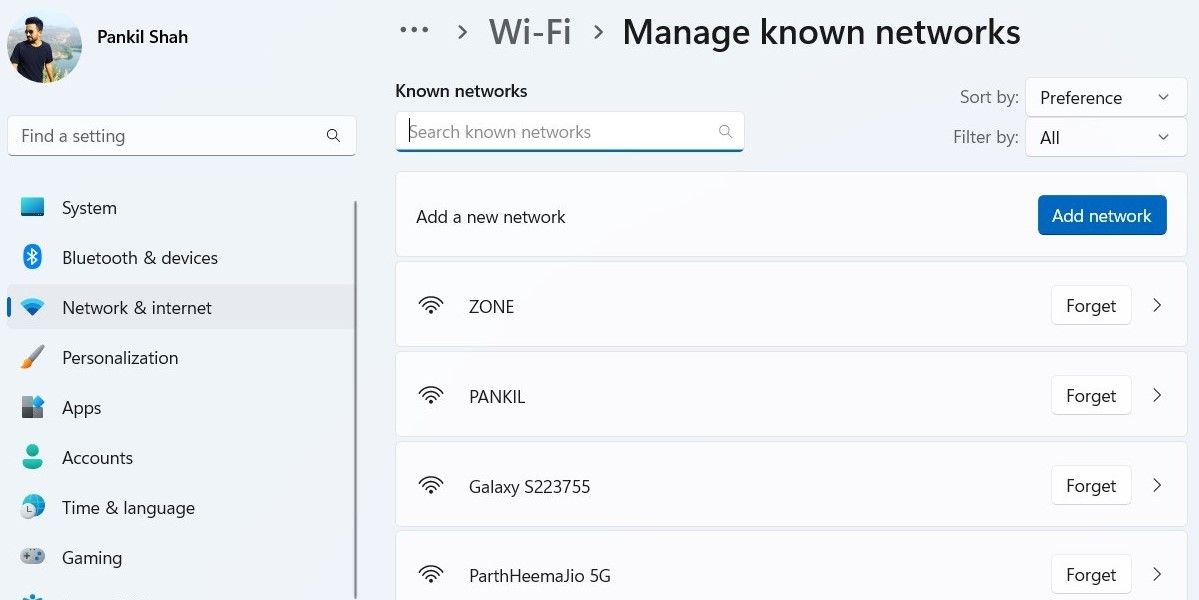
And that’s about it. Once you click the Forget button, Windows will remove the network profile associated with that network.
3. Remove a Saved Wi-Fi Network With Command Prompt or PowerShell
Another option for removing a saved Wi-Fi network is to use a command-line tool such as Command Prompt or Windows PowerShell. You can easily forget a Wi-Fi network by running a couple of commands in the terminal window. Here’s how you can go about it.
- Click the magnifying icon on the taskbar or press Win + S to open the search menu.
- Type command prompt or windows powershell and select Run as administrator.
- Select Yes when the User Account Control (UAC) prompt appears.
-
In the console, type the following command and press Enter to view a list of saved Wi-Fi networks on your PC.
netsh wlan show profiles - Note down the name of the network profile you want to remove.
-
Paste the following command, replace WIFIName with the network name, and press Enter.
netsh wlan delete profile name="WIFIName"
You can repeat the above command to remove as many networks as you want. Conveniently, the command-line tool also lets you remove all the saved Wi-Fi networks at once. To do so, use this command:
netsh wlan delete profile name=* i=*
4. Remove a Saved Wi-Fi Network Using Registry Editor
If you’re feeling adventurous, you can also use the Registry Editor to remove a saved Wi-Fi network from Windows. Since deleting registry files is risky, you should only use this method if the other ones do not work.
If you decide to use this method, make sure you back up all your registry files just in case. If you need help, check our guide on how to back up and restore the Windows Registry and follow the steps outlined there.
To remove a Wi-Fi network using the Registry Editor:
- Press Win + R to open the Run dialog.
- Type regedit and press Enter. This will open the Registry Editor.
- Select Yes when the User Account Control (UAC) prompt appears.
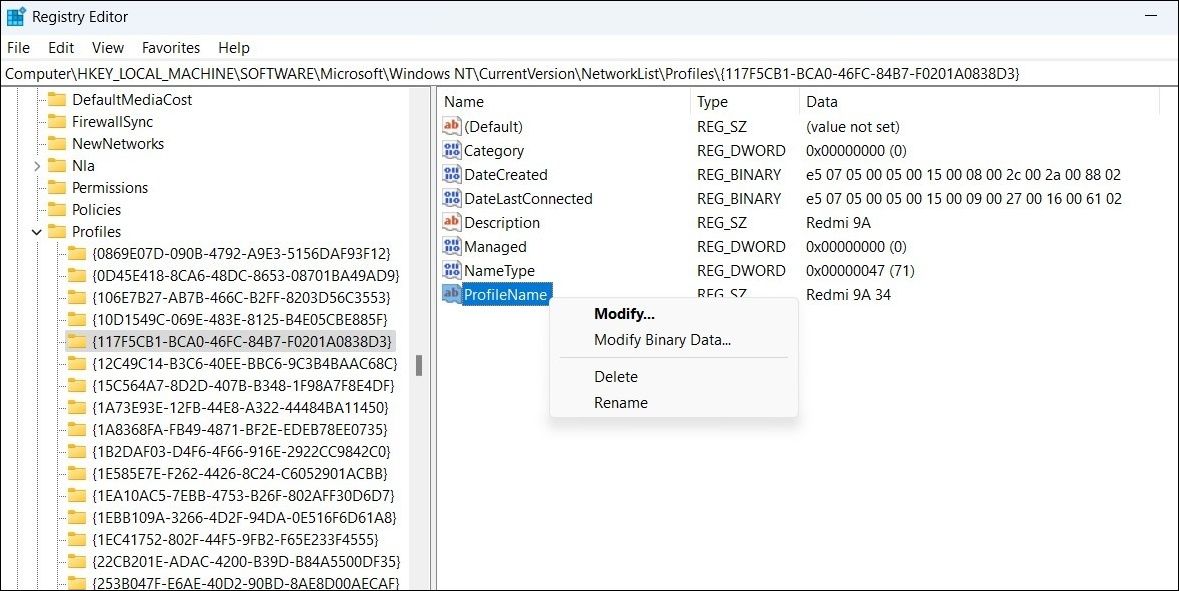
- Use the left pane to navigate to Computer > HKEY_LOCAL_MACHINE > SOFTWARE > Microsoft > Windows NT > CurrentVersion > NetworkList > Profiles.
- Within the Profiles key, you’ll find several subkeys. Each key represents a network profile.
- Select a subkey and look for the ProfileName DWORD on your right to identify the name of the network.
- Once you find the key corresponding to your network, right-click on it and select Delete.
-
Select Yes to confirm.

Once you complete the above steps, the saved profile will be removed from your system.
How to Reconnect to a Forgotten Wi-Fi Network on Windows 11
You can always reconnect to a Wi-Fi network later after forgetting it. For that, you’ll need to manually select the network and enter the password for authentication.
To connect to a Wi-Fi network on Windows 11, press Win + A to open the Quick Settings panel. Click the arrow next to the Wi-Fi button to view a list of nearby networks. Select the network you want to connect to and click the Connect button. Enter the password for that network and you should be good.
Of course, this isn’t the only way to connect to a Wi-Fi network on Windows. Refer to our guide on different ways to connect to Wi-Fi on Windows to learn more.
Removing Saved Wi-Fi Networks From Windows 11
Although there are no significant disadvantages to keeping old Wi-Fi networks on your PC, you may want to delete some of them just to keep things tidy. Luckily, Windows 11 offers ample ways to remove unused Wi-Fi networks.
Aside from deleting old Wi-Fi networks, you can also manage wireless network profiles on Windows in a few different ways.
Вопрос от пользователя
Здравствуйте.
Подскажите с одной загвоздкой… В общем, пришлось поменять пароль Wi-Fi сети, чтобы на ТВ к ней можно было подключиться (т.к. на ТВ нельзя было ввести один символ, который использовался ранее в пароле). Но теперь ноутбук пытается подключиться к Wi-Fi сети автоматически и не может этого сделать (т.к. по видимому использует старый пароль).
В чем сам вопрос: как бы мне стереть настройки старого Wi-Fi подключения, чтобы я мог подключиться к сети заново. «Тыкал» уже раз 100 по значку сети возле часов — но такое чувство, что ноутбук не реагирует на это… даже пароль не спрашивает.
Здравствуйте.
Вероятно, вам нужно удалить старый профиль Wi-Fi (в Windows эта операция называться: «забыть»), и затем заново подключиться к сети. Почему стандартным способом это не удается сделать — сказать трудно, возможно какие-то ошибки проводника.
Ниже рассмотрю неск. альтернативных вариантов (один из них должен помочь 👌).
*
Способы «удаления» старых Wi-Fi профилей
📌 Вариант 1
Самый очевидный вариант забыть старую Wi-Fi сеть, к который «пытается» подключиться ноутбук (ПК), — это кликнуть по значку сети в трее Windows (рядом с часами), затем нажать ПКМ по ее названию и выбрать опцию «Забыть».
Далее можно подключаться к другой сети. Как правило, в большинстве случаев этот способ работает.
👉 В помощь!
Если у вас нет значка сети в трее Windows — см. эту заметку: https://ocomp.info/propal-znachok-iz-treya.html
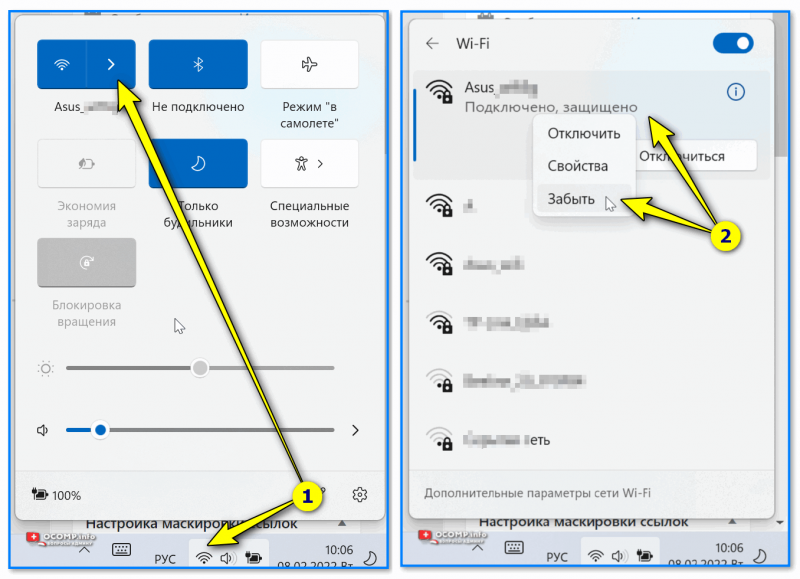
Забыть Wi-Fi сеть / Windows 11
*
📌 Вариант 2
В параметрах Windows 11/10 (чтобы их открыть используйте сочетание Win+i) во вкладке «Сеть и интернет / Wi-Fi» есть спец. вкладка «Управление известными сетями» — именно в которой хранятся все профили.
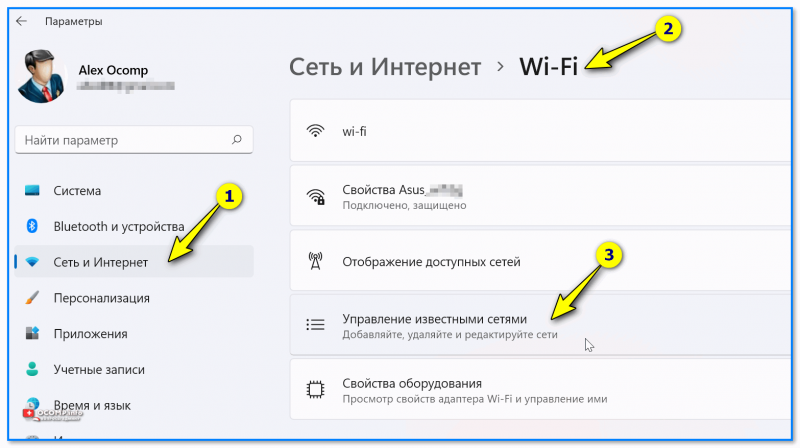
Управление известными Wi-Fi сетями (Windows 11)
Чтобы забыть ту или иную сеть — просто кликните мышкой по соответствующей строке. См. пример ниже (если у вас много таких профилей — придется щелкнуть неск. раз мышкой… 👌).
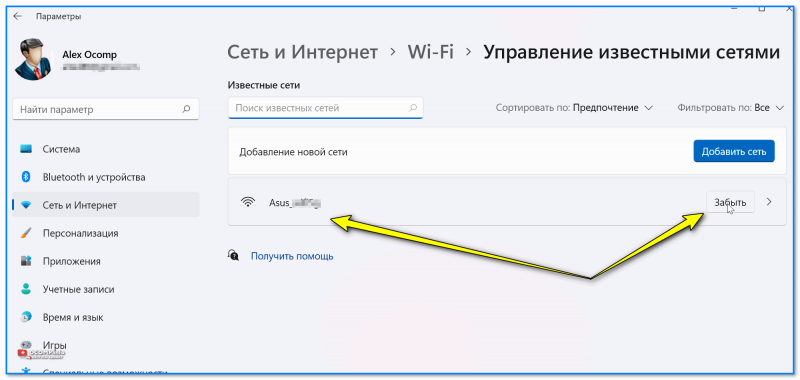
Список сетей, к которым вы когда-то подключались (Windows 11)
*
📌 Вариант 3
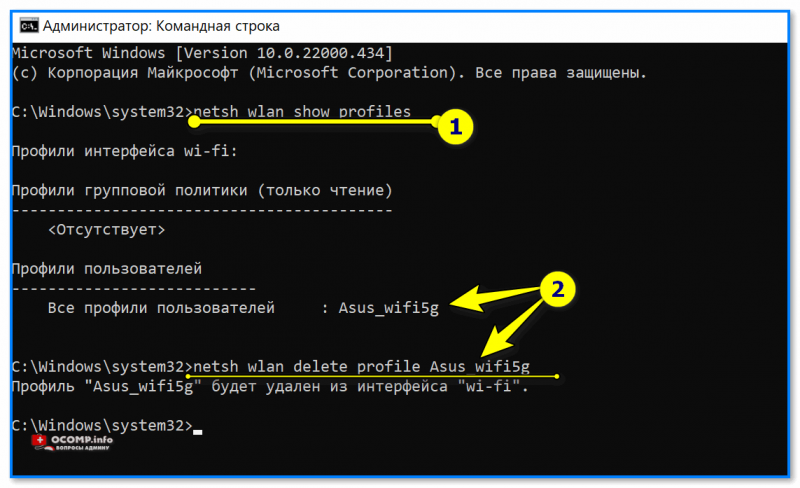
- Сначала необходимо запустить командную строку от имени администратора;
- далее ввести команду netsh wlan show profiles и нажать Enter (этим мы посмотрим все известные сети);
- затем для удаления одной из них — использовать команду netsh wlan delete profile Asus_wifi5g (где вместо «Asus_wifi5g» — используйте свое название сети);
- Чтобы удалить все профили Wi-Fi — можно воспользоваться командной: netsh wlan delete profile * (звездочка на конце обязательна).
Пример работы представлен на скрине ниже. 👇
Командная строка — смотрим и удаляем профиль
Обратите внимание, что если вы были подключены к одной из сетей, профиль которой вы удалили, — связь у вас тут же будет разорвана (и значок в трее просигнализирует об этом 👇)!

Сеть пропала
*
📌 Вариант 4
В параметрах системы (Win+i) есть спец. вкладка «Сеть и интернет / сброс сети» для глобального сброса сетевых настроек (прим.: будут удалены все сетевые параметры — т.е. сеть станет работать так, как это бывает сразу же после «чистой» установки Windows).
Отмечу, что файлы и документы (да и прочие настройки Windows, не относящиеся к сетевым) — этим сбросом затронуты не будут! (по крайней мере так было ранее)
👉 В помощь!
Как сбросить настройки сети в Windows 11/10 (помощь тем, у кого лагает сеть) — https://ocomp.info/kak-sbrosit-nastroyki-seti.html
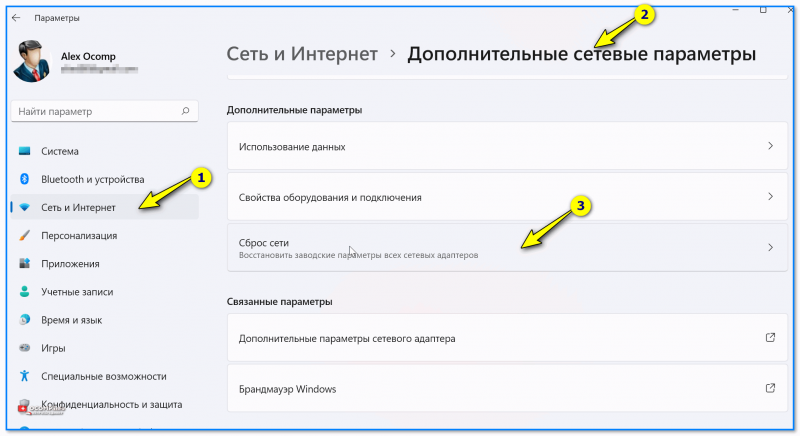
Доп. сетевые параметры — сброс сети
*
📌 Вариант 5
Если все вышеперечисленное не помогло — попробуйте зайти в папку: C:\ProgramData\Microsoft\Wlansvc\Profiles\Interfaces (именно в ней хранятся все сетевые профили текущей ОС).
Разумеется, найдя нужный — можно его удалить (или удалить всё, если вам не нужны никакие профили 👇). Важно: после этого перезагрузите компьютер!
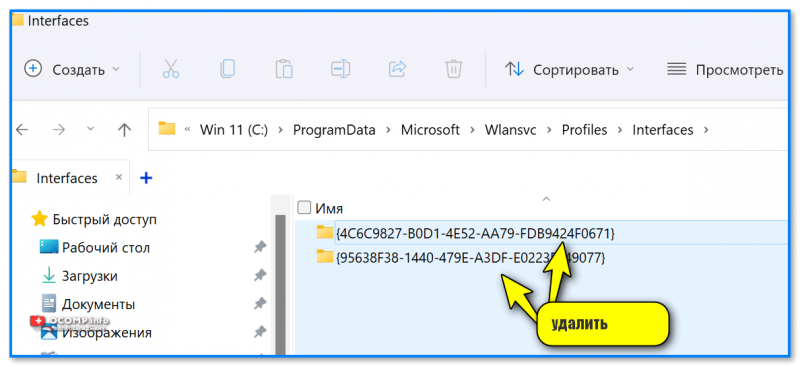
Удалить из папки все!
*
Дополнения и иные рекомендации — приветствуются в комментариях!
Успехов!
👋
Sign in to your How-To Geek account
Quick Links
-
How to Forget a Known Network in Quick Settings
-
How to Forget a Known Network in Settings
Sometimes while troubleshooting a Wi-Fi connection in Windows 11, it can help to clear or delete stored Wi-Fi network settings and start fresh. Or sometimes you don’t want your PC to connect to a certain hotspot anymore. Luckily, it’s easy to «forget» a Wi-Fi network in just a few clicks. Here’s how.
How to Forget a Known Network in Quick Settings
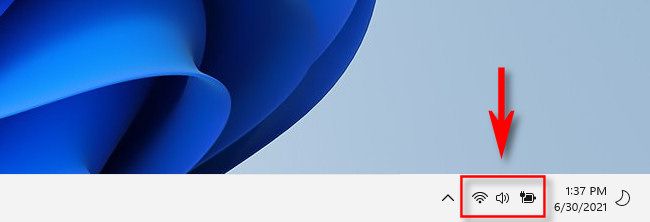
It’s easy to forget a Wi-Fi network using the Quick Settings menu—if that network is nearby. First, click the Quick Settings button located in the far right corner of the Windows taskbar. It’s a hidden button located over the Wi-Fi and sound volume icons.
When the Quick Settings menu appears, locate the Wi-Fi control button and click the sideways-facing arrow inside it. (If you don’t see the Wi-Fi control button, you can click the pencil icon and add it to the Quick Settings menu.)
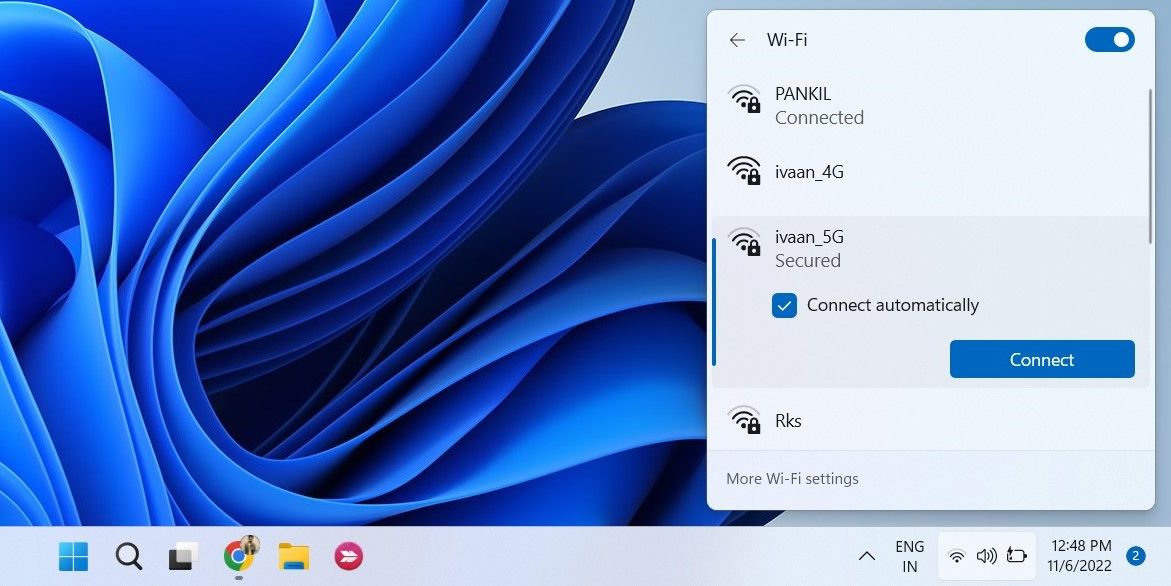
The Quick Settings menu will display a list of Wi-Fi access points, including the one you’re currently connected to (if any) at the top of the list.
Before you forget a Wi-Fi network, make sure you know the network’s Wi-Fi password if you plan to reconnect in the future. Forgetting will erase your stored Wi-Fi password for that network.
Locate the Wi-Fi access point whose profile you want to delete and right-click it. Select «Forget» in the small menu that appears.
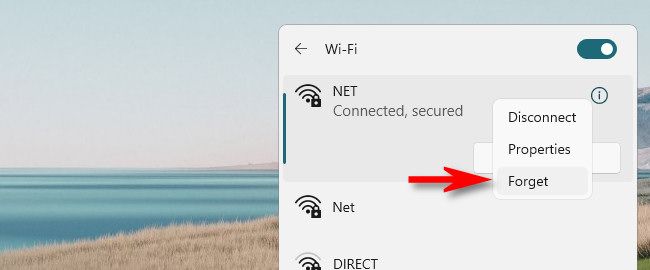
Windows 11 will forget the Wi-Fi network, clearing its stored settings for that particular access point. If it had previously been the default Wi-Fi access point, your PC will no longer attempt to connect to it automatically.
If you want to reconnect to the network you just forgot, click the «Connect» button below the Wi-Fi network’s name in the list, type in the password, and you’ll be back online.
How to Forget a Known Network in Settings
You can also forget saved Wi-Fi networks in the Windows 11 Settings app. This will let you forget a Wi-Fi network even if you’re not within range of it at the moment.
To do so, open Settings (press Windows+i), then navigate to Network & Internet > Wi-Fi and click «Manage Known Networks.»
Before you forget a Wi-Fi network, make sure you know the network’s Wi-Fi password if you plan to reconnect in the future. Forgetting will erase your stored Wi-Fi password for that network.
In the «Manage Known Networks» menu, locate the Wi-Fi network you want to remove and click the «Forget» button beside it.
Windows will delete the network, and you’re set. Close Settings, and you can keep using your PC as usual. Good luck!