
Need Space in PC or only want to remove or uninstall Windows 7 Service Pack 1 On PC ( Windows 7, 8, 10, and Mac )? but how to, after it still having files in C: drive? With this article, you will able to delete or kick out all of those files also after uninstalling the Windows 7 Service Pack 1.
Are you bored, or tired of using Windows 7 Service Pack 1? Now, wanna kick-off this software from your PC ( Windows 7, 8, 10, and Mac )? There is no condition to follow up before installing, so, you can remove it without getting any confusion about it.
There are 10 methods that users can adapt if they want to uninstall Windows 7 Service Pack 1 :
Method #1
- Go to Start Menu, then click on the Control Panel.
- In Control Panel, under programs, go through the list of the ones that are installed on your computer
- Right-click on Windows 7 Service Pack 1, and then click on uninstall a program
- Follow the prompt on the screen, and you will get to see a progress bar that will take you to remove the Windows 7 Service Pack 1 from the computer.


Method #2
The second method involves uninstaller.exe, through which Windows 7 Service Pack 1 can be uninstalled. Just follow the instructions below to execute this step:
- Go to the installation folder of Windows 7 Service Pack 1.
- Find a file that is named uninstall.exe or unins000.exe
- Double click on the file, and then follow the instructions that appear on the screen.


Method #3
The third method involves System Restore. For those who don’t know, System Restore is a utility, which helps the user restore their system to its previous state. System Restore removes all those programs, which interfere with the operation and performance of the computer.


If you have created a system restore point before you installed Windows 7 Service Pack 1, then you can use this software to restore the system, and remove such unwanted programs. However, before you do so, make sure that you save all the important data.Follow the steps below to know more from this method:
- Close all the files and programs, which are currently running on your PC
- Open Computer from the desktop, and then select Properties
- System Window will open
- On the left side and click on System Protection
- System Properties will open.
- Then do click on the option of System Restore, and a new window will again open.
- Now, choose the ‘different restore point’ option, and click on Next.
- You have to select a date and time from the given options; when you select a date, the drivers that you installed after the chosen date won’t work.
- Click on Finish and then Confirm the ‘Restore Point’ on the screen.
- When you click Yes to confirm, the Windows 7 Service Pack 1 would be uninstalled.
Method #4
If you have an antivirus, then you can use it to uninstall Windows 7 Service Pack 1.There is much malware or Windows 7 Service Pack 1 software in the computer applications that we download nowadays. They have become very difficult to remove from the system, like Trojan and spyware.
- If you cannot remove Windows 7 Service Pack 1 with the above methods.
- It means that there is malware or Windows 7 Service Pack 1 in it, and only a good antivirus can be used for removing it.
You can either download Norton Antivirus or AVG antivirus, as these are reputable software and will surely remove the malware, Windows 7 Service Pack 1 on the system.

Method #5
If you want to uninstall Windows 7 Service Pack 1, then you can do so using Command Displayed in the Registry. A registry is a place where all the settings of Windows, along with information, are stored. This also includes the command to uninstall a software or program.
You can try this method with Windows 7 Service Pack 1 as well, but it is a very risky method. If you make any mistake and delete the wrong information, then the system is most likely to crash. It would become difficult for you to bring it back from deletion.

To execute this method, To follow the steps given below:
- Hold Windows + R together, and then Run command
- When the command box opens, type Regedit in the box and then click on OK
- You have to navigate and find the registry key for the Windows 7 Service Pack 1
- You will see an uninstall string on the next window; double click on it, and also copy ‘Value Data’
- Again hold Windows + R keys, and run the Command; paste the value data that you just copy and click on OK
Follow what comes on the screen and then uninstall Windows 7 Service Pack 1.
Method #6
The seventh method is to uninstall the Windows 7 Service Pack 1 using a third-party uninstaller.
At times, those who don’t have any knowledge of computer language, won’t be able to manually uninstall the software fully.
Many files occupy the hard disk of the computer, so it is best to use third-party software to uninstall them.

Method #7
There are some codes that users can type into the command prompt, and they would be able to uninstall the Windows 7 Service Pack 1. For example, if they want to remove the package, then just type.
sudo apt-get remove Windows 7 Service Pack 1
If you want to uninstall Windows 7 Service Pack 1 and its dependencies as well, then type:
sudo apt-get remove –auto-remove Windows 7 Service Pack 1
For those who don’t know, some of the dependencies of Windows 7 Service Pack 1 are GCC-5, libc6, libgcc1, Windows 7 Service Pack 1 dev, and gc++-5.

Method #8
If the user wants to remove the configuration and data files of Windows 7 Service Pack 1, then they need to run the following code on the Command Prompt:
sudo apt-get purge Windows 7 Service Pack 1

Method # 9
It depends on you that are you willing to kick-out the data or you want to remove the configuration data or data files, along with the dependencies, then the following code is most likely to work for you:
sudo apt-get auto-remove -purge Windows 7 Service Pack 1

To uninstall Windows 7 Service Pack 1 on mac because anytime we need space or only want to remove from pc due to some viruses and also many problems which are needed to remove or uninstall from pc.
So I will show you some steps of uninstalling Windows 7 Service Pack 1 on the mac so follow my this step or method if you have still confusion so you may contact with us for uninstall of Windows 7 Service Pack 1 on pc or mac.
How to Uninstall Windows 7 Service Pack 1 on Mac?
For uninstalling Windows 7 Service Pack 1 on the mac so as I told you that there is a simple method to uninstall apps on mac. As there are installed some apps on your Mac and now you want to remove or uninstall from your pc successfully and want to install some other apps on my mac so follow my these steps to uninstall Windows 7 Service Pack 1 on mac.
Method #1
In method 1, you have to open mac on your pc as I’m showing in the image follow the images to uninstall Windows 7 Service Pack 1 on your mac.

In the image, there is a Windows 7 Service Pack 1 app on your mac dashboard and now we have to uninstall it from our mac we will uninstall this app and will remove it in of mac now double-click-on-app showing in the image.

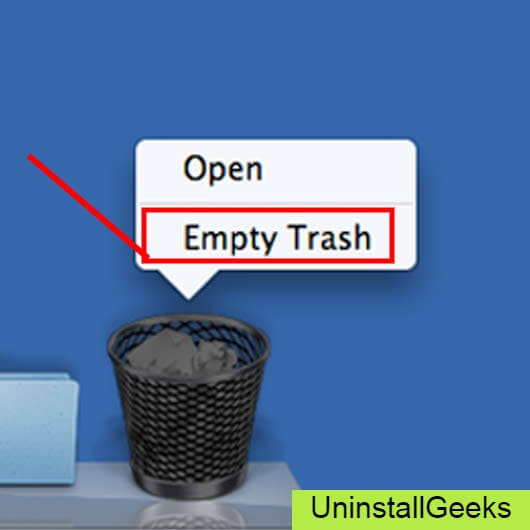
Now you double-clicked on the app mac will ask that are you sure to uninstall Windows 7 Service Pack 1 click on the Delete button so go to Trash of mac to uninstall completely from mac. Showing in image trash bin click on trash bin and go inside there will be Windows 7 Service Pack 1 which we had to delete before so have to uninstall completely from mac.

Not right-click on trash to remove all data or app which we had uninstalled before seeing in the image. Click on Empty Trash the whole data which is in the trash will auto remove successfully.
Now we uninstalled Windows 7 Service Pack 1 on the mac so as you see that how to uninstall or remove any app on the mac so if you liked this so share once. This method doesn’t require any antivirus or uninstaller software from them we are to uninstall.
I described only a simple method of uninstalling Windows 7 Service Pack 1 on mac. This method more people are using but some people take it is too hard uninstalling in mac but in this step, anyone can understand this simple method.
How To Install?
For those who don’t know much about Windows 7 Service Pack 1, they might lean more towards uninstalling it. These Windows 7 Service Pack 1 create an environment, where users can create a high GPU-accelerated application. If you want to install this Windows 7 Service Pack 1, then make sure that your system is compatible with it.
Firstly, verify that the system you are using has a Windows 7 Service Pack 1 capable GPU, and then download the Windows 7 Service Pack 1. Install it, and then test that the software runs smoothly on the system. If it doesn’t run smoothly, then it could be because its communication with the hardware is corrupted.


Conclusion
There are other methods of uninstalling the Windows 7 Service Pack 1 as well as in pc or windows, but these could be difficult for those, who don’t have much technical expertise. Execute these methods, and they will surely work. These methods don’t require the user to have much knowledge of the technical side of an operating system. They can follow simple steps and uninstall Windows 7 Service Pack 1.
-
Home
-
News
- Windows 7 Service Pack 1 – How to Download/Install/Uninstall?
By Daisy | Follow |
Last Updated
Microsoft released a major update to Windows 7 called Service Pack 1 (SP1) in February 2011. Although now Microsoft has ended the support for Windows 7, there are still some Windows 7 users who want to download Windows 7 Service Pack 1. This post from MiniTool provides a detailed guide.
Microsoft has ended support for Windows 7 ends on January 14, 2020. It’s recommended to you use the latest Windows operating system – Windows 11 to continue receiving security updates from Microsoft.
Some users are sticky to using Windows 7 and want to download Windows 7 Service Pack 1 for PC’s security. The following provides features of Windows 7 Service Pack 1 and tells you how to download and install it.
What Is Windows 7 Service Pack 1
What is Windows 7 Service Pack 1? It brings a large number of bug fixes and security fixes to Windows 7. Keeps the security features of the operating system up-to-date, which in turn helps improve system reliability.
- It improves the reliability of HDMI audio device connections.
- It improves the compatibility of programs.
- It enhances visualization capabilities.
How to Check If Service Pack 1 Is Installed Windows 7
How do I know if I have Service Pack 1 for Windows 7? To do that, here are the steps:
Step 1: Select the Start button and right-click Computer to select Properties.
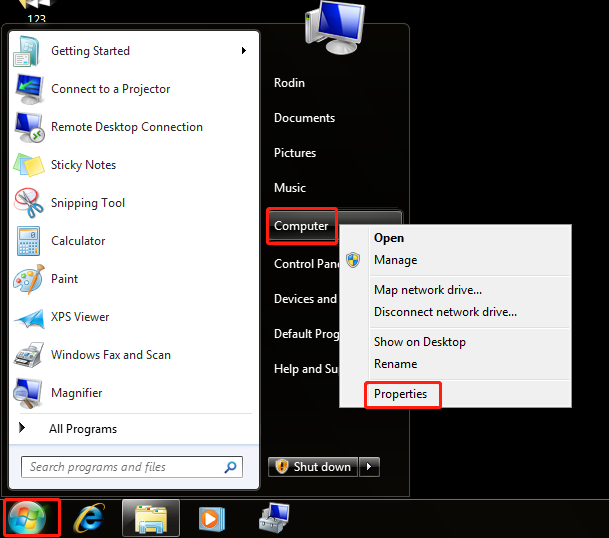
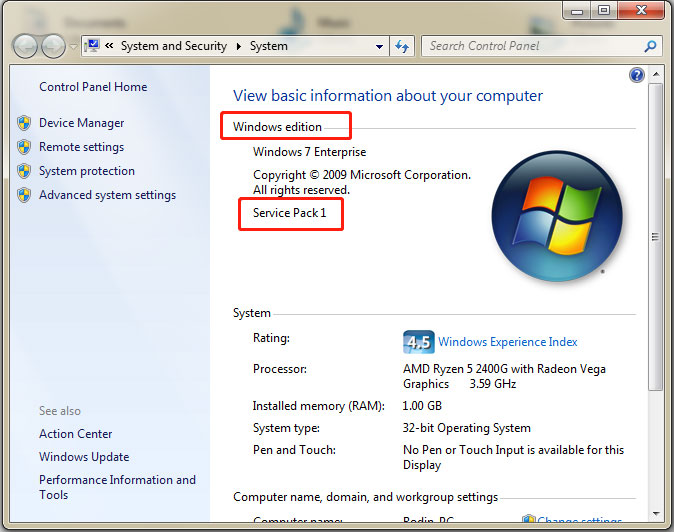
Step 2: Then, you can check if Service Pack 1 is listed under the Windows edition part.
Windows 7 Service Pack 1 Download and Install
If Windows 7 Service Pack 1 is not installed on your PC, you can download and install Windows 7 Service Pack 1 by following the below instructions. There are two ways for you – via Windows Update or Microsoft Update Catalog.
Way 1: Download and Install Windows 7 Service Pack 1 via Windows Update
Step 1: Click the Start menu > Control Panel.
Step 2: Go to System and Security > Windows Update > Check for updates.
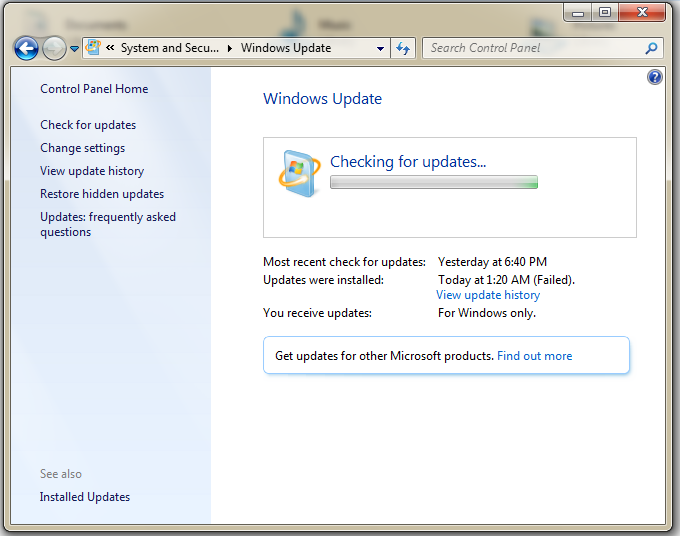
Step 3: If any important updates are found, select the link to view available updates. Then, select Service Pack for Microsoft Windows (KB976932) and then select OK.
Step 4: Click Install updates and follow the on-screen instructions to install Windows 7 Service Pack 1.
Way 2: Download and Install Windows 7 Service Pack 1 via Microsoft Update Catalog
You can also download and install Windows 7 Service Pack 1 via Microsoft Update Catalog.
Step 1: Go to the Windows 7 Service Pack 1 download page.
Step 2: Select the Download link that corresponds to your version of Windows 7. You can also search for Windows 7 Service Pack 1 (KB976932) or Windows 7 Service Pack 1 KB976932 directly.

Step 3: After downloading the package, double-click the exe file to install it.
How to Uninstall Windows 7 Service Pack 1
How to uninstall Windows 7 Service Pack 1? To do that, go to Contro Panel > Programs > Programs and Features > View installed updates. Find and right-click Windows 7 Service Pack 1 to choose Uninstall.
Final Words
What is Service Pack 1? How to check if Service Pack 1 is installed Windows 7? How to uninstall Windows 7 Service Pack 1? How to update Windows 7 Service Pack 1 offline? How to get Windows 7 Service Pack 1 download 64-bit? You can find answers in the above content.
About The Author
Position: Columnist
Having been an editor at MiniTool since graduating college as an English major, Daisy specializes in writing about data backups, disk cloning, and file syncing as well as general computer knowledge and issues. In her free time, Daisy enjoys running and going with friends to the amusement park.
How can Uninstall Microsoft Windows 7 Service Pack 1 Completely from Computer
Microsoft Windows 7 Service Pack 1 removal has been a tough problem on your PC? Do you need an effective way to uninstall Microsoft Windows 7 Service Pack 1 quickly with simple steps? Don’t worry, you will be able to solve the problem via the following removing instructions of the program.
Get Bloatware Uninstaller Now
Microsoft Windows 7 Service Pack 1 may be great in providing its specific function for the users, but it also can turn out to be a problem when the program get some running issues or you don’t want to keep it on your computer any more. In this case, removing Microsoft Windows 7 Service Pack 1 will be the common and also effective means to resolve the problem, and the real difficulty just come out when people try to uninstall Microsoft Windows 7 Service Pack 1 from their PCs.
What usually make people to remove Microsoft Windows 7 Service Pack 1
- Microsoft Windows 7 Service Pack 1 is not compatible with other installed applications
- Program gets a corrupted issue unexpectedly
- Microsoft Windows 7 Service Pack 1 is not as good as the user expected, and need to be erased from the computer
- Microsoft Windows 7 Service Pack 1 should be uninstalled first and reinstalled on the PC
- The application is regarded by the user and some websites as a suspect malware
Most common problems of removing the software
- Microsoft Windows 7 Service Pack 1 program is not available on the Windows uninstall panel
- Microsoft Windows 7 Service Pack 1 can’t be removed from the Windows and always receive a notification
- Nothing happen when click on the uninstall button on Windows
- Microsoft Windows 7 Service Pack 1 or the related process still keep running on the computer after removing it
- Some files and traces of the program still can be found
- Removing process running for a long time and does not come to the end
If must be a headache if encountering such a problem on the computer, and there are still many other problems people might come across when perform the program removal on their own computers. Therefore, you should know the right way about how to uninstall Microsoft Windows 7 Service Pack 1 from PC, or the way to fix/avoid the removing issue on the computer. Here are just several options that can support you to remove the application well.
How can uninstall Microsoft Windows 7 Service Pack 1 well on PC? Check these guides
Option 1: Use the product’s uninstall tool
There are many applications in nowadays provides an uninstall process on the program’s installation folder, or the publisher gets an uninstaller which is specifically used to remove its own products. To remove Microsoft Windows 7 Service Pack 1 in this way, please refer to the following uninstall instructions:
- 1. Right-click on Microsoft Windows 7 Service Pack 1 icon on the desktop, and select «Open file location»
- 2. Scroll down the list of files and find the uninstall process, usually named «uninst000», «Uninstall», or «Uninstaller»
- 3. Double click on the uninstall process to start the removal
- 4. Follow the uninstall wizard to finish the removal, and restart your computer
- 5. Open the directory of the installation folder again, and make sure everything has been cleared well
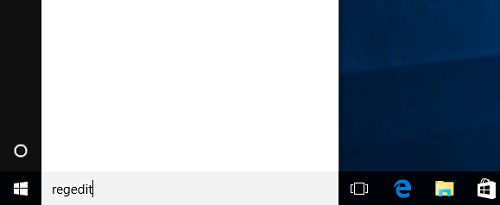
- 6. Click on the Windows button on the bottom-left-corner, and enter «regedit» on the search box
-

- 7. Click to open «regedit» or Registry Editor on the search result
-
- 8. Unfold the registry group inside, and find out those registry keys or entries which contains the program’s name
- 9. Back up these files, and then remove them from your computer system

Note: once problems occur after deleting the registry, please restore the back-up registry to Registry Editor.
When using the publisher’s uninstaller, you should download and install the uninstall application additionally, and choose to uninstall Microsoft Windows 7 Service Pack 1 from its interface. Similar to the above removal, you should restart your computer after finish the uninstall process, and clear its remnants again which are still staying on the PC.
Things you need to know about Registry Editor
Registry Editor is a place that stores many important registry keys and entries which closely related to the system operation and program’s performance on the computer, removing a wrong file inside usually cause serious problem for the system, so you should be very careful when you have to manually delete some registries inside.
Get Bloatware Uninstaller Now
Option 2:Remove it with Windows uninstall feature
Windows system provide an uninstall feature in Control Panel that support the user to remove unwanted program on the PC, to access this applet in different operating system, you can follow these instructions:
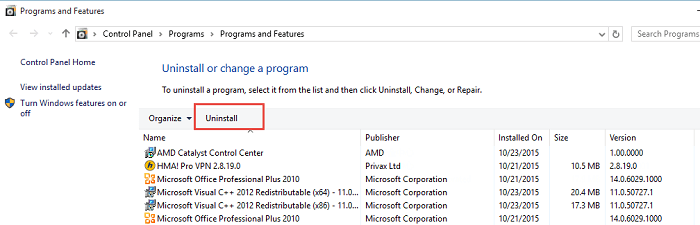
- 1. Open the uninstall panel on Windows system
- 2. Select Microsoft Windows 7 Service Pack 1 on the programs list, click on Remove/Uninstall button
-
- 3. Confirm the program removal, and complete the removing steps with guides
- 4. When finish, reboot the computer
- 5. The same to the removing steps in Option 1, you should clear the leftovers in the installation folder as well as Registry Editor
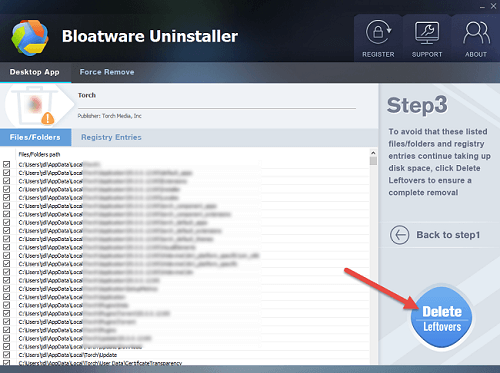
Option 3:Uninstall Microsoft Windows 7 Service Pack 1 with Bloatware Uninstaller
If you want to totally avoid the risky manual removal of registry, and handle Microsoft Windows 7 Service Pack 1 uninstall more easily and quickly, taking a professional uninstall tool will be a great help for you, because it can count all of the files (including registry keys and temporary files) and provide a complete and automatic removal, thus, many risky and annoying manual steps could be skipped can you can totally remove Microsoft Windows 7 Service Pack 1 on the PC more quickly.
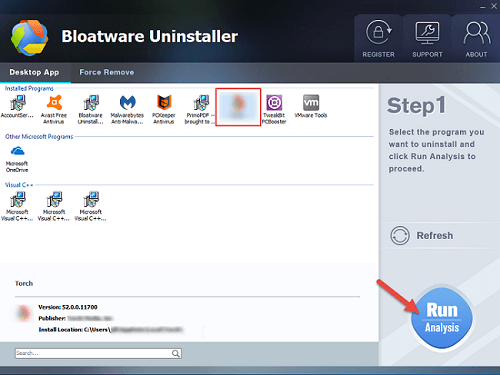
Bloatware Uninstaller is an advanced uninstall utility that can give a good example about how uninstall Microsoft Windows 7 Service Pack 1 well:
- 1. Install and launch the uninstaller on PC
- 2. Find and select Microsoft Windows 7 Service Pack 1 from the programs list, and click on Scan button
-
- 3. When all of files being detected, click on the uninstall or remove button
-
- 4. Follow the uninstall wizard to remove all of components from the computer
-
- 5. Exit the uninstaller when finish, and reboot the computer system

Get Bloatware Uninstaller Now
This is a very effective way to uninstall Microsoft Windows 7 Service Pack 1 and other applications, while the manual removal usually resulted in an unsuccessful removal, and the most important point is it is much easier for the common user to take and get rid of the program they want. So it is currently the best way we found and would like to recommend you to remove unneeded programs with a good app uninstaller.
If you installed Service Pack 1 (SP1) for Windows 7, you might experience some stability issues with it. If so, you can uninstall it, provided you haven’t deleted the SP1 backup files with the Disk Cleanup utility. Today we’ll take a look at the process and what to look out for.
1. So, you installed Windows 7 SP1 and you notice your system is unstable, certain programs or hardware isn’t working correctly. If that’s the case, you might want to uninstall it.
![sshot-2011-02-25-[00-00-32]](http://www.simplehelp.net/wp-content/uploads/sshot-2011-02-25-00-00-32_thumb.png)
Ensure You Have Service Pack Backup Files
2. To make sure you are able to uninstall SP1 you’ll need to make sure you don’t delete the SP1 Backup files. If you run the Disk Cleanup utility, make sure you don’t delete them.
Note: If you get a computer with Windows 7 SP1 pre-installed, you won’t be able to uninstall it.
If you installed SP1 through Windows Updates, first verify you have the SP1 Backup Files. Click Start then Computer.
![sshot-2011-02-25-[14-47-25]](http://www.simplehelp.net/wp-content/uploads/sshot-2011-02-25-14-47-25_thumb.png)
3. Right-Click on your local drive then click Properties from the context menu.
![sshot-2011-02-25-[14-54-18]](http://www.simplehelp.net/wp-content/uploads/sshot-2011-02-25-14-54-18_thumb.png)
4. Click on the General tab – which should be open by default – then click the Disk Cleanup button.
![sshot-2011-02-25-[14-54-50]](http://www.simplehelp.net/wp-content/uploads/sshot-2011-02-25-14-54-50_thumb.png)
5. Wait for Windows to scan your local drive.
6. Then go through the list until you find Service Pack Backup Files – where in this case it’s 650 MB.
![sshot-2011-02-25-[14-56-36]](http://www.simplehelp.net/wp-content/uploads/sshot-2011-02-25-14-56-36_thumb.png)
7. If you want to want the ability to remove Windows 7 SP1 Don’t Delete these files. Otherwise according to the Windows Website, you’ll have to do a fresh install of Windows 7 and start over.
![sshot-2011-02-25-[15-07-37]](http://www.simplehelp.net/wp-content/uploads/sshot-2011-02-25-15-07-37_thumb.png)
Uninstall Windows 7 SP1
8. Provided you still have the Service Pack Backup Files, the uninstall process is pretty basic through Programs and Features in Control Panel. Click on Start then Control Panel.
![sshot-2011-02-25-[15-10-56]](http://www.simplehelp.net/wp-content/uploads/sshot-2011-02-25-15-10-56_thumb.png)
9. When Control Panel opens click to View by Large Icons then click on Programs and Features.
![sshot-2011-02-25-[15-12-12]](http://www.simplehelp.net/wp-content/uploads/sshot-2011-02-25-15-12-12_thumb.png)
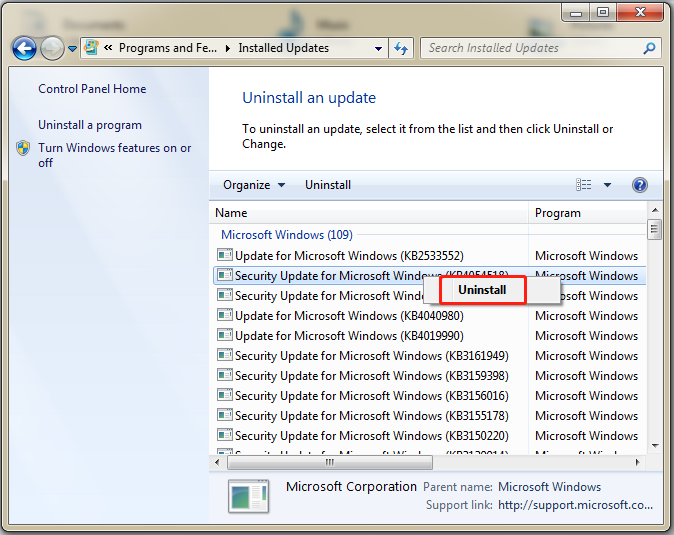
10. In the next screen click on View installed updates.
![sshot-2011-02-25-[15-13-40]](http://www.simplehelp.net/wp-content/uploads/sshot-2011-02-25-15-13-40_thumb.png)
11. Then scroll until you find Service Pack for Microsoft Windows (KB976932) – right-click on it and Uninstall.
![sshot-2011-02-25-[15-14-23]](http://www.simplehelp.net/wp-content/uploads/sshot-2011-02-25-15-14-23_thumb.png)
12. Click Yes in the dialog asking if you’re sure you want to uninstall it.
13. Then wait while Service Pack 1 is uninstalled…it really does take several minutes…about 7 minutes on our Dual-Core test system.
14. Then a restart is required to complete the uninstall process.
15. While your computer restarts you’ll see the a couple of messages following message it’s being uninstalled.
![sshot-2011-02-25-[15-25-25]](http://www.simplehelp.net/wp-content/uploads/sshot-2011-02-25-15-25-25_thumb.png)
16. When you get back from the Restart, right-click on Computer and you’ll see Service Pack 1 has been successfully uninstalled.
![sshot-2011-02-25-[15-31-56]](http://www.simplehelp.net/wp-content/uploads/sshot-2011-02-25-15-31-56_thumb.png)
If you’ve installed Service Pack 1 for Windows, make sure you test out the computer for a week or two and verify there are no stability issues. If not, then it’s probably safe to uninstall the backup files in Disk Cleanup. If you have a large enough drive, you can keep them there for a while, just to be safe in case you want to uninstall SP1 in the future.
If this article helped you, I’d be grateful if you could share it on your preferred social network — it helps me a lot. If you’re feeling particularly generous, you could buy me a coffee and I’d be super grateful 
There have not been many complaints yet from users who have installed the service pack update on their Windows PCs. Still, there are always some cases where users want to uninstall the update again, likely because it is causing instabilities or other problems on the system that were not experienced before.
Those users need to uninstall the Windows 7 Service Pack 1 to restore the old state of the system prior to the update.
The Control Panel provides access to the easiest service pack uninstallation option.
Users need to click on the Start orb on the taskbar and select Control Panel from the options. The uninstallation applet is available under Programs > Uninstall a program, or if all apples are displayed at once under Programs and Features.
Locate the View installed updates link in the left sidebar and click it to open the list of updates that have been installed on the computer system.

Windows displays a list of all updates that have been installed on the system. The service pack is basically nothing more than a larger update. Locate the Service Pack for Microsoft Windows (KB976932) entry under Microsoft Windows. This is the Windows 7 Service Pack 1. To uninstall it select it with a left-click and click the Uninstall link to uninstall it. you need to confirm your selection and restart the computer after the uninstallation process has finished.
The uninstallation removes the service pack from the operating system.
Some users may not be able to uninstall the program via the Control Panel applet. This is for instance the case if the service pack installation corrupted the system.
It is then possible to use the command prompt to try and uninstall the service pack. An elevated command prompt is required. To get there, users need to click on the start orb, then All Programs > Accessories, and right-click on the Command Prompt entry there and select Run as administrator.
They then need to use the following command to uninstall the service pack again:
wusa.exe /uninstall /kb:976932
A confirmation is again required before the service pack is uninstalled by Windows.
System restore, or previously created backups, are another alternative if they have been created before the service pack was installed on the Windows 7 system. (via)
Advertisement