
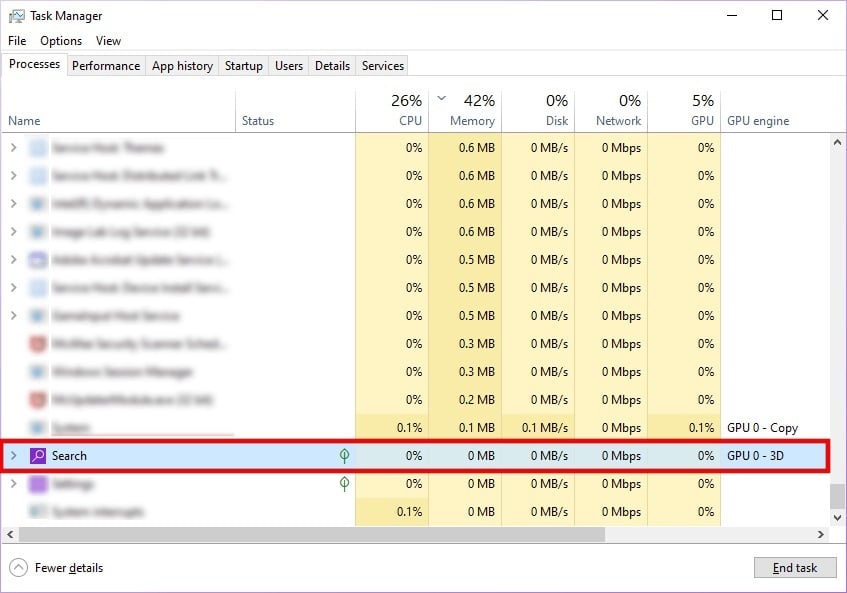
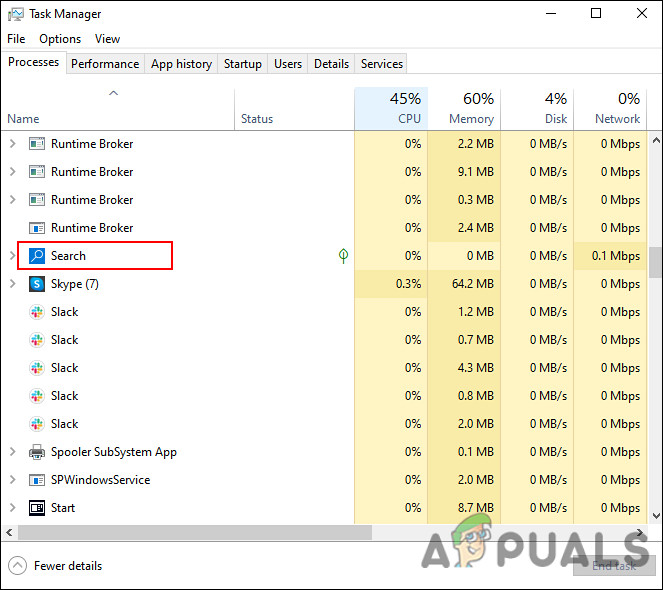
Открыв Диспетчер задач, иногда можно наткнуться на процесс SearchApp.exe. Присутствует он как на Windows 10, так и Windows 11. Как правило, данный процесс потребляет минимум системных ресурсов, причем не постоянно, а лишь в редкие моменты — и то кратковременно. Тем не менее в сети можно найти жалобы пользователей, согласно которым процесс SearchApp создает умеренную или даже чрезмерную нагрузку на ОС.
Что такое процесс SearchApp.exe, почему он нагружает ПК, можно ли его отключить/удалить и другое — в сегодняшней статье.
SearchApp.exe — вирус или системный процесс?
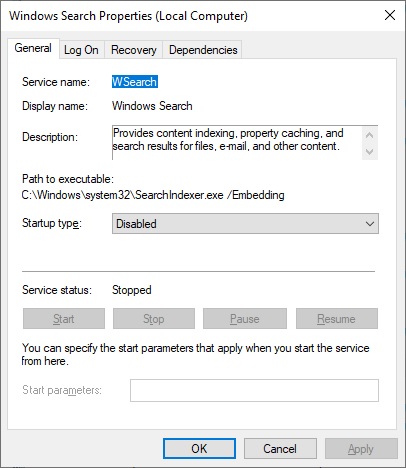
SearchApp.exe — это системный процесс Windows, который ответственен за функционирование поисковика. Последний можно найти в Проводнике, панели задач Пуск и других участках ОС. Многие пользователи, завидев такой процесс в Диспетчере задач, сразу же задаются вопросом: а не вирус ли это? Как правило, нет, однако, если есть подозрения, его можно проверить на подлинность следующим образом:
- кликните ПКМ на процесс SearchApp.exe в Диспетчере задач и выберите «Открыть расположение файла»;
- исполняющий файл оригинального будет располагаться по следующему пути:
%windir%\SystemApps\Microsoft.Windows.Search_cw5n1h2txyewy
- нажмите ПКМ по самому файлу и выберите «Свойства»;
- перейдите во вкладку «Цифровые подписи» и изучите список подписей.
В подписях значится Microsoft Windows? Все в порядке, вы имеете дело с подлинной системной службой. Все равно переживаете о безопасности своего компьютера и данных на нем? Что же, тогда ничего не мешает вам провести сканирование системы любым доступным антивирусом.
Почему SearchApp.exe нагружает ПК и как это исправить?
SearchApp.exe в принципе не должен создавать какой бы то ни было нагрузки на ПК. Более того, большую часть времени процесс неактивен — он начинает работу только тогда, когда выполняются те или иные поисковые запросы в системе. Но ни с того ни с сего поисковик начинает нагружать компьютер — как с этим бороться?
На самом деле, решений тут не так-то и много:
- завершить работу процесса SearchApp.exe в Диспетчере задач;
- отключить функцию быстрого запуска (Fast Boot) в настройках электропитания;
- просканировать и восстановить потенциально поврежденные системные файлы.
Первый пункт — тут все понятно. Давайте быстро пробежимся по двум остальным.
Как отключить функцию Fast Boot
- Нажмите WIN+R для вызова диалогового окошка «Выполнить»;
- пропишите в пустой строке control и нажмите ENTER;
- переключите режим просмотра на «Крупные значки» (или мелкие);
- перейдите в разделы «Электропитание»→«Действия кнопок электропитания»;
- кликните на пункт «Изменение параметров, которые сейчас недоступны»;
- уберите галочку с опции «Включить быстрый запуск (рекомендуется)»;
- сохраните внесенные в настройки изменения и закройте открытые окошки;
- перезагрузите ПК.
Проверка целостности системных файлов
- Нажмите WIN+R для вызова диалогового окошка «Выполнить»;
- пропишите в пустой строке cmd и нажмите CTRL+SHIFT+ENTER;
- пропишите в консоли команду sfc /scannow и нажмите ENTER;
- подождите завершения сканирования и восстановления поврежденных файлов (если такие найдутся);
- закройте Командную строку и перезагрузите ПК.
Как отключить/удалить SearchApp.exe
Можно ли отключить SearchApp? Конечно можно. Правда, не совсем понятно, зачем вам это делать. Поисковик Windows — это чрезвычайно полезный инструмент, который многократно упрощает и, что не менее важно, ускоряет пользование системой. Зачем лесть через бесконечные окошки GUI, если можно просто нажать WIN+S и найти нужный для себя раздел настроек или, например, ряд важных файлов в Проводнике?
- Нажмите WIN+R для вызова диалогового окошка «Выполнить»;
- пропишите в пустой строке cmd и нажмите CTRL+SHIFT+ENTER;
- выполните в консоли следующий ряд команд:
takeown /f %windir%\SystemApps\Microsoft.Windows.Search_cw5n1h2txyewy /r /d y
icacls %windir%\SystemApps\Microsoft.Windows.Search_cw5n1h2txyewy /grant Администраторы:F /t
ren %windir%\SystemApps\Microsoft.Windows.Search_cw5n1h2txyewy\searchapp.exe seachapp.old.exe
- после выполнения команд закройте консоль и прервите выполнение SearchApp в Диспетчере задач;
- перейдите в расположение SearchApp.exe (↑) и удалите его привычным образом.
Теперь вы знаете, что такое процесс SearchApp.exe и стоит ли о нем переживать. Более того, мы даже разобрали то, как отключить/удалить этот процесс в Windows 10 и Windows 11. Последнее делать мы, конечно же, не рекомендуем, но выбор за вами. Если у вас возникли какие-то дополнительные вопросы по теме, пожалуйста, оставляйте их в комментариях ниже.
В операционной системе Windows присутствует множество процессов, которые отвечают за её корректную работу. Некоторые из них вызывают вопросы у пользователей, особенно когда они замечают их в диспетчере задач. Один из таких процессов — загадочный элемент, который часто становится причиной обсуждения. В этой статье мы рассмотрим важность и особенности этого процесса в Windows.
Многие пользуются операционной системой Windows в повседневной жизни, но не каждый задумывается о том, что скрывается за многочисленными процессами, работающими в фоновом режиме. Понимание назначения этих процессов помогает лучше контролировать производительность системы и принимать обоснованные решения по их управлению. Оказывается, один из этих элементов может оказаться дублирующим или вовсе ненужным для конкретного использования.
Самое время разобраться, стоит ли отключать определённый процесс и какова его реальная функция в Windows. Основные причины беспокойства пользователей, как правило, связаны с потреблением системных ресурсов, возможными конфликтах с другими программами и даже потенциальными угрозами безопасности. Осознание этих аспектов позволит принять взвешенные решения и оптимизировать работу вашего компьютера.
Программы и службы Windows
Существует множество причин для исследования активных программ и служб в Windows. Одной из них является оптимизация производительности системы. Отключение ненужных процессов может высвободить ресурсы, такие как оперативная память и CPU, тем самым ускоряя работу устройства. К тому же, знание о работе различных программ может помочь в выявлении и устранении проблем, связанных с их функционированием.
Чтобы лучше понять, какие процессы действуют на вашем компьютере, стоит обратиться к Диспетчеру задач, который предоставляет детализированную информацию о каждом активном компоненте. Здесь можно увидеть, сколько ресурсов потребляет конкретная служба или приложение, и решить, нужно ли его отключать для повышения производительности.
| Программа или служба | Функция | Причина отключения |
|---|---|---|
| Superfetch | Ускоряет запуск часто используемых приложений | Потребляет много памяти на старых устройствах |
| Windows Search | Обеспечивает индексирование файлов для быстрого поиска | Может замедлить системы со слабым производительным процессором |
| Telemetry | Отправляет данные о возмущениях системы Microsoft | Заботится о конфиденциальности и снижении нагрузки на сеть |
Используя данные таблицы, можно легко определить те процессы, от которых имеет смысл избавиться. Важно помнить, что некорректное отключение системных служб может привести к неправильной работе операционной системы. Поэтому рекомендуется проводить такие действия с осторожностью и предварительно делать резервные копии важных данных.
Таким образом, управление службами и программами в Windows требует внимательного подхода и знания о функционале каждого элемента. Осознанное отключение ненужных процессов поможет сохранить высокую производительность и надежность вашей системы.
Функции и задачи процесса searchapp exe
| Функция | Описание |
|---|---|
| Поиск файлов и папок | Обеспечивает эффективный поиск файлов и папок на устройствах пользователя, что значительно облегчает организацию данных. |
| Поиск приложений | Позволяет находить и запускать установленные программы и утилиты на компьютере, упрощая доступ к необходимому софту. |
| Интеграция с Cortana | Служит основой для работы голосового помощника, что даёт возможность использовать голосовые команды для выполнения поисковых операций. |
| Поиск в интернете | Предоставляет возможность осуществлять интернет-поиск прямо из окна операционной системы, без необходимости открывать браузер. |
Важно понимать, что отключение данного процесса может привести к утрате части функциональности Windows. Причина отключения searchapp exe может быть связана с снижением производительности компьютера или желанием улучшить конфиденциальность. Однако такой шаг следует предпринимать осторожно и только в том случае, если пользователь уверен в последствиях своих действий.
Проблемы и их решения
Ошибка данного программного компонента нередко вызывает затруднения у пользователей операционной системы Windows, которые могут проявляться различными способами и иметь различные причины. Важно понять, что именно вызывает сбой, чтобы устранить его и восстановить корректную работу компьютера.
Замедление системы: Один из распространенных симптомов – замедление работы системы. Подобная проблема возникает из-за высокого потребления ресурсов. Для решения этой проблемы можно попробовать перезапустить данный процесс или вовсе отключить его через диспетчер задач. Если проблема сохраняется, стоит проверить систему на наличие вирусов и другого вредоносного ПО.
Ошибки в работе поиска: Изредка пользователи могут заметить, что поиск в системе работает некорректно или вовсе не отвечает на запросы. Причиной этому может служить сбой внутренней процедуры. Лучший способ решения – перезагрузить систему. Также можно воспользоваться командной строкой для проверки и восстановления целостности системных файлов при помощи команды sfc /scannow.
Некоторые пользователи могут предпочесть отключать компонент на постоянной основе, чтобы вовсе избежать возможных сбоев. Это можно сделать, открыв Параметры системы, Контрольные панели или используя специальные утилиты для управления автозагрузкой. Однако, следует понимать, что подобное отключение может привести к ограничению функционала системы.
Проблемы совместимости: В редких случаях определенные обновления системы могут вступать в конфликт со стабильностью работы компонентов. Если после установки апдейтов проявляются сбои, рекомендуется провести откат системы к предыдущей точке восстановления и дождаться выхода исправлений от разработчиков. Периодически проверяйте наличие обновлений, чтобы не пропустить важные патчи.
Раз различные методы не помогли устранить неполадку, последний вариант – переустановка операционной системы. Этот метод кардинален, но нередко он позволяет избавиться от любых возникших ошибок и вернуть системе прежнюю стабильность и скорость работы.
Безопасность и конфиденциальность
Один из ключевых вопросов, который нужно рассматривать при обеспечении безопасности, — необходимость отключения определенных компонентов поиска. В случае, если процесс не имеет критической важности для вашей работы, его деактивация может стать простым, но эффективным шагом для уменьшения риска утечки данных. Важно понимать, что отключение ненужных функций сокращает количество потенциальных точек атак.
В операционных системах Windows процесс поиска может взаимодействовать с множеством других служб и программ. Это увеличивает вероятность, что ваши личные данные могут попасть в нежелательные руки. Пользователю важно знать, какие конкретно процессы выполняются в его системе и как они влияют на конфиденциальность. Рекомендуется регулярно проводить аудиты системы и изучать активности, связанные с поисковыми функциями.
Еще один аспект защиты — это настройки, касающиеся управления данными и их индексирования. Ограничивая доступ некоторых приложений к личным файлам и информации, пользователь может минимизировать риски несанкционированного доступа. В Windows предусмотрены различные средства для регулирования привилегий и прав доступа, что позволяет гибко управлять безопасностью.
Наконец, обновления системы играют важную роль в защите конфиденциальности. Регулярное обновление компонентов Windows и антивирусного программного обеспечения помогает закрывать уязвимости, которые могут быть использованы злоумышленниками. Таким образом, пользователь минимизирует риски, связанные с уязвимостями в процессах поиска и других функциях операционной системы.
Итак, безопасность и конфиденциальность при использовании функций поиска в Windows зависят от множества факторов. Отключение ненужных процессов, регулярный аудит системы, настройка прав доступа и своевременные обновления являются ключевыми шагами для защиты ваших данных. Будьте внимательны и осведомлены, чтобы максимально обезопасить свои устройства.
Настройка и оптимизация
Причины оптимизации могут быть различными: от улучшения скорости работы до снижения потребления ресурсов. Найдите подход к настройкам, который максимально улучшит производительность вашей системы.
Шаги для настройки и оптимизации:
-
Анализ текущих процессов:
Первый шаг в оптимизации – разобраться, какие процессы активно работают. Откройте диспетчер задач (Ctrl + Shift + Esc) и просмотрите список запущенных процессов. Это поможет понять, какие процессы потребляют наибольшее количество ресурсов.
-
Настройка автозагрузки:
Определите, какие программы и процессы запускаются при старте системы. Для этого перейдите в диспетчер задач, вкладка «Автозагрузка», и отключите ненужные элементы. Это позволит ускорить запуск Windows и уменьшить число запущенных процессов.
-
Отключение ненужных служб:
Некоторые службы, работающие в фоновом режиме, могут замедлять систему. Перейдите в панель управления, выберите «Администрирование», затем «Службы». Просмотрите список: отключите те службы, которыми не пользуетесь, однако будьте осторожны, чтобы случайно не отключить важные компоненты Windows.
-
Регулярное обновление системы:
Убедитесь, что ваша операционная система обновлена до последней версии. Многие обновления содержат исправления и улучшения, которые могут повысить стабильность работы и производительность.
-
Использование утилит для оптимизации:
Существуют специальные программы для оптимизации и очистки системы, такие как CCleaner, Advanced SystemCare и другие. Эти утилиты помогут удалять временные файлы, корректировать реестр и отключать ненужные процессы, что может существенно повысить производительность ПК.
Следование этим рекомендациям позволит оптимизировать работу Windows и уменьшить нагрузку на систему. Повышение производительности возможно благодаря тщательной настройке и регулярному обслуживанию компьютера.
Альтернативные поисковые утилиты
В мире операционной системы Windows существует множество решений для оптимизации поиска информации на компьютере. Различные утилиты могут повысить производительность, улучшить точность и разнообразить возможности поиска данных. Пользователи часто интересуются, какие программы могут заменить стандартные инструменты и как их эффективно использовать.
Одной из популярных альтернатив является Everything. Это легкая и быстрая программа, способная мгновенно индексировать и отображать результаты поиска. Интерфейс приложения интуитивно понятен, а поиск осуществляется по имени файлов и папок в реальном времени. Пользователи высоко ценят ее за оперативную работу и минимальную нагрузку на систему.
Другой мощный инструмент – Listary. Эта утилита интегрируется с большинством популярных приложений Windows и позволяет быстро находить и файлы, и папки. Она поддерживает контекстное меню и горячие клавиши, которые значительно увеличивают удобство работы. Listary активно используется как разработчиками, так и обычными пользователями, желающими оптимизировать процесс поиска информации.
Отличается своими функциями и UltraSearch. Используя особенности файловой системы NTFS, программа оперативно находит файлы без необходимости предварительного индексирования. UltraSearch позволяет выполнять сложные поисковые запросы и сохраняет детали поиска для последующего использования, что делает ее незаменимой для пользователей, работающих с большим количеством данных.
Если необходимо что-то более гибкое, стоит обратить внимание на Agent Ransack. Эта утилита способна производить глубокий анализ содержимого файлов. Возможности поиска по текстовому содержимому и регулярным выражениям делают ее мощным инструментом для профессиональной работы с информацией. Agent Ransack поддерживает различные форматы файлов и обеспечивает быстрые результаты даже для сложных запросов.
Поисковые утилиты значительно облегчают жизнь пользователей, обеспечивая быструю и эффективную работу с файлами и данными. Важно выбирать такие инструменты, которые соответствуют вашим потребностям и специфике работы. Для тех, кто ищет максимальную производительность и удобство, альтернативные утилиты могут стать незаменимыми помощниками в ежедневной работе с Windows. Если же стандартная утилита потребляет слишком много ресурсов, всегда есть возможность найти и использовать подходящее решение, не отключая системные процессы вручную.
Updated May 2025: Stop error messages and fix your computer problem with this tool. Get it now at this link
- Download and install the software.
- It will scan your computer for problems.
- The tool will then fix the issues that were found.
SearchApp.exe is an application which runs under Windows 10, 8 & 7. This program is related to Microsoft Search Engine. If you want to disable this program, you must go into Registry Editor and delete the registry key named HKEY_Local_Machine\Software\Microsoft\Windows\currentversion\searchapps\exe.
If you don’t know how to do this, we’ve got some tips for you. Read our mini guide about “How To Delete Key In Registry”.
What Exactly Is SearchApp.exe?
SearchApp.exe is a Windows application that runs whenever you start up your computer. You don’t really notice it unless you’re looking for it, because it’s usually running in the background. But it does some pretty important stuff behind the scenes.
This video explains what SearchApp.exe is and how it works.
Is SearchApp.exe Safe?
SearchApp.exe is one of those programs you don’t want to run. If you do, you might end up downloading malware onto your computer. This program is used to download malicious software such as adware, spyware, and potentially dangerous viruses. You shouldn’t allow SearchApp.exe access to your system because it could cause harm.
If you’re worried about what SearchApp.exe does, there are ways to stop it without having to uninstall it completely. Here’s how to prevent SearchApp.exe from running again.
Step 2: Click Uninstall a Program under Windows Components.
Step 3: Locate SearchApp.exe and select it.
Step 4: Select Change/Remove and then Remove.
You’ll now see a confirmation window asking whether you really want to delete SearchApp.exe. Click Yes to continue.
Can You Disable SearchApp.exe?
SearchApp.exe is one of the most annoying applications you might encounter while browsing the web. It consumes lots of system resources and causes problems. If you want to stop it from running automatically every time Windows starts up, you need to follow the instructions below.
How to Stop SearchApp.exe From Running Automatically
1. Open the Task Manager and go to Processes tab.
2. Right-click on the process named “SearchApp.exe” and select End task.
3. Close the Task Manager window.
4. Restart your computer.
Updated: May 2025
We highly recommend that you use this tool for your error. Furthermore, this tool detects and removes common computer errors, protects you from loss of files, malware, and hardware failures, and optimizes your device for maximum performance. This software will help you fix your PC problems and prevent others from happening again:
- Step 1 : Install PC Repair & Optimizer Tool (Windows 11, 10, 8, 7, XP, Vista).
- Step 2 : Click Start Scan to find out what issues are causing PC problems.
- Step 3 : Click on Repair All to correct all issues.
How to Disable SearchApp.exe?
Delete the SearchApp.exe file located in %systemroot%\System32\SearchApp.exe will delete all files associated to it, including the settings, and you won’t be able to reenable it. If you want to keep the settings, use the following method.
1. Open Command Prompt.
2. Type “cd \”. This changes directory to the root of the system.
3. Type “del /f SearchApp.exe”, replacing the quotation marks with double quotes. This deletes the entire SearchApp.exe folder.
4. Press Enter.
5. Restart the computer.
6. 7. Click OK.
8. Reinstall the app.
Way 1: Use Task Manager
To check whether there is any trouble with the SearchApp.exeproblem, you should open Task manager and find out the running process of the program. Then, select it and click end task to stop the running process. You can see the following picture:
After terminating the running process of Searchapp.exe on Windows 10,you will disable the program successfully.
#2: Uninstall SearchApp.exe
You can uninstall SearchApp.exe manually. Please follow the steps below to uninstall SearchApp.exe completely.
- If you want to delete the SearchApp.exe files permanently, please use Disk Cleanup tool to clean up unnecessary files.
Way 2: Use Command Prompt
To remove the process, you need to use the Task Manager. This tool allows you to kill processes that are running in the background. Once opened, go to Processes tab and select the process you want to stop. Right-click on it and choose End Process. If you don’t see the process listed, you might need to restart your computer.
Once you’ve killed the process, you’ll need to delete the file. Go to the Recycle Bin folder and look for the file named “notepad.exe”. Select it and press Delete key.
If you’re using Windows 8 or earlier, you won’t have access to the Recycle Bin. In that case, you’ll need to open the Control Panel and navigate to System & Security section. Click on Disk Cleanup option and clean up some space.
There are two versions of Windows – Home and Professional. They both come with the same apps, but the difference lies in the features included in each one. For instance, the professional version of Windows includes Microsoft Office applications such as Word, Excel, PowerPoint and others, whereas the home version doesn’t.
RECOMMENATION: Click here for help with Windows errors.
Frequently Asked Questions
How do I delete SearchApp.exe?
If you are having issues with SearchApp.exe, there are several ways to resolve this issue. You can try one of the following solutions:
1. Disable SearchApp.exe
2. Uninstall SearchApp.exe
3. Delete SearchApp.exe
4. Reinstall Windows 10
5. Reset your PC
6. Restart your computer
Remove SearchApp.exe Virus
SearchApp.exe is an advertising program that gets installed on your PC without your permission. This malicious software displays ads while you are browsing the web. You don’t need to worry about it because this adware doesn’t affect your privacy or security. However, some people use this adware to generate revenue. If you want to stop this annoying adware from displaying ads, we recommend downloading and installing SpyHunter.
This malware is very dangerous since it could potentially harm your system. Therefore, manual removal is highly recommended. We provide detailed instructions on how to manually delete SearchApp.exe from your computer.
Step 1: Download SpyHunter Anti-Malware Tool
Download SpyHunter anti-malware tool from here. After downloading, install it on your computer.
Step 2: Run SpyHunter Malware Scanner
Once installed, run the SpyHunter application and follow the prompts. When done scanning, you can see the list of detected threats. To remove SearchApp.exe, simply press “Next”.
Step 3: Delete SearchApp.exe Files
There are several Windows processes that work in the background of our operating system, helping the processes run smoothly so that we can perform our tasks. One such process is the searchapp.exe process, which is related to the Windows search feature and Cortana.
So what exactly is this process and is it safe to run on your Windows operating system? Let’s find out!
SearchApp.exe, as its name suggests, is an executable associated with Windows search functions. SearchApp.exe was used to search inside Cortana and Windows 10 in previous builds of Windows 10. But later, (with Windows 10 version 2004), Microsoft merged this executable file with Windows search functions.
When you click the search bar located in the bottom-left corner of the taskbar, this low-resource process ensures that the search menu appears instantly. Essentially, SearchApp.exe is responsible for making sure that the search bar on your taskbar works properly and provides you with accurate search results for all your queries.
It is an executable file that runs in the background, so normally, it uses minimal system resources. There are, however, some problems associated with this executable file:
- Application error with SearchApp.exe process.
- The file consumes too much CPU and RAM resources.
- ‘SearchApp.exe’ disabled or failed to start.
- ‘SearchApp.exe’ (application) is not running or responding.
Is SearchApp.exe Safe to Run?
Typically, since it is a legitimate Windows process, it is safe to run. However, there are times when malicious programs might disguise themselves as searchapp.exe to spread viruses in your operating system.
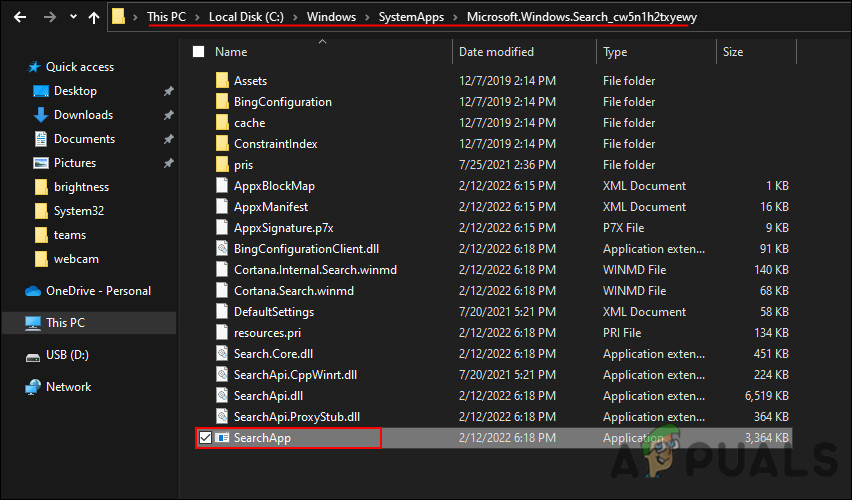
To determine if this file is safe to run on your operating system, you should check its location. the SearchApp.exe file should fall under the directory:
C:\Windows\SystemApps\Microsoft.Windows.Search_cw5n1h2txyewy
The path may look something like:
C:\Program Files\Nikon Corporation\Nikon Capture\SearchApp.exe
Here is how you can check the location of this file:
- Launch File Explorer and click on This PC.
- Now type the following address in the address bar and hit Enter. You can also navigate to this location manually.
C:\Windows\SystemApps\Microsoft.Windows.Search_cw5n1h2txyewy
- In the newly launched window, locate the ‘SearchApp.exe/SearchApp’ file.

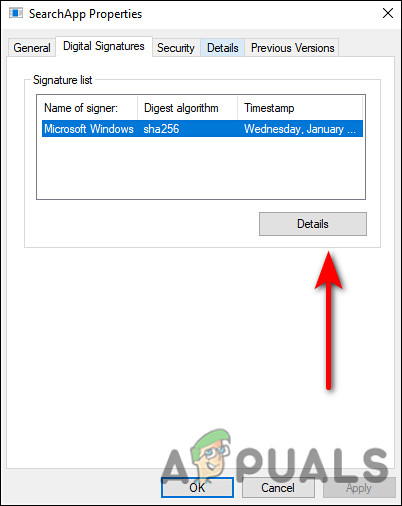
Right-click the SearchApp file in the File Explorer - Right-click on this file and select Properties from the context menu.
- In the Properties window, head over to the Digital Signatures tab.
- Click on the Details button.

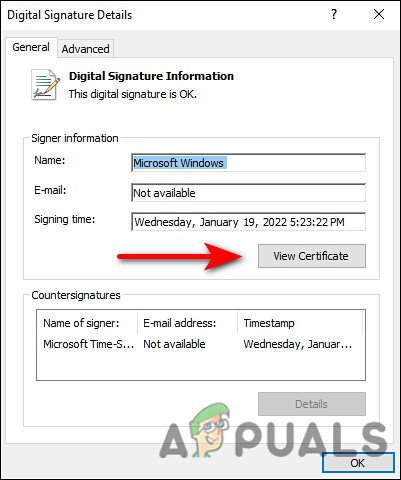
Click the Details button - Next, go to the General tab and click on the View Certificate button.

View the certificate of the process - The next window will open with Microsoft’s certification information about this executable file.
How to Disable SearchApp.exe on Windows
If due to any reason you want to disable the process on Windows, there are several ways to do so. Below, we have listed the two most popular ways to disable this utility, and you can proceed with the one that suits you the best.
Using Task Manager
The task manager displays information about the processes and applications running on a computer, as well as the overall status of your system. In this method, we will end the process of searchapp.exe via the Task Manager utility.
Here is what you need to do:
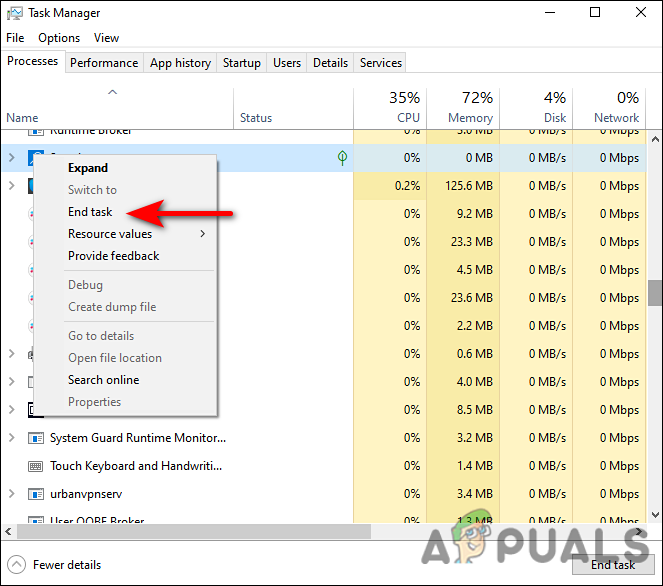
- Type Task Manager in the search area of the taskbar and hit Enter.
- Inside the Task Manager window, navigate to the Processes tab and locate searchapp.exe/Search.
- Right-click on it and select End task from the context menu.

End the processes task - If a confirmation prompt appears on your screen, click on the End process button to proceed.
Using Command Prompt
Command Prompt is a utility that can be accessed from any Windows PC and allows you to use text commands to manage the computer. With it, you can automate tasks, troubleshoot problems, and perform all kinds of other tasks.
Here is how you can use Command Prompt to disable the process on Windows:
- Type cmd in the search area of the taskbar and click on Run as administrator to launch elevated Command Prompt.
- In the Command Prompt window, type the command mentioned below and hit Enter to execute it. This will launch System Apps on your system.
cd %windir%\SystemApps
- Next, execute the following command to delete the process.
taskkill /f /im SearchApp.exe
- Once done, execute this last command.
move Microsoft.Windows.Search_cw5n1h2txyewy Microsoft.Windows.Search_cw5n1h2txyewy.old
That’s it. Doing so will successfully remove the targeted utility from your system.
Zainab Falak
Zainab Falak is a highly educated professional with a background in actuarial science and a strong passion for technology. Her expertise lies in the field of data analytics and she is a proficient programmer in languages such as Python and R. At Appuals, Zainab shares her extensive knowledge of Windows 8, 10, and 11, covering a broad range of topics related to these operating systems. Zainab’s ability to effectively communicate technical concepts in a clear and concise manner has earned her recognition and respect in the tech community. She is committed to staying up-to-date with the latest developments in the field and providing readers with insightful and informative content.
SearchApp.exe is a potentially unwanted application that may cause various issues on a Windows 10 system. From displaying intrusive advertisements to consuming excessive resources, this program can disrupt the user experience and impact the overall performance of the computer. In this article, we will guide you through the step-by-step process of removing SearchApp.exe from your Windows 10 device, ensuring a smoother and more secure computing experience.
Identifying And Understanding The SearchApp.exe Malware
SearchApp.exe is a malicious file that often disguises itself as a legitimate application in order to infiltrate and infect Windows 10 systems. Understanding the nature of this malware is crucial to effectively removing it from your computer.
SearchApp.exe is typically categorized as adware or potentially unwanted program (PUP), as it is primarily designed to generate intrusive advertisements and collect user data without permission. It may be installed alongside free software downloads or obtained through malicious websites.
To identify if your system is infected with SearchApp.exe, look out for certain signs such as an increased number of pop-up ads, browser redirects, sluggish computer performance, altered browser settings, or unfamiliar programs running in the background.
Once you have identified the presence of SearchApp.exe on your Windows 10 system, it is important to take immediate action to remove it. Failure to do so may result in further security risks and potential damage to your personal information.
Symptoms Of SearchApp.exe Infection On Windows 10
SearchApp.exe is a malicious file commonly associated with adware or potentially unwanted programs (PUPs) that can infect Windows 10 systems. It is crucial to be aware of the symptoms of SearchApp.exe infection to quickly take action and remove it from your computer.
One common symptom of SearchApp.exe infection is the presence of excessive and intrusive advertisements. These ads may appear on your desktop, in web browsers, or even within other applications. You may also notice that your web browser’s homepage or default search engine has been changed without your permission.
Another sign of SearchApp.exe infection is a noticeable decrease in your computer’s performance. Your system may slow down, freeze, or crash frequently. Additionally, the malware might redirect your search queries to suspicious websites or generate fake search results.
Furthermore, SearchApp.exe may modify your browser settings, such as adding unnecessary toolbars or extensions. This can lead to a compromised browsing experience and potential privacy concerns.
If you experience any of these symptoms, it is crucial to take immediate action to remove SearchApp.exe from your Windows 10 system.
Manual Removal Methods For SearchApp.exe
Manual removal methods for SearchApp.exe can be effective in completely eliminating the malware from your Windows 10 system. However, it is important to proceed with caution and follow the steps carefully to avoid any unintended consequences.
To manually remove the SearchApp.exe malware, you can start by accessing the Control Panel and navigating to the ‘Programs and Features’ section. Look for any suspicious programs or applications that you do not recognize and uninstall them. Additionally, you can check the ‘Startup’ tab in the Task Manager to disable any suspicious entries that may be associated with the malware.
Furthermore, it is recommended to conduct a thorough scan of your system using a reliable antivirus software to ensure that no traces of SearchApp.exe are left behind. You can also use an anti-malware tool specifically designed to detect and remove this particular malware.
Remember to keep your Windows 10 operating system and all installed applications up to date, as outdated software can leave vulnerabilities for malware like SearchApp.exe to exploit. Implementing strong security measures and regularly backing up your data can also help prevent future infections and protect your system from malicious threats.
Using Antivirus Software To Remove SearchApp.exe
Antivirus software is a powerful tool when it comes to removing malware like SearchApp.exe from your Windows 10 system. These programs are designed to scan your computer for any malicious files or programs and eliminate them effectively. Here are some steps to follow when using antivirus software to remove SearchApp.exe:
1. Update your antivirus software: Ensure that your antivirus program is up to date with the latest virus definitions. This allows it to identify and remove the most recent malware threats, including SearchApp.exe.
2. Perform a full system scan: Run a comprehensive scan of your entire computer. The software will examine all files, programs, and system areas for any signs of SearchApp.exe.
3. Follow software prompts: If the antivirus software detects SearchApp.exe or any related components, it will prompt you to take appropriate action. This may involve quarantining or deleting the infected files, depending on the severity of the infection.
4. Restart your computer: Once the antivirus software has successfully removed SearchApp.exe, it is recommended to restart your computer. This allows any remaining traces of the malware to be completely eliminated.
By using antivirus software, you can effectively remove SearchApp.exe from your Windows 10 system, ensuring the security and smooth operation of your computer.
Removing SearchApp.exe Through The Windows Task Manager
One effective method to remove SearchApp.exe from Windows 10 is by utilizing the Windows Task Manager. This powerful tool allows users to monitor and control the processes and applications running on their computer. To remove SearchApp.exe using the Windows Task Manager, follow these steps:
1. Open the Windows Task Manager by pressing “Ctrl+Shift+Esc” on your keyboard or by right-clicking on the taskbar and selecting “Task Manager” from the menu.
2. Once the Task Manager window appears, click on the “Processes” or “Details” tab, depending on your Windows version.
3. Look for any suspicious or unfamiliar processes that could be related to SearchApp.exe. Pay attention to processes with similar names or excessive resource usage.
4. Right-click on the suspicious process and select “End Task” or “End Process” to terminate it.
5. After terminating the process, search for any associated files or folders on your computer and delete them. These files are typically located in the “Program Files” or “AppData” directories.
6. Finally, empty your Recycle Bin to ensure that the SearchApp.exe files are completely removed from your system.
By following these steps, you can effectively remove SearchApp.exe from your Windows 10 computer using the Windows Task Manager. Remember to exercise caution when terminating processes and deleting files to avoid any unintended consequences.
Cleaning The Windows Registry To Eliminate SearchApp.exe
The Windows registry is a crucial component of the operating system that stores important settings and configurations. Unfortunately, malware like SearchApp.exe can modify the registry entries, causing further harm to your computer. To completely eliminate SearchApp.exe from your Windows 10 system, it’s necessary to clean the Windows registry.
Before making any changes to the registry, it’s highly recommended to backup your registry or create a system restore point to avoid any potential issues. To clean the registry, follow these steps:
1. Press the Windows key + R on your keyboard to open the Run dialog box.
2. Type “regedit” and press Enter to open the Registry Editor.
3. Once the Registry Editor is open, navigate to the following key: HKEY_CURRENT_USERSoftwareMicrosoftWindowsCurrentVersionRun
4. Look for any suspicious or unfamiliar entries related to SearchApp.exe and delete them. Be cautious not to delete any important system files or entries.
5. Next, navigate to the following key: HKEY_LOCAL_MACHINESOFTWAREMicrosoftWindowsCurrentVersionRun
6. Again, search for any suspicious entries associated with SearchApp.exe and remove them.
7. Exit the Registry Editor and restart your computer to apply the changes.
Cleaning the Windows registry can help eliminate any leftover traces of SearchApp.exe and ensure your system is free from its harmful effects. However, exercise caution while making any changes to the registry, as incorrect modifications can cause serious system issues.
Preventing Future Infections By Strengthening Windows 10 Security
By taking proactive measures to strengthen the security of your Windows 10 system, you can greatly reduce the risk of future infections by malware like SearchApp.exe. Here are some steps you can take:
1. Keep Windows up to date: Regularly install the latest security updates and patches provided by Microsoft. These updates often include important security fixes that can protect your system from known vulnerabilities.
2. Install a reliable antivirus software: Choose a reputable antivirus program and keep it updated. This will help detect and remove any malware, including SearchApp.exe, before it can cause harm.
3. Enable Windows Defender: Windows 10 comes with built-in antivirus protection called Windows Defender. Ensure that it is enabled and regularly updated to provide real-time protection against malware.
4. Be cautious while browsing and downloading: Avoid visiting potentially dangerous websites and downloading files from untrusted sources. Always verify the authenticity of websites and only download files from reputable sources.
5. Use strong and unique passwords: Strengthen your system security by using complex passwords that are unique for each online account. Consider using a password manager to securely store and generate strong passwords.
Taking these precautions will significantly decrease the likelihood of a future malware infection, including the pesky SearchApp.exe. Stay proactive and prioritize your system’s security.
Additional Measures To Ensure Complete Removal Of SearchApp.exe
After following the previous steps to remove SearchApp.exe from your Windows 10 system, it is essential to take some additional measures to ensure complete eradication of this malware and prevent any potential reinfection.
1. Update your operating system: Make sure your Windows 10 is up to date with the latest security patches and updates. This helps strengthen your system’s defenses against known vulnerabilities that malware like SearchApp.exe may exploit.
2. Enable Windows Defender or install reputable antivirus software: Having a reliable antivirus program can provide real-time protection against malware threats. Keep it updated and perform regular scans to detect and remove any lingering traces of SearchApp.exe.
3. Be cautious when downloading and installing software: Avoid downloading files from untrustworthy sources and always choose the custom installation option to avoid bundled software. Read user reviews and research the software’s origin before installing it.
4. Enable Windows Firewall: Enable the built-in Windows Firewall to prevent unauthorized access to your system and block suspicious connections.
5. Use ad-blockers and caution while browsing: Install ad-blockers on your web browser to reduce the risk of drive-by downloads and malicious adverts. Also, be mindful of the websites you visit and exercise caution when clicking on unfamiliar links or downloading files.
By following these additional measures, you can ensure a thorough removal of SearchApp.exe and minimize the risk of future malware infections on your Windows 10 system.
FAQ
1. What is SearchApp.exe and why should I remove it from Windows 10?
SearchApp.exe is a potentially unwanted program that may have been installed on your Windows 10 system. It usually comes bundled with freeware and can cause various issues such as unwanted pop-up ads, system slowdowns, and privacy concerns. Removing SearchApp.exe is recommended to improve system performance and ensure a safer browsing experience.
2. How can I manually remove SearchApp.exe from Windows 10?
To manually remove SearchApp.exe from Windows 10, you can follow these steps:
1. Press the Windows key + R, then type “taskmgr” and press Enter to open the Task Manager.
2. In the Task Manager, go to the Processes tab and look for SearchApp.exe or any related suspicious processes. Right-click on them and select “End Task”.
3. Open the Control Panel by pressing the Windows key + X and selecting “Control Panel”.
4. In the Control Panel, click on “Programs” or “Programs and Features”, then find SearchApp or any related suspicious program in the list. Click on it, and then click “Uninstall”.
5. Follow the on-screen instructions to complete the uninstallation process.
6. After uninstalling the program, it is also recommended to scan your system with reputable antivirus or anti-malware software to ensure that any leftover traces of SearchApp.exe are fully removed.
3. Is there any specialized software available to remove SearchApp.exe?
Yes, there are specialized software tools available that can help you remove SearchApp.exe and other potentially unwanted programs more effectively. These tools, often called anti-malware or anti-adware software, can scan your system, detect and remove any traces of SearchApp.exe, and provide real-time protection against future infections. Some popular examples of such software include Malwarebytes, AdwCleaner, and Spybot – Search & Destroy. Ensure to download these tools from reputable sources and regularly update them to keep your system protected.
Verdict
In conclusion, removing SearchApp.exe from Windows 10 is crucial for maintaining the security and performance of your computer. By following the steps outlined in this article, users can effectively eliminate the potentially harmful executable file and prevent any associated malicious activities. It is vital to regularly scan your system for such unwanted files and take appropriate action to keep your Windows 10 operating system safe.