
Guide to Enable/Disable Secure Boot in Windows 11
Published
4 min read
How to ENABLE or DISABLE Secure Boot in Windows 11: A Complete Guide
Secure Boot is a feature in UEFI (Unified Extensible Firmware Interface) that helps ensure that your PC boots using only software that is trusted by the PC manufacturer. When you enable Secure Boot, it prevents malicious software and unauthorized operating systems from loading during the start-up process. In Windows 11, Secure Boot is a core part of the operating system’s security features, and understanding how to enable or disable it can be vital for certain installations, troubleshooting, and system customization.
This comprehensive guide will walk you through the steps to enable or disable Secure Boot on your Windows 11 system, along with reasons for doing so, possible challenges you might face, and how to troubleshoot them.
Understanding Secure Boot
Before delving into the how-to section, it’s essential to understand why Secure Boot could be necessary for your system. Here are some key points that illustrate its significance:
-
Protection Against Rootkits and Malware: Secure Boot helps prevent malicious software from loading during the boot process, thereby protecting your operating system from potential threats.
-
Compatibility with Modern Operating Systems: Windows 11 requires Secure Boot to be enabled on compatible systems. This requirement is part of Microsoft’s effort to create a more secure ecosystem.
-
Enhanced System Integrity: Enabling Secure Boot ensures that your system remains in a good state by allowing only trusted software to run at boot time.
-
System Performance: Although not a direct performance enhancer, a more secure boot process often leads to a more stable and reliable operating system.
Despite its benefits, there are scenarios where you may need to disable Secure Boot, such as:
- Installing non-Windows operating systems that do not support Secure Boot.
- Running certain hardware or software tools that require it to be turned off.
This guide will help you navigate the enabling and disabling processes in a straightforward manner.
Prerequisites
Before proceeding, ensure that:
- You have administrative access to your Windows 11 PC.
- You know how to access your BIOS/UEFI settings.
- Your system uses UEFI firmware, as Secure Boot is not available in Legacy BIOS mode.
Steps to Enable or Disable Secure Boot in Windows 11
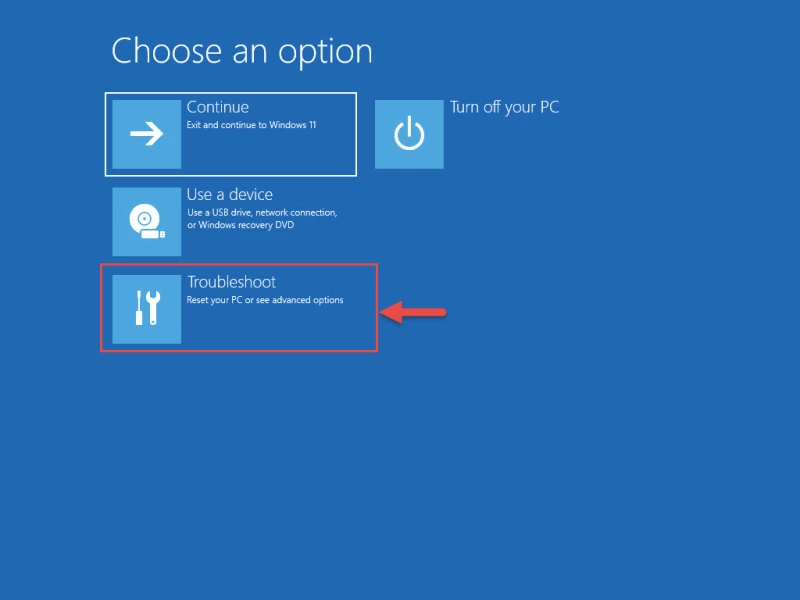
1. Accessing UEFI Firmware Settings
First, you’ll need to access your computer’s UEFI settings. Here’s how:
-
Via Settings App:
- Click on the Start button and select Settings.
- Navigate to System and then Recovery.
- Under the Advanced startup section, click on Restart now.
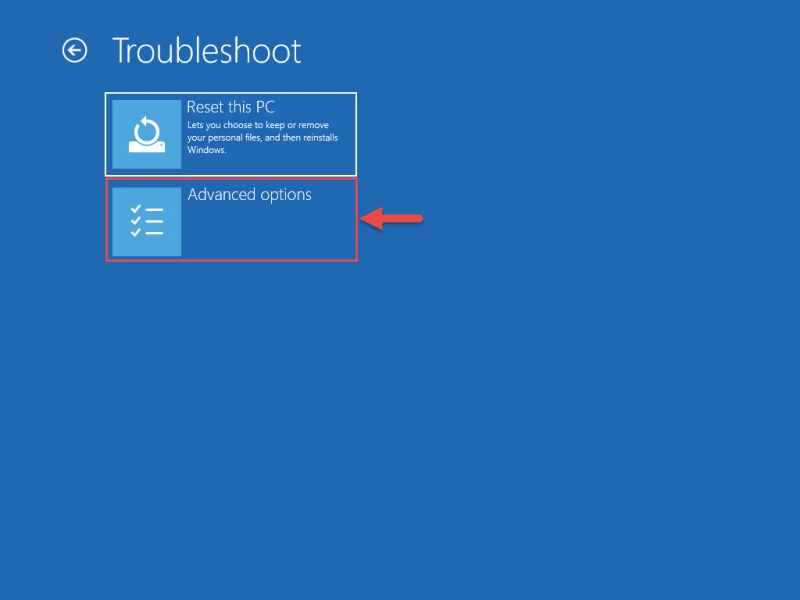
- After your device restarts, click on Troubleshoot.
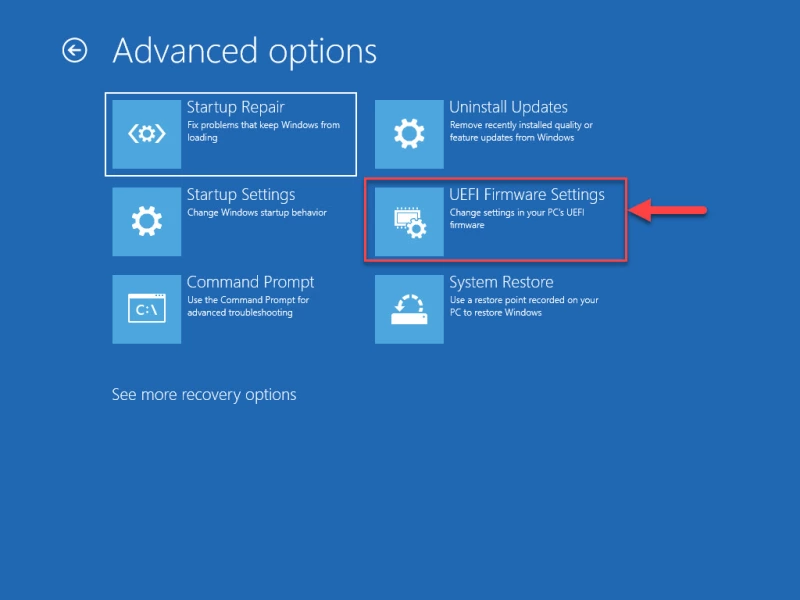
- Select Advanced options, then click on UEFI Firmware Settings.
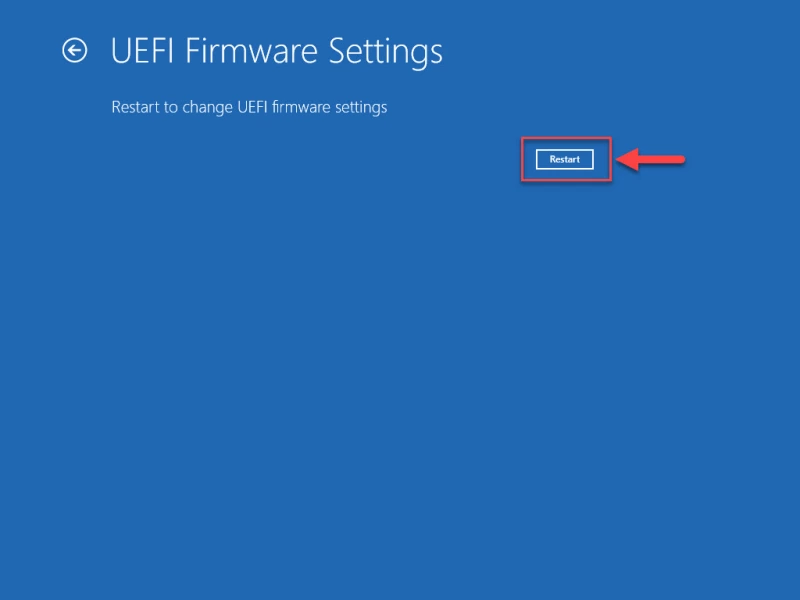
- Click on Restart to enter UEFI settings.
-
Via the Startup Menu:
- Restart your computer.
- During startup, repeatedly press the appropriate key (usually F2, F10, DEL, or ESC) to enter the BIOS/UEFI settings.
2. Navigating the UEFI Menu
Once you are in the UEFI firmware settings:
- Look for the Secure Boot option. The location can vary by manufacturer, but it is usually found under Boot, Security, or Authentication tabs.
- Use the arrow keys to navigate through the menu items.
3. Enabling Secure Boot
To enable Secure Boot, follow these steps:
-
Find the Secure Boot option: It may typically say “Secure Boot Control” or “Secure Boot.”
-
Change the setting to Enabled:
- Highlight the Secure Boot option using the arrow keys.
- Press Enter and select Enabled.
-
Save and Exit:
- Look for an option that says Save Settings and Exit, usually under the Exit tab or simply designated by pressing F10.
- Confirm any prompts that ask if you want to save changes.
4. Disabling Secure Boot
To disable Secure Boot, the steps are similar:
-
Access the Secure Boot option in the UEFI firmware settings.
-
Change the setting to Disabled:
- Highlight the option, press Enter and select Disabled.
-
Save and Exit:
- Again, navigate to save your settings and exit the UEFI setup.
5. Booting into Windows 11
Your system should now boot into Windows 11 as per the newly configured Secure Boot settings.
Troubleshooting
Sometimes you might face issues while trying to enable or disable Secure Boot. Below, we address potential problems you could encounter.
1. Secure Boot Option is Greyed Out
- Ensure you are booting in UEFI mode. Secure Boot won’t be available if your machine is using Legacy Mode.
- Check if you have the appropriate permissions, especially if your PC is from an organization.
- Some motherboards require you to set a supervisor password before allowing changes to the Secure Boot setting.
2. Can’t Access BIOS/UEFI Settings
- If you are having trouble accessing UEFI settings, consider the following:
- Restart your computer and immediately press the correct key for your system (often F2, DEL, or ESC).
- Update your motherboard’s firmware if you are unable to get to the settings due to bugs.
3. Windows 11 Fails to Boot After Changing Secure Boot Settings
- If you enabled Secure Boot but Windows fails to boot, it’s possible that your current OS installation is not compatible with Secure Boot.
- You may need to disable Secure Boot and troubleshoot compatibility issues or reinstall Windows 11.
4. Incompatible Hardware or Software
- Older hardware may not fully support Secure Boot, which can necessitate the disabling of this feature to function correctly.
Conclusion
Knowing how to enable or disable Secure Boot on your Windows 11 system is essential for effective system management. By securing your boot process, you’re taking a significant step towards safeguarding your device from malicious software and unauthorized access. However, it’s equally important to understand when it might be necessary to disable this feature for specific use cases.
Remember to follow all the steps outlined in this guide carefully, and never hesitate to seek additional help from your device’s manual or the manufacturer’s support site if you encounter issues. Experimenting with Secure Boot requires caution; hence, always make sure your system’s needs align with the changes you are implementing.
Для установки Windows 11 (или при обновлении с Windows 10), ваш компьютер должен соответствовать определённом минимальным системам требованиям: наличие чипа TPM 2.0 (Trusted Platform Module), режим UEFI + Secure Boot, 4 Гб RAM, 64 Гб диск и совместимый двухъядерный процессор 1 ГГц (не все процессоры поддерживаются!). Microsoft ограничивает установку Windows 11 на несовместимые компьютеры, выполняя проверку на соответствие системным требования перед началом установки Windows. В этой статье мы покажем, как установить Windows 11 на несовместимые устройства без проверки требований к CPU, TPM, Secure Boot (и т.д.)
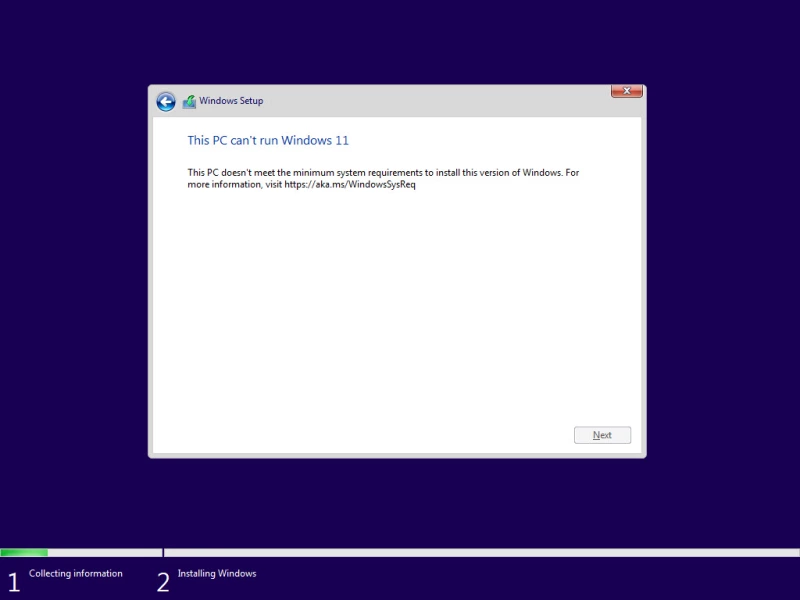
Если компьютер не соответствует минимальным требованиям для Windows 11, то при установке ОС появится ошибка:
Запуск Windows 11 на этом компьютере не возможен
. Этот компьютер не соответствует минимальным требованиям к системе для установки этой версии Windows. Дополнительные сведения см. на сайте aka.ms/WindowsSysReq
This PC can’t run Windows 11
. This PC doesn’t meet the minimum system requirements to install this version of Windows. For more information, visit aka.ms/WindowsSysReq<
Чтобы понять, каким конкретно требованиям не соответствует вашим компьютер, нужно изучить лог ошибок установки Windows 11 setuperr.log. В этом файле содержаться только ошибки установки Windows (полный лог установки находится в файле setupact.log, но изучать его сложно из-за большого объема).
Чтобы открыть файл лога ошибок установки Windows, откройте командную строку прямо на экране установки, нажав
Shift + F10
и выполните команду:
notepad x:\windows\panther\setuperr.log
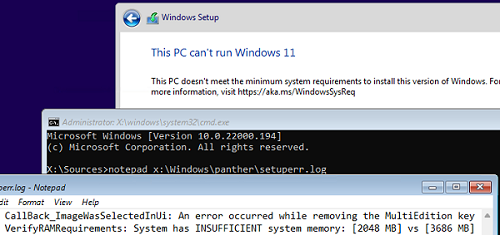
В нашем случае ошибка говорит, что на компьютере недостаточно оперативной памяти (всего 2 Гб вместо 3).
2021-11-11 10:57:51, Error VerifyRAMRequirements: System has INSUFFICIENT system memory: [2048 MB] vs [3686 MB]
Обратите внимание, что если ваш компьютер не соответствует нескольким системным требованиям для установки Windows, то в логе будет указана только первая из причин. Т.е. если вы исправили (или пропустили) одну из ошибок несовместимости, то при следующем запуске установки Windows 11 в логе будет содержаться следующая ошибка совместимости.
После того, как мы добавили RAM появилась другая ошибка:
2021-11-11 11:13:37, Error VerifyTPMSupported:Tbsi_GetDeviceInfo function failed - 0x8028400f[gle=0x0000007a]
Т.е. установщик определил, что на компьютере отсутствует TPM чип.
Если вы устанавливаете Windows 11 в виртуальную машину VMWare, вы можете добавить виртуальный TPM чип в соответствии с этой статьей. Для Hyper-V используется другая инструкция.
Однако вы можете продолжить установку Windows 11, просто игнорировал одно или все требования совместимости.
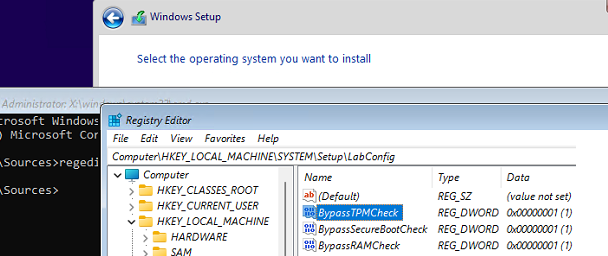
Для этого нужно в командной строке на экране установки Windows 11:
- Запустить редактор реестра
regedit.exe
; - Перейти в раздел HKEY_LOCAL_MACHINE\SYSTEM\Setup и создать новую ветку с именем LabConfig;
- В этой ветке нужно создать DWORD параметры со значением 1 для тех проверок совместимости, которые вы хотите пропустить при установке
Доступны следующие параметры, позволяющие установить Windows 11 на устройства:
-
BypassCPUCheck
– с несовместимыми процессорами; -
BypassTPMCheck
– без чипа TPM 2; -
BypassRAMCheck
– не проверять минимальное количество RAM -
BypassSecureBootCheck
–с Legacy BIOS (или UEFI с отключенным Secure Boot) -
BypassStorageCheck
– не проверять размер системного диска
Например, чтобы не проверять наличие TPM модуля при установке, нудно создать параметр реестра BypassTPMCheck со значением 1. Параметр можно создать с помощью графического редактора реестра или с помощью команды:
reg add HKLM\SYSTEM\Setup\LabConfig /v BypassTPMCheck /t REG_DWORD /d 1
Аналогичным образом нужно создать другие параметры для проверок, который вы хотите пропустить при установке Windows 11.
Затем вернитесь в окно установки Window 11, вернитесь на шаг назад и продолжите обычную установки без проверки совместимости.
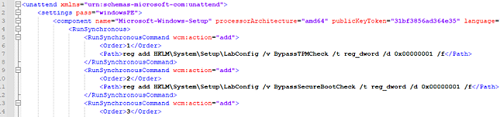
Вы можете модифицировать установочный ISO образ Windows 11, чтобы все эти проверки TPM, SecureBoot, диск, память, CPU) пропускались автоматически при установке ОС.
Для этого создайте текстовый файл AutoUnattend.xml со следующим содержимым:
<unattend xmlns="urn:schemas-microsoft-com:unattend">
<settings pass="windowsPE">
<component name="Microsoft-Windows-Setup" processorArchitecture="amd64" publicKeyToken="31bf3856ad364e35" language="neutral" versionScope="nonSxS" xmlns:wcm="http://schemas.microsoft.com/WMIConfig/2002/State" xmlns:xsi="http://www.w3.org/2001/XMLSchema-instance">
<RunSynchronous>
<RunSynchronousCommand wcm:action="add">
<Order>1</Order>
<Path>reg add HKLM\System\Setup\LabConfig /v BypassTPMCheck /t reg_dword /d 0x00000001 /f</Path>
</RunSynchronousCommand>
<RunSynchronousCommand wcm:action="add">
<Order>2</Order>
<Path>reg add HKLM\System\Setup\LabConfig /v BypassSecureBootCheck /t reg_dword /d 0x00000001 /f</Path>
</RunSynchronousCommand>
<RunSynchronousCommand wcm:action="add">
<Order>3</Order>
<Path>reg add HKLM\System\Setup\LabConfig /v BypassRAMCheck /t reg_dword /d 0x00000001 /f</Path>
</RunSynchronousCommand>
<RunSynchronousCommand wcm:action="add">
 <Order>5</Order>
<Path>reg add HKLM\System\Setup\LabConfig /v BypassCPUCheck /t reg_dword /d 0x00000001 /f</Path>
</RunSynchronousCommand>
<RunSynchronousCommand wcm:action="add">
<Order>4</Order>
<Path>reg add HKLM\System\Setup\LabConfig /v BypassStorageCheck /t reg_dword /d 0x00000001 /f</Path>
</RunSynchronousCommand>
</RunSynchronous>
<UserData>
<ProductKey>
<Key></Key>
</ProductKey>
</UserData>
</component>
</settings>
</unattend>
Если вы хотите отключить экран создания онлайн аккаунта Microsoft при установке Windows 11, добавьте в файл следующий секцию компонента:
<component name="Microsoft-Windows-Shell-Setup" processorArchitecture="amd64" publicKeyToken="31bf3856ad364e35" language="neutral" versionScope="nonSxS" xmlns:wcm="http://schemas.microsoft.com/WMIConfig/2002/State" xmlns:xsi="http://www.w3.org/2001/XMLSchema-instance">
<OOBE>
<HideOnlineAccountScreens>true</HideOnlineAccountScreens>
<HideWirelessSetupInOOBE>true</HideWirelessSetupInOOBE>
<ProtectYourPC>3</ProtectYourPC>
</OOBE>
</component>
Скопируйте данный файл в корень установочной USB флешки с Windows 11.
Если вам нужно добавить файл ответов в ISO образ Windows 11, распаккуйте его содержимое в любую папку на компьютере, скопируйте в этот каталог файл AutoUnattend.xml и пересоберите ISO образ.
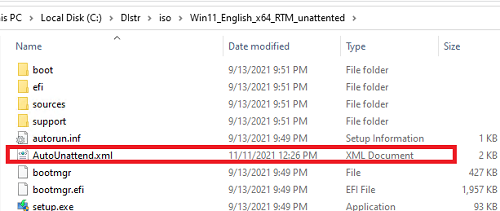
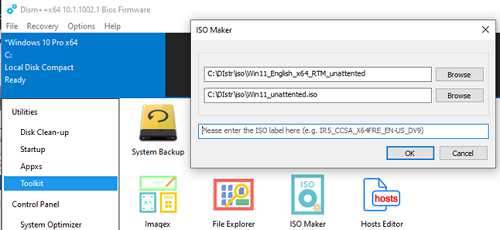
Я использовал для создания образа бесплатную утилиту DISM++ (Toolkit -> ISO maker).
Теперь никакие проверки совместимости не будут производится при установке Windows 11.
В новой версии утилиты Rufus, использующейся для создания загрузочных USB флешек, появилась специальная опция Extended Windows 11 Installation (no TPM/no Secure Boot/8Gb- RAM). Данная опция позволяет создать образ для установки Windows 11 без проверки TPM и Secure Boot:

Если у вас уже есть оригинальный образ Windows 11 и вы захотите выполнить установку с него в виртуальную машину Hyper-V, VirtualBox или другую, то с большой вероятностью после выбора версии системы вы получите информацию о том, что запуск Windows 11 на этом компьютере невозможен и компьютер не соответствует минимальным требованиям к системе.
В этой инструкции пошагово описано, как быстро и не меняя образ ISO установить Windows 11 в виртуальной машине, пропустив проверку наличия модуля TPM 2.0 и безопасной загрузки Secure Boot.
Решение «Запуск Windows 11 на этом компьютере невозможен» при установке в виртуальной машине

Обычная причина того, что установщик Windows 11 сообщает о несоответствии минимальным требованиям при установке — отсутствие модуля TPM 2.0. Даже если он есть в основной ОС, виртуальная машина не имеет к нему доступа. В некоторых случаях дополнительной причиной может быть отключенная безопасная загрузка (Secure Boot) в виртуальной машине. Для того, чтобы это обойти, достаточно выполнить следующие шаги:
- В программе установки Windows 11 в виртуальной машине нажмите клавиши Shift+F10, иногда — Shift+Fn+F10, это откроет командную строку.
- Для отключения проверки наличия модуля TPM 2.0, введите команду
REG ADD HKLM\SYSTEM\Setup\LabConfig /v BypassTPMCheck /t REG_DWORD /d 1
- Если необходимо (в виртуальной машине может быть и включена безопасная загрузка), введите следующую команду для отключения проверки статуса Secure Boot
REG ADD HKLM\SYSTEM\Setup\LabConfig /v BypassSecureBootCheck /t REG_DWORD /d 1

- В редких случаях, если нужно отключить проверку на наличие нужного объема оперативной памяти, может пригодиться команда
REG ADD HKLM\SYSTEM\Setup\LabConfig /v BypassRAMCheck /t REG_DWORD /d 1
- Закройте командную строку и продолжайте установку как обычно, аналогично тому, как описано в инструкции Установка Windows 11 с флешки.


После описанных действий чистая установка Windows 11 в виртуальной машине будет выполнена успешно, несмотря на несоответствие системным требованиям.
Применим ли этот метод на реальном оборудовании, а не в виртуальной машине? Его можно использовать и на обычном ПК или ноутбуке: некоторые пользователи сообщают, что установка проходит успешно, но есть и обратные отзывы.
Существуют и другие способы. Например, с помощью скрипта Universal Media Creation Tool, описанного в материале Как обновиться до Windows 11 на неподдерживаемом компьютере, можно не только выполнить обновление, но и создать ISO-образ Windows 11, при установке с которого не выполняются проверки TPM 2.0, безопасной загрузки, поколения процессора, что позволяет использовать его практически на любых устройствах, в том числе в виртуальной машине.
В случае, если остаются вопросы, связанные с установкой Windows 11 в виртуальной машине, их можно задать в комментариях, не исключено, что решение есть.
При выпуске оригинальной версии Windows 11 компания Microsoft установила весьма специфические системные требования, которые должны быть выполнены для установки или обновления до Windows 11 с любой предыдущей ОС. Эти требования включают TPM 2.0, Secure Boot, 4 ГБ оперативной памяти, минимум 2 ядра процессора и т.д. Однако не каждый компьютер может соответствовать этим требованиям, особенно если вы ограничены в бюджете.
Бывают случаи, когда вы хотите установить последнюю версию Windows 11, например Windows 11 23H2, но не можете ее установить, поскольку ваше оборудование не соответствует требованиям ОС. Если вы столкнулись с подобной дилеммой, то сообщаем вам, что существуют методы установки Windows 11 версии 23H2 в обход специфических аппаратных требований Windows 11.
При этом новые требования к Windows призваны повысить безопасность систем в связи с участившимися кибератаками. Однако не каждый ПК можно или нужно модернизировать в соответствии с этими требованиями.
Интересно: Как включить скрытую функцию распознавания текста в приложении Фото на Windows 11
Системные требования Windows 11 23H2
Windows 11 23H2 имеет те же системные требования, что и оригинальный выпуск. Прежде чем планировать обновление текущей ОС до Windows 11 23H2, рекомендуется проверить, поддерживает ли оборудование эту ОС по умолчанию, или необходимо обойти требования.
Ниже приведен список основных системных требований Windows 11 23H2:
- Процессор: 1 ГГц или более быстрый CPU или система на кристалле (SoC) с двумя и более ядрами.
- ОЗУ: Не менее 4 ГБ.
- Жесткий диск: 64 ГБ или более.
- Прошивка системы: UEFI, с поддержкой Secure Boot.
- ТПМ: Модуль доверенной платформы (TPM) версии 2.0.
- Графика: Совместимость с DirectX 12 или более поздней версией с драйвером WDDM 2.0.
- Разрешение экрана: Дисплей высокой четкости (720p) с диагональю более 9″, 8 бит на цветовой канал.
- Сеть: Учетная запись Microsoft и подключение к Интернету.
Эти спецификации означают, что не все компьютеры смогут установить Windows 11 23H2 в исходном виде. Придется либо перепрошивать ее, либо обновлять аппаратное обеспечение, либо обходить эти требования. Последний вариант представляется более предпочтительным, если у вас нет бюджета на модернизацию оборудования, а безопасность системы не является вашей главной заботой.
Проверка наличия TPM 2.0
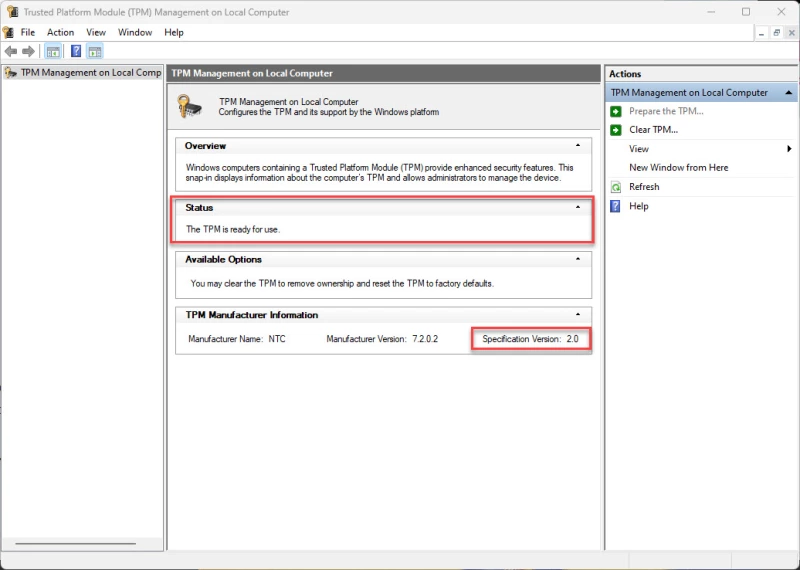
Начните с проверки наличия или отсутствия в компьютере чипсета TPM 2.0, выполнив следующие действия:
- Нажмите Win + R, чтобы открыть окно Run Command.
- Введите «tpm.msc» и нажмите Enter чтобы открыть консоль управления TPM.
- Здесь найдите статус TPM в разделе Status _. Вы также найдете его версию в разделе _TPM Manufacturer Information.

Если в Status написано «TPM готов к использованию», это означает, что он доступен и включен. Если же в Status написано «Compatible TPM cannot be found», это означает, что либо TPM недоступен, либо присутствует, но отключен в настройках BIOS/прошивки UEFI.
Узнайте другие способы проверк TPM.
Включить TPM
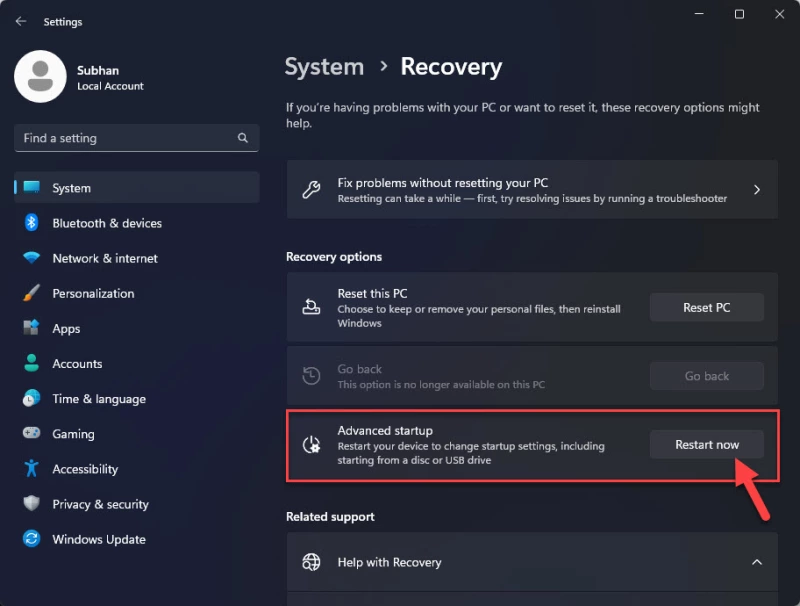
Если TPM отключен, необходимо включить его в настройках UEFI. Вот как это делается:
- Нажмите клавишу Win + i, чтобы открыть приложение настроек Windows.
- Перейдите к следующему:
System >> Recovery
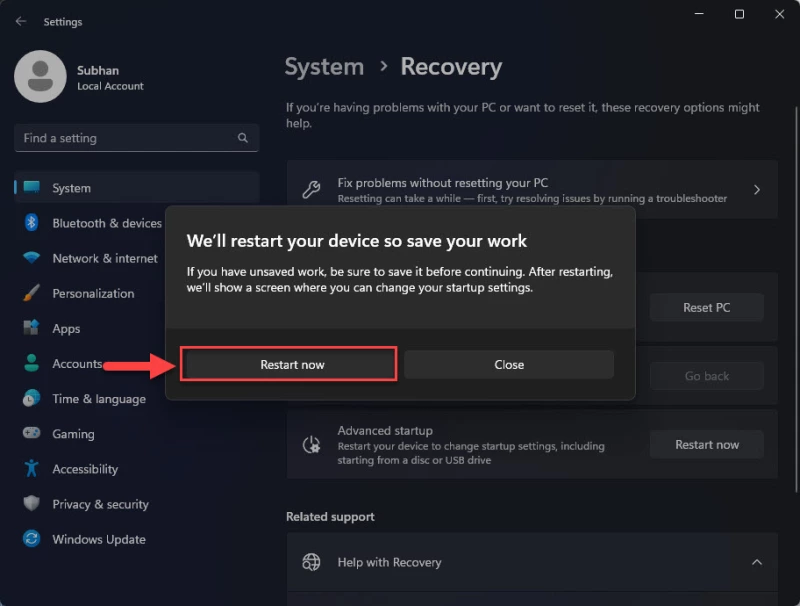
- Нажмите «Перезагрузить сейчас» перед «Дополнительный запуск».

- Во всплывающем окне подтверждения снова нажмите «Перезагрузить сейчас».
Компьютер включится и загрузится в среду восстановления Windows (WinRE).
- Нажмите Troubleshoot.

- Затем нажмите «Advanced options.»
- Нажмите «UEFI Firmware Settings.»
- Теперь нажмите Restart.
Компьютер снова перезагрузится.
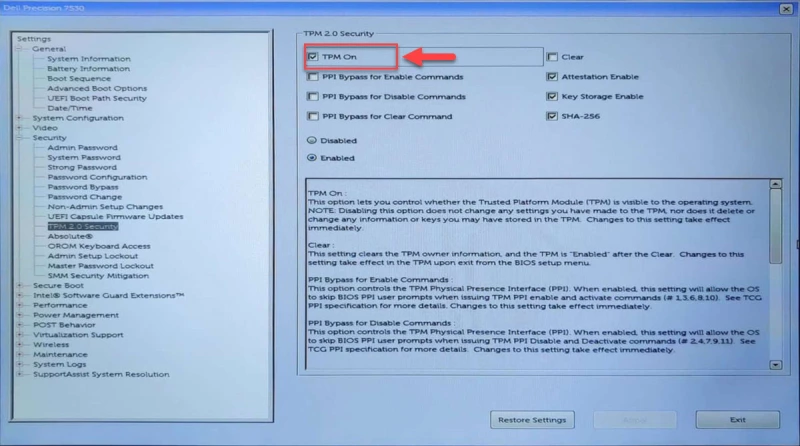
- Теперь перейдите к настройкам Advanced, Security или Boot. Они зависят от типа материнской платы.
- Выберите опцию TPM 2.0 и выберите опции «Enabled» и «TPM On».

Если вы обнаружили, что опция TPM 2.0 отсутствует или не может быть включена, то, скорее всего, она недоступна на вашей материнской плате. Однако если проблема заключается в чем-то другом, попробуйте воспользоваться следующими методами устранения неисправностей TPM.
Проверка наличия Secure Boot
Другим обязательным требованием является Secure Boot. Проверьте, включена ли Secure Boot, выполнив следующие действия:
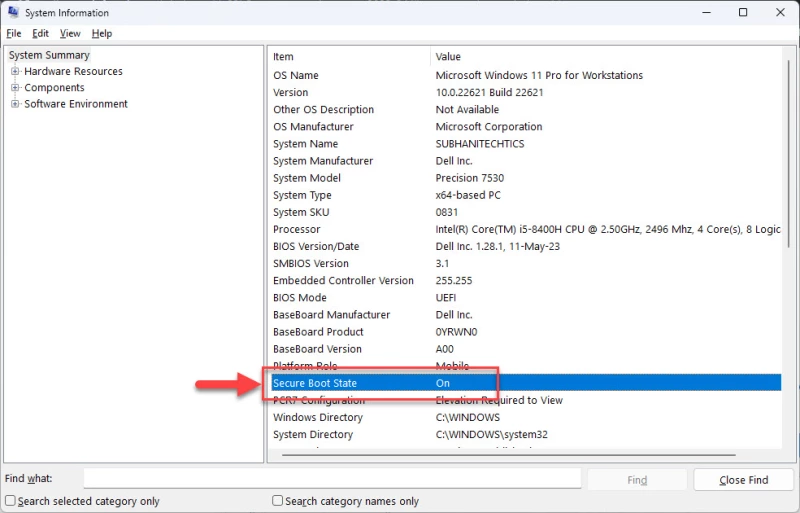
- Нажмите Win + R, чтобы открыть окно Run Command.
- Введите «msinfo23» и нажмите Enter.
- На вкладке System Summary проверьте наличие информации перед строкой «Secure Boot State».

Если Secure Boot выключен или отключен, его можно включить в настройках UEFI Firmware так же, как и TPM 2.0, описанным выше способом.
Если вы убедились, что и TPM 2.0, и Secure Boot доступны и включены, только тогда можно переходить к установке Windows 11 23H2 обычными методами. Если же ни одна из опций не доступна или не включена, то необходимо установить Windows 11 23H2 в обход системных требований, используя описанные ниже методы.
Установка Windows 11 23H2 на неподдерживаемое оборудование
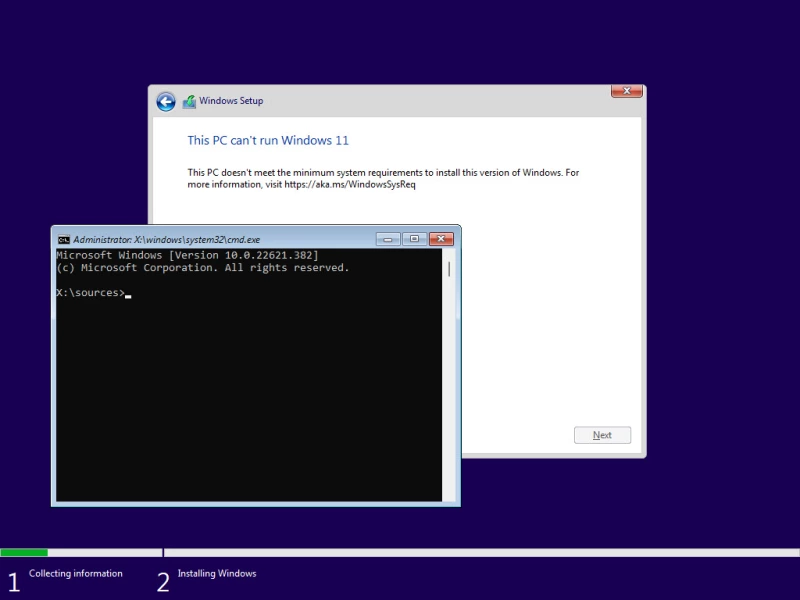
Если попытаться установить Windows 11 23H2 или любую другую версию Windows 11 на компьютер, не соответствующий системным требованиям, то установить или перейти на нее обычными методами не удастся. Вместо этого при попытке установки появится сообщение об ошибке, подобное следующему:
This PC can't run Windows 11 This PC doesn't meet the minimum system requirments to install this version of Windows.
В этом случае можно выполнить одно из следующих решений, чтобы обойти эти системные требования и продолжить установку Windows 11 23H2 без обновления оборудования
Обход ограничений на установку Windows 11 23H2
Обход требований TPM и Secure Boot из реестра Windows
Чтобы обойти системные требования TPM 2.0 и Secure Boot при установке Windows 11 23H2, выполните следующие действия:
- Начните с загрузки Windows 11 23H2 ISO.
- Продолжите создание загрузочного USB-накопителя или используйте Ventoy для создания мультизагрузочного USB-накопителя.
- Загрузитесь с загрузочного USB-накопителя и нажмите кнопку Next на первом экране установки Windows.
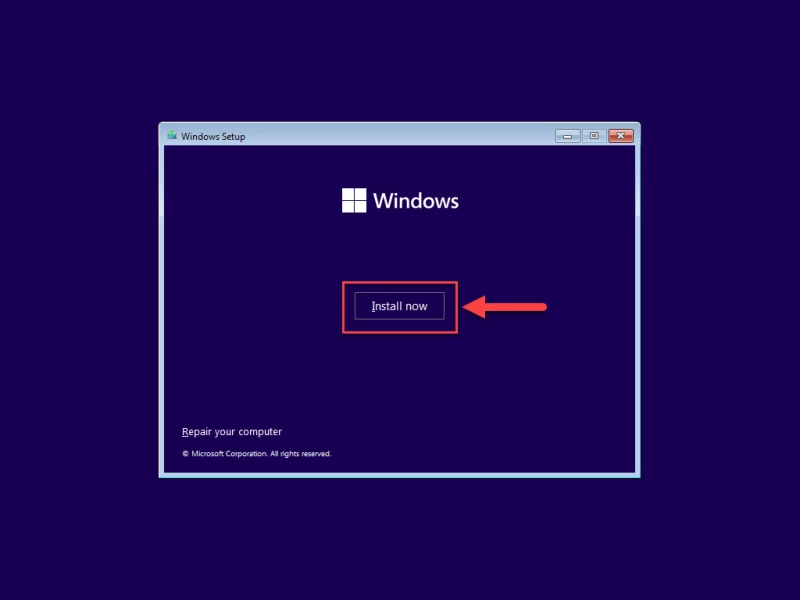
- Нажмите «Установить сейчас.»
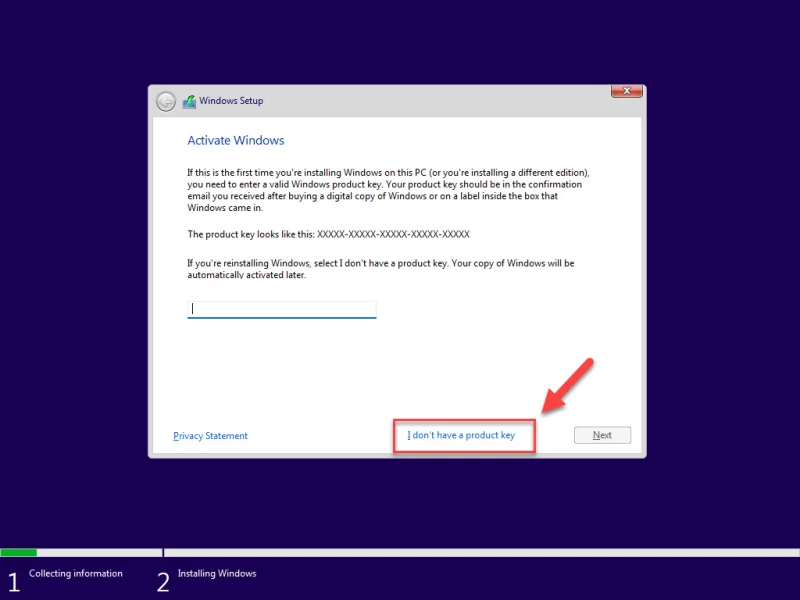
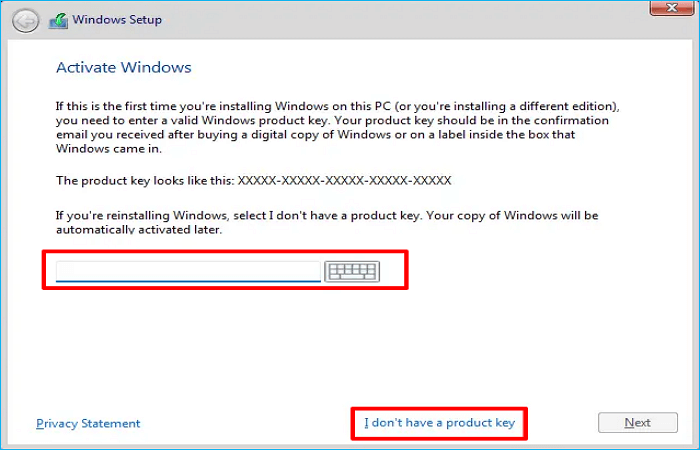
- Нажмите «У меня нет ключа продукта.«Даже если у вас есть ключ продукта, вы можете использовать его для активации Windows позже.
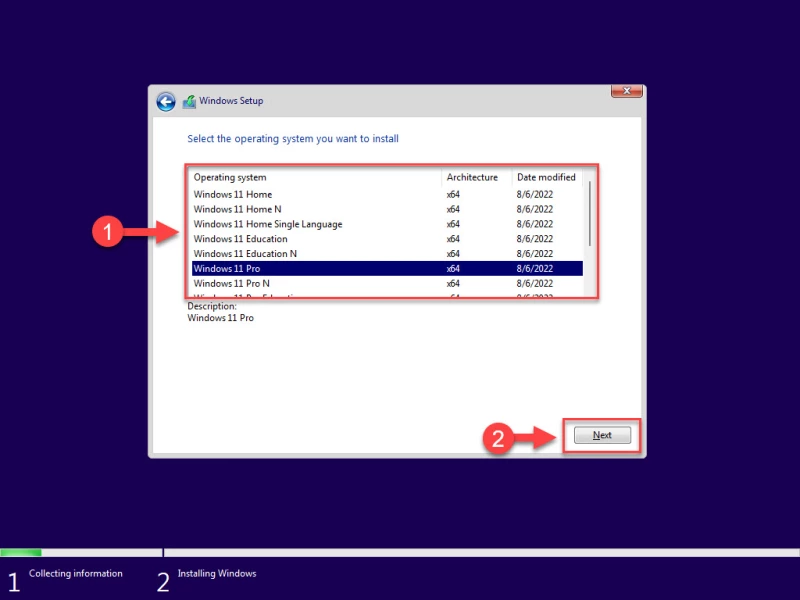
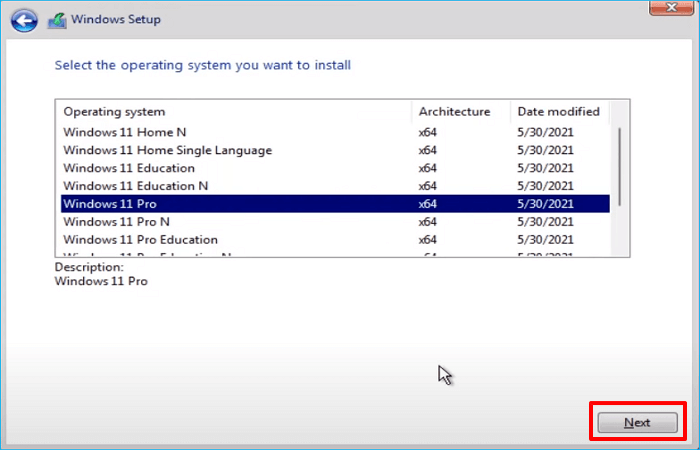
- Выберите одну из редакций Windows и нажмите Next.
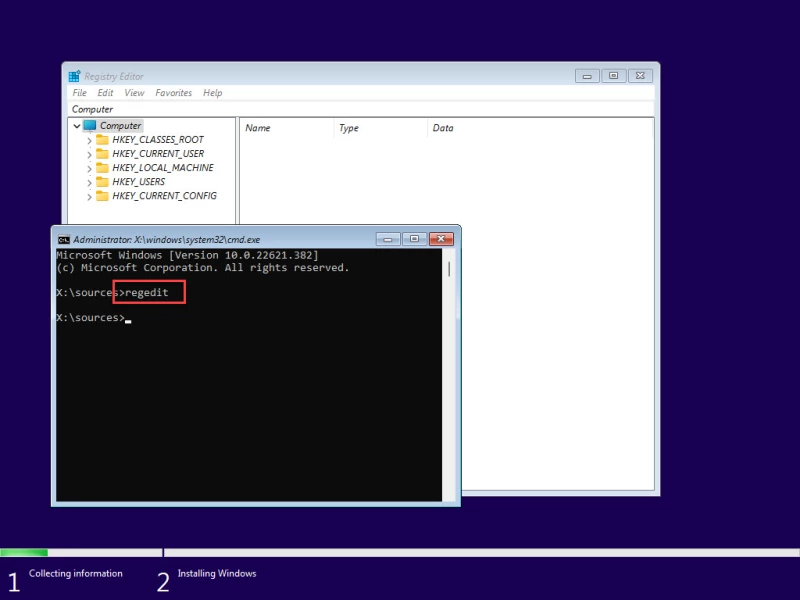
- На экране ошибок одновременно нажмите клавиши Shift + F10, чтобы открыть Командную строку.
- Введите «regedit» и нажмите Enter, чтобы открыть редактор реестра.
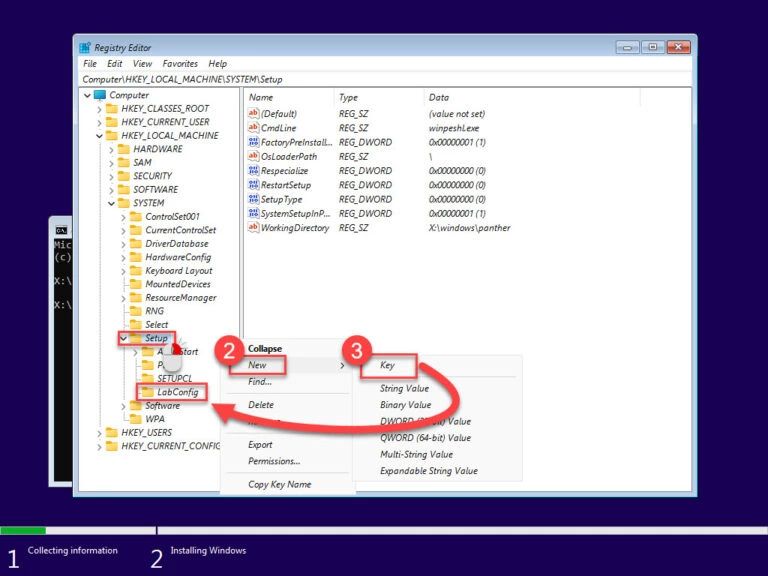
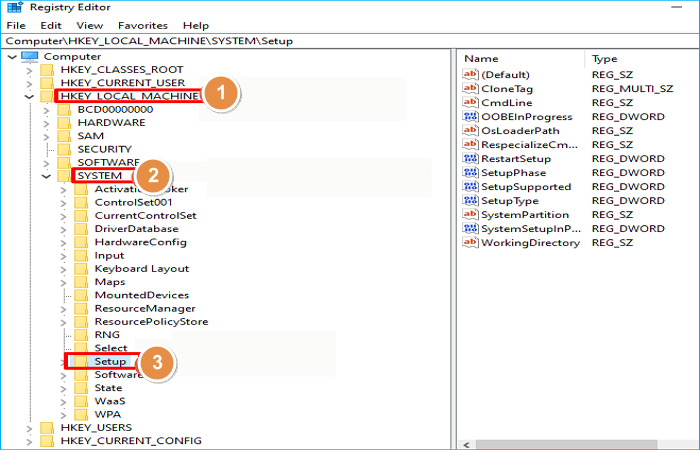
- В редакторе реестра перейдите к следующему пути из левой панели:
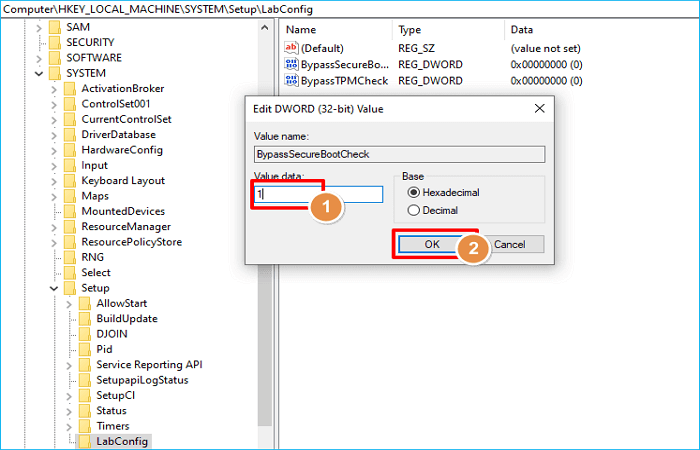
Computer\HKEY_LOCAL_MACHINE\SYSTEM\Setup
- Щелкните правой кнопкой мыши «Setup», разверните New и выберите Key. Назовите этот ключ «LabConfig.»

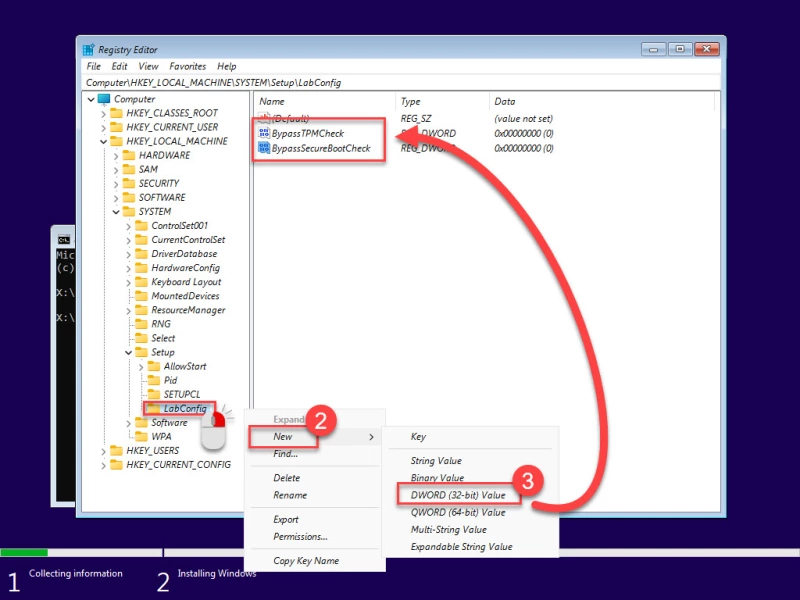
- Щелкните правой кнопкой мыши «LabConfig», разверните New и выберите «DWORD (32-bit) Value». Назовите этот DWORD «BypassTPMCheck».
- Повторите все действия еще раз и создайте еще один DWORD в ключе LabConfig с именем «BypassSecureBootCheck».
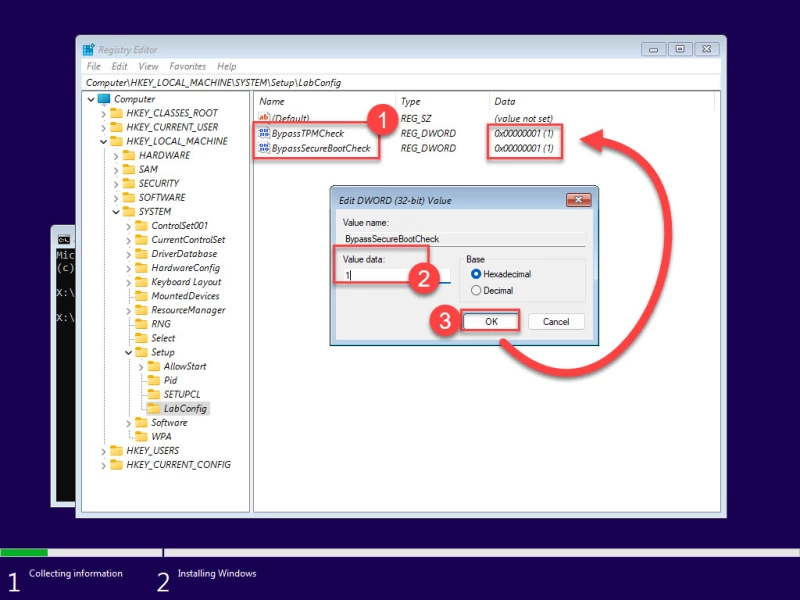
- Дважды щелкните оба этих DWORD и измените их Value Data на «1».
- Закройте редактор реестра и окно командной строки.
- Нажмите кнопку «Назад» в мастере установки Windows.
- Теперь снова выберите редакцию Windows и нажмите кнопку Next.

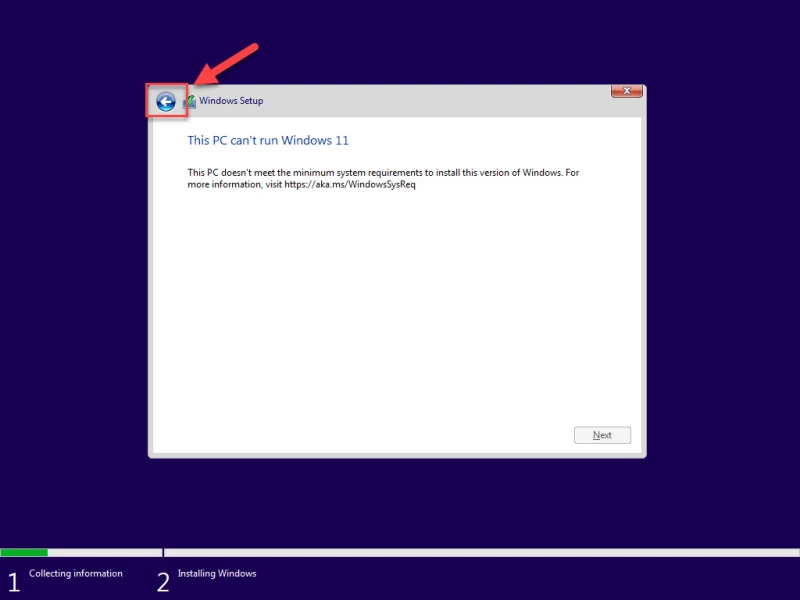
Теперь вы заметите, что подсказка об ошибке исчезла, а на ее месте появились правила и условия. Продолжайте выполнять оставшиеся шаги для успешной установки Windows 11 23H2 без соблюдения системных требований.
*Примечание: *Остальные шаги типичны для всех современных установок Windows.
Обход требований TPM и Secure Boot с помощью Rufus
Rufus, полное название которого «The *R*eliable *U*SB *F*ormatting *U*tility, with *S*ource», – это утилита с открытым исходным кодом для операционной системы Windows, позволяющая изменять и создавать ISO-файлы операционной системы Windows. Теперь эта утилита также включает в себя опции, которые можно выбрать, что позволит создать загрузочный USB-накопитель, на котором системные требования Windows 11 23H2 уже обойдены.
Для обхода требований TPMm Secure to и RAM с помощью Rufus выполните следующие действия:
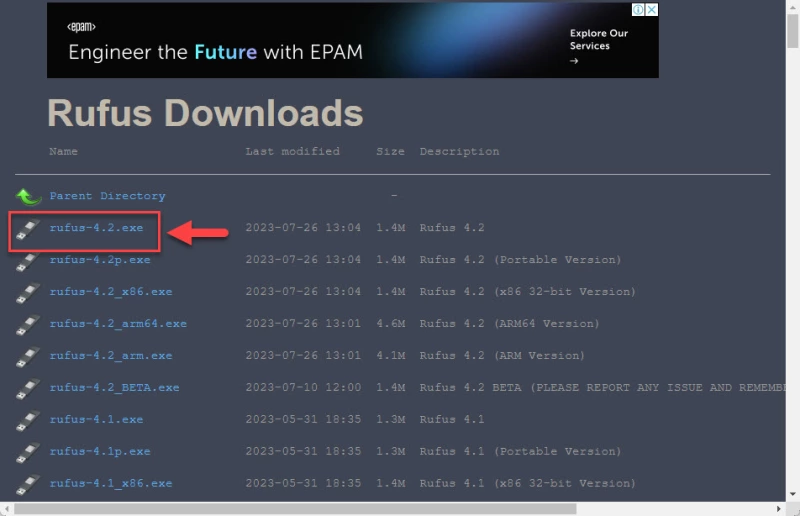
- Откройте Сайт Руфус и нажмите на последнюю версию Rufus, чтобы загрузить ее.

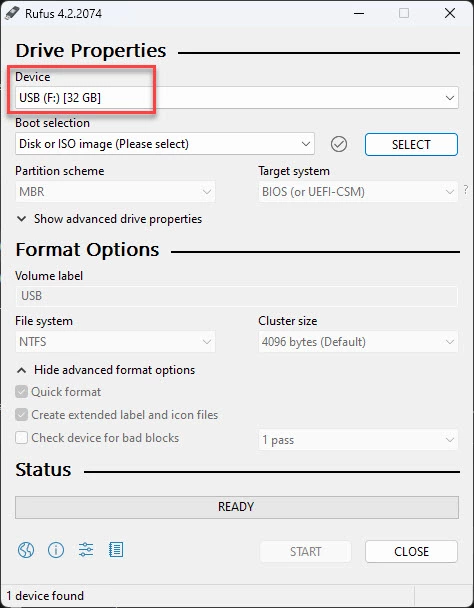
- Подключите USB-накопитель к компьютеру и запустите Rufus.
- В Rufus убедитесь, что USB-накопитель выбран в выпадающем меню Device.

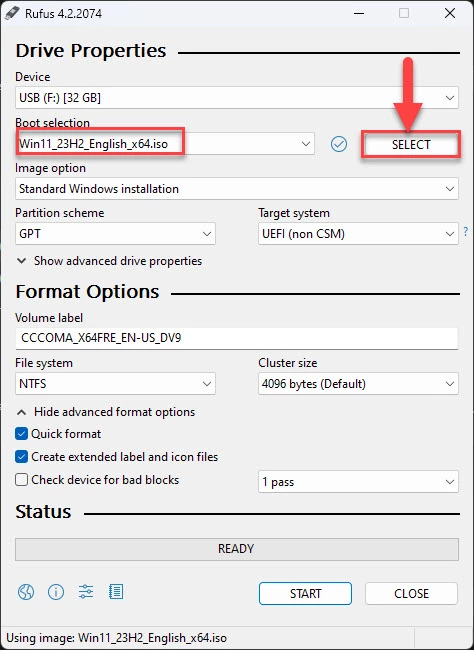
- Нажмите Select и выберите ISO-файл Windows 11 23H2.

- Убедитесь, что остальные настройки соответствуют следующим:
- Опция образа: Стандартная установка Windows
- Схема разделов: GPT
- Целевая система: UEFI (не CSM)
- Филевая система: NTFS
- Размер кластера: значение по умолчанию
- Выберите: «Быстрое форматирование» и «Создать расширенные файлы меток и значков»
- Нажмите Старт.
- Во всплыающем окне выберите следующие опции и снимите все остальные:
- Снять требования к 4 Гб RAM, Secure Boot, и TPM 2.0
- Убрать требование к учетной записи Microsoft в Интернете
Выбрав эти опции, нажмите Ok.
- Во всплывающем окне с предупреждением нажмите Ok.
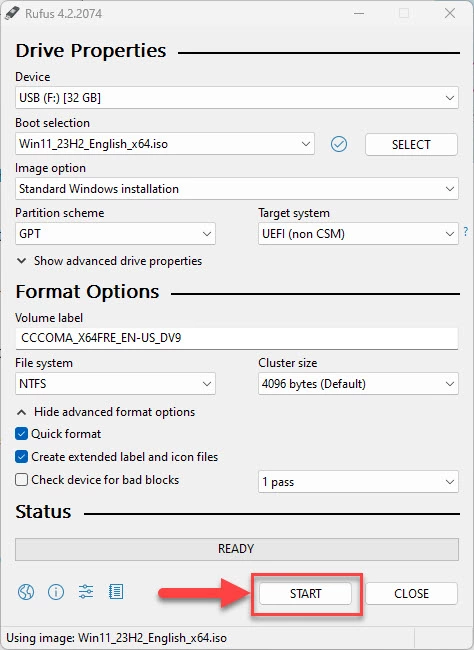

Rufus отформатирует USB-накопитель и создаст загрузочный диск Windows 11 23H2, который будет автоматически обходить требования к TPM 2.0, Secure Boot и RAM. При установке Windows с этого накопителя никаких дополнительных действий не потребуется.
Заключение
Хотя для нашего же блага мы гарантируем, что наши системы соответствуют минимальным требованиям к версиям Windows 11, это не всегда необходимо. Например, если у вас есть отдельный компьютер для тестирования, не подключенный к Интернету и не содержащий конфиденциальной информации, то нет необходимости вкладывать средства в модернизацию его аппаратного обеспечения только для тестирования под Windows 11.
Таким образом, вы можете спокойно обойти требования TPM 2.0 и Secure Boot, используя любой из двух рассмотренных выше методов. Обход минимальных требований Windows 11 с помощью реестра Windows позволяет обойти только требования Secure Boot и TPM, тогда как с помощью Rufus можно обойти оба этих требования, а также ограничения по минимальному объему оперативной памяти.
Do you want to install Windows 11 on your computer? But what if you find that your computer doesn’t support Secure Boot and TPM 2.0? Don’t worry. This does not mean you cannot install Windows 11 on your current computer or should buy a new computer with Secure Boot and TPM. There are other ways out.
This article offered by EaseUS will tell you how to install Windows 11 without Secure Boot and TPM with step-by-step pictures. Let’s come to the details.
What Are TPM and Secure Boot
TPM, short for Trusted Platform Module, is a security module often soldered as a chip onto the computer’s motherboard. It works as a cryptographic processor by using a hardware-based approach to help create hashes and store cryptographic keys, biometric information, user data, and other data.

Secure Boot is a security standard. It can ensure a boot device using the only software trusted by the OEM (Original Equipment Manufacturer).
When your computer starts, the firmware of the computer runs a signature check on all boot software, including the operating system (OS), EFI programs, and UEFI firmware drivers. The PC boots, and the firmware hands control to the operating system if the signatures are reliable.
Are Secure Boot and TPM Necessary for Windows 11 Installation
Windows 11 is the latest operating system developed by Microsoft. Many Windows users want to upgrade from Windows 10 to 11 to enjoy more features. However, some of them sometimes find that they cannot upgrade to Windows 11.
This will happen when they get the «TPM 2.0 must be supported and enabled on this PC» or «This PC must support Secure Boot» message.
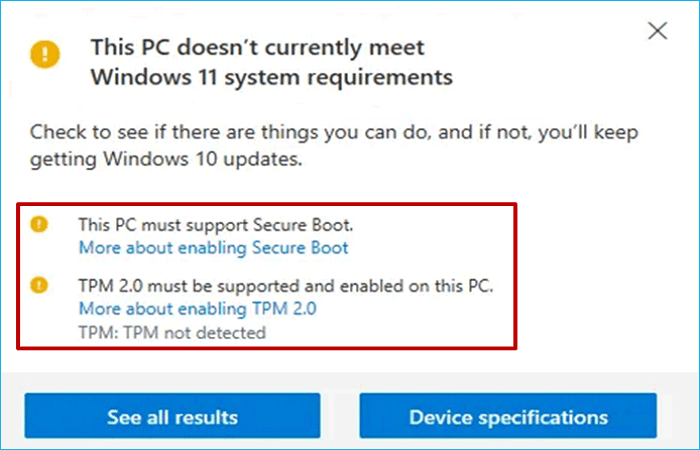
According to the Windows 11 requirements, Windows 11 will only work on a computer that meets the basic requirements:
- 1 GHz or faster core processor
- Secure Boot
- Trusted Platform Module (TPM) 2.0
- 4 GB RAM or higher
- 64 GB storage space or larger
- Internet connectivity and more
From the list, we can see that TPM and Secure Boot are necessary for Windows 11 installation. But does that mean you cannot install Windows 11 without TPM and Secure Boot?
Definitely, no. Although Microsoft does not allow you to install Windows 11 without TPM 2.0 and Security Boot, you can still find a way out. Installing Windows 11 from a bootable USB will be one of the most straightforward ways. The content below will describe how to bypass Secure Boot and TPM on Windows 11. Please keep reading!
Microsoft has released the latest Windows 11 version — Windows 11 23H2. If you want to download the ISO file for installation, you can refer to the following article.
How to Download Windows 11 23H2 ISO File | 3 Ways
This article discusses 3 free and simple ways to download the Windows 11 23H2 ISO image file. Read more >>
How to Install Windows 11 Without TPM and Secure Boot
This part will walk you through how to bypass Security Boot and TPM to install Windows 11. Installing Windows 11 without TPM 2.0 and Secure Boot includes 4 parts. Therefore, you should be careful to follow the detailed steps in case something goes wrong. Let’s see how to go about it.
- Part 1. Bypassing TPM and Secure Boot Checks
- Part 2. Creating a Windows 11 Bootable USB
- Part 3. Booting Your PC from the Bootable USB
- Part 4. Installing Windows 11 Without TPM and Secure Boot
Part 1. Bypassing TPM and Secure Boot Checks
You can use the Windows Registry to bypass Secure Boot and TPM on your Windows 11. Perform the steps below to avoid TPM and Secure Boot on Windows 11.
⭐Note:
EaseUS OS2Go allows you to create a Windows 11 bootable USB bypassing TMP and Secure Boot checks. You can directly skip to Part 2.
Step 1. Press the Win + R keys to launch the Run box. Then, type regedit in the box and press Enter.
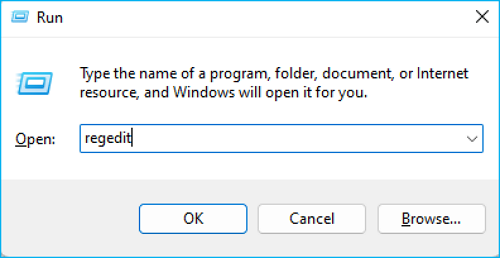
Step 2. Navigate to the path below when Registry Editor opens.
Computer\HKEY_LOCAL_MACHINE\SYSTEM\Setup
Step 3. Right-click the blank when you are in the Setup folder, then select New, and select Key. Ensure you name it as LabConfig.
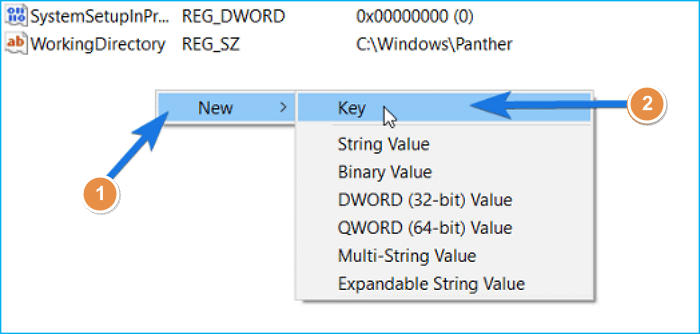
Step 4. Right-click on the blank under the LabConfig folder, select New, and then DWORD (32-bit) Value to create a new DWORD value.
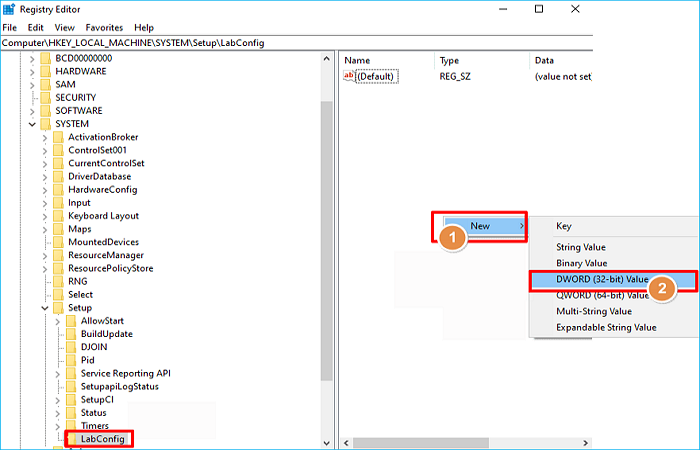
Step 5. When the file is created, name them BypassSecureBootCheck and BypassTPMCheck, respectively.
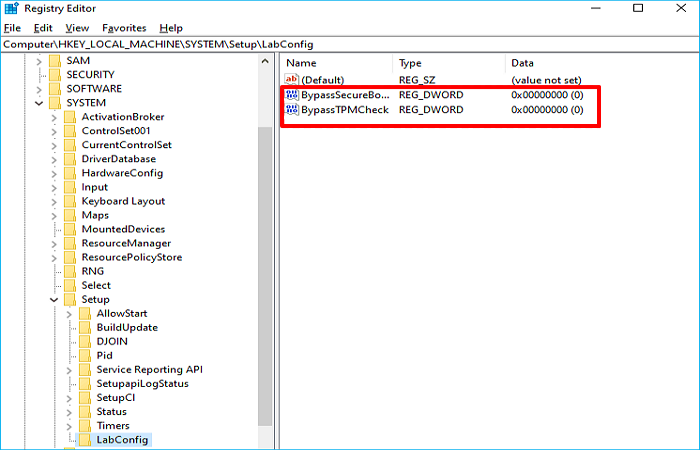
Step 6. Double-click on the two files you created, change their Value data from 0 to 1, and then tap OK.
Once done, close the Windows Registry editor and restart your PC to save all these new settings. Now, you have bypassed TPM 2.0 and Secure Boot requirements on Windows 11, and you can turn to the next part.
Part 2. Creating a Windows 11 Bootable USB
When it comes to creating a Windows 11 bootable USB, you can visit the Microsoft official site to download Windows 11 ISO image file and then create a bootable USB drive step by step on your own.
However, creating a bootable USB manually is time-consuming and troublesome. Therefore, you can use professional and free bootable USB drive creators, such as EaseUS OS2Go, to help you.
EaseUS OS2Go is a practical, easy-to-use Windows To Go creator for Windows 11/10/8/7. It can help you create a bootable USB without an ISO file and automatically download a desired Windows 10/11 version. In addition, it can help you install Windows 10 without a Microsoft account and put your Windows 10 on another computer.
The following are some key features of this bootable USB creator.
- Play Windows games on Mac
- Install Windows 11 on any PC
- Create a Windows bootable USB drive without ISO
- Install two operating systems on one computer
- Clone Windows 11/10/8/7 to a USB as portable Windows
Here is how to create a Windows 11 bootable USB with this bootable USB creator.
Step 1. Install EaseUS OS2Go on your Windows computer, it will display your system drive’s used space. Plug in a USB drive that is larger than the system drive used space. Choose the target USB drive and click Next to continue.

Step 2. EaseUS OS2Go will notify you that the following operation would delete all data on your drive. Make sure that you have backed up all the important data. Click the Continue button to proceed.

Step 3. Adjust disk layout. The default disk layout on the target drive will be exactly the same as the resource drive. You could also edit the layout according to your needs. Tick the option there if you’re using a Solid State Drive as the Windows bootable drive. Next, click Proceed.

Step 4. Then EaseUS OS2Go will start to create the portable USB drive. It usually takes a while depending on your OS and Network condition. When the progress reaches 100%, the USB drive should be bootable now.

Step 5. Insert the portable Windows USB and start your computer. Press the required key (F2, DEL, F10…) to access BIOS. Choose to boot from the USB disk.
Note: Please make sure that the boot mode (UEFI or Legacy) of the portable USB and your target computer are the same, otherwise you may not be able to boot.
Part 3. Booting Your PC from the Bootable USB
To boot your computer from the Windows 11 bootable USB drive, perform the steps below:
Step 1. Insert the bootable USB drive into your PC that you want to install Windows 11.

Step 2. Restart your computer, and press the F1, F2, F10, ESC, or DEL keys to access the BIOS Settings. Then, select USB as the boot drive.
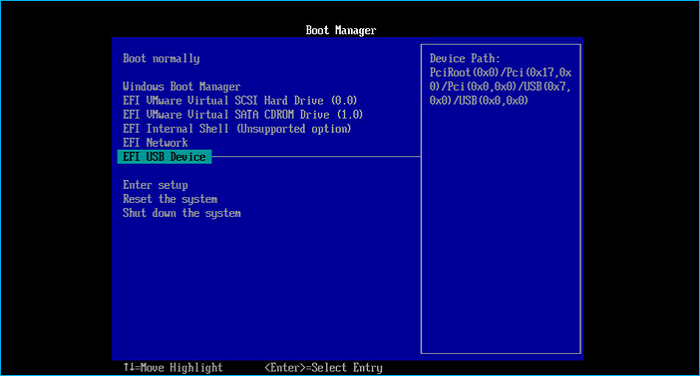
Step 3. Restart your computer again, and it will boot from the bootable USB.
Part 4. Installing Windows 11 Without TPM and Secure Boot
After you have done the above preparations, it is time to see how to bypass TPM 2.0 and Secure Boot to install Windows 11 on your computer. For that, you need to follow the instructions below carefully.
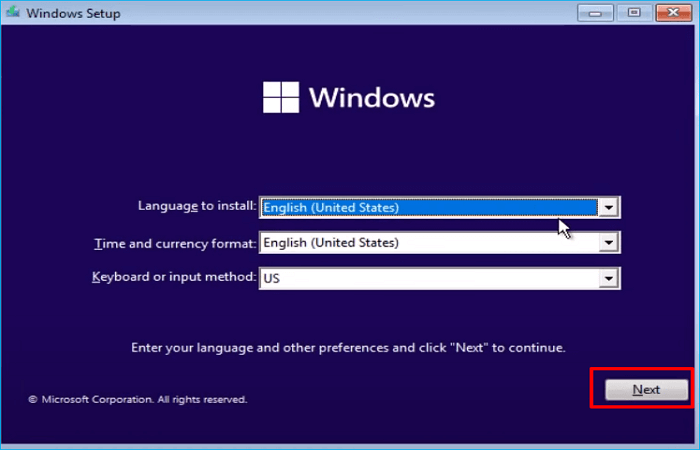
Step 1. Set the parameters when you see the Windows 11 Setup window and click Next.
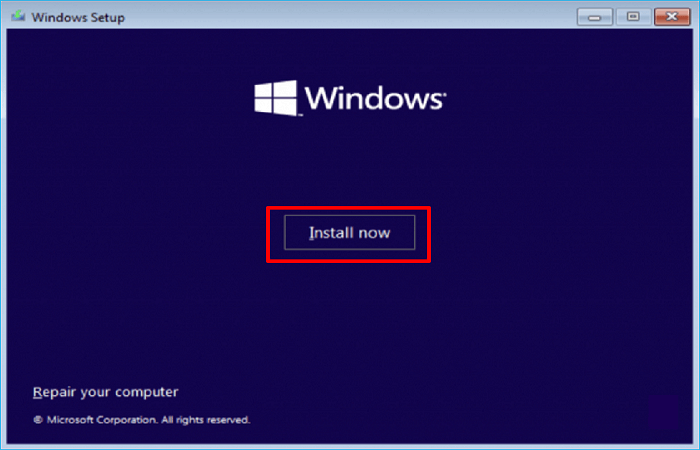
Step 2. Click Install now.
Step 3. Enter the product key or click I don’t have a product key.
Step 4. Select a Windows edition you want to install and tap Next.
Step 5. Select Custom: Install Windows only (advanced).

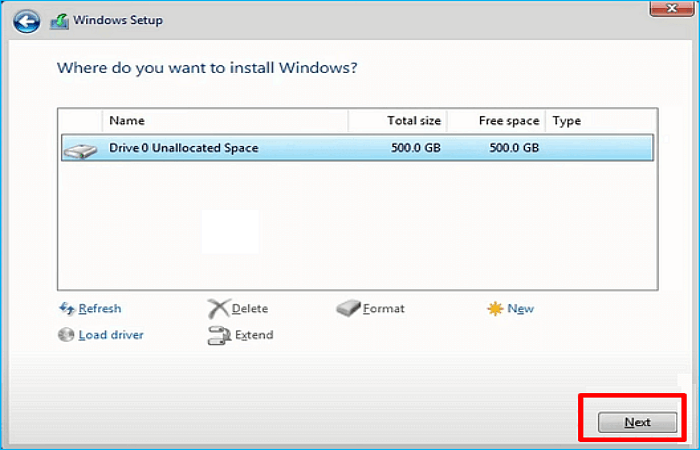
Step 6. Choose a drive where you want to install Windows 11, press Next, and follow the on-screen prompt to complete the Win 11 installation.
After you finish the installation, you can use Windows 11 on your computer without hassle.
To Wrap Things Up
That is the full instructions on how to install Windows 11 without Secure Boot and TPM. Generally speaking, Microsoft does not allow you to bypass TPM 2.0 and Secure Boot to install Windows 11 on your computer. But you can follow the steps in the article to help you install Windows 11 without them. It has 4 parts involved to install Windows 11 without using TPM 2.0 and Secure Boot.
It is worth noting that EaseUS OS2Go is a practical tool to help you create a Windows bootable USB if you want to install Windows without Secure Boot and TPM. It can also help you to fix the WinToUSB not working and install Windows on a Mac without boot camp. More valuable features are here for you to explore.
FAQs on How to Install Windows 11 Without Secure Boot and TPM
1. How do I enable TPM 2.0 without BIOS in Windows 11?
Users can activate a bypass and enable TPM 2.0 in Windows 11 without touching the BIOS by making a few registry modifications or by using script-based tools. One can utilize their device’s troubleshooter or Microsoft’s management console to enable this feature.
2. What happens if I install Windows 11 on unsupported processor?
If you install your Windows 11 on an unsupported processor, your computer will no longer be supported if you install Windows 11, and you won’t be able to get updates. The manufacturer’s warranty does not cover harm done to your computer as a result of incompatibility.
3. Can I enable Secure Boot without TPM?
Secure Boot does not require a TPM to function. However, your operating systems and any other boot media must be Secure Boot compatible for Secure Boot to be enabled.
4. How to bypass TPM and Secure Boot Windows 11 upgrade?
Start the Windows 11 installation process until you read, «This PC can’t run Windows 11.» Regedit should be entered at the Command Prompt. Next, click on LabConfig, then select New > DWORD (32-bit Value) from the right-clicked pane’s context menu. Press OK after double-clicking on BypassTPMCheck and changing the Value data to 1.