
Администраторы время от времени должны удалять старые профили пользователей (уволенные пользователи, неактивные пользователи, и т.д.) в каталоге C:\Users на рабочих станциях и серверах Windows. Чаще всего с задачей очисткой профилей пользователей Windows сталкиваются на терминальных серверах RDS (Remote Desktop Services).
Основная проблема терминальных серверов – постоянный рост размеров каталогов профилей пользователей на диске. Частично эта проблема решается политиками квотирования размера профиля пользователя с помощью FSRM или NTFS квот, использованием профилей типа FSLogix или User Profile Disk, перемещаемыми папками и т.д. Но при большом количестве RDS пользователей в папке C:\Users со временем накапливается огромное количество каталогов с неиспользуемыми профилями пользователей.
Содержание:
- Как вручную удалить профиль пользователя в Windows?
- Групповая политика для автоматической очистки старых профилей
- PowerShell скрипт для удаления старых профилей пользователей в Windows
Как вручную удалить профиль пользователя в Windows?
В Windows вы можете вручную удалить профиль пользователя через панель управления.
- Откройте Advanced System Settings (команда
SystemPropertiesAdvanced
) -> User Profiles -> Settings; - В этом окне перечислен список всех профилей пользователей (локальных и доменных), которые хранятся на этом компьютере. Размер каждого профиля пользователя на диске указан в столбце Size.
- Выберите пользователя, чей профиль нужно удалить и нажмите кнопку Delete.


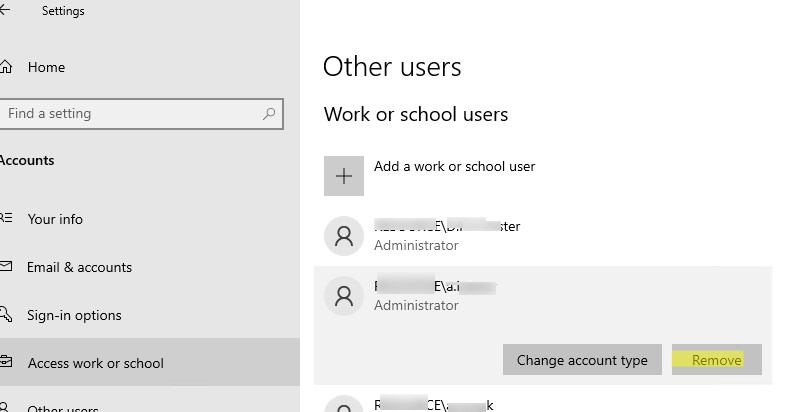
В Windows 11/10 и Windows Server 2022/2019 вы можете удалить профили пользователей с диска через приложение Settings. Перейдите в раздел Accounts -> Access work and school (или выполните команду быстрого доступа
ms-settings:otherusers
). Выберите пользователя и нажмите Remove чтобы удалить его данные с компьютера.
При корректном удалении профиля пользователя с диска будет удален каталог профиля в C:\Users и запись о пользователе в реестре.
Многие начинающиеся администраторы пытаются вручную удалить каталог с профилем пользователя из папки C:\Users. В этом случае нужно обязательно вручную удалить информацию о профиле из реестра Windows:
- Откройте редактор реестра
regedit.exe
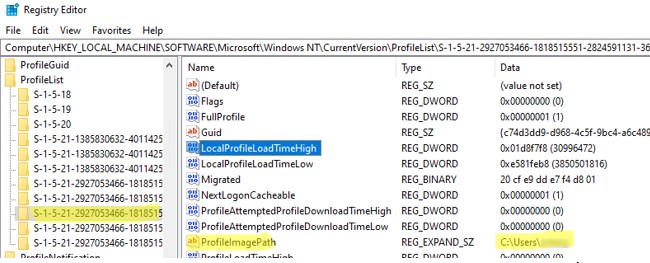
; - Перейдите в ветку HKEY_LOCAL_MACHINE\SOFTWARE\Microsoft\Windows NT\CurrentVersion\ProfileList
- Для каждого пользователя, выполнившего локальный вход в систему (этот метод входа должен быть разрешен пользователю настройками параметра Allow log on locally в GPO), создается отдельная ветка с SID пользователя в качестве имени;
- Вы можете найти раздел реестра, соответствующий пользователю по SID, или можете вручную просмотреть содержимое всех вложенных разделв, пока не найдете раздел, в котором значение ProfileImagePath указывает на каталог с профилем пользователя на диске (например,
C:\Users\kbuldogov
);
- Удалите данный раздел реестра, чтобы завершить корректное удаление профиля.
Также вы можете удалить профиль конкретного пользователя с помощью PowerShell:
Get-CimInstance -Class Win32_UserProfile | Where-Object { $_.LocalPath.split(‘\’)[-1] -eq 'kbuldogov' } | Remove-CimInstance
Эта команда удалит как каталог на диске, так и ссылку на профиль пользователя kbuldogov в реестре HKEY_LOCAL_MACHINE\SOFTWARE\Microsoft\Windows NT\CurrentVersion\ProfileList.
Эта команда будет работать как в Windows PowerShell, так и в новых версиях PowerShell Core 6.x,7.x
Можно удалить профиль пользователя на удаленном компьютере с помощью PowerShell Remoting и командлета Invoke-Command:
$compname="wks21s32"
$user = "kbuldogov"
Invoke-Command -ComputerName $compname -ScriptBlock {
param($user)
Get-CimInstance -Class Win32_UserProfile | Where-Object { $_.LocalPath.split(‘\’)[-1] -eq $user } | Remove-CimInstance
} -ArgumentList $user
Групповая политика для автоматической очистки старых профилей
В Windows есть специальный параметр групповой политики для автоматического удаления старых профилей пользователей старше xx дней. Вы можете включить этот параметр с помощью локального редактора GPO (
gpedit.msc
) или с помощью консоли управления доменными GPO (
gpmc.msc
). В этом примере на назначим политику автоматической очистки профилей на хосты в ферме RDS, которые вынесены в отдельный контейнер (Organizational Unit) Active Directory.
Прежде чем применять политику удаления старых профилей ко всем хостам, настоятельно рекомендуем проверить ее на тестовом сервере. Выведите один из серверов RDSH в режим обслуживания и протестируйте политику на нем.
- Найдите OU с компьютерами/серверами, на который вы хотите применить политику очистки старых профилей пользователей. Щелкните по OU и выберите Create a GPO in this domain and Link it here;
- Укажите имя политики и отредактируйте GPO;
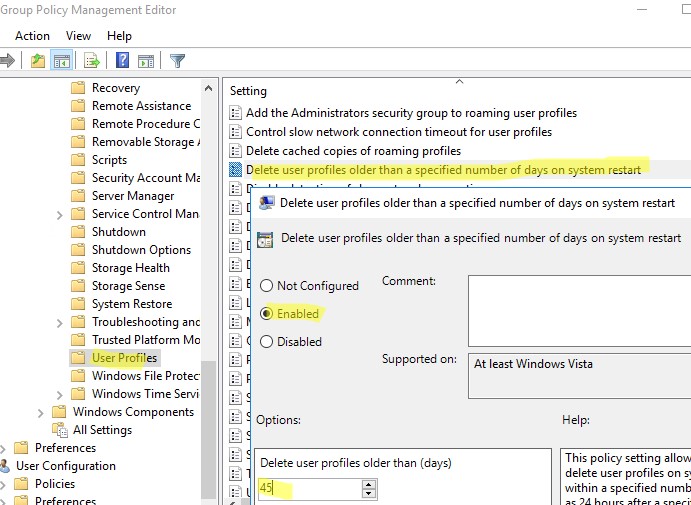
- Перейдите в раздел Конфигурация компьютера -> Административные шаблоны -> Система -> Профили пользователей (Computer Configuration -> Administrative Templates -> System -> User Profiles);
- Откройте параметр “Удалять при перезагрузке системы профили пользователей по истечении указанного числа дней” (Delete user profiles older than a specified number days on system restart);
- Включите политику и укажите через сколько дней профиль пользователя считается неактивным и “Служба профилей пользователей Windows” можно автоматически удалить такой профиль при следующей перезагрузке. Обычно тут стоит указать не менее 45-90 дней;

- После применения новых настроек групповых политк, служба User Profile Services на ваших серверах Windows будет автоматически удалять старые профили пользователей. Удаление выполняется при перезагрузке сервера.
При использовании этой политики нужно быть уверенным, что при выключении/перезагрузке сервера нет проблем с системным временем (время не сбивается), иначе могут быть удалены профили активных пользователей.
Другой недостаток — вы не можете запретить удаление определенных профилей, например, локальных учетных записей, администраторов и т.д.
В версиях до Windows 11/10 и Windows Server 2022/2019 эта политика работала некорректно. Дело в том, что неактивноть профиля пользователя ранее определялась по дате именения файла NTUSER.dat. При установке обновлений Windows, служба Trusted Installer может менять дату изменения файла NTUSER.dat в профиле каждого пользователя. В результате служба Win32_UserProfile считает, что профиль использовался недавно.
В современных версиях Windows эта политика проверяет активность профиля пользователей по параметрам LocalProfileUnloadTimeLow и LocalProfileUnloadTimeHigh в ветке
HKEY_LOCAL_MACHINE\SOFTWARE\Microsoft\Windows NT\CurrentVersion\ProfileList\<User Sid>
.
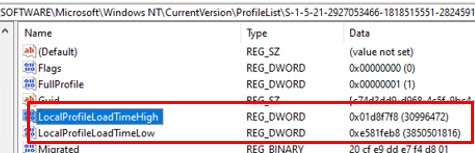
Вы можете получить значения параметров реестра LocalProfileLoadTimeLow и LocalProfileUnloadTimeHigh в привычном формате времени с помощью скрипта:
$profilelist = Get-ChildItem "HKLM:\SOFTWARE\Microsoft\Windows NT\CurrentVersion\ProfileList"
foreach ($p in $profilelist) {
    try {
        $objUser = (New-Object System.Security.Principal.SecurityIdentifier($p.PSChildName)).Translate([System.Security.Principal.NTAccount]).value
    } catch {
        $objUser = "[UNKNOWN]"
  }
    Remove-Variable -Force LTH,LTL,UTH,UTL -ErrorAction SilentlyContinue
    $LTH = '{0:X8}' -f (Get-ItemProperty -Path $p.PSPath -Name LocalProfileLoadTimeHigh -ErrorAction SilentlyContinue).LocalProfileLoadTimeHigh
    $LTL = '{0:X8}' -f (Get-ItemProperty -Path $p.PSPath -Name LocalProfileLoadTimeLow -ErrorAction SilentlyContinue).LocalProfileLoadTimeLow
    $UTH = '{0:X8}' -f (Get-ItemProperty -Path $p.PSPath -Name LocalProfileUnloadTimeHigh -ErrorAction SilentlyContinue).LocalProfileUnloadTimeHigh
    $UTL = '{0:X8}' -f (Get-ItemProperty -Path $p.PSPath -Name LocalProfileUnloadTimeLow -ErrorAction SilentlyContinue).LocalProfileUnloadTimeLow
    $LoadTime = if ($LTH -and $LTL) {
        [datetime]::FromFileTime("0x$LTH$LTL")
    } else {
        $null
    }
    $UnloadTime = if ($UTH -and $UTL) {
        [datetime]::FromFileTime("0x$UTH$UTL")
    } else {
        $null
    }
    [pscustomobject][ordered]@{
        User = $objUser
        SID = $p.PSChildName
        Loadtime = $LoadTime
        UnloadTime = $UnloadTime
    }
}

PowerShell скрипт для удаления старых профилей пользователей в Windows
Вы можете удалять профили неактивных или заблокированных пользователей с помощью скрипта PowerShell.
Сначала попробуем подсчитать размер профиля каждого пользователя в папке C:\Users c помощью простого скрипта из статьи “Вывести размер папок с помощью PowerShell”:
gci -force ‘C:\Users\’-ErrorAction SilentlyContinue | Where { !($_.Attributes -match " ReparsePoint") }| ? { $_ -is [io.directoryinfo] } | % {
$len = 0
gci -recurse -force $_.fullname -ErrorAction SilentlyContinue | % { $len += $_.length }
$_.fullname, ‘{0:N2} GB’ -f ($len / 1Gb)
$sum = $sum + $len
}
“Общий размер профилей”,'{0:N2} GB’ -f ($sum / 1Gb)
Итого суммарный размер всех профилей пользователей в каталоге C:\Users около 22 Гб.
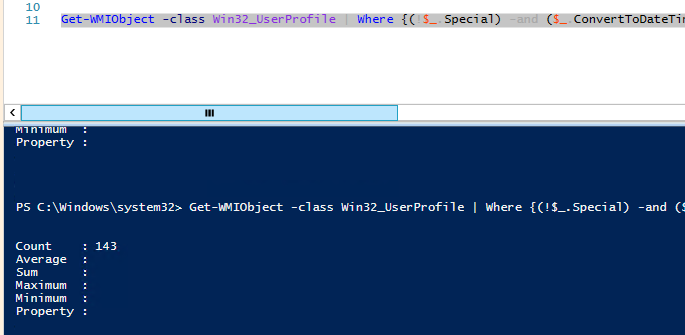
Теперь выведем список пользователей, профиль которых не использовался более 60 дней. Для поиска можно использовать значение атрибута профиля LastUseTime.
Get-WMIObject -class Win32_UserProfile | Where {(!$_.Special) -and ($_.ConvertToDateTime($_.LastUseTime) -lt (Get-Date).AddDays(-60))}| Measure-Object
У меня на терминальном сервере оказалось 143 профиля неактивных пользователей (общим размером около 10 Гб).
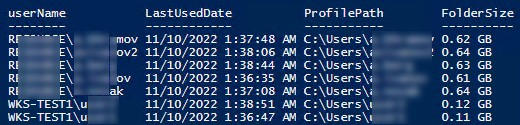
Следующий PowerShell скрипт выведет список подробную информацию о профилях пользователей, которые не обновлялись более 60 дней. Скрипт сконвертирует SID пользователя в имя, посчитает размер профиля каждого пользователя и выведет все в таблице:
$allprofilesinfo = @()
$OldProfiles=Get-WMIObject -class Win32_UserProfile | Where {(!$_.Special) -and ($_.ConvertToDateTime($_.LastUseTime) -lt (Get-Date).AddDays(-60))}
Foreach ($OldProfile in $OldProfiles)
   {$objSID = New-Object System.Security.Principal.SecurityIdentifier ($OldProfile.SID)
    $objUser = $objSID.Translate( [System.Security.Principal.NTAccount])
        $userinfo = New-Object PSObject -Property @{
            userName = $objUser.Value
            ProfilePath = $OldProfile.localpath
            LastUsedDate = $OldProfile.ConvertToDateTime($OldProfile.LastUseTime)
            FolderSize =  "{0:N2} GB" -f ((gci –force $OldProfile.localpath –Recurse -ErrorAction SilentlyContinue| measure Length -s).sum / 1Gb)
        }
    $allprofilesinfo += $userinfo
   }
$allprofilesinfo
Чтобы удалить все эти профили достаточно добавить перенаправить список на команду Remove-WmiObject (перед использование скрипта удаления желательно несколько раз перепроверить его вывод с помощью параметра –WhatIf ):
Get-WMIObject -class Win32_UserProfile | Where {(!$_.Special) -and (!$_.Loaded) -and ($_.ConvertToDateTime($_.LastUseTime) -lt (Get-Date).AddDays(-30))} | Remove-WmiObject –WhatIf
Как мы уже упомянули выше, при установке некоторых обновлений Windows, служба Trusted installer может менять дату изменения файла NTUSER.dat в профиле каждого пользователя.
На скриншоте выше видно, что все профили были изменены примерно в одно и тоже время. Проверьте дату последней установки обновлений в Windows:
gwmi win32_quickfixengineering |sort installedon |select InstalledOn -Last 1
Или с помощью модуля PSWindowsUpdate:
Get-WUHistory | Select-Object -First 20
Скорее всего она совпадет с датой изменения профилей. Поэтому в старых версиях Windows можно получить список неактивных профилей с помощью другого скрипта, который проверяет атрибуту lastwritetime каталога пользователя:
$USERS= (Get-ChildItem -directory -force 'C:\Users' | Where { ((Get-Date) — $_.lastwritetime).days -ge 60 } | % {'c:\users\' + $_.Name})
foreach ($User in $USERS) {
Get-WMIObject -class Win32_UserProfile | Where {(!$_.Special) -and (!$_.Loaded) -and ($_.LocalPath -eq $User)} | Remove-WmiObject WhatIf }
Чтобы не удалять профили некоторых пользователей, например, специальные аккаунты System и Network Service, учетную запись локального администратора, пользователей с активными сессиями, список аккаунтов-исключений), нужно модифицировать скрипт следующим образом:
#Список аккаунтов, чьи профили нельзя удалять
$ExcludedUsers ="Public","zenoss","svc",”user_1”,”user_2”
$LocalProfiles=Get-WMIObject -class Win32_UserProfile | Where {(!$_.Special) -and (!$_.Loaded) -and ($_.ConvertToDateTime($_.LastUseTime) -lt (Get-Date).AddDays(-60))}
foreach ($LocalProfile in $LocalProfiles)
{
if (!($ExcludedUsers -like $LocalProfile.LocalPath.Replace("C:\Users\","")))
{
$LocalProfile | Remove-WmiObject
Write-host $LocalProfile.LocalPath, "профиль удален” -ForegroundColor Magenta
}
}
Вы можете настроить запуск этого скрипта через shutdown скрипт групповой политики или по расписанию заданием планировщика. (перед настройкой автоматического удаления профилей внимательно протестируйте скрипт в своей среде!).
Можно модифицировать скрипт, чтобы автоматически удалять пользователи всех пользователей, которые добавлены в определенную группу AD. Например, вы хотите автоматически удалять профили уволившихся пользователей. Просто добавьте такие учетные записи в группу DisabledUsers и выполните на сервере скрипт:
$users = Get-ADGroupMember -Identity DisabledUsers | Foreach {$_.Sid.Value}
$profiles = Get-WmiObject Win32_UserProfile
$profiles | Where {$users -eq $_.Sid} | Foreach {$_.Delete()}
Deleting a domain user profile from the registry in Windows 10 is a task that involves tinkering with the system’s innards. It’s essential for freeing up space or refreshing a user’s settings without affecting others. First, remove the profile through the system settings, then delve into the registry to clear out remaining traces. Proceed with caution, as the registry is like the brain of your computer, and a misstep can cause headaches. Follow this guide, and you’ll be a registry whiz in no time!
In this section, we’re going to walk through the steps to completely remove a domain user profile from the Windows 10 registry. This process ensures that all settings and data related to the user profile are wiped clean, making way for a fresh start.
Step 1: Back Up Your Data
Before starting, ensure all important files are backed up.
Backing up is crucial because once you delete something from the registry, it’s gone for good. Use an external drive or cloud service for peace of mind.
Step 2: Access System Properties
Go to “System Properties” to begin the deletion process.
Open the “Run” dialog by pressing Win + R, type “sysdm.cpl,” and hit Enter. This takes you to the System Properties where user profiles are managed.
Step 3: Delete User Profile
Select and delete the profile from the “User Profiles” window.
In the “User Profiles” section, find the domain user profile you wish to delete and click on “Delete.” This removes the profile from the main system.
Step 4: Open the Registry Editor
Access the registry editor by typing “regedit” in the Run dialog.
Be extra careful here. The registry editor is powerful but unforgiving. A wrong move can lead to system issues, so double-check each click.
Step 5: Navigate to ProfileList
Find the ProfileList key where user data is stored.
In the registry editor, navigate to “HKEY_LOCAL_MACHINESOFTWAREMicrosoftWindows NTCurrentVersionProfileList.” This is where Windows keeps user profile information.
Step 6: Identify and Delete the SID Key
Locate the SID key for the user and delete it.
Look for the SID (Security Identifier) that corresponds to the deleted profile. Right-click and select “Delete” to remove it completely.
After completing these actions, the domain user profile will be fully removed from Windows 10. This means all settings and preferences will be reset, and the profile will no longer exist on the system.
Tips for Deleting Domain User Profile from Registry in Windows 10
- Always back up your registry before making changes. You can do this by selecting “File” and then “Export” in the registry editor.
- Use the “Whoami /user” command in the Command Prompt to find a user’s SID if you’re unsure.
- Avoid deleting anything in the registry unless you’re sure it’s related to the user profile.
- If you’re not confident, seek help from a tech-savvy friend or professional.
- Regularly cleaning up old profiles can help keep your system running smoothly and free up disk space.
Frequently Asked Questions
What is a domain user profile?
A domain user profile stores personal settings and files for users who log in through a network domain.
Why should I delete a domain user profile?
Deleting a profile can help resolve corrupted settings or free up disk space if the user no longer needs access.
Can deleting a profile affect other users?
No, deleting one user profile does not impact other profiles on the same machine.
What happens if I delete the wrong SID in the registry?
Deleting the wrong SID can cause login issues or remove the wrong user’s data, so double-check before deleting.
Is there a way to recover a deleted user profile?
Once a profile is deleted from the registry, it cannot be recovered. Always back up important data beforehand.
Summary
- Back up your data.
- Access System Properties.
- Delete User Profile.
- Open the Registry Editor.
- Navigate to ProfileList.
- Identify and Delete the SID Key.
Conclusion
Congratulations, you’ve successfully learned how to delete a domain user profile from the registry in Windows 10! This process is like spring cleaning for your computer. By clearing out old user profiles, you’re not only tidying up but also potentially speeding up your system. Remember, the registry is the digital heart of your PC, and while it might seem daunting at first, with careful steps and a methodical approach, it’s something anyone can manage.
Taking charge of your computer’s registry can seem intimidating, but with practice, you’ll become more confident. Always keep safety a priority; create backups and double-check every step. If you feel a bit lost, plenty of resources and forums are available to help. Perhaps consider documenting your journey for others or even for your future self.
As we wrap up, don’t forget to share your newfound skills. Whether it’s a colleague stuck with a sluggish PC or a friend needing technical help, your knowledge can be a beacon of hope. Keep exploring the digital world, and remember, every click brings you closer to mastering your computer!
Matt Jacobs has been working as an IT consultant for small businesses since receiving his Master’s degree in 2003. While he still does some consulting work, his primary focus now is on creating technology support content for SupportYourTech.com.
His work can be found on many websites and focuses on topics such as Microsoft Office, Apple devices, Android devices, Photoshop, and more.
Adding a new account in Windows 11 / Windows 10 creates a user profile, a collection of settings, and folders that ensure each person on the PC has a unique, customized experience. This also contains their documents, saved games, videos, and more. This can take up some space, but fortunately, Windows lets you delete a user profile if you no longer need it or it gets corrupted.
The Difference Between User Profiles and User Accounts in Windows
Managing user data and settings on Windows 10 and 11 systems involves understanding the distinction between a user account and a user profile. While often used interchangeably, these two components serve different yet complementary roles in the Windows operating environment.
A user account is essentially the gateway to accessing a Windows system, acting as the user’s identity for system access. It consists of a username and, optionally, a password, which are required to log into Windows. User accounts can be associated with different levels of privileges, such as standard user rights or administrative permissions, determining what the user can and cannot do on the system.
In contrast, a user profile is a personalized environment linked to a user account. Once a user logs in, the system loads a unique user profile containing personal settings, configurations, desktop backgrounds, application settings, and files stored in the user’s personal folders. This profile ensures that each user’s experience is tailored to their preferences and saved from session to session.
Deleting a Windows User Profile vs. Deleting a Windows User Account
Deleting a user profile is a process distinct from deleting a user account. When you delete a user profile in Windows 10 or 11, you’re removing all the personalized settings and files associated with that profile, effectively resetting the user’s environment to a default state. However, the user account itself may remain intact, allowing for the creation of a new profile when the user logs in again. This process can be essential for troubleshooting, such as when a profile becomes corrupted, or for removing the data of users who no longer need access to the system.
There are multiple methods to delete a user profile in Windows, each suitable for different scenarios and user preferences. The Settings app offers a straightforward approach for those seeking simplicity, while the Control Panel and User Accounts Wizard provide more granular control over the deletion process. For a comprehensive removal, especially to address deeper system-level issues or ensure the complete clearance of all profile remnants, Advanced System Properties might be the preferred method.
⚠️ Please note: The process described below is the same in Windows 11 as it is in Windows 10. However, bear in mind that we’ll be using screenshots from Windows 10, so your UI may look a little different. We’ll point out any changes you need to be aware of as they come up.
How to Delete a Windows User Profile via System Properties
Before you start this process, make sure the user account you wish to delete is signed out.
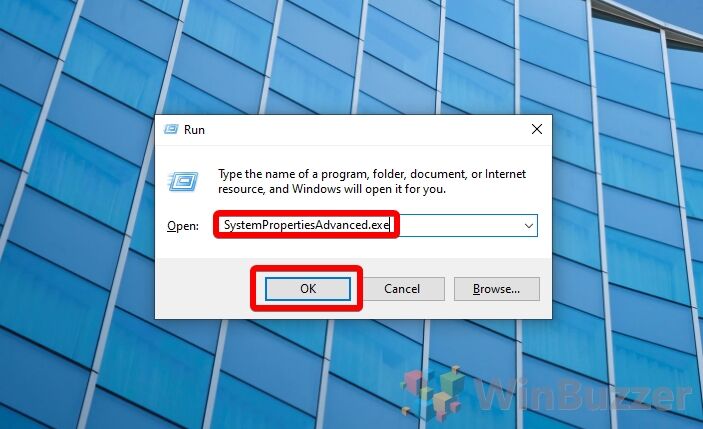
- Open System Properties
Press “Windows + R” to open the Run dialog, type “systempropertiesadvanced.exe”, and click “OK”.

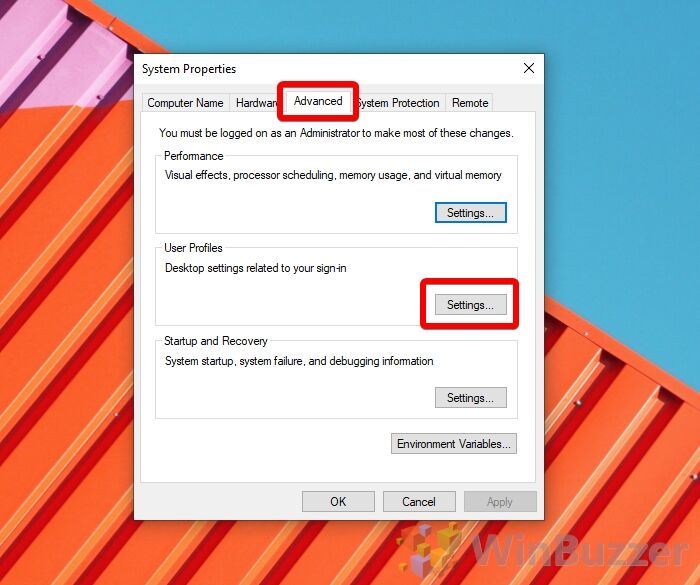
- Open the Windows 11 / Windows 10 user profile settings
In the “Advanced” tab, look for the “User Profiles” heading and click “Settings…”.

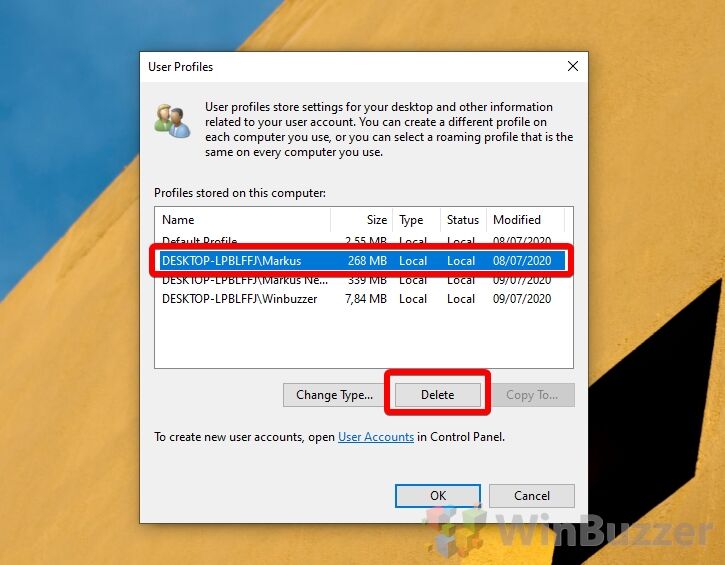
- Delete the Windows 11 / Windows 10 user profile
Windows 11 / Windows 10 will now return a list of user profiles linked to certain accounts. You’ll be able to see the name of the account after the PC identifier. Click the account, then press “Delete”.

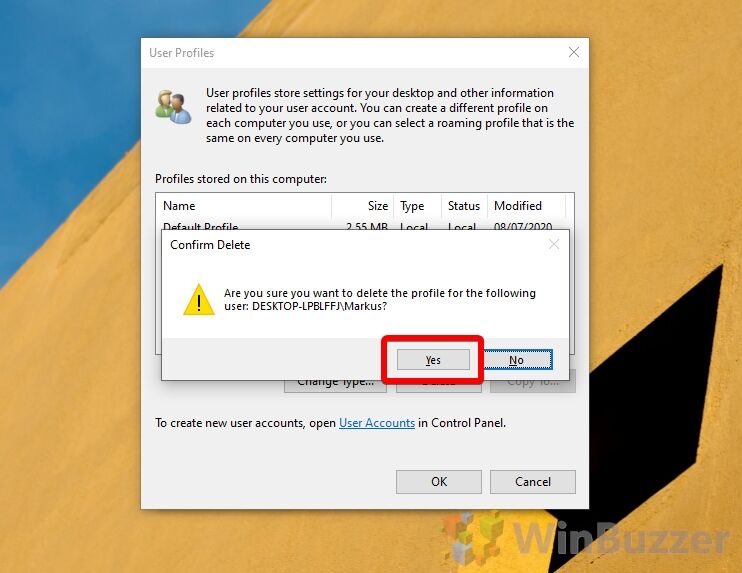
- Confirm the Windows 11 / Windows 10 delete user profile action
Microsoft will then make sure you really want to remove the user profile. You should make sure there are no files or settings you need on that account before you continue. When ready, click “Yes”.

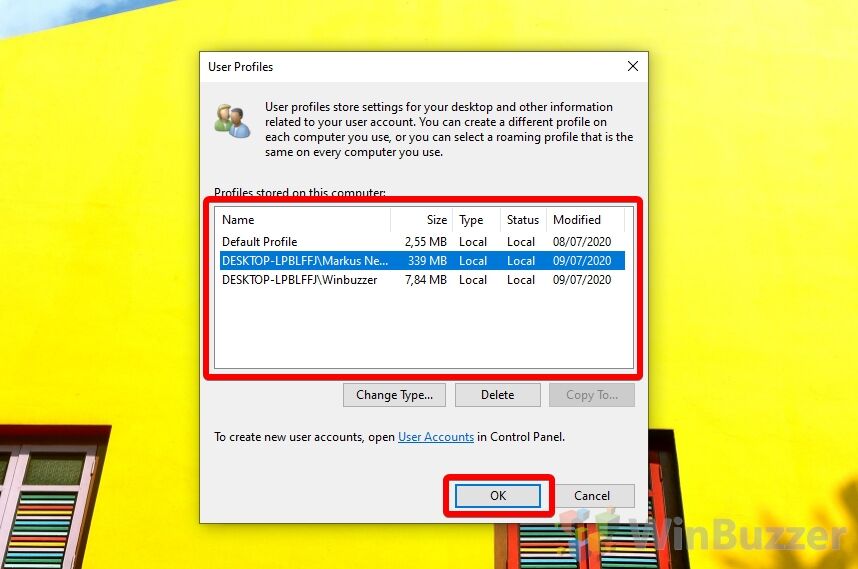
- Check the profile is removed from the User Profiles window
After pressing yes, you should note that the user profile is gone from the “Profiles stored on this computer:” list. Press “OK” to close it.

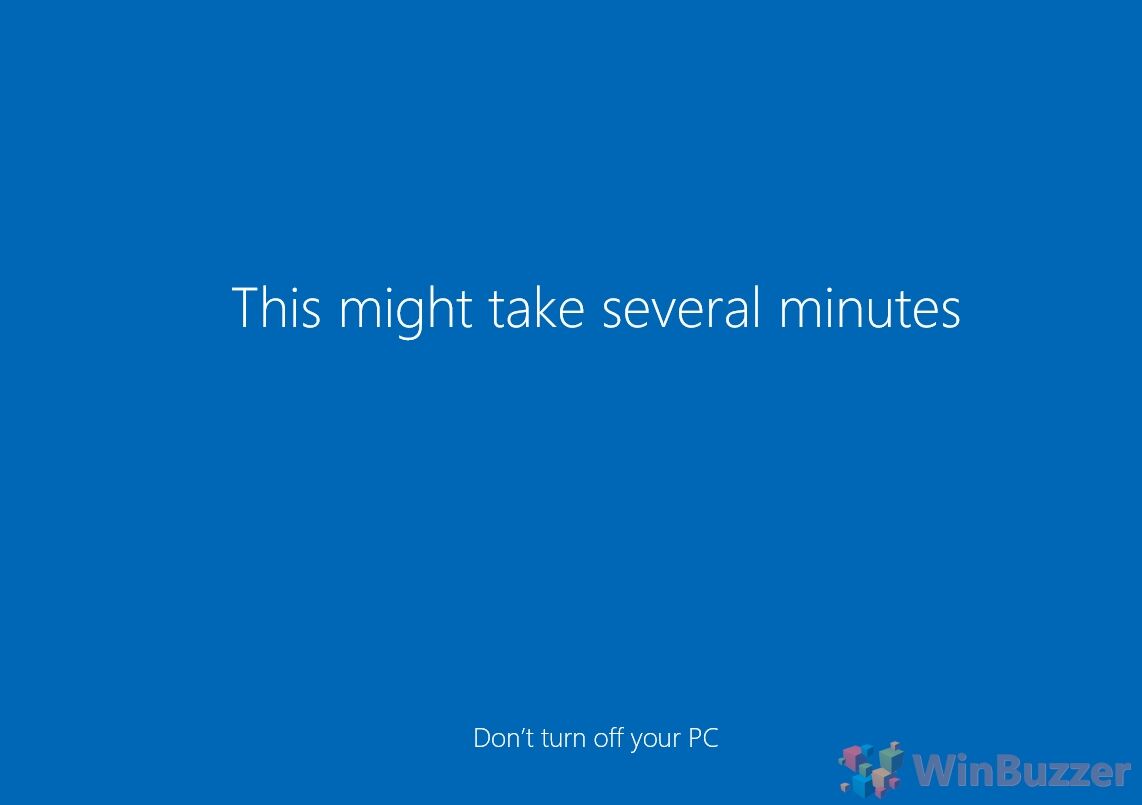
- Log back in to the user account to create a new user profile
You can create a new user profile for that account at any time by simply logging into it again. When you do so, Windows 10 will show a “This might take several minutes” prompt.

How to Delete a Windows User Profile from the Registry
If the above method doesn’t work, you can delete a user profile from the registry and via Windows 11 / Windows 10 File Explorer. First, though, sign out of the user and read up on how to safely edit the registry.
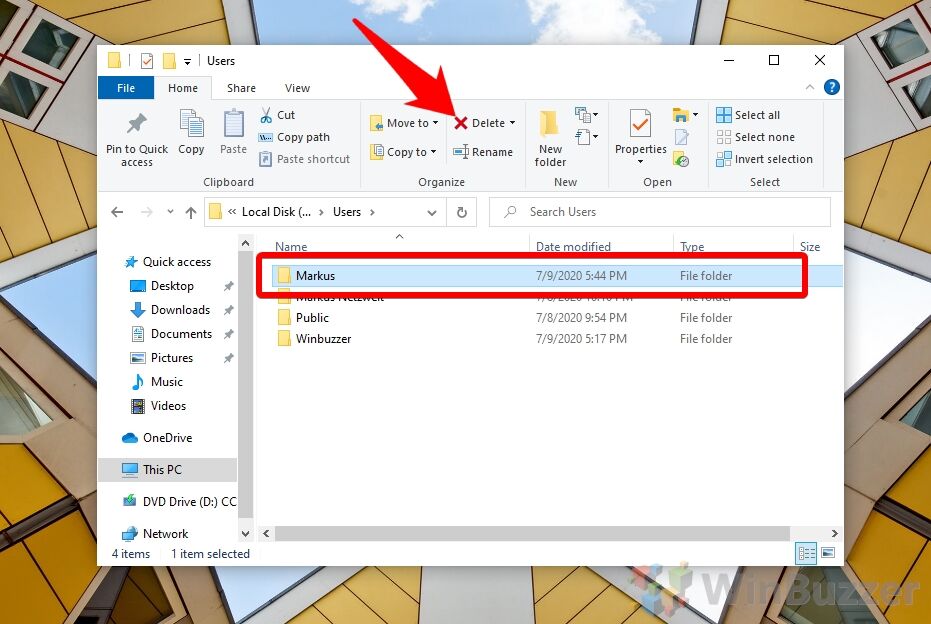
- Delete the Windows 11 / Windows 10 user profile via File Explorer
Head to the
C:\Usersfolder and look for the user profile you want to remove. Click it, then press “Delete”.
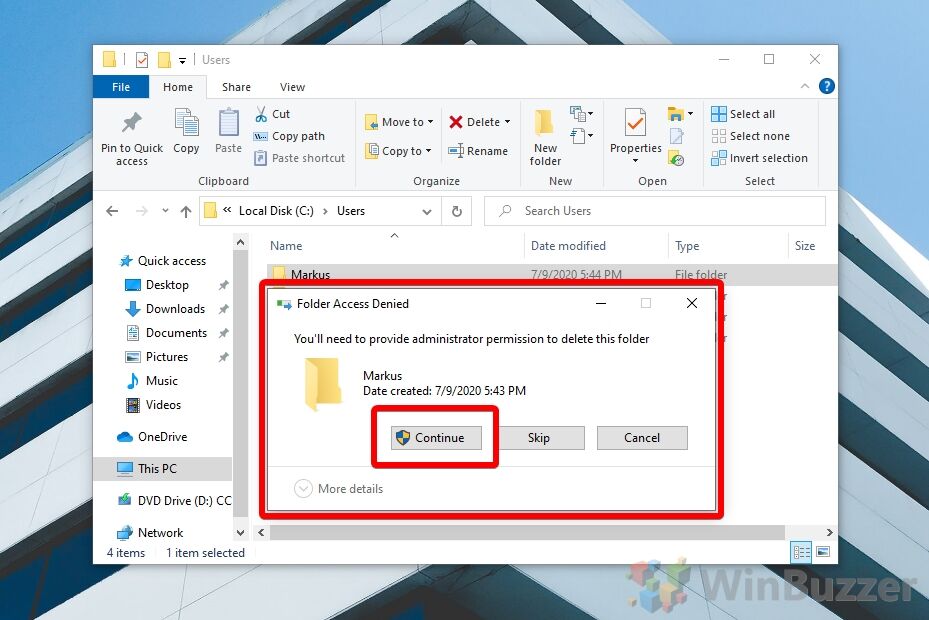
- Press “Continue” on UAC prompt

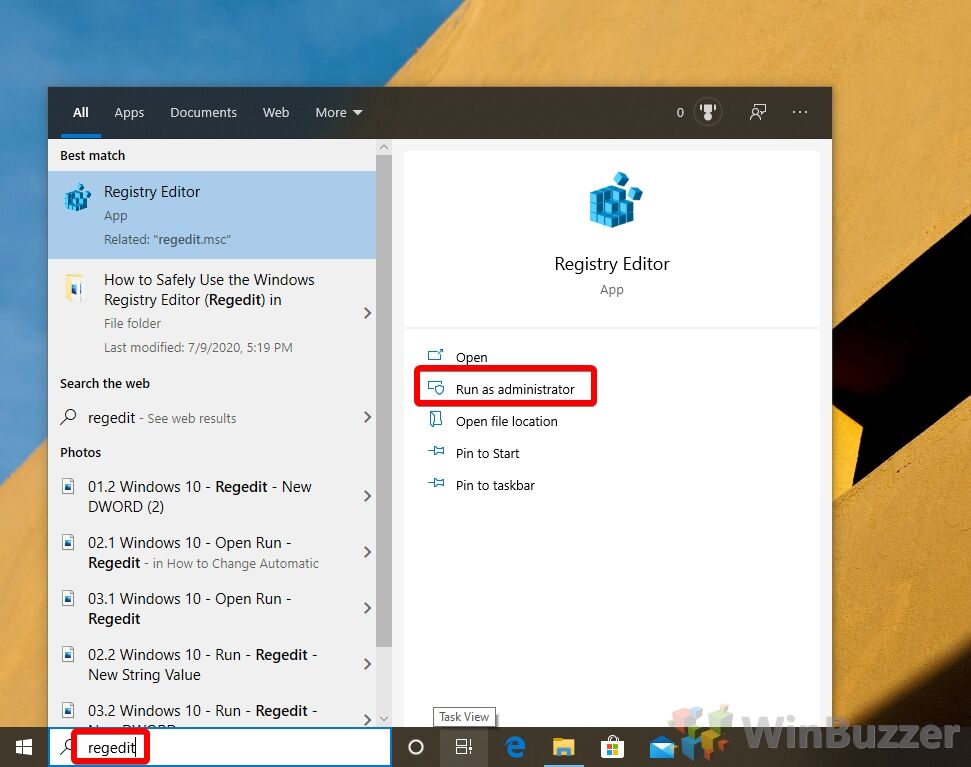
- Open the Registry editor
Press the “Start” button and type “regedit”, then click “Run as administrator”.

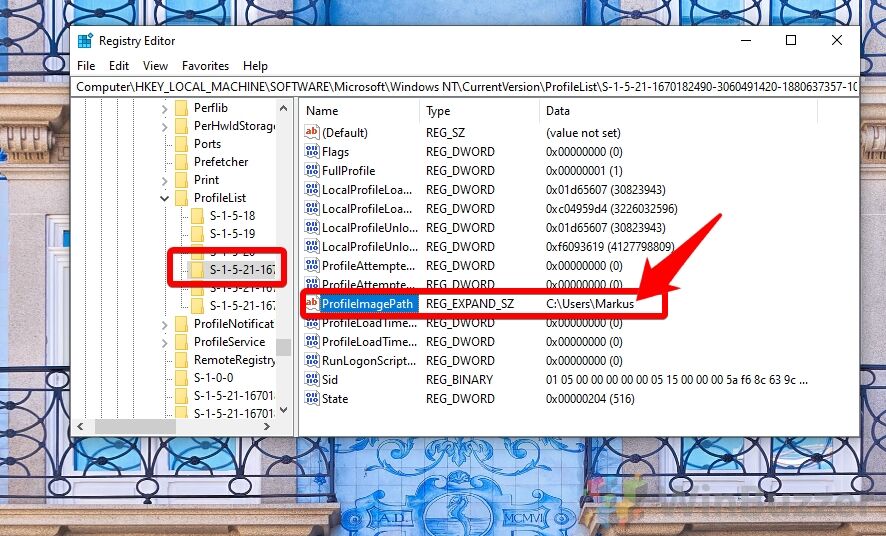
- Navigate to the profile list in registry editor
In the search bar or side menu, navigate to the profile list in registry editor, which is found at:
Computer\HKEY_LOCAL_MACHINE\SOFTWARE\Microsoft\Windows NT\ProfileList
- Find the account in the profile list registry key
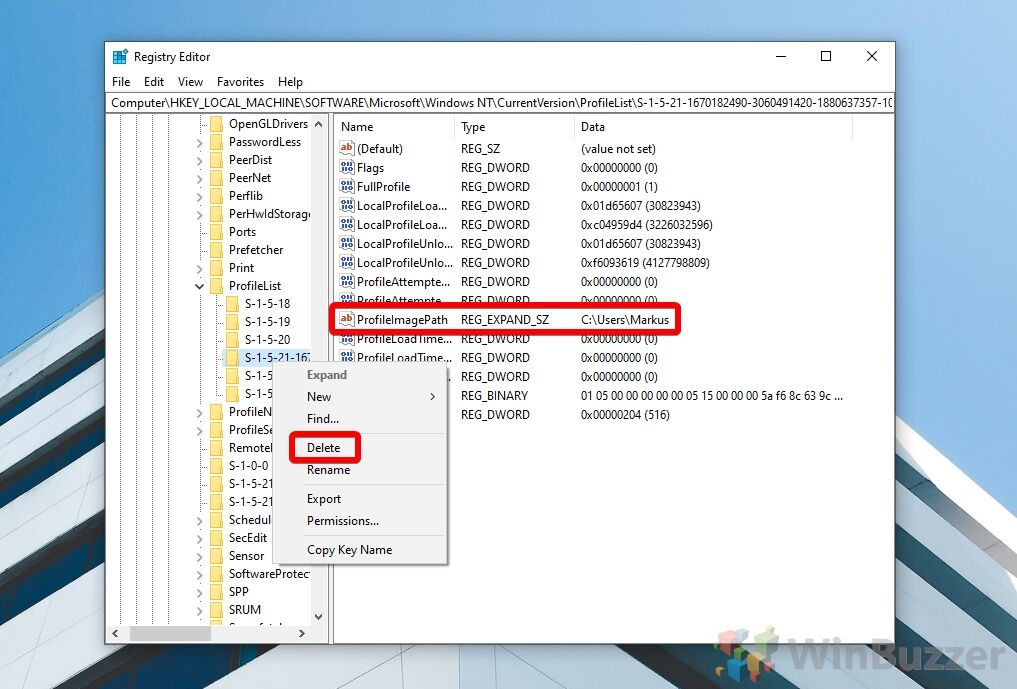
The profile list registry key will have several SID keys for each user. To find the one you’re looking for, click on each and check the “Data” field next to the “ProfileImagePath” entry.

- Delete the user profile registry key
In the left-hand side menu, right-click the correct user SID and press “Delete”.

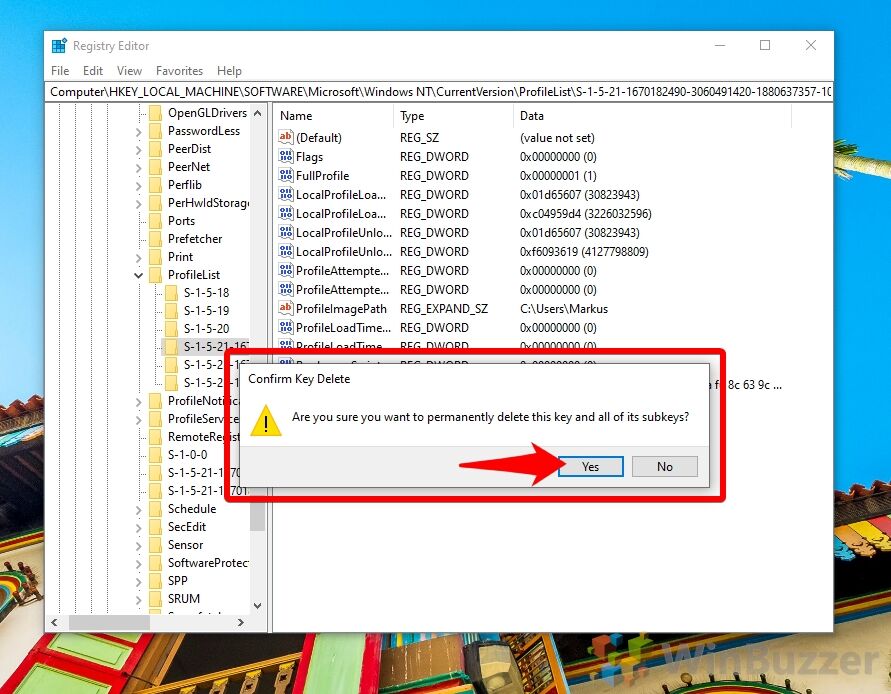
- Confirm the user profile registry key deletion
Make sure you’re deleting the key for the correct user before clicking “Yes”.


FAQ – Frequently Asked Questions about Windows User Profiles
How can I back up a user profile before deleting it in Windows 10 or 11?
Use Windows Backup and Restore feature to create a system image or manually copy the user folder from C:\Users\ to another location. Ensure all necessary files are included in the backup.
What are the implications of deleting a user profile on shared documents and desktop items?
Items stored in a user’s profile, including documents and desktop items, will be permanently deleted. Shared items located in public folders or other user profiles won’t be affected.
Can I delete a user profile to fix a login issue without deleting the account?
Yes, deleting just the profile can often resolve login problems by allowing Windows to create a fresh profile on the next login, without affecting the user’s account.
How do I manage user accounts and profiles in a family or shared computer setup?
Use Windows Settings to create separate accounts for each user, allowing for individual profiles, settings, and parental controls if necessary. This ensures a personalized and secure environment for each user.
What steps should I take if I’m unable to delete a user profile through the usual methods?
Restart your computer in Safe Mode and try deleting the profile again, or use a third-party software designed to clean up user profiles and registry entries.
How do I restore a user profile that was accidentally deleted?
If you have a backup, you can restore the user’s data by copying it back to the C:\Users\ directory. Restoring the profile settings exactly as they were might not be possible without a system restore point.
Can I delete a user profile to free up disk space?
Yes, deleting user profiles can free up disk space, especially if the profiles contain large files or have accumulated a lot of data over time.
How do I change the default location of user profiles in Windows 10 or Windows 11?
This involves editing the registry or using Group Policy, and it’s a complex process that can affect system stability. It’s typically recommended only for advanced users or IT professionals.
What should I do if a user profile deletion fails due to file permission issues?
Ensure you have administrative rights, take ownership of the files or folders in question, or check for any open files and applications that might be using the profile.
How does deleting a user profile affect cloud-synced data, like OneDrive or Dropbox?
Data synced with cloud services like OneDrive or Dropbox is not lost when a user profile is deleted, but you’ll need to reconfigure the sync settings when you log in again or set up a new profile.
Can I delete all user profiles at once in Windows 10 or Windows 11?
While technically possible, it’s risky and not recommended because it includes deleting the default and system profiles, which can render the system unusable or unstable.
How can I ensure that all traces of a user profile are removed from the system?
After deleting the profile via System Properties, manually check the C:\Users\ directory and the registry to ensure all related data and settings are removed.
What are the best practices for managing multiple user profiles on a shared computer?
Regularly back up important data, set clear storage and privacy guidelines, periodically review and clean up unused profiles, and ensure each user logs out after their session.
How can I prevent users from creating new profiles on a Windows 10 or Windows 11 PC?
This can be controlled through Group Policy settings by disabling the “Add or remove user accounts” option and other related settings under User Rights Assignment.
Is it possible to convert a local user profile to a Microsoft account profile without losing data?
Yes, you can link a local account to a Microsoft account through the Settings app under Accounts > Your info. This retains the profile data while enabling sync features and other Microsoft account benefits.
Related: How to Delete a Windows User Account
There are various reasons you might need to delete a user account: maybe the account is no longer needed, you’re preparing to give the computer to someone else, or you simply want to clean up old accounts that are no longer in use. Regardless of the reason, Windows 11 offers several ways to remove user accounts, which we explain in detail in our other guide.
Related: How to Enable the Hidden Administrator Account in Windows 11 and Windows 10
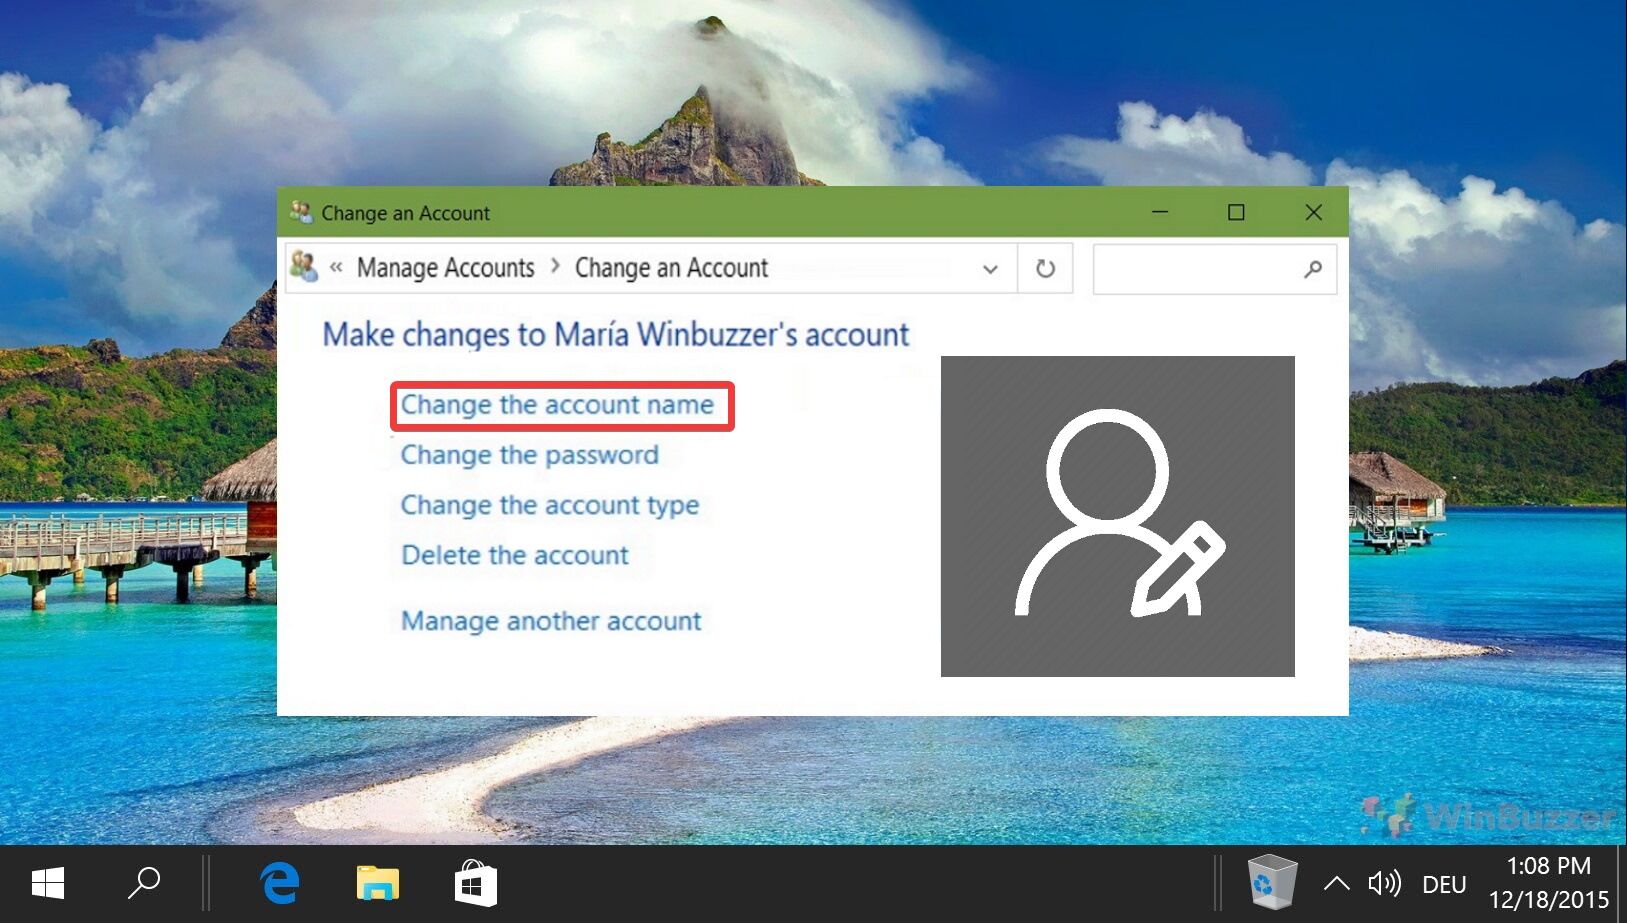
Related: How to Change a Windows Username / Account Name
There are different reasons why you might want to change a username in Windows 11 or Windows 10. Maybe your real name has changed and you need to reflect this change in Windows as well. Or you have been using a nickname and want to do a username change to your real name. In our other guide, we show you how to change a username / account name in Windows.
Last Updated on November 7, 2024 10:44 pm CET
Столкнулся с проблемой — глюканул профиль пользователя: винда стала требовать пароль, при этом, пароля там не было. Сброс пароля с помощью net user ни к чему не приводил. В учетных записях (netplwiz) пользователь не отображался, однако в реестре профиль был, команда net users его показывала.
Поскольку, там ничего ценного не было, то решил удалить его и создать другой.
В командной строке ввел net user profile_name /delete — сообщение, что команда выполнена.
Перезагрузил, в командной строке net users — профиль на месте.
net user profile_name /delete выдает ошибку, что профиля нет.
net user profile_name /add выдает ошибку, что профиль есть.
В общем, профиль Шредингера.
При этом, не работает ПУ — Учетные записи пользователей — Изменение типа… и ПУ — Учетные записи пользователей — Удаление… не открываются.
В реестре, в ветке HKLM\Software\Microsoft\Windows NT\CurrentVersion\ProfileList раздел профиля удалил.
ОС Win10 Home
Собственно, вопрос: как удалить профиль не переустанавливая системы?
-
Вопрос задан
-
1891 просмотр

Поскольку среди пользователей Windows 10 есть новички, только приступившие к знакомству с операционной системой, на нашем сайте появляются инструкции с описанием вещей, которые опытным юзерам уже давно знакомы, понятны и очевидны. В этом гайде уделено внимание вопросам: как удалить пользователя Windows 10; как удалить встроенные учётные записи Администратор и Гость, если появляется сообщение «Пользователь не может быть удален»; что делать, если при входе в систему отображаются два одинаковых пользователя Windows 10.
Обратите внимание, что для совершения всех манипуляций учетная запись должна обладать правами администратора. Сменить их в случае необходимости поможет инструкция Как создать учётную запись пользователя Windows 10. Перед ликвидацией ненужного аккаунта позаботьтесь о том, чтобы в нём не было важных файлов и данных.
Удаление пользователя в Параметрах Windows 10
Если вас пока не сильно тянет искать сложные пути для удаления пользователя в Windows 10, вы можете воспользоваться распространённым и простым способом удаления ненужного пользовательского профиля со своего компьютера.
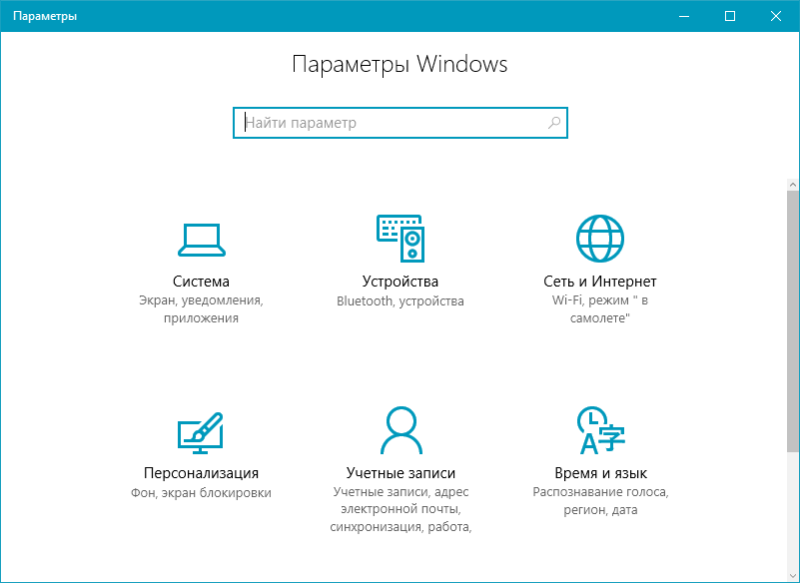
- Откройте приложение Параметры. Сделать это можно из меню Пуск, либо же сочетанием клавиш Win + I.

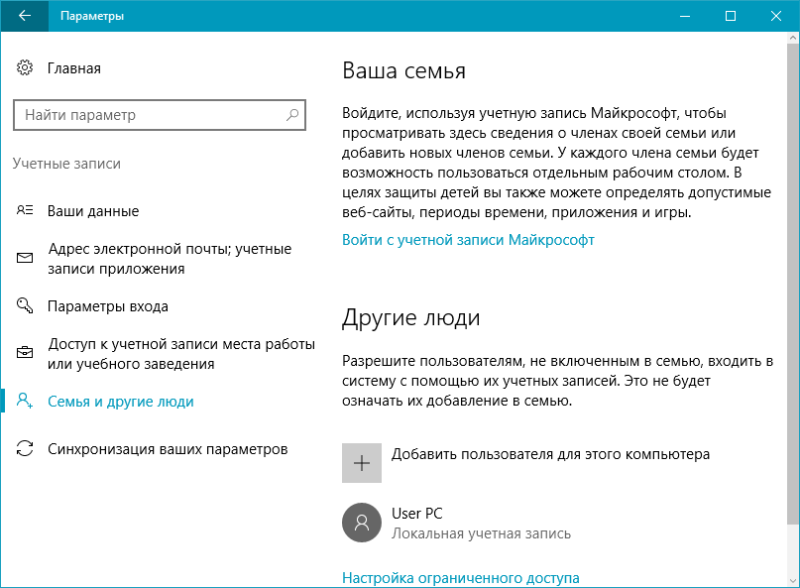
- Пройдите в раздел Учетные записи и откройте подраздел Семья и другие люди.

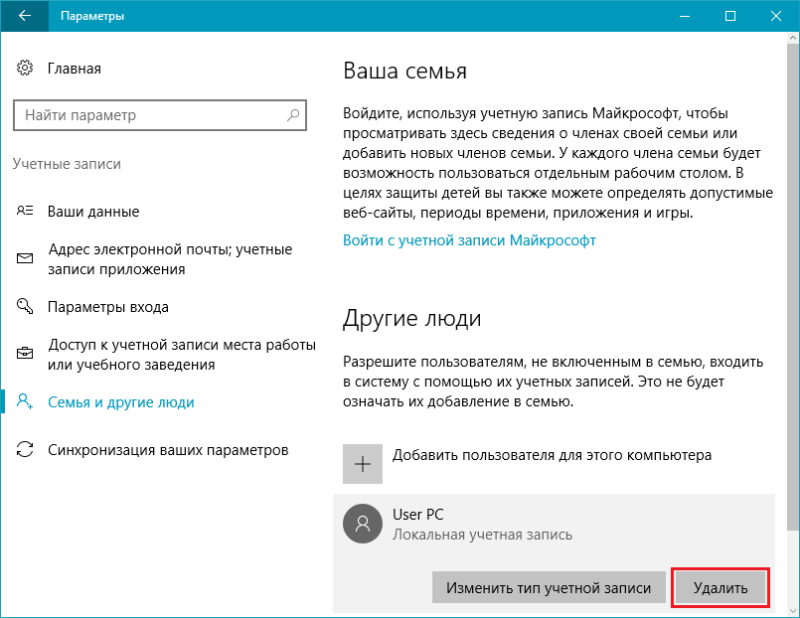
- Перед вами появятся две группы. Во второй, под названием Другие люди, один раз нажмите на аккаунт, который вы хотите убрать, и кликните под ним на Удалить.

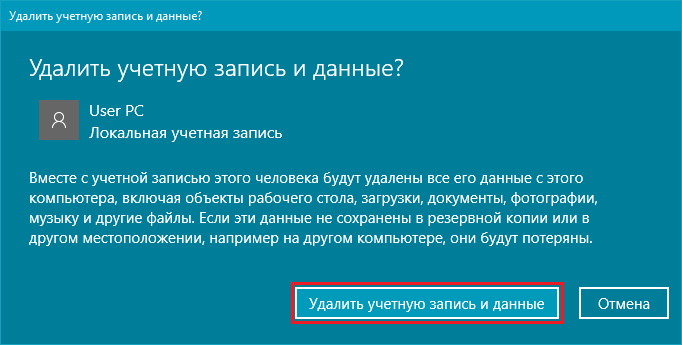
- Если в учётной записи юзера не осталось никаких важных файлов или данных, то просто кликните по кнопке Удалить учетную запись и данные.

Удаление пользователя с помощью командной строки
Предпочитаете нестандартно подходить к решению вопроса? Попробуйте удалить пользовательский профиль с помощью командной строки.
- Нажмите на Win + X и выберите пункт Командная строка (администратор), либо же воспользуйтесь комбинацией Win + S, а затем введите Командная строка. Кликните правой кнопкой мышки по результату и произведите запуск от имени администратора.
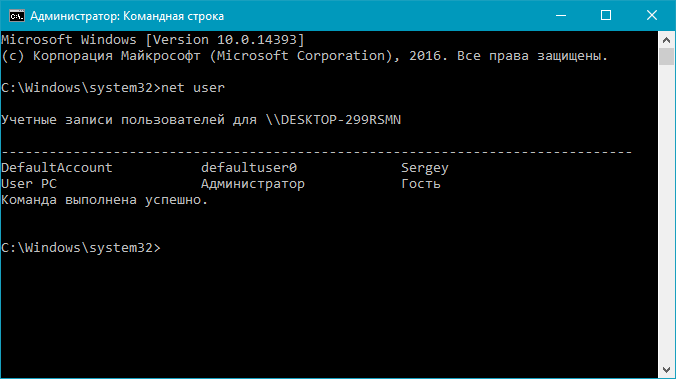
- Введите net user и запомните точное название аккаунта, который будет подвергнут ликвидации.

- Введите net user username /delete, где username — имя учётной записи, от которой вы хотите избавиться. Если в имени присутствуют пробелы, его нужно взять в двойные кавычки.

Важно: Не стоит таким образом пытаться удалить стандартные профили Администратор и Гость.
Удаление пользователя через Учетные записи пользователей
Ещё один не совсем очевидный вариант — удаление аккаунта с помощью системной утилиты Учетные записи пользователей.
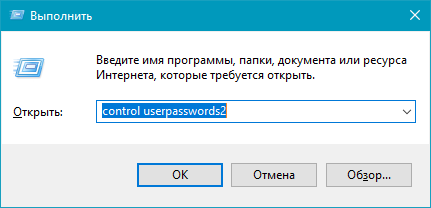
- Нажмите Win + R и введите control userpasswords2.

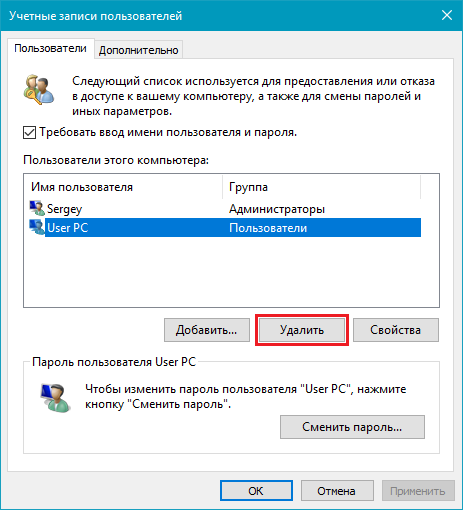
- Появится окно утилиты. Найдите в нём нужную учётную запись, нажмите на неё и удалите. Если при попытке удаления вы получили ошибку, тогда вам стоит попробовать способ с применением командной строки.

Удаление пользователя через Управление компьютером
Если вам этого мало, вы можете рассмотреть еще один способ удаления лишней учётной записи с помощью Управление компьютером.
- Откройте поиск, нажав на Win + S, и введите Управление компьютером.
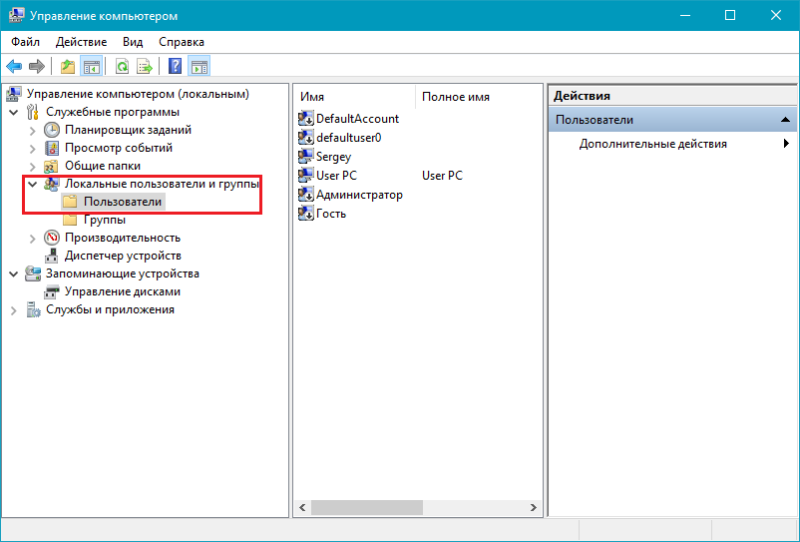
- В окне оснастки откройте каталог с записями пользователей.

- Правой кнопкой мышки кликните по нужному юзеру и нажмите Удалить.

Как удалить встроенные учетные записи Администратор и Гость
Если у вас вдруг появилось желание стереть стандартные записи Администратор и Гость, вам не удастся это сделать с помощью вышеописанных вариантов. А всё потому, что эти учётки встроены в систему. Их разве что можно отключить. В этом деле вам поможет инструкция Как отключить или включить учётную запись пользователя Windows 10. Удаление таких учетных записей может Вам понадобиться также в том случае, если вы видите сообщение «Пользователь не может быть удален».
Читайте также: Как создать гостевую учетную запись в Windows 10.
Два одинаковых пользователя Windows 10
Бывают ситуации, когда при входе в Windows 10 отображаются два пользователя с одинаковым именем. Вполне возможно, что этот баг мог появиться в следствии каких-то манипуляций с аккаунтом юзера. Например, после отключения пароля для входа в Windows 10.
В основном данная неисправность устраняется следующим образом:
- Запускается утилита Учетные записи пользователей комбинацией клавиш Win + R – control userpasswords2.
- Включается запрос пароля для этого пользователя и применяется изменение.
- Перезагружается компьютер.
- Отключается запрос пароля в той же утилите.
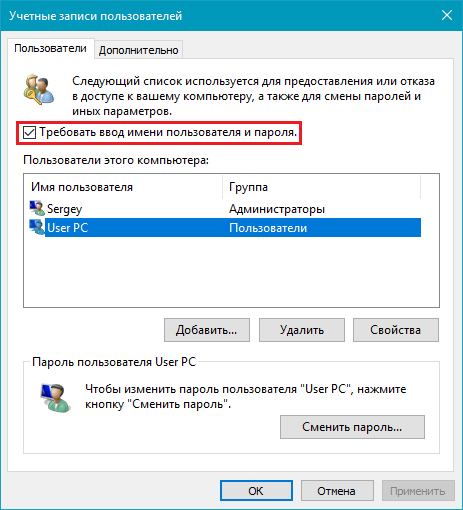
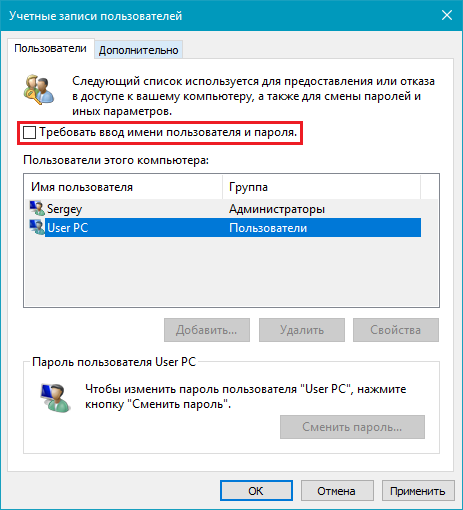
После всех проделанных телодвижений дубликат учётной записи должен исчезнуть.