
В этой пошаговой инструкции подробно о том, как удалить пользователя в Windows 10 в различных ситуациях — об удалении простой учетной записи, или того, пользователя, которые не отображается в списке пользователей в параметрах; о том, как выполнить удаление, если вы видите сообщение о том, что «Пользователь не может быть удален», а также о том, что делать, если при входе в систему отображается два одинаковых пользователя Windows 10, и нужно убрать одного лишнего. См. также: Как удалить учетную запись Майкрософт в Windows 10.
В общем случае, учетная запись из которой производится удаление пользователя, должна иметь права администратора на компьютере (особенно если удаляется существующий аккаунт администратора). Если в настоящий момент она имеет права простого пользователя, то для начала зайдите под имеющимся пользователем с правами администратора и дайте нужному пользователю (тому, под которым в дальнейшем планируете работать) права администратора, о том, как это сделать разными способами написано в руководстве «Как создать пользователя Windows 10».
Простое удаление пользователя в параметрах Windows 10
Если вам требуется удалить «простого» пользователя, т.е. созданного лично вами или заранее присутствовавшего в системе при покупке компьютера или ноутбука с Windows 10 и более не нужного, сделать это можно, используя параметры системы.
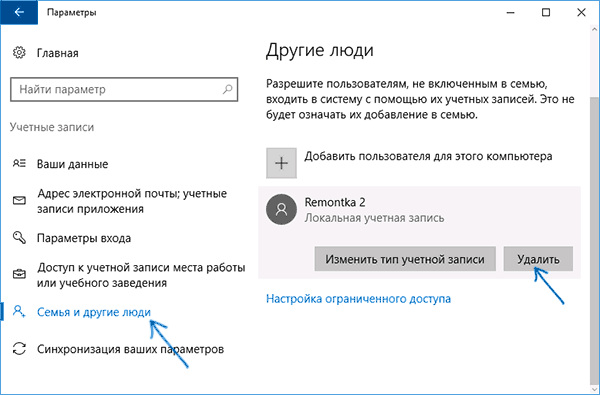
- Зайдите в Параметры (клавиши Win+I, или Пуск — значок шестеренки) — Учетные записи — Семья и другие люди.
- В разделе «Другие люди» кликните по пользователю, которого нужно удалить и нажмите соответствующую кнопку — «Удалить». Если нужный пользователь отсутствует в списке, о том, почему это может быть — далее в инструкции.

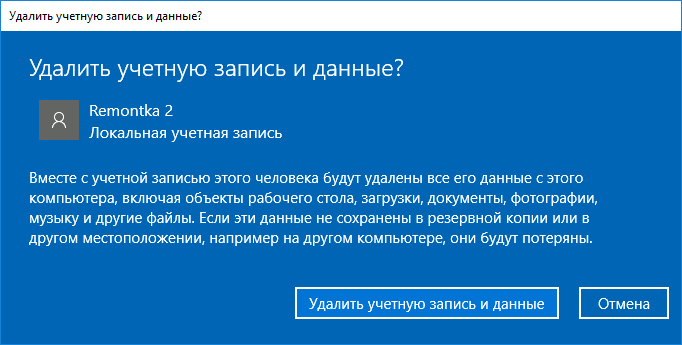
- Вы увидите предупреждение о том, что вместе с учетной записью будут удалены файлы этого пользователя, хранящиеся в его папках рабочего стола, документов и прочего. Если важных данных у этого пользователя нет, нажмите «Удалить учетную запись и данные».

Если все прошло успешно, то ненужный вам пользователь будет удален с компьютера.
Удаление в управлении учетными записями пользователей
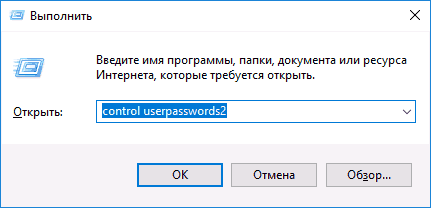
Второй способ — использовать окно управления учетными записями пользователей, открыть которое можно так: нажмите клавиши Win+R на клавиатуре и введите в него control userpasswords2 после чего нажмите Enter.
В открывшемся окне выберите пользователя, которого нужно удалить, а затем нажмите кнопку «Удалить».
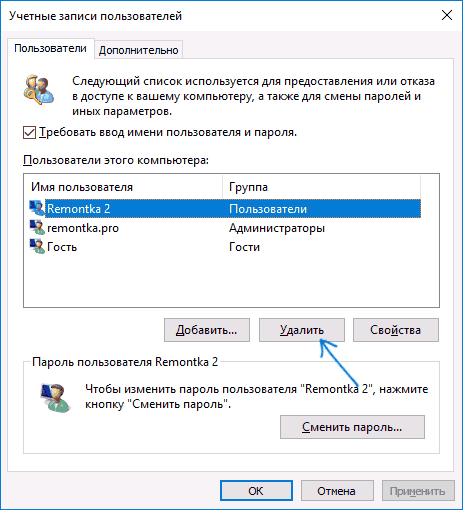
Если при этом вы получите сообщение об ошибке и о том, что пользователь не может быть удален, это обычно говорит о попытке удаления встроенной системной учетной записи, о которых — в соответствующем разделе этой статьи.
Как удалить пользователя с помощью командной строки
Следующий вариант: использовать командную строку, которую следует запустить от имени администратора (в Windows 10 это можно сделать через меню правого клика по кнопке «Пуск»), а затем использовать команды (нажимая Enter после каждой):
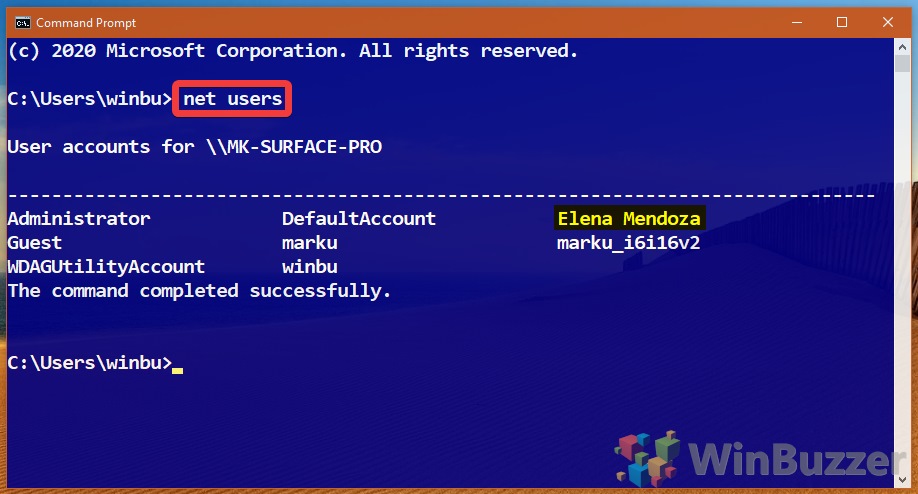
- net users (выдаст список имен пользователей, активных и нет. Вводим для проверки того, что правильно помним имя пользователя, которого нужно удалить). Внимание: не удаляйте таким образом встроенные учетные записи Администратор, Гость, DefaultAccount и defaultuser.
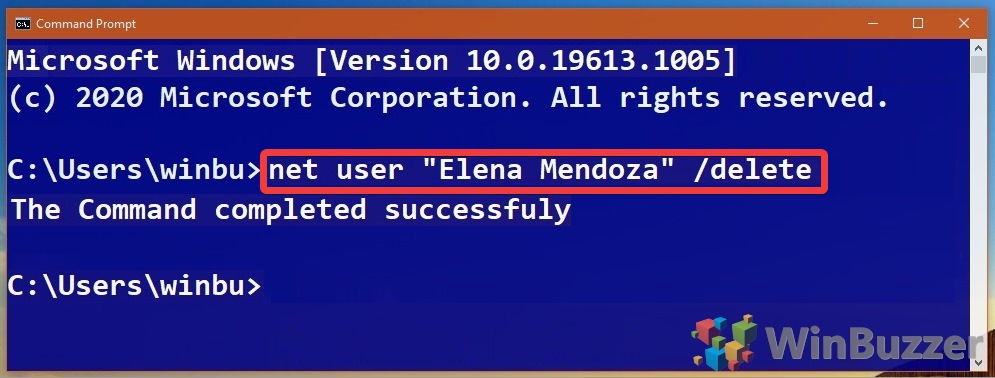
- net user Имя_пользователя /delete (команда удалит пользователя с указанным именем. Если имя содержит проблемы, используйте кавычки, как на скриншоте).

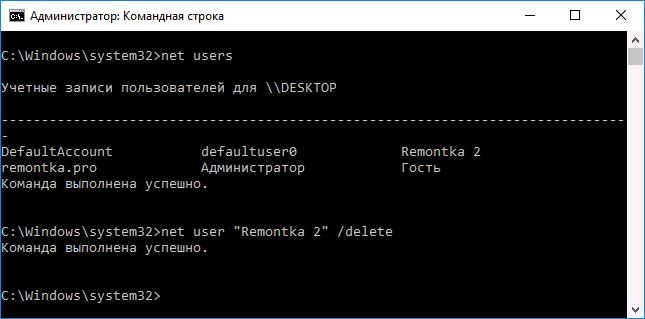
Если команда была выполнена успешно, пользователь будет удален из системы.
Как удалить встроенные учетные записи Администратор, Гость или другие
Если вам требуется убрать лишних пользователей Администратор, Гость, а возможно и какие-то другие, сделать этого так, как описывалось выше, не получится. Дело в том, что это встроенные системные учетные записи (см., например: Встроенная учетная запись Администратор в Windows 10) и их нельзя удалить, но можно отключить.
Для того, чтобы сделать это, выполните два простых шага:
- Запустите командную строку от имени администратора (клавиши Win+X, затем выбрать нужный пункт меню) и введите следующую команду
- net user Имя_пользователя /active:no


После выполнения команды, указанный пользователь будет отключен и исчезнет в окне входа в Windows 10 и из списка учетных записей.
Два одинаковых пользователя Windows 10
Один из распространенных багов в Windows 10, который заставляет искать способы удаления пользователей — отображение при входе в систему двух учетных записей с одинаковыми именами.
Обычно это происходит после каких-либо манипуляций с профилями, например, после такого: Как переименовать папку пользователя, при условии, что до этого вы отключили пароль при входе в Windows 10.
Чаще всего срабатывающее решение, позволяющее убрать дубликат пользователя, выглядит так:
- Нажать клавиши Win+R и ввести control userpasswords2
- Выбрать пользователя и включить запрос пароля для него, применить настройки.
- Перезагрузить компьютер.
После этого можно снова убрать запрос пароля, но второй пользователь с таким же именем снова появиться не должен.
Постарался учесть все возможные варианты и контексты необходимости удаления учетных записей Windows 10, но если вдруг решения для вашей проблемы здесь не нашлось — опишите ее в комментариях, возможно, мне удастся помочь.
All things change, including the user accounts you want on your computer. There are many ways to delete a user account in Windows 10, and we’re going to show you six of them today.
The easiest way to delete a user account in Windows 10 is via the settings menu, but that’s not suitable for everyone. At times, it can throw up errors, run into conflicts with family groups, or be unsuitable for an enterprise environment.
As a result, this tutorial will cover how to remove an account through settings, the Control Panel, Computer Management, netplwiz, PowerShell, and command prompt. Let’s get started:
How To Delete a User Account via Settings
This is the easiest way to delete a Windows 10 user account and the method most people should use.
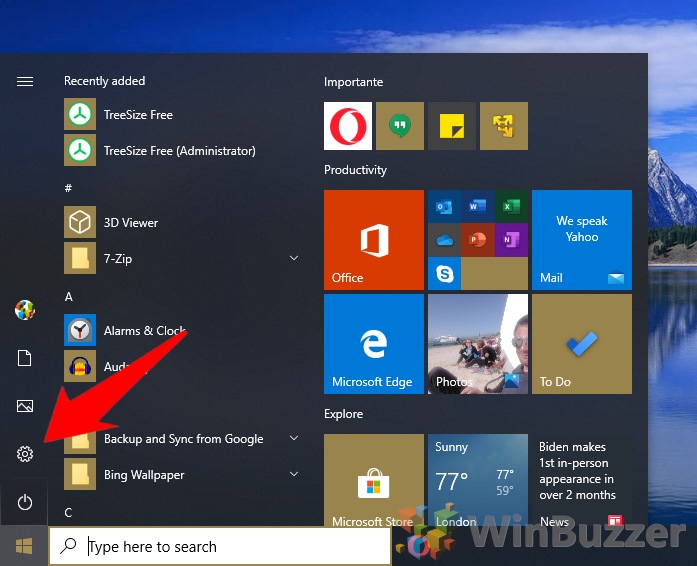
- Open settings
Press the Windows key to open the Start Menu and click the settings cog on the left-hand side.

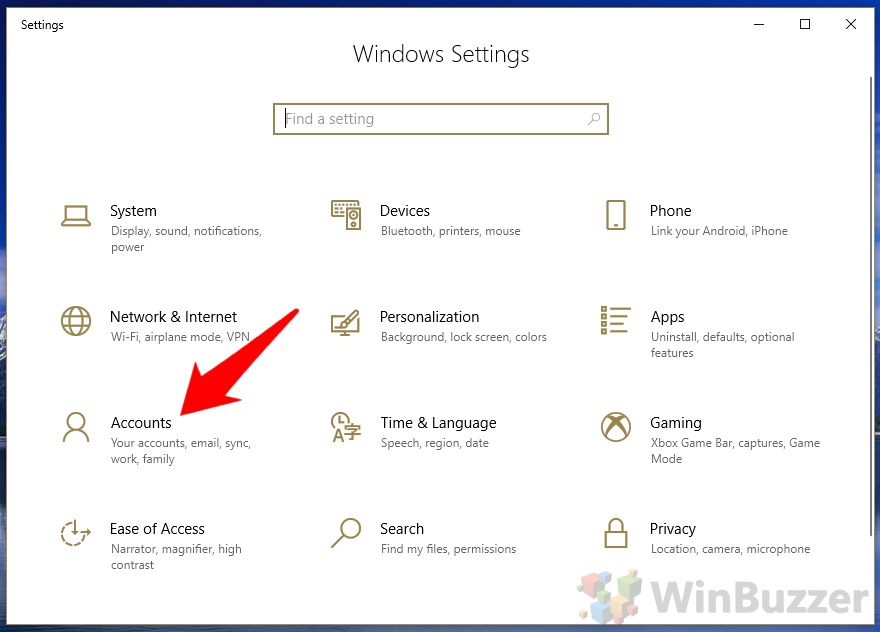
- Open Account settings
In the Windows Settings app, click “Accounts”.

- Open “Family & other users”
On the left side-panel of account settings, click “Family & other users”. Then, click on the account you’d like to delete.

- Click “Remove”

- Delete the account
Back up any local files you need and click “Delete account and data” to fully remove it.


How To Delete a Windows 10 Account via the Control Panel
- Open Control Panel
Press the Windows key and type “Control Panel”. Click the first result under ‘Best match’.

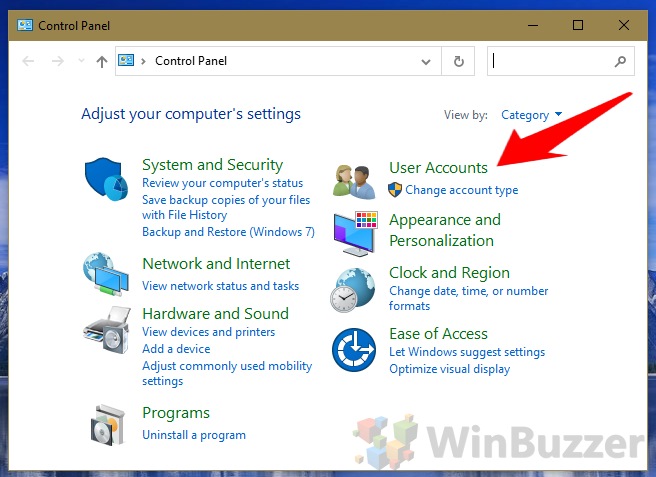
- Go to User Accounts
In the Control Panel, click on the “User Accounts” category.

- Manage another account
Under “Make changes to your user account”, click “Manage another user account”.

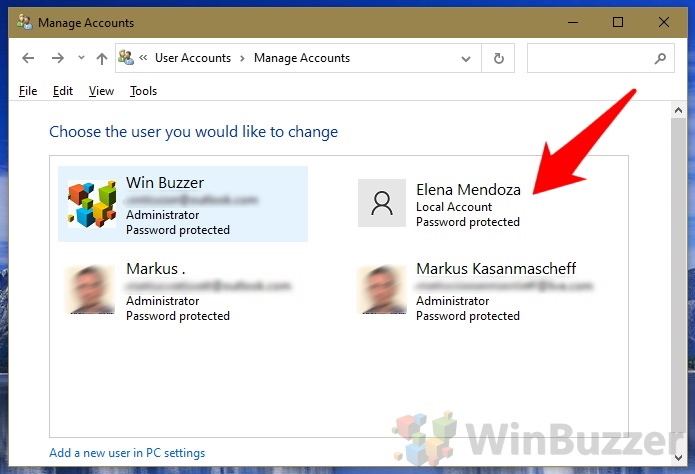
- Click on the Windows 10 user account you’d like to delete

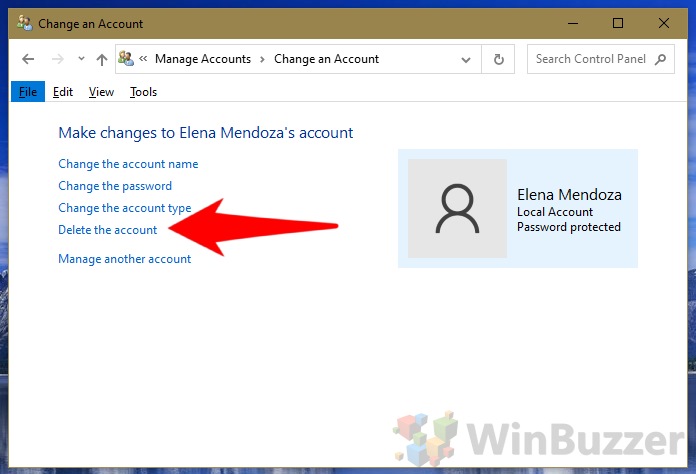
- Make changes to the account
In the next window, click the text that says “Delete the account”.

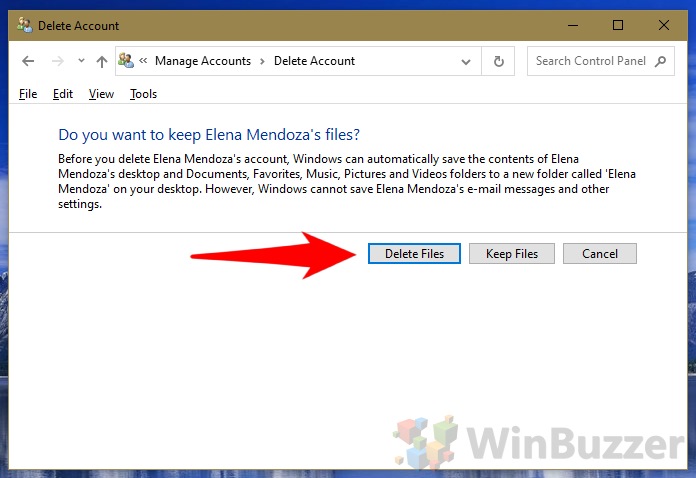
- Press Delete Files
Read the small print and make any required backups before clicking “Delete Files”.

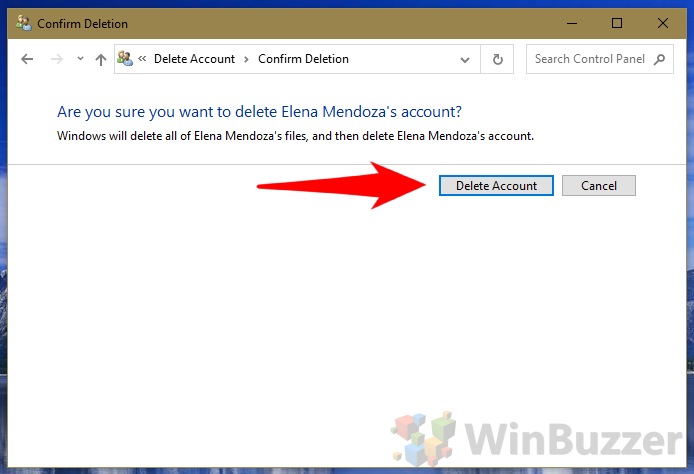
- Confirm the deletion


How To Remove a User Account with Computer Management
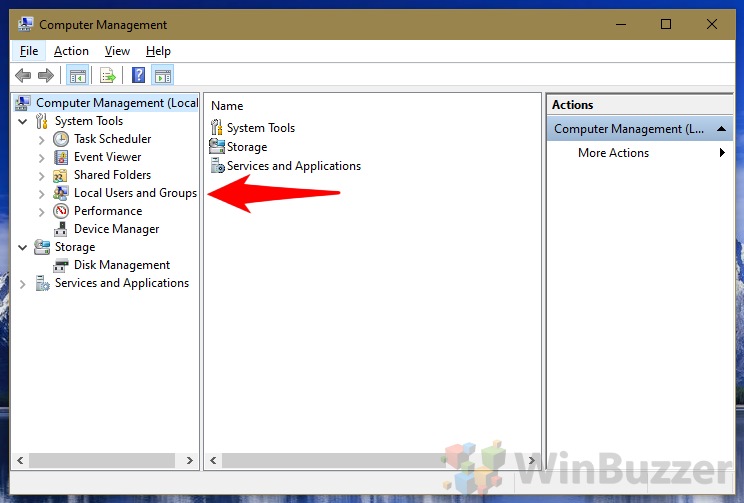
- Open Computer Management
Press the Windows key and type “Computer Management”. Click the first result under ‘Best match’.

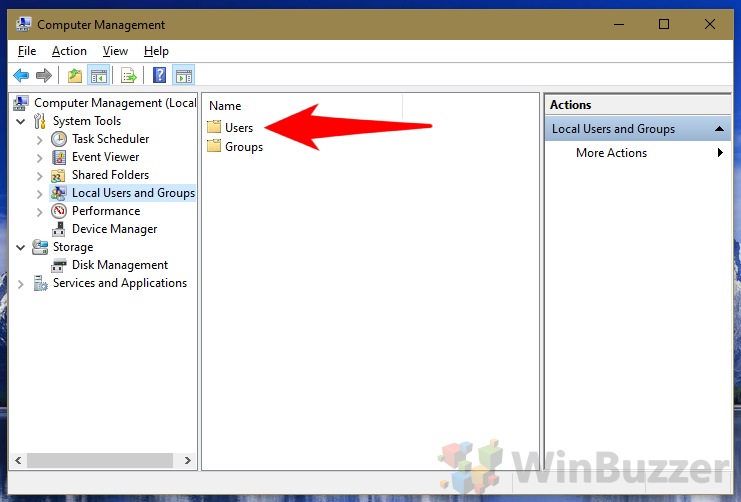
- Open “Local Users and Groups”
The “Local Users and Groups” subheading can be found under ‘System Tools’ in the left sidebar. Click it.

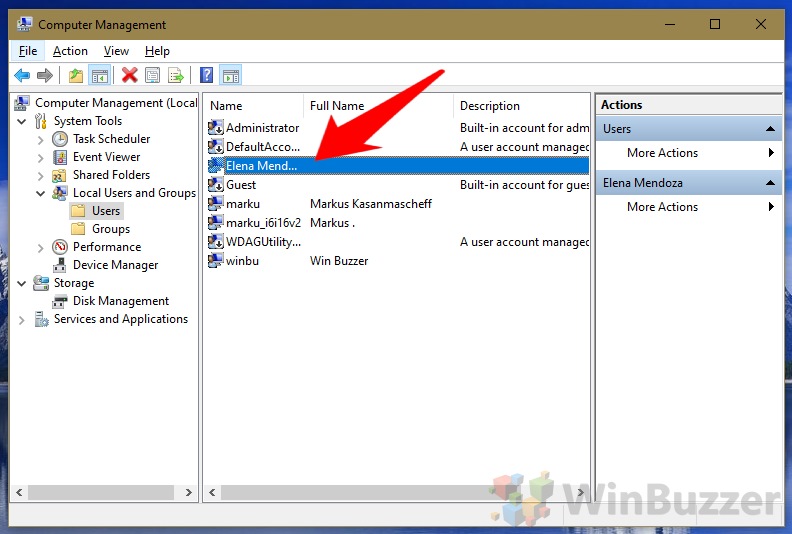
- Click “Users”

- Find the account
The Users folder contains a list of all the accounts on the PC. Click the person you’d like to delete, in our case, ‘Elena Mendoza’.

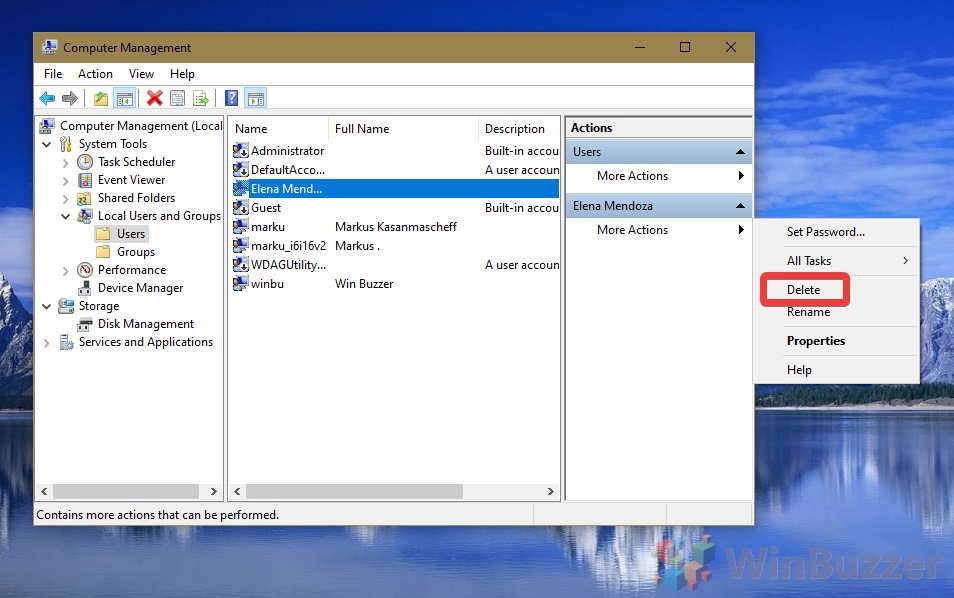
- Click “More Actions”

- Click “Delete”

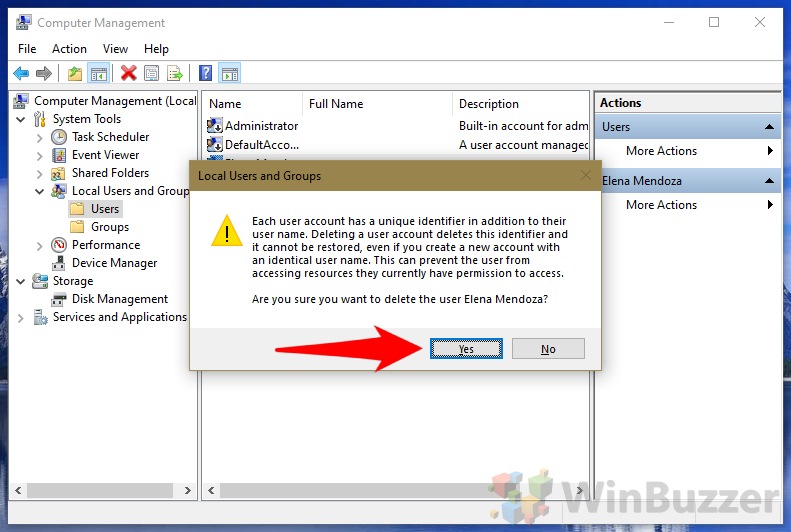
- Read the small print
Windows 10 will now inform you that deleting a user account via this method will delete its identifier, meaning that even if you create an account with the same username they’ll be unable to access the old user’s files. If you’re okay with that, click “Yes”.


How To Delete Windows 10 User Account via netplwiz
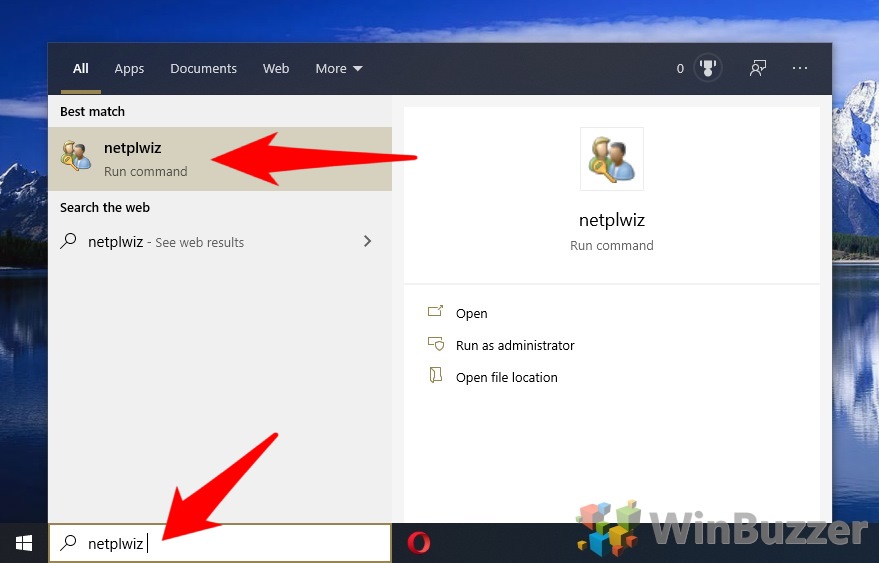
- Open netplwiz
Press the Windows key and type “netplswiz. Click the first result under ‘Best match’.

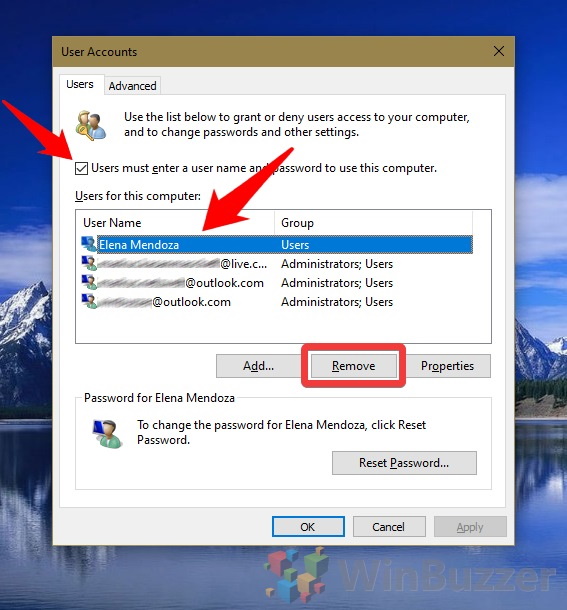
- Find the account
This will open a list of all users. Find the user you’d like to delete and click “Remove”.

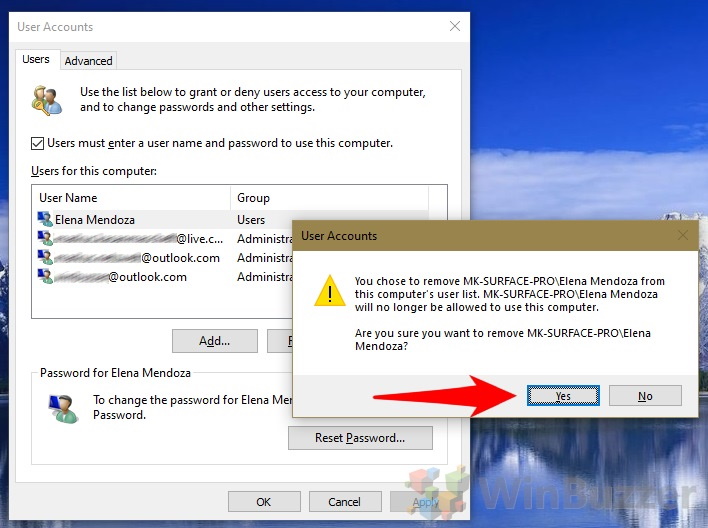
- Click “Yes”
Make sure you read Microsoft’s warning so you know exactly what you’re getting into.

How To Delete a User Account in Windows 10 via PowerShell
The command-line often provides faster methods for advanced users. Here’s how to delete a user account in Windows 10 with PowerShell:
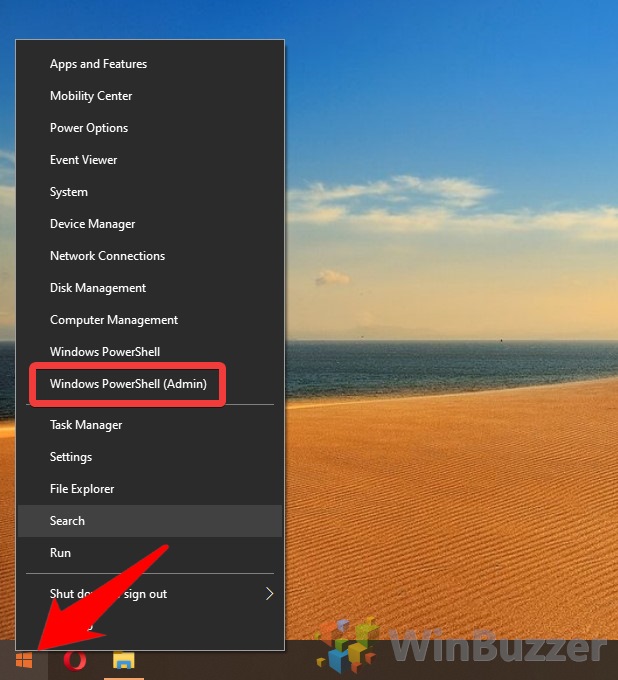
- Open PowerShell as an Admin
Press “Windows + X” and then click “Windows PowerShell (Admin)”.

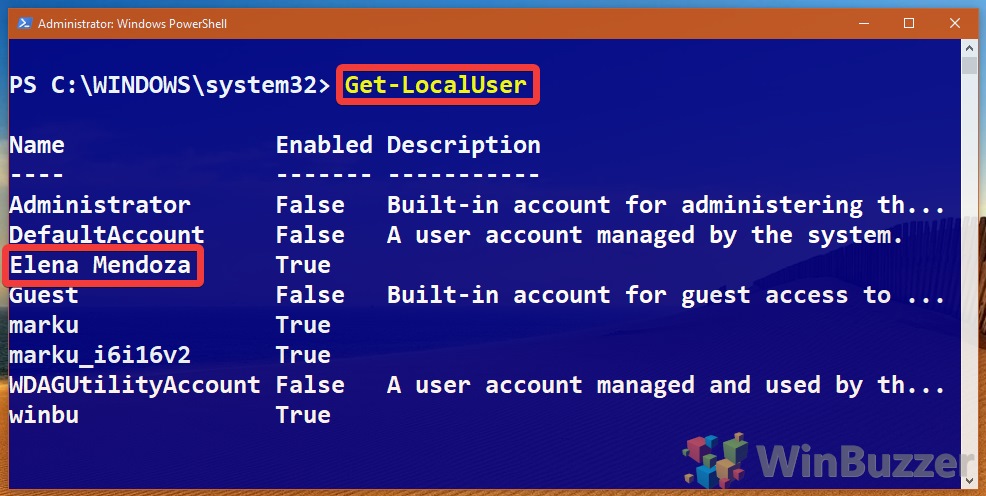
- Find the user list
Type Get-LocalUser to return a list of all the accounts and their official names.

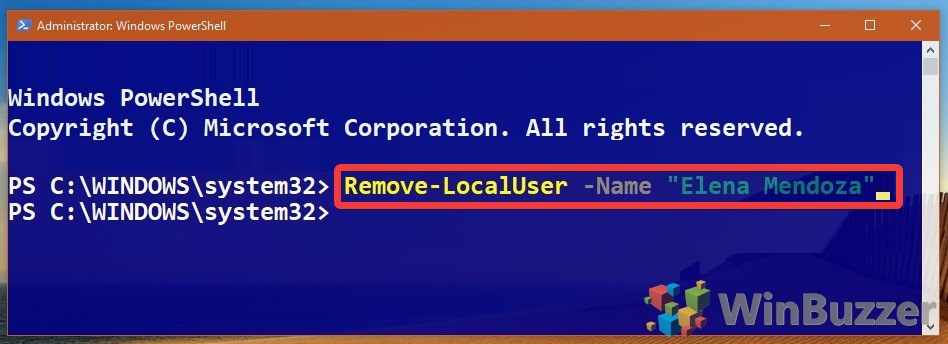
- Remove the user
Type Remove-LocalUser -Name “Elena Mendoza”. Bear in mind that though there’s no warning, the same applies as when you delete an account via any other method – you may permanently lose access to its files.

How To Delete a User Account in Windows 10 via Command Prompt
Some prefer to use Command Prompt as their terminal of choice. Here’s the method for Microsoft’s classic command-line tool:
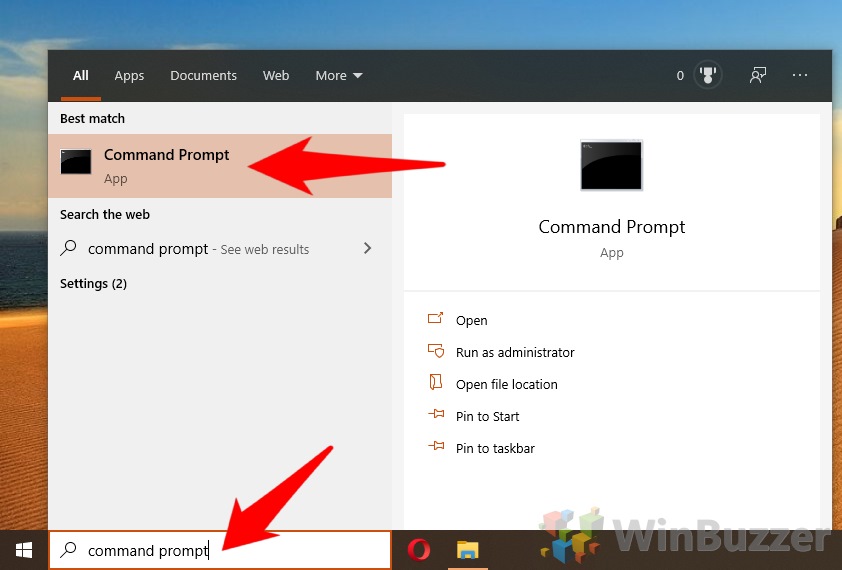
- Open Command Prompt
Press the Windows key and type “Command Prompt”. Click the first result under ‘Best match’.

- Get a list of users
In the Command Prompt interface, type net users to get a list of all the accounts. Take note of the one you wish to delete.

- Delete the user
Type net user “Elena Mendoza” /delete to remove the user account. Bear in mind that you may also lose all of its data, so you should still make a backup first.

- Delete a user account from domain
If the above command does not work, it’s likely because the account is a domain user rather than a local one. You can remedy this by adding /domain to the end of the command, like so:
net user “Elena Mendoza” /delete /domain


Загрузить PDF
Загрузить PDF
В Windows командная строка является аналогом терминала в Mac OS X, то есть в ней можно вводить команды, чтобы настроить систему. Большинство команд можно заменить простым обращением к графическому интерфейсу пользователя, но создать (или удалить) учетную запись пользователя легче и быстрее с помощью командной строки.
-

Для этого нажмите кнопку «Пуск» в левом нижнем углу экрана. Чтобы создать или удалить учетную запись, войдите в систему в качестве администратора.
- Также можно нажать кнопку ⊞ Win, чтобы открыть меню «Пуск».
-

Значок командной строки появиться в результатах поиска в верхней части меню «Пуск».
- Также можно нажать ⊞ Win+Х, чтобы открыть панель быстрого доступа, на которой есть значок командной строки.
-
Откроется выпадающее меню.
-
Вы не получите доступ к командной строке, если вошли в систему в качестве гостя.
- Если вы используете панель быстрого доступа, просто нажмите «Командная строка (Администратор)». Не выбирайте стандартную опцию командной строки.
-
Так вы откроете командную строку как администратор.
Реклама


-
Так вы активируете курсор внутри командной строки.[1]
-
Для этого введите команду net user (имя пользователя) (пароль) /add и нажмите ↵ Enter. Так будет создана новая учетная запись пользователя.
- Замените информацию в круглых скобках на имя пользователя и пароль. Не забудьте удалить круглые скобки.
-
Для этого введите команду net user (имя пользователя) /delete и нажмите ↵ Enter. Выбранная учетная запись будет удалена.
- Когда учетная запись будет создана или удалена, в командной строке появится строка с сообщением «The command completed successfully» (Команда успешно выполнена).
-
Теперь вы знаете, как создавать и удалять учетные записи пользователей с помощью командной строки.
Реклама


Советы
- Если вы открыли командную строку без опции «Запуск от имени администратора», вы не сможете создавать или удалять учетные записи пользователей.
Реклама
Предупреждения
- Будьте осторожны, когда удаляете учетную запись пользователя – если ее удалить, восстановить ее не получится.
Реклама
Об этой статье
Эту страницу просматривали 95 793 раза.
Была ли эта статья полезной?
In this tutorial, you will learn how to use the net user command to create, delete and change user accounts in the Windows command prompt (CDM).
We can perform the following tasks using the net user command:
- View user accounts.
- Add and Remove user accounts.
- Activate and Deactivate user accounts.
- Change the user password.
If you are operating in an Active Directory domain environment, always use the /domain command switch to execute the net user command on the domain controller rather than on the local computer.
Examples
List users on the local computer:
net userList users on the domain controller:
net user /domainThis command displays detailed information about the Administrator account:
net user AdministratorCreate a user named user1 with a password of strongPassword:
net user /add user1 "strongPassword"Delete the user user1 from the computer:
net user /delete user2This command enables the built-in Administrator account on Windows 10/11:
net user Administrator /active:yesThis command sets (changes) the Administrator account password:
net user Administrator "adminPassWord"Execute the following command to disable the Administrator account on Windows 10/11:
net user Administrator /active:noThis command forces the user user1 to change the password at the next logon:
net user user1 /logonpasswordchg:yesCreate a user; the user must change the password at the next logon:
net user /add user1 "strongPassword" /logonpasswordchg:yesCreate a new user; the account expires on January 31st:
net user /add user1 "strongPassword" /expires:01/31/2023Command Options
| username | The name of the user to create, delete, view, or modify. |
| password | Password for the user. |
| * | Use this option to produce a prompt for the password. |
| /add | Use this option when you want to create a new user. |
| /delete | Use this option to remove a user from the Windows system. |
| /active:{yes | no} | Activates or Deactivates a user. The default is yes when creating a new user. |
| /expires:{date | never} | Use this option to set the expiration date (mm/dd/yy) for an account. The default is never. |
| /fullname:»name» | Full name of the user. |
| /passwordchg:{yes | no} | Specifies whether users can change their own password. The default is yes. |
| /passwordreq:{yes | no} | No means the user can log in without a password. The default is YES. |
| /logonpasswordchg:{yes|no} | Specifies whether the user should change the password at the next logon. The default is NO. |
| /homedir:path | The home directory location. |
| /comment:»text» | Use this option to add a description to the user’s account. |
You can view the manual page by typing net help user at the command prompt.
View a User
When you execute the net user command without any options, it displays a list of user accounts on the computer.
net userYou will see an output similar to the following:
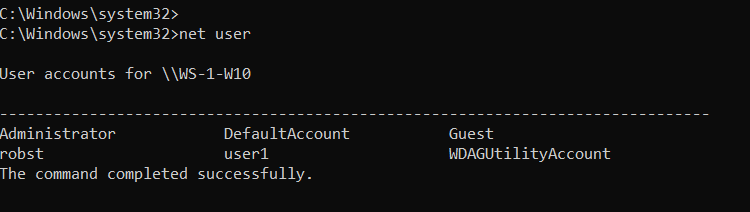
Add the /domain command switch if you want to list users on the Active Directory Domain controller.
net user /domainTo see detailed information about a particular user, execute the command net user Username, where the Username is the name of the user you want to view. For example, you can view the Administrator account by running the following command:
net user AdministratorCreate and Delete User Accounts
To create a user account, use the following syntax:
net user /add UserName PasswordFor example, the following command creates a user named user1 with a password of strongPassword:
net user /add user1 "strongPassword"Use an asterisk (*) in place of the password to produce a prompt, as shown in the following example:
net user /add user1 *
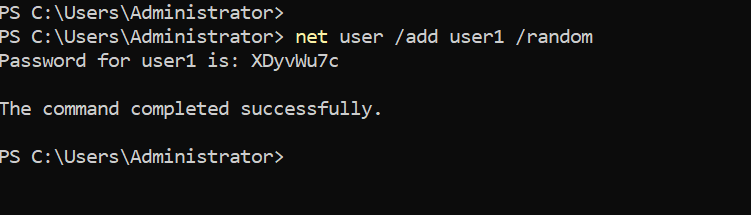
Alternatively, you can also use the /random option to generate a strong random password, as shown in the following example:
net user /add user1 /randomThe randomly generated password will be displayed on the command prompt after you execute the command.
To delete a user, use the following syntax:
net user /delete UserNameThe following command deletes the user user1 from the computer:
net user /delete user2Change Passwords
To change passwords, use the following syntax:
net user UserName New-PasswordUse an asterisk (*) or /random in place of the password to produce a prompt or generate a random password:
net user UserName *
net user user1 /random
Notes
The net user command is most of the time used in Windows Server to manage Active Directory users.
Windows 10/11 uses a new Settings pane to manage users, but the net user command is still useful for some tasks. For example, if you want to activate the built-in Administrator account, it is easy to do that using this command.
While working at the command prompt, run the net help user command to see all available command options.
In the next tutorial, we are going to learn how to manage Windows groups using the net localgroup CMD command.