
По умолчанию настроенная Windows 10 предлагает пользователям множество навязчивых функций, которые не всем нужны. В этот список можно внести и ПИН-код. Операционная система будет регулярно вам предлагать его установить. Даже во время инсталляции «десятка» не упустит возможность сделать такое «заманчивое» предложение. И если вы согласитесь, то при каждом запуске компьютера вам придется вводить секретную комбинацию. Это не очень удобно.
Хотя мы не являемся сторонниками незащищенных паролем операционных систем, всё же допускаем, что для некоторых юзеров это более комфортные условия пользования. Поэтому рассказываем несколько способов, как отключить ПИН-код на Windows 10.
Изменяем PIN-код через учетные записи пользователей
- Нажмите комбинацию клавиш Win + R и в появившемся поле введите команду netplwiz. Нажатием клавиши Enter подтвердите операцию.
- Откроется окно, в котором вы увидите все учетные записи, имеющиеся на компьютере. Здесь же можно создать новых пользователей компьютера или удалить старых.
Для каждой учетной записи можно включить или отключить ПИН-код если воспользоваться пунктом «требовать ввод имени пользователя и пароля» в верхней части окна. Также если нажать комбинацию клавиш CTRL + ALT + DEL, откроется меню, в котором нужно выбрать пункт «изменить пароль». Стоит отметить, что для установки нового пароля требуется знать текущий пароль.
Не обязательно полностью избавляться от защиты операционной системы. Можно,например, удалить пароль для гостевых аккаунтов, а для администратора, который обладает повышенным уровнем доступа, наоборот, оставить.
Доступ через редактор реестра
Нажмите комбинацию клавиш Win + R и введите команду regedit. В левой части окна проследуйте по адресу: HKEY_LOCAL_MACHINE\ Software\ Microsoft\ Windows NT\ CurrentVersion\ Winlogon. Здесь требуется создать строковый параметр с именем DefaultPassword и прописать пароль в виде значения.
Параметр DefaultDomainName должен соответствовать имени локального компьютера. А для параметра AutoAdminLogon требуется задать значение 1. После внесения всех изменений нужно перезагрузить компьютер, чтобы всё заработало.
Как на Windows 10 сменить ПИН-код на другой способ входа
Не обязательно осуществлять вход в операционную систему с помощью классического многозначного пароля. Это устаревший метод. Современная Windows 10 предлагает пользователю различные варианты, включая распознавание лиц. Чтобы воспользоваться данным функционалом, нам потребуется открыть «Мой компьютер» и в верхней части окна зайти в «Параметры». Затем перейдите в раздел «Учетные записи» и, наконец, в меню «Варианты входа».
Здесь на ваш вкус будет предложено 6 вариантов: распознавание лиц Windows Hello, распознавание отпечатков пальцев Windows Hello, ПИН-код для Windows Hello, ключ безопасности, пароль и графический пароль. Можно выбирать любой, какой понравится. Также здесь можно осуществить настройку динамической блокировки, в результате которой ОС будет блокировать связанные с Windows 10 устройства, когда они выйдут за пределы допустимого диапазона. Теперь вы знаете, как на Windows 10 поставить не только ПИН-код, но и осуществить вход другими способами.
Читайте также:
- Как настроить VPN-соединение в Windows 10
- Срочно менять! Названы самые популярные в России пароли
Если на вашем компьютере используется учетная запись Майкрософт, Windows 10 будет настойчиво предлагать создать ПИН-код при входе, а также в пункте «Защита учетных записей» центра безопасности. Этот запрос можно убрать, если вы уже создали ПИН-код, можно удалить и его.
В этой инструкции подробно о том, как удалить уже созданный или отключить запрос на создание ПИН-кода в Windows 10 последних версий несколькими способами. Если же ваша задача — вход в систему без ПИН-кода и пароля, то сначала удалите ПИН-код, а затем используйте шаги из инструкции Как отключить запрос пароля при входе в Windows 10.
- Как отключить запрос создания ПИН-кода при входе в Windows 10
- Как удалить созданный ПИН-код
- Видео инструкция
Как отключить предложение создать ПИН-код при входе в Windows 10 и в защитнике

Предложение создать ПИН-код в Windows 10 может постоянно появляться при входе в систему, а также напоминать о себе в Защитнике Windows (в Центре безопасности). В защитнике можно просто нажать «Закрыть», чтобы временно убрать восклицательный знак, но по отзывам через некоторое время он появляется вновь.
Чтобы полностью отключить предложения создания ПИН-кода в Windows 10 Pro и Enterprise выполните следующие шаги:
- Нажмите клавиши Win+R на клавиатуре, введите gpedit.msc и нажмите Enter.
- Откроется редактор локальной групповой политики. В нем перейдите в раздел Конфигурация компьютера — Административные шаблоны — Компоненты Windows — Windows Hello для Бизнеса.
- В правой части выберите пункт «Использовать Windows Hello для бизнеса» и дважды нажмите по нему. Выберите пункт «Отключено» и примените настройки.


Обычно, сделанное изменение срабатывает через короткое время даже без перезагрузки компьютера и никаких напоминаний о ПИН-коде не появляется.
В случае, если на вашем компьютере установлена Windows 10 Домашняя, в ней отсутствует редактор локальной групповой политики. Но вы можете добавить нужные параметры в реестр. Для этого вы можете создать reg-файл со следующим содержимым:
Windows Registry Editor Version 5.00

[HKEY_LOCAL_MACHINE\SOFTWARE\Policies\Microsoft\PassportForWork]
"Enabled"=dword:00000000
"DisablePostLogonProvisioning"=dword:00000000
После чего импортировать его в реестр. Либо, в редакторе реестра создать раздел
HKEY_LOCAL_MACHINE\SOFTWARE\Policies\Microsoft\PassportForWork
а в нем — параметры DWORD с именами Enabled и DisablePostLogonProvisioning (значение не изменяем, оставляем 0), после чего перезагрузить компьютер.
Как отключить и удалить уже имеющийся ПИН-код Windows 10
Если вы уже создали ПИН-код, то его удаление состоит из следующих шагов:
- Зайдите в Параметры (для этого можно нажать клавиши Win+I) — Учетные записи — Варианты входа.
- Нажмите по пункту «ПИН-код для Windows Hello» и нажмите кнопку «Удалить». Если кнопка не активна, ниже отключите пункт «Требовать выполнение входа с помощью Windows Hello для учетных записей Майкрософт» (или «Для повышения безопасности разрешите вход Windows Hello для учетных записей Майкрософт на этом устройстве»), закройте окно параметров, затем снова зайдите в параметры — теперь удаление будет возможным.

- Подтвердите удаление, а затем введите пароль вашей учетной записи Майкрософт для окончательного удаления ПИН-кода.

На этом процесс будет завершен, ПИН-код удален.
Видео инструкция
В случае, если у вас остаются какие-то дополнительные вопросы, связанные с ПИН-кодом для входа в Windows 10 — задавайте их в комментариях, я постараюсь ответить.
Hi, I changed my Windows password, and one of my family did it as well, and for some reason, it only displays the PIN code. I tried logging in, but all of us don’t have the PIN code. There isn’t any option for the password or an option for forgetting the PIN code. — Microsoft Forum
Forgetting your Windows 10 PIN can be frustrating. No one wants to be locked out of their own devices. If you encounter a situation similar to the example above and don’t know how to resolve the issue, continue reading. This comprehensive guide from EaseUS will offer you three answers to how to bypass PIN Windows 10.
Way 1. Bypass PIN Windows 10 via Password Removal Tool
If you’re locked out of your PC and having trouble signing in to your Windows 10 account due to a forgotten PIN, a password removal tool is exactly what you need.
For a way to bypass the PIN ASAP, EaseUS Partition Master Professional offers an additional feature to help users. It can help you bypass PIN on the Windows system without logging in. All you need is this powerful tool and a USB drive to complete the process. If you are good to go, check the steps below.
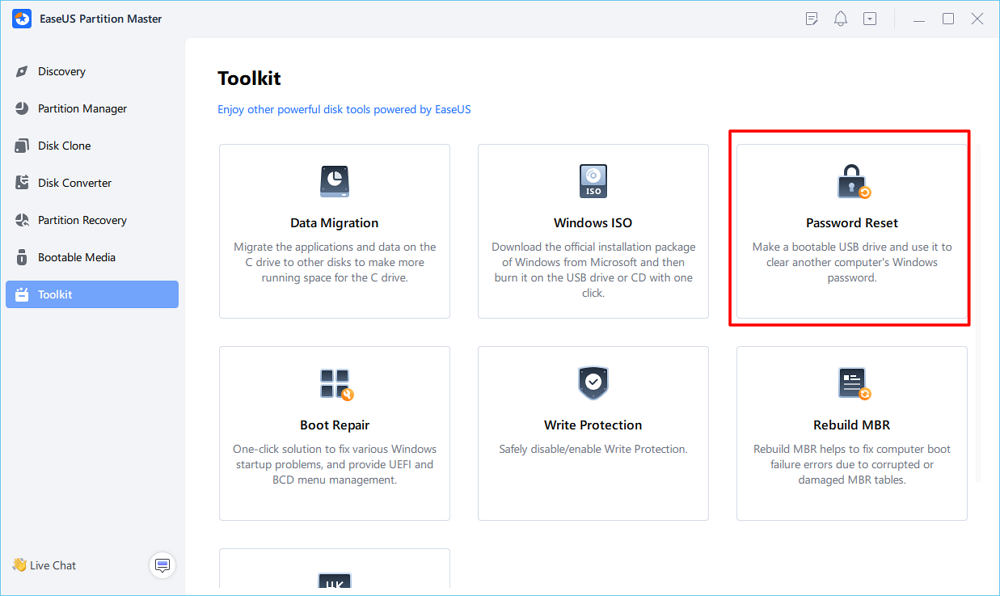
Step 1. Insert the target USB disk into a computer, run EaseUS Partition Master, and click «Toolkit» > «Password Reset.»
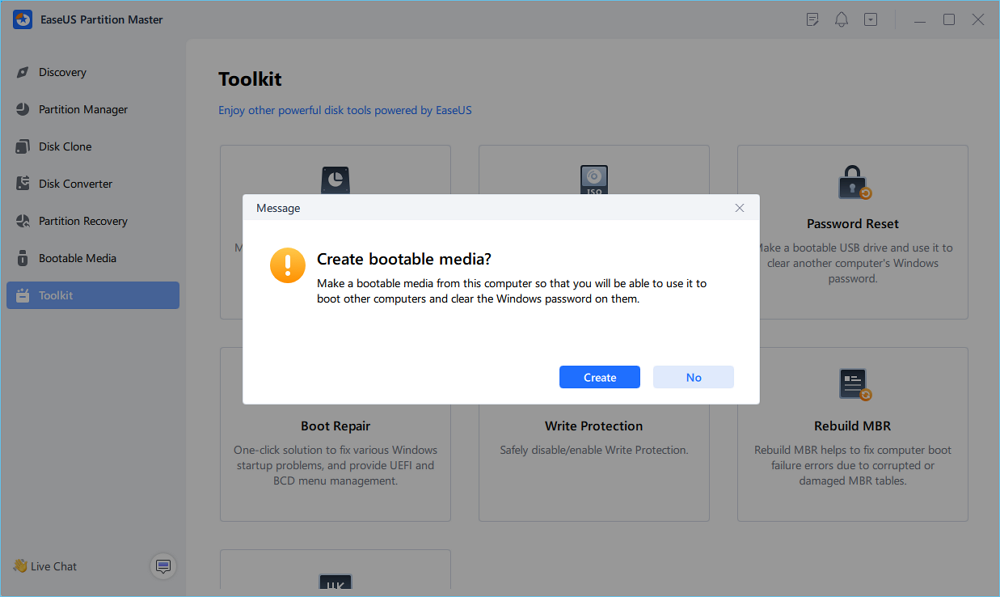
Step 2. A message will pop up. After reading it carefully, click «Create» to create bootable media.
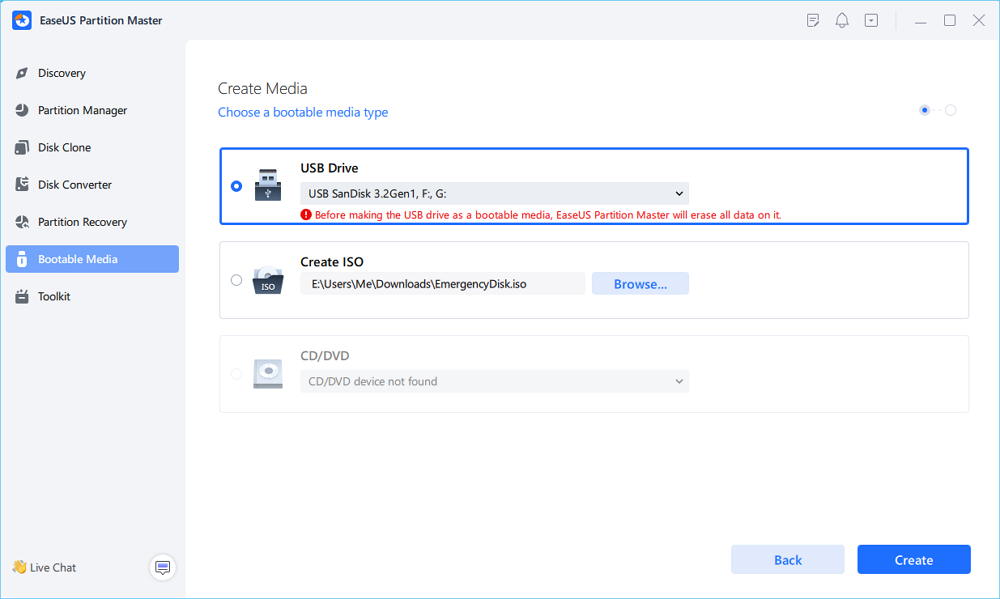
Step 3. Select the correct USB flash drive and click «Create» and «Yes.» This will erase all data on the USB, so please back up if any important data on it.
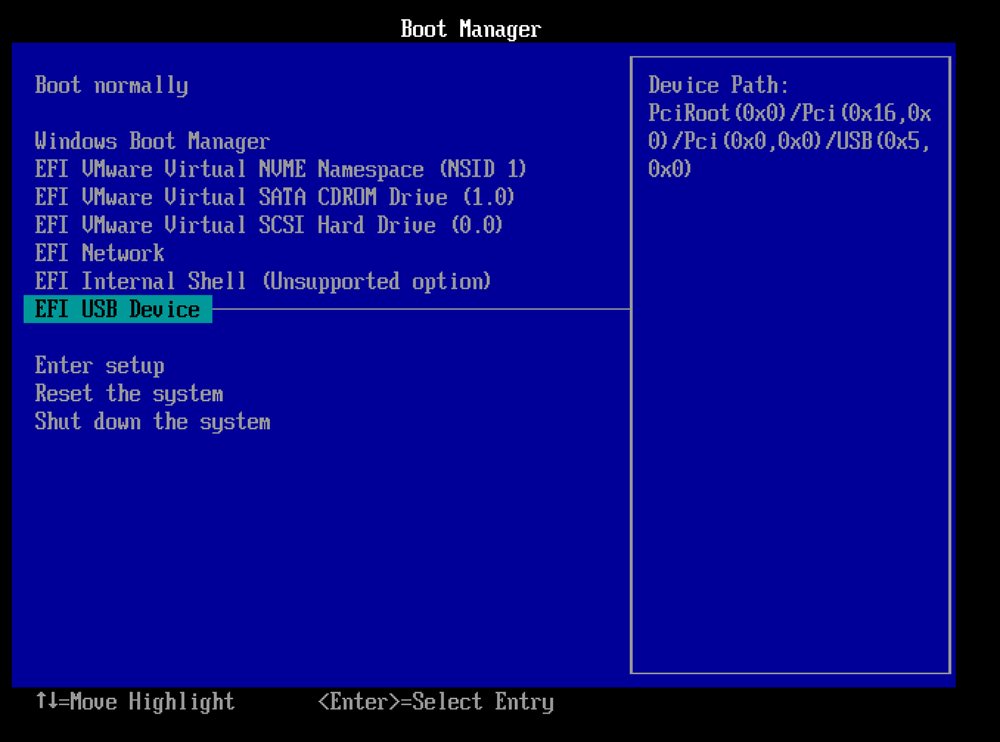
Step 4. Wait patiently. After the password reset USB flash drive is created, connect the USB to the locked PC. Restart the locked PC and press F2/F8/F11/Del to enter the BIOS, set the bootable USB as the boot drive. Once completed, the system will automatically boot from the USB.
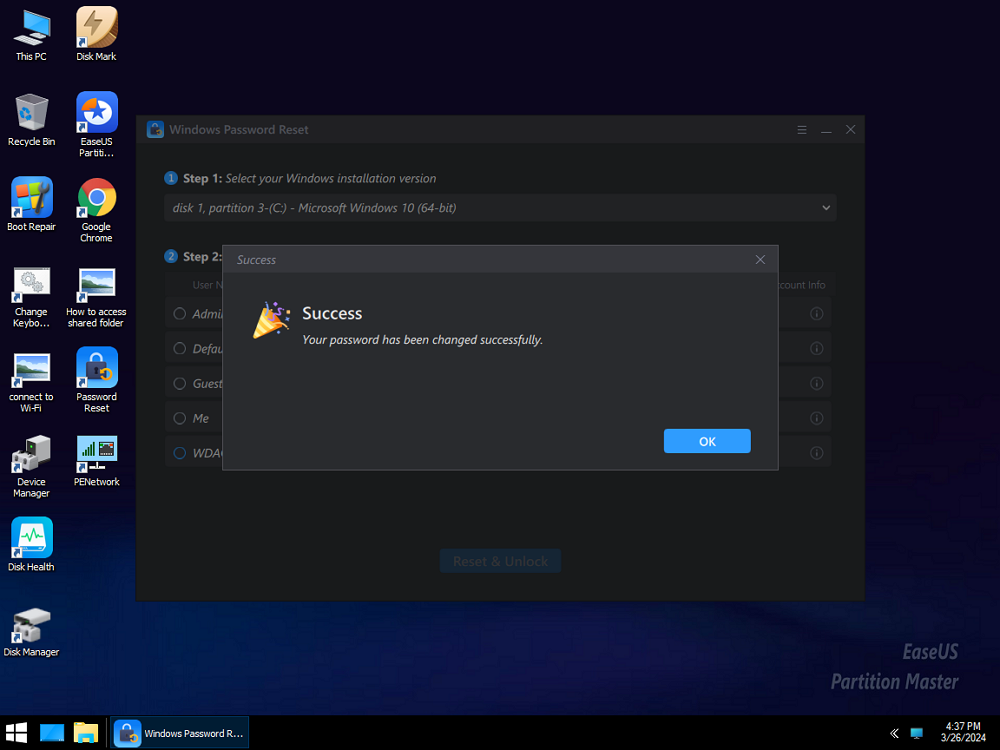
Step 5. After restarting, launch EaseUS Partition Master again and go to «Password Reset.» All accounts on the PC will be displayed in the interface; click on the target account and check «Reset & Unlock.»

Step 6. When you receive this prompt, click «Confirm» to continue. Your password will be erased.
Not only can it remove the PIN on your device, but also remove the password on your Windows. Feel free to click the following buttons to share this tool and help other users.
Way 2. Bypass PIN Windows 10 via Authentication
If you forgot the Windows PIN code and need to regain access to your PC, Microsoft has provided several secure methods to regain access and reset your forgotten PIN. The recommended approach is to reset the PIN through the official Windows settings. This process involves verifying your identity via a 4-digit code acquired on your Microsoft account or answering the preset security questions.
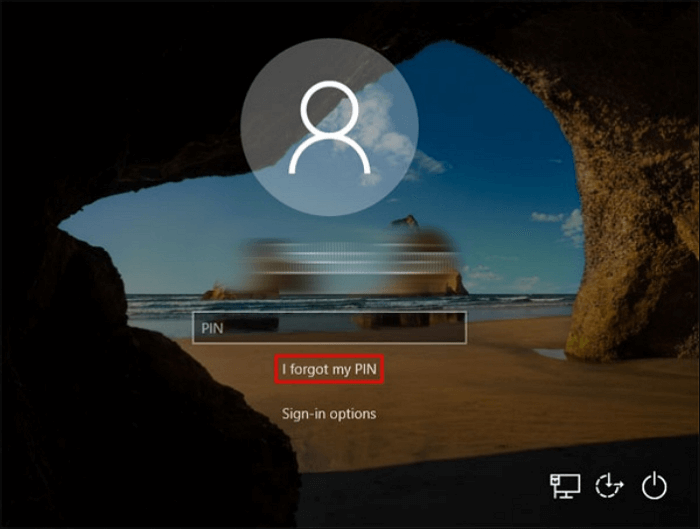
Step 1. On the login screen, input an incorrect PIN to show the «I forget my PIN» option.
Step 2. Click on it and then input your Microsoft account password, or use your email to get a verification code to verify your identity.
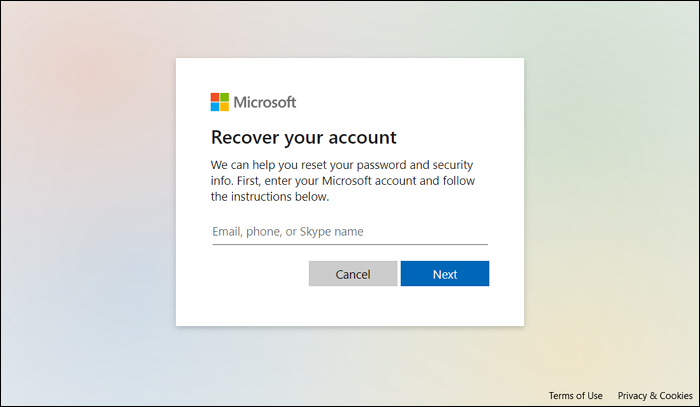
Step 3. Click «Continue» and reset your Windows PIN.
Step 4. Click «OK» to save it.
After this, try the new PIN and see if you can successfully enter the Windows desktop.
Way 3. Bypass PIN Windows 10 via New Local Account
There’s another way to bypass PIN on Windows 10 — create a new account. However, it takes a lot of steps and some command lines. Some beginners might find it complex and even encounter unexpected issues during the operation.
If you are ready, follow the guide below.
🚩Related article: How to Create Bootable USB Windows 10
Step 1. Connect a Windows Bootable USB or CD to your locked computer. Then, boot Windows 10 from the USB.
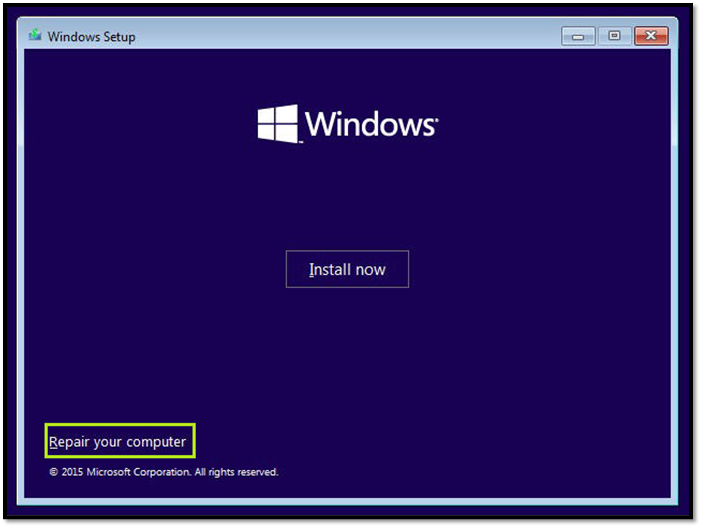
Step 2. In the new window, click «Next» and then «Repair your computer.»
Step 3. Go to «Troubleshoot» > «Command Prompt» and input regedit to open Registry Editor.
Step 4. Go to «Computer» > «HKEY_LOCAL_MACHINE.» Then, click «File» on the top bar and select «Load Hive.»
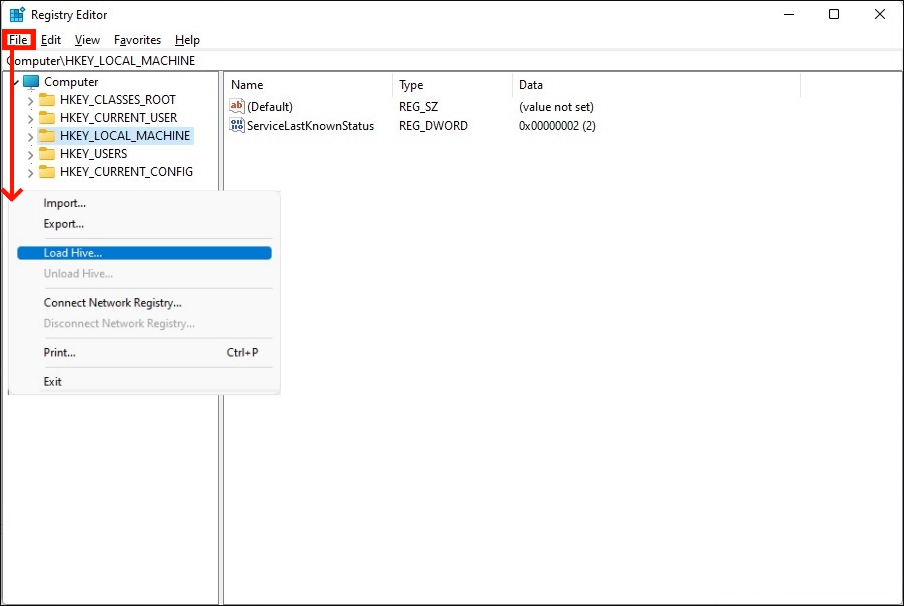
Step 5. Navigate to C:\Windows\System32\config and open the file called «SYSTEM.» Then, name it as BYPASSPIN or whatever you want.
Step 6. Then, go to «Computer» > «HKEY_LOCAL_MACHINE» > «BYPASSPIN» > «Setup.»
- Double-click on «CmdLine,» modify its value data as cmd.exe, and hit «OK.»
- Double-click on «SetupType,» set its value data as 2, and hit «OK.»
Step 7. Go back to «Computer» > «HKEY_LOCAL_MACHINE.» Select BYPASSPIN, click on «File» in the bar, and select «Unload Hive.»
Step 8. Close Registry Editor and Command Prompt widows. Click «Continue» to access the Windows system.
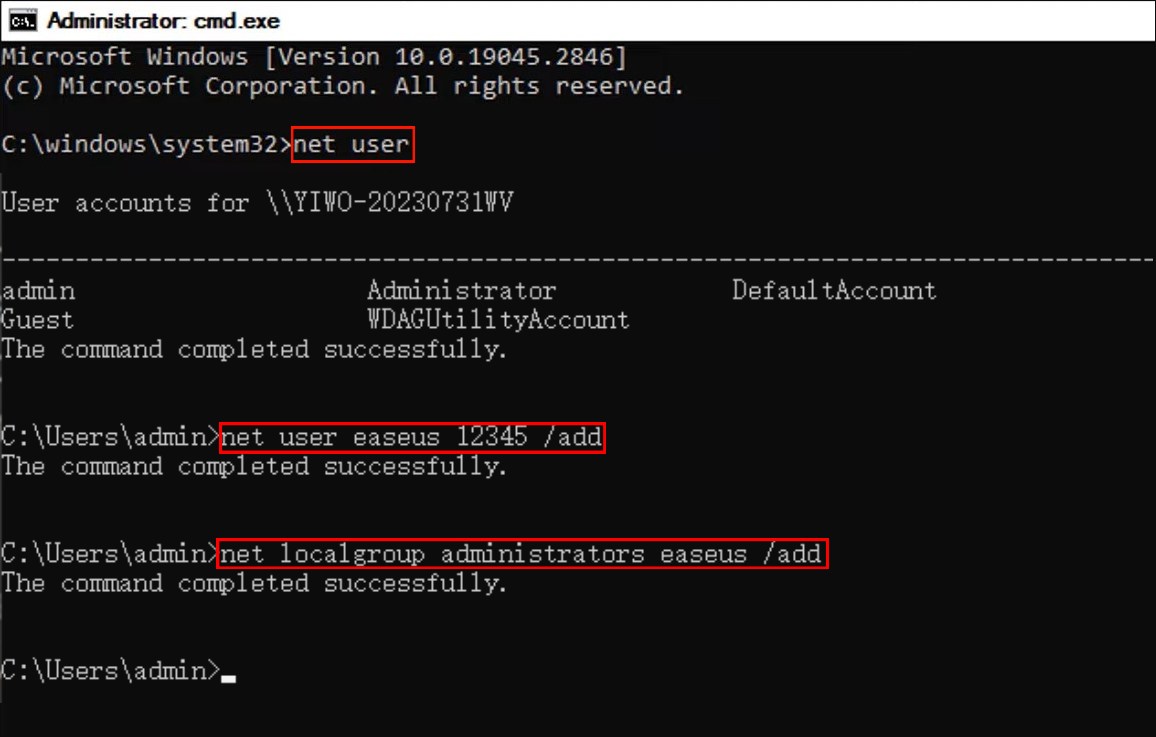
Step 9. During the startup, the cmd.exe window will pop up. Input net user and hit «Enter,» and you will see the current accounts on your computer.
Step 10. Now, type in the following commands and hit «Enter» after each to create a new account:
- net user (a new username) (a new password) /add
- net localgroup administrators (a new username) /add
Then, enter exit to continue.
Step 11. Then, you’ll enter the Windows sign-in screen. Choose the new account you just created and log in with the password you set.
Step 12. Now, you may notice the desktop is quite empty. Go to C:\Users\admin\Desktop, and you will see all your files that belong to your old account.
Don’t forget to share these methods with other users who might benefit from them.
Conclusion
With the detailed tutorial on bypassing PIN in Windows 10 on this page, you can quickly access the system without risking your data. EaseUS Partition Master is the fastest and safest way to remove the PIN from a computer. With these practical and easy-to-follow solutions in mind, you can get back to using your Windows 10 device easily.
Bypass PIN Windows 10 FAQs
-
Q
1. Can I use Windows 10 without PIN?
- Yes, you can disable PIN on Windows 10 in Settings. Open Settings and go to Accounts. Find Windows Hello PIN in Sign-in options and remove it.
-
Q
2. What to do if you dont remember your password or PIN Windows 10?
- You can use tools like EaseUS Partition Master to remove the password or PIN on your Windows 10 if you forgot them.
-
Q
3. Is Windows PIN the same as password?
- Windows PIN is not the same as a password. The PIN is local to your device, while the password is associated with your account
В данной статье показаны действия, с помощью которых можно отключить (включить) сброс ПИН-кода при входе в Windows 10.
В отличие от ввода сложного пароля, использование ПИН-кода упрощает вход в систему. Для обеспечения дополнительной безопасности вашего устройства, можно отключить сброс ПИН-кода при входе в Windows.
Если вы отключите сброс ПИН-кода при входе в систему, то на экране входа в систему не будет отображаться ссылка Я не помню свой PIN-код.
Чтобы отключить (или включить) сброс ПИН-кода при входе в Windows 10, необходимо войти в систему с правами администратора
Как отключить (включить) сброс ПИН-кода при входе используя редактор реестра
Отключить сброс ПИН-кода при входе в Windows 10, можно с помощью внесения изменений в системный реестр Windows
Прежде чем вносить какие-либо изменения в реестр, настоятельно рекомендуется создать точку восстановления системы или экспортировать тот раздел реестра, непосредственно в котором будут производиться изменения.
Откройте редактор реестра и перейдите по следующему пути:
HKEY_LOCAL_MACHINE\\SOFTWARE\\Microsoft\\Windows\\CurrentVersion\\Authentication\\LogonUI\
gcPin
В разделе NgcPin, дважды щелкните левой кнопкой мыши по параметру EnablePinReset и измените его значение на 0 и нажмите кнопку OK.

Чтобы включить сброс ПИН-кода при входе в Windows 10 и тем самым вернуть отображение ссылки Я не помню свой PIN-код на экран входа в систему, для параметра EnablePinReset установите значение f и нажмите кнопку OK.
Как отключить (включить) сброс ПИН-кода при входе используя файл реестра
Данный способ также позволяет отключить (или включить) сброс ПИН-кода при входе в Windows 10 с помощью внесения изменений в системный реестр Windows.
Прежде чем вносить какие-либо изменения в реестр, настоятельно рекомендуется создать точку восстановления системы или экспортировать тот раздел реестра, непосредственно в котором будут производиться изменения.
Все изменения производимые в редакторе реестра отображены ниже в листингах файлов реестра.
Чтобы отключить сброс ПИН-кода при входе в Windows 10, создайте и примените файл реестра следующего содержания:
Windows Registry Editor Version 5.00.
[HKEY_LOCAL_MACHINE\\SOFTWARE\\Microsoft\\Windows\\CurrentVersion\\Authentication\\LogonUI\
gcPin].«EnablePinReset»=dword:00000000
Чтобы включить сброс ПИН-кода при входе в Windows 10, создайте и примените файл реестра следующего содержания:
Windows Registry Editor Version 5.00.
[HKEY_LOCAL_MACHINE\\SOFTWARE\\Microsoft\\Windows\\CurrentVersion\\Authentication\\LogonUI\
gcPin].«EnablePinReset»=dword:0000000f
После того, как вы отключите сброс ПИН-кода при входе в систему, то на экране входа в систему не будет отображаться ссылка Я не помню свой PIN-код, пример на скриншоте ниже.

11 October 2023 Specialist of Customer Service Dept.
Summary
Discover a simple and effective method for resetting your Windows 10 PIN with the command prompt, even if you’ve forgotten your password. Use this quick and easy solution to regain access to your device.
In today’s digital age, passwords are a crucial element in securing our personal information and devices. However, with the increasing complexity and frequency of cyber attacks, it is essential to regularly update and reset our passwords to stay one step ahead of potential threats. This is particularly true for our Windows 10 PIN, which provides quick and easy access to our devices. Thankfully, Microsoft has provided a simple and effective solution for resetting your Windows 10 PIN using the command prompt. In this chapter, we will walk you through the process and highlight just how easy and effective it can be if you are still able to log in to your device.
Option 1 : Reset Windows 10 PIN using Command Prompt(If still login)
Resetting your Windows 10 PIN using the command prompt is a simple and effective method that allows you to regain access to your device even if you’ve forgotten your password. This option can come in handy if you still have the ability to log in to your Windows 10 account.
Before we dive into the process, it’s important to note that using the command prompt requires some basic knowledge of command-line operations. However, don’t worry if you’re not familiar with it – we’ll provide step-by-step instructions to make the process as easy as possible.
Step 1: Open the Command Prompt in Safe Mode
If you are unable to log in to your Windows 10 account, you can still access the command prompt by restarting your PC in Safe Mode. To do this, follow these steps:
- Bring up the Windows 10 login screen by pressing the Power button and selecting the Restart option while holding the Shift key.
- On the Choose an option screen, select Troubleshoot, then Advanced options.
- Select Startup Settings, then click Restart.
- When the system starts up, press either the number 6 or the F6 key to enter Safe Mode.
Step 2: Reset the PIN using the “net user” command
Once you have entered Safe Mode and the Command Prompt appears, you can proceed with resetting your Windows 10 PIN. Type the following command and press Enter:
Replace your_username with your actual Windows username. This command will prompt you to enter a new password for your account.
After resetting your password, you can now set a new PIN for your Windows 10 account. To do this, type the following command and press Enter:
net user your_username new_pin
Replace your_username with your actual Windows username, and new_pin with the new PIN you wish to set. Make sure to create a PIN that is easy for you to remember but difficult for others to guess.
Step 4: Log in with your new PIN
Once you’ve successfully reset and set your new PIN, you can now log in to your Windows 10 account using the new PIN. Restart your computer and on the login screen, enter your username and the new PIN you’ve just created.
Additional Considerations:
If you don’t have another login with permissions to reset user passwords, you can use the Windows 10 installation media to reset your password. This method requires temporarily altering some system files, but no data will be lost.
It’s important to note that this method works for local accounts and not Microsoft accounts. If you are using a Microsoft account, you may need to follow alternative procedures such as filling out the Microsoft Account Recovery form to reset your password.
Resetting your Windows 10 PIN using the command prompt is a straightforward process that can save you from the hassle of forgetting your password. Whether you can still log in to your account or need to use Safe Mode, following the steps outlined above will allow you to regain access to your device and set a new PIN. Remember to choose a strong and memorable PIN to ensure the security of your Windows 10 account.
Option 2: Delete NGC Folder to Reset Windows 10 PIN using Command Prompt
The NGC folder plays a crucial role in the Windows 10 PIN setup and login process. It contains essential configuration files that determine the functionality and security of your PIN login. However, there may be instances where the NGC folder becomes corrupted or experiences bugs after Windows 10 updates. This can lead to issues such as the PIN not working or being unavailable. In such cases, you can try deleting the NGC folder to resolve the problem and create a new PIN.
If you are unable to log into your Windows 10/11 computer using your PIN or experiencing a PIN not working issue, you can attempt to fix it by deleting the NGC folder and creating a new PIN.
Step 1: Taking Ownership in Properties
To begin the process, open File Explorer and navigate to C:\WINDOWS\ServiceProfiles\LocalService\AppData\Local\Microsoft, where the NGC folder is located. If you encounter any permission issues, you may need to change the folder’s permissions. Right-click on the NGC folder and select Properties. In the properties window, click on the Security tab and choose Advanced. Next, select the Change option in the Owner section. Enter the account name of the administrator user, click Check Names, and then hit OK. Tick the “Replace owner on subcontainers and objects” checkbox and click Apply & OK to save the changes.
Step 2: Recreating a New PIN
Once you have gained ownership of the NGC folder, you can proceed to delete its contents. Open the NGC folder and delete all files and folders within it. This will remove any existing PIN configurations on your Windows 10/11 computer.
After deleting the NGC folder, you can recreate a new PIN by following the appropriate steps based on your Windows version:
On Windows 11:
1. Go to Start > Settings > Account.
2. Click PIN (Windows Hello) from the right panel.
3. Click the Set up button.
4. Enter your account password and click OK.
5. Enter your new PIN twice and click OK to save it.
On Windows 10:
1. Go to Start > Settings > Account > Sign-in options.
2. Click the Add button under PIN.
3. Enter the password for your account and click Sign in.
4. Set up a new PIN by entering it twice and clicking OK.
Resetting the Permissions for the NGC Folder
After deleting the NGC folder, it is recommended to reset the permissions for the folder using Command Prompt. Open Command Prompt as an administrator by searching for it in the start menu, right-clicking on it, and selecting “Run as administrator“. In the Command Prompt window, enter the following command:
icacls C:\WINDOWS\ServiceProfiles\LocalService\AppData\Local\Microsoft\NGC /T /Q /C /RESET
This command will reset the permissions for the NGC folder.
Additional Tips for PIN Issues
If deleting the NGC folder and recreating a new PIN does not resolve your issue, you can try the following troubleshooting steps:
— Use the “I forgot my PIN” feature to set up a new PIN.
— Switch to a different sign-in method and then switch back to PIN login.
— Go back to a previous build of Windows 10/11.
— Create a new user account and try setting up a PIN on that account.
— Modify Group Policy settings to enable convenience PIN sign-in.
— Set the IPsec Policy Agent to start automatically.
— Restart your computer in the PIN phase to force PIN login.
— Uninstall the latest optional updates that may be causing PIN issues.
— Consider reinstalling Windows 10/11 as a last resort.
Option 3 : If forget PIN, using Windows Installation Media and Renee PassNow to Reset Windows 10 PIN
If you have forgotten your Windows 10 PIN and are unable to access your computer, do not worry. There are various options available to help you reset your PIN and regain access to your Windows system. In this chapter, we will discuss how you can use Windows Installation Media and Renee PassNow to remove the NGC folder and reset your Windows 10 password.
1: Creating Windows Installation Media
Firstly, you will need to create a bootable Windows Installation Media on a USB drive or DVD. To do this, you can follow these steps:
1. Insert a USB drive or DVD into your computer.
2. Download the Media Creation Tool from the Microsoft website.
| Windows Version | Download Link | Requirement |
|---|---|---|
| Windows 7 | https://learn.microsoft.com/lifecycle/products/windows-7 | PC with a working Internet connection/ a blank USB flash drive or DVD with at least 8 GB of available storage space/ a product key |
| Windows 8/8.1 | https://www.microsoft.com/software-download/windows8 | Same to above |
| Windows 10 | https://www.microsoft.com/software-download/windows10 | Same to above |
| Windows 11 | https://www.microsoft.com/software-download/windows11 | Same to above |
3. Run the tool and select “Create installation media for another PC.“
4. Choose the desired language, edition, and architecture for your Windows 10 installation.
5. Select “USB flash drive” or “ISO file” as the media type, depending on whether you want to create a bootable USB drive or DVD.
6. Follow the instructions on the screen to complete the process.
2: Booting from the Windows Installation Media
Once you have created the Windows Installation Media, you will need to boot your computer from it. To do this, follow these steps:
1. Insert the USB drive or DVD into your computer.
2. Restart your computer and enter the boot menu by pressing the designated key (usually F12 or Esc) during the boot process.
3. Select the USB drive or DVD from the boot menu.
4. Allow the computer to boot from the media.
3: Removing the NGC Folder
After booting from the Windows Installation Media, you will need to remove the NGC folder from your computer. This folder contains the encrypted key used for your PIN, so removing it will reset your PIN and allow you to access your computer. To do this, follow these steps:
1. In the Windows Setup screen, press Shift + F10 to open the Command Prompt.
ren c:\Windows\ServiceProfiles\LocalService\AppData\Local\Microsoft\NGC c:\Windows\ServiceProfiles\LocalService\AppData\Local\Microsoft\NGC.old
to close the Command Prompt.
4. Continue with the Windows 10 installation process.
4: Resetting Windows 10 Password with Renee PassNow
Now that the NGC folder has been removed, you can use Renee PassNow to reset your Windows 10 password and regain access to your computer. To do this, follow these steps:
Tips:If your account is Microsoft Account, Renee PassNow will convert this account to Local account. After resetting login password, you need to connect your account to your Microsoft Account again.
To reset your Windows password using Renee PassNow, follow these steps:
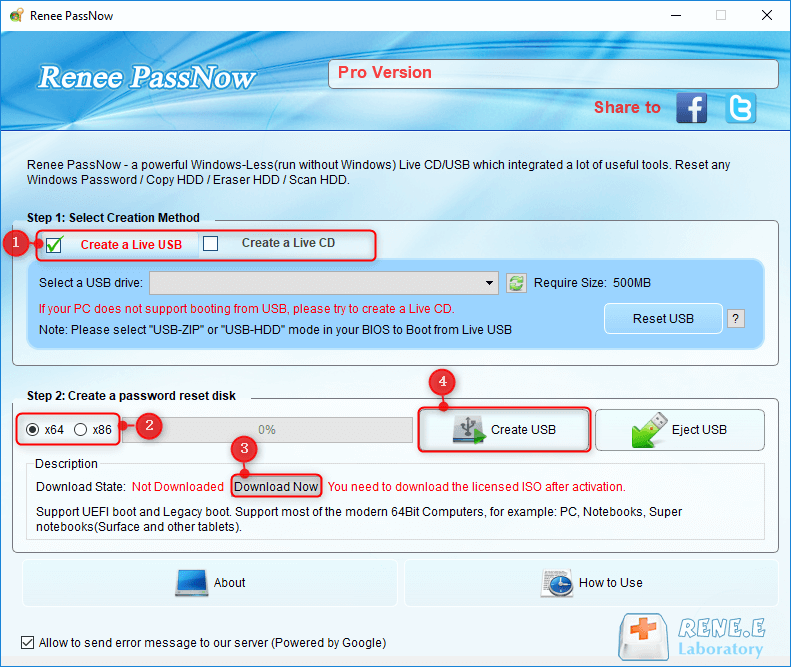
Step 1: Download and Install Renee PassNow
Start by downloading Renee PassNow from the official website and install it on a different computer that you can access. You can choose the appropriate version based on your computer’s operating system.
Renee PassNow – Professional Windows System Rescue Tool

Remove Windows Login Password 3 steps for whole password remove process.
Recover the files Recover the deleted files without Windows system.
Transfer the data Transfer the important files of the computer with system.
Fix Windows startup error Fix various Windows startup failures or crashes.
Erase disk Completely erase disk files which will not be restored.
Remove Windows Login Password 3 steps for whole password remove process.
Recover the files Recover the deleted files without Windows system.
Transfer the data Transfer the important files of the computer with system.
Step 2: Create a Bootable USB or CD/DVD
Launch Renee PassNow and insert a USB flash drive or blank CD/DVD into the computer. Select the option to create a bootable media. Follow the on-screen instructions to complete the process.
Step 3: Boot the Locked Server from the Bootable Media
Insert the bootable USB or CD/DVD into the locked Windows computer. Restart the computer and enter the BIOS settings by pressing the appropriate key (usually F2 or Delete). Configure the boot order to prioritize the bootable media.
| Server Type | Enter boot menu method |
|---|---|
| DELL | Press the F12 key repeatedly before the Dell logo appears on the screen. |
| HP | Press the F9 key multiple times when the HP logo is displayed. |
| BIOS Name | Enter boot menu method |
|---|---|
| ASRock | DEL or F2 |
| ASUS | DEL or F2 for PCs/ DEL or F2 for Motherboards |
| Acer | DEL or F2 |
| Dell | F12 or F2 |
| ECS | DEL |
| Gigabyte / Aorus | DEL or F2 |
| Lenovo (Consumer Laptops) | F2 or Fn + F2 |
| Lenovo (Desktops) | F1 |
| Lenovo (ThinkPads) | Enter then F1 |
| MSI | DEL |
| Microsoft Surface Tablets | Press and hold Power and Volume Up buttons |
| Origin PC | F2 |
| Samsung | F2 |
| Toshiba | F2 |
| Zotac | DEL |
| HP | Esc/ F9 for `Boot Menu`/ Esc/ F10/ Storage tab/ Boot Order/ Legacy Boot Sources |
| INTEL | F10 |

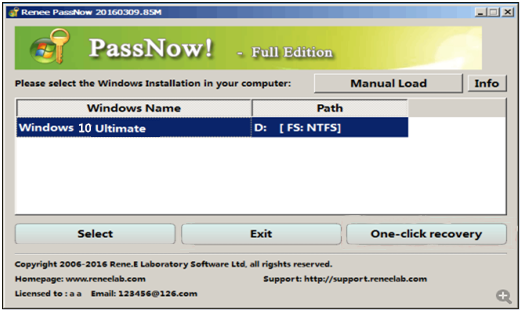
Step 4: Select password reset function
After successfully booting from the bootable media, Renee PassNow will load. Select “PassNow!” function after booting from the new created Windows password reset disk.
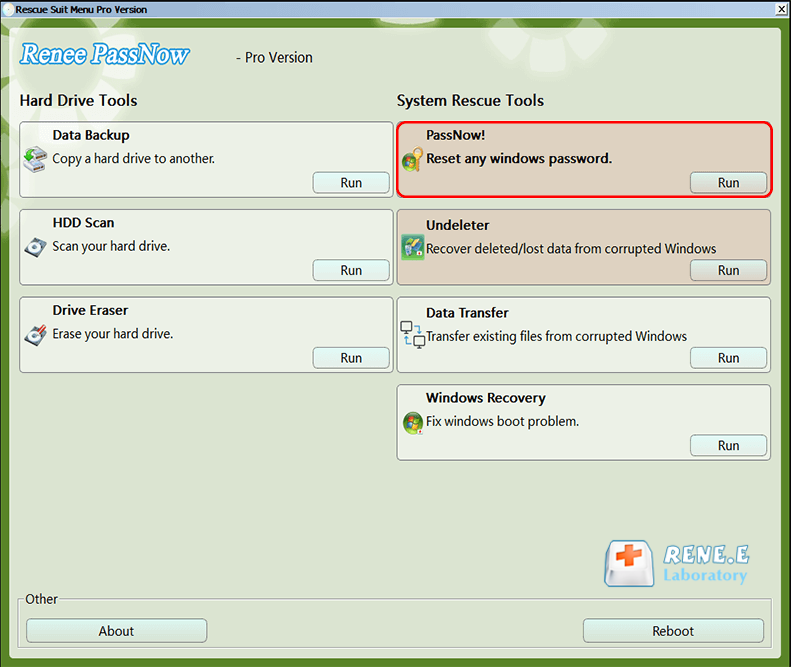
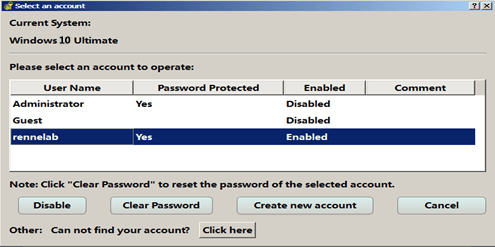
Step 5: Resetting the Password
Choose the user account for which you want to reset the password. Then, click on the “Clear Password” button. Renee PassNow will remove or reset the password for the selected user account.
Step 6: Reboot the PC
Once the password is reset, remove the bootable media from the PC and restart the computer. You will now be able to log in to Windows Account without a password.
After following these steps, your Windows 10 password will be reset, and you can log in to your computer. It is recommended to set a new PIN once you have regained access to your computer.
In conclusion, if you have forgotten your Windows 10 PIN, using Windows Installation Media and Renee PassNow is a simple and effective way to remove the NGC folder and reset your password. Make sure to keep your password and PIN in a safe place to avoid this issue in the future.
Conclusion
In conclusion, resetting your Windows 10 PIN using the command prompt can be a simple and effective solution in regaining access to your device if you have forgotten your password. This method can be easily done by following the steps explained in Option 1. However, if you have a PIN login option and want to remove it, deleting the NGC folder as described in Option 2 can be a viable solution. And in case you forget your PIN and are unable to log in, using Windows Installation Media and Renee PassNow as mentioned in Option 3 can help you reset your Windows 10 password and regain access to your device. Remember to keep your device secure by regularly updating your PIN or password and creating a password reset disk. With these tips, you can confidently reset your Windows 10 PIN using the command prompt and ensure that you always have access to your device.