
Sign in to your MUO account

Creating and deleting folders and files is a natural part of using any operating system over a long period. However, in some rare cases, you might be unable to delete these files or folders at all.
That’s where force deletion can come to your rescue. In this article, we’ll look at precisely what force deletion is, and then go over the exact steps to force delete your folders or files on Windows 11.
What Is Force Delete?
Force Delete is a feature on Windows that overrides any conflicting processes that might prevent you from deleting any file or folder on your PC. The process stopping you from deleting a specific file or folder can be anything: a malware attack, an overriding script of some other process, permission rights, etc.
Whatever the cause, with force deletion you can get rid of your files or folders easily. So let’s look at how you can override this error and force delete your files or folders.
How to Force Delete a File or Folder on Windows 11
There are a host of ways to force delete a folder or file on Windows 11. While some might work for you, others might not work for someone else. So we’ll lay out all the approaches; you can then try out all and stick with the ones that you find work best.
1. Delete Files With the Command Prompt
Command Prompt is the default command line interpreter for Windows computers. You can also use it to force delete your files or folders on Windows 11. Here’s how.
1. Head to the Start menu search bar, type in ‘cmd,’ and select the best match.
2. On File Explorer, go to the folder or file your want to delete and grab its location from the address bar above.
In the Command prompt, type in the del command along with the address of your file or folder as shown below:
del C:\Users\user\folder-name\filename.extension
Hit Enter and your file or folder will be deleted.
That’s it. Do this, and you’ll be able to remove random files or folders on your Windows PC.
2. Take Ownership of the Folder
If it’s a specific folder that you’ve been unable to delete, then make sure your user account gives you full ownership of it. Here’s how you can sort out this problem:
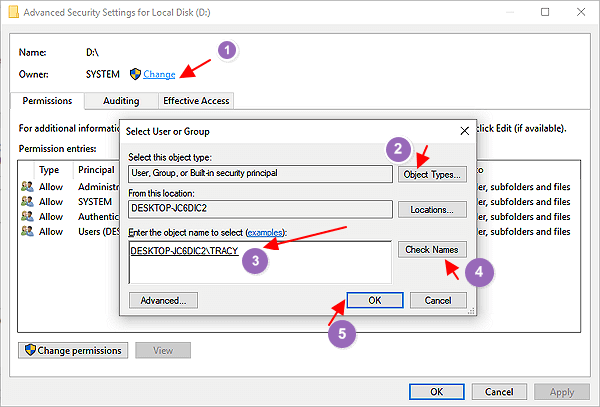
- Open the File Explorer and head to the specific folder, right-click on it, and select Properties. Then select Security > Advanced.
- Look for the Owner field and click on Change written in front of it. Then, in the Enter the object names to select field, type in ‘Administrator,’ and click on Check Names. Finally, click on OK.
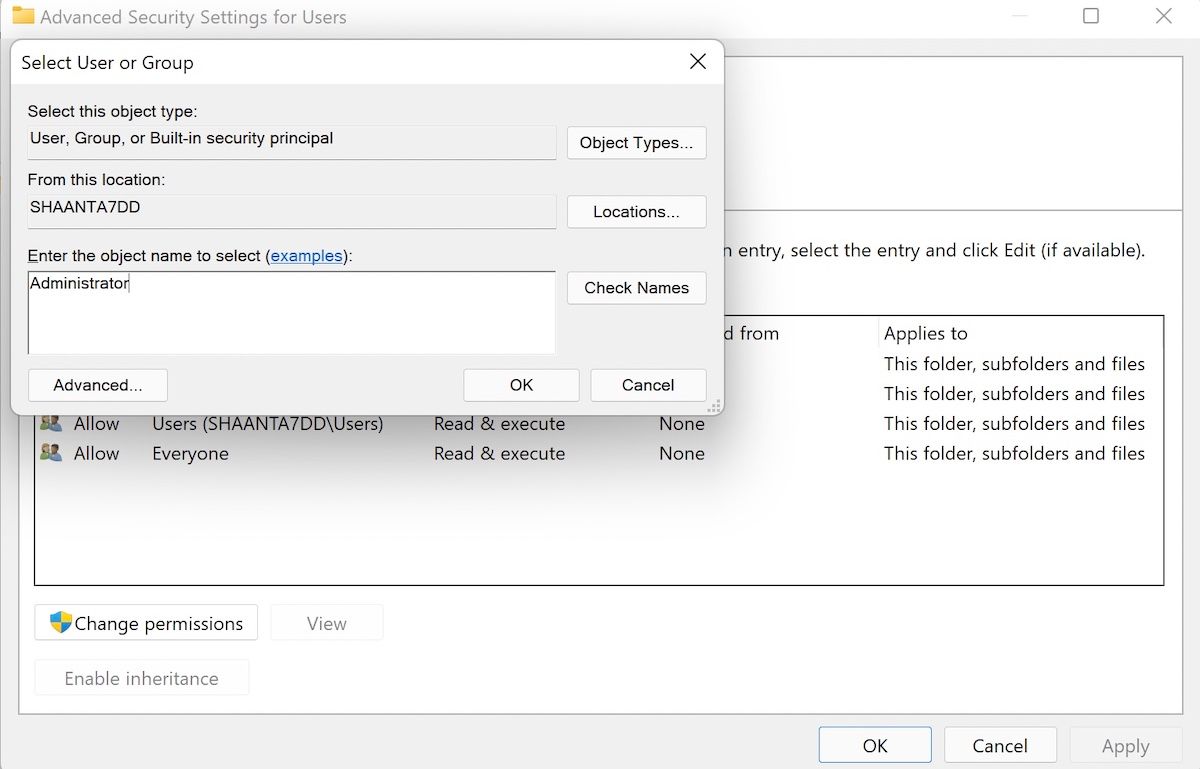
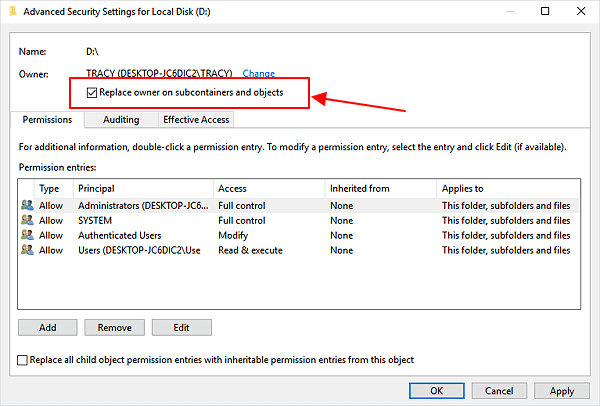
As soon as you do this, you’ll see that the Owner property has been changed to Administrator. Right below the Owner property, you’ll find the Replace owner on subcontainers and objects checkbox. Select it and finally click on Apply from below.
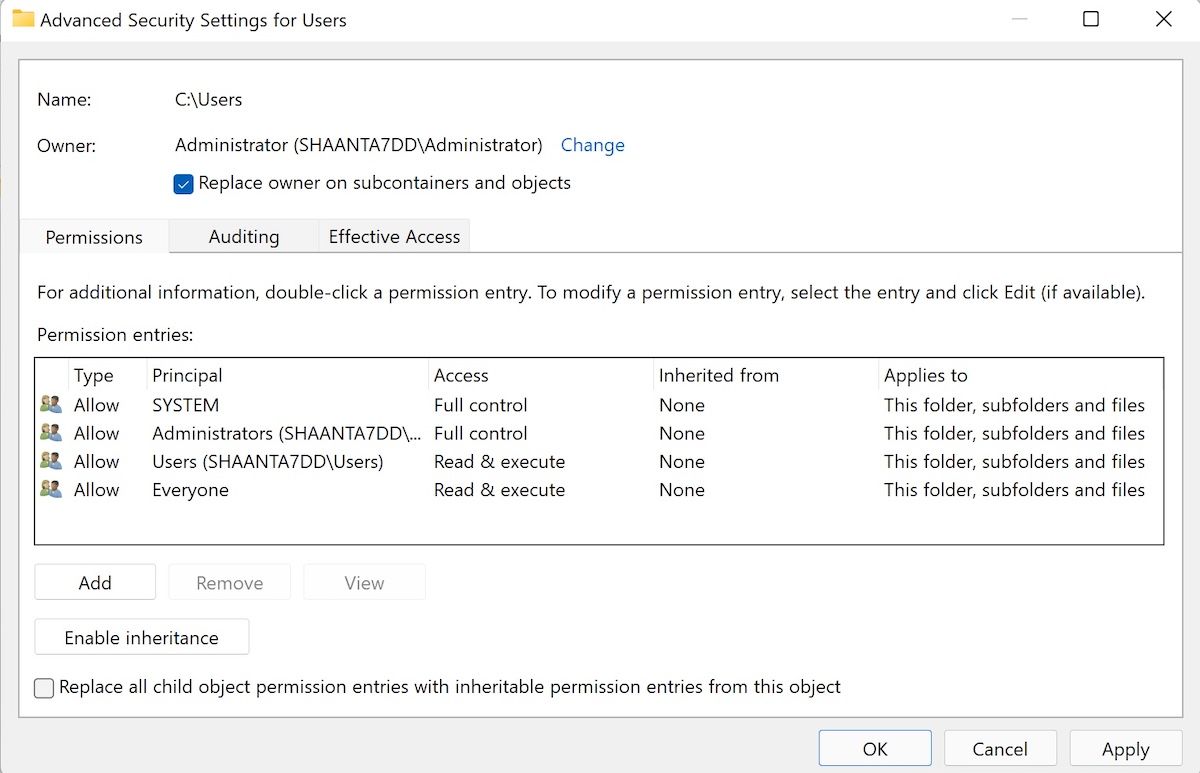
Do this, and you will completely own your files and folders. Try deleting them now and see if you face any problems.
3. Go Into Safe Mode
Safe mode is a special way to run your Windows where your PC only boots with a minimum set of files and drivers. Interestingly, once you’re in the Safe mode, you can then delete your files or folders you couldn’t in normal mode.
There are different ways to enter Safe mode in Windows 11. For this example, we’d suggest you boot into it straight from your Settings menu. Here’s how.
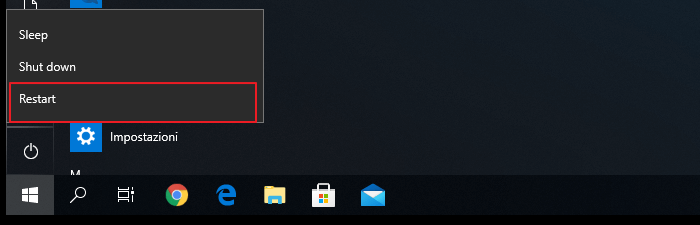
- Press Win + I to open the Settings menu.
- In the Settings tab, scroll down and click on Recovery option.
- Click on Restart now and your PC will reboot.
-
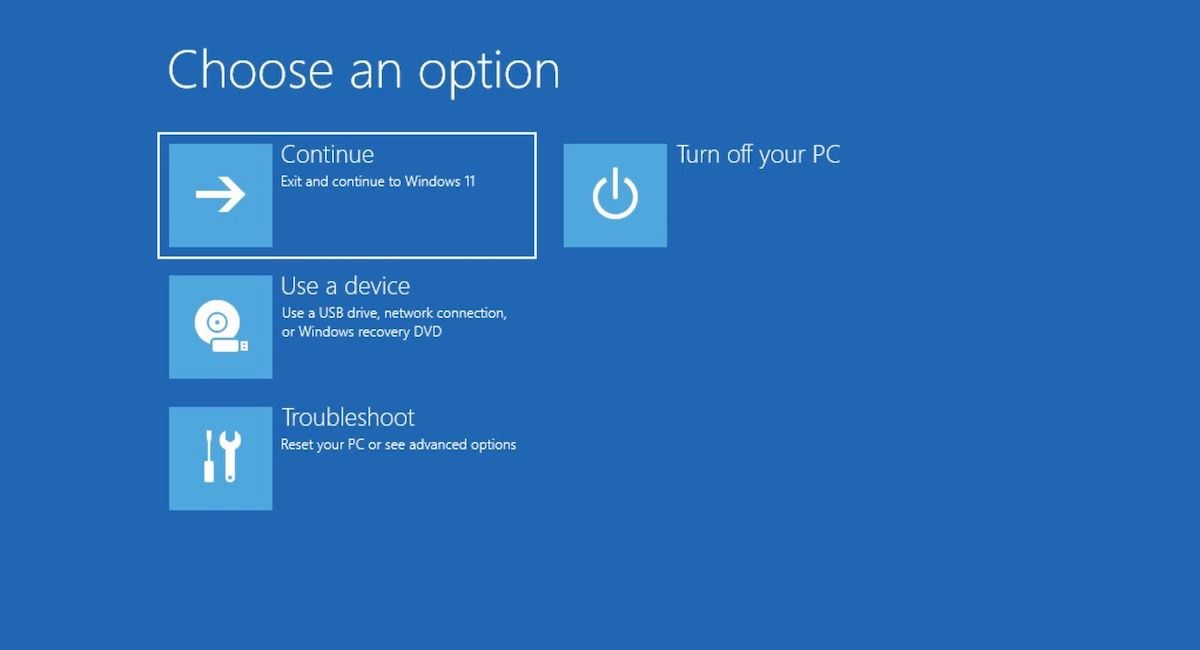
From there, click on Troubleshoot.

- Select Advanced options > Startup settings.
-
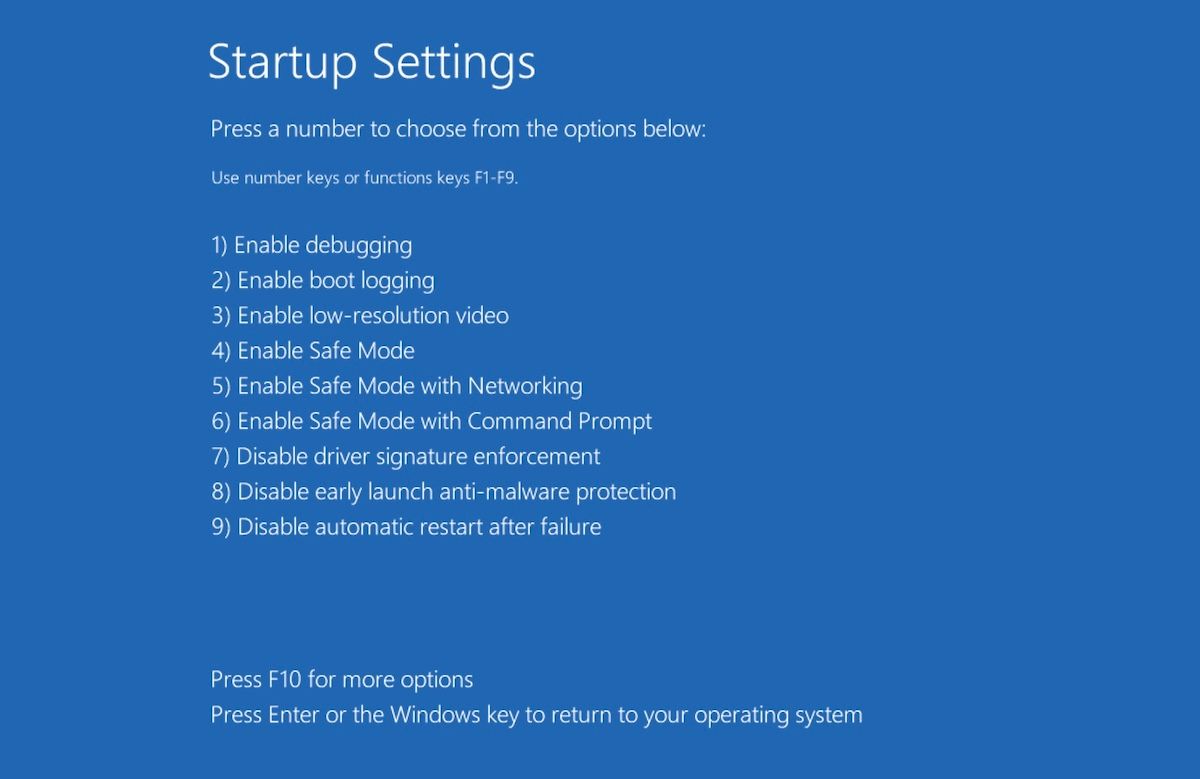
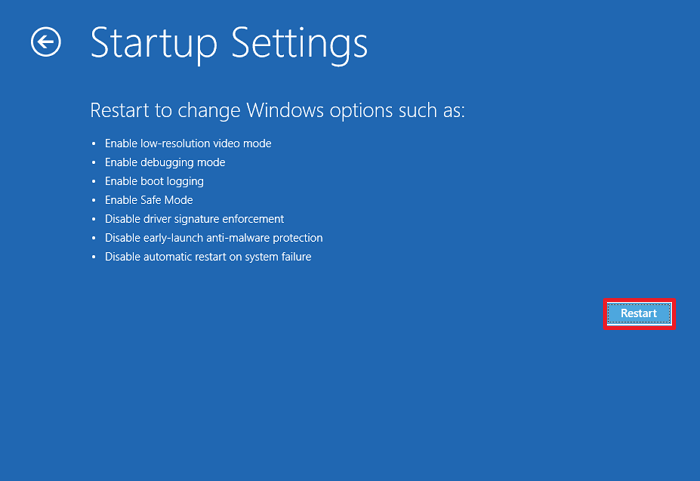
Click on Restart, and you’ll be taken to the Startup settings page.

- Press 4 to boot your PC into Safe Mode.
Your PC will start and will boot into safe mode. Now give deleting your file or folder a go; you should be able to delete them rather quickly. After you’re done, give your Windows a restart, and you’ll exit the safe mode.
Force Deleting a Folder or File on Windows 11
Forced deletion can come in handy when the usual ways to remove your Windows file or folders fail. We hope one of the methods listed above did the trick for you, and you were able to get rid of your Windows files or folders successfully. The only thing you need to remember is not delete other useful files or folders during the force deletion. Setting up careful measures against accidental deletion can help you in cases like this—so make sure you have got those covered.
Наверняка вы к сталкивались с ситуацией, когда не удавалось удалить ненужную папку в Windows 11. А все из-за того, что папка или файл использовались каким-то приложением или на папку или файл были наложены какие-либо ограничения в части прав доступа, например папка являлась системной и Windows не разрешал её удалить. В этой статье мы рассмотрим несколько вариантов удаления «неудаляемых» папок и файлов при помощи стандартных средств Windows, а также стороннего программного обеспечения.
Способ 1. Удаляем не удаляемый файл/папку через командную строку (CMD)
Командная строка является одним из эффективных способов по принудительному удалению папок и фалов в ОС Windows 11.
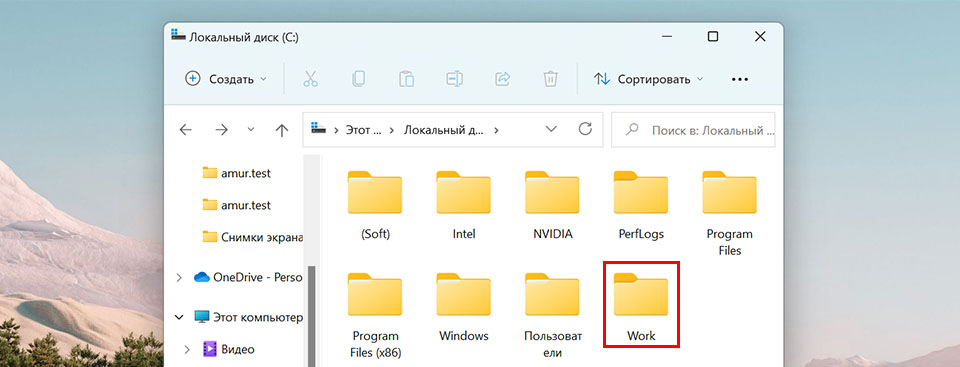
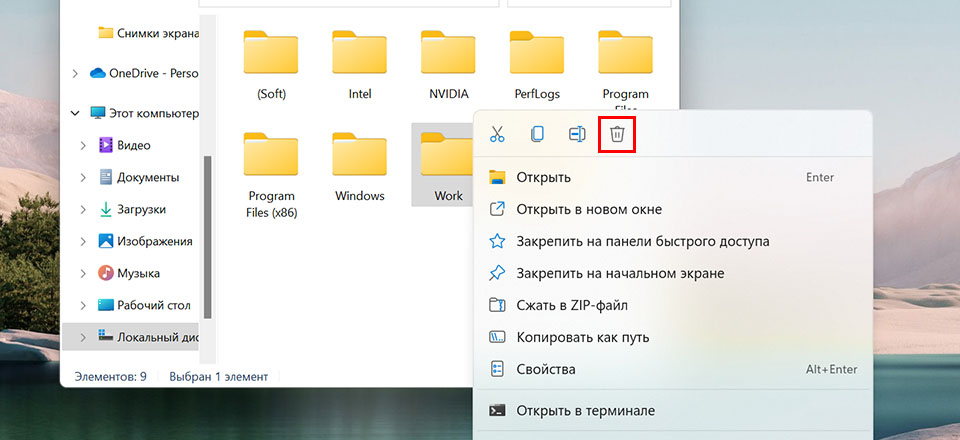
Сперва запоминаем или копируем путь папки или файла, который хотим удалить. В нашем примере удалять будем папку «Work» (расположение «C:\Work»).
Теперь открываем командную строку с правами администратора одним из следующих способов: 1. Нажимаем «горячие» клавиши «Win+R», чтобы открыть окно «Выполнить», в котором указываем команду «cmd» в текстовом поле «Открыть». Затем, для того, чтобы открыть CMD с правами админа, нажимаем на клавиатуре клавиши «Ctrl+Shift+Enter».

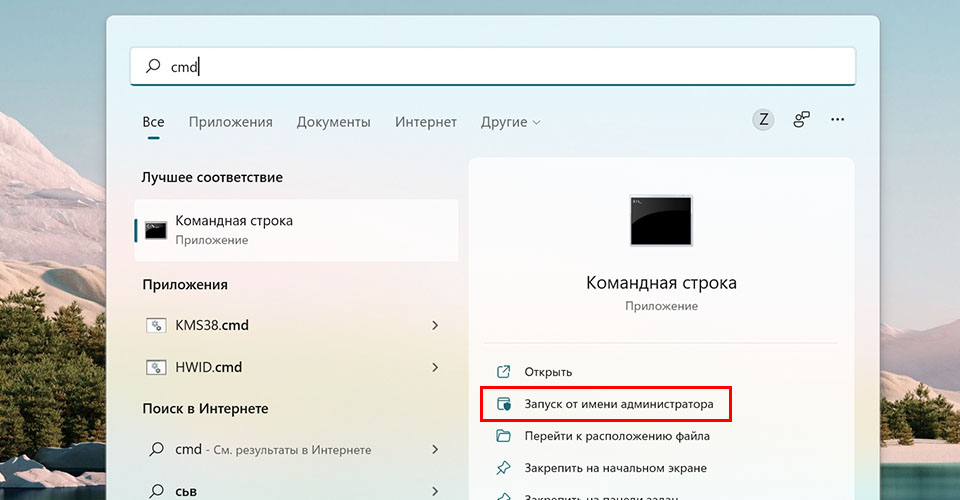
2. Альтернативный способ запуска командной строки — через меню поиска Windows 11. Для этого нажимаем на меню «Пуск» (либо клавиши «Win+S») и в верхней поисковой строке вводим «cmd». Далее нажимаем на ссылку «Запуск от имени администратора».
Отлично! В появившемся окне CMD вводим следующую команду:
rmdir /s /q "Путь"
где «Путь» — расположение удаляемой папки или файла.
В нашем примере команда будет следующая:
rmdir /s /q C:\Work
Для выполнения команды не забываем нажать клавишу ввода «Enter».
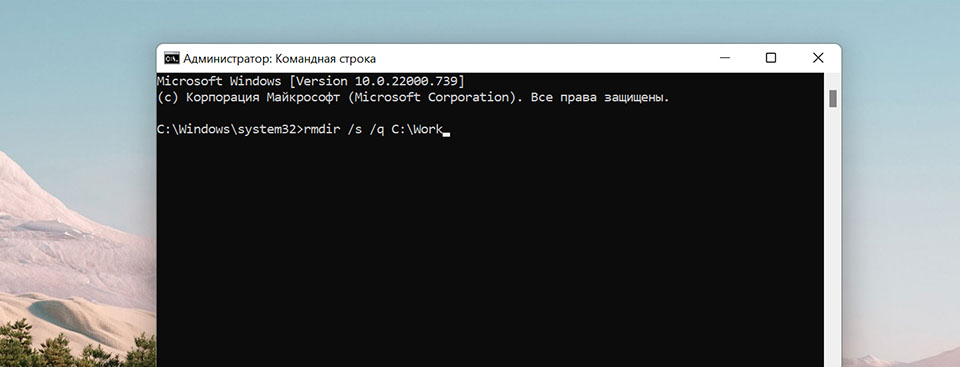
Теперь папка будет удалена с ПК. Если в пути присутствуют проблемы, то добавляем двойные кавычки.
Способ 2. Удаляем не удаляемый файл/папку через безопасный режим
Если у вас нет понимания, каким приложением занята папка или файл, просто переходим в безопасный режим через перезагрузку ПК и удаляем оттуда. Безопасный режим предотвращает загрузку сторонних приложений, поэтому с большей долей вероятности папка будет доступна для удаления.
Существует несколько способов перехода в безопасный режим, рассмотрим один из них — нажимаем на клавиатуре клавиши «Win+R», указываем команду «msconfig» и нажимаем кнопку «ОК».
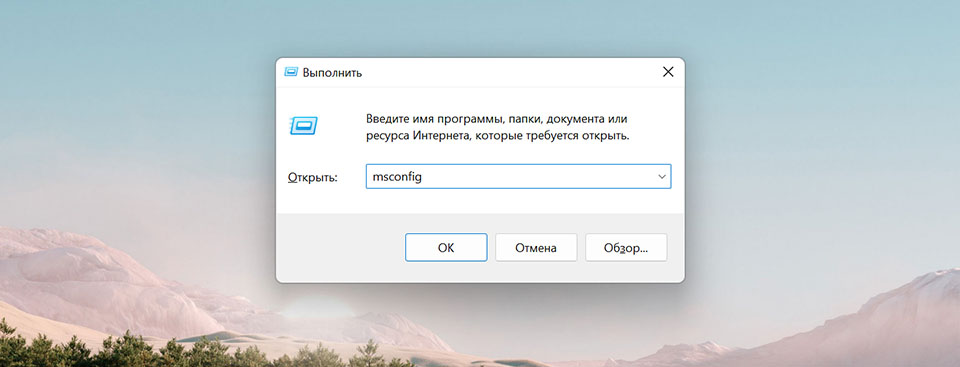
Запуститься окно «Конфигурация системы», в разделе «Параметры загрузки» отмечаем галочкой «Безопасны режим», параметр выбираем любой. Затем нажимаем кнопку «ОК» и подтверждаем перезагрузку, когда система запросит её.

В безопасном режиме находим папку, которую хотим удалить, щелкаем по ней правой кнопкой мыши и нажимаем на значок корзины, чтобы удалить. Либо нажимаем клавишу «Del» на клавиатуре.
Вот и все! Папка или файл будут удалены с вашего компьютера.
Способ 3. Удаляем не удаляемый файл/папку через приложение «Unlocker»
В сети Интернет можно скачать стороннее бесплатное приложение, которое называется — Unlocker. Оно сможет помочь с удалением и разблокировкой любых папок и файлов на ПК с Windows 11.
Итак, скачиваем, устанавливаем и запускаем приложение «Unlocker». При запуске появится проводник приложения, в котором выбираем папку, необходимую для удаления и нажимаем кнопку «ОК».

После нажатия на кнопку «ОК», появится небольшое окно, где в выпадающем списке выбираем команду «Delete» и затем нажимаем кнопку «ОК», чтобы завершить удаление файла или папки.

Unlocker разблокируем файл/папку и удалит её с вашего ПК.
Способ 4. Удаляем не удаляемый файл/папку через приложение «WinRar»
Вот небольшой лайфхак — архиватор WinRAR так же как и Unlocker обладает возможностью разблокировки файлов/папок, а как это сделать смотрим дальше в инструкции.
Сперва скачиваем сам WinRAR, если его у вас нет. Затем переходим в проводнике Windows 11 к папке (в нашем примере папка «Work»), которую хотим удалить. Щелкаем правой кнопкой мыши по папке, чтобы отобразить контекстное меню, в котором наводим мышь на пункт «WinRAR», а затем щелкаем на подпункт «Добавить в архив…».

Появится окно WinRAR «Имя и параметры архива», в этом окне находим раздел «Параметры архивации» и отмечаем галочкой пункт «Удалить файлы после архивации», это и есть небольшой лайфхак. Теперь нажимаем кнопку «ОК», чтобы WinRAR создал архив и удалил заблокированную папку с нашего ПК.
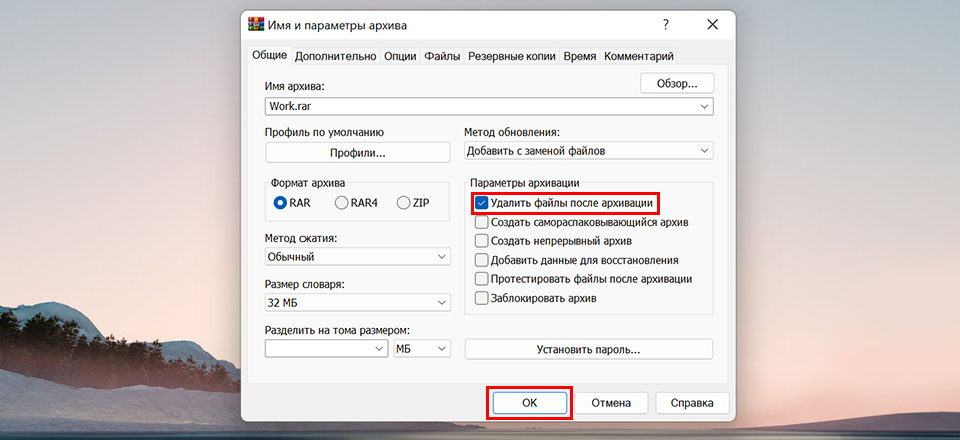
Вот так легко избавиться от заблокированных файлов и папок в Windows 11.
Deleting files or folders in Windows 10 is something we do all the time. Regular file deleting simply requires you to right-click on the item and select the Delete option from the context menu, or after selecting the file, press the Delete key on your keyboard directly.
You can also permanently delete a file or folder using the Shift + Delete keys combination. But some files or folders are so stubborn that you can’t delete them no matter what you do, only get the error message «Cannot delete [filename]: Access is denied».
There are many reasons why a file or folder cannot be deleted. For example, the file or folder is in use by a program and you cannot delete it until the program using the file is closed. Or the folder is read-only, the disk on which the files are stored is write-protected, the Recycle Bin is full, and so on. Whatever the reason, if you are sure that the file or folder is useless, you can try the following four methods to force delete folders or files on Windows 11/10/8/7.
| Workable Solutions | Step-by-step Troubleshooting |
|---|---|
| Fix 1. Force delete folder in CMD | If you can’t regularly delete some folders or files, you can apply the DEL command in CMD…Full steps |
| Fix 2. Force delete folder with software | Using force delete folder software to learn files that can’t be deleted is a useful and simple way…Full steps |
| Fix 3. Delete files with ownership | To delete files or folders on Windows, you need to have user ownership. Gain or change the ownership…Full steps |
| Fix 4. Force delete a folder or file in Safe Mode | In Safe Mode, problematic applications or features won’t start, you can delete folders…Full steps |
1. Force Delete Folder Windows 10 Using Del Command in CMD
Windows’ Command Prompt can be used to perform advanced operations, including forcing delete folders or files, whether or not a program is using them. If you’re a computer expert, Command Prompt is a great disk and file management tool for you.
Here’s how to force delete a folder on Windows 10.
Step 1. Press Win + E to open File Explorer. Find the file or folder that is to be deleted. Copy the location of the file or folder.

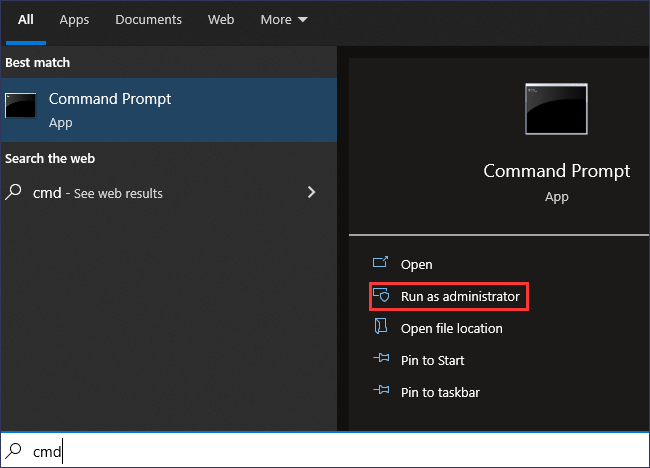
Step 2. Click the Search button and type in cmd. Click on «Run as administrator» on the right panel to open it with admin rights.
Step 3. Type the following command and press Enter.
del (FilePath)
e.g. del D:\Pictures. Replace the FilePath with the file or folder address copied in Step 1.
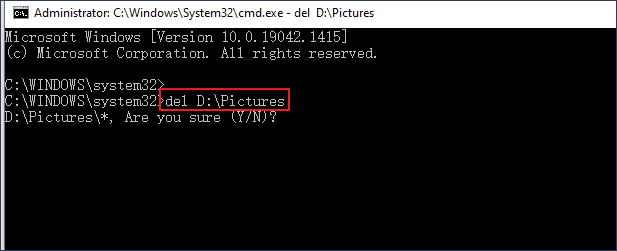
Step 4. Type Y for «Are you sure (Y/N)?» and press Enter. Then, the folder will be deleted fast.
- Warning
- The DEL command will permanently delete a folder or file bypass the Recycle Bin on your Windows PC, and you can’t restore it unless using a professional file recovery tool.
How to Recover Permanently Deleted Folders or Files on Windows 10/11
You may permanently lose files by accidental deletion/formatting, hard drive corruption, virus attack, or OS crash. In any case, you can use EaseUS data recovery software to retrieve lost or deleted files safely and efficiently.
EaseUS Data Recovery Wizard is one of the top-notch data recovery software that you can use to recover lost and deleted files stored on HDD, SSD, SD card, USB flash drive, pen drive, and many more devices without hassle.
What’s more, it’s also good at repairing corrupted files after data recovery. You can repair corrupted videos (MOV/MP4/GIF), photos(JPEG/JPG/BMP/PNG), and documents (DOC/DOCX/XLS/XLSX) effortlessly.
Now, free download this reliable file recovery program to restore more than 1000 kinds of files like video, audio, documents, graphics, emails, and other files.
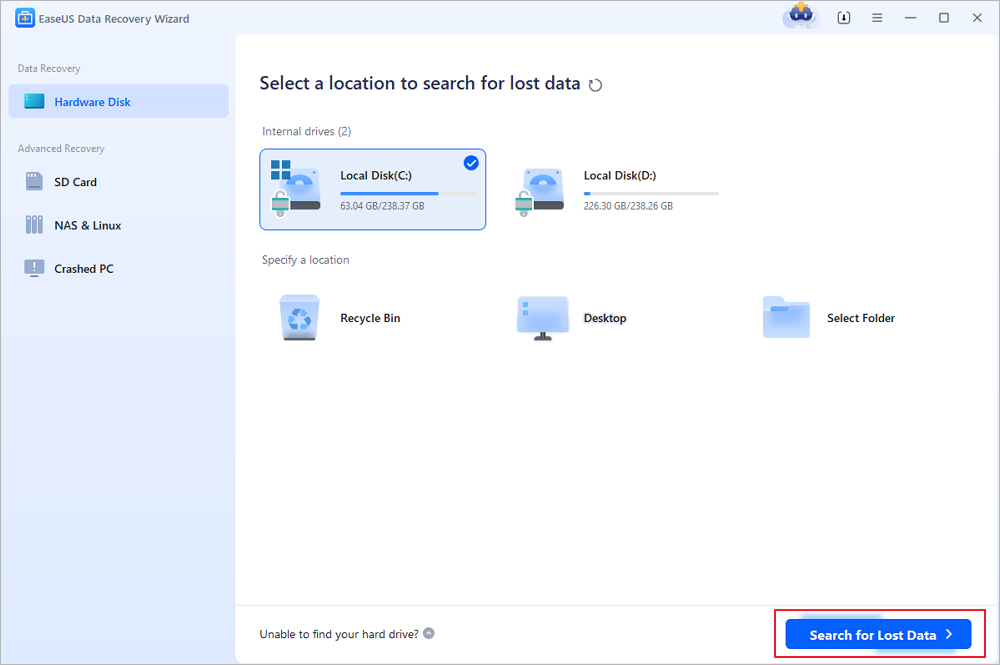
Step 1. Select the location to scan
Choose the specific device and drive where you have permanently deleted files using Shift delete or emptying recycle bin. Then, click the «Search for Lost Data» button to find lost files.
Step 2. Check the results
The software will automatically start scanning all over the selected drive. When the scan completes, select the deleted or lost folders in the left panel using the «Path» feature. Then, apply the «Filter» feature or use the search box to quickly find the deleted files.

Step 3. Recover deleted files
Select the deleted files and click «Preview». Next, click «Recover» to save them to another secure location or device. You can choose a cloud storage, such as OneDrive, Google Drive, etc., and click «Save» to save your recovered files.

2. Use a File Shredder Tool to Force Delete a Folder or File
Another useful way to remove folders or files that cannot be deleted is using a simple file shredder. EaseUS LockMyFile is an easy-to-use file management tool that can help you delete and shred files or folders from your computer completely with its File Shredder feature.
Step 1. Download and launch EaseUS LockMyFile.
Step 2. Click «File Shredder» under More Tools, click «Add Files, Add Folders, or Add drive» to select files, folders, or a disk that you need to shred.
Step 3. Confirm the files, folder, or drive that you need to shred, click «Safe Delete» or «Disk Wiper» to shred the selected items.
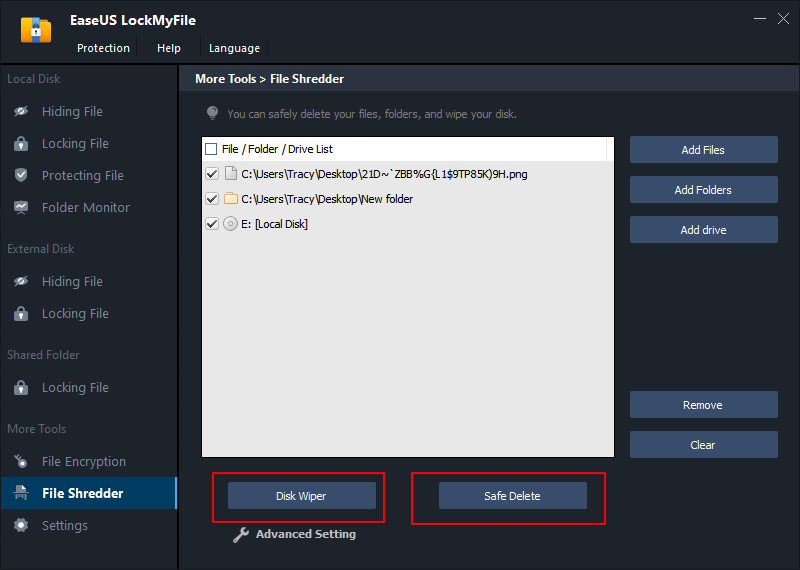
These are for removing unwanted folders or files. The software is best known for file/folder protection, including file encryption, file locking, file hiding, and so on. If you need maximum protection for your important data, try this tool.
3. Force Delete Folders Windows 10 by Changing File Ownership
To delete a file or folder, you need to have ownership of that folder/file. If you are trying to remove folders created by another user, learn how to get ownership on Windows 11/10/8 with the steps below.
Step 1. Go to Windows File Explorer and find the file/folder you need to delete. Right-click it and select «Properties».
Step 2. Click «Security» > «Advanced» as shown in the screenshot below.
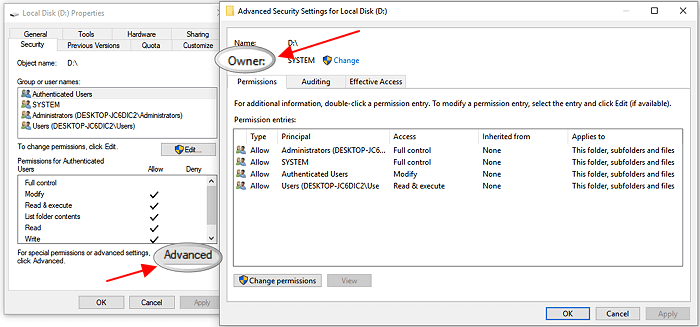
Step 3. To change a user or a group that already existed: click «Change», choose the target user account, and click «OK» to save changes.
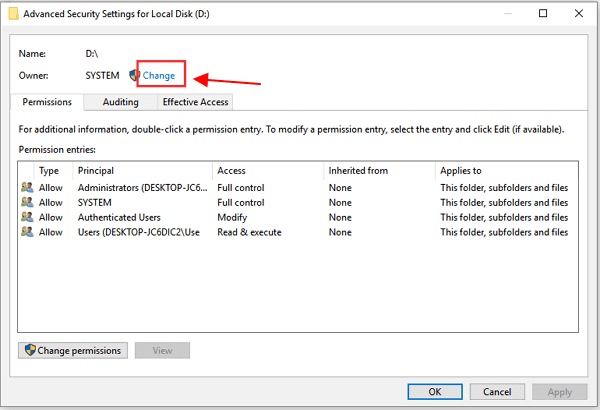
If you want to change the ownership to a user or group that does not exist: Click «Change» > «Object Types…», and type the name of the user or group under «Enter the object name to select», then click «Check Names» > «OK».
Step 4. If you want to change the owner of all sub-containers and objects, tick the «Replace owner on sub-containers and objects» box.
Then, try again to see if you can delete folders or files that cannot be deleted.
Gain ownership to force delete folder on Windows 7:
Step 1. Right-click the target folder or file and choose «Properties».
Step 2. Click the «Security» >»Advanced».
Step 3. Click the «Owner» > «Edit» to change the owner.
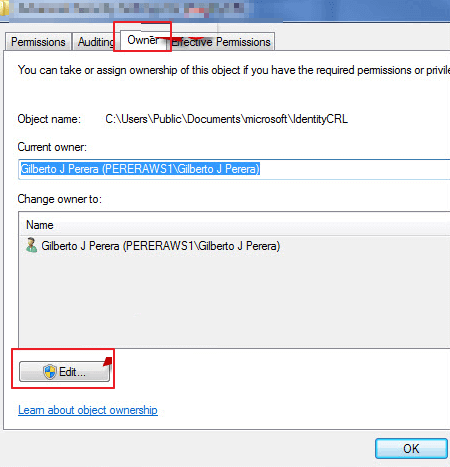
Step 4. Click «Other users or groups» to choose the user manually.
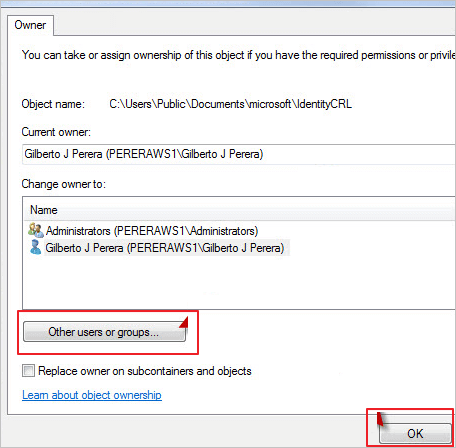
Step 5. Follow the on-screen instructions to change the ownership like the above Step 3 on Windows 10.
4. Force Delete a Folder or File Using Safe Mode
If the above methods failed, you still have the last chance to force delete folders on Windows 10 or Windows 11 in Safe Mode. In safe mode, most applications will not start, so there is a very simple environment to delete a file/folder.
Step 1. Click the Windows button and choose «Power». Hold the «shift» key and click «Restart».
Step 2. Click the «Troubleshoot» > «Advanced options».
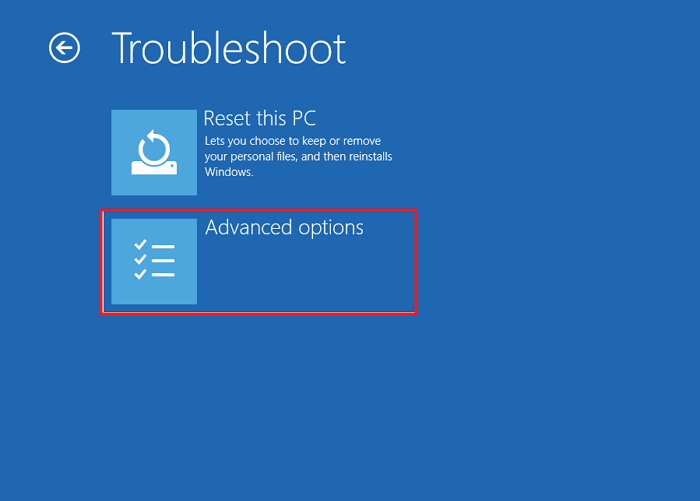
Step 3. Click «Startup Settings» on the following screen. Then, click «Restart».
Step 4. From the startup settings, choose one way to enable Safe Mode as listed in numbers 4, 5, and 6.
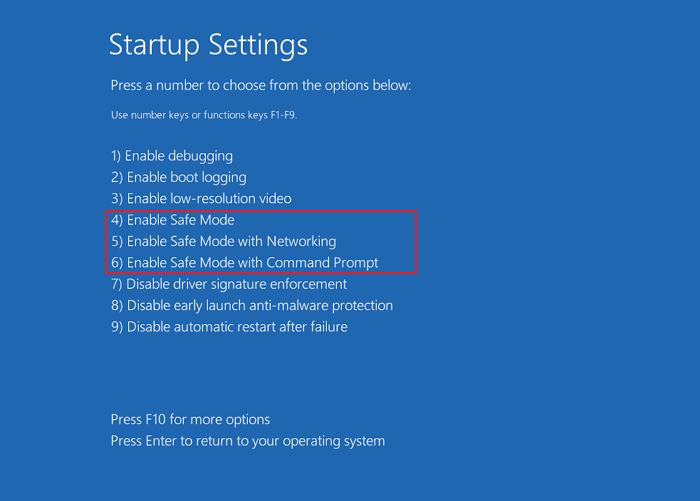
Then, your Windows computer will start in Safe Mode. You can try to delete folders or files again.
Concluding Words and FAQs
We covered these four working solutions to help you force delete a folder or file in Windows 10 or Windows 11. Other quick tips you can try to remove an undeletable folder or folder are checking your antivirus, which protects your files from being deleted, rebooting your system, uninstalling some third-party applications, and more.
Before performing force delete, make sure that the data you are going to clear is the target folder or file. If an error occurs, stop using your computer or external device and use EaseUS data recovery software to retrieve your data immediately.
More Force Delete Folder FAQs
1. How to force delete folder Windows 10 open in another program?
To overcome the File in Use error when deleting folders, you can:
- Close the program via the Task Manager
- Restart your computer
- Force delete folder using CMD
- Force delete folder with software
2. Force delete folder software
Try the following two force delete folder software on Windows 10/8/7
- EaseUS LockMyFile: its File Shredder feature allows you to completely delete folders, files, or even wipe the whole disk
- EaseUS Partition Master Free: its Wipe Data feature enables you to clean partition data permanently
3. How to force delete folder Windows 10 PowerShell
Step 1. Search for PowerShell and run it as administrator.
Step 2. In the Command Prompt window, type remove-item D:\Pictures and hit Enter key.
Tip: Replace D:\Pictures with the location of the file or folder you need to delete.
You can easily delete a folder on Windows by selecting it and pressing the Del key or by right-clicking the folder and selecting Delete. If you don’t want your deleted folder to stay in the Recycle bin for 30 days, you can also press Shift + Del key to permanently delete the folder.
However, sometimes you won’t be able to delete a folder by conventional means, and it can show errors like “folder in use,” or “You’ll require admin permission…” In such cases, you will need to force delete the folder using Command-line-interfaces or through a variety of other ways.
Note: You can check out our other article if you want to force delete a file instead of a folder on Windows.
Using Command Prompt
You can pretty easily force delete a folder by running the rd /s /q command on the Command prompt. The /s and /q parameters will forcefully delete the intended folder and all of its subfolders without a confirmation prompt.
- Press Windows + R hotkey to open the Run dialog box.
- Type
cmdand press Ctrl + Shift + Enter to open Elevated Command Prompt. - Now, enter the command
rd /s /q “folder location”. For example,rd /s /q “C:\Windows Backup\Old Backups"will delete the Old Backups folder.
- If you don’t know how to find the location of a folder, you can right-click the folder on File Explorer and select Copy as path.

If you can’t delete a folder because it says “could not find this item…,” it is likely that the folder or one of its subfolders contains invalid trailing characters. In such cases, you can add the \\?\ syntax to the full path in the command.
This will use the long device path of the folder and force delete it.
For example, rd /s /q “\\?\C:\Windows Backup\Old Backups "
Using PowerShell
You can also force delete a folder from the PowerShell command-line interface. It is pretty similar to using Command Prompt, and you’ll be using the remove-item cmdlet with the -recurse and -force parameters.
The -recurse parameter deletes a folder without prompt confirmation, and the -force parameter will forcefully delete the folder.
- Open Run Utility by pressing Windows + R shortcut key.
- Type
powershelland Ctrl + Shift + Enter to open PowerShell with admin access. - Enter the command
remove-item -recurse -force “folder location”

Take Ownership of the Folder
Sometimes, even with administrator access, you might not be able to delete a folder. This usually happens when the folder is not owned by you—the system admin. Most of the time, they are the system folders.
However, as the system administrator, you can forcefully take ownership of that folder. Then, you can simply delete the folder.
- Make sure you are logged into Windows with an admin account.
- Right-click on the folder and select Properties.

- Select the Security tab and click on Advanced.
- Next to Owner, click on Change.

- In the text field, enter your currently logged-in account username and click on Check Names.
- If the username entered was valid, it will automatically change to your device name and user name.

- Click OK and OK again.
- Click on Edit and select Users(DeviceName\Users).
- Next to Full control, make sure Allow is selected.
- Click OK and OK again.
- Now, you can delete the folder normally.


Delete Folders in Safe Mode
You won’t be able to delete a folder by conventional means if the folder is in use by an application or service. You can look for which application is using that folder, and end its process from Task Manager. Then, you will be able to delete it.
However, if you can’t find which application is using the folder, you might want to boot into Safe mode. This ensures Windows boots in a basic state with no unnecessary applications and services running. Anyway, let’s see how you can do so:
- Go to the start button and click on the power button icon.
- Hold down the shift key and click on Restart to enter Windows Recovery Environment (WinRE).
- Go to Troubleshoot > Advanced options > Startup Settings and click on Restart.

- After the restart completes, press F4 or 4 to boot into safe mode.

- Now, you can use conventional methods to delete the intended folder.


Using Third-Party Software
Lastly, you can use third-party software to forcefully delete folders on Windows. There are some great applications that perform this function like Unlocker, File Assassin, and XL Delete. While you will need to download and install them, these applications make it way simpler to force delete a folder after installation.
Do you need help removing a folder from your Windows 10 or Windows 11 computer? If so, it could be a system folder or a folder utilized by another software. We’ll show you how to remove “undeletable” folders from your PC.
Why you can’t delete your folder?
The most common cause for being unable to delete a folder is that it is a Windows system folder. In this scenario, the system blocks you from eliminating the folder since doing so may cause your PC to become unstable.
If you’re certain it’s not a system folder, your “undeletable” folder may be in use by your installed apps. Windows restricts you from making changes to a folder when an app is using it. In this situation, you might try to delete the folder after closing the app using your folder.
If nothing of the aforementioned scenarios applies to your situation, you could choose to use one of the following:
Method 1: Use Command Prompt
Using Command Prompt is a quick way to delete a folder. You can use this tool to run a command that deletes the folder you’ve chosen.
To begin, open your “Start” menu and look for “Command Prompt.” Then, on the right, select “Run as Administrator.”
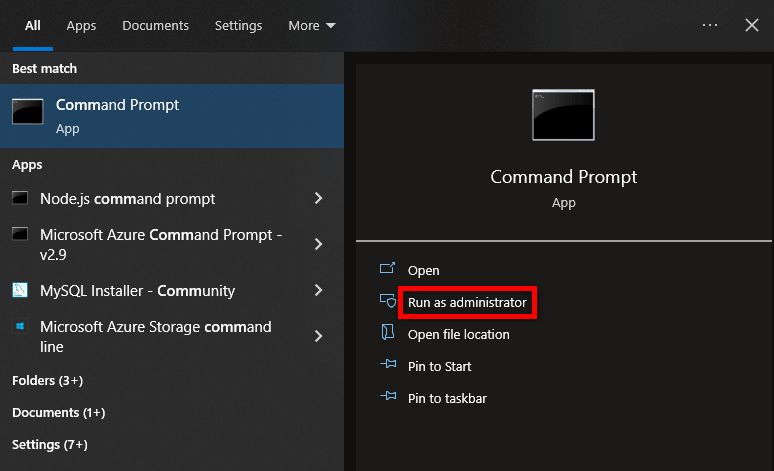
A “User Account Control” prompt will appear. Choose “Yes.”
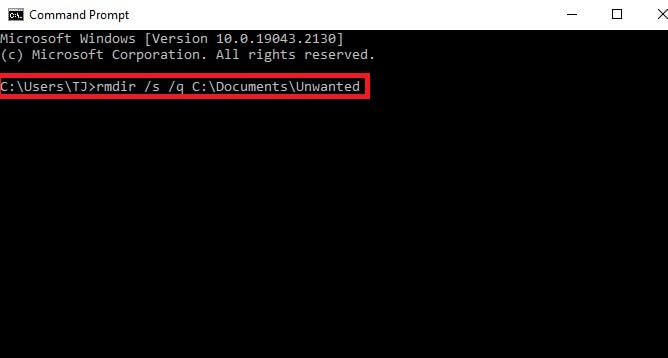
When the Command Prompt window appears, enter the following command and press Enter.
rmdir /s /q PATH
Replace PATH with the path to the folder you want to delete in this command.
If your path contains spaces, enclose it with double quotes.
For example, in the Documents folder on your C drive, you’d delete a folder called Unwanted.
rmdir /s /q C:\Documents\Unwanted
Method 2: Boot in Windows Safe Mode
If you are unsure which app has hijacked your folder and prevented you from deleting it, restart your PC in safe mode and then attempt to delete the folder. In safe mode, your PC only loads the necessary Windows files, preventing any third-party apps from launching automatically.
To begin, use our guide to boot your Windows 10 or Windows 11 PC into safe mode.
Once in safe mode, open File Explorer and navigate to the folder you want to delete. Then, right-click on the folder and select “Delete”.
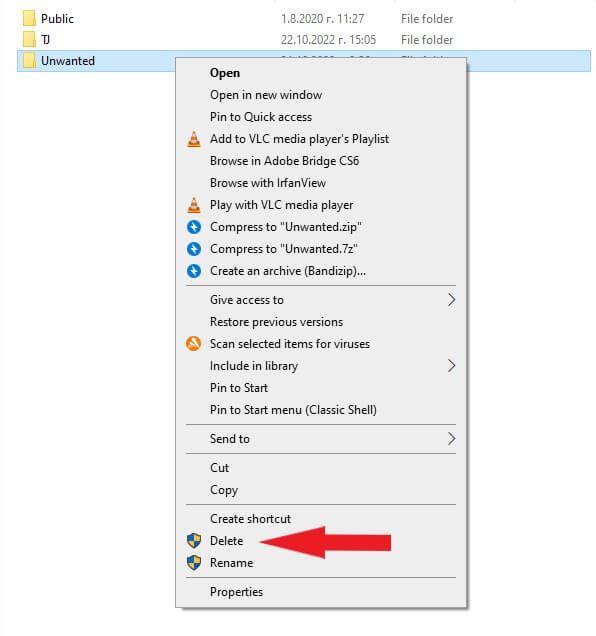
Your folder has been deleted.
You may also want to remove the folder from the Recycle Bin, which you can do by opening it, right-clicking your folder, and selecting “Delete”.
Method 3: Use WinRAR to Force Remove Folders
This may sound strange, but you can delete stubborn folders using WinRAR (a file compression app). This works by creating an archive from your “undeletable” folder and then asking the app to delete the original folder after the archive is created.
When WinRAR creates an archive from your folder, it automatically deletes the original folder. The newly created archive can then be deleted as well.
To begin, download and install the free version of WinRAR on your computer. Then restart your Windows 10 or Windows 11 computer so that WinRAR is integrated into the context menu.
When your computer restarts, launch File Explorer and navigate to the folder you want to delete. Then, right-click on this folder and select “Add to Archive”
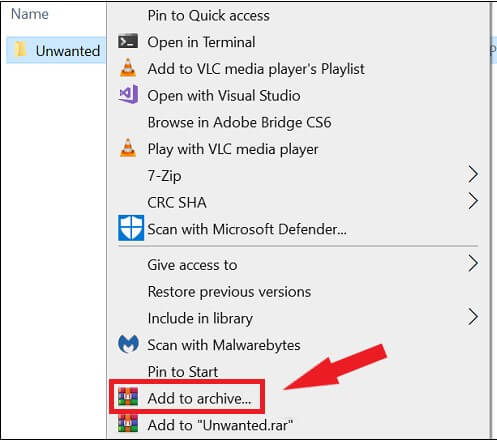
On the “Archive Name and Parameters” window, in the “Archiving Options” section, enable the “Delete Files After Archiving” option. Then, at the bottom of the window, select “OK.”
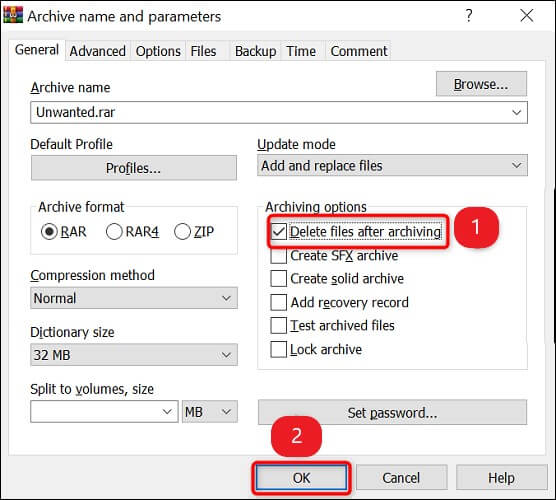
Allow WinRAR to create an archive from the folder you’ve chosen. After that, WinRAR will delete the original folder. You may now delete your recently created archive.
That’s how you get rid of any unwanted or stubborn folders on your Windows PC.
Post Views: 81,445