
FAQ
[Windows 11/10] Как удалить приложения, обновления Windows и драйверы
Применимо для продуктов: Ноутбук, Настольный компьютер, Моноблочный компьютер, Игровая консоль, Мини-компьютер.
Если требуется удалить приложения, обновления Windows или драйверы с Вашего устройства, Вы можете воспользоваться методами, которые описаны ниже.
Пожалуйста, перейдите к соответствующей инструкции, исходя из текущей операционной системы Windows на Вашем устройстве:
- Windows 11
- Windows 10
Windows 11
Содержание:
Удалить приложения
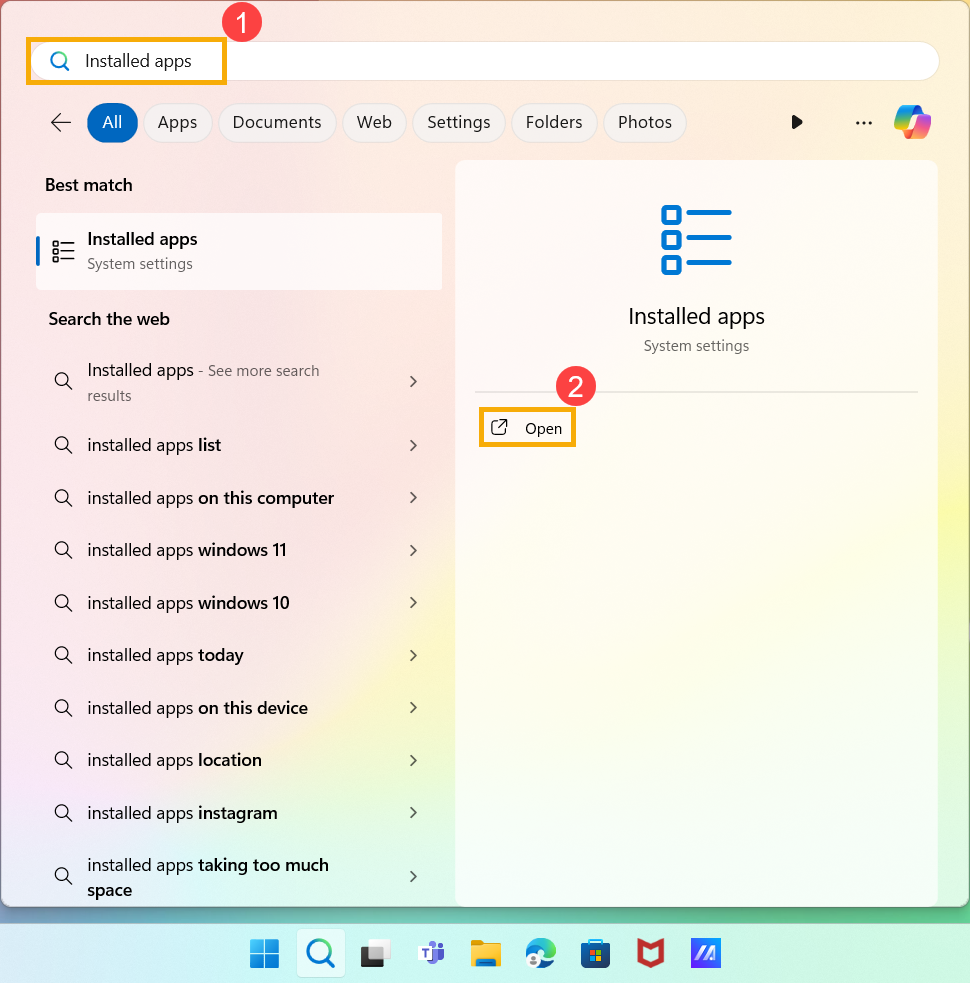
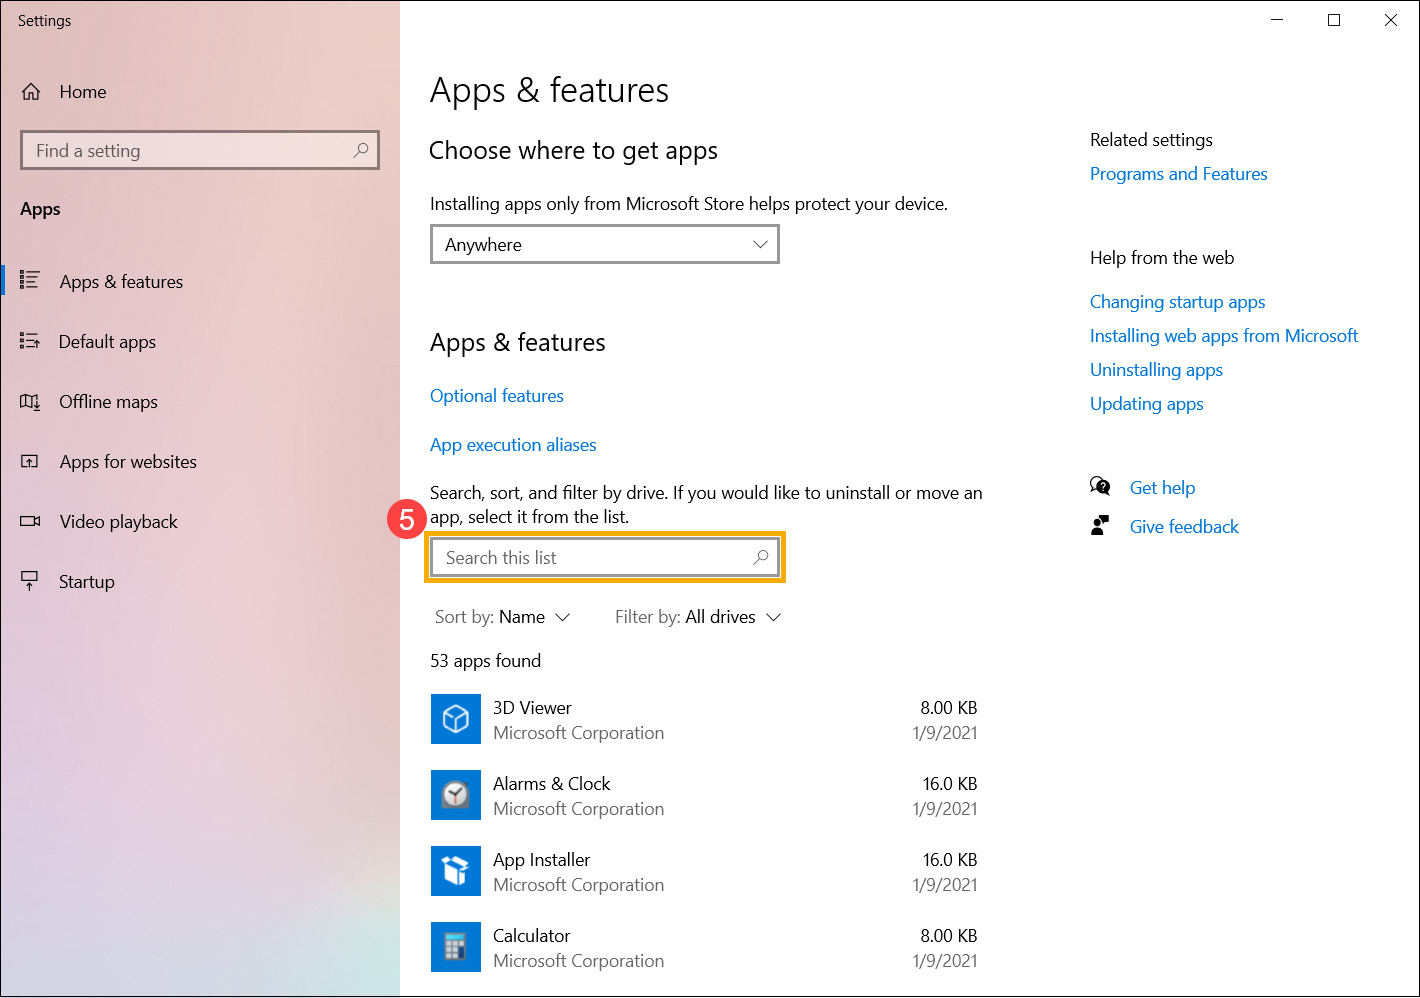
- Введите и найдите [Установленные приложения] в строке поиска Windows①, потом нажмите [Открыть]②.

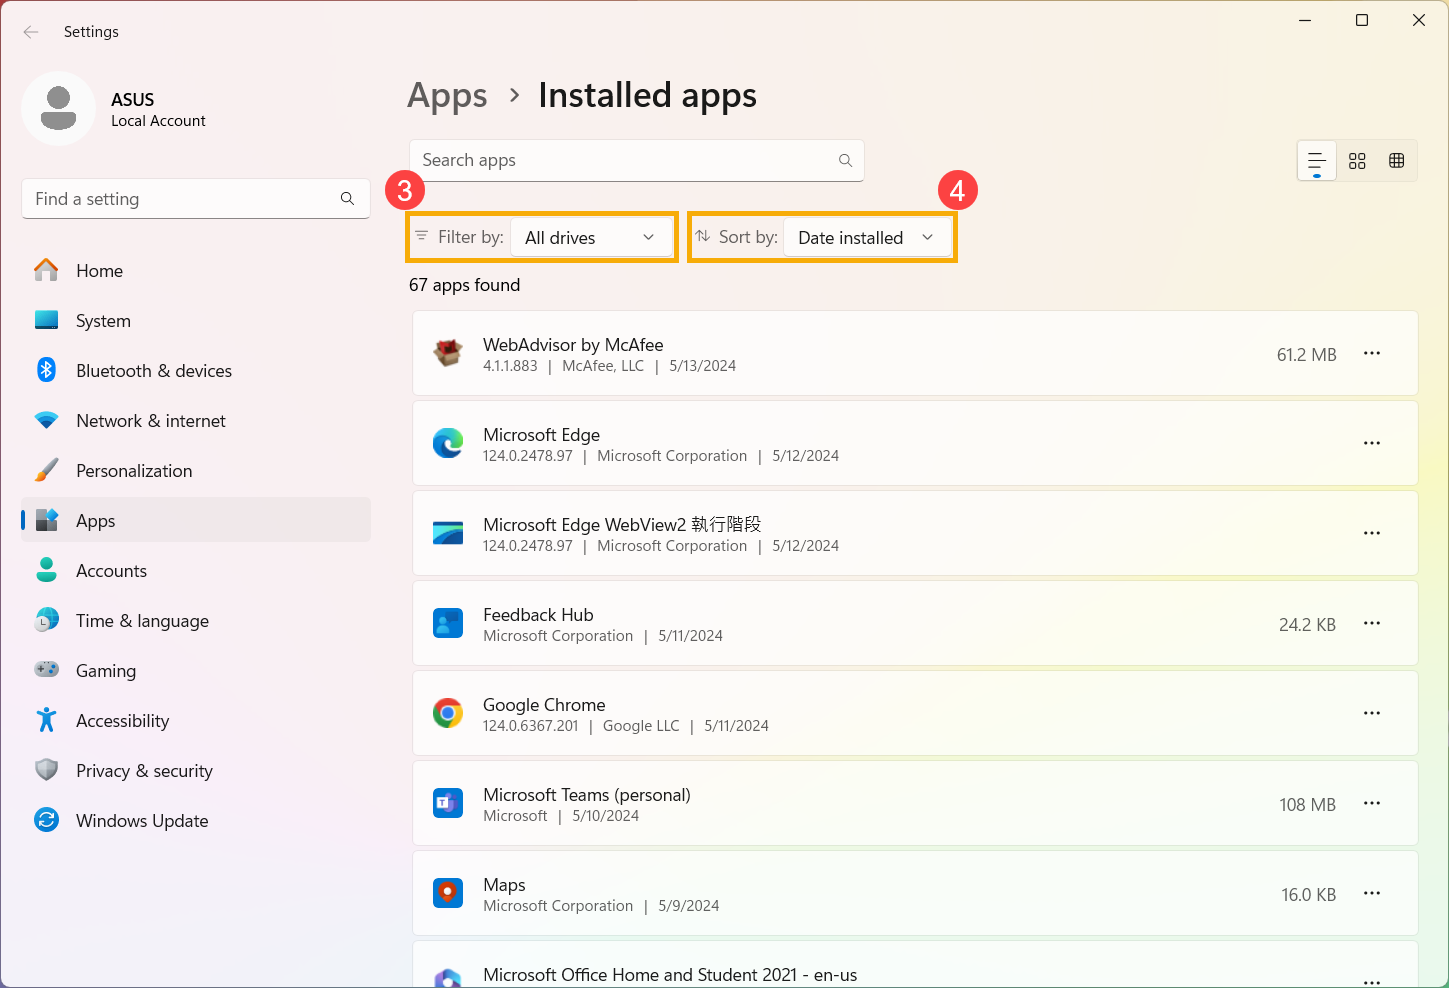
- При нахождении в окне установленных приложений, Вы можете сортировать приложения по имени, размеру или дате установки④, а также фильтровать приложения по параметрам Все диски или определенный диск③.
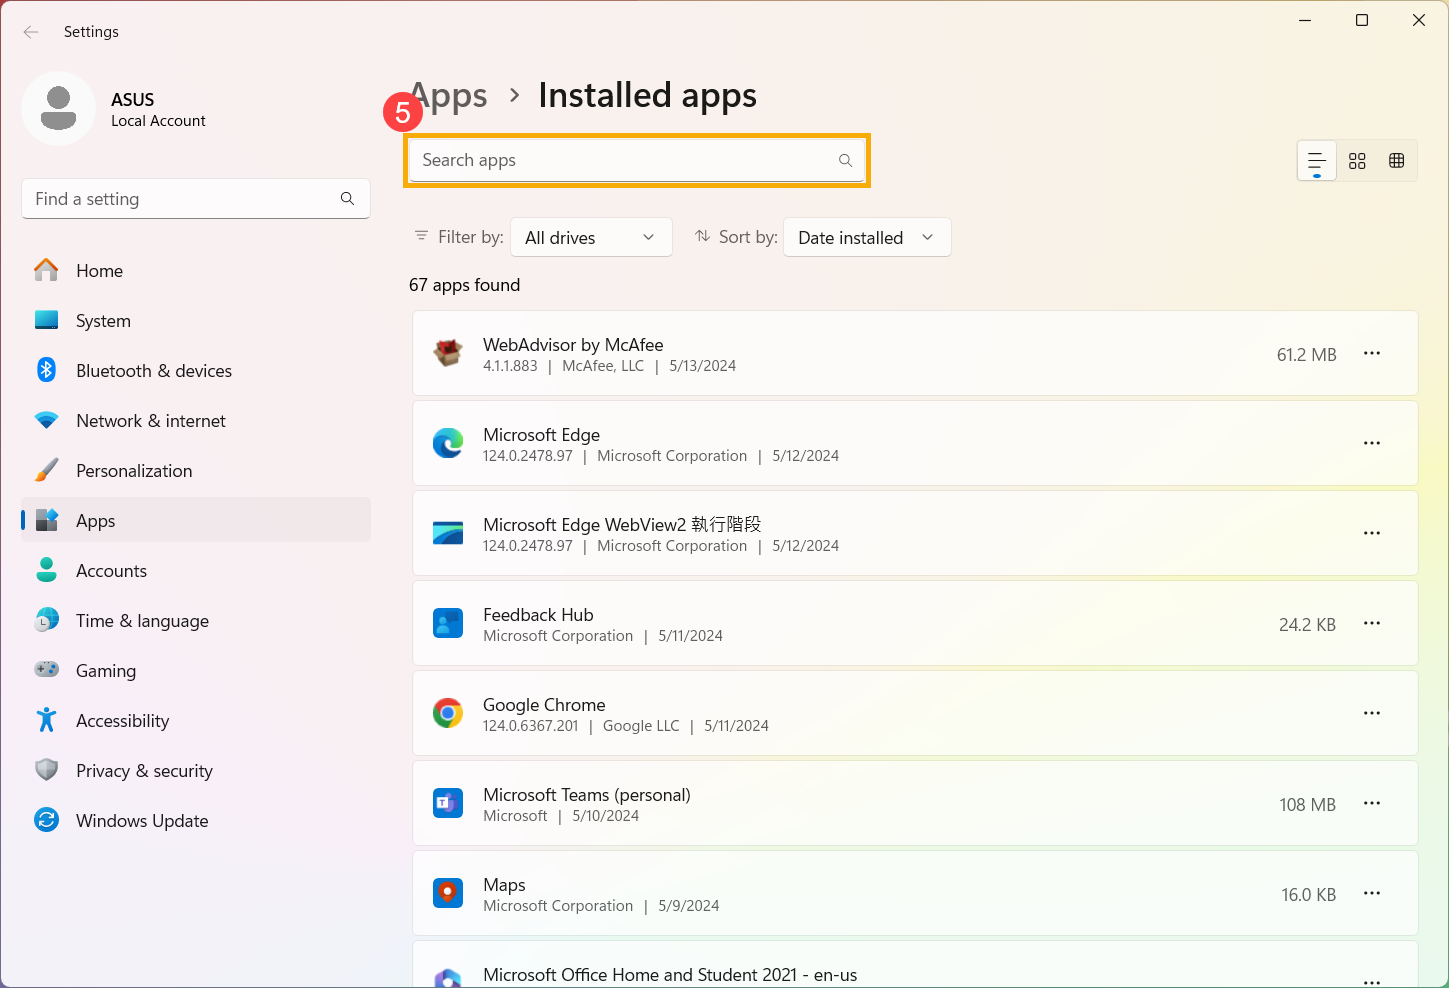
- Также Вы можете ввести имя приложения (или ключевое слово из него), которое хотите удалить, в разделе «Поиск приложений«⑤, после чего получите результат поиска в списке ниже.
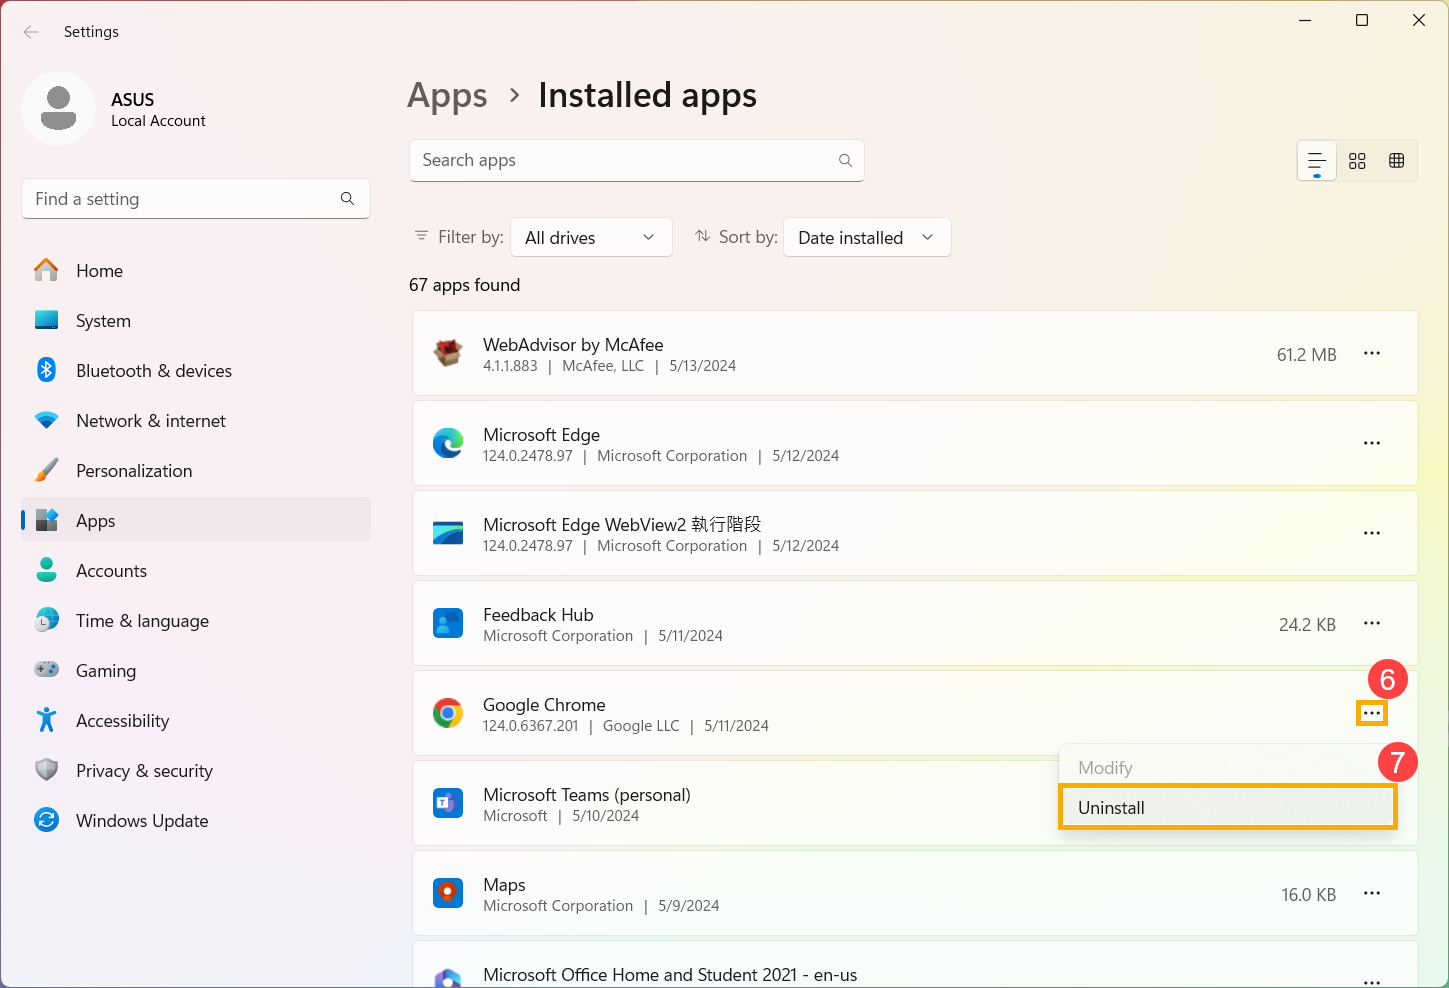
- Выберите [Подробнее] ⑥ рядом с приложением, которое Вы хотите удалить, потом нажмите [Удалить]⑦.
Вернуться в начало
Удалить обновления Windows
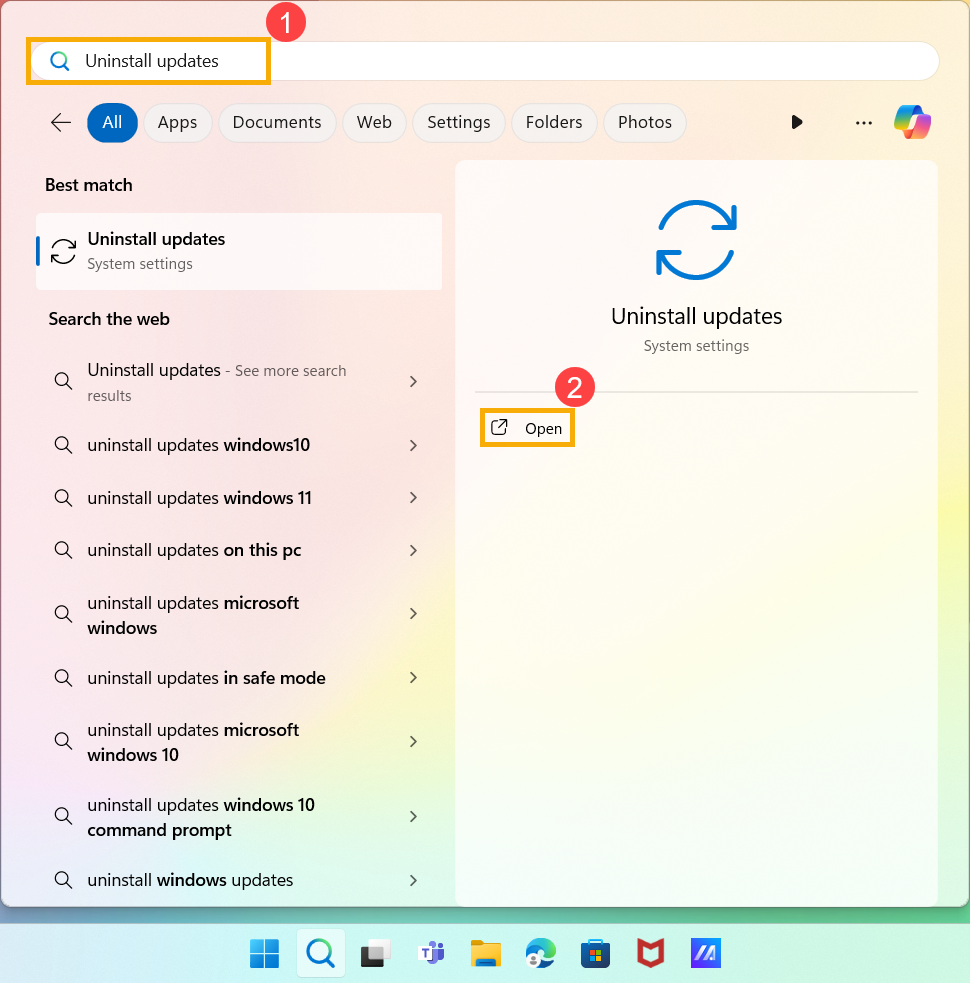
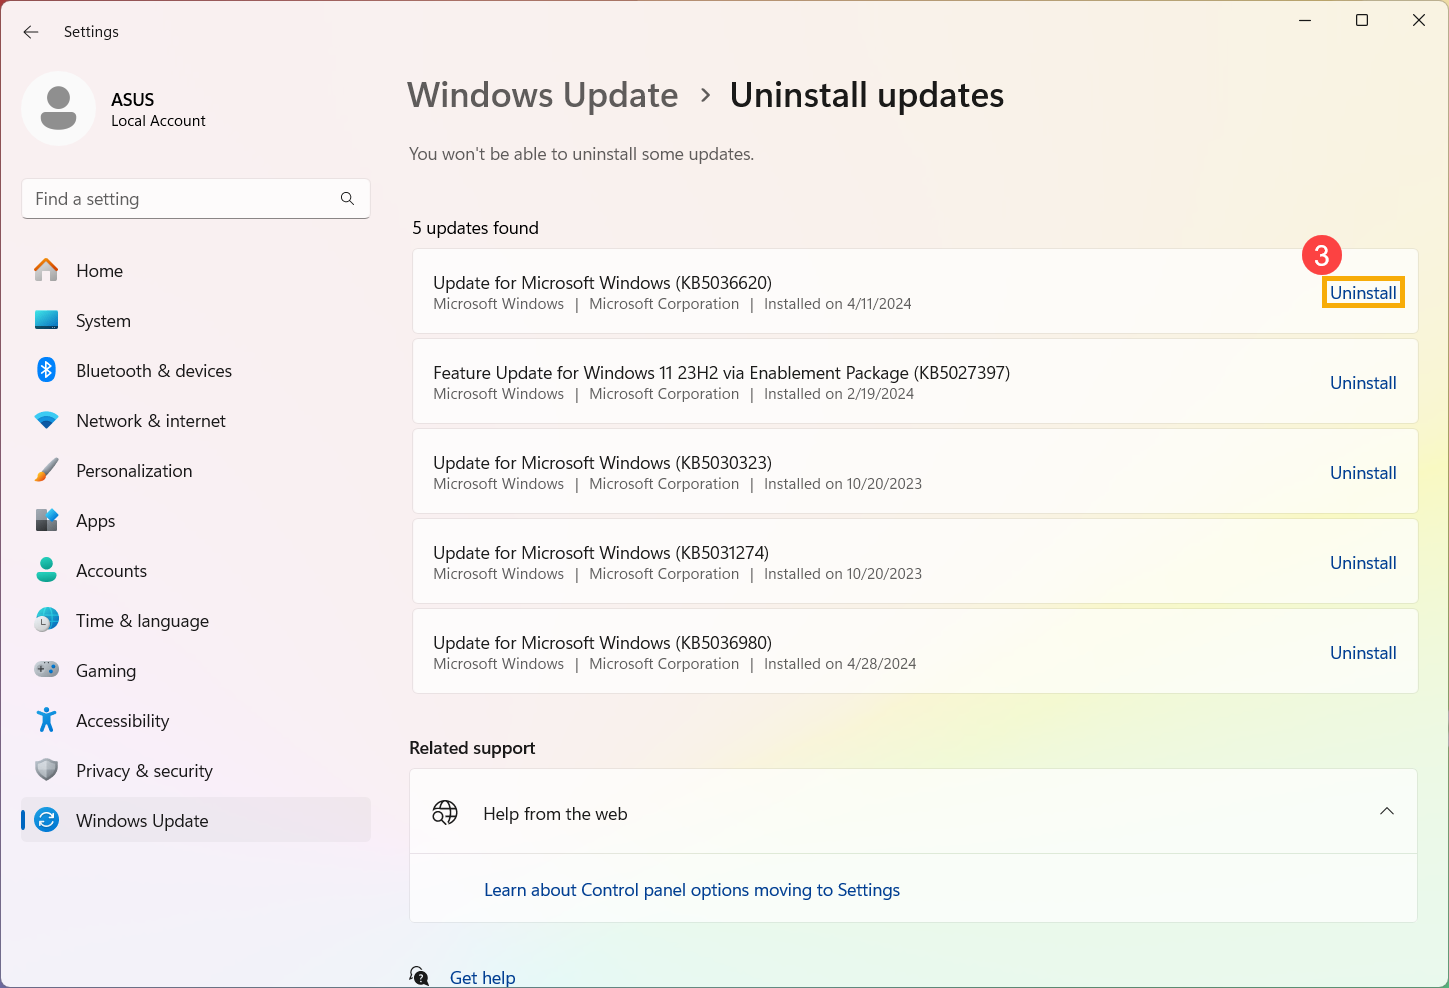
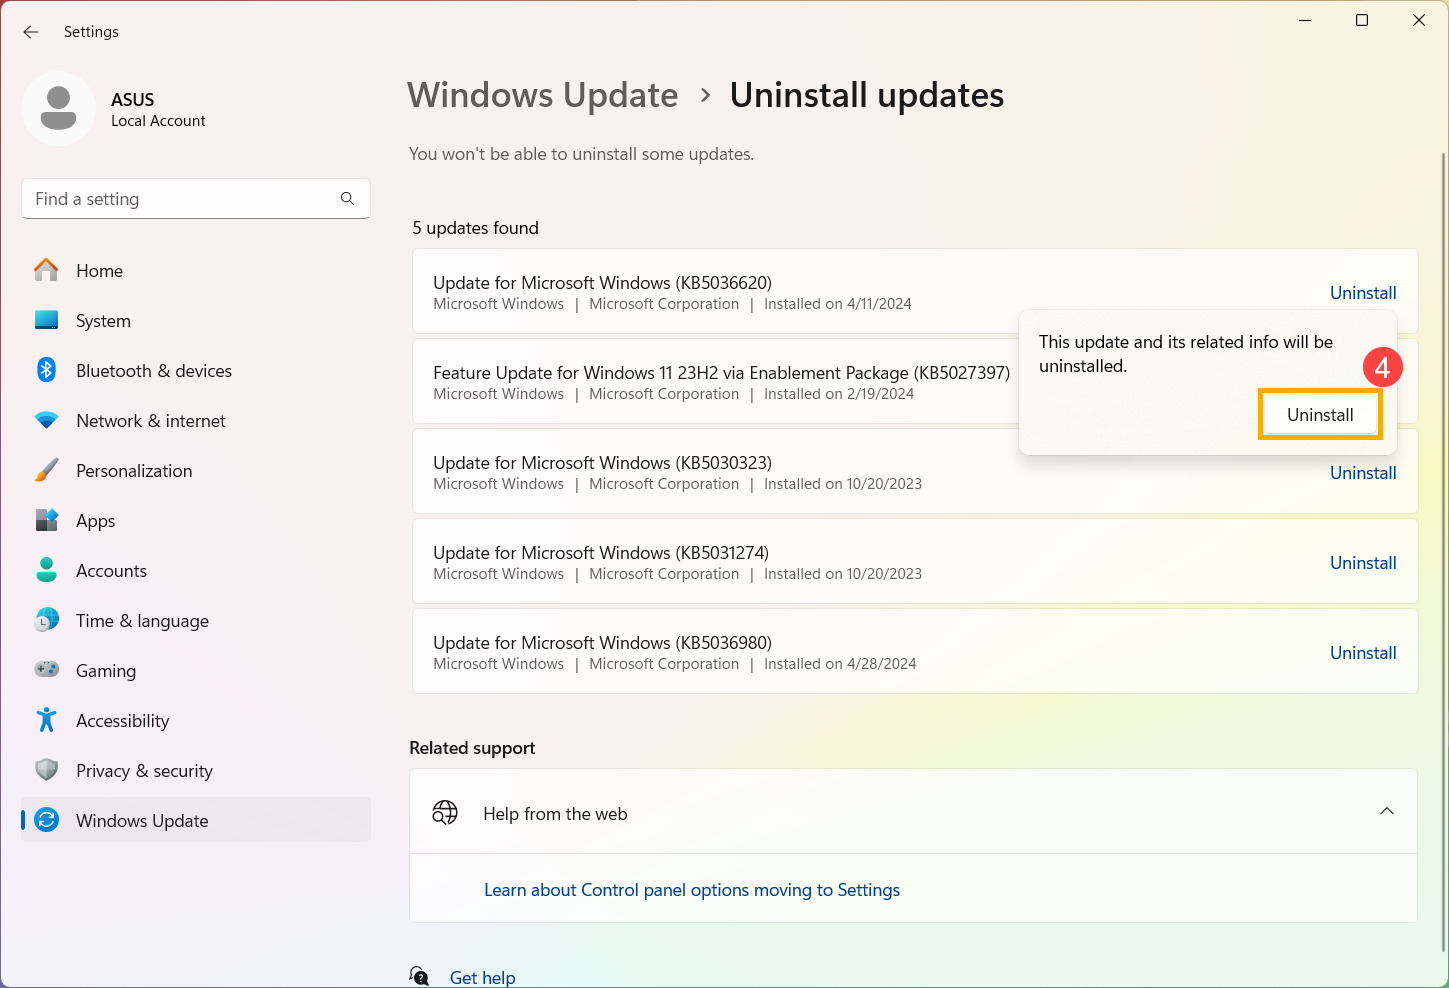
- Введите и найдите [Удалить обновления] в строке поиска Windows①, потом нажмите [Открыть]②.
- Найдите в списке обновление операционной системы, которое требуется удалить, потом нажмите кнопку [Удалить]③.
- Подтвердите удаление этого обновления и связанной с ним информации, потом снова нажмите кнопку [Удалить]④.
Вернуться в начало
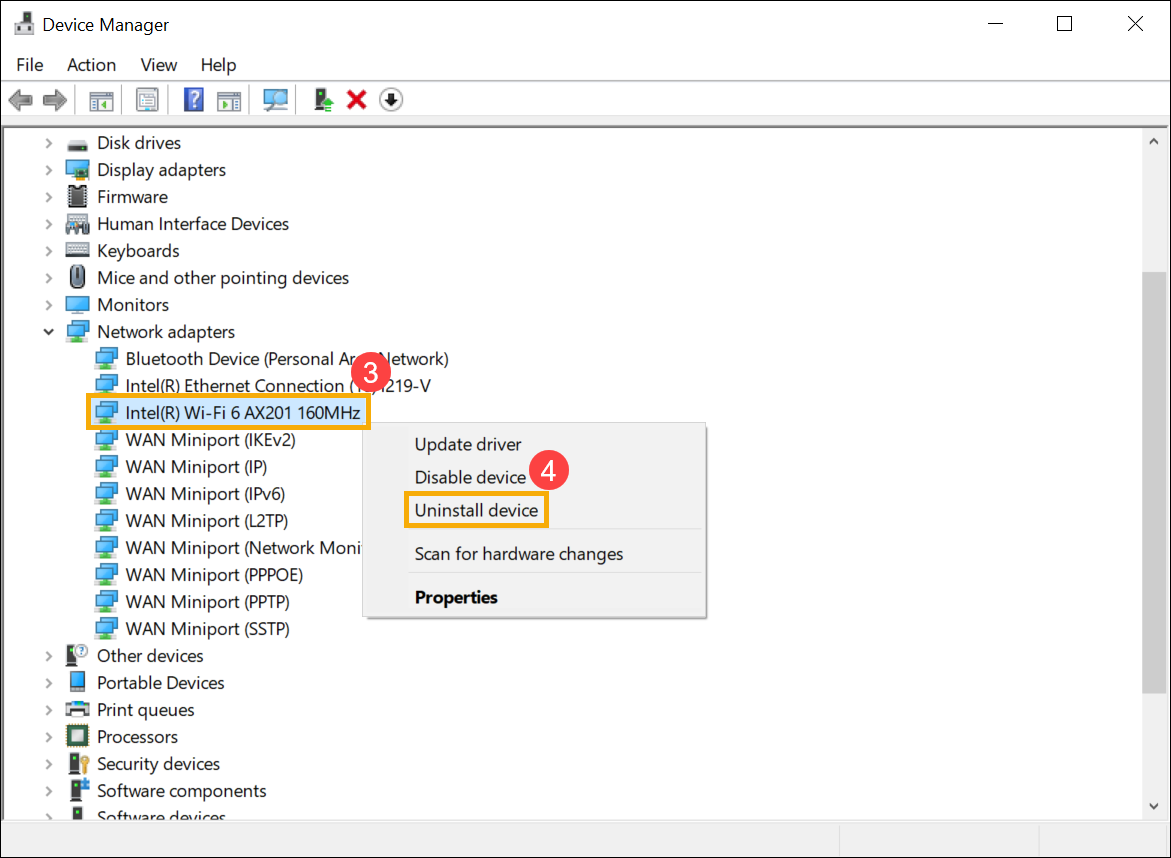
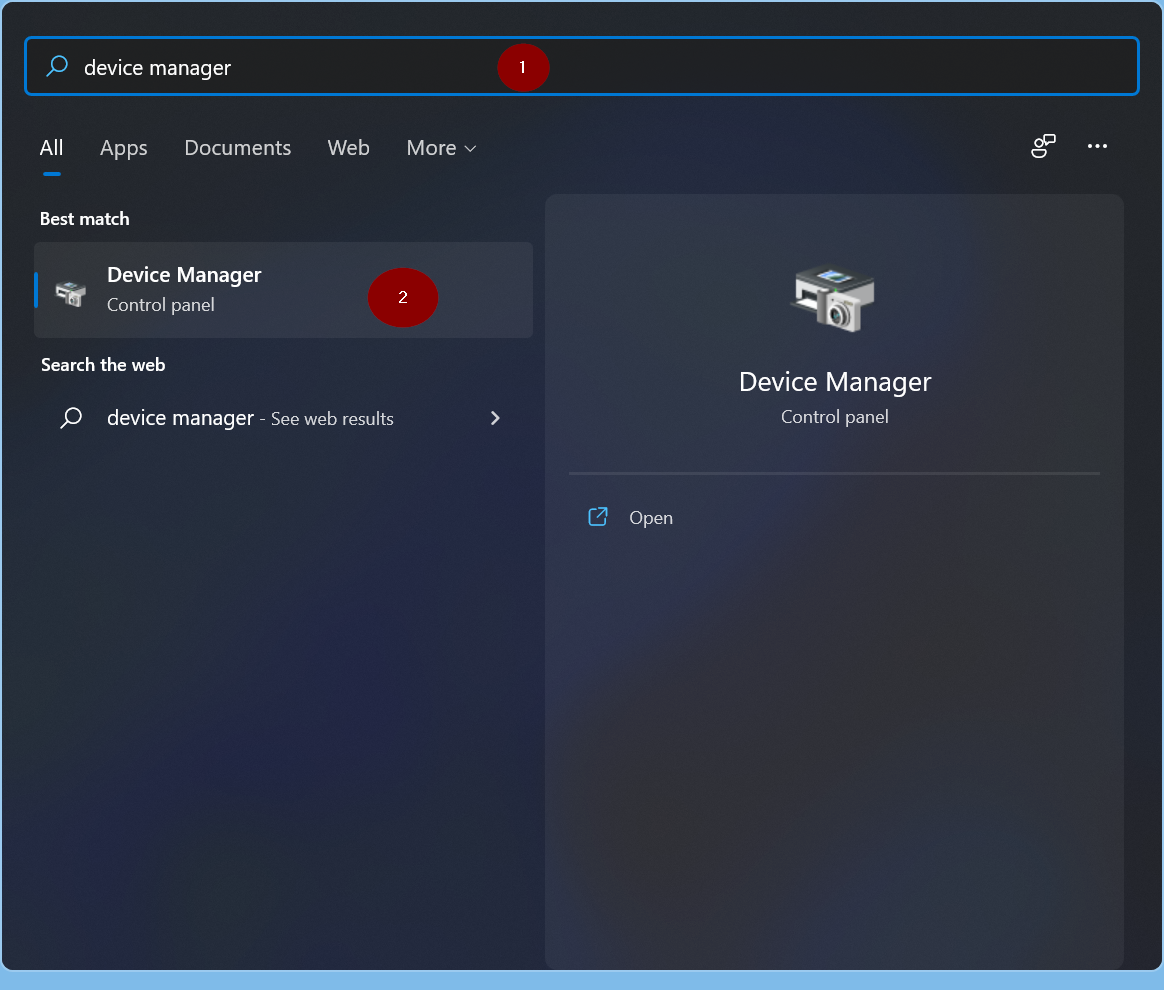
Удалить драйверы
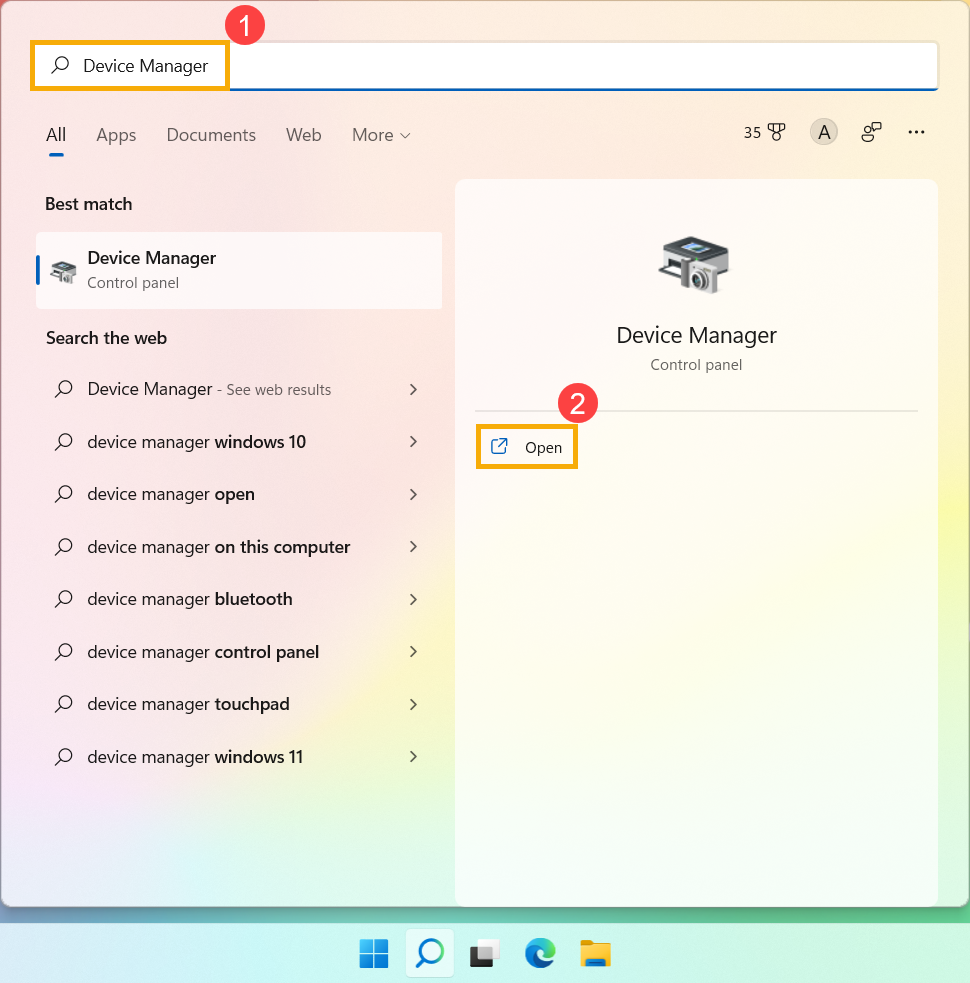
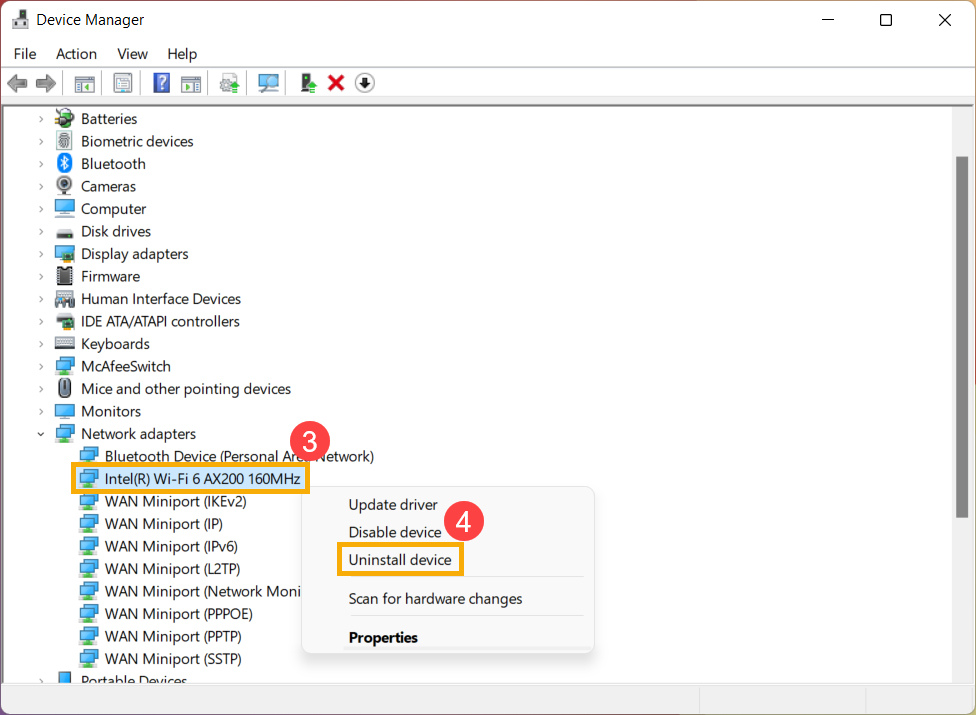
- Введите и найдите [Диспетчер устройств] в строке поиска Windows①, потом нажмите [Открыть]②.
- Нажмите правой кнопкой мыши на устройство, драйвер которого Вы хотите удалить③, потом выберите [Удалить устройство]④.
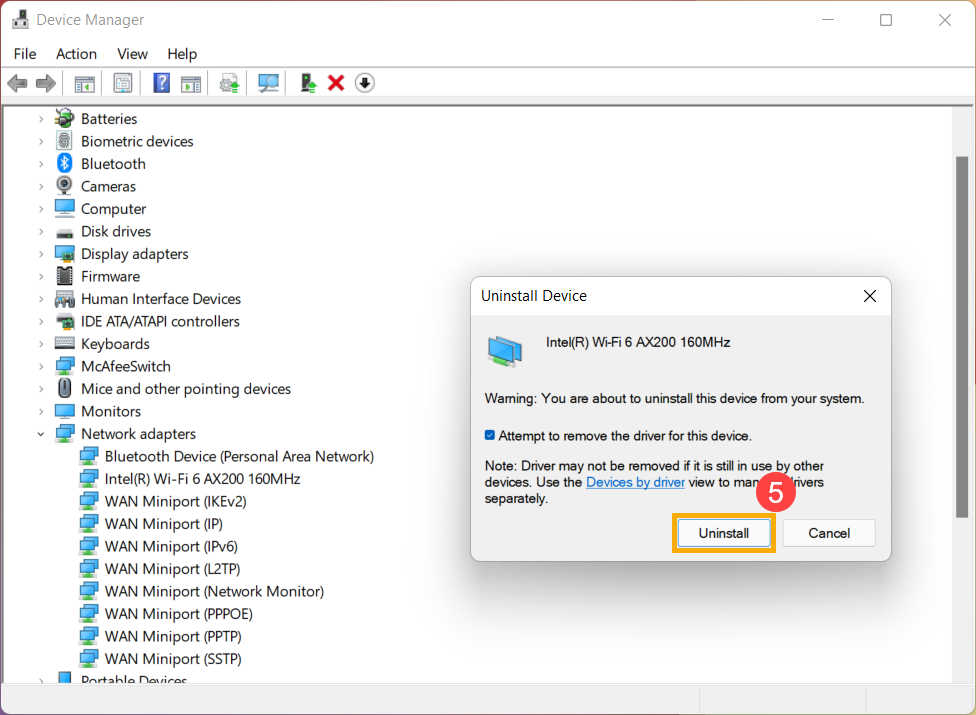
- Установите галочку «Попытаться удалить драйвер для этого устройства», потом нажмите [Удалить]⑤, чтобы удалить его.
Вернуться в начало
Windows 10
Содержание:
Удалить приложения
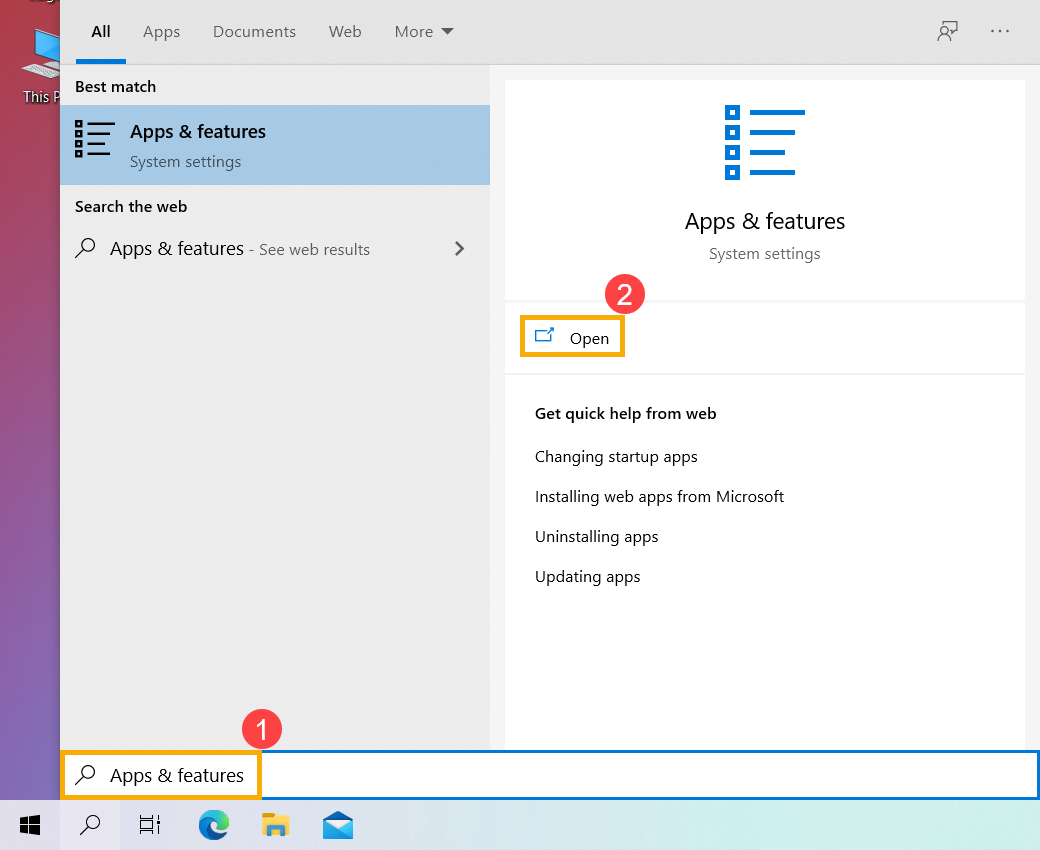
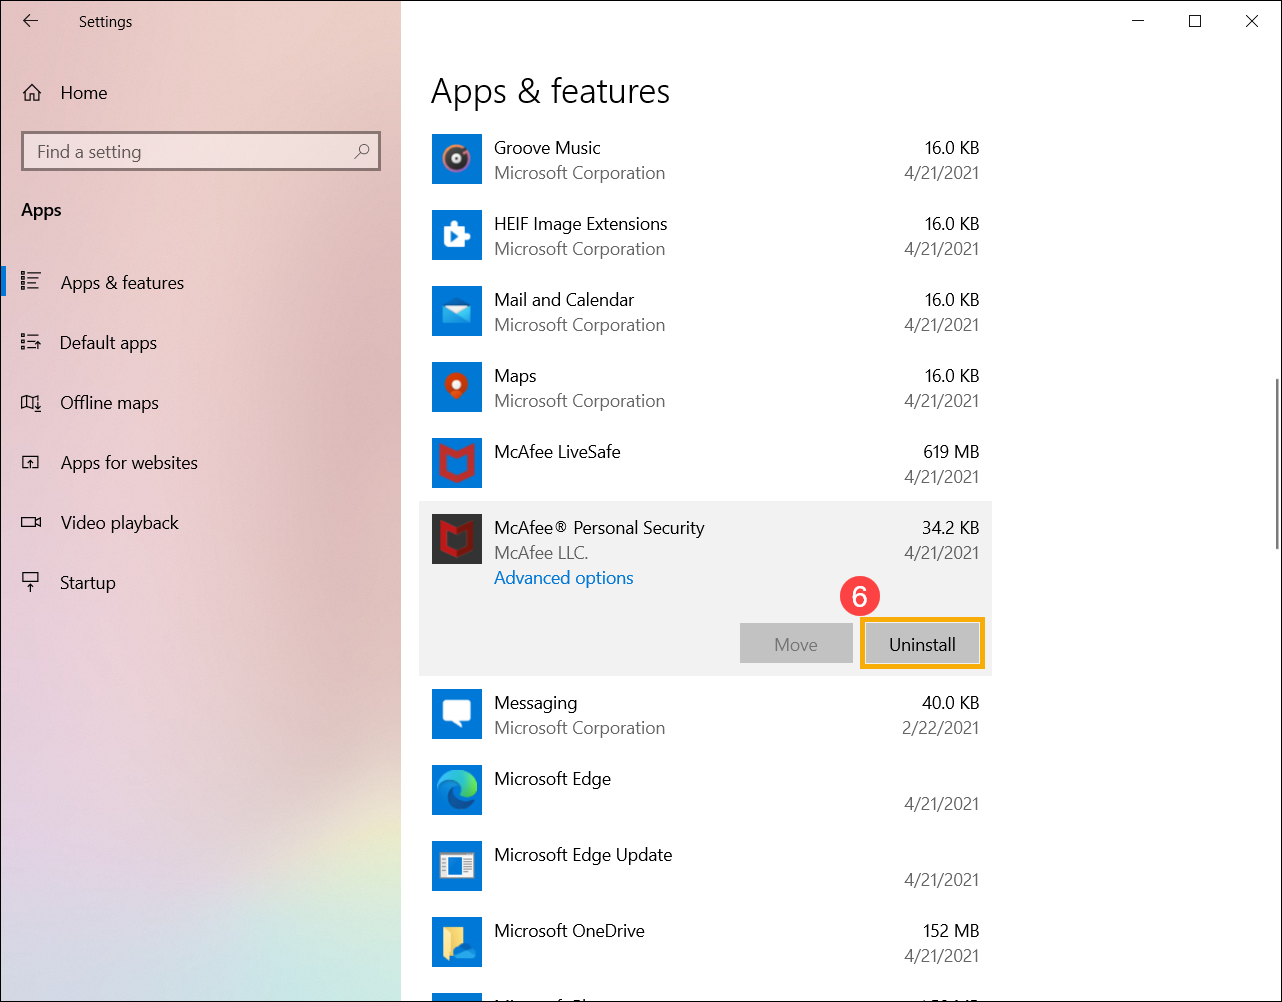
- Напишите в строке поиска Windows [Приложения и возможности]①, потом нажмите [Открыть]②.
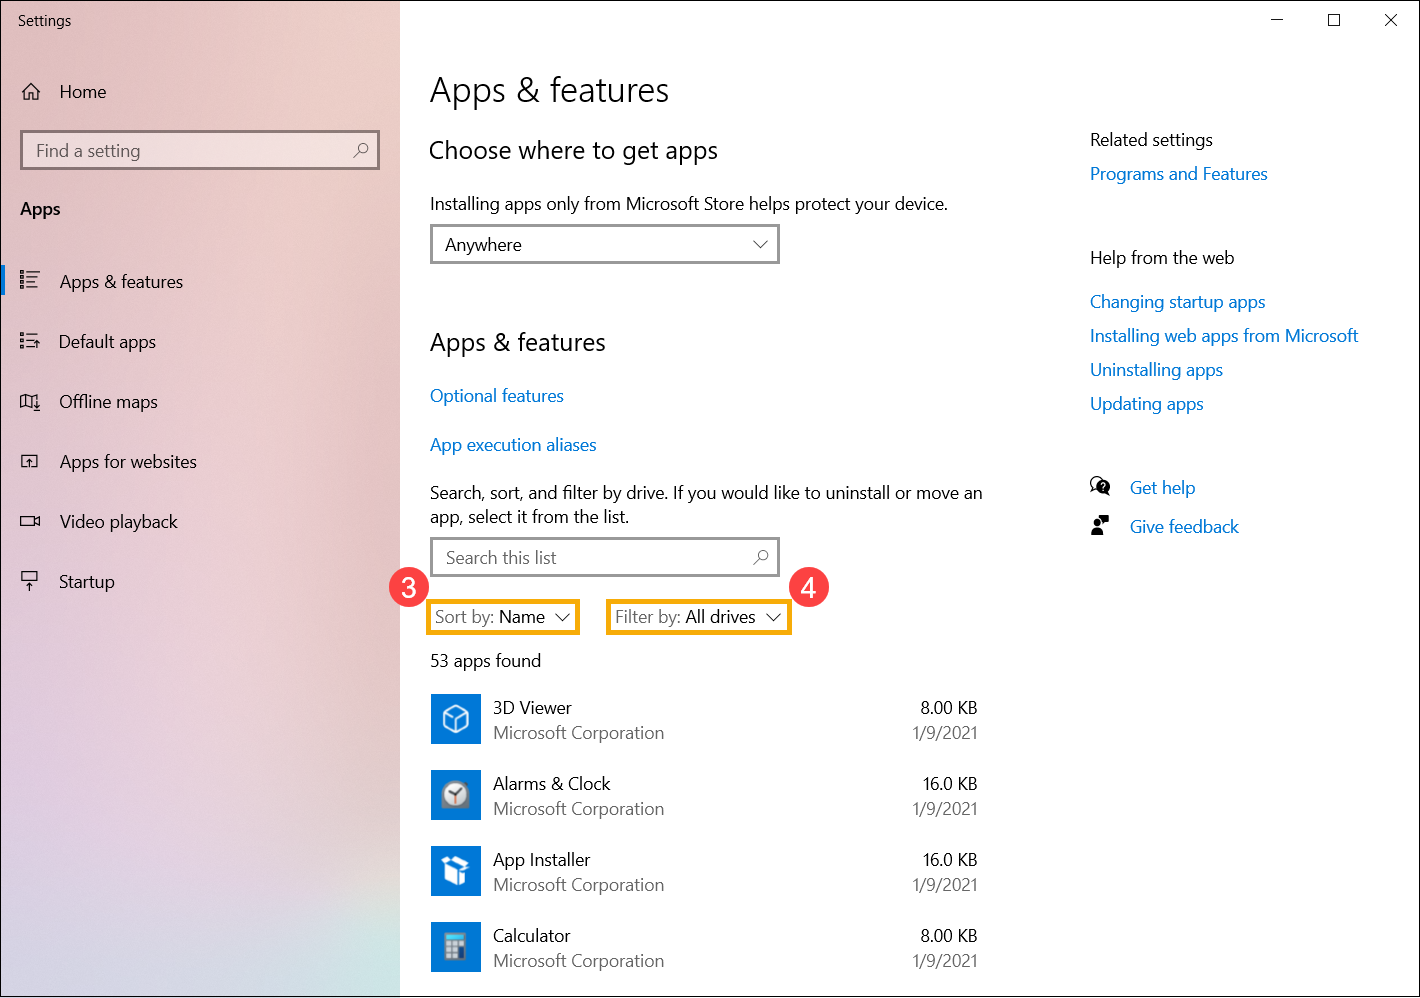
- В Приложениях и Возможностях Вы можете отсортировать приложения по имени, размеру или дате установки③, и отфильтровать приложения по местоположению — на всех дисках или на определенном диске④.
- В противном случае Вы также можете ввести имя приложения (или ключевое слово из него), которое Вы хотите удалить, в разделе Искать в этом списке⑤, и тогда Вы получите результат поиска в списке ниже.
- Выберите приложение, которое хотите удалить, потом нажмите кнопку [Удалить]⑥.
Вернуться в начало
Удалить обновления Windows
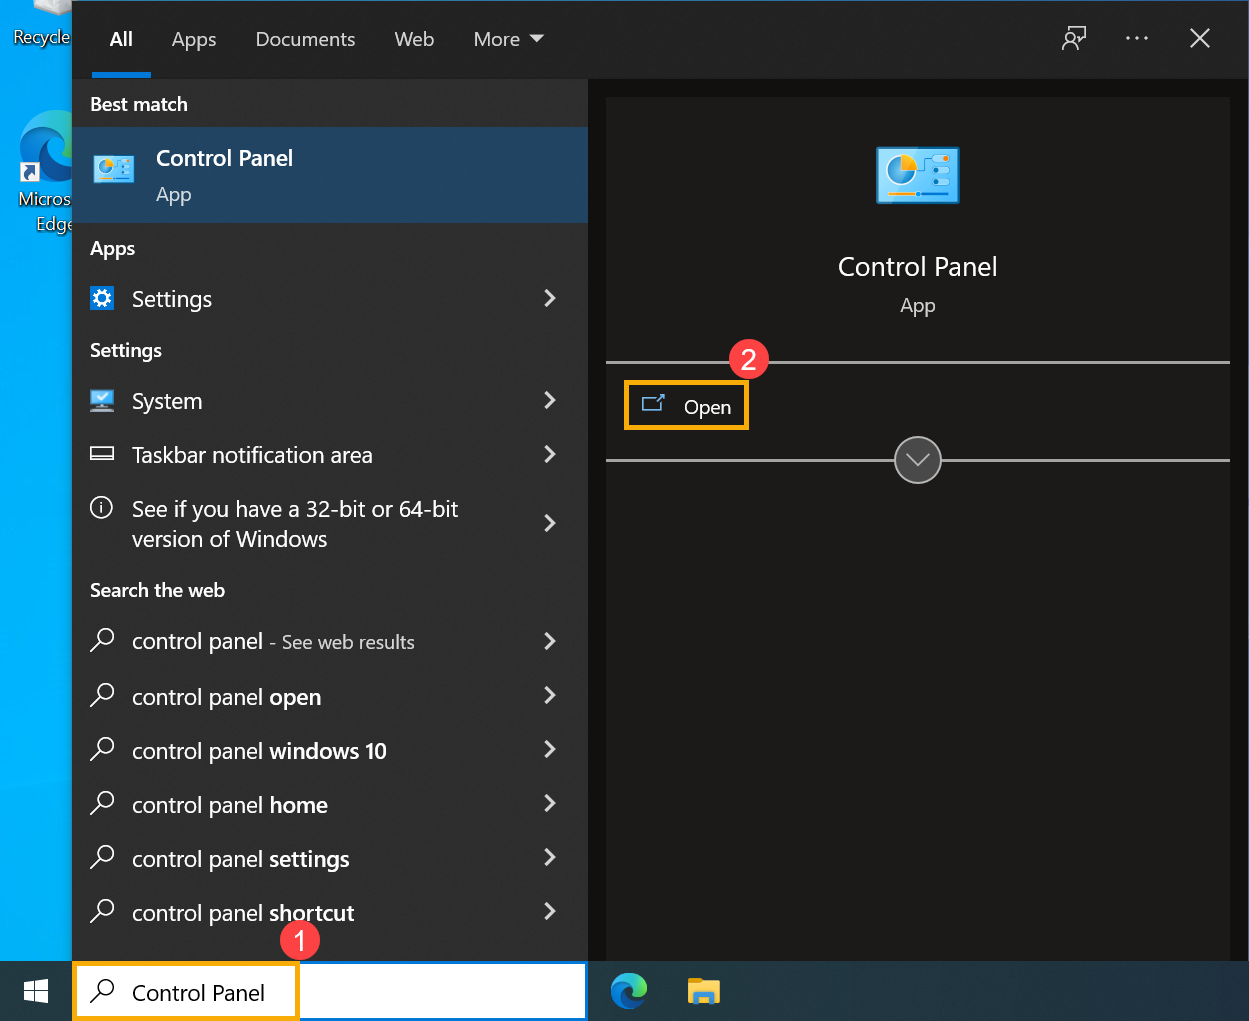
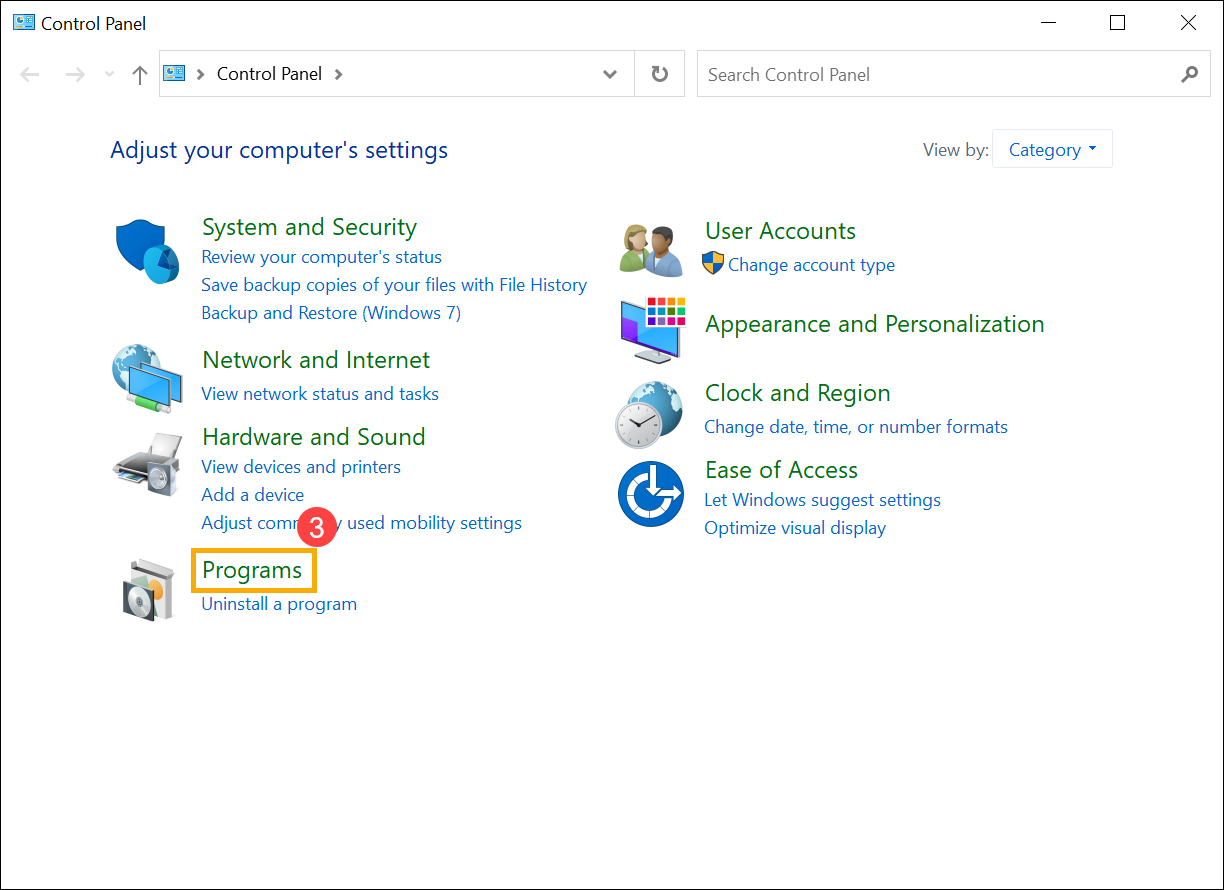
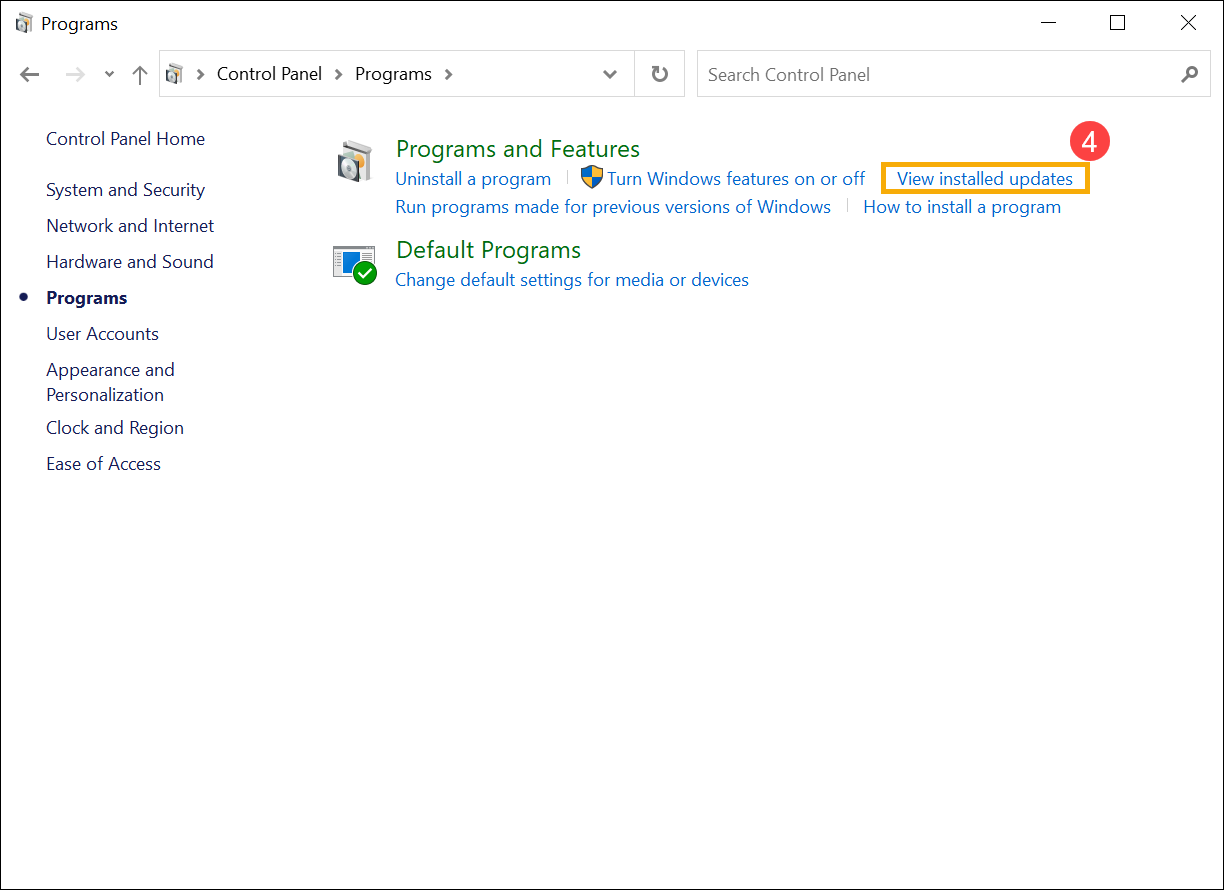
- Введите и найдите [Панель управления] в строке поиска Windows①, потом нажмите [Открыть]②.
- Выберите [Программы]③.
- Выберите [Просмотреть установленные обновления]④.
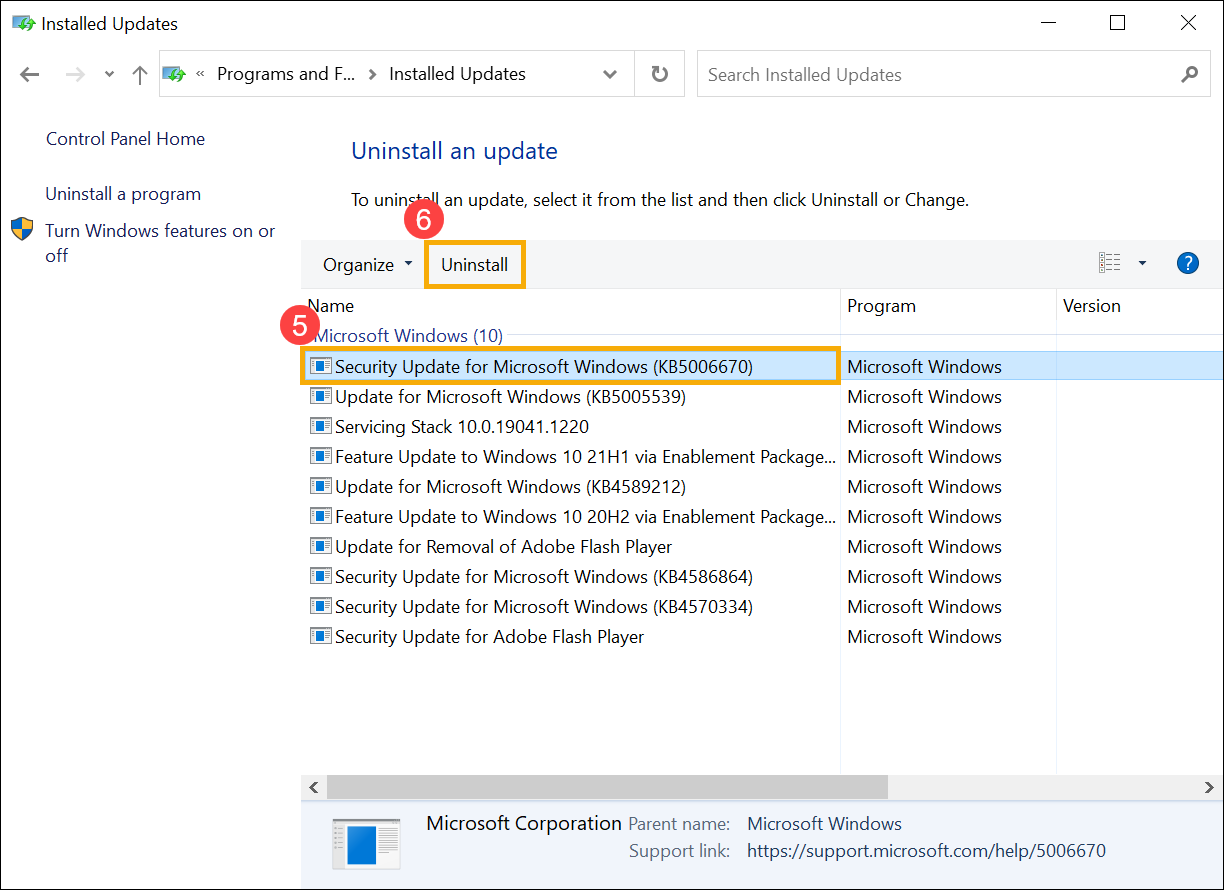
- Выберите установленное обновление Windows, которое Вы хотите удалить⑤, потом нажмите кнопку [Удалить]⑥.
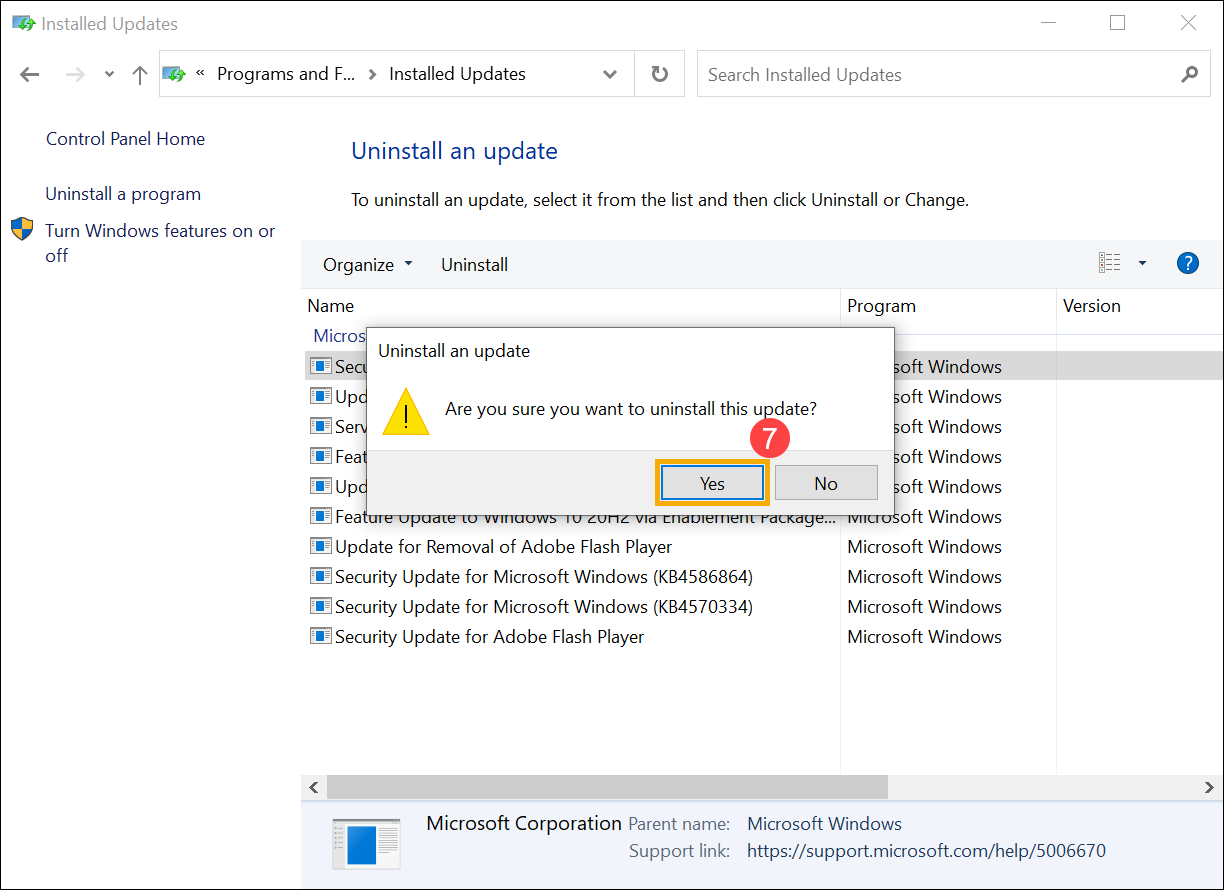
- Подтвердите, хотите ли Вы удалить это обновление, потом выберите [Да]⑦, чтобы удалить его.
Вернуться в начало
Удалить драйверы
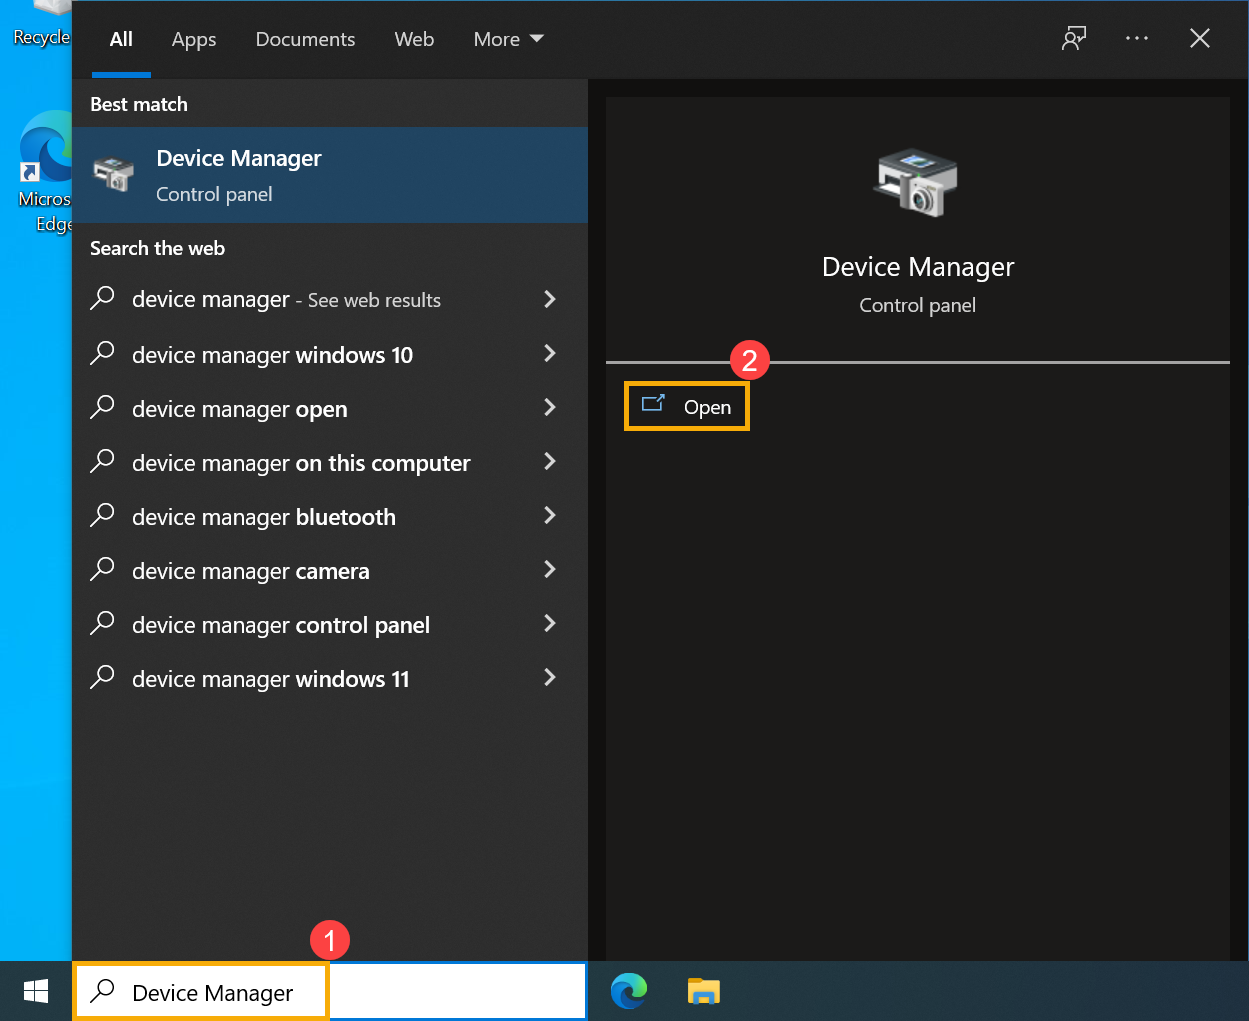
- Введите и найдите [Диспетчер устройств] в строке поиска Windows①, потом нажмите [Открыть]②.
- Нажмите правой кнопкой мыши на устройство, драйвер которого Вы хотите удалить③, потом выберите [Удалить устройство]④.
- Установите галочку «Удалить программы драйверов для этого устройства», потом нажмите [Удалить]⑤, чтобы удалить его.

Вернуться в начало
Эта информация была полезной?
Yes
No
- Приведенная выше информация может быть частично или полностью процитирована с внешних веб-сайтов или источников. Пожалуйста, обратитесь к информации на основе источника, который мы отметили. Пожалуйста, свяжитесь напрямую или спросите у источников, если есть какие-либо дополнительные вопросы, и обратите внимание, что ASUS не имеет отношения к данному контенту / услуге и не несет ответственности за него.
- Эта информация может не подходить для всех продуктов из той же категории / серии. Некоторые снимки экрана и операции могут отличаться от версий программного обеспечения.
- ASUS предоставляет вышеуказанную информацию только для справки. Если у вас есть какие-либо вопросы о содержании, пожалуйста, свяжитесь напрямую с поставщиком вышеуказанного продукта. Обратите внимание, что ASUS не несет ответственности за контент или услуги, предоставляемые вышеуказанным поставщиком продукта.
Rolling back driver updates on Windows 11 is a simple process. Drivers are crucial for hardware to function properly as they act as a bridge between the hardware and the operating system. Without proper drivers, hardware may not work or may function improperly. Accessing hardware components and their drivers can be done via Device Manager.
Windows updates often come with driver updates that automatically install on your PC. However, you can manually update drivers if you prefer. In some cases, updated drivers may malfunction, and you may want to revert to an earlier version.
How to Roll Back Driver Updates on Windows 11?
In case of hardware issues, rolling back to the previous version of drivers can often resolve the problem. Malfunctioning drivers are often the culprit behind hardware failures. Fortunately, Windows 11 offers an easy way to roll back to the previous version of drivers.
Here is how to Roll Back Driver Updates on Windows 11:-
Step 1. Click on the Start button on the taskbar or press Windows + S shortcut keys to open the Search menu. In the search field, type device manager and click on its search result to open the same.
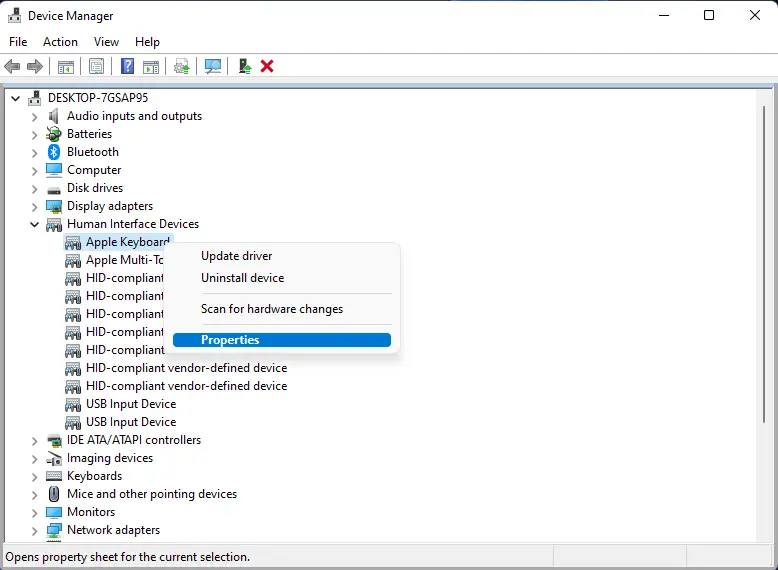
Step 2. In the Device Manager, double-click on the devices tree to expand and view the device details. For instance, we want to roll back the drivers of the Keyboard; hence, we have expanded Human Interface Devices by double-clicking on it.

Step 3. Right-click on the device you want to roll back the driver update and select the Properties option from the context menu.
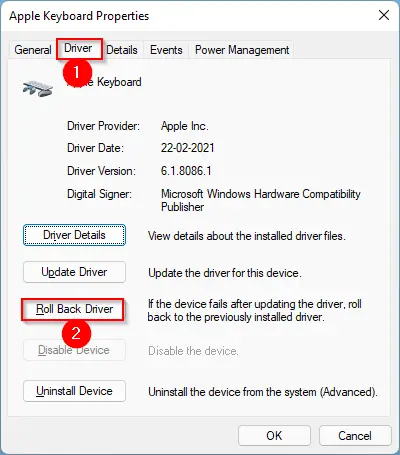
Step 4. Navigate to the Driver tab in the pop-up window that opens and click on the Roll Back Driver button.
Step 5. A new pop-up window will open. In the “Driver Package rollback” window, select any reason for rolling back the update from the list and click on the Yes bottom to initiate the roll-back process.
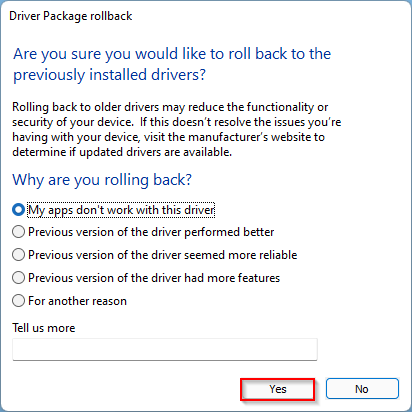
That’s it. Now, the latest driver update of the device will be uninstalled from your PC. Restart your computer and check if everything is working correctly.
How to Update the Drivers Manually on Windows 11?
If you would like to update the drivers of any device manually on Windows 11, perform the following steps:-
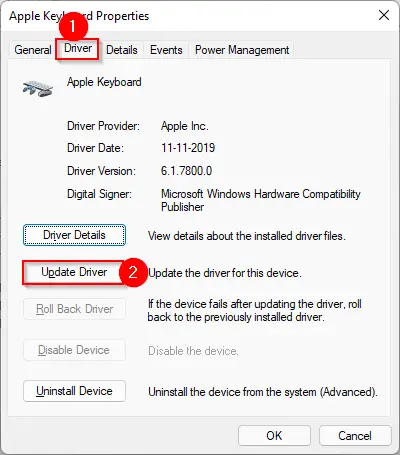
Step 1. Click on the Start button on the taskbar or press Windows + S shortcut keys to open the Search menu. In the search field, type device manager and click on its search result to open the same.
Step 2. In the Device Manager, double-click on the devices tree to expand and view the device details. For instance, we want to update the drivers of the Keyboard; hence, we have expanded Human Interface Devices by double-clicking on them.
Step 3. Right-click on the device you want to update the drivers and select the Properties option from the context menu.
Step 4. Navigate to the Driver tab in the pop-up window that opens and click on the Update Driver button.
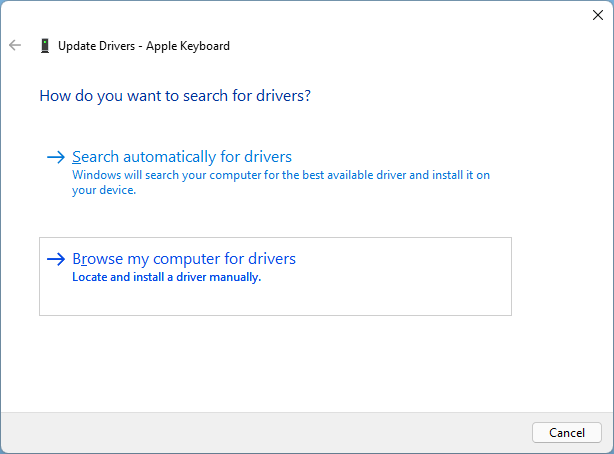
Step 5. A new window will appear now. Here, you will be greeted with two options:-
- Search automatically for drivers
- Browse my computer for drivers
If you want to update the drivers online and automatically, then click on the first option, “Search automatically for drivers.”
Once you select the above option, Windows will search online for available updates, and if an update is available for your device, it will install automatically. Finally, you should see a message that the hardware you installed will not work until you restart your computer.
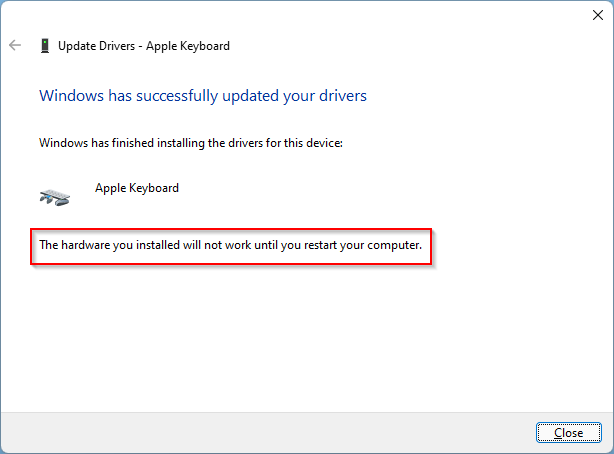
Step 6. Restart your computer.
How to Disable or Turn Off Automatic Driver Updates on Windows 11?
If you would like to disable or turn off, automatic driver updates on Windows 11, perform the following steps:-
Step 1. Press Windows + S hotkey to launch the Search menu. Type Change device installation settings and then click on the relevant search result in the search results.
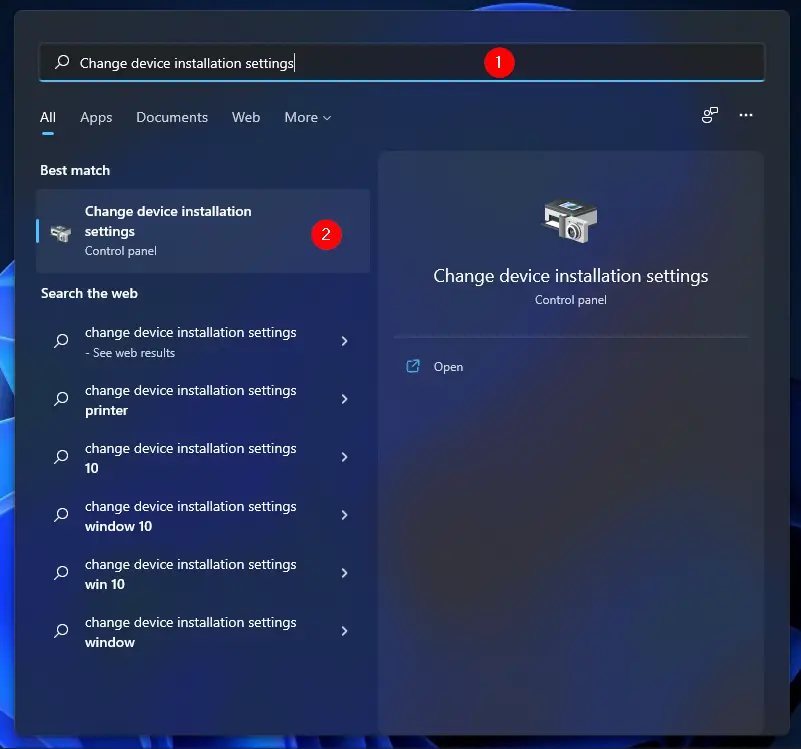
Step 2. In the Device installation settings window that appears, select the second option, No (your device might not work as expected), and then click on the Save Changes button.

That’s it. Now drivers will not be updated automatically by Microsoft. However, we recommend keeping the automatic updates of the drivers turned on as they may come with new features or some bug fixes. If you have decided to turn it off, you should opt for a third-party driver update software.
Good luck.
Conclusion
In conclusion, drivers are essential for hardware to function correctly, and Windows 11 provides easy ways to update or roll back drivers. Rolling back to a previous driver version can solve hardware issues caused by malfunctioning drivers. The Device Manager is the primary tool for managing drivers on Windows 11. Updating drivers manually is also possible through the Device Manager. However, Windows 11 automatically updates drivers, but you can disable automatic driver updates if desired. Although it is recommended to keep automatic updates enabled, third-party driver update software can be used instead. By following the steps provided, users can manage their drivers and ensure that their hardware functions correctly.
5 Easy Steps to Uninstall Driver Updates in Windows 11
Imagine this: you’ve just updated your drivers on your Windows 11 computer, expecting to see improved performance or new features. But instead, you find that your system is now plagued with endless bugs and crashes. Frustration starts to sink in as you wonder if there’s any way to reverse the situation. Fear not! In this article, we will walk you through 5 easy steps on how to uninstall driver updates in Windows 11 and return your computer to its previous stable state.
*Step 1: Enter Safe Mode*
Before we dive into the actual process of uninstalling driver updates, it is crucial to ensure that your system is in a safe environment where issues won’t arise while performing the task. For this purpose, we recommend starting your Windows 11 computer in Safe Mode. Safe Mode is a diagnostic mode that loads Windows with the minimal set of drivers and services, making it easier to troubleshoot and fix problems.
To enter Safe Mode in Windows 11, follow these steps:
1. Press the “Shift” key while clicking “Restart” from the Start menu.
2. Select “Troubleshoot,” then “Advanced options,” and finally “Startup Settings.”
3. Click “Restart,” and once the Startup Settings menu appears, press the “4” or “F4” key to enable Safe Mode.
*Step 2: Identify the Driver to Uninstall*
Once you are in Safe Mode, the next step is to identify which driver or drivers need to be uninstalled. To do this, navigate to the Device Manager – a centralized tool in Windows that lets you view and manage all the hardware devices and their respective drivers. Follow these steps:
1. Press “WIN + X” to open the Quick Link menu and click on “Device Manager.”
2. In the Device Manager window, locate the problematic device (e.g., display adapter, network adapter, etc.) by looking for a yellow triangle with an exclamation mark.
3. Right-click on the device and select “Properties.”
*Step 3: Check the Driver Details*
In the Properties window, click on the “Driver” tab to view information about the installed driver, including the driver version and date. Take note of these details, as you will need them in the next step to ensure that you are removing the correct update.
*Step 4: Uninstall the Driver Update*
Now that you have identified the problematic driver, it’s time to uninstall it. To do so, follow these steps:
1. While still on the “Driver” tab in the Properties window, click on the “Uninstall Device” button.
2. In the confirmation prompt that appears, check the box that says “Delete the driver software for this device” to ensure that the update is completely removed. Then, click “Uninstall.”
3. Wait for the process to complete, and restart your computer afterward.
*Step 5: Prevent the Driver Update from Reinstalling*
To prevent Windows Update from automatically reinstalling the problematic driver update, we recommend using the Show or Hide Updates troubleshooter tool from Microsoft. This tool allows you to block specific updates from being installed on your system. Here’s how to use it:
1. Download the Show or Hide Updates troubleshooter tool from the Microsoft website.
2. Run the tool and click “Next.”
3. Select “Hide updates” when prompted, then choose the driver update you want to block, and click “Next” again.
4. Once the process is complete, click “Close” to exit the tool.
With these 5 simple steps, you now know how to uninstall driver updates in Windows 11, ensuring that your system remains stable and free from performance issues. Make sure to share this article with other software experts who might find it helpful. Keep in mind that, although driver updates generally improve system performance, there may be instances where they introduce compatibility issues or bugs. Always remember to keep track of driver updates and verify their source, and don’t hesitate to roll back should any unexpected problems arise.
How to Reinstall NVIDIA Drivers in Windows 11 [2023]
How do I Uninstall a driver update?
When it comes to uninstalling a driver update, it’s important to understand that this process might require some technical skills. Here’s a guide on how to uninstall a driver update:
1. Open Device Manager: Press the Windows key + X and click on Device Manager from the menu. This tool is essential for managing all hardware devices and their drivers installed on your system.
2. Find the device with the updated driver: In the Device Manager, locate the device category (such as display adapters, network adapters, sound devices, etc.) whose driver was recently updated. Expand the category by clicking on the arrow or plus sign next to it. Find the specific device with the updated driver.
3. Right-click on the device: After finding the device in question, right-click on it to open up a context menu.
4. Select “Properties”: From the context menu, click on Properties to open the device properties dialog.
5. Navigate to the “Driver” tab: In the device properties dialog, click on the Driver tab. This tab displays information about the current driver installed for the device.
6. Click “Roll Back Driver”: If the updated driver is causing issues or you simply wish to revert to the previous version, click the Roll Back Driver button. Follow the on-screen instructions and confirm the rollback. The system will then uninstall the updated driver and restore the previous version. Keep in mind that the Roll Back Driver option will only be available if there is a previous driver version to roll back to.
7. Uninstall the driver manually: If the Roll Back Driver option is not available or if you want to completely remove the driver, click on Uninstall Device. Make sure to check the box “Delete the driver software for this device,” if present, to ensure the driver files are also removed. Restart your computer after uninstalling the driver.
Please note that uninstalling a driver might cause the associated device to stop functioning correctly. It is recommended to have the correct driver version ready to install once the unwanted driver update has been uninstalled.
How do I Uninstall a device driver in Windows 11?
When it comes to uninstalling device drivers in Windows 11, it is essential to exercise caution, as removing the wrong driver can lead to system instability. To ensure a smooth process, follow these steps:
1. Press the Windows key + X on your keyboard or right-click on the Start button, then select Device Manager from the context menu.
2. In the Device Manager window, you will see a list of hardware categories. Navigate to the one that includes the driver you want to uninstall.
3. Click on the small arrow next to the category to expand and show the devices related to that category. Locate the device with the driver you want to remove.
4. Right-click on the selected device, and click on Uninstall device from the dropdown menu.
5. A confirmation window will appear asking if you’re sure to uninstall the driver. Here, you may also see an option to Delete the driver software for this device. Check the box if you want to completely remove the driver and its files from your system; otherwise, the driver might automatically reinstall upon restarting your computer.
6. Click on the Uninstall button to proceed with the uninstallation process.
7. Once the process is complete, restart your computer to apply the changes.
By following these steps, you can successfully uninstall a device driver in Windows 11. Remember always to create a backup or system restore point before removing any critical drivers to avoid any unexpected issues.
Where are driver updates Windows 11?
In the context of uninstalling apps, here’s how to access and manage driver updates on Windows 11:
Step 1: Open Device Manager
1. Press Windows key + X or right-click on the Start button.
2. Select Device Manager from the menu.
Step 2: Find the device and driver update
1. Expand the category for the device type you want to update.
2. Right-click on the device for which you want to manage drivers.
3. Select Properties from the context menu.
Step 3: Manage driver updates
1. Go to the Driver tab in the Properties window.
2. To update the driver, click on Update Driver and follow the prompts.
3. To uninstall the driver, click on Uninstall Device. This will remove the driver software associated with the device, but remember that this may cause the device to stop functioning properly.
4. After uninstalling the driver, you can either restart your computer to let Windows automatically reinstall the necessary driver or install a new driver manually by clicking on Update Driver and selecting the appropriate option.
Keep in mind that uninstalling drivers might lead to device malfunctions, so it is recommended to perform a backup and create a system restore point before making any changes to driver installations.
How to Uninstall drivers Windows 11 command prompt?
How to Uninstall Drivers in Windows 11 using Command Prompt
When it comes to uninstalling apps, we often think about the graphical user interface (GUI) method. But sometimes, especially for drivers, using the command prompt can be more efficient. In this tutorial, we will learn how to uninstall drivers in Windows 11 using the command prompt.
Before we start, make sure you have administrative privileges to execute the commands.
Step 1: Open Command Prompt with Administrative Privileges
1. Press the Windows key + X on your keyboard to open the Power User menu.
2. Select Windows Terminal (Admin) or Command Prompt (Admin) from the menu.
3. Click Yes on the User Account Control prompt asking for permission.
Step 2: Use the ‘pnputil’ Command to Uninstall Drivers
1. In the command prompt, type pnputil /enum-drivers and press Enter. This command will list all the installed drivers on your system.
2. Identify the driver you want to uninstall by noting its published name, which has the format “oemXX.inf” (e.g., oem12.inf).
3. Type pnputil /delete-driver oemXX.inf /uninstall (replace ‘XX’ with the actual number) and press Enter. This command will uninstall the driver you specified.
Note: Make sure you replace “oemXX.inf” with the correct published name for the driver you want to uninstall.
After executing the commands above, the driver should be uninstalled. You might need to restart your computer for the changes to take effect.
What are the most effective methods to uninstall driver updates in Windows 11 using uninstall apps?
The most effective methods to uninstall driver updates in Windows 11 using uninstall apps are:
1. Device Manager: Device Manager is a built-in tool in Windows that allows you to view and manage all hardware devices connected to your computer. You can use it to roll back or uninstall specific driver updates.
2. Control Panel: The Control Panel is another built-in tool in Windows that enables you to uninstall programs and drivers. By accessing the “Programs and Features” section, you can uninstall specific driver updates.
3. System Restore: System Restore is a built-in feature in Windows that enables you to roll back your system to an earlier point in time. If you have a restore point before the driver update was installed, you can use this feature to revert your system and remove the update.
4. Third-party uninstall apps: There are several third-party uninstall apps available that can help you remove driver updates from Windows 11. Some popular ones include Revo Uninstaller, IObit Uninstaller, and Geek Uninstaller. These apps ensure complete removal of unwanted driver updates and their associated files.
Always remember to create a backup or system restore point before uninstalling driver updates to avoid potential issues.
Can you recommend the top 3 uninstall apps for removing driver updates in Windows 11 with ease?
Sure! The top 3 uninstall apps for removing driver updates in Windows 11 with ease are:
1. Display Driver Uninstaller (DDU): This powerful software helps you completely remove NVIDIA, AMD, and Intel graphics drivers, ensuring that no leftovers remain in the system.
2. Driver Fusion: A comprehensive solution for managing and maintaining your computer’s devices and drivers. It offers a powerful driver cleaner that removes unwanted and outdated drivers, including driver updates.
3. IObit Uninstaller: Though not specifically designed for driver updates, IObit Uninstaller is an excellent tool for uninstalling programs, browser plug-ins, and Windows apps. It also comes with a built-in feature to clean up residual files and registry entries left after uninstalling drivers.
Remember to create a system restore point before using these apps to remove driver updates, as it can help you revert any changes if you face issues afterward.
How do uninstall apps handle removing problematic driver updates in Windows 11, and which ones are the most reliable?
Uninstall apps handle the removal of problematic driver updates in Windows 11 by identifying the specific driver causing issues and reverting it to a previous, stable version. They help users perform a clean uninstall and prevent any residual files or registry changes that could cause further complications.
Some of the most reliable uninstall apps for dealing with problematic driver updates are:
1. IObit Uninstaller: This app thoroughly removes software, including the drivers, and cleans up any leftover traces, ensuring a clean and smooth uninstallation process.
2. Revo Uninstaller: Revo Uninstaller offers advanced scanning features to find and remove all traces of drivers, ensuring no leftover files remain after the uninstallation process.
3. Display Driver Uninstaller (DDU): As a specialized tool for removing display drivers, DDU is particularly effective at uninstalling NVIDIA, AMD, and Intel graphics drivers from your system.
4. Driver Easy: Alongside its primary function of updating drivers, Driver Easy also includes an uninstaller feature for removing problematic drivers and reverting to previously stable versions.
5. Geek Uninstaller: This lightweight uninstaller can efficiently remove drivers and their associated files, helping you resolve issues arising from problematic driver updates.
In conclusion, uninstall apps provide an efficient solution for removing problematic driver updates in Windows 11, ensuring that your system remains stable and operates smoothly. It’s essential to select a reliable and reputable uninstall app, like the ones mentioned above, to address driver-related issues effectively.
Post Views: 230
- To uninstall drivers on Windows 11, open Device Manager, right-click the driver, and choose “Uninstall device.”
- Alternatively, open Settings > Apps > Installed apps, select the device driver, and click “Uninstall.”
- You can also open Control Panel > Programs > Uninstall a program, select the component to remove, and click “Uninstall.”
- Finally, you can also remove some drivers using the PnPutil tool from Command Prompt or PowerShell.
UPDATED 1/21/2025: On Windows 11, you can uninstall device drivers in several ways without relying on third-party tools, and in this guide, I will explain how to complete this process.
What’s a driver on Windows 11?
A device driver is a critical component that enables the operating system to detect and control the hardware installed on your computer. Think of it as a translator that bridges the communication between the hardware (such as a graphics card, printer, or sound card) and the operating system.
While the system typically handles driver installation automatically for your hardware, there are situations where you might need to uninstall a driver manually — perhaps due to performance issues or because the hardware is no longer in use.
Whatever the case, Windows 11 provides at least four built-in methods to remove drivers, including using the Settings app, Control Panel, Device Manager, and Command Prompt.
In this guide, I will teach you how to remove device drivers from Windows 11.
- Uninstall drivers on Windows 11 from Device Manager
- Uninstall drivers on Windows 11 from Settings
- Uninstall drivers on Windows 11 from Control Panel
- Uninstall drivers on Windows 11 from Command Prompt
Uninstall drivers on Windows 11 from Device Manager
To uninstall a driver from Device Manager, use these steps:
-
Open Start on Windows 11.
-
Search for Device Manager and click the top result to open the app.
-
Expand the category with the device driver to remove.
-
Right-click the device and select the Uninstall device option.

-
(Optional) Check the “Delete the driver software for this device” option (if applicable).
Quick note: If you don’t check this option, the system will uninstall the device, but it’ll keep the driver files if you need to reinstall it. However, removing and downloading it again is best if the driver has problems.
-
Click the Uninstall button.

Once you complete the steps, the driver will be removed from your computer entirely.
Uninstall drivers on Windows 11 from Settings
To uninstall drivers on Windows 11 from the Settings app, use these steps:
-
Open Settings.
-
Click on Apps.
-
Click the Installed apps tab.
-
Select the driver, click the menu (three-dotted) button on the right side, and select the Uninstall option to remove it.

-
Click the Uninstall option.

Once you complete the steps, the device will be removed from the computer. However, the computer may keep some driver components depending on the uninstaller instructions.
Uninstall drivers on Windows 11 from Control Panel
Alternatively, you can also delete drivers using Command Prompt,
To remove a driver through the Control Panel on Windows 11, use these steps:
-
Open Control Panel.
-
Click the Uninstall a program option under the “Programs” section.
-
Select the driver package.
-
Click the Uninstall button.

-
Click the Yes button to remove the driver.

After you complete the steps, the driver will no longer be available on Windows 11. Similar to using the Settings app, the computer may keep some components depending on the uninstaller instructions.
Uninstall drivers on Windows 11 from Command Prompt
To uninstall device drivers through Command Prompt, use these these steps:
-
Open Start.
-
Search for Command Prompt (or PowerShell), right-click the top result, and select the Run as administrator option.
-
Type the following command to generate a list of the drivers installed on your computer and press Enter:
pnputil /enum-drivers

-
Confirm the driver you want to uninstall by its publisher name (such as HP). For example, oem10.inf.
-
Type the following command to uninstall the device driver from Windows 11 and press Enter:
pnputil /delete-driver PUBLISHER-NAME /uninstall /force
In the command, replace PUBLISHER-NAME with the actual name of the driver.


Once you complete the steps, the driver will be removed from the driver store, preventing future installations.
Other ways to uninstall hardware drivers
Although these instructions will work in most cases, some devices may have different instructions. For example, uninstalling a printer on Windows 11 is a two-step process. You first have to use the “Printers & scanners” settings in the Settings app to uninstall the printer and then the “Print Management” app or PowerShell (depending on whether you use Windows 11 Pro or Home) to delete the driver package from the device.
If you encounter a problem after an update, try rolling back to the previous version instead of deleting the driver to see if that fixes the issue.
If you recently installed a driver update and Windows 11 no longer boots correctly, you can use these instructions to uninstall the driver from the Windows Recovery Environment (WinRE).
Finally, when you want to remove a graphic driver from Nvidia or AMD completely, it’s best to use the Display Driver Uninstaller (DDR) tool.
Update January 21, 2025: This guide has been updated to ensure accuracy and reflect changes to the process.
Removing incompatible drivers from Windows 11 can help improve your computer’s performance and prevent annoying errors. To do this, you’ll need to identify the problematic driver, uninstall it, and ensure your system is running smoothly. This guide will walk you through each step, making it easy to tackle this common issue without confusion.
In this section, we’ll cover the steps to remove incompatible drivers from your Windows 11 system. This will help you resolve issues caused by these drivers and ensure your computer runs efficiently.
Step 1: Identify the Incompatible Driver
First, open the Device Manager by right-clicking on the Start button and selecting “Device Manager”.
Device Manager is like a backstage pass to all the hardware and drivers on your computer. Look for any yellow triangle icons indicating problematic drivers. These icons suggest there’s an issue with that driver.
Step 2: Update the Driver
Next, right-click on the problematic driver and select “Update driver”.
Sometimes, the simplest fix is just updating the driver. Windows will search for the latest version, which might resolve compatibility issues without needing to uninstall anything.
Step 3: Uninstall the Driver
If updating doesn’t work, right-click the driver again and choose “Uninstall device”.
Uninstalling the driver removes it from your system. Don’t worry; you can always reinstall it later if needed. This step helps eliminate the source of the problem.
Step 4: Restart Your Computer
After uninstalling, restart your computer to complete the process.
Restarting ensures your computer fully removes the driver and resets all necessary settings. This refresh helps to solidify the changes you’ve made.
Step 5: Install the Correct Driver
Finally, go to the manufacturer’s website to download and install the latest compatible driver.
Manufacturers often release updated drivers to solve compatibility issues. By downloading directly from their website, you ensure you’re getting the correct and most reliable version.
After removing the incompatible driver and restarting your computer, you should experience improved performance and fewer errors. Your system will now be better equipped to handle tasks without the glitches that incompatible drivers can cause.
Tips for Removing Incompatible Drivers in Windows 11
- Check if Windows Updates offer a compatible driver as an alternative to manually searching.
- Use a system restore point before making changes, so you can revert if necessary.
- Regularly update all drivers to prevent future incompatibility issues.
- Consider using third-party driver update tools for convenience, but research their reliability first.
- Keep track of which drivers you’ve updated or removed, to avoid confusion later.
Frequently Asked Questions
Why are incompatible drivers a problem on Windows 11?
Incompatible drivers can cause system instability, crashes, and reduced performance. They might conflict with other software or hardware, leading to errors.
How do I know which driver is incompatible?
In Device Manager, look for yellow triangle icons next to any device. These indicate there’s a problem with that driver.
Can I reinstall a driver after uninstalling it?
Yes, you can reinstall drivers by downloading them from the manufacturer’s website or letting Windows find them.
Is it safe to use third-party driver update tools?
While some are safe and effective, others can be unreliable. Research thoroughly and choose reputable tools if you decide to use them.
What if uninstalling the driver doesn’t fix my problem?
Try checking for other hardware or software issues. Sometimes, multiple factors contribute to system problems.
Summary
- Identify the incompatible driver in Device Manager.
- Update the driver if possible.
- Uninstall the driver if updating fails.
- Restart your computer.
- Install the correct driver from the manufacturer.
Conclusion
In conclusion, knowing how to remove incompatible drivers on Windows 11 is a valuable skill that can save you from a lot of headaches. By following the steps outlined above, you can enhance your computer’s performance and sidestep many common issues. Drivers are like the unsung heroes of your hardware, quietly doing their job. But when they misbehave, they can wreak havoc.
Keeping your drivers in check is akin to maintaining a tidy workspace; it keeps things running smoothly and efficiently. Remember, technology should make life easier, not harder. If you’re interested in learning more, explore other resources on managing your Windows 11 system. Dive into forums or tech blogs to stay updated on the latest tips and tricks.
Feel empowered to tackle driver issues, knowing that you’re not alone. Every tech enthusiast faces these challenges. So, next time you encounter a driver problem, you’ll know exactly what to do. Happy computing!
Matthew Burleigh has been writing tech tutorials since 2008. His writing has appeared on dozens of different websites and been read over 50 million times.
After receiving his Bachelor’s and Master’s degrees in Computer Science he spent several years working in IT management for small businesses. However, he now works full time writing content online and creating websites.
His main writing topics include iPhones, Microsoft Office, Google Apps, Android, and Photoshop, but he has also written about many other tech topics as well.
Read his full bio here.