
Firefox
Firefox
Последнее обновление:
39% пользователей проголосовали за полезность
В этой статье описано, как удалить приложение Firefox для поддерживаемых операционных систем. Если вы планируете удалить и переустановить Firefox с целью устранения проблем, которые у вас возникли, прочтите сначала эту статью.
Оглавление
- 1 Удаление Firefox
- 1.1 Запуск удаления Mozilla Firefox
- 1.2 Завершение удаления Mozilla Firefox
- 2 Удаление пользовательских данных и настроек
Удаление Firefox
Для удаления Firefox сделайте следующее:
- Закройте Firefox (если он запущен): Нажмите кнопку меню Firefox и выберите .Нажмите кнопку меню Firefox в верхней части экрана и выберите .Нажмите кнопку меню Firefox и выберите .
- Откройте папку Программы в Finder.
- Перетащите приложение Firefox в корзину.
Вы завершили удаление Firefox.
- Если вы установили Firefox из менеджера пакетов вашего дистрибутива, воспользуйтесь тем же способом для его удаления — для получения дополнительной информации прочтите эту статью.
- Если же вы загрузили и установили бинарный пакет со страницы загрузки Firefox, для удаления Firefox просто удалите папку firefox из своего домашнего каталога.
Запуск удаления Mozilla Firefox
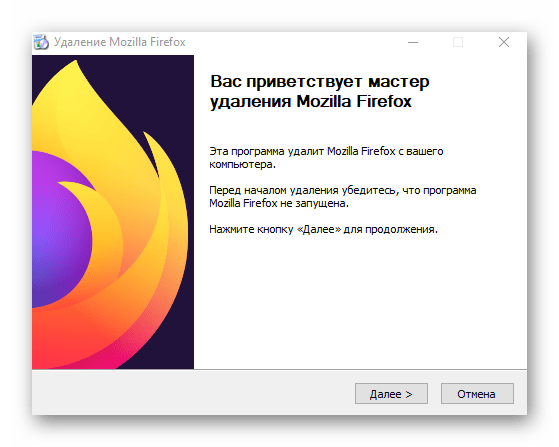
Чтобы начать процесс удаления Firefox, сделайте следующее:
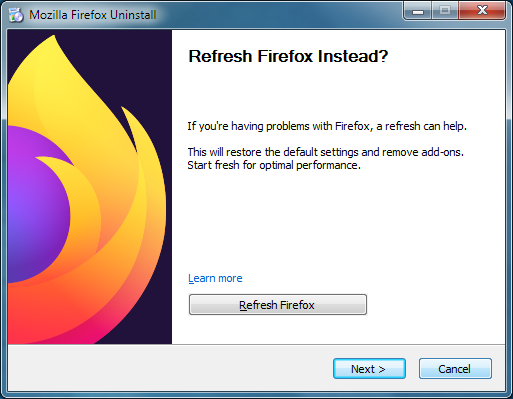
Примечание: Вместо удаления Firefox вы можете попробовать очистить его прямо из окна удаления. Это может решить многие проблемы путём восстановления настроек по умолчанию и удаления дополнений.
Завершение удаления Mozilla Firefox
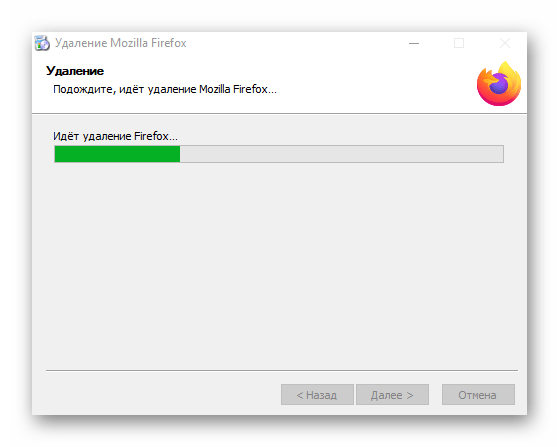
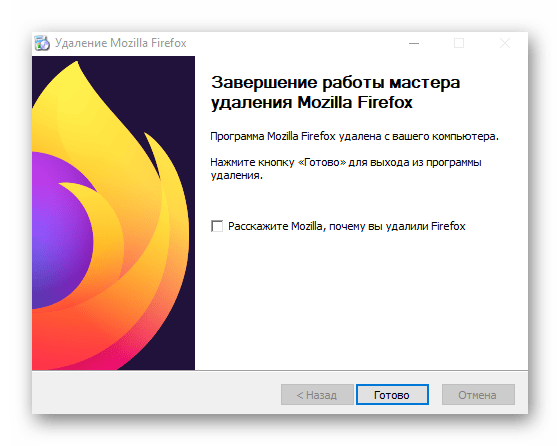
Для завершения удаления Firefox сделайте следующее:
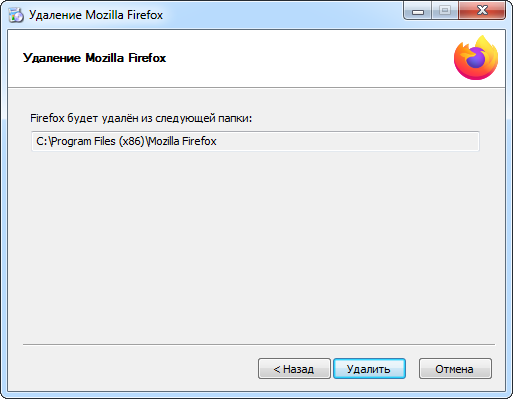
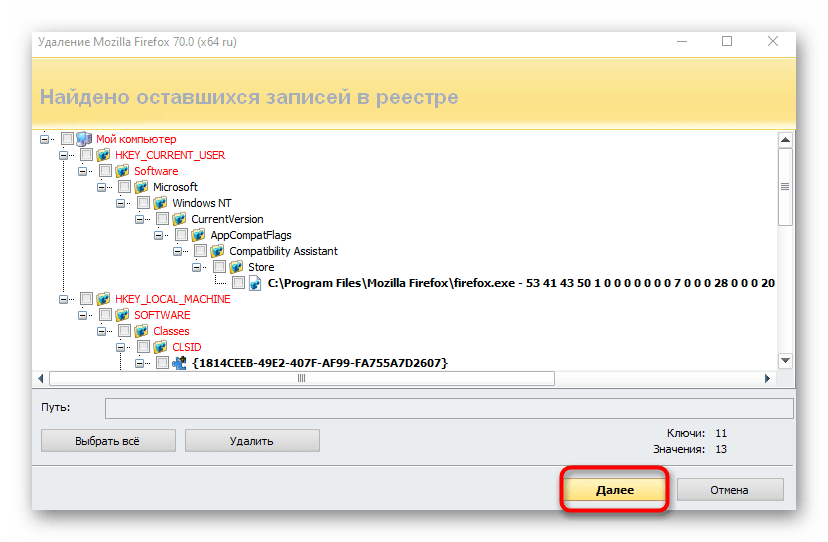
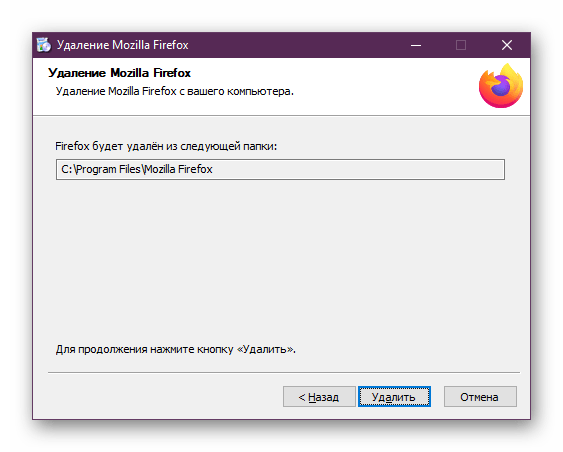
- Нажмите Далее в окне Удаление Mozilla Firefox. В следующем открывшемся окне будет отображено расположение программы Firefox, которое будет удалено.

- Нажмите Удалить.
- Нажмите Готово, чтобы завершить удаление.
- Чтобы удалить другие файлы и папки, которые могли быть не удалены, удалите вручную программную папку Firefox в расположении, отображённом в окне Удаление Mozilla Firefox (обычно C:\Program Files\Mozilla Firefox или C:\Program Files (x86)\Mozilla Firefox).
Удаление пользовательских данных и настроек
Удаление Firefox не приводит к удалению каких-либо пользовательских данных, таких как закладки, историю, пароли и куки (если вы не используете snap на Ubuntu). Если вы также хотите удалить эту информацию, вы должны удалить вручную папку Firefox с вашим профилем:
- Нажмите на значок Finder на панели Dock.
- На панели меню нажмите меню , зажмите клавишу option или Alt и выберите . Откроется окно, содержащее папку Библиотека.
- Откройте папку Application Support.
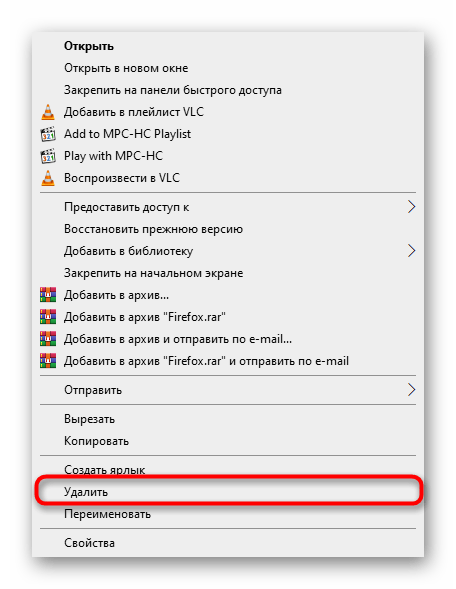
- Удалите папку Firefox.
- (Ubuntu) Нажмите на меню в левоем верхнем углу экрана и выберите . Откроется окно Просмотр файлов.
- Нажмите на меню и выберите , если это ещё не отмечено.
- Откройте папку, отмеченную .mozilla.
- Удалите папку папку, отмеченную firefox.
- Нажмите на кнопку Windows Пуск и выберите . Откроется диалоговое окно Выполнить.
- В качестве альтернативы вы можете нажать +{key R}, чтобы открыть диалоговое окно Выполнить.
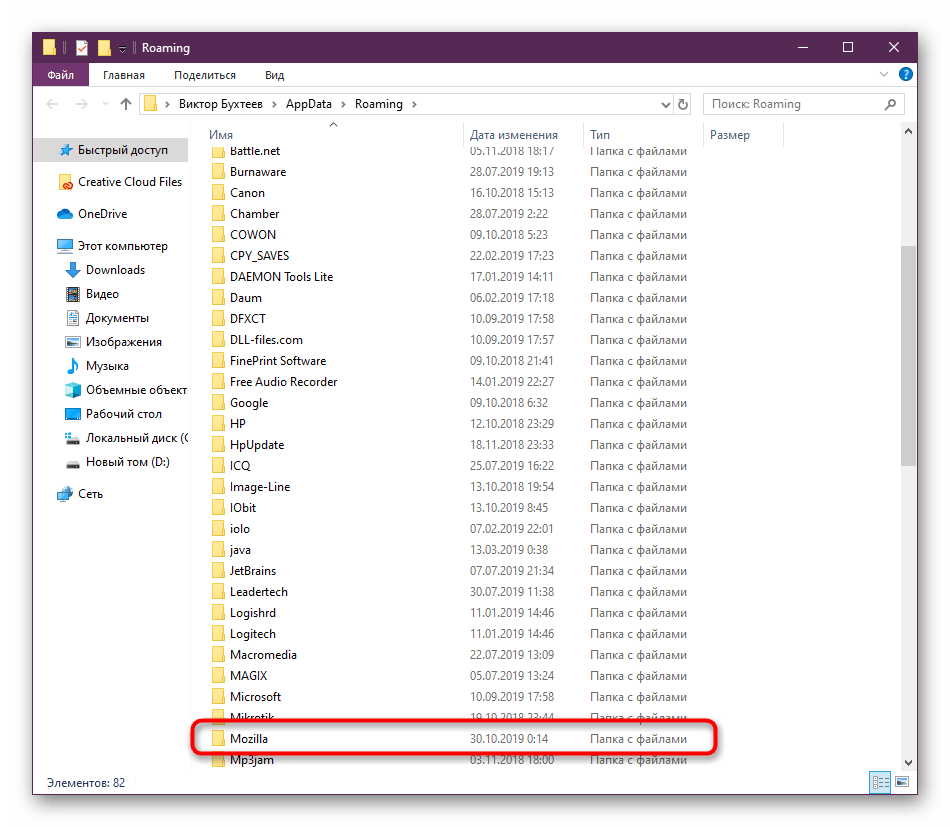
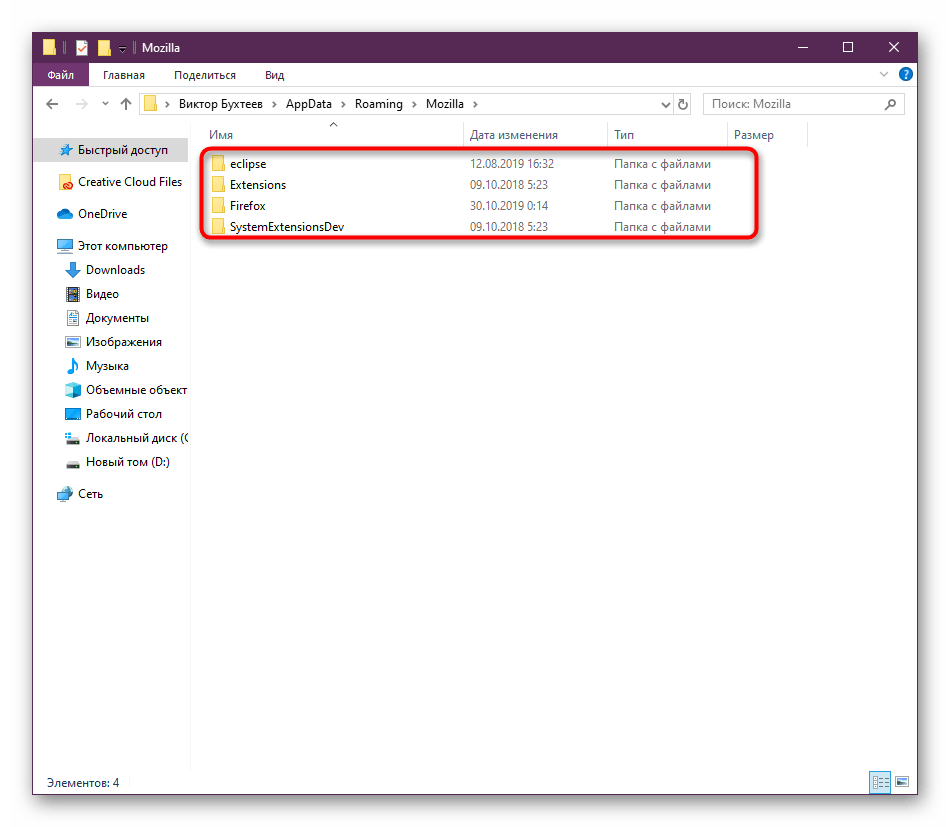
- Введите %APPDATA%\Mozilla\ и нажмите OK. Откроется окно, содержащее папку Firefox.
- Удалите папку Firefox.
- На экране Пуск выберите плитку Рабочий стол. Откроется режим просмотра Рабочий стол.
- На Рабочем столе переместите курсор в правый нижний угол, чтобы открыть панель Charms.
- На панели Charms выберите . Откроется боковая панель Поиск.
- Введите «%APPDATA%\Mozilla\» в поле поиска и нажмите Enter. Откроется окно, содержащее папку Firefox.
- Удалите папку Firefox.
- Нажмите на кнопку Пуск или клавишу .
- Введите в поле поиска %APPDATA%\Mozilla\ и нажмите Enter. Откроется окно, содержащее папку Firefox.
- Удалите папку Firefox.
Кроме того, вы можете нажать +R, чтобы открыть диалоговое окно Выполнить, ввести %APPDATA%\Mozilla\ и нажать Enter, чтобы открыть папку Mozilla, а затем удалить папку Firefox.</div>
Эти прекрасные люди помогли написать эту статью:

Станьте волонтёром
Растите и делитесь опытом с другими. Отвечайте на вопросы и улучшайте нашу базу знаний.
Подробнее
Все способы:
- Полностью удаляем браузер Mozilla Firefox в Windows
- Способ 1: IObit Uninstaller
- Способ 2: Revo Uninstaller
- Способ 3: Встроенные средства Windows
- Вопросы и ответы: 4
Не всегда пользователей устраивает установленный на компьютере браузер, поэтому они хотят избавиться от него. Еще возникают ситуации, которые вынуждают переустанавливать веб-обозреватель. Все это может коснуться и обладателей Mozilla Firefox. Специально для таких случаев мы подготовили детальное описание трех различных методов, которые помогут решить поставленную задачу. Советуем сначала ознакомиться с приведенными вариантами, а уже потом решать, какой из них будет наиболее подходящим в сложившейся ситуации.
Полностью удаляем браузер Mozilla Firefox в Windows
Существуют как сторонние решения для удаления софта, так и стандартные, которые имеются в операционной системе. Пользователь вправе сам выбрать оптимальный для себя вариант, поскольку каждый имеет свои преимущества и недостатки. Мы же покажем осуществление поставленной задачи на примере двух сторонних программ и стандартного средства, чтобы каждый юзер смог найти идеальное решение.
Способ 1: IObit Uninstaller
Первая программа, которая будет упомянута в нашей сегодняшней статье, называется IObit Uninstaller. К ее достоинствам можно отнести максимально удобный и современный интерфейс, доступность удаления сразу нескольких приложений и полную очистку от остаточных файлов. Что касается взаимодействия с этим ПО, то оно осуществляется следующим образом:
Скачать IObit Uninstaller
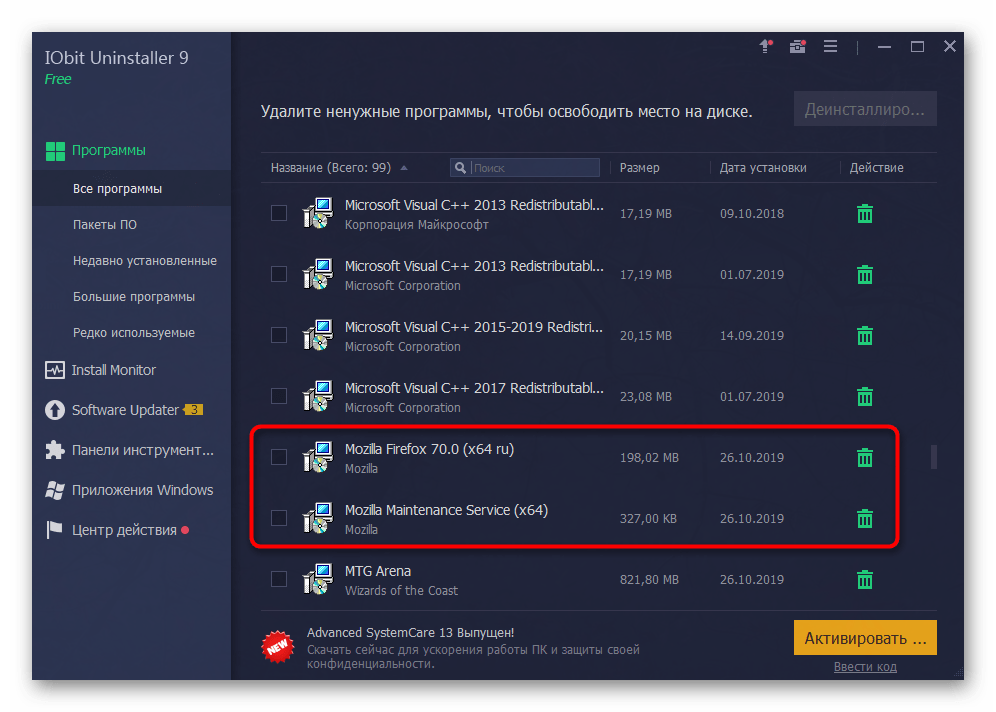
- Используйте приведенную выше кнопку, чтобы перейти на официальный сайт и скачать оттуда IObit Uninstaller. После инсталляции запустите ПО и зайдите в раздел «Программы».
- Отыщите все программы и дополнения, которые связаны с Mozilla Firefox. Выделите их галочками.
- Затем нажмите на активную зеленую кнопку «Деинсталлировать».
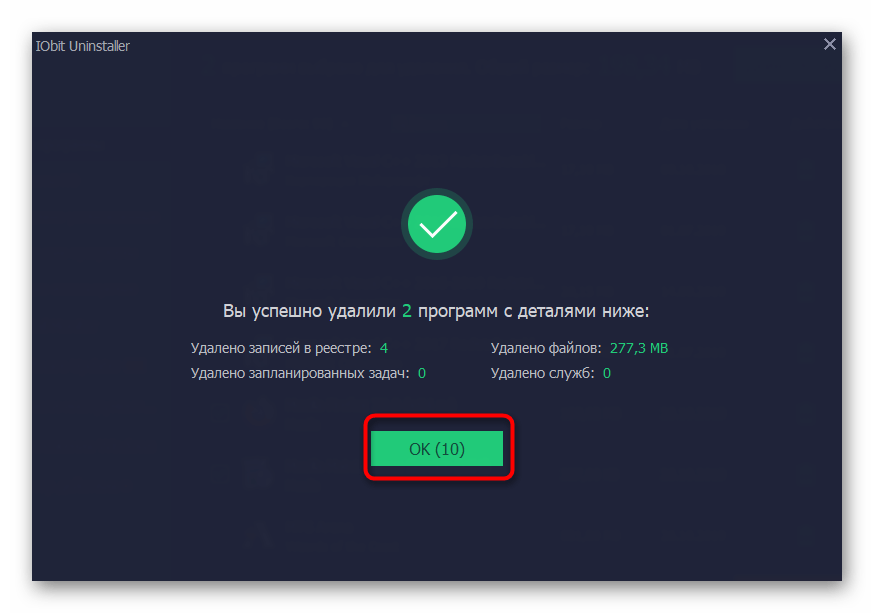
- Отметьте галочкой пункт «Автоматически удалять все остаточные файлы» и повторно кликните по кнопке с аналогичным названием «Деинсталлировать».
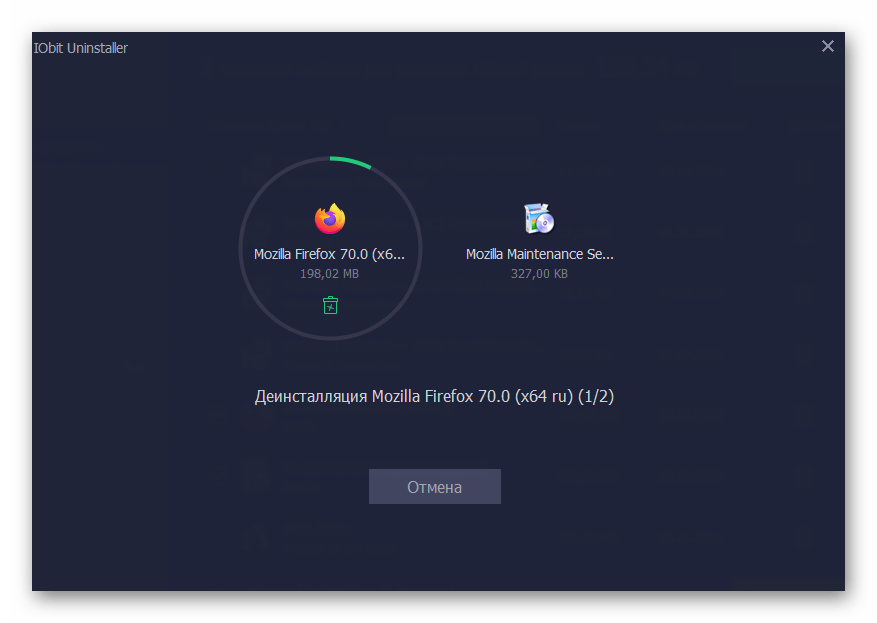
- Ожидайте завершения выполнения операции.
- На этом этапе обязательно появится новое окно со стандартным Мастером удаления Firefox. Ознакомьтесь с его описанием переходите к следующему шагу.
- Дождитесь окончания удаления.
- После этого закройте окно Мастера.
- Вы будете уведомлены, что при деинсталляции было очищено определенное количество записей реестра и освобождено количество мегабайт на компьютере. На этом этапе взаимодействие с IObit Uninstaller заканчивается.


Как видите, ничего сложного в удалении веб-обозревателя через упомянутую программу нет, к тому же все остаточные файлы будут очищены автоматически, что позволит вам просто перезагрузить ПК и быть уверенным в том, что от Mozilla Firefox не осталось никаких следов.
Способ 2: Revo Uninstaller
Однако далеко не всех пользователей устраивает приведенный выше инструмент по разным причинам. В связи с этим мы решили рассказать о доступной бесплатной альтернативе под названием Revo Uninstaller. Этот софт функционирует примерно по такому же принципу, так же очищая и остаточные объекты, но запуск деинсталляции осуществляется немного по-другому.
Скачать Revo Uninstaller
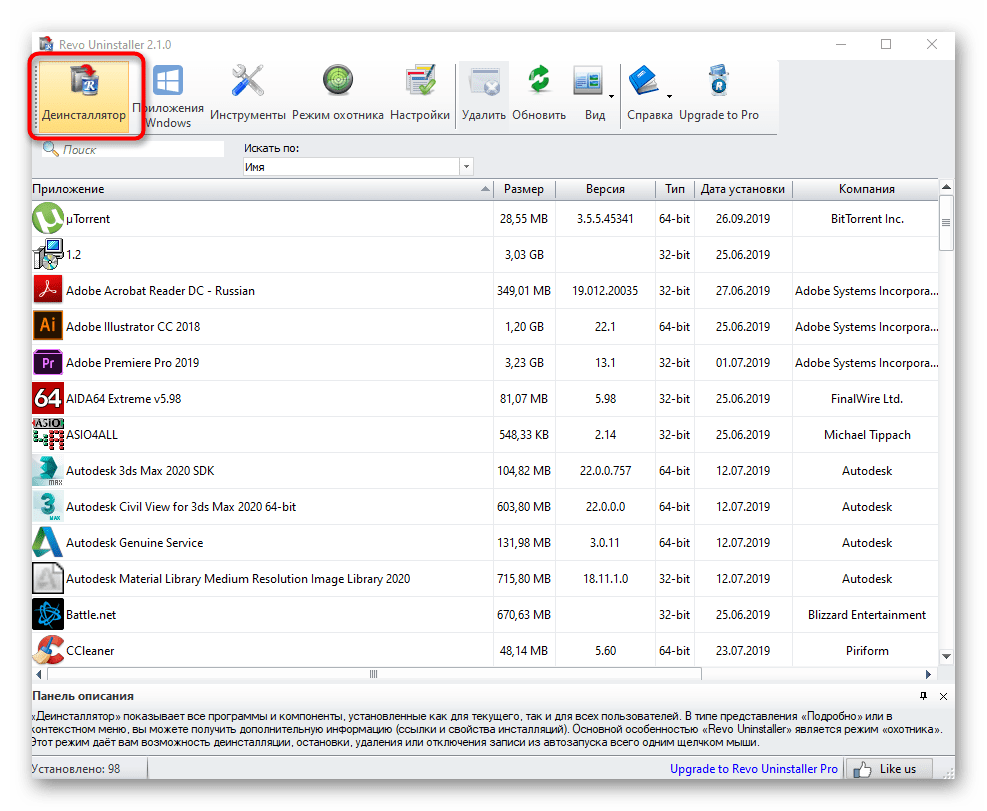
- После инсталляции и запуска софта активируйте инструмент «Деинсталлятор», выбрав его на верхней панели.
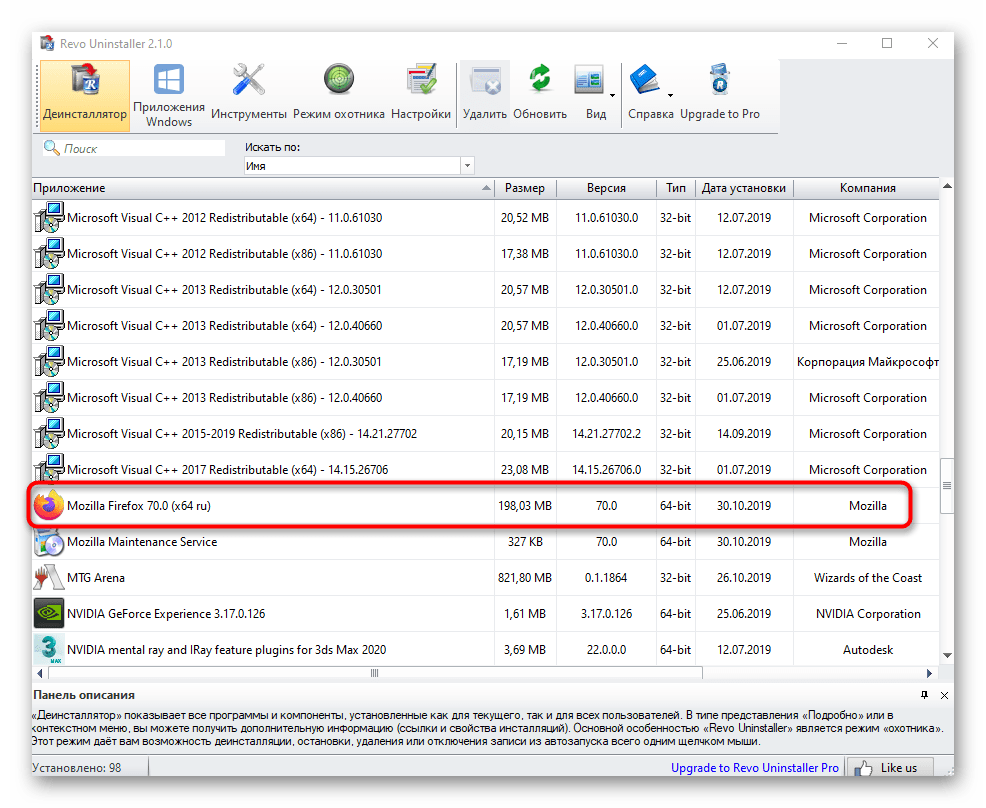
- Затем опуститесь вниз по списку и найдите рассматриваемый браузер. Кликните по нему дважды левой кнопкой мыши.
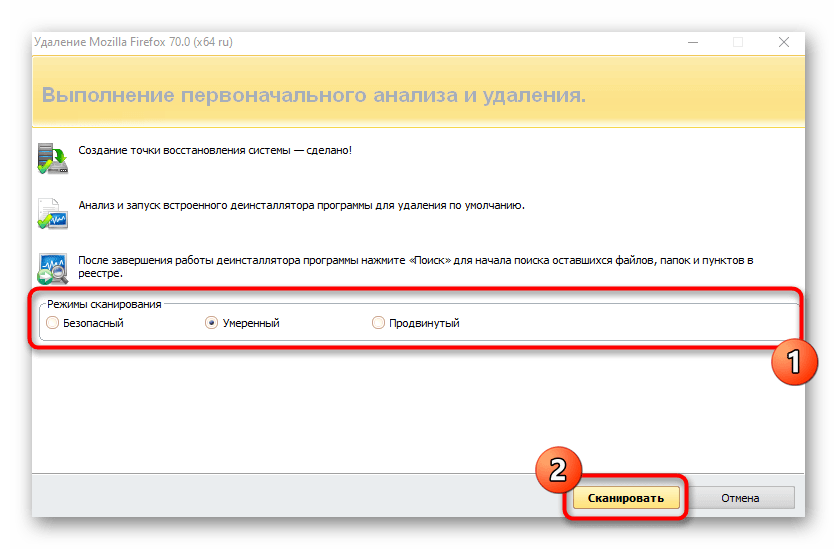
- Начнется создание точки восстановления системы. От вас требуется дождаться появления окна Мастера удаления.
- После этого сразу же переходите к следующему этапу, щелкнув по «Далее».
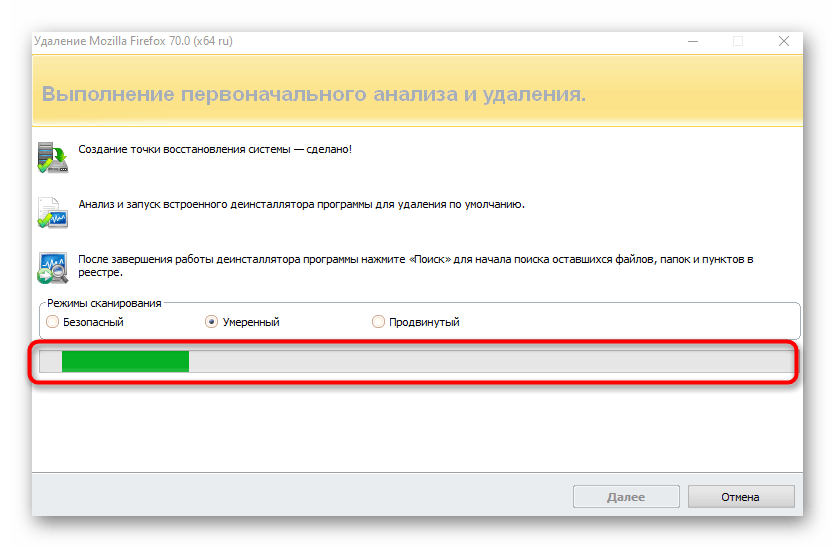
- В конце Revo Uninstaller предложит произвести сканирование остаточных объектов. Мы рекомендуем оставить тип в значении «Умеренный», а затем запустить проверку.
- Это займет несколько минут. Во время данной операции лучше не выполнять других действий на компьютере.
- Теперь вы можете отметить галочками все записи реестра и удалить их. Если это не требуется, просто жмите «Далее».
- Оставшиеся файлы и папки тоже можно будет очистить.


Revo Uninstaller — один из тех инструментов, который можно оставить на своем компьютере и использовать по мере необходимости для упрощения процедуры взаимодействия с различными программами. Обо всех достоинствах этого софта мы предлагаем узнать из другой нашей статьи далее.
Подробнее: Использование программы Revo Uninstaller
Что касается дополнительных сторонних решений, то подходящего ПО действительно существует огромное количество. Все эти представители функционируют примерно по одному и тому же алгоритму, поэтому рассматривать каждый из них не имеет смысла. Взамен мы предлагаем изучить этот софт, если приведенные выше инструменты вам не подошли.
Подробнее: Программы для удаления программ
Способ 3: Встроенные средства Windows
Последний рассматриваемый сегодня способ имеет одно большое преимущество перед предыдущими — пользователю не придется устанавливать никаких дополнительных приложений для деинсталляции другого. Однако здесь имеются и свои недостатки, ведь каждое действие придется производить самостоятельно. Если этому уделить несколько минут, изучив следующую инструкцию, то никаких трудностей не возникнет.
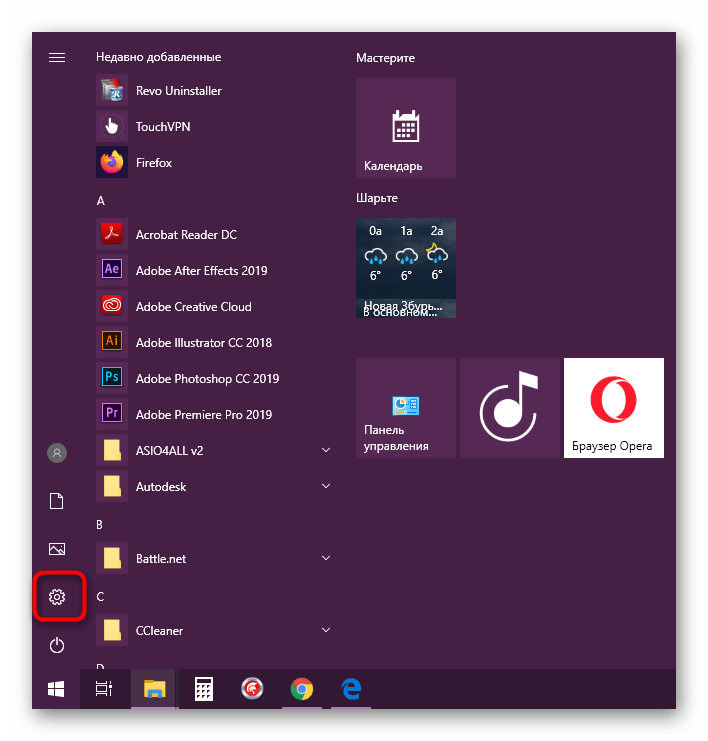
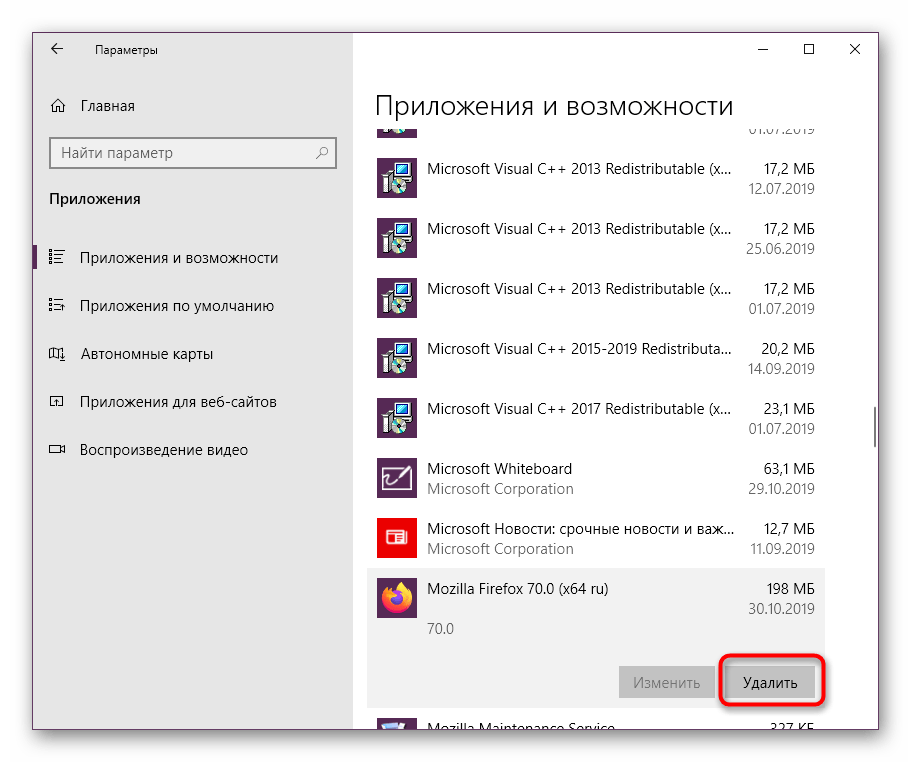
- Откройте меню «Пуск» и оттуда перейдите в «Параметры» или «Панель управления», что зависит от версии операционной системы.
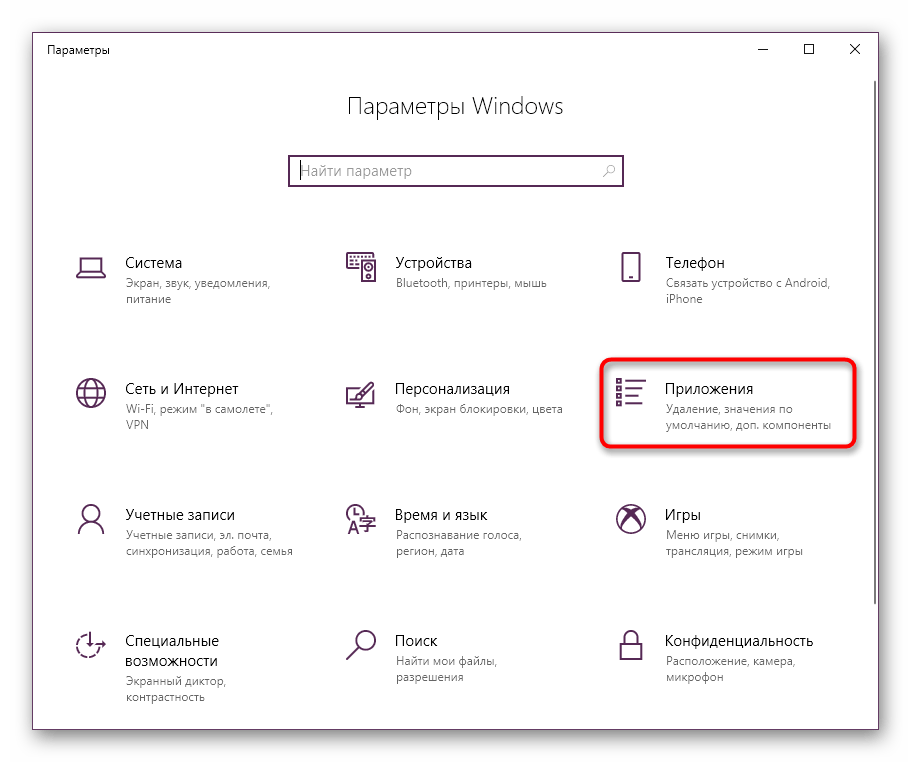
- Здесь выберите раздел «Приложения» или «Программы и компоненты», где и осуществляются все операции со стандартным и сторонним софтом.
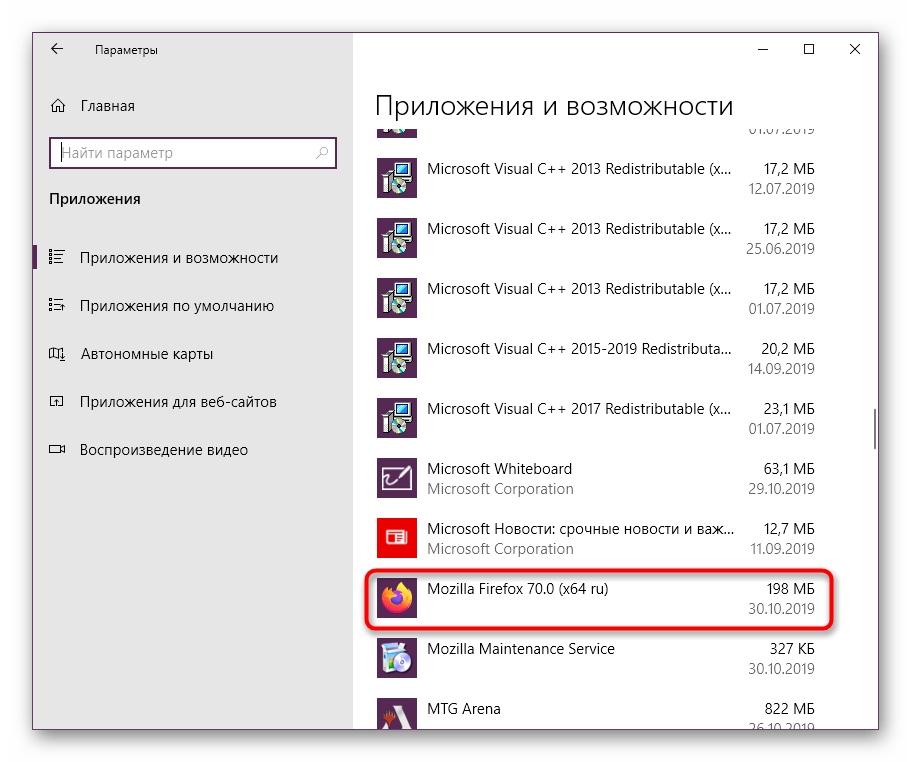
- В списке отыщите Mozilla Firefox и кликните ЛКМ по данной строке.
- Появится набор опций, где вам следует нажать на «Удалить».
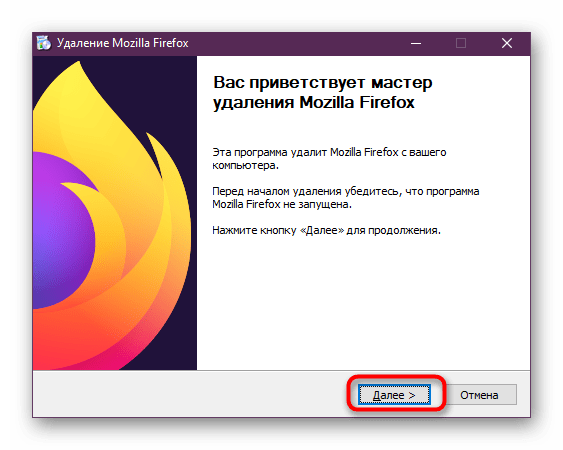
- Запустится Мастер деинсталляции веб-обозревателя. Если этого не произошло, придется открывать его самостоятельно, перейдя по пути
C:\Program Files\Mozilla Firefox\uninstall\helper.exeилиC:\Program Files (x86)\Mozilla Firefox\uninstall\helper.exe. - Затем вы получите уведомление о том, что браузер будет удален из определенной папки. Подтвердите это действие и переходите далее, ожидая завершения очистки.
- По умолчанию стандартный Мастер деинсталляции не очищает систему от остаточных файлов, поэтому это придется сделать самостоятельно. В первую очередь откройте утилиту «Выполнить» через Win + R и в ней напишите
%APPDATA%, после нажав на Enter. - Отыщите в открывшейся директории папку «Mozilla».
- В ней вы можете удалить все оставшиеся директории, если больше не используете никаких сервисов от данной компании. Для этого выделите объекты и щелкните ПКМ.
- В появившемся контекстном меню вас интересует пункт «Удалить».
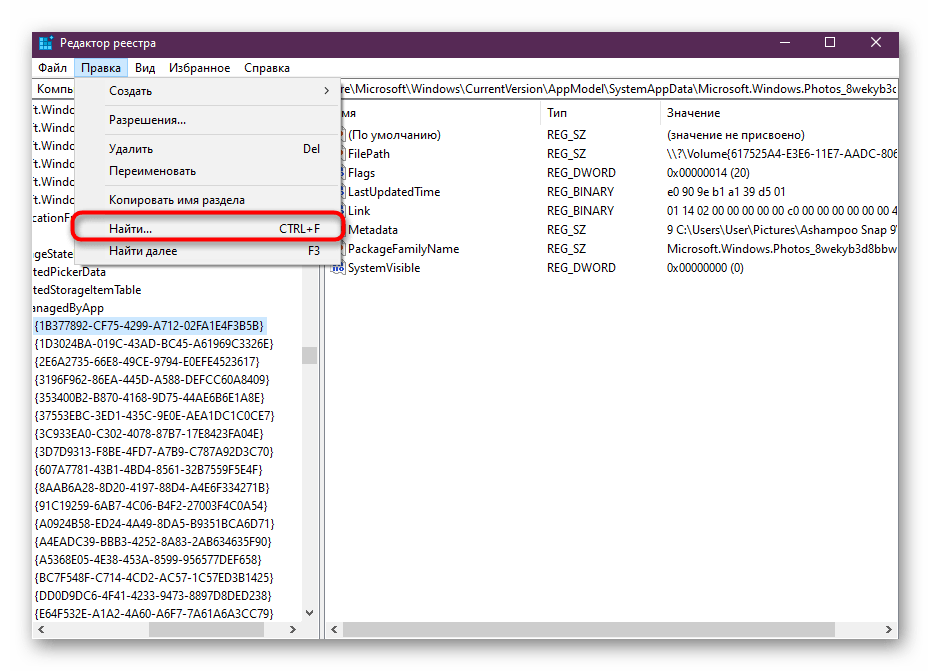
- После этого снова запустите «Выполнить», где уже введите
regeditдля открытия «Редактора реестра». - Используйте функцию «Найти», открыв ее через раздел «Правка» или нажав на Ctrl + F.
- В поле введите
firefoxи начните поиск ключей. - Удаляйте все найденные варианты, перемещаясь между ними нажатием на F3.


Вся сложность этого способа заключается только в необходимости осуществления действий вручную, но при должном подходе с поставленной задачей справится даже самый начинающий пользователь.
Сегодня вы были ознакомлены с тремя вариантами полной деинсталляции веб-обозревателя Mozilla Firefox в Windows. В конце материала хотим отметить, что не всегда стоит удалять браузер, если он стал работать некорректно. У этого могут быть другие причины, которые решаются менее радикальными способами. Если же вы действительно столкнулись с такими проблемами и желаете переустановить программу, для начала советуем изучить следующие инструкции.
Подробнее:
Mozilla Firefox грузит процессор: что делать
Наша группа в TelegramПолезные советы и помощь
-
Home
-
News
- How to Uninstall/Reinstall Firefox on Windows 10 or Mac
By Alisa |
Last Updated
Here is a step-by-step guide for how to uninstall Firefox on your Windows 10 or Mac computer. Remove Firefox from your computer if you are tired of this browser or want to reinstall it to troubleshoot issues. For more computer tips and solutions, please visit MiniTool Software official website.
Firefox is one of the most popular browsers in the market. If your Firefox browser has problems and you want to uninstall and reinstall it to see if the issue can be fixed, below is a detailed guide for how to uninstall Firefox on Windows 10 or Mac.
Tips:
Experience a faster system with MiniTool System Booster – your solution to effortless program uninstallation.
MiniTool System Booster TrialClick to Download100%Clean & Safe
How to Uninstall Firefox on Windows 10 – 4 Ways
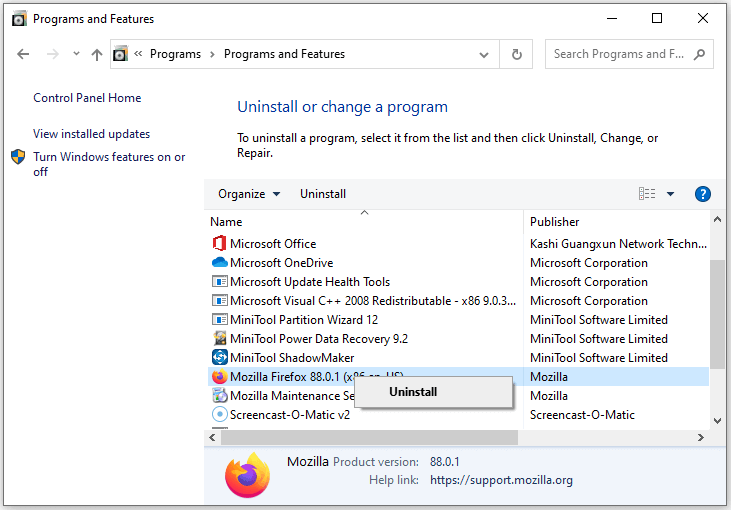
Way 1. Uninstall Firefox from Control Panel
- Press Windows + R, type control panel, and press Enter to open Control Panel on Windows 10.
- Click Uninstall a program under Programs.
- Scroll down to find Mozilla Firefox, right-click it and click Uninstall to remove Firefox from your computer.
Way 2. Uninstall Firefox from Settings
- Click Start -> Settings -> Apps -> Apps & features.
- In the right window, scroll down to find Mozilla Firefox, click it and click Uninstall button to uninstall Firefox on Windows 10.
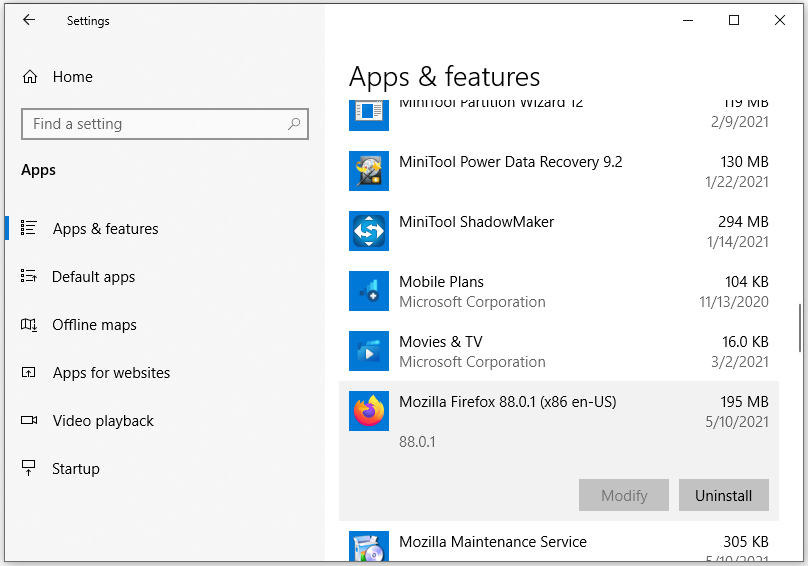
Tip: Some Firefox files and folders may be still left on your computer after uninstalling Firefox. To completely clear the leftover files, you can go to C:\Program Files\Mozilla Firefox or C:\Program Files (x86/x64)\Mozilla Firefox to manually delete this folder. Still, click Start, type %appdata%, click Mozilla folder and delete Firefox folder to completely remove Firefox data and settings.
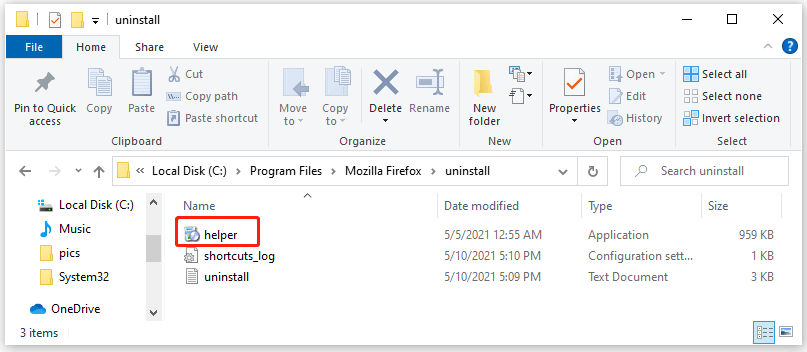
Way 3. Uninstall Firefox with its built-in uninstaller
- Right-click Firefox browser icon on your computer and select Open file location.
- Find and click Uninstall folder.
- Double-click the helper application to open Mozilla Firefox Uninstall window. Follow the on-screen instructions to uninstall Firefox from your Windows 10 computer.
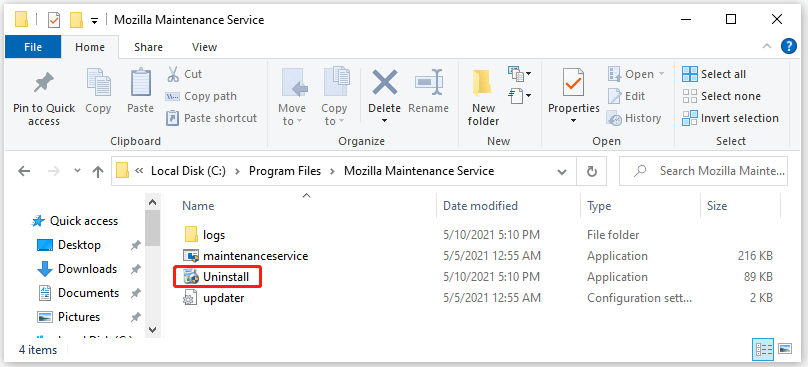
Alternatively, you can also go to C:\Program Files\Mozilla Firefox\Mozilla Maintenance Service, and click Uninstall application to remove Firefox.
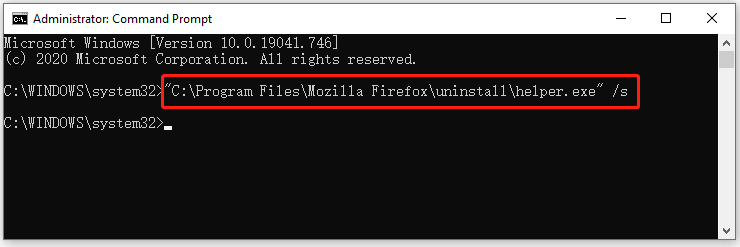
Way 4. How to uninstall Firefox with command line
- Press Windows + R, type cmd, press Ctrl + Shift +Enter to open command Prompt.
- Type the command line: “[install directory]\uninstall\helper.exe” /s in Command Prompt, for instance, “C:\Program Files\Mozilla Firefox\uninstall\helper.exe” /s, and press Enter to remove Firefox. If you install Firefox in another directory, you should replace “install directory” with the real install path of Firefox.
How to Completely Uninstall Firefox on Mac
- Open Finder app and click Applications in the left panel.
- Right-click Firefox app and select Move to Trash to uninstall Firefox on Mac.
- Then you can empty Trash to completely remove Firefox from your Mac computer.
After you delete Firefox, you can go to Firefox website to download Firefox for Windows 10 or Mac computer again if you want.
How to Uninstall and Reinstall Firefox without Losing Bookmarks
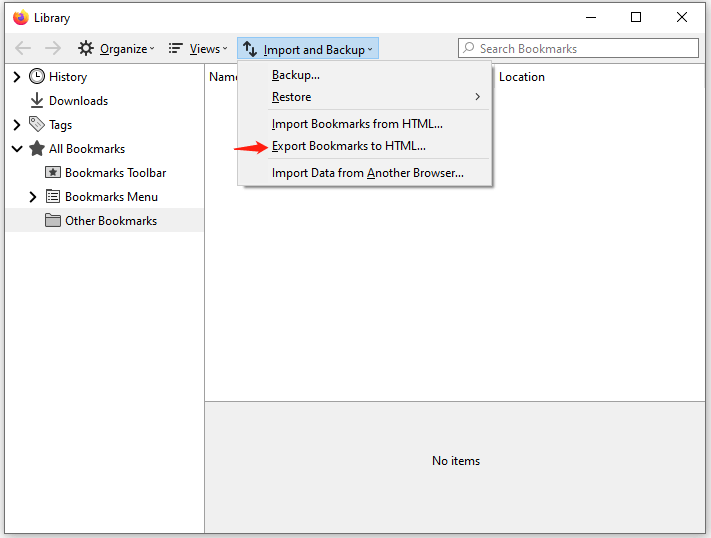
Performing a clean uninstall of Firefox will remove all your Firefox data including your saved bookmarks. If you want to keep the bookmarks, you can export the bookmarks and import them to Firefox after reinstalling Firefox. Check how to export Firefox bookmarks below.
- Open Firefox browser. Click the Library button. If you don’t see it, you can click the three-line menu icon at the top-right corner and click Library. Click Manage Bookmarks (Ctrl + Shift + O).
- In the Library window, click Import and Backup and click Export Bookmarks to HTML.
- Set a file name and select a location to save the backup file.
If you want to import bookmarks to Firefox after reinstalling the Firefox browser, you can follow the same operation and click Import Bookmarks from HTML to select the bookmark HTML file to import.
4 Tips to Fix Firefox Not Working/Won’t Open
Fix 1. Clear cache/cookies in Firefox. Click the three-line menu icon and click Options in Firefox. Click Privacy & Security on the left. Under Cookies and Site Data, click Clear Data button. Click Clear button.
Fix 2. Restart the computer and restart Firefox.
Fix 3. Reset Firefox to default settings. Click the three-line icon and click Help. Then click More Troubleshooting Information. Click Refresh Firefox under Give Firefox a tune up to reset Firefox.
Fix 4. Uninstall and reinstall Firefox. Follow the guide above to remove Firefox and reinstall it.
About The Author
Position: Columnist
Alisa is a professional English editor with 4-year experience. She loves writing and focuses on sharing detailed solutions and thoughts for computer problems, data recovery & backup, digital gadgets, tech news, etc. Through her articles, users can always easily get related problems solved and find what they want. In spare time, she likes basketball, badminton, tennis, cycling, running, and singing. She is very funny and energetic in life, and always brings friends lots of laughs.
This article contains instructions to uninstall Firefox and remove it from your system. You should set another default browser if you are not going to reinstall Firefox and it is currently the default [1]. You can use the information in this article as a general guide.
Important: It is rarely necessary to remove Firefox to repair it. Usually it is sufficient to create a new profile, and it is not necessary to remove the old profile. In some cases it is also necessary to uninstall Firefox and install it in a new folder. Note that it is usually safer to rename files and folders than to delete them.
On Mac OS X
- Drag the Firefox application to the Trash.
- Firefox also has a .plist file at ~/Library/Preferences/org.mozilla.firefox.plist you may wish to remove.
If you also wish to remove your Firefox user data and settings (bookmarks, extensions, etc.) trash the «Firefox» folder, located here: ~Library/Application Support/Firefox. [2] See Removing user profile data (below) for additional information.
On Linux
Remove the firefox Installation directory, usually: /usr/lib/firefox-<version>. For example, if using Firefox 1.0 it would be: /usr/lib/firefox-1.0
On Windows
Exit Firefox completely, open the Windows Control Panel and then,
- On Windows Vista and above, go to «Programs -> Programs and Features», select Mozilla Firefox <version> and click click Uninstall. [3] [4]
- On Windows XP (or below), double-click «Add or Remove Programs» Select «Mozilla Firefox <version>» in the list of installed programs and click «Remove» to run the uninstaller.
Note: In Firefox 30.0 and below, the uninstaller includes the option, «Remove my Firefox personal data and customizations». This removes your Firefox user profile data (bookmarks, passwords, cookies, extensions, preferences, etc.). DO NOT select this option if you want to keep your Firefox profile data and settings. This option has been removed in Firefox 31 so, if you wish to remove your Firefox user profile data, you will need to do it manually (see below for instructions). [5]
Even if the uninstall fails, as it may in some cases, continue on with the rest of the uninstall instructions.
- Delete the Firefox Installation directory located here, by default: C:\Program files\Mozilla Firefox or, on 64-bit Windows, C:\Program Files (x86)\Mozilla Firefox (Optionally make a backup copy of the «plugins» or «browser/plugins» subfolder first, since it may contain the Windows Media Player Firefox plugin and/or other plugin files, so that you can restore it later if you plan on reinstalling Firefox.)
- If necessary, remove the «Mozilla Firefox» shortcuts in the Windows Start -> Programs menu by right-clicking and deleting the entries. This step should not be needed unless the Firefox uninstall from the Windows Control Panel failed.
- (Optional) Delete the following additional files or folders (recommended if you are preparing for a clean reinstall):
- Windows XP and above: Delete all C:\WINDOWS\Prefetch\FIREFOX* files
- Folders containing temporary Firefox data ( *.mfl files, Cache and Updates), which would be located here, if not removed by the uninstall process (you’ll need to show hidden files and folders): Important: Make sure you delete the folder(s) under Local Settings or Local. Deleting the wrong folder will remove your user profile data!
- Windows 2000/XP: C:\Documents and Settings\<username>\Local Settings\Application Data\Mozilla\Firefox
- Windows Vista and above: C:\Users\<username>\AppData\Local\Mozilla\Firefox and C:\Users\<username>\AppData\Local\Mozilla\updates [6] and/or C:\Users\<username>\AppData\Local\VirtualStore\Program Files\Mozilla Firefox (if found) [7]
The Firefox uninstall will leave behind some Windows registry entries. Normally, these extra entries are harmless and it is not necessary to remove them. Note: Registry editing is a potentially hazardous undertaking. Also avoid using 3rd party uninstallers (e.g. Revo uninstaller) since these tools can sometimes do more harm than good! [8]
You may also need to manually change some Windows file associations or icons, even after setting a new default browser, as reported here.
Removing user profile data
Note: In Firefox 30 and below on Windows, you can use the Firefox uninstaller option, «Remove my Firefox personal data and customizations» (see above) instead of following these instructions.
This step is only recommended if you want to completely remove Firefox from your system, and you do not want to save any of your data. This will remove your Firefox user profile data, which includes bookmarks, passwords, cookies, preference settings and added extensions.
Rename (or delete) the Firefox folder in the default profile path (or move it to a backup location). For example, on Windows 7, press «Windows key + R» to open the Run box
(or, you can click «Start → Run…» on Windows XP). In the Run box, type in %APPDATA% and click OK, then open the «Mozilla» folder and rename the «Firefox» folder.
Caution: Make sure that you rename or delete the entire Firefox profile folder, which includes the profiles.ini file that keeps track of profiles. Do not simply rename or delete the profile folder that contains your user data, as doing so can result in a profile cannot be loaded or a «profile in use»/»already running» message when you next attempt to run Firefox (bug 278860).
See also
- Go back to an old version of Firefox
- Go back to an old version of Thunderbird
- Bug 338752 — Firefox will not uninstall using the uninstall/install utility in WindowsME Control Panel
- Bug 330885 — uninstaller hangs waiting for parent process to disappear
- Bug 398434 – Provide option to remove profiles during uninstall
- Bug 432017 — Selecting remove personal data description text should clearly state that it removes *all* Firefox personal data
Introduction
Removing Firefox from your Windows 10 computer may become necessary for various reasons, such as troubleshooting issues, freeing up disk space, or switching to a different web browser. While uninstalling the application itself is a straightforward process, completely removing all associated data and settings requires a more thorough approach. This article will guide you through the steps to completely remove Firefox from your Windows 10 system, ensuring that no residual files or registry entries are left behind.
By following the steps outlined in this guide, you can effectively eliminate all traces of Firefox from your computer, thereby optimizing its performance and ensuring a clean slate for future installations or usage of alternative web browsers. Whether you’re a tech-savvy user looking to perform a meticulous cleanup of your system or a novice seeking clear instructions, this comprehensive tutorial will equip you with the knowledge and tools needed to accomplish the task with confidence.
Uninstalling Firefox from Windows 10 is just the first step in the process. To ensure that all remnants of the browser are eradicated, it’s essential to delve deeper into your system and eliminate any residual data and settings. This meticulous approach not only frees up valuable storage space but also prevents potential conflicts or errors that may arise from incomplete removal. Additionally, cleaning up any lingering registry entries associated with Firefox is crucial for maintaining the overall stability and performance of your Windows 10 system.
In the following sections, we will explore the step-by-step process of uninstalling Firefox from Windows 10, removing its data and settings, and cleaning up any remaining registry entries. By meticulously following these instructions, you can achieve a thorough and effective removal of Firefox, leaving your Windows 10 system pristine and ready for your next browsing adventure.
Uninstalling Firefox from Windows 10
Uninstalling Firefox from your Windows 10 computer is a relatively simple process that can be accomplished through the built-in Windows settings. To begin, navigate to the «Settings» app by clicking on the Start menu and selecting the gear icon. From the Settings menu, choose «Apps» to access the list of installed applications on your system.
Scroll through the list of installed apps to locate «Mozilla Firefox.» Once you’ve found it, click on the entry to reveal the «Uninstall» button. Clicking «Uninstall» will initiate the removal process, prompting a confirmation dialog to ensure that you want to proceed with uninstalling Firefox.
Upon confirming the uninstallation, Windows will begin removing Firefox from your system. This process may take a few moments, depending on the speed of your computer and the amount of data associated with the application. Once the uninstallation is complete, you will receive a notification indicating that Firefox has been successfully removed from your Windows 10 computer.
It’s important to note that uninstalling Firefox through the Windows settings primarily removes the application itself, but it may not eliminate all associated data and settings. To ensure a thorough removal of Firefox from your system, including its residual files and settings, it’s essential to proceed with the subsequent steps outlined in this guide.
By following these instructions, you can confidently uninstall Firefox from your Windows 10 computer, paving the way for a more comprehensive cleanup process. With the application successfully uninstalled, you are now ready to proceed to the next crucial steps of removing Firefox’s data and settings, as well as cleaning up any remaining registry entries to achieve a complete eradication of the browser from your Windows 10 system.
Removing Firefox Data and Settings
Once you have uninstalled Firefox from your Windows 10 system, it’s essential to address the residual data and settings that may still linger on your computer. This step is crucial for achieving a thorough removal of Firefox and ensuring that no remnants of the browser impact your system’s performance or interfere with future installations.
Clearing AppData and LocalAppData
To begin the process of removing Firefox’s data and settings, you’ll need to navigate to the AppData and LocalAppData folders on your Windows 10 computer. These folders contain application-specific data and settings, including those associated with Firefox. To access these folders, press the Windows key + R to open the Run dialog, then type «%appdata%» and «%localappdata%» (without quotes) and press Enter.
Within the AppData and LocalAppData folders, locate the Mozilla folder and delete it to remove any remaining Firefox data and settings. This action ensures that no residual configuration files or user data from Firefox are left behind, contributing to a more thorough cleanup of your system.
Removing Profile Data
Firefox stores user-specific data, such as bookmarks, browsing history, and preferences, within individual profiles. To completely remove this data, open File Explorer and navigate to the following directory: C:\Users\YourUsername\AppData\Roaming\Mozilla\Firefox\Profiles. Within the Profiles folder, delete any remaining profile folders associated with Firefox to eliminate all user-specific data and settings.
By removing the profile data, you effectively erase any personalized information and configurations linked to Firefox, further enhancing the completeness of the browser’s removal from your Windows 10 system.
Cleaning Up Registry Entries
In addition to clearing out the application and user data, it’s important to address any registry entries associated with Firefox. While the Windows Registry is a sensitive area of the operating system, removing obsolete or leftover entries related to Firefox can contribute to a more pristine system environment.
To clean up registry entries, you can utilize reputable third-party registry cleaning tools or manually navigate to the Windows Registry using the regedit command. Exercise caution when modifying the registry, as improper changes can adversely affect your system’s stability.
By meticulously following these steps to remove Firefox’s data and settings, you can achieve a comprehensive eradication of the browser from your Windows 10 system. This meticulous approach not only ensures a clean slate for future browser usage but also contributes to the overall optimization and stability of your computer.
With Firefox’s data and settings effectively removed, your Windows 10 system is now primed for a fresh start, devoid of any lingering traces of the browser.
Cleaning Up Registry Entries
Cleaning up registry entries associated with Firefox is a crucial step in ensuring a thorough removal of the browser from your Windows 10 system. The Windows Registry serves as a centralized database that stores configuration settings and options for the operating system, installed applications, and user preferences. While the registry is a sensitive component of the Windows environment, addressing obsolete or residual entries related to Firefox can contribute to a cleaner and more optimized system.
To begin the process of cleaning up registry entries, you can utilize reputable third-party registry cleaning tools that are designed to scan for and remove redundant or invalid entries. These tools offer a convenient and automated approach to identifying and addressing registry issues, including those associated with uninstalled applications such as Firefox. By leveraging the capabilities of these tools, you can streamline the cleanup process and mitigate the risk of manual errors when modifying the registry.
Alternatively, if you prefer a more hands-on approach, you can manually navigate to the Windows Registry using the regedit command. It’s important to exercise caution and precision when modifying the registry, as inadvertent changes can potentially impact the stability and functionality of your Windows 10 system. Before making any modifications, it’s advisable to create a backup of the registry to safeguard against unforeseen complications.
Once within the Windows Registry, you can navigate to specific registry hives and keys associated with Firefox. This may include entries related to the application’s installation path, settings, file associations, and other configurations. By identifying and removing these obsolete entries, you can effectively declutter the registry and eliminate any remnants of Firefox that may persist after the application’s uninstallation.
It’s worth noting that while cleaning up registry entries can contribute to a more streamlined and organized registry, the impact on system performance may be marginal. However, from a maintenance and housekeeping perspective, addressing residual registry entries aligns with best practices for optimizing the overall health of your Windows 10 system.
By meticulously following these steps to clean up registry entries, you can complement the thorough removal of Firefox from your Windows 10 system, contributing to a more pristine and well-maintained computing environment. This meticulous approach not only ensures a clean slate for future installations and system operations but also aligns with proactive measures to uphold the integrity and efficiency of your Windows 10 system.
Conclusion
In conclusion, the process of completely removing Firefox from a Windows 10 system involves more than just uninstalling the application through the standard Windows settings. By following the comprehensive steps outlined in this guide, you can ensure a thorough eradication of Firefox, including its associated data, settings, and registry entries. This meticulous approach not only contributes to a cleaner and more optimized system but also sets the stage for a fresh start, whether you intend to switch to a different web browser or perform a system cleanup.
Uninstalling Firefox from Windows 10 is just the initial step in the process. Once the application is uninstalled, it’s essential to address the residual data and settings that may linger on the system. This includes clearing out the AppData and LocalAppData folders, removing profile data, and addressing any lingering registry entries associated with Firefox. By meticulously following these steps, you can achieve a comprehensive removal of the browser, leaving your Windows 10 system free from any remnants that could potentially impact its performance or stability.
Furthermore, the meticulous cleanup of Firefox from your Windows 10 system not only ensures a clean slate for future browser usage but also aligns with best practices for system maintenance and optimization. By eliminating obsolete data and registry entries, you contribute to a more streamlined and organized computing environment, potentially mitigating the risk of conflicts or errors that may arise from incomplete removal.
It’s important to note that while the steps outlined in this guide offer a thorough approach to removing Firefox from Windows 10, exercising caution and precision is paramount, particularly when modifying the Windows Registry. Always ensure that you have a backup of critical data and settings before making any modifications, and consider leveraging reputable third-party tools for registry cleanup to streamline the process and minimize the risk of errors.
By following the guidance provided in this tutorial, you can confidently navigate the process of completely removing Firefox from your Windows 10 system, empowering you to maintain a pristine and well-optimized computing environment. Whether you’re seeking to troubleshoot issues, reclaim disk space, or transition to a different web browser, the meticulous removal of Firefox ensures that your Windows 10 system is ready for the next chapter in its digital journey.