
Applies ToOffice 2024 Office 2021 Office 2019 Office 2016 Microsoft 365 для дома Microsoft365.com Office для бизнеса Office 365 для малого бизнеса Администратор Microsoft 365 Служба Office 365, предоставляемая 21Vianet служба Office 365 для малого бизнеса, предоставляемая 21Vianet — для администраторов Служба Office 365, предоставляемая 21Vianet, — для администраторов Office 365 Germany корпоративный Office 365 Germany корпоративный для администраторов
Ниже приведены пошаговые инструкции по удалению продуктов Microsoft 365 с ПК (ноутбука, настольного компьютера или трансформера 2-в-1). Если вы хотите удалить Office с компьютера Mac, см. статью Удаление Office для Mac.
Совет: При удалении Microsoft 365 с компьютера удаляются только приложения Microsoft 365, при этом файлы, документы и книги, созданные с помощью этих приложений, остаются.
Удаление Microsoft 365 для вашего типа установки
Действия по удалению Microsoft 365 зависят от вашего типа установки. Наиболее распространенные типы установки: по технологии «нажми и работай» и с помощью установщика Microsoft Windows (MSI). Другой тип — это установка Microsoft 365 из приложения Microsoft Store.
Выберите ниже вкладку Технология «нажми и работай» или MSI или Microsoft Store и следуйте инструкциям по удалению для вашего типа установки.
Не знаете, какой у вас тип установки?
Откройте приложение Microsoft 365, чтобы проверить тип установки
Примечание: Если не удается открыть приложение для проверки типа установки, сначала попробуйте выполнить действия по удалению распространенного типа установки «нажми и работай» или MSI.
-
Создайте или откройте существующий файл и выберите Файл > Учетная запись (этот элемент также может называться Учетная запись Office).
-
В разделе сведений о продукте найдите кнопку О программе и проверьте наличие следующих элементов:
Технология «нажми и работай»

Для установок по технологии «нажми и работай» указана версия и номер сборки, а также фраза нажми и работай.
Следуйте приведенным ниже инструкциям для технологии «нажми и работай» или MSI.
MSI
Установки MSI не содержат версии и номера сборки.
Следуйте приведенным ниже инструкциям для технологии «нажми и работай» или MSI.
Microsoft Store
Для установок из Microsoft Store указана версия и номер сборки, а также фраза Microsoft Store.
Если вы используете этот тип установки, выберите вкладку Microsoft Store.

Если вы использовали установку типа «нажми и работай» или MSI, удалите Microsoft 365 через панель управления или скачайте средство поддержки удаления.
Удаление Microsoft 365 или Office из панель управления
-
Нажмите клавишу с логотипом Windows (или выберите панель поиска на панели задач) и введите панель управления. Выберите панель управления в списке результатов.
-
Выберите Программы > Программы и компоненты. Выберите продукт Microsoft 365 и нажмите кнопку Удалить.
-
Совет: Если вы устанавливали приложения Microsoft 365 как часть набора, например Office для дома и учебы или Microsoft 365, найдите имя этого набора. Чтобы найти отдельное приложение, выполните поиск по его имени, например Project или Visio.
В большинстве случаев нельзя удалить отдельное приложение, если оно включено в набор приложений Microsoft 365. Приложения можно удалять по отдельности, только если они были приобретены не в наборе.
-
Следуйте указаниям, чтобы завершить удаление.
Примечание: Если Microsoft 365 не указан в панели управления, возможно, вы использовали установку из Microsoft Store. Вместо этого выберите вкладку Microsoft Store выше и следуйте указанным в ней инструкциям по удалению.
-
Чтобы переустановить Microsoft 365, см. статью Установка или переустановка Office на ПК.
Удаление Microsoft 365 илиOffice с помощью средства устранения неполадок удаления
Чтобы удалить Microsoft 365, Office 2021, Office 2019 или Office 2016 с компьютера с Windows, используйте средство устранения неполадок с удалением.
-
Чтобы запустить средство устранения неполадок с удалением, нажмите расположенную ниже кнопку.
Удалить
-
Если появится всплывающее окно с сообщением, что этот сайт пытается открыть окно получения помощи, нажмите кнопку Открыть.
-
Следуйте указаниям и при появлении запроса перезагрузите компьютер.
-
Выберите действия для версии Office, которую нужно установить или переустановить.
Microsoft 365 | Office 2024 | Office 2021 | Office 2019 | Office 2016
Важно:
-
Средство устранения неполадок удаления в настоящее время не может удалить Office 2024.
-
Запустите средство устранения неполадок на том же компьютере Windows с продуктом Microsoft 365 или Office, который требуется удалить.
-
Чтобы запустить средство устранения неполадок, необходимо использовать Windows 10 или более поздней версии.
Совет: Если средство устранения неполадок Microsoft 365 не полностью удаляет Microsoft 365 или Office с компьютера, можно попытаться удалить Office вручную.
Совет: Если вы владелец малого бизнеса и хотите получить дополнительные сведения о настройке Microsoft 365, посетите раздел Справка и обучение для малого бизнеса.
Нужна дополнительная помощь?
Нужны дополнительные параметры?
Изучите преимущества подписки, просмотрите учебные курсы, узнайте, как защитить свое устройство и т. д.
Все способы:
- Способ 1: «Параметры»
- Способ 2: «Панель управления»
- Очистка реестра
- Ручное удаление остаточных файлов
- Способ 3: Утилита Microsoft Support and Recovery Assistant
- Способ 4: Специализированный софт
- Вопросы и ответы: 1
Способ 1: «Параметры»
Office 365 – это комплект офисных приложений от компании Microsoft, который доступен в рамках платной подписки на использование продуктов компании. Она включает в себя использование офисных программ сразу на нескольких устройствах, выделенный объем в фирменном облачном хранилище OneDrive и дополнительные возможности Skype, позволяющие с этой подпиской бесплатно звонить на стационарные телефоны. Есть несколько способов полностью удалить программное обеспечение, и один из наиболее простых заключается в использовании штатных «Параметров»:
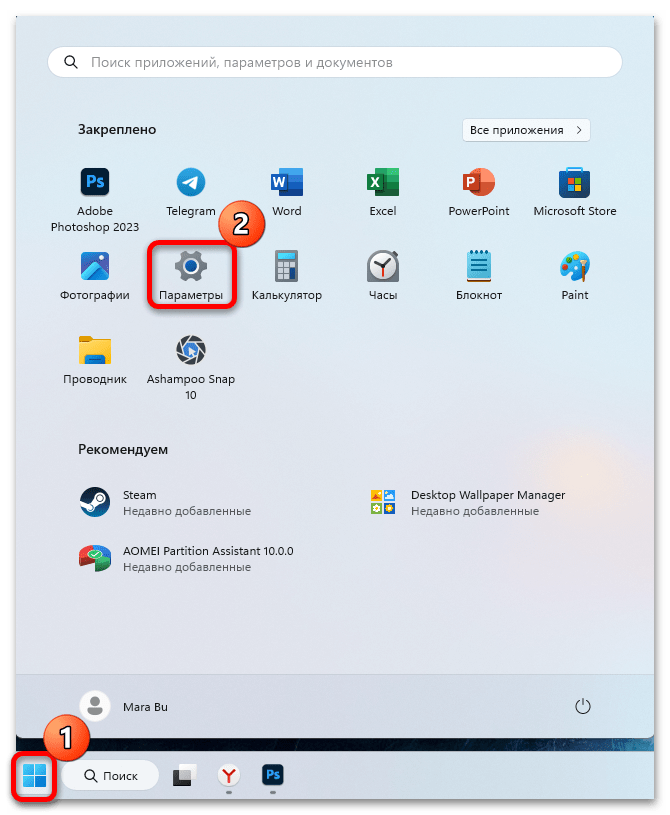
- Нажмите на кнопку «Пуск» и из появившегося меню выберите «Параметры».
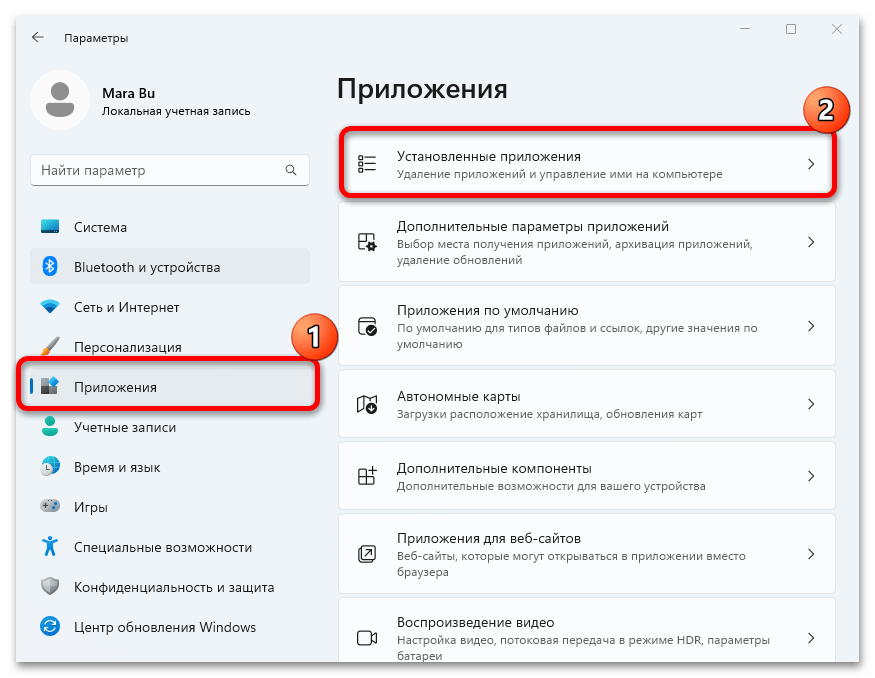
- Переключитесь на вкладку «Приложения» на панели слева, затем в центральной части окна кликните по строке «Установленные приложения».
- В списке инсталлированного софта отыщите «Office 365», кликните по трем горизонтальным точкам справа и из контекстного меню выберите удаление.
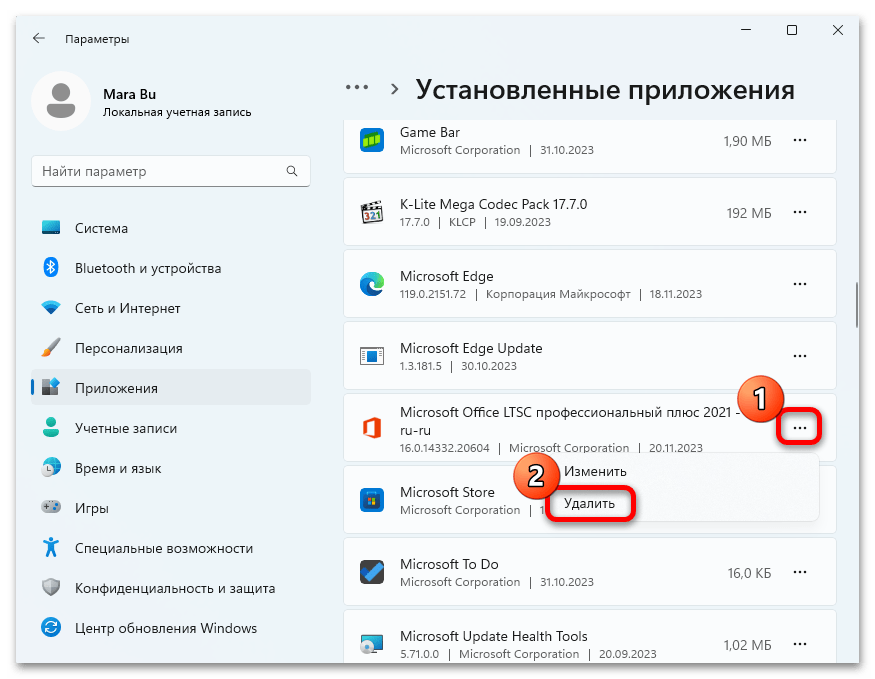
Запустится пошаговый мастер деинсталляции. Выполняйте процедуру в соответствии с инструкцией, в результате чего программный пакет будет удален из системы. Если вы удаляете Офис для переустановки по причине того, что сейчас он нестабильно работает, следует учитывать, что после такой деинсталляции от приложения могут оставаться следы, поэтому рекомендуем перейти к разделам «Очистка реестра» и «Ручное удаление остаточных файлов», чтобы полностью стереть все данные, связанные с этим ПО.
Способ 2: «Панель управления»
Также можно воспользоваться классической «Панелью управления», которая в ранних выпусках операционной системы была основным средством управления. В Windows 11 она все еще присутствует и удаляет приложения точно так же, как и современный аналог — «Параметры».
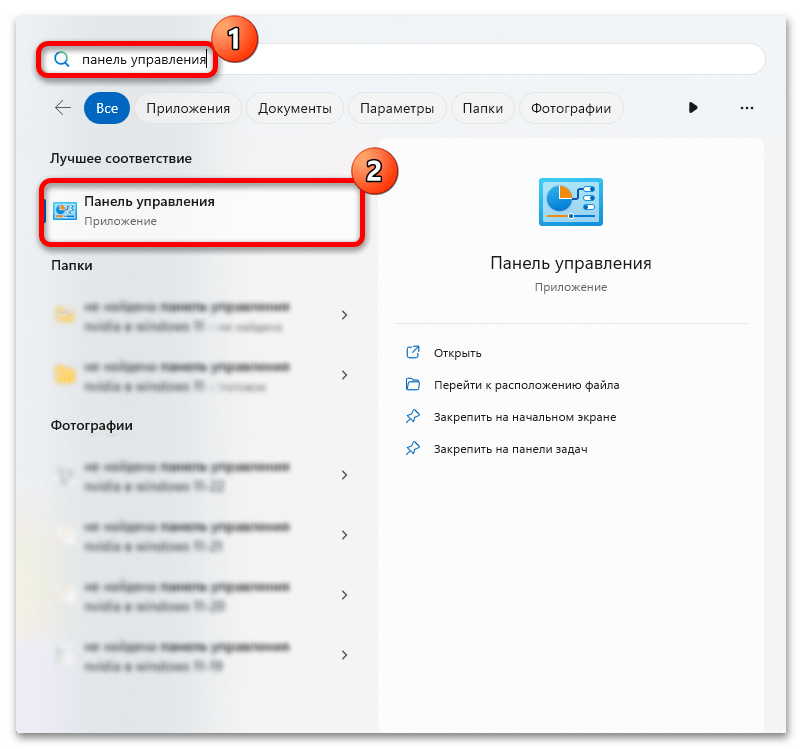
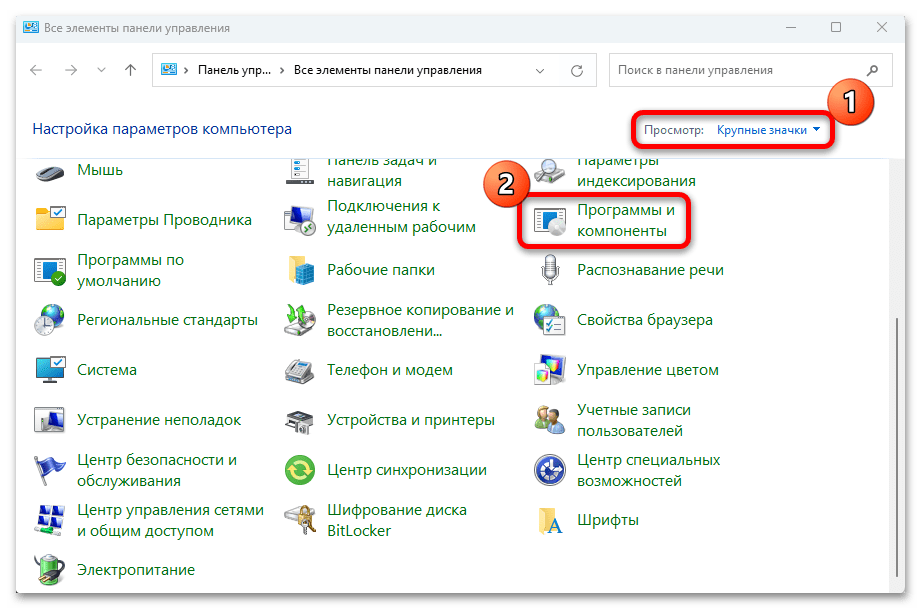
- Нажмите на «Пуск» и в строке системного поиска начните набирать «панель управления» – ниже появится нужный результат, по которому и кликните.
- Если в строке «Просмотр» у вас установлен режим «значки», перейдите в «Программы и компоненты». Если «категория» — в «Удаление программы».
- Появится список всех установленных программ – найдите «Office 365», выделите строку и выберите кнопку «Удалить» вверху.
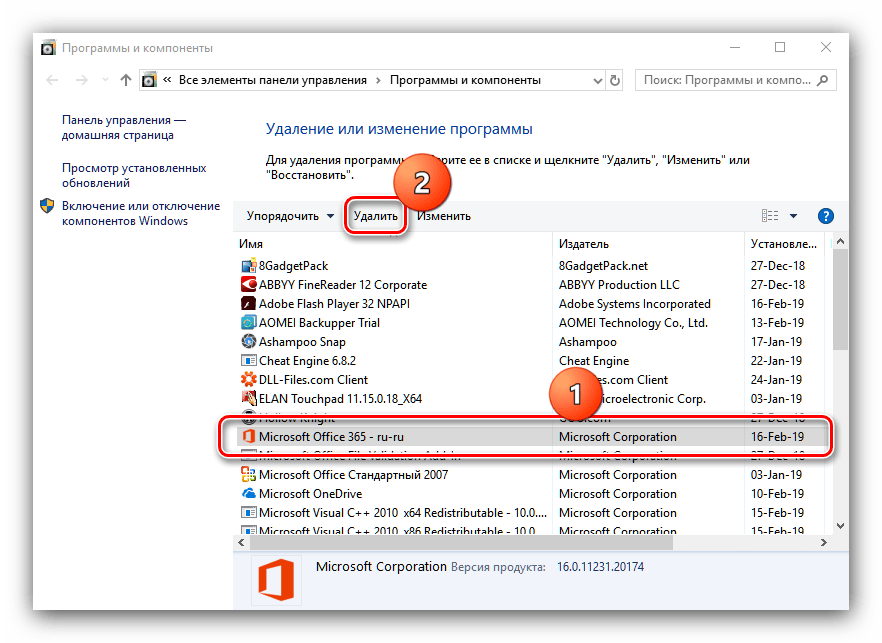
Так же, как и в предыдущем способе, будет запущен пошаговый мастер удаления, но для полной очистки лучше перейти к следующим разделам и удалить все связанные с ПО данные из системного реестра и памяти системы.
Очистка реестра
Даже после удаления программного пакета с помощью пошагового мастера высока вероятность, что остаточные файлы и параметры в реестре остались. Предлагаем руководство, как почистить следы, связанные с программой, вручную удалив соответствующие параметры из системного реестра.
Чистить реестр нужно после того, как программа была удалена с помощью стандартных средств, поскольку, если сделать это предварительно, может возникнуть сбой при попытке запустить пошаговый мастер деинсталляции.
- Нажмите на клавиши «Win + R», затем в диалоговом окне «Выполнить» введите команду
regeditи нажмите на кнопку «ОК», чтобы вызвать «Редактор реестра». - В адресную строку сверху вставьте такой путь —
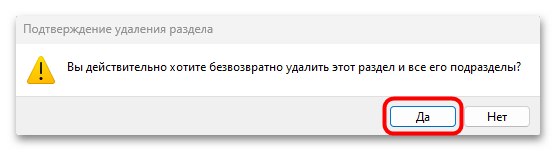
Компьютер\HKEY_LOCAL_MACHINE\SOFTWARE\Microsoft\Office. Также можно перейти к соответствующей ветке через панель слева. В подразделе «Office» изучите содержимое. Если там есть папки с цифровыми обозначениями («16.0», «15.0» или «14.0»), то следует их удалить. Для этого кликните по одной из них правой кнопкой мыши и выберите пункт «Удалить». - И подтвердите действие в новом окне.

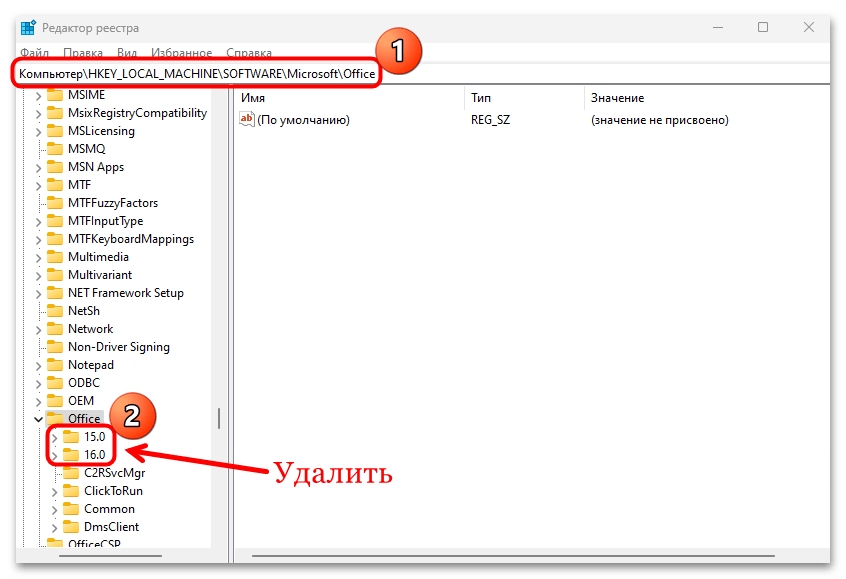
Если таких каталогов несколько, проделайте то же самое с каждым из них, затем перезагрузите компьютер.
Ручное удаление остаточных файлов
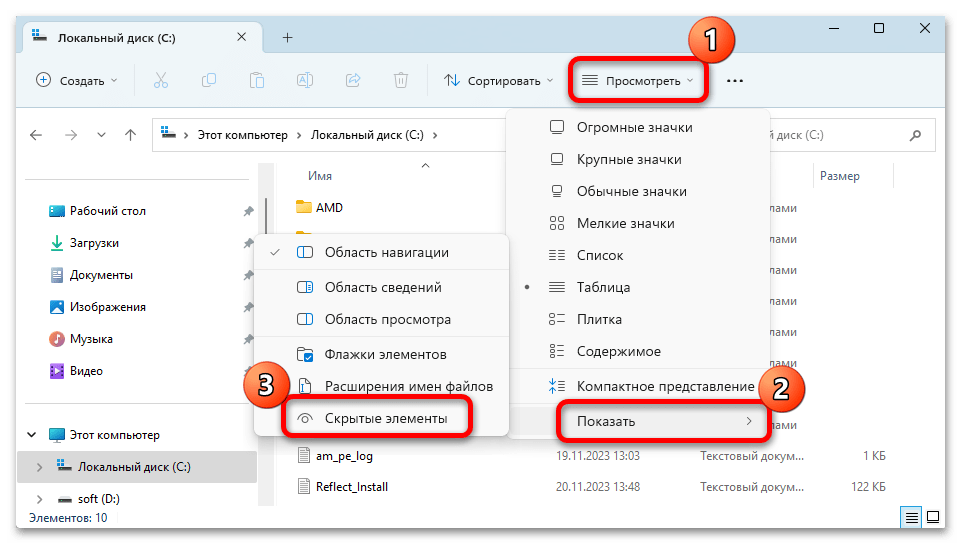
Также следует вручную стереть содержимое одной из папок каталога «AppData», где хранятся пользовательские данные, связанные с программным пакетом Office 365. Поскольку раздел скрыт, сначала нужно включить отображение скрытых элементов:
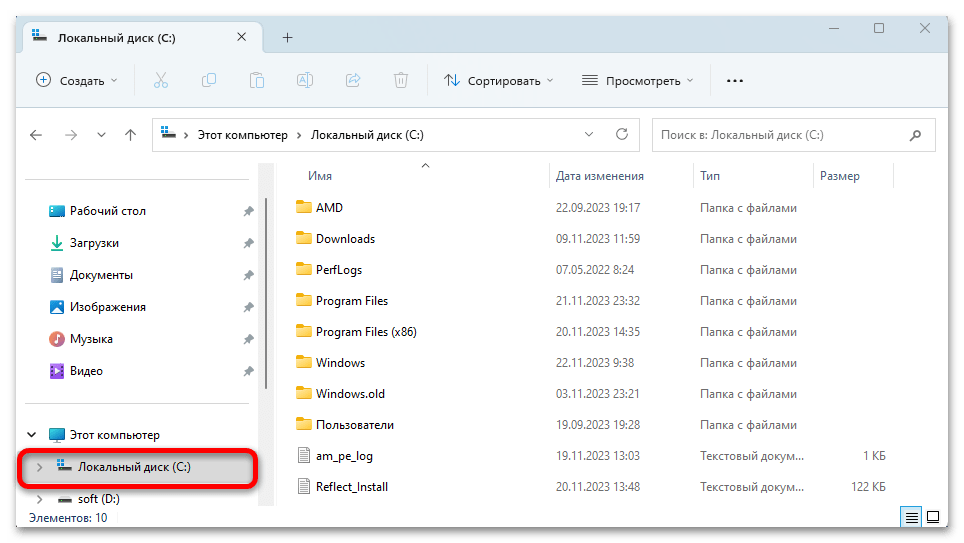
- Запустите «Проводник», затем перейдите в «Локальный диск (C:)».
- Кликните по кнопке «Просмотреть», расположенной на верхней панели, затем наведите курсор на пункт «Показать» и выберите «Скрытые элементы».
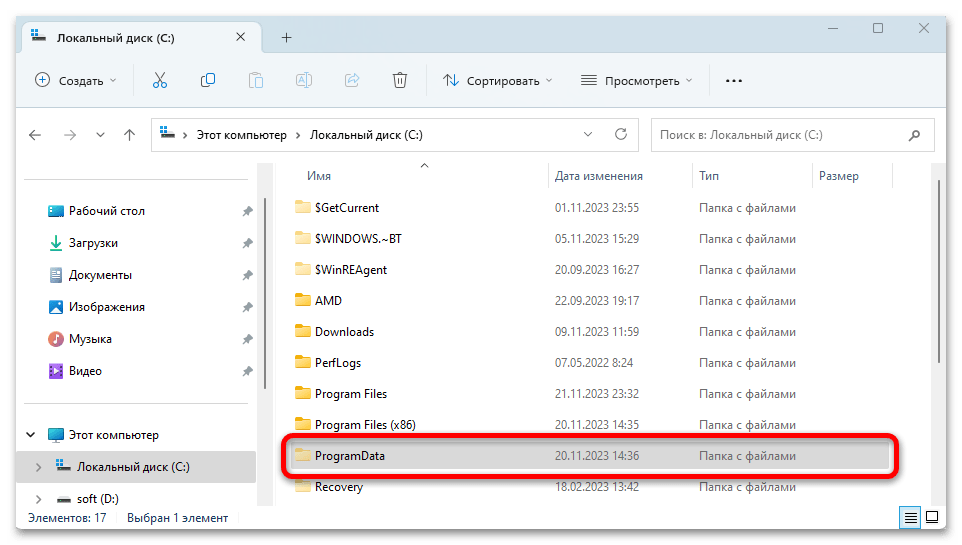
- Затем откройте скрытую папку «ProgramData» — если в ней есть каталог, связанный с Office 365, удалите его.
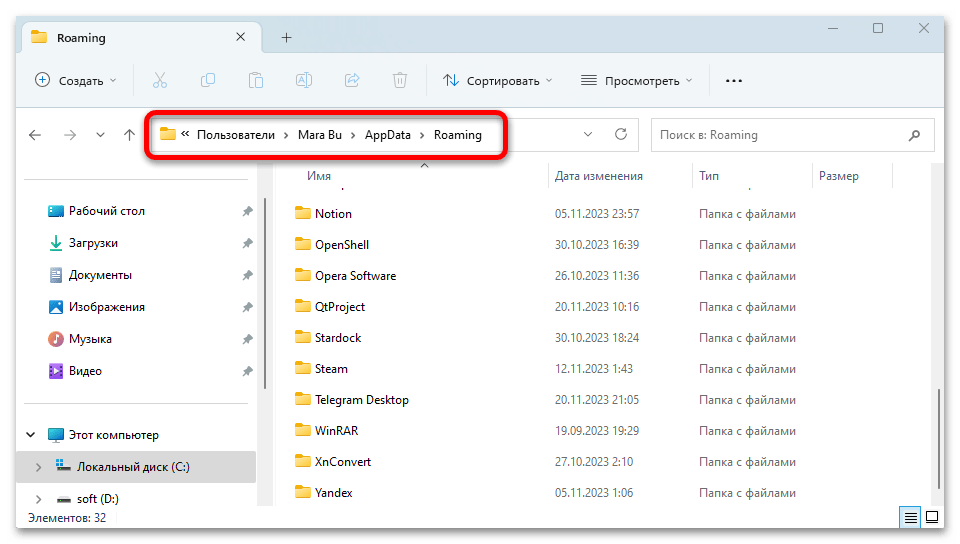
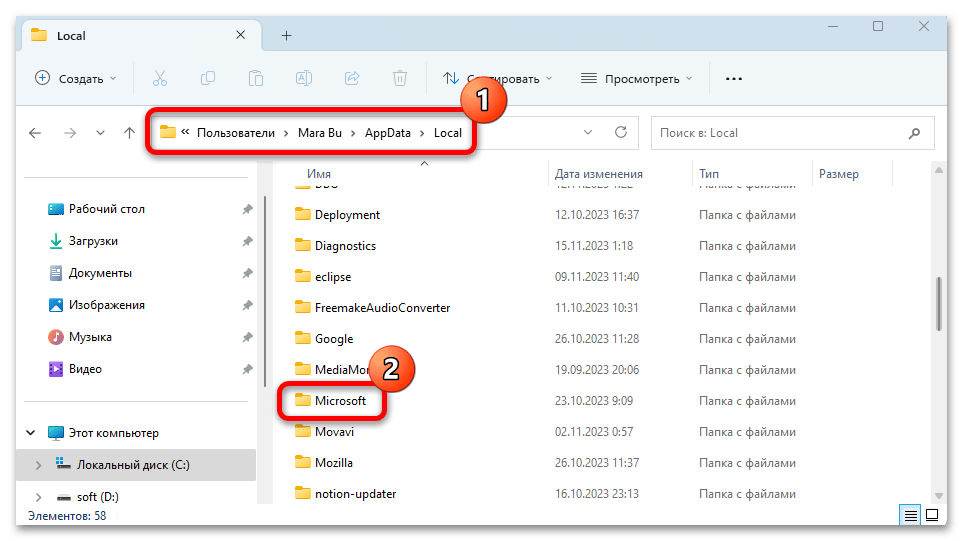
- Далее перейдите по пути
C:\Users\Имя_пользователя\AppData\Roamingи также удалите папку, которая связана с программным пакетом. - Еще стоит проверить, есть ли внутри каталога «Microsoft», который располагается по адресу
C:\Users\Имя_пользователя\AppData\Local, папки, оставшиеся после удаленной программы.
Так как после удаления Office 365 стандартными способами остаточные файлы продолжают храниться в скрытых директориях на системном диске, ручное удаление этих данных поможет в будущем избежать конфликтов при попытке установить другие аналогичные продукты или версии офисного пакета компании.
Способ 3: Утилита Microsoft Support and Recovery Assistant
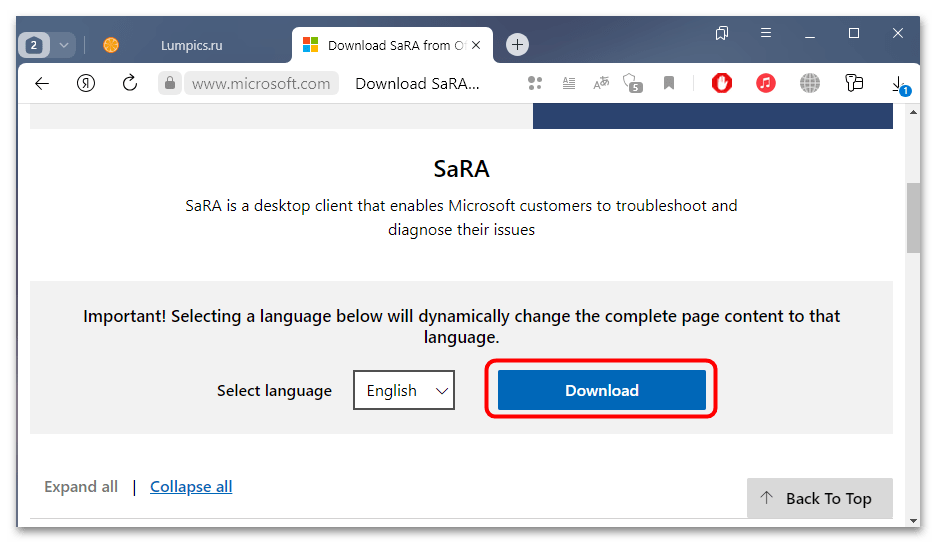
На официальном сайте Майкрософт представлена официальная утилита для полного удаления разного фирменного программного обеспечения, в частности Microsoft Office различных редакций и пакета Office 365.
- Попав на страницу сайта компании, нажмите по кнопке «Download», затем подтвердите скачивание в браузере.
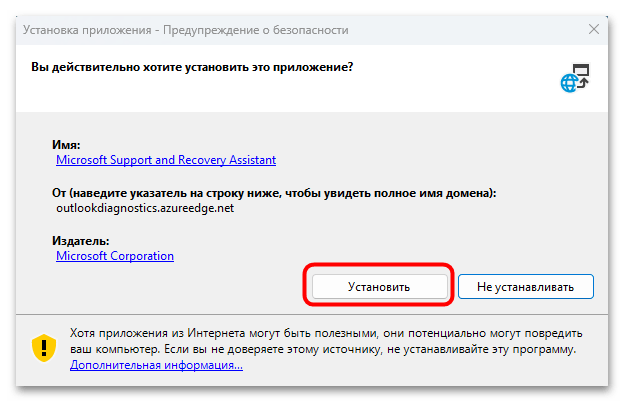
- Установите утилиту, запустив загруженный файл.
- После того как все необходимые компоненты будут распакованы и инсталлированы, ознакомьтесь с лицензионным соглашением и примите его.
- Из выпадающего меню выберите «Microsoft 365» и кликните по «Далее».


Останется дождаться окончания процедуры, а по завершении перезагрузить систему, нажав на соответствующую кнопку.
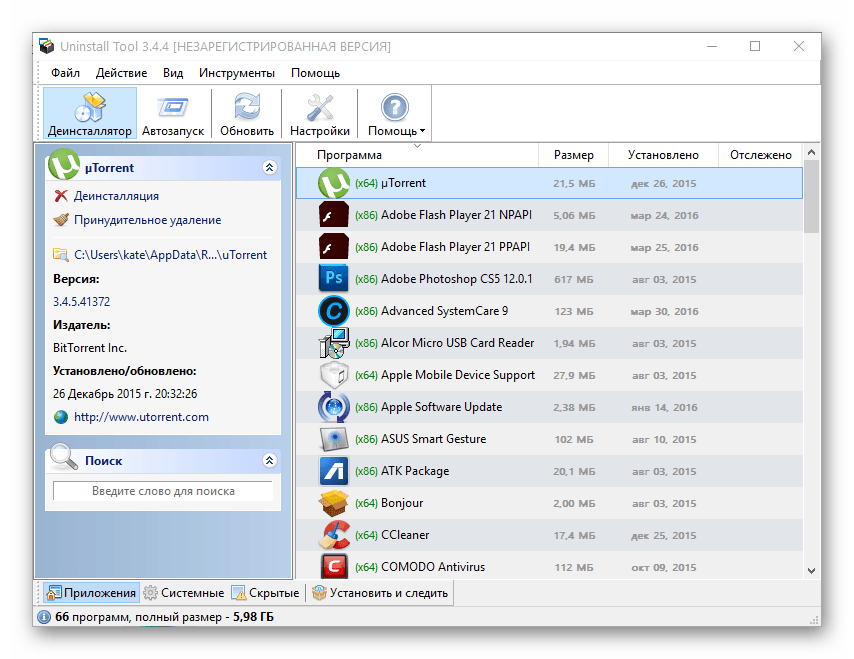
Способ 4: Специализированный софт
Для полного удаления различных программ разработан специализированный софт. Он способен самостоятельно очистить системный реестр и локальное хранилище от временных и остаточных данных, которые остались после использования ПО. Деинсталлировать пакет Office 365 можно с помощью самых разных продуктов из этой категории — мы уже разбирали несколько наиболее популярных и эффективных вариантов в отдельном обзоре на сайте.
Подробнее: Программы для удаления программ
На примере популярной программы Revo Uninstaller можете ознакомиться с тем, как выполняется подобная процедура.
Подробнее: Удаление программ с помощью Revo Uninstaller
Наша группа в TelegramПолезные советы и помощь
If you are using Office 365 on Windows 11 and are looking for a way to uninstall it, you have come to the right place. Uninstalling Office 365 from your computer can be necessary for various reasons, such as upgrading to a newer version or switching to a different productivity suite. Whatever the reason may be, this step-by-step guide will walk you through the process of uninstalling Office 365 on Windows 11.
Step 1: Open the Start menu on your Windows 11 computer.
Step 2: Locate the “Office 365” app in the list of installed applications.
Step 3: Right-click on the “Office 365” app and select “Uninstall” from the context menu.
Step 4: A pop-up window will appear asking if you are sure you want to uninstall Office 365. Confirm your decision by clicking “Uninstall.”
Step 5: Wait for the uninstallation process to complete. This may take a few minutes depending on the speed of your computer.
Note: If you have any unsaved work or documents open in Office 365, make sure to save them before proceeding with the uninstallation.
Step 6: Once the uninstallation is finished, you will receive a confirmation message. Click “Close” to exit the uninstaller.
Step 7: Restart your computer to complete the uninstallation process.
That’s it! You have successfully uninstalled Office 365 from your Windows 11 computer. If you ever decide to reinstall it in the future, you can do so by following the official Microsoft guidelines. Now you are ready to explore other productivity suites or upgrade to a newer version of Office. Happy computing!
Preparing for the uninstallation process
Before you begin the uninstallation process of Office 365 on Windows 11, there are a few things you need to consider:
- Backup your data: It’s always a good idea to back up any important files or documents before uninstalling Office 365. This ensures that you won’t lose any valuable information during the process.
- Sign out and deactivate licenses: If you have an active subscription or licenses associated with your Office 365 account, make sure to sign out of all Office applications and deactivate the licenses. This will prevent any issues or complications during the uninstallation.
- Check for any dependencies: Office 365 may have dependencies with other software or applications installed on your system. Before proceeding with the uninstallation, ensure that there are no dependencies that might be affected.
- Disconnect from the internet: While it’s not mandatory, disconnecting from the internet during the uninstallation process can help ensure a smooth and uninterrupted operation. This prevents any possible interference from online services or updates.
- Keep your product key: If you purchased a copy of Office 365 and have a product key, make sure to keep it handy. You might need it if you decide to reinstall Office or activate it on another computer.
By following these steps and precautions, you can be well prepared for the uninstallation process of Office 365 on your Windows 11 system.
Backup important files and documents
Before uninstalling Office 365 from your Windows 11 computer, it is essential to back up any important files and documents to avoid potential data loss. This step ensures that you have a copy of all your important data, such as documents, spreadsheets, presentations, and emails, before proceeding with the uninstallation process.
To backup your important files:
Step 1: Identify the files to backup
Take some time to go through your personal folders and determine which files and documents you want to back up. This might include work-related files, personal photos, videos, or any other important data stored on your computer.
Step 2: Create a backup folder
Create a folder on an external hard drive, USB stick, or any other storage device where you can securely store your backup files. Name the folder something easily identifiable, like “Office 365 Backup.”
Step 3: Copy the files to the backup folder
Using the File Explorer, navigate to the location of your files, select the files you want to back up, right-click, and choose “Copy.” Then, go to the backup folder you created in the previous step, right-click, and choose “Paste” to copy the files into the backup folder.
Step 4: Verify the backup
After copying the files to the backup folder, double-check that all the necessary files are present. Verify that the file sizes and last modified dates match to ensure that the backup is complete and accurate.
| Important Tip |
|---|
| Remember to also back up any important data from cloud-based storage solutions like OneDrive or SharePoint. Download any needed files and save them to your backup folder before proceeding with the uninstallation. |
By following these steps, you can ensure that your important files and documents are safely backed up before uninstalling Office 365 from your Windows 11 computer. This precautionary measure will give you peace of mind knowing that your data is secure and can be easily restored if needed.
Close all Office 365 applications
In order to successfully uninstall Office 365 on Windows 11, it is important to close all open Office 365 applications. This includes programs such as Word, Excel, PowerPoint, and Outlook.
Step 1: Save your work and close any unsaved documents
Before closing the applications, make sure to save any work you have open in these programs. This will prevent any loss of data or unsaved changes.
Step 2: Close Office 365 applications
To close the Office 365 applications, follow these steps:
- Click on the “File” tab located in the upper left corner of the application.
- Select “Exit” or “Close” from the drop-down menu.
Repeat this process for each Office 365 application that is currently open on your Windows 11 computer.
By closing all Office 365 applications, you ensure that there are no active processes running in the background that may interfere with the uninstallation process.
Accessing the Control Panel
To begin the process of uninstalling Office 365 on Windows 11, you will need to access the Control Panel. The Control Panel provides you with access to various settings and features on your computer, including the ability to uninstall programs.
To access the Control Panel, follow these steps:
- Click on the Start menu located at the bottom left corner of your screen.
- In the Start menu, search for “Control Panel” using the search bar at the top.
- Click on the Control Panel app that appears in the search results.
Alternatively, you can also access the Control Panel through the Windows Settings. To do this, follow these steps:
- Click on the Start menu and then click on the gear icon to open Windows Settings.
- In the Windows Settings window, click on the “System” category.
- In the left sidebar, click on the “Apps & features” option.
- On the right side of the window, click on the “Programs and Features” link under the “Related settings” section.
Once you have accessed the Control Panel through either method, you will be able to proceed with the uninstallation process for Office 365.
Navigating to the Programs and Features section
To uninstall Office 365 from your Windows 11 computer, you will need to navigate to the Programs and Features section in the Control Panel. The Programs and Features section contains a list of all the applications installed on your computer, allowing you to easily uninstall them.
Here is how you can navigate to the Programs and Features section:
- Click on the Start menu icon in the taskbar to open the Start menu.
- Locate and click on the Settings icon, which is represented by a gear-shaped icon.
- In the Settings window, click on the System category.
- On the left side of the System category, click on the Apps & features option.
- On the right side of the Apps & features page, click on the Programs and features link under the Related settings section.
Once you have completed these steps, you will be taken to the Programs and Features section in the Control Panel, where you can proceed to uninstall Office 365 from your Windows 11 computer.
Locating Office 365 in the list of installed programs
In order to uninstall Office 365 on Windows 11, you will first need to locate it in the list of installed programs. Follow these steps to find Office 365:
- Click on the “Start” button in the bottom left corner of your screen.
- Type “Control Panel” in the search bar and select “Control Panel” from the results.
- In the Control Panel window, click on the “Programs” category.
- Under the “Programs and Features” section, click on “Uninstall a program”.
- A list of installed programs will appear. Scroll through the list to find “Office 365”.
- If you have multiple versions of Office 365 installed, look for the specific version you want to uninstall.
Once you have located Office 365 in the list of installed programs, you can proceed with the uninstallation process.
Selecting Office 365 for removal
To uninstall Office 365 on Windows 11, follow these steps:
- Open the Control Panel by searching for it in the Start menu.
- Click on Programs to view the list of installed programs.
- Scroll through the list and locate Microsoft Office 365.
- Select Microsoft Office 365 and click Uninstall at the top of the list.
- Follow the prompts to confirm the uninstallation process.
By following these steps, you can easily select and remove Office 365 from your Windows 11 computer. Once the uninstallation process is complete, you will no longer have Office 365 installed on your system.
Reviewing the uninstallation options
When it comes to removing Office 365 from your Windows device, there are several options available to you. Whether you’re looking for a quick uninstallation or a more thorough removal, Windows provides a range of methods to suit your needs.
Uninstalling through the Control Panel:
If you prefer a traditional approach, you can uninstall Office 365 using the Control Panel. Simply navigate to the “Programs and Features” section, locate Microsoft Office 365 in the list of installed programs, and select the “Uninstall” option. This method is suitable if you want a straightforward removal without any additional steps.
Using the Office Uninstall Support Tool:
If you encounter any issues with the standard uninstallation process or want to ensure a complete removal of Office 365, you can use the Office Uninstall Support Tool. This tool is designed to thoroughly remove all Office files and settings from your Windows system. It can help resolve any lingering issues and provide a clean slate for reinstalling Office or using alternative productivity suites.
Automated uninstallation with third-party software:
For those who prefer a more automated process, there are various third-party uninstallation tools available. These tools can streamline the uninstallation process, saving you time and effort. However, it’s crucial to choose a reliable and reputable tool to ensure a safe and thorough removal.
Regardless of the method you choose, be sure to back up any files or data you may need from Office 365 before proceeding with the uninstallation. Once uninstalled, you can explore other productivity software options or reinstall Office as needed.
Confirming the removal of Office 365
Before proceeding with the uninstallation process, it is important to confirm that you want to remove Office 365 from your Windows 11 system. This step ensures that you are aware of the consequences and are ready to proceed with the removal.
Step 1: Backup your files
Before uninstalling Office 365, it is recommended to create a backup of all your important files and documents. This step ensures that you don’t accidentally lose any important data during the removal process. You can backup your files by copying them to an external storage device or uploading them to cloud storage services.
Step 2: Close all Office 365 applications
Make sure that all Office 365 applications are closed before proceeding with the uninstallation. This step ensures that any unsaved data or work in progress is not lost during the removal process. Close all open documents, save your work, and exit any Office 365 programs running in the background.
Note: If you are unsure about which applications are part of Office 365, you can check the list of installed programs in the Control Panel or the Apps & Features settings in Windows 11.
Once you have completed these steps, you are ready to confirm the removal of Office 365 from your Windows 11 system.
Uninstalling Office 365
If you no longer need Office 365 on your Windows system, you can uninstall it. Uninstalling Office 365 involves a few simple steps:
1. Open the Start menu and navigate to “Settings”.
2. Click on “Apps” or “Apps & features”.
3. Scroll through the list of installed applications and locate “Microsoft Office 365”.
4. Click on “Microsoft Office 365” and select “Uninstall”.
5. Follow the on-screen prompts to complete the uninstallation process.
Once the uninstallation is complete, Office 365 will be removed from your Windows device.
Note: Uninstalling Office 365 will remove all Office applications and their associated data from your computer. Make sure to backup any important files before proceeding with the uninstallation.
Removing any remaining Office 365 files
Once the Office 365 uninstallation process is complete, it’s important to make sure that any remaining Office 365 files are removed from your Windows 11 computer. Here are the steps to do so:
- Open the File Explorer by selecting the folder icon on your taskbar or by pressing the
Windows key + Eon your keyboard. - Navigate to the
C:Program FilesMicrosoft Officefolder. - Locate the
Office15orOffice16folder, depending on the version of Office 365 you had installed. - Right-click on the folder and select Delete from the context menu.
- If prompted for confirmation, click Yes to permanently delete the folder.
- Empty the Recycle Bin to ensure that the files are completely removed from your computer.
By following these steps, you will remove any remaining Office 365 files from your Windows 11 operating system.
Restarting your computer
After uninstalling Office 365 from your Windows 11 device, it is important to restart your computer. Restarting allows the system to fully remove any remaining files and settings related to Office 365, ensuring a clean start.
To restart your computer, follow these steps:
| 1. | Click on the Start menu in the bottom left corner of your screen. |
| 2. | Click on the Power icon. |
| 3. | Select Restart from the drop-down menu. |
| 4. | Wait for your computer to shut down and restart. |
Once your computer has restarted, it is now ready for a fresh installation of Office or any other software you may want to use. Remember to check for any updates to your operating system before proceeding with the installation.
Restarting your computer can often resolve any lingering issues and ensure that your system is running smoothly. It is a good practice to restart your computer periodically to clear out temporary files and refresh system processes.
Verifying the successful uninstallation of Office 365
After following the step-by-step guide to uninstall Office 365 on Windows 11, it is important to verify that the uninstallation was successful. Follow these steps to ensure that all traces of Office 365 have been removed from your system:
Step 1: Open the Start menu and search for “Apps & Features.”
Step 2: Click on “Apps & Features” to open the settings page.
Step 3: Scroll through the list of installed applications and look for any entries related to Office 365.
Step 4: If you find any Office 365 entries, select them and click on the “Uninstall” button.
Step 5: Follow the prompts to complete the uninstallation process for each Office 365 component.
If you do not find any Office 365 entries in the Apps & Features settings page, it means that the uninstallation was successful and all traces of Office 365 have been removed from your system.
Note: It is always a good idea to restart your computer after uninstalling any software to ensure that all changes take effect.
Managing other Microsoft Office apps
Windows 11 comes with a variety of Microsoft Office apps pre-installed, such as Word, Excel, PowerPoint, and Outlook. If you no longer need these apps or want to uninstall them for any reason, you can easily do so.
To uninstall any Microsoft Office app in Windows 11, follow these steps:
| Step | Description |
|---|---|
| 1 | Open the Start menu and navigate to “Settings”. |
| 2 | Click on “Apps” in the Settings window. |
| 3 | In the Apps settings, click on “Apps & features” on the left-hand side. |
| 4 | Scroll down the list of installed apps until you find the Microsoft Office app you want to uninstall. |
| 5 | Click on the Microsoft Office app, and then click on the “Uninstall” button that appears. |
| 6 | Follow the instructions in the uninstallation wizard to complete the uninstallation process. |
By following these steps, you can easily manage and uninstall other Microsoft Office apps that are not part of the Office 365 suite on your Windows 11 computer.
Troubleshooting common issues
If you’re encountering any issues while uninstalling Office 365 on Windows 11, here are some common problems and their solutions:
| Issue | Solution |
|---|---|
| Office 365 not appearing in the list of installed programs | Try restarting your computer and checking again. If it still doesn’t appear, you can try using the official Office uninstallation tool provided by Microsoft. |
| Uninstall process freezes or takes a long time | This can happen if your computer is running other resource-intensive processes. Try closing any unnecessary applications and running the uninstallation process again. If the issue persists, you can try using the Office uninstallation tool. |
| Error messages during uninstallation | If you encounter any error messages, note down the details and search for solutions online. Microsoft’s support website and community forums can be helpful in finding solutions for specific error codes. |
| Office 365 files or shortcuts remaining after uninstallation | If you notice any leftover files or shortcuts, you can manually delete them. Make sure to only delete Office 365-related files and not other system files. Also, clearing your system’s temporary files can help remove any remnants of Office 365. |
| Reinstalling Office 365 after uninstallation | If you decide to reinstall Office 365 after uninstalling, make sure to download it from the official Microsoft website. Follow the installation steps carefully to avoid any issues. |
If you continue to experience problems or have specific questions about uninstalling Office 365 on Windows 11, it is recommended to reach out to Microsoft’s support for further assistance.
Question-answer:
Why would I want to uninstall Office 365 on Windows 11?
There could be several reasons why you might want to uninstall Office 365 on Windows 11. For example, you may be switching to a different office suite or you may no longer need the features and functionality provided by Office 365.
How do I uninstall Office 365 on Windows 11?
Uninstalling Office 365 on Windows 11 is a simple process. First, open the Settings app and navigate to the “Apps & Features” section. From there, find “Microsoft Office 365” in the list of installed apps and click on it. Finally, click the “Uninstall” button and follow the on-screen prompts to complete the uninstallation.
Can I uninstall Office 365 on Windows 11 without losing my documents and files?
Yes, you can uninstall Office 365 on Windows 11 without losing your documents and files. Uninstalling Office 365 will not remove any files or documents that you have created or saved using Office applications like Word or Excel. However, it is always a good practice to backup your important files before uninstalling any software.
Is there a way to reinstall Office 365 on Windows 11 after uninstalling it?
Yes, you can reinstall Office 365 on Windows 11 after uninstalling it. To reinstall Office 365, you will need the installation files or the Microsoft Office installer. You can download the installer from the official Microsoft website or use the original installation media if you have it. Simply run the installer and follow the prompts to reinstall Office 365 on your computer.
Are there any alternative office suites that I can use instead of Office 365 on Windows 11?
Yes, there are several alternative office suites that you can use instead of Office 365 on Windows 11. Some popular alternatives include Google Docs, LibreOffice, and WPS Office. These office suites offer similar functionality to Office 365 and can be a good choice if you are looking for alternatives.
Is it possible to uninstall Office 365 on Windows 11 without losing my data?
Yes, uninstalling Office 365 on Windows 11 does not delete your data. However, it is always a good idea to back up important files before uninstalling any software, just to be safe. You can save your Office files to a different location on your computer or to an external storage device before uninstalling Office 365. After reinstalling Office or switching to a different office suite, you can import your files back into the new software.
Can I reinstall Office 365 on Windows 11 after uninstalling it?
Yes, you can reinstall Office 365 on Windows 11 after uninstalling it. To reinstall Office 365, you will need to sign in to your Microsoft account and download the installation files from the Microsoft Office website. Follow the on-screen instructions to reinstall Office 365 on your computer. Keep in mind that you may need to activate your subscription again after reinstalling Office 365.
Are you looking to uninstall Office 365 from your Windows 11 computer? While Office 365 is a popular productivity suite, there may be instances where you no longer require it or want to switch to a different version. Removing Office 365 from Windows 11 is a straightforward process, but it’s essential to follow the correct steps to ensure a clean uninstallation. Let’s explore how you can remove Office 365 from your Windows 11 device.
To remove Office 365 from Windows 11, you can utilize the built-in uninstallation feature or use a specialized uninstallation tool. The uninstallation process for Office 365 involves removing the individual Office applications as well as the suite itself. By uninstalling Office 365, you can free up valuable storage space on your device and simplify your software environment. Whether you want to switch to a different productivity suite or no longer require Office 365’s functionalities, properly removing it from your Windows 11 computer is crucial for a seamless transition.
To remove Office 365 from Windows 11, follow these steps:
- Open the Control Panel by pressing Windows Key + X and selecting «Control Panel».
- Click on «Programs»
- Under «Programs and Features,» click «Uninstall a Program.»
- Scroll down and locate «Office 365» in the list of installed programs.
- Right-click on «Office 365» and select «Uninstall.»
- Follow the on-screen prompts to complete the uninstallation process.

Uninstalling Office 365 from Windows 11: A Comprehensive Guide
Office 365 is a popular productivity suite that offers a range of applications, including Word, Excel, PowerPoint, and Outlook. While it provides users with powerful tools for work and personal use, there may come a time when you need to remove Office 365 from your Windows 11 computer. Whether you’re switching to a different software provider or simply need to free up space on your device, uninstalling Office 365 can be done easily and efficiently. In this guide, we will walk you through the process step by step.
Before You Begin: Back Up Your Files
Before you uninstall Office 365 from your Windows 11 computer, it’s essential to back up any important files or documents. This ensures that you don’t accidentally lose any critical data during the uninstallation process. You can back up your files by saving them to an external hard drive, cloud storage service, or another location on your computer.
Additionally, if you have any unsaved documents open in Office 365 applications, make sure to save and close them before proceeding with the uninstallation. This will prevent any potential data loss or corruption.
Once you have backed up your files and closed any open documents, you’re ready to proceed with the uninstallation process.
Method 1: Uninstall Office 365 Using Control Panel
The Control Panel is a standard Windows utility that allows you to manage various settings and programs on your computer. You can use it to uninstall Office 365 from your Windows 11 device.
Here’s how you can uninstall Office 365 using the Control Panel:
- Open the Control Panel by searching for it in the Windows 11 search bar.
- Click on «Uninstall a program» under the «Programs» section.
- In the list of installed programs, locate and select «Microsoft Office 365.»
- Click on the «Uninstall» button at the top of the list.
- Follow the on-screen prompts to complete the uninstallation process.
- Once the uninstallation is complete, restart your computer.
After restarting your computer, Office 365 should be successfully uninstalled from your Windows 11 device.
Method 2: Uninstall Office 365 Using Settings
In addition to the Control Panel, you can also uninstall Office 365 using the Settings app in Windows 11. This method provides an alternative way to remove the software from your device.
Follow these steps to uninstall Office 365 using Settings:
- Open the Settings app by clicking on the Start button and selecting «Settings» from the menu.
- In the Settings window, click on «Apps» to open the Apps & Features section.
- Scroll down the list of installed apps and locate «Microsoft Office 365.»
- Click on «Microsoft Office 365» to expand the options.
- Click on the «Uninstall» button.
- Follow the on-screen instructions to complete the uninstallation.
- Restart your computer after the uninstallation process is finished.
Once your computer restarts, Office 365 will be removed from your Windows 11 device.
Method 2a: Uninstall Office 365 Apps Individually
If you prefer to uninstall specific Office 365 apps instead of the entire suite, you can do so using the Settings app. This method allows you to customize which Office 365 apps you want to remove from your Windows 11 device.
Here’s how you can uninstall Office 365 apps individually:
- Open the Settings app and navigate to the Apps & Features section as mentioned earlier.
- Scroll down to find the specific Office 365 app you want to uninstall, such as Word or Excel.
- Click on the app to expand the options, and then click on the «Uninstall» button.
- Follow the on-screen instructions to complete the removal process.
- Repeat these steps for each Office 365 app you wish to uninstall.
- Restart your computer after all the desired apps have been uninstalled.
By following these steps, you can selectively remove individual Office 365 apps from your Windows 11 device.
Removing Office 365: Ensuring a Clean Uninstallation
When uninstalling Office 365 from your Windows 11 computer, it’s essential to ensure a clean uninstallation to avoid any leftover files or registry entries. Here are a few additional steps you can take to ensure a thorough removal:
Step 1: Remove Office 365 Remnants from the Registry
The Windows Registry contains configuration settings for various applications on your computer, including Office 365. After uninstalling Office 365 using either the Control Panel or Settings app, it’s a good idea to check the Registry for any remaining entries and remove them if necessary.
| Key | Path |
| HKEY_CURRENT_USER\Software\Microsoft\Office\16.0 | C:\Users\%USERNAME%\AppData\Local |
| HKEY_CURRENT_USER\Software\Microsoft\Office\ClickToRun | C:\Users\%USERNAME%\AppData\Local |
Open the Registry Editor by searching for «regedit» in the Windows search bar, and then navigate to the following paths:
HKEY_CURRENT_USER\Software\Microsoft\Office\16.0C:\Users\%USERNAME%\AppData\LocalHKEY_CURRENT_USER\Software\Microsoft\Office\ClickToRunC:\Users\%USERNAME%\AppData\Local
Under each path, look for any remaining Office 365 entries and delete them. However, exercise caution when modifying the Registry, as making incorrect changes can cause issues with your computer.
Step 2: Remove Office 365 Files and Folders
In addition to the Registry, you should also remove any remaining Office 365 files and folders on your computer. These files may include installation files, temporary files, and user data.
You can perform a manual search for Office 365 files and folders by navigating to the following locations in File Explorer:
| Location |
| C:\Program Files\Microsoft Office |
| C:\Program Files (x86)\Microsoft Office |
| C:\Users\%USERNAME%\AppData\Local\Microsoft\Office |
| C:\Users\%USERNAME%\AppData\Roaming\Microsoft\Office |
Go to each location and delete any Office 365-related files and folders you find. Be cautious when deleting files and folders, as removing the wrong ones could affect other applications on your computer.
Step 3: Restart Windows 11
After completing the previous steps, restart your Windows 11 computer to finalize the removal of Office 365 and ensure that any remaining components are no longer active. This will also allow your computer to perform necessary system checks and updates.
Once your computer restarts, you can verify that Office 365 has been successfully and completely removed from your Windows 11 device.
In Conclusion
Removing Office 365 from your Windows 11 computer is a relatively simple process that can be done using either the Control Panel or the Settings app. By following the step-by-step instructions outlined above, you can easily uninstall Office 365 and ensure a clean removal. Remember to back up your important files, close any open Office 365 documents, and follow the additional steps to remove any leftover files and registry entries. With these efforts, you can successfully remove Office 365 and free up space on your Windows 11 device.

Removing Office 365 from Windows 11
Removing Office 365 from Windows 11 is a straightforward process that can be done through the Settings app. Here are the steps to follow:
- Open the Settings app on your Windows 11 PC.
- Click on «Apps» from the left sidebar.
- In the Apps window, click on «Apps & features.»
- Scroll down and find «Microsoft Office 365» in the list of installed apps.
- Select «Microsoft Office 365» and click on the «Uninstall» button.
- Follow the on-screen instructions to complete the uninstallation process.
- Once the uninstallation is complete, restart your computer.
This process will remove Office 365 from your Windows 11 system, freeing up storage space and removing any associated applications and services. Keep in mind that uninstalling Office 365 will also erase any files or documents stored in its applications, so make sure to back up any important data before proceeding with the uninstallation. If you wish to reinstall Office 365 in the future, you can do so by signing in to your Microsoft account and downloading the software again.
Key Takeaways
- Uninstalling Office 365 from Windows 11 is a straightforward process.
- Open the «Settings» app and navigate to the «Apps» section.
- Select «Office 365» from the list of installed apps.
- Click on the «Uninstall» button and follow the prompts to remove Office 365.
- Make sure to save any important documents before uninstalling Office 365.
Frequently Asked Questions
Here are some common questions and answers regarding the process of removing Office 365 from Windows 11:
1. Can Office 365 be uninstalled from Windows 11?
Yes, Office 365 can be uninstalled from Windows 11. Follow the steps below to remove it from your system:
— Open the Settings app on your Windows 11 computer.
— Click on «Apps» from the list of available options.
— In the «Apps & features» section, search for Office 365.
— Select Office 365 and click on the «Uninstall» button.
— Follow the on-screen prompts to complete the uninstallation process.
2. Will removing Office 365 from Windows 11 delete my files and documents?
No, uninstalling Office 365 from Windows 11 will not delete your files and documents. These files are separate from the Office suite and will remain intact even after the uninstallation process.
However, it’s always a good practice to back up your important files before making any changes to your system.
3. Can I reinstall Office 365 after removing it from Windows 11?
Yes, you can reinstall Office 365 after removing it from Windows 11. To reinstall it, follow these steps:
— Visit the official Microsoft Office website and sign in to your account.
— Go to the «My Account» page and click on the «Install» button next to Office 365.
— Follow the on-screen instructions to download and install Office 365 on your Windows 11 computer.
4. Are there any alternative methods to remove Office 365 from Windows 11?
Yes, besides using the Settings app, you can also remove Office 365 from Windows 11 through the Control Panel. Here’s how:
— Open the Control Panel on your Windows 11 computer.
— Select «Programs» and then click on «Uninstall a program.»
— Find Office 365 in the list of installed programs.
— Right-click on Office 365 and choose «Uninstall.»
— Follow the prompts to complete the uninstallation process.
5. Will uninstalling Office 365 affect other Microsoft Office applications on my Windows 11?
No, uninstalling Office 365 from Windows 11 will not affect other Microsoft Office applications that you may have installed. Office 365 is a separate product from the traditional Microsoft Office suite, and uninstalling it will not impact other Office applications like Word, Excel, or PowerPoint.
If you want to remove other Office applications, such as Word or Excel, you will need to uninstall them separately.
Removing Office 365 from Windows 11 is a straightforward process that can be accomplished in just a few steps. By following the instructions provided in this article, users can safely uninstall Office 365 from their systems. It is important to note that uninstalling Office 365 will remove all its applications and data from the computer.
To remove Office 365 from Windows 11, users can access the «Apps & Features» settings and locate Office 365 in the list of installed applications. From there, they can click on Office 365 and select the «Uninstall» option. By following the prompts and confirming the action, Office 365 will be successfully removed from the system. Users may need to restart their computers for the changes to take effect.
Uninstalling Office 365 from Windows 11 is a straightforward process that can be done through the Settings app. Begin by opening the Settings, go to ‘Apps,’ and then select ‘Installed apps.’ Find Microsoft Office 365 in the list, click on it, and choose ‘Uninstall.’ Follow any additional prompts to remove the software completely.
Removing Office 365 from your Windows 11 PC can help free up space and resolve software conflicts. Follow these steps to safely uninstall it from your system.
Step 1: Open Settings
First, click on the ‘Start’ button and select ‘Settings.’
The Settings app is your control center for managing your computer. It’s where you’ll find all your system’s management tools, including the apps installed on your machine.
Step 2: Navigate to Apps
Click on the ‘Apps’ section within the Settings menu.
In the Apps section, you’ll see a list of all the applications installed on your device. This is where you can manage, modify, or uninstall any software.
Step 3: Go to Installed Apps
From the Apps section, select ‘Installed apps.’
This will display a comprehensive list of every program currently on your computer, making it easier to find Microsoft Office 365.
Step 4: Locate Microsoft Office 365
Scroll through the list and find ‘Microsoft Office 365.’
Finding the specific program you want to uninstall might take a little scrolling, but it’ll be listed alphabetically, making it easier to locate.
Step 5: Uninstall Microsoft Office 365
Click on Microsoft Office 365 and then select ‘Uninstall.’
You’ll be prompted to confirm that you want to remove the program. Follow any additional instructions to ensure it’s completely uninstalled from your computer.
After completing these steps, Office 365 will be removed from your Windows 11 system. You might need to restart your computer to complete the uninstallation process fully.
Tips for Uninstalling Office 365 on Windows 11
- Backup Your Files: Before uninstalling, ensure that all your important documents are backed up to avoid accidental data loss.
- Check for Other Office Versions: Ensure there are no other versions of Microsoft Office on your computer that you wish to keep.
- Restart Your Computer: After uninstalling, restart your computer to clear any remaining files or settings.
- Use a Third-party Uninstaller: Consider using third-party software to remove any leftover files or registry entries.
- Reinstall If Necessary: If you’re uninstalling for troubleshooting purposes, you can always reinstall Office 365 later if needed.
Frequently Asked Questions
Can I reinstall Office 365 after uninstalling it?
Yes, you can reinstall Office 365 anytime by downloading it from the official Microsoft website and using your existing credentials.
Will uninstalling Office 365 remove my documents?
No, uninstalling Office 365 will not delete any of your saved documents. However, it’s always a good idea to back up important files.
Do I need to deactivate Office 365 before uninstalling?
It’s not necessary to deactivate Office 365 before uninstalling, but doing so can prevent license issues if you plan to reinstall later.
How long does it take to uninstall Office 365?
The uninstallation process typically takes a few minutes, but it can vary depending on your system’s performance.
Is it safe to use third-party uninstallers?
Yes, reputable third-party uninstallers can safely remove leftover files, but be sure to choose a reliable program to avoid any issues.
Summary of How to Uninstall Office 365 on Windows 11
- Open Settings
- Navigate to Apps
- Go to Installed Apps
- Locate Microsoft Office 365
- Uninstall Microsoft Office 365
Conclusion
Uninstalling Office 365 on Windows 11 is an essential skill for managing your computer’s software. Whether you’re trying to resolve performance issues, free up space, or simply want a fresh start, removing unnecessary programs can make a world of difference. A few simple steps in the Settings app are all it takes to uninstall Office 365, and with some handy tips and tricks, you can make sure the process goes smoothly.
Should you decide to reinstall Office 365 in the future, the process is just as simple, allowing you to get back to work in no time. Remember, technology is like a garden; sometimes you need to pull out the old to make room for the new. So, take charge of your digital space and enjoy a more streamlined, efficient computing experience.
For those curious about further optimizing their Windows 11 experience, consider exploring additional resources on software management, system optimization, and security practices. The digital world is constantly evolving, and staying informed is your best tool for navigating it.
Matthew Burleigh has been writing tech tutorials since 2008. His writing has appeared on dozens of different websites and been read over 50 million times.
After receiving his Bachelor’s and Master’s degrees in Computer Science he spent several years working in IT management for small businesses. However, he now works full time writing content online and creating websites.
His main writing topics include iPhones, Microsoft Office, Google Apps, Android, and Photoshop, but he has also written about many other tech topics as well.
Read his full bio here.