
- Home
- Windows Tips
- Install and uninstall codecs in windows 10
Codecs are needed to play media files and to open certain file types. Desktop operating systems by default already have some codecs installed. These codecs are meant for common file types like MP4s and MP3s. For less common, proprietary file formats, you need to install a codec. OS developers will sometimes publish additional codecs that users can download and install as and when needed. These are normally free. Independent app developers also develop codecs and some, not all, are app specific. Here’s how to install and uninstall codecs in Windows 10.
This method will work on all Windows versions from Windows 7 and up.
Install A Codec
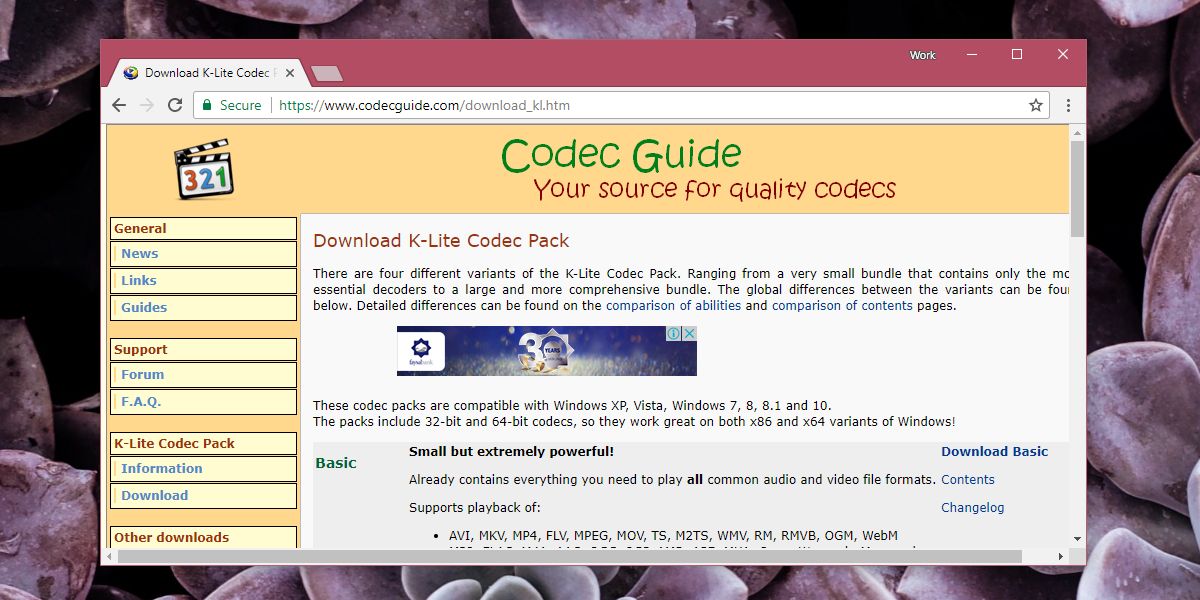
There are two ways to find and install codecs on Windows. First is to look for stand alone codec packs. These may, or may not be free. Case in point is the popular K-Lite codec pack which is free and supports AVI, MKV, MP4, FLV, MPEG, MOV, TS, M2TS, WMV, RM, RMVB, OGM, WebM video formats, and an equally long list of audio codecs. You can download the codec and run it like any app installer to install it. All apps that support this coded are listed on the official website.
Stock OS apps like the Windows Media Player can also search for and install codecs. Microsoft also lets you download codecs from their official website or from the Windows Store. A codec available on the Microsoft Website installs like any other app. To install a codec from the Windows Store, click the Install button and it will take care of the rest.
Uninstall A Codec
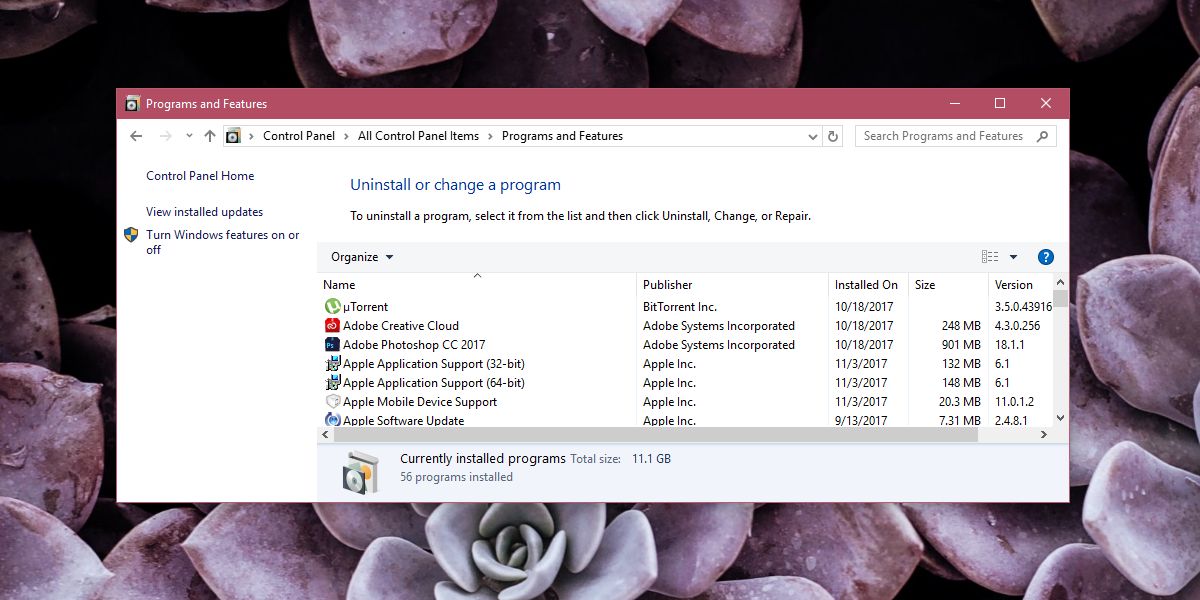
To uninstall a codec, you must know how you installed it. For example, if you installed the K-Lite codec, you will remove it from Control Panel>Programs and Features. Look for the codec by the name of the publisher that developed it. Select it, and click the Uninstall button at the top of the programs list. If you installed a codec from Microsoft’s official website, the same process applies.
If you installed a codec as an app from the Windows Store, look for the app in the list of apps in the Start Menu. Right-click it and select the Uninstall option from the context menu. If the app isn’t listed there, look for it the Control Panel.
If you’re still unable to find the app, go to the Settings app and look for it under the Apps group of settings in the Apps & Features tab.

Fatima Wahab
Fatima has been writing for AddictiveTips for six years. She began as a junior writer and has been working as the Editor in Chief since 2014.
Fatima gets an adrenaline rush from figuring out how technology works, and how to manipulate it. A well-designed app, something that solves a common everyday problem and looks
Need Space in PC or only want to remove or uninstall codecs On PC ( Windows 7, 8, 10, and Mac )? but how to, after it still having files in C: drive? If the application run on the pc, windows 7, 8, & 10 so you can uninstall using Control Panel or CMD Or If this applicaion run in Mac so you know that how to uninstall in MAC. With this article, you will able to delete or kick out all of those files also after uninstalling the codecs.
Are you bored, or tired of using codecs? Now, wanna kick-off this software from your PC ( Windows 7, 8, 10, and Mac )? There is no condition to follow up before installing, so, you can remove it without getting any confusion about it.
There are 10 methods that users can adapt if they want to uninstall codecs :
Method #1
- Go to Start Menu, then click on the Control Panel.
- In Control Panel, under programs, go through the list of the ones that are installed on your computer
- Right-click on codecs, and then click on uninstall a program
- Follow the prompt on the screen, and you will get to see a progress bar that will take you to remove the codecs from the computer.


Method #2
The second method involves uninstaller.exe, through which codecs can be uninstalled. Just follow the instructions below to execute this step:
- Go to the installation folder of codecs.
- Find a file that is named uninstall.exe or unins000.exe
- Double click on the file, and then follow the instructions that appear on the screen.


Method #3
The third method involves System Restore. For those who don’t know, System Restore is a utility, which helps the user restore their system to its previous state. System Restore removes all those programs, which interfere with the operation and performance of the computer.


If you have created a system restore point before you installed codecs, then you can use this software to restore the system, and remove such unwanted programs. However, before you do so, make sure that you save all the important data.Follow the steps below to know more from this method:
- Close all the files and programs, which are currently running on your PC
- Open Computer from the desktop, and then select Properties
- System Window will open
- On the left side and click on System Protection
- System Properties will open.
- Then do click on the option of System Restore, and a new window will again open.
- Now, choose the ‘different restore point’ option, and click on Next.
- You have to select a date and time from the given options; when you select a date, the drivers that you installed after the chosen date won’t work.
- Click on Finish and then Confirm the ‘Restore Point’ on the screen.
- When you click Yes to confirm, the codecs would be uninstalled.
Method #4
If you have an antivirus, then you can use it to uninstall codecs.There is much malware or codecs software in the computer applications that we download nowadays. They have become very difficult to remove from the system, like Trojan and spyware.
- If you cannot remove codecs with the above methods.
- It means that there is malware or codecs in it, and only a good antivirus can be used for removing it.
You can either download Norton Antivirus or AVG antivirus, as these are reputable software and will surely remove the malware, codecs on the system.

Method #5
If you want to uninstall codecs, then you can do so using Command Displayed in the Registry. A registry is a place where all the settings of Windows, along with information, are stored. This also includes the command to uninstall a software or program.
You can try this method with codecs as well, but it is a very risky method. If you make any mistake and delete the wrong information, then the system is most likely to crash. It would become difficult for you to bring it back from deletion.

To execute this method, To follow the steps given below:
- Hold Windows + R together, and then Run command
- When the command box opens, type Regedit in the box and then click on OK
- You have to navigate and find the registry key for the codecs
- You will see an uninstall string on the next window; double click on it, and also copy ‘Value Data’
- Again hold Windows + R keys, and run the Command; paste the value data that you just copy and click on OK
Follow what comes on the screen and then uninstall codecs.
Method #6
The seventh method is to uninstall the codecs using a third-party uninstaller.
At times, those who don’t have any knowledge of computer language, won’t be able to manually uninstall the software fully.
Many files occupy the hard disk of the computer, so it is best to use third-party software to uninstall them.

Method #7
There are some codes that users can type into the command prompt, and they would be able to uninstall the codecs. For example, if they want to remove the package, then just type.
sudo apt-get remove codecs
If you want to uninstall codecs and its dependencies as well, then type:
sudo apt-get remove –auto-remove codecs
For those who don’t know, some of the dependencies of codecs are GCC-5, libc6, libgcc1, codecs dev, and gc++-5.

Method #8
If the user wants to remove the configuration and data files of codecs, then they need to run the following code on the Command Prompt:
sudo apt-get purge codecs

Method # 9
It depends on you that are you willing to kick-out the data or you want to remove the configuration data or data files, along with the dependencies, then the following code is most likely to work for you:
sudo apt-get auto-remove -purge codecs

To uninstall codecs on mac because anytime we need space or only want to remove from pc due to some viruses and also many problems which are needed to remove or uninstall from pc.
So I will show you some steps of uninstalling codecs on the mac so follow my this step or method if you have still confusion so you may contact with us for uninstall of codecs on pc or mac.
How to Uninstall codecs on Mac?
For uninstalling codecs on the mac so as I told you that there is a simple method to uninstall apps on mac. As there are installed some apps on your Mac and now you want to remove or uninstall from your pc successfully and want to install some other apps on my mac so follow my these steps to uninstall codecs on mac.
Method #1
In method 1, you have to open mac on your pc as I’m showing in the image follow the images to uninstall codecs on your mac.

In the image, there is a codecs app on your mac dashboard and now we have to uninstall it from our mac we will uninstall this app and will remove it in of mac now double-click-on-app showing in the image.

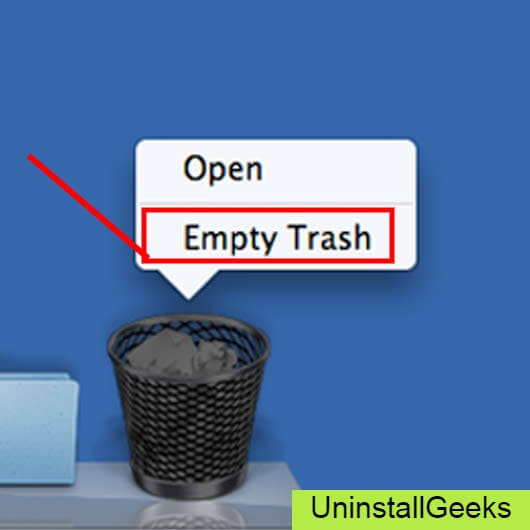
Now you double-clicked on the app mac will ask that are you sure to uninstall codecs click on the Delete button so go to Trash of mac to uninstall completely from mac. Showing in image trash bin click on trash bin and go inside there will be codecs which we had to delete before so have to uninstall completely from mac.

Not right-click on trash to remove all data or app which we had uninstalled before seeing in the image. Click on Empty Trash the whole data which is in the trash will auto remove successfully.
Now we uninstalled codecs on the mac so as you see that how to uninstall or remove any app on the mac so if you liked this so share once. This method doesn’t require any antivirus or uninstaller software from them we are to uninstall.
I described only a simple method of uninstalling codecs on mac. This method more people are using but some people take it is too hard uninstalling in mac but in this step, anyone can understand this simple method.
How To Install?
For those who don’t know much about codecs, they might lean more towards uninstalling it. These codecs create an environment, where users can create a high GPU-accelerated application. If you want to install this codecs, then make sure that your system is compatible with it.
Firstly, verify that the system you are using has a codecs capable GPU, and then download the codecs. Install it, and then test that the software runs smoothly on the system. If it doesn’t run smoothly, then it could be because its communication with the hardware is corrupted.


Conclusion
There are other methods of uninstalling the codecs as well as in pc or windows, but these could be difficult for those, who don’t have much technical expertise. Execute these methods, and they will surely work. These methods don’t require the user to have much knowledge of the technical side of an operating system. They can follow simple steps and uninstall codecs.
You may be wondering how to uninstall codecs in Windows 10. While it’s possible to uninstall codecs like any other software program, you’ll find it difficult to delete codecs manually. The trouble is, if you don’t know how to remove them, codecs could leave invalid references in your registry, causing a system crash. Thankfully, there’s a simple way to do so.
If you’ve accidentally deleted a codec or are just curious about how to remove it completely, the best way to get rid of it is to use System Restore. System Restore allows you to restore your system to a previous point, so you can get rid of programs that are interfering with your PC’s performance or operation. To use System Restore, click Start > Search and then enter “system info”. You’ll find it in the System Information section, so you’ll need to choose a date before installing codecs.
To uninstall codecs on Windows 10, find them in the Start Menu and right-click on them to select the “uninstall” option. Alternatively, you can search for codecs in the Configuration path, Control Panel, or Applications and features. Alternatively, you can search for them by name in Control Panel, Configuration path, or Applications and features. If you’re not able to find them in Control Panel, you can find them in the Applications and features section.
How Do I Remove Codecs From My Computer?
You might have been wondering how to remove codecs from my computer in the first place. But this task can be tricky, especially if you are not technically savvy. Luckily, there are two methods that can help you completely uninstall codecs. You can use third-party uninstallers to completely remove these files, or you can simply follow the instructions below. However, you should note that some methods require advanced technical knowledge to remove the files from your PC.
To uninstall codecs from your computer, you must first know how to install them. If you’ve installed a K-Lite codec, for example, you’ll find that you can do this in the Control Panel by selecting the codec from the programs and features list. Next, click the Uninstall button on the top-right corner of the program list. Similarly, you can do the same with Microsoft codecs.
In Windows 10, codecs are available for download from the Internet. You can use this to install codecs that your system requires. If your computer doesn’t have the codecs you need, video and audio files will be incompatible. This may result in video distortion or audio not playing properly. In Windows 10, you can find codecs in the browser. To install a codec pack, navigate to its download location and select the file name. Then, restart your computer. Check whether your new codecs have been installed.
Once you have downloaded the program, open the Control Panel in the Start Menu. Click on the Add New Hardware button. Click on the codec you want to install. A window will appear asking you to browse for the appropriate driver. Select the correct codec and restart your PC. This will allow the codec to work on your PC. However, if you are unable to find the codec you need, you can try the GSpot tool to find them.
Do I Need Codecs Windows 10?
If you are a video fanatic, the question of Do I Need Codecs for Windows 10 is a big one. While Windows 10 does come with a built-in media player, a variety of third-party codecs are required to play most video formats. If you want to make the most of your entertainment experience, you’ll want to download the latest versions of codecs for Windows.
What is a codec? A codec is a special piece of software that encodes or decodes video or audio files. You may be wondering whether your computer is equipped with the necessary codecs. This piece of software allows you to view and play a wide variety of videos and audio files, which may otherwise not work. If you’re unsure, you can install a codec pack to find out which files your PC supports.
You can check whether your PC has a codec by opening the Windows media player. To do so, you can click the Start menu and type “Windows Media Player”. You can also open the media player by pressing Windows key + H, or by selecting Windows + X from the Start menu. If the latter option isn’t available, you can also open the Windows Media Player using a web browser. To get the details of your current codec, click the More Info button.
How Do I Check the Codecs on My Computer?
How do I check the installed codecs on my computer? You can use the “System Information” option in the Control Panel. Right-click on the icon in the search results to open the “System Information” window. There, you will see a list of all the installed audio/video codecs and decoders. If you don’t see any listed, click the “Check for updates” button.
To check if any codecs are missing or broken, you can perform a search online. In most cases, the name of the missing codec can be found in the file’s metadata. You can also use the properties option to check the codecs installed on your computer. Switch to the “Details” tab and search for the Video or Audio Codec.
While this is the easiest way to check if any codecs are installed on your computer, you can also remove them one by one. It is important to remember that uninstalling codecs may result in more problems than it solves. If you uninstalled a codec, you must re-install it to fix your problem.
Where Do Codecs Get Installed?
If you’re having trouble playing some types of media on your PC, you may wonder Where Do Codecs Get installed in Windows 10. The short answer is within the Windows Media Player. The default audio and video player for Windows, it can help you determine which codecs you’re missing on your system. To open the Windows Media Player, either click on the Start button and type wmplayer. In the Run dialog box, type wmplayer to access the program. You can also open the Help section of Windows Media Player by right-clicking on the empty space in the bar at the top of the screen. You can expand the context menu and click on Help. If you’re running a Web Browser, click on the Technical Support Information link at the bottom of the window.
Codecs are small pieces of software that allow your computer to play specific types of media. While most codecs are built-in to Windows 10, mistakes are possible. You can check if any codecs are missing by using the Video Inspector, a free tool available from Microsoft. If you’ve forgotten to install a codec, open Video Inspector and check it there. You can use it to download and install missing codecs.
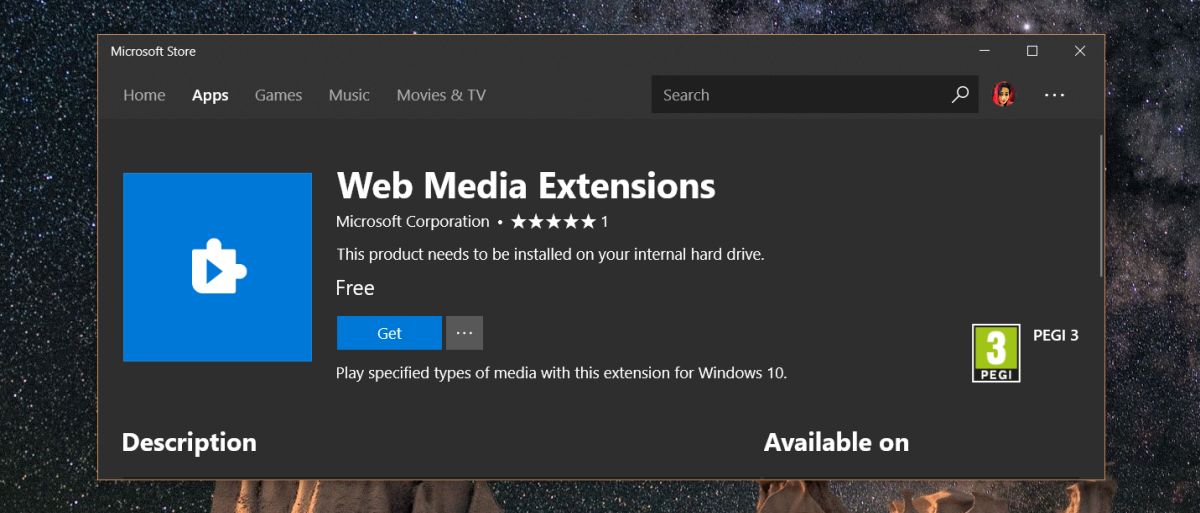
How Do I Remove HEVC Codec From Windows 10?
The HEVC video codec is not supported by Windows 10 as of the Fall Creators Update. If you’re considering installing the Fall Creators Update, you should first determine if it’s compatible with your graphics card. Microsoft has published a list of components that are compatible with the HEVC codec. The list includes top Intel i7 processors and graphics processing boards. The HEVC video codec is necessary to watch content such as Netflix and Movies & TV.
You can install the free version of HEVC codec by visiting Microsoft Store. After installing the extension, you will be asked for your Microsoft account. You’ll need to provide this account in order to install the HEVC codec. Once the extension is installed, it will be installed on your PC. While it won’t be installed automatically, you can download it manually by following these steps. However, you must note that it’s best to install the latest version of HEVC codec before updating Windows 10.
How Do I Update Codecs in Windows 10?
In order to play certain files on your computer, you need a codec. A codec is a piece of software that compresses and decompresses data for transmission. If a codec is missing, a file may be out of sync, the audio will not be heard correctly, or the picture will be blurry. Fortunately, some software can identify and update the missing codec for you.
You can also check the System Information page. This utility displays information about the codecs installed on your PC, but it can only display a small part of it. That’s why alternative methods are a better option. Start by typing “msinfo32” to open the system information utility. Expand the Multimedia section and find the Audio Codecs and Video Codecs options. After you find the correct ones, click “Next”.
You can also use a free codec tool. GSpot can identify video codecs on.avi files and audio compression methods in videos. It can also display a list of codec drivers and DirectShow filters installed on your computer. If the application is not installed, you can download it from the Windows Store. When you install this tool, you can choose from three different codec releases. The advanced release contains decoders, a GUI controller, and LAV filters. The standard release includes the VSFilter and LAV filters.
Learn More Here:
1.) Windows Help Center
2.) Windows – Wikipedia
3.) Windows Blog
4.) Windows Central
Because some people are complaining that they aren’t able to find the uninstall shortcut in the «Add or remove programs»/ «Apps and Features» settings page:
— «how did you uninstall x86? i dont see it in the program list.» — said Martin, in the reply to megan’s review.
— «How did you manage to remove the HEVC codec we downloaded from this website?» — also said CodedEnjoyer, in the reply to Joseph’s review.
We thought it would be good idea to add a small guide that will help them to remove/uninstall and reinstall the HEVC and/or HEIF Extensions using the winget command on Windows 11.
In order to do that, follow these steps:
Open the Start menu and search for «Command Prompt«.
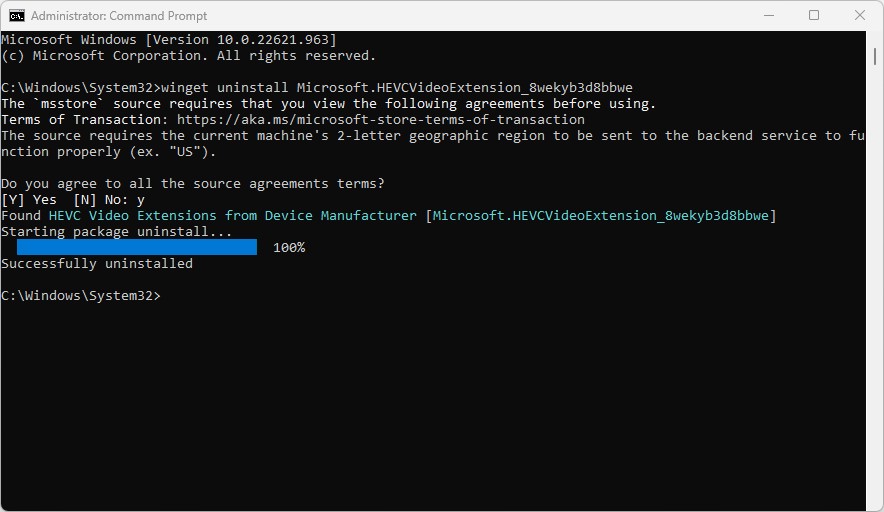
Right-click on «Command Prompt» and select «Run as administrator».
In the Command Prompt window, type the following command to uninstall the HEVC extension:
winget uninstall --id=Microsoft.HEVCVideoExtensionPress Enter.
The HEVC extension will be uninstalled.
To uninstall the HEIF extension, type the following command:
winget uninstall --id=Microsoft.HEIFImageExtensionPress Enter.
The HEIF extension will be uninstalled.
After uninstalling the extensions, you can reinstall them using the winget command.
To install the HEVC extension, use the following command:
winget install --id=Microsoft.HEVCVideoExtensionTo install the HEIF extension, use the following command:
winget install --id=Microsoft.HEIFImageExtensionNote: The winget command is only available on Windows 10 version 1809 and later.
If you are using an earlier version of Windows, you can try uninstalling the extensions through the «Apps and Features» settings page.
To do this, go to «Settings» > «Apps» > «Apps and Features», and then search for «HEVC» or «HEIF». Select the extension and click «Uninstall».
If you’re still encountering issues while trying to uninstall the HEVC and HEIF extensions using the winget command on Windows 11, there are a few things you can try:
Make sure that you are running the command prompt as an administrator.
Try running the command with the —verbose flag, which will display additional information about the operation. For example:
winget uninstall --id=Microsoft.HEVCVideoExtension --verboseIf the extension is still not uninstalling, try using the —force flag to force the uninstallation. For example:
winget uninstall --id=Microsoft.HEVCVideoExtension --forceIf the problem persist, you may need to seek further assistance or consult with Microsoft support.
Reviews & Comments
@Tanaka
To check if HEIF Image Extensions and HEVC Video Extensions are installed and find their versions on your Windows system, follow these steps:
Open Settings (press Win + I).
Go to Apps > Installed apps.
In the search bar, type HEIF or HEVC to locate the installed extensions.
Click the extension and select Advanced Options (if available).
The version number will be listed under Specifications.
I want to check if HEIF Image Extensions and HEVC Video Extensions are installed, and those versions. How to do?
I used IObit Uninstaller. It took out all the registries for this Malware. No problems.
Garbage app/software needs a stern warning about ‘using at own risk’. More like Malware.
Кодеки необходимы для воспроизведения медиа-файлов и открытия файлов определенных типов. В настольных операционных системах по умолчанию уже установлены некоторые кодеки. Эти кодеки предназначены для распространенных типов файлов, таких как MP4 и MP3. Для менее распространенных проприетарных форматов файлов вам необходимо установить кодек. Разработчики ОС иногда публикуют дополнительные кодеки, которые пользователи могут загружать и устанавливать по мере необходимости. Это обычно бесплатно. Независимые разработчики приложений также разрабатывают кодеки, и некоторые, не все, специфичны для приложений. Вот как установить и удалить кодеки в Windows 10.
Этот метод будет работать на всех версиях Windows от Windows 7 и выше.
Установить кодек
Есть два способа найти и установить кодеки в Windows. Во-первых, искать автономные пакеты кодеков. Они могут или не могут быть бесплатными. В качестве примера можно привести популярный пакет кодеков K-Lite, который является бесплатным и поддерживает форматы видео AVI, MKV, MP4, FLV, MPEG, MOV, TS, M2TS, WMV, RM, RMVB, OGM, WebM, а также длинный список аудиокодеки. Вы можете скачать кодек и запустить его, как любой установщик приложения, чтобы установить его. Все приложения, которые поддерживают этот код, перечислены на официальном сайте.


Удалить кодек
Чтобы удалить кодек, вы должны знать, как вы его установили. Например, если вы установили кодек K-Lite, вы удалите его из Панели управления> Программы и компоненты. Ищите кодек по имени издателя, который его разработал. Выберите его и нажмите кнопку «Удалить» в верхней части списка программ. Если вы установили кодек с официального сайта Microsoft, применяется тот же процесс.

Если вы все еще не можете найти приложение, перейдите в приложение «Настройки» и найдите его в группе настроек «Приложения» на вкладке «Приложения и функции».