
Microsoft официально заверила поддержку Internet Explorer (IE) для большинства современных версий Windows 10 и 11 (кроме LTSC редакций и Windows Server) с 15 июня 2022. Классическое приложение Internet Explorer 11 будет постепенно перенаправляться во встроенный браузер Microsoft Edge. В ближайших обновлениях, распространяемых через Windows Update, MSFT обещает полностью отключить IE на современных билдах Windows. В этой статье мы рассмотрим, как отключить или удалить Internet Explorer в Windows 11/10/8.1 и Windows Server.
Содержание:
- Удаляем Internet Explorer в Windows 10 и 11
- Как удалить Internet Explorer в Windows Server?
- Как отключить Internet Explorer 11 с помощью групповых политик?
Удаляем Internet Explorer в Windows 10 и 11
Internet Explorer 11 в Windows 10 и 11 поставляется в виде отдельного компонента, доступного как Feature on Demand/FoD (по аналогии с RSAT или NetFx3). Вы можете установить или удалить IE через приложение Параметры.
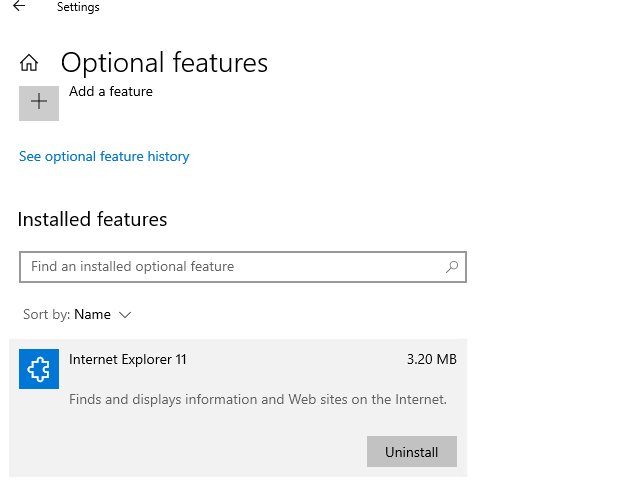
- Перейдите в Settings -> Apps -> Apps and Feature -> Optional Features или выполните команду быстрого доступа
ms-settings:appsfeatures - Найдите в списке Internet Explorer 11 и нажмите кнопку Uninstall;

Также вы можете с помощью PowerShell проверить, установлены ли компоненты IE на компьютере:
Get-WindowsOptionalFeature -Online –FeatureName Internet-Explorer-Optional-amd64

FeatureName : Internet-Explorer-Optional-amd64 DisplayName : Internet Explorer 11 Description : Finds and displays information and Web sites on the Internet. RestartRequired : Required

State : Enabled CustomProperties : \SoftBlockLink : http://go.microsoft.com/fwlink/?LinkID=142507
В данном примере компоненты IE11 устанговлены, чтобы удалить IE11, выполните команду:
Disable-WindowsOptionalFeature -FeatureName Internet-Explorer-Optional-amd64 –Online
Перезагрузите компьютер.
После удаления Internet Explorer исчезнут ассоциации для файлов .html (и других веб-форматов) с IE. При этом Windows Store и другие встроенные приложения будут работать, даже если на компьютере не установлено другого веб браузера.
При удалении компонентов Internet Explorer 11 в Windows, вы не сможете использовать режим совместимости Internet Explorer в браузере Microsoft Edge. Если вам нужен этот режим для просмотра устаревших сайтов, вместо удаления IE, отключите его с помощью групповых политик (описано в последнем разделе этой статьи).
Вы можете использовать такой скрипт для удаления IE на компьютере:
RemoveIE.ps1
#PowerShell script to remove Internet Explorer
#Check If IE is Installed
$check = Get-WindowsOptionalFeature -Online | Where-Object {$_.FeatureName -eq "Internet-Explorer-Optional-amd64"}
If ($check.State -ne "Disabled")
{
#Remove Internet Explorer
Disable-WindowsOptionalFeature -FeatureName Internet-Explorer-Optional-amd64 -Online -NoRestart | Out-Null
}
Для удаления Internet Explorer на удаленных компьютерах, можно использовать команду Invoke-Command (требует настроенного WinRM/PowerShell Remoting):
Invoke-Command -ComputerName PC01,PC02,PC03 -FilePath C:\PS\RemoveIE.ps1
Как удалить Internet Explorer в Windows Server?
IE уже отсутствует в Windows в Windows Server 2022. В более старых версиях Windows Server (2019/2016/2012R2) вы можете удалить Internet Explorer 11 с помощью DISM:
dism /online /disable-feature /featurename:Internet-Explorer-Optional-amd64

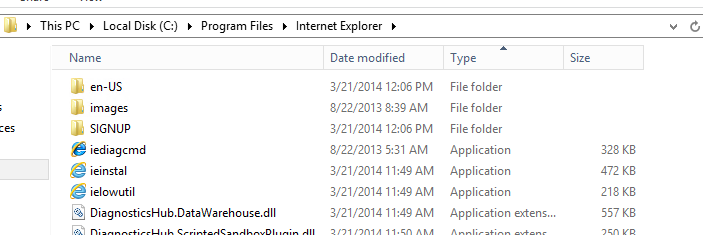
Перезагрузите Windows Server и убедитесь, что файл iexplore.exe успешно удален из
C:\Program Files\Internet Explorer
.
Как отключить Internet Explorer 11 с помощью групповых политик?
Если вы не хотите полностью удалять IE в Windows (например, вы хотите использовать IE Mode в Microsoft Edge), вы можете запретить запуск браузера Internet Explorer 11 с помощью групповых политик:
-
- Создайте новую доменную GPO и назначьте ее на OU с компьютерами/серверами с помощью консоли
GPMC.msc
или воспользуйтесь редактором локальной групповой политики (
gpedit.msc
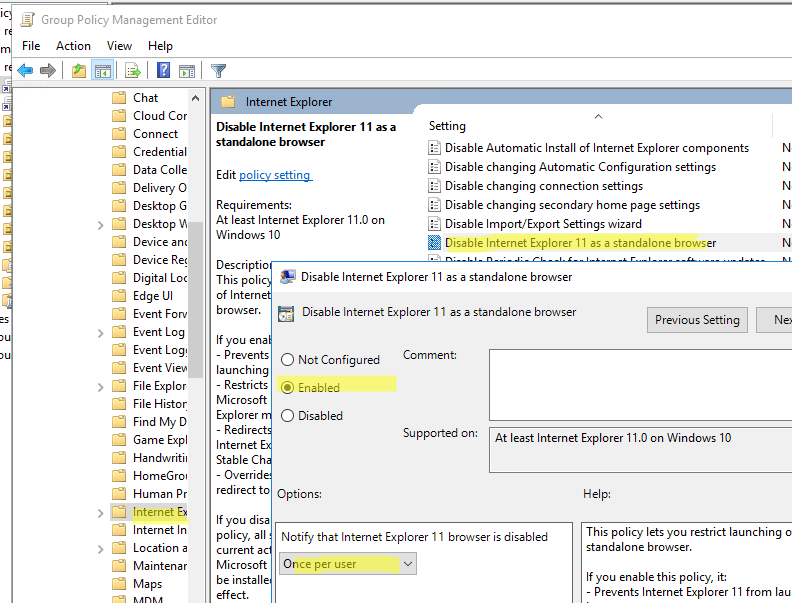
); - Перейдите в раздел Computer Configuration -> Administrative Templates -> Windows Components -> Internet Explorer;
- Найди параметр GPO Disable Internet Explorer 11 as a standalone browser, включите его и выберите тип уведомления пользователя об отключении IE:Never – пользователи не будут уведомлены о том, что IE 11 отключен;
Always – при каждом запуске IE пользователи будут получать уведомление об отключенном Internet Explorer 11 и перенаправляться в альтернативный браузер Microsoft Edge;
Once per user – пользователи оповещаются только один раз (рекомендовано);
- Создайте новую доменную GPO и назначьте ее на OU с компьютерами/серверами с помощью консоли
- Обновите настройки GPO на компьютерах;
Данная политика запрещается запуск браузера Internet Explorer 11 (через файловые ассоциации Windows или прямым запуском iexplore.exe) и запускает вместо него Microsoft Edge (при этом режим совместимостей IE в Edge полностью работоспособен). Иконки IE 11 удаляются из стартового меню и панели задач.
При попытке запустить IE вручную, появляется уведомление:
Internet Explorer
This action is restricted. For more information, please contact your system administrator.

It is not necessary to keep Internet Explorer (IE) on Windows Server 2019 if you don’t have any legacy applications that require it. In fact, many organizations choose to remove or disable IE on their servers for security and maintenance reasons.
Here are a few reasons why you might consider removing IE from your Windows Server 2019:
- Security: Internet Explorer has been the target of numerous security vulnerabilities over the years. Removing it reduces the attack surface and decreases the risk of exploitation.
- Maintenance: By removing IE, you can simplify system maintenance and reduce the overhead associated with updating and patching the browser.
- Resource Optimization: IE consumes system resources, and removing it can potentially free up memory and CPU cycles for other processes.
- Compliance: In some regulated environments, removing unnecessary software components like IE can help streamline compliance efforts by reducing the number of potential attack vectors.
Please note that, as with any changes to system components, it’s crucial to understand the potential impacts and test the script in a non-production environment before deploying it to production systems. Additionally, removing Internet Explorer may affect certain system functionalities and compatibility with certain applications.
Remove IE from Windows Server 2019
Open Server Manager
Open Server Manager by clicking on the Start button and selecting «Server Manager.»
Access Server Manager Dashboard
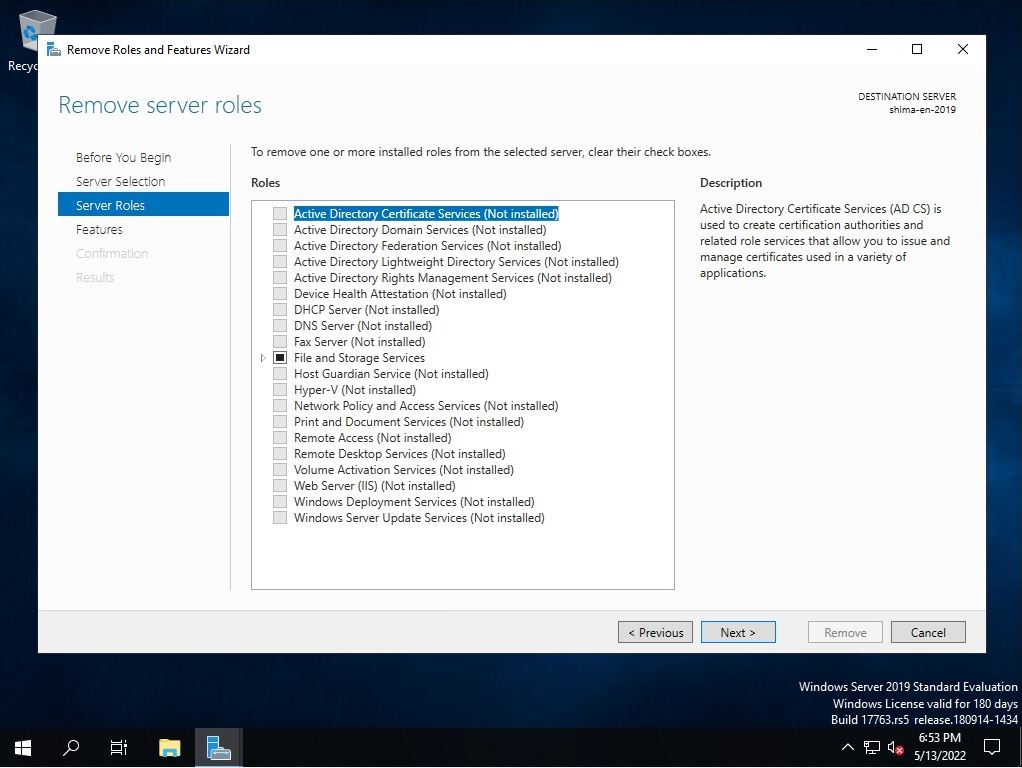
Once Server Manager is open, locate and click on «Manage» from the top-right menu, then select «Remove Roles and Features» from the dropdown menu. This will open the «Remove Roles and Features Wizard.»
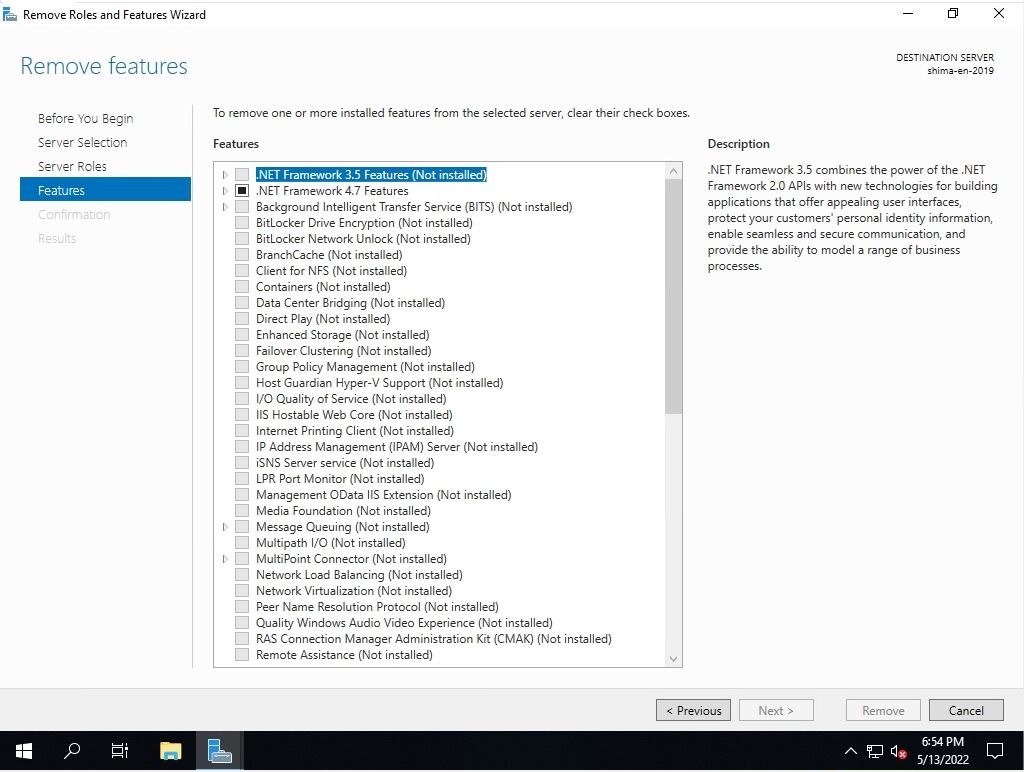
Select Features
In the wizard, navigate to the Features section and find «Internet Explorer 11.» Uncheck the box next to it. You’ll likely receive a prompt indicating that removing IE will also remove additional components and features. Confirm that you want to proceed.
Complete Removal
Follow the prompts to complete the removal process. This will uninstall Internet Explorer from your Windows Server 2019 system.
Reboot if Necessary
After the removal is complete, you may need to restart your server for the changes to take effect. If prompted, go ahead and restart the server.
Verification
Once the server has restarted, you can verify that Internet Explorer has been removed by checking the Programs and Features section of the Control Panel or attempting to search for and launch Internet Explorer.
PowerShell script to uninstall IE
Save this script with a .ps1 extension (e.g., Uninstall-IE.ps1). Before running the script, ensure that you have elevated privileges (Run as Administrator) in PowerShell. This script will check if Internet Explorer is installed on the system and then proceed to uninstall it if it’s found. After executing the script, Internet Explorer should be uninstalled from the Windows Server 2019 system.
							# Check if the script is running with elevated privileges
if (-not ([Security.Principal.WindowsPrincipal] [Security.Principal.WindowsIdentity]::GetCurrent()).IsInRole([Security.Principal.WindowsBuiltInRole] "Administrator")) {
    Write-Warning "You need to run this script as an administrator. Please run PowerShell as administrator and then try again."
    Exit
}

# Uninstall Internet Explorer
Write-Host "Uninstalling Internet Explorer..."

# Uninstall Internet Explorer 11
$IEFeatureName = "Internet-Explorer-Optional-amd64"
$IEFeature = Get-WindowsOptionalFeature -Online | Where-Object { $_.FeatureName -eq $IEFeatureName }

if ($IEFeature -ne $null) {
    Disable-WindowsOptionalFeature -FeatureName $IEFeatureName -Online
    Write-Host "Internet Explorer has been uninstalled."
} else {
    Write-Warning "Internet Explorer is not installed on this system."
}
How to Uninstall Internet Explorer from Windows Server 2019?
Why Uninstall Internet Explorer?
Internet Explorer (IE) has been the built-in web browser for Windows operating systems since its inception. However, with the advent of modern web browsers like Google Chrome, Mozilla Firefox, and Microsoft Edge, its popularity has gradually declined. In fact, Microsoft itself has recommended the use of alternative browsers for better security and performance. Therefore, many organizations have opted to uninstall Internet Explorer from their Windows servers to ensure better security and improved user experience.
Uninstalling Internet Explorer from Windows Server 2019
Uninstalling Internet Explorer from Windows Server 2019 is a relatively straightforward process. Here’s a step-by-step guide to help you do so:
Method 1: Uninstall Internet Explorer using the Control Panel
- Go to the Control Panel by searching for it in the Start menu or by typing «Control Panel» in the Run dialog box (Windows key + R).
- Click on Programs and Features (in Windows 10 or Programs and Features in Windows 7/Vista).
- Look for Internet Explorer in the list of installed programs. Click on it and then click the Uninstall button.
- Follow the prompts to complete the uninstallation process.
Method 2: Uninstall Internet Explorer using Command Prompt or PowerShell
- Open the Command Prompt as an administrator by right-clicking on the Start button and selecting Open Windows PowerShell (Admin).
- Type the following command and press Enter:
wmic product where (name='INTERNET EXPLORER') call uninstall - Alternatively, you can use PowerShell to uninstall Internet Explorer:
Get-Package -Name Microsoft-Windows-Internet-Explorer -ArgumentsList '/Uninstall' | Foreach-Object {($_ | Add-Member -NotePropertyMembers 'parameters' -NotePropertyMember ' /quiet' -Type 'NoteProperty') | Add-Member -NotePropertyMembers 'parameters' -NotePropertyMember ' /norestart' -Type 'NoteProperty')}
Important Notes:
- Before uninstalling Internet Explorer, make sure you have an alternative web browser installed and configured on your system.
- Uninstalling Internet Explorer may break some legacy applications that rely on it.
- Some customizations and settings in Internet Explorer may not be retained after uninstallation.
Post-Uninstallation:
After uninstalling Internet Explorer, you can:
- Delete leftover files and folders: Manually delete the files and folders associated with Internet Explorer. You can find these in the %userprofile%AppDataLocalLowMicrosoftWindowsTemporary Internet Files and %userprofile%AppDataLocalMicrosoftWindowsTemporary Internet Files directories.
- Disable any remnants: Run the following command in the Command Prompt or PowerShell to disable any remaining Internet Explorer-related services:
net stop iexplore(for Windows 10) ornet stop iisadmin(for Windows 7/Vista).
Conclusion:
Uninstalling Internet Explorer from Windows Server 2019 is a relatively simple process, and can be done using either the Control Panel or Command Prompt/PowerShell. While it’s not recommended for general use, uninstalling Internet Explorer might be necessary for specific scenarios, such as:
- Security concerns: If you’re concerned about potential security vulnerabilities, uninstalling Internet Explorer may be a good idea.
- Incompatibility issues: If an application relies on Internet Explorer and causes problems, uninstalling it may resolve the issue.
- Legacy application requirements: If you need to run a legacy application that relies on Internet Explorer, uninstalling it might be necessary.
Additional Resources:
- Microsoft’s official documentation on uninstalling Internet Explorer: <https://docs.microsoft.com/en-us/previous-versions/windows/it-pro/windows-7/user-admin/uninstalled-application– support-uninstall>
- Windows Server 2019 documentation: https://docs.microsoft.com/en-us/windows-server/get-started/technical-reference
By following these steps, you can successfully uninstall Internet Explorer from your Windows Server 2019 installation. Remember to consider alternative web browsers and potential implications before making the decision.
Your friends have asked us these questions — Check out the answers!

Windows Server 2019
The standard browser for Windows Server 2019 is IE (Internet Explorer) 11. If you no longer need Internet Explorer, you can uninstall (disable) Internet Explorer 11 by launching a command prompt as an administrator user. * It is also possible to re-enable Internet Explorer after disabling it.
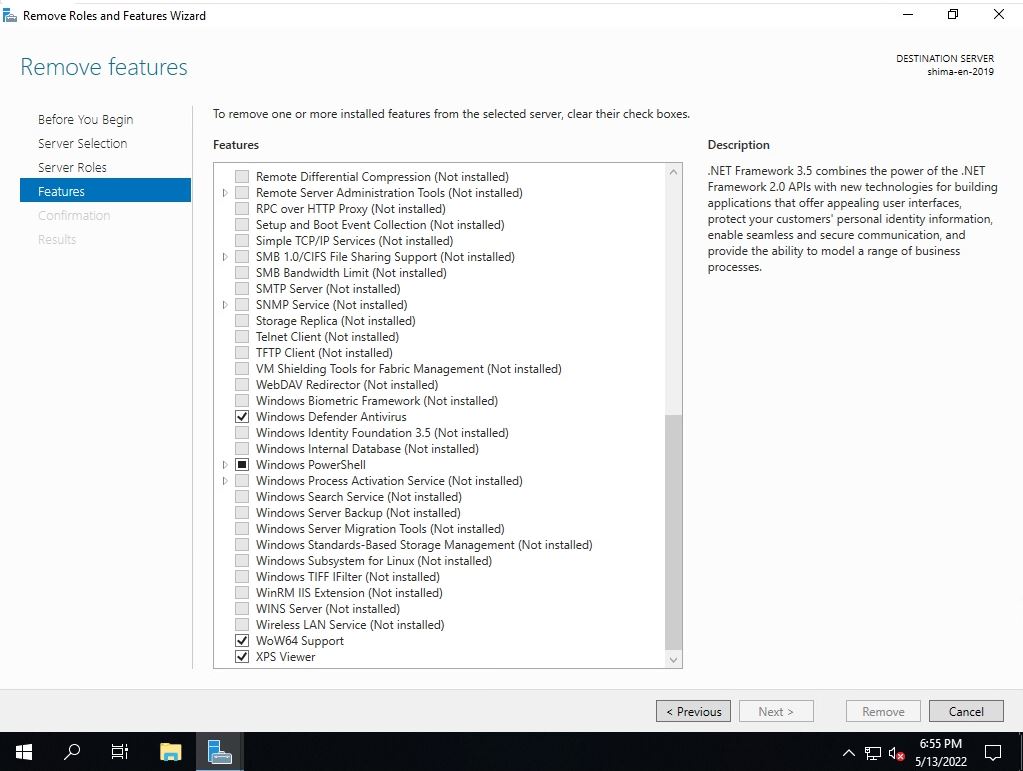
In Windows Server 2019, the “IE (Internet Explorer)” item is not displayed on the Remove Roles and Features Wizard screen and cannot be disabled using the GUI (Graphical User Interface).
Remove server roles: Server Roles screen (1/1)
Remove Roles and Features Wizard screen: Features screen (1/2)
Remove Roles and Features Wizard screen: Features screen (2/2)
In this article, we will explain how to delete (disable) “IE (Internet Explorer) 11” using the DISM image management command from the command prompt of Windows Server 2019, and enable IE from the disabled state as a supplement.
Windows Server 2019: Internet Explorer 11 How to Disable
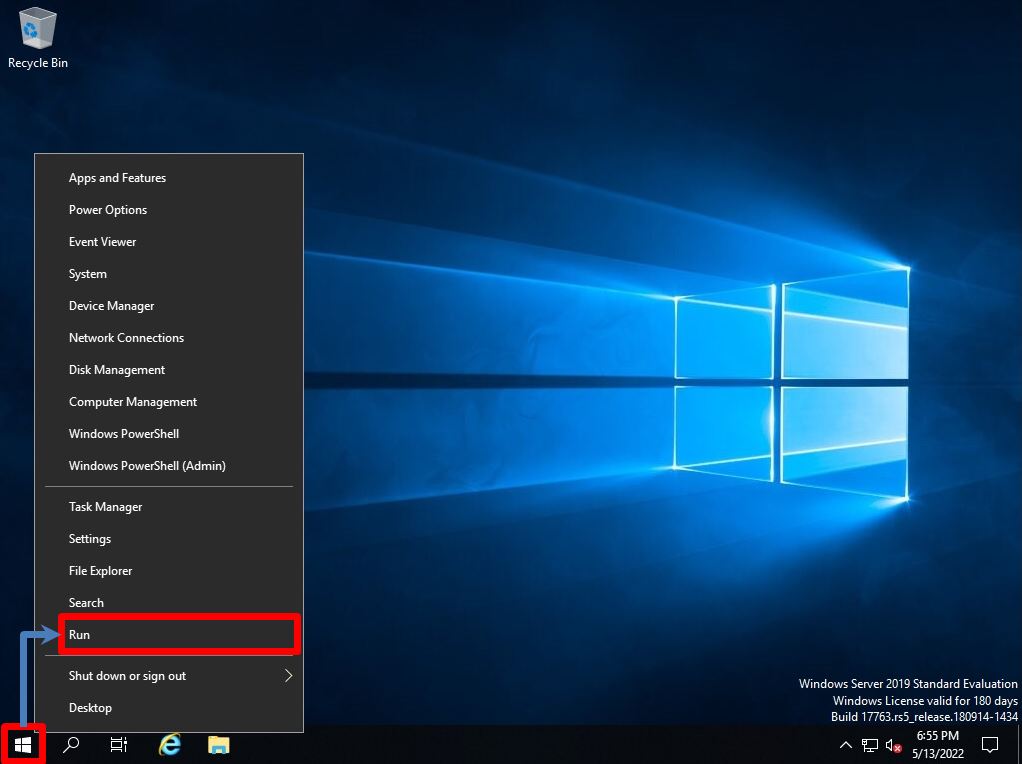
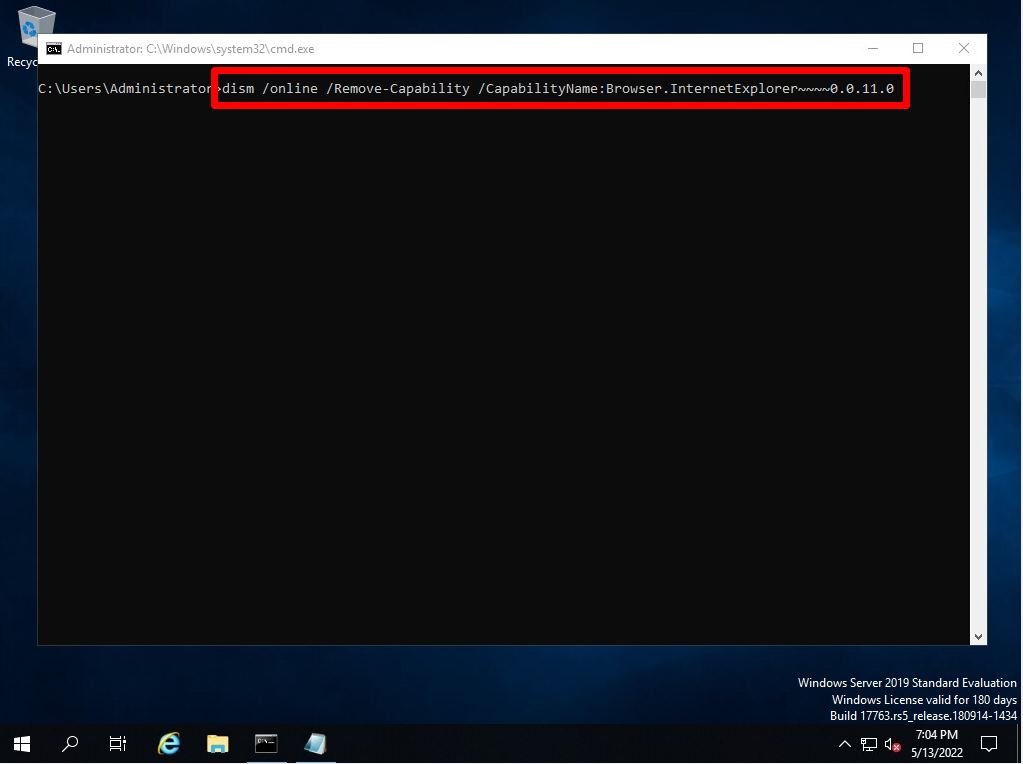
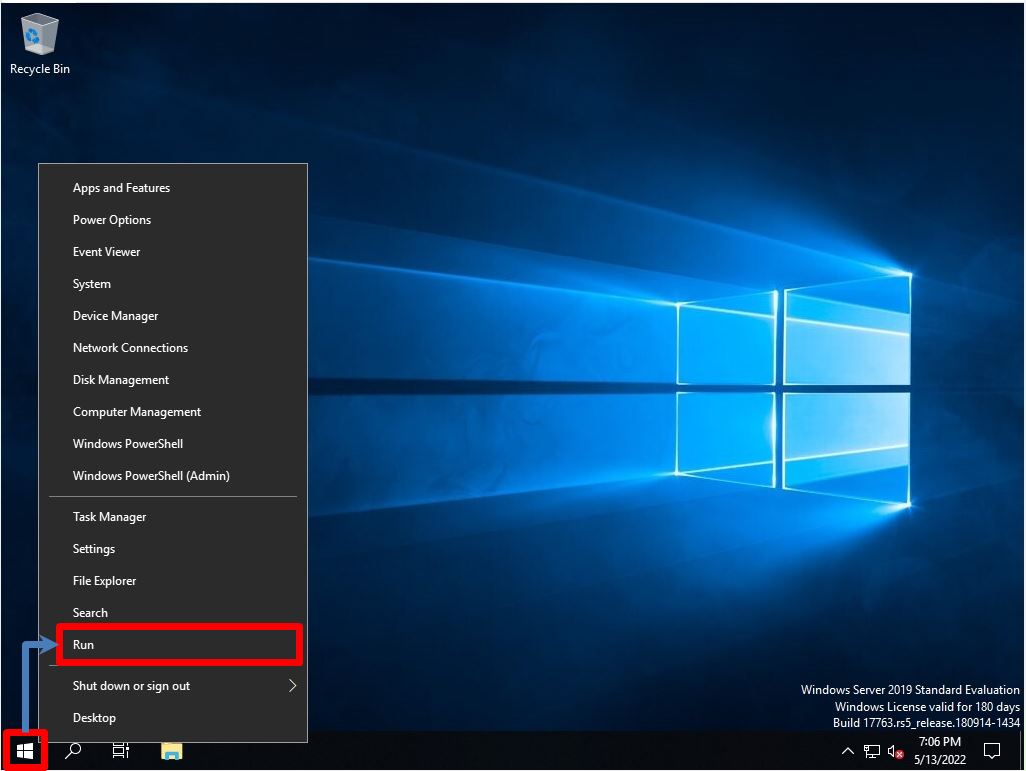
Step 1:
Right-click the Windows mark at the bottom left of the desktop screen-> select “Run”.
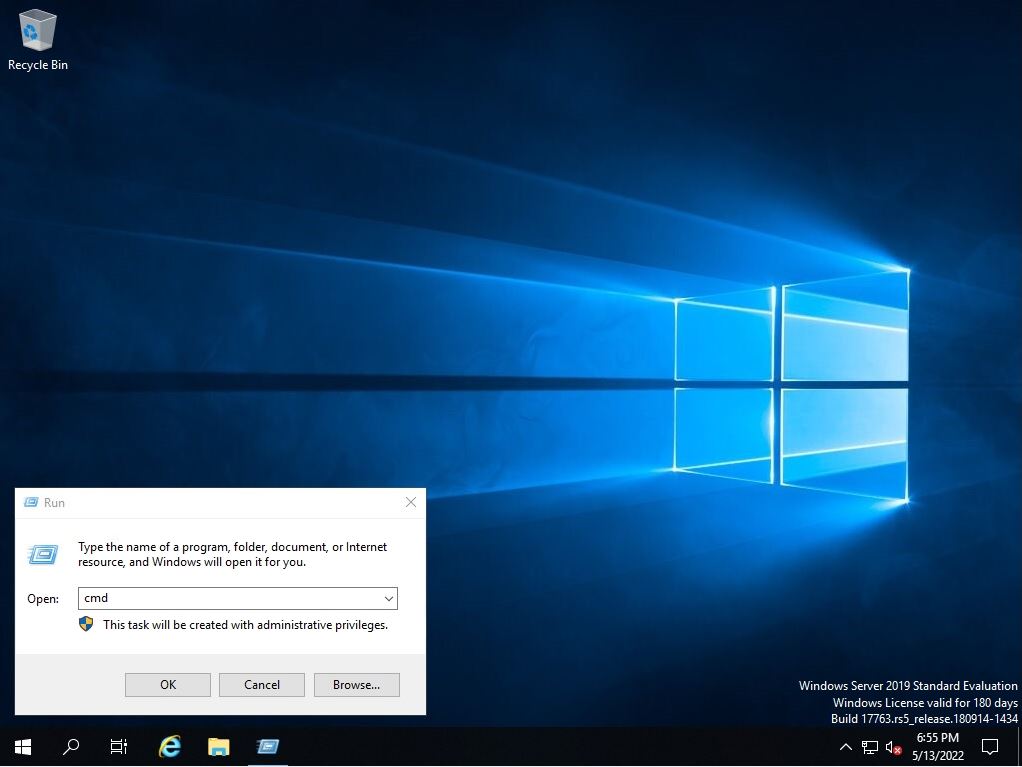
Step 2:
Run screen: Enter “cmd”-> Select “OK”.
Step 3:
Below, disable IE with the execution command.
dism /online /Remove-Capability /CapabilityName:Browser.InternetExplorer~~~~0.0.11.0
The IE invalidation command is described on the Microsoft support site. https://docs.microsoft.com/en-us/troubleshoot/browsers/disable-internet-explorer-windows
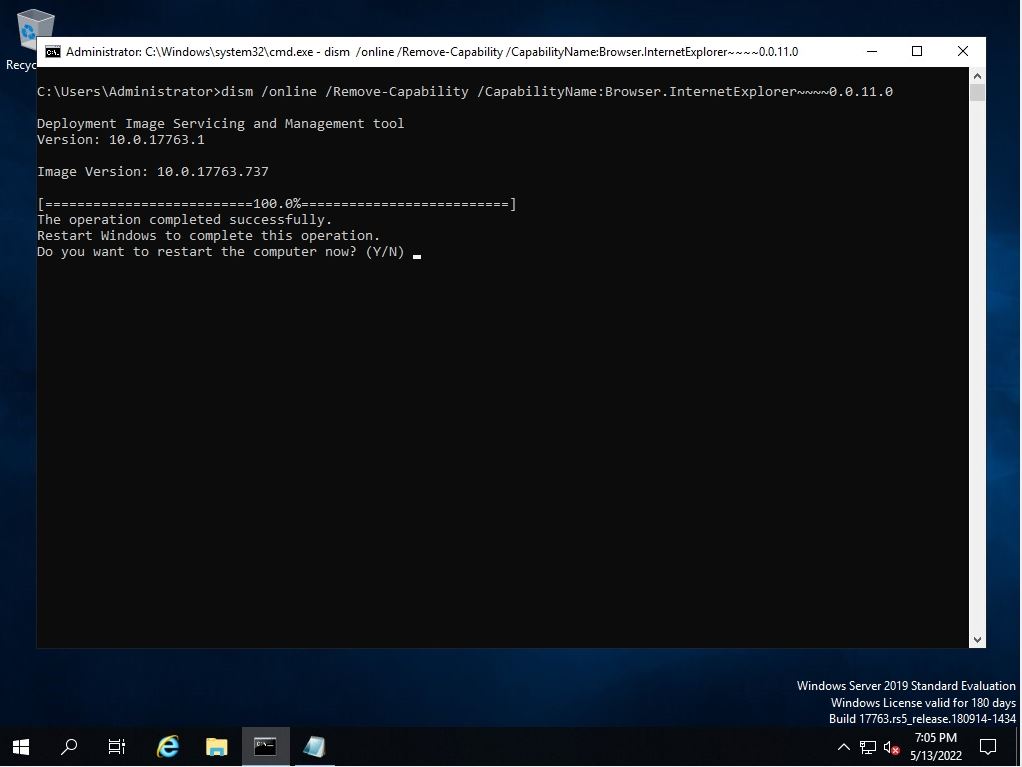
Step 4:
Wait a moment for the operation to complete successfully. After the processing is completed, the following screen will be output.
Do you want to restart the computer now? Enter Y on the keyboard with (Y/N) and the server will restart immediately.
Windows Server 2019: Internet Explorer 11 How to Enable
Step 1:
Right-click the Windows mark at the bottom left of the desktop screen -> select “Run”.
Step 2:
Run screen: Enter “cmd” -> Select “OK”.

Step 3:
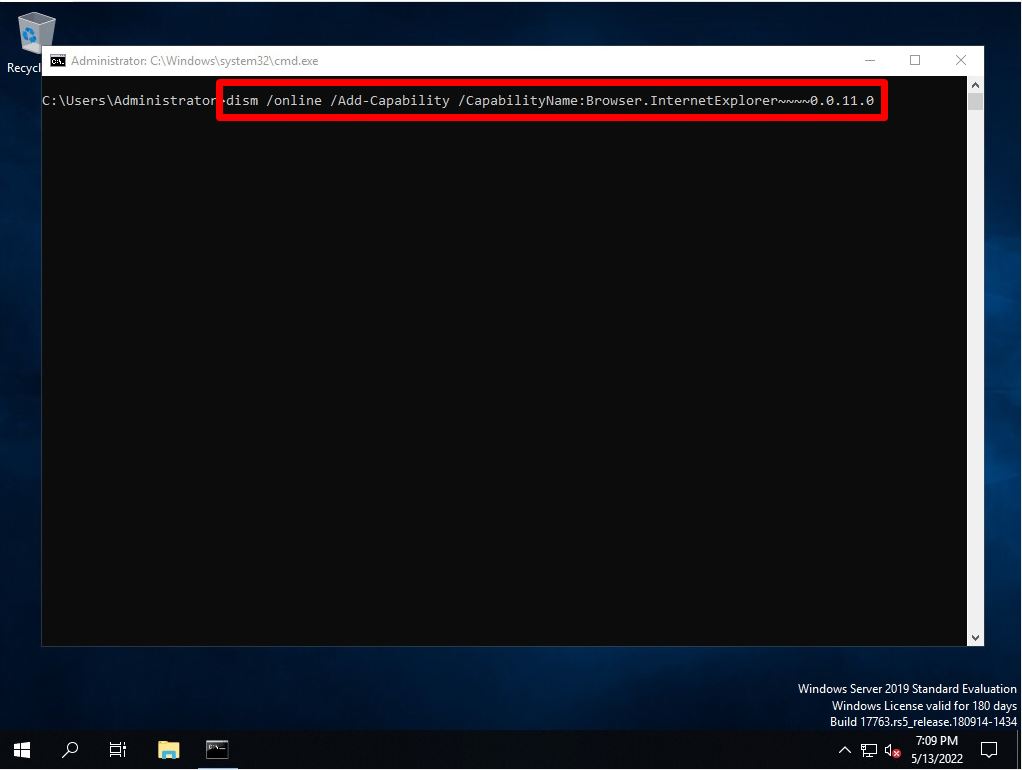
Below, enable IE with the execution command.
dism /online /Add-Capability /CapabilityName:Browser.InternetExplorer~~~~0.0.11.0
The IE activation command is described on the Microsoft support site. https://docs.microsoft.com/en-us/troubleshoot/browsers/disable-internet-explorer-windows
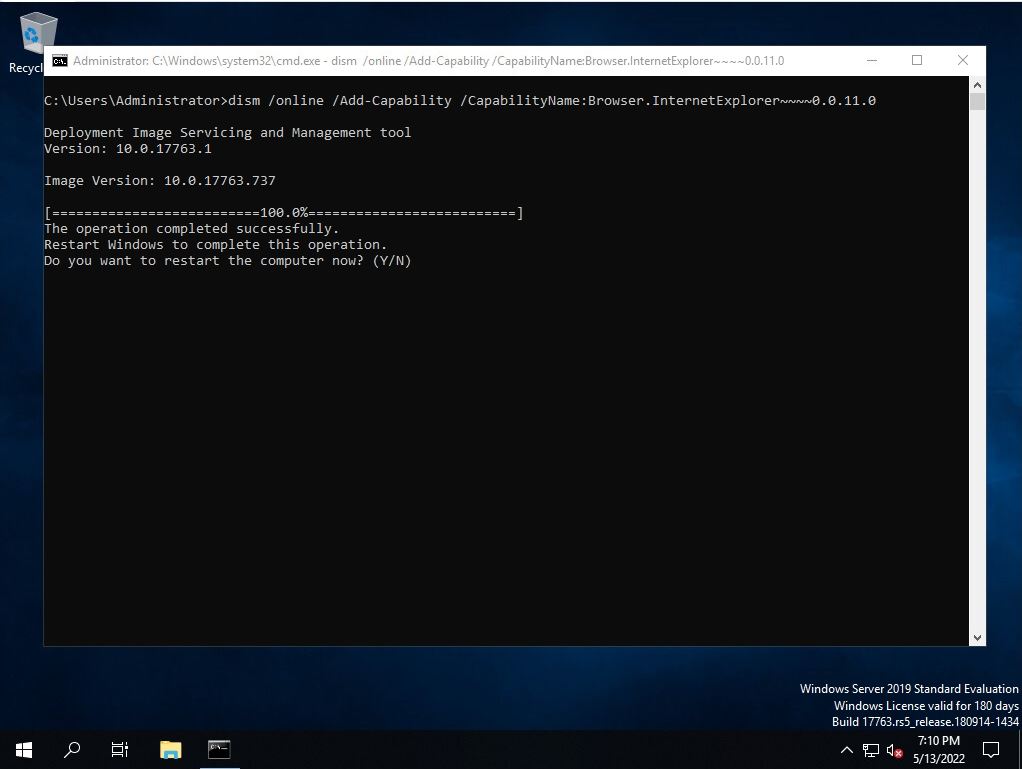
Step 4:
Wait a moment for the operation to complete successfully. After the processing is completed, the following screen will be output.
Would you like to restart your computer now? Enter Y on the keyboard with (Y/N) and the server will restart immediately.
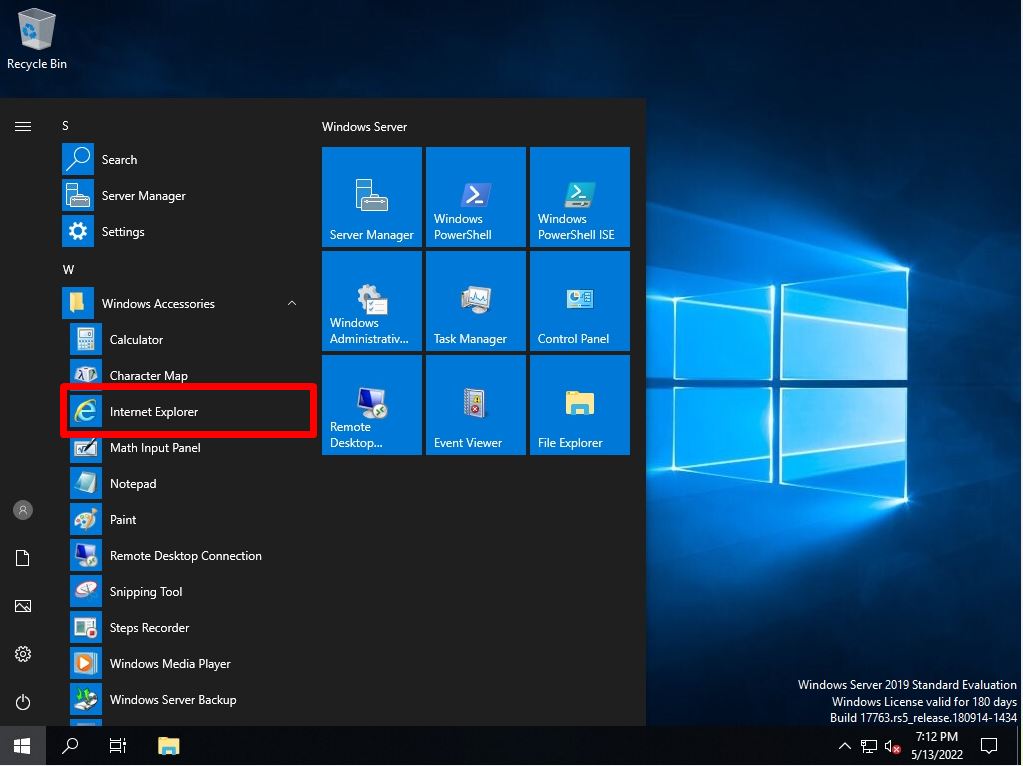
After restarting Windows Sever 2019, it will be displayed and available under Windows Accessories again.
In this article, I will show you how to uninstall Internet Explorer from Windows Server. You can safely uninstall Internet Explorer from Windows Server when Microsoft Edge is installed on the server.
Internet Explorer 11 is the last major version of Internet Explorer. There won’t be any more updates to Internet Explorer because the software is no longer supported. The Internet Explorer 11 desktop application went out of support for certain operating systems starting June 15, 2022.
Microsoft advises Internet Explorer (IE) users to switch to Microsoft Edge with IE mode. The IE mode in Edge browser provides built-in legacy browser support for sites requiring Internet Explorer.

There are multiple ways to uninstall Internet Explorer from Windows Server. However, going to Apps > Optional Features would be the simplest way to remove IE from the server. DISM can be used to uninstall the IE11 application from Windows Server and even PowerShell.
It should be noted that Internet Explorer 11 comes pre-installed on the most recent releases of Windows Server. This includes Windows Server 2019, Windows Server 2022. Only when you determine that Internet Explorer is not required, proceed with the uninstallation.
If you are looking to replace Internet Explorer with Microsoft Edge browser, here are some helpful articles:
- Deploy Microsoft Edge using Intune
- How to Deploy Microsoft Edge using SCCM
- Complete Guide to Deploy Edge Updates using SCCM ADR
- Create Microsoft Edge Device Collection in SCCM
Reasons to Uninstall Internet Explorer
There are many reasons why you should uninstall Internet Explorer from Windows Server:
- Although Windows Server 2012 R2 and later will continue to receive IE updates, Internet Explorer has reached the end of its support life.
- It is not recommended to have Internet Explorer installed on Windows Server as the administrators who log into servers won’t have a need for it anyway, plus it can be a security concern.
- It is secure to uninstall Internet Explorer from Windows Server because Microsoft Edge has already replaced it. You can use Microsoft Edge in IE mode to access websites that function in IE.
- Microsoft Edge is a stable browser, has more features than IE, and gets frequent updates.
The below articles include advanced ways to disable Internet Explorer on multiple devices.
- Disable Internet Explorer 11 using Group Policy
- Disable Internet Explorer using Intune
To check if Internet Explorer is installed on Windows Server, click Start and type Internet Explorer in the search box. If the Internet Explorer app appears in the search results, IE is present and has been installed on the server.

How To Uninstall Internet Explorer from Windows Server
We will now look at the steps to uninstall Internet Explorer from Windows Server. Log in to Windows Server and launch the Settings app. Now select Apps and in the Apps & Features window, select Optional Features.

On the Optional Features window, scroll down and look for Internet Explorer under Installed Features and select Uninstall. This step will essentially uninstall the IE app from Windows Server.

The IE app uninstallation begins. Once the Internet Explorer 11 app is removed from the server, a server reboot is required. Restart the Windows Server to complete the removal of Internet Explorer app.

Remove Internet Explorer from Windows Server using DISM
An alternate method to uninstall Internet Explorer is using DISM. With a single command, you can remove the IE11 from Windows Server. On your Windows Server, launch the command prompt as administrator and run the below command to uninstall Internet Explorer using DISM.
dism /online /disable-feature /featurename:Internet-Explorer-Optional-amd64

To complete the uninstallation of Internet Explorer, restart the server once.
Deployment Image Servicing and Management tool
Version: 10.0.20348.681
Image Version: 10.0.20348.803
Disabling feature(s)
[==========================100.0%==========================]
The operation completed successfully.
Restart Windows to complete this operation.
Do you want to restart the computer now? (Y/N)
Still Need Help?
If you need further assistance on the above article or want to discuss other technical issues, check out some of these options.

Prajwal Desai
Prajwal Desai is a technology expert and 10 time Dual Microsoft MVP (Most Valuable Professional) with a strong focus on Microsoft Intune, SCCM, Windows 365, Enterprise Mobility, and Windows. He is a renowned author, speaker, & community leader, known for sharing his expertise & knowledge through his blog, YouTube, conferences, webinars etc.