
Microsoft официально заверила поддержку Internet Explorer (IE) для большинства современных версий Windows 10 и 11 (кроме LTSC редакций и Windows Server) с 15 июня 2022. Классическое приложение Internet Explorer 11 будет постепенно перенаправляться во встроенный браузер Microsoft Edge. В ближайших обновлениях, распространяемых через Windows Update, MSFT обещает полностью отключить IE на современных билдах Windows. В этой статье мы рассмотрим, как отключить или удалить Internet Explorer в Windows 11/10/8.1 и Windows Server.
Содержание:
- Удаляем Internet Explorer в Windows 10 и 11
- Как удалить Internet Explorer в Windows Server?
- Как отключить Internet Explorer 11 с помощью групповых политик?
Удаляем Internet Explorer в Windows 10 и 11
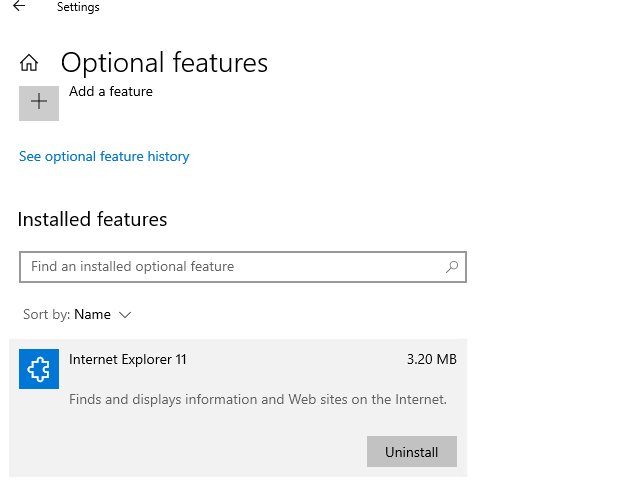
Internet Explorer 11 в Windows 10 и 11 поставляется в виде отдельного компонента, доступного как Feature on Demand/FoD (по аналогии с RSAT или NetFx3). Вы можете установить или удалить IE через приложение Параметры.
- Перейдите в Settings -> Apps -> Apps and Feature -> Optional Features или выполните команду быстрого доступа
ms-settings:appsfeatures - Найдите в списке Internet Explorer 11 и нажмите кнопку Uninstall;

Также вы можете с помощью PowerShell проверить, установлены ли компоненты IE на компьютере:
Get-WindowsOptionalFeature -Online –FeatureName Internet-Explorer-Optional-amd64

FeatureName : Internet-Explorer-Optional-amd64 DisplayName : Internet Explorer 11 Description : Finds and displays information and Web sites on the Internet. RestartRequired : Required

State : Enabled CustomProperties : \SoftBlockLink : http://go.microsoft.com/fwlink/?LinkID=142507
В данном примере компоненты IE11 устанговлены, чтобы удалить IE11, выполните команду:
Disable-WindowsOptionalFeature -FeatureName Internet-Explorer-Optional-amd64 –Online
Перезагрузите компьютер.
После удаления Internet Explorer исчезнут ассоциации для файлов .html (и других веб-форматов) с IE. При этом Windows Store и другие встроенные приложения будут работать, даже если на компьютере не установлено другого веб браузера.
При удалении компонентов Internet Explorer 11 в Windows, вы не сможете использовать режим совместимости Internet Explorer в браузере Microsoft Edge. Если вам нужен этот режим для просмотра устаревших сайтов, вместо удаления IE, отключите его с помощью групповых политик (описано в последнем разделе этой статьи).
Вы можете использовать такой скрипт для удаления IE на компьютере:
RemoveIE.ps1
#PowerShell script to remove Internet Explorer
#Check If IE is Installed
$check = Get-WindowsOptionalFeature -Online | Where-Object {$_.FeatureName -eq "Internet-Explorer-Optional-amd64"}
If ($check.State -ne "Disabled")
{
#Remove Internet Explorer
Disable-WindowsOptionalFeature -FeatureName Internet-Explorer-Optional-amd64 -Online -NoRestart | Out-Null
}
Для удаления Internet Explorer на удаленных компьютерах, можно использовать команду Invoke-Command (требует настроенного WinRM/PowerShell Remoting):
Invoke-Command -ComputerName PC01,PC02,PC03 -FilePath C:\PS\RemoveIE.ps1
Как удалить Internet Explorer в Windows Server?
IE уже отсутствует в Windows в Windows Server 2022. В более старых версиях Windows Server (2019/2016/2012R2) вы можете удалить Internet Explorer 11 с помощью DISM:
dism /online /disable-feature /featurename:Internet-Explorer-Optional-amd64

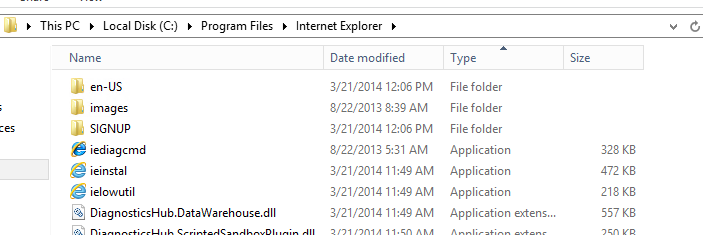
Перезагрузите Windows Server и убедитесь, что файл iexplore.exe успешно удален из
C:\Program Files\Internet Explorer
.
Как отключить Internet Explorer 11 с помощью групповых политик?
Если вы не хотите полностью удалять IE в Windows (например, вы хотите использовать IE Mode в Microsoft Edge), вы можете запретить запуск браузера Internet Explorer 11 с помощью групповых политик:
-
- Создайте новую доменную GPO и назначьте ее на OU с компьютерами/серверами с помощью консоли
GPMC.msc
или воспользуйтесь редактором локальной групповой политики (
gpedit.msc
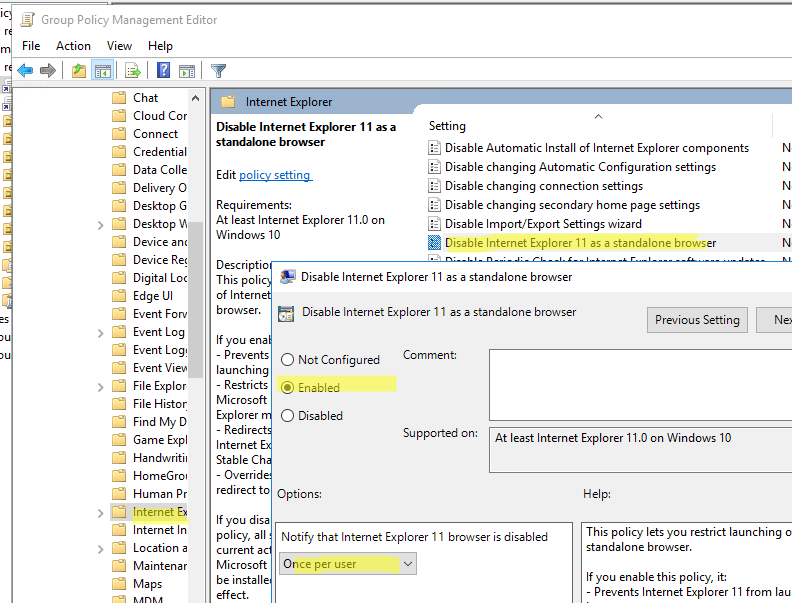
); - Перейдите в раздел Computer Configuration -> Administrative Templates -> Windows Components -> Internet Explorer;
- Найди параметр GPO Disable Internet Explorer 11 as a standalone browser, включите его и выберите тип уведомления пользователя об отключении IE:Never – пользователи не будут уведомлены о том, что IE 11 отключен;
Always – при каждом запуске IE пользователи будут получать уведомление об отключенном Internet Explorer 11 и перенаправляться в альтернативный браузер Microsoft Edge;
Once per user – пользователи оповещаются только один раз (рекомендовано);
- Создайте новую доменную GPO и назначьте ее на OU с компьютерами/серверами с помощью консоли
- Обновите настройки GPO на компьютерах;
Данная политика запрещается запуск браузера Internet Explorer 11 (через файловые ассоциации Windows или прямым запуском iexplore.exe) и запускает вместо него Microsoft Edge (при этом режим совместимостей IE в Edge полностью работоспособен). Иконки IE 11 удаляются из стартового меню и панели задач.
При попытке запустить IE вручную, появляется уведомление:
Internet Explorer
This action is restricted. For more information, please contact your system administrator.

How to Uninstall Internet Explorer 11 from Windows Server 2016
Internet Explorer 11 (IE 11) has been a part of the Windows ecosystem for years, often serving as the default web browser for many Windows users. However, with the advent of more modern browsers like Microsoft Edge and Google Chrome, many organizations are opting to uninstall IE 11, especially in environments such as Windows Server 2016. This article details how you can effectively and safely uninstall Internet Explorer 11 from a Windows Server 2016 system.
Understanding Internet Explorer 11 on Windows Server 2016
Windows Server 2016 is a robust operating system designed for stability and performance, largely used in business and enterprise environments. Internet Explorer 11, the last version of Microsoft’s long-standing browser, comes pre-installed with this OS. While some legacy applications might require IE 11 to function correctly, many IT professionals and organizations seek to remove it due to security vulnerabilities and the move towards more modern web standards.
Why Uninstall Internet Explorer 11?
Before proceeding with the steps to uninstall IE 11, it’s vital to understand the rationale behind removing this browser:
-
Security Concerns: IE 11 has been the target of numerous security vulnerabilities. With the cessation of regular updates, keeping it installed poses a cybersecurity risk.
-
Compatibility Issues: Some modern applications are not compatible with IE, making it less desirable compared to contemporary browsers.
-
Performance: Newer browsers tend to be faster and provide better resource management, which can lead to overall improved server performance.
-
Legacy Application Support: If you’re not using applications that require IE, uninstalling it can reduce the attack surface of your server.
Prerequisites for Uninstallation
Before you begin the uninstallation process, consider these prerequisites:
- Administrative Privileges: You must have administrative privileges to uninstall components from Windows Server.
- Backup Important Data: Although uninstalling a system feature like a browser is generally safe, always ensure that you have current backups of your important data.
Steps to Uninstall Internet Explorer 11
Uninstalling Internet Explorer 11 on Windows Server 2016 can be achieved through different methods: using the Server Manager, using PowerShell, or using the Control Panel. Below are the detailed instructions for each method.
Method 1: Using Server Manager
-
Open Server Manager:
- Click on the Start button.
- Select ‘Server Manager’ from the Start menu.
-
Access Features:
- In Server Manager, find and click on ‘Manage’ in the top right corner.
- Select ‘Remove Roles and Features’ from the dropdown menu.
-
Navigate to the Wizard:
- The ‘Remove Roles and Features Wizard’ will open.
- Click ‘Next’ until you reach the selection of roles and features.
-
Select Your Server:
- Choose the server from which you want to uninstall features.
- Again, click ‘Next’.
-
Find and Disable Internet Explorer 11:
- In the Features section, locate ‘Internet Explorer 11’.
- Uncheck the box next to it.
-
Proceed with the Uninstallation:
- Click ‘Next’ and then ‘Remove’ to begin the uninstallation process.
- Wait for the process to complete and then click ‘Close.’
-
Restart the Server:
- After uninstallation, it’s advisable to restart your server for the changes to take full effect.
Method 2: Using PowerShell
For those who prefer command-line interfaces, using PowerShell to uninstall Internet Explorer 11 can be an efficient way:
-
Open PowerShell as Administrator:
- Right-click on the Start button and select ‘Windows PowerShell (Admin)’ from the context menu.
-
Check Installed Features:
- Before removing features, it’s a good idea to confirm what is installed. Run the following command:
Get-WindowsFeature | Where-Object { $_.Name -eq "Web-IE" }
- Before removing features, it’s a good idea to confirm what is installed. Run the following command:
-
Uninstall Internet Explorer 11:
- After confirming its presence, you can uninstall IE 11 by executing the command:
Uninstall-WindowsFeature -Name Web-IE -IncludeManagementTools
- After confirming its presence, you can uninstall IE 11 by executing the command:
-
Non-Interactive Removal (Optional):
- If you need to perform the removal without prompts, add the
-Confirm:$falseflag:Uninstall-WindowsFeature -Name Web-IE -IncludeManagementTools -Confirm:$false
- If you need to perform the removal without prompts, add the
-
Verify Uninstallation:
- You can verify that Internet Explorer 11 has been uninstalled by rerunning the command from Step 2. The results should indicate that Internet Explorer is no longer available.
-
Restart the Server:
- Again, to complete changes, restart the server.
Method 3: Using the Control Panel
If you are more comfortable using the Graphical User Interface, you can uninstall IE via the Control Panel:
-
Open Control Panel:
- On the computer, navigate to the Start menu, type ‘Control Panel’, and hit Enter.
-
Access Programs and Features:
- Locate and click on ‘Programs’, then select ‘Programs and Features’.
-
Turn Windows Features On or Off:
- On the left sidebar, click on ‘Turn Windows features on or off’.
-
Locate Internet Explorer 11:
- In the Windows Features dialog, look for ‘Internet Explorer 11’. Uncheck the box next to it.
-
Confirm the Changes:
- Click ‘OK’ to apply the changes. Windows will begin to uninstall Internet Explorer.
-
Reboot the System:
- After it completes, follow the prompt to restart your server.
Post-Uninstallation Considerations
After successfully uninstalling Internet Explorer 11, you may consider the following steps and best practices:
-
Choose a Replacement Browser: Ensure that you have another web browser installed on your server. Microsoft Edge or another secure browser should be your priority.
-
Test Application Compatibility: If you have web applications that were previously accessing IE, test them in the new browser to ensure they function correctly.
-
Enhance Security Measures: With the uninstallation of IE, consider tightening your server’s security by implementing additional firewall rules or policies, as the removal of any software can lead to vulnerabilities if not properly managed.
-
Monitor Server Performance: After the removal, monitor how it affects the overall performance of the server and the applications running on it. This can help identify any unforeseen issues related to the application’s performance or user experience.
-
User Education: If your server supports end-users or departments, ensure they are informed about the change and provide guidance on using the new browser.
Conclusion
Uninstalling Internet Explorer 11 from Windows Server 2016 is a straightforward task that can lead to improved security and performance. By following the methods outlined above, you can effectively remove this outdated browser from your server environment. As technology progresses, adapting to modern web standards and tools is crucial, so ensuring your server remains as secure and efficient as possible is of utmost importance.
It’s essential to keep your server updated and regularly assess the applications and capabilities it offers to ensure optimal performance in your operational environment. Uninstalling outdated or unused software components is a proactive step towards a robust, secure, and modern digital infrastructure.
How to Uninstall Internet Explorer 11 from Windows Server 2016
Internet Explorer 11 (IE 11) has served as Windows’ built-in web browser for many years, but its relevance has diminished significantly with the rise of modern browsers like Microsoft Edge, Google Chrome, and Mozilla Firefox. Windows Server 2016, like all other Windows operating systems, comes with IE 11 pre-installed. However, some administrators and users may wish to uninstall it for various reasons, such as security concerns, preference for another browser, or to save resources on a server environment. This guide will walk you through the detailed process of uninstalling Internet Explorer 11 from Windows Server 2016.
Why Uninstall Internet Explorer 11?
Before diving into the uninstallation process, it’s important to understand why one might consider removing IE 11:
-
Security Vulnerabilities: IE 11 has been plagued by several vulnerabilities over the years. With Microsoft encouraging users to switch to Edge, some organizations prefer to remove outdated browsers to mitigate risks.
-
Resource Management: For resource-constrained environments, especially on a server, minimizing the number of installed applications can enhance performance.
-
Preference for Alternative Browsers: Many users find newer browsers like Microsoft Edge, Google Chrome, or Mozilla Firefox more efficient and user-friendly, so they wish to use these instead.
Pre-requisites
Before you begin the uninstallation process, here are a few things to keep in mind:
-
Administrator Access: You will need administrative privileges to uninstall Internet Explorer from Windows Server 2016.
-
Backup Important Data: It’s always a good practice to back up your system or important data before making significant changes to system software.
-
Plan for Downtime: Depending on your environment’s setup, consider making these changes during a maintenance window to avoid any disruptions.
Step-by-Step Guide to Uninstall Internet Explorer 11
The uninstallation can be accomplished using two main methods: through the Control Panel and using PowerShell. Both methods are straightforward and detailed below.
Method 1: Uninstalling Using Control Panel
-
Open the Control Panel:
- Press
Windows + Rto open the Run dialog box. - Type
controland hitEnterto open the Control Panel.
- Press
-
Access Programs and Features:
- In the Control Panel, locate and click on “Programs.”
- Under the “Programs and Features” section, click on “Turn Windows features on or off.”
-
Locate Internet Explorer 11:
- In the Windows Features dialog box, find “Internet Explorer 11.”
- It should be listed with a checkbox next to it.
-
Uncheck Internet Explorer 11:
- Simply uncheck the box next to “Internet Explorer 11.” A confirmation prompt may appear, warning you about the impacts of this change.
-
Confirm the Uninstallation:
- Click “Yes” or “OK” to confirm your selection, and then choose “OK” again in the Windows Features dialog box.
-
Restart Your Server:
- Windows will prompt you to restart your server to complete the uninstallation process. Make sure to save any ongoing work and then proceed to restart.
-
Verify Uninstallation:
- After your server has restarted, you can confirm the uninstallation by trying to open Internet Explorer. It should no longer be available on your server.
Method 2: Uninstalling Using PowerShell
For those who prefer command-line tools, PowerShell provides a more efficient way to uninstall IE 11.
-
Open PowerShell as Administrator:
- Right-click on the Start menu and select “Windows PowerShell (Admin)” or search for PowerShell in the Start menu, right-click, and choose “Run as administrator.”
-
Check the Version of Internet Explorer:
- Before proceeding, it is wise to verify that IE 11 is indeed installed. You can check this by typing the following command:
Get-WindowsFeature -Name *Internet* | Where-Object {$_.Installed -eq $true} - This command lists the status of related features, indicating whether IE is installed.
- Before proceeding, it is wise to verify that IE 11 is indeed installed. You can check this by typing the following command:
-
Uninstall Internet Explorer:
- To uninstall Internet Explorer 11, type the following command in the PowerShell window:
Disable-WindowsOptionalFeature -Online -FeatureName Internet-Explorer-Optional-amd64 - Press
Enterto execute the command.
- To uninstall Internet Explorer 11, type the following command in the PowerShell window:
-
Wait for Completion:
- Allow the command to run until it completes. You may see a progress indicator, and once done, you may be prompted to restart your server to apply the changes.
-
Restart Your Server:
- Similar to the Control Panel method, restarting is necessary to finalize the changes made during the uninstallation process.
-
Verify Uninstallation:
- After the server restarts, check if Internet Explorer is removed by searching for it in the Start menu. It should no longer be found.
Troubleshooting Common Issues
While uninstalling IE 11 from Windows Server 2016 is typically a straightforward procedure, you may run into some common issues:
-
Cannot Find Internet Explorer:
- If you do not see Internet Explorer listed in the Windows Features, first ensure that it was not previously removed or disabled.
-
Uninstallation Prompt Fails:
- If the uninstallation fails, ensure that you have administrative privileges. Additionally, try restarting your server and attempt the uninstallation again.
-
Group Policy Restrictions:
- In a managed environment, Group Policies might prevent the modification of browser settings. Consult with your IT administrator to check for any active policies that could be interfering.
-
Revert Changes:
- If after uninstallation your server begins to exhibit unexpected behavior or if you change your mind, you can follow the reverse process to reinstall Internet Explorer through the same “Turn Windows features on or off” dialog or using PowerShell with:
Enable-WindowsOptionalFeature -Online -FeatureName Internet-Explorer-Optional-amd64
- If after uninstallation your server begins to exhibit unexpected behavior or if you change your mind, you can follow the reverse process to reinstall Internet Explorer through the same “Turn Windows features on or off” dialog or using PowerShell with:
Alternative Browsers Post-Uninstallation
After IE 11’s removal, you might consider setting up alternative browsers. Here are a few popular choices:
- Microsoft Edge: Microsoft’s modern browser, which is faster and has better security features than IE.
- Google Chrome: Widely acclaimed for its speed and vast library of extensions.
- Mozilla Firefox: Known for its privacy features and customization options.
Conclusion
Uninstalling Internet Explorer 11 from Windows Server 2016 can be beneficial for various reasons, including improved security and resource management. Whether you choose to use the Control Panel or PowerShell method, the process is straightforward with the right administrative privileges. Always ensure to back up your system and verify that the server’s functionalities align with your organization’s goals post-uninstallation. With this guide, you have all the necessary steps to remove IE 11 properly and consider alternative browsers to meet your needs better.
¡Bienvenidos al blog ! En este artículo, aprenderemos cómo desinstalar Internet Explorer en Windows Server 2016. Si deseas mejorar la seguridad y el rendimiento de tu servidor, sigue estos pasos detallados.
Efficiently Uninstalling Internet Explorer from Windows Server 2016: A Comprehensive Guide
Efficiently Uninstalling Internet Explorer from Windows Server 2016: A Comprehensive Guide
In order to remove Internet Explorer from a Windows Server 2016 system, follow these steps:
1. First, open the Server Manager by clicking on its icon on the taskbar or using the Start menu.
2. In the Server Manager dashboard, click on “Manage” located in the upper right corner and choose “Remove Roles and Features” from the drop-down menu.
3. The “Remove Roles and Features Wizard” will open. Click “Next” to proceed.
4. In the “Server Selection” tab, choose the server where you want to uninstall Internet Explorer, and click “Next“.
5. In the “Features” tab, find the “User Interfaces and Infrastructure” section and uncheck the box next to “Internet Explorer 11“. This process disables the Internet Explorer feature on your server.
6. Click “Next“, review your changes, and click “Remove” at the confirmation prompt. The process of uninstalling Internet Explorer will begin, which may take some time depending on your system.
7. Once Internet Explorer is successfully removed, you may need to restart your server. If prompted, click on “Close” and then “Yes” to restart your server. After restarting, Internet Explorer will no longer be available on your Windows Server 2016 system.
By following these steps, you can efficiently uninstall Internet Explorer from your Windows Server 2016 installation, ensuring that your system remains secure and up to date with the latest software developments.
Stop Internet Explorer redirects to Microsoft Edge | How To Open internet explorer instead of edge
Uninstall HP System Event Utility in Windows 10 (2023 Updated)
Will Internet Explorer be removed from Windows Server?
Yes, Internet Explorer will be removed from Windows Server in the future, as Microsoft is shifting its focus towards the more modern and feature-rich Microsoft Edge browser. However, the exact timeline for the removal has not been disclosed yet. In the meantime, it is highly recommended for users to switch to Microsoft Edge or other modern browsers for better performance, security, and compatibility with the latest web standards.
In the context of uninstalling apps, users should be aware that it’s crucial to follow proper procedures to avoid any disruptions or issues. Here’s a step-by-step guide on how to uninstall Internet Explorer from Windows Server 2012:
1. Begin by opening the Server Manager Dashboard.
2. In the top-right corner, click on ‘Manage,’ then select ‘Add Roles and Features‘ from the resulting drop-down menu.
3. On the ‘Add Roles and Features Wizard’ page, click ‘Next‘.
4. Select the ‘Features‘ option and click ‘Next‘.
5. Scroll down and locate the ‘User Interfaces and Infrastructure‘ section, which contains the ‘Graphical Management Tools and Infrastructure‘ and ‘Desktop Experience‘ sub-features.
6. Expand the ‘User Interfaces and Infrastructure‘ section, and then deselect the ‘Internet Explorer 10‘ checkbox. This will begin the process of uninstalling Internet Explorer from Windows Server 2012.
7. Click ‘Next‘, and then confirm your selections by clicking ‘Remove‘.
8. Wait for the system to complete the removal process, which might take a few minutes.
9. Restart the server if required.
Please note that completely removing Internet Explorer from your system may cause compatibility issues with certain applications, as some depend on it for proper functionality. Therefore, it is recommended to carefully consider the potential consequences before proceeding with this uninstallation.
How to Uninstall Internet Explorer Windows Server PowerShell?
If you’re looking to uninstall Internet Explorer from your Windows Server using PowerShell, follow these simple steps. This process is useful when you want to free up space or need to remove the browser due to security concerns.
Step 1: Open PowerShell with Administrative Privileges
To begin the uninstallation process, you’ll need Administrator access. To open PowerShell with administrative privileges, press the Windows key + X and select Windows PowerShell (Admin) from the menu.
Step 2: Enter the Uninstall Command
With PowerShell open, enter the following command:
“`powershell
Disable-WindowsOptionalFeature -Online -FeatureName Internet-Explorer-Optional-amd64
“`
This command disables the Internet Explorer feature from your Windows Server.
Step 3: Restart Your System
Once the command has been executed successfully, you will be prompted to restart your system. Type Y and hit Enter to confirm the restart.
After the system restarts, Internet Explorer will be uninstalled from your Windows Server.
It’s important to note that while this method removes Internet Explorer, it is still integrated into certain aspects of the operating system. If you need a completely isolated environment without Internet Explorer, consider using a different operating system or server configuration.
Always exercise caution when uninstalling built-in applications, as doing so may affect system stability or functionality.
How do I remove Internet Explorer from the registry?
Important note: Editing the registry can be risky and may cause issues with your computer if not done correctly. Always backup your registry before making any changes.
To remove Internet Explorer from the registry, follow these steps:
1. Backup your registry: Click on the Start button, type “regedit” in the search box, and press Enter. In the Registry Editor, click on “File” and then “Export.” Choose a location to save the backup and give it a name. Make sure the “Export range” is set to “All,” and click “Save.”
2. Remove Internet Explorer registry entries: Navigate to the following key:
“`
HKEY_LOCAL_MACHINESOFTWAREMicrosoftWindowsCurrentVersionApp PathsIEXPLORE.EXE
“`
Right-click on the “IEXPLORE.EXE” key and select “Delete.”
3. Next, navigate to:
“`
HKEY_LOCAL_MACHINESOFTWAREMicrosoftActive SetupInstalled Components{89820200-ECBD-11cf-8B85-00AA005
B4383}
“`
Right-click on the “{89820200-ECBD-11cf-8B85-00AA005B4383}” key and select “Delete.”
4. Close the Registry Editor: After deleting the above keys, close the Registry Editor.
5. Restart your computer: Restart your computer for the changes to take effect.
These steps should effectively remove Internet Explorer from your registry. However, it’s important to note that this method will only remove registry entries and not uninstall Internet Explorer completely. To fully uninstall Internet Explorer, it’s recommended to follow the official method provided by Microsoft.
How to completely uninstall Internet Explorer from Windows Server 2016 while ensuring other applications remain unaffected?
How to Completely Uninstall Internet Explorer from Windows Server 2016
Internet Explorer is a default browser that comes pre-installed on Windows Server 2016. Sometimes, users may want to uninstall it due to security concerns or personal preference. Here’s a step-by-step guide on how to uninstall Internet Explorer from Windows Server 2016 without affecting other applications:
Step 1: Open Server Manager
– Click on the Start button and then click on Server Manager.
Step 2: Add Roles and Features Wizard
– In the Server Manager dashboard, click on Manage (located in the top right corner) and select Remove Roles and Features from the dropdown menu.
Step 3: Select server
– In the Remove Roles and Features Wizard, click Next until you reach the Select features page.
– Scroll down the list of features, find Internet Explorer 11, and uncheck the box beside it.
– Click on Next to proceed.
Step 4: Confirm and begin uninstallation
– Review the selections on the Confirmation page to ensure that only Internet Explorer 11 is selected for removal.
– Click on Remove to start the uninstallation process.
Step 5: Restart the system
– Once the removal is complete, you will be prompted to restart your system to apply the changes. Click on Close and then Restart the system.
After these steps, Internet Explorer should be completely uninstalled from your Windows Server 2016 without affecting other applications. Keep in mind that some applications might rely on Internet Explorer components, so ensure that the removal doesn’t negatively impact the functionality of other software on your system.
What are the key steps in successfully removing Internet Explorer from a Windows Server 2016 environment without causing system instability?
To successfully remove Internet Explorer from a Windows Server 2016 environment without causing system instability, follow these key steps:
1. Backup your system: Before removing any application that may affect system stability, create a backup of your system and important data.
2. Disable Internet Explorer: Open Server Manager by clicking on the icon in the bottom-left corner of the screen or by searching “Server Manager” on the Start Menu. Then, click on the “Add roles and features” option.
3. Navigate to Features: In the Add Roles and Features Wizard, proceed through the screens until you reach the “Features” tab.
4. Uncheck Internet Explorer: Scroll down to the “User Interfaces and Infrastructure” section under the Features tab. Uncheck the box that says “Internet Explorer 11.”
5. Apply changes: Click “Next” and proceed through the rest of the wizard, confirming any prompts that appear. Once you reach the final screen, click “Install” to apply the changes and remove Internet Explorer 11.
6. Restart your server: Upon completion, restart your server to ensure that the changes take effect properly.
7. Verify the uninstallation: After your server has restarted, confirm that Internet Explorer is no longer installed on your system by trying to search for it in the Start menu or checking the program files folder.
Please note that disabling or removing Internet Explorer could cause compatibility issues with certain applications relying on its components. It’s essential to have an alternative browser installed if you plan to browse the web without Internet Explorer.
Are there any potential complications or consequences when uninstalling Internet Explorer from Windows Server 2016, and how can they be addressed?
Uninstalling Internet Explorer from Windows Server 2016 may result in some potential complications and consequences. It is important to consider these before proceeding with the uninstallation:
1. Compatibility issues: Some web applications, particularly older ones, may require Internet Explorer to function properly. Uninstalling it could lead to compatibility issues, negatively affecting user experience.
2. Security concerns: Removing Internet Explorer might cause security updates to be missed or ignored, potentially leaving the system vulnerable to attacks and malware.
3. Unsupported features: Certain features within Windows Server 2016, such as Internet Information Services (IIS) Manager, may rely on Internet Explorer components. Uninstalling the browser may cause these features to stop working or malfunction.
To address these potential issues, consider the following steps:
1. Test alternative browsers: Before uninstalling Internet Explorer, ensure that all necessary web applications function properly on alternative browsers, such as Microsoft Edge, Google Chrome, or Mozilla Firefox.
2. Keep Windows updates enabled: Regularly check for and install Windows updates to maintain system security, even if Internet Explorer is uninstalled.
3. Monitor functionality: Monitor the performance and functionality of any features that depend on Internet Explorer components. If problems arise, consider reinstalling Internet Explorer or seeking alternative solutions.
4. Backup your system: Create a complete backup of your Windows Server 2016 system before uninstalling Internet Explorer to have a recovery option in case any unexpected issues occur.
Uninstalling Internet Explorer should be done with caution, keeping in mind these potential complications and taking steps to mitigate any negative impacts on the system.
Post Views: 1,342
How to Uninstall Internet Explorer 11 from Windows Server 2016
Internet Explorer (IE) 11 is a web browser developed by Microsoft, which was bundled with Windows 8.1 and later versions, including Windows Server 2016. However, for various reasons, system administrators and users might want to uninstall IE 11 from their Windows Server 2016 installations. This could be due to the desire to reduce the attack surface for security vulnerabilities, improve system performance, or migrate to more modern browsers.
While Internet Explorer has been a staple in many organizations and has been used widely for various applications, Microsoft has shifted its focus towards its newer browser, Microsoft Edge. As organizations transition to Edge, the uninstallation process of IE 11 becomes crucial.
This comprehensive guide will walk you through the steps to uninstall Internet Explorer 11 from Windows Server 2016, covering the requirements, safety considerations, and step-by-step procedures.
Understanding the Implications of Uninstalling IE 11
Before you proceed with the uninstallation, it is essential to understand the implications of this action:
-
Compatibility Issues: Some applications built for Internet Explorer may not function correctly in other browsers. If your organization relies on legacy applications, it’s vital to test them in alternative browsers before uninstalling IE 11.
-
Security: Many users might want to remove IE 11 due to its history of security vulnerabilities. By uninstalling it, you are reducing the potential attack vectors on your server. However, you should ensure that alternative security measures are in place.
-
User Experience: Switching from IE 11 to another browser may take time for users to adjust, especially if they are accustomed to IE’s functionalities. Providing proper training or guides can help ease this transition.
Pre-Uninstallation Checklist
Before uninstalling IE 11, consider the following steps to ensure minimal disruption:
-
Backup Important Data: Make sure to back up any critical data and settings. It’s also wise to create a system restore point or a full server backup to ensure that you can revert to the previous state if necessary.
-
Communicate with Users: Inform users about the planned uninstallation. It can help to provide training sessions or documentation for them to familiarize themselves with alternative browsers.
-
Test Alternative Browsers: Install and test alternative browsers like Microsoft Edge, Google Chrome, or Mozilla Firefox to ensure that they meet your organization’s needs.
-
Check for Dependencies: Ensure that no essential services or applications rely on IE 11. This includes custom-built web applications and enterprise software.
Methods for Uninstalling IE 11
There are multiple ways to uninstall Internet Explorer 11 from Windows Server 2016: using the Control Panel, using PowerShell, and using the DISM command. Each method is efficient; choose whichever you’re most comfortable with.
Method 1: Uninstalling via Control Panel
This is the most straightforward way to uninstall applications in Windows Server 2016.
-
Open Control Panel: Click on the Start button, type
Control Panel, and press Enter. -
Go to Programs and Features: In the Control Panel, click on «Programs» and then «Programs and Features».
-
Access Installed Updates: On the left-hand side, click on «View installed updates».
-
Locate Internet Explorer 11: In the list of installed updates, find «Internet Explorer 11». It might be listed under «Microsoft Windows».
-
Uninstall IE 11: Right-click on «Internet Explorer 11» and select «Uninstall». A confirmation dialogue will appear. Click «Yes» to confirm the uninstallation.
-
Restart the Server: Once uninstallation is complete, it’s important to restart your server to ensure all changes take effect.
Method 2: Using PowerShell
PowerShell provides a sophisticated way to manage Windows features, including uninstalling Internet Explorer 11.
-
Open PowerShell as Administrator: Right-click the Start button, select «Windows PowerShell (Admin)».
-
Check Installed Features: You can view installed features by executing:
Get-WindowsFeatureFind «Internet-Explorer-Optional» or similar entries.
-
Uninstall Internet Explorer 11: Use the following command:
Uninstall-WindowsFeature -Name Internet-Explorer-OptionalConfirm the action if prompted.
-
Restart the Server: After the process is complete, restart your server.
Method 3: Using the DISM Command
The Deployment Image Servicing and Management (DISM) tool can also be used to uninstall Internet Explorer 11. This method is particularly useful for remote management and automation through command scripts.
-
Open Command Prompt as Administrator: Search for «cmd», right-click on Command Prompt, and select «Run as administrator».
-
Uninstall IE 11 Using DISM: Input the following command:
DISM /Online /Disable-Feature /FeatureName:Internet-Explorer-OptionalWait for the process to complete, and it will provide updates on the operations performed.
-
Restart the Server: As usual, restart your server to apply the changes.
Post-Uninstallation Considerations
After uninstalling Internet Explorer 11, consider the following actions to ensure a smooth transition:
-
Test Firefox, Chrome, or Edge: Ensure that all necessary applications function correctly in the new browsers.
-
Monitor System Performance: After the uninstallation, monitor the server for any performance changes or issues that may arise.
-
Feedback from Users: Collect feedback from users regarding their experiences with the new browser(s). Adjust support resources and training materials as necessary.
-
Security Audits: Regularly perform security audits to ensure that the uninstallation has not introduced any vulnerabilities into your environment.
Conclusion
Uninstalling Internet Explorer 11 from Windows Server 2016 is a straightforward process but should be approached with careful planning and consideration. Understanding the implications of this action can significantly help in ensuring that your organization continues to function smoothly without disruptions. Adopting modern browsers like Microsoft Edge, Google Chrome, or Mozilla Firefox will not only improve security but also align your organization with modern web standards. Regular training and support for users transitioning to new browsers will guarantee that they can continue their work effectively without relying on outdated tools.
As technology evolves, continuing to adapt will be key to maintaining an efficient and secure IT environment.