
Tackling the removal of IIS (Internet Information Services) from Windows Server can be unexpectedly tricky. Below, we delve into the root causes of the “Undoing changes” issue and explore proven solutions to help you remove IIS smoothly, even when traditional methods fail.
TOC
Why Removing IIS on Windows Server Can Become So Complex
When you first install IIS on Windows Server 2016 or 2019, it integrates deeply with the operating system. It’s not just a single feature—it’s a collection of components, services, and registry entries. Removing all of these cleanly should, under normal circumstances, be straightforward. However, many administrators have encountered an issue where every attempt to uninstall IIS, whether through Server Manager or PowerShell, leads to a post-reboot message:
“We couldn’t complete features. Undoing changes.”
And in many cases, an accompanying error code like 0x800f0922. Below are some reasons why this may happen and detailed methods to overcome it.
Under the Hood of IIS Removal
Removing IIS is more than just clicking a checkbox or running a PowerShell command. IIS comprises numerous sub-features such as:
- ASP.NET components
- WebSockets support
- CGI or ISAPI Extensions
- Logging and Tracing
- IIS management tools
- IIS security features (Basic Authentication, Windows Authentication, etc.)
Each of these sub-features depends on Windows system files, registry entries, and sometimes .NET components. During a removal attempt, conflicts can arise if certain files are locked by active processes or if recent Windows Updates have changed the component store in unexpected ways.
Impact of Locked Files
Windows may prevent the deletion of critical IIS-related files if another service or application is using them. For instance, you might have a third-party or internal service that starts automatically and ties into the IIS infrastructure. When the uninstall process detects a locked file, it tries to either defer removal until the next reboot or skip it entirely—both of which can lead to incomplete uninstalls.
Windows Updates and Feature Packs
Patches like KB5036896 for Windows Server have been reported in some user forums to coincide with failed IIS removals. Installing or uninstalling these updates might partially modify or revert certain system components, making the feature-removal process stumble.
Symptoms: How the Issue Manifests
- Server Manager: The role removal process runs without error initially, but after the inevitable reboot, you see the “We couldn’t complete features. Undoing changes” message.
- PowerShell: Commands like
Uninstall-WindowsFeature -Name Web-Server -Restartmight seem successful, but once the server restarts, the error returns, and IIS is still present. - DISM/SFC Check: Running system diagnostics using
sfc /scannoworDISM /Online /Cleanup-Image /RestoreHealthoften shows no corruption despite repeated IIS removal failures. - File Deletion Blocks: Attempting to remove folders like
C:\inetpuborC:\Windows\System32\inetsrvcan be obstructed by “File in use” messages.
Proven Strategies for a Successful Uninstall
Here are some tried-and-tested approaches that administrators have used to remove IIS from Windows Server 2016 and 2019.
1. Uninstall via PowerShell with Elevated Privileges
If using Server Manager fails, PowerShell provides more transparency. Open PowerShell as an administrator and run:
Uninstall-WindowsFeature -Name Web-Server -Restart- Note: Some users still face the undoing-changes loop, but this method tends to be more reliable than the GUI approach because PowerShell can show more detailed error messages.
2. Remove IIS-Related Sub-Features First
Before removing the top-level IIS role, try manually disabling all sub-features. This process involves removing any optional components that might be preventing a clean removal.
Get-WindowsOptionalFeature -Online | Where-Object FeatureName -Like "*IIS*" |
  Disable-WindowsOptionalFeature -Online -Remove
Then follow up with:
Uninstall-WindowsFeature -Name Web-Server -Restart- Why It Works: By isolating sub-features and removing them first, you reduce the chances that one locked component will stall the entire process.
3. Clear Temporary Files to Prevent Locking
Clearing out C:\Windows\Temp can help ensure that no leftover temporary files are holding on to crucial IIS libraries. You can safely delete most items within this folder, although some files might be in use and skip deletion automatically.
4. Investigate Windows Update Rollbacks
Certain administrators noted that this problem began immediately after applying recent Windows patches. If your environment allows it, rolling back the suspect update might be worthwhile:
- Identify recent patches (including any .NET updates).
- Uninstall them via the Control Panel or through
wusa /uninstall /kb:KBnumberin an elevated command prompt. - Attempt the IIS removal again.
However, there is no guarantee that rolling back will solve the problem, particularly if the update introduced changes to the component store that remain even after the patch is removed.
5. Look for Other Roles or Services Dependent on IIS
Some Windows Server roles—like Remote Desktop Services (if configured to use RD Web Access)—rely on IIS. Check the following:
- Server Manager → Manage → Remove Roles and Features: Ensure roles related to Remote Desktop, application servers, or third-party web-based services are fully removed or disabled.
- Services.msc: Look for any custom services that might be using IIS processes.
If another role depends on IIS, you’ll likely see a warning or error during the removal process. Disable or remove that dependent role first to prevent partial uninstallation.
Diving Deeper: Event Logs, Registry, and Advanced Tools
When standard removal steps still fail, you may need a more advanced approach. Below are further troubleshooting areas to explore.
1. Use DISM to Analyze the Component Store
The Windows component store (WinSxS folder) tracks all Windows features, including IIS. Sometimes, stale references or partially applied updates trigger repeated failures.
DISM /Online /Cleanup-Image /CheckHealth
DISM /Online /Cleanup-Image /ScanHealth
DISM /Online /Cleanup-Image /RestoreHealth- CheckHealth: Scans to see if the image is flagged as repairable.
- ScanHealth: Performs a deeper check for component store corruption.
- RestoreHealth: Attempts to repair corruption using Windows Update or another source.
If RestoreHealth fixes any issues, retry your IIS uninstall steps afterward. Should DISM indicate irreparable corruption, you might need to source a known-good image (like an official ISO for your exact Windows Server build) and reference it via the /Source parameter.
2. Examine CBS (Component-Based Servicing) Logs
Installation and removal of Windows features rely on CBS. Failures are documented in:
C:\Windows\Logs\CBS\CBS.logOpen the log (preferably after reproducing the error) to identify any lines referencing the Web-Server feature or “IIS.” This log might reveal which files or registry entries are causing the process to revert.
3. Registry Cleanup (Proceed with Caution)
If you’re comfortable editing the registry, you can look for leftover IIS entries in:
HKEY_LOCAL_MACHINE\SOFTWARE\Microsoft\InetStp
HKEY_LOCAL_MACHINE\SYSTEM\CurrentControlSet\Services\W3SVC
HKEY_LOCAL_MACHINE\SYSTEM\CurrentControlSet\Services\IISADMIN
Before deleting or modifying any registry key:
- Back up your registry.
- Double-check that the keys genuinely pertain to IIS and are not associated with other services or third-party applications.
- Use a staged approach—remove or disable one set of entries at a time, reboot, and test the removal process again.
Additional Considerations for Azure-Hosted Servers
Many administrators host Windows Server 2016 or 2019 on Microsoft Azure. While the steps are largely the same, keep in mind:
- Azure VM Extensions: Certain extensions, such as the Azure Diagnostic Extension, could cause files to remain locked. Temporarily disable or remove these extensions before trying to uninstall IIS.
- Snapshot/Backup: In Azure, it’s easy to create a VM snapshot or rely on Recovery Services Vault backups. Use these backups as a safety net before performing advanced registry tweaks or manual folder deletions.
Manual Deletion: Last Resort Steps
If you’ve tried every conventional method, you might consider a manual cleanup:
- Stop World Wide Web Publishing Service (W3SVC) and IIS Admin Service (IISADMIN) if present.
- Attempt to rename or delete
C:\inetpubandC:\Windows\System32\inetsrv. - Remove relevant registry keys (as discussed earlier).
Proceed with utmost caution when manually deleting system folders. There’s a real risk of destabilizing your system, especially if other services rely on IIS components. Always ensure you have a full backup.
Keeping Your Server Stable and Future-Proofing
Even if you successfully remove IIS using these techniques, it’s wise to practice good server hygiene to prevent future role or feature-removal problems:
Regular Maintenance
- Schedule DISM and SFC scans monthly or quarterly to detect hidden issues.
- Apply Windows Updates in a testing environment first, if possible, to confirm they don’t introduce new conflicts.
- Document Any Dependencies: Keep track of which internal or third-party apps rely on IIS for web services.
Rolling Out Features Cautiously
- When installing a new server role, keep notes about relevant sub-features.
- Plan for end-of-life or potential decommission scenarios by mapping which services or websites rely on which features.
Staying Informed on Known Issues
Microsoft regularly updates its knowledge base, release notes, and official blog posts whenever a new cumulative update introduces or resolves a feature-removal issue. Keep an eye on:
- Microsoft Docs
- Windows Update Catalog
- Feedback Hub (for insider previews and known issues)
- Official Tech Community Forums
Potential Workaround: In-Place Upgrade or Repair
For servers in a production environment where downtime is minimal but the server’s stability is crucial, an in-place upgrade or repair installation of Windows Server can sometimes resolve underlying component store corruption. This method reinstalls the operating system while preserving your data and installed roles. After the in-place upgrade, you could try removing IIS again with fewer obstacles.
| Scenario | Recommended Step |
|---|---|
| Basic removal fails (Server Manager) | Move to PowerShell and attempt sub-feature removal first. |
| Errors persist after sub-feature removal | Verify Windows Updates, see if rollback is possible, run DISM checks. |
| DISM indicates corruption | Use RestoreHealth, or reference a known-good image for repairs. |
| Manual removal necessary | Stop IIS services, rename/delete folders, remove registry keys carefully. |
| Persistent failures | Consider in-place upgrade or full rebuild as a last resort. |
Conclusion: Finding the Right Path to a Clean Uninstall
Uninstalling IIS from Windows Server 2016 or 2019 should, in theory, be straightforward. But thanks to locked files, partial updates, and unforeseen dependencies, it can become a frustrating loop of “Undoing changes.” By using the strategies outlined here—removing sub-features individually, clearing locked temp files, investigating update conflicts, and examining registry hives—you significantly increase your chances of success.
Still, there are servers so deeply integrated with IIS components or affected by cryptic system issues that even these methods might not be enough. In such rare cases, an in-place repair or server rebuild may be the only reliable path to fully removing IIS without harming other critical system roles.
If you’re encountering this issue, don’t lose hope: stay proactive, gather detailed logs, back up your system, and consult official Microsoft documentation or community forums for the latest patches and known issue resolutions. It might take a few tries, but with patience and the right strategy, you can finally say goodbye to IIS on your Windows Server.
The use of Windows Server 2019 in a corporate environment is one of the most practical solutions if we want to have global and centralized control of roles, services and functions that allow managing both users and computers and everything they can execute in the company.
Windows Server 2019 allows us to install or add many more features than we normally use and this results in a comprehensive scalability with which it will be possible to take full advantage of the full potential of the server and if the approach of the organization or administrators It is the development or web hosting feature IIS (Internet Information Services) is the most suitable for this type of users.
What is IIS?
As we have mentioned, IIS (Internet Information Services), or also known as Windows Web Server is a feature that we can enable on our server with Windows Server 2019 to host web applications since when we install and configure IIS, our web server will manage applications with In order for them to process the messages that arrive using the default TCP ports, in this case for HTTP traffic it is port 80 and for HTTPS it will be port 443.
Throughout the world of web traffic, there are two process models for web servers to manage requests, these are:
- Management of requests in a single thread.
- Creation of new threads for each particular request.
IIS in Windows Server 2019 makes use of the creation of new threads for each request which in turn allows to capture a thread from an existing thread group for each request received.
IIS features
When using IIS we are talking about a feature that will be compatible with HTTP, HTTP / 2, HTTPS, FTP, FTPS, SMTP and NNTP protocols. In the new versions of IIS for Windows Server 2019 we find:
- Strict HTTP Transport Security (HSTS — HTTP Strict Transport Security) which allows a website to send a notification that it is a secure host and issue a report to browsers that should be contacted only through HTTPS (secure) connections .
- New IISAdministration cmdlets in PowerShell.
- Container improvements which help optimize executions in IIS work processes.
- Adding new server variables for the cryptographic protocol, the encryption algorithm, the key exchange algorithm and the message authentication algorithm, which seeks to increase the overall security of IIS.
- It allows to build and develop customized servers or with a special focus.
- Improves overall server performance.
- Reduce the web attack surface.
Now TechnoWikis will explain how to install IIS on Windows Server 2019 and thus get the maximum benefit from the web functions of this role.
To keep up, remember to subscribe to our YouTube channel! SUBSCRIBE
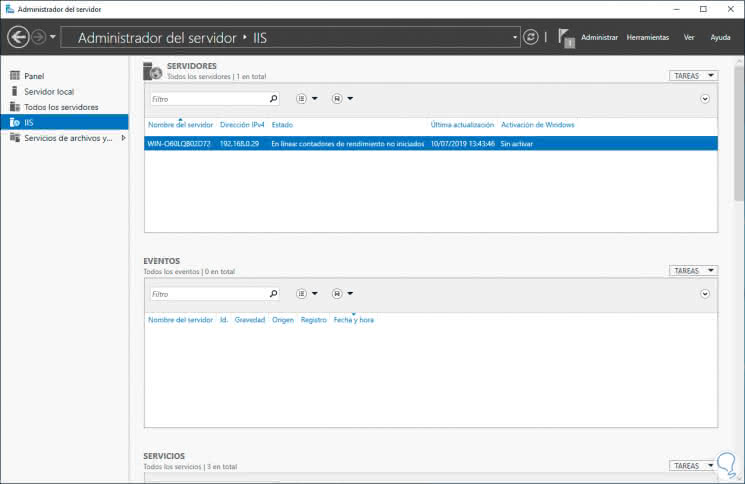
1. Install IIS with Windows Server 2019 Server Administrator
Step 1
The Server Manager in Windows Server 2019 has been developed as a central point of administration in which we can carry out various tasks of control, management and support of the operating system and its components. This Server Manager opens by default in the system or we can access it from the Start menu:
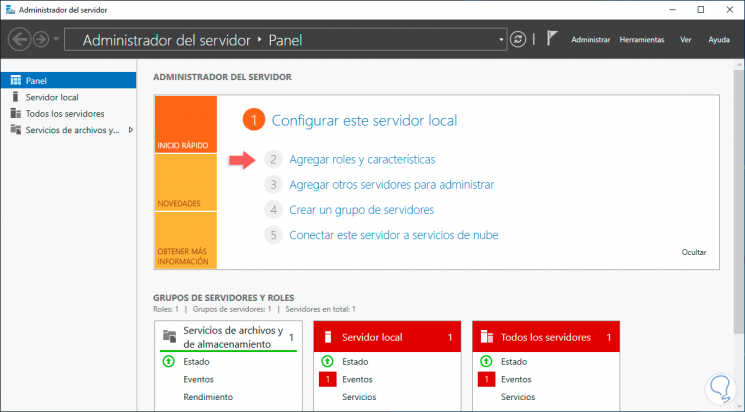
Step 2
There we click on the «Add roles and characteristics» line where we will see the following informative window:
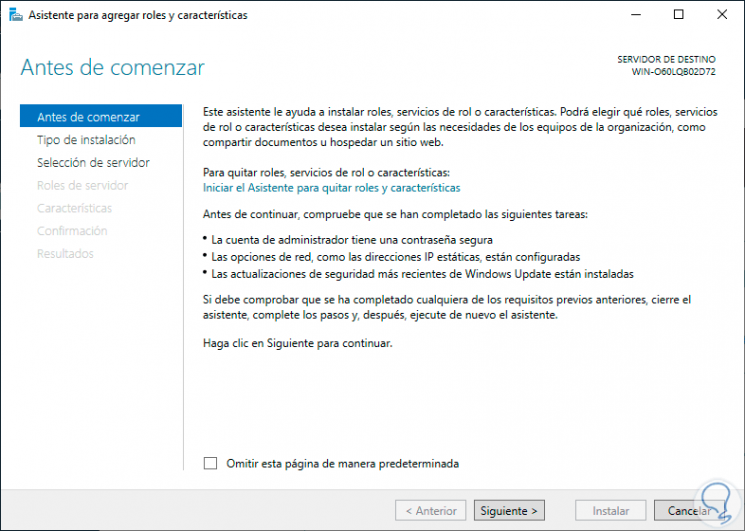
Step 3
Click Next and then check the box «Installation based on features and roles»:
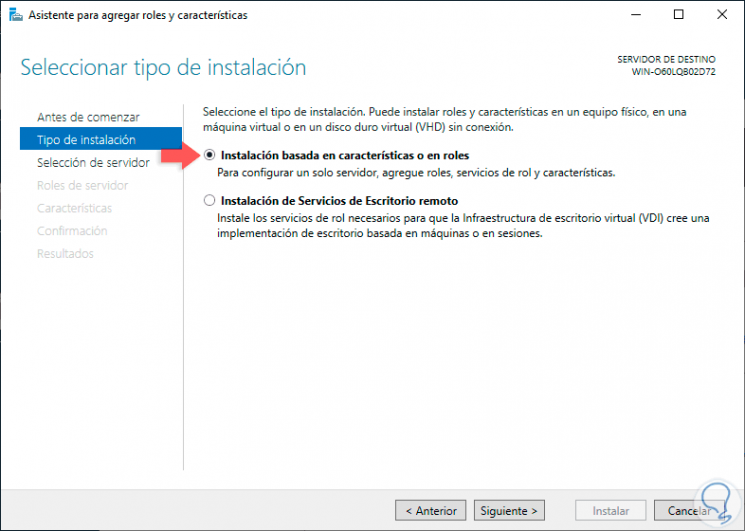
Step 4
In the next window we select the server where we will install IIS:
Step 5
We click on Next and then we will locate the role called «Web server (IIS)»:
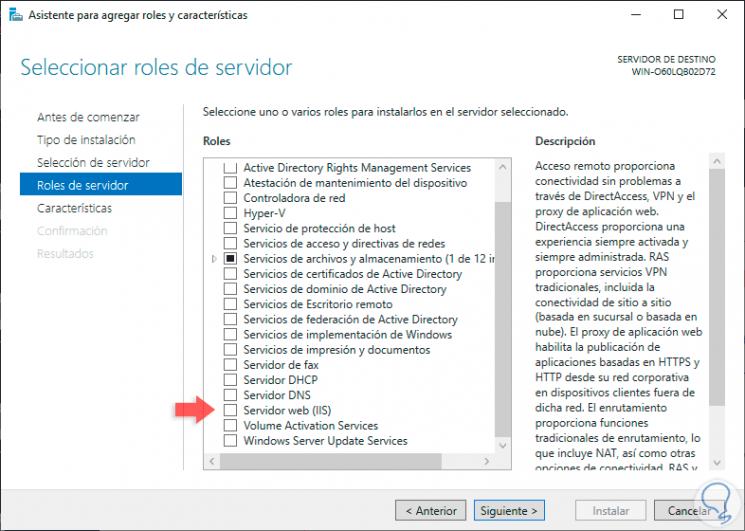
Step 6
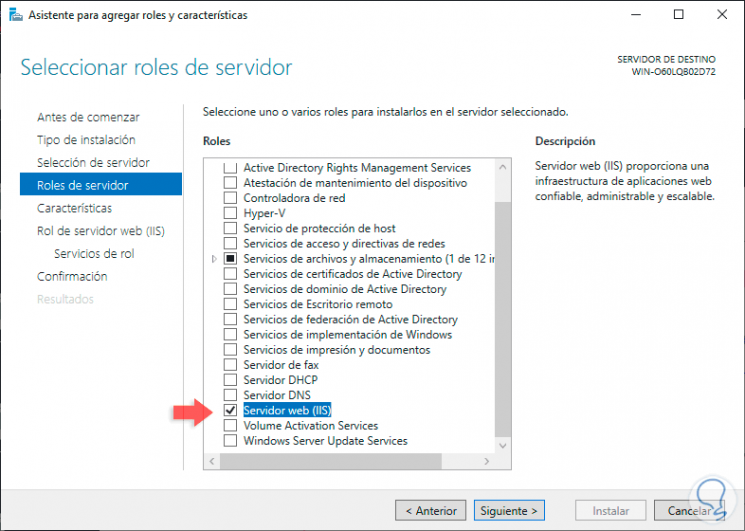
We activate your box and the following window will be displayed where we click on the «Add features» button:

Step 7
We can see that IIS is selected:
Step 8
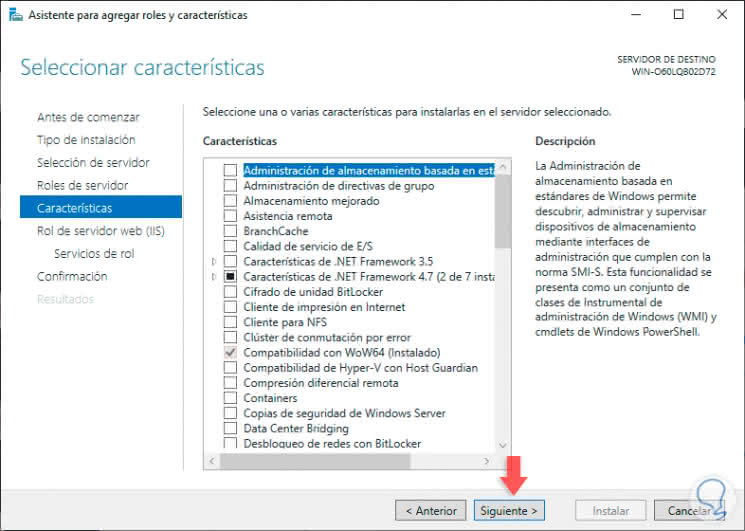
We click on Next and in the next section «Features» we can omit it since nothing is required there:
Step 9
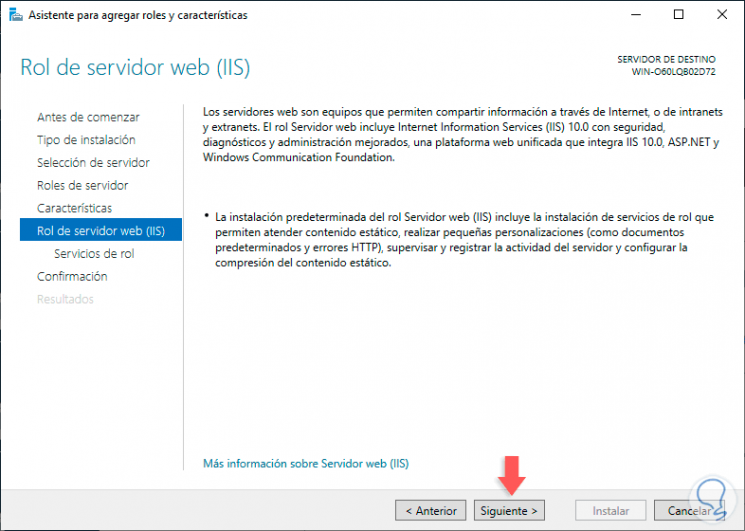
In the next window we will find a brief summary about what IIS gives us in Windows Server 2019:
Step 10
In the following window it will be possible to manage the services of the role which are in categories such as:
- Web server
- Status and diagnosis
- performance
- Security and more
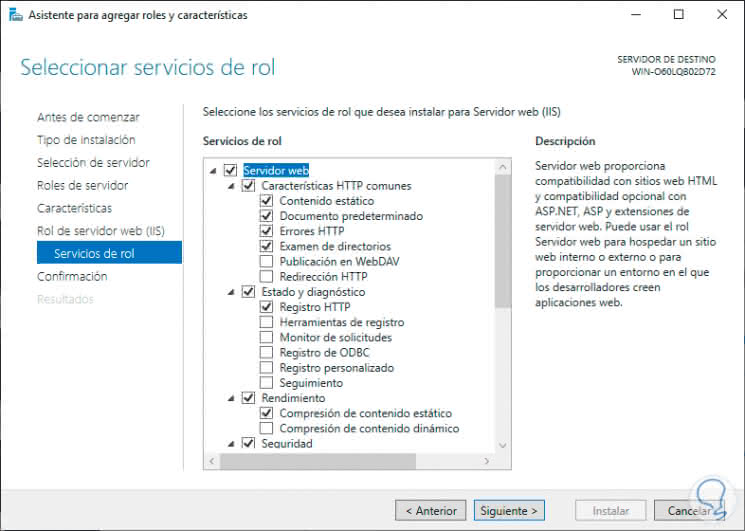
Step 11
We can leave the default values ​​or activate the boxes that we consider are necessary for our management tasks, after this we click on Next and we will see a summary of the task to be executed on the server:
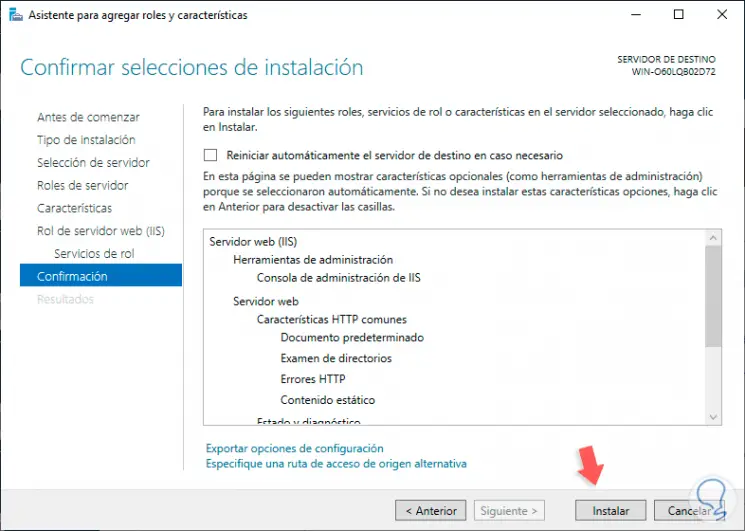
Step 12
Click on «Install» to start the process:
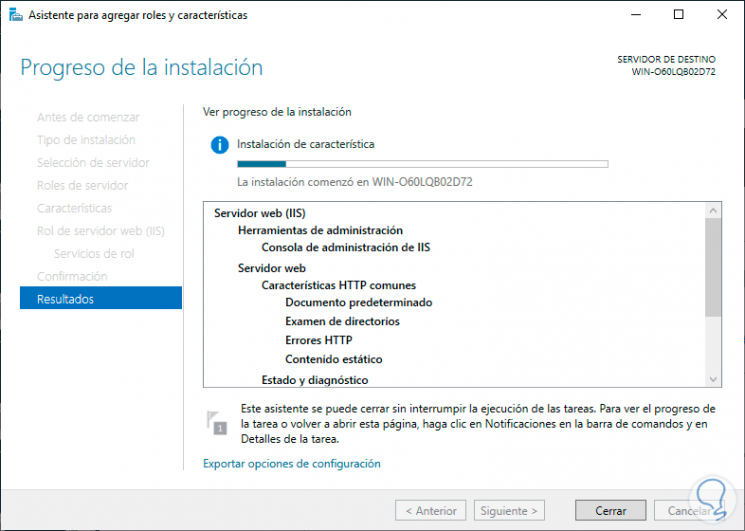
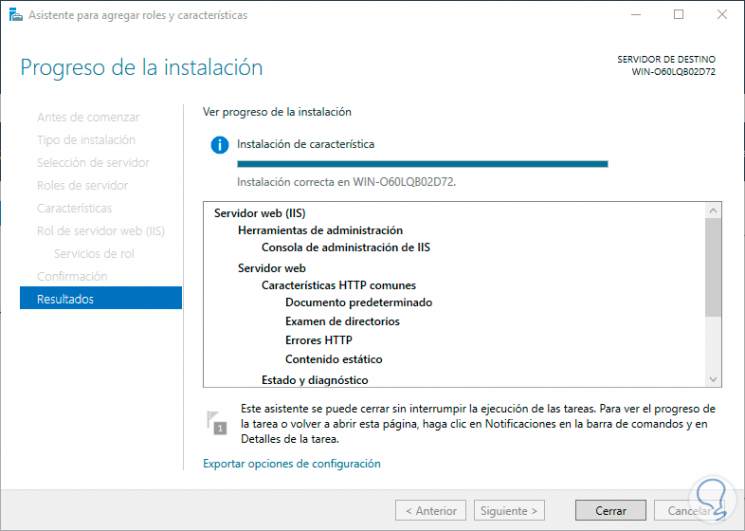
Step 13
Once this is finished we will see the following:
Step 14
IIS will automatically be available from Server Manager:
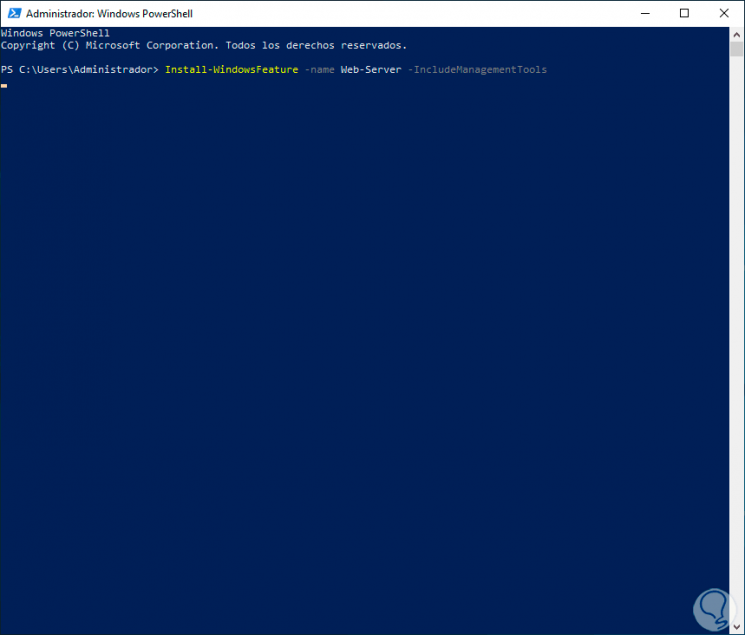
2. Install IIS with Windows PowerShell Windows Server 2019
Another option we have to install IIS on Windows Server 2019 is using PowerShell which is the integrated administration console with hundreds of cmdlets.
Step 1
For this, we access Windows Powershell as administrators and there we execute the following:
Install-WindowsFeature -name Web-Server -IncludeManagementTools
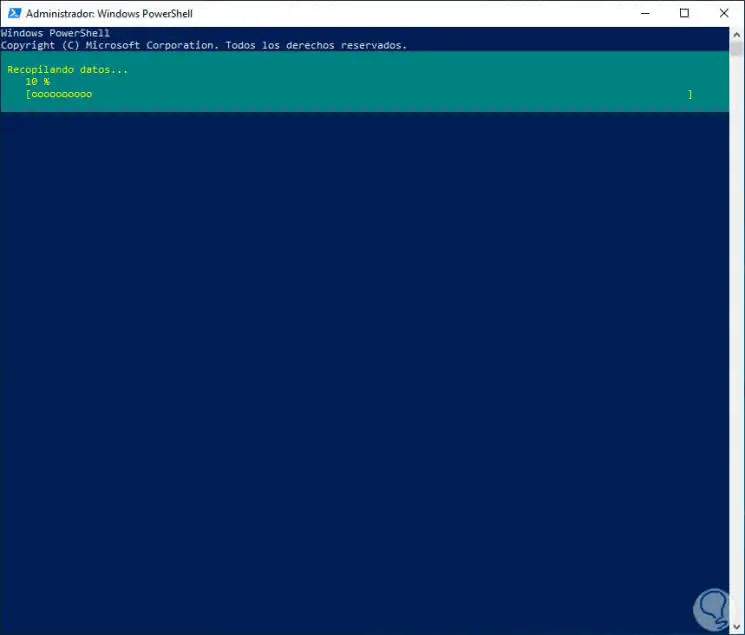
Step 2
Pressing Enter will start data collection:
Step 3
When this is over we will see the following. As of this moment we are ready to use and configure IIS in Windows Server 2019.

3. Open and configure IIS with Windows Server 2019 Server Administrator
Step 1
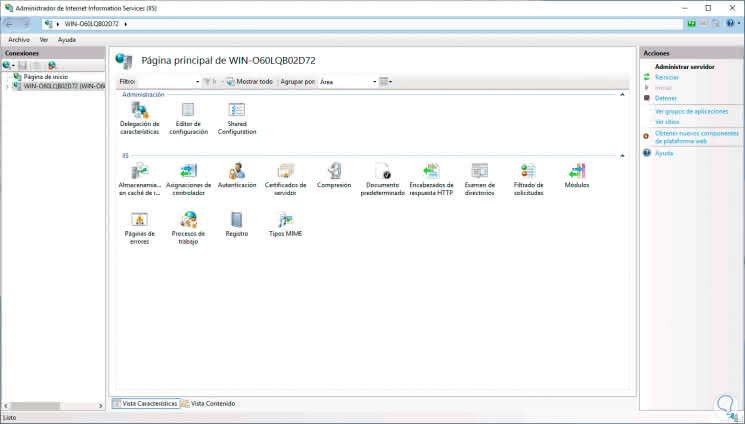
We can access IIS from the Server Administrator:
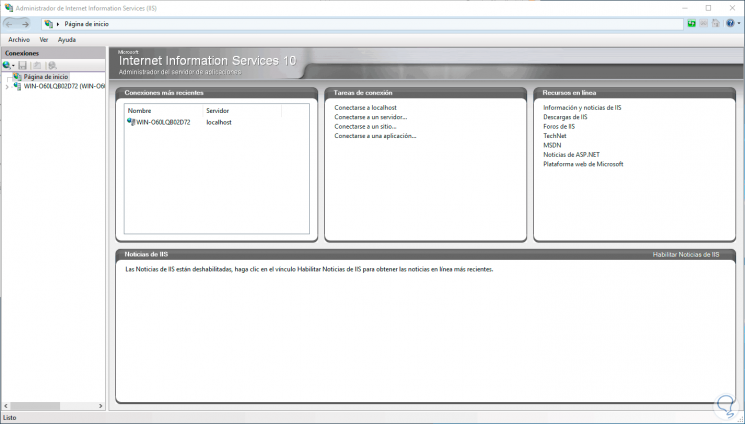
Step 2
From there we will see the various configuration options to use:
Step 3
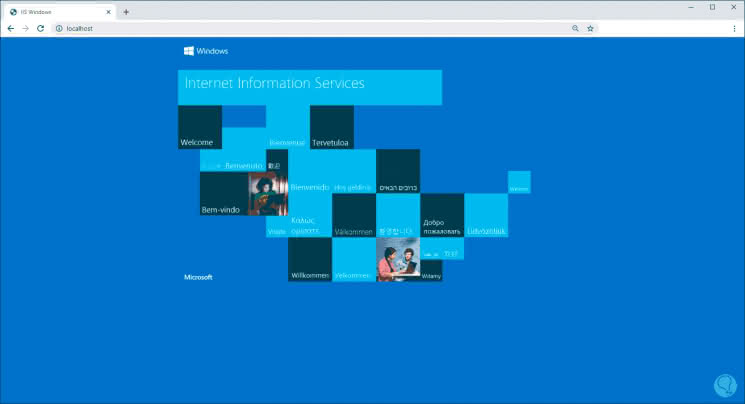
Finally, we can go to a website and enter the following:
http: // localhost http: // IP_address
Step 4
Using any of these options we will see the following if everything has been correctly installed:
4. Uninstall IIS with Windows Server 2019 Server Administrator
Step 1
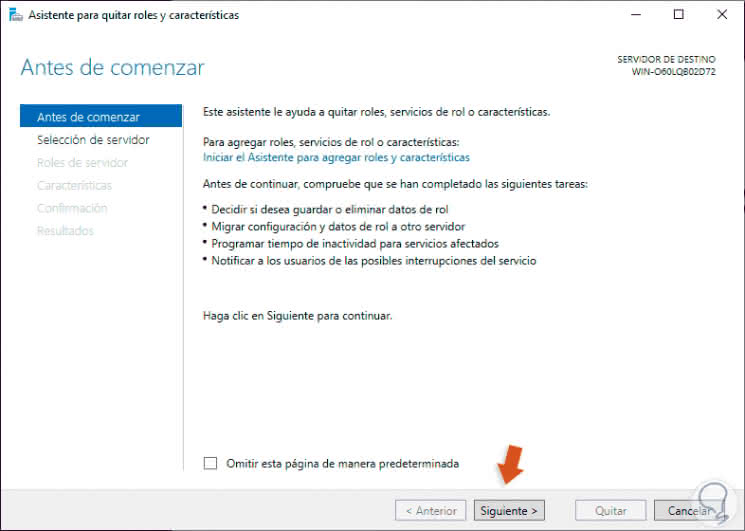
If at any time we do not have to configure and use IIS on the server, a good advice that TechnoWikis gives you is to uninstall it from the system, for this we go to the Server Administrator and from the Manage menu we select «Remove roles and functions» and the following will be displayed :
Step 2
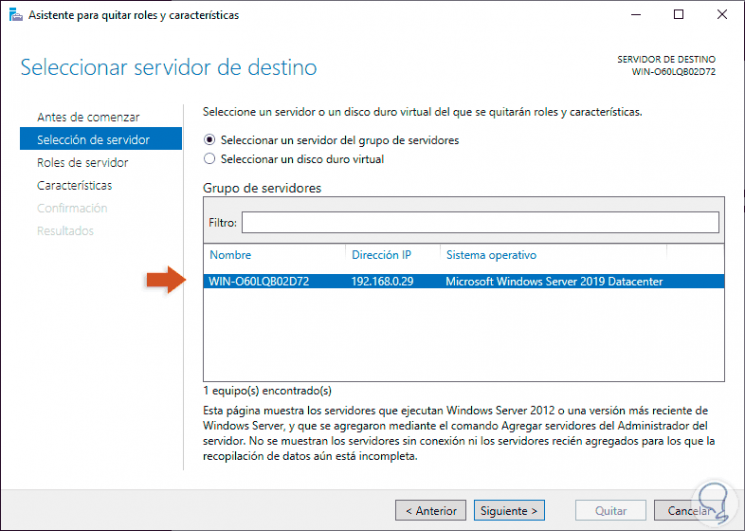
Click Next and select the server:
Step 3
In the following window we deactivate the Web Server (IIS) box:
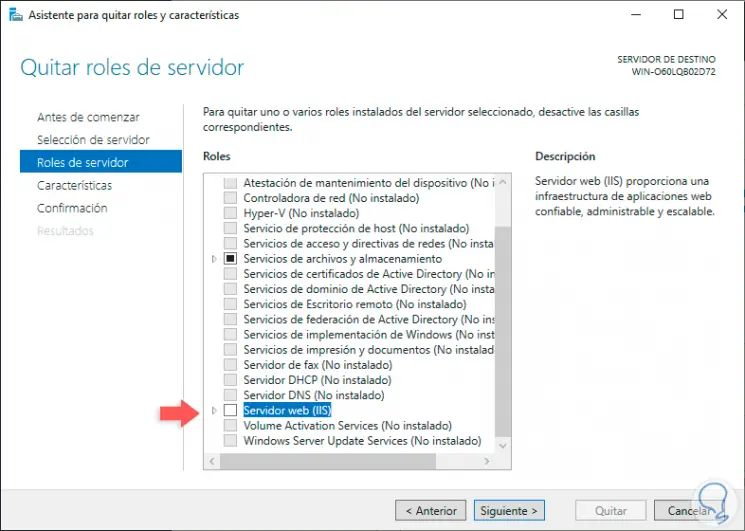
Step 4
Click Next and we can skip the Features section to go directly to the summary of the task to be performed:
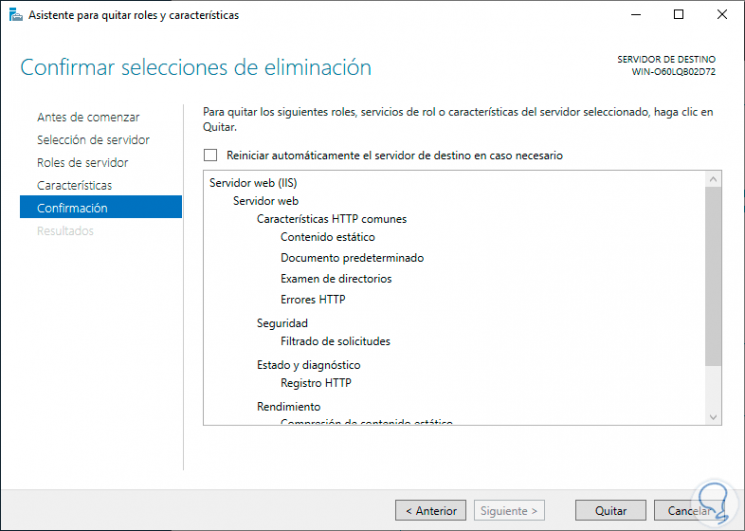
Step 5
We click on the «Remove» button to proceed with the uninstallation of IIS in Windows Server 2019:
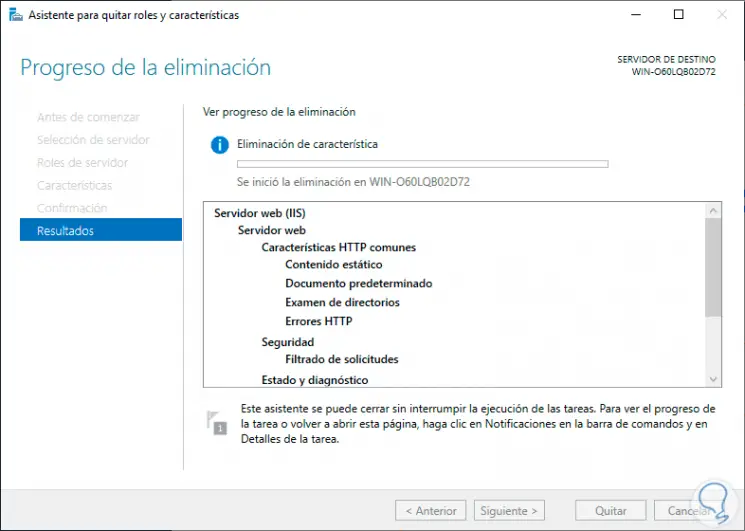
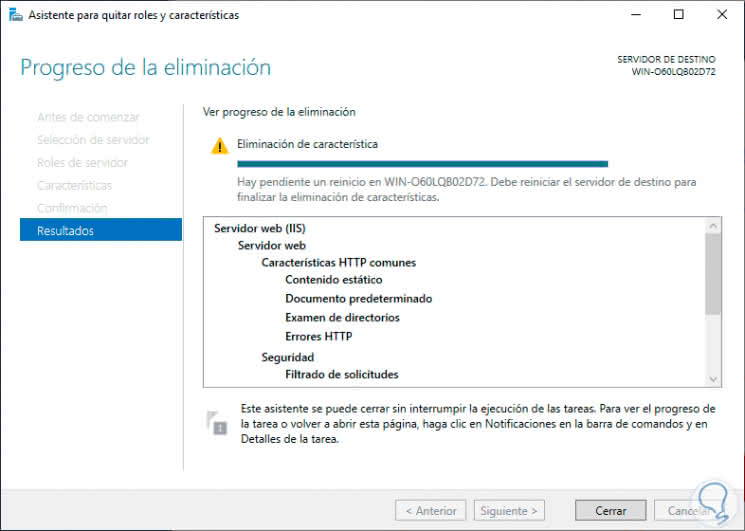
Step 6
When this is over we will see the following. As we can see, the restart of the operating system is required to complete the uninstall process.
So you have learned to install and remove IIS from Windows Server in a practical way and you already know all the functions that this role gives us for website tasks.

How To Add And Remove Iis Web Server On Windows 2019 Via The Use Learn how to add and remove iis web server with ease on windows server 2019 using server manager and powershell. Start your powershell console as admin, and issue the following command in powershell: this will completely remove internet information services (iis) and its configuration! if you want to remove iis web server, and be able to reinstall it later on, don’t use the remove parameter:.

How To Add And Remove Iis Web Server On Windows 2019 Via The Use Try to remove iis from windows server using powershell. uninstalls specified windows server roles, role services, and features from a computer that is running windows server 2012 r2. by adding the remove parameter, also deletes feature files, or payload, from a computer. for more details, please refer to this documentation. The new release of windows server 2019 from microsoft comes with iis version 10. this guide shows how it is installed and how various activities such as the creation of websites, virtual directories, and others are tackled. Here how to configure ssl between wsus upstream and downstream servers and how to setup and configure windows server update services (wsus), and how to add and remove iis web server on windows server 2019 via the server manager and powershell. ¶ step 1: install iis ¶ using server manager. open server manager: click add roles and features. role based installation: select role based or feature based installation. select server: choose the server from the pool and click next. add web server (iis): under server roles, select web server (iis). add required features when prompted.

How To Add And Remove Iis Web Server On Windows Server 2019 Via The Here how to configure ssl between wsus upstream and downstream servers and how to setup and configure windows server update services (wsus), and how to add and remove iis web server on windows server 2019 via the server manager and powershell. ¶ step 1: install iis ¶ using server manager. open server manager: click add roles and features. role based installation: select role based or feature based installation. select server: choose the server from the pool and click next. add web server (iis): under server roles, select web server (iis). add required features when prompted. Video tutorial to install or uninstall iis in windows server 2019 and configure it. Follow these instructions to enable remote iis management. log on to the target server. open powershell (by typing “powershell” at the command prompt) and install the web management service with the following command. create a firewall exception (if needed) by running the following command in powershell. Iis can be managed using the iis manager gui or through a command line interface using the “appcmd” tool. iis can be extended by installing additional roles and features, such as asp , php, or a media streaming server. In this guide, you will learn how to setup and configure iis web server on windows server 2008 2012 2016 2019 2022 windows 10 & 11.

Add And Remove Iis Web Server On Windows Server Video tutorial to install or uninstall iis in windows server 2019 and configure it. Follow these instructions to enable remote iis management. log on to the target server. open powershell (by typing “powershell” at the command prompt) and install the web management service with the following command. create a firewall exception (if needed) by running the following command in powershell. Iis can be managed using the iis manager gui or through a command line interface using the “appcmd” tool. iis can be extended by installing additional roles and features, such as asp , php, or a media streaming server. In this guide, you will learn how to setup and configure iis web server on windows server 2008 2012 2016 2019 2022 windows 10 & 11.

Add And Remove Iis Web Server On Windows Server Iis can be managed using the iis manager gui or through a command line interface using the “appcmd” tool. iis can be extended by installing additional roles and features, such as asp , php, or a media streaming server. In this guide, you will learn how to setup and configure iis web server on windows server 2008 2012 2016 2019 2022 windows 10 & 11.
Internet Information Services of IIS role in windows server can get easily corrupted and when this happens even removal of the role doesn’t help.
There exist a very simple way through which you can completely remove IIS from your server, making it as good as it was never installed.
Follow the below steps to completely remove IIS
- Step 1 : Open cmd as Administrator
- Step 2 : Type below command hit enter
start /w pkgmgr /uu:IIS-WebServerRole;IIS-WebServerManagementTools;IIS-IIS6ManagementCompatibility;IIS-Metabase;IIS-WMICompatibility;IIS-ManagementConsole;IIS-ManagementScriptingTools;IIS-WebServer;IIS-CommonHttpFeatures;IIS-StaticContent;IIS-DefaultDocument;IIS-DirectoryBrowsing;IIS-HttpErrors;IIS-HttpRedirect;IIS-ApplicationDevelopment;IIS-ASP;IIS-ASPNET;IIS-ISAPIExtensions;IIS-ISAPIFilter;IIS-NetFxExtensibility;IIS-ServerSideIncludes;IIS-HealthAndDiagnostics;IIS-HttpLogging;IIS-HttpTracing;IIS-LoggingLibraries;IIS-RequestMonitor;IIS-Performance;IIS-HttpCompressionStatic;IIS-Security;IIS-RequestFiltering;IIS-WindowsAuthentication;WAS-WindowsActivationService;WAS-ProcessModel;WAS-NetFxEnvironment;WAS-ConfigurationAPI
- Step 3 : When asked click “Yes” to proceed with removal and restart the server.
- Step 4 : Delete the below folders manually after restart
C:\Windows\system32\inetsvr\
C:\inetpub\
C:\Windows\iis7.log
C:\Program Files\PHP
C:\Program Files\MySQL
C:\ProgramData\MySQL
Step 5 : Restart the server
That’s all, IIS should be completely removed. You are free to install it again and configure it.
Printable templates have revolutionized the way we approach DIY projects, offering a convenient and flexible solution for various needs. Whether you’re planning an event, organizing your workspace, or crafting a personal project, these templates can be your best ally.
Benefits of Using DIY Templates
- Cost-Effective: DIY templates save you money. Instead of hiring a designer or purchasing pre-made items, you can customize templates to fit your needs.
- Personal Touch: With DIY templates, you can add a personal touch to your projects, ensuring they reflect your style and personality.
- Versatility: Printable templates are versatile. They can be used for various purposes, from invitations to planners and more.
How to Use Printable Templates
Using printable templates is straightforward. All you need is the template itself, a printer, and some creativity. Download the template, customize it to your liking, and print!
Steps to Customize Your Printables
- 1. Choose the Right Template: Start by selecting a template that fits your project’s requirements.
• How to: Browse online platforms or software that offer a variety of templates. Consider the purpose of your project and the design you envision. - Edit the Text: Modify the text to suit your needs.
• How to: Use software like Microsoft Word, Adobe Acrobat, or online platforms like Canva to edit the text. Ensure the font, size, and color match your theme. - Add Images or Graphics: Enhance your template with visuals.
• How to: Insert images or graphics using the editing software’s tools. Ensure they are high resolution and complement the overall design. - Adjust Colors and Design Elements: Make sure the design aligns with your vision.
• How to: Use the color palette options in your software to change background colors, text colors, or any design elements. Ensure consistency throughout the template. - Print and Test: Before finalizing, print a test copy to check the design.
• How to: Use a good quality printer and paper. Check for any alignment issues, color discrepancies, or design flaws. Make necessary adjustments before the final print.

Printable templates offer a world of possibilities for DIY enthusiasts. With the right tools and a touch of creativity, you can transform any template into a masterpiece that resonates with your personal touch. Whether you’re a newbie or a seasoned DIYer, these tips will ensure you make the most out of your printable templates.
Printable templates have revolutionized the way we approach DIY projects, offering a convenient and flexible solution for various needs. Whether you’re planning an event, organizing your workspace, or crafting a personal project, these templates can be your best ally.
Benefits of Using DIY Templates
- Cost-Effective: DIY templates save you money. Instead of hiring a designer or purchasing pre-made items, you can customize templates to fit your needs.
- Personal Touch: With DIY templates, you can add a personal touch to your projects, ensuring they reflect your style and personality.
- Versatility: Printable templates are versatile. They can be used for various purposes, from invitations to planners and more.
How to Use Printable Templates
Using printable templates is straightforward. All you need is the template itself, a printer, and some creativity. Download the template, customize it to your liking, and print it!
Steps to Customize Your Printables
- Choose the Right Template: Start by selecting a template that fits your project’s requirements.
• How to: Browse online platforms or software that offer a variety of templates. Consider the purpose of your project and the design you envision. - Edit the Text: Modify the text to suit your needs.
• How to: Use software like Microsoft Word, Adobe Acrobat, or online platforms like Canva to edit the text. Ensure the font, size, and color match your theme. - Add Images or Graphics: Enhance your template with visuals.
• How to: Insert images or graphics using the editing software’s tools. Ensure they are high resolution and complement the overall design. - Adjust Colors and Design Elements: Make sure the design aligns with your vision.
• How to: Use the color palette options in your software to change background colors, text colors, or any design elements. Ensure consistency throughout the template. - Print and Test: Before finalizing, print a test copy to check the design.
• How to: Use a good quality printer and paper. Check for any alignment issues, color discrepancies, or design flaws. Make necessary adjustments before the final print.
Printable templates offer a world of possibilities for DIY enthusiasts. With the right tools and a touch of creativity, you can transform any template into a masterpiece that resonates with your personal touch. Whether you’re a newbie or a seasoned DIYer, these tips will ensure you make the most out of your printable templates.