
-
Home
-
News
- How to Uninstall iCloud on Windows 10/11, Mac, iPhone
By Alisa |
Last Updated
This post teaches you how to uninstall iCloud on Windows 10/11 PC or turn off iCloud on Mac or iPhone/iPad. A free data recovery program from MiniTool Software is also introduced to help you recover deleted or lost files, photos, videos, and more.
How to Uninstall iCloud on Windows 10/11
iCloud offers a desktop app for Windows. You can easily download iCloud for Windows from Microsoft Store. However, if you have problems with using iCloud on your PC and want to uninstall iCloud, you can check the steps below to uninstall iCloud from Windows 10/11.
Way 1 – From Settings
- Click Start > Settings > Apps > App features.
- Scroll down to find and click the iCloud app. Click Uninstall to remove iCloud from your Windows computer.
Way 2 – From Control Panel
- Press Windows + R, type control, and press Enter to open Control Panel on Windows 10/11.
- Click Uninstall a program under Programs.
- Find and right-click iCloud and select Uninstall to uninstall iCloud from your PC. This will completely uninstall iCloud and delete all iCloud data from Your PC.
How to Turn Off iCloud on Windows
- Open the iCloud app on your PC.
- Choose the iCloud services that you want to turn off and disable them.
- Then you can click the Sign out button to sign out of iCloud on your PC to stop using iCloud.
Can You Uninstall iCloud from Mac or iPhone/iPad?
iCloud is built into macOS and iOS, and you can’t completely remove it. If you want, you can stop using iCloud on your device. Check how to disable iCloud on Mac or iOS devices below.
On Mac:
Click the Apple menu and select System Preferences. Click iCloud and click Sign Out to sign out of iCloud on your Mac.
On iPhone or iPad:
- You can click Settingsand click your name.
- Scroll down to tap Passwords & Accounts.
- Tap iCloud under Accounts.
- Select Sign Out and tap Delete from My iPhone.
- Choose the Keep on My iPhone or Delete from My iPhone option when asking you what you would like to do with your iCloud data.
- Enter your Apple ID password and tap Turn Off to sign out of iCloud on iPhone/iPad.
Free Data Recovery Software for PC
Here we also introduce a professional free data recovery program to help you recover deleted or lost files, photos, videos, emails, etc.
MiniTool Power Data Recovery is a Windows data recovery application. You can use it to recover any deleted or lost data from Windows computers, USB flash drives, SD or memory cards, external hard drives, SSDs, etc. You can use this program to recover data from various data loss situations, even help you recover data when your PC won’t boot.
Download and install MiniTool Power Data Recovery on your Windows PC or laptop and check the simple steps below to recover your data.
MiniTool Power Data Recovery FreeClick to Download100%Clean & Safe
- Launch MiniTool Power Data Recovery.
- Under Logical Drives, select the target drive and and click Scan. You can also click the Devices tab and select the entire disk or device and click Scan.
- When it finishes the scan, you can check the scan result to find the wanted files, check them and click Save to choose a new destination to store the recovered files.
Bottom Line
In this post, you’ve learned how to uninstall iCloud on Windows, Mac, or iPhone/iPad. A free data recovery program is also provided to help you recover deleted or lost files. Hope it helps. For more computer tips and tricks, please visit MiniTool News Center.
About The Author
Position: Columnist
Alisa is a professional English editor with 4-year experience. She loves writing and focuses on sharing detailed solutions and thoughts for computer problems, data recovery & backup, digital gadgets, tech news, etc. Through her articles, users can always easily get related problems solved and find what they want. In spare time, she likes basketball, badminton, tennis, cycling, running, and singing. She is very funny and energetic in life, and always brings friends lots of laughs.
Using iCloud is usually associated with Apple products and their respective operating systems such as Mac OS X and iOS. However, there is a Windows version of iCloud which works just as it should.
All you need to do is download its installer from Apple’s official site, install it, and use your Apple ID in order to sign in to use it and select just which features would like to sync across your devices. Also, you will need to use and setup iCloud on all of the devices you would like to keep synced. However, certain issues may arise with this program so let’s see just what can happen.
Uninstalling iCloud on Windows
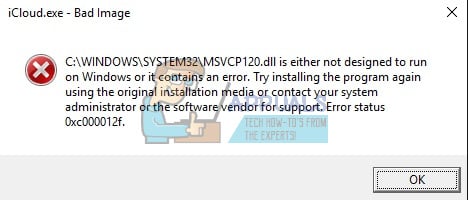
A lot of users have reported that they have uninstalled iCloud on their Windows PCs but they are still receiving iCloud related error messages such as:
“The Shared library “Cloud Music Library” is not responding”
“iCloud music library can’t be enabled”
“iCloud Verification Failed / The request timed out”
“iCloud Error: A critical syncing error with iCloud has been detected. iCloud syncing with Day One has been disabled.”
This shouldn’t happen because people have uninstalled it using its uninstaller but somehow pieces of it have remained on their computer. These pieces are not impossible to remove but make sure you follow the instructions from below carefully and do try each one before giving up.
Solution 1: Uninstalling Through Control Panel/Settings
This is probably the first thing you tried yourself but let’s try this again in order to make sure we tried to uninstall it the conventional way. If this method helps you deal with iCloud-related error messages, you don’t have to continue with other solutions.
- First of all, make sure you are logged in with an administrator account as you won’t be able to delete programs using any other account.
- Backup the data you want to save because deleting iCloud will remove it.
- Open iCloud and check the boxes next to data you want to backup and click Apply.
- As soon as your data has been uploaded to iCloud, click on the Sign out button located in the lower left corner.
- Click on the Start menu and open Control Panel by searching for it. Alternatively, you can click on the gear icon in order to open settings if you are using Windows 10.
- In Control Panel, select to View as: Category at the top right corner and click on Uninstall a Program under the Programs section.
- If you are using the Settings app, clicking on Apps should immediately open a list of all installed programs on your PC.
- Locate iCloud in Control Panel or Settings and click on Uninstall.
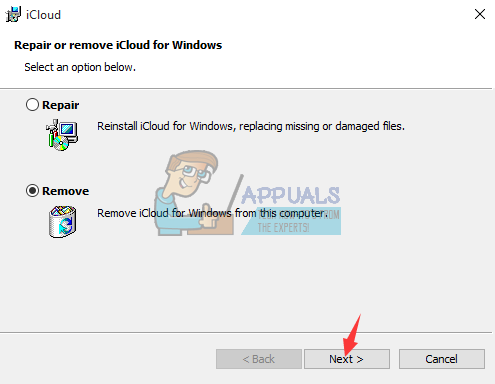
- iCloud’s uninstall wizard should open with two options: Repair and Remove. Select Remove and click Next in order to uninstall the program.
- A message will pop up asking “Do you want to completely remove iCloud for Windows?” Choose Yes.
- Click Finish when the uninstalled completes the process and restart your computer to see whether errors will still appear.
Solution 2: Running the Downloaded Installer
There has been a discussion at Apple Forums where users stated that uninstalling using Control Panel or Settings won’t get the job done properly. Instead, people said that you need to run the installer you downloaded in order to install the program to your PC. This is definitely something you should try and it won’t take a long time.
- Open your Downloads folder or the folder you used to download the iCloud installer to. You can also try and search for the file by typing “iCloudSetup.exe” in your Search bar.
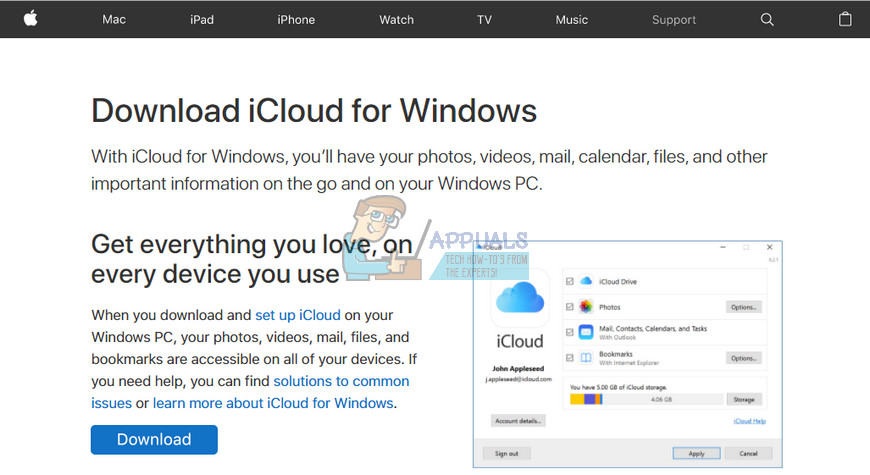
- If you have already deleted the file, you can redownload it by visiting Apple’s site.
- Run the file you located or downloaded and you should again be prompted with Remove and Repair options just like in the Solution 1.
- Follow steps 6-8 in order to uninstall iCloud from your computer.
- Restart your computer and wait to see if everything is okay now.
Solution 3: Locating the Hidden Uninstaller
There is also a way to find the uninstaller and delete iCloud from your computer permanently by locating it on your hard drive. However, if previous installers failed to load properly or if they opened an error message, this solution might not work either but it’s worth giving it a show since this helped a couple of people get rid of iCloud.
- Open My Computer (or This PC) and navigate to your Local Disk C: drive.
- Click on the View tab at the top of the window and check the box next to Hidden Items.
- Navigate to ProgramData >> Apple >> Installer Cache >> iCloud Control Panel #.#.#.## where hashes represent the installed version of the program and it depends from computer to computer.
- Locate the icloud64.msi if your Windows version is 64 bit or look for icloud32.msi if your OS is 32 bit.
- Run this file and the installer should appear.
- Follow the steps 6, 7, and 8 from Solution 1 in order to uninstall iCloud.
- Reboot your computer and check for errors.
Solution 4: Using Advanced Uninstaller Pro to Remove iCloud
There are a lot of different uninstallers designed to replace Control Panel and Settings as they often get unresponsive and they sometimes freeze in the middle of the uninstallation process. You don’t have to use this particular uninstaller but this one was able to help people who were dealing with this problem in particular and that is exactly why we recommend it.
- Download Advanced Uninstaller Pro from their official website
- Locate the file you downloaded, double-click on it, and follow the instructions on screen in order to uninstall it. Be careful not to install any additional programs you might be prompted to install and uncheck them all. Select Custom Installation and uncheck everything except Advanced Uninstaller Pro.
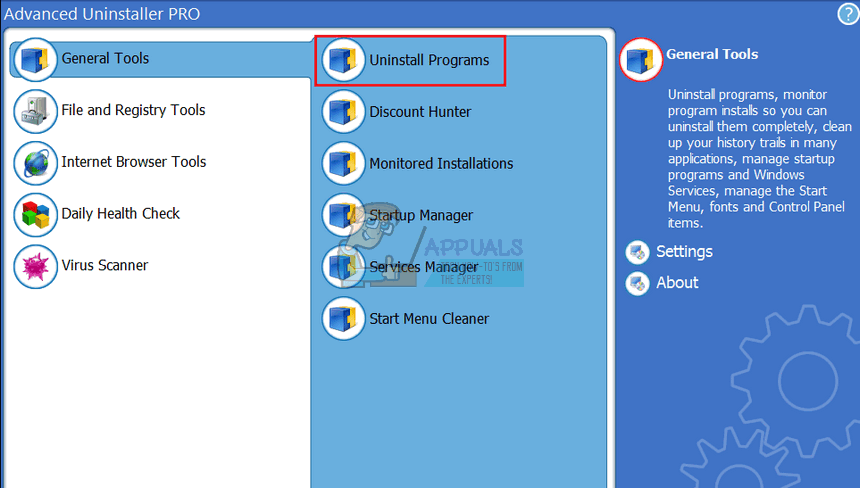
- Open the program and open General Tools.
- Under General Tools, click on Uninstall Programs and a list of all your installed programs should appear.
- Select iCloud and click the Uninstall button located to the left under the information about the program you selected.
- After clicking on the Uninstall button, the uninstaller will probably fail since it’s either displaying an error message or it has already been used or deleted.
- However, this program implements a scanner whose purpose is to scan your hard drive and your registry for leftovers. It will locate these files and you can click on Select All and remove them.
- Reboot your PC and check to see if your issue persists.
Solution 5: Using Windows PowerShell
Windows PowerShell is a powerful tool which can help you automate tasks using a command-line shell and a scripting language which was built using .NET Framework and .NET Core. It used to be exclusive to Windows but it was made open-source and now it’s available to all platforms. You can use PowerShell to uninstall various apps and you can even use it to delete preinstalled Windows Apps such as Photos, Video, Calculator, etc.
- Type PowerShell in your Search bar, right-click on the first result, and select Run as administrator.
- Copy and paste the following command in order to receive the full list of the apps you have installed along with detailed info regarding every single one: Get-AppxPackage
- Wait for the list to load and try to search for iCloud. This might take a while but be patient while you look through the installed apps.
- When you find it, copy everything next to the PackageFullName line by selecting the entire text and using the Ctrl + C key combination.
- Use the following command in order to uninstall iCloud from your PC. Replace the bolded PackageFullName with the actual name you just copied and click Enter.
Remove-AppxPackage -package PackageFullName
- Restart your computer and see if there are any changes regarding the error messages.
Solution 6: The Aftermath
This solution includes deleting the leftover files after completing any of the solutions above or after completing all of them. However, since we have used several different methods, you shouldn’t be able to find many files related to iCloud. Still, it’s worth to check just in case as these leftover files may simply be the ones which are causing all of these iCloud-related errors even though iCloud is not even installed on your Computer.
- Navigate to following folders and delete everything related to iCloud. Be careful not to delete anything related to other Apple software you may have installed:
My Computer >> C: >> Program Files (x86) >> Common Files >> Apple
My Computer >> C: >> Program Files (x86) >> Apple Software Update
My Computer >> C: >> Program Files (x86) >> Bonjour
My Computer >> C: >> Program Files (x86) >> Common Files >> Apple >> Internet Services
My Computer >> C: >> Program Files >> Common Files >> Apple >> Internet Services
- Check from iCloud entries in registry by typing “regedit” in the Search bar and opening the Registry Editor.
- Backup your registry by clicking on File >> Export… and save the current state of your registry somewhere.
- Look under HKEY_CURRENT_USER\Software and HKEY_LOCAL_MACHINE\Software for folders related to iCloud and delete them.
- Click on Edit >> Find and search for “iCloud” and delete everything you can find related to iCloud.
- Restart your computer and your problems should be gone by now.
Kevin Arrows
Kevin Arrows is a highly experienced and knowledgeable technology specialist with over a decade of industry experience. He holds a Microsoft Certified Technology Specialist (MCTS) certification and has a deep passion for staying up-to-date on the latest tech developments. Kevin has written extensively on a wide range of tech-related topics, showcasing his expertise and knowledge in areas such as software development, cybersecurity, and cloud computing. His contributions to the tech field have been widely recognized and respected by his peers, and he is highly regarded for his ability to explain complex technical concepts in a clear and concise manner.
¡Hola a todos! Hoy les traemos un artículo especialmente útil para aquellos que quieren desinstalar iCloud en Windows 10. Aprenderán cómo hacerlo paso a paso y liberar espacio en su PC. ¡No se lo pierdan!
Efficiently Uninstalling iCloud for Windows 10: A Comprehensive Guide for App Removal
Efficiently Uninstalling iCloud for Windows 10: A Comprehensive Guide for App Removal
- Close iCloud for Windows 10: Ensure that the app is not running in the background. Right-click on the taskbar, click “Task Manager,” find “iCloud” under “Processes,” and click “End Task.”
- Open the Control Panel: Press “Windows key + X” to open the Quick Access menu, and click on “Control Panel.”
- Navigate to Programs and Features: In the Control Panel window, click on “Programs” or “Uninstall a program” (depending on your view mode), and then click on “Programs and Features.”
- Locate iCloud for Windows 10: Scroll through the list of installed programs until you find “iCloud.” Click on it to select it.
- Uninstall the app: With “iCloud” selected, click on “Uninstall” at the top of the window, and follow the prompts to complete the process.
- Restart your computer: After successfully uninstalling iCloud for Windows 10, restart your computer to ensure all components have been removed.
- Verify the removal: Upon restarting your computer, check the “Programs and Features” list again to make sure iCloud for Windows 10 has been completely removed. Additionally, confirm that there are no remaining iCloud-related files or folders in your system’s AppData and Program Files directories.
- Optional – Remove iCloud-related registry entries: To thoroughly remove all traces of iCloud, use a reliable registry cleaner tool or manually delete iCloud-related entries from your system’s registry. However, undertaking this step is recommended only for advanced users, as incorrect modifications to the registry can be harmful to your computer.
Delete these garbage Windows files!
Free Bypass/Erase Permanently iCloud Activation Lock From iPhone XS,Pro,Max [iPhone Locked To Owner]
How do I remove iCloud?
If you want to remove iCloud from your device, follow these steps:
1. Sign out of iCloud: Before removing iCloud, it’s essential to sign out of the account on your device. This will ensure all data is synchronized and prevent any issues while uninstalling.
– For iOS devices: Go to Settings, tap on your name at the top, scroll down and click on Sign Out. Enter your Apple ID password when prompted and confirm signing out.
– For macOS devices: Go to System Preferences, click on Apple ID, and then click Overview. Click on Sign Out and follow any prompts to sign out of iCloud.
2. Disable iCloud app performance: If you only want to disable certain apps or features from using iCloud but keep the core service intact, you can manage them individually:
– For iOS devices: Go to Settings, tap on your name, tap on iCloud, and toggle off the apps or services you want to disable.
– For macOS devices: Go to System Preferences, click on Apple ID, click iCloud in the sidebar, and uncheck the apps or services you want to disable.
Note: You cannot completely uninstall iCloud as it is an integral part of the Apple ecosystem. However, signing out and disabling iCloud functionality for certain apps or services will limit its impact on your device.
How do I manually delete iCloud?
Manually Delete iCloud
Note: It is not possible to completely delete or uninstall iCloud from your iPhone, iPad, or Mac devices, as it is deeply integrated into the operating system. However, you can disable some of its features and delete your iCloud account from a device. Here’s how:
On iPhone and iPad:
1. Open the Settings app.
2. Tap on your Apple ID at the top of the screen.
3. Scroll down and tap on iCloud.
4. To disable specific features, toggle the switch next to each feature (like Photos, Mail, or Contacts) to the off position.
5. To delete your iCloud account from the device, scroll down and tap on Sign Out. Confirm your action by entering your Apple ID password.
On Mac:
1. Click on the Apple logo on the top-left corner of the screen.
2. Choose System Preferences.
3. Click on Apple ID (or “iCloud” if you’re using macOS Mojave or earlier).
4. To disable specific features, uncheck the box next to each feature you want to turn off.
5. To delete your iCloud account from the Mac, click on Overview (in macOS Catalina and later), then click Sign Out. In macOS Mojave and earlier, click on iCloud, then click the Sign Out button.
By following these steps, you can manually disable or remove iCloud features from your devices. Keep in mind that this will not delete your iCloud account entirely, as it will still be accessible on other devices and the web.
Do I need iCloud on Windows 10?
Although iCloud can be useful, it is not absolutely necessary to have iCloud installed on your Windows 10 device. It mainly depends on your preferences and how you use Apple services.
If you primarily use Apple devices (iPhone, iPad, or Mac) or rely heavily on Apple services (such as Photos, Contacts, and Calendars), having iCloud installed on your Windows 10 device can help you access and synchronize your files, contacts, photos, and other information across your devices.
However, if you do not use any Apple devices or services, or if you prefer using alternative cloud storage services, such as Google Drive or Microsoft OneDrive, you might not need iCloud on your Windows 10 computer. In that case, you can consider uninstalling the app to free up some space and reduce background processes on your system.
In summary, whether you need iCloud on your Windows 10 device depends on your personal usage of Apple services and how much you value seamless integration with your other devices.
How do I reinstall iCloud on Windows 10?
Reinstalling iCloud on Windows 10 after uninstalling it can be done by following these steps:
1. Download iCloud for Windows: Visit the official Apple website (https://support.apple.com/en-us/HT204283) or Microsoft Store (https://www.microsoft.com/en-us/p/icloud/9plxrdf0nmlt) to download the latest version of iCloud for Windows.
2. Locate the downloaded file: Once downloaded, locate the file in your Downloads folder or wherever you have saved the file.
3. Run the Installer: Double-click on the iCloud setup file to launch the installation process.
4. Follow the installation instructions: Read and accept the terms and conditions, then follow the on-screen prompts to complete the installation. You may be prompted to restart your computer during the installation.
5. Sign in with your Apple ID: Once iCloud is installed, open the application and sign in with your Apple ID and password to access your iCloud services.
Now you have successfully reinstalled iCloud on your Windows 10 computer after uninstalling it. Remember to keep your iCloud application up to date, as updates often address bugs and compatibility issues.
How do I completely uninstall iCloud for Windows 10 from my system?
To completely uninstall iCloud for Windows 10 from your system, follow these steps:
1. Close iCloud: Ensure that iCloud is not running on your system. Right-click the iCloud icon in the system tray and select “Exit” or “Close.”
2. Open Control Panel: Click the Start button and type “Control Panel” in the search bar. Click on “Control Panel” from the search results to open it.
3. Navigate to Programs and Features: Locate “Programs and Features” in the Control Panel window and click on it.
4. Find iCloud: In the list of installed programs, scroll down and find “iCloud.” Click on it to select it.
5. Uninstall iCloud: Click the “Uninstall” button at the top of the list. Follow the prompts to complete the uninstallation process.
6. Remove leftover files and registry entries (optional): After uninstalling iCloud, some files and registry entries may still remain on your system. To completely remove them, you can use a third-party tool like CCleaner or manually delete the remaining files and registry entries. Proceed with caution and create a system restore point before deleting any files or registry entries, as this could cause issues with your system if done incorrectly.
Once you’ve completed these steps, iCloud for Windows 10 will be completely uninstalled from your system.
What are the common issues faced during the uninstallation process of iCloud for Windows 10?
During the uninstallation process of iCloud for Windows 10, users may face several common issues. Some of these include:
1. Incomplete uninstallation: In some cases, the iCloud for Windows may not be entirely removed from the system, leaving behind residual files and registry entries that can cause issues with future installations or updates.
2. Error messages: Users may encounter error messages during the uninstallation process, such as “The feature you are trying to use is on a network resource that is unavailable” or “The older version of iCloud cannot be removed.”
3. Difficulty locating the uninstaller: Some users may have trouble finding the appropriate uninstaller for iCloud within the Control Panel or the Windows Settings app, causing confusion and frustration.
4. Loss of data: Unintentionally removing important files or data related to iCloud while attempting to uninstall the software can lead to lost photos, contacts, or other essential information.
5. System performance issues: A problematic uninstallation may cause Windows 10 to slow down or become unstable, negatively impacting overall system performance.
6. Reboot requirement: In some instances, users may need to restart their computer multiple times to successfully uninstall iCloud for Windows, which can be time-consuming and inconvenient.
Are there any alternative methods or third-party tools to effectively uninstall iCloud for Windows 10?
Yes, there are alternative methods and third-party tools to effectively uninstall iCloud for Windows 10. One popular option is using a dedicated uninstaller software, such as Revo Uninstaller or IObit Uninstaller.
These tools can help you completely remove iCloud from your system, including any leftover files and registry entries that might not be removed with traditional uninstall methods.
To uninstall iCloud for Windows 10 using Revo Uninstaller or IObit Uninstaller, follow these steps:
1. Download and install one of the mentioned uninstaller programs.
2. Open the uninstaller software and browse through the list of installed programs until you find iCloud.
3. Select iCloud and click on the button to uninstall the program (usually labeled “Uninstall” or “Remove”).
4. The uninstaller will then perform a deep scan to identify all related files and registry entries. Review the list of leftover items and select those you want to remove.
5. Click the button to finalize the removal process, and iCloud will be completely uninstalled from your Windows 10 system.
Keep in mind that it is essential to create a system restore point or backup before making significant changes to your system, like uninstalling software. This practice ensures you can revert to the previous state if anything goes wrong during the process.
Post Views: 130
With iCloud for Windows, you can access all your data saved on your iCloud account. That is, you can download/upload your iCloud photos, videos, bookmarks, mail & calendar right from your computer.
The iCloud setup offers you configure and install iCloud Drive, iCloud Photos, Mail, Contacts, Calendars, and Tasks and Bookmarks. You can select what you want during the set up.

If you want to uninstall iCloud from your Windows 10 PC, here is how to do it.
Method 1 of 2
Uninstall iCloud installed from Windows 10 Store
Step 1: Go to Windows 10 Settings > Apps > Apps & features page.
Step 2: Look for iCloud entry and click on the same to reveal the Uninstall button.
Step 3: Click on the Uninstall button and then click the Uninstall button again when you are asked for confirmation to uninstall iCloud and other services offered with iCloud.


This will remove iCloud and other services (like Photos) offered with iCloud.
Method 2 of 2
Uninstall iCloud installed from Apple
Follow this method if you downloaded the iCloud installer file from Apple and manually installed it.
Step 1: Before uninstalling iCloud from your computer, we recommend signing out of iCloud desktop client on your PC to avoid any data loss that might occur if you uninstall iCloud when files are being uploaded.
To sign out of iCloud, launch iCloud and then click on the Sign out button located at the lower left bottom of the iCloud dialog.

Step 2: Head over to Settings > Apps > Apps & features page. In the apps list, look for the iCloud entry. Note that you can use the search on the same page to quickly access the iCloud entry.
Step 3: Select the iCloud entry to reveal the Modify button. The Uninstall button is greyed out. But do not worry about it!

Step 4: Click on the Modify button.
Step 5: In the resulting iCloud dialog, select the Remove radio button and then click on the Next button.

Step 6: You will get the following confirmation dialog, next. Click on the Yes button to begin uninstalling.

If you get a dialog “Sign out of iCloud before uninstalling iCloud for Windows,” click on the Uninstall anyway button to continue uninstalling. If you want to sign out first, click the Open iCloud button and then sign out.

Step 7: If you click on the Uninstall anyway button in the previous step, you will get the following dialog with “Uninstalling iCloud for Windows while signed in may cause data loss” message.

Step 8: To continue the uninstallation, click the Uninstall iCloud button. The iCloud program will be removed from your computer in a few seconds. Once done, click on the Finish button to exit.
