
Hi @brian_kennedy1,
I’d like to help!
Let’s try a power reset on the printer and restart the computer
Reset the product
- With the printer turned on, disconnect the power cord from the rear of the printer.
- Unplug the power cord from the wall outlet.
- Wait at least 60 seconds.
- Plug the power cord back into the wall outlet.
- Reconnect the power cord to the printer.
- Turn the printer on. HP recommends plugging the printer directly into a wall outlet.
- Restart the computer and then try uninstalling the HP PRINT AND SCAN DOCTOR
Hope this helps! Keep me posted.
And, Welcome to the HP Support Community.
Please click “Accept as Solution” if you feel my post solved your issue, it will help others find the solution.
Click the “Kudos, Thumbs Up» on the bottom right to say “Thanks” for helping
In our technologically driven world, printer issues can be frustrating, especially when they interrupt our workflows. HP Print and Scan Doctor is designed to optimize the performance of HP printers and scanners by diagnosing problems and offering solutions. While it often proves to be a helpful tool, there might come a time when you decide that you no longer need it. Whether due to software conflicts, a preference for using alternative applications, or because you’ve found a more suitable solution for your printing and scanning needs, uninstalling HP Print and Scan Doctor isn’t as daunting as it may seem. In this guide, we’ll walk you through the entire process of uninstalling HP Print and Scan Doctor, along with helpful tips and insights.
Understanding HP Print and Scan Doctor
Before diving into the uninstallation process, let’s briefly understand what HP Print and Scan Doctor is. This utility is a free software application that helps users troubleshoot common issues with HP printers and scanners. It can address problems related to connectivity, print quality, and communication errors. While it serves a specific purpose, having extra software on your system can sometimes clutter your device, lead to compatibility issues, or simply not be necessary for your particular situation.
Why Uninstall HP Print and Scan Doctor?
There can be several reasons for uninstalling HP Print and Scan Doctor:
-
Software Conflicts: Sometimes, installed software can conflict with one another, causing performance issues or glitches.
-
Storage Management: Reducing clutter ensures that your hard drive has enough space for necessary software and files.
-
Preference for Alternatives: You may find third-party applications that offer similar or better features according to your requirements.
-
Device Migration: If you’ve upgraded or changed your printer/scanner, you may not require the use of this particular utility anymore.
-
Troubleshooting Complete: Once the troubleshooting has been successfully carried out, you may opt to remove the tool.
Steps to Uninstall HP Print and Scan Doctor on Windows
Uninstalling HP Print and Scan Doctor from a Windows machine is straightforward. Follow these steps based on the version of Windows you are currently using.
On Windows 10 & Windows 11
-
Open Settings:
- Click on the Start Menu (the Windows icon) located at the bottom left corner.
- Select Settings (the gear icon).
-
Navigate to Apps:
- In the Settings window, click on Apps.
- In the Apps & features section, scroll through the list to locate HP Print and Scan Doctor.
-
Uninstall the Program:
- Click on HP Print and Scan Doctor to highlight it.
- You will see an option to Uninstall. Click on this option.
- A confirmation prompt will appear. Click Uninstall again to confirm the action.
-
Follow the Uninstallation Wizard:
- Follow any prompts the uninstallation wizard provides until the process is complete.
-
Restart Your Computer (Recommended):
- While not always necessary, it’s often a good practice to restart your computer after uninstalling software to ensure all changes take effect properly.
On Windows 8 & 8.1
-
Access the Control Panel:
- Right-click the Start Screen button and select Control Panel from the menu.
-
Programs and Features:
- Click on Programs and then select Programs and Features.
-
Find HP Print and Scan Doctor:
- Locate HP Print and Scan Doctor in the list of installed programs.
-
Uninstall:
- Click on the program and then select Uninstall at the top of the window.
- Confirm the uninstallation process and follow the prompts.
-
Restart Your Computer:
- Once the uninstallation is complete, it’s advisable to restart your computer.
On Windows 7
-
Open Control Panel:
- Click on the Start Menu and select Control Panel.
-
Access Programs and Features:
- Click on Programs, then Programs and Features.
-
Select HP Print and Scan Doctor:
- Search for HP Print and Scan Doctor in the list provided.
-
Uninstall:
- Click to select it and then click on Uninstall.
- Confirm the action to proceed with deletion.
-
Reboot Your PC:
- After the process is done, it’s beneficial to restart your system.
Steps to Uninstall HP Print and Scan Doctor on Mac
macOS users will find the uninstallation process quite different from Windows. Although the steps are simple, let’s demonstrate how to remove HP Print and Scan Doctor from a Mac computer.
-
Go to Finder:
- Click on the Finder icon in your Dock.
-
Open Applications:
- On the Finder sidebar, click on Applications.
- Locate HP Print and Scan Doctor in the Applications folder.
-
Move to Trash:
- Right-click (or Control-click) on the HP Print and Scan Doctor icon.
- Choose Move to Trash from the context menu.
- Alternatively, you can drag the app icon to the Trash bin on the Dock.
-
Empty the Trash:
- Right-click on the Trash bin and select Empty Trash to permanently delete the application from your Mac.
-
Restart Your Mac (Recommended):
- Restarting your Mac after uninstallation can help clear any residual files associated with the program.
Cleaning Up Residual Files
After uninstalling any application, including HP Print and Scan Doctor, it’s prudent to check for leftover files that might take up space on your hard drive. Here’s how you can clean up any remnants on both Windows and Mac.
On Windows
-
Run Disk Cleanup:
- Search for Disk Cleanup in the Windows Search bar and launch it.
- Select the drive where the software was installed (usually C:).
- The tool will scan for unnecessary files. From here, you can check various categories to delete, including temporary files.
-
Search for HP Folder:
- Open File Explorer and navigate to
C:Program FilesandC:Program Files (x86). - Check for any folders related to HP Print and Scan Doctor and delete them, if present.
- Open File Explorer and navigate to
-
Registry Cleanup (Advanced):
- Press
Win + R, typeregedit, and press Enter to open the Registry Editor. - Backup your registry before making changes (File > Export).
- Look for any entries related to HP Print and Scan Doctor; right-click and delete them. Be cautious, as modifying registry settings can affect your system.
- Press
On Mac
-
Search Library Files:
- Open Finder, click on Go in the menu bar, then press and hold the Option key to reveal Library.
- Check inside relevant folders (e.g., Application Support, Caches, Preferences) for any files or folders associated with HP or HP Print and Scan Doctor and remove them.
-
Use Third-party Cleanup Tools:
- Consider using third-party applications like CleanMyMac or AppCleaner, which can assist in thoroughly removing unneeded files from removed applications.
Conclusion
Uninstalling HP Print and Scan Doctor is a straightforward process on both Windows and Mac operating systems. The steps are user-friendly, ensuring you can complete the process regardless of your technical expertise. After following this guide, you should now be equipped to uninstall the software easily and clear any remaining files to optimize your system’s performance.
As a final tip, always ensure that you really want to remove a software application—even those you think you no longer need—since some of them could offer features or enhancements that might be beneficial later on.
Remember, if you ever decide to use HP Print and Scan Doctor again, it is freely available for download on the official HP website. Happy printing and scanning!
Need Space in PC or only want to remove or uninstall HP Print and Scan Doctor On PC ( Windows 7, 8, 10, and Mac )? but how to, after it still having files in C: drive? With this article, you will able to delete or kick out all of those files also after uninstalling the HP Print and Scan Doctor.
Are you bored, or tired of using HP Print and Scan Doctor? Now, wanna kick-off this software from your PC ( Windows 7, 8, 10, and Mac )? There is no condition to follow up before installing, so, you can remove it without getting any confusion about it.
There are 10 methods that users can adapt if they want to uninstall HP Print and Scan Doctor :
Method #1
- Go to Start Menu, then click on the Control Panel.
- In Control Panel, under programs, go through the list of the ones that are installed on your computer
- Right-click on HP Print and Scan Doctor, and then click on uninstall a program
- Follow the prompt on the screen, and you will get to see a progress bar that will take you to remove the HP Print and Scan Doctor from the computer.


Method #2
The second method involves uninstaller.exe, through which HP Print and Scan Doctor can be uninstalled. Just follow the instructions below to execute this step:
- Go to the installation folder of HP Print and Scan Doctor.
- Find a file that is named uninstall.exe or unins000.exe
- Double click on the file, and then follow the instructions that appear on the screen.


Method #3
The third method involves System Restore. For those who don’t know, System Restore is a utility, which helps the user restore their system to its previous state. System Restore removes all those programs, which interfere with the operation and performance of the computer.


If you have created a system restore point before you installed HP Print and Scan Doctor, then you can use this software to restore the system, and remove such unwanted programs. However, before you do so, make sure that you save all the important data.Follow the steps below to know more from this method:
- Close all the files and programs, which are currently running on your PC
- Open Computer from the desktop, and then select Properties
- System Window will open
- On the left side and click on System Protection
- System Properties will open.
- Then do click on the option of System Restore, and a new window will again open.
- Now, choose the ‘different restore point’ option, and click on Next.
- You have to select a date and time from the given options; when you select a date, the drivers that you installed after the chosen date won’t work.
- Click on Finish and then Confirm the ‘Restore Point’ on the screen.
- When you click Yes to confirm, the HP Print and Scan Doctor would be uninstalled.
Method #4
If you have an antivirus, then you can use it to uninstall HP Print and Scan Doctor.There is much malware or HP Print and Scan Doctor software in the computer applications that we download nowadays. They have become very difficult to remove from the system, like Trojan and spyware.
- If you cannot remove HP Print and Scan Doctor with the above methods.
- It means that there is malware or HP Print and Scan Doctor in it, and only a good antivirus can be used for removing it.
You can either download Norton Antivirus or AVG antivirus, as these are reputable software and will surely remove the malware, HP Print and Scan Doctor on the system.

Method #5
If you want to uninstall HP Print and Scan Doctor, then you can do so using Command Displayed in the Registry. A registry is a place where all the settings of Windows, along with information, are stored. This also includes the command to uninstall a software or program.
You can try this method with HP Print and Scan Doctor as well, but it is a very risky method. If you make any mistake and delete the wrong information, then the system is most likely to crash. It would become difficult for you to bring it back from deletion.

To execute this method, To follow the steps given below:
- Hold Windows + R together, and then Run command
- When the command box opens, type Regedit in the box and then click on OK
- You have to navigate and find the registry key for the HP Print and Scan Doctor
- You will see an uninstall string on the next window; double click on it, and also copy ‘Value Data’
- Again hold Windows + R keys, and run the Command; paste the value data that you just copy and click on OK
Follow what comes on the screen and then uninstall HP Print and Scan Doctor.
Method #6
The seventh method is to uninstall the HP Print and Scan Doctor using a third-party uninstaller.
At times, those who don’t have any knowledge of computer language, won’t be able to manually uninstall the software fully.
Many files occupy the hard disk of the computer, so it is best to use third-party software to uninstall them.

Method #7
There are some codes that users can type into the command prompt, and they would be able to uninstall the HP Print and Scan Doctor. For example, if they want to remove the package, then just type.
sudo apt-get remove HP Print and Scan Doctor
If you want to uninstall HP Print and Scan Doctor and its dependencies as well, then type:
sudo apt-get remove –auto-remove HP Print and Scan Doctor
For those who don’t know, some of the dependencies of HP Print and Scan Doctor are GCC-5, libc6, libgcc1, HP Print and Scan Doctor dev, and gc++-5.

Method #8
If the user wants to remove the configuration and data files of HP Print and Scan Doctor, then they need to run the following code on the Command Prompt:
sudo apt-get purge HP Print and Scan Doctor

Method # 9
It depends on you that are you willing to kick-out the data or you want to remove the configuration data or data files, along with the dependencies, then the following code is most likely to work for you:
sudo apt-get auto-remove -purge HP Print and Scan Doctor

To uninstall HP Print and Scan Doctor on mac because anytime we need space or only want to remove from pc due to some viruses and also many problems which are needed to remove or uninstall from pc.
So I will show you some steps of uninstalling HP Print and Scan Doctor on the mac so follow my this step or method if you have still confusion so you may contact with us for uninstall of HP Print and Scan Doctor on pc or mac.
How to Uninstall HP Print and Scan Doctor on Mac?
For uninstalling HP Print and Scan Doctor on the mac so as I told you that there is a simple method to uninstall apps on mac. As there are installed some apps on your Mac and now you want to remove or uninstall from your pc successfully and want to install some other apps on my mac so follow my these steps to uninstall HP Print and Scan Doctor on mac.
Method #1
In method 1, you have to open mac on your pc as I’m showing in the image follow the images to uninstall HP Print and Scan Doctor on your mac.

In the image, there is a HP Print and Scan Doctor app on your mac dashboard and now we have to uninstall it from our mac we will uninstall this app and will remove it in of mac now double-click-on-app showing in the image.

Now you double-clicked on the app mac will ask that are you sure to uninstall HP Print and Scan Doctor click on the Delete button so go to Trash of mac to uninstall completely from mac. Showing in image trash bin click on trash bin and go inside there will be HP Print and Scan Doctor which we had to delete before so have to uninstall completely from mac.

Not right-click on trash to remove all data or app which we had uninstalled before seeing in the image. Click on Empty Trash the whole data which is in the trash will auto remove successfully.
Now we uninstalled HP Print and Scan Doctor on the mac so as you see that how to uninstall or remove any app on the mac so if you liked this so share once. This method doesn’t require any antivirus or uninstaller software from them we are to uninstall.
I described only a simple method of uninstalling HP Print and Scan Doctor on mac. This method more people are using but some people take it is too hard uninstalling in mac but in this step, anyone can understand this simple method.
How To Install?
For those who don’t know much about HP Print and Scan Doctor, they might lean more towards uninstalling it. These HP Print and Scan Doctor create an environment, where users can create a high GPU-accelerated application. If you want to install this HP Print and Scan Doctor, then make sure that your system is compatible with it.
Firstly, verify that the system you are using has a HP Print and Scan Doctor capable GPU, and then download the HP Print and Scan Doctor. Install it, and then test that the software runs smoothly on the system. If it doesn’t run smoothly, then it could be because its communication with the hardware is corrupted.


Conclusion
There are other methods of uninstalling the HP Print and Scan Doctor as well as in pc or windows, but these could be difficult for those, who don’t have much technical expertise. Execute these methods, and they will surely work. These methods don’t require the user to have much knowledge of the technical side of an operating system. They can follow simple steps and uninstall HP Print and Scan Doctor.
-
Home
-
News
- How to Download & Use HP Print and Scan Doctor on Windows
By Daisy | Follow |
Last Updated
HP Print and Scan Doctor is a useful tool. If you want to know how to download, install, use it on your Windows, this post is what you need. Now, you can continue to read this post from MiniTool to get more information.
What Is HP Print and Scan Doctor
What is HP Print and Scan Doctor? HP Print and Scan Doctor is a free tool for Windows XP/7/8/10 that can help solve common printing and scanning issues, such as missing or damaged print drivers, connection issues, firewall issues, scan error messages, printer offline, and print job stuck.
Tip: HP Print and Scan Doctor is not available for Mac.
How to Download & Use HP Print and Scan Doctor
Step 1: Turn on the printer and load plain paper into the main tray. Go to this address to download the package of HP Print and Scan Doctor.Step 2: Follow the on-screen instructions to install HP Print and Scan Doctor.Step 3: After the download and installation are complete, HP Print and Scan Doctor will open. Click Start on the welcome screen. If your printer is not listed, make sure the printer is turned on and connected, click My product is not listed, and then click Retry. Select your printer and click Next.Step 4: Choose Fix Printing or Fix Scanning according to the problem you encounter, and then follow the instructions on the screen.Step 5: The result of each test is as follows:
- A checkmark indicates that your printer has passed.
- A wrench spanner means that the problem was found and fixed.
- Exclamation An exclamation mark indicates that the test failed and was skipped.
- A cross X indicates that there is a problem with the printer. You need to follow the instructions to fix it.
How to Uninstall HP Print and Scan Doctor
If you don’t want to use HP Print and Scan Doctor, you can choose to uninstall it from your Windows. There are 2 ways for you to uninstall it.Option 1: Control PanelFirst, you can try to use Control Panel to uninstall HP Print and Scan Doctor. Follow the steps below to uninstall it:Step 1: Search for Control Panel in the Search box to open it.Step 2: Navigate to the Programs and Features section and click it.Step 3: Find HP Print and Scan Doctor in the list and right-click it to choose Uninstall/Change.Step 4: Follow the on-screen instructions to uninstall HP Print and Scan Doctor.Option 2: SettingsYou can try to use the Settings application to remove the HP Print and Scan Doctor application.Step 1: Type Settings in the Search box to open the Settings application. Then go to the Apps part.
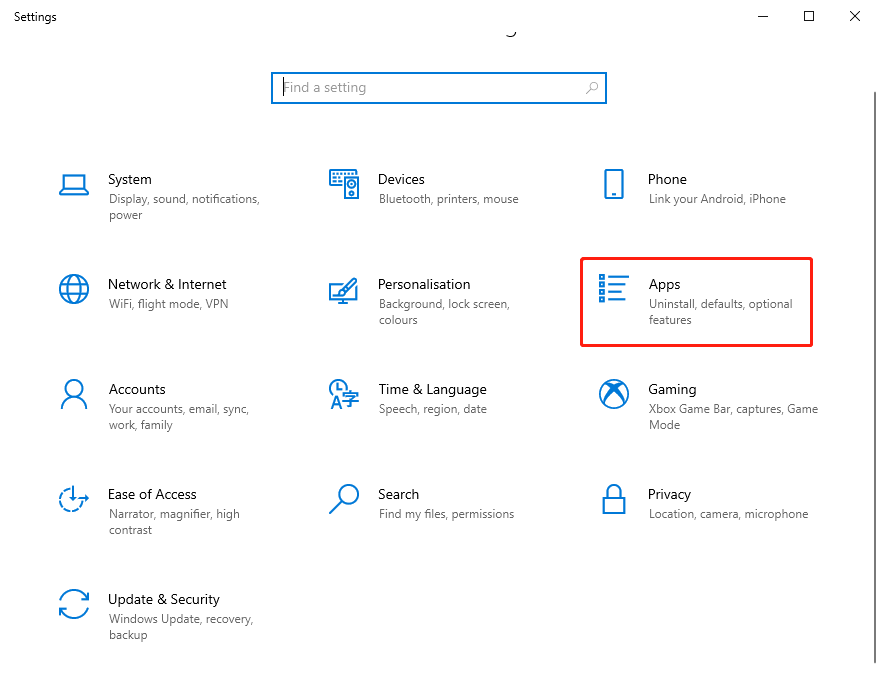
Step 2: Navigate to the Apps & features part, find HP Print and Scan Doctor. Click it and click Uninstall.
Final Words
In this post, you can know what HP Print and Scan Doctor is, how to download and install it. Besides, you can know how to uninstall it. If you have any related issues, you can comment on our post to let us know.
About The Author
Position: Columnist
Having been an editor at MiniTool since graduating college as an English major, Daisy specializes in writing about data backups, disk cloning, and file syncing as well as general computer knowledge and issues. In her free time, Daisy enjoys running and going with friends to the amusement park.
You can delete the HP PSDR from your file location if you wish to remove the program. Right-click on the HP PSDR icon and choose “open the file’s location”. To completely remove HP PSDR from your computer, delete the folder.
HP Print And Scan Doctor is a helpful tool to fix the printer problems of HP users. It helps troubleshoot printing problems such as broken lines or faint colors. It will also clean, and align the printheads, as well as determine the overall health of the printer. The tool can be downloaded from HP’s website for free. However, before downloading the software, you should first read the instructions. Then, install it on your computer.
Once you download HP Print And Scan Doctor, it opens on your computer. It features a welcome screen. You can see which printers are connected to your computer, and which are not. When you select a printer, a wrench spanner appears on the screen. If the printer passes the test, there are no errors, but if it fails, the tool displays an exclamation mark. To install the software, follow the steps shown on the screen.
After installing HP Print And Scan Doctor, run its uninstaller. Right-click on the printer’s icon, select «uninstall», and follow the instructions. If you are not able to uninstall it, contact HP support to get assistance. They will help you resolve the issues. The installation process is simple and takes just a few minutes. It’s worth it for the peace of mind it will give you!
HP Print And Scan Doctor is an excellent tool for anyone using a printer. The free software requires minimal resources, so even people with no technical background can use it. It can solve a variety of common printer problems, from connectivity issues to hardware failure. It can also optimize your PC for maximum efficiency and update the printer drivers. If you’re using a printer from HP, be sure to download HP Print And Scan Doctor to get the most out of it.
Click Here To See More