
Overview
In today’s fast-paced software development world, managing version control is pivotal. Git, a distributed version control system, is at the core of this management, allowing multiple developers to work on a project simultaneously without stepping on each other’s toes. However, there comes a time when you may need to disconnect your project from Git, whether it’s to clear out old repositories, streamline your file system, or prepare your project for a different version control system.
In this article, we’ll learn about how to remove Git from project.
Pre-Requisites
- Basic Git Commands
- Basics of Visual Studio Code
How to Remove Git from the Project?
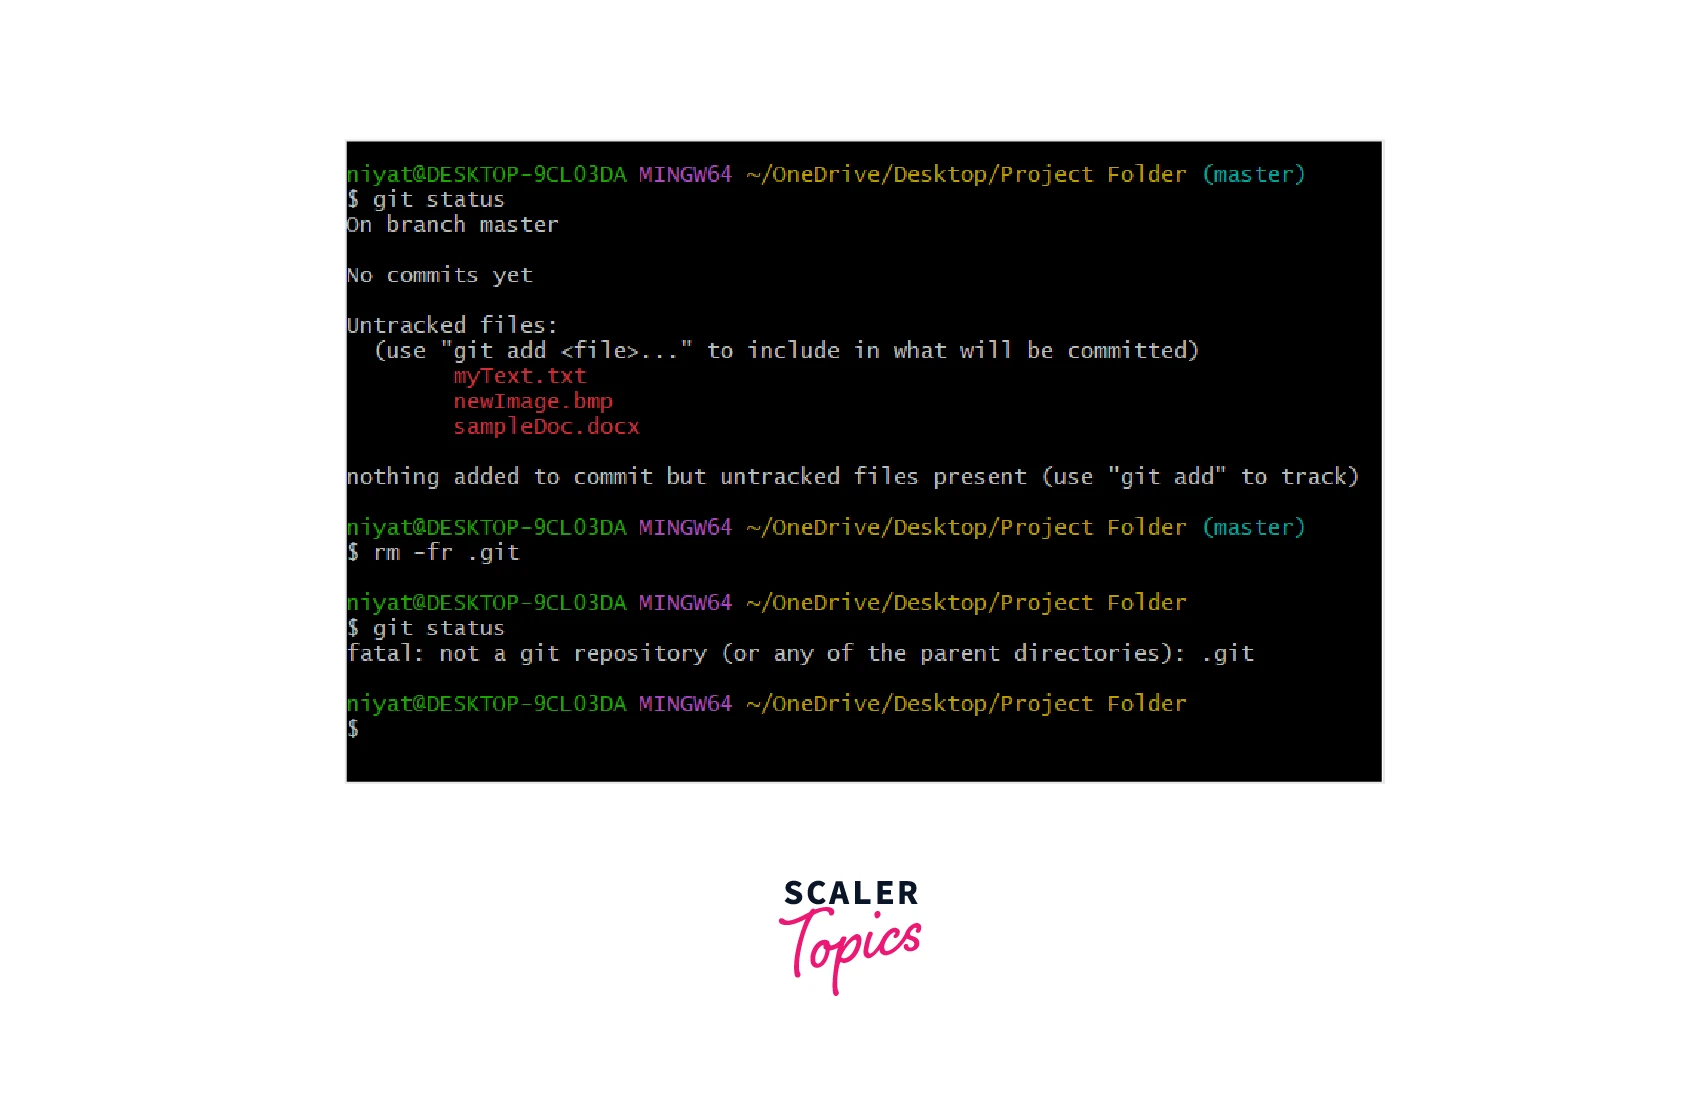
To remove Git from project we can remove the .git folder using the Git command.
The Git command rm -rf is used, rm removes a file from Git, and the -rf option of this command removes files recursively and forcefully. .git* removes the folder starting with .git.

As we can see, when we ask for the status of Git it returns that it is not a Git repository.
We can also delete Git from a project simply using cmd as well. Command del /F /S /Q /A .git can be used in this case to remove the .git folder.
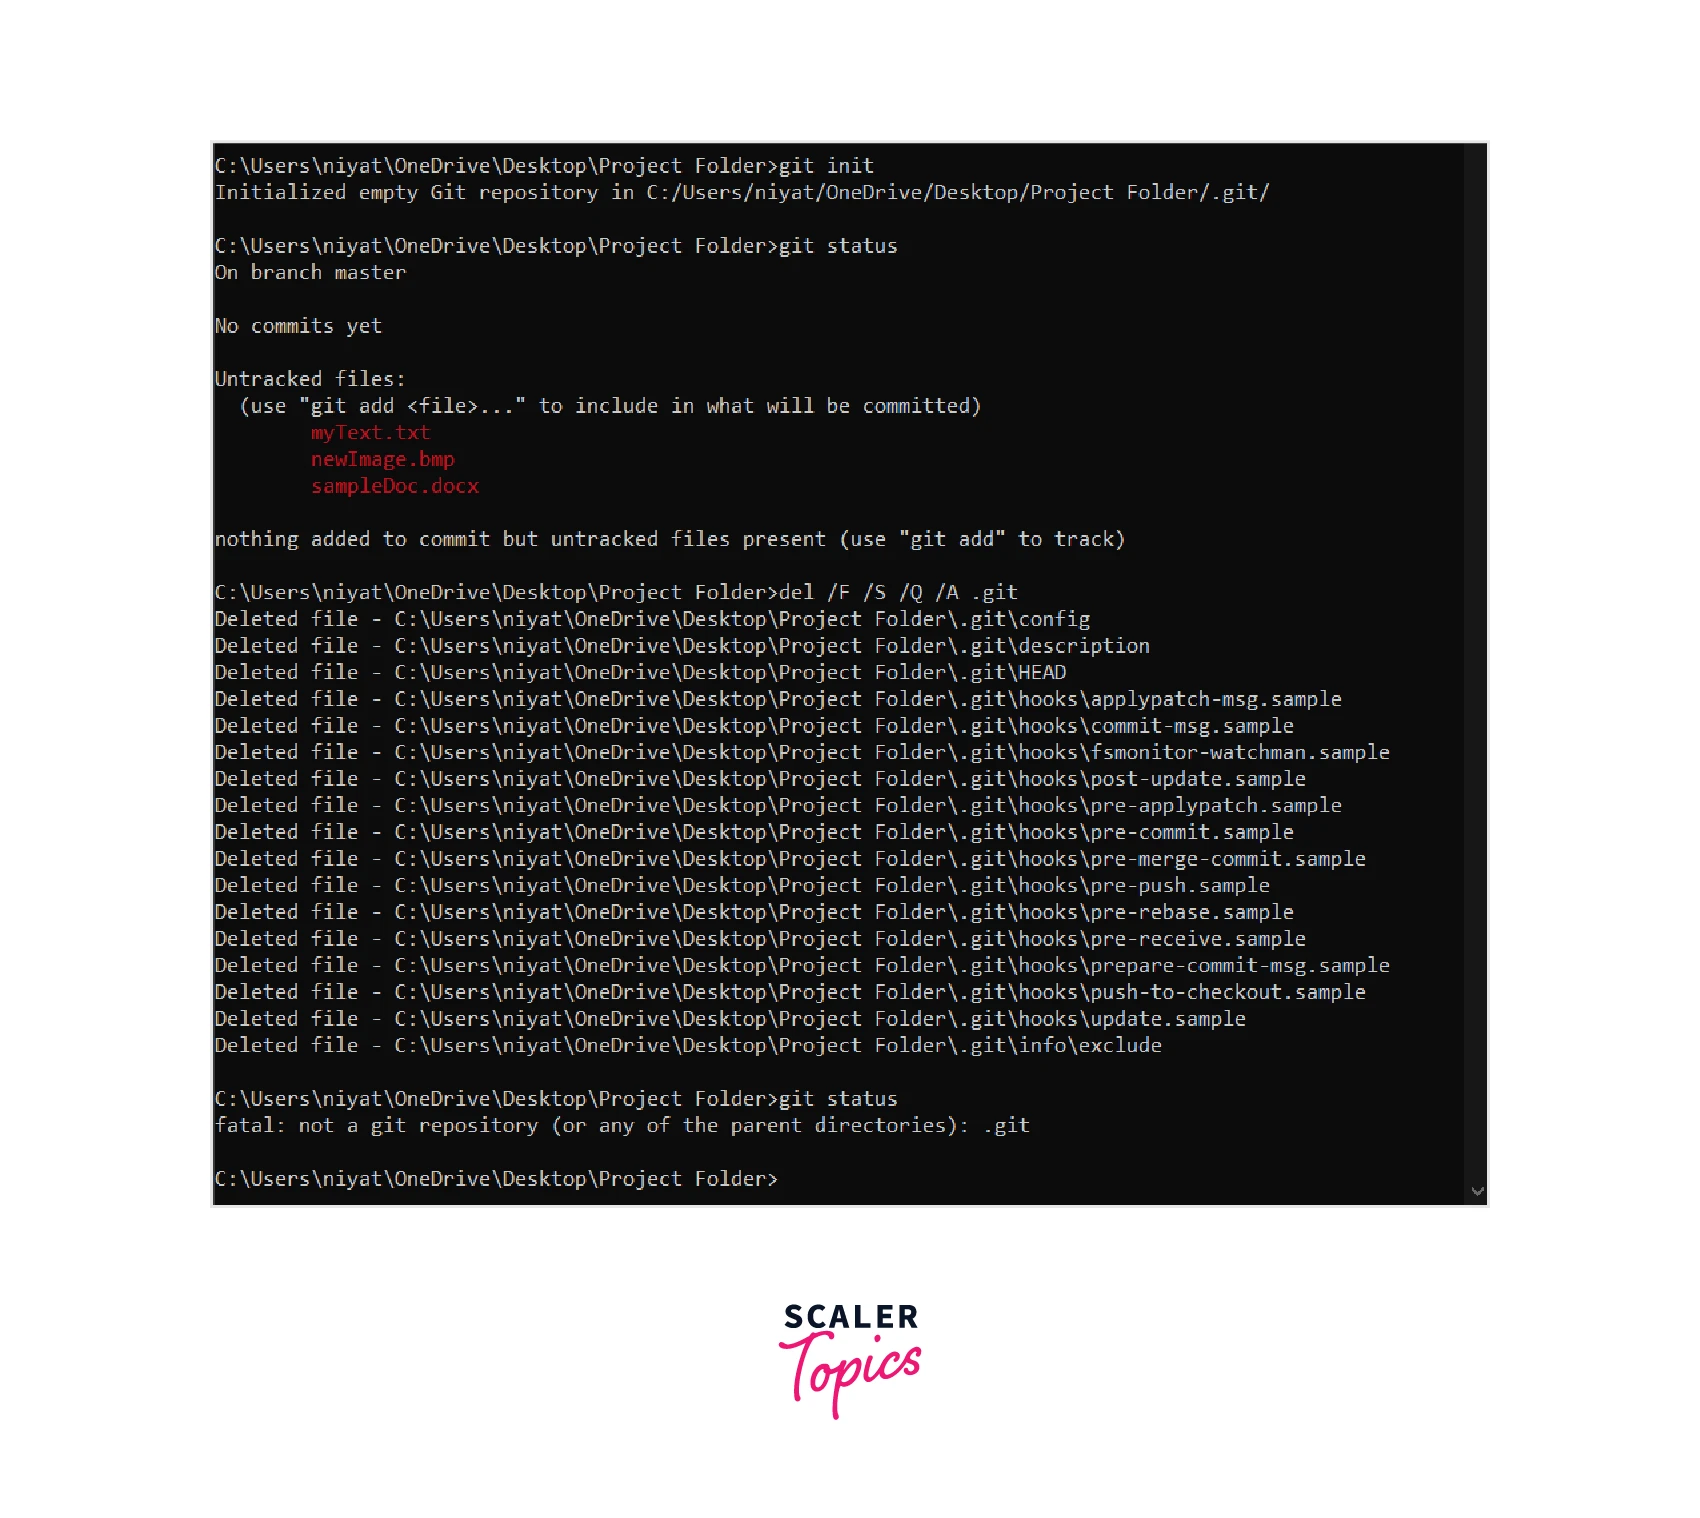
In the example above, we initialize a folder as a Git repository. After using the del /F /S /Q /A .git command we see a list of files that are being removed from the folder. And now when we use the git status command, we see a message that it is no more a Git repository. Note that none of the files of the project are touched only Git’s file only.
How to Remove Git from Project VS Code?
In VS Code as well, we are using Git commands to remove git from project. Thus, we can use the same Git command rm -rf .git or rmdir .git to remove Git from the project folder.
How to Remove Git from the Computer?
Git is an application installed manually on our computer. To remove it from the PC follow the following steps:
- Open the control panel from the start menu.
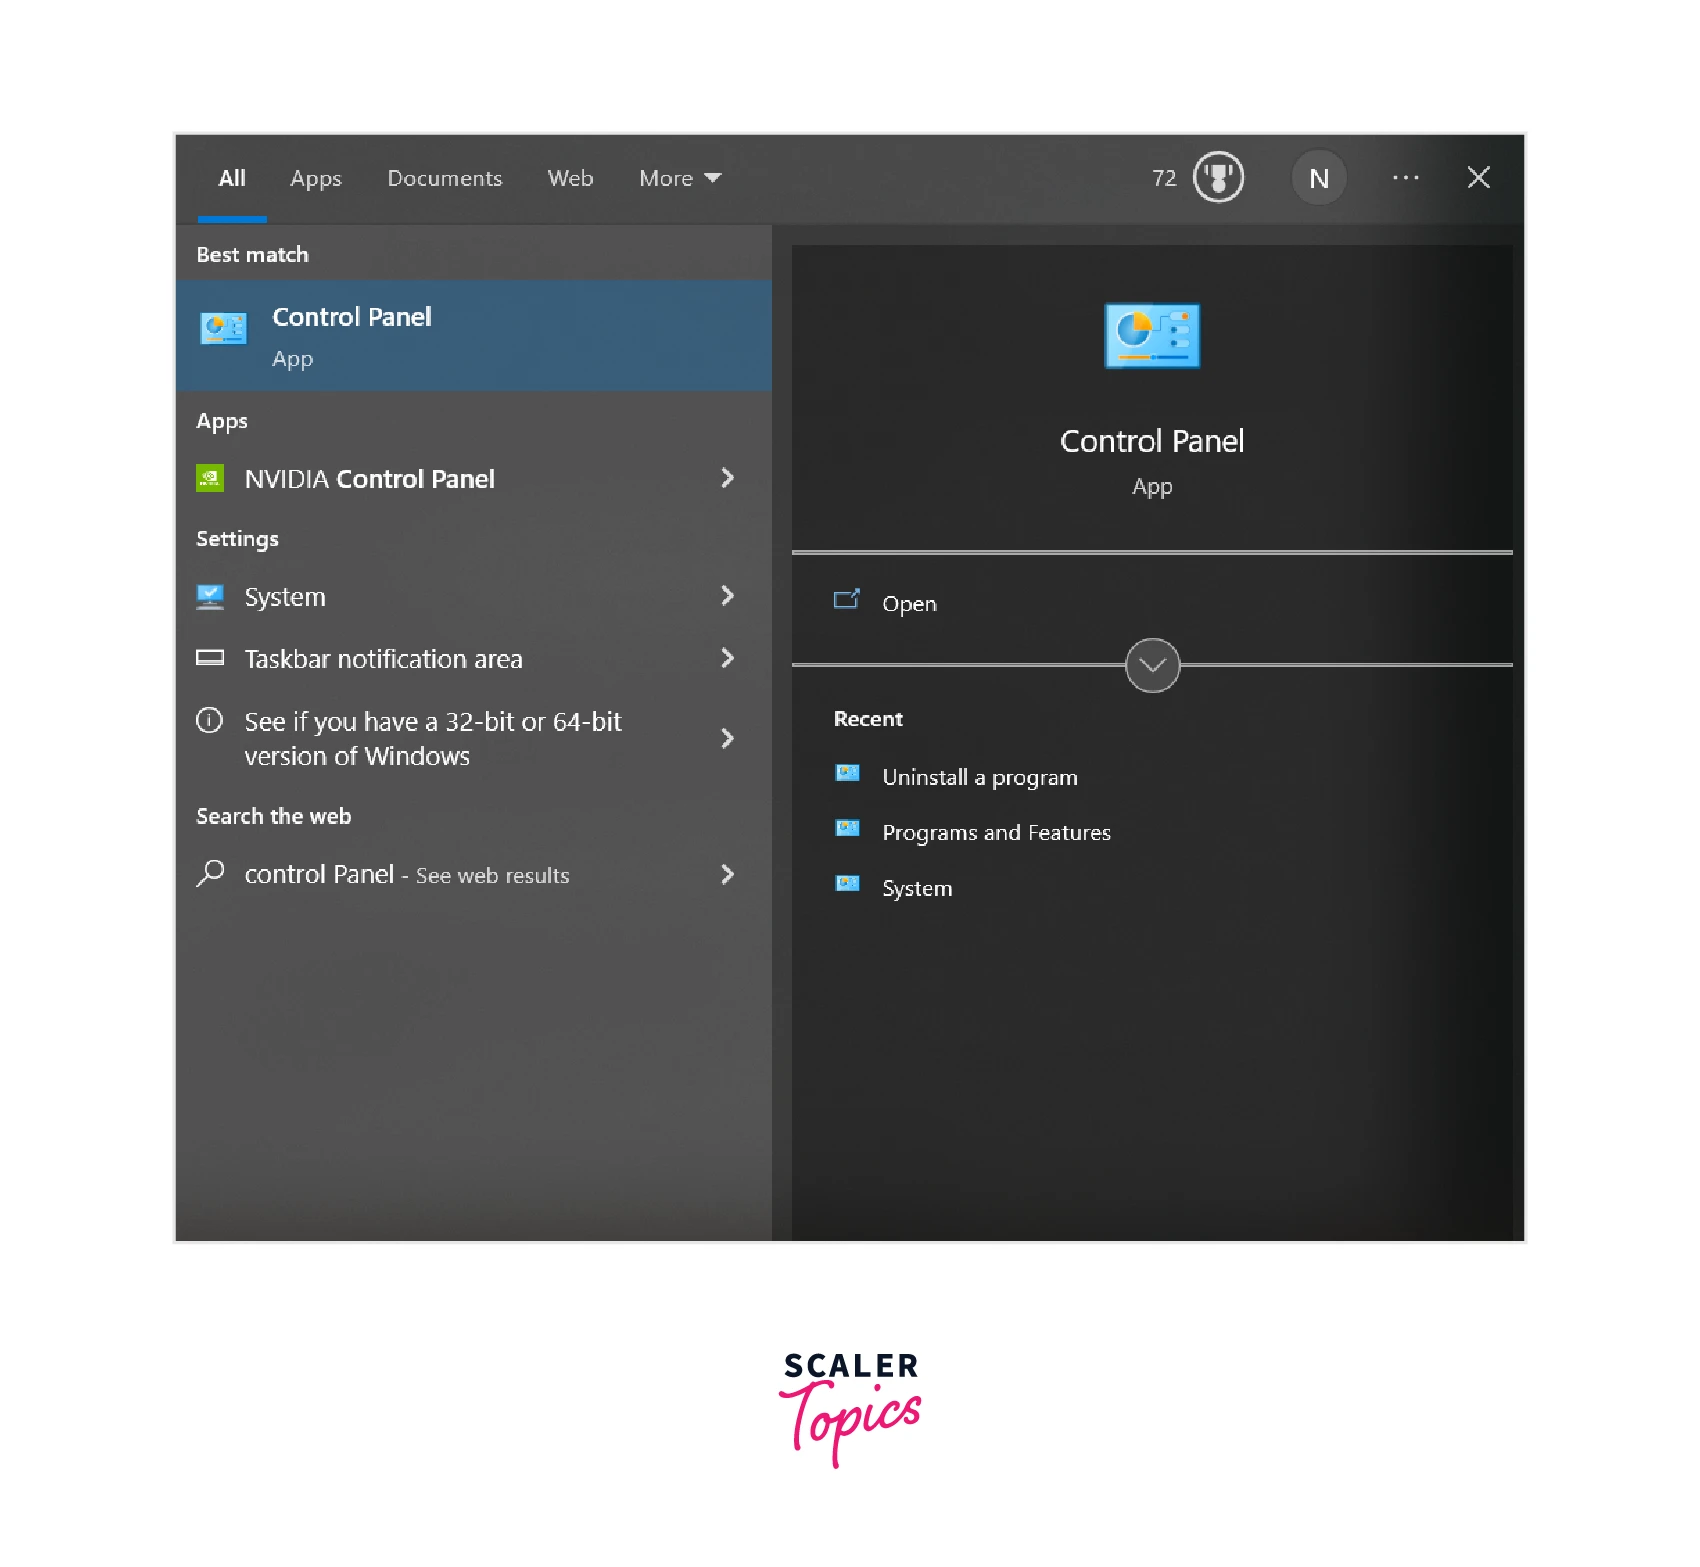
- Select the Uninstall a program

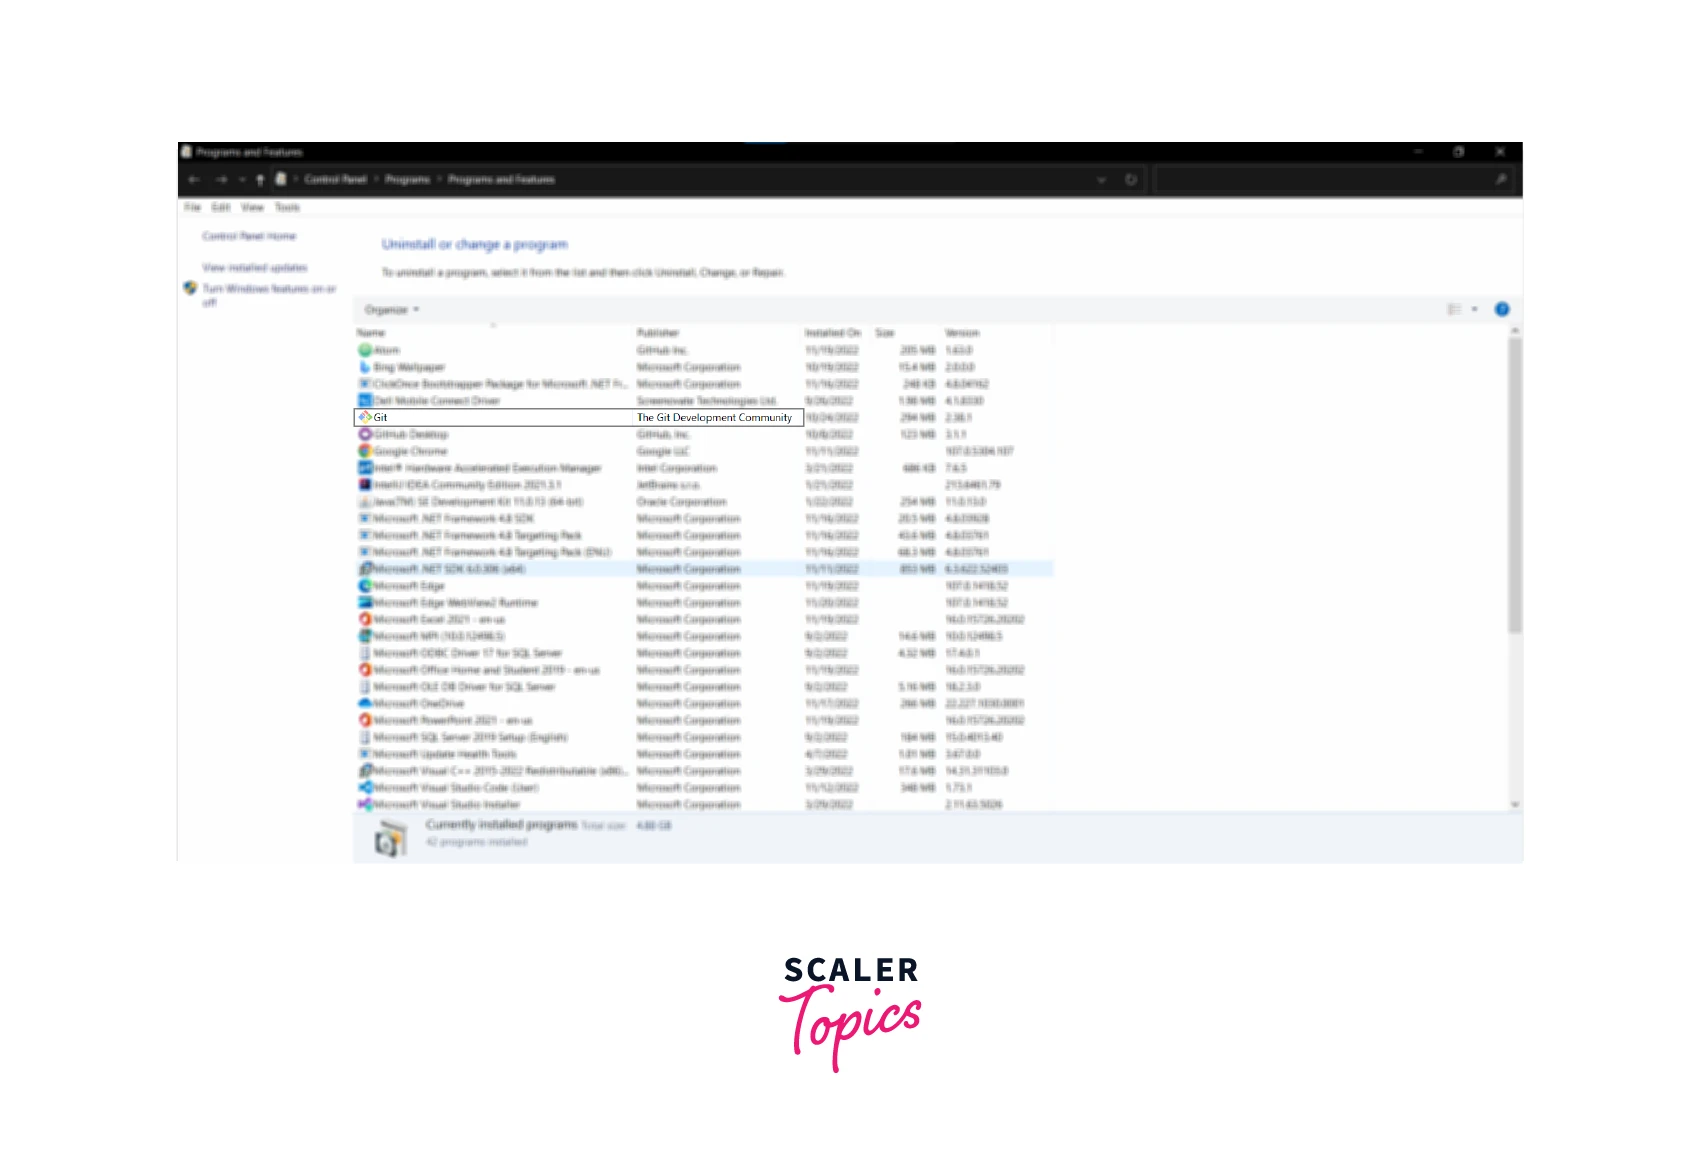
- Look for Git in the options, and double-click on it. It will display a dialog asking for permission. If you wish to uninstall Git, press on YES else you can exit by clicking on NO.
How to Remove a Git User from the Terminal?
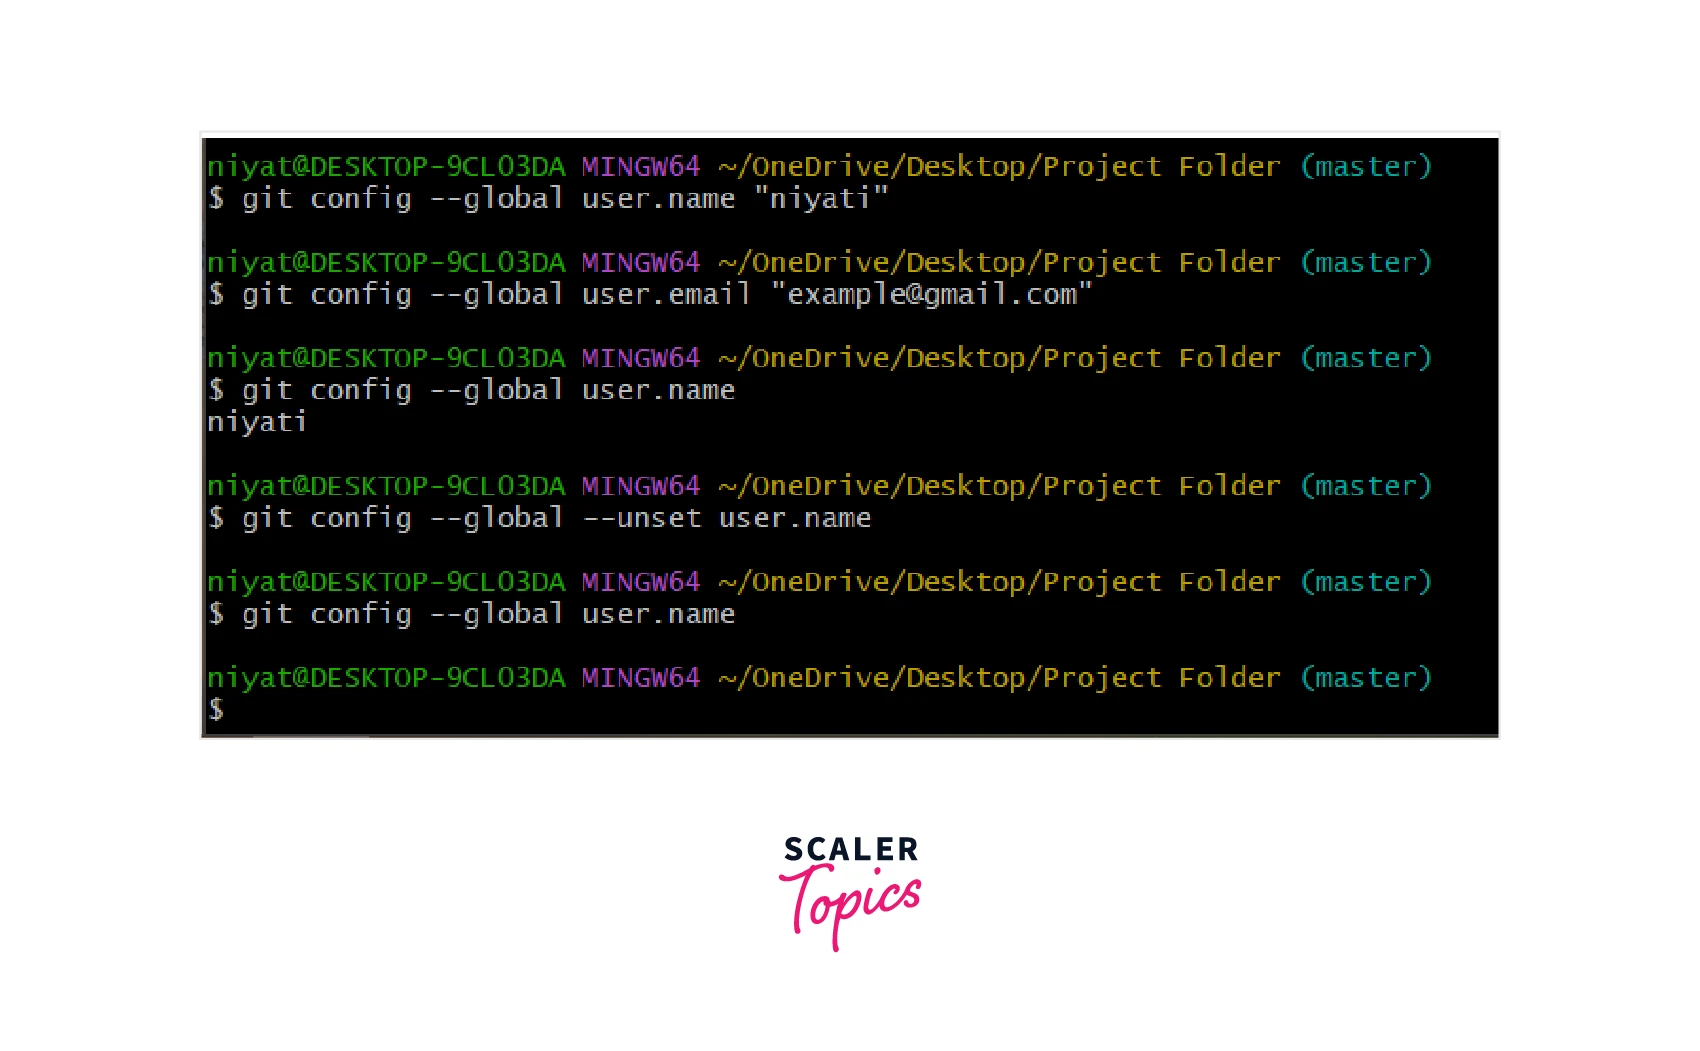
Git user can be set using the following commands:
Username and email can be checked using the following commands
Now to remove user details we use the unset commands as given below:
Have a look at the example, we first set the username, and then we unset it. After the unset command when we request user.name it displays nothing.
:::
How to Delete a Git Repository?
Delete Git repo locally
Deleting the Git repository locally is not very tricky. We are only supposed to delete the initialized or cloned Git repository.
Every Git repository has a hidden folder called .git. To view this folder in the file explorer we are required to display the hidden files.
Steps to Delete a Local Git Repo
To delete the local Git repository or in simpler words stop Git from tracking the project we are required to follow the steps below:
- To remove Git from project, open the local Git repository’s root folder in the file explorer.
- Delete the hidden .git folder by right-clicking on it and selecting the delete option.
- Now the Git is removed from the project folder. To verify we can go to Git bash and open the folder to run the git status command. We will get an error saying fatal: not a git repository.
Command Line Git Repository Delete
To delete the .git folder using the command line, we can use the rm -fr .git or rmdir .git commands. It will delete the folder .git along with all of its components in one go.
Verify Git Repo is Removed
Lastly, to verify that the project folder is no more a Git repository we can use the git status command. If the directory is a Git repository, it will show the status of the repository else it will show an error saying it is not a Git repository.
Example:
How to Remove the Remote Origin URL?
Git remote command lets us create, view, delete, and update the remote repository. The repository is stored remotely and is updated periodically by the project team members individually. If the repository is locally stored, it is difficult to work parallelly on different features of the same project which is why a remote repository is preferred.
The remote origin URL is a URL to the repository. Git remote command can also be used to remove the remote origin URL. We can either modify this URL or we can remove the URL.
To remove the remote origin URL:
To modify the URL:
Conclusion
- Git repositories contain a special folder that helps Git to identify the folder as the repository.
- If we accidentally remove this folder, Git will no more detect it as a repository and all the version details will be lost.
- On the other hand we can remove this to remove Git from project. We can remove it using the command line as well as using file explorer.
- To remove the Git application from windows, we have to use the control panel >> programs >> Uninstall a program >> Git
- Using the command line we can also remove Git user details and Git remote origin URL with the help of git config —global —unset user.name and git remote remove origin commands respectively.
Removing Git from the Project
Step 1: Backup your project
Before proceeding, make sure you have a backup of your project files in case anything goes wrong.
Step 2: Delete the local Git repository
- Open your terminal or command prompt.
- Navigate to your project directory using the
cdcommand. - Remove the
.gitfolder by running:
rm -rf .git
Enter fullscreen mode
Exit fullscreen mode
This command will delete the hidden .git directory which contains all the version control information.
Uploading to a New Repository
After removing Git, you can now upload your project to a new repository.
Step 1: Initialize a new Git repository
- Create a new empty repository on your preferred Git hosting service (GitHub, GitLab, Bitbucket, etc.).
- In your terminal, navigate to your project directory.
- Initialize a new Git repository:
git init
Enter fullscreen mode
Exit fullscreen mode
Step 2: Add your files and commit
- Add all your project files to the new repository:
git add .
Enter fullscreen mode
Exit fullscreen mode
- Commit the files:
git commit -m "Initial commit"
Enter fullscreen mode
Exit fullscreen mode
Step 3: Link the local repository to the remote one
- Link your local repository to the new remote repository:
git remote add origin <new_repository_URL>
Enter fullscreen mode
Exit fullscreen mode
Replace <new_repository_URL> with the URL of your new repository.
- Push your code to the new remote repository:
git push -u origin master
Enter fullscreen mode
Exit fullscreen mode
This will push your code to the new repository’s master branch. If you have a different branch name, replace master with your branch name.
Remember to substitute <new_repository_URL> with the actual URL of your new repository.
These steps will create a new Git repository for your project and upload the files to the remote repository.
-
Star
(0)
You must be signed in to star a gist -
Fork
(0)
You must be signed in to fork a gist
-
Clone this repository at <script src="https://gist.github.com/thomaskanzig/d0a5b2d3b08cd29a031d5787141c4a61.js"></script>
- Save thomaskanzig/d0a5b2d3b08cd29a031d5787141c4a61 to your computer and use it in GitHub Desktop.
Clone this repository at <script src="https://gist.github.com/thomaskanzig/d0a5b2d3b08cd29a031d5787141c4a61.js"></script>
How to Remove Git from the Project
To remove Git from project we can remove the .git folder using the Git command.
The Git command rm -rf is used, rm removes a file from Git, and the -rf option of this command removes files recursively and forcefully. .git* removes the folder starting with .git.
Одна из самых распространенных систем управления версиями – Git. Ее ядро добавляет в систему ряд консольных команд, предназначенных для управления репозиториями. В самих же репозиториях хранятся важные каталоги, конфигурационные файлы, журналы и прочие связанные элементы.
Далее я расскажу, как создать, клонировать и удалить эти репозитории.
Следующие инструкции предназначены для тех, кто уже установил Git на свой сервер. Если вы еще не сделали этого, используйте руководство с GitHub, которое поможет разобраться с выполнением поставленной задачи.
Подробнее: How to install Git
Создание Git-репозитория
Сначала рассмотрим создание репозитория. Представим, что у вас уже есть папка для хранения файлов, но она еще не находится под контролем Git.
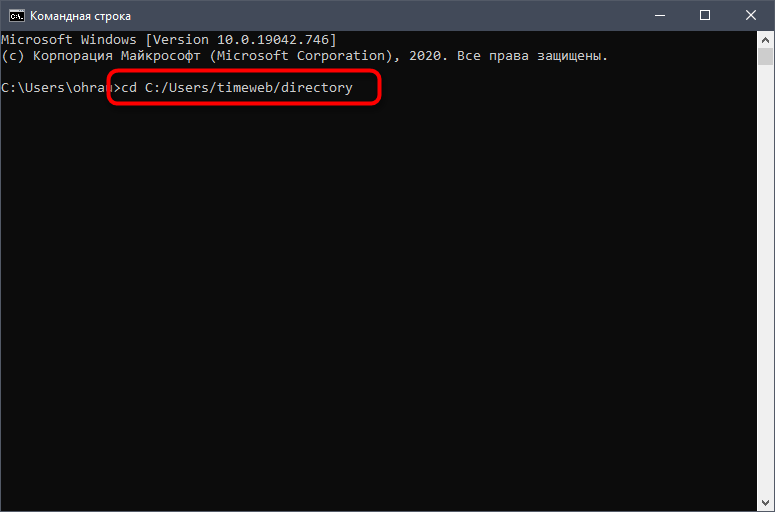
Откройте «Командную строку» (Windows) или Терминал (Linux/macOS) и перейдите по пути данной папки.
В Linux выполните команду:
cd /home/user/directory
В macOS:
cd /Users/user/directory
В Windows:
cd C:/Users/user/directory
Остается только ввести нижеуказанную команду, чтобы завершить первый этап.
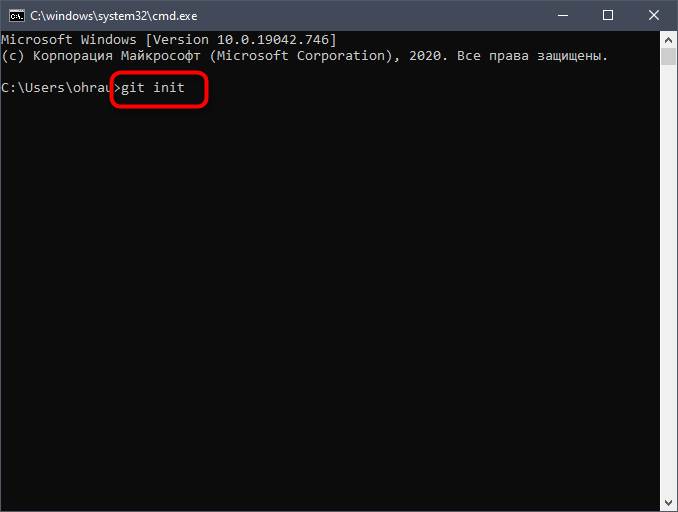
Благодаря этой команде создается структура подкаталога со всеми необходимыми файлами. Кстати, все они расположены в подпапке с названием .git. Пока что проект не находится под контролем учета версий, поскольку в него добавлены только нужные элементы для работы Git. Для добавления файлов в репозиторий будем использовать git add. Команда git commit является заключительной:
git add

git commit -m 'initial project version'
Теперь у вас есть Git-репозиторий со всеми необходимыми составляющими и отслеживаемыми файлами.
Комьюнити теперь в Телеграм
Подпишитесь и будьте в курсе последних IT-новостей
Подписаться
Клонирование существующего репозитория
Второй вариант создания директории для контроля версий – копирование существующего проекта с другого сервера. Это актуально, когда осуществляется доработка готового проекта или вы желаете внедрить его компоненты в свой. В этом поможет команда git clone, о которой и пойдет речь далее.
При использовании упомянутой команды вы получаете клоны всех версий файлов, а значит, можете использовать любые из них, если что-то пойдет не так. Это же пригождается, когда требуется вернуть предыдущую версию проекта, что осуществимо благодаря файлам, помещенным под версионный контроль.
Для клонирования существующего репозитория понадобится ввести git clone <url>. Пример такой команды вы видите ниже:
git clone https://github.com/rep/rep
Данная команда позволила вам получить клон всех версий указанного репозитория (в качестве примера было взято название rep). Теперь на вашем сервере создана директория с указанным названием. К ней подключена поддержка контроля версий, то есть появилась папка .git.
При использовании вышеуказанной команды репозиторий клонируется с текущим названием. Если же оно должно отличаться, используйте следующую вариацию команды:
git clone https://github.com/rep/rep myrep
Завершим этот раздел статьи описанием содержимого, которое появляется в консоли при выполнении команды. Данный вывод соответствует успешному клонированию:
Cloning into 'Git'...

remote: Counting objects: 46, done.

remote: Compressing objects: 100% (25/25), done.

remote: Total 46 (delta 7), reused 43 (delta 4), pack-reused 0

Unpacking objects: 100% (46/46), done.

Checking connectivity... done.
Удаление локального Git-репозитория
Если с созданием и клонированием репозиториев все понятно, то как быть, когда папка с проектом уже существует, но в нее нужно поместить новые данные, удалив предыдущие, или когда Git-репозиторий на сервере больше не нужен. В таком случае осуществляется стандартное удаление.
В корне каталога с проектом необходимо избавиться от папки .git, о которой уже шла речь выше. Так вы удаляете только ту информацию, которая связана с Git, но сам проект остается. В Linux через Терминал вы должны перейти к каталогу с проектом и ввести следующую команду:
Еще один вариант – удаление .gitignore и .gitmodules в случае их наличия. Тогда команда меняет свой вид на:
Остается только убедиться в отсутствии скрытой папки, которая может помешать инсталляции новой. Для этого существует простая команда ls -lah, выполнить которую необходимо с указанием того же каталога.
Только что мы разобрались с основами создания, клонирования и удаления Git-репозитория. Удачи!

Table of Contents
- Removing a repository locally
- Conclusion
When you use the git init command, it will initialize a brand new Git repository in the same folder that the command was run in.
It will initialize in a folder called .git in the root directory, and it will contain all the information about the repository.
In this post, we’ll learn how you can effectively undo this, and delete the repository locally.
Removing a repository locally
You can remove a Git repository created locally by git init by simply removing the resulting .git folder.
When this folder is removed, it will no longer be a valid Git repository, as that is what Git uses to identify a repository.
You can simply use your operating system’s file manager to remove the .git folder by right-clicking on it and selecting Delete.
Windows
If you’re on Windows, you can use the following command to remove the .git folder:
BASH
rmdir .git
macOS
If you’re running macOS, you can use the following command to remove the .git folder:
BASH
rm -rf .git
Linux
If you’re on Linux, you can use the following command to remove the .git folder:
BASH
rm -rf .git
Regardless of your operating system, once the folder is gone, the repository will no longer be a valid Git repository.
Conclusion
In this post, we learned how to remove a Git repository locally, effectively reversing what git init does.
Simply get rid of the resulting .git folder, and the repository will no longer exist on your computer.
Thanks for reading!
To learn more about web development, founding a start-up, and bootstrapping a SaaS, follow me on X!