
One of the new features on Windows 10 Insider preview build 10547 is the ability to remove the Windows background picture on the sign-in screen. Removing the picture is as easy as flipping a switch in the settings. If you need guidance, we’ll show you how to do it.
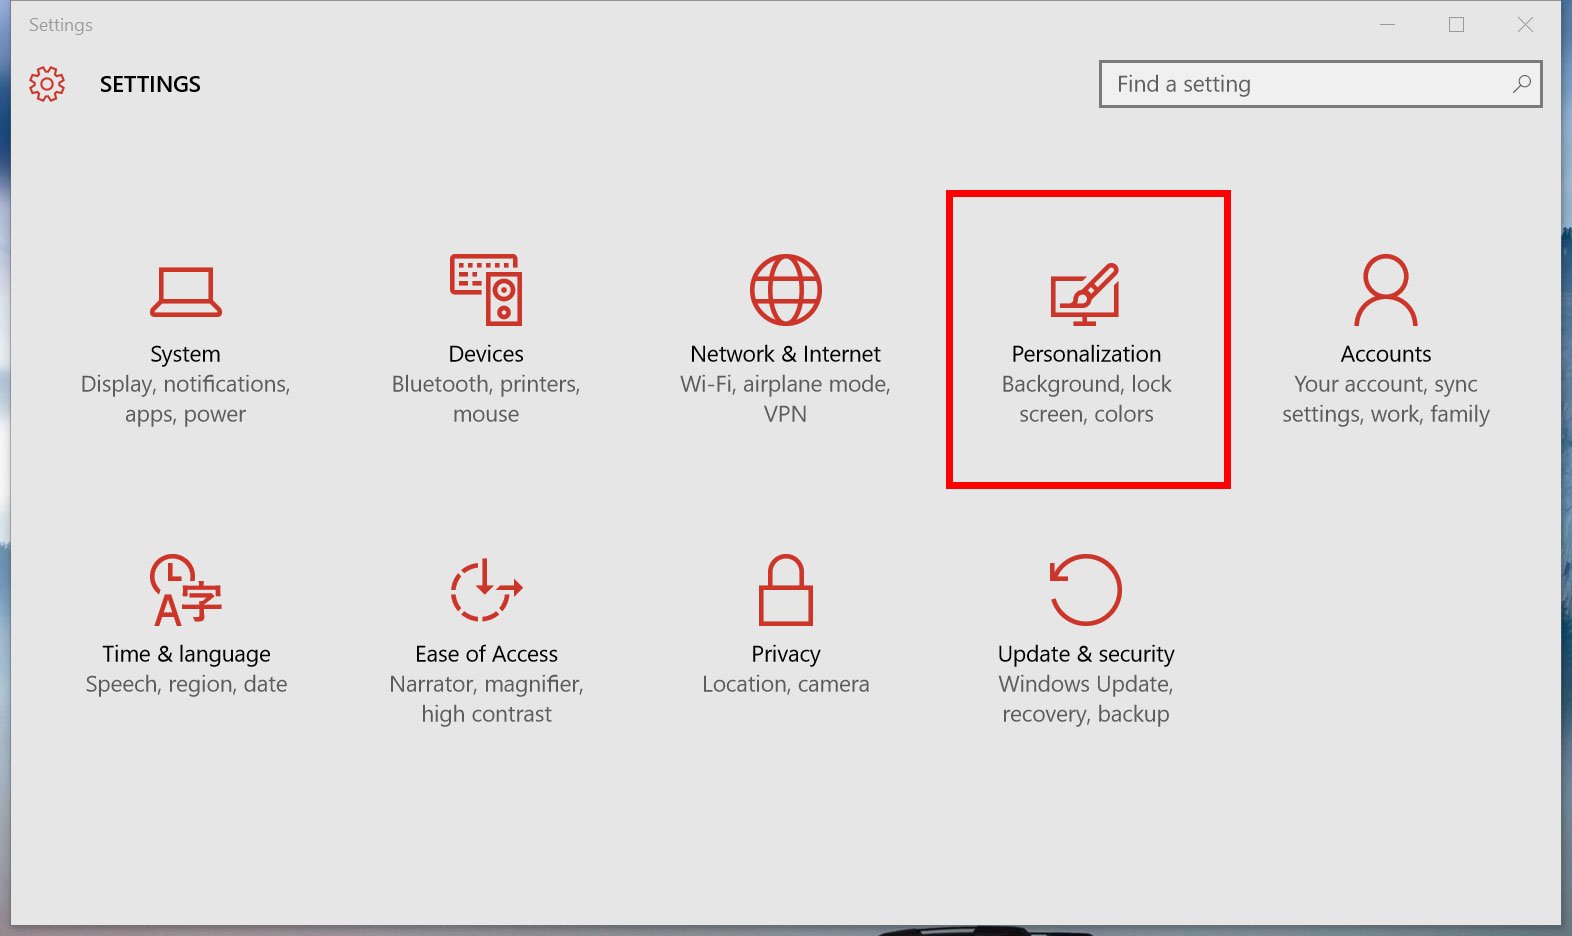
1. Go to Settings (keyboard shortcut: Windows + I) > Personalization > Lock screen
2. Scroll down and turn off the option, «Show Windows background picture on the sign-in screen.»
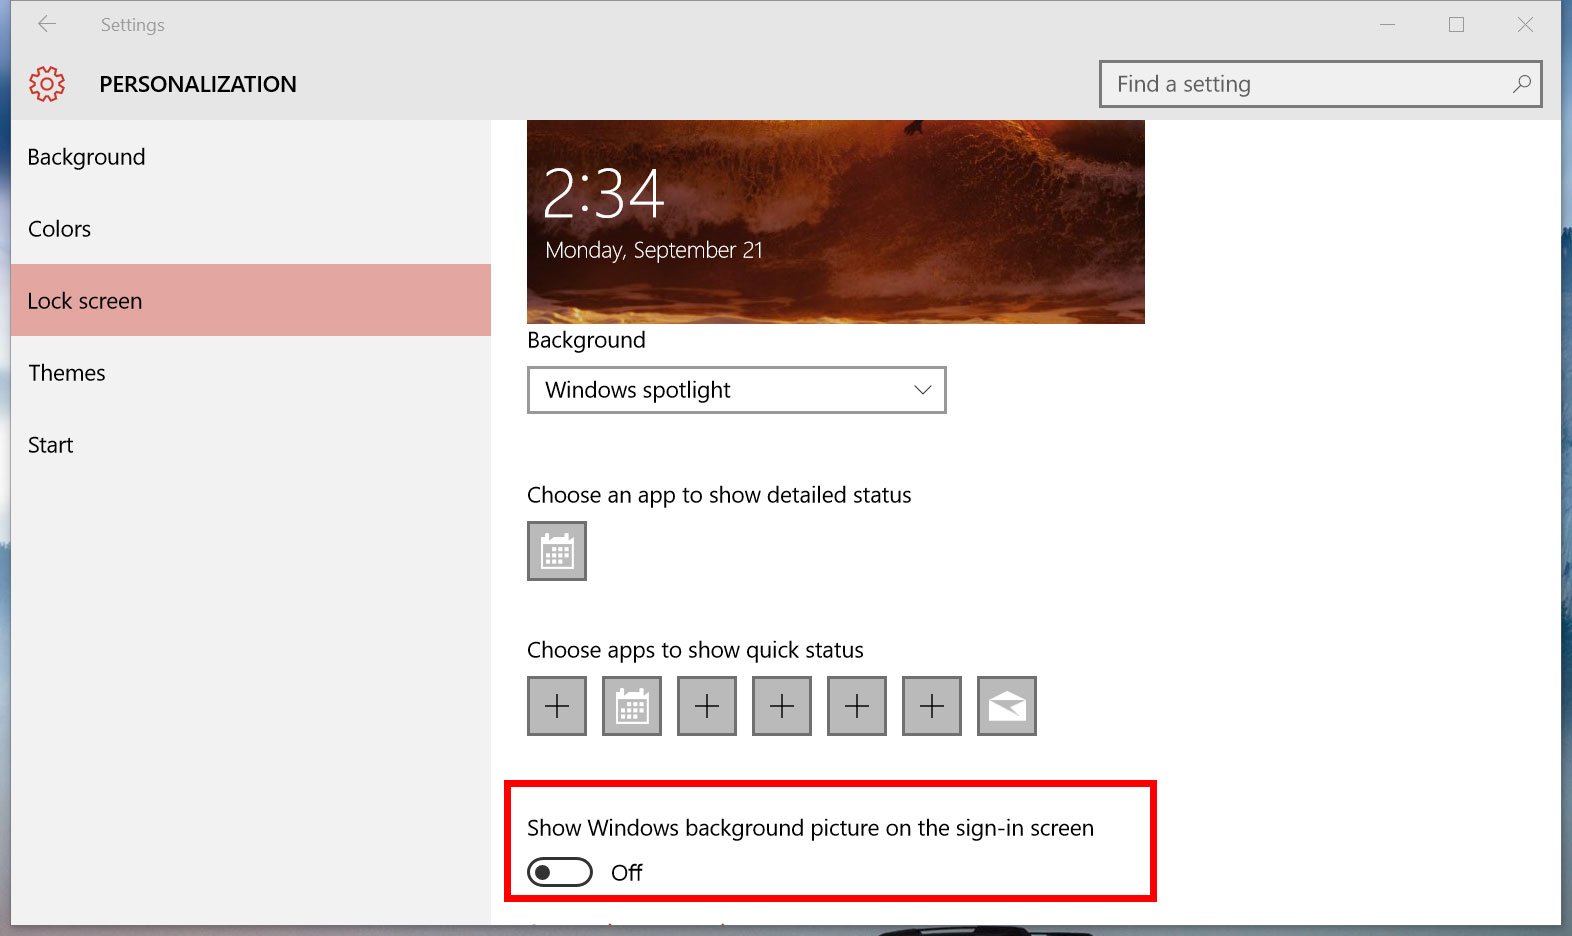
That’s it! No, really… that’s all you need to do. Instead of the default black and blue Windows 10 wallpaper on the sign-in screen, you’ll see the solid color matching your theme. What would be even more awesome is if we have a built-in option to replace the image instead of just removing it. Hopefully, Microsoft will add that option in a future update.
Need more visuals? You can see this setting in our hands-on video for Windows 10 Insider preview build 10547.
Are you removing the Windows 10 wallpaper on the sign-in screen? Let us know in the comments!
All the latest news, reviews, and guides for Windows and Xbox diehards.
Sign in to your How-To Geek account

Windows 10 lets you customize the look of the lock screen with personalized pictures within the Settings app. It also remembers the last five images you used. If you don’t like any of the default images in the history—or want a fresh start—you can remove them from the suggested images.
Your lock screen history in the Settings app shows five images that Windows picks randomly from a hidden folder on your system. These images include any that you’ve previously used as a lock screen background.
By default, Windows shows the five most recently used images, so you could add new images to push out old ones from the suggestions. The trouble is that those images still exist in the folder of lock screen images and sometimes Windows will get mixed up and not just show the most recent images.
There is a way to remove these images. You will have to jump through a couple of hoops, though.
The first hoop involves finding the right folder. Windows stores all these images in the following location:
C:\ProgramData\Microsoft\Windows\SystemData\User_Account_Security_Identifier\ReadOnly
The User_Account_Security_Identifier part of that path is different for everyone. Each user account on the computer has a different Security Identifier (SID). To find yours, fire up the Command Prompt or PowerShell and type the following command at the prompt:
whoami /user
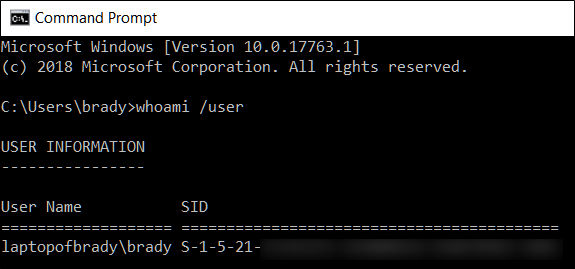
Note: The SID is much longer than what’s shown in the image above. We’ve masked out most of ours because, well, it’s a security identifier.
Now comes the second hoop through which you’ll need to jump. Once you have the SID, you can navigate to the right folder. However, the System Data folder is protected by Windows. When you try to open it, you’ll see this message.

And if you click the «Continue» button on that message, you’ll get this one next.
To resolve this, you’ll need to take ownership of the System Data folder (and while you’re doing so, make sure you select the option to replace all child object permissions so that you take ownership of the subfolders, too). If you’re not familiar with that process, it’s not hard to do, but there are several steps to the process. Check out our guide to taking ownership of a folder in Windows, take ownership of the System Data folder, and then follow along with the rest of the process here.
Now that you know the folder you want and you’ve taken ownership of the System Data folder; there’s nothing left to stand in your way. Open the folder, and you’ll see a few subfolders inside. Open the one that matches your SID and then open the «ReadOnly» folder inside that.
Now, you should see a bunch of folders whose names start with «LockScreen_» and end with different letters. Each of these folders holds one image in your lock screen history.
Open any folder to check the images inside. Each folder contains four different resolutions of the same image—the original and three thumbnail versions. If the image is one you want to get rid of, Click on any folder to make sure it’s the correct one you want to get rid of.
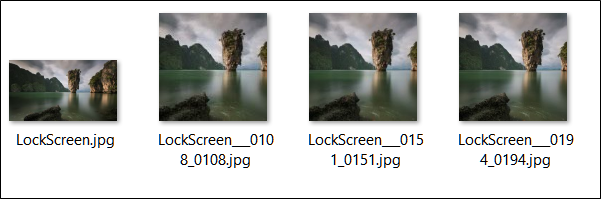
If the image is one you want to get rid of, back up to the «ReadOnly» folder and delete the folder containing the images you don’t want. If you want to delete all previous lock screen images, go ahead and delete all the «LockScreen_x» folders.
That’s all there is to it. After you delete the images from this folder, they will disappear from the history in the Settings app. You may need to close and re-open Settings for it to refresh. Windows will show only its default images on the Settings page and will create additional folders in that SID folder as you add more lock screen images.
It’s a lot more complicated than it needs to be for such a minor thing, but at least you can do it if you want to.
Download Article
Easy to follow instructions for removing your user account picture in Windows 10
Download Article
When you select a Windows 10 user account photo, it’ll appear on the login screen, the Start menu, and various other places in Windows. If you don’t want to have a profile photo at all, you’ll need to replace it with something else, such as the default profile icon (an outline of a person). Once you replace the photo, you can delete your old profile photos. This wikiHow will teach you how to reset your Windows 10 user account photo to the default profile icon and delete your old profile photos.
Quick Steps
- Click on your username in the Windows menu.
- Select Change account settings.
- Click Browse for one under the «Create your picture» heading.
- Select a default picture from «C:\ProgramData\Microsoft\User Account Pictures».
- Save your profile.
- Go to «%appdata%\Microsoft\Windows\AccountPictures» in File Explorer.
- Delete your old user account picture.
-

It’s usually at the bottom-left corner of the screen.
-
It should look like your current user photo, and it’s near the top-left corner of the Start menu.[1]
Advertisement
-
-
It’s under the «Create your picture» header. You’ll see the «Open» dialog window.
-

\ProgramData\Microsoft\User Account Pictures. This is where you’ll find the default user icons. Here’s a quick way to do this:
- Highlight this text with your mouse: C:\ProgramData\Microsoft\User Account Pictures.[2]
- Press Ctrl+C to copy it to your clipboard.
- In the address bar at the top of the Open window, click your mouse at the end of the current path. This highlights the information that’s already in that box.
- Press Ctrl+V to paste the copied location.
- Press ↵ Enter.
- Highlight this text with your mouse: C:\ProgramData\Microsoft\User Account Pictures.[2]
-

Any of the files with the name «user» should be fine. This replaces your user profile photo with the default.
- Your old photo will still appear in your account settings. If you want to delete it from the computer completely, continue with this method.
-

Now you’ll use the File Explorer to delete your old photo from the computer.
-

You’ll do this just as you did when you navigated to the User Account Pictures folder in the Open window.
-

Now you’ll see all of your user account photos.
-
To select multiple photos, hold Ctrl as you click.
-
The selected photos are now removed from your account.
- If you log into Windows with your Microsoft account, you may still see your old profile photo in some locations (such as when you sign into other Windows 10 computers). See the «Removing a Profile Photo from a Microsoft Account» method to learn how to remove it.


Advertisement
-
You’ll find this app near the bottom of the Start menu.
- If your Windows 10 login is connected to your Microsoft account and you don’t want your old profile photo to appear anywhere, use this method to remove it from your Microsoft account. [3]
- If your Windows 10 login is connected to your Microsoft account and you don’t want your old profile photo to appear anywhere, use this method to remove it from your Microsoft account. [3]
-
It’s the icon that looks like the outline of a person.[4]
-

It’s below your current user photo.
-
If you’re not already signed in to your account, you’ll be prompted to do so now. Use the same login and password you use to sign into Windows.
-

It’s at the top-left corner of the page. A larger version of your photo will appear.
-
It’s near the bottom-right corner of the page. A confirmation message will appear at the bottom.[5]
-

The photo is no longer associated with your account.[6]


Advertisement
Add New Question
-
Question
I deleted the picture, but it’s still there. What should I do?
Review Steps 7 — 8 to ensure that you’ve also deleted it from the account folder.
-
Question
I have deleted the picture, but still it shows me. Can you tell me about account folder?
Ashkan Sahba
Community Answer
If you’re unsure of the folder name, you can also just browse to the location. Here, you’ll find all the account pictures you’ve ever added to your account using the Settings app. Select any images you no longer want and then press the Delete key to relegate them to the Recycle Bin.
Ask a Question
200 characters left
Include your email address to get a message when this question is answered.
Submit
Advertisement
Video
Thanks for submitting a tip for review!
References
About This Article
Article SummaryX
1. Open the Start menu.
2. Click your profile photo.
3. Click Change account settings.
4. Click Browse for one.
5. Navigate to C:\ProgramData\Microsoft\User Account Pictures.
6. Select user.png and click Choose picture.
For more tips, including how to permanently delete your account picture from your computer, read on!
Did this summary help you?
Thanks to all authors for creating a page that has been read 440,031 times.
Reader Success Stories
-
Andrew Mathenge
Feb 15, 2019
«Excellent instructions, including how to delete an ugly photo that I has added by accident. Just couldn’t find…» more
Is this article up to date?
-
Home
-
News
- How to Delete Desktop Background Images in Windows 10
By Alisa |
Last Updated
Check the guides for how to delete desktop background images in Windows 10, how to clear recently used desktop background pictures, how to delete lock screen image in Windows 10, etc. For Windows users, you can find many useful free tools from MiniTool Software, e.g. MiniTool Power Data Recovery, MiniTool Partition Manager, etc.
You can freely set the desktop background image in Windows 10. You can use the default Windows 10 background images, download HD or 4K wallpapers from image sites, or use your own image as the Windows 10 desktop wallpaper.
Every image you used as the background is stored in computer. If you want to delete the desktop background or clear recently used desktop background images in Windows 10, you can check the step-by-step guide below.
How to Delete Desktop Background Images in Windows 10
How to Delete System Background Images
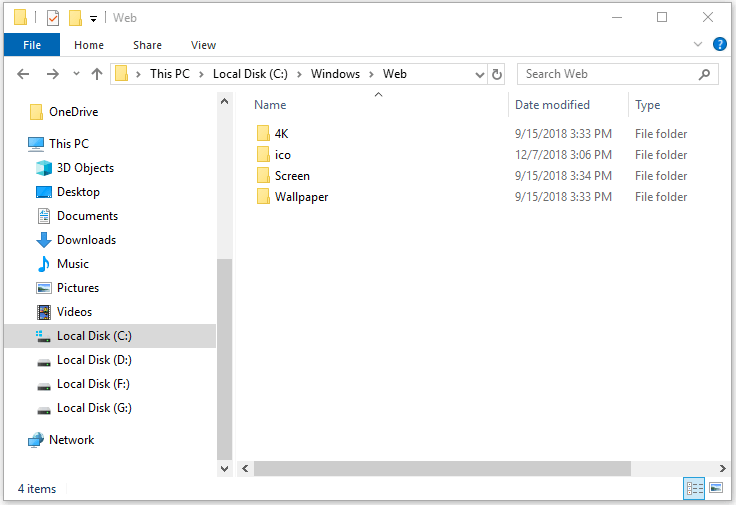
- Double-click This PC to open File Explorer.
- Click as the following directory: C:\Windows\Web. This is Window 10 wallpaper location.
- Open Wallpaper folder, and you can check the Windows 10 system background images in those folders.
- Open one folder and right-click one image to select Delete. This will delete the desktop background images from your Windows 10 computer.
How to Delete Uploaded Desktop Background Images
If you can find the image location, you can locate it and right-click it and select Delete to delete the picture. If you can find the location of the picture, you can follow the steps below to find and delete it.
- Right-click the blank area of desktop and select Personalize.
- Click Themes from the left column, and you can see the image name under Background.
- Search the image name in File Explorer. Find the target image and delete it.
How to Clear Recently Used Desktop Background Images in Windows 10
If you want to remove recently used desktop background images and clear the Windows 10 background history, you can follow the steps below.
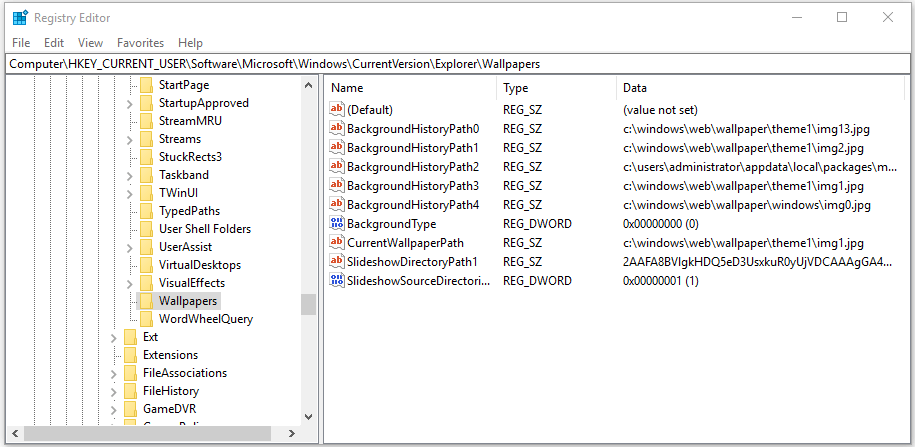
- Press Windows + R, type regedit, and press Enter to open Registry Editor in Windows 10.
- Click as follows: HKEY_CURRENT_USER\Software\Microsoft\Windows\CurrentVersion\Explorer\Wallpapers.
- After you click Wallpapers key, you can find a few values in the right window named BackgroundHistoryPath followed by numbers.
- You can right-click one value and click Delete to delete the desktop background image in Windows 10. You can delete the history background images in batch. After you delete the backgrounds, Windows will rebuild these values with its default wallpapers.
Tip: You should be careful to edit the registry. Before you edit the Windows Registry, it’s advised you back up registry first in case something goes wrong and causes computer crash. Learn: backup and restore registry.
How to Delete Lock Screen Image in Windows 10
You can go to C:\Windows\Web\Screen folder, right-click the lock screen image and select Delete to delete lock screen image in Windows 10.
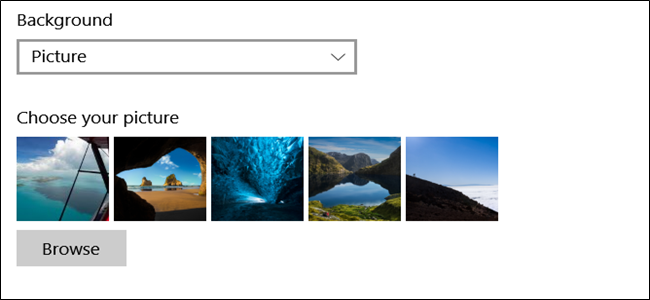
To change the lock screen image in Windows 10:
- Right-click the blank area on the desktop and click Personalize.
- Click Lock screen in the left panel.
- Click Picture under Background. You can change the lock screen image in this window.
Bottom Line
If you want to delete desktop background images/wallpapers or lock screen images, clear recently used desktop background images in Windows 10, you can follow the above guide.
About The Author
Position: Columnist
Alisa is a professional English editor with 4-year experience. She loves writing and focuses on sharing detailed solutions and thoughts for computer problems, data recovery & backup, digital gadgets, tech news, etc. Through her articles, users can always easily get related problems solved and find what they want. In spare time, she likes basketball, badminton, tennis, cycling, running, and singing. She is very funny and energetic in life, and always brings friends lots of laughs.

Windows 10 is the latest version of the Windows OS series created by Microsoft. The tech giant did its best to make the software a great product in terms of functionality and aesthetics. One of the new features in this version is Windows Spotlight, an app that comes with striking images exclusively curated for the lock screen of your operating system. These images are saved on your PC or tablet automatically from the search engine, Microsoft Bing. The result is a regularly changed new background image for your lock screen.
But there are users who find these Spotlight images on their screen, a source of a nuisance. As these images are not stored in the typical Windows wallpaper location, it is really difficult to locate and disable them. It is important to mention here that these images do not appear on your sign-in screen which comes up when you first log into your PC after a boot-up. The lock screen is the one that comes up if the PC is locked while running and Windows Spotlight images are only shown on this screen. As there is no way of deleting the lock images directly from the background history in Windows 10, we will show you an alternative method for removal of these images in this post.
Finding the location of the Images
The lock screen images are saved in the ReadOnly folder on the C drive. To reach this folder you need to follow a couple of steps mentioned below:
Step 1: Click on ‘File Explorer’ and go to your PC’s C drive. In the ‘View’ tab click on ‘Options’. A window with ‘Folder Options’ label will open. Check the radio button next to the option with the label ‘Show hidden files, folders and drives’. Select ‘Apply’ and then ‘Ok’.
Step 2: Follow the given below path to reach the folder named ‘SystemData’.
C -> ProgramData -> Microsoft -> Windows -> SystemData
Step 3: When you will click on SystemData folder, a prompt will appear with the message that you do not have the permission to currently access this folder. Click on ‘Continue’ in order to access the folder.
Step 4: In the folder, click on ‘User_Account_Security_Identifier’ folder that has your SID number. To find your user account security identifier, type ‘cmd’ in the start menu and click on ‘Command Prompt’. This will open a window with the label command prompt. Run the ‘whoami/user’ command here. This will give you the current user’s ‘SID’.
Step 5: In the SID folder, you will find the ‘ReadOnly’ folder. Open it and you will find multiple subfolders containing your lock screen images with names similar to ‘LockScreen.jpg’.
Deletion of the Lock Screen Images
Open the folder with the lock screen images you want to remove and simply empty it via deletion.
This method will ensure that the lock screen images are permanently removed from the lock screen background history in your Windows 10. Let us know in the comments below whether you prefer the Spotlight images or their removal.